Acura RL (1996-2004 year). Manual - part 580


  Index      Acura     Acura RL 1996-2004 year - service repair manual


Search            


Content   ..  578  579  580  581   ..


Acura RL (1996-2004 year). Manual - part 580


Exterior

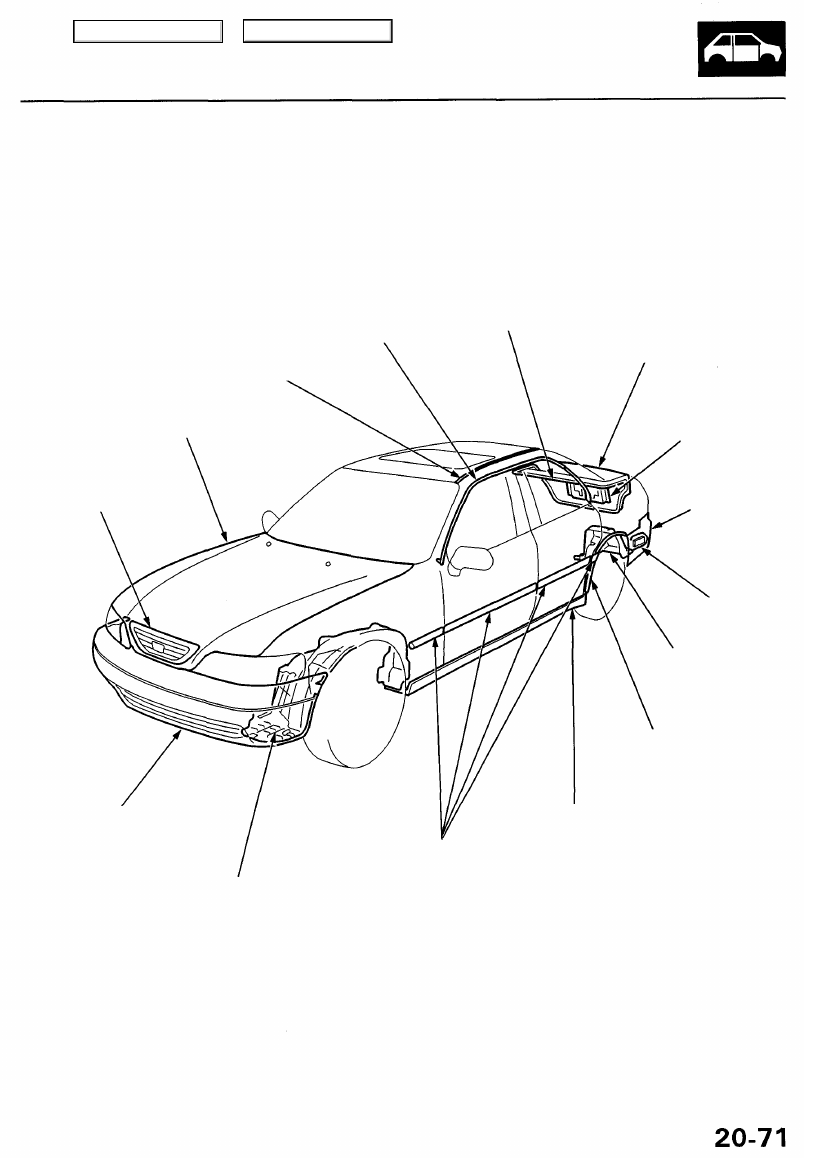
Component Location Index

NOTE: Refer to the 1996 Acura 3.5RL Body Repair Manual (P/N 61SZ330) for the hood and trunk lid removal.

ROOF MOLDING
Removal,
page 

20-80

SIDE WINDOW
MOLDINGS

Removal,
Page

 20-79

TRUNK LID
WEATHERSTRIP

Installation,
page

 20-78


TRUNK LID
Adjustment, page 

20-76

Torsion Bar Removal,
page 

20-77

HOOD
Adjustment, page

 20-75

FRONT GRILLE
Removal, page 

20-77

LICENSE PLATE

TRIM

Removal,
page 

20-78

REAR BUMPER
Removal,
page 

20-74

REAR AIR OUTLET
Removal,
page 

20-85

REAR FENDER
COVER

Removal,
page 

20-85

FENDERWELL TRIM
Removal, page 

20-85

FRONT BUMPER
Removal — '96 - 98 Models, page 

20-72

Removal — '99 - 01 Models, page 

20-73

SIDE SILL PANEL

Removal, page

 20-84

INNER FENDER
Removal, page 

20-85

DOOR and SIDE MOLDINGS
Removal — '96 - 98 Models, page 

20-81

Removal — '99 - 01 Models, page 

20-82

Main Menu

Table of Contents

Front Bumper

Removal — '96 - 98 Models

CAUTION: Put on gloves to protect your hands.

NOTE:

An assistant is helpful when removing and installing
the front bumper.
Take care not to scratch the front bumper and body.
When reinstalling the front bumper molding, replace
the adhesive tape.

Before reinstalling the front bumper molding, clean

the front bumper bonding surface with a sponge
dampened in alcohol.

Adhesive tape
Thickness: 1.2 mm (0.05 in.)
Width: 6 mm (0.24 in.)

FRONT BUMPER
BEAM

FRONT BUMPER

: Bolt, screw locations

6 x 1.0 mm

9.8 N-m (1.0 kgf-m,

7.2 Ibf-ft)

8 x 1.25 mm

22 N-m (2.2 kgf-m,

16 Ibf-ft)

Clip locations, 7

Installation is the reverse of the removal procedure.

NOTE:

Make sure the front bumper engages the front
bumper upper beam and side clips securely.
If necessary, adjust the front bumper beam to
obtain the proper gap.

FRONT
BUMPER

FRONT BUMPER
UPPER BEAM

BOLTS

SIDE
CLIP

ABSORBER BOX

ABSORBER

SIDE
CLIP

HOOK

BOLTS

HOOK

Adhesive
area.

LICENSE PLATE
BRACKET

CLIP

PIN

FRONT BUMPER
MOLDING

CLIP

Adhesive
area.

Main Menu

Table of Contents

Removal — '99 - 01 Models

CAUTION: Put on gloves to protect your hands.

NOTE:

An assistant is helpful when removing and installing the front bumper.
Take care not to scratch the front bumper and body.

8 x 1.25 mm

22 N-m (2.2 kgf-m,

16 Ibf-ft)

: Clip locations, 7

RIGHT FRONT FOG
LIGHT CONNECTOR

FRONT BUMPER BEAM

FRONT BUMPER

RIGHT SIDE FRONT
BUMPER MOLDING

LEFT FRONT FOG

LIGHT CONNECTOR

LICENSE PLATE
BRACKET

LEFT SIDE FRONT BUMPER MOLDING

FRONT SPOILER

Installation is the reverse of the removal procedure.

NOTE:

Make sure the front bumper engages the front bumper upper beam and side clips securely.
If necessary, adjust the front bumper beam to obtain the proper gap.

ABSORBER

ABSORBER BOX

SIDE
CLIP

Bolt, screw locations

6 x 1.0 mm

9.8 N-m (1.0 kgf-m,

7.2 Ibf-ft)

Main Menu

Table of Contents

Rear Bumper

Removal

CAUTION: Put on gloves to protect your hands.

NOTE:

An assistant is helpful when removing and installing
the rear bumper.
Take care not to scratch the rear bumper and body.
To remove the rear bumper beam, remove the rear
trim panel and trunk side trim (see page 

20-44

).

'96 - 98 models: When reinstalling the rear bumper

molding, replace the adhesive tape.

'96 - 98 models: Before reinstalling the rear bumper
molding, clean the rear bumper bonding surface with
a sponge dampened in alcohol.

Adhesive tape
Thickness: 1.2 mm (0.05 in.
Width: 6 mm (0.24 in.)

ACCESS
CAPS

'96 - 99 models

10 x 1.25 mm

38 N-m (3.9 kgf-m,
28 Ibf-ft)

'00 - 01 models

12 x 1.25 mm

54 N-m (5.5 kgf-m,
40 Ibf-ft)

Nut locations, 4

6 x 1.0 mm
9.8 N-m (1.0 kgf-m,
7.2 Ibf-ft)

: Clip locations

REAR
BUMPER

GROMMET

REAR
FENDER
COVER

RIGHT SIDE
REAR BUMPER
MOLDING
('99 - 01 models)

REAR BUMPER

CENTER
REAR BUMPER
MOLDING
('99 - 01 models)

LEFT SIDE REAR
BUMPER MOLDING
('99 - 01 models)

Installation is the reverse of the removal procedure.

NOTE: If necessary, replace any damaged clips.

HOOKS

HOOKS

SIDE CLIPS

REAR BUMPER
MOLDING
('96 - 98 models)

CLIP

PIN

CLIP

REAR
BUMPER
UPPER
BEAM

REAR BUMPER
BEAM

ABSORBER

Adhesive
area.

CLIP

Bolt, screw locations

ACCESS
CAPS

Main Menu

Table of Contents


Content   ..  578  579  580  581   ..