Acura RL. Manual - part 604
 

  Index      Acura     Acura RL - service repair manual 2005-2008 year


Search            


Content   ..  602  603  604  605   ..


Acura RL. Manual - part 604


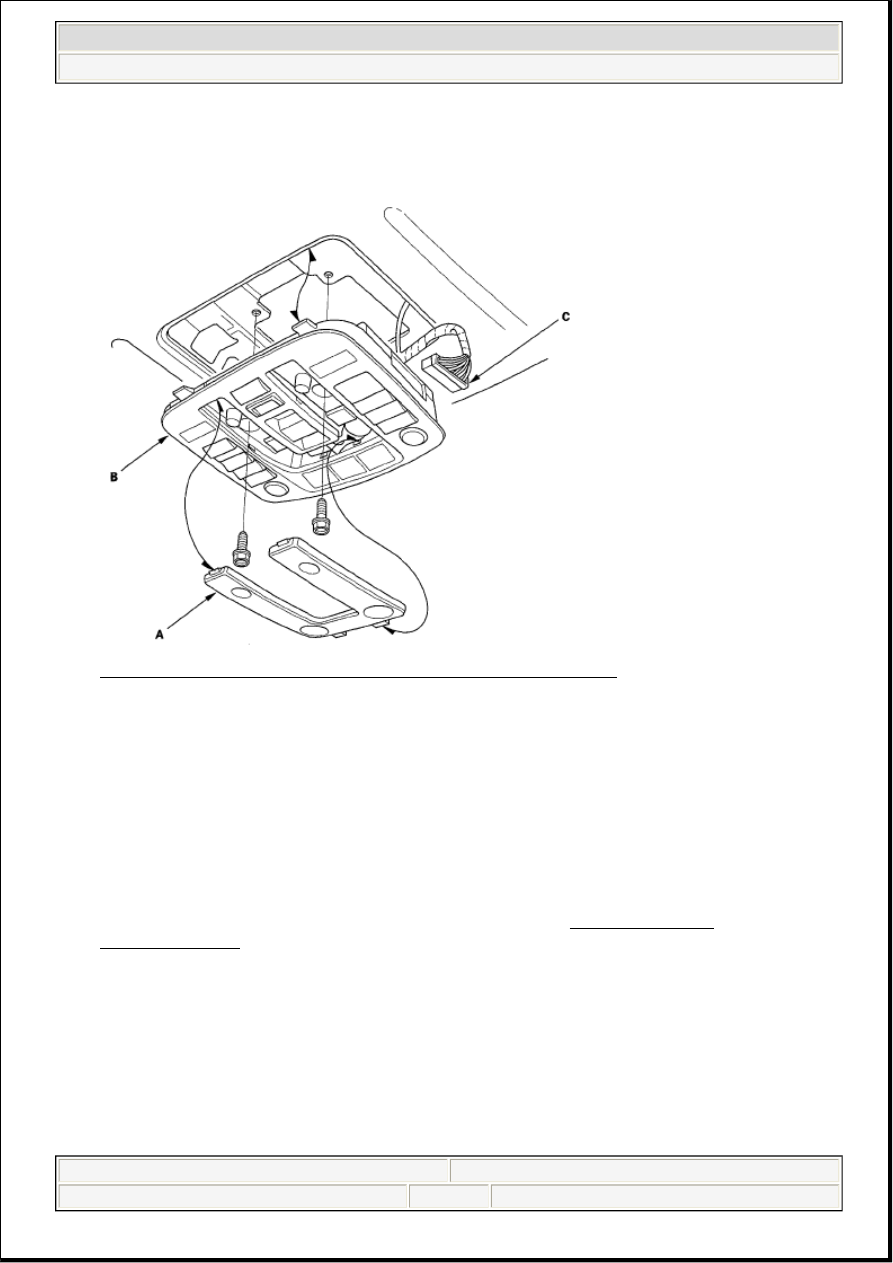
1. Turn the map light switch OFF.  

2. Carefully remove the front map light lens (A). 

Fig. 17: Identifying Front Map Light Lens, Roof Console And Bolts 
Courtesy of AMERICAN HONDA MOTOR CO., INC. 

3. Remove the two bolts and the roof console (B).  

4. Pull down on the front corners of the roof console to release the two clips.  

5. Push the console forward, then swing the rear edge down.  

6. Disconnect the 28P connector (C) from the roof console.  

7. Install in the reverse order of removal.  

AMBIENT LIGHT TEST 

1. Remove the roof console, and disconnect the 28P connector (see ROOF CONSOLE 

REPLACEMENT).  

2. Connect the roof console connector No. 8 terminal to battery power and No. 7 terminal to body 

ground. The ambient lights (A) should turn on. If they do not turn on, replace the roof console. 


2007 Acura RL 

2005-08 ACCESSORIES AND EQUIPMENT Interior Lights - RL


me 


Friday, June 05, 2009 3:31:24 PM

Page 23 

© 2005 Mitchell Repair Information Company, LLC. 

Fig. 18: Identifying Ambient Light 28P Connector 
Courtesy of AMERICAN HONDA MOTOR CO., INC. 

FRONT INDIVIDUAL MAP LIGHT REPLACEMENT 

1. Carefully pry off the lens (A) with a small screwdriver. 

Front Map Light: 8 W x 2  

Fig. 19: Identifying Front Individual Map Light Lens And Bulb 
Courtesy of AMERICAN HONDA MOTOR CO., INC. 

2. Check the bulb(s) (B). If the bulb is OK, but there is a malfunction, check the interior lights switch 

(see ROOF CONSOLE INPUT TEST). 


2007 Acura RL 

2005-08 ACCESSORIES AND EQUIPMENT Interior Lights - RL


me 


Friday, June 05, 2009 3:31:24 PM

Page 24 

© 2005 Mitchell Repair Information Company, LLC. 

REAR INDIVIDUAL MAP LIGHT TEST/REPLACEMENT

1. Carefully pry off the lens (A) with a small screwdriver. 

Rear Map Light: 8 W x 2  

Fig. 20: Identifying Rear Map Light, Lens And 10P Connector 
Courtesy of AMERICAN HONDA MOTOR CO., INC. 

2. Remove the two mounting bolts.  

3. Disconnect the 10P connector (B) from the rear map light (C). 

Switch Test  

4. Check for continuity between the No. 5 (or No. 6) and No. 7 terminals with the left (or right) rear map 

light switch ON. There should be continuity.  

5. Check for continuity between the No. 5 (or No. 6) and No. 7 terminals with the left (or right) rear map 

light switch OFF. There should be no continuity.  

6. If the continuity is not as specified, replace the rear map light assembly. 

Map Light Test  

7. Connect battery power to the No. 4 terminal and ground the No. 8 terminal. The left map light should 

come on.  

8. Connect battery power to the No. 4 terminal and ground the No. 9 terminal. The right map light 

should come on.  

9. If the test result is not as specified, check the bulb. If the bulb is OK, replace the rear map light 

assembly. 

Ambient Lights Test 


2007 Acura RL 

2005-08 ACCESSORIES AND EQUIPMENT Interior Lights - RL


me 


Friday, June 05, 2009 3:31:24 PM

Page 25 

© 2005 Mitchell Repair Information Company, LLC. 

10. Connect battery power to the No. 3 terminal and ground the No. 1 terminal. The ambient lights should 

come on.  

11. If the test result is not as specified, replace the rear map light assembly. 

Switch Lights Test  

12. Connect battery power to the No. 3 terminal and ground the No. 2 terminal. The switch lights should 

come on.  

13. If the test result is not as specified, check the bulbs. If the bulbs are OK, replace the rear map light 

assembly.  

GLOVE BOX LIGHT REPLACEMENT 

1. Remove the glove box stops and damper (see GLOVE BOX DAMPER REPLACEMENT ).  

2. Carefully pry the glove box light out of the glove box housing.  

3. Twist the socket (A) to remove it from the glove box light (B). 

Glove Box Light: 1.4 W  

Fig. 21: Identifying Glove Box Light, Socket And Bulb 
Courtesy of AMERICAN HONDA MOTOR CO., INC. 

4. Remove the bulb (C) from the socket.  

5. Install the light in the reverse order of removal.  

CONSOLE BOX LIGHT REPLACEMENT 

1. Remove the center console (see CENTER CONSOLE REMOVAL/INSTALLATION ).  

2. Carefully pry out the console box light out of the center console.  

3. Twist the socket (A) to remove it from the console box light (B). 

Console Box Light: 1.4 W  


2007 Acura RL 

2005-08 ACCESSORIES AND EQUIPMENT Interior Lights - RL


me 


Friday, June 05, 2009 3:31:24 PM

Page 26 

© 2005 Mitchell Repair Information Company, LLC. 


Content   ..  602  603  604  605   ..