Acura RL. Manual - part 583


  Index      Acura     Acura RL - service repair manual 2005-2008 year


Search            


Content   ..  581  582  583  584   ..


Acura RL. Manual - part 583


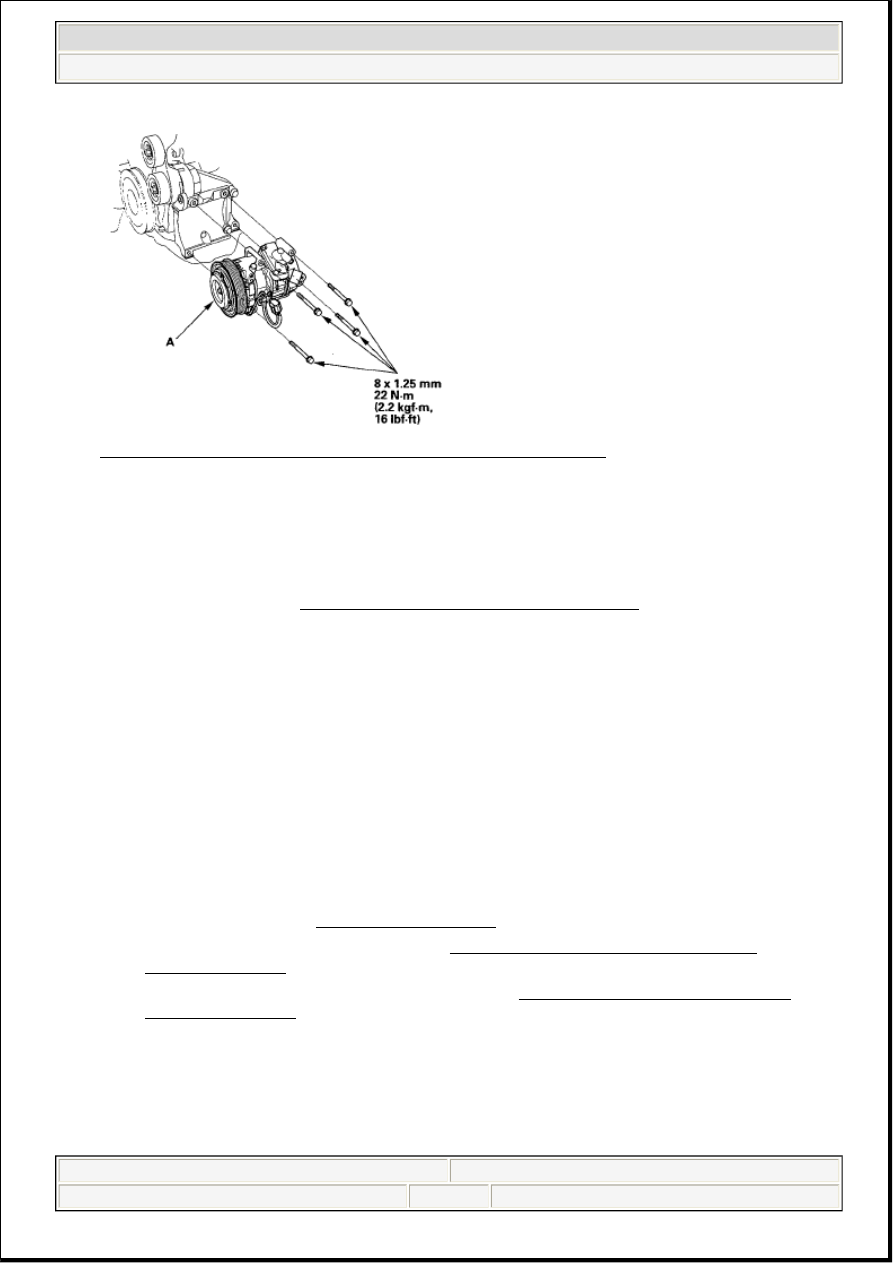
Fig. 147: Identifying A/C Compressor With Torque Specifications 
Courtesy of AMERICAN HONDA MOTOR CO., INC. 

9. Install the A/C compressor in the reverse order of removal, and note these items: 

Inspect the A/C lines for any signs of contamination. Purge the system if necessary before 
installing the compressor.  

If you're installing a new A/C compressor, you must calculate the amount of refrigerant oil to be 
removed from it (see A/C SERVICE TIPS AND PRECAUTIONS ). A new A/C compressor 
comes with a full charge of oil.  

Replace the O-rings with new ones at each fitting, and apply a thin coat of refrigerant oil before 
installing them. Be sure to use the correct O-rings for HFC-134a (R-134a) to avoid leakage.  

Use refrigerant oil (DENSO ND-OIL 8) for HFC-134a DENSO piston type A/C compressor 
only.  

To avoid contamination, do not return the oil to the container once dispensed, and never mix it 
with other refrigerant oils.  

Immediately after using the oil, reinstall the cap on the container, and seal it to avoid moisture 
absorption.  

Do not spill the refrigerant oil on the vehicle; it may damage the paint; if the refrigerant oil 
contacts the paint, wash it off immediately.  

Be careful not to damage the radiator fins when installing the compressor and the A/C 
condenser fan shroud.  

Charge the system (see SYSTEM CHARGING ).  

Reset the power window control unit (see RESETTING THE POWER WINDOW 
CONTROL UNIT
 ).  

Do the steering column position memorization (see STEERING COLUMN POSITION 
MEMORIZATION
 ).  

Enter the anti-theft codes for the audio system and the navigation system (if equipped).  

Set the clock.  

A/C COMPRESSOR CLUTCH CHECK 

1. Check the pressure plate for discoloration, peeling, or other damage. If there is damage, replace the 


2007 Acura RL 

2005-08 HVAC HVAC - RL


me 


Friday, June 05, 2009 2:25:43 PM

Page 115  © 2005 Mitchell Repair Information Company, LLC. 

clutch set (see A/C COMPRESSOR CLUTCH OVERHAUL ). 

2. Check the pulley bearing play and drag by rotating the pulley by hand. Replace the clutch set with a 

new one if it is noisy or has excessive play/drag (see A/C COMPRESSOR CLUTCH 
OVERHAUL
 ). 

Fig. 148: Checking Pulley Bearing Play 
Courtesy of AMERICAN HONDA MOTOR CO., INC. 

3. Measure the clearance between the pulley (A) and the pressure plate (B) all the way around. If the 

clearance is not within specified limits, remove the pressure plate (see A/C COMPRESSOR 
CLUTCH OVERHAUL
 ) and add or remove shims as needed to increase or decrease clearance. 

Clearance: 0.26-0.60 mm (0.010-0.024 in.)  

Fig. 149: Measuring Clearance Between Pulley And Pressure Plate 
Courtesy of AMERICAN HONDA MOTOR CO., INC. 

4. Measure the resistance of the field coil. If the resistance is not within specifications, replace the field 

coil (see A/C COMPRESSOR CLUTCH OVERHAUL ). 

NOTE:

The shims are available in three thicknesses: 0.1 mm, 0.3 mm, and 0.5 
mm.


2007 Acura RL 

2005-08 HVAC HVAC - RL


me 


Friday, June 05, 2009 2:25:43 PM

Page 116  © 2005 Mitchell Repair Information Company, LLC. 

Fig. 150: Measuring Resistance Of Field Coil 
Courtesy of AMERICAN HONDA MOTOR CO., INC. 

A/C COMPRESSOR CLUTCH OVERHAUL 

Special Tools Required  

A/C clutch holder, Robin air 10204 or Kent-Moore J37872, or Honda Tool and Equipment KMT-J33939, 
commercially available 

1. Remove the center bolt while holding the pressure plate (A) with a commercially available A/C clutch 

holder (B). 

Fig. 151: Identifying A/C Clutch Center Bolt With Torque Specifications 
Courtesy of AMERICAN HONDA MOTOR CO., INC. 

2. Remove the pressure plate (A) and shim(s) (B), taking care not to lose the shim(s). If the clutch needs 

adjustment, increase or decrease the number and thickness of shims as necessary, then reinstall the 
pressure plate, and recheck its clearance (see A/C COMPRESSOR CLUTCH CHECK ). 

NOTE:

The shims are available in three thicknesses: 0.1 mm, 0.3 mm, and 0.5 
mm.


2007 Acura RL 

2005-08 HVAC HVAC - RL


me 


Friday, June 05, 2009 2:25:43 PM

Page 117  © 2005 Mitchell Repair Information Company, LLC. 

Fig. 152: Identifying Pressure Plate And Shim 
Courtesy of AMERICAN HONDA MOTOR CO., INC. 

3. If you are replacing the field coil, remove the snap ring (A) with snap ring pliers, then remove the 

pulley (B). Be careful not to damage the pulley or the A/C compressor. 

Fig. 153: Identifying Snap Ring And Pulley 
Courtesy of AMERICAN HONDA MOTOR CO., INC. 

4. Remove the screw from the field coil ground terminal (A) and bracket (B). Disconnect the connectors 

(C) from the field coil and variable capacity control solenoid valve, then remove the wire harness (D). 
Remove the snap ring (E) with snap ring pliers, then remove the field coil (F). Be careful not to 
damage the field coil or the A/C compressor. 


2007 Acura RL 

2005-08 HVAC HVAC - RL


me 


Friday, June 05, 2009 2:25:43 PM

Page 118  © 2005 Mitchell Repair Information Company, LLC. 


Content   ..  581  582  583  584   ..