Acura RL. Manual - part 470
 

  Index      Acura     Acura RL - service repair manual 2005-2008 year


Search            


Content   ..  468  469  470  471   ..


Acura RL. Manual - part 470


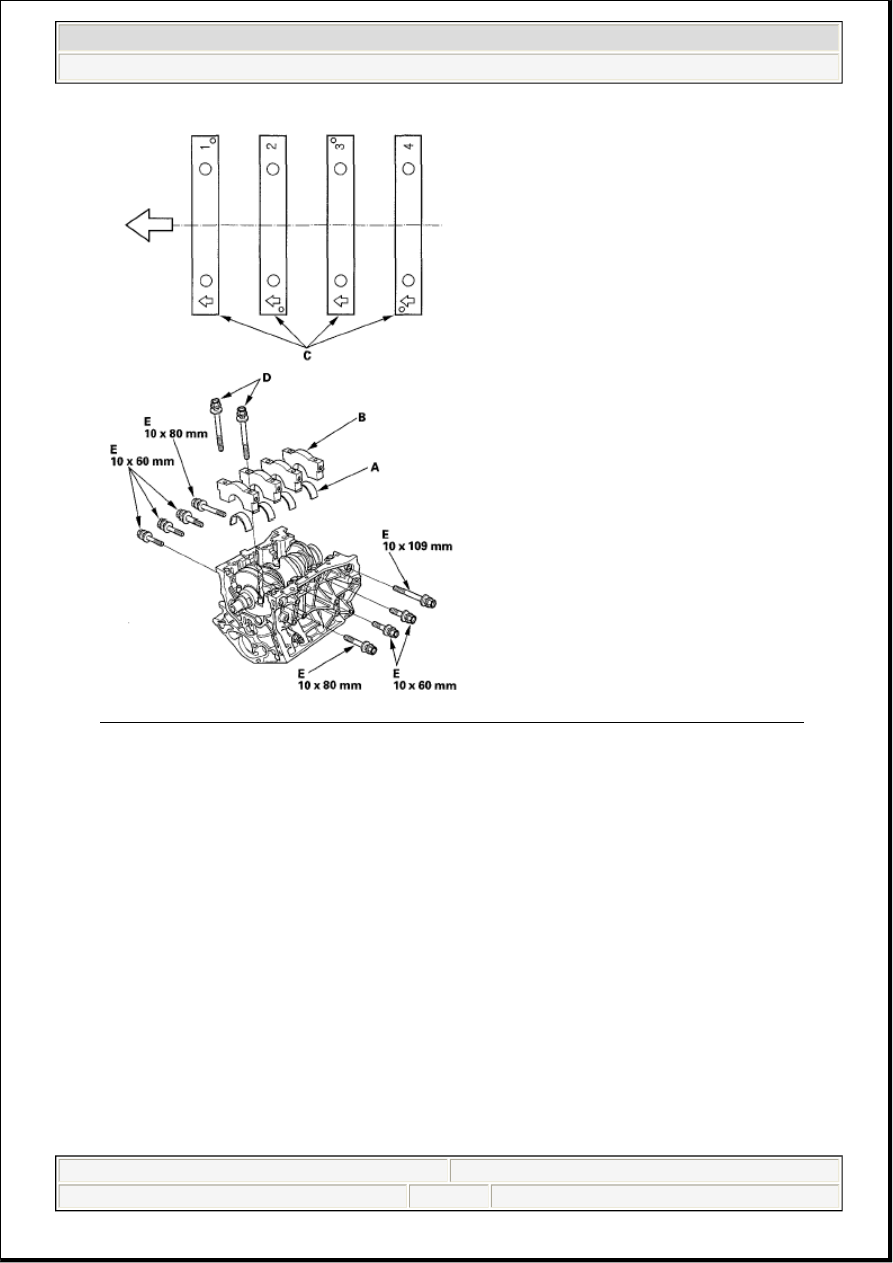
Fig. 53: Identifying Bearings, Bearing Caps, Bearing Cap Bolts And Bearing Cap Side Bolts 
Courtesy of AMERICAN HONDA MOTOR CO., INC. 

8. Apply new engine oil to the bolt threads and flanges, then loosely install the bearing cap bolts (D) and 

bearing cap side bolts (E).  

9. Set the crankshaft to bottom dead center (BDC) for the cylinder you are installing the piston in.  

10. Apply new engine oil to the piston, inside of the ring compressor, and the cylinder bore.  

11. Attach the ring compressor to the piston/ connecting rod assembly, and check that the bearing is 

securely in place.  

12. Position the piston/connecting rod assembly with the arrow (A) facing the timing belt side of the 

engine. 


2007 Acura RL 

2005-08 ENGINE Engine Block - RL


me 


Friday, June 05, 2009 3:16:24 PM

Page 34 

© 2005 Mitchell Repair Information Company, LLC. 

Fig. 54: Identifying Arrow Mark On Piston/Connecting Rod Assembly 
Courtesy of AMERICAN HONDA MOTOR CO., INC. 

13. Position the piston/connecting rod assembly in the cylinder, and tap it in using the wooden handle of a 

hammer (A). Maintain downward force on the ring compressor (B) to prevent the rings from 
expanding before entering the cylinder bore. 

Fig. 55: Installing Piston/Connecting Rod Assembly In Cylinder 
Courtesy of AMERICAN HONDA MOTOR CO., INC. 

14. Stop after the ring compressor pops free, and check the connecting rod-to-crank journal alignment 

before pushing the piston into place.  

15. Measure the diameter of each connecting rod bolt at point A and point B. 


2007 Acura RL 

2005-08 ENGINE Engine Block - RL


me 


Friday, June 05, 2009 3:16:24 PM

Page 35 

© 2005 Mitchell Repair Information Company, LLC. 

Fig. 56: Identifying Diameter Of Connecting Rod Bolt 
Courtesy of AMERICAN HONDA MOTOR CO., INC. 

16. Calculate the difference in diameter between point A and point B. 

Point A-Point B = Difference in Diameter  

Difference in Diameter  

Specification: 0-0.1 mm (0-0.004 in.)  

17. If the difference in diameter is out of tolerance, replace the connecting rod bolt.  

18. Line up the mark (A) on the connecting rod and cap, then install the cap. 

Fig. 57: Identifying Mark On Connecting Rod And Cap 
Courtesy of AMERICAN HONDA MOTOR CO., INC. 

19. Apply new engine oil to the bolt threads and flanges. Torque the bolts (B) to 20 N.m (2.0 kgf.m, 14 

lbf.ft).  

20. Mark the connecting rod (A) and bolt head (B) as shown. 


2007 Acura RL 

2005-08 ENGINE Engine Block - RL


me 


Friday, June 05, 2009 3:16:24 PM

Page 36 

© 2005 Mitchell Repair Information Company, LLC. 

Fig. 58: Identifying Connecting Rod And Bolt Head 
Courtesy of AMERICAN HONDA MOTOR CO., INC. 

21. Tighten the bolt until the mark on the bolt head lines up with the mark on the connecting rod (turn the 

bolt 90°). 

22. Tighten the bearing cap bolts, and then the bearing cap side bolts to the specified torque in the 

sequence as shown. Repeat the torque sequence again to measure the bolts are properly torqued. 

NOTE:

Remove the connecting rod bolt if you tightened it beyond the specified 
angle, and go back to step 15 of the procedure. Do not loosen it back to 
the specified angle.


2007 Acura RL 

2005-08 ENGINE Engine Block - RL


me 


Friday, June 05, 2009 3:16:24 PM

Page 37 

© 2005 Mitchell Repair Information Company, LLC. 


Content   ..  468  469  470  471   ..