Acura RL. Manual - part 180
 

  Index      Acura     Acura RL - service repair manual 2005-2008 year


Search            


Content   ..  178  179  180  181   ..


Acura RL. Manual - part 180


Fig. 429: Identifying Left Side Driver's Seat Position Sensor And Fastener With Torque 
Specifications
 
Courtesy of AMERICAN HONDA MOTOR CO., INC. 

2. Reconnect the driver's airbag 4P connector (see DISCONNECTING SYSTEM CONNECTORS ).  

3. Reconnect the negative cable to the battery.  

4. Check the operation of the driver's seat position sensor with the HDS (see DRIVER'S SEAT 

POSITION SENSOR OPERATION CHECK ).  

FRONT PASSENGER'S WEIGHT SENSOR UNIT REPLACEMENT 

REMOVAL 

1. Slide the seat all the way to the rear.  

2. Disconnect the negative cable from the battery, then wait for 3 minutes before starting work.  

3. Disconnect the front passenger's airbag 4P connector (see step 2 ).  

4. Disconnect the connectors from the front passenger's weight sensor unit. Remove the mounting bolt 

(A) and the front passenger's weight sensor unit (B) from the seat riser. 

NOTE:

Review the seat replacement procedure (see FRONT SEAT 
REMOVAL/INSTALLATION ) before performing repair or service.


2007 Acura RL 

2005-08 RESTRAINTS SRS (Supplemental Restraint System) - RL


me 


Friday, June 05, 2009 2:21:59 PM

Page 304  © 2005 Mitchell Repair Information Company, LLC. 

Fig. 430: Identifying Front Passenger's Weight Sensor Unit And Fastener 
Courtesy of AMERICAN HONDA MOTOR CO., INC. 

INSTALLATION 

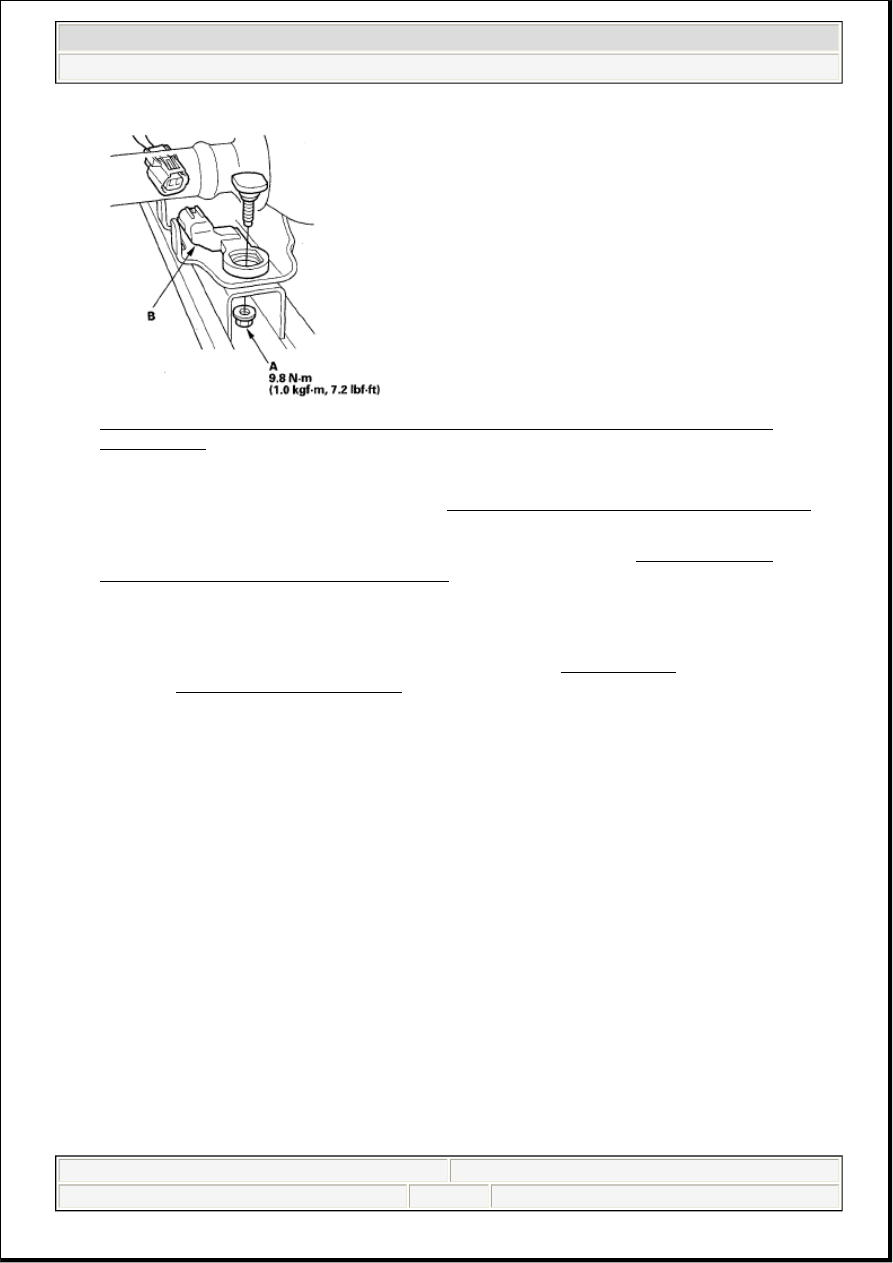
1. Place the new front passenger's weight sensor unit on the seat riser. Torque the mounting bolt (A), and 

connect the connectors. 

Fig. 431: Identifying Front Passenger's Weight Sensor Unit And Fastener With Torque 
Specifications
 
Courtesy of AMERICAN HONDA MOTOR CO., INC. 

2. Reconnect the front passenger's airbag 4P connector (see DISCONNECTING SYSTEM 

CONNECTORS ).  

3. Reconnect the negative cable to the battery.  

4. Calibrate the front passenger's weight sensor unit (see FRONT PASSENGER'S WEIGHT 

SENSOR UNIT CALIBRATION ).  

5. After installing the front passenger's weight sensor unit, confirm proper system operation: Turn the 

ignition switch ON (II); the SRS indicator should come on for about 6 seconds and then go off. 

NOTE:

Be sure to install the harness wires so they are not pinched or interfering 
with other parts.


2007 Acura RL 

2005-08 RESTRAINTS SRS (Supplemental Restraint System) - RL


me 


Friday, June 05, 2009 2:21:59 PM

Page 305  © 2005 Mitchell Repair Information Company, LLC. 

PASSENGER'S AIRBAG CUTOFF INDICATOR ILLUMINATION BULB 
TEST 

1. Remove the passenger's vent panel (see DRIVER'S VENT PANEL 

REMOVAL/INSTALLATION ).  

2. Push out the passenger's airbag cutoff indicator from behind the passenger's vent panel. 

Fig. 432: Checking For Continuity Between No. 3 And No. 4 Terminals Of Indicator Connector
Courtesy of AMERICAN HONDA MOTOR CO., INC.
 

3. Disconnect the 6P connector (A) from the passenger's airbag cutoff indicator (B).  

4. Check for continuity between the No. 3 and No. 4 terminals of the indicator. If there is no continuity, 

replace the bulb (C). 

5. Reinstall the parts in the reverse order of removal. 

NOTE:

Both illumination bulbs are connected in parallel. If there is continuity, 
remove the upper, hazard switch illumination bulb, and recheck for 
continuity. If there is no continuity, replace the lower, passenger's 
airbag cutoff indicator illumination bulb.


2007 Acura RL 

2005-08 RESTRAINTS SRS (Supplemental Restraint System) - RL


me 


Friday, June 05, 2009 2:21:59 PM

Page 306  © 2005 Mitchell Repair Information Company, LLC. 

2005-08 ACCESSORIES AND EQUIPMENT

Audio System - RL 

COMPONENT LOCATION INDEX 

Fig. 1: Identifying Audio System Component Location (1 Of 2) 
Courtesy of AMERICAN HONDA MOTOR CO., INC.


2007 Acura RL 

2005-08 ACCESSORIES AND EQUIPMENT Audio System - RL


2007 Acura RL 

2005-08 ACCESSORIES AND EQUIPMENT Audio System - RL


me 


Friday, June 05, 2009 3:53:06 PM

Page 1 

© 2005 Mitchell Repair Information Company, LLC. 

me 


Friday, June 05, 2009 3:53:13 PM

Page 1 

© 2005 Mitchell Repair Information Company, LLC. 


Content   ..  178  179  180  181   ..