Kia Soul (2024 year). Manual in english - page 6
 

  Index      Kia     Kia Soul (2024 year). Manual in english


Search            copyright infringement  


Content      ..     4      5      6      7     ..


Kia Soul (2024 year). Manual in english - page 6


Features of your vehicle

92

4

Automatic climate control system

Manual heating and air conditioning

The heating and cooling system can be controlled manually by pressing buttons or 
turning knob(s) other than the AUTO button.

In this case, the system works sequentially according to the order of buttons or 
knob(s) selected.

1. Start the vehicle.

2. Set the mode to the desired position.

For improving the effectiveness of heating and cooling;

• Heating:

• Cooling:

3. Set the temperature control to the desired position.

4. Set the air intake control to the outside (fresh) air position.

5. Set the fan speed control to the desired speed.

If air conditioning is desired, turn the air conditioning system on.

Press the AUTO button in order to convert to full automatic control of the system.

OSK3042314L

93

4

4

Features of your vehicle

Automatic climate control system

Mode selection

The mode selection button controls the 
direction of the air flow through the ven

-

tilation system.

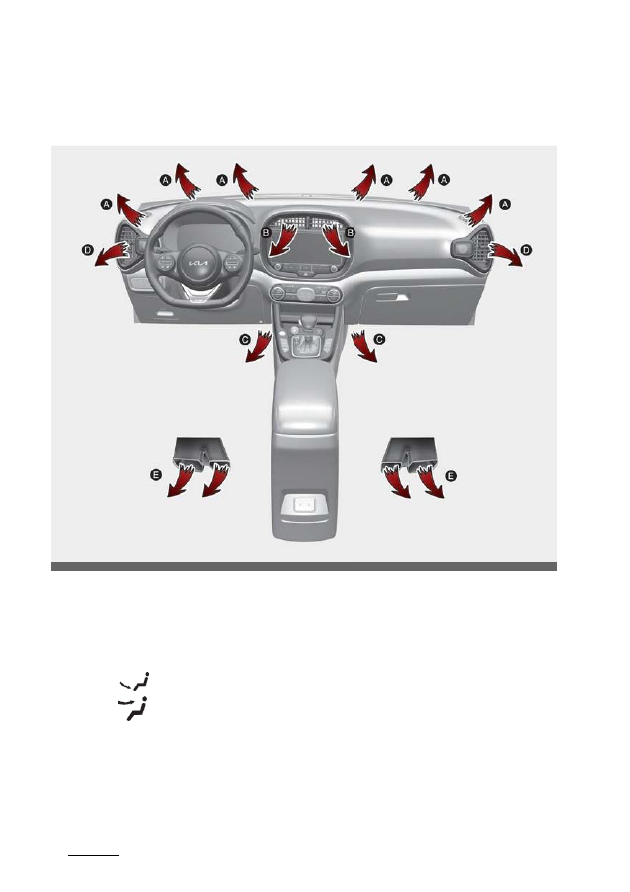
The air flow outlet port is converted as 
follows:

Face-Level (B, D)

Air flow is directed toward the upper 
body and face. Additionally, each outlet 
can be controlled to direct the air dis

-

charged from the outlet.

Bi-Level (B, C, D, E)

Air flow is directed towards the face and 
the floor.

Floor-Level (A, C, D, E)

Most of the air flow is directed to the 
floor, with a small amount of the air 
being directed to the windshield and 
side window defrosters.

Floor/Defrost-Level (A, C, D, E)

Most of the air flow is directed to the 
floor and the windshield with a small 
amount directed to the side window 
defrosters.

Defrost-Level (A, D)

Most of the air flow is directed to the 
windshield with a small amount of air 
directed to the side window defrosters.

Instrument panel vents

The outlet vents can be opened or 
closed separately using the thumb-
wheel. (if equipped)

Also, you can adjust the direction of air 
delivery from these vents using the vent 
control lever as shown.

OSK3048318NR

OSK3048319NR

OSK3041315N

Features of your vehicle

94

4

Automatic climate control system

Temperature control

The temperature will increase to the 
maximum (82

°F (28 °C)) by turning the 

knob to the extreme right.

The temperature will decrease to the 
minimum (62 

°F (17 °C)) by turning the 

knob to the extreme left.

When turning the knob, the temperature 
will increase or decrease by 1

°F / 0.5 °C. 

When set to the lowest temperature set

-

ting, the air conditioning will operate 
continuously.

NOTICE

When starting the vehicle in cold weather
using manual temperature con

-

trol,

operate the system in the following 
method to improve heating.
• Turn off or lower the blower, right 

after starting the engine.

• Allow the engine to warm up during

this time since the air flow from the
heater is still cold.

• After a few minutes of engine warm

up, turn on or set the fan to a higher
level and adjust the temperature set

-

ting to hot.

Adjusting the driver and passen

-

ger side temperature equally

• Press the "SYNC" button to adjust the 

driver and passenger side tempera

-

ture equally. The passenger side tem

-

perature will be set to the same 
temperature as the driver side tem

-

perature.

• Turn the driver side temperature con

-

trol knob. The driver and passenger 
side temperature will be adjusted 
equally.

Adjusting the driver and passen

-

ger side temperature individually

• Press the "SYNC" button again to 

adjust the driver and passenger side 
temperature individually. The illumi

-

nation of button turns off.

• Operate the driver side temperature

control knob to adjust the driver side
temperature.

• Operate the passenger side tempera

-

ture control knob to adjust the pas

-

senger side temperature.

Temperature conversion

You can switch the temperature mode 
from Centigrade to Fahrenheit as fol

-

lows:

OSK3048317NR

OSK3048327NR

95

4

4

Features of your vehicle

Automatic climate control system

While pressing the OFF button, press the 
AUTO button for 3 seconds or more. The 
display will change from Centigrade to 
Fahrenheit, or from Fahrenheit to Centi

-

grade. If the battery has been dis

-

charged or disconnected, the 
temperature mode display will reset to 
Fahrenheit.

Controlling air intake

This is used to select the outside (fresh) 
air position or recirculated air position.

To change the air intake control position:

Push the control button.

Outside (fresh) air position

With the outside (fresh) air 
position selected, air enters 
the vehicle from outside and is
heated or cooled according

to the function selected.

Recirculated air position

With the recirculated air posi

-

tion selected, air from the 
passenger compartment will 
be drawn through the heating

system and heated or cooled according 
to the function selected.

Prolonged operation of the heater in the 
recirculated air position (without air con

-

ditioning selected) may cause fogging of 
the windshield and side windows and the
air within the passenger compart

-

ment

may become stale.

In addition, prolonged use of the air con

-

ditioning with the recirculated air posi

-

tion

selected will result in excessively dry air in
the passenger compartment.

Controlling fan speed

The fan speed can be set to the desired 
speed by operating the fan speed con

-

trol button.

To change the fan speed:
• Press button right for higher speed, or 

press button left for lower speed.

• To turn the fan speed control off, 

press the front blower OFF button.

Air conditioning

OSK3048320NR

OSK3048321NR

OSK3048322NR

Features of your vehicle

96

4

Automatic climate control system

• Press the A/C button to turn the air 

conditioning system on (indicator light 
will illuminate).

• Press the button again to turn the air 

conditioning system off.

W ARNING

Reduced Visibility
Continuous use of the climate control 
system in the recirculated air position 
may allow humidity to increase inside the
vehicle, which may fog the glass and 
obscure visibility.

W ARNING

Recirculated Air
Continued use of the climate control sys

-

tem in the recirculated air position can 
cause drowsiness or sleepiness, and loss 
of vehicle control. Set the air intake con

-

trol to the outside (fresh) air position as 
much as possible while driving.

W ARNING

Sleeping with A/C on
Do not sleep in a vehicle with the air con

-

ditioning or heating on, as this may
cause serious harm or death due to a
drop in the oxygen level and/or body 
temperature.

Turning off the front air climate 
control

• Press the front blower OFF button to 

turn off the front air climate control 
system.

However, you can still operate the 
mode and air intake buttons as long
as the ignition switch or ENGINE 
START/STOP button is in the ON
posi

-

tion.

Automatic ventilation

The system automatically selects the 
outside (fresh) air position when the cli

-

mate control system operates over a
certain period of time (5 minutes) in low 
temperature with the recirculated air 
position selected.

To cancel or reset the Automatic 
Ventilation

When the air conditioning system is on,

select Face Level

mode and press

the recirculated air position more than 
five times within 3 seconds while press

-

ing A/C button.

When the automatic ventilation is can

-

celed, the indicator blinks 3 times. When 
the automatic ventilation is activated, the
indicator blinks 6 times.

OSK3048323NR

97

4

4

Features of your vehicle

Automatic climate control system

Scheduled Ventilation Control

The Scheduled Ventilation Control 
releases hot air in the vehicle to lower 
cabin temperature before getting in the 
vehicle.

Depending on the outside ambient tem

-

perature, the blower is operated for 5 to
15 minutes while the vehicle is parked.

Turning Schedule Ventilation

Control On or Off

The Schedule Ventilation Control can be
turned on and off by selecting

‘Setup →

Vehicle Settings

→ Automatic Ventilation

→ Scheduled Ventilation Control’ from

the infotainment system screen. Also, 
the starting time can be set within 24 
hours. Schedule Ventilation Control 
operates only once when the feature is 
set.

System operation

Ventilation

1. Set the mode to the

position.

2. Set the air intake control to the out

-

side (fresh) air position.

3. Set the temperature control to the 

desired position.

4. Set the fan speed control to the 

desired speed.

Heating

1. Set the mode to the

position.

2. Set the air intake control to the out

-

side (fresh) air position.

3. Set the temperature control to the 

desired position.

4. Set the fan speed control to the 

desired speed.

5. If dehumidified heating is desired,

turn the air conditioning system (if
equipped) on.
• If the windshield fogs up, set the

mode to the

or

position.

Operation Tips

• To keep dust or unpleasant fumes 

from entering the vehicle through the 
ventilation system, temporarily set the 
air intake control to the recirculated air
position. Be sure to return the con

-

trol

to the fresh air position when the 
irritation has passed to keep fresh air 
in the vehicle. This will help keep the 
driver alert and comfortable.

• Air for the heating/cooling system is 

drawn in through the grilles just ahead
of the windshield. Care should be
taken that these are not blocked by
leaves, snow, ice or other obstruc

-

tions.

• To prevent interior fog on the wind

-

shield, set the air intake control to the 
fresh air position and fan speed to the 
desired position, turn on the air condi

-

tioning system, and adjust the tem

-

perature control to desired 
temperature.

Air conditioning (if equipped)

All

Kia Air Conditioning Systems are
filled with R-1234yf refrigerant.

1. Start the vehicle. Press the air condi

-

tioning button.

2. Set the mode to the

position.

3. Set the air intake control to the out

-

side-air or recirculated air position.

4. Adjust the fan speed control and tem

-

perature control to maintain maxi

-

mum comfort.

Features of your vehicle

98

4

Automatic climate control system

• When maximum cooling is desired, 

set the temperature control to the 
extreme left position, set the mode 
control to the MAX A/C position, 
then set the fan speed control to the
highest speed.

CAUTION

Excessive A/C Use
When using the air conditioning system, 
monitor the temperature gauge closely 
while driving up hills or in heavy traffic 
when outside temperatures are high. Air 
conditioning system operation may cause
vehicle overheating. Continue to use the
blower fan but turn the air con

-

ditioning 

system off if the temperature gauge
indicates vehicle overheating.

CAUTION

• The refrigerant system should only be 

serviced by trained and certified tech

-

nicians to insure proper and safe 
operation.

• The refrigerant system should be ser

-

viced in a well-ventilated place.

• The air conditioning evaporator (cool

-

ing coil) shall never be repaired or 
replaced with one removed from a
used or salvaged vehicle and new 
replacement MAC evaporators shall 
be certified (and labeled) as meeting 
SAE Standard J2842.

CAUTION

When opening the windows in humid 
weather, air conditioning may create 
water droplets inside the vehicle. Since 
excessive water droplets may cause 
damage to electrical equipment, air con

-

ditioning should only be used with the 
windows closed.

Air conditioning system opera

-

tion tips

• If the vehicle has been parked in 

direct sunlight during hot weather, 
open the windows for a short time to 
let the hot air inside the vehicle 
escape.

• To help reduce moisture inside of the 

windows on rainy or humid days, 
decrease the humidity inside the vehi

-

cle by operating the air conditioning 
system.

• During air conditioning system opera

-

tion, you may occasionally notice a
slight change in vehicle speed as the 
air conditioning compressor cycles. 
This is a normal system operation 
characteristic.

• Use the air conditioning system every 

month only for a few minutes to 
ensure maximum system perfor

-

mance.

• When using the air conditioning sys

-

tem, you may notice clear water drip

-

ping (or even puddling) on the ground 
under the passenger side of the vehi

-

cle. This is a normal system operation 
characteristic.

• Operating the air conditioning system 

in the recirculated air position pro

-

vides maximum cooling; however, 
continual operation in this mode may 
cause the air inside the vehicle to 
become stale.

• During cooling operation, you may 

occasionally notice a misty air flow 
because of rapid cooling and humid 
air intake. This is a normal system 
operation characteristic.

99

4

4

Features of your vehicle

Automatic climate control system

Climate control air filter (if
equipped)

The climate control air filter installed 
behind the glove box filters the dust or 
other pollutants that come into the vehi

-

cle from the outside through the heating 
and air conditioning system.

If dust or other pollutants accumulate in 
the filter over a period of time, the air flow
from the air vents may decrease, 
resulting in moisture accumulation on the
inside of the windshield even when the
outside (fresh) air position is selected. If
this happens, have the cli

-

mate control

air filter replaced by an authorized Kia
dealer.

NOTICE

• Replace the filter according to the 

Maintenance Schedule. If the vehicle 
is being driven in severe conditions, 
such as dusty or rough roads, more 
frequent air conditioner filter inspec

-

tions and changes are required.

• When the air flow rate suddenly 

decreases, the system should be 
checked at an authorized Kia dealer.

Checking the amount of air con

-

ditioner refrigerant and compres

-

sor lubricant

When the amount of refrigerant is low, 
the performance of the air conditioning 
is reduced. Overfilling also has a nega

-

tive impact on the air conditioning sys

-

tem.

Therefore, if abnormal operation is found,
have the system inspected by an 
authorized Kia dealer.

W ARNING

The oil and refrigerant in your vehicle's 
air conditioning system is under very high
pressure. If proper service proce

-

dures

are not followed an explosion may result.
To reduce the risk of serious injury or
death, the air conditioning sys

-

tem in

your vehicle should only be ser

-

viced by 

trained and certified technicians.

CAUTION

It is important that the correct type and 
amount of oil and refrigerant is used, 
otherwise damage to the vehicle may 
occur. To prevent damage, the air condi

-

tioning system in your vehicle should only
be serviced by trained and certified 
technicians.

W ARNING

Vehicles equipped with R-1234yf

Since the refrigerant is mildly

inflammable and operated at high pres

-

sure, the air conditioning system should
only be serviced by trained and certified
technicians. (Refer to the SAE J2845)

It is important that the correct type and
amount of oil and refrigerant are used.

OSK3068036NR

Features of your vehicle

100

4

Windshield defrosting and defogging

All refrigerants should be reclaimed with 
proper equipment. Venting refrigerants 
directly to the atmosphere is harmful to 
individuals and environment.

Failure to heed these warnings can lead 
to serious injuries.

Air Conditioning refrigerant label

Example

* The actual Air Conditioning refrigerant

label in the vehicle may differ from the
illustration.

Each symbol and specification on the air 
conditioning refrigerant label is repre

-

sented below:

1. Classification of refrigerant

2. Amount of refrigerant

3. Classification of Compressor lubricant

4. Caution

5. Flammable Refrigerant
6. Requires Registered Technician to 

Service Air Conditioning system

Refer to "Refrigerant label" on page 9-13
for more detail on the location of air con

-

ditioning refrigerant label.

Windshield defrosting and 
defogging

When the windshield is covered with 
frost or moisture, the front view is 
blurred, you should remove the frost 
and moisture.

W ARNING

Windshield heating

Do not use the

or

position

during cooling operation in extremely 
humid weather. The difference between 
the temperature of the outside air and the
windshield could cause the outer surface
of the windshield to fog up, causing loss
of visibility. In this case, set

the mode selection to the

position

and fan speed control to the lower 
speed.

• For maximum defrosting, set the tem

-

perature control to the extreme right/
hot position and the fan speed control
to the highest speed.

• If warm air to the floor is desired while

defrosting or defogging, set the mode
to the floor-defrost position.

• Before driving, clear all snow and ice 

from the windshield, rear window, 
outside rear view mirrors, and all side 
windows.

• Clear all snow and ice from the hood 

and air inlet in the cowl grill to improve
heater and defroster effi

-

ciency and

to reduce the probability of fogging
up the inside of the wind

-

shield.

Manual climate control system

You

can defog or defrost using the man

-

ual

climate control system.

OKA4040574N

101

4

4

Features of your vehicle

Windshield defrosting and defogging

To defog inside windshield

1. Select any fan speed except "0" posi

-

tion.

2. Select desired temperature.

3. Select the

or

position.

4. The outside (fresh) air and air condi

-

tioning will be selected automatically.

If the air conditioning and outside (fresh) 
air position are not selected automati

-

cally, press the corresponding button 
manually.

To defrost outside windshield

1. Set the fan speed to the highest 

(extreme right) position.

2. Set the temperature to the extreme 

hot position.

3. Select the

position.

4. The outside (fresh) air and air condi

-

tioning will be selected automatically.

Automatic climate control system

You can defog or defrost using the auto

-

matic climate control system.

Defogging inside windshield with
the automatic climate control

1. Set the fan speed to the desired posi

-

tion.

2. Select desired temperature.

3. Press the defroster button (

).

4. The outside (fresh) air position will be 

selected automatically and the air 
conditioning will turn on according to 
the detected ambient temperature.

If the air conditioning and outside (fresh) 
air position are not selected automati

-

cally, adjust the corresponding button

manually. If the

position is

selected, lower fan speed is adjusted to 
a higher fan speed.

OSK3042309N

OSK3042310N

OSK3048324NR

Features of your vehicle

102

4

Windshield defrosting and defogging

Defrosting outside windshield 
with automatic climate control

1. Set the fan speed to the highest posi

-

tion.

2. Set the temperature to the extreme 

hot (HI) position.

3. Press the defroster button (

).

4. The outside (fresh) air position will be 

selected automatically and the air 
conditioning will turn on according to 
the detected ambient temperature.

Defogging logic (if equipped)

To reduce the possibility of fogging up 
the inside of the windshield, the air 
intake or air conditioning is controlled 
automatically according to certain con

-

ditions such as

or

position.

To cancel automatic defogging logic or 
return to the automatic defogging logic, 
do the following.

Manual climate control system

1. Turn the ignition switch to the ON 

position.

2. Turn the mode selection knob to the 

defrost position (

).

3. Push the air intake control button at 

least 5 times within 3 seconds.

The indicator light in the air intake 
control button will blink 3 times. It 
indicates that the defogging logic is 
canceled or returned to the pro

-

grammed status.

If the battery has been discharged or 
disconnected, it resets to the defog logic 
status.

Turning the defogging logic on or
off

OSK3048325NR

OSK3048311NR

OSK3048326NR

103

4

4

Features of your vehicle

Storage compartment

1. Turn the ignition switch or ENGINE 

START/STOP button to the ON
posi

-

tion.

2. Press the defroster button (

).

3. While pressing the air conditioning 

button (A/C), press the air intake con

-

trol button at least 5 times within 3
seconds.

The recirculation indicator blinks 3 times 
in 0.5 second of intervals. It indicates that
the defogging logic is canceled or 
returned to the programmed status.

If the battery has been discharged or 
disconnected, it resets to the defog logic 
status.

Storage compartment

These compartments can be used to 
store small items required by the driver 
or passengers.
• To avoid possible theft, do not leave 

valuables in the storage compart

-

ment.

• Always keep the storage compart

-

ment covers closed while driving. Do 
not attempt to place so many items in 
the storage compartment that the 
storage compartment cover cannot 
close securely.

W ARNING

Flammable materials
Do not store glasses, gas lighter, porta

-

ble battery, canned beverage, spray can, 
propane cylinder, cosmetic tube or other 
flammable/explosive materials in the 
vehicle. These items may catch fire and/ 
or explode if the vehicle is exposed to hot
temperatures for extended periods.

Center console storage

To open the center console storage:

Pull up the lever.

OSK3048011NR

Features of your vehicle

104

4

Storage compartment

Glove box

To open the glove box:
• Pull the handle and the glove box will 

automatically open.

Close the glove box after use.

W ARNING

Glove Box
To reduce the risk of injury in an acci

-

dent or sudden stop, always keep the
glove box door closed while driving.

NOTICE

If the temperature control switch is in the 
warm or hot position, warm or hot air will
flow into the glove box.

Sunglass holder

To open the sunglass holder:
• Press the cover and the holder will 

slowly open.

Place your sunglasses with the lenses 
facing out. To close the sunglass holder 
push it up.

W ARNING

Sunglass holder
• Do not keep objects except sun

-

glasses inside the sunglass holder. 
Such objects can be thrown from the 
holder in the event of a sudden stop 
or an accident, possibly injuring the 
passengers in the vehicle.

• Do not open the sunglass holder while 

the vehicle is moving. The rear view 
mirror of the vehicle can be blocked by
an opened sunglass holder.

Luggage net holder (if equipped)

To keep items from shifting in the cargo 
area, you can use the 4 holders located 
in the cargo area to attach the luggage 
net.

If necessary, Contact an authorized Kia 
dealer.

OSK3048012NR

OSK3048013NR

OSK3048014NR

105

4

4

Features of your vehicle

Storage compartment

CAUTION

To prevent damage to the goods or the
vehicle, be careful when carrying fragile
or bulky objects in the luggage compart

-

ment.

W ARNING

Avoid eye injury. DO NOT overstretch 
the luggage net, ALWAYS keep your 
face and body out of the luggage net's 
recoil path. DO NOT use when the strap 
has visible signs of wear or damage.

Increase cargo space (if
equipped)

If you want to increase cargo space,
1. Grasp the handle on the top of the 

cover and lift it

2. Fold the rear part of the luggage 

board frontward

3. Pull the luggage board hinge to the 

end of upper side sliding slot and it 
will fall down lower to increase cargo 
space.

4. Slide it frontward (refer to the above 

pictures)

OSK3048015NR

OSK3048016NR

OSK3040408NR

Features of your vehicle

106

4

Interior features

Interior features

There are various features inside the 
vehicle for the convenience of the occu

-

pants.

Cup holder

The front and rear seats of the vehicle 
have cup holders to accommodate cups.

W ARNING

Hot liquids
Do not place uncovered cups with hot 
liquid in the cup holder while the vehicle 
is in motion. If the hot liquid spills, you 
may burn yourself. Such a burn to the 
driver could lead to loss of control of the 
vehicle.

CAUTION

• Keep your drinks sealed while driving 

to prevent spilling your drink. If liquid 
spills, it may get into the vehicle's 
electrical/electronic system and dam

-

age electrical/electronic parts.

• When cleaning spilled liquids, do not

use heat to dry the cup holders. This
may damage the cup holder.

Front

Center (if equipped)

Cups or small beverage cans may be 
placed in the cup holders.

Seat warmer (if equipped)

The seat warmer is provided to warm 
the front seats during cold weather.

Front seat (Type A)

OSK3042020L

OSK3048021NR

OSK3042023L

107

4

The seat warmer defaults to the OFF
position whenever the ignition switch or 
ENGINE START/STOP button is
turned
on.

4

Features of your vehicle

Interior features

Front seat (Type B)

Rear seat

With the ignition switch or ENGINE 
START/STOP button in the ON
position:
• Push either of the buttons to warm 

the front and rear seats.

During mild weather or under conditions 
where the operation of the seat warmer 
is not needed, keep the switches in the 
"OFF" position.

Temperature control (Manual)

Each time you press the buttons, the 
temperature setting of the seat will 
change as follows:

Front seat (Type A)

Front seat (Type B)

Rear seat

Temperature control (Automatic)

The seat warmer starts to automatically 
control the seat temperature in order to 
prevent low-temperature burns after 
being manually turned ON.

Front seat

You may manually press the button to 
increase the seat temperature. However, 
it soon returns to the automatic mode 
again. When pressing the buttons for 
more than 1.5 seconds with the seat 
warmer operating, the seat warmer will 
turn OFF. The seat warmer defaults to 
the OFF position whenever the ignition 
switch or ENGINE START/STOP button
is in the ON position.

OSK3040023NR

OSK3048025NR

Features of your vehicle

108

4

Interior features

NOTICE

With the seat warmer buttons in the ON 
position, the heating system in the seat 
turns off or on automatically depending 
on the seat temperature.

W ARNING

Seat warmer burns
The seat warmer may cause burns, even 
at low temperature, if used over a long 
period of time. Never allow passengers 
who may not be able to take care of 
themselves to be exposed to the risk of 
seat heater burns. These include:

1. Infants, children, elderly or disabled 

persons, or hospital outpatients

2. Persons with sensitive skin or those 

that burn easily

3. Fatigued individuals

4. Intoxicated individuals
5. Individuals taking medication that can 

cause drowsiness or sleepiness 
(sleeping pills, cold tablets, etc.)

Air ventilation seat (if equipped)

The temperature setting of the seat 
changes according to the switch posi

-

tion.

• To ventilate your seat cushion, press 

the buttons (blue color).

Each time you press the button, the 
airflow will change as follows:

The seat warmer (with air ventilation) 
defaults to the OFF position whenever 
the ignition switch or ENGINE START/ 
STOP button is turned on.

CAUTION

Seat damage
• When cleaning the seats, do not use 

an organic solvent, such as paint thin

-

ner, benzene, alcohol and gasoline. 
Doing so may damage the air ventila

-

tion seat.

• Do not place heavy or sharp objects

on the seat. Those things may dam

-

age the air ventilation seat.

• Be careful not to spill liquid, such as 

water or beverages, on the seat. If you 
spill some liquid, wipe the seat with a
dry towel. Before using the air ventila

-

tion seat, dry the seat completely.

OSK3042024L

109

4

4

Features of your vehicle

Interior features

Sun visor

Use the sun visor to shield direct light 
through the front or side windows.

*The actual sun visor lamp in the vehicle

may differ from the illustration.

• To use the sun visor, pull it downward.

To use the sun visor for the side win

-

dow, pull it downward, unsnap it from
sun visor retainer clip (1) and swing it
to the side (2).

• To use the vanity mirror, pull down

the visor and slide the mirror cover
(3).

Adjust the sun visor extension forward
or backward (4).

The ticket holder (5) is provided for
holding a tollgate ticket (if equipped)

CAUTION

Vanity mirror lamp
If you use the vanity mirror lamp, turn off
the lamp before returning the sun visor to
its original position; otherwise, it could 
result in battery discharge and possible 
sun visor damage.

Power outlet (if equipped)

The power outlet is designed to provide 
power for mobile telephones or other 
devices designed to operate with vehicle 
electrical systems.

Type A

Type B

The devices should draw less than 10 
amps with the vehicle on.
• Use the power outlet only when the 

vehicle is on and remove the acces

-

sory plug after use. Using the acces

-

sory plug for prolonged periods of 
time with the vehicle off could cause 
the battery to discharge.

• Only use 12 V electric accessories 

which are less than 10 A in electric 
capacity

OSK3040022NR

OSK3042026L

OSK3042027N

Features of your vehicle

110

4

Interior features

• Adjust the air-conditioner or heater to

the lowest operating level when using
the power outlet.

• Close the cover when not in use.
• Some electronic devices can cause 

electronic interference when plugged 
into a vehicle's power outlet. These 
devices may cause excessive audio 
static and malfunctions in other elec

-

tronic systems or devices used in your 
vehicle.

• Push the plug in as far as it will go. If 

good contact is not made, the plug 
may overheat and the fuse may open.

• Plug in battery equipped electronic 

devices with reverse current protec

-

tion. The current from the battery may 
flow into the vehicle's electrical/elec

-

tronic system and cause system mal

-

function.

W ARNING

Electric shock
Do not put a finger or a foreign object 
(pen, etc.) into a power outlet and do not 
touch with a wet hand. You may get an 
electric shock.

USB charger (if equipped)

The USB car charger allows drivers to 
charge their digital devices like smart

-

phones, and PC tablets. Plug the cable 
into the USB port, and charging will 
begin.

Front

Center

The USB car charger is available with 
either the ACC or the ignition on. We rec

-

ommend you connect the USB port and 
digital devices with the engine running. 
See the display screen of the device to 
check its charging process completion. 
Your smartphone or table PC could get 
heated up while charging. This is no rea

-

son to worry, as it doesn't impact life or 
functions of the device. For the safety 
reason, charging can be stopped if the 
battery gets heated up to a certain point 
of temperature that the devices can be 
negatively affected. Charging some digi

-

tal devices is not available or requires 
special dedicated adapters if their

OSK3042074L

OSK3042075L

111

4

4

Features of your vehicle

Interior features

charging methods don't fit the way the 
USB car charger works.

The smartphone or PC tablet without 
fast charging is charged at a regular 
speed.

Rated output:
• Digital devices with fast charging: -

9.0 V, 1.67 A

• Digital devices with normal charging: -

5.0 V, 2.1 A

CAUTION

• Use the USB car charger with the igni

-

tion on. Otherwise, Vehicle battery
can be discharged.

• Use the official USB cable of the man

-

ufacturer of the digital device to be 
charged.

• Make sure that any foreign object, 

drinks, and water do not come into 
contact with the USB car charger. 
Water or foreign object can damage 
the USB charger.

• Do not charge a device those current 

consumption exceeds 2.1 A.

• Do not connect an electrical device 

that generates excessive electromag

-

netic noise to the USB car port. If you 
do so, noise can be caused or vehicle 
electronic devices can be interrupted 
while audio or AV is on.

• If the charger is connected incorrectly, 

it can cause serious damage on the 
devices. Please note that damages 
due to incorrect usage are not cov

-

ered by warranty service.

Wireless smart phone charging 
system (if equipped)

A wireless smart phone charging system 
is located in front of the center console.

Firmly close all doors, and turn vehicle 
on. To start wireless charging, place the 
smart phone equipped with wireless 
charging function on the wireless 
charging pad.

For best wireless charging results, place 
the smart phone on the center of the 
charging pad.

The wireless charging system is 
designed for one smart phone equipped 
with QI only. Please refer to the smart 
phone accessory cover or the smart 
phone manufacturer homepage to
check whether your smart phone sup

-

ports QI function.

Charging wireless smart phone

1. Remove any object on the smart 

phone charging pad including the 
smart key. If there is any foreign 
object on the pad other than a smart 
phone, the wireless charging function 
may not operate properly.

2. Place the smart phone on the center 

of the wireless charging pad.

The indicator light will change to 
orange once the wireless charging

OSK3042076L

Features of your vehicle

112

4

Interior features

begins. After the charging is com

-

plete, the orange light will change to 
green.

You can choose to turn the wireless 
charging function to either ON or OFF
by selecting the USM on the instrument 
cluster. (Please refer to "Instrument clus

-

ter" on page 4-41 for details).

If the wireless charging does not work, 
gently move your smart phone around 
the pad until the charging indicator light 
turns orange.

Depending on the smart phone, the 
charging indicator light may not turn 
green even after the charging is com

-

plete.

If the wireless charging is not function

-

ing properly, the orange light will blink 
and flash for ten seconds then turn off. In
such cases, remove the smart phone 
from the pad and replace it on the pad 
again, or double check the charging sta

-

tus.

If you leave the smart phone on the 
charging pad when the vehicle is turned 
off, the vehicle will alert you through 
warning messages and sound (applica

-

ble for vehicles with voice guidance 
function) after the 'Good bye' function on
the instrument cluster ends.

W ARNING

Distracted driving
Driving while distracted can result in a
loss of vehicle control that may lead to an
accident, severe bodily injury, or death.
The driver's primary responsibility is in the
safe and legal operation of a vehicle. Any
use of handheld devices, other
equipment, or vehicle systems that take
the driver's eyes, attention, and focus
away from the safe operation of a vehicle 
are not permissable by law.

These should never be used during the 
operation of the vehicle.

CAUTION

Liquid in Wireless Smart Phone Char

-

ger

To prevent liquid from damaging the 
wireless smart phone charging system in 
your vehicle, be sure not to spill liquid 
over the charging system when charging 
your phone.

CAUTION

Metal in Wireless Charging System
If any metallic object, such as a coin, is 
located between the wireless charging 
system and the smart phone, the 
charging may be disrupted. Also, the 
metallic object may heat up and poten

-

tially damage the charging system. If 
there is any metallic object between the 
smart phone and the charging pad, 
immediately remove the smart phone. 
Remove the metallic object after it has 
cooled down.

NOTICE

• When the interior temperature of the 

wireless charging system rises above 
a set temperature, the wireless 
charging system will cease to func

-

tion. After the interior temperature 
drops below the threshold, the wire

-

less charging function will resume.

• The wireless charging system may not 

function properly when there is a
heavy accessory cover on the smart 
phone.

• The wireless charging system will stop 

when using the wireless smart key 
search function to prevent radio wave 
disruption.

113

• When any smart phone without a

wireless charging function or a metal

-

lic object is placed on the charging 
pad, a small noise may sound. This 
small sound is due to the vehicle dis

-

cerning compatibility of the object 
placed on the charging pad. It does 
not affect your vehicle or the smart 
phone in any way.

• The wireless cellular phone charging 

system may not support certain cellu

-

lar phones, which are not verified for

Qi specification

.

• When placing your cellular phone on

the charging mat, position the phone

4

in the middle of the mat for optimal 
charging performance. If your cell
phone is off to the side, the charging 
rate may be less and in some cases 
the cell phone may experience higher 
heat conduction.

• When charging some cellular phones 

with a self-protection feature, the 
wireless charging speed may 
decrease and the wireless charging 
may stop.

4

Features of your vehicle

Interior features

• The wireless charging system will stop 

when the smart key is moved out of 
the vehicle with the vehicle in ON.

• The wireless charging system will stop 

when any of the doors are opened 
(applicable for vehicles equipped with 
smart keys).

• The wireless charging system will stop 

when the vehicle is turned OFF.

• The wireless charging will stop when 

the smart phone is not in complete 
contact with the wireless charging 
pad.

• Items equipped with magnetic com

-

ponents, such as credit card, tele

-

phone card, bankbook or any 
transportation ticket, may become 
damaged during wireless charging.

• Place the smart phone on the center 

of the charge pad for best results. The 
smart phone may not charge when 
placed near the rim of the charging 
pad. When the smart phone does get 
charged, it may heat up excessively.

• For smart phones without a built-in 

wireless charging system, an appro

-

priate accessory has to be equipped 
in order to use the vehicle's wireless 
charging system.

• Smart phones of some manufacturers 

may display messages on weak cur

-

rent. This is due to the particular char

-

acteristic of the smart phone and
does not imply a malfunction on wire

-

less charging function.

• The indicator light of some manufac

-

turers' smart phones may still be 
orange after the smart phone is fully 
charged. This is due to the particular 
characteristic of the smart phone and 
not a malfunction of the wireless 
charging system.

This device complies with Part 15
of the FCC rules.

Operation is subject to the following two
conditions:

1. This device may not cause harmful

interference.

2. This device must accept any interfer

-

ence received, including interference
that may cause undesired operation.

Features of your vehicle

114

4

Interior features

Coat hook (if equipped)

A Coat hook is next to the rear grab han

-

dle.

*This actual feature may differ from the 

illustration.

CAUTION

Hanging clothing
Do not hang heavy clothes, since they 
may damage the hook.

W ARNING

Do not hang other objects, such as 
hangers or hard objects except clothes. 
Also, do not put heavy, sharp or break

-

able objects in the clothing's pockets. In 
an accident or when the curtain air bag is
inflated, it may cause vehicle damage or
bodily injury.

Floor mat anchor(s) (if equipped)

When using a floor mat on the front floor
carpet, make sure it attaches to the floor
mat anchor(s) in your vehicle. This keeps
the floor mat from sliding forward.

W ARNING

• After market floor mat

- Do not install after market floor 

mats that are not capable of being 
securely attached to the vehicle's 
floor mat anchors.

Unsecured floor mats can interfere 
with pedal operation.

• Use floor mats not too thick and 

designed to be properly secured on 
the floor to avoid the interference with 
pedals. Make sure that installing the 
floor mats without removing plastic 
films on carpets may damage or 
break floor mat fix rings, resulting in 
the mats to be unsecured. Especially 
for a driver's seat, the unsecured mats 
may cause unintended acceleration/ 
brake. Ensure to remove all the plastic 
films on the carpets before installing 
the mats.

OSK3048028NR

OSK3040409NR

OSK3042086L

115

4

4

Features of your vehicle

Interior features

The following must be observed when 
installing ANY floor mat to the vehicle.
• Ensure that the floor mats are

securely attached to the vehicle's floor 
mat anchor(s) before driving the vehi

-

cle.

• Do not use ANY floor mat that cannot 

be firmly attached to the vehicle's floor
mat anchors.

• Do not stack floor mats on top of one 

another (e.g. all-weather rubber mat 
on top of a carpeted floor mat). Only a
single floor mat should be installed in 
each position.

Cargo area cover (if equipped)

Use the cargo area cover to hide items 
stored in the cargo area.

Removal and installation

To remove the cargo area cover:

1. Fold the cargo area cover up in half.

2. Firmly hold the folded part of the 

cover and lift it up.

3. While lifting the cover up, hold the area

near the front slots. Then, pull up the
cover at approximately 45

° angle.

W ARNING

Folded cover may block the rear view. 
Put the folded cover in the appropriate 
position.

OSK3048029NR

OSK3048030NR

OSK3040031NR

OSK3048032NR

Features of your vehicle

116

4

Exterior features

To install the cargo area cover:
1. To use the cargo area cover, insert the 

4 edges into the slots.

W ARNING

Do not place objects on the cargo area 
cover. Such objects may be thrown 
about inside the vehicle and possibly 
injure vehicle occupants during an acci

-

dent or when braking.

CAUTION

Since the cargo area cover may be dam

-

aged or malformed, do not put luggage 
on it when it is used.

Exterior features

If the vehicle has a roof rack, you can 
load cargo on top of your vehicle.

Roof rack (if equipped)

Crossbars and fixing components 
needed to install the roof rack on your 
vehicle may be obtained from an autho

-

rized Kia dealer.

NOTICE

• The crossbars (if equipped) should be 

placed in the proper load carrying 
positions prior to placing items onto the
roof rack.

• If the vehicle is equipped with a sun

-

roof, be sure not to position cargo onto
the roof rack in such a way that it could 
interfere with sunroof opera

-

tion.

• When the roof rack is not being used 

to carry cargo, the crossbars may 
need to be repositioned if wind noise 
is detected.

OSK3040034NR

OSK3048033NR

117

4

4

Features of your vehicle

Exterior features

CAUTION

Loading Roof Rack
• When carrying cargo on the roof rack, 

take the necessary precautions to 
make sure the cargo does not dam

-

age the roof of the vehicle.

• When carrying large objects on the 

roof rack, make sure they do not 
exceed the overall roof length or 
width.

• When you are carrying cargo on the 

roof rack, do not operate the sunroof 
(if equipped). This can damage the 
sunroof.

• The following specification is the max

-

imum weight that can be loaded onto 
the roof rack. Distribute the load as 
evenly as possible across the cross

-

bars (if equipped) and roof rack and 
secure the load firmly.

Loading cargo or luggage in excess of 
the specified weight limit on the roof 
rack may damage your vehicle.

W ARNING

• The vehicle center of gravity will be 

higher when items are loaded onto the
roof rack. Avoid sudden starts, 
braking, sharp turns, abrupt maneu

-

vers or high speeds that may result in 
loss of vehicle control or rollover 
resulting in an accident.

• Always drive slowly and turn corners 

carefully when carrying items on the 
roof rack. Severe wind updrafts, 
caused by passing vehicles or natural 
causes, can cause sudden upward 
pressure on items loaded on the roof 
rack. This is especially true when car

-

rying large, flat items, such as wood 
panels or mattresses. This could 
cause the items to fall off the roof rack
and cause damage to your vehi

-

cle

or others around you.

• To prevent damage or loss of cargo 

while driving, check frequently before 
or while driving to make sure the items
on the roof rack are securely fastened.

ROO


LOAD

220 lbs. (100 kg) 

EVENLY

DISTRIBUTED

Features of your vehicle

118

4

Infotainment system

Infotainment system

NOTICE

If you install an after market HID head 
lamp, your vehicle's audio and electronic 
device may malfunction.

*If your vehicle is equipped with multi

-

media system, refer to a separately 
supplied manual for detailed informa

-

tion.

Shark-fin antenna

The shark-fin antenna transmits and 
receives wireless signals such as AM/FM, 
Sirius XM, GNSS, etc

*The signals which antenna can transmit 

and receive vary by the vehicle option.

USB port

You can use the USB port to plug in an 
USB.

NOTICE

When using a portable audio device con

-

nected to the power outlet, noise may 
occur during playback. If this happens, 
use the power source of the portable 
audio device.

How vehicle radio works

FM reception

AM and FM radio signals are broadcast 
from transmitter towers located around 
your city. They are intercepted by the 
radio antenna on your vehicle. This sig

-

OSK3048071NR

OSK3048085NR

ODEEV068216NR

119

4

4

Features of your vehicle

Infotainment system

nal is then processed by the radio and 
sent to your vehicle speakers.

However, in some cases the signal com

-

ing to your vehicle may not be strong 
and clear.

This can be due to factors, such as the 
distance from the radio station, close

-

ness of other strong radio stations or the 
presence of buildings, bridges or other 
large obstructions in the area.

A M reception

AM broadcasts can be received at 
greater distances than FM broadcasts. 
This is because AM radio waves are 
transmitted at low frequencies. These 
long distance, low frequency radio 
waves can follow the curvature of the 
earth rather than traveling straight. In 
addition, they curve around obstructions 
resulting in better signal coverage.

FM radio station

FM broadcasts are transmitted at high 
frequencies and do not bend to follow 
the earth's surface. Because of this, FM 
broadcasts generally begin to fade within
short distances from the station. Also, 
FM signals are easily affected by 
buildings, mountains, and obstructions. 
This can lead to undesirable or unpleas

-

ant listening conditions which might lead 
you to believe a problem exists with your 
radio.

The following conditions are normal and 
do not indicate radio trouble:
• Fading - As your vehicle moves away 

from the radio station, the signal will 
weaken and sound will begin to fade. 
When this occurs, we suggest that you 
select another station with a stronger 
signal.

ODEEV068217NR

ODEEV068219NR

Features of your vehicle

120

4

Infotainment system

• Flutter/Static - Weak FM signals or 

large obstructions between the trans

-

mitter and your radio can disturb the 
signal causing static or fluttering 
noises to occur. Reducing the treble 
level may lessen this effect until the 
disturbance clears.

• Station Swapping - As an FM signal 

weakens, another more powerful sig

-

nal near the same frequency may 
begin to play. This is because your 
radio is designed to lock onto the 
clearest signal. If this occurs, select 
another station with a stronger signal.

• Multi-Path Cancellation - Radio sig

-

nals being received from several 
directions can cause distortion or flut

-

tering. This can be caused by a direct 
and reflected signal from the same

station, or by signals from two sta

-

tions with close frequencies. If this 
occurs, select another station until the 
condition has passed.

Using a cellular phone or a two-
way radio

When a cellular phone is used inside the 
vehicle, noise may be produced from the 
audio system. This does not mean that 
something is wrong with the audio 
equipment. In such a case, try to operate 
mobile devices as far from the audio 
equipment as possible.

When using a communication system 
such as a cellular phone or a radio set 
inside the vehicle, a separate external 
antenna must be fitted. When a cellular 
phone or a radio set is used with an 
internal antenna alone, it may interfere 
with the vehicle's electrical system and 
adversely affect safe operation of the 
vehicle.

W ARNING

Cell phone use
Do not use a cellular phone while driv

-

ing. Stop at a safe location to use a cellu

-

lar phone.

W ARNING

Distracted driving
Driving while distracted can result in a
loss of vehicle control that may lead to an
accident, severe bodily injury, or death.
The driver's primary responsibility is in the
safe and legal operation of a vehicle. Any
use of handheld devices, other
equipment, or vehicle systems that take
the driver's eyes, attention, and focus
away from the safe operation of a vehicle
are not permissable by law.

OSK3048403NR

ODEEV068220NR

121

4

4

Features of your vehicle

Declaration of Conformity

These should never be used during the 
operation of the vehicle.

Declaration of Conformity

FCC

This equipment has been tested and 
found to comply with the limits for a
Class B digital device, pursuant to part 
15 of the FCC Rules. These limits are 
designed to provide reasonable protec

-

tion against harmful interference in a
residential installation.

This equipment generates, uses and can 
radiate radio frequency energy and, if not
installed and used in accordance with the
instructions, may cause harmful 
interference to radio communications. 
However, there is no guarantee that 
interference will not occur in a particular 
installation. If this equipment does cause 
harmful interference to radio or televi

-

sion reception, which can be determined 
by turning the equipment off and on, the 
user is encouraged to try to correct the 
interference by one or more of the fol

-

lowing measures:
• Reorient or relocate the receiving 

antenna.

• Increase the separation between the 

equipment and receiver.

• Connect the equipment into an outlet 

on a circuit different from that to which
the receiver is connected.

• Consult the dealer or an experienced 

radio/TV technician for help.

CAUTION

Any changes or modifications to this 
device not explicitly approved by the 
manufacturer could void your authority 
to operate this equipment.

This device complies with part 15 of the 
FCC Rules. Operation is subject to the 
following two conditions:

Features of your vehicle

122

4

Declaration of Conformity

1. This device may not cause harmful

interference.

2. This device must accept any interfer

-

ence received, including interference
that may cause undesired operation.

This equipment complies with FCC radi

-

ation exposure limits set forth for an 
uncontrolled environment.

This equipment should be installed and 
operated with minimum 8 in (20 cm) 
between the radiator and your body.
This transmitter must not be collocated 
or operating in conjunction with any 
other antenna or transmitter unless 
authorized to do so by the FCC.

Driving your vehicle

5

Be sure the exhaust system does not leak. ................................ 5-3 

Before

driving ................................................................................ 5-3

Key positions.................................................................................. 5-5

Illuminated ignition switch ........................................................................... 5-5

Ignition switch position .................................................................................. 5-
5

Starting the engine.......................................................................................... 5-
6

ENGINE START/STOP button ...................................................... 5-7

Illuminated ENGINE START/STOP button.............................................
5-7

ENGINE START/STOP button position ................................................... 5-7

Starting the engine.......................................................................................... 5-9

Intelligent variable transmission (IVT).......................................5-11

Intelligent Variable Transmission (IVT)  operation ............................ 5-11

Shift lock system ............................................................................................ 5-

14

Ignition key interlock system .................................................................... 5-
15

Intelligent variable transmission (IVT) warning messages .......... 5-15

Good driving practices ................................................................................ 5-

17

Brake system ................................................................................ 5-18

Power brakes ................................................................................................... 5-
18

Parking brake ................................................................................................. 5-20

Electronic Parking Brake (EPB).................................................................5-21

AUTO HOLD .....................................................................................................5-

25

Electronic Stability Control (ESC) 

............................................................5-28

Hill-start assist control (HAC)................................................................... 5-
30

Vehicle stability management (VSM) .................................................... 5-
31

Brake Assistant System (BAS) .................................................................. 5-
32

Emergency Stop Signal (ESS) ...................................................................
5-32
Good braking practices ............................................................................... 5-


Content      ..     4      5      6      7     ..