Kia Soul (2024 year). Manual in english - page 4
 

  Index      Kia     Kia Soul (2024 year). Manual in english


Search            copyright infringement  


Content      ..     2      3      4      5     ..


Kia Soul (2024 year). Manual in english - page 4


Features of your vehicle

28

4

Fuel filler door

2. Lower the hood until it is about 12 

inches (30 cm) above the closed posi

-

tion and let it drop. Make sure that it 
locks into place.

3. Then double check to be sure the 

hood is secure.
• If the hood can be raise slightly, it is 

not properly engaged.

• Open it again and close it with a lit

-

tle more force.

CAUTION

Hood obstruction
Before closing the hood, ensure that all 
obstructions are removed from the hood 
opening. Closing the hood with an 
obstruction present in the hood opening 
may result in severe personal injury or 
property damage.

W ARNING

Fire risk
Do not leave gloves, rags or any other 
combustible material in the motor com

-

partment. Doing so may cause a heat-
induced fire.

W ARNING

Unsecured hood
Always double check to be sure that the 
hood is firmly latched before driving 
away. If it is not latched, the hood could 
fly open while the vehicle is being driven, 
causing a total loss of visibility, which 
might result in an accident.

Fuel filler door

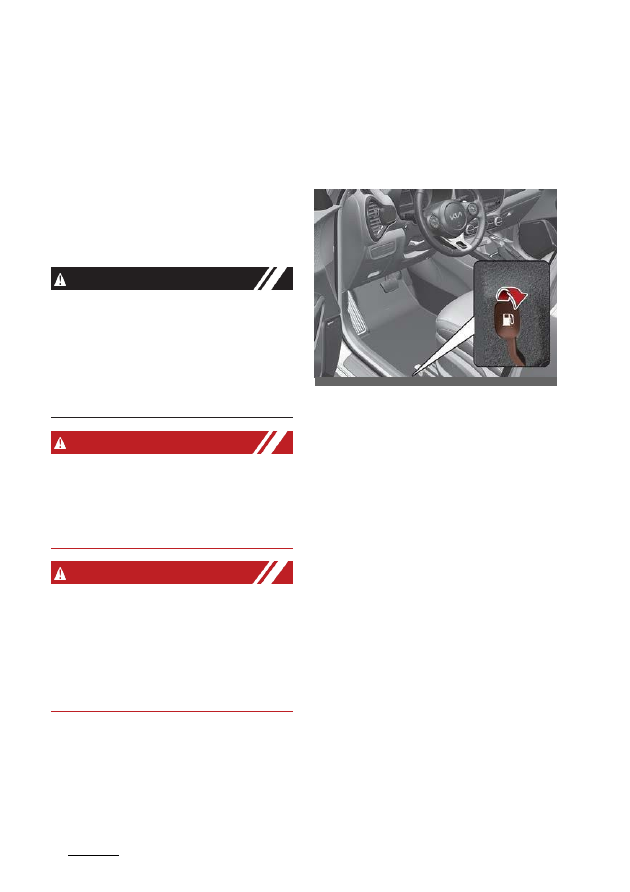
Opening the fuel filler door

The fuel filler door must be opened from 
inside the vehicle by pulling up the fuel 
filler door opener.

If the fuel filler door does not open 
because ice has formed around it, tap 
lightly or push on the door to break the 
ice and release the door. Do not pry on 
the door. If necessary, spray around the 
door with an approved de-icer fluid (do 
not use radiator anti-freeze) or move the 
vehicle to a warm place and allow the ice 
to melt.

1. Stop the engine.
2. To open the fuel filler door, pull the 

fuel filler door opener up.

3. Pull open the fuel filler door (1) out to 

fully open.

OSK3041049N

29

4

4

Features of your vehicle

Fuel filler door

4. To remove the cap turn the fuel filler 

cap (2) counterclockwise.

5. Refuel as needed.

CAUTION

Before refueling, be sure to check what 
type of fuel is used for your vehicle. If 
you put diesel fuel into a gasoline-pow

-

ered vehicle or gasoline into a diesel-
powered vehicle, it may affect the fuel 
system and cause serious damage to the 
vehicle.

Closing the fuel filler door

1. To install the cap, turn it clockwise 

until it "clicks" one time. This indicates 
that the cap is securely tightened.

2. Close the fuel filler door and push it 

lightly and make sure that it is 
securely closed.

W ARNING

Refueling
Always remove the fuel cap carefully 
and slowly. If the cap is venting fuel or if 
you hear a hissing sound, wait until the 
condition stops before completely 
removing the cap.

If pressurized fuel sprays out, it can 
cover your clothes or skin and subject 
you to the risk of fire and burns.

NOTICE

When refueling on unlevel ground, the 
fuel gauge may not point to the F posi

-

tion. It is not a malfunction. If you move 
your vehicle to a level ground, the fuel 
gauge will move to the full position.

NOTICE

Tighten the cap until it clicks one time, 
otherwise the fuel cap open warning 
indicator light will appear.

Always check that the fuel cap is 
installed securely to prevent fuel spillage 
in the event of an accident.

W ARNING

Fire/explosion risk
Read and follow all warnings posted at 
the gas station facility. Failure to follow 
all warnings will result in severe personal 
injury, severe burns or death due to fire 
or explosion.

W ARNING

Static electricity
• Before touching the fuel nozzle, you 

should eliminate potentially danger

-

ous static electricity discharge by 
touching another metal part of the 
vehicle, a safe distance away from the 
fuel filler neck, nozzle, or other gas 
source.

• Do not get back into a vehicle once 

you have begun refueling since you 
can generate static electricity by 
touching, rubbing or sliding against 
any item or fabric (polyester, satin,

OSK3048050NR

Features of your vehicle

30

4

Fuel filler door

nylon, etc.) capable of producing 
static electricity. Static electricity dis

-

charge can ignite fuel vapors resulting 
in rapid burning. If you must reenter 
the vehicle, you should once again 
eliminate potentially dangerous static 
electricity discharge by touching a
metal part of the vehicle, away from 
the fuel filler neck, nozzle or other 
gasoline source.

W ARNING

Portable fuel container
When using an approved portable fuel 
container, be sure to place the container 
on the ground prior to refueling. Static 
electricity discharge from the container 
can ignite fuel vapors causing a fire.
Once refueling has begun, contact with 
the vehicle should be maintained until
the filling is complete. Use only
approved portable plastic fuel contain

-

ers designed to carry and store gasoline.

W ARNING

Cell phone fires
Do not use cellular phones while refuel

-

ing. Electric current and/or electronic 
interference from cellular phones can 
potentially ignite fuel vapors causing a
fire.

W ARNING

Refueling & Vehicle fires
When refueling, always shut the engine 
off. Sparks produced by electrical com

-

ponents related to the engine can ignite 
fuel vapors causing a fire. Once refuel

-

ing is complete, check to make sure the 
filler cap and filler door are securely 
closed, before starting the engine.

W ARNING

Smoking
DO NOT use matches or a lighter and 
DO NOT SMOKE or leave a lit
cigarette in your vehicle while at a gas
station especially during refueling.
Automotive fuel is highly flammable and
can result in fire when ignited.

Make sure to refuel your vehicle accord

-

ing to "Fuel requirements" on page 1-2.

If the fuel filler cap requires replace

-

ment, use only a genuine Kia cap or the 
equivalent specified for your vehicle. An 
incorrect fuel filler cap can result in a
serious malfunction of the fuel system or 
emission control system.

CAUTION

Exterior paint
Do not spill fuel on the exterior surfaces
of the vehicle. Any type of fuel spilled on
painted surfaces may damage the paint.

NOTICE

The fuel filler door will unlock when 
Driver's door is unlocked.

To unlock fuel filler door:
• Press the unlock button on your smart 

key

• Press the Central Door unlock button 

on armrest trim of

driver’s door

• Pull the driver’s inside door handle 

outward

The fuel filler door will lock when all 
doors are locked.

To lock fuel filler door:
• Press the lock button on your smart 

key

• Press the Central Door lock button on 

armrest trim of

driver’s door

31

4

4

Features of your vehicle

Sunroof

*All doors will automatically lock after the

vehicle speed exceeds 9.3 mph (15 
km/h). Fuel door is also locked when 
vehicle speed exceeds 9.3 mph (15 
km/h).

Sunroof (if equipped)

If your vehicle is equipped with a sun

-

roof, you can slide or tilt your sunroof
with the sunroof switch located on the
overhead console.

The sunroof can only be operated when 
the ignition switch or ENGINE START/ 
STOP button is in the ON or START
posi

-

tion.

The sunroof can be operated for 
approximately 10 minutes after the igni

-

tion switch or ENGINE START/STOP
but

-

ton is in the ACC or LOCK/OFF

position.

However, if the front door is open, the 
sunroof cannot be operated even within 
the 10 minute period.

W ARNING

• Adjust the sunroof or sunshade when 

your vehicle stops. This could result in 
loss of control and an accident that 
may cause injury, or property dam

-

age.

• Do not leave the engine running and 

the key in your vehicle with unsuper

-

vised children. Unattended children 
could operate the sunroof, which 
could result in serious injury.

• Do not sit on the top of the vehicle. It 

may cause injury or vehicle damage.

OSK3042051L

Features of your vehicle

32

4

Sunroof

NOTICE

Do not operate sunroof when roof bars 
are installed on the vehicle or when 
there is luggage on the roof.

Sunshade

Use the sunshade to block direct sun

-

light coming through the sunroof glass.

Open or close the sunshade by hand.

NOTICE

The sunshade opens automatically when 
the sunroof glass is opened, but the sun

-

shade does not close automatically
when the sunroof glass is closed. Also, 
only the sunshade cannot be closed 
when the sunroof glass is opened.

NOTICE

Do not pull the sunshade up or down, or 
apply excessive force as such action 
may damage the sunshade or cause it to 
malfunction.

Tilt open/close

1. Tilt open

2. Tilt close
• Push the sunroof switch upward, the 

sunroof glass tilts open.

• Push the sunroof switch forward 

when the sunroof glass is tilt opened, 
the sunroof glass closes.

The sunroof glass tilts open or closes 
while the switch is pushed

NOTICE

The sunroof glass cannot slide open and 
tilt open at the same time. You cannot
tilt the sunroof glass open while the sun

-

roof glass is slide open. Also, you cannot 
slide open while the sunroof is tilt open. 
Slide open or tilt open the sunroof glass 
when the sunroof glass is completely 
closed.

ODEEV068029NR

OSK3042053L

33

4

4

Features of your vehicle

Sunroof

Slide open/close

• Push the sunroof switch rearward, the 

sunshade and sunroof glass slide 
open.

Push the sunroof switch forward, only 
the sunroof glass closes.

• Push the sunroof switch forward or 

rearward to the first detent position, 
the sunroof glass moves until the 
switch is released.

• Push the sunroof switch forward or 

rearward to the second detent posi

-

tion, the sunroof glass operates auto

-

matically (auto slide feature). To stop 
the sunroof movement at any point, 
push the sunroof switch in any direc

-

tion.

• The sunroof glass stops halfway (first 

detent position) before it is fully 
opened. To fully open the sunroof 
glass, push the sunroof switch rear

-

ward once more. At this time, the sun

-

roof glass opens only while the switch 
is pushed.

To stop the sunroof movement at any 
point, push the sunroof switch in any 
direction.

NOTICE

To reduce wind noise while driving, we
recommend you to drive at the recom

-

mended position before the maximum
slide open position.

Automatic reversal

If the sunroof glass senses any obstacle 
while it is closing automatically, it will 
reverse direction then stop at a certain 
position.

The auto reverse function may not work 
if an object thin or soft is caught, 
between the sliding sunroof glass and 
sunroof sash.

W ARNING

• Make sure heads, hands, arms or any

other body parts or objects are out of
the way before operating the sunroof.
Body parts or objects may get caught
causing injuries or vehicle damage.

• Never deliberately use your body parts

to test the automatic reversal function.
The sunroof automatic reversal
function may not work prop

-

erly if soft

body parts are caught between the 
sliding sunroof glass and sunroof sash
and reverse direction, but there is a
risk of injury.

OSK3042052L

OSK3040200NR

Features of your vehicle

34

4

Sunroof

NOTICE

• Do not continue to push the sunroof 

switch after the sunroof is fully 
opened, closed, or tilted. Damage to 
the sunroof motor could occur.

• Continuous operations such as slide 

open/close, tilt open/close, etc. may 
cause the motor or sunroof system to 
malfunction.

• Regularly remove any accumulated 

dust on the sunroof rail.

• Dust accumulated between the sun

-

roof and roof panel can make noise. 
Open the sunroof and remove dust 
regularly using a clean cloth.

• Do not try to open the sunroof when 

the temperature is below freezing or 
when the sunroof is covered with 
snow or ice. The sunroof may not 
work properly and may break if 
opened by force.

• Do not open or drive with the sunroof 

glass open immediately after rain or 
washing the vehicle. Water may wet 
the interior of the vehicle.

• Do not extend any luggage outside 

the sunroof while driving. Vehicle 
damage may occur if the vehicle sud

-

denly stops.

W ARNING

Do not extend your head, arms, body 
parts or objects outside the sunroof 
while driving. Injuries may occur if the 
vehicle suddenly stops.

Resetting the sunroof

In some circumstances resetting the 
sunroof operation may need to be per

-

formed. Some instances where resetting 
the sunroof may be required include:
• When the 12 volt battery is either dis

-

connected or discharged

• When the sunroof fuse is replaced
• If the sunroof one-touch AUTO OPEN/ 

CLOSE operation is not functioning 
properly

Sunroof resetting procedure:
1. It is recommended to perform the 

reset procedure with the vehicle 
engine running. Start the vehicle in P
(Park).

2. Make sure the sunroof glass is in the 

fully closed position. If the sunroof 
glass is open, push the switch forward 
until the sunroof glass is fully closed.

3. Release the switch when the sunroof 

glass is fully closed.

4. Push the switch forward until the sun

-

roof glass moves slightly. Then
release the switch.

5. Once again, push and hold the sun

-

roof switch forward until the sunroof 
glass slides open and close. Do not 
release the switch until the operation is
completed. If you release the switch

OSK3041053L

35

4

4

Features of your vehicle

Steering wheel

during operation, start the procedure 
again from step 2.

NOTICE

If the sunroof does not reset when the
vehicle battery is disconnected or dis

-

charged, or the sunroof fuse is blown,
the sunroof may not operate normally.

Sunroof open warning

If the driver turns off the engine when the
sunroof is not fully closed, the warn

-

ing

chime will sound for several seconds and
the sunroof open warning will appear on
the cluster LCD display.

Close the sunroof securely when leaving 
your vehicle.

CAUTION

Make sure the sunroof is closed fully 
when leaving your vehicle. If the sunroof 
is left open, rain or snow may wet the 
interior of the vehicle. Also, leaving the 
sunroof open when the vehicle is unat

-

tended may invite theft.

Steering wheel

The steering wheel of this vehicle is 
equipped with electronic power steering.

Electric Power Steering (EPS)

Power steering uses the motor to assist 
you in steering the vehicle. If the engine 
is off or if the power steering system 
becomes inoperative, the vehicle may 
still be steered, but it will require 
increased steering effort.

The EPS is controlled by the power 
steering control unit which senses the 
steering wheel torque and vehicle speed 
to command the motor.

The steering effort becomes heavier as 
the vehicle's speed increases and 
becomes lighter as the vehicle's speed 
decreases for better control of the steer

-

ing wheel.

Should you notice any change in the 
effort required to steer during normal 
vehicle operation, have the system 
checked by a professional workshop. 
Visit an authorized Kia dealer.

NOTICE

The following symptoms may occur 
during normal vehicle operation:
• The EPS warning light does not 

appear.

• The steering effort is high immedi

-

ately after turning the ignition switch or
ENGINE START/STOP button on. 
This happens as the EPS system per

-

forms the diagnostics. When the diag

-

nostics is completed, the steering effort
will return to its normal condi

-

tion.

• A click noise may be heard from the 

EPS relay after the ignition switch or 
ENGINE START/STOP button is 
turned to the ON or LOCK position.

OSK3042475L

Features of your vehicle

36

4

Steering wheel

• Motor noise may be heard when the 

vehicle is at a stop or at a low driving 
speed.

• When the abnormality is detected in 

the electric power steering system, a
deadly accident prevention purposes, 
steering assist functions will be 
stopped. At this time, the instrument 
panel warning light turns on or blinks 
and the power to manipulate the 
steering of a sudden a lot you can. 
Please check immediately after mov

-

ing the vehicle to a safe zone.

• The steering effort increases if the 

steering wheel is rotated continu

-

ously when the vehicle is not in motion.
However, after a few minutes, it will
return to its normal conditions.

• If the Electric Power Steering System 

does not operate normally, the warn

-

ing light will appear on the instrument 
cluster. The steering wheel may 
become difficult to control or operate 
abnormally. In this case, have the sys

-

tem inspected by a professional work

-

shop. Visit an authorized Kia dealer.

• When you operate the steering wheel 

in low temperature, abnormal noise 
could occur. If temperature rises, the 
noise will disappear. This is a normal 
condition.

Tilt & telescopic steering wheel

A tilt and telescopic steering wheel 
allows you to adjust the steering wheel 
before you drive

You can also raise it to give your legs 
more room when you exit and enter the 
vehicle.

The steering wheel should be positioned 
so that it is comfortable for you to drive, 
while permitting you to see the instru

-

ment panel warning lights and gauges.

W ARNING

Steering wheel adjustment
Never adjust the angle and height of the 
steering wheel while driving. You may 
lose steering control.

Adjusting steering wheel angle 
and height

1. To change the steering wheel angle, 

pull down the lock release lever (1).

2. Adjust the steering wheel to the 

desired angle (2) and height (3).

3. Pull up the lock-release lever to lock 

the steering wheel in place.

4. Be sure to adjust the steering wheel to 

the desired position before driving.

NOTICE

After adjustment, sometimes the lock-
release lever may not lock the steering
wheel.

It is not a malfunction. This occurs when 
two gears engage. In this case, adjust 
the steering wheel again and then lock 
the steering wheel.

OSK3042055L

37

4

4

Features of your vehicle

Steering wheel

Heated steering wheel (if
equipped)

With the ignition switch in the ON posi

-

tion, pressing the heated steering wheel 
button warms the steering wheel. The 
indicator on the button will appear.

To turn the heated steering wheel off, 
press the button once again. The indica

-

tor on the button will turn off.

NOTICE

The heated steering wheel will turn off 
automatically approximately 30 min

-

utes after the heated steering wheel is 
turned on.

CAUTION

• Do not install any type of grip cover 

for the steering wheel, it may impair 
the function of the heated steering 
wheel system.

• When cleaning the heated steering 

wheel, do not use an organic solvent, 
such as paint thinner, benzene, alco

-

hol and gasoline. Doing so may dam

-

age the surface of the steering wheel.

• If the surface of the steering wheel is

damaged by a sharp object, damage
to the heated steering wheel compo

-

nents could occur.

W ARNING

If the steering wheel becomes too warm, 
turn the system off. The heated steering 
wheel may cause burns even at low tem

-

peratures, especially if used for long 
periods of time.

Horn

To sound the horn, press the area indi

-

cated by the horn symbol on your steer

-

ing wheel (see illustration).

The horn will operate only when this area
is pressed. Check the horn regularly to be
sure it operates properly.

OSK3048056NR

OSK3042057L

Features of your vehicle

38

4

Mirrors

Mirrors

This vehicle is equipped with a rearview 
mirrors inside and outside to provide 
views of objects behind the vehicle.

Inside rearview mirror

Adjust the rearview mirror so that the 
center view through the rear window is 
seen. Make this adjustment before you 
start driving.

Do not place objects in the rear seat or 
cargo area which would interfere with 
your vision through the rear window.

W ARNING

Mirror adjustment
Do not adjust the rearview mirror while 
the vehicle is moving. This could result in 
loss of control.

W ARNING

Do not modify the inside mirror in any 
manner, including installing a wide mir

-

ror. Doing so could result in injury during 
an accident or deployment of the air bag.

CAUTION

Cleaning mirror
When cleaning the mirror, use a paper 
towel or similar material dampened with 
glass cleaner. Do not spray glass cleaner 
directly on the mirror. It may cause the 
liquid cleaner to enter the mirror hous

-

ing.

Day/night rearview mirror (if
equipped)

*(1): Day, (2): Night
Make this adjustment before you start 
driving and while the day/night lever is 
in the day position (1).

Pull the day/night lever toward you (2) to 
reduce the glare from the headlights of 
the vehicles behind you during night 
driving.

Remember that you lose some rearview 
clarity in the night position.

Day/night rearview mirror with 
Telematics function (if equipped)

For day and night function:

*(1): Day, (2): Night

OSK3048058NR

ODEEV068034NR

39

4

4

Features of your vehicle

Mirrors

Make this adjustment before you start 
driving and while the day/night lever (1) 
is in the day position.

Pull the day/night lever (2) toward you to 
reduce the glare from the headlights of 
the vehicles behind you during night 
driving.

Remember that you lose some rearview 
clarity in the night position.

For Telematics button function:

Telematics buttons are also located on 
the mirror.

1. Virtual Assist button

2. Kia Connect button

3. Roadside assist button

Electric chromic mirror (ECM) 
with KIA Connect service (if
equipped)

The electric rearview mirror automati

-

cally controls the glare from the head

-

lights of the vehicles behind you in 
nighttime or low light driving conditions. 
The sensor (4) mounted in the mirror 
senses the light level around the vehicle, 
and automatically controls the headlight 
glare from the vehicles behind you.

When the engine is running, the glare is 
automatically controlled by the sensor 
mounted in the rearview mirror.

Telematics buttons are also located on 
the mirror.

1. Virtual Assist button

2. Kia Connect button

3. Roadside assist button

Outside rearview mirror

Your vehicle is equipped with both left-
hand and right-hand outside rearview 
mirrors.

Be sure to adjust the mirror angles 
before driving.

The mirrors can be adjusted remotely 
with the remote switch. The mirror 
heads can be folded back to prevent 
damage during an automatic car wash

OSK3042088N

OSK3042097N

Features of your vehicle

40

4

Mirrors

or when passing through a narrow 
street.

CAUTION

Rearview mirrors
Do not scrape ice off the mirror face; this 
may damage the surface of the glass. If 
ice should restrict the movement of the 
mirror, do not force the mirror for 
adjustment. To remove ice, use a de-icer 
spray, a sponge or soft cloth with very 
warm water.

If the mirror is jammed with ice, do not 
adjust the mirror by force. Use an 
approved spray de-icer (not radiator 
antifreeze) to release the frozen mecha

-

nism or move the vehicle to a warm 
place and allow the ice to melt.

W ARNING

Mirror adjustment
Do not adjust or fold the outside rear

-

view mirrors while the vehicle is moving. 
This could result in loss of control.

Adjusting the outside rearview 
mirrors

Adjusting the rearview mirrors:

1. Move the L (Front left side) or R (Front

right side) switch (1) to select the rear

-

view mirror you would like to adjust.

2. Use the mirror adjustment control (2) 

to position the selected mirror up, 
down, left or right.

CAUTION

• The mirrors stop moving when they 

reach the maximum adjusting angles, 
but the motor continues to operate 
while the switch is pressed. Do not 
press the switch longer than neces

-

sary, the motor may be damaged.

• Do not attempt to adjust the outside 

rearview mirror by hand. Doing so 
may damage the parts.

Folding the outside rearview mir

-

ror

Manual type
To fold the outside rearview mirror, grasp
the housing of the mirror and then fold it
toward the rear of the vehicle.

OSK3048059NR

OSK3048060NR

41

4

4

Features of your vehicle

Instrument cluster

Instrument cluster

*The actual cluster and contents of the LCD display in the vehicle may differ from the 

illustration.

1. Tachometer

2. Speedometer

3. Engine coolant temperature gauge

4. Fuel gauge

5. Warning and indicator lights

6. LCD display

OSK3042463N

Features of your vehicle

42

4

Instrument cluster

Instrument cluster control

The brightness of the instrument panel 
illumination is changed by pressing the 
illumination control button ("+" or "-") 
when ignition switch is ON, or the tail

-

lights are turned on.

• If you hold the illumination control 

button ("+" or "-"), the brightness will 
be changed continuously.

• If the brightness reaches to the maxi

-

mum or minimum level, an alarm will
sound.

Gauges

The gauges display various information 
such as the speed of the vehicle, the 
amount of charge of the battery, and so 
on.

Speedometer

The speedometer indicates the speed of 
the vehicle and is calibrated in miles per 
hour (mph) and/or kilometers per hour 
(km/h).

Tachometer

The tachometer indicates the approxi

-

mate number of engine revolutions per 
minute (rpm).

Use the tachometer to select the correct
shift points and to prevent lugging and/
or over-revving the engine.

CAUTION

Do not operate the engine within the 
tachometer's RED ZONE. This may
cause severe engine damage.

OSK3042048N

OSK3042479L

OSK3042482N

OSK3042484L

43

4

4

Features of your vehicle

Instrument cluster

Engine Coolant Temperature 
Gauge

This gauge indicates the temperature of 
the engine coolant when the ignition 
switch or ENGINE START/STOP button
is ON.

CAUTION

If the gauge pointer moves beyond the 
normal range area (between the C-H) 
toward the "H" position, it indicates over

-

heating that may damage the engine.

Do not continue driving with an over

-

heated engine. If your vehicle overheats, 
refer to "If the engine overheats" on page
7-6.

W ARNING

Never remove the radiator cap when the 
engine is hot. The engine coolant is 
under pressure and could severely burn. 
Wait until the engine is cool before add

-

ing coolant to the reservoir.

Fuel Gauge

This gauge indicates the approximate 
amount of fuel remaining in the fuel 
tank.

NOTICE

• The fuel tank capacity is given in 

"Recommended lubricants and capac

-

ities" on page 9-9.

• The fuel gauge is supplemented by a

low fuel warning light, which will 
appear when the fuel tank is nearly 
empty.

• On inclines or curves, the fuel gauge 

pointer may fluctuate or the low fuel 
warning light may come on earlier 
than usual due to the movement of 
fuel in the tank.

NOTICE

Fuel Gauge
Running out of fuel can expose vehicle 
occupants to danger.

You must stop and obtain additional fuel 
as soon as possible after the warning 
light comes on or when the gauge indi

-

cator comes close to the "E" level.

OSK3042488L

OSK3042462N

Features of your vehicle

44

4

Instrument cluster

CAUTION

Avoid driving with a extremely low fuel 
level. Running out of fuel could cause
the engine to misfire damaging the cata

-

lytic converter.

NOTICE

The fuel display may not be accurate if 
the vehicle is on an incline.

Odometer

The odometer Indicates the total dis

-

tance that the vehicle has been driven 
and should be used to determine when 
periodic maintenance should be per

-

formed.
• Odometer range: 0~999,999 miles or 

1,599,999 kilometers.

Outside Temperature Gauge

This gauge indicates the current outside 
air temperatures by 1

°F (1 °C).

• Temperature range: -40~211 °F (-

40~85

°C)

The outside temperature on the display 
may not change immediately like a gen

-

eral thermometer to prevent the driver 
from being distracted.

To change the temperature unit (from 

°F 

to

°C or from °C to °F)

The temperature unit can be changed
by using the "User Settings" mode of the 
LCD display.

*For more details, refer to "LCD display" 

on page 4-46.

Transmission shift indicator

Transmission shift indicator displays
gear information depending on your
vehicle's transmission type.

Intelligent variable transmission 
shift indicator (if equipped)

This indicator displays which automatic 
transmission shift lever is selected.

OSK3042464N

OSK3042465N

45

4

4

Features of your vehicle

Instrument cluster

• Park: P
• Reverse:
R

Neutral:

N

Drive: D

• Sports Mode: 1, 2, 3, 4, 5, 6

OSK3042490L

Features of your vehicle

46

4

LCD display

LCD display

The LCD display shows trip computer 
and other information.

LCD Display Control

The LCD display modes can be
changed by using the control buttons.

1.

: MODE button for changing 

modes

2.

/

: MOVE switch for changing 

items

3. OK: SELECT/RESET button for

setting or resetting the selected item

LCD Display Modes

The LCD display provides 5 modes. You can switch modes by pressing the Mode but

-

ton.

* : if equipped
* The information provided may differ depending on which functions are applicable 

to your vehicle.

OSK3042054L

Mode

Driving Assist

Trip Computer

Turn By Turn (TBT)*

User Settings

Information/Master

Warning

Up/

Down

Lane Keeping Assist*

Smart Cruise Control*

Lane Following Assist*

Drive info

Route Guidance

Driver Assistance

TPMS

Since Refuelling

Destination Info

Cluster

The Master Warning

mode displays warning

messages related to

the vehicle when one

or more systems is not

operating normally.

Accumulated info

Lights

Digital Speedometer

Door

Convenience

Units

Reset

47

4

4

Features of your vehicle

LCD display

Driving Assist mode

This mode displays the state of :

Smart Cruise Control

• Lane Keeping Assist

Lane Following Assist

*For more details, refer to "Lane Keeping 

Assist (LKA) (if equipped)" on page 6-
30, "Smart Cruise Control (SCC) (if 
equipped)" on page 6-69, "Lane Fol

-

lowing Assist (LFA) (if equipped)" on 
page 6-89.

Trip computer mode

The trip computer mode displays infor

-

mation related to vehicle driving param

-

eters including fuel economy, tripmeter 
information and vehicle speed.

*For more details, refer to "Trip informa

-

tion (Trip computer)" on page 4-52.

Turn By Turn (TBT) mode

This mode displays the state of the navi

-

gation.

Master warning mode

This warning light informs the driver the 
following situations.
• Driver assistance system malfunction, 

limitation or radar/camera blockage

• LED headlamp malfunction
• Blind-Spot Collision Warning malfunc

-

tion (if equipped)

• Lamp malfunction
• TPMS failure, low tire pressure, etc.

OSK3052310L

OSK3042487N

OSK3052309L

OSK3052311L

Features of your vehicle

48

4

LCD display

At this time, a Master Warning icon

(

) will appear beside the User Set

-

tings icon (

), on the LCD display.

If the warning situation is resolved, the 
master warning light will be turned off 
and the Master Warning icon will disap

-

pear.

User settings mode

In this mode, you can change the set

-

tings of the instrument cluster, doors,
lamps, etc.

1. Driver Assistance

2. Cluster

3. Lights

4. Door

5. Convenience

6. Units

7. Reset
The information provided may differ 
depending on which functions are appli

-

cable to your vehicle.

Shift to P to edit settings / Engage
parking brake to edit set

-

tings

This warning message appears if you try 
to adjust the User Settings while driving.

A: Shift to P
For your safety, change the User Set

-

tings after parking the vehicle, applying 
the parking brake and moving the shift 
lever to P (Park).

OSK3042471L

OSK3042472L

49

4

4

Features of your vehicle

LCD display

1. Driver Assistance (if equipped)

*The information provided may differ depending on which functions are applicable to

your vehicle.

Items

Explanation

Driving Convenience

Smart Cruise Control

To set the distance, acceleration and the reaction speed of Smart Cruise Control.

*For more details, refer to "Smart Cruise Control (SCC) (if equipped)" on page 6-69

Speed Limit

Country Selection

Speed Limit Offset (if equipped)

Speed Limit Assist/Speed Limit Warning/Off

Sets the properties of the Speed Limitsystem.

*For more details, refer to "Intelligent Speed Limit Assist (ISLA) (if equipped)" on page 6-

53

Warning Volume

High/Medium/Off

Sets the volume of the warning sound.

Driver Attention Warning

Leading Vehicle Departure Alert

Sets the properties of the Driver Attention Warning system.

*For more details, refer to "Driver Attention Warning (DAW) (if equipped)" on page 6-60

Driving Safety

Forward Safety

Provides a warning and vehicle control when a risk of forward collision is detected.

* For more details, refer to "Forward Collision-Avoidance Assist (FCA) (Front Camera

Only) (if equipped)" on page 6-4, "Forward Collision-Avoidance Assist (FCA)

(Sen

-

sor Fusion) (if equipped)" on page 6-16

Forward Safety Warning Timing

Sets the warning timing of the Forward Safety function.

* For more details, refer to "Forward Collision-Avoidance Assist (FCA) (Front Camera

Only) (if equipped)" on page 6-4, "Forward Collision-Avoidance Assist (FCA)

(Sen

-

sor Fusion) (if equipped)" on page 6-16

Lane Safety

Automatically assists with steering to help prevent the vehicle from leaving the lane.

*

For more details, refer to "Lane Keeping Assist (LKA) (if equipped)" on page 6-30

Blind-Spot Safety

Provides a warning when a risk of blind-spot collision is detected and provides a
emergency braking while exiting.

* For more details, refer to "Blind-Spot Collision-Avoidance Assist (BCA) (if

equipped)" on page 6-36

Exit Safety

Provides a warning when an approaching vehicle is detected in the vehicle's blind
spot.

* For more details, refer to "Safe Exit Warning (SEW) (if equipped)" on page 6-46

Parking Safety

Parking Distance Warning Auto On

Automatically activates Parking Distance Warning when driving at low speeds.

* For more details, refer to "Forward/Reverse Parking Distance Warning (PDW) (if

equipped)" on page 6-117

Rear Cross-Traffic Safety

Provides a warning and emergency braking when a risk of rear cross-traffic collision
is detected while reversing.

* For more details, refer to "Rear Cross-Traffic Collision-Avoidance Assist (RCCA) (if

equipped)" on page 6-104

Features of your vehicle

50

4

LCD display

2. Cluster

*The information provided may differ depending on which systems are applicable to 

your vehicle.

3. Lights

*The information provided may differ depending on which functions are applicable to

your vehicle.

4. Door

Items

Explanation

Theme Selection

• Link to Drive Mode / Classic A / Classic B / Classic C / 
Dynamic

If this item is checked, the cluster theme will change 

accordingly.

Wiper/Lights Dis

-

play

If this item is checked, the wiper/lights display will be activated.

Traffic Signs

If this item is checked, the traffic signs display will be activated.

Icy Road Warning If this item is checked, the icy road warning will be activated.

Cluster Voice Guid

-

ance Volume

• 0~3 level
To set the volume of cluster voice.

Welcome Sound

If this item is checked, the welcome sound function will be activated.

Items

Explanation

One touch turn indicator

• Off: The one touch turn signal function will be deactivated.
• 3, 5, 7 Flashes: The turn signal indicator will blink 3, 5, or 7 times when the

turn signal lever is moved slightly.

*For more details, refer to "One-touch lane change function" on page 4-69.

Head Lamp Delay

If this item checked, the head lamp delay function will be activated.

Items

Explanation

Automatically Lock

• Off: The auto door unlock operation will be canceled.
• Enable on speed: All doors will be automatically locked when the vehicle

speed exceeds 15 km/h (9.3 mph).

• Enable on shift (Except Manual transmission): All doors will be automati

-

cally locked if the vehicle is shifted from the P (Park) position to the R
(Reverse), N (Neutral), or D (Drive) position. (With the Engine ON, it is acti

-

vated.)

Automatically Unlock

• Off: The auto door unlock operation will be canceled.
• Vehicle Off/Key out (if equipped): All doors will be automatically unlocked

when the ignition key is removed from the ignition switch or ENGINE
START/STOP button or the Engine Star/Stop button is set to the OFF
posi

-

tion.

• On shift to P (Except Manual transmission): All doors will be automatically

unlocked if the gear is shifted to the P (Park) position. (With the Engine
ON, it is activated.)

51

4

4

Features of your vehicle

LCD display

*The information provided may differ depending on which functions are applicable to

your vehicle.

5. Convenience (if equipped)

*The information provided may differ depending on which functions are applicable to

your vehicle.

6. Units

*The information provided may differ depending on which functions are applicable to

your vehicle.

7. Reset

Items

Explanation

Rear Occupant Alert

If this item is checked, the Rear Occupant Alert (ROA) display will be acti

-

vated.

Service Interval

• Enable Service Interval

If this item is checked, Service Interval will be activated.

Adjust Interval

If the service interval menu is activated, you may adjust the time and dis

-

tance.

• Reset

To reset the service interval function.

Welcome Mirror/Light

• On door unlock/On driver approach
To select the welcome mirror/light function.

Wireless Charging System

If this item is checked, the wireless charging function will be activated.

Auto Rear Wiper (in R)

• If this item checked, the Auto rear wiper will be activated.

Items

Explanation

Speed Unit

• km/h, MPH
To select the Speed unit.

Temperature Unit

• °C / °F
To select the Temperature unit.

Fuel Economy Unit

• Km/L, L/100Km
To select the Fuel economy unit.

*For more details, refer to "Trip information (Trip computer)" on page 4-52.

Tire Pressure Unit

• psi / kPa / bar
To select the Tire Pressure Unit

Items

Explanation

Reset

You can reset the menus in the User Settings mode. All menus in the User
Settings mode are reset to factory settings, except language and service
interval.

Features of your vehicle

52

4

LCD display

Trip information (Trip computer)

The trip computer is a microcomputer-
controlled driver information system that
displays information related to driv

-

ing.

NOTICE

Some driving information stored in the trip
computer resets if the battery is dis

-

connected.

Trip Modes

• A: Drive Info
• B: Since Refueling
• C: Accumulated Info
• D: Digital Speedometer
1 Tripmeter

2 Fuel Economy

3 Timer

To change the trip mode, scroll the tog

-

gle the switch (

/

)on the steering 

wheel.

Since refueling information mode

A: Drive Info

1 Accumulated trip distance

2 Average energy consumption

3 Total driving time
This display shows the trip distance, the 
average fuel efficiency, and the instant 
fuel efficiency (or the total driving time) 
since refueling.
• Information since refueling is calcu

-

lated after the vehicle has run for 
more than 300 m (0.19 miles).

• Information since refueling is calcu

-

lated after the vehicle has run for 
more than 300 m (0.19 miles).

• f you press "OK" button for more than 1

second after the information since 
refueling is displayed, the information 
will be reset.

• If the engine is running, even when 

the vehicle is not in motion, the infor

-

mation will be accumulated.

OSK3042502L

OSK3042487N

53

4

4

Features of your vehicle

LCD display

Digital speedometer

This mode displays the current speed of 
the vehicle.

Service Mode

This mode reminds you of scheduled 
maintenance information.

Service in

It calculates and displays when you need
a scheduled maintenance service (mile

-

age or days).

If the remaining mileage or time reaches 
900 miles (1,500 km) or 30 days, "Ser

-

vice in" message is displayed for several 
seconds each time you set the ignition 
switch or ENGINE START/STOP button 
to the ON position.

Service required

If you do not have your vehicle serviced 
according to the already inputted ser

-

vice interval, "Service required" message 
is displayed for several seconds each 
time you set the ignition switch or 
ENGINE START/STOP button to the
ON position.

To reset the service interval to the mile

-

age and days you inputted before:

• Press the OK button (Reset) for more 

than 1 second.

NOTICE

If any of the following conditions occurs, 
the mileage and days may be incorrect.
• The battery cable is disconnected.
• The battery is discharged.

Driving info display

At the end of each driving cycle, the 
Driving Info message is displayed.

This display shows the trip distance (1), 
average energy consumption (2), driving 
time (3).

This information is displayed for a few 
seconds when you turn off the vehicle, 
and then goes off automatically. The 
information is calculated for each time 
the vehicle is turned on.

NOTICE

• If sunroof open warning is displayed in

the cluster, the Driving Information
message may not be displayed.

OSK3042482N

OSK3042487N

Features of your vehicle

54

4

LCD display

LCD display messages

Engine has overheated

This warning message appears when
the engine coolant temperature is above 
248

°F (120 °C). This mean that the 

engine is overheated and may be dam

-

aged.

*If your vehicle is overheated, refer to "If 

the engine overheats" on page 7-6.

Low Key Battery for smart key
system

This warning message appears if the 
battery of the smart key is discharged 
when the ENGINE START/STOP
button changes to the OFF position.

Press START button while turn

-

ing wheel for smart key system

It means that you should press the 
ENGINE START/STOP button while
turn

-

ing the steering wheel right and left.

Steering wheel unlocked for
smart key system

This warning message appears if the 
steering wheel is not lock when the 
ENGINE START/STOP button changes
to the OFF position.

Check Steering Wheel Lock Sys

-

tem for smart key system

This warning message appears if there is 
malfunction in steering wheel lock sys

-

tem when the ENGINE START/STOP 
button changes to the OFF position.

Key not in vehicle for smart key
system

This warning message appears if the 
smart key is not in the vehicle when the 
ENGINE START/STOP button is in the 
ON position.

It means that you should always have 
the smart key with you.

Key not detected for smart key
system

This warning message appears if the 
smart key is not detected when you 
press the ENGINE START/STOP
button.

Door, Hood, Liftgate open warn

-

ing display

This warning is displayed if any door or
the hood or the liftgate is left open. The
warning will indicate which door is open
in the display.

NOTICE

Before driving the vehicle, you should 
confirm that the door/hood/liftgate is fully
closed. Also, check that there is no 
door/hood/liftgate open warning light or 
message displayed on the instrument 
cluster.

OSK3042473L

55

4

4

Features of your vehicle

LCD display

Sunroof open warning display (if
equipped)

This warning is displayed if you turn off 
the vehicle when the sunroof is open.

Close the sunroof securely before leav

-

ing your vehicle.

Low Pressure warning display

This warning message is displayed if the 
tire pressure is low. The corresponding 
tire on the vehicle will be appeared.

* For more details, refer to "Tire Pressure

Monitoring System (TPMS)" on page 7-
8.

Lights mode

A: Lights

This indicator displays which exterior 
light is selected using the lighting con

-

trol.

You can activate or deactivate Wiper/ 
Lights Display function from the User 
Settings mode in the cluster LCD display.

Wiper mode

A: Front Wipers
This indicator displays which wiper 
speed is selected using the wiper con

-

trol.

You can activate or deactivate Wiper/ 
Lights Display function from the User 
Settings mode in the cluster LCD display.

Shift to P or N to start engine for
smart key system

This warning message appears if you try 
to start the engine with the shift lever not
in the P (Park) or N (Neutral) posi

-

tion.

Press brake pedal to start engine 
for smart key system

This warning message appears if the 
ENGINE START/STOP button changes
to the ACC position twice by pressing
the

OSK3042475L

OSK3042476L

OSK3042477L

Features of your vehicle

56

4

LCD display

button repeatedly without depressing 
the brake pedal.

It means that you should depress the 
brake pedal to start the engine.

Battery discharging due to exter

-

nal electrical devices

The vehicle can detect self-discharge of 
the battery due to over-current that is 
generated by unauthorized electrical 
devices such as dashboard camera(dash 
cam) mounting during parking.

Please note that functions such as Idle
Stop and Go (ISG) are limited and bat

-

tery discharge problems may occur.

If the warning continues even after 
external electrical devices are removed, 
have your vehicle inspected by an 
authorized Kia dealer.

Press START button again for
smart key system

This warning message appears if you 
cannot operate the ENGINE START/ 
STOP button when there is a problem 
with the ENGINE START/STOP
button system.

It means that you could start the engine 
by pressing the ENGINE START/STOP 
button once more.

If the warning appears each time you 
press the ENGINE START/STOP
button, have the vehicle inspected by an
autho

-

rized Kia dealer.

Press START button with key for
smart key system

This warning message appears if you 
press the ENGINE START/STOP
button while the warning message "Key
not detected" is illuminating.

At this time, the immobilizer indicator 
light blinks.

Check Lane Keeping Assist (LKA) 
(if equipped)

This warning message is displayed if 
there is a problem with Lane Keeping 
Assist. Have your vehicle inspected by 
an authorized Kia dealer.

*For more details, refer to "Lane Keeping 

Assist (LKA) (if equipped)" on page 6-
30

Check High Beam Assist (HBA) 
system (if equipped)

This warning message is displayed if 
there is a problem with High Beam 
Assist. Have your vehicle inspected by 
an authorized Kia dealer.

*For more details, refer to "High Beam 

Assist (HBA) (if equipped)" on page 4-
70

Check Forward Collision-Avoid

-

ance Assist system (if equipped)

This warning message is displayed if 
there is a problem with Forward Colli

-

sion-Avoidance Assist. Have your vehicle 
inspected by an authorized Kia dealer.

*For more details, refer to "Forward Col

-

lision-Avoidance Assist (FCA) (Front 
Camera Only) (if equipped)" on page
6-4

Check Smart Cruise Control Sys

-

tem (if equipped)

This warning message is displayed if 
there is a problem with the Smart Cruise 
Control. Have your vehicle inspected by 
an authorized Kia dealer.

57

4

4

Features of your vehicle

LCD display

*For more details, refer to"Cruise Con

-

trol (CC) (if equipped)" on page 6-65

Check Blind-Spot Collision Warn

-

ing System (if equipped)

This warning message is displayed if 
there is a problem with Blind- SpotColli

-

sion-Avoidance Assist. In this case, have 
the vehicle inspected by an authorized 
Kia dealer.

*For more information, refer to "Blind-

Spot Collision-Avoidance Assist (BCA) 
(if equipped)" on page 6-36.

Check Driver Attention Warning 
(DAW ) System (if equipped)

This warning message is displayed if 
there is a problem with Driver Attention 
Alert. In this case, have the vehicle 
inspected by an authorized Kia dealer.

*For more information, refer to "Driver 

Attention Warning (DAW) (if 
equipped)" on page 6-60.

Icy Road Warning (if equipped)

A: Ice possible. Drive with care
This warning is to warn the driver the 
road may be icy.

When the following conditions occur, the 
warning light (including Outside Tem

-

perature Gauge) blinks 5 times and then 
appears, and also warning chime sounds 
once.
• The temperature on the Outside Tem

-

perature Gauge is below approxi

-

mately 40

°F (4 °C).

NOTICE

If the icy road warning appears while 
driving, you should drive more atten

-

tively and safely refraining from over-
speeding, rapid acceleration, sudden 
braking or sharp turning, etc.

OSK3042470N

Features of your vehicle

58

4

Warning and indicator lights

Warning and indicator lights

The warning light and indicator light 
indicate a situation where the driver 
should be careful and whether the vari

-

ous functions are activated.

Warning lights

The warning light indicates situations 
that require the driver to pay attention.

NOTICE

Warning lights
Make sure that all warning lights are
OFF after starting the vehicle. If any light 
is still ON, this indicates a situation that 
needs attention.

Air bag Warning Light

This warning light appears:

• Once you set the ignition switch or 

ENGINE START/STOP button to
the ON position.

- It appears for approximately 6 sec

-

onds and then goes off.

• When there is a malfunction with the 

SRS.

In this case, have the vehicle inspected 
by an authorized Kia dealer.

Seat Belt Warning Light

This warning light informs the driver that 
the seat belt is not fastened.

*For more details, refer to "Seat belts" on 

page 3-19.

Parking Brake & Brake Fluid 

Warning Light

This warning light appears:

• Once you set the ignition switch or 

ENGINE START/STOP button to
the ON position.

- It appears for approximately 3 sec

-

onds

- It remains on if the parking brake is 

applied.

• When the parking brake is applied.
• When the brake fluid level in the res

-

ervoir is low.

- If the warning light appears with the

parking brake released, it indi

-

cates the brake fluid level in reser

-

voir is low.

If the brake fluid level in the res

-

ervoir is low:

1. Drive carefully to the nearest safe 

location and stop your vehicle.

2. With the vehicle stopped, check the 

brake fluid level immediately and add 
fluid as required (For more details, 
refer to "Brake fluid" on page 8-19). 
Then check all brake components for 
fluid leaks. If any leak on the brake 
system is still found, the warning light 
remains on, or the brakes do not 
operate properly, do not drive the 
vehicle.

In this case, have your vehicle towed 
to an authorized Kia dealer and 
inspected.

Dual-diagonal braking system

Your vehicle is equipped with dualdiago

-

nal braking systems. This means you still 
have braking on two wheels even if one 
of the dual systems should fail.

59

4

4

Features of your vehicle

Warning and indicator lights

With only one of the dual systems work

-

ing, greater pedal pressure are required
to stop the vehicle.

Also, the vehicle will require increased 
stopping distance with only a portion of 
the brake system working.

W ARNING

Parking Brake & Brake Fluid Warning
Light

Driving the vehicle with a warning light 
ON is dangerous. If the Parking Brake &
Brake Fluid Warning Light appears with 
the parking brake released, it indicates 
that the brake fluid level is low.

In this case, have your vehicle inspected 
by an authorized Kia dealer.

Anti-lock Brake System (ABS) 

Warning Light

This warning light appears:

• Once you set the ignition switch or 

ENGINE START/STOP button to
the ON position.

- It appears for approximately 3 sec

-

onds and then goes off.

• When there is a malfunction with the

ABS (The normal braking system will
still be operational without the assis

-

tance of the anti-lock brake system).

In

this

case,

have

your

vehicle

inspected by an authorized Kia dealer.

Electronic Brake force Distribu

-

tion (EBD) System Warning Light

These two warning lights appear at
the same time while driving:

• When the ABS and regular brake sys

-

tem may not work normally.

In this case, have your vehicle 
inspected by an authorized Kia dealer.

W ARNING

Electronic Brake force Distribution
(EBD) System Warning Light

When both ABS and Parking Brake &
Brake Fluid Warning Lights are on, the 
brake system will not work normally and 
you may experience an unexpected and 
dangerous situation during sudden 
braking.

In this case, avoid high speed driving 
and abrupt braking.

Have your vehicle inspected by an 
authorized Kia dealer as soon as possi

-

ble.

Electric Power Steering (EPS) 

Warning Light

This warning light appears:

• Once you set the ignition switch or 

ENGINE START/STOP button to
the ON position.

- It remains on until the vehicle is 

started.

- When there is a malfunction with 

the EPS.

• When there is a malfunction with the 

EPS.


Content      ..     2      3      4      5     ..