Kia Soul (2024 year). Manual in english - page 3


  Index      Kia     Kia Soul (2024 year). Manual in english


Search            copyright infringement  


Content      ..     1      2      3      4      ..


Kia Soul (2024 year). Manual in english - page 3


Safety features of your vehicle

52

3

Air bag - advanced supplemental restraint system

W ARNING

No attaching objects
• Do not place any objects over the air 

bag. Also, do not attach any objects 
around the area in which the air bag 
inflates, such as the door, side door 
glass, front and rear pillar, roof side 
rail.

• Do not hang hard, breakable, or 

heavy objects on the coat hooks for 
safety reasons.
53

3

3

Safety features of your vehicle

Air bag - advanced supplemental restraint system

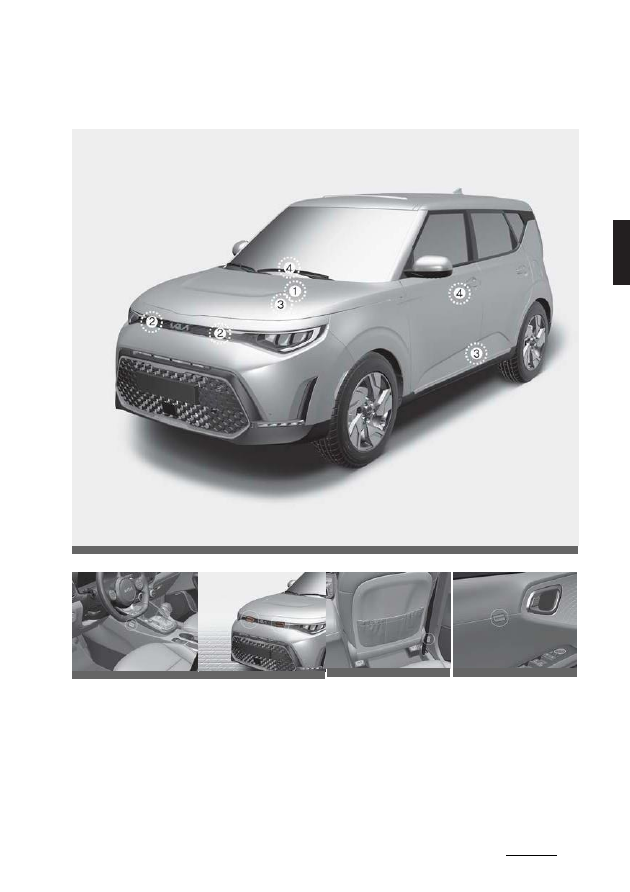
Air bag collision sensors

The air bag collision sensors are located in the following positions

*The actual shape and position of sensors may differ from the illustration.

1. SRS control module / Rollover sensor

2. Front impact sensor

3. Side impact sensor

4. Side pressure sensor

OSK3032039N

OSK3032040L

OSK3032041N

OSK3038042NR

OSK3038043NR

Safety features of your vehicle

54

3

Air bag - advanced supplemental restraint system

W ARNING

Air bag sensors
• Do not hit or allow any objects to 

impact the locations where air bags or 
sensors are installed.

This may cause unexpected air bag 
deployment, which could result in 
serious personal injury or death.

• If the installation location or angle of 

the sensors is altered in any way, the 
air bags may deploy when they 
should not or they may not deploy 
when they should.

Therefore, do not try to perform main

-

tenance on or around the air bag sen

-

sors. Have the vehicle checked and 
repaired by an authorized Kia dealer.

Problems may arise if the sensor instal

-

lation angles are changed due to the 
deformation of the front bumper, front 
end module, body or front doors where 
side collision sensors are installed. Have 
the vehicle checked and repaired by an 
authorized Kia dealer.

Installing bumper guards (or side step or 
running board) or replacing a bumper (or
front door module) with non-genuine parts
may adversely affect your vehicle's 
collision and air bag deployment perfor

-

mance.

Kia Genuine bumper guards/bumpers
are parts we guarantee for quality and
performance.

Why didn't my air bag go off in a
collision? (Inflation and non-infla

-

tion conditions of the air bag)

There are many types of accidents in 
which the air bag would not be expected 
to provide additional protection.

These include rear impacts, second or
third collisions in multiple impact acci

-

dents, as well as low speed impacts.

Air bag inflation conditions

Front air bags

Front air bags are designed to inflate in 
a frontal collision depending on the 
severity of impact of the front collision.

Side and/or curtain air bags

Side and/or curtain air bags are 
designed to inflate when an impact is 
detected by side collision sensors 
depending on the severity of impact 
resulting from a side impact collision.

Also, the side and curtain air bags are 
designed to inflate when a rollover is 
detected by a rollover sensor.

Although the front air bags (driver's and 
front passenger's air bags) are primarily 
designed to inflate in frontal collisions, 
they may inflate in other types of colli

-

sions if the front impact sensors detect a
sufficient frontal force in another type of 
impact.

Similarly, although side and curtain air 
bags are designed to inflate in certain 
side impact collisions, they may inflate in 
other types of collisions where a side 
force is detected by the sensors. For 
instance, side air bag and/or curtain air 
bags may inflate if rollover sensors indi

-

cate the possibility of a rollover occur

-

ring (even if none actually occurs) or in 
other situations, including when the 
vehicle is tilted while being towed.

Even if side and/or curtain air bags do 
not provide impact protection in a roll

-

over, they will deploy to prevent ejection 
of occupants, especially those who are 
restrained with seat belts.

55

3

3

Safety features of your vehicle

Air bag - advanced supplemental restraint system

If the vehicle chassis is impacted by 
bumps or objects on unimproved roads, 
the air bags may deploy. Drive carefully 
on unimproved roads or on surfaces not 
designed for vehicle traffic to prevent 
unintended air bag deployment.

Air bag non-inflation conditions

• In certain low-speed collisions the air 

bags may not deploy. The air bags are 
designed not to deploy in such cases 
because they may not provide bene

-

fits beyond the protection of the seat 
belts in such collisions.

• Air bags are not designed to inflate in 

rear collisions, because occupants are 
moved backward by the force of the 
impact. In this case, inflated air bags 
would not be able to provide any 
additional benefit.

• Front air bags may not inflate in side 

impact collisions, because occupants 
move to the direction of the collision, 
and thus in side impacts, frontal air 
bag deployment would not provide 
additional occupant protection.

• In an angled collision, the force of 

impact may direct the occupants in a
direction where the air bags would not 
be able to provide any additional ben

-

efit, and thus the sensors may not 
deploy any air bags.

• Just before impact, drivers often brake

heavily. Such heavy braking lowers
the front portion of the vehicle causing
it to "ride" under a vehicle with a higher
ground clearance. Air bags may not
inflate in this "under- ride" situation
because deceleration forces that are
detected by sensors may be
significantly reduced by such "under-
ride" collisions.

• Front air bags may not inflate in all 

rollover accidents when the SRSCM 
indicates that the front air bag 
deployment would not provide addi

-

tional occupant protection.

• Air bags may not inflate if the vehicle 

collides with objects such as utility 
poles or trees, where the point of 
impact is concentrated to one area 
and the full force of the impact is not 
delivered to the sensors.

Supplemental Restraint System 
(SRS) Care

The SRS is virtually maintenance-free 
and so there are no parts you can safely 
service by yourself.

If the SRS air bag warning light does not 
appear, or continuously remains on, have
your vehicle immediately inspected by an
authorized Kia dealer.

Any work on the SRS system, such as 
removing, installing, repairing, or any 
work on the steering wheel, the front 
passenger's panel, front seats and roof 
rails must be performed by an autho

-

rized Kia dealer. Improper handling of 
the SRS system may result in serious 
personal injury.

For cleaning the air bag pad covers, use 
only a soft, dry cloth or one which has 
been moistened with plain water. Sol

-

vents or cleaners could adversely affect 
the air bag covers and proper deploy

-

ment of the system.

If components of the air bag system must
be discarded, or if the vehicle must be
scrapped, certain safety precautions 
must be observed. An authorized Kia 
dealer knows these precautions and can 
give you the necessary information. Fail

-

ure to follow these precautions and pro

-

cedures could increase the risk of 
personal injury.

Safety features of your vehicle

56

3

Air bag - advanced supplemental restraint system

W ARNING

Tampering with SRS
Do not tamper with or disconnect SRS 
wiring, or other components of the SRS 
system. Doing so could result in the acci

-

dental inflation of the air bags or render 
the SRS inoperative.

W ARNING

Towing Vehicle
Always have the ignition off when your 
vehicle is being towed. The side air bags 
may inflate if the vehicle is tilted, such as 
when being towed, because of the roll

-

over sensors in the vehicle.

Adding equipment to or modify

-

ing

your air bag-equipped vehicle

If you modify your vehicle by changing 
your vehicle's frame, bumper system, 
front end or side sheet metal or ride 
height, this may affect the operation of 
your vehicle's air bag system.

Air bag warning label

Air bag warning labels, some required by
the U.S. National Highway Traffic Safety
Administration (NHTSA,U.S. only), are
attached to the sun visor to alert the 
driver and passengers of potential risks 
of the air bag system.

OSK3038049NR

Features of your vehicle

4

Keys .................................................................................................4-6

Battery replacement .....................................................................4-6

Key operations............................................................................... 4-7

Smart key........................................................................................4-8

This device complies with Part 15 of the F CC rules........................4-
10

Remote keyless entry...................................................................4-11

Transmitter precautions.............................................................................. 4-
12

This device complies with Part 15 of the F CC rules........................ 4-

13

Immobilizer system ....................................................................................... 

4-13

This device complies with Part 15 of the F CC rules........................ 4-

14

Theft-alarm system....................................................................................... 

4-14
Door locks..................................................................................... 4-16

Rear Occupant Alert (ROA) system ...................................................... 4-20

Liftgate.......................................................................................... 4-21

Opening the liftgate ...................................................................................... 4-
21

Closing the liftgate......................................................................................... 4-
21

Opening the liftgate in emergency ........................................................4-22

Windows .......................................................................................4-23

Window opening and closing .................................................................. 4-
24

Power window lock switch .........................................................................4-
26

Hood.............................................................................................. 4-27

Opening the hood..........................................................................................4-
27

Hood open warning ......................................................................................4-
27

Closing the hood ............................................................................................4-
27

Fuel filler door..............................................................................4-28

Opening the fuel filler door .......................................................................4-28
Closing the fuel filler door..........................................................................4-29

4

Features of your vehicle

Tilt

open/close ................................................................................................. 4-

32

Slide open/close .............................................................................................4-
33

Automatic reversal ........................................................................................4-
33

Resetting the sunroof...................................................................................4-
34

Sunroof open warning.................................................................................4-
35

Steering wheel ............................................................................ 4-35

Electric Power Steering (EPS)...................................................................4-
35

Tilt & telescopic steering wheel ...............................................................4-36

Adjusting steering wheel angle and height........................................4-36

Heated steering wheel.................................................................................4-37

Horn

.....................................................................................................................4-

37

Mirrors ..........................................................................................

4-38

Inside rearview mirror..................................................................................4-38

Outside rearview mirror ..............................................................................4-39

Instrument cluster........................................................................4-41

Instrument cluster control..........................................................................4-42

Gauges................................................................................................................4-

42

Transmission shift indicator ..................................................................... 4-44

LCD display.................................................................................. 4-46

LCD Display Control..................................................................................... 4-
46

LCD Display Modes ...................................................................................... 4-
46

Trip information (Trip computer)............................................................4-52

Service Mode ...................................................................................................4-53

Driving info display .......................................................................................4-
53

LCD display messages................................................................................ 4-
54

Warning and indicator lights..................................................... 4-58

Warning lights ................................................................................................ 4-
58

Features of your vehicle

4

Daytime running light ................................................................................. 4-
66

Lighting control ...............................................................................................4-
67

Operating high beam .................................................................................. 4-
68

Operating turn signals and lane change signals ............................ 4-69

Operating front fog light............................................................................ 4-69

High Beam Assist (HBA)............................................................................. 4-
70

Wipers and washers .................................................................... 4-73

Operating windshield washer...................................................................4-75

Operating rear window wiper and washer switch...........................4-75

Interior lights................................................................................4-76

Automatic turn off function .......................................................................4-76

Room lamp........................................................................................................4-76

Map

lamp...........................................................................................................4-

77

Liftgate room lamp....................................................................................... 4-
78

Vanity mirror lamp ....................................................................................... 4-
78

Glove box lamp ...............................................................................................4-
79

Welcome system ..........................................................................4-79

Defroster...................................................................................... 4 - 80

Operating rear window defroster ..........................................................4-80

Outside mirror defroster ............................................................................4-80

Manual climate control system .................................................. 4-81

Heating and air conditioning ....................................................................4-82

System operation .......................................................................................... 4-
86

Climate control air filter.............................................................................. 4-88

Checking the amount of air conditioner

refrigerant and compressor lubricant .................................................. 4-88

Air Conditioning refrigerant label .......................................................... 4-89

Automatic climate control system............................................ 4-90

Heating and air conditioning automatically ....................................... 4-91

Manual heating and air conditioning ....................................................4-92

4

Features of your vehicle

Temperature control ................................................................................... 4-
94

Controlling air intake ....................................................................................4-
95

Controlling fan speed...................................................................................4-
95

Air

conditioning...............................................................................................4-

95

Turning off the front air climate control ..............................................4-96

Automatic ventilation ...................................................................................4-96

Scheduled Ventilation Control .................................................................4-
97

System

operation...........................................................................................4-

97

Climate control air filter...............................................................................4-99

Checking the amount of air conditioner

refrigerant and compressor lubricant ...................................................4-99

Air Conditioning refrigerant label ........................................................4-100

Windshield defrosting and defogging................................... 4-100

Manual climate control system.............................................................4-100

Automatic climate control system ........................................................ 4-101

Defogging logic............................................................................................ 4-102

Storage compartment .............................................................. 4-103

Center console storage ............................................................................ 4-
103

Glove box ....................................................................................................... 4-
104

Sunglass holder ........................................................................................... 4-
104

Luggage net holder.................................................................................... 4-
104

Increase cargo space ................................................................................ 4-
105

Interior features ........................................................................ 4-106

Cup holder ..................................................................................................... 4-
106

Seat warmer .................................................................................................. 4-
106

Air ventilation seat...................................................................................... 4-
108

Features of your vehicle

4

Cargo area cover.......................................................................................... 4-
115

Exterior features........................................................................ 4-116

Roof rack.......................................................................................................... 4-116

Infotainment system ................................................................. 4-118

Shark-fin antenna ........................................................................................ 4-
118

USB

port ........................................................................................................... 4-

118

How vehicle radio works........................................................................... 4-
118

Declaration of Conformity ........................................................4-121

FCC.....................................................................................................................

4-

121

Features of your vehicle

6

4

Keys

Features of your vehicle

Keys

W ARNING

Never leave the keys in your vehicle with 
unsupervised children. Leaving children 
unattended in a vehicle with a manual 
ignition key or a smart key is dangerous.

Children copy adults and they could 
place the key in the ignition switch or 
press the start button. The key would 
enable children to operate power win

-

dows or other controls, or even make the 
vehicle move, which could result in seri

-

ous bodily injury or death.

Record your key number

The key code number 
is stamped on the key 
code tag attached to 
the key set. Should

you lose your keys, this number will 
enable an authorized Kia dealer to dupli

-

cate the keys easily. Remove the key 
code tag and store it in a safe place.
Also, record the key code number and 
keep it in a safe and handy place, but 
not in the vehicle.

W ARNING

Aftermarket keys
Use only Kia original parts for the igni

-

tion key in your vehicle. If an aftermarket 
key is used, the ignition switch may not 
return to ON after START. If this hap

-

pens, the starter will continue to operate 
causing possible fire due to excessive 
current in the wiring.

Battery replacement

A battery should last for several years, 
but if the transmitter or smart key is not 
working properly, try replacing the bat

-

tery with a new one.

If you are unsure how to use or replace 
the battery, contact an authorized Kia 
dealer.

1. Pry open the transmitter cover.
2. Replace the battery with a new bat

-

tery (CR2032). When replacing the 
battery, make sure the battery posi

-

tion is correct.

3. Install the battery in the reverse order 

of removal.

W ARNING

THIS PRODUCT CONTAINS A
BUT

-

TON BATTERY

If swallowed, a lithium button battery can
cause severe or fatal injuries within 2
hours.
Keep batteries out of reach of children. 

If you think batteries may have been
swallowed or placed inside any part of
the body, seek immediate medical atten

-

tion.

The transmitter or smart key is designed 
to give you years of trouble- free use, 
however it can malfunction if exposed to

OSK3048402NR

7

4

4

Features of your vehicle

Key operations

moisture or static electricity. If you are
unsure how to use or replace the bat

-

tery, contact an authorized Kia dealer.

Using the wrong battery can cause the 
transmitter or smart key to malfunction. 
Be sure to use the correct battery.

An inappropriately disposed 
battery can be harmful to the 
environment and human 
health. Dispose the battery

according to your local law(s) or regula

-

tion.

CAUTION

Transmitter damage
The transmitter or smart key can mal

-

function if dropped, exposed to mois

-

ture, static electricity, heat or direct 
sunlight.

Key operations

Folding key

To unfold the key, press the release but

-

ton then the key will unfold automati

-

cally.

Folding key

To fold the key, fold the key manually 
while pressing the release button.

CAUTION

Key button operation
Do not fold the key without pressing the 
release button. This may damage the 
key.

Smart key

To remove the mechanical key, press 
and hold the release button and remove 
the mechanical key.

OSK3041401N

Features of your vehicle

8

4

Smart key

Smart key

To reinstall the mechanical key, put the 
key into the hole and push it until a click 
sound is heard.

W ARNING

Ignition key
Never leave the keys in your vehicle with 
unsupervised children. Leaving children 
unattended in a vehicle with a manual 
ignition key or a smart key is dangerous.

Children copy adults and they could 
place the key in the ignition switch or 
press the start button. The key would 
enable children to operate power win

-

dows or other controls, or even make the 
vehicle move, which could result in seri

-

ous bodily injury or death.

Smart key (if equipped)

With a smart key, you can lock or unlock
a door and even start the engine without
inserting the key.

The functions of the buttons on a smart 
key are similar to the remote keyless 
entry. (Refer to "Remote keyless entry (if 
equipped)" on page 4-11)

Smart key functions

Carrying the smart key, you may lock 
and unlock the vehicle doors. Also, you 
may start the engine. Refer to the follow

-

ing, for more details.

OSK3048400NR

OSK3041094N

OSK3041446N

9

4

4

Features of your vehicle

Smart key

Locking

Pressing the button of the front outside 
door handles with all doors closed and 
any door unlocked, locks all the doors 
(and hood, liftgate).

The hazard warning lights will blink once 
to indicate that all doors are locked. The 
button will only operate when the smart 
key is within 28~40 inches (0.7~1 m) 
from the outside door handle. If you want
to make sure that a door has locked or
not, you should check the door lock
button inside the vehicle or pull the 
outside door handle.

In some instances, when the outside 
door button is pressed the doors will not 
lock and the chime will sound for 3 sec

-

onds if any of the following occurs:
• The smart key is in the vehicle.
• The ignition switch is in the ACC or 

ON position.

• Any door except the liftgate is 

opened.

Unlocking

Pressing the button of the driver's out

-

side door handle with all doors closed 
and locked, unlocks the driver's door. 
The hazard warning lights will blink and 
the chime will sound twice to indicate 
that the driver's door is unlocked.

Pressing the button in the front passen

-

ger's outside door handle with all doors 
closed and locked, unlocks all the doors. 
The hazard warning lights will blink and 
the chime will sound twice to indicate that
all doors are unlocked. The button will 
only operate when the smart key is within
28~40 inches (0.7~1 m) from the outside
door handle.

Liftgate unlocking

If you are within 28~40 inches (0.7~1 m) 
from the outside liftgate handle, with your
smart key in possession, the liftgate will
unlock and open when you press the 
liftgate handle switch.

The hazard warning lights will blink 
twice to indicate that the liftgate is 
unlocked.

Also, once the liftgate is opened and 
then closed, the liftgate will lock auto

-

matically.

Smart key precautions

• If you lose your smart key, you will not 

be able to start the engine. Tow the 
vehicle, if necessary, and contact an 
authorized Kia dealer.

• A maximum of 2 smart keys can be 

registered to a single vehicle. If you 
lose a smart key, you should immedi

-

ately take the vehicle and key to your 
authorized Kia dealer to protect it from 
potential theft.

• The smart key will not work if any of 

following occurs:

- The smart key is close to a radio 

transmitter such as a radio station 
or an airport which can interfere 
with normal operation of the smart 
key.

OSK3048047NR

Features of your vehicle

10

4

Smart key

- The smart key is near a mobile two-

way radio system or a cellular 
phone.

- Another vehicle's smart key is being 

operated close to your vehicle.

When the smart key does not work cor

-

rectly, open and close the door with the 
mechanical key. If you have a problem 
with the smart key, contact an autho

-

rized Kia dealer.
• If the smart key is in close proximity to 

your cell phone or smart phone, the 
signal from the smart key could be 
blocked by normal operation of your 
cell phone or smart phone. This is 
especially important when the phone 
is active such as making calls, receiv

-

ing calls, text messaging, and/or 
sending/receiving emails. Avoid plac

-

ing the smart key and your cell phone 
or smart phone in the same pants or 
jacket pocket and maintain adequate 
distance between the two devices.

• Do not leave the smart key near 

metallic objects such as golf bags, 
metal cases and so on.

• Door Lock/Unlock failure or poor 

starting can occur when the smart key 
is placed near metallic objects.

• Always carry your smart key when 

you leave the car. An unattended 
smart key close to the vehicle can 
cause the vehicle battery to be dis

-

charged.

• Internal circuit damage may occur 

when the key comes into contact with 
moisture (beverage, water etc.) or 
heat. Damage to the smart key due to 
exposure to liquids or heat is not cov

-

ered by the manufacturer's vehicle 
warranty.

• If the smart key is not moved for some

time, the detection function for

smart key operation will pause. Lift
the smart key to activate the detec

-

tion again.

CAUTION

Transmitter
Keep the smart key away from water or 
any liquid as it can become damaged 
and not function properly.

This device complies with Part 15
of the FCC rules.

Operation is subject to the following two
conditions:

1. This device may not cause harmful

interference, and

2. This device must accept any interfer

-

ence received, including interference
that may cause undesired operation.

NOTICE

Changes or modifications not expressly 
approved by the party responsible for 
compliance could void the user's author

-

ity to operate the equipment. If the key

-

less entry system is inoperative due to 
changes or modifications not expressly 
approved by the party responsible for 
compliance, it will not be covered by
your manufacturer's vehicle warranty.

11

4

4

Features of your vehicle

Remote keyless entry

Remote keyless entry (if 
equipped)

Using the remote keyless entry, you can 
lock and unlock the doors remotely.

Remote keyless entry system 
operations

Type A

Type B

Type
C

Lock (1)

All doors are locked if the lock button is 
pressed. If all doors are closed, the haz

-

ard warning lights will blink and the 
chime will sound once (for Type B) to 
indicate that all doors are locked.

Also, if the lock button is pressed once 
more within 4 seconds, the hazard warn

-

ing lights will blink and the chime will 
sound once to confirm that the door is 
locked.

However, if any door remains open, the 
hazard warning lights (and/or the chime) 
will not operate. But if all doors are closed
after the lock button is pressed, the
hazard warning lights will blink once.

Unlock (2)

The driver's door is unlocked if the 
unlock button is pressed once. The haz

-

ard warning lights will blink twice and the
chime will sound twice (for Type B) to
indicate that the driver's door is 
unlocked.

All doors are unlocked if the unlock but

-

ton is pressed once more within 4 sec

-

onds. The hazard warning lights will blink
(for smart key, the chime also sounds)
twice again to indicate that all

OSK3041093N

OSK3041094N

OSK3041446N

Features of your vehicle

12

4

Remote keyless entry

doors are unlocked. After pressing this 
button, the doors will lock automatically 
unless you open any door within 30 sec

-

onds.

If you attempt to lock or unlock the door 
by pressing the door lock/unlock button 
in any of the following states, the door 
will not be locked or unlocked.
• When you want to lock or unlock the 

door in the ACC or ON state.

• When you want to lock a door in a car 

with one or more doors open.

Depending on the vehicle, the driver can
turn off or set the 2-press unlock setting
function.

NOTICE

If the keyless entry system is inoperative 
due to exposure to water or liquids, it will 
not be covered by your manufacturer's 
vehicle warranty.

Liftgate open (3)

The liftgate is opened if the button is
pressed for more than 1 second.

Once the liftgate is opened and then
closed, the liftgate will lock automati

-

cally.

Panic alarm (4)

The horn sounds and the hazard warn

-

ing lights blink for about 30 seconds if 
this button is pressed for more than 0.5 
seconds. To stop the horn and lights, 
press any button on the transmitter.

Remote start (5)

You can start the vehicle using the 
remote start button (5) of the smart key. 
To start the vehicle remotely:

• Lock the doors by pressing the door 

lock button (1) within 32 feet (10 m) 
distance from the vehicle.

• Press the remote start button (5) for 

over 2 seconds within 4 seconds after 
locking the doors.

• Press the remote start button (5) once 

to turn off the vehicle.

• Air conditioner/heater system main

-

tains the status before turning off the 
vehicle. If no further action for operat

-

ing/driving the vehicle is taken, the 
vehicle will be turned off 10 minutes 
after starting the vehicle remotely

Transmitter precautions

The transmitter (or smart key) will not 
work if any of following occurs:
• The ignition key is in the ignition

-

switch.

• You exceed the operating distance 

limit (about 90 feet [30 m]).

• The battery in the transmitter (or 

smart key) is weak.

• Other vehicles or objects may be 

blocking the signal.

• The weather is extremely cold.
• The transmitter (or smart key) is close 

to a radio transmitter such as a radio 
station or an airport which can inter

-

fere with normal operation of the 
transmitter.

When the transmitter (or smart key) 
does not work properly, open and close 
the door with the ignition key. If you have 
a problem with the transmitter (or smart
key), contact an authorized Kia dealer.
• If the transmitter is in close proximity to 

your cell phone or smart phone, the 
signal from the transmitter could be 
blocked by normal operation of your 
cell phone or smart phone. This is

Do not put metal accessories near the 
ignition switch.

Metal accessories may interrupt the 
transponder signal and may prevent the 
engine from being started.

If you need additional keys or lose your 
keys, consult an authorized Kia dealer.

4

13

4

Features of your vehicle

Remote keyless entry

especially important when the phone 
is active such as making calls, receiv

-

ing calls, text messaging, and/or 
sending/receiving emails.

Avoid placing the transmitter and
your cell phone or smart phone in the 
same pants or jacket pocket and 
maintain adequate distance between 
the two devices.

This device complies with Part 15
of the FCC rules.

Operation is subject to the following two
conditions:

1. This device may not cause harmful

interference, and

2. This device must accept any interfer

-

ence received, including interference
that may cause undesired operation.

NOTICE

Changes or modifications not expressly 
approved by the party responsible for 
compliance could void the user's author

-

ity to operate the equipment. If the key

-

less entry system is inoperative due to 
changes or modifications not expressly 
approved by the party responsible for 
compliance, it will not be covered by
your manufacturer's vehicle warranty.

Immobilizer system

Your vehicle may be equipped with an 
electronic engine immobilizer system to 
reduce the risk of unauthorized vehicle 
use.

Your immobilizer system is comprised of a
small transponder in the ignition key and
electronic devices inside the vehicle.

With the immobilizer system, whenever 
you insert your ignition key into the igni

-

tion switch and turn it to ON, it checks

and determines and verifies that the 
ignition key is valid.

If the key is determined to be valid, the 
engine will start.

If the key is determined to be invalid, the 
engine will not start.

To deactivate the immobilizer 
system:

Insert the ignition key into the key cylin

-

der and turn it to the ON position.

To activate the immobilizer sys

-

tem:

Turn the ignition key to the OFF position. 
The immobilizer system activates auto

-

matically. Without a valid ignition key for 
your vehicle, the engine will not start.

Your Immobilizer password is a cus

-

tomer unique password and should be 
kept confidential. Do not leave this num

-

ber anywhere in your vehicle.

NOTICE

Keep each key separately in order to
avoid a starting malfunction.

NOTICE

In order to prevent theft of your vehicle, 
do not leave spare keys anywhere in 
your vehicle. Your immobilizer password 
is a customer unique password should 
be kept confidential. Do not leave this 
number anywhere in your vehicle.

Features of your vehicle

14

4

Remote keyless entry

CAUTION

Immobilizer damage
Do not expose your immobilizer system 
to moisture, static electricity or rough 
handling. This may damage your immo

-

bilizer.

CAUTION

Immobilizer alterations
Do not change, alter or adjust the immo

-

bilizer system because it could cause the
immobilizer system to malfunction.

This device complies with Part 15
of the FCC rules.

Operation is subject to the following two
conditions:

1. This device may not cause harmful

interference, and

2. This device must accept any interfer

-

ence received, including interference
that may cause undesired operation.

NOTICE

Changes or modifications not expressly 
approved by the party responsible for 
compliance could void the user's author

-

ity to operate the equipment. If the key

-

less entry system is inoperative due to 
changes or modifications not expressly 
approved by the party responsible for 
compliance, it will not be covered by 
your manufacturer's vehicle warranty.

Theft-alarm system (if equipped)

This system is designed to provide pro

-

tection from unauthorized entry into the 
vehicle.

1 Armed stage

2 Theft-alarm stage

3 Disarmed stage

This system is operated in three stages: 
the first is the "Armed" stage, the second 
is the "Theft-alarm" stage, and the third 
is the "Disarmed" stage. If triggered, the 
system provides an audible alarm with 
blinking of the hazard warning lights.

CAUTION

Do not attempt to alter this system or
add other devices to it.

Armed stage

Using the smart key

Park the vehicle and stop the engine. 
Arm the system as described below.

1. Park the vehicle and stop the engine. 

Arm the system as described below.

2. Make sure that all doors, the hood 

and liftgate are closed and latched.

3. Lock the doors by pressing the button 

of the front outside door handle with 
the smart key in your possession.

OSK3062053L

15

4

4

Features of your vehicle

Remote keyless entry

After completion of the steps above, 
the hazard warning lights will operate 
once to indicate that the system is 
armed.

If any door (or liftgate) or hood 
remains open, the hazard warning 
lights and the chime will not operate 
and the theft-alarm will not arm. If all 
doors and liftgate and hood are 
closed after the lock button is 
pressed, the hazard warning lights 
blink once.

The system can also be armed by 
locking the doors with the key from 
the front doors; however, the hazard 
warning lights will not blink using this 
method.

4. Lock the doors by pressing the lock 

button on the smart key.

After completion of the steps above, 
the hazard warning lights will operate 
once to indicate that the system is 
armed.

Using the transmitter

Park the vehicle and stop the engine. 
Arm the system as described below.

1. Turn off the engine and remove the 

ignition key from the ignition switch.

2. Make sure that all doors (and liftgate), 

the engine hood are closed and 
latched.

3. Lock the doors by pressing the lock 

button on the transmitter.

After completion of the steps above, the 
hazard warning lights will blink once to 
indicate that the system is armed.

If any door (and liftgate) or engine hood 
remains open, the hazard warning lights 
won't operate and theft-alarm will not 
arm. After this, if all doors (and liftgate) 
and engine hood are closed, the hazard 
warning lights blink once.

NOTICE

Do not arm the system until all passen

-

gers have left the vehicle. If the system is 
armed while a passenger(s) remains in 
the vehicle, the alarm may be activated 
when the remaining passenger(s) leaves 
the vehicle. If any door (or liftgate) or 
hood is opened within 30 seconds after 
the system enters the armed stage, the 
system will be disarmed to prevent 
unnecessary alarm.

Theft-alarm stage

The alarm will be activated if any of the 
following occurs while the system is 
armed.
• A front or rear door is opened without 

using the smart key.

• The liftgate is opened without using 

the smart key.

• The hood is opened.
The horn will sound and the hazard 
warning lights will blink continuously for 
approximately 27 seconds, and repeat 
the horn 3 times unless the system is 
disarmed. To turn off the system, unlock 
the doors with the transmitter (or smart 
key).

Disarmed stagedisarmed stage

The system will be disarmed when:

Transmitter

• The door unlock button is pressed.

The engine is started. (within 3 sec

-

onds)

• The ignition switch is in the "ON" posi

-

tion for 30 seconds or more.

Features of your vehicle

16

4

Door locks

Smart key

• The door unlock button is pressed.
• The button of the front outside door is 

pressed while carrying the smart key.

• The engine is started. (within 3 sec

-

onds)

After pressing the unlock button, the 
hazard warning lights will blink and the 
chime will sound twice (in smart key) to 
indicate that the system is disarmed.

After pressing the unlock button, if any 
door (or liftgate) is not opened within 30 
seconds, the system will be rearmed.

NOTICE

• Avoid trying to start the engine while 

the alarm is activated. The vehicle 
starting motor is disabled during the 
theft-alarm stage.

If the system is not disarmed with the 
transmitter, insert the key into the 
ignition switch, turn the ignition switch 
to the ON position and wait for 30 
seconds. Then the system will be dis

-

armed.

• If you lose your keys, consult your 

authorized Kia dealer.

CAUTION

Adjusting alarm system
Do not change, alter or adjust the theft 
alarm system in your vehicle. Improper 
installation of the alarm system could 
damage the vehicle or cause the system 
to malfunction.

NOTICE

Malfunctions caused by improper alter

-

ations, adjustments or modifications to
the theft-alarm system are not covered
by your vehicle manufacturer warranty.

Door locks

Operating door locks from out

-

side the vehicle

To remove the cover:

1. Pull out the door handle.
2. Press the lever (1) located inside the 

bottom part of the cover with a key or 
flat-head screwdriver.

3. Push out the cover (2) while pressing 

the lever.

Turn the key toward the rear of the vehi

-

cle to lock (A) and toward the front of
the vehicle to unlock (B).
• If you lock the driver's door with a key, 

only the driver's door will lock/unlock.

• From the driver's door, turn the key 

toward the front of the vehicle once to 
unlock the driver's door and once more
within 4 seconds to unlock all doors.

• Doors can also be locked and 

unlocked with the smart key.

• Once the doors are unlocked, they 

may be opened by pulling the door 
handle.

• When closing the door, push the door 

by hand. Make sure the doors are 
closed securely.

OSK3048065NR

17

4

4

Features of your vehicle

Door locks

NOTICE

• In cold and wet climates, door lock 

and door mechanisms may not work 
properly due to freezing conditions.

• If the door is locked/unlocked multiple 

times in rapid succession with either 
the vehicle key or door lock switch, the
system may stop operating tem

-

porarily in order to protect the circuit 
and prevent damage to system com

-

ponents.

W ARNING

• Securely close your door before you 

begin driving. Failure to fully close 
your door may cause it to be opened 
during vehicle operation.

• Keep proper distance from the door to

prevent injuries when the door is clos

-

ing.

CAUTION

Do not unnecessarily open and close the 
door repeatedly or with excessive force. 
Such action can damage the vehicle 
door.

NOTICE

Always turn the ignition switch to the 
OFF position, engage the parking brake, 
close all windows, and lock all doors 
when leaving your vehicle unattended.

Operating door locks from inside 
the vehicle

With the door lock button

• To unlock a door, push the door lock 

button (1) to the "Unlock" position. The 
red mark on the door lock button will 
be visible.

• To lock a door, push the door lock 

button (1) to the "Lock" position. If the 
door is locked properly, the red mark 
on the door lock button will not be vis

-

ible.

• To open a door, pull the door handle

(2) outward.

• Front door

If the inner door handle is pulled when
the door is locked, the door will unlock
and open.

• Rear door (if equipped)
• Doors cannot be locked if the smart 

key is in the vehicle and a door is 
open.

If the inner door handle is pulled once
when the door is locked, the door will
unlock.

If the inner door handle is pulled once
more, the door will open.

OSK3048037NR

Features of your vehicle

18

4

Door locks

Door lock malfunction

If a power door lock ever fails to function 
while you are in the vehicle, try one or 
more of the following techniques to exit:
• Operate the door unlock feature 

repeatedly (both electronic and man

-

ual) while simultaneously pulling on 
the door handle.

• Operate the other door locks and han

-

dles, front and rear.

• Lower a front window and use the key 

to unlock the door from outside.

W ARNING

Do not pull the inner door handle of 
driver's (or passenger's) door while the 
vehicle is moving.

With central door lock switch

Driver side

Passenger side

Operate by pressing the central door
lock switch.
• When pressing the right portion (1) for

driver side or the upper portion (1) for
passenger side of the switch, all vehi

-

cle doors will lock.

• When pressing the left portion (2) for

driver side or the lower portion (2) for
passenger side of the switch, all vehi

-

cle doors will unlock.

• If the smart key is in the vehicle and 

any door is opened, the doors will not 
lock even though the right portion (1) 
for driver side or upper portion (1) for 
passenger side of the central door 
lock switch is pressed.

W ARNING

Doors
• The doors should always be fully 

closed and locked while the vehicle is 
in motion to prevent accidental open

-

ing of the door.

• When opening the doors, always be 

careful and watch out for vehicles, 
motorcycles, bicycles or pedestrians 
approaching the vehicle. Opening a
door when something is approaching

OSK3048066NR

OSK3048087NR

19

4

4

Features of your vehicle

Door locks

can result in an accident to cause 
vehicle damage or serious injury

W ARNING

Unattended children, the elderly or
pets

An enclosed vehicle can become 
extremely hot, causing death or severe 
injury such as heatstroke to unattended 
children, the elderly or pets who cannot 
escape the vehicle. When left or trapped 
in a hot vehicle, make sure to stay 
hydrated and avoid sun exposure 
through the

vehicle’s windshield. Fur

-

thermore, children might operate fea

-

tures of the vehicle that could injure 
them, or they could encounter other 
harm, possibly from someone gaining 
entry to the vehicle. Never leave children 
or animals unattended in your vehicle.

Door lock/unlock features

Impact sensing door unlock sys

-

tem

All doors will automatically unlock when 
an impact causes the air bags to deploy.

Auto UNLOCK On Shift to P

When this feature is set in the infotain

-

ment system screen, all the doors will be 
unlocked automatically when the vehi

-

cleis shifted back into P (Park) while the 
vehicle is ON.

Speed sensing door lock system

All doors will automatically lock after the 
vehicle speed exceeds 10 mph (15 km/ 
h).

You can activate or deactivate the auto 
door lock/unlock features in the vehicle.

Refer to "User settings mode" on page 4-
48.

Child-protector rear door locks

The child safety lock is provided to help 
prevent children from accidentally open

-

ing the rear doors from inside the vehi

-

cle. The rear door safety locks should be 
used whenever children are in the vehi

-

cle.

The child safety lock is located on the 
edge of each rear door. When the child 
safety lock is in the lock position (1), the 
rear door will not open if the inner door 
handle (2) is pulled.

To lock the child safety lock, insert a key
(or screwdriver) into the hole and turn it
to the lock position.

To allow a rear door to be opened from 
inside the vehicle, unlock the child safety 
lock.

W ARNING

Rear door locks
Use the rear door safety locks whenever 
children are in the vehicle. If a child acci

-

dently opens the rear doors while the 
vehicle is moving, he or she may fall out.

OSK3042067N

Features of your vehicle

20

4

Door locks

Rear Occupant Alert (ROA) sys

-

tem

The Rear Occupant Alert (ROA) is pro

-

vided to help prevent exiting the vehicle 
with a rear passenger left in the vehicle.
• When you open the front door after 

opening and closing the rear door and 
turning off the engine, the "Check rear 
seats" warning message appears on 
the cluster.

A: Check rear seat for passengers and
belongings

You can activate or deactivate the ROA 
from the User Settings mode in the clus

-

ter LCD display.

The option can be found under the fol

-

lowing menu:

1. Press the MODE button (

) several

times on the steering wheel until 'User 
Settings' menu appears on the LCD.

2. Select 'Convenience

→ Rear

Occupant Alert' with the MOVE switch (

/

)

and the OK button on the steering 
wheel.

W ARNING

The Rear Occupant Alert (ROA) system 
does not actually detect objects or peo

-

ple in the rear seat. By using a rear door 
opened and closed history, the system 
informs the driver that there may be 
something in the rear seat.

CAUTION

The Rear Occupant Alert (ROA) system 
uses a rear door opened and closed his

-

tory.

The history is reset after the driver turns 
off ignition normally, exits the vehicle and
locks the door remotely using the remote 
keyless entry. So even if a rear door 
does not reopen, the ROA system alert
can occurs.

For example, after the ROA system alert 
occurs, if the driver does not lock the 
door, and drives again, the alert can 
occur.

W ARNING

The door lock system may not work if the
electrical system is compromised. 
Accordingly, please train children pas

-

sengers regarding how to open the car 
door manually before an emergency sit

-

uation arises. That way, they would be 
able to open the door manually in the 
event an emergency situation arises.

OSK3042460L

21

4

4

Features of your vehicle

Liftgate

Liftgate

When you open the liftgate, you will see 
a space where you can load the cargo.

Opening the liftgate

The liftgate is locked or unlocked when 
all doors are locked or unlocked with the 
key, smart key or central door lock/ 
unlock switch.

CAUTION

Liftgate lift
Make sure that you close the liftgate 
before driving your vehicle. Possible 
damage may occur to the liftgate gas 
lifters and attached hardware if the lift

-

gate is not closed prior to driving.

• Only the liftgate is unlocked if the lift

-

gate unlock button on the transmitter 
or smart key is pressed for approxi

-

mately 1 second.

• If unlocked, the liftgate can be opened 

by pressing the handle and pulling it 
up.

• Once the liftgate is opened and then 

closed, the liftgate locks automati

-

cally. (All doors must be locked.)

NOTICE

In cold and wet climates, door lock and
door mechanisms may not work prop

-

erly due to freezing conditions.

W ARNING

The liftgate swings upward. Make sure 
no objects or people are near the rear of 
the vehicle when opening the liftgate.

Closing the liftgate

Lower and push down the liftgate firmly. 
Make sure that the liftgate is securely 
latched.

Make sure your hands, feet and other 
parts of your body are safely out of the 
way before closing the liftgate.

W ARNING

Exhaust Fumes
The liftgate should always be kept com

-

pletely closed while the vehicle is in 
motion. If it is left open or ajar, poison

-

ous exhaust gases may enter the car 
and serious illness or death may result.

OSK3042068N

OSK3042069N

Features of your vehicle

22

4

Liftgate

Opening the liftgate in emer

-

gency

Your vehicle is equipped with the emer

-

gency liftgate safety release lever 
located on the bottom of the liftgate.
When someone is inadvertently locked 
in the luggage compartment.

The liftgate can be opened by doing as 
follows:

1. Input the mechanical key into the 

hole.

2. Push the mechanical key to the right 

(1).

3. Push up the liftgate.

W ARNING

• No one should be allowed to occupy 

the cargo area of the vehicle at any 
time. The cargo area is a very danger

-

ous location in the event of a crash.

• Use the release lever for emergencies

only. Use with extreme caution, espe

-

cially while the vehicle is in motion.

CAUTION

Make sure there are no people or objects
around the liftgate before open

-

ing or 

closing the liftgate. Wait until the liftgate
is open fully and stopped before

loading or unloading cargo from the 
vehicle.

W ARNING

Do not grasp the part supporting the lift

-

gate (gas lifter), as this may cause seri

-

ous injury.

OSK3042035N

OSK3048036NR

23

4

4

Features of your vehicle

Windows

Windows

The doors of this vehicle are equipped with power windows that can be operated by a 
switch.

1. Driver's door power window switch

2. Front passenger's door power window switch

3. Rear door (left) power window switch

4. Rear door (right) power window switch

5. Window opening and closing

6. Automatic power window up/down*

7. Power window lock switch

*if equipped

OSK3048038NR

Features of your vehicle

24

4

Windows

NOTICE

In cold and wet climates, power windows 
may not work properly due to freezing 
conditions.

The ignition switch must be in the ON 
position for power windows to operate.

Each door has a power window switch 
that controls the door's window. The driver
has a power window lock switch which
can block the operation of rear passenger
windows. The power windows can be
operated for approximately 10 minutes
after the ignition key is removed or set to
the ACC or LOCK position. How

-

ever, if

the front doors are opened, the power 
windows cannot be operated even within
the 10 minutes period.

The driver's door has a master power 
window switch that controls all the win

-

dows in the vehicle.

If the window cannot be closed because 
it is blocked by objects, remove the 
objects and close the window.

NOTICE

While driving with the rear windows down 
or with the sunroof (if equipped) in an
open (or partially open position), your 
vehicle may demonstrate a wind buffet

-

ing or pulsation noise. This noise is a
normal occurrence and can be reduced 
or eliminated by taking the following 
actions. If the noise occurs with one or 
both of the rear windows down, partially 
lower both front windows approximately 1
inch (2.5 cm). If you experience the noise
with the sunroof open, slightly reduce the
size of the sunroof opening.

CAUTION

Do not install any accessories in the 
vehicle that extend into the open win

-

dow area. Such objects will impact the 
proper functioning of the automatic 
reversal "jam protection" feature.

Window opening and closing

Type A

To open or close a window, press down
or pull up the front portion of the corre

-

sponding switch to the first detent posi

-

tion (5).

Type B - Auto down window (if
equipped)

OSK3048089NR

OSK3048091NR

25

4

4

Features of your vehicle

Windows

Pressing the power window switch 
momentarily to the second detent posi

-

tion (6) completely lowers the window 
even when the switch is released. To 
stop the window at the desired position 
while the window is in operation, pull up 
the switch briefly to the opposite direc

-

tion of the window movement.

Type C - Auto up/down window 
(if equipped)

Pressing or pulling up the power window 
switch momentarily to the second detent 
position (6) completely lowers or raises 
the window even when the switch is 
released. To stop the window at the 
desired position while the window is in 
operation, pull up or press down and 
release the switch.

If the power window does not operate 
normally, the automatic power window 
system must be reset as follows:

1. Turn the ignition switch to the ON 

position.

2. Close the window and continue pull

-

ing up the power window switch for at 
least 1 second after the window is 
completely closed.

Automatic reversal for Type C

If the upward movement of the window 
is blocked by an object or part of the 
body, the window will detect the resis

-

tance and will stop upward movement. 
The window will then lower approxi

-

mately 11.8 inches (30 cm) to allow the 
object to be cleared.

If the window detects the resistance 
while the power window switch is pulled 
up continuously, the window will stop 
upward movement then lower approxi

-

mately 1 inch (2.5 cm).

If the power window switch is pulled up 
continuously again within 5 seconds after
the window is lowered by the auto

-

matic

window reversal feature, the auto

-

matic

window reversal will not operate.

NOTICE

The automatic reverse feature for the 
window is only active when the "auto up" 
feature is used by fully pulling up the 
switch. The automatic reverse feature will
not operate if the window is raised using
the halfway position on the power 
window switch.

OSK3048090NR

ODEEV068020NR

Features of your vehicle

26

4

Windows

W ARNING

Always check for obstructions before 
raising any window to avoid injuries or 
vehicle damage. If an object less than
0.16 of an inch (4 mm) in diameter is 
caught between the window glass and 
the upper window channel, the auto

-

matic reverse window may not detect 
the resistance and will not stop and 
reverse direction.

W ARNING

The automatic reverse feature doesn't 
activate while resetting power window 
system. Make sure body parts or other 
objects are safely out of the way before 
closing the windows to avoid injuries.

W ARNING

Do not install any accessories in the 
vehicle that extend into the open win

-

dow area. Such objects could prevent 
the automatic reverse feature from 
functioning.

Power window lock switch

The driver can disable the power win

-

dow switches on the rear passengers' 
doors by pressing the power window lock
switch to the lock position (pressed).

When the power window lock switch is
pressed:
• The driver's master control can oper

-

ate the front passenger's power win

-

dow and the rear passengers' power
windows.

• The front passenger's control can 

operate the front passenger's power 
window.

• The rear passengers' control cannot

operate the rear passengers' power
window.

CAUTION

Opening/closing Window
To prevent possible damage to the 
power window system, do not open or 
close two windows or more at the same 
time. This will also ensure the longevity 
of the fuse.

Always double check to make sure all
arms, hands, head and other obstruc

-

tions are safely out of the way before
closing a window.

If the window cannot be close because it 
is blocked by objects, remove the objects
and close the window.

W ARNING

Power windows
• Do not allow children to play with the

power windows. Keep the power win

-

dow lock switch (on the driver's door)
in the LOCK (pressed) position.

• Do not extend a face or arms outside 

the window opening while the vehicle 
is in motion. Doing so could result in 
significant bodily injury.

OSK3048039NR

27

4

4

Features of your vehicle

Hood

Hood

The hood serves as a cover for the 
engine compartment. Open the hood if 
maintenance work needs to be per

-

formed in the engine compartment or if 
you need to look at the compartment.

Opening the hood

1. Pull the release lever to unlatch the 

hood. The hood should pop open 
slightly.

NOTICE

Open the hood after turning off the 
engine on a flat surface, shifting the shift 
lever to the P (Park) position.

2. Go to the front of the vehicle, raise the 

hood slightly, push the secondary 
hood release lever (1) up side and lift 
the hood (2).

3. Raise the hood. It will completely rise 

by itself after it has been raised about 
halfway.

Hood open warning

A warning message will appear on the 
LCD display when hood is open.

The warning chime will operate when the
vehicle is being driven above 2 mph (3
km/h) with the hood open.

Closing the hood

1. Before closing the hood, check the 

following:
• All filler caps in the engine com

-

partment must be correctly 
installed.

• Gloves, rags or any other combusti

-

ble material must be removed from
the engine compartment.

OSK3041040N

OSK3041041N

OSK3042474L


Content      ..     1      2      3      4      ..