Kia Forte (2024 year). Manual in english - page 2


  Index      Kia     Kia Forte (2024 year). Manual in english


Search            copyright infringement  


Content      ..      1      2      3      ..


Kia Forte (2024 year). Manual in english - page 2


Safety features of your vehicle

20

3

Seat belts

To adjust the height of the seat belt 
anchor, lower or raise the height 
adjuster into an appropriate position.
• To raise the height adjuster, pull it up 

(1).

• To lower it, push it down (3) while 

pressing the height adjuster button 
(2).

Release the button to lock the anchor 
into position. Try sliding the height 
adjuster to make sure that it has locked 
into position.

Improperly positioned seat belts can 
cause serious injuries in an accident.

W ARNING

Shoulder belt positioning
Verify the shoulder belt anchor is locked 
into position at the appropriate height. 
Never position the shoulder belt across 
your neck or face. Improperly positioned 
seat belts can cause serious injuries in 
an accident.

W ARNING

Seat belt replacement
After a collision, the seat belt system 
should be inspected to ensure it is oper

-

ating normally. Replace any belts that 
are not functioning appropriately.

Seat belts - Front passenger and
rear seat 3-point system with 
combination locking retractor

The following explains how to fasten the 
passenger's and rear seat belts.

Fastening your seat belt:

Combination retractor type seat belts are
installed in the rear seat positions to help
accommodate the installation of

Child Restraint System. Although a com

-

bination retractor is also installed in the 
front passenger seat position, it is 
strongly recommended that children 
always be seated in the rear seat. NEVER 
place any infant restraint system in the 
front seat of the vehicle.

This type of seat belt combines the fea

-

tures of both an emergency and auto

-

matic locking retractor.
• Pull it out of the retractor and insert the

metal tab into the buckle. There will be
an audible "click" when the tab locks
into the buckle. When not secur

-

ing a

child restraint, the seat belt operates in
the same way as the driver's seat belt
(emergency locking retractor type).

It automatically adjusts to the proper 
length only after the lap belt portion of the
seat belt is adjusted manually so that it
fits snugly across your hips.

When the seat belt is fully extended from
the retractor to allow the installa

-

tion of a

Child Restraint System, the seat belt
operation changes to allow the belt to
retract, but not to extend (automatic 
locking retractor type).

NOTICE

Although the combination retractor pro

-

vides the same level of protection for 
seated passengers in either emergency 
or automatic locking modes, have the 
seated passengers use the emergency 
locking feature. The automatic locking 
function is intended only for child restraint
installation. To convert from the automatic
locking feature to the emer

-

gency 

locking operation mode, allow the 
unbuckled seat belt to fully retract.
21

3

3

Safety features of your vehicle

Seat belts

CAUTION

Do NOT fold down the left portion of the 
rear seatback when the rear center seat 
belt is buckled. ALWAYS UNBUCKLE
the rear center seat belt before folding 
down the left portion of the rear seatback.
If the rear center seat belt is buckled
when the left portion of the rear seatback
is folded down, distortion and damage to 
the top portion of the seatback and seat 
belt webbing may result, causing the 
seatback to lock into the folded down 
position.

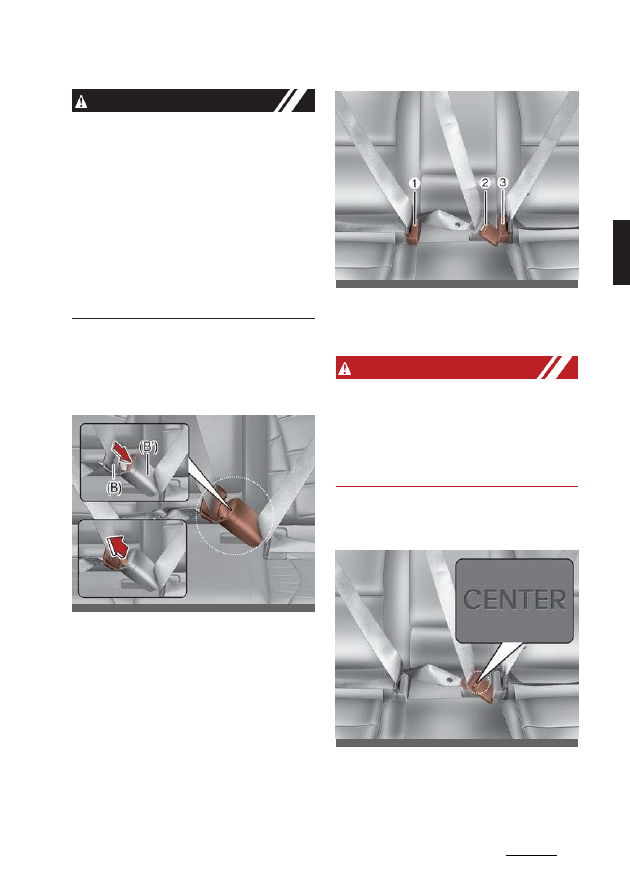
Pull the metal tab (B) and insert it (B) 
into the buckle

(B’). There will be an 

audible

“click“ when the tab locks into 

the buckle. Make sure the belt is not 
twisted.

The seat belt should be locked into the 
buckle on each seat cushion to be prop

-

erly fastened.

1. Rear right seat belt fastening buckle

2. Rear center seat belt fastening buckle

3. Rear left seat belt fastening buckle

W ARNING

Prior to fastening the rear seat belts, 
ensure the latch matches the seat belt 
buckle. Forcefully fastening the left or 
right seat belt to the center buckle can 
result in an improper fastening scenario 
that will not protect you in an accident.

When using the rear center seat belt, the
buckle with the "CENTER" mark must be
used.

OCK030025

OBD031022

OBD031023

Safety features of your vehicle

22

3

Seat belts

Stowing the rear seat belt

The rear seat belt buckles can be stowed
in the pocket between the rear seatback
and cushion when not in use.

1. Route the seat belt webbing through 

the rear seat belt guides. It will help 
keep the belts from being trapped 
behind or under the seats.

2. After inserting the seat belt, tighten 

the belt webbing by pulling it up.

CAUTION

When pulling out to wear the seat belt, 
the tongue should be slowly pulled out 
of the seat belt guide so that the seat 
belt guide does not come off the trim.

Pre-tensioner seat belt

Your vehicle is equipped with driver's 
and front passenger's pre-tensioner seat 
belts (retractor pre-tensioner and EFD 
(Emergency Fastening Device). The
pre- tensioner seat belts may be
activated, when a frontal collision is
severe enough, together with the air
bags, depending on the crash severity,
angle, speed and point of impact.

When the vehicle stops suddenly, or if 
the occupant tries to lean forward too 
quickly, the seat belt retractor may lock 
into position. In certain frontal collisions, 
the pre-tensioner will activate and pull 
the seat belt tighter.

1. Retractor Pre-tensioner

The purpose of the retractor pre-ten

-

sioner is to make sure that the shoul

-

der belts fit in tightly against the 
occupant's upper body in certain fron

-

tal collisions.

2. EFD (Emergency Fastening

Device) (for front seat belt)

The purpose of the EFD is to make 
sure that the lap belts fit tightly 
against the occupant's lower body in 
certain frontal collisions.

If the system detects excessive tension 
on the driver or passenger's seat belt 
when the pre-tensioner system acti

-

vates, the load limiter inside the retractor 
pre-tensioner will release some of the 
pressure on the affected seat belt.

NOTICE

When the pre-tensioner seat belts are 
activated, a loud noise may be heard 
and fine dust, which may appear to be 
smoke, may be visible in the passenger 
compartment. These are normal operat

-

ing conditions and are not hazardous.

ODL3A030029

OSP2031073

23

3

3

Safety features of your vehicle

Seat belts

The seat belt pre-tensioner system con

-

sists mainly of the following compo

-

nents. Their locations are shown in the 
illustration:

1. SRS (supplemental restraint system) 

air bag warning light

2. Front retractor pre-tensioner assem

-

bly

3. SRS control module
4. Emergency fastening device

(EFD) (for front seat belt)

W ARNING

Skin Irritation
Wash all exposed skin areas thoroughly 
after an accident in which the pre-ten

-

sioner seat belts were activated. The fine 
dust from the pre-tensioner activation 
may cause skin irritation and should not 
be breathed in for prolonged periods.

NOTICE

• Both the driver's and front passen

-

ger's seat belt pre-tensioner system 
may be activated not only in certain 
frontal collisions, but also in certain 
side collisions or rollovers, if the vehi

-

cle is equipped with a side or curtain 
air bag.

• The sensor that activates the SRS air 

bag is connected to the pre-tensioner 
seat belt. The SRS air bag warning 
light

on the instrument panel will 

illuminate for approximately 6 sec

-

onds after the ignition switch or 
ENGINE START/STOP button has 
been turned to the ON position, and 
should then turn off.

If the pre-tensioner seat belt system is 
not working properly, this warning light 
will illuminate even if there is not a mal

-

function of the SRS air bag. If the SRS
air bag warning light does not illuminate 
when the Ignition switch or ENGINE 
START/STOP button is turned ON, or if
it remains illuminated approximately 6
seconds, or if it illuminates while the 
vehicle is being driven, have an autho

-

rized Kia dealer inspect it as soon as 
possible.

NOTICE

Do not attempt to service repair, inspect 
or replace the pre-tensioner seat belt 
system. This must be done by an autho

-

rized Kia dealer.

W ARNING

Hot pretensioner
Do not touch the pre-tensioner seat belt 
assemblies for several minutes after
they have been activated. When the pre-
tensioner seat belt mechanism activates 
during a collision the pre-tensioner 
becomes hot and can burn you.

Pre-tensioners operate only one time. 
After activation, pre-tensioner seat belts 
must be replaced. If the pre-tensioner 
must be replaced, contact an authorized 
Kia dealer.

ORP036066L

Safety features of your vehicle

24

3

Seat belts

Seat belt precautions 

Infant or small child

All 50 states have child restraint laws. 
You should be aware of the specific 
requirements in your state. Child and/or 
infant seats must be properly placed and
installed in the rear seat. For more 
information about the use of these 
restraints, refer to "Child Restraint Sys

-

tem (CRS)" on page 3-26.

NOTICE

Children 13 and under are best pro

-

tected from injury in an accident when 
properly restrained in the rear seat by a
child restraint system that meets the 
requirements of the Federal Motor Vehi

-

cle Safety Standards. Before buying any 
child restraint system, make sure that it 
has a label certifying that it meets Fed

-

eral Motor Vehicle Safety Stan

-

dard(FMVSS) 213. The restraint must be 
appropriate for your child's height and 
weight. Check the label on the child 
restraint for this information. Refer to 
"Child Restraint System (CRS)" on page
3-26.

Larger children

Children who are too large for child 
restraint systems must always sit in the 
rear seat and use the available lap/ 
shoulder belts. The lap portion should be 
fastened and snugly on the hips as low 
as possible. Check periodically to ensure 
that the belt fits. A squirming child could 
move the belt out of position. Children 
are given the most safety in the event of
an accident when they are restrained by
a proper restraint system in the rear 
seat. If a larger child (over age 13) must
be seated in the front seat, the child 
should be securely restrained by the

available lap/shoulder belt and the seat 
should be placed in the rearmost posi

-

tion. Children aged 13 and under should 
be restrained securely in the rear seat. 
NEVER place a child aged 13 and under 
in the front seat.

If the shoulder belt portion touches the 
child’s neck or face, try placing the child 
closer to the center of the vehicle. If the 
shoulder belt still touches their face or 
neck. You need to use a child restraint 
system.

W ARNING

Small children
Do not allow small children to ride in the 
vehicle without an appropriate child 
restraint system. If the shoulder belt 
contacts your child's neck or face, your 
child is too small to ride in the vehicle 
without an appropriate child restraint 
system. NEVER place a rear facing
child

seat in the front seat.

Restraint of pregnant women

Pregnant women should wear lap/shoul

-

der belt assemblies whenever possible 
according to specific recommendations 
by their doctors. The lap portion of the 
belt should be worn AS SECURELY
AND LOW AS POSSIBLE.

W ARNING

Pregnant women
Pregnant women must never place the 
lap portion of the seat belt above or on 
the abdomen where the fetus is located. 
The force of the seat belt during a colli

-

sion can seriously injure the fetus.

25

3

3

Safety features of your vehicle

Seat belts

Injured person

A seat belt should be used when an 
injured person is being transported. 
When this is necessary, you should con

-

sult a physician for recommendations.

One person per belt

Two people (including children) should 
never attempt to use a single seat belt. 
This could increase injury severity in 
case of an accident.

Do not lie down

To reduce the chance of injuries in the 
event of an accident and to achieve 
maximum effectiveness of the restraint 
system, all passengers should be sitting 
up and the front and rear seats should 
be in an upright position when the vehi

-

cle is moving. A seat belt cannot provide 
proper protection if a person is lying 
down in the rear seat or if the front and 
rear seats are in a reclined position.

Care of seat belts

Seat belt systems should never be disas

-

sembled or modified. Care should be 
taken to assure that seat belts and belt 
hardware are not damaged by seat 
hinges, doors or abuse.

W ARNING

Pinched seat belt
Make sure that the webbing and/or 
buckle does not get caught or pinched in 
the rear seat when returning the rear 
seatback to its upright position. A caught 
or pinched webbing/ buckle may become
damaged and could fail during a collision
or sudden stop.

W ARNING

Seatbelts can become hot in a vehicle 
that has been closed in sunny weather. 
Please handle with care, as they could 
burn infants and.

Periodic inspection

All seat belts should be inspected peri

-

odically for any wear or damage. Any 
damaged parts should be replaced as 
soon as possible.

Keep belts clean and dry

Seat belts should be kept clean and dry. 
They can be cleaned by using a mild 
soap solution and warm water. Chemical 
substances should not be used.

When to replace seat belts

The seat belt assembly should be 
replaced if the vehicle has been involved 
in an accident, even if no damage is visi

-

ble. Additional questions concerning
seat belt operation should be directed to 
an authorized Kia dealer.

Safety features of your vehicle

26

3

Child Restraint System (CRS)

Child Restraint System (CRS)

Children Always in the Rear

W ARNING

Restraint Location
Never install a child or infant seat on the 
front passenger's seat. A child riding in 
the front can be forcefully struck by an 
inflating airbag and seriously injured.

W ARNING

Hot Child Restraint
A child restraint system can become 
very hot if it is left in a closed vehicle on 
a sunny day. Check the seat cover, 
buckles and latches before placing a
child in the restraint system.

Children age 13 and under must always 
ride in the rear seats and be properly 
restrained to minimize the risk of injury in
an accident, sudden stop or maneu

-

ver.

According to accident statistics, children 
are safer when properly restrained in the 
rear seats than in the front seat. Even 
with air bags, children can be seriously 
injured or killed. Children too large for a
child restraint must use the seat belts 
provided.

All 50 states have child restraint laws 
which require children to travel in 
approved child restraint devices. The 
laws governing the age or height/weight 
restrictions at which seat belts can be 
used instead of child restraints differs 
among states, so you should be aware of 
the specific requirements in your state, 
and where you are travelling.

Child restraint systems must be properly
placed and installed in the rear seat. You
must use a commercially available child

restraint system that meets the Federal 
Motor Vehicle Safety Standards 
(FMVSS).

Child restraint systems are designed to 
be secured in a vehicle seat by lap belt 
portion of a lap/shoulder belt, or by a
LATCH system in the rear seats of the 
vehicle.

Child restraint system (CRS)

Infants and younger children must be 
restrained in an appropriate rear-facing 
or forward-facing CRS that has first 
been properly secured to the rear seat of 
the vehicle. Read and comply with the 
instructions for installation and use pro

-

vided by the manufacturer of the CRS.

W ARNING

Child Restraint Installation
An improperly secured child restraint can
increase the risk of serious injury or 
death in an accident. Always take the 
following precautions when using a child 
restraint system:
• Always follow the CRS manufacturer’s 

instructions for installation and use.

• Always properly restrain your child in 

the child restraint.

• If the head rest prevents proper 

installation of a child seat (as 
described in the manual), the head 
restraint of the respective seating 
position should be readjusted or 
entirely removed.

• Do not use an infant carrier or a child 

safety seat that "hooks" over a seat

-

back, it may not provide adequate 
protection in an accident.

27

3

3

Safety features of your vehicle

Child Restraint System (CRS)

NOTICE

After an accident, have a Kia dealer 
check the child restraint system, seat 
belts, tether anchors and lower anchors.

Selecting a Child Restraint Sys

-

tem (CRS)

When selecting a CRS for your child, 
always:
• Make sure the CRS has a label

certify

-

ing that it meets (FMVSS 213).

• Select a child restraint based on your 

child’s height and weight. The required 
label or the instructions for use
typically provide this information.

• Select a child restraint that fits the 

vehicle seating position where it will 
be used.

• Read and comply with the warnings

and instructions for installation and
use provided with the CRS.

W ARNING

Holding Children
Never hold a child in your arms or lap 
when riding in a vehicle. The violent 
forces created during a crash will tear 
the child from your arms and throw the 
child against the

car’s interior. Always 

use a child restraint system which is 
appropriate for your child's height and 
weight.

W ARNING

Unattended Children
Never leave children unattended in a
vehicle. The car can heat up very 
quickly, resulting in injuries to the child 
in the vehicle.

W ARNING

Seat Belt Use
Do not use one seat belt for two occu

-

pants at the same time. This will elimi

-

nate any safety benefit provided by the 
seat belt to the occupants.

Child restraint system types

There are three main types of child 
restraint systems: rear-facing seats, for

-

ward-facing seats, and booster seats.
They are classified according to the 
child’s age, height and weight.

Rear-facing child seats

A rear-facing child seat provides restraint
with the seating surface against the back
of the child. The harness sys

-

tem holds

the child in place, and in an accident,
acts to keep the child posi

-

tioned in the

seat and reduces the stress to the neck
and spinal cord.

OBD031205

Safety features of your vehicle

28

3

Child Restraint System (CRS)

All children under age one must always 
ride in a rear-facing infant child restraint.

Convertible and 3-in-1 child seats typi

-

cally have higher height and weight lim

-

its for the rear-facing position, allowing 
you to keep your child rear-facing for a
longer period.

Continue to use a rear-facing child seat 
for as long as your child will fit within the 
height and weight limits allowed by the 
child seat manufacturer. 

It’s the best

way to keep them safe. Once your child 
has outgrown the rear-facing child 
restraint, your child is ready for a for

-

ward-facing child restraint with a har

-

ness.

Forward-facing child restraints

A forward-facing child seat provides 
restraint for the

child’s body with a har

-

ness. Keep children in a forwardfacing 
child seat with a harness until they reach 
the top height or weight limit allowed by 
your child

restraint’s manufacturer.

Once your child outgrows the forward-
facing child restraint, your child is ready 
for a booster seat.

Booster seats

A booster seat is a restraint designed to
improve the fit of the

vehicle’s seat belt

system. A booster seat positions the seat
belt so that it fits properly over the lap of
your child.

Keep your child in a booster seat until 
they are big enough to sit in the seat 
without a booster and still have the seat 
belt fit properly. For a seat belt to fit 
properly, the lap belt must lie snugly 
across the upper thighs, not the stom

-

ach. The shoulder belt should lie snug 
across the shoulder and chest and not 
across the neck or face. Children age 13 
and under must always ride in the rear 
seats and must always be properly 
restrained to minimize the risk of injury.

Installing a Child Restraint Sys

-

tem (CRS)

After selecting a proper child seat for 
your child, check to make sure it fits 
properly in your vehicle. Follow the 
instructions provided by the manufac

-

turer when installing the child seat. Note 
these general steps when installing the 
seat in your vehicle:
• Properly secure the child restraint

to the vehicle. All child restraints 
must be secured to the vehicle with 
the lap part of a lap/shoulder belt or 
with the Lower Anchors and Tether 
for Children (LATCH) system.

• Make sure the child restraint is

firmly secured. After installing a child 
restraint to the vehicle, push and pull 
the seat forward and from side-to- side
to verify that it is securely attached to
the seat. A child restraint secured with
a seat belt should be installed as firmly
as possible. How

-

ever, some side-to

side movement can be expected.

OBD031206

29

3

Safety features of your vehicle

Child Restraint System (CRS)

• Secure the child in the child restraint.

Make sure the child is prop

-

erly

strapped in the child restraint 
according to the manufacturer 
instructions.

Lower Anchors and Tether for
Children (LATCH) System

The LATCH system holds a child 
restraint during driving and in an acci

-

dent. This system is designed to make 
installation of the child restraint easier 
and reduce the possibility of improperly 
installing your child restraint. The LATCH 
system uses anchors in the vehicle and 
attachments on the child restraint. The 
LATCH system eliminates the need to 
use seat belts to secure the child restraint
to the rear seats.

Lower anchors are metal bars built into 
the vehicle. There are two lower anchors 
for each LATCH seating position that will 
accommodate a child restraint with lower
attachments.

To use the LATCH system in your vehi

-

cle, you must have a child restraint with 
LATCH attachments.

The child seat manufacturer will provide 
you with instructions on how to use the 
child seat with its attachments for the 
LATCH lower anchors.

LATCH anchors have been provided in 
the left and right outboard rear seating 
positions. Their locations are shown in 
the illustration. There are no LATCH 
anchors provided for the center rear 
seating position.

W ARNING

LATCH Lower Anchors
Never attempt to attach a LATCH 
equipped seat in the center seating posi

-

tion. LATCH lower anchors are only to be

3

used in the left and right rear outboard
seating positions.You may damage the
anchors or the anchors may fail and
break in a collision.

The lower anchor position indicator sym

-

bols are located on the left and right rear 
seat backs to identify the position of the 
lower anchors in your vehicle (see
arrows in illustration).

The LATCH anchors are located 
between the seatback and the seat 
cushion of the rear seat left and right 
outboard seating positions.

To use the lower anchor, push the upper 
portion of the lower anchor cover.

*(1) : Lower Anchor

(2) : Lower Anchor position symbol

OBD031200

OBD031027

Safety features of your vehicle

30

3

Child Restraint System (CRS)

Securing a child restraint with the
LATCH anchors system

To install a LATCH-compatible child 
restraint in either of the rear outboard 
seating positions:

1. Move the seat belt buckle away from 

the lower anchors.

2. Move any other objects away from 

the anchors that could prevent a
secure connection between the child 
restraint and the lower anchors.

3. Place the child restraint on the vehicle

seat, then attach the seat to the lower
anchors according to the instructions
provided by the child restraint manu

-

facturer.

4. Follow the child restraint manufac

-

turer’s instructions for properly 
adjusting and tightening the lower 
attachments on the child restraint to 
the lower anchors.

W ARNING

Take the following precautions when 
using the LATCH system:
• Read and follow all installation 

instructions provided with your child 
restraint system.

• To prevent a child from playing with 

unused seat belts, buckle all unused 
rear seat belts before the child is 
placed into the vehicle. Lock each 
unused seat belt following the instruc

-

tions in the "Automatic locking mode" 
subsection and place the webbing 
behind the child seat or against an 
unused seat back. Children can be 
strangled if a shoulder belt becomes 
wrapped around their neck and the 
seat belt tightens.

• NEVER attach more than one child 

restraint to a single anchor. This could

cause the anchor or attachment to 
come loose or break.

• Always have the LATCH system 

inspected by your authorized Kia 
dealer after an accident. An accident 
can damage the LATCH system and 
may not properly secure the child 
restraint.

NOTICE

The recommended maximum weight for 
the LATCH system is 65 lbs. (30 kg).
When selecting a proper child restraint, 
the total weight of the child plus the child
restraint should be less than 65 lbs (30
kg).

As a guide, the MAX child restraint 
weight should be determined by the fol

-

lowing calculation:

Child Restraint Weight = 65 - (child's 
total weight in lbs.)

Securing a child restraint seat 
with

“Tether Anchor” system

First secure the child restraint with the 
LATCH lower anchors or the seat belt. If 
the child restraint manufacturer recom

-

mends that the top tether strap be 
attached, attach and tighten the top

OBDM031025

31

3

3

Safety features of your vehicle

Child Restraint System (CRS)

tether strap to the top tether strap 
anchor.

Child restraint hook holders are located 
on the back of the rear seatbacks.

W ARNING

Take the following precautions when 
installing the tether strap:
• Read and follow all installation 

instructions provided with your child 
restraint system.

• NEVER attach more than one child 

restraint to a single tether anchor.
This could cause the anchor or attach

-

ment to come loose or break.

• Do not attach the tether strap to any

-

thing other than the correct tether 
anchor. It may not work properly if 
attached to something else.

• Do not use the tether anchors for adult

seat belts or harnesses, or for 
attaching other items or equipment to 
the vehicle.

• Always fasten the seat belts behind 

the child restraint seat when they are 
not used to secure the child seat. Fail

-

ure to do so may result in child stran

-

gulation.

To install the tether anchor:

1. Route the child restraint tether strap 

over the child restraint seatback. 
Route the tether strap under the head 
restraint and between the head 
restraint posts route the tether strap 
over the top of the vehicle seatback. 
Make sure the strap is not twisted.

2. Connect the tether strap hook to the 

tether anchor, then tighten the tether 
strap according to the child seat man

-

ufacturer’s instructions to firmly secure
the child restraint to the seat.

3. Check that the child restraint is 

securely attached to the seat by push

-

ing and pulling the seat forward and 
from side-to-side.

Securing a child restraint with a
lap/shoulder belt

When not using the LATCH system,
all child restraints must be secured to a
vehicle rear seat with the lap part of a
lap/shoulder belt.

Installing a Child Restraint Sys

-

tem with a lap/shoulder belt

Since all passenger seat belts move 
freely under normal conditions and only 
lock under extreme or emergency condi

-

tions (emergency locking mode), you 
must manually pull the seat belt all the 
way out to shift the retractor to the

OBD038026

E2MS103005

Safety features of your vehicle

32

3

Child Restraint System (CRS)

“Automatic Locking” mode to secure a
child restraint.

The

“Automatic Locking” mode will help 

prevent the normal movement of the child 
in the vehicle from causing the seat belt
to loosen and compromise the child 
restraint system.

To install a child restraint system on the 
rear seats, do the following :

1. Place the child restraint system on a

rear seat and route the lap/ shoulder 
belt around or through the child 
restraint, following the restraint man

-

ufacturer’s instructions.
Be sure the seat belt webbing is not 
twisted.

2. Fasten the lap/shoulder belt latch into 

the buckle. Listen for the

distinct “click”

sound.

Position the release button so that it is 
easy to access in case of an emer

-

gency.

3. Pull the shoulder portion of the seat 

belt all the way out. When is fully 
extended, it will shift the retractor to 
the

“Automatic Locking” (child 

restraint) mode.

4. Slowly allow the shoulder portion of 

the seat belt to retract and listen for 
an audible

“clicking” or “ratcheting” 

sound. This indicates that the retrac

-

tor is in the

“Automatic Locking” 

mode. If no distinct sound is heard, 
repeat steps 3 and 4.

5. Remove as much slack from the belt 

as possible by pushing down on the 
child restraint system while feeding the
shoulder belt back into the retrac

-

tor.

6. Push and pull on the child restraint 

system to confirm that the seat belt is 
holding it firmly in place. If it is not, 
release the seat belt and repeat steps 
2 through 6.

ODEEV058042NR

ODEEV058043NR

ODEEV058044NR

33

3

3

Safety features of your vehicle

Child Restraint System (CRS)

7. Double check that the retractor is in 

the

“Automatic Locking” mode by 

attempting to pull more of the seat belt 
out of the retractor. If you cannot, the
retractor is in the

“Automatic Locking” 

mode.

If your CRS manufacturer instructs or 
recommends you use a tether anchor 
with the lap/shoulder belt, refer to 
"Securing a child restraint with the 
LATCH anchors system" on page 3-
30.

NOTICE

When the seat belt is allowed to retract to
its fully stowed position, the retractor will
automatically switch from the

“Auto

-

matic

Locking” mode to the emergency 

lock mode for normal adult usage.

W ARNING

Auto lock mode
Set the retractor to Automatic Lock
mode when installing any child restraint 
system. If the retractor is not in the Auto

-

matic Locking mode, the child restraint 
can move when your vehicle turns or 
stops suddenly.

To remove the child restraint, press the 
release button on the buckle and then 
pull the lap/shoulder belt out of the 
restraint and allow the seat belt to 
retract fully.

Safety features of your vehicle

34

3

Air bag - advanced supplemental restraint system

Air bag - advanced supplemental restraint system

*The actual air bags in the vehicle may differ from the illustration.

1.

Driver’s front air bag

2.

Passenger’s front air bag

3. Side air bag

4. Curtain air bag
Even in vehicles with air bags, you and your passengers must always wear the safety
belts provided in order to minimize the risk and severity of injury in the event of a col

-

lision or rollover.

OBDM031028L

35

3

3

Safety features of your vehicle

Air bag - advanced supplemental restraint system

How does the air bag system 
operate?

• Air bags are activated (able to inflate 

if necessary) only when the Ignition 
switch or ENGINE START/STOP
but

-

ton is turned to the ON or engine

is running.

• The appropriate air bags inflate 

instantly in the event of a serious 
frontal collision or side collision in 
order to help protect the occupants 
from serious physical injury.

• There is no single speed at which the 

air bags will inflate.

Generally, air bags are designed to 
inflate based on the severity of a colli

-

sion and its direction. These two fac

-

tors determine whether the sensors 
produce an electronic deployment/ 
inflation signal.

• Air bag deployment depends on sev

-

eral factors, including vehicle speed 
and angles of impact.

• The front air bags will completely 

inflate and deflate in an instant.

It is virtually impossible for you to see
the air bags inflate during an accident.
It is much more likely that you will
simply see the deflated air bags hang

-

ing out of their storage compartments
after the collision.

• In addition to inflating in serious side 

collisions, side and/or curtain air bags 
will inflate if the sensing system 
detects a rollover.

• When a rollover is detected, side and/

or curtain air bags will remain inflated
longer to help provide protection from
ejection, especially when used in con

-

junction with the seat belts.

• In order to help provide protection, the

air bags must inflate rapidly. The

speed of inflation is a consequence of 
the extremely short time before the 
occupant impacts those vehicle struc

-

tures. This speed of inflation reduces 
the risk of serious or life-threatening 
injuries and is thus a necessary part of 
the air bag design.

However, air bag inflation can also 
cause injuries including facial abra

-

sions, bruises and broken bones 
because the inflation speed also 
causes the air bags to inflate with a
great deal of force.

• There are even circumstances

under which contact with the steer

-

ing wheel or passenger air bag can
cause fatal injuries, especially if the
occupant is too close to the steering
wheel or passenger air bag.

W ARNING

Airbag inflation
Sit as far back as possible from the 
steering wheel while still maintaining 
comfortable control of your vehicle. A
distance of at least 10" from your chest to
the steering wheel is recommended. 
Failure to do so can result in airbag infla

-

tion injuries to the driver.

Noise and smoke

When inflated, the air bags make a loud
noise and release smoke and powder in
the vehicle. This is normal and is a result
of the ignition of the air bag inflator.
After the air bag inflates, you may feel
substantial discomfort in breathing due
to the contact of your chest with both 
the seat belt and the air bag, as well as 
from breathing the smoke and powder. 
Open your doors and/or windows as
soon as possible after impact to
reduce discomfort and prevent pro

-

Safety features of your vehicle

36

3

Air bag - advanced supplemental restraint system

longed exposure to the smoke and
powder.

Though the smoke and powder are non

-

toxic, it they may cause irritation to the 
skin (eyes, nose and throat, etc). Wash 
and rinse with cold water immediately 
and consult a doctor if the symptom per

-

sists.

W ARNING

Hot components
Do not touch the air bag storage area's 
internal components immediately after 
airbag inflation. The components in the 
steering wheel, instrument panel and the 
roof rails above the front and rear doors 
are very hot and can cause burn injuries.

W ARNING

Do not install or place any accessories 
near air bag deployment areas.

Do not install a child restraint on
the front

passenger’s seat.

Never place a rear-facing child restraint 
in the front

passenger’s seat. If the air 

bag deploys, it would impact the rear-
facing child restraint, causing serious or 
fatal injury.

Do not place front-facing child restraints
in the front

passenger’s seat. If the front

passenger air bag inflates, it could cause
serious or fatal injuries to the child.

W ARNING

Air bag deployment
• When children are seated in the rear 

outboard seats of a vehicle equipped 
with side and/or curtain air bags, install
the child restraint system as far away
from the door as possible. Infla

-

tion of

the side and/or curtain air bags could
impact the child.

• Do not install or place any accessories 

near air bag deployment areas, such 
as the instrument panel, windows, pil

-

lars, and roof rails.

ODEEV058046NR

37

3

3

Safety features of your vehicle

Air bag - advanced supplemental restraint system

Air bag warning light

The purpose of air bag warning light in 
your instrument panel is to alert you of a
potential problem with your air bag sys

-

tem, which could include your side and/ 
or curtain air bags used for rollover pro

-

tection.

SRS components and functions

The SRS consists of the following com

-

ponents:

1.

Driver's front air bag module

2.

Passenger's front air bag module

3.

Side air bag modules

4.

Curtain air bag modules

5.

Retractor pre-tensioner assemblies

6.

Air bag warning light

7.

SRS control module (SRSCM) /
Roll

-

over sensor

8.

Front impact sensors

9.

Side impact sensors

10.

PASSENGER AIR BAG

“OFF”

indicator

(Front

passenger’s seat only)

11.

Occupant detection system (Front 
passenger’s seat only)

12.

Emergency fastening device
(EFD) (for front seat belt)

13.

Side pressure sensors

If the air bag warning light is illuminated 
for more than 6 seconds after the igni

-

tion switch or ENGINE START/STOP
but

-

ton is turned on, or if it illuminates 

during vehicle operation, an SRS compo

-

nent may not be functioning properly, 
and you should have your vehicle 
checked by an authorized Kia dealer.

If any of the following conditions occur, 
this indicates a malfunction in the air 
bag system. Have an authorized Kia 
dealer inspect the air bag system as 
soon as possible.
• The light does not turn on briefly 

when you turn the ENGINE START/ 
STOP button to the ON position.

• The light stays on after illuminating 

for approximately 6 seconds.

• The light comes on while the vehicle is 

in motion.

• The light blinks when the ignition 

switch or ENGINE START/STOP
but

-

ton to the ON position.

The front air bag modules are located 
both in the center of the steering wheel 
and in the front passenger's panel above 
the glove box. When the SRSCM
detects a sufficiently severe impact to
the front of the vehicle, it will automatically
deploy the front air bags.

ODEEV068100NR

OBDM030075N

Safety features of your vehicle

38

3

Air bag - advanced supplemental restraint system

Driver’s front air bag (1)

Upon deployment, tear seams molded 
directly into the pad covers will separate 
under pressure to allows full inflation of 
the air bags.

Driver’s front air bag (2)

A fully inflated air bag, in combination 
with a properly worn seat belt, slows the 
driver's or the passenger's forward 
motion, reducing the risk of head and 
chest injury.

Driver’s front air bag (3)

After complete inflation, the air bag 
immediately starts deflating, enabling 
the driver to maintain forward visibility 
and the ability to steer or operate other 
controls.

Passenger’s front air bag

W ARNING

Air bag obstructions
Do not install or place any accessories 
on the steering wheel, instrument panel, 
or on the front passenger's panel above 
the glove box in a vehicle. Such objects 
may become dangerous projectiles if the 
air bag deploys.

ODEEV058048NR

ODEEV058049NR

ODEEV058050NR

ODEEV058051NR

39

3

3

Safety features of your vehicle

Air bag - advanced supplemental restraint system

W ARNING

Flying objects
Do not place any objects (an umbrella, 
bag, etc.) between the front door and
the front seat. Such objects may become 
dangerous projectiles if the side airbag 
inflates.

• If an air bag deploys, there may be a

loud noise and powder released in the 
vehicle. These conditions are normal 
and are non-toxic. The air bags are 
packed in this fine powder. The dust 
generated during air bag deployment 
may cause skin or eye irritation as well 
as aggravate asthma for some per

-

sons. Wash all exposed skin areas 
thoroughly with cold water and a mild 
soap after an accident in which the air 
bags were deployed.

• The SRS can function only when the 

ignition switch or ENGINE START/ 
STOP button is in the ON position. If 
the SRS warning light does not illumi

-

nate, or remains on after about 6 sec

-

onds when the ignition switch is turned
to the ON position or after the engine is
started, or illuminates while driving, the
SRS is not working prop

-

erly. Have

your vehicle immediately inspected by
an authorized Kia dealer.

NOTICE

Before replacing fuse or disconnecting a
battery terminal, turn the ignition switch or
ENGINE START/STOP button to the 
OFF position.

Never remove or replace an air bag 
related fuse (s) when the ignition switch 
or ENGINE START/STOP button is in
the ON position as the SRS warning light
will illuminate.

Occupant Detection System 
(ODS)

Your vehicle is equipped with an ODS in 
the front passenger's seat.

The ODS is designed to detect the pres

-

ence of a properly seated front passen

-

ger and determine if the passenger's 
front air bag should be activated (may 
inflate) or not. Only the front passen

-

ger’s air bag is controlled by the ODS.
Do not put anything that blocks the PAS

-

SENGER AIR BAG OFF indicator.

Main components of the ODS

• An detection device located within the 

front passenger seat cushion.

• An electronic system which deter

-

mines whether the passenger air bag

OBD033085N

OBD033086N

Safety features of your vehicle

40

3

Air bag - advanced supplemental restraint system

systems should be activated or deac

-

tivated.

• An indicator light located on the 

instrument panel which illuminates the
words PASSENGER AIR BAG OFF 
indicates the front passenger air bag 
system is deactivated.

• The instrument panel air bag warning 

light is connected to the occupant 
detection system.

If the front passenger seat is occupied
by a person that the system determines 
to be of appropriate size, and is seated 
properly (upright with the seatback in an 
upright position, centered on the seat 
cushion with their seat belt on, legs com

-

fortably extended and feet on the floor), 
the PASSENGER AIR BAG

“OFF”

indica

-

tor will turn off and the front 

passenger's air bag will be able to inflate, 
if neces

-

sary, in frontal crashes.

You will find the PASSENGER AIR BAG 
OFF indicator on the center instrument 
panel. This system detects the condi

-

tions 1 ~ 4 in the following table and acti

-

vates or deactivates the front passenger 
air bag based on these conditions.

Always be sure that you and all vehicle 
occupants are seated and restrained 
properly (sitting upright with the seat in 
an upright position, centered on the seat 
cushion, legs comfortably extended, feet 
on the floor, and wearing the seat belt 
properly) for effective protection.
• The ODS may not function properly if 

the passenger takes actions which 
can defeat the detection system. 
These include:

1. Failing to sit in an upright position.
2. Leaning against the door or center 

console.

3. Sitting towards the sides or the 

front of the seat.

4. Putting legs on the dashboard or 

resting them on other locations 
which reduce the passenger weight 
on the front seat.

5. Improperly wearing the seat belt.

6. Reclining the seat back.

41

3

3

Safety features of your vehicle

Air bag - advanced supplemental restraint system

Condition and operation in the front passenger ODS

* 1. The system determines a person of adult size as an adult. When a smaller adult 

sits in the front passenger seat, the system may recognize him/her as a child 
depending on his/her size or sitting position.

* 2. Do not allow children to ride in the front passenger seat. When a larger child who 

has outgrown a child restraint system sits in the front passenger seat, the system 
may recognize him/her as an adult depending upon his/her size or sitting position.

* 3. Never install a child restraint system on the front passenger seat.
* 4. The PASSENGER AIR BAG

“OFF” indicator may turn on or off when a child

above 

12 months to 13 years old (with or without child restraint system) sits

in the front 

passenger seat. This is a normal condition.

CAUTION

• Do not install a child restraint seat on

the passenger seat when it is soaked
with liquid.

• Do not modify the ODS. This may 

damage the system and prevent its 
proper function in a collision.

NOTICE

• Do not use car seat cushions or after

-

market seat heaters that cover the 
surface of the seat.

• After cleaning the interior with steam or

detergent, the seat should be thor

-

oughly dried. Check for normal opera

-

tion of the PASSENGER AIR BAG
“OFF” and air bag warning lights.

• Any service related to the passenger

seat and the ODS must be done at a
Kia service center.

• After the passenger seat has been 

removed or installed for repair pur

-

poses, check for normal operation of 
the PASSENGER AIR BAG OFF and
air bag warning lights with a person 
seated or not seated in the passenger 
seat.

Condition detected by the occupant clas

-

sification system

Indicator/Warning light

Devices

“PASSENGER AIR BAG OFF”

indi

-

cator light

SRS warning light

Front passenger air bag

1.Adult

*1

Off

Off

Activated

2. Child restraint system with child under

12months old

*2*3*4

On

Off

Deactivated

3. Unoccupied

On

Off

Deactivated

4. Malfunction in the system

Off

On

Activated

Safety features of your vehicle

42

3

Air bag - advanced supplemental restraint system

W ARNING

ODS System
Riding in an improper position adversely 
affects the ODS and may result in the 
deactivation of the front passenger air

-

bag. It is important for the driver to 
instruct the passenger as to the proper 
seating instructions as contained in this 
manual.

NOTICE

When the PASSENGER AIR BAG OFF
symbol is illuminated, the passenger air
bag system will not operate. The passen

-

ger air bag system will operate when 
necessary if the symbol is not illumi

-

nated.

NOTICE

Do not modify or replace the front pas

-

senger seat. Don't place anything on or 
attach anything such as a blanket, front 
seat cover or after market seat heater to 
the front passenger seat. This can 
adversely affect the ODS.

W ARNING

ODS System
Riding in an improper position adversely 
affects the ODS and may result in the 
deactivation of the front passenger air

-

bag. It is important for the driver to 
instruct the passenger as to the proper 
sitting positions as contained in this 
manual.

• Do not place a heavy load in the front

passenger seatback pocket or on the
front passenger seat.

• Do not place feet on the front passen

-

ger seatback.

• Never sit with hips shifted towards the 

front of the seat.

ODEEV058055NR

ODEEV058056NR

ODEEV058057NR

43

3

3

Safety features of your vehicle

Air bag - advanced supplemental restraint system

• Never excessively recline the front 

passenger seatback.

• Never place feet on the dashboard.

• Do not use car seat accessories such

as thick blankets and cushions which
cover up the car seat surface.

• Never lean on the door or center con

-

sole.

• Do not sit with your weight exces

-

sively skewing to the left or right on 
the front passenger seat.

• Do not place electronic devices such 

as laptops or DVD players or heavy 
objects such as a large quantity of 
water bottles on the passenger seat.

• Wet Passenger Seat

Do not spill liquid in the passenger 
seat. Spilled liquid on the passenger 
seat may cause the air bag warning 
light to illuminate or malfunction. If any
liquid is spilled, make sure the seat has
been completely dried before driving
the vehicle.

ODEEV058002NR

ODEEV058059NR

ODEEV058061NR

ODEEV058060NR

ODEEV058062NR

Safety features of your vehicle

44

3

Air bag - advanced supplemental restraint system

Proper position

When an adult is seated in the front pas

-

senger seat, if the PASSENGER AIR
BAG OFF indicator is on, turn the ignition 
switch or ENGINE START/STOP button 
to the OFF position and have the pas

-

senger sit properly (sitting upright with the
seat back in an upright position, cen

-

tered on the seat cushion with their seat 
belt on, legs comfortably extended and 
feet on the floor). Restart the engine and 
ensure the passenger remains in that 
position. This will allow the system to 
detect the person and to enable the pas

-

senger air bag.

If the PASSENGER AIR BAG OFF
indica

-

tor is still on, have the passenger

to move to the rear seat.

W ARNING

PASSENGER AIR BAG OFF light
Do not allow an adult passenger to ride 
in the front seat when the PASSENGER 
AIR BAG OFF indicator is illuminated 
because the air bag will not deploy in the 
event of a collision. Have the passenger 
reposition in the seat. Failure to properly 
position may lead to air bag deactivation 
resulting in air bag non-deployment in a
collision. If the PASSENGER AIR BAG 
“OFF” indicator remains illuminated after 
repositioned properly and the vehicle is 
restarted, have the passenger move to 
the rear seat because the front air bag 
will not deploy.

NOTICE

The PASSENGER AIR BAG

“OFF”

indica

-

tor illuminates for about 4 seconds after 
the ignition switch or ENGINE START/
STOP button is turned to the ON posi

-

tion or after the engine is started. If the 
front passenger seat is occupied, the 
occupant detection sensor will then clas

-

sify the front passenger after several 
more seconds.
• Even though your vehicle is equipped 

with ODS, never install a CRS in the 
front passenger's seat. A deploying air 
bag can forcefully strike a child result

-

ing in serious injuries or death. Any 
child age 13 and under should ride in 
the rear seat. Children too large for 
child restraints should use the avail

-

able lap/shoulder belts. No matter what
type of collision, children of all ages are
safer when restrained in the rear seat.

• If the PASSENGER AIR BAG “OFF”

indicator is illuminated when the front 
passenger's seat is occupied by an

ODEEV058063NR

ODEEV058064NR

45

3

3

Safety features of your vehicle

Air bag - advanced supplemental restraint system

adult sitting properly, have that per

-

son sit in the rear seat.

If there is a malfunction of the ODS the 
PASSENGER AIR BAG

“OFF”

indicator will not illuminate and the
passenger's front air bag will inflate in
frontal impacts even if there is no
occupant in the front passenger's seat.

Driver's and passenger's front air
bag

Driver’s front air bag

Passenger’s front air bag

Your vehicle is equipped with an 
Advanced Supplemental Restraint (Air 
Bag) System and lap/shoulder belts at 
both the driver and passenger seating 
position.

The indicators are the words

“AIR BAG”

located on the air bag pad cover on the
steering wheel and the passenger's side
front panel pad above the glove box.

The SRS consists of air bags installed 
under the pad covers in the center of the 
steering wheel and the passenger's side 
front panel above the glove box.

The purpose of the SRS is to provide the 
vehicle's driver and/or the front passen

-

ger with additional protection of the seat 
belt system in a frontal impact of suffi

-

cient severity. The SRS uses sensors to 
gather information about the driver's and
front passenger's seat belt usage and
impact severity.

These sensors provide the ability to con

-

trol the SRS deployment based on 
whether the seat belts are fastened, and 
how severe the impact is.

The advanced SRS offers the ability to 
control the air bag inflation with two lev

-

els. A first stage is provided for moder

-

ate impacts. A second stage level is 
provided for more severe impacts.

The

passenger’s front air bag is 

designed to help reduce injuries to small 
adults sitting close to the instrument 
panel in low-speed collisions. Children 
must be restrained in the rear seat.

According to the impact severity and 
seat belt usage, the SRSCM (SRS
Control Module) controls air bag inflation.
Failure to properly wear seat belts can
increase the risk or severity of injury in an
acci

-

dent.

NOTICE

The

driver’s hands should be placed on 

the steering wheel at the 9:00 and 3:00 
positions. The

passenger’s arm and 

hands should be placed on their laps.

OBDM031029L

OBD031031

Safety features of your vehicle

46

3

Air bag - advanced supplemental restraint system

Your vehicle is equipped with an ODS in 
the front passenger's seat. The ODS 
detects the presence of a passenger in 
the front passenger's seat and will turn 
off the front passenger's air bag under 
certain conditions. For more detail, see 
“Occupant detection system” in this sec

-

tion.

Modification to the seat structure can 
cause the air bag to deploy at a different 
level than should be provided.

Manufacturers are required by govern

-

ment regulations to provide a contact 
point concerning modifications to the 
vehicle for persons with disabilities, which
modifications may affect the vehi

-

cle’s 

advanced air bag system. That con

-

tact

is

Kia’s toll-free Customer Assistance

center at 1- 800-333- 44Kia(U.S. only).
Kia neither endorses
nor support any changes to any part or
structure of the vehicle that could affect 
the advanced air bag system, including 
the ODS.

W ARNING

Replacement/ modifications
The front passenger seat, dashboard or 
door should not be replaced except by an
authorized Kia dealer using original Kia
parts designed for this vehicle and model.
Any other such replacement or 
modification could adversely affect the 
operation of the occupant detection sys

-

tem and your advanced air bags.

Advanced air bags are combined with 
pre-tensioner seat belts to help provide 
enhanced occupant protection in frontal 
crashes. Front air bags are not intended 
to deploy in collisions in which sufficient 
protection can be provided by the pre-
tensioner seat belt.

NOTICE

Air bags can only be used once

– have 

an authorized Kia dealer replace the air
bag immediately after deployment.

Front air bags are not intended to 
deploy inside impact, rear impacts or 
rollovers. When the frontal deployment 
threshold is satisfied in a side impact, 
the front air bags may deploy. Front air 
bags will not deploy in frontal impacts 
below the deployment threshold.

W ARNING

SRS Wiring
Do not tamper with or disconnect SRS 
wiring or other components of the SRS 
system. This could result in injury, due to 
accidental deployment of the air bags or
by rendering the SRS inoperative.

W ARNING

Do not attaching objects.
• No objects (such as an instrument 

panel cover, mobile phone holder, cup 
holder, perfume, stickers, etc.) should 
be placed over or near the air bag 
modules on the steering wheel, instru

-

ment panel, windshield glass or, front 
passenger's instrument panel above 
the glove box. Such objects could 
cause harm if the vehicle is in a colli

-

sion severe enough to deploy the air

-

bag.

Do not place any objects over the air 
bag or between the air bag and you.

• Never place or insert any object into 

any small opening near the side air

-

bag labels attached to the vehicle 
seats.

When the air bag deploys, the object 
may affect the deployment and result

47

3

3

Safety features of your vehicle

Air bag - advanced supplemental restraint system

in an unexpected accident or an 
injury.

Side air bag

*The actual air bags in the vehicle may 

differ from the illustration.

Your vehicle is equipped with a side air 
bag in each front seat. The purpose of 
these air bags is to provide the vehicle's 
driver and/or the front passenger with 
additional protection than by seat belts 
alone.
• The side air bags are designed to 

deploy during certain side-impact col

-

lisions, depending on the crash sever

-

ity, angle, speed and point of impact. 
However, when side deployment 
threshold is satisfied at front impact, 
side air bags may deploy.

• The side air bags may deploy on the 

side of the impact or on both sides.

• The side and/or curtain air bags on 

both sides of the vehicle will deploy if a
rollover or possible rollover is detected.

• The side air bags are not designed to 

deploy in all side impact or rollover 
situations.

W ARNING

Unexpected deployment
Avoid impact to the side impact airbag 
sensor when the ENGINE
START/STOP button is ON to prevent
unexpected deployment of the side air
bag.
• The side air bag is supplemental to 

the driver's and the passenger's seat 
belt systems and is not a substitute 
for them. Your seat belts must be 
always worn while the vehicle is in 
operation.

• For best protection from the side air 

bag system and to avoid being injured 
by the deploying side air bag, both 
front seat occupants should sit in an 
upright position with seat belts prop

-

erly fastened. The driver's hands 
should be placed on the steering 
wheel at the 9:00 and 3:00 positions. 
The passenger's arms and hands 
should be placed on their laps.

W ARNING

Deployment
Do not install any accessories including
seat covers, on the side or near the side
air bag as this may affect deployment of
the side air bags.

• If seat or seat cover is damaged, have 

the vehicle checked and repaired by 
an authorized Kia dealer. Inform the

OBD031034

OBD031201

Safety features of your vehicle

48

3

Air bag - advanced supplemental restraint system

dealer that your vehicle is equipped 
with side air bags and an ODS.

W ARNING

Flying objects
Do not place any objects (an umbrella, 
bag, etc.) between the front door and 
the front seat. They may become dan

-

gerous projectiles if the side airbag 
inflates.

W ARNING

Do not attach objects
• Do not place any objects over the air 

bag or between the air bag and you. 
Do not attach any objects around the 
area the air bag inflates such as the 
door, side door glass, front and rear 
pillar.

• Do not put any objects between the 

side airbag label and seat cushion. It 
could cause harm if the vehicle is in a
crash severe enough to deploy the 
airbags..

• Never place or insert any object into 

any small opening near the side air

-

bag labels attached to the vehicle 
seats. When the air bag deploys, the 
object may affect the deployment and 
result in unexpected accident or injury.

• Do not install any accessory on the 

side or near the side air bags.

Curtain air bag

*The actual air bags in the vehicle may 

differ from the illustration.

Curtain air bags are located along both 
sides of the roof rails above the front 
and rear doors.

They are designed to help protect occu

-

pants in certain side impacts and to help 
reduce the risk of ejection from the vehi

-

cle as a result of a rollover, especially 
when the seatbelts are also in use.
• The curtain air bags are designed to 

deploy during certain side impact col

-

lisions, depending on crash severity, 
angle, speed and point of impact. 
However, when the side deployment 
threshold is satisfied in a frontal 
impact, side air bags may deploy.

OBD031035

OBD031204

49

3

3

Safety features of your vehicle

Air bag - advanced supplemental restraint system

• The curtain air bags may deploy on 

the side of the impact or on both 
sides.

• The curtains air bags on both sides of 

the vehicle will deploy in certain roll

-

over situations.

• The curtain air bags are not designed

to deploy in all side impact or rollover
situations.

Do not allow passengers to lean their 
heads or bodies against the doors, put 
their arms on the doors, extend arms out 
of the window or place objects between 
the doors and passengers when they are 
seated on seats equipped with side 
impact and/or curtain air bags.

NOTICE

Never try to open or repair any compo

-

nents of the side and curtain air bag sys

-

tem. This should only be done by an 
authorized Kia dealer.

W ARNING

Do not attach objects
• Do not place any objects over the air 

bag. Do not attach any objects around 
the area the air bag inflates such as 
the door, side door glass, front and 
rear pillar or roof side rail.

• Do not hang hard or breakable 

objects on the coat hook.

Inflation and non-inflation conditions of
the air bag

There are many types of accidents in 
which the air bag would not be expected 
to provide additional protection.

These include rear impacts, second or
third collisions in multiple impact acci

-

dents, as well as low speed impacts.

Safety features of your vehicle

50

3

Air bag - advanced supplemental restraint system

Air bag collision sensors

OBDM031037L

(1)

(2)

(3)

(4)

OBDM031036L

OBDM031039L

1. SRS control module/ Rollover sensor

2. Front impact sensor

3. Side pressure sensor

4. Side impact sensor

OBDM031038L

OBDM031041L

51

3

3

Safety features of your vehicle

Air bag - advanced supplemental restraint system

W ARNING

Air bag sensors
• Do not hit or allow any objects to 

impact the locations where air bags or 
sensors are installed.

This may cause unexpected air bag 
deployment, which could result in 
serious personal injury or death.

• If the installation location or angle of 

the sensors is altered in any way, the 
air bags may deploy when they 
should not, or they may not deploy 
when they should.

Do not perform maintenance on or 
around the air bag sensors. Have the 
vehicle checked and repaired by an 
authorized Kia dealer.

Problems may arise if the sensor instal

-

lation angles are changed due to the 
deformation of the front bumper, front 
end module, body or front doors where 
side collision sensors are installed. Have 
the vehicle checked and repaired by an 
authorized Kia dealer.

Installing bumper guards, side steps or 
running boards, or replacing a bumper 
(or front door module) with non-genuine 
parts may adversely affect your vehicle's 
collision and air bag deployment perfor

-

mance.

Kia Genuine bumper guards/bumpers
are guaranteed for quality and perfor

-

mance.

Air bag inflation conditions 

Front air bags

Front air bags may inflate in a frontal 
collision depending on the severity, 
speed and angles of impact.

Side and/or curtain air bags

OBDM031040L

OBDM031043L

OBD031202


Content      ..      1      2      3      ..