FANUC AC SERVO MOTOR ai series, AC SPINDLE MOTOR ai series, SERVO AMPLIFIER ai series. MAINTENANCE MANUAL - page 1
B-65285EN/04
SAFETY PRECAUTIONS
SAFETY PRECAUTIONS
The "Safety Precautions" section describes the safety precautions relating to the use of FANUC servo
motors, spindle motors, and servo amplifiers (Power Supply, Servo Amplifier, and Spindle Amplifier).
Users of any servo motor or amplifier model are requested to read the "Safety Precautions" carefully before
using the servo motor or amplifier.
The users are also requested to read an applicable specification manual carefully and understand each
function of the motor or amplifier for correct use.
The users are basically forbidden to do any behavior or action not mentioned in the "Safety Precautions."
They are invited to ask FANUC previously about what behavior or action is prohibited.
Contents
1.1 DEFINITION OF WARNING, CAUTION, AND NOTE
s-2
1.2 FANUC AC SERVO MOTOR αis/αi series
FANUC AC SPINDLE MOTOR αi series
s-3
1.2.1Warning
s-3
1.2.2Caution
s-5
1.2.3Note
s-6
1.3 FANUC SERVO AMPLIFIER αi series
s-8
1.3.1Warnings and Cautions Relating to Mounting
s-8
1.3.1.1 Warning
s-8
1.3.1.2 Caution
s-9
1.3.1.3 Note
s-10
1.3.2Warnings and Cautions Relating to a Pilot Run
s-10
1.3.2.1 Warning
s-10
1.3.2.2 Caution
s-11
1.3.3Warnings and Cautions Relating to Maintenance
s-12
1.3.3.1 Warning
s-12
1.3.3.2 Caution
s-13
1.3.3.3 Note
s-13
s-1
SAFETY PRECAUTIONS
B-65285EN/04
1.1
DEFINITION OF WARNING, CAUTION, AND NOTE
This manual includes safety precautions for protecting the user and preventing damage to the machine.
Precautions are classified into Warning and Caution according to their bearing on safety. Also,
supplementary information is described as a Note. Read the Warning, Caution, and Note thoroughly before
attempting to use the machine.
WARNING
Applied when there is a danger of the user being injured or when there is a
damage of both the user being injured and the equipment being damaged if the
approved procedure is not observed.
CAUTION
Applied when there is a danger of the equipment being damaged, if the approved
procedure is not observed.
NOTE
The Note is used to indicate supplementary information other than Warning and
Caution.
If a precaution described even as "CAUTION" is not followed, a serious result may be caused depending on
the status. Be sure to follow the precautions described as "WARNING" and "CAUTION" since they give
important information.
* Read this manual carefully, and store it in a safe place.
s-2
B-65285EN/04
SAFETY PRECAUTIONS
1.2
FANUC AC SERVO MOTOR αis/αi series
FANUC AC SPINDLE MOTOR αi series
1.2.1
Warning
WARNING
-
Be sure to ground a motor frame.
To avoid electric shocks, be sure to connect the grounding terminal in the terminal box to the grounding
terminal of the machine.
-
Before starting to connect a motor to electric wires, make sure they are
isolated from an electric power source.
A failure to observe this caution is vary dangerous because you may get electric shocks.
-
Do not ground a motor power wire terminal or short-circuit it to another power
wire terminal.
A failure to observe this caution may cause electric shocks or a burned wiring.
* Some motors require a special connection such as a winding changeover. For details, refer to Chapter
7, "OUTLINE DRAWINGS," in B-65262EN.
-
When connecting a cord such as a power line to the terminal block, use
specified tightening torque to firmly connect the cord.
If operation is performed with a loose terminal, the terminal block can overheat, resulting in a fire.
Moreover, a terminal can be detached, resulting in a ground fault, short circuit, or electric shock.
-
Do not apply current when a terminal of the terminal block or the crimp
terminal of a power line is exposed.
If the hand or a conductive object touches a terminal of the terminal block or the crimp terminal of a power
line, you may get electric shocks. Attach an insulation cover (accessory) onto the terminal block. Moreover,
cover the crimp terminal at the tip of a power line with an insulation tube.
-
Assemble and install a power connector securely.
If a power line is detached due to a failure in crimping or soldering, or a conductive area is exposed due to
a failure in shell assembly, you may get electric shocks.
-
Do not touch a motor with a wet hand.
A failure to observe this caution is vary dangerous because you may get electric shocks.
-
Before touching a motor, shut off the power to it.
Even if a motor is not rotating, there may be a voltage across the terminals of the motor.
Especially before touching a power supply connection, take sufficient precautions.
Otherwise you may get electric shocks.
-
Do not touch any terminal of a motor for a while (at least 20 minutes) after the
power to the motor is shut off.
High voltage remains across power line terminals of a motor for a while after the power to the motor is shut
off. So, do not touch any terminal or connect it to any other equipment. Otherwise, you may get electric
shocks or the motor and/or equipment may get damaged.
-
On the machine, install a stop device for securing safety.
The brake built into the servo motor is not a stop device for securing safety. The machine may not be held if
a failure occurs.
s-3
SAFETY PRECAUTIONS
B-65285EN/04
WARNING
-
Do not enter the area under the vertical axis without securing safety.
If a vertical axis drop occurs unexpectedly, you may be injured.
-
Fasten a motor firmly before driving the motor.
If a motor is driven when the motor is not fastened firmly or is fastened insufficiently, the motor can tumble
or is removed, resulting in a danger. If the motor mounting section is not sufficiently strong, the machine
may be damaged or the user may be injured.
-
Do not get close to a rotary section of a motor when it is rotating.
When a motor is rotating, clothes or fingers can be caught, resulting in an injury.
-
Do not drive a motor with an object such as a key exposed.
An object such as a key can be thrown away, resulting in an injury. Before rotating a motor, check that there
is no object that is thrown away by motor rotation.
-
Do not apply a radial load exceeding the "allowable radial load".
The shaft can break, and components can be thrown away. When the vertical axis is involved, a vertical axis
drop can occur.
-
To drive a motor, use a specified amplifier and parameters.
An incorrect combination of a motor, amplifier, and parameters may cause the motor to behave
unexpectedly. This is dangerous, and the motor may get damaged.
-
Do not bring any dangerous stuff near a motor.
Motors are connected to a power line, and may get hot. If a flammable is placed near a motor, it may be
ignited, catch fire, or explode.
-
Be safely dressed when handling a motor.
Wear safety shoes or gloves when handling a motor as you may get hurt on any edge or protrusion on it or
electric shocks.
-
Use a crane or lift to move a motor from one place to another.
A motor is heavy, so that if you lift a motor by hand, you may be exposed to various risks. For example, the
waist can be damaged, and the motor can drop to injure you. Use equipment such as a crane as needed. (For
the weight of a motor, see Specification manual (B-65262EN).)
-
Do not touch a motor when it is running or immediately after it stops.
A motor may get hot when it is running. Do not touch the motor before it gets cool enough. Otherwise, you
may get burned.
-
Be careful not get your hair or cloths caught in a fan.
Be careful especially for a fan used to generate an inward air flow.
Be careful also for a fan even when the motor is stopped, because it continues to rotate while the amplifier
is turned on.
-
Install the components around a motor securely.
If a component is displaced or removed during motor rotation, a danger can result.
s-4
B-65285EN/04
SAFETY PRECAUTIONS
1.2.2
Caution
CAUTION
-
Use the eyebolt of a motor to move the motor only.
When a motor is installed on a machine, do not move the machine by using the eyebolt of the motor.
Otherwise, the eyebolt and motor can be damaged.
-
Do not disassemble a motor.
Disassembling a motor may cause a failure or trouble in it.
If disassembly is in need because of maintenance or repair, please contact a service representative of
FANUC.
For pulse coder replacement, refer to the Subsection III-1.2.6.
-
Do not machine and modify a motor.
Do not machine and modify a motor in any case except when motor machining or modification is specified
by FANUC. Modifying a motor may cause a failure or trouble in it.
-
Do not conduct dielectric strength or insulation test for a sensor.
Such a test can damage elements in the sensor.
-
Be sure to connect motor cables correctly.
An incorrect connection of a cable cause abnormal heat generation, equipment malfunction, or failure.
Always use a cable with an appropriate current carrying capacity (or thickness). For details, refer to Chapter
7, “OUTLINE DRAWINGS” in the Specification manual (B-65262EN).
-
Do not apply shocks to a motor or cause scratches to it.
If a motor is subjected to shocks or is scratched, its components may be adversely affected, resulting in
normal operation being impaired. Plastic components and sensors can be damaged easily. So, handle those
components very carefully. In particular, do not lift a motor by using a plastic component, connector,
terminal block, and so forth.
-
Do not step or sit on a motor, and do not put a heavy object on a motor.
If you step or sit on a motor, it may get deformed or broken. Do not put a motor on another unless they are
in packages.
-
When attaching a component having inertia, such as a pulley, to a motor,
ensure that any imbalance between the motor and component is minimized.
If there is a large imbalance, the motor may vibrates abnormally, resulting in the motor being broken.
-
Be sure to attach a key to a motor with a keyed shaft.
If a motor with a keyed shaft runs with no key attached, it may impair torque transmission or cause
imbalance, resulting in the motor being broken.
-
Use a motor under an appropriate environmental condition.
Using a motor in an adverse environment may cause a failure or trouble in it. Refer to Specification manual
(B-65262EN) for details of the operating and environmental conditions for motors.
-
Do not apply a commercial power source voltage directly to a motor.
Applying a commercial power source voltage directly to a motor may result in its windings being burned.
Be sure to use a specified amplifier for supplying voltage to the motor.
s-5
SAFETY PRECAUTIONS
B-65285EN/04
CAUTION
-
Do not use the brake built into a motor for braking.
The brake built into a servo motor is designed for holding. If the brake is used for braking, a failure can
occur.
-
Ensure that motors are cooled if they are those that require forcible cooling.
If a motor that requires forcible cooling is not cooled normally, it may cause a failure or trouble. For a
fan-cooled motor, ensure that it is not clogged or blocked with dust and dirt. For a liquid-cooled motor,
ensure that the amount of the liquid is appropriate and that the liquid piping is not clogged. For both types,
perform regular cleaning and inspection.
-
When storing a motor, put it in a dry (non-condensing) place at room
temperature (0 to 40 °C).
If a motor is stored in a humid or hot place, its components may get damaged or deteriorated. In addition,
keep a motor in such a position that its shaft is held horizontal and its terminal box is at the top.
-
FANUC motors are designed for use with machines. Do not use them for any
other purpose.
If a FANUC motor is used for an unintended purpose, it may cause an unexpected symptom or trouble. If
you want to use a motor for an unintended purpose, previously consult with FANUC.
1.2.3
Note
NOTE
-
Ensure that a base or frame on which a motor is mounted is strong enough.
Motors are heavy. If a base or frame on which a motor is mounted is not strong enough, it is impossible to
achieve the required precision.
-
Do not remove a nameplate from a motor.
If a nameplate comes off, be careful not to lose it. If the nameplate is lost, the motor becomes unidentifiable,
resulting in maintenance becoming impossible.
-
When testing the winding or insulation resistance of a motor, satisfy the
conditions stipulated in IEC60034.
Testing a motor under a condition severer than those specified in IEC60034 may damage the motor.
-
For a motor with a terminal box, make a conduit hole for the terminal box in a
specified position.
When making a conduit hole, be careful not to break or damage unspecified portions. Refer to the
Specification manual (B-65262EN).
-
Before using a motor, measure its winding and insulation resistances, and
make sure they are normal.
Especially for a motor that has been stored for a prolonged period of time, conduct these checks. A motor
may deteriorate depending on the condition under which it is stored or the time during which it is stored. For
the winding resistances of motors, refer to the Specification manual (B-65262EN), or ask FANUC. For
insulation resistances, see the following table.
s-6
B-65285EN/04
SAFETY PRECAUTIONS
NOTE
-
To use a motor as long as possible, perform periodic maintenance and
inspection for it, and check its winding and insulation resistances.
Note that extremely severe inspections (such as dielectric strength tests) of a motor may damage its
windings. For the winding resistances of motors, refer to the Specification manual (B-65262EN), or ask
FANUC. For insulation resistances, see the following table.
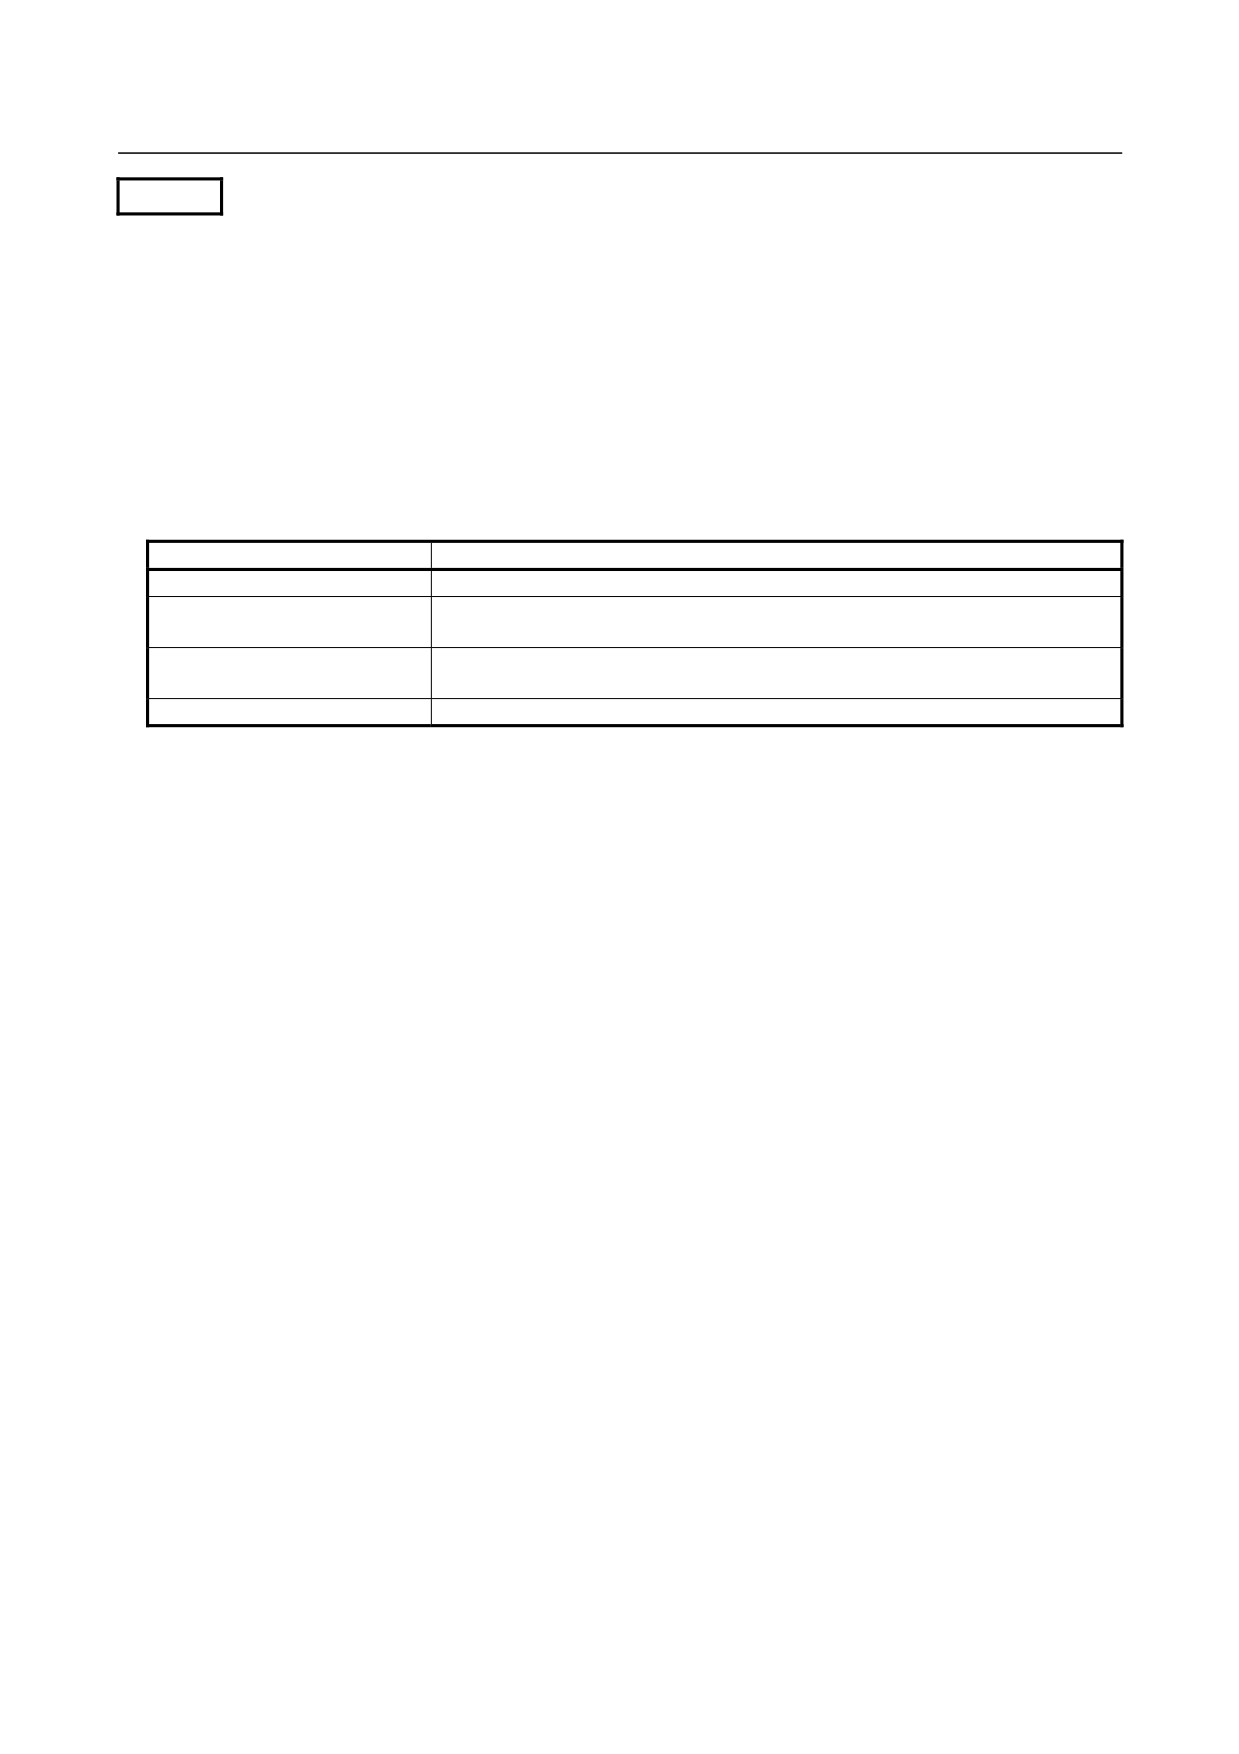
MOTOR INSULATION RESISTANCE MEASUREMENT
Measure an insulation resistance between each winding and motor frame using an insulation resistance
meter (500 VDC). Judge the measurements according to the following table. Make an insulation
resistance measurement on a single motor unit after detaching cords such as a power line.
Insulation resistance
Judgment
100 MΩ or higher
Acceptable
The winding has begun deteriorating. There is no problem with the performance at
10 to 100 MΩ
present. Be sure to perform periodic inspection.
The winding has considerably deteriorated. Special care is in need. Be sure to
1 to 10 MΩ
perform periodic inspection.
Lower than 1 MΩ
Unacceptable. Replace the motor.
s-7
SAFETY PRECAUTIONS
B-65285EN/04
1.3
FANUC SERVO AMPLIFIER αi series
1.3.1
Warnings and Cautions Relating to Mounting
1.3.1.1 Warning
WARNING
-
Check the specification code of the amplifier.
Check that the delivered amplifier is as originally ordered.
-
Mount a ground fault interrupter.
To guard against fire and electric shock, fit the factory power supply or machine with a ground fault
interrupter (designed for use with an inverter).
-
Securely ground the amplifier.
Securely connect the ground terminal and metal frame of the amplifier and motor to a common ground
plate of the power magnetics cabinet.
-
Be aware of the weight of the amplifier and other components.
Control motor amplifiers and AC reactors are heavy. When transporting them or mounting them in the
cabinet, therefore, be careful not to injured yourself or damage the equipment. Be particularly carefull
not to jam your fingers between the cabinet and amplifier.
-
Never ground or short-circuit either the power supply lines or power lines.
Protect the lines from any stress such as bending. Handle the ends appropriately.
-
Ensure that the power supply lines, power lines, and signal lines are securely connected.
A loose screw, loose connection, or the like will cause a motor malfunction or overheating, or a ground
fault.
Be extremely careful with power supply lines, motor power lines, and DC link connections through
which a large amount of current passes, because a loose screw (or poor contact in a connector or poor
connection between a connector terminal and a cable) may cause a fire.
-
Insulate all exposed parts that are charged.
-
Never touch the regenerative discharge resistor or radiator directly.
The surface of the radiator and regenerative discharge unit become extremely hot. Never touch them
directly. An appropriate structure should also be considered.
-
Close the amplifier cover after completing the wiring.
Leaving the cover open presents a danger of electric shock.
-
Do not disassemble the amplifier.
-
Ensure that the cables used for the power supply lines and power lines are of the appropriate
diameter and temperature ratings.
-
Do not apply an excessively large force to plastic parts.
If a plastic section breaks, it may cause internal damage, thus interfering with normal operation. The
edge of a broken section is likely to be sharp and, therefore, presents a risk of injury.
s-8
B-65285EN/04
SAFETY PRECAUTIONS
1.3.1.2 Caution
CAUTION
-
Do not step or sit on the amplifier.
Also, do not stack unpacked amplifiers on top of each other.
-
Use the amplifier in an appropriate environment.
See the allowable ambient temperatures and other requirements, given in the corresponding
descriptions.
-
Protect the amplifier from corrosive or conductive mist or drops of water.
Use a filter if necessary.
-
Protect the amplifier from impact.
Do not place anything on the amplifier.
-
Do not block the air inlet to the radiator.
A deposit of coolant, oil mist, or chips on the air inlet will result in a reduction in the cooling efficiency.
In some cases, the required efficiency cannot be achieved. The deposit may also lead to a reduction in
the useful life of the semiconductors. Especially, when outside air is drawn in, mount filters on both
the air inlet and outlet. These filters must be replaced regularly.
So, an easy-to-replace type of filter should be used.
-
Connect the power supply lines and power lines to the appropriate terminals and connectors.
-
Connect the signal lines to the appropriate connectors.
-
Before connecting the power supply wiring, check the supply voltage.
Check that the supply voltage is within the range specified in this manual, then connect the power
supply lines.
-
Ensure that the combination of motor and amplifier is appropriate.
-
Ensure that valid parameters are specified.
Specifying an invalid parameter for the combination of motor and amplifier may not only prevent
normal operation of the motor but also result in damage to the amplifier.
-
Ensure that the amplifier and peripheral equipment are securely connected.
Check that the magnetic contactor, circuit breaker, and other devices mounted outside the amplifier are
securely connected to each other and that those devices are securely connected to the amplifier.
-
Check that the amplifier is securely mounted in the power magnetics cabinet.
If any clearance is left between the power magnetics cabinet and the surface on which the amplifier is
mounted, dust entering the gap may build up and prevent the normal operation of the amplifier.
-
Apply appropriate countermeasures against noise.
Adequate countermeasures against noise are required to maintain normal operation of the amplifier.
For example, signal lines must be routed away from power supply lines and power lines.
s-9
SAFETY PRECAUTIONS
B-65285EN/04
1.3.1.3 Note
NOTE
-
Keep the nameplate clearly visible.
-
Keep the legend on the nameplate clearly visible.
-
After unpacking the amplifier, carefully check for any damage.
-
Mount the amplifier in a location where it can be easily accessed periodic inspection and daily
maintenance.
-
Leave sufficient space around the machine to enable maintenance to be performed easily.
Do not place any heavy objects such that they would interfere with the opening of the doors.
-
Keep the parameter table and spare parts at hand.
Also, keep the specifications at hand. These items must be stored in a location where they can be
retrieved immediately.
-
Provide adequate shielding.
A cable to be shielded must be securely connected to the ground plate, using a cable clamp or the like.
1.3.2
Warnings and Cautions Relating to a Pilot Run
1.3.2.1 Warning
WARNING
-
Before turning on the power, check that the cables connected to the power magnetics cabinet
and amplifier, as well as the power lines and power supply lines, are securely connected. Also,
check that no lines are slack.
A loose screw, loose connection, or the like will cause a motor malfunction or overheating, or a ground
fault. Be extremely careful with power supply lines, motor power lines, and DC link connections
through which a large amount of current passes, because a loose screw (or poor contact in a connector
or poor connection between a connector terminal and a cable) may cause a fire.
-
Before turning on the power, ensure that the power magnetics cabinet is securely grounded.
-
Before turning on the power, check that the door of the power magnetics cabinet and all other
doors are closed.
Ensure that the door of the power magnetics cabinet containing the amplifier, and all other doors, are
securely closed. During operation, all doors must be closed and locked.
-
Apply extreme caution if the door of the power magnetics cabinet or another door must be
opened.
Only a person trained in the maintenance of the corresponding machine or equipment should open the
door, and only after shutting off the power supply to the power magnetics cabinet (by opening both the
input circuit breaker of the power magnetics cabinet and the factory switch used to supply power to the
cabinet). If the machine must be operated with the door open to enable adjustment or for some other
purpose, the operator must keep his or her hands and tools well away from any dangerous voltages.
Such work must be done only by a person trained in the maintenance of the machine or equipment.
s-10
B-65285EN/04
SAFETY PRECAUTIONS
WARNING
-
When operating the machine for the first time, check that the machine operates as instructed.
To check whether the machine operates as instructed, first specify a small value for the motor, then
increase the value gradually. If the motor operates abnormally, perform an emergency stop
immediately.
-
After turning on the power, check the operation of the emergency stop circuit.
Press the emergency stop button to check that the motor stops immediately, and that the power being
supplied to the amplifier is shut off by the magnetic contactor.
-
Before opening a door or protective cover of a machine to enable adjustment of the machine,
first place the machine in the emergency stop state and check that the motor has stopped.
1.3.2.2 Caution
CAUTION
-
Note whether an alarm status relative to the amplifier is displayed at power-up or during
operation.
If an alarm is displayed, take appropriate action as explained in the maintenance manual. If the work to
be done requires that the door of the power magnetics cabinet be left open, the work must be carried
out by a person trained in the maintenance of the machine or equipment. Note that if some alarms are
forcibly reset to enable operation to continue, the amplifier may be damaged. Take appropriate action
according to the contents of the alarm.
-
Before operating the motor for the first time, mount and adjust the position and speed sensors.
Following the instructions given in the maintenance manual, adjust the position and speed sensors for
the spindle so that an appropriate waveform is obtained.
If the sensors are not properly adjusted, the motor may not rotate normally or the spindle may fail to
stop as desired.
-
If the motor makes any abnormal noise or vibration while operating, stop it immediately.
Note that if operation is continued in spite of there being some abnormal noise or vibration, the
amplifier may be damaged. Take appropriate corrective action, then resume operation.
-
Observe the ambient temperature and output rating requirements.
The continuous output rating or continuous operation period of some amplifiers may fall as the
ambient temperature increases. If the amplifier is used continuously with an excessive load applied,
the amplifier may be damaged.
-
Unless otherwise specified, do not insert or remove any connector while the power is turned on.
Otherwise, the amplifier may fail.
s-11
SAFETY PRECAUTIONS
B-65285EN/04
1.3.3
Warnings and Cautions Relating to Maintenance
1.3.3.1 Warning
WARNING
-
Read the maintenance manual carefully and ensure that you are totally familiar with its
contents.
The maintenance manual describes daily maintenance and the procedures to be followed in the event
of an alarm being issued. The operator must be familiar with these descriptions.
-
Notes on replacing a fuse or PC board
1)
Before starting the replacement work, ensure that the circuit breaker protecting the power
magnetics cabinet is open.
2)
Check that the red LED that indicates that charging is in progress is not lit.
The position of the charging LED on each model of amplifier is given in this manual. While the
LED is lit, hazardous voltages are present inside the unit, and thus there is a danger of electric
shock.
3)
Some PC board components become extremely hot. Be careful not to touch these components.
4)
Ensure that a fuse having an appropriate rating is used.
5)
Check the specification code of a PC board to be replaced. If a modification drawing number is
indicated, contact FANUC before replacing the PC board.
Also, before and after replacing a PC board, check its pin settings.
6)
After replacing the fuse, ensure that the screws are firmly tightened. For a socket-type fuse,
ensure that the fuse is inserted correctly.
7)
After replacing the PC board, ensure that it is securely connected.
8)
Ensure that all power lines, power supply lines, and connectors are securely connected.
-
Take care not to lose any screws.
When removing the case or PC board, take care not to lose any screws. If a screw is lost inside the nit
and the power is turned on, the machine may be damaged.
-
Notes on replacing the battery of the absolute pulse coder
Replace the battery only while the power is on. If the battery is replaced while the power is turned off,
the stored absolute positioning data will be lost. Some series servo amplifier modules have batteries in
their servo amplifiers. To replace the battery of any of those models, observe the following procedure:
Open the door of the power magnetics cabinet; Leave the control power of the power supply module
on; Place the machine in the emergency stop state so that the power being input to the amplifier is shut
off; Then, replace the battery. Replacement work should be done only by a person who is trained in the
related maintenance and safety requirements. The power magnetics cabinet in which the servo
amplifier is mounted has a high-voltage section. This section presents a severe risk of electric shock.
-
Check the number of any alarm.
If the machine stops upon an alarm being issued, check the alarm number. Some alarms indicate that a
component must be replaced. If the power is reconnected without first replacing the failed component,
another component may be damaged, making it difficult to locate the original cause of the alarm.
-
Before resetting an alarm, ensure that the original cause of the alarm has been removed.
-
Contact FANUC whenever a question relating to maintenance arises.
-
Notes on removing the amplifier
Before removing the amplifier, first ensure that the power is shut off. Be careful not to jam your fingers
between the power magnetics cabinet and amplifier.
s-12
B-65285EN/04
SAFETY PRECAUTIONS
1.3.3.2 Caution
CAUTION
-
Ensure that all required components are mounted.
When replacing a component or PC board, check that all components, including the snubber capacitor,
are correctly mounted. If the snubber capacitor is not mounted, for example, the IPM will be damaged.
-
Tighten all screws firmly.
-
Check the specification code of the fuse, PC board, and other components.
When replacing a fuse or PC board, first check the specification code of the fuse or PC board, then
mount it in the correct position. The machine will not operate normally if a fuse or PC board having
other than the correct specification code is mounted, or if a fuse or PC board is mounted in the wrong
position.
-
Mount the correct cover.
The cover on the front of the amplifier carries a label indicating a specification code. When mounting
a previously removed front cover, take care to mount it on the unit from which it was removed.
-
Notes on cleaning the heat sink and fan
1)
A dirty heat sink or fan results in reduced semiconductor cooling efficiency, which degrades
reliability. Periodic cleaning is necessary.
2)
Using compressed air for cleaning scatters the dust. A deposit of conductive dust on the amplifier
or peripheral equipment will result in a failure.
3)
To clean the heat sink, do so only after turning the power off and ensuring that the heat sink has
cooled to room temperature. The heat sink becomes extremely hot, such that touching it during
operation or immediately after power-off is likely to cause a burn. Be extremely careful when
touching the heat sink.
1.3.3.3 Note
NOTE
-
Ensure that the battery connector is correctly inserted.
If the power is shut off while the battery connector is not connected correctly, the absolute position
data for the machine will be lost.
-
Store the manuals in a safe place.
The manuals should be stored in a location where they can be accessed immediately it so required
during maintenance work.
-
Notes on contacting FANUC
Inform FANUC of the details of an alarm and the specification code of the amplifier so that any
components required for maintenance can be quickly secured, and any other necessary action can be
taken without delay.
s-13
B-65285EN/04
PREFACE
PREFACE
Organization of this manual
This manual describes information necessary to maintain FANUC Servo Amplifier αi series products, such
as a Power Supply, Servo Amplifier, and Spindle Amplifier and FANUC Servo Motor αis/αi series and
FANUC Spindle Motor αi series products.
Part I explains the start-up procedure, and part II focuses on troubleshooting.
Part III explains the maintenance for servo motor and spindle motor.
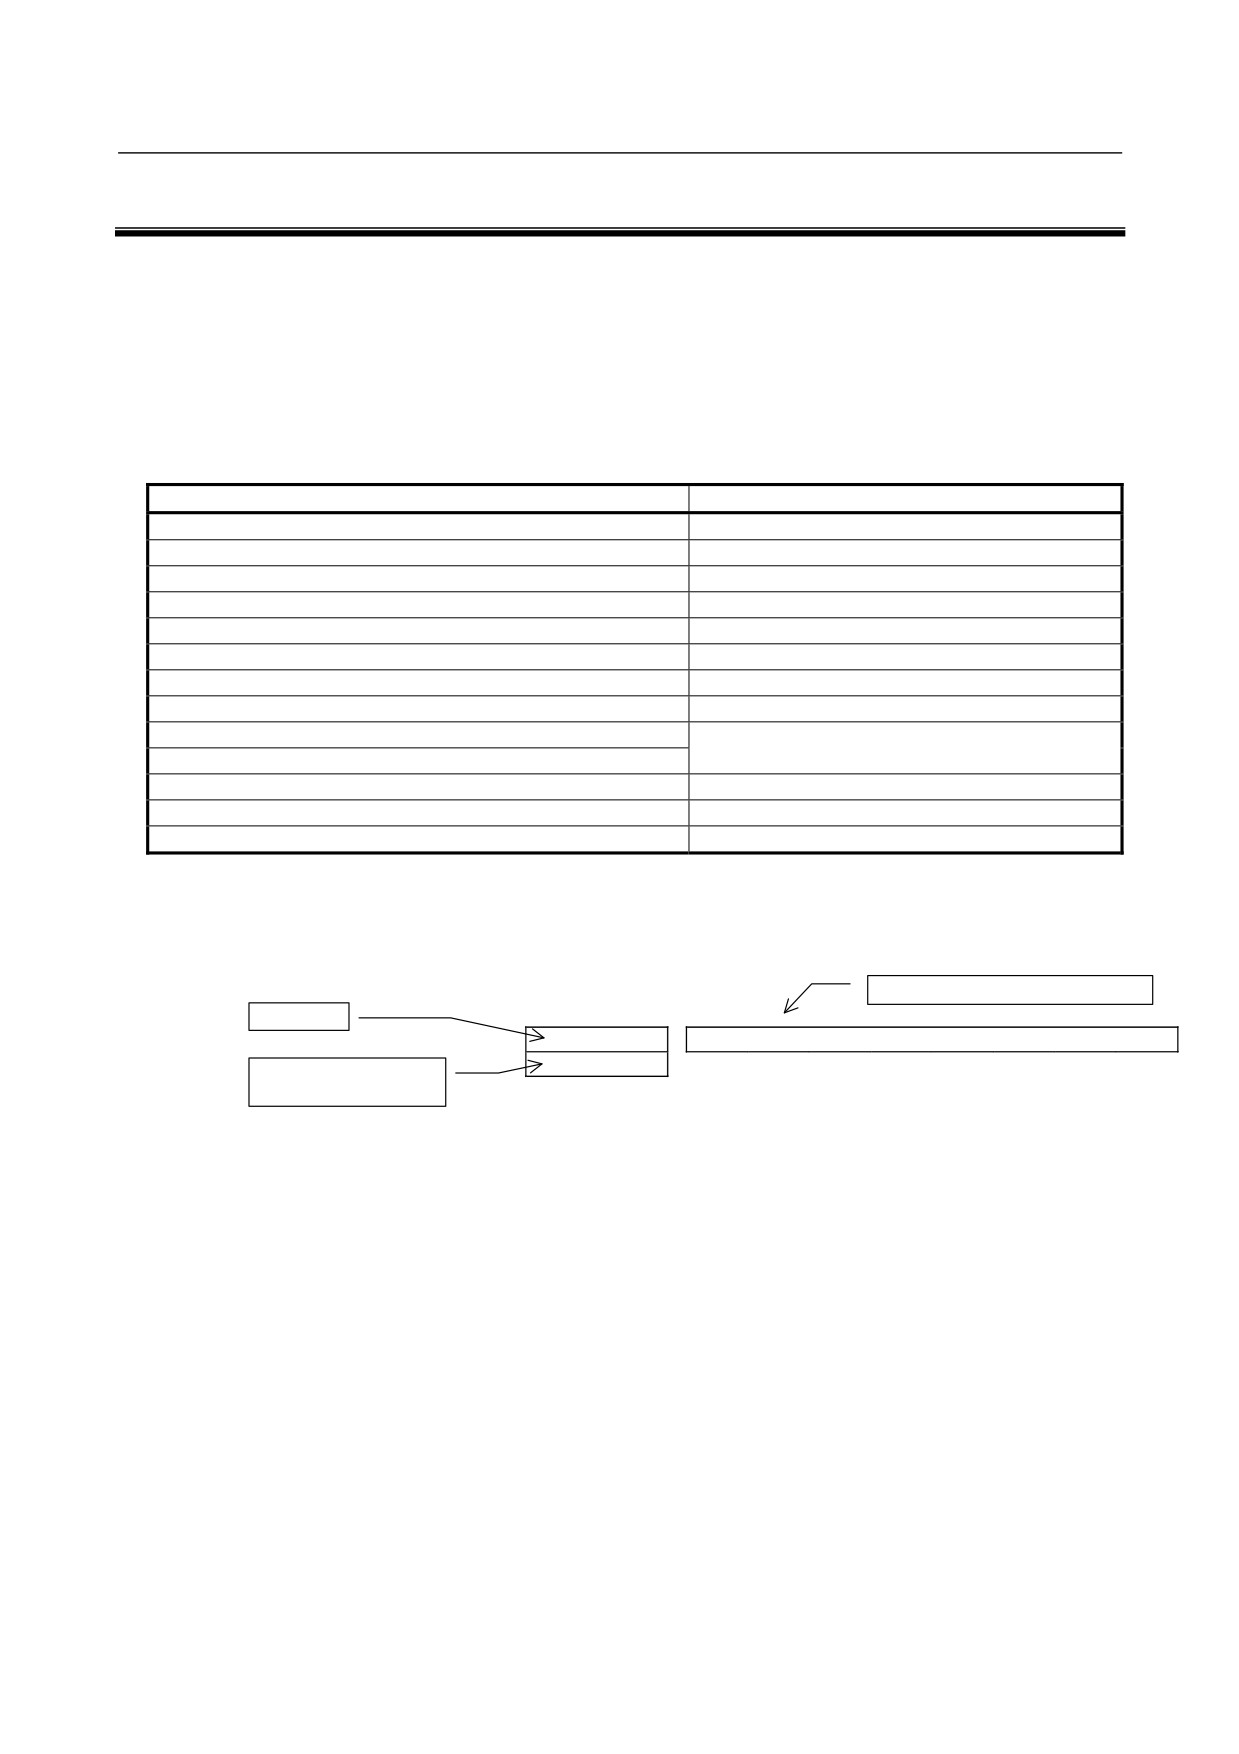
The abbreviations listed below are used in this manual.
Product name
Abbreviations
FANUC Series 15i
FS15i
FANUC Series 16i
FS16i
FANUC Series 18i
FS18i
FANUC Series 21i
FS21i
FANUC Series 30i
FS30i
FANUC Series 31i
FS31i
FANUC Series 32i
FS32i
FANUC Series 0i
FS0i
FANUC Power Mate i-D
PMi
FANUC Power Mate i-H
Power Supply
PS
Servo Amplifier
SV
Spindle Amplifier
SP
* In this manual, the parameter numbers of servo parameters are sometimes indicated without CNC
product names as follows:
Servo parameter function name or bit
Series 15i
No. 1877 (FS15i)
Overload protection coefficient (OVC1)
No. 2062 (FS16i)
Series 16i, 18i, 21i, 0i, PMi
* The manuals shown below provide information related to this manual. This manual may refer you to
these manuals.
FANUC SERVO AMPLIFIER αi series Descriptions
B-65282EN
FANUC AC SERVO MOTOR αi series Descriptions
B-65262EN
FANUC AC SPINDLE MOTOR αi series Descriptions
B-65272EN
FANUC AC SERVO MOTOR αi series, FANUC AC SERVO MOTOR βi series,
FANUC LINEAR MOTOR LiS series,
FANUC SYNCHRONOUS BUILT-IN SERVO MOTOR DiS series Parameter Manual
B-65270EN
FANUC AC SPINDLE MOTOR αi/βi series, BUILT-IN SPINDLE MOTOR Bi series
Parameter Manual
B-65280EN
p-1
B-65285EN/04
TABLE OF CONTENTS
TABLE OF CONTENTS
SAFETY PRECAUTIONS
S-1
1.1
DEFINITION OF WARNING, CAUTION, AND NOTE
s-2
1.2
FANUC AC SERVO MOTOR αis/αi series
FANUC AC SPINDLE MOTOR αi series
s-3
1.2.1
Warning
s-3
1.2.2
Caution
s-5
1.2.3
Note
s-6
1.3
FANUC SERVO AMPLIFIER αi series
s-8
1.3.1
Warnings and Cautions Relating to Mounting
s-8
1.3.1.1
Warning
s-8
1.3.1.2
Caution
s-9
1.3.1.3
Note
s-10
1.3.2
Warnings and Cautions Relating to a Pilot Run
s-10
1.3.2.1
Warning
s-10
1.3.2.2
Caution
s-11
1.3.3
Warnings and Cautions Relating to Maintenance
s-12
1.3.3.1
Warning
s-12
1.3.3.2
Caution
s-13
1.3.3.3
Note
s-13
PREFACE
p-1
I. START-UP PROCEDURE
1
OVERVIEW
3
2
CONFIGURATIONS
4
2.1
CONFIGURATIONS
4
2.2
MAJOR COMPONENTS
5
2.2.1
Power Supply
5
2.2.2
Servo Amplifier
6
2.2.3
Spindle Amplifier
8
3
START-UP PROCEDURE
11
3.1
START-UP PROCEDURE (OVERVIEW)
11
3.2
CONNECTING THE POWER
11
3.2.1
Checking the Voltage and Capacity of the Power
11
3.2.2
Connecting a Protective Ground
12
3.2.3
Selecting the Ground Fault Interrupter That Matches the Leakage Current
12
3.2.4
Checking the Phase Sequence of the Fan Motor Power Supply
12
3.3
INITIALIZING PARAMETERS
12
4
CONFIRMATION OF THE OPERATION
13
4.1
POWER SUPPLY
13
4.1.1
Checking the Status LEDs (Power Supply)
14
4.1.2
Check Terminal on the Printed-circuit Board
14
4.1.3
The PIL LED (Power ON Indicator) Is Off
16
4.1.4
Checking Method when Magnetic Contactor Is not Switched On
16
4.2
SERVO AMPLIFIER
17
4.2.1
Checking the STATUS Display (Servo Amplifier)
18
c-1
TABLE OF CONTENTS
B-65285EN/04
4.2.2
VRDY-OFF Alarm Indicated on the CNC Screen
18
4.2.3
Method for Observing Motor Current
19
4.3
SPINDLE AMPLIFIER
22
4.3.1
STATUS Display (Spindle Amplifier)
23
4.3.2
Troubleshooting at Startup
23
4.3.2.1
The PIL LED (power-on indicator) is off
23
4.3.2.2
The STATUS display is blinking with "--."
23
4.3.2.3
The motor does not turn
24
4.3.2.4
A specified speed cannot be obtained
24
4.3.2.5
When cutting is not performed, the spindle vibrates, making noise
25
4.3.2.6
An overshoot or hunting occurs
25
4.3.2.7
Cutting power weakens or acceleration/deceleration slows down
25
4.3.3
Status Error Indication Function
26
4.3.4
Checking the Feedback Signal Waveform
29
4.3.4.1
αi M sensor, αi MZ sensor, and αi BZ sensor
30
4.3.4.2
Analog αi CZ sensor
31
4.3.4.3
α position coder S
32
4.3.5
Spindle Check Board
32
4.3.5.1
Spindle check board specifications
32
4.3.5.2
Check board connection
33
4.3.5.3
Check terminal output signals
33
4.3.6
Observing Data Using the Spindle Check Board
35
4.3.6.1
Overview
35
4.3.6.2
Major characteristics
35
4.3.6.3
Observation method
35
4.3.6.4
Specifying data to be monitored
36
4.3.6.5
Address descriptions and initial values (Spindle Amplifier)
36
4.3.6.6
Principles in outputting the internal data of the serial spindle
37
4.3.6.7
Data numbers
39
4.3.6.8
Example of observing data
41
4.3.7
Checking Parameters Using the Spindle Check Board
42
4.3.7.1
Overview
42
4.3.7.2
Checking parameters
42
4.3.8
Observing Data Using the SERVO GUIDE
42
4.3.8.1
Overview
42
4.3.8.2
Usable series and editions
42
4.3.8.3
List of spindle data that can be observed using the SERVO GUIDE
43
4.3.8.4
About the spindle control and spindle status signals
44
4.3.8.5
Example of observing data
45
II. TROUBLESHOOTING
1 OVERVIEW
49
2 ALARM NUMBERS AND BRIEF DESCRIPTIONS
50
2.1
FOR Series 15i
50
2.1.1
Servo Alarm
50
2.1.2
Spindle Alarm
51
2.2
FOR Series 16i, 18i, 20i, 21i, 0i, AND Power Mate i
54
2.2.1
Servo Alarm
54
2.2.2
Spindle Alarm
55
2.3
FOR Series 30i/ 31i/32i
58
2.3.1
Servo Alarm
58
2.3.2
Spindle Alarm
59
2.4
FOR Series 0i-D
61
c-2
B-65285EN/04
TABLE OF CONTENTS
2.4.1
Servo Alarm
61
2.4.2
Spindle Alarm
62
3
TROUBLESHOOTING AND ACTION
64
3.1
POWER SUPPLY (αiPS, αiPSR)
64
3.1.1
No LED Display (αiPS, αiPSR)
64
3.1.2
Alarm Code 1 (αiPS)
64
3.1.3
Alarm Code 2 (αiPS, αiPSR)
65
3.1.4
Alarm Code 3 (αiPS)
65
3.1.5
Alarm Code 4 (αiPS, αiPSR)
65
3.1.6
Alarm Code 5 (αiPS, αiPSR)
66
3.1.7
Alarm Code 6 (αiPS, αiPSR)
66
3.1.8
Alarm Code 7 (αiPS, αiPSR)
66
3.1.9
Alarm Code 8 (αiPSR)
66
3.1.10
Alarm Code A (αiPS)
67
3.1.11
Alarm Code E (αiPS, αiPSR)
67
3.1.12
Alarm Code H (αiPSR)
67
3.1.13
Alarm Code P (αiPS, αiPSR)
67
3.2
SERVO AMPLIFIER
68
3.2.1
Alarm Code 1
69
3.2.2
Alarm Code 2
69
3.2.3
Alarm Code 5
69
3.2.4
Alarm Code 6
69
3.2.5
Alarm Code F
70
3.2.6
Alarm Code P
70
3.2.7
Alarm Code 8
70
3.2.8
Alarm Codes 8., 9., and A
70
3.2.9
Alarm Codes 8., 9., and A
71
3.2.10
Alarm Codes b, c, and d
71
3.2.11
Alarm Code "-" Blinking
71
3.2.12
Alarm Code U
72
3.2.13
Alarm Code L
72
3.2.14
DB Relay Error (CNC Message "Alarm SV0654")
73
3.3
SERVO SOFTWARE
73
3.3.1
Servo Adjustment Screen
73
3.3.2
Diagnosis Screen
74
3.3.3
Overload Alarm (Soft Thermal, OVC)
75
3.3.4
Feedback Disconnected Alarm
76
3.3.5
Overheat Alarm
77
3.3.6
Invalid Servo Parameter Setting Alarm
77
3.3.7
Alarms Related to Pulsecoder and Separate Serial Detector
78
3.3.8
Other Alarms
79
3.4
SPINDLE AMPLIFIER
81
3.4.1
Alarm Code 01
81
3.4.2
Alarm Code 02
81
3.4.3
Alarm Code 03
82
3.4.4
Alarm Code 06
82
3.4.5
Alarm Code 07
83
3.4.6
Alarm Code 09
83
3.4.7
Alarm Code 10
83
3.4.8
Alarm Code 12
84
3.4.9
Alarm Code 13
84
3.4.10
Alarm Code 14
84
c-3
TABLE OF CONTENTS
B-65285EN/04
3.4.11
Alarm Code 15
85
3.4.12
Alarm Code 16
85
3.4.13
Alarm Code 17
85
3.4.14
Alarm Code 18
85
3.4.15
Alarm Codes 19 and 20
85
3.4.16
Alarm Code 21
86
3.4.17
Alarm Code 22
86
3.4.18
Alarm Code 24
86
3.4.19
Alarm Code 27
86
3.4.20
Alarm Code 29
87
3.4.21
Alarm Code 31
88
3.4.22
Alarm Code 32
88
3.4.23
Alarm Code 34
88
3.4.24
Alarm Code 36
88
3.4.25
Alarm Code 37
89
3.4.26
Alarm Code 41
89
3.4.27
Alarm Code 42
90
3.4.28
Alarm Code 43
90
3.4.29
Alarm Code 46
90
3.4.30
Alarm Code 47
90
3.4.31
Alarm Code 49
91
3.4.32
Alarm Code 50
91
3.4.33
Alarm Codes 52 and 53
92
3.4.34
Alarm Code 54
.......................................................................................................92
3.4.35
Alarm Code 55
.......................................................................................................92
3.4.36
Alarm Code 56
.......................................................................................................92
3.4.37
Alarm Code 61
.......................................................................................................92
3.4.38
Alarm Code 65
.......................................................................................................93
3.4.39
Alarm Code 66
.......................................................................................................93
3.4.40
Alarm Code 67
.......................................................................................................93
3.4.41
Alarm Code 69
.......................................................................................................93
3.4.42
Alarm Code 70
.......................................................................................................94
3.4.43
Alarm Code 71
.......................................................................................................94
3.4.44
Alarm Code 72
.......................................................................................................94
3.4.45
Alarm Code 73
.......................................................................................................94
3.4.46
Alarm Code 74
.......................................................................................................95
3.4.47
Alarm Code 75
.......................................................................................................95
3.4.48
Alarm Code 76
.......................................................................................................95
3.4.49
Alarm Code 77
.......................................................................................................95
3.4.50
Alarm Code 78
.......................................................................................................96
3.4.51
Alarm Code 79
.......................................................................................................96
3.4.52
Alarm Code 80
.......................................................................................................96
3.4.53
Alarm Code 81
.......................................................................................................96
3.4.54
Alarm Code 82
.......................................................................................................97
3.4.55
Alarm Code 83
.......................................................................................................97
3.4.56
Alarm Code 84
.......................................................................................................98
3.4.57
Alarm Code 85
.......................................................................................................98
3.4.58
Alarm Code 86
.......................................................................................................98
3.4.59
Alarm Code 87
.......................................................................................................98
3.4.60
Alarm Code 88
.......................................................................................................98
3.4.61
Alarm Code 89
.......................................................................................................98
3.4.62
Alarm Code 90
99
3.4.63
Alarm Code 91
99
3.4.64
Alarm Code 92
100
3.4.65
Alarm Codes A, A1, and A2
100
c-4
B-65285EN/04
TABLE OF CONTENTS
3.4.66 Alarm Code b0
100
3.4.67 Alarm Codes C0,C1, and C2
101
3.4.68 Alarm Code C3
101
3.4.69 Alarm Code C4
101
3.4.70 Alarm Code C5
101
3.4.71 Alarm Code C7
101
3.4.72 Alarm Code C8
101
3.4.73 Alarm Code C9
102
3.4.74 Alarm Code d0
102
3.4.75 Alarm Code d1
102
3.4.76 Alarm Code d2
102
3.4.77 Alarm Code d3
103
3.4.78 Alarm Code d4
103
3.4.79 Alarm Code d7
103
3.4.80 Alarm Code d9
103
3.4.81 Alarm Code E0
103
3.4.82 Alarm Code E1
104
3.4.83 Other Alarms
104
3.5
αCi SERIES SPINDLE AMPLIFIER MODULE
105
3.5.1
Alarm Code 12
105
3.5.2
Alarm Code 35
106
4
REPLACING AMPLIFIER COMPONENTS
107
4.1
REPLACEMENT OF A FAN MOTOR
107
4.2
REPLACING BATTERY FOR ABSOLUTE PULSECODERS
112
4.2.1
Overview
112
4.2.2
Replacing Batteries
112
4.2.3
Replacing the Batteries in a Separate Battery Case
113
4.2.4
Replacing the Battery Built into the Servo Amplifier
113
4.2.5
Notes on Replacing a Battery (Supplementary Explanation)
115
4.2.5.1
Battery connection modes
115
4.2.5.2
Connecting the battery for the α series motor
115
4.2.5.3
Notes on attaching connectors
116
4.3
HOW TO REPLACE THE FUSES
118
4.3.1
Fuse Locations
119
4.3.1.1
Power Supply
119
4.3.1.2
Servo Amplifier
119
4.3.1.3
Spindle Amplifier
120
III. MOTOR/DETECTOR/AMPLIFIER PREVENTIVE
MAINTENANCE
1 MOTOR/DETECTOR/AMPLIFIER PREVENTIVE MAINTENANCE ... 124
1.1
LIST OF MANUALS RELATED TO MOTORS AND AMPLIFIERS
124
1.2
PREVENTIVE MAINTENANCE OF MOTORS AND DETECTORS
125
1.2.1
Warnings, Cautions, and Notes on Preventive Maintenance of Motors and
Detectors
125
1.2.2
Preventive Maintenance of a Motor (Common to All Models)
127
1.2.2.1
Main inspection items
127
1.2.2.2
Periodic cleaning of a motor
130
1.2.2.3
Notes on motor cleaning
130
1.2.2.4
Notes on the cutting fluid (informational)
130
1.2.3
Routine Inspection of a Spindle Motor with a Through Hole
131
c-5
TABLE OF CONTENTS
B-65285EN/04
1.2.4
Preventive Maintenance of a Built-in Spindle Motor and Spindle Unit
131
1.2.4.1
Routine inspection of the FANUC-NSK spindle unit
132
1.2.4.2
Maintenance of the FANUC-NSK spindle unit
132
1.2.4.3
Test run of the FANUC-NSK spindle unit
133
1.2.4.4
Storage method of the FANUC-NSK spindle unit
133
1.2.5
Preventive Maintenance of a Linear Motor
133
1.2.5.1
Appearance inspection of the linear motor (magnet plate)
133
1.2.6
Maintenance of a Detector
134
1.2.6.1
Alarms for built-in detectors (αi and βi Pulsecoders) and troubleshooting
actions
134
1.2.6.2
Alarms for separate detectors and troubleshooting actions
135
1.2.6.3
Detailed troubleshooting methods
135
1.2.6.4
Maintenance of βiS motor Pulsecoders
137
1.3
PREVENTIVE MAINTENANCE OF SERVO AMPLIFIERS
138
1.3.1
Warnings, Cautions, and Notes on Operation of Servo Amplifiers
138
1.3.2
Preventive Maintenance of a Servo Amplifier
141
1.3.3
Maintenance of a Servo Amplifier
142
1.3.3.1
Display of the servo amplifier operation status
142
1.3.3.2
Replacement of a fan motor
144
1.4
REPLACING BATTERY FOR ABSOLUTE PULSECODERS
145
1.4.1
Overview
145
1.4.2
Replacing Batteries
146
1.4.3
Replacing the Batteries in a Separate Battery Case
146
1.4.4
Replacing the Battery Built into the Servo Amplifier
147
IV. MOTOR MAINTENANCE
1 SERVO MOTOR MAINTENANCE
151
1.1
SERVO MOTOR MAINTENANCE PARTS
151
1.1.1
Pulsecoder
151
1.1.2
Cooling Fan
152
1.2
REPLACING COOLING FANS
153
1.2.1
Replacing a Cooling Fan
153
1.2.1.1
αiS 50 with Fan, αiS 60 with Fan, and αiF 40 with Fan
153
1.2.1.2
αiS 100 with Fan and αiS 200 with Fan (including HV)
156
1.2.1.3
αiS 300 and αiS 500 (including HV)
156
1.2.1.4
αiS 1000HV
157
1.2.1.5
αiS 2000HV and αiS 3000HV
157
2 SPINDLE MOTOR MAINTENANCE PARTS
158
2.1
MAINTENANCE PARTS
158
APPENDIX
A MEASURING SERVO MOTOR WAVEFORMS (TCMD, VCMD)
165
ADDITIONAL INFORMATION
c-6
B-65285EN/04
START-UP PROCEDURE
1.OVERVIEW
1 OVERVIEW
This part describes the units and components of the Servo Amplifier. It also explains the following
information necessary to start up the Servo Amplifier:
• Configurations
• Start-up procedure
• Confirmation of the operation
• Periodic maintenance of servo amplifier
- 3 -
2.CONFIGURATIONS
START-UP PROCEDURE
B-65285EN/04
2 CONFIGURATIONS
2.1
CONFIGURATIONS
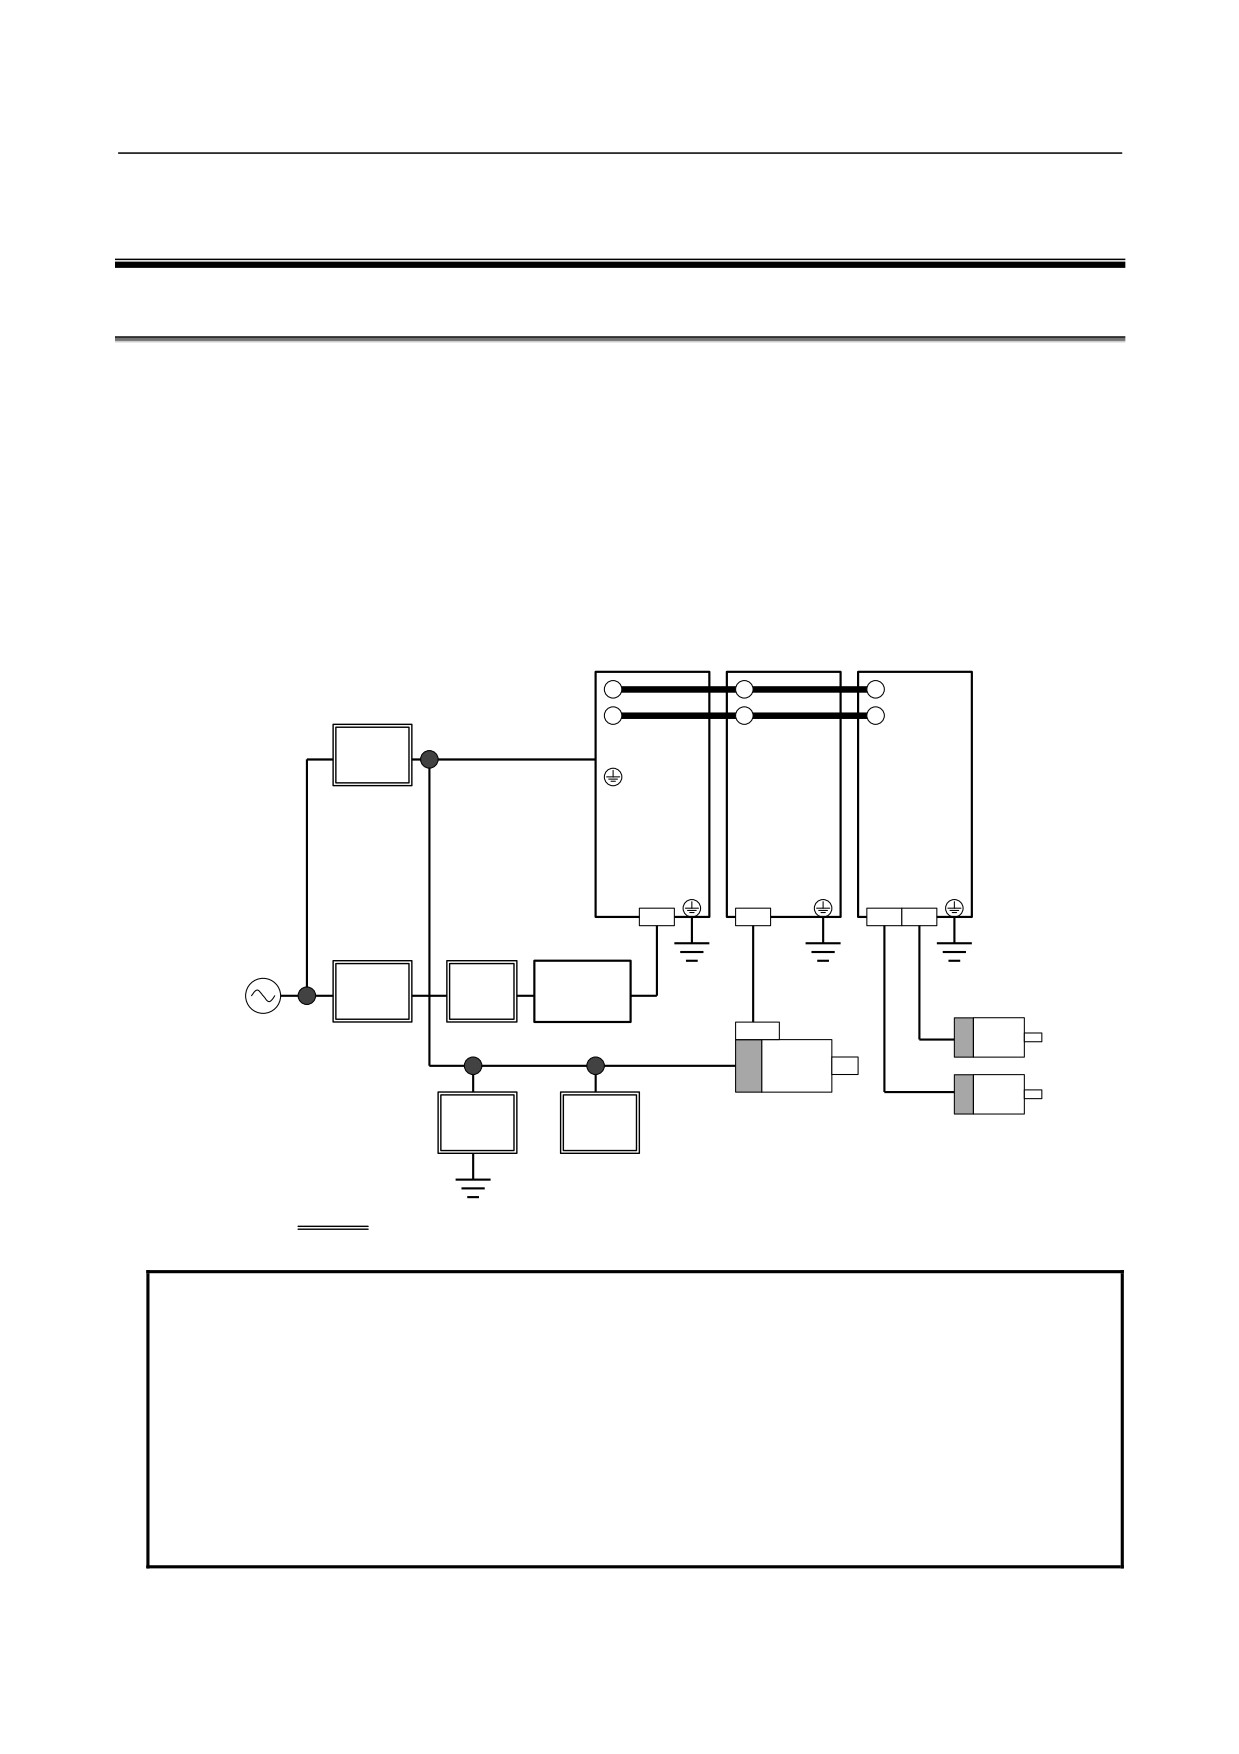
The FANUC servo amplifier αi series consists of the units and components listed below:
(1) Power Supply (PS)
(basic)
(2) Servo Amplifier (SV)
(basic)
(3) Spindle Amplifier (SP)
(basic)
(4) AC reactor
(basic)
(5) Connectors (for connecting cables)
(basic)
(6) Fuses
(option)
(7) Power transformer
(option)
Constituent (example)
Power Supply
Servo Amplifier
Spindle Amplifier
PS
SV
SP
DC link
(300V DC)
Circuit
200R,200S
breaker 2
1φ
Circuit
Magnetic
AC reactor
breaker 1
contactor
3φ
200 to 240VAC
3φ fan motor
3φ
Lightning
Lightning
Spindle motor
surge
surge
Servo motor
protector
protector
Units prepared by the machine tool builder
NOTE
1 See Chapter 4, “HOW TO SELECT THE MODULE” in the FANUC SERVO
AMPLIFIER αi series (B-65282EN) for details of how to combine the Power
Supply, Servo Amplifiers, and Spindle Amplifiers.
2 A magnetic contactor, AC reactor, and circuit breakers are always required.
3 To protect the unit from surge currents caused by lightning, connect surge
absorbers between lines, and between the lines and ground, at the power inlet of
the power magnetics cabinet. See Appendix A, “FITTING A LIGHTNING SURGE
PROTECTION DEVICE” in the FANUC SERVO AMPLIFIER αi series
(B-65282EN) for details.
- 4 -
B-65285EN/04
START-UP PROCEDURE
2.CONFIGURATIONS
2.2
MAJOR COMPONENTS
2.2.1
Power Supply
(1) Power Supply (PS, 200VAC-input, power regeneration type)
Order
Printed circuit board
Model
Unit specification
Wiring board specification
specification
specification
αi PS 5.5
A06B-6110-H006
A06B-6110-C006
A16B-2203-0640
A20B-2100-0391(*1)
αi PS 11
A06B-6110-H011
A06B-6110-C011
A16B-2203-0641
A20B-2100-0391(*1)
αi PS 15
A06B-6110-H015
A06B-6110-C015
A16B-2203-0642
A20B-2100-0391(*1)
αi PS 26
A06B-6110-H026
A06B-6110-C026
A16B-2203-0630
A20B-2100-0391(*2)
αi PS 30
A06B-6110-H030
A06B-6110-C030
A16B-2203-0631
A20B-2100-0391(*2)
αi PS 37
A06B-6110-H037
A06B-6110-C037
A16B-2203-0632
A20B-2100-0391(*2)
A20B-1008-0081
αi PS 55
A06B-6110-H055
A06B-6110-C055
A20B-2100-0391(*2)
(Driver PCB) A20B-2003-0420
αi PS 5.5
A06B-6140-H006
A06B-6140-C006
A16B-2203-0640
A20B-2100-0390
αi PS 11
A06B-6140-H011
A06B-6140-C011
A16B-2203-0641
A20B-2100-0390
αi PS 15
A06B-6140-H015
A06B-6140-C015
A16B-2203-0642
A20B-2100-0390
αi PS 26
A06B-6140-H026
A06B-6140-C026
A16B-2203-0630
A20B-2100-0390
αi PS 30
A06B-6140-H030
A06B-6140-C030
A16B-2203-0631
A20B-2100-0390
αi PS 37
A06B-6140-H037
A06B-6140-C037
A16B-2203-0632
A20B-2100-0390
A20B-1008-0081
αi PS 55
A06B-6140-H055
A06B-6140-C055
A20B-2100-0390
(Driver PCB) A20B-2003-0420
(*1) Old specification: A20B-2100-0760 (*2) Old specification: A20B-2100-0761
(2) Power Supply (PS, 400VAC-input, power regeneration type)
Order
Printed circuit board
Model
Unit specification
Wiring board specification
specification
specification
αi PS 11HV
A06B-6120-H011
A06B-6120-C011
A16B-2203-0647
A20B-2100-0391(*1)
αi PS 18HV
A06B-6120-H018
A06B-6120-C018
A16B-2203-0648
A20B-2100-0391(*1)
αi PS 30HV
A06B-6120-H030
A06B-6120-C030
A16B-2203-0636
A20B-2100-0391(*2)
αi PS 45HV
A06B-6120-H045
A06B-6120-C045
A16B-2203-0637
A20B-2100-0391(*2)
A20B-1008-0086
αi PS 75HV
A06B-6120-H75
A06B-6120-C75
A20B-2100-0391(*2)
(Driver PCB) A20B-2003-0420
A20B-1008-0087
αi PS 100HV
A06B-6120-H100
A06B-6120-C100
A20B-2100-0391(*2)
(Driver PCB) A20B-2003-0420
αi PS 11HV
A06B-6150-H011
A06B-6150-C011
A16B-2203-0647
A20B-2100-0390
αi PS 18HV
A06B-6150-H018
A06B-6150-C018
A16B-2203-0648
A20B-2100-0390
αi PS 30HV
A06B-6150-H030
A06B-6150-C030
A16B-2203-0636
A20B-2100-0390
αi PS 45HV
A06B-6150-H045
A06B-6150-C045
A16B-2203-0637
A20B-2100-0390
αi PS 60HV
A06B-6150-H060
A06B-6150-C060
A16B-2203-0638
A20B-2100-0390
A20B-1008-0086
αi PS 75HV
A06B-6150-H75
A06B-6150-C75
A20B-2100-0390
(Driver PCB) A20B-2003-0420
A20B-1008-0087
αi PS 100HV
A06B-6150-H100
A06B-6150-C100
A20B-2100-0390
(Driver PCB) A20B-2003-0420
(*1) Old specification: A20B-2100-0760 (*2) Old specification: A20B-2100-0761
(3) Power Supply (PSR, 200VAC-input, resistance regeneration type)
Model
Order specification
Unit specification
Printed circuit board specification
αi PSR 3
A06B-6115-H003
A06B-6115-C003
A16B-2203-0781
αi PSR 5.5
A06B-6115-H006
A06B-6115-C006
A16B-2203-0782
- 5 -
2.CONFIGURATIONS
START-UP PROCEDURE
B-65285EN/04
2.2.2
Servo Amplifier
(1) Single-axis Servo Amplifier (200VAC-input)
Wiring board
Printed circuit board
Model
Order specification
Unit specification
specification
specification
αi SV 20
A06B-6114-H103
A06B-6114-C103
A16B-2203-0691
αi SV 40
A06B-6114-H104
A06B-6114-C104
A16B-2203-0660
A20B-2101-0040 (*1)
αi SV 80
A06B-6114-H105
A06B-6114-C105
A16B-2203-0661
αi SV 160
A06B-6114-H106
A06B-6114-C106
A16B-2203-0662
A16B-2203-0625
αi SV 360
A06B-6114-H109
A06B-6114-C109
or
A20B-2101-0070 (*2)
A16B-2203-0875
αi SV 4
A06B-6117-H101
A06B-6117-C101
A16B-2203-0690
αi SV 20
A06B-6117-H103
A06B-6117-C103
A16B-2203-0691
αi SV 40
A06B-6117-H104
A06B-6117-C104
A16B-2203-0660
A20B-2101-0040
αi SV 80
A06B-6117-H105
A06B-6117-C105
A16B-2203-0661
αi SV 160
A06B-6117-H106
A06B-6117-C106
A16B-2203-0662
αi SV 360
A06B-6117-H109
A06B-6117-C109
A16B-2203-0875
A20B-2101-0070
αi SV 20L
A06B-6117-H153
A06B-6117-C153
A16B-2203-0666
αi SV 40L
A06B-6117-H154
A06B-6117-C154
A16B-2203-0660
A20B-2101-0040
αi SV 80L
A06B-6117-H155
A06B-6117-C155
A16B-2203-0667
αi SV 160L
A06B-6117-H156
A06B-6117-C156
A16B-2203-0663
(*1) Old specification: A20B-2100-0740 (*2) Old specification: A20B-2100-0830
(2) Two-axis Servo Amplifier (200VAC-input)
Wiring board
Printed circuit board
Model
Order specification
Unit specification
specification
specification
αi SV 4/4
A06B-6114-H201
A06B-6114-C201
A16B-2203-0692
αi SV 20/20
A06B-6114-H205
A06B-6114-C205
A16B-2203-0695
αi SV 20/40
A06B-6114-H206
A06B-6114-C206
A16B-2203-0670
αi SV 40/40
A06B-6114-H207
A06B-6114-C207
A16B-2203-0671
A20B-2101-0041 (*1)
αi SV 40/80
A06B-6114-H208
A06B-6114-C208
A16B-2203-0672
αi SV 80/80
A06B-6114-H209
A06B-6114-C209
A16B-2203-0673
αi SV 80/160
A06B-6114-H210
A06B-6114-C210
A16B-2203-0674
αi SV 160/160
A06B-6114-H211
A06B-6114-C211
A16B-2203-0675
αi SV 4/4
A06B-6117-H201
A06B-6117-C201
A16B-2203-0692
αi SV 4/20
A06B-6117-H203
A06B-6117-C203
A16B-2203-0694
αi SV 20/20
A06B-6117-H205
A06B-6117-C205
A16B-2203-0695
αi SV 20/40
A06B-6117-H206
A06B-6117-C206
A16B-2203-0670
αi SV 40/40
A06B-6117-H207
A06B-6117-C207
A16B-2203-0671
αi SV 40/80
A06B-6117-H208
A06B-6117-C208
A16B-2203-0672
αi SV 80/80
A06B-6117-H209
A06B-6117-C209
A16B-2203-0673
A20B-2101-0041
αi SV 80/160
A06B-6117-H210
A06B-6117-C210
A16B-2203-0674
αi SV 160/160
A06B-6117-H211
A06B-6117-C211
A16B-2203-0675
αi SV 20/20L
A06B-6117-H255
A06B-6117-C255
A16B-2203-0677
αi SV 20/40L
A06B-6117-H256
A06B-6117-C256
A16B-2203-0678
αi SV 40/40L
A06B-6117-H257
A06B-6117-C257
A16B-2203-0679
αi SV 40/80L
A06B-6117-H258
A06B-6117-C258
A16B-2203-0672
αi SV 80/80L
A06B-6117-H259
A06B-6117-C259
A16B-2203-0673
(*1) Old specification: A20B-2100-0741
- 6 -
B-65285EN/04
START-UP PROCEDURE
2.CONFIGURATIONS
(3) Three-axis Servo Amplifier (200VAC-input)
Wiring board
Printed circuit board
Model
Order specification
Unit specification
specification
specification
αi SV 4/4/4
A06B-6114-H301
A06B-6114-C301
A16B-2203-0696
αi SV 20/20/20
A06B-6114-H303
A06B-6114-C303
A16B-2203-0698
A20B-2101-0042 (*1)
αi SV 20/20/40
A06B-6114-H304
A06B-6114-C304
A16B-2203-0680
αi SV 4/4/4
A06B-6117-H301
A06B-6117-C301
A16B-2203-0696
αi SV 20/20/20
A06B-6117-H303
A06B-6117-C303
A16B-2203-0698
A20B-2101-0042
αi SV 20/20/40
A06B-6117-H304
A06B-6117-C304
A16B-2203-0680
(*1) Old specification: A20B-2100-0742
(4) Single-axis Servo Amplifier (400VAC-input)
Printed circuit
Model
Order specification
Unit specification
Wiring board specification
board specification
αi SV 10HV
A06B-6124-H102
A06B-6124-C102
A16B-2203-0803
αi SV 20HV
A06B-6124-H103
A06B-6124-C103
A16B-2203-0800
A20B-2101-0040(*1)
αi SV 40HV
A06B-6124-H104
A06B-6124-C104
A16B-2203-0801
αi SV 80HV
A06B-6124-H105
A06B-6124-C105
A16B-2203-0802
A16B-2203-0629
αi SV 180HV
A06B-6124-H106
A06B-6124-C106
or
A20B-2101-0071 (*2)
A16B-2203-0876
A20B-1008-0099
αi SV 360HV
A06B-6124-H109
A06B-6124-C109
A20B-2101-0070 (*3)
(Driver PCB) A20B-2003-0420
αi SV 10HV
A06B-6127-H102
A06B-6127-C102
A16B-2203-0803
αi SV 20HV
A06B-6127-H103
A06B-6127-C103
A16B-2203-0800
αi SV 40HV
A06B-6127-H104
A06B-6127-C104
A16B-2203-0801
A20B-2101-0040
αi SV 80HV
A06B-6127-H105
A06B-6127-C105
A16B-2203-0802
αi SV 180HV
A06B-6127-H106
A06B-6127-C106
A16B-2203-0876
A20B-2101-0071
A20B-1008-0098
αi SV 360HV
A06B-6127-H109
A06B-6127-C109
A20B-2101-0070
(Driver PCB) A20B-2003-0770
A20B-1008-0098
αi SV 540HV
A06B-6127-H110
A06B-6127-C110
A20B-2101-0072
(Driver PCB) A20B-2003-0770
αi SV 10HVL
A06B-6127-H152
A06B-6127-C152
A16B-2203-0804
αi SV 20HVL
A06B-6127-H153
A06B-6127-C153
A16B-2203-0805
A20B-2101-0040
αi SV 40HVL
A06B-6127-H154
A06B-6127-C154
A16B-2203-0806
αi SV 80HVL
A06B-6127-H155
A06B-6127-C155
A16B-2203-0802
(*1) Old specification: A20B-2100-0740 (*2) Old specification: A20B-2100-0831
(*3) Old specification: A20B-2100-0830
(5) Two-axis Servo Amplifier (400VAC-input)
Wiring board
Printed circuit board
Model
Order specification
Unit specification
specification
specification
αi SV 10/10HV
A06B-6124-H202
A06B-6124-C202
A16B-2203-0815
αi SV 20/20HV
A06B-6124-H205
A06B-6124-C205
A16B-2203-0810
αi SV 20/40HV
A06B-6124-H206
A06B-6124-C206
A16B-2203-0811
A20B-2101-0041 (*1)
αi SV 40/40HV
A06B-6124-H207
A06B-6124-C207
A16B-2203-0812
αi SV 40/80HV
A06B-6124-H208
A06B-6124-C208
A16B-2203-0813
αi SV 80/80HV
A06B-6124-H209
A06B-6124-C209
A16B-2203-0814
- 7 -
2.CONFIGURATIONS
START-UP PROCEDURE
B-65285EN/04
Wiring board
Printed circuit board
Model
Order specification
Unit specification
specification
specification
αi SV 10/10HV
A06B-6127-H202
A06B-6127-C202
A16B-2203-0815
αi SV 20/20HV
A06B-6127-H205
A06B-6127-C205
A16B-2203-0810
αi SV 20/40HV
A06B-6127-H206
A06B-6127-C206
A16B-2203-0811
αi SV 40/40HV
A06B-6127-H207
A06B-6127-C207
A16B-2203-0812
αi SV 40/80HV
A06B-6127-H208
A06B-6127-C208
A16B-2203-0813
A20B-2101-0041
αi SV 80/80HV
A06B-6127-H209
A06B-6127-C209
A16B-2203-0814
αi SV 10/10HVL
A06B-6127-H252
A06B-6127-C252
A16B-2203-0816
αi SV 20/20HVL
A06B-6127-H255
A06B-6127-C255
A16B-2203-0817
αi SV 20/40HVL
A06B-6127-H256
A06B-6127-C256
A16B-2203-0811
αi SV 40/40HVL
A06B-6127-H257
A06B-6127-C257
A16B-2203-0812
(*1) Old specification: A20B-2100-0741
2.2.3
Spindle Amplifier
The order specification varies according to the sensor (function) used.
(1) αi series Spindle Amplifier (200VAC-input)
TYPE A
Order
Printed circuit board
Model
Unit specification
Wiring board specification
specification
specification
αi SP 2.2
A06B-6111-H002
A06B-6111-C002
A16B-2203-0650
A20B-2101-0354
αi SP 5.5
A06B-6111-H006
A06B-6111-C006
A16B-2203-0651
A20B-2101-0354
αi SP 11
A06B-6111-H011
A06B-6111-C011
A16B-2203-0652
A20B-2101-0354
αi SP 15
A06B-6111-H015
A06B-6111-C015
A16B-2203-0653
A20B-2101-0354
αi SP 22
A06B-6111-H022
A06B-6111-C022
A16B-2203-0620
A20B-2101-0354
αi SP 26
A06B-6111-H026
A06B-6111-C026
A16B-2203-0621
A20B-2101-0354
αi SP 30
A06B-6111-H030
A06B-6111-C030
A16B-2203-0622
A20B-2101-0354
αi SP 37
A06B-6111-H037
A06B-6111-C037
A16B-2203-0623
A20B-2101-0354
A20B-1008-0090
αi SP 45
A06B-6111-H045
A06B-6111-C045
A20B-2101-0354
(Driver PCB) A20B-2003-0420
A20B-1008-0091
αi SP 55
A06B-6111-H055
A06B-6111-C055
A20B-2101-0354
(Driver PCB) A20B-2003-0420
αi SP 2.2
A06B-6141-H002
A06B-6141-C002
A16B-2203-0656
A20B-2101-0350
αi SP 5.5
A06B-6141-H006
A06B-6141-C006
A16B-2203-0657
A20B-2101-0350
αi SP 11
A06B-6141-H011
A06B-6141-C011
A16B-2203-0658
A20B-2101-0350
αi SP 15
A06B-6141-H015
A06B-6141-C015
A16B-2203-0659
A20B-2101-0350
αi SP 22
A06B-6141-H022
A06B-6141-C022
A16B-2203-0870
A20B-2101-0350
αi SP 26
A06B-6141-H026
A06B-6141-C026
A16B-2203-0871
A20B-2101-0350
αi SP 30
A06B-6141-H030
A06B-6141-C030
A16B-2203-0872
A20B-2101-0350
αi SP 37
A06B-6141-H037
A06B-6141-C037
A16B-2203-0873
A20B-2101-0350
A20B-1008-0092
αi SP 45
A06B-6141-H045
A06B-6141-C045
A20B-2101-0350
(Driver PCB) A20B-2003-0770
A20B-1008-0093
αi SP 55
A06B-6141-H055
A06B-6141-C055
A20B-2101-0350
(Driver PCB) A20B-2003-0770
TYPE B
Printed circuit board
Model
Order specification
Unit specification
Wiring board specification
specification
αi SP 2.2
A06B-6112-H002
A06B-6111-C002
A16B-2203-0650
A20B-2101-0355
αi SP 5.5
A06B-6112-H006
A06B-6111-C006
A16B-2203-0651
A20B-2101-0355
αi SP 11
A06B-6112-H011
A06B-6111-C011
A16B-2203-0652
A20B-2101-0355
αi SP 15
A06B-6112-H015
A06B-6111-C015
A16B-2203-0653
A20B-2101-0355
- 8 -
B-65285EN/04
START-UP PROCEDURE
2.CONFIGURATIONS
Printed circuit board
Model
Order specification
Unit specification
Wiring board specification
specification
αi SP 22
A06B-6112-H022
A06B-6111-C022
A16B-2203-0620
A20B-2101-0355
αi SP 26
A06B-6112-H026
A06B-6111-C026
A16B-2203-0621
A20B-2101-0355
αi SP 30
A06B-6112-H030
A06B-6111-C030
A16B-2203-0622
A20B-2101-0355
αi SP 37
A06B-6112-H037
A06B-6111-C037
A16B-2203-0623
A20B-2101-0355
A20B-1008-0090
αi SP 45
A06B-6112-H045
A06B-6111-C045
A20B-2101-0355
(Driver PCB) A20B-2003-0420
A20B-1008-0091
αi SP 55
A06B-6112-H055
A06B-6111-C055
A20B-2101-0355
(Driver PCB) A20B-2003-0420
αi SP 2.2
A06B-6142-H002
A06B-6141-C002
A16B-2203-0656
A20B-2101-0351
αi SP 5.5
A06B-6142-H006
A06B-6141-C006
A16B-2203-0657
A20B-2101-0351
αi SP 11
A06B-6142-H011
A06B-6141-C011
A16B-2203-0658
A20B-2101-0351
αi SP 15
A06B-6142-H015
A06B-6141-C015
A16B-2203-0659
A20B-2101-0351
αi SP 22
A06B-6142-H022
A06B-6141-C022
A16B-2203-0870
A20B-2101-0351
αi SP 26
A06B-6142-H026
A06B-6141-C026
A16B-2203-0871
A20B-2101-0351
αi SP 30
A06B-6142-H030
A06B-6141-C030
A16B-2203-0872
A20B-2101-0351
αi SP 37
A06B-6142-H037
A06B-6141-C037
A16B-2203-0873
A20B-2101-0351
A20B-1008-0092
αi SP 45
A06B-6142-H045
A06B-6141-C045
A20B-2101-0351
(Driver PCB) A20B-2003-0770
A20B-1008-0093
αi SP 55
A06B-6142-H055
A06B-6141-C055
A20B-2101-0351
(Driver PCB) A20B-2003-0770
(2) αi series Spindle Amplifier (400VAC-input)
TYPE A
Order
Printed circuit board
Model
Unit specification
Wiring board specification
specification
specification
αi SP 5.5HV
A06B-6121-H006
A06B-6121-C006
A16B-2203-0820
A20B-2101-0354
αi SP 11HV
A06B-6121-H011
A06B-6121-C011
A16B-2203-0821
A20B-2101-0354
αi SP 15HV
A06B-6121-H015
A06B-6121-C015
A16B-2203-0822
A20B-2101-0354
αi SP 30HV
A06B-6121-H030
A06B-6121-C030
A16B-2203-0627
A20B-2101-0354
αi SP 45HV
A06B-6121-H045
A06B-6121-C045
A16B-2203-0628
A20B-2101-0354
A20B-1008-0096
αi SP 75HV
A06B-6121-H075
A06B-6121-C075
A20B-2101-0354
(Driver PCB) A20B-2003-0420
A20B-1008-0097
αi SP 100HV
A06B-6121-H100
A06B-6121-C100
A20B-2101-0354
(Driver PCB) A20B-2003-0420
αi SP 5.5HV
A06B-6151-H006
A06B-6151-C006
A16B-2203-0826
A20B-2101-0350
αi SP 11HV
A06B-6151-H011
A06B-6151-C011
A16B-2203-0827
A20B-2101-0350
αi SP 15HV
A06B-6151-H015
A06B-6151-C015
A16B-2203-0828
A20B-2101-0350
αi SP 30HV
A06B-6151-H030
A06B-6151-C030
A16B-2203-0877
A20B-2101-0350
αi SP 45HV
A06B-6151-H045
A06B-6151-C045
A16B-2203-0878
A20B-2101-0350
A20B-1008-0094
αi SP 75HV
A06B-6151-H075
A06B-6151-C075
A20B-2101-0350
(Driver PCB) A20B-2003-0770
A20B-1008-0095
αi SP 100HV
A06B-6151-H100
A06B-6151-C100
A20B-2101-0350
(Driver PCB) A20B-2003-0770
TYPE B
Order
Printed circuit board
Model
Unit specification
Wiring board specification
specification
specification
αi SP 5.5HV
A06B-6122-H006
A06B-6121-C006
A16B-2203-0820
A20B-2101-0355
αi SP 11HV
A06B-6122-H011
A06B-6121-C011
A16B-2203-0821
A20B-2101-0355
αi SP 15HV
A06B-6122-H015
A06B-6121-C015
A16B-2203-0822
A20B-2101-0355
αi SP 30HV
A06B-6122-H030
A06B-6121-C030
A16B-2203-0627
A20B-2101-0355
αi SP 45HV
A06B-6122-H045
A06B-6121-C045
A16B-2203-0628
A20B-2101-0355
- 9 -
2.CONFIGURATIONS
START-UP PROCEDURE
B-65285EN/04
Order
Printed circuit board
Model
Unit specification
Wiring board specification
specification
specification
A20B-1008-0096
αi SP 75HV
A06B-6122-H075
A06B-6121-C075
A20B-2101-0355
(Driver PCB) A20B-2003-0420
A20B-1008-0097
αi SP 100HV
A06B-6122-H100
A06B-6121-C100
A20B-2101-0355
(Driver PCB) A20B-2003-0420
αi SP 5.5HV
A06B-6152-H006
A06B-6151-C006
A16B-2203-0826
A20B-2101-0351
αi SP 11HV
A06B-6152-H011
A06B-6151-C011
A16B-2203-0827
A20B-2101-0351
αi SP 15HV
A06B-6152-H015
A06B-6151-C015
A16B-2203-0828
A20B-2101-0351
αi SP 30HV
A06B-6152-H030
A06B-6151-C030
A16B-2203-0877
A20B-2101-0351
αi SP 45HV
A06B-6152-H045
A06B-6151-C045
A16B-2203-0878
A20B-2101-0351
A20B-1008-0094
αi SP 75HV
A06B-6152-H075
A06B-6151-C075
A20B-2101-0351
(Driver PCB) A20B-2003-0770
A20B-1008-0095
αi SP 100HV
A06B-6152-H100
A06B-6151-C100
A20B-2101-0351
(Driver PCB) A20B-2003-0770
(3) αCi series Spindle Amplifiers (200VAC-input)
Order
Printed circuit board
Model
Unit specification
Wiring board specification
specification
specification
SPMC-2.2i
A06B-6116-H002
A06B-6111-C002
A16B-2203-0650
A20B-2100-0802
SPMC-5.5i
A06B-6116-H006
A06B-6111-C006
A16B-2203-0651
A20B-2100-0802
SPMC-11i
A06B-6116-H011
A06B-6111-C011
A16B-2203-0652
A20B-2100-0802
SPMC-15i
A06B-6116-H015
A06B-6111-C015
A16B-2203-0653
A20B-2100-0802
SPMC-22i
A06B-6116-H022
A06B-6111-C022
A16B-2203-0620
A20B-2100-0802
- 10 -
B-65285EN/04
START-UP PROCEDURE
3.START-UP PROCEDURE
3 START-UP PROCEDURE
3.1
START-UP PROCEDURE (OVERVIEW)
Make sure that the specifications of the CNC, servo motors, servo amplifiers, and other units you received
are exactly what you ordered, and these units are connected correctly. Then, turn on the power.
(1) Before turning on the circuit breaker, check the power supply voltage connected.
→ See Section 3.2.
(2) Some types of Power Supply, Servo Amplifier, and Spindle Amplifier require settings before the
system can be used. So check whether you must make settings.
→ See Section 3.3.
(3) Turn on the power, and set initial parameters on the CNC.
For the initialization of servo parameters, refer to the following manual:
FANUC AC SERVO MOTOR αi series Parameter Manual (B-65270EN)
For the initialization of spindle parameters, refer to the following manual:
FANUC AD SPINDLE MOTOR αi series Parameter Manual (B-65280EN)
(4) For start-up adjustment and troubleshooting, see Chapter 4.
•
Method of using optional wiring boards for adjustment of the Power Supply, Servo Amplifier,
and Spindle Amplifier
•
Spindle sensor adjustment values
3.2
CONNECTING THE POWER
3.2.1
Checking the Voltage and Capacity of the Power
Before connecting the power, you should measure the AC power voltage.
Table 3.2.1 (c) and (b) list the input power specification for the Power Supply. Use a power source with
sufficient capacity so that the system will not malfunction due to a voltage drop even at a time of peak load.
Table 3.2.1 (c) AC power voltage specifications (200-V input type)
αiPS
αiPS
αiPS
αiPS
αiiPS
αiPS
αiPS
Model
5.5
11
15
26
30
37
55
Nominal voltage rating
200 to 240 VAC -15%,+10%
Power source frequency
50/60 Hz ±1 Hz
Power source capacity (for the
9
17
22
37
44
53
79
main circuit) [kVA]
Power source capacity (for the
0.7
control circuit) [kVA]
- 11 -