FANUC Series 0i-MODEL C, Series 0i Mate-MODEL C. MAINTENANCE MANUAL - page 5
1. DISPLAY AND OPERATION
B-64115EN/02
NOTE
With parameter No. 3121, choose whether the sixth-type
sampling data is thermal simulation data or spindle load
meter data. When spindle load meter is selected, the
spindle data of the first axis is stored with each path.
(4) Sampling axis: The axes along which data will be sampled are
displayed.
(5) Sampling period: The sampling period for each axis is displayed.
(6) Date of storage: While data is being sampled, MEMORY blinks in this
field. When data sampling stops, the date at that point appears in this
field.
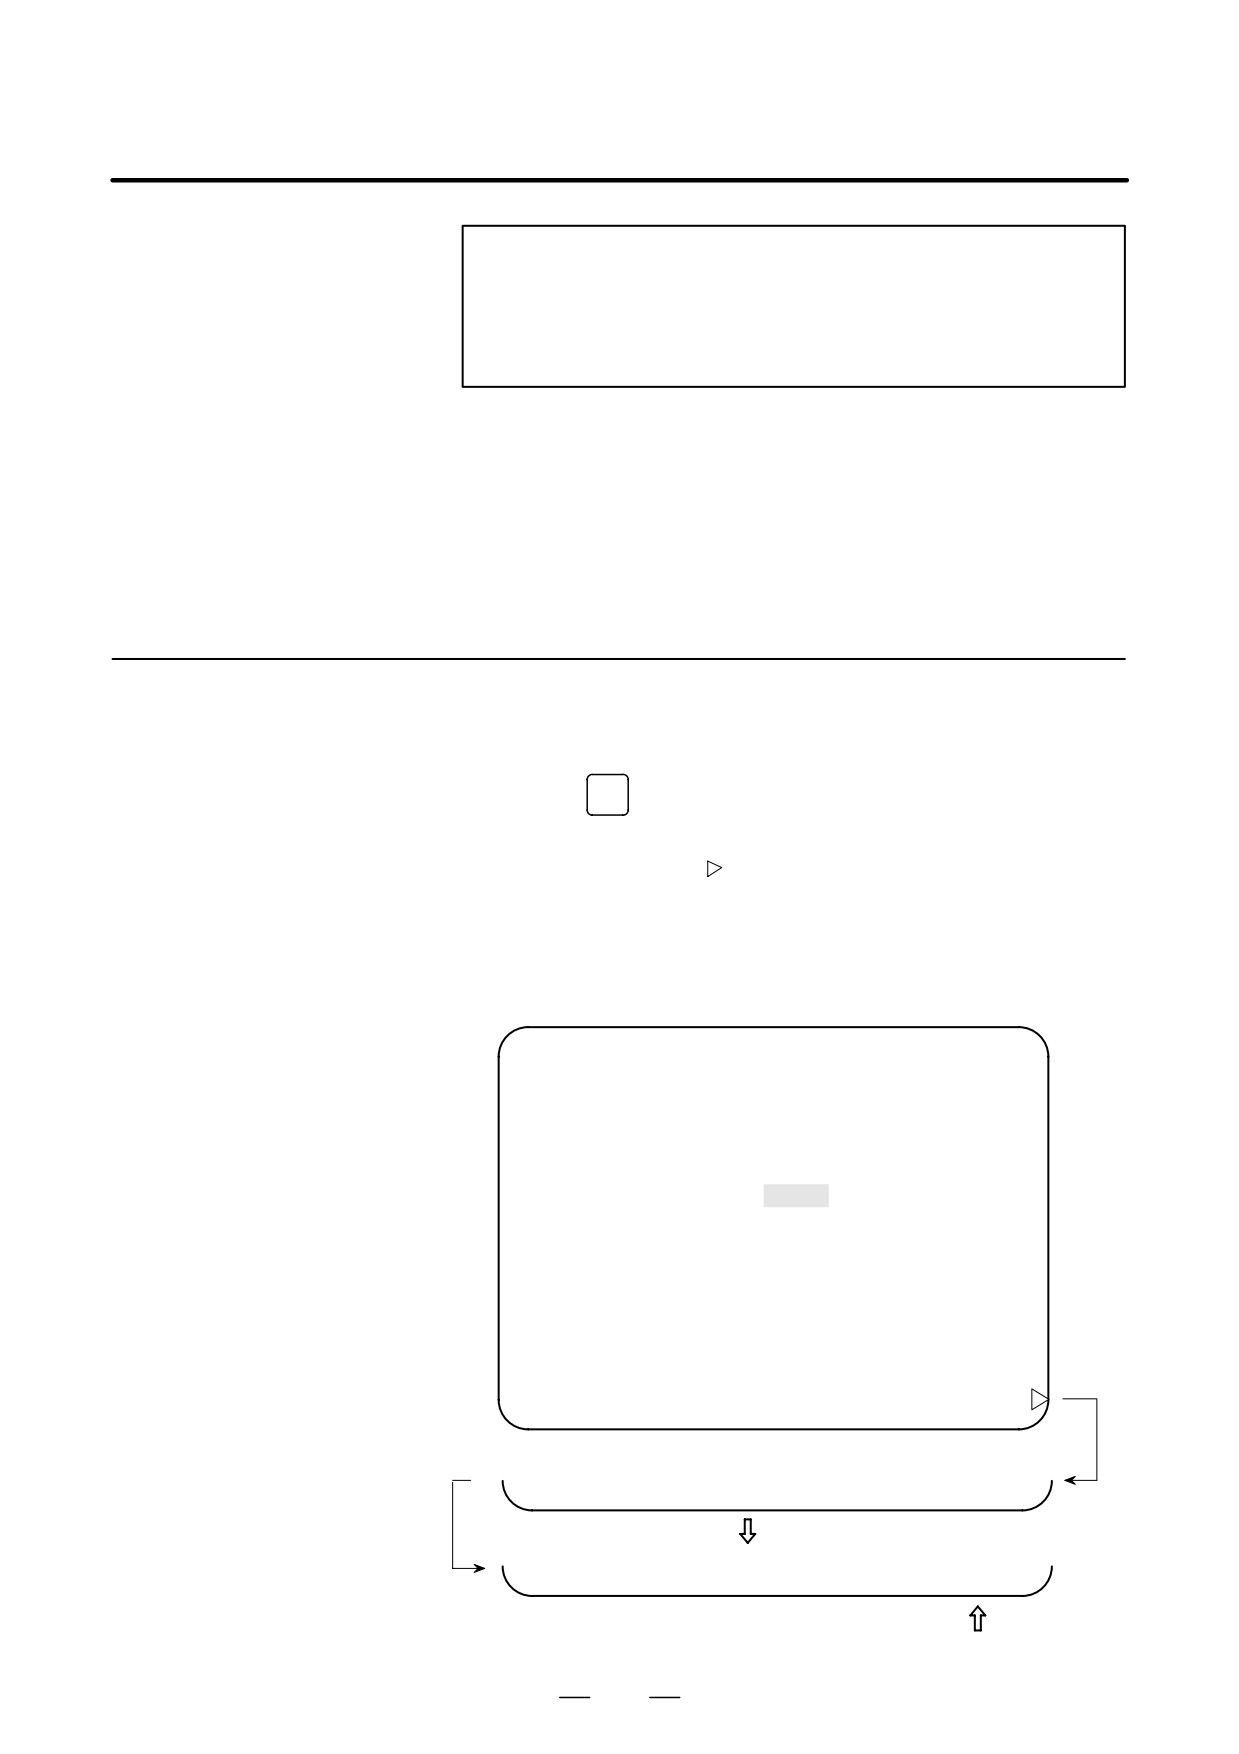
Waveform diagnosis data of servo alarm format can be output to an I/O
1.10.5
device, as follows:
Outputting Waveform
1) Select EDIT mode.
Diagnosis Data
(Storage Type)
2) Press the
SYSTEM
key, then display the WAVE DIAGNOS. (MEMORY)
screen.
3) Press the [W.MEM],
, [PUNCH], and [EXEC] soft keys, in this
order.
For details of input/output to/from the Handy File, see “Output to Handy
File,” below.
WAVE DIAGNOSE (MEMORY)
O1234 N12345
CONDIGION:
100
TRIGGER: G0123.4
DATA KINDS
SAMPLING AXIS
POS ERROR
XYZA
MOTION CMD
XYZA
CURRENT (%)
XYZA
SPEED (RPM)
NONE
TORQUE CMD
NONE
HEAT SIMLT
XYZA
SMPL TIME :
2.0SEC
DATE
: 01/01/13
12:15:00
EDIT **** *** ***
12:15:52
[SELECT] [
] [
] [
] [START]
[
] [
] [PUNCH] [
] [
]
Press
[
] [
] [
] [ CAN ] [ EXEC ]
Press
100

B-64115EN/02
1. DISPLAY AND OPERATION
D Output to Handy File
1) Select EDIT mode.
2) Press the
SYSTEM
key, then display the WAVE DIAGNOS. (MEMORY)
screen.
3) Open the write protect tab on the cassette.
4) Press the [W.MEM],
, [PUNCH], and [EXEC] soft keys, in this
order.
The waveform diagnosis data is output to a file named WAVE
DIAGNOS, to which the number of the last file is assigned.
If a file named WAVE DIAGNOS already exists in the cassette, P/S alarm
86 is issued. A cassette can contain only one file for waveform diagnosis
data. If the existing WAVE DIAGNOS file contains unnecessary
waveform diagnosis data of servo alarm format, delete that file before
attempting to output new data. The procedure for deleting a file is
described later.
D Directory display
The directory in the cassette is displayed by means of the following
procedure:
1) Select EDIT mode.
2) Press the
PROG
function key to select the program screen.
3) Press the continuous menu key
, then press [FLOPPY].
PAGE
4) Press page key
The directory is displayed.
D Deleting a file
A file stored on a cassette is deleted by means of the following procedure:
1) Select EDIT mode.
2) Press the
PROG
function key to select the program screen.
3) Set the write protect switch on the cassette to enable writing.
4) Press [FLOPPY].
5) Press [DELETE].
6) Enter the file number, then press [F SET].
7) Press [EXEC].
The file corresponding to the specified file number is deleted. The
number of each file subsequent to the deleted file is decremented by
one.
101
1. DISPLAY AND OPERATION
B-64115EN/02
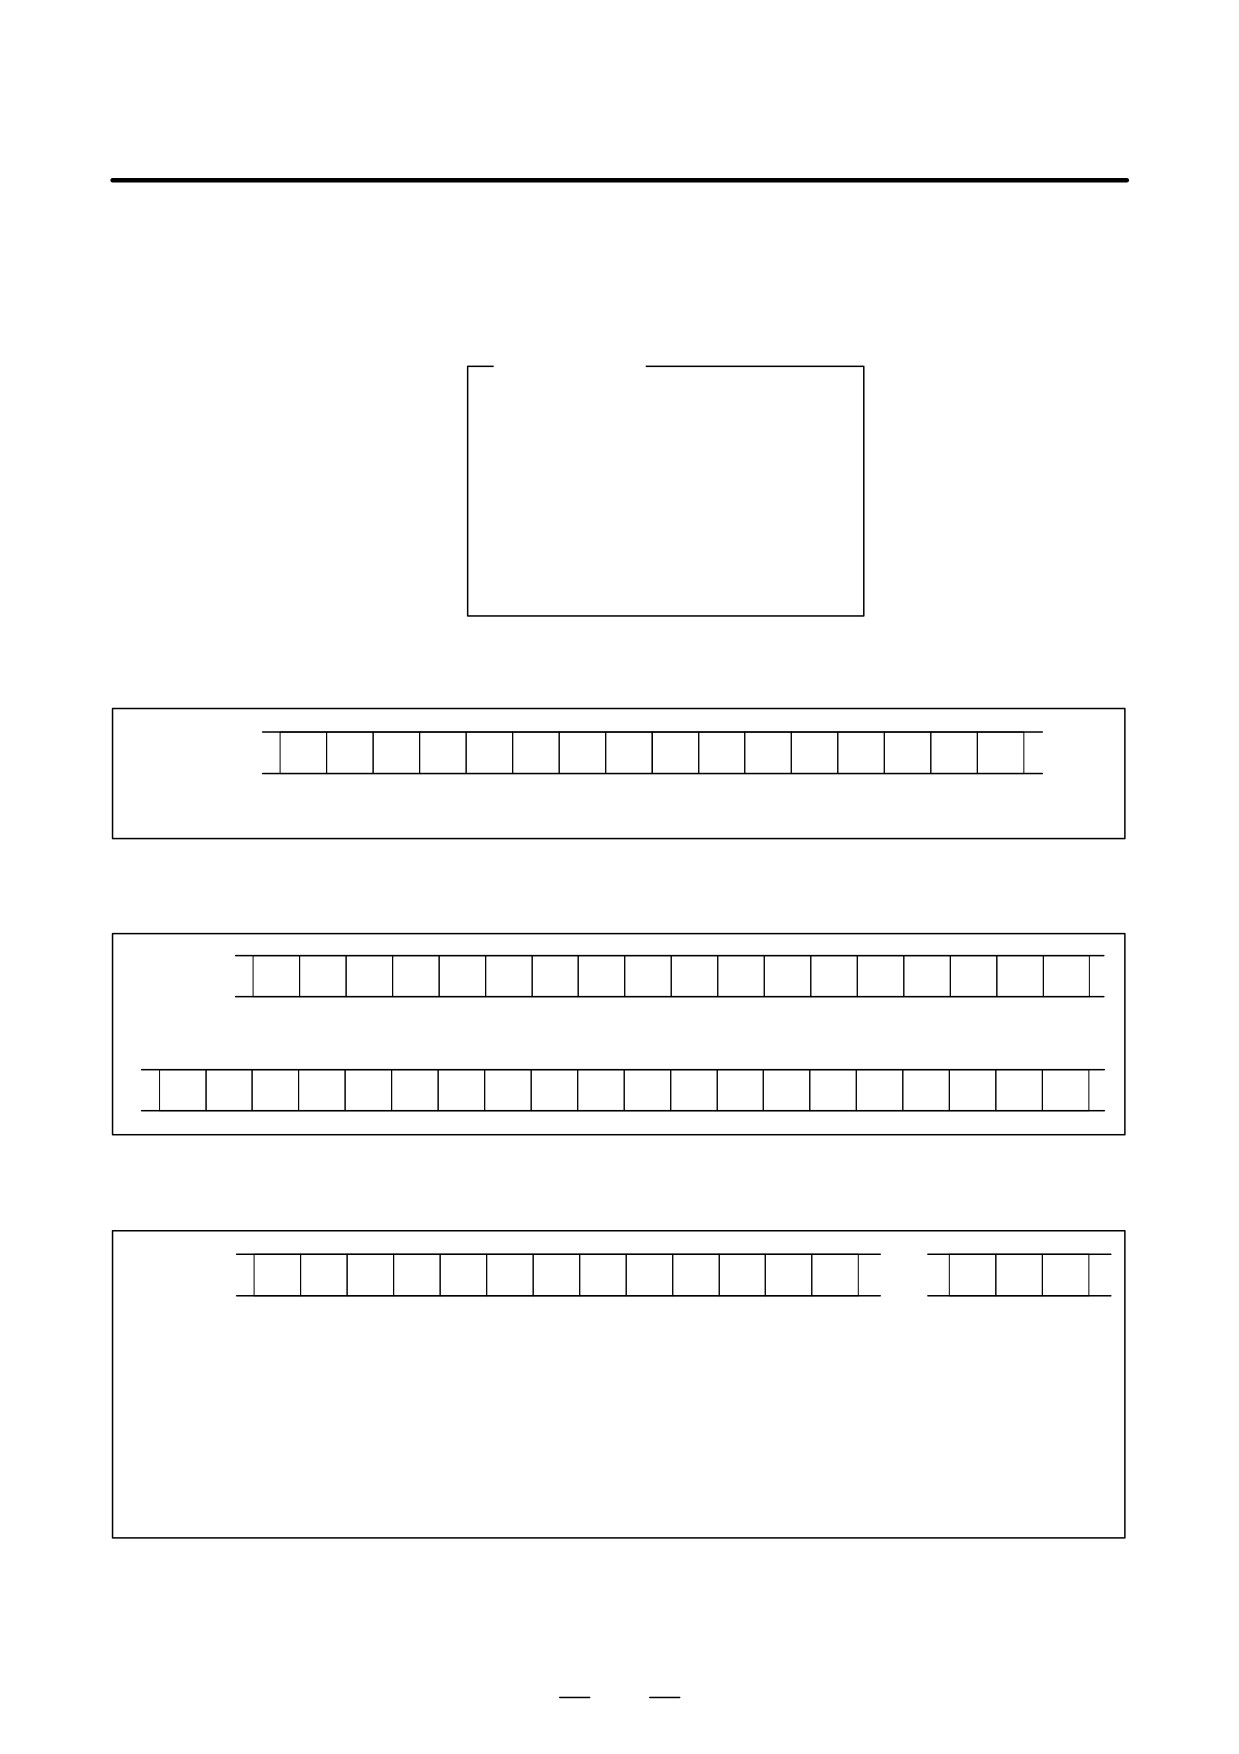
D Output format
In the servo alarm format, the header, date and time, selected axes, and
waveform diagnosis data are output in this order. Data items are identified
by ten identifier words. Output data other than the identifier words varies
with the data type.
T(identifier word)
T0 : Header
T60 : Positional deviation
T61 : Move command
T62 : Actual current
T63 : Actual speed
T64 : Command current
T65 : Thermal simulation
T66 : Load meter for the spindle
T68 : Selected axes
T69 : Date and time
1) Header
T
0
C
W
A
V
E
D
I
A
G
N
O
S
;
C: Data word
2) Data word
T
6
9
D
,
;
D *..*: Data Example: 12:14 59 seconds on June 23, 2002
T
6
9
D
2
0
0
2
0
6
2
3
,
1
2
1
4
5
9
;
3) Selected axes
T
6
8
P
*
*
D
,
*
*
,
to
*
*
,
P0: Positional deviation
P1: Actual speed
P2: Move command
P3: Command current
P4: Actual current
P5: Thermal simulation
D*.. *: Axis number (1 to 4)
102
B-64115EN/02
1. DISPLAY AND OPERATION
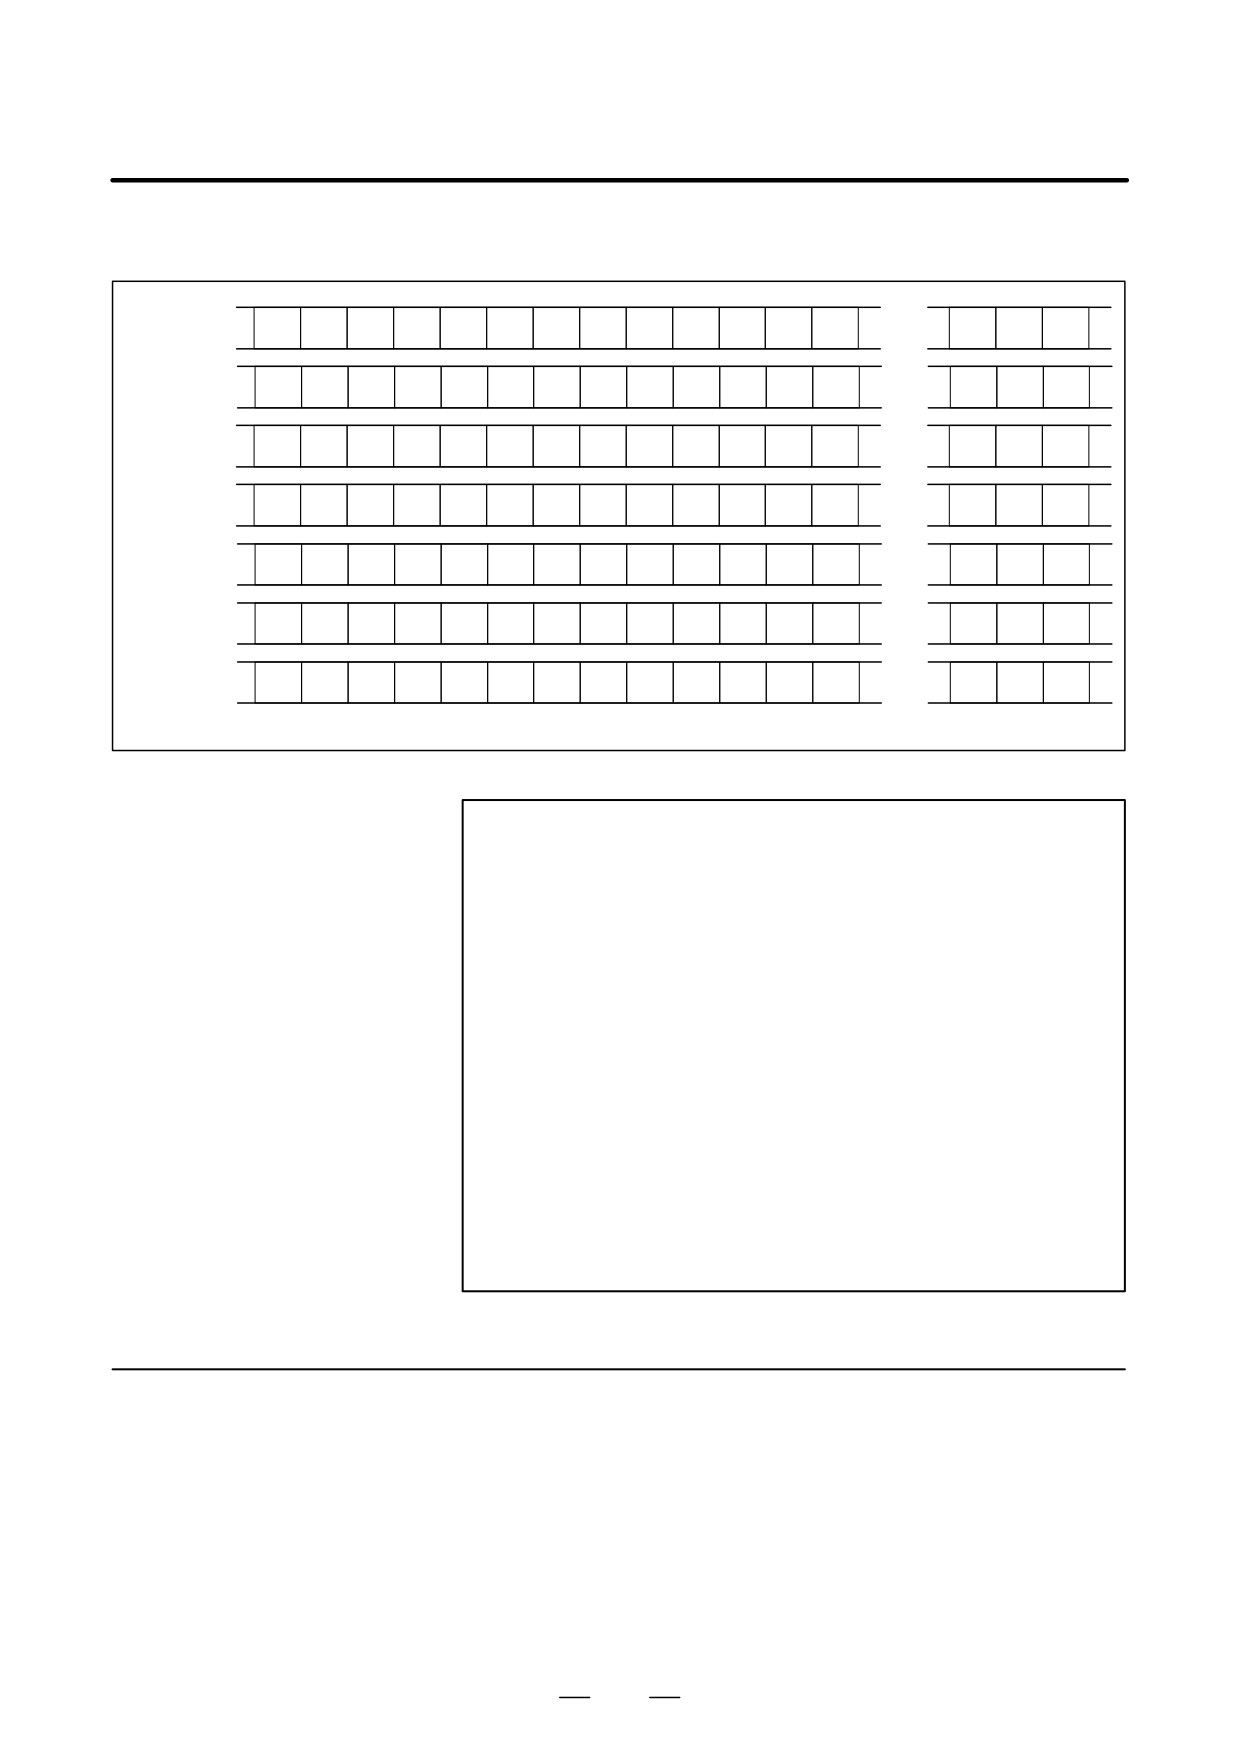
4) Waveform diagnosis data
T
6
0
D
,
,
,
to
,
T
6
1
D
,
,
,
to
,
T
6
2
D
,
,
,
to
,
T
6
3
D
,
,
,
to
,
T
6
4
D
,
,
,
to
,
T
6
5
D
,
,
,
to
,
T
6
6
D
*
,
,
,
to
,
D *..*: Waveform diagnosis data x number of axes
NOTE
1
Records are classified into header records and data
records.
2
“%” is used as an end-of-record code.
3
Each record starts with an identifier and ends with an
end-of-block code.
4
Either the ISO or EIA code system is used.
5
The output code type is specified with parameter ISO (bit 1
of No. 0100). For ISO code, parameter NCR (bit 3 of No.
0100) is used to specify whether the end-of-block code is
<LF> only, or a sequence of <LF> <CR> <CR>.
6
Parameter NFD (bit 7 of No. 01X1, where X is the channel
number) is used to specify whether a feed code is output
before and after the data.
7
No identifier word is output for a data item for which no axis
is selected.
8
The above file corresponds to a paper tape of about 200 m
in length.
1.10.6
(1) Once the storage is full, the oldest data is overwritten.
Notes
(2) Stored-type waveform diagnostic data is not lost, even when the
power is turned off.
(3) The waveform diagnostic function is disabled when parameter SGD
(bit 0 of No. 3112) is set to 0.
(4) Set the correct date and time using the setting screen.
103
1. DISPLAY AND OPERATION
B-64115EN/02
Load meter of the servo axis and the serial spindle and the speed meter
1.11
can be displayed.
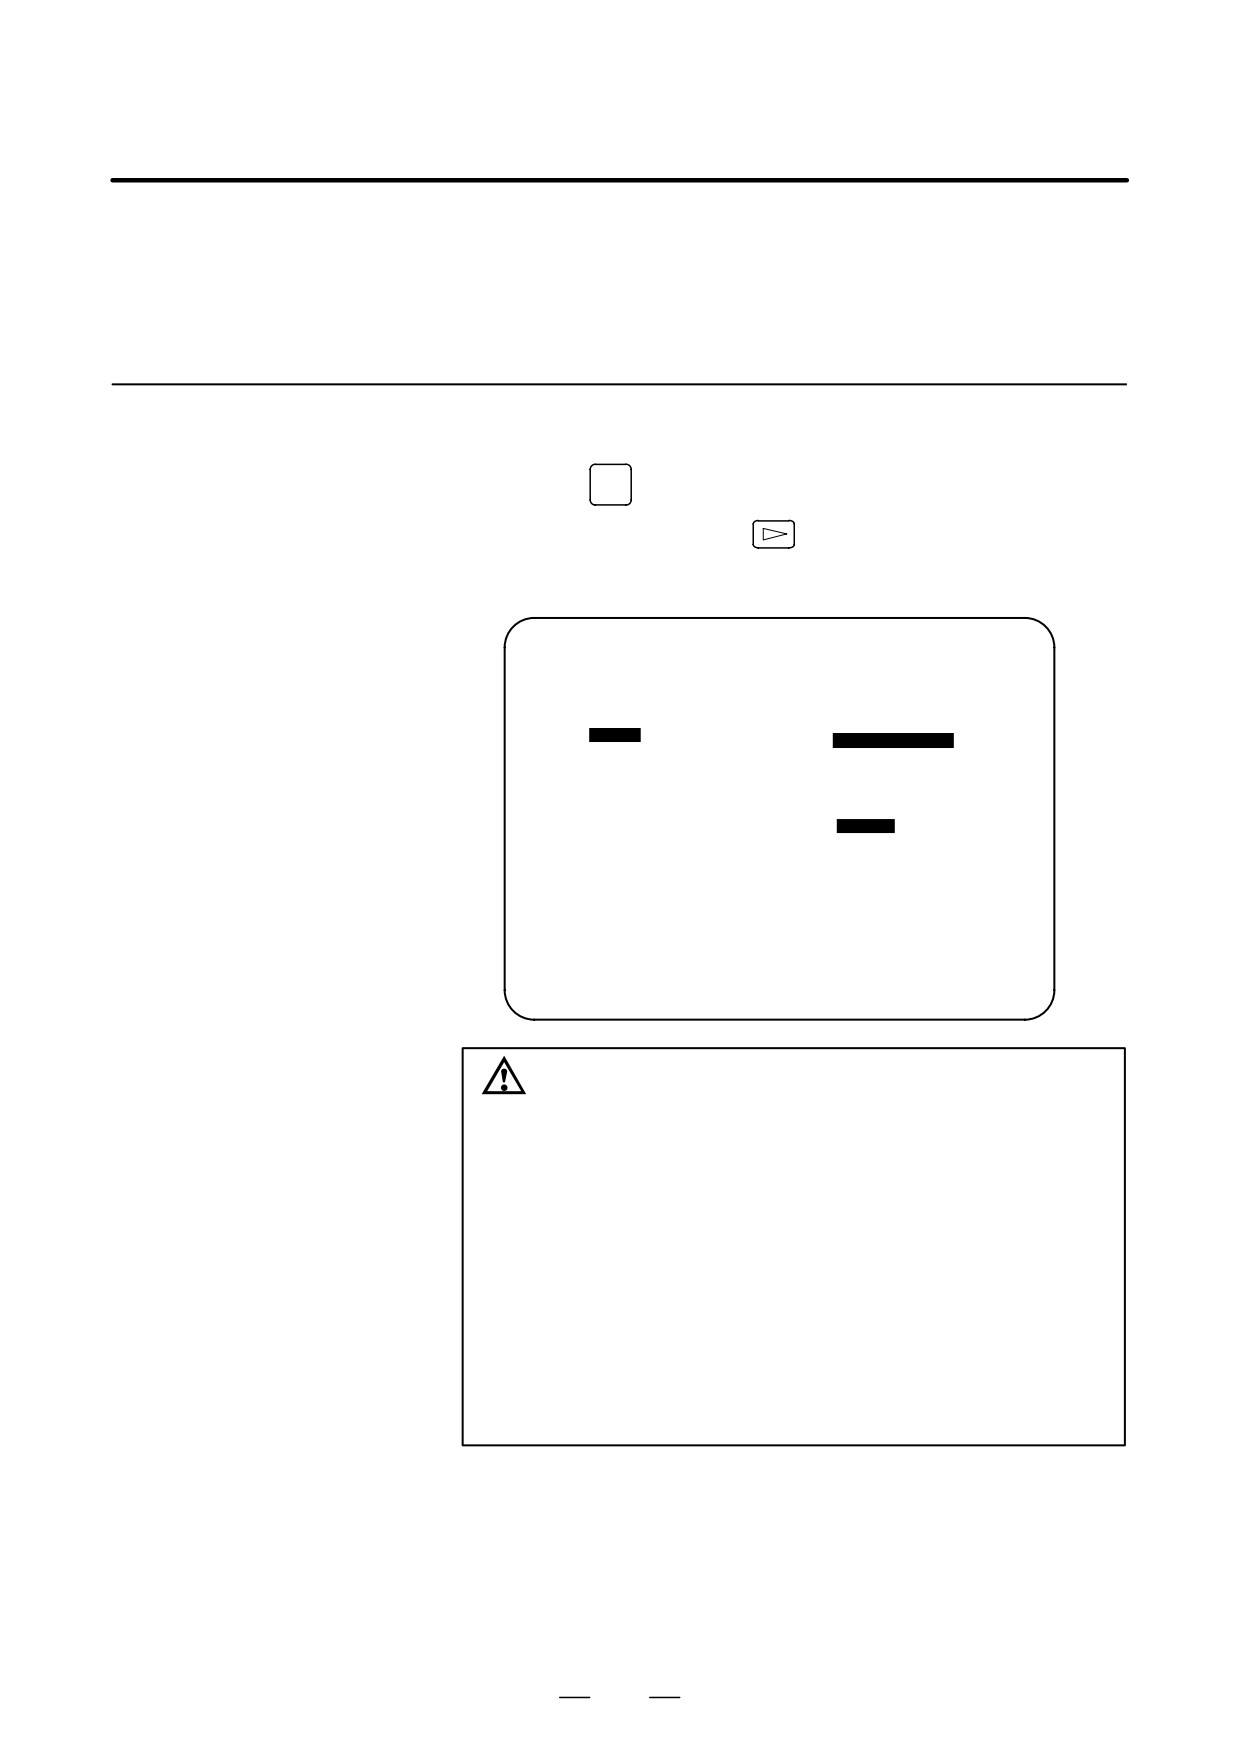
OPERATING
MONITOR
1.11.1
1. Set a parameter to display operating monitor. (Bit 5 (OPM) of
parameter No.3111)
Display Method
2. Press the
POS
key to display the position display screen.
3. Press continuous menu key
, then soft key [MONI] is displayed.
4. Press the soft key [MONI], then the operating monitor screen is
displayed.
OPERATING MONITOR
O0001 N00001
(LOAD METER)
X :
80%
S1:
201%
Y :
* * * * *
0%
(SPEED METER RPM)
Z :
* * * * *
0% S1:
1500
PART COUNT
5
RUN TIME
0H15M
CYCLE TIME
0H 0M38S
ACT.F
3000 MM/M
S
0
T
0000
MEM STRT MTN ***
09:06:35
[
[ ABS ] [ REL ] [ ALL ] [ HNDL ] [ OPRT ]
CAUTION
1
The bar graph for the load meter shows load up to 200%.
2
The bar graph for the speed meter shows the ratio of the
current spindle speed to the maximum spindle speed
(100%). Although the speed meter normally indicates the
speed of the spindle motor, it can also be used to indicate
the speed of the spindle by setting bit 6. (OPS) of parameter
3111 to 1.
3
The servo axes for their load meters are displayed are set
to parameter No. 3151 to 3. If parameters 3151 to 3153 are
all zero, the load meter of the basic axes are displayed.
4
For color display, the bar of the load meter that exceed
100% shows purple color.
104
B-64115EN/02
1. DISPLAY AND OPERATION
1.11.2
Parameters
#7
#6
#5
#4
#3
#2
#1
#0
DGN
3111
OPS
OPM
[Data type]
Bit
OPM
Operating monitor display is:
0 : Disabled
1 : Enabled
OPS
The speed meter on the operating monitor screen displays:
0 : Spindle motor speed
1 : Spindle speed
DGN
3151
Axis number for which the first servo motor load meter is displayed
DGN
3152
Axis number for which the second servo motor load meter is displayed
DGN
3153
Axis number for which the third servo motor load meter is displayed
DGN
3154
Axis number for which the fourth servo motor load meter is displayed
[Data type]
Byte
[Valid data range]
0, 1, ... number of controlled axes
These parameters specify the numbers of the axes for which load meters
for servo motors are to be displayed. Up to four load meters can be
displayed. Set 0 for those axes for which no load meter is to be displayed.
105
1. DISPLAY AND OPERATION
B-64115EN/02
1.12
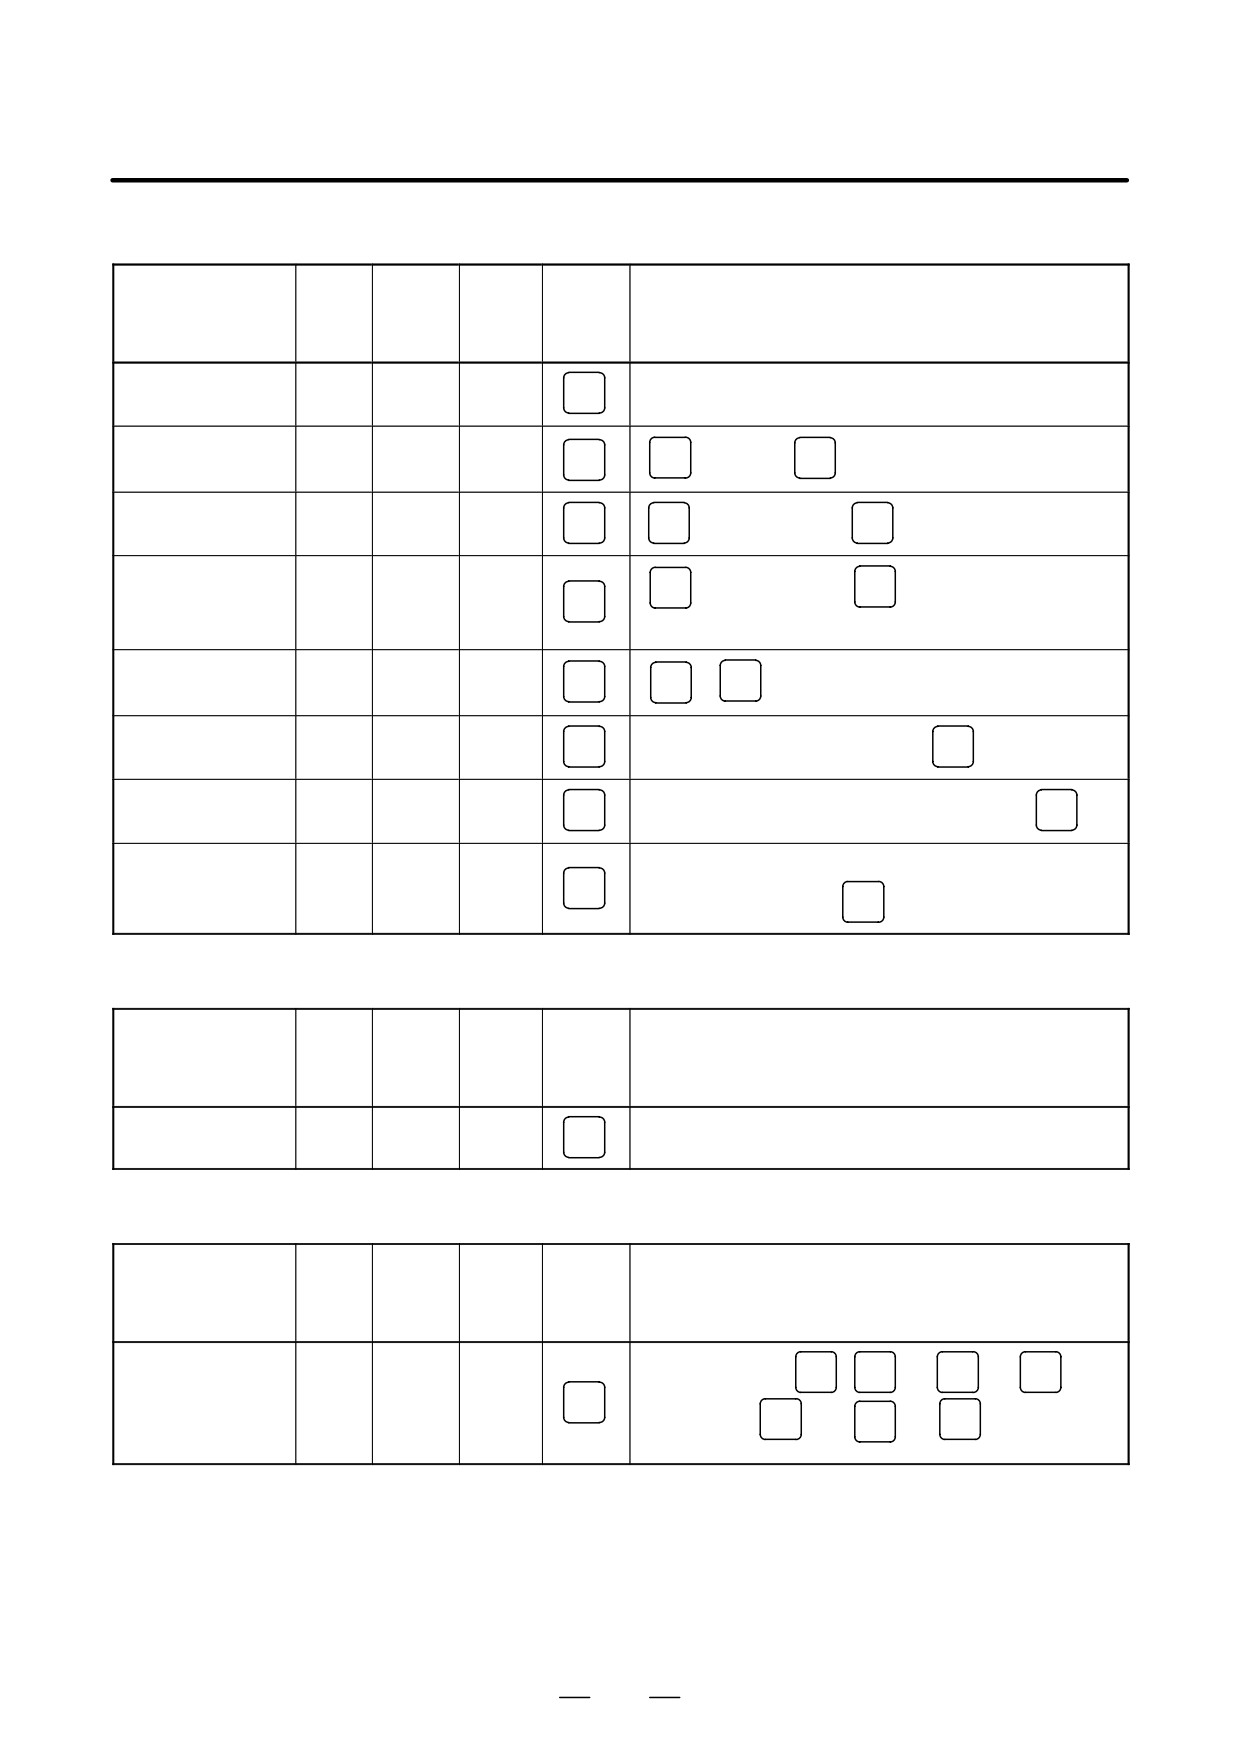
LIST OF
OPERATIONS
Reset
Data
Param-
Func-
protec-
Function
eter
Mode
tion
Operation
tion
write=1
button
key
Resetting run hour
[(OPRT)] [RUNPRE]→[EXEC]
-
POS
Resetting no. of
[(OPRT)] [PTSPRE]→[EXEC]
machined parts
-
POS
Resetting OT alarm
At Pow-
-
P
and
CAN
er ON
Resetting alarm 100
-
-
CAN
and
RESET
Registration from MDI
Data
Param-
Func-
protec-
Function
eter
Mode
tion
Operation
tion
write=1
button
key
SYSTEM
Parameter no.→[NO.SRH]→Data→
INPUT
Inputting
MDI or
Ę
parameters
E.Stop
(PA-
→ PWE =0 →
RESET
RAM)
Inputting offset
OFFSET
OFF
-
SETTING
Offset number→[NO.SRH]→Offset value→
INPUT
values
Inputting setting
OFFSET
OFF
MDI
SETTING
Setting no.→[NO.SRH]Data→
INPUT
data
Input of PMC
parameters, counter
OFF or Ę
[PMCPRM]→[COUNTR] or [DATA]→Data→
INPUT
and data table
SYSTEM
MDI or
E.Stop
Inputting PMC
(PMC)
parameters
Ę
[PMCPRM]→[TIMER] or [KEEPRL]→Data→
INPUT
(Timer, keep relay)
POS
POS
(Display of relative coordinate)<AXIS>→ [ORIGIN]
Tool length
JOG
→
OFFSET
measurement
→
SETTING
→Jog the tool to measuring position
OFFSET
SETTING
Offset no.→[NO.SRH]→<AXIS>→[INP.C]
106
B-64115EN/02
1. DISPLAY AND OPERATION
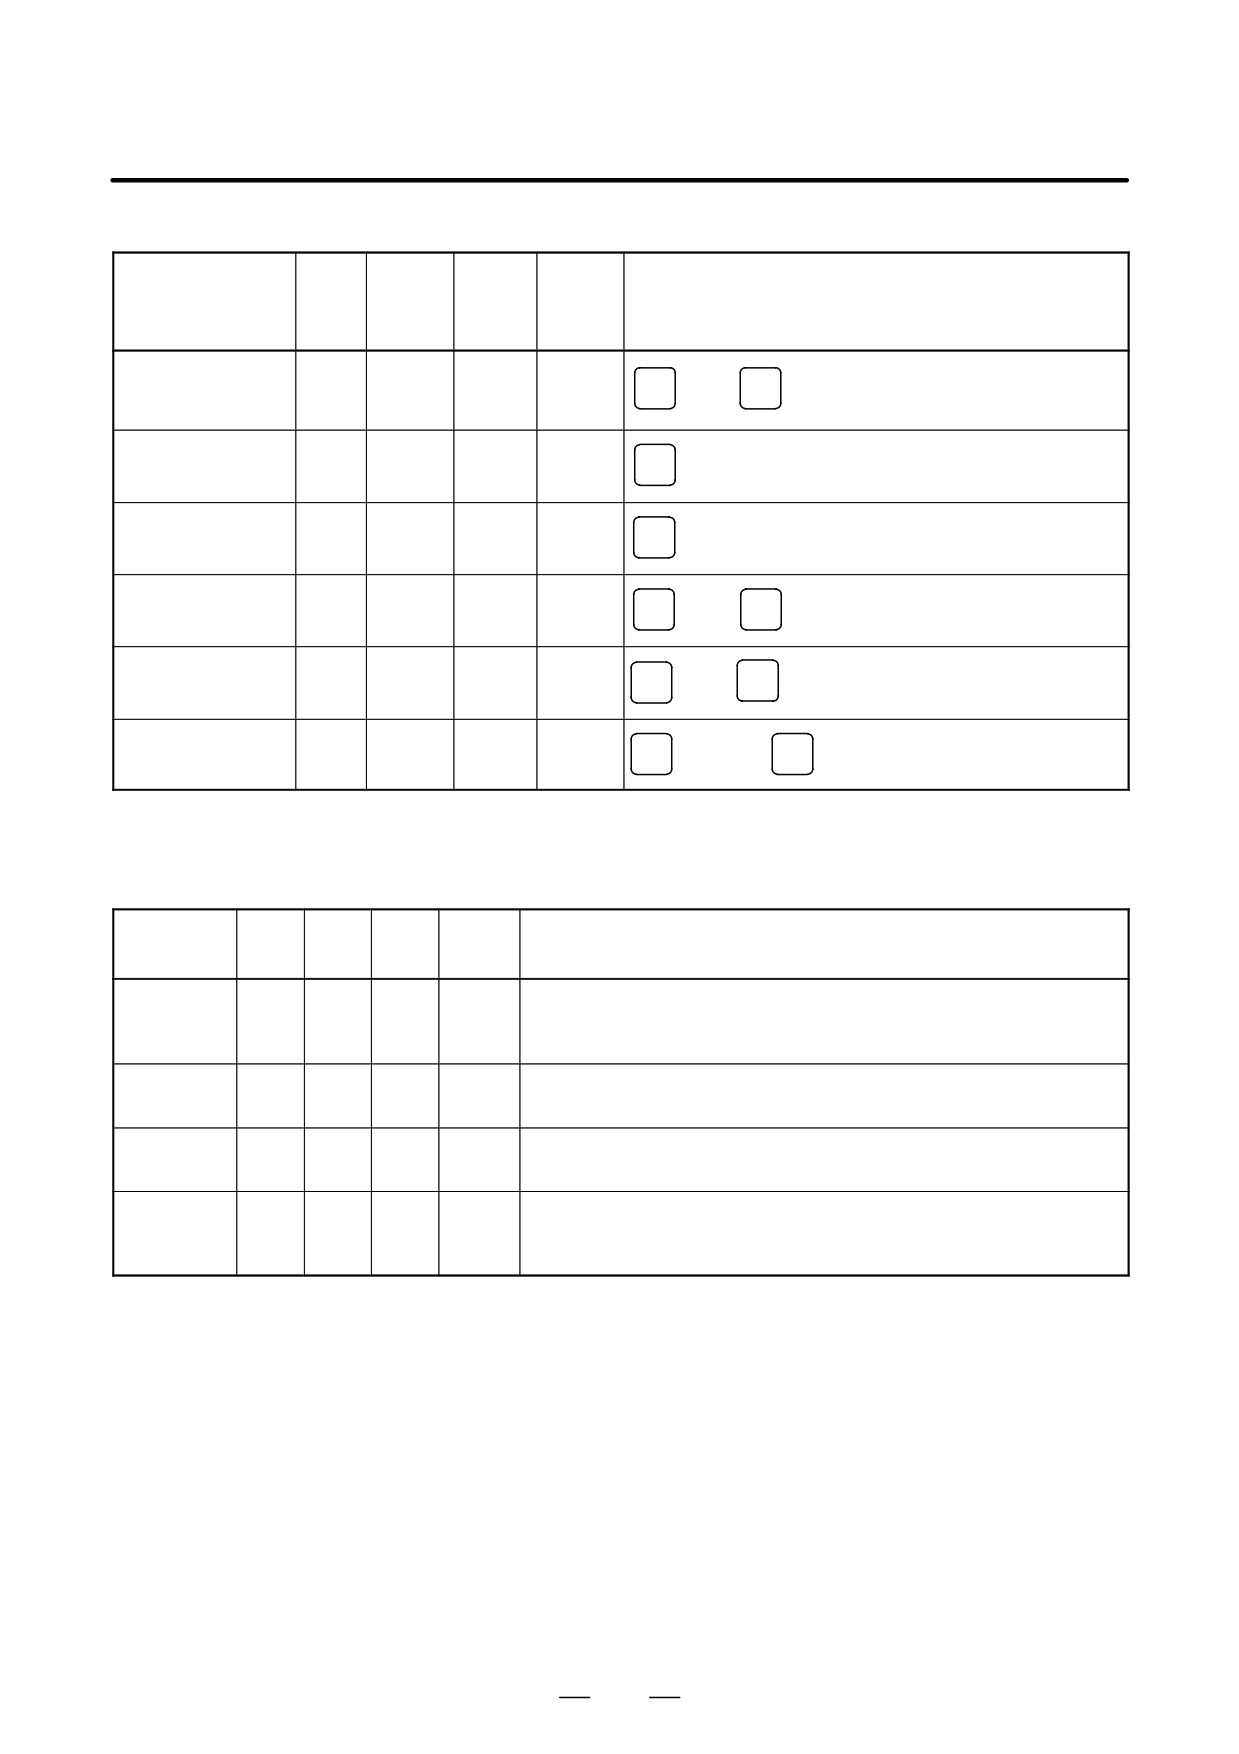
Input/Output with FANUC Cassette
Data
Param-
Func-
protec-
Function
eter
Mode
tion
Operation
tion
write=1
button
key
Heading a file
EDIT
PROG
N
→File no.→[ " ]→[F SRH]→[EXEC]
Deleting a file
OFF
EDIT
PROG
N
→File no.→[ " ]→[DELETE→[EXEC]
Collating a program
EDIT
PROG
Heading a file→
O
→Program number→[(OPRT)]
→[ " ]→[READ]→[EXEC]
Inputting From FANUC Cassette
Data
Param-
Func-
protec-
Function
eter
Mode
tion
Operation
tion
write=1
button
key
Inputting
Ę
EDIT or
[(OPRT)]→[ " ]→[READ]→[EXEC]
SYSTEM
parameters
E.Stop
(PA-
RAM)
Inputting PMC
Ę
E.Stop
SYSTEM
INPUT
parameters
[
" ]→[I/O]→(CANNEL NO)
1
→
(PMC)
(DEVICE NAME) [FDCAS]→(KIND OF DATA) [PA-
RAM]→[READ]→(FILE NO) File no.
INPUT
→[EXEC]
Inputting offset
OFF
EDIT
(Heading a file no.)→[(OPRT)]→[ " ]→[READ]→[EXEC]
OFFSET
SETTING
values
Registering a
OFF
EDIT
PROG
→File no.→
INPUT
→[ " ]→[READ]→[EXEC]
program
N
Inputting macro
OFF
EDIT
PROG
N
→File no.→
INPUT
→[ " ]→
→
variables
O
Program no. → [READ]→[EXEC]
MEMO
<START>
PROG
RY
(Note) After loading into the program by assigning an ap-
propriate program number, this function performs
execution in MEM mode. Then, it deletes the pro-
gram.
107
1. DISPLAY AND OPERATION
B-64115EN/02
Output to FANUC Cassette
Data
Param-
Func-
protec-
Function
eter
Mode
tion
Operation
tion
write=1
button
key
EDIT
[(OPRT)]→[ " ]→[PUNCH]→[EXEC]
or
SYSTEM
Output of
Emer-
parameter
(PA-
gency
RAM)
Stop
[
" ]→[I/O]→(CANNEL NO)
1
INPUT
→(DEVICE
Output of PMC
SYSTEM
EDIT
NAME) [FDCAS] →(KIND OF DATA) [PARAM] → [WRITE]
parameter
(PMC)
→ (FILE NO)
INPUT
→[EXEC]
1
[(OPRT)]→[ " ]→[PUNCH]→[EXEC]
OFFSET
Output of offset
EDIT
SETTING
Output of all
EDIT
PROG
O
→-9999→[ " ]→[PUNCH]→[EXEC]
programs
Output of one
EDIT
PROG
O
→Program no.→[ " ]→[PUNCH]→[EXEC]
program
Output of macro
[
" ]→[MACRO]→[(OPRT)]→[ " ]→[PUNCH]→[EXEC]
OFFSET
EDIT
SETTING
variables
Search
Data
Param-
Func-
protec-
Function
eter
Mode
tion
Operation
tion
write=1
button
key
Searching a
MEMO
program number
RY
PROG
O
→Program no.→[O SRH]
or EDIT
Searching a
MEMO
PROG
Program no. search→
N
→Sequence number→[NSRH]
sequence number
RY
Searching an
Data to be searched→[SRH↑] or[SRH↓] or
address word
EDIT
PROG
(cursor key)
Searching an
Address to be searched [SRH↑] or[SRH↓] or
address only
EDIT
PROG
(Cursor key)
Searching an offset
Offset no.→[NO.SRH]
OFFSET
-
SETTING
number
Searching a
Diagnostic number→[NO.SRH]
SYSTEM
diagnostic number
-
(DGNOS)
Searching a
Parameter no.→[NO.SRH]
SYSTEM
parameter number
-
(PA-
RAM)
108
B-64115EN/02
1. DISPLAY AND OPERATION
Edit
Data
Param-
Func-
protec-
Function
eter
Mode
tion
Operation
tion
write=1
button
key
Display of memory
[LIB]
EDIT
PROG
capacity used
Deleting all
OFF
EDIT
PROG
O
→-9999→
DELETE
programs
OFF
Deleting a program
EDIT
PROG
O
→Program no.→
DELETE
Deleting several
N
→Sequence no.→
DELETE
OFF
EDIT
PROG
blocks
(Deleted up to a block with a specified sequence no.)
OFF
Deleting a block
EDIT
PROG
EOB
→
DELETE
OFF
Deleting a word
EDIT
PROG
Searching a word to be deleted→
DELETE
OFF
Changing a word
EDIT
PROG
Searching a word to be changed→New Data→
ALTER
OFF
Searching a word immediately before a word to be
Inserting a word
EDIT
PROG
searched→New Data→
INSERT
Collation
Data
Param-
Func-
protec-
Function
eter
Mode
tion
Operation
tion
write=1
button
key
ON
[(OPRT)]→[ " ]→[READ]→[EXEC]
Collating memory
EDIT
PROG
Playback
Data
Param-
Func-
protec-
Function
eter
Mode
tion
Operation
tion
write=1
button
key
OFF
TEACH
Jog the machine→
X
,
or
Z
→
INSERT
-IN
Y
Input of NC data
JOG/
PROG
→ NC data →
INSERT
→
→
INSERT
HAN-
EOB
DLE
109
1. DISPLAY AND OPERATION
B-64115EN/02
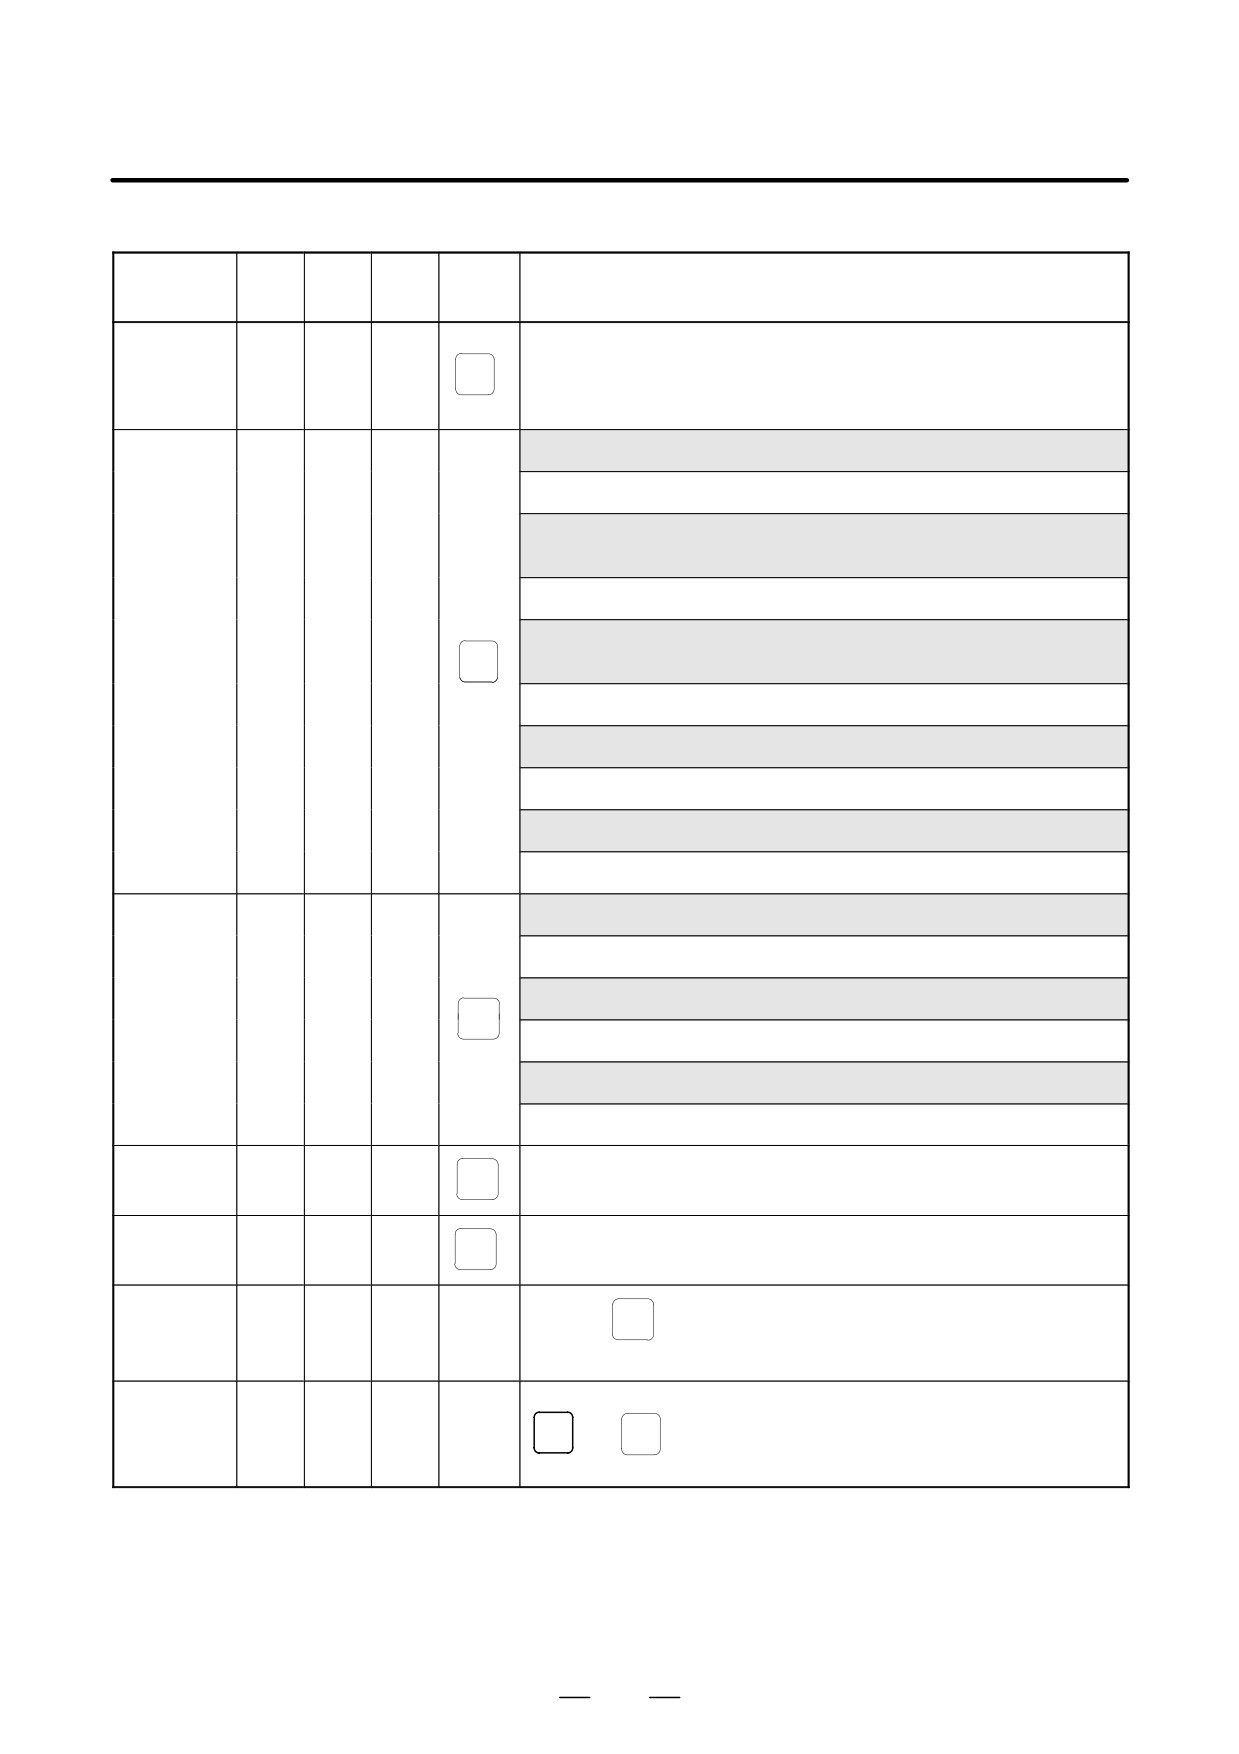
Clear
Data
Param-
Func-
prote-
Function
eter
Mode
tion
Operation
ction
write=1
key
key
Memory all clear
At
power
RESET
DELETE
AND
ON
Parameter/offset
At
clear
f
Power
RESET
ON
Clearing a program
At
f
Power
DELETE
ON
Program under
edition at power
-
PROG
AND
RESET
off(PS101)
PMC RAM *
At
Power
X
AND
0
(O)
ON
Additional SRAM
At
area clear
Power
O
(O) AND
DELETE
ON
* PMC ladder program is not cleard in FROM.
Manual operation
KEY
PWE
Func-
Function
Mode
Operation
SW
=1
tion key
Manual refer-
Turn on Reference point return switch ³ Turn on +X, -X, +Z, or -Z ³
ence point
JOG
Reference point return switch LED lit.
return
Turn on +X, -X, +Z, or -Z ³ Use JOG FEEDRATE to set jog feedrate
Jog feed
JOG
³ Press Rapid traverse button, if required.
Incremental
Use Move distance selection switch to select move distance ³ Turn on
INC
feed
+X, -X, +Z, or -Z ³ Press Rapid traverse button, if required.
Use Axis selection switch to select axis to be operated ³ Use Handle
Manual
HND
magnification selection to select magnification ³ Turn manual pulse
handle feed
generator.
110
B-64115EN/02
1. DISPLAY AND OPERATION
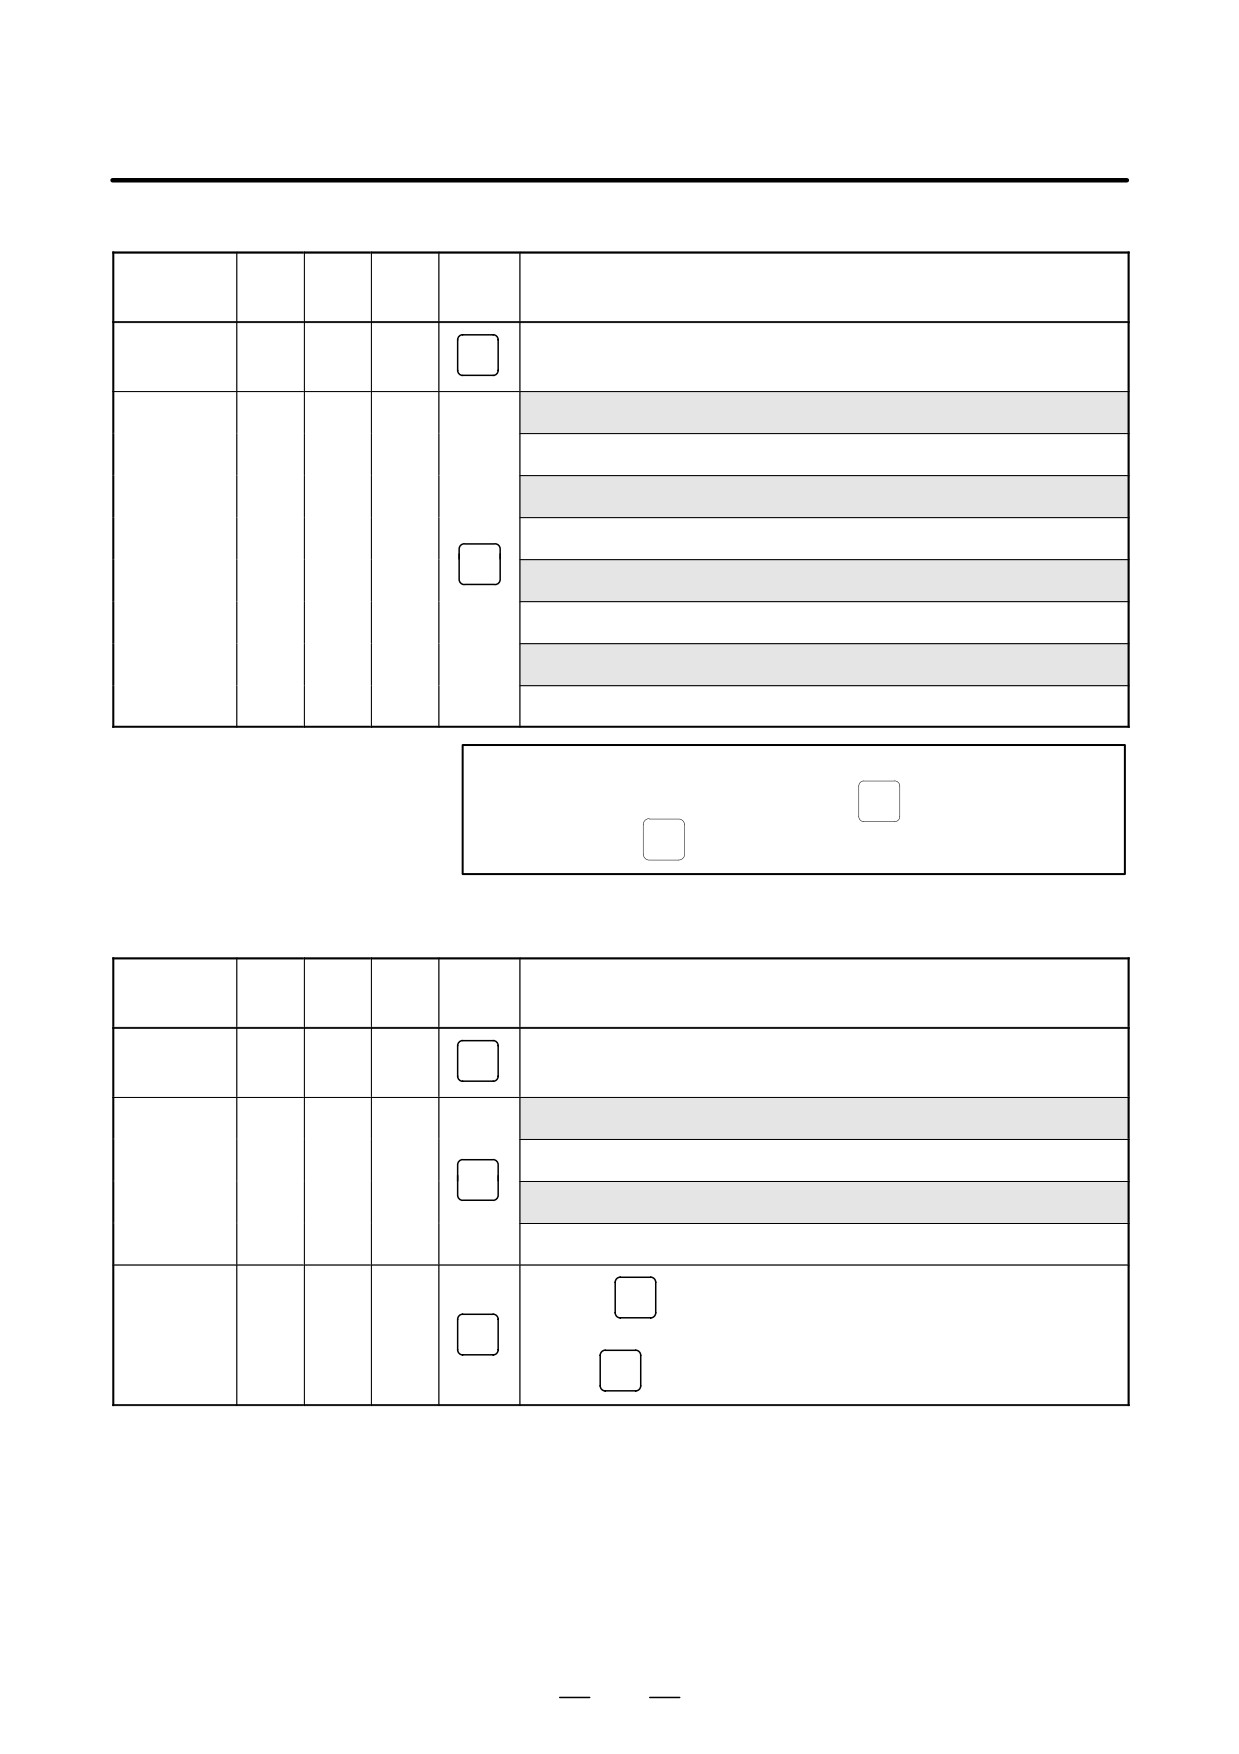
Display
Function
KEY
PWE
Func-
Mode
Operation
SW
=1
tion key
Amount of
program
EDIT
PROG
[ DIR ]
memory in
use
Command
Command value being executed, and previously specified modal value
value display
[CURRNT]
Command value being executed, and next command value to be
executed
[ NEXT ]
MEM
Command value entered from MDI, and previously specified modal
or
PROG
value
MDI
[ MDI ]
Program in memory being executed
[PRGRM]
Executable blocks in memory and current position
[CHECK]
Current-
Representation of the position in the workpiece coordinate system
position
display
[ ABS ]
Representation of the position in the relative coordinate system
POS
[ REL ]
General position indication
[ ALL ]
Alarm display
—
MESSAGE
[ALARM ] when an alarm condition has occurred.
Alarm history
MESSAGE
[HISTRY]
display
Screen erase
CAN
Press the
and function keys simultaneously. The function key
—
—
causes re-display.
Screen
switching
SHIFT
and
HELP
between NC
and loader
111
1. DISPLAY AND OPERATION
B-64115EN/02
Graphics functions (T series)
KEY
PWE
Func-
Function
Mode
Operation
SW
=1
tion key
Parameter
GRAPH
[G.PRM]
setting
Select a graphics drawing screen.
[GRAPH]
Begins and ends drawing.
During automatic operation or manual operation
Tool path
GRAPH
drawing
Erase a drawing screen.
[(OPRT)]
³ [ERASE ]
Enlarge graphics.
[ ZOOM ]
NOTE
For the small-size MDI, read the
GRAPH
function key in this
CUSTOM
table as the
GRAPH
function key.
Graphics function (M series)
Function
KEY
PWE
Func-
Mode
Operation
SW
=1
tion key
Parameter
GRAPH
[PARAM]
setting
Tool path
Select a graphics drawing screen.
drawing
[GRAPH]
GRAPH
Begin and end drawing.
During automatic operation or manual operation
Tool path dia-
Press the
GRAPH
key several times ³ Display “PATH GRAPHIC
gram data
setting
GRAPH
(PARAMETER)” screen ³ [PARAM ] ³ Enter numerals using numeric
keys ³
INPUT
112
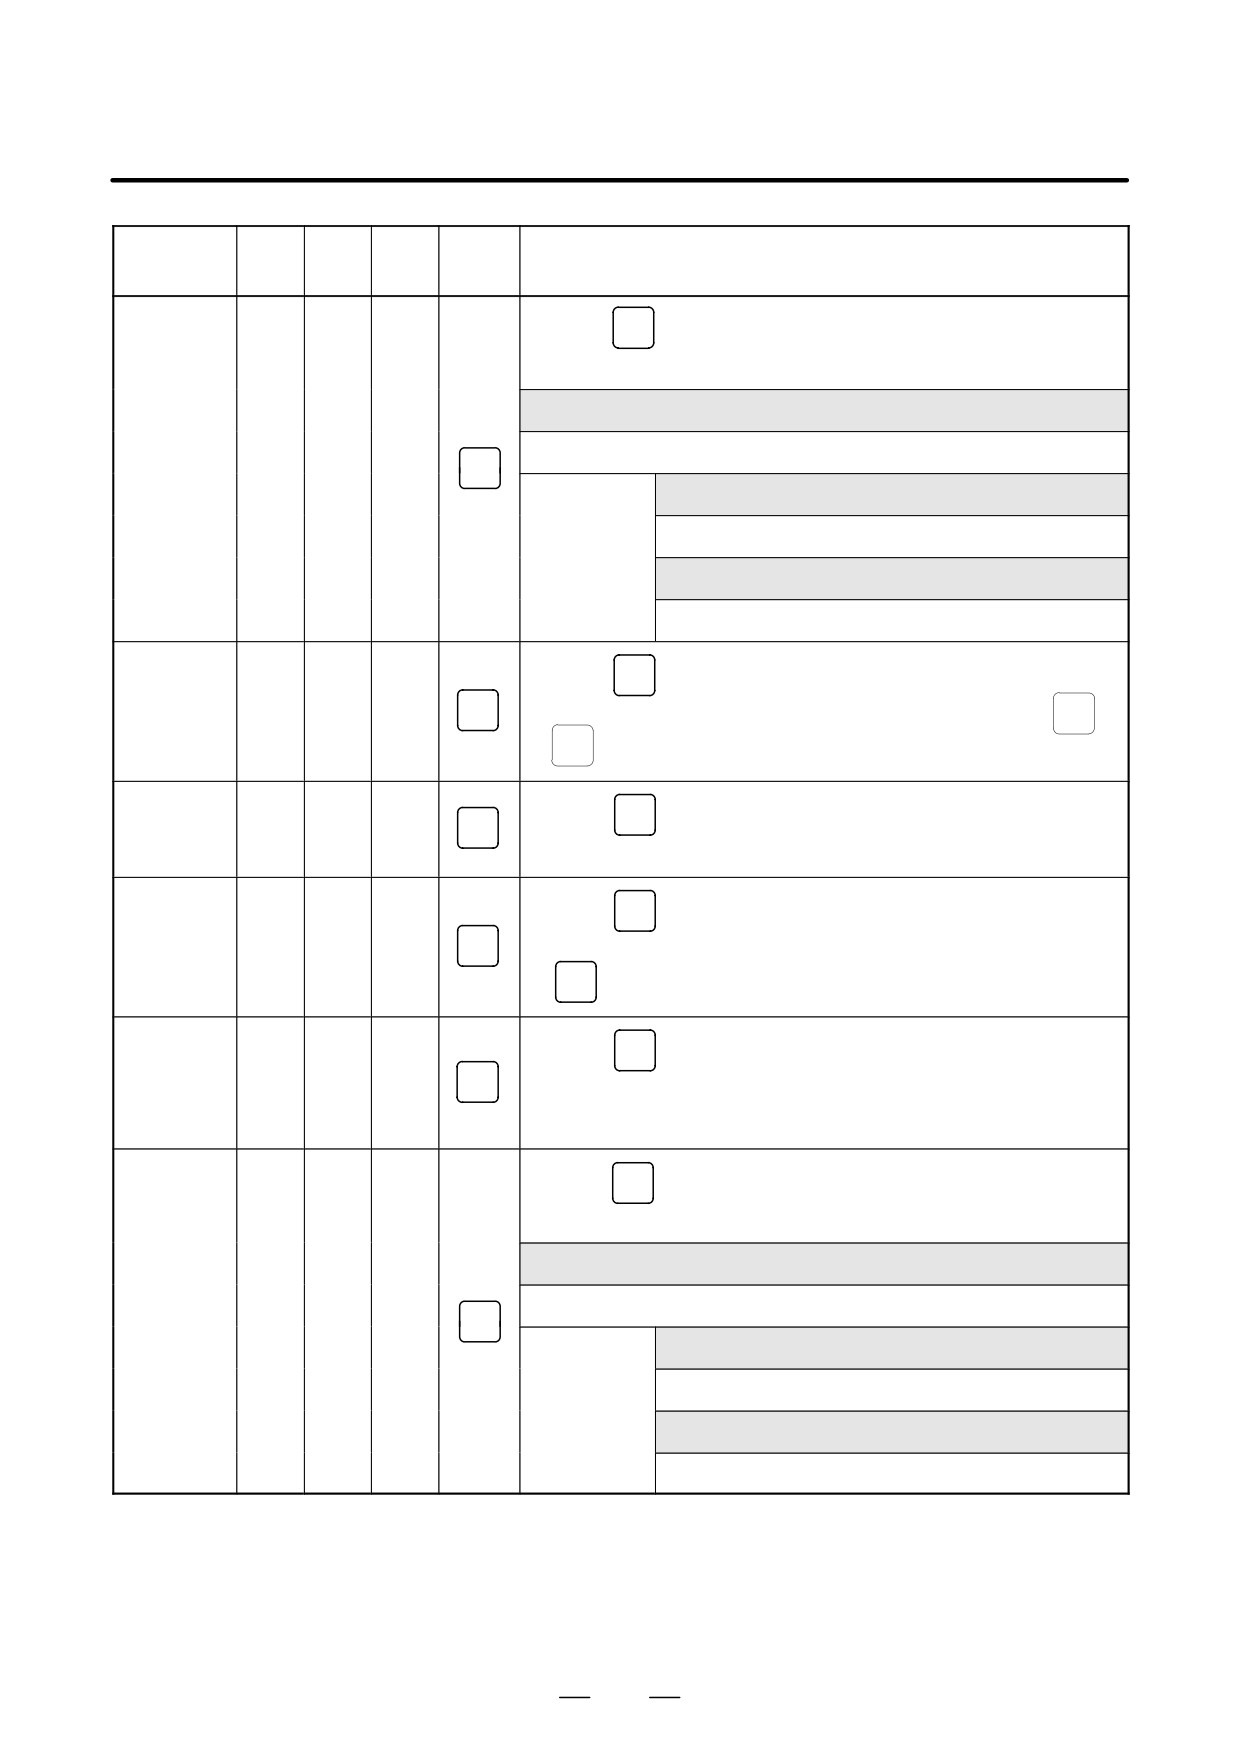
B-64115EN/02
1. DISPLAY AND OPERATION
Function
KEY
PWE
Func-
Mode
Operation
SW
=1
tion key
Tool path
GRAPH
drawing
Press the
key several times ³ Display “PATH GRAPHIC
(PARAMETER)” screen ³ [EXEC] ³ [(OPRT)] ³ [ AUTO ] or [START]
Suspend drawing
[ STOP ]
MEM
GRAPH
Execute.
[START]
Suspend
drawing
Draw starting at the top of the program.
[REWIND] ³ [START ]
Enlarging
Press the
GRAPH
key several times ³ Display “PATH GRAPHIC
part of the
tool path
GRAPH
(PARAMETER)” screen ³ [SCALE] ³ [(OPRT)][²][³][±][°] ³
P c
drawing
or
M #
³ [EXEC]
Current-tool
Press the
GRAPH
key several times ³ Display “SOLID GRAPHIC
position mark
GRAPH
display
(PARAMETER)” screen ³ [ POS ]
Machining
Press the
GRAPH
key several times ³ “SOLID GRAPHIC
profile
drawing data
GRAPH
(PARAMETER)” screen ³ Enter numerals using numeric keys
setting
³
INPUT
Blank figure
Press the
GRAPH
key several times ³ “SOLID GRAPHIC
drawing
GRAPH
(PARAMETER)” screen ³ [BLANK ] ³ [(OPRT)] ³ [ ANEW ] ³
[+ ROT][- ROT][+TILT ][-TILT ]
Machining
Press the
GRAPH
key several times ³ “SOLID GRAPHIC
profile draw-
ing
(PARAMETER)” screen ³ [EXEC] ³ [(OPRT)] ³ [ A.ST ] or [ F.ST ]
Suspend drawing
[ STOP ]
MEM
GRAPH
Execute.
[ A.ST ] or [ F.ST ]
After drawing
is suspended
Display the start of part program.
[REWIND] ³ [ A.ST ] or [ F.ST ]
113
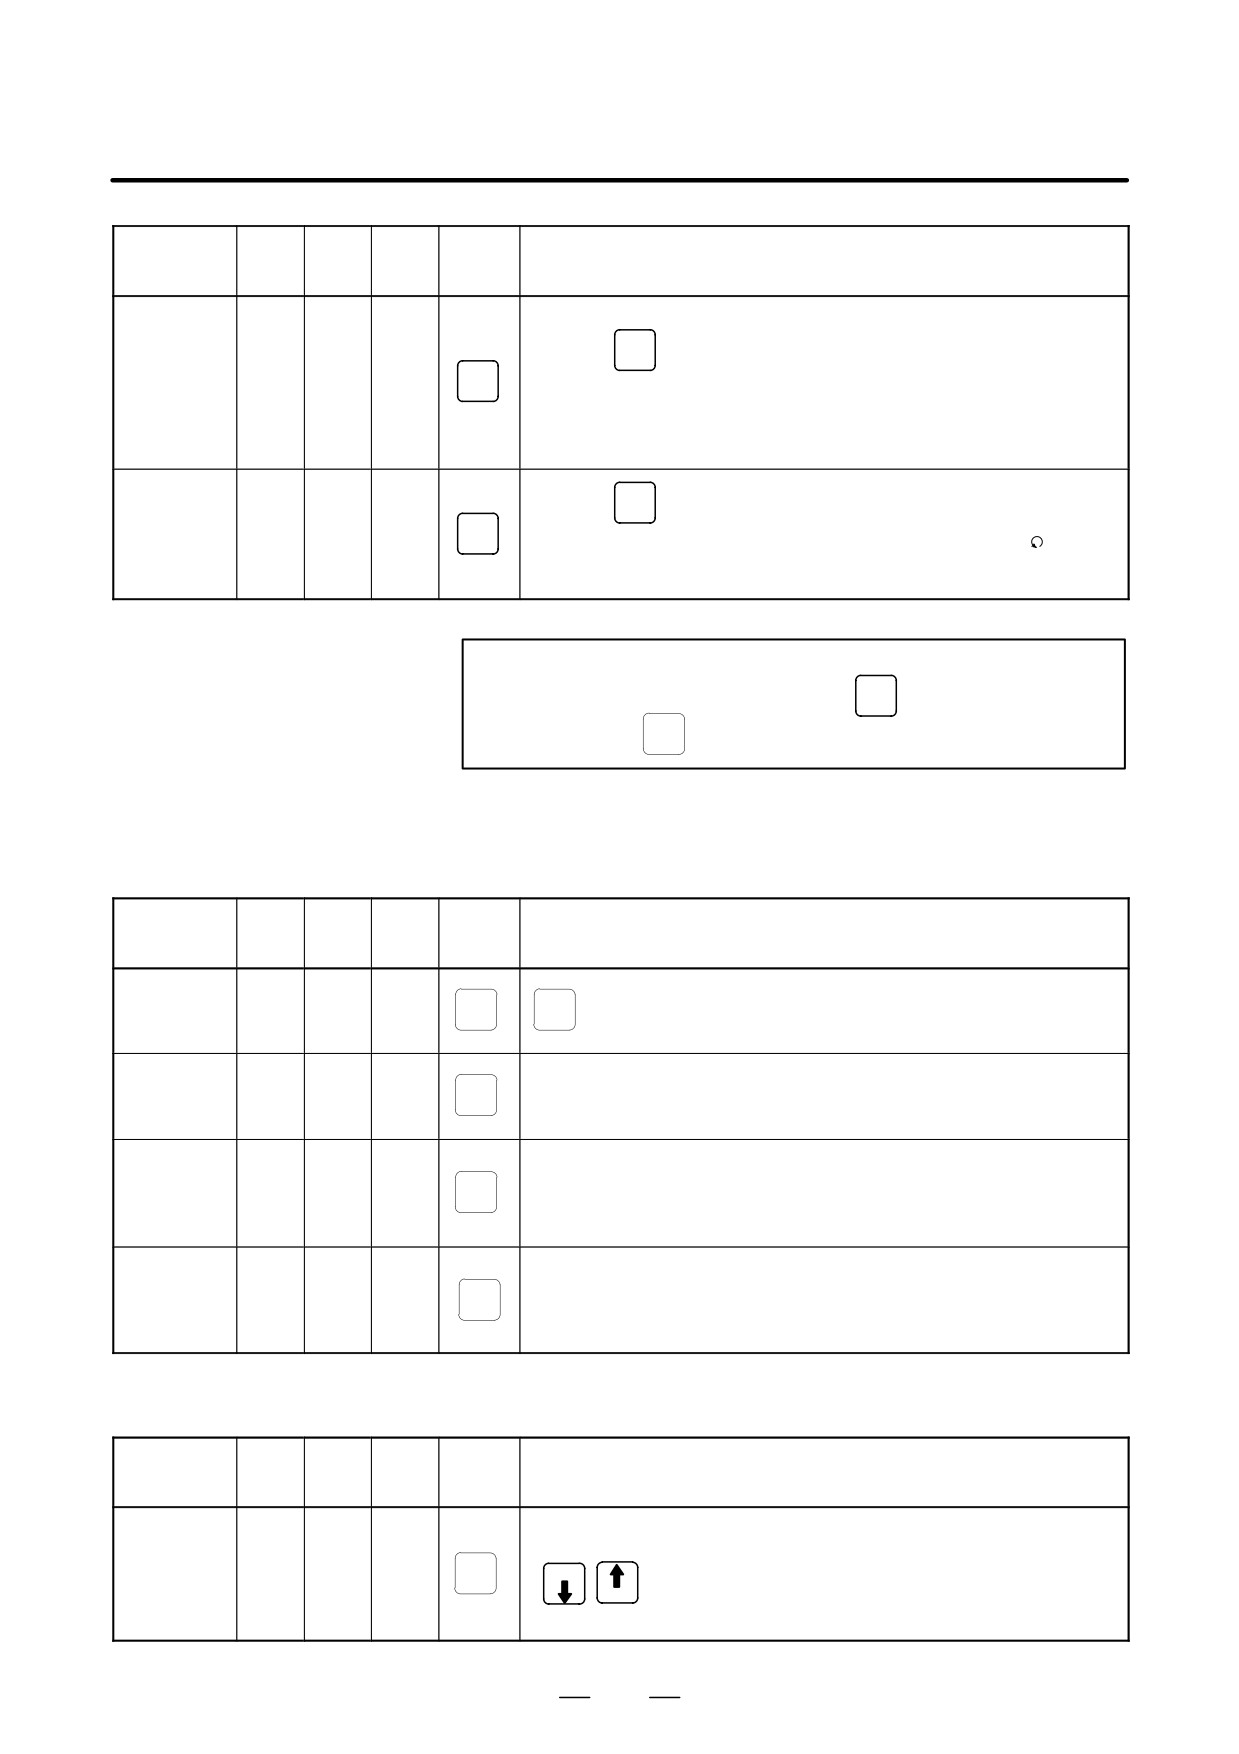
1. DISPLAY AND OPERATION
B-64115EN/02
Function
KEY
PWE
Func-
Mode
Operation
SW
=1
tion key
Re-drawing
of “SOLID
Press the
GRAPH
key several times ³ “SOLID GRAPHIC
GRAPHIC
(PARAME-
GRAPH
(PARAMETER)” screen ³ [REVIEW] ³ [(OPRT)] ³ [ ANEW ] ³
TER)” in a
different
[+ ROT ][- ROT ][+TILT ][-TILT ]
orientation
3-plane
Press the
GRAPH
key several times ³ “SOLID GRAPHIC
drawing
GRAPH
(PARAMETER)” screen ³ [ "] ³ [3-PLN ] ³ [(OPRT)] ³ [
]
[²][³][°][±]
NOTE
For the small-size MDI, read the
GRAPH
function key in this
CUSTOM
table as the
GRAPH
function key.
Help function
KEY
PWE
Func-
Function
Mode
Operation
SW
=1
tion key
Initial menu
screen dis-
HELP
HELP
play
Alarm detail
screen dis-
HELP
[ALARM ] ³ Alarm No. ³ [SELECT]
play
Operation
method
HELP
[OPERAT] ³ Operation method item No. ³ [SELECT]
screen dis-
play
Parameter
table-of-con-
HELP
[PARAM]
tents screen
display
Self-diagnosis function
KEY
PWE
Func-
Function
Mode
Operation
SW
=1
tion key
[DGNOS ]
Self-diagno-
±
sis screen
SYSTEM
1.
PAGE
page switch keys
display
PAGE
2. Diagnosis data No. ³ [NO.SRH]
114
B-64115EN/02
1. DISPLAY AND OPERATION
Boot
KEY
PWE
Func-
Function
Mode
Operation
SW
=1
tion key
System mon-
Pow-
itor screen
er-on
—
and a soft key at its left
display
time
Reading file
Place the cursor at 1. SYSTEM DATA LOADING on the system monitor
from memory
screen ³ [SELECT] ³ Place the cursor at the target file ³ [SELECT]
card
³ [YES]
Listing files in
flash ROM
Place the cursor at 2. SYSTEM DATA CHECK on the system monitor
and display-
screen ³ [SELECT] ³ Place the cursor at the target item ³ [SELECT]
ing detail
screen
Deleting file
Place the cursor at 3. SYSTEM DATA DELETE on the system monitor
from flash
screen ³ [SELECT] ³ Place the cursor at the target file ³ [SELECT]
ROM
³ [YES]
Outputting
Place the cursor at 4. SYSTEM DATA SAVE on the system monitor
file from flash
screen ³ [SELECT] ³ Place the cursor at the target file ³ [SELECT]
ROM to
³ [YES]
memory card
Place the cursor at 5. SRAM DATA BACKUP on the system monitor
Transferring
screen ³ [SELECT]
contents be-
- Batch output to memory card
tween SRAM
Place the cursor at 1. SRAM BACK UP ³ [SELECT] ³ [YES]
and memory
- Batch input from memory card
card in batch
Place the cursor at 2. RESTORE SRAM ³ [SELECT] ³ [YES]
Deleting file
Place the cursor at 6. MEMORY CARD FILE DELETE on the system
from memory
monitor screen ³ [SELECT] ³ Place the cursor at the target file ³
card
[SELECT] ³ [YES]
Memory card
Place the cursor at 7. MEMORY CARD FORMAT on the system moni-
formatting
tor screen ³ [SELECT] ³ [YES]
Exiting sys-
Place the cursor at 10. END on the system monitor screen
tem monitor
³ [SELECT] ³ [YES]
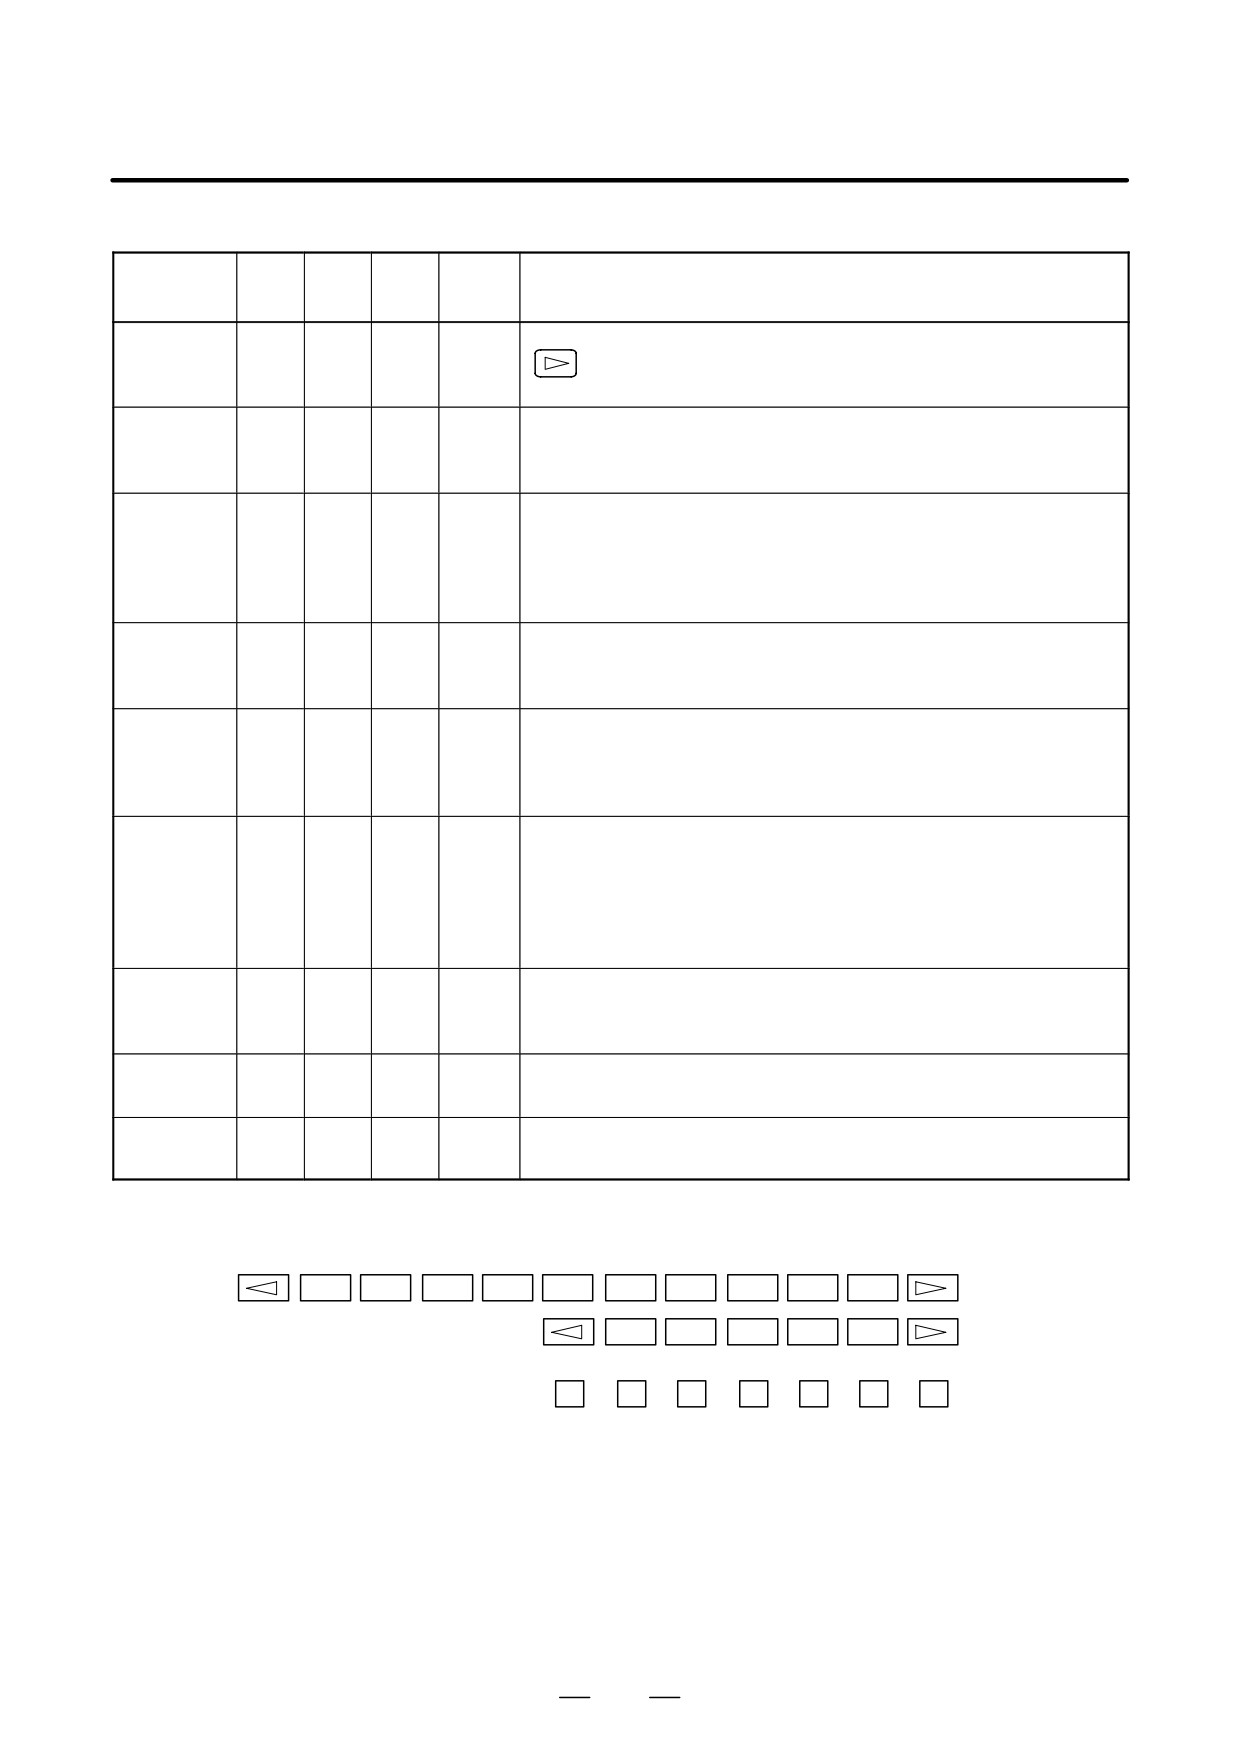
Reference
If no soft key is available as with a touch panel, use the numeric keys on
the MDI keypad.
: 12-soft key type
: 7-soft key type
±
±
±
±
±
±
±
1
2
3
4
5
6
7
115

1. DISPLAY AND OPERATION
B-64115EN/02
1.13
WARNING SCREEN
DISPLAYED WHEN
AN OPTION IS
CHANGED
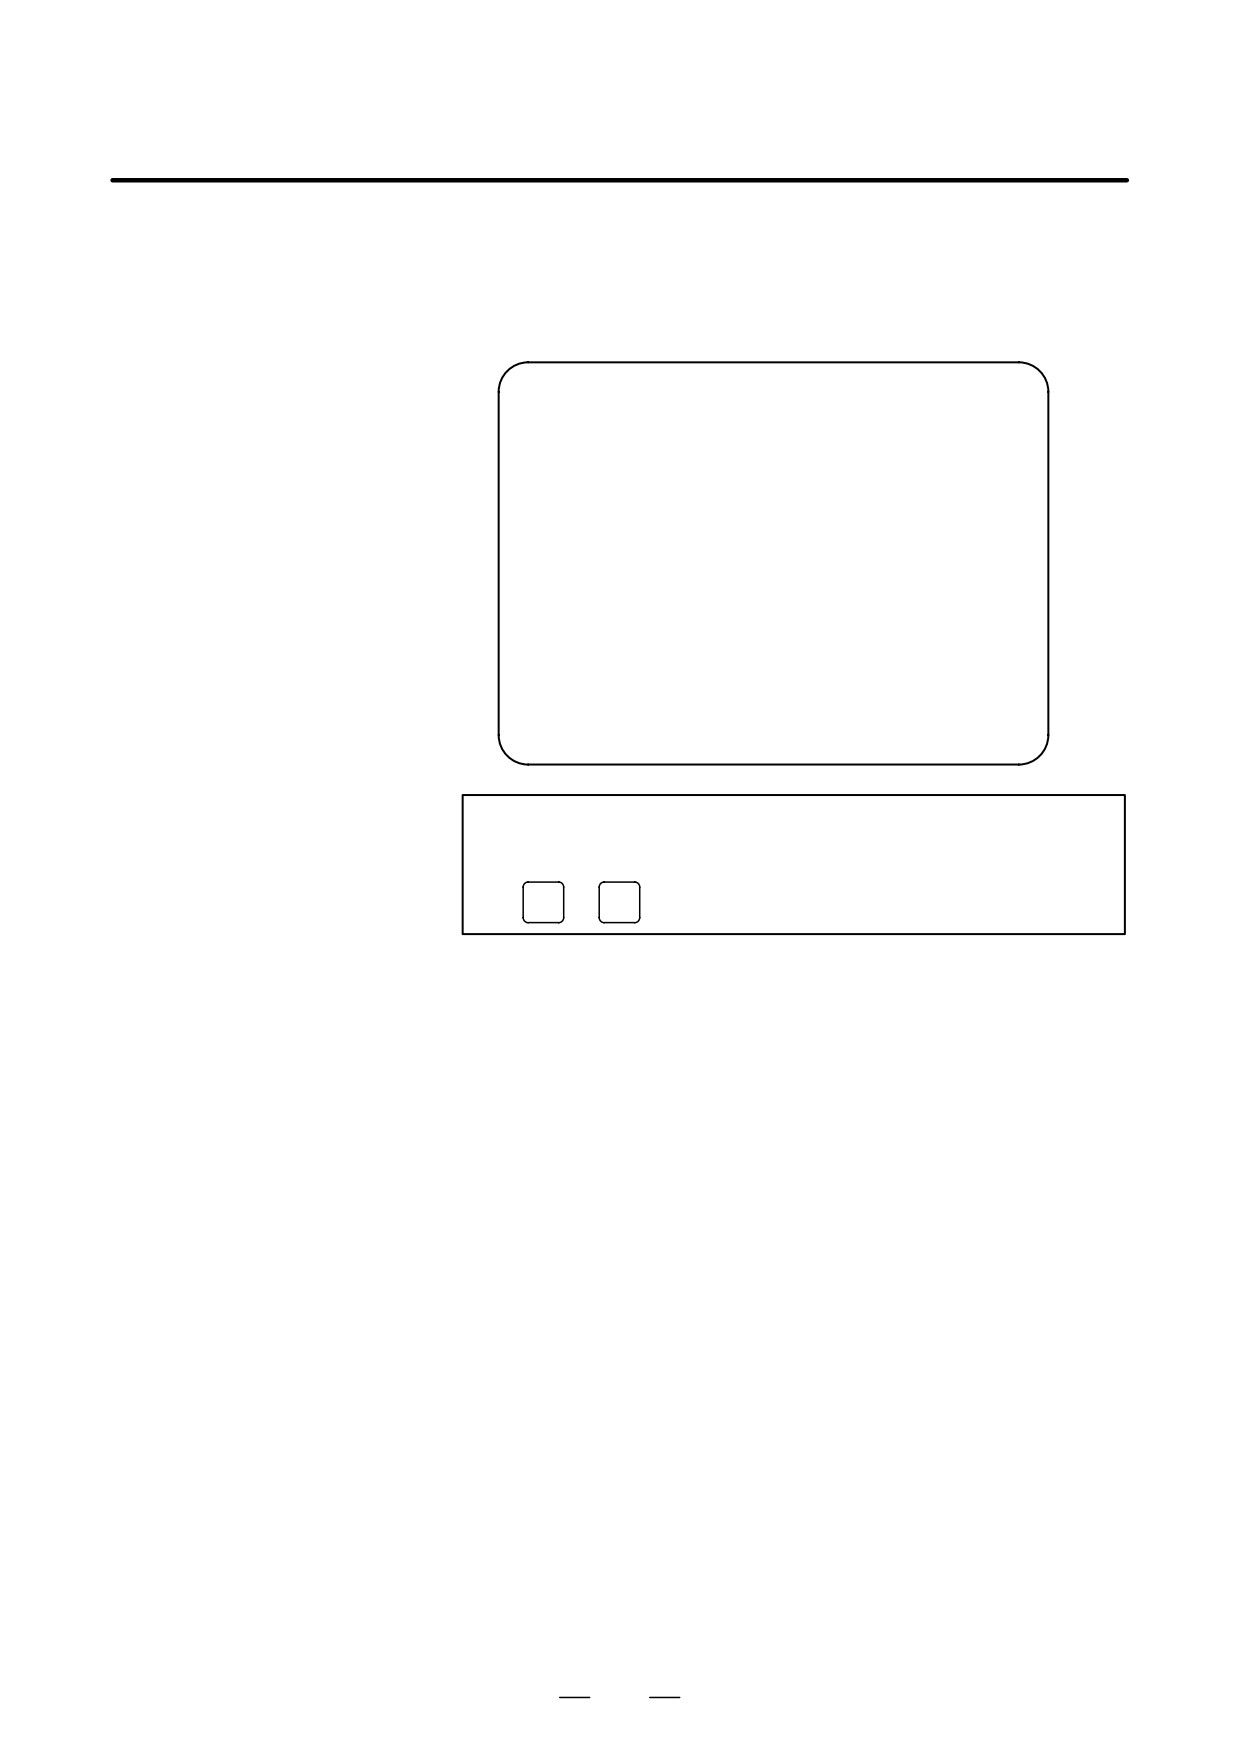
D Warning screen
This CNC displays a warning screen when the configuration of the
options using the SRAM area is changed. The data for the function
indicated on the screen is cleared the next time the system is turned on.
WARNING
YOU SET THE PARAMETER NO.jjjj#j
THE FOLLOWING DATA WILL BE CLEARED.
* PART PROGRAM MEMORY
PLEASE PRESS <DELETE> OR <CAN> KEY.
<DELETE> : CLEAR ALL DATA
<CAN>
: CANCEL
NOTE
Mark* varies with the parameter settings. Two or more
function names may be displayed.
116
B-64115EN/02
1. DISPLAY AND OPERATION
D Allocation error screen
When an option which uses the SRAM area is added, the system software
may require more SRAM than is currently installed in the system. In this
case, an allocation error screen appears the first time the system is turned
on after the addition of the option, thus restoring the state existing before
the addition.
FILE ALLOCATION ERROR
S-RAM CAPACITY IS NOT SUFFICIENT.
ADDITIONAL S-RAM IS NECESSARY.
PLEASE PRESS <CAN> KEY :
RETURN TO THE STATE BEFORE
OPTION PARAMETER IS CHANGED.
NOTE
When replacing SRAM, perform all memory clear.
(
RESET
+
DELETE
)
117

1. DISPLAY AND OPERATION
B-64115EN/02
When an attempt is made to turn on the power to the CNC after replacing
1.14
the system software, the screen shown below is displayed, and the system
WARNING SCREEN
is not started if the replacing new system software is not compatible with
DISPLAYED WHEN
the replaced system software.
SYSTEM SOFTWARE
IS REPLACED
(SYSTEM LABEL
CHECK ERROR)
D6B1-01
SYSTEM LABEL CHECK ERROR:
CLEAR ALL SRAM MODULE
NOT READY
In this case, perform memory all clear (by holding down the
RESET
and
DELETE
MDI keys then turning on the power) or reinstall the original system
software.
118
B-64115EN/02
1. DISPLAY AND OPERATION
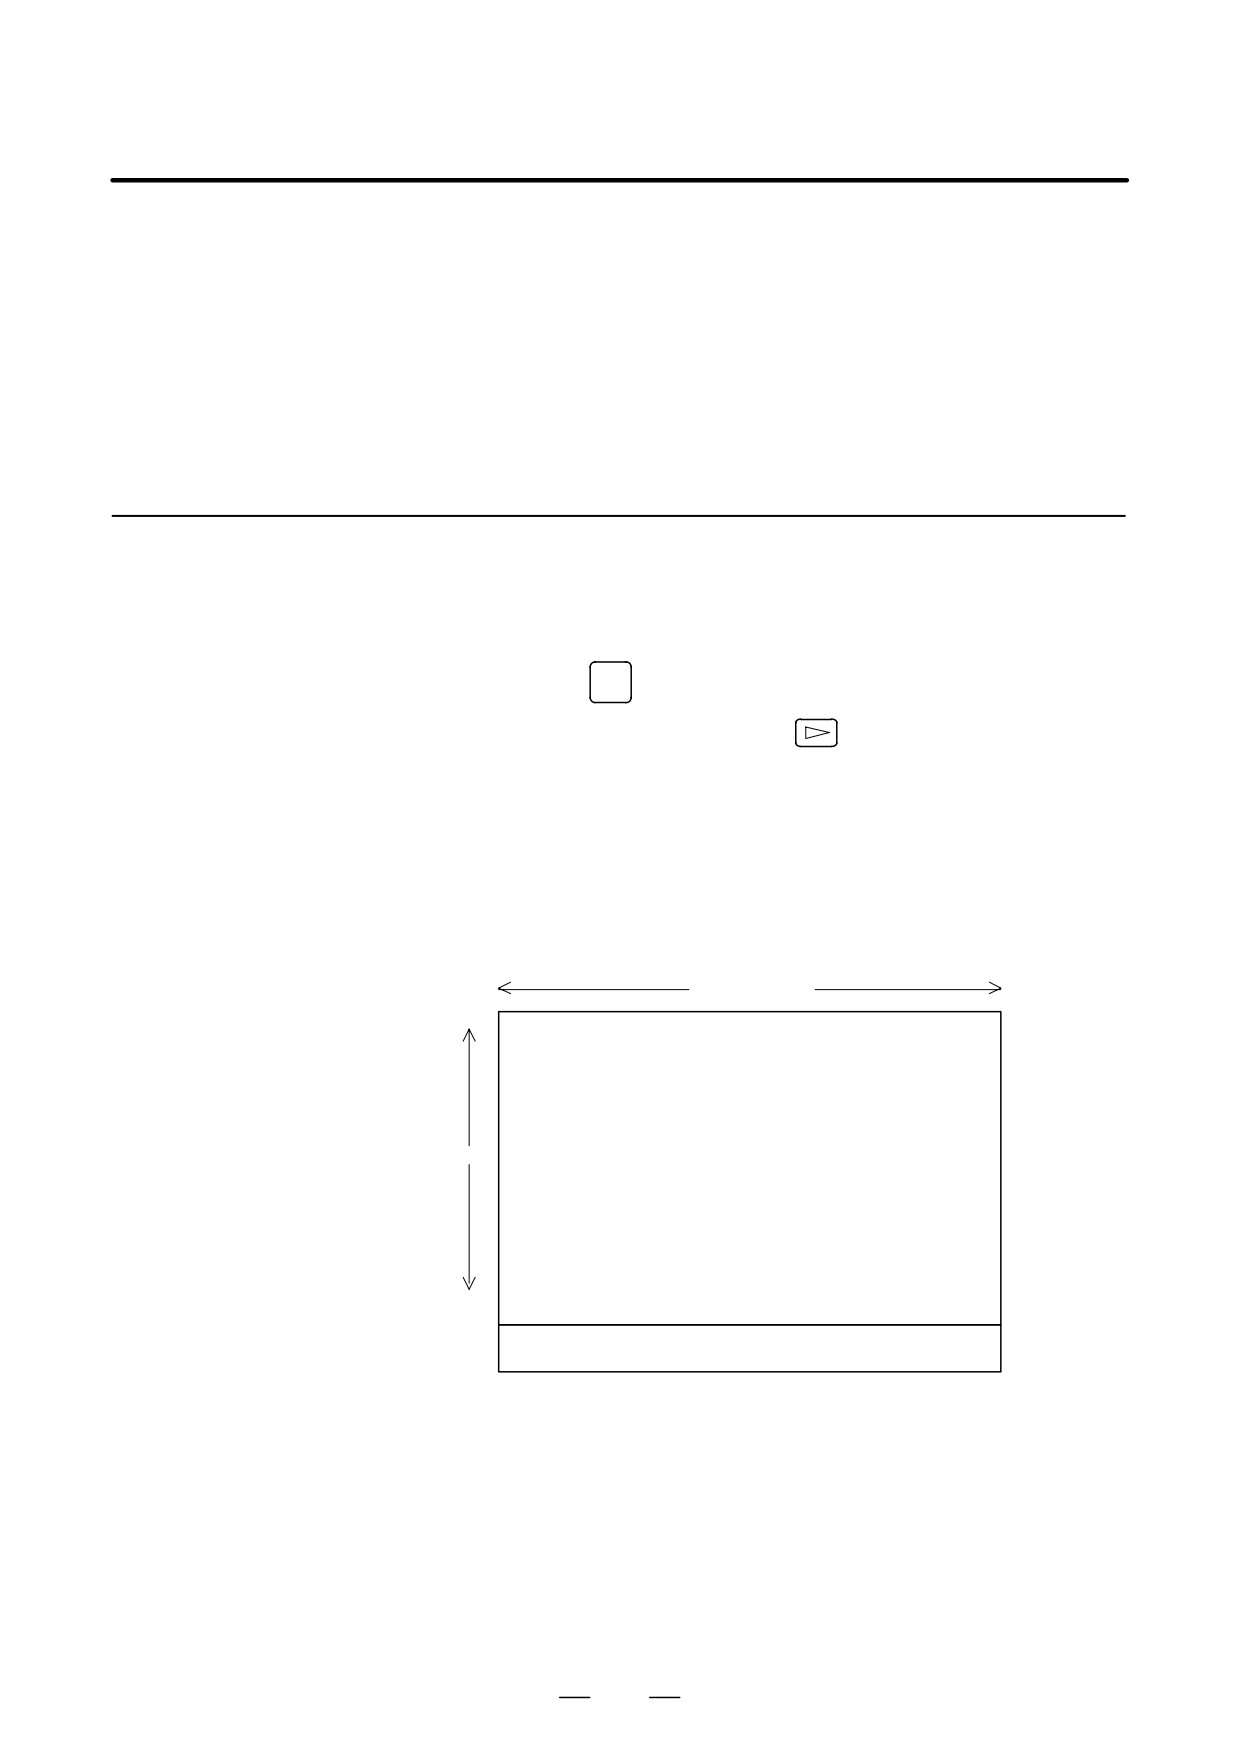
The maintenance information screen is provided to record the history of
1.15
maintenance performed by a service person of FANUC or machine tool
MAINTENANCE
builder.
INFORMATION
The screen has the following features:
SCREEN
D MDI alphabetical input is allowed.
D The recording screen can be scrolled in units of lines.
D Edited maintenance information can be read and punched.
D The screen can be saved in flash ROM.
1.15.1
Screen Display and
Operation
D Screen display
1. Press the
SYSTEM
function key.
2. Press the continuous menu key
several times. [M-INFO] soft
key appears.
3. Press the [M-INFO] soft key. The maintenance information screen
appears.
When selected, the maintenance screen shows the latest information.
The recording screen has an input area of 40 characters by 11 lines.
The status (mode, number of empty character spaces, cursor line, column
number) is displayed at the bottom of the screen.
40 characters
MAINTENANCE INFORM
aaa
bbb
ccc
ddd
11
lines
eee
fff
nnn
|OVER|EDIT|spaces:2078
33:1
119
1. DISPLAY AND OPERATION
B-64115EN/02
Status display
⋅ OVER/INSERT : OVER : Overwrite mode ; INSERT: Insert
mode
⋅ EDIT/VIEW :
EDIT : Editing allowed ; VIEW : Editing inhi
bited
⋅ Number of empty character spaces
⋅ Current cursor line
⋅ Current cursor column
D Screen operation
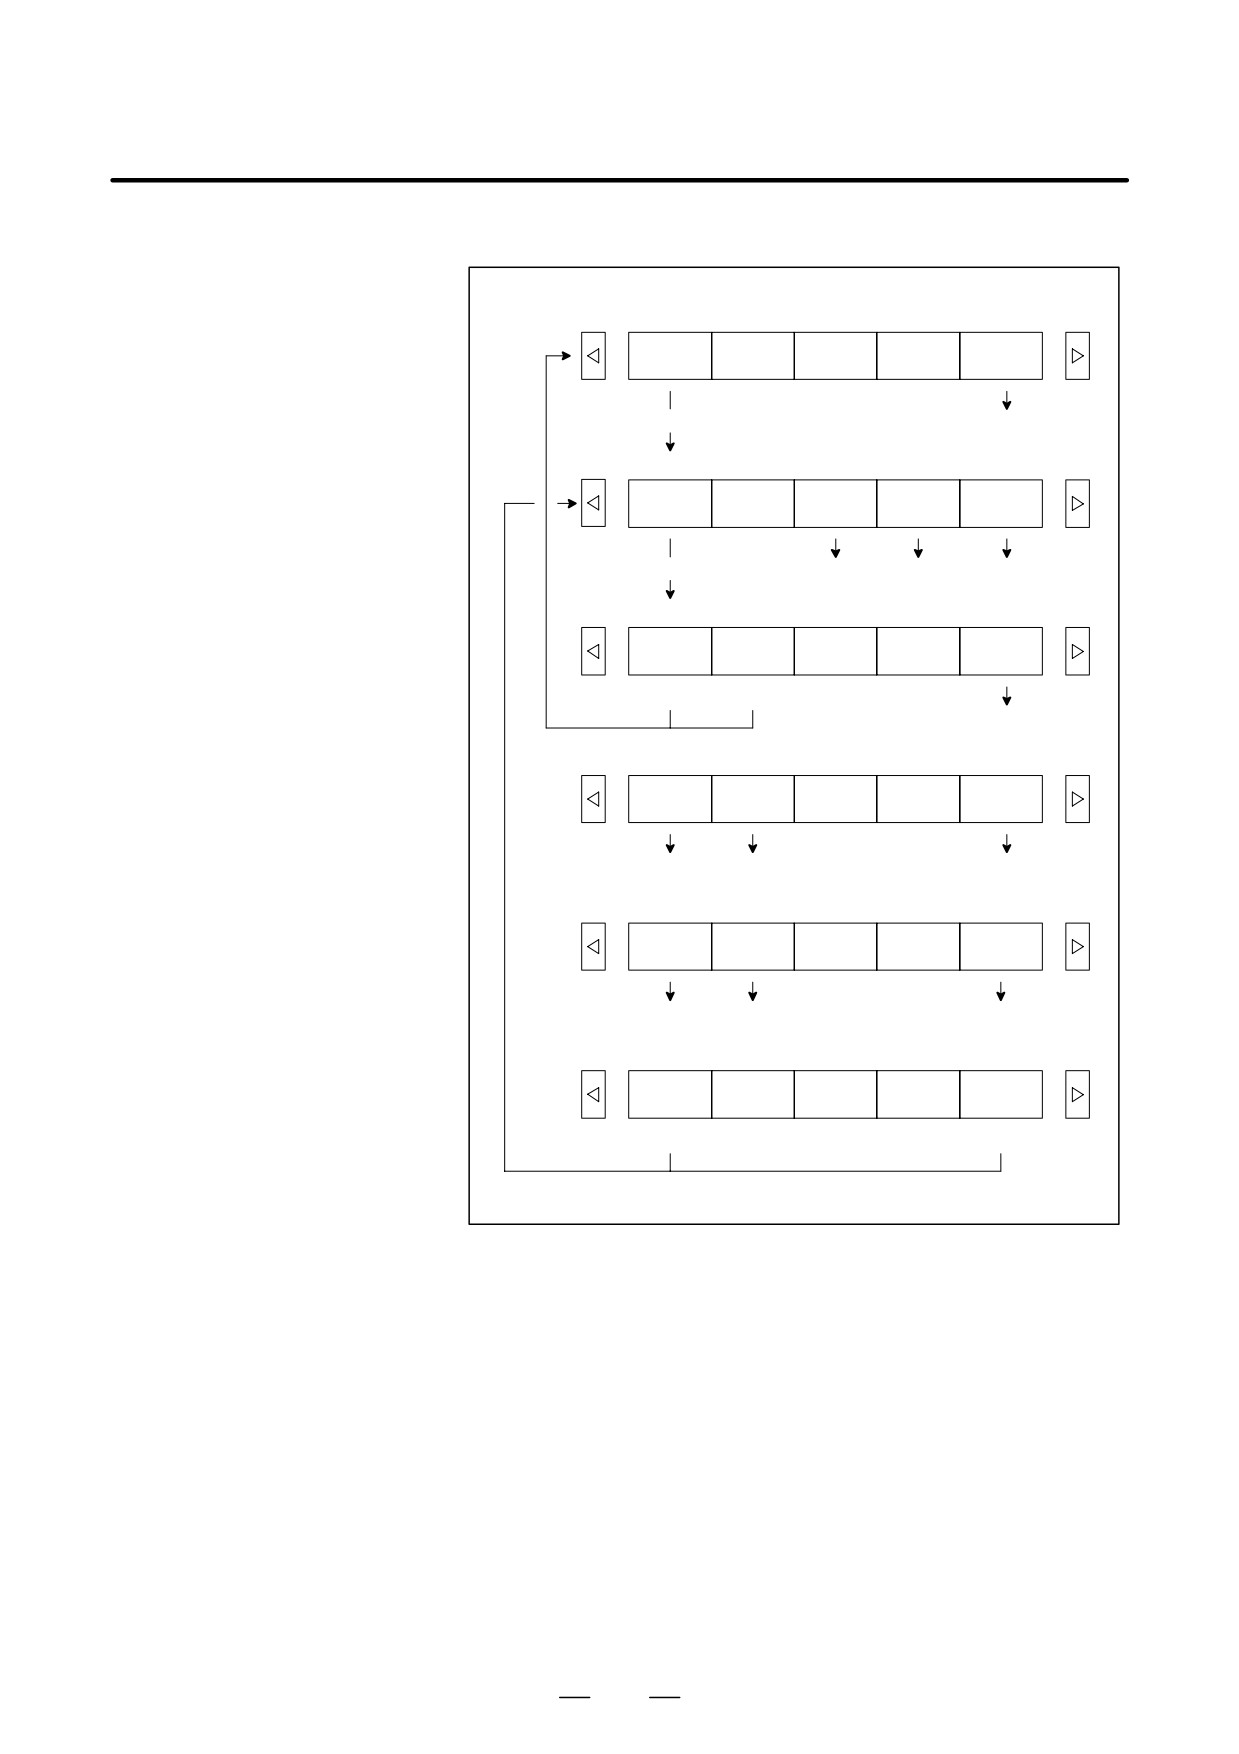
The maintenance information screen has view mode and edit mode, which
are selected by pressing the [END] or [EDIT] soft key.
Initially, view mode is selected. To start editing, select edit mode by
pressing the [(OPRT)] and [EDIT] keys. When the editing is completed,
press the [END] key. Then, select [STORE] or [IGNORE]. Unless
[STORE] is selected, the edited data will be lost at next power-up.
To scroll the screen showing the recorded information, press a cursor key
or page key on the MDI panel.
The following keys are used for editing (character input) and viewing:
Operation table
Mode
Key
Description
View
Soft keys
Allows editing.
[EDIT]
Displays the beginning or the end.
[JUMP]
Cursor key
Scrolls the screen up or down.
Page key
Scrolls the screen up or down in units of whole screens.
Edit
Soft keys
[END]
Ends editing. Select whether to store the edited data.
[ALLDEL]
Clears all maintenance information. (This key is enabled when the MDC bit (bit 3 of parameter 3118) is
set to 1.)
[I/O]
Reads or punches the maintenance information.
[JUMP]
Moves the cursor to the beginning or end.
Cursor key
Moves the cursor position up or down.
Page key
Scrolls the screen up or down in units of whole screens.
Alphanumeric/spe-
Allows alphabetical, numeric, or special character input.
cial character keys
key
Selects either insert mode or overwrite mode.
INSERT
key
Deletes a single character.
DELETE
key
Deletes a single character before the cursor position.
CAN
key
Starts a new line.
INPUT
120
B-64115EN/02
1. DISPLAY AND OPERATION
Operation of the soft keys
(1)
View mode
Edit
Jump
(2)
(5)
(2)
Edit mode
END
I/O
ALLDEL
Jump
(3)
(4)
(6)
(5)
(3)
Edit saving
MAINTE-
IGNORE
CANCEL
NANCE
(1)
(1)
(2)
(4)
I/O
READ
PUNCH
CANCEL
(6)
(6)
(2)
(5)
Jump
BEGIN-
END
CANCEL
ING
(1) (2)
(1) (2)
(1) (2)
(6)
Execution
EXEC
CANCEL
(2)
(2)
121

1. DISPLAY AND OPERATION
B-64115EN/02
1.15.2
The maintenance information can be read and punched.
When the maintenance information is input from or output to a memory
Maintenance
card, a file name MAINTINF.DAT is used.
Information
(1) Format
Input/Output
%%
Data
(2) Reading
When a MAINTINF.DAT file generated in the format shown above is
read, the data is added at the end of the existing maintenance
information.
NOTE
1
A TAB code is converted to one to four blanks, depending
on the input position.
2
80h to 90h and E0h to EBh are assumed as prefix codes of
double-byte characters. Reading these codes alone is
inhibited.
3
Control codes
(00H to 1FH) except TAB and LF are
discarded in reading.
4
%% cannot be input.
(3) Punching
All maintenance information is output in the format shown above.
122
B-64115EN/02
1. DISPLAY AND OPERATION
When VGA screen display is selected (NVG bit (bit 7 of parameter 3119)
1.16
is set to 0), the color scheme of the VGA screen can be set on the color
COLOR SETTING
setting screen.
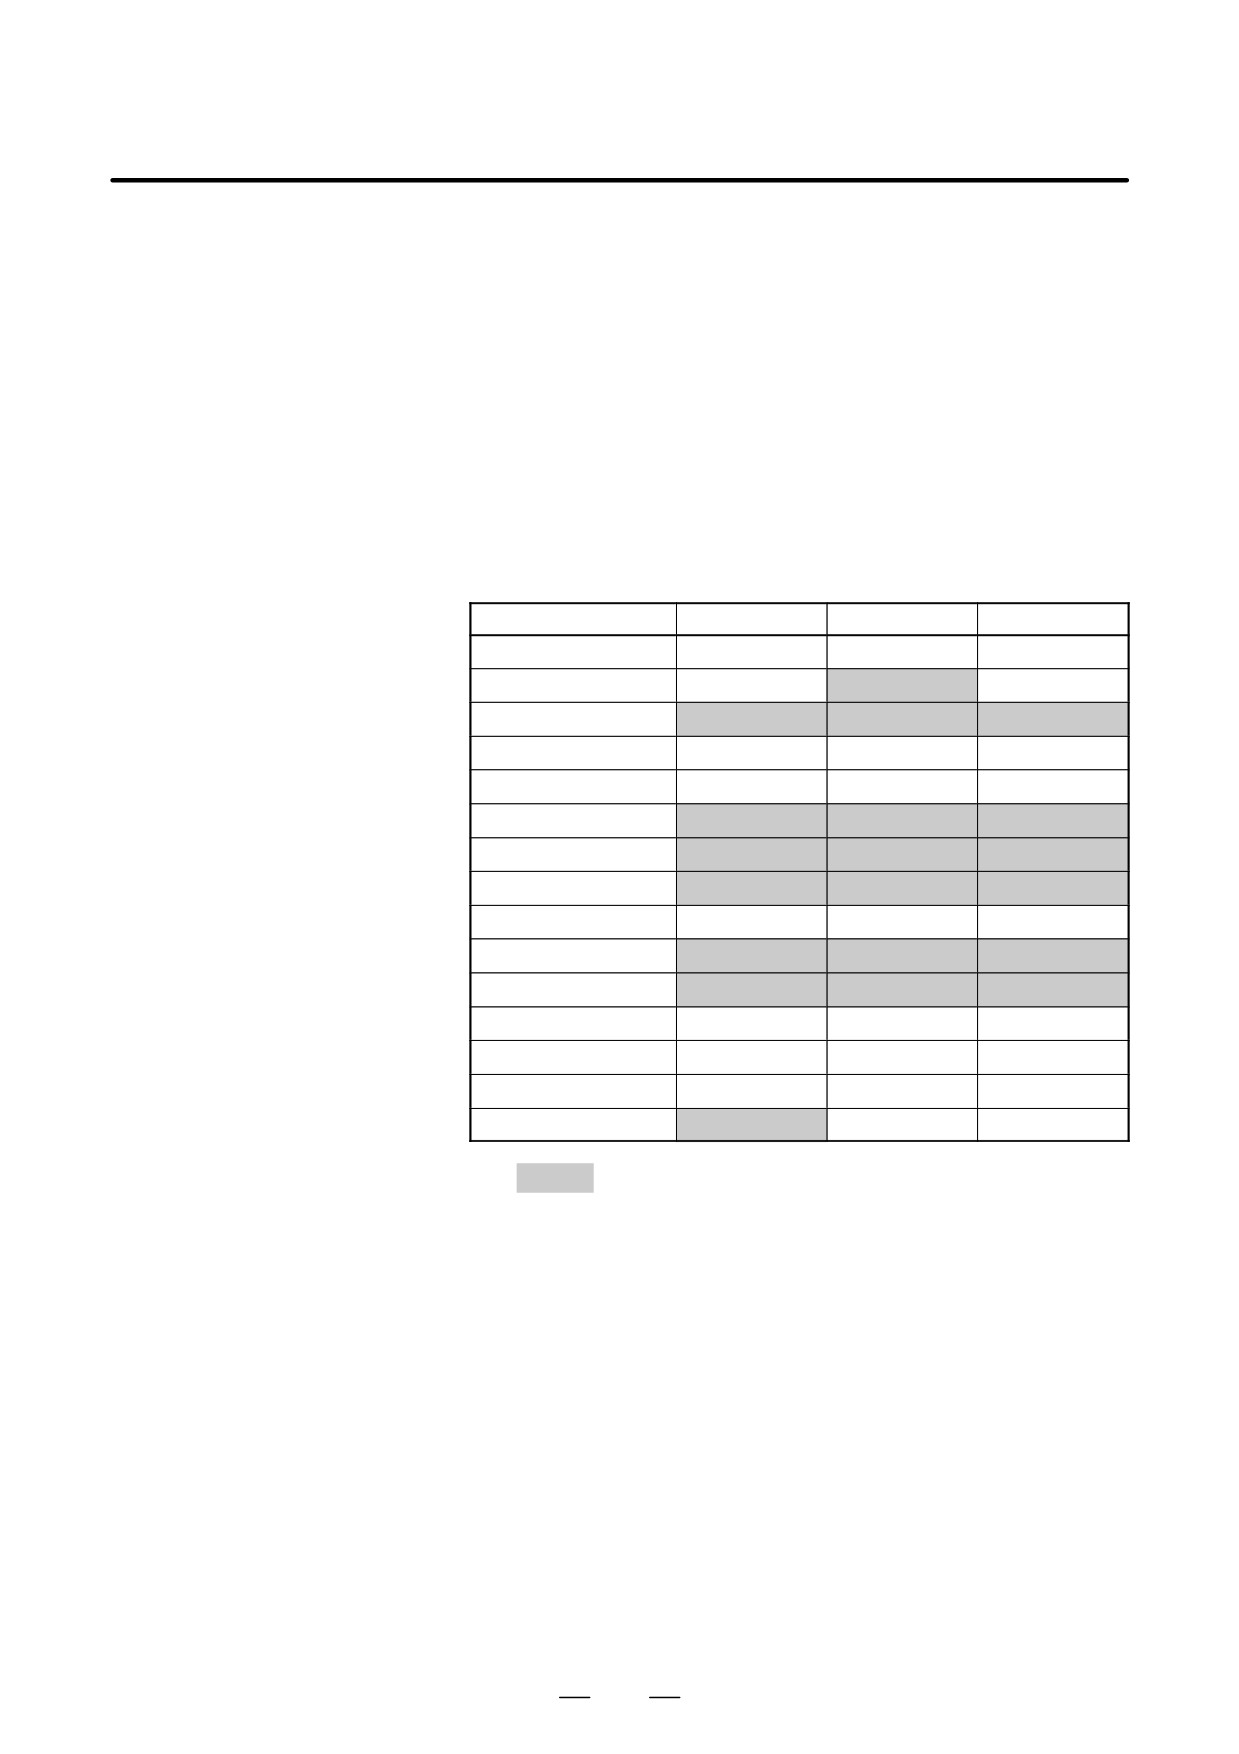
SCREEN (8.4″
COLOR LCD)
D Setting FANUC standard
If all standard color data parameters (No. 6561 to 6595) of color scheme
color scheme 1 (new
1 are “0”, turning the power off and on again with the NDC parameter (bit
FANUC standard color
6 of parameter No. 13101) set to “1” selects FANUC standard color
scheme)
scheme 1 (new FANUC standard color scheme) for color setting (color
palette values).
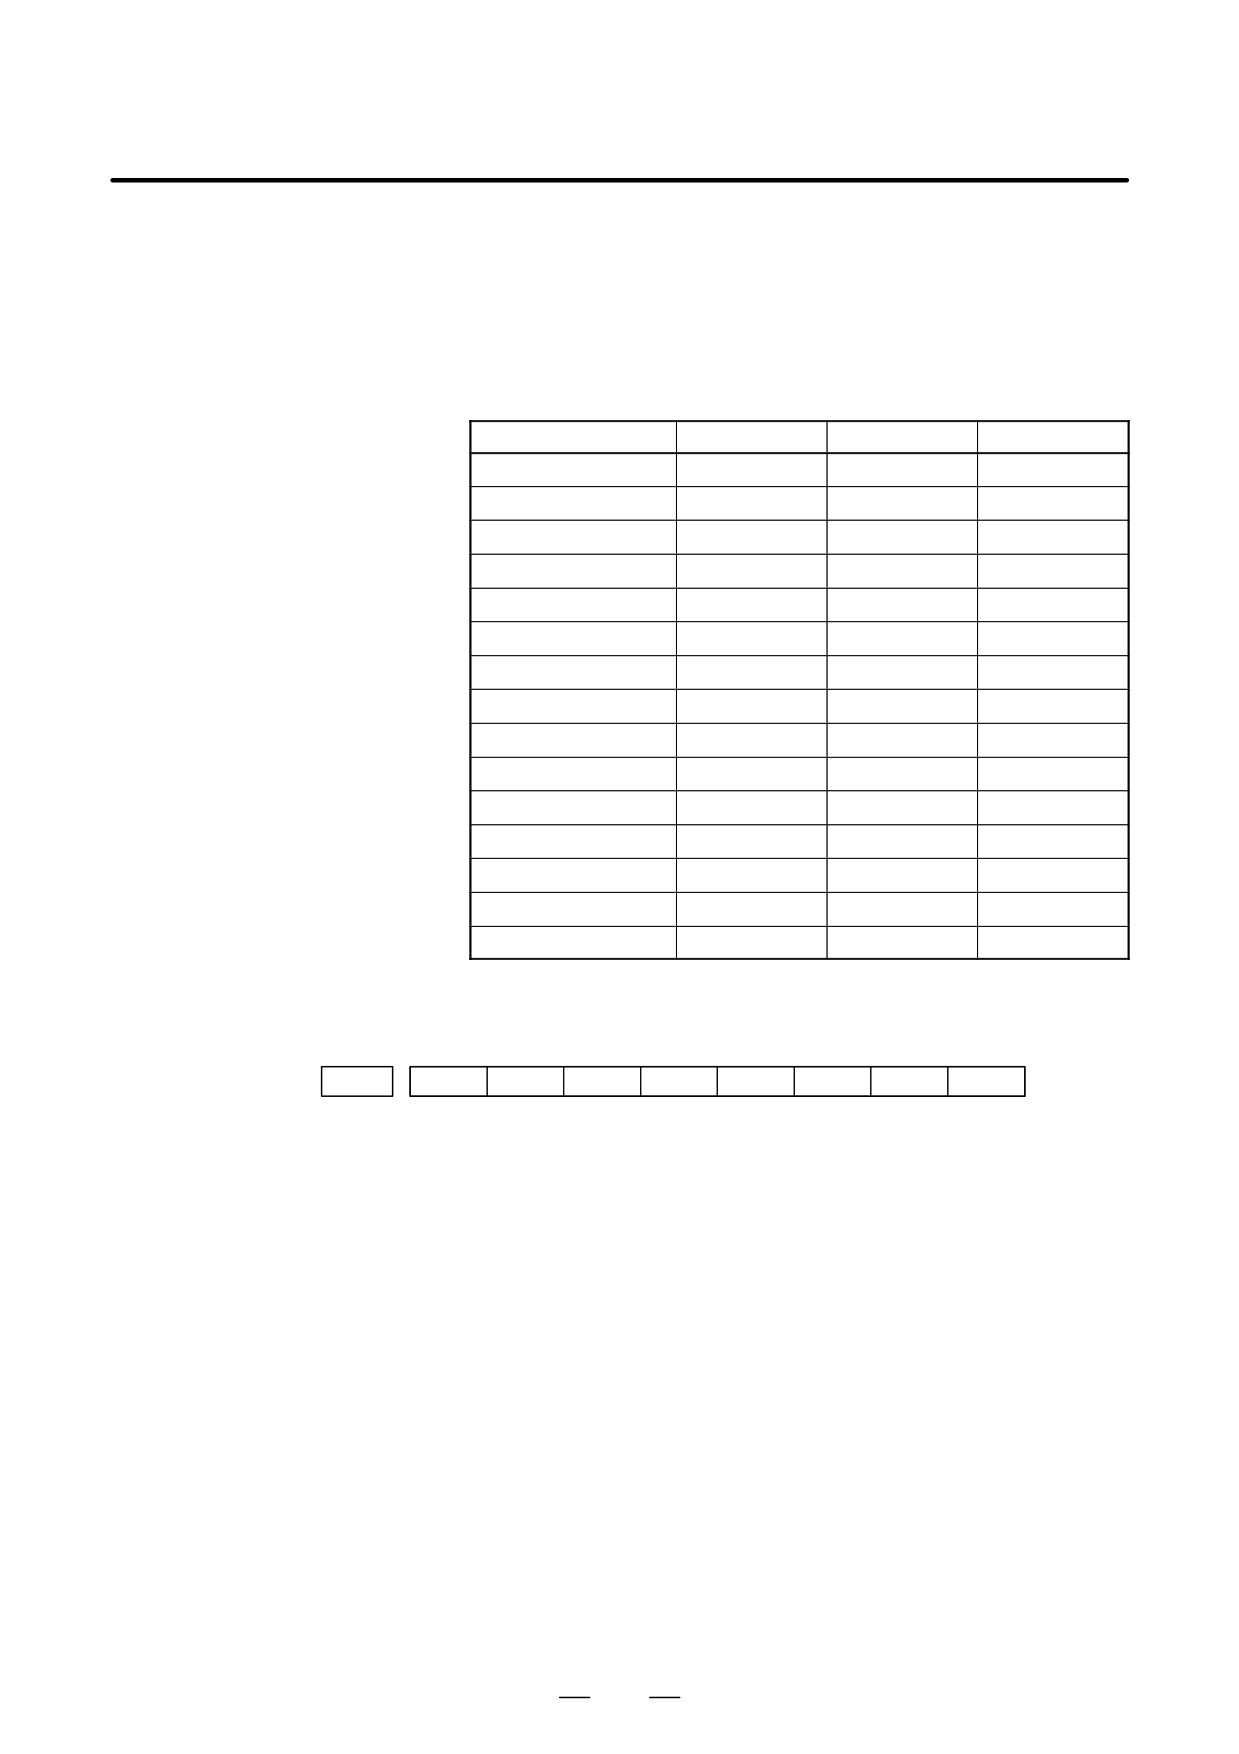
The following table summarizes what FANUC standard color scheme 1
(new FANUC standard color scheme) is like.
Color setting number
Red
Green
Blue
1
8
0
0
2
0
0
0
3
5
5
5
4
15
15
0
5
15
0
15
6
1
6
6
7
0
0
0
8
4
11
9
9
0
11
11
10
4
11
9
11
12
11
11
12
15
15
15
13
12
11
11
14
4
4
4
15
11
11
11
Note)
: Indicates a difference between FANUC standard color
schemes 1 and 2.
123
1. DISPLAY AND OPERATION
B-64115EN/02
D Setting FANUC standard
If all standard color data parameters (No. 6561 to 6595) of color scheme
color scheme 2 (former
1 are “0”, turning the power off and on again with the ODC parameter (bit
FANUC standard color
7 of parameter No. 13101) set to “1” selects FANUC standard color
scheme)
scheme 2 (former FANUC standard color scheme) for color setting (color
palette values).
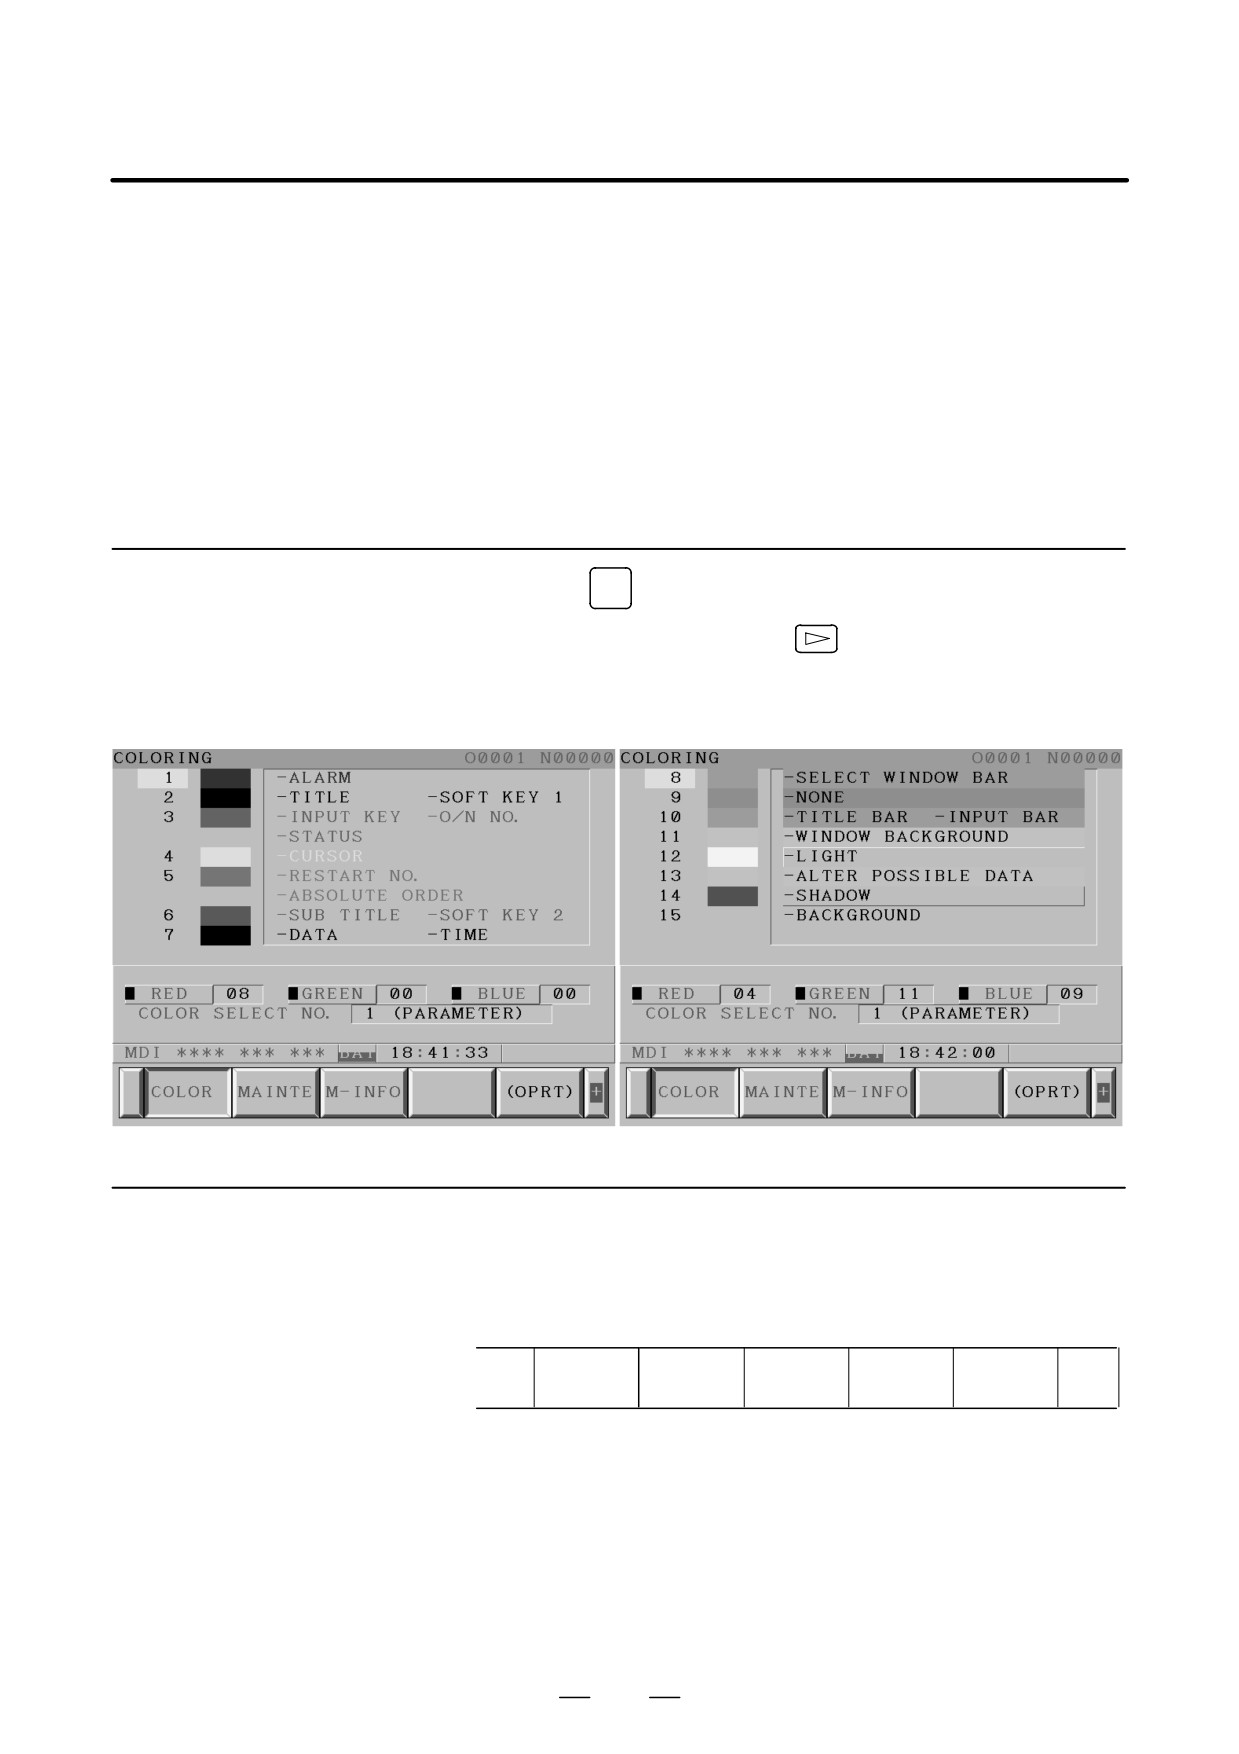
The following table summarizes what FANUC standard color scheme 2
(former FANUC standard color scheme) is like.
Color setting number
Red
Green
Blue
1
8
0
0
2
0
8
0
3
8
8
0
4
15
15
0
5
15
0
15
6
0
8
8
7
3
1
1
8
0
0
15
9
0
11
11
10
15
15
15
11
10
9
9
12
15
15
15
13
12
11
11
14
4
4
4
15
12
11
11
D Parameters
#7
#6
#5
#4
#3
#2
#1
#0
13101
ODC
NDC
[Data type] Bit
ODC For the color LCD of FANUC Series 16i/18i/21i/0i-MODEL B, the VGA
screen display colors (color palette values) are:
0 : Not changed.
1 : Set to FANUC standard color scheme 2 (former FANUC standard
color scheme).
NDC For the color LCD of FANUC Series 16i/18i/21i/0i-MODEL B, the VGA
screen display colors (color palette values) are:
0 : Not changed.
1 : Set to FANUC standard color scheme 1 (new FANUC standard color
scheme).
After the ODC parameter is set to “1”, turning the power off and on again
allows the ODC parameter to be automatically reset to “0”.
After the NDC parameter is set to “1”, turning the power off and on again
allows the NDC parameter to be automatically reset to “0”.
If all standard color data parameters (No. 6561 to 6595) of color scheme
1 are “0”, setting the ODC or NDC parameter to “1” allows color settings
to be changed.
124
B-64115EN/02
1. DISPLAY AND OPERATION
D Notes
(1) This function is valid for screens created using the macro executor.
If the macro executor program (conversational macro program)
already specifies colors (color palette values), however, these colors
are valid.
(2) This function is invalid:
1) For the monochrome LCD
2) If the NVG parameter (bit 7 of parameter No. 3119) is “1”
3) For the MDI virtual keys
4) For display links
1.16.1
1. Press the
SYSTEM
function key.
Screen Display
2. Press the continuous menu key
several times. The [COLOR]
soft key appears.
3. Press the [COLOR] soft key. The color setting screen appears.
1.16.2
Color Setting
D Changing a color
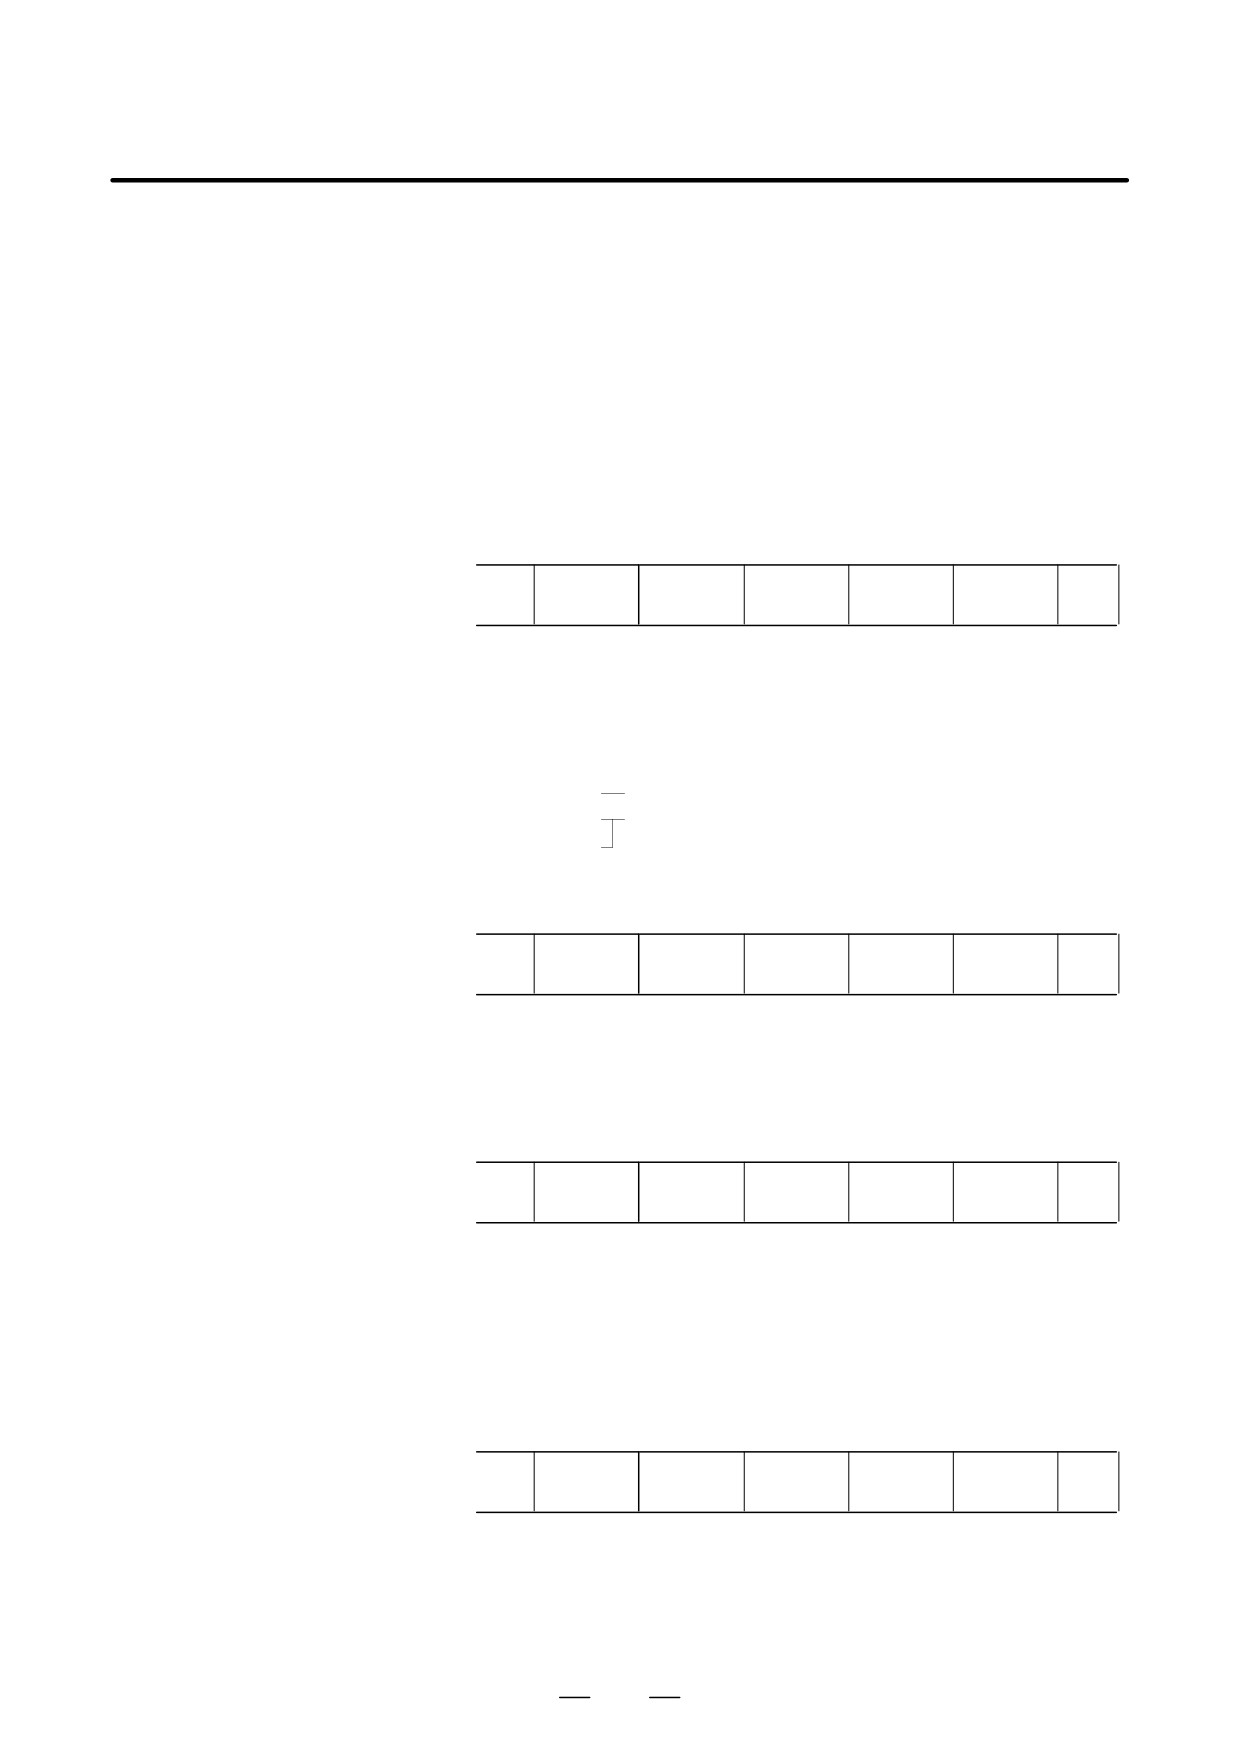
1. Press the [(OPRT)] soft key. The following operation soft keys appear.
(color palette value)
RED
GREEN
BLUE
BRIGHT
DARK
+
2. Move the cursor to the color number corresponding to the color palette
value to be changed.
The current color palette values of individual color elements are
displayed.
125
1. DISPLAY AND OPERATION
B-64115EN/02
3. Select a desired color element by pressing the [RED], [GREEN], or
[BLUE] operation soft key.
Two or more color elements can be simultaneously selected.
Each time the [RED], [GREEN], or [BLUE] operation soft key is
pressed, the selection is made or canceled.
(If the [RED], [GREEN], and [BLUE] operation soft keys are not
displayed, press the rightmost soft key.)
4. Press the [LIGHT] or [DARK] operation soft key to change the
luminance of the selected color element.
D Storing colors
A specified color palette value can be stored.
(color palette values)
STORE
CALL
COLOR1
COLOR2
COLOR3
+
1.
Select a desired storage area by pressing the [COLOR1], [COLOR2],
or [COLOR3] operation soft key.
(If the [COLOR1], [COLOR2], and [COLOR3] operation soft keys
are not displayed, press the rightmost soft key.)
COLOR1
Standard color data parameters (6561 to 6595)
COLOR2
Internal RAM
COLOR3
2.
Press the [STORE] operation soft key. The following operation soft
keys appear.
CAN
EXEC
+
3.
To store the current color palette values in the selected area, press the
[EXEC] operation soft key. To cancel the storage, press the [CAN]
operation soft key or the leftmost key.
D Calling colors
(color palette values)
STORE
CALL
COLOR1
COLOR2
COLOR3
+
1.
Select a color palette storage area by pressing the [COLOR1],
[COLOR2], or [COLOR3] operation soft key.
(If the [COLOR1], [COLOR2], and [COLOR3] operation soft keys
are not displayed, press the rightmost soft key.)
2.
Press the [CALL] operation soft key. The following operation soft
keys appear.
CAN
EXEC
+
3.
To call the color palette values from the selected area, press the
[EXEC] operation soft key. If no color palette value is stored, this step
cannot be executed.
To stop calling, press the [CAN] operation soft key or the leftmost key.
126
B-64115EN/02
1. DISPLAY AND OPERATION
1.16.3
Parameters
#7
#6
#5
#4
#3
#2
#1
#0
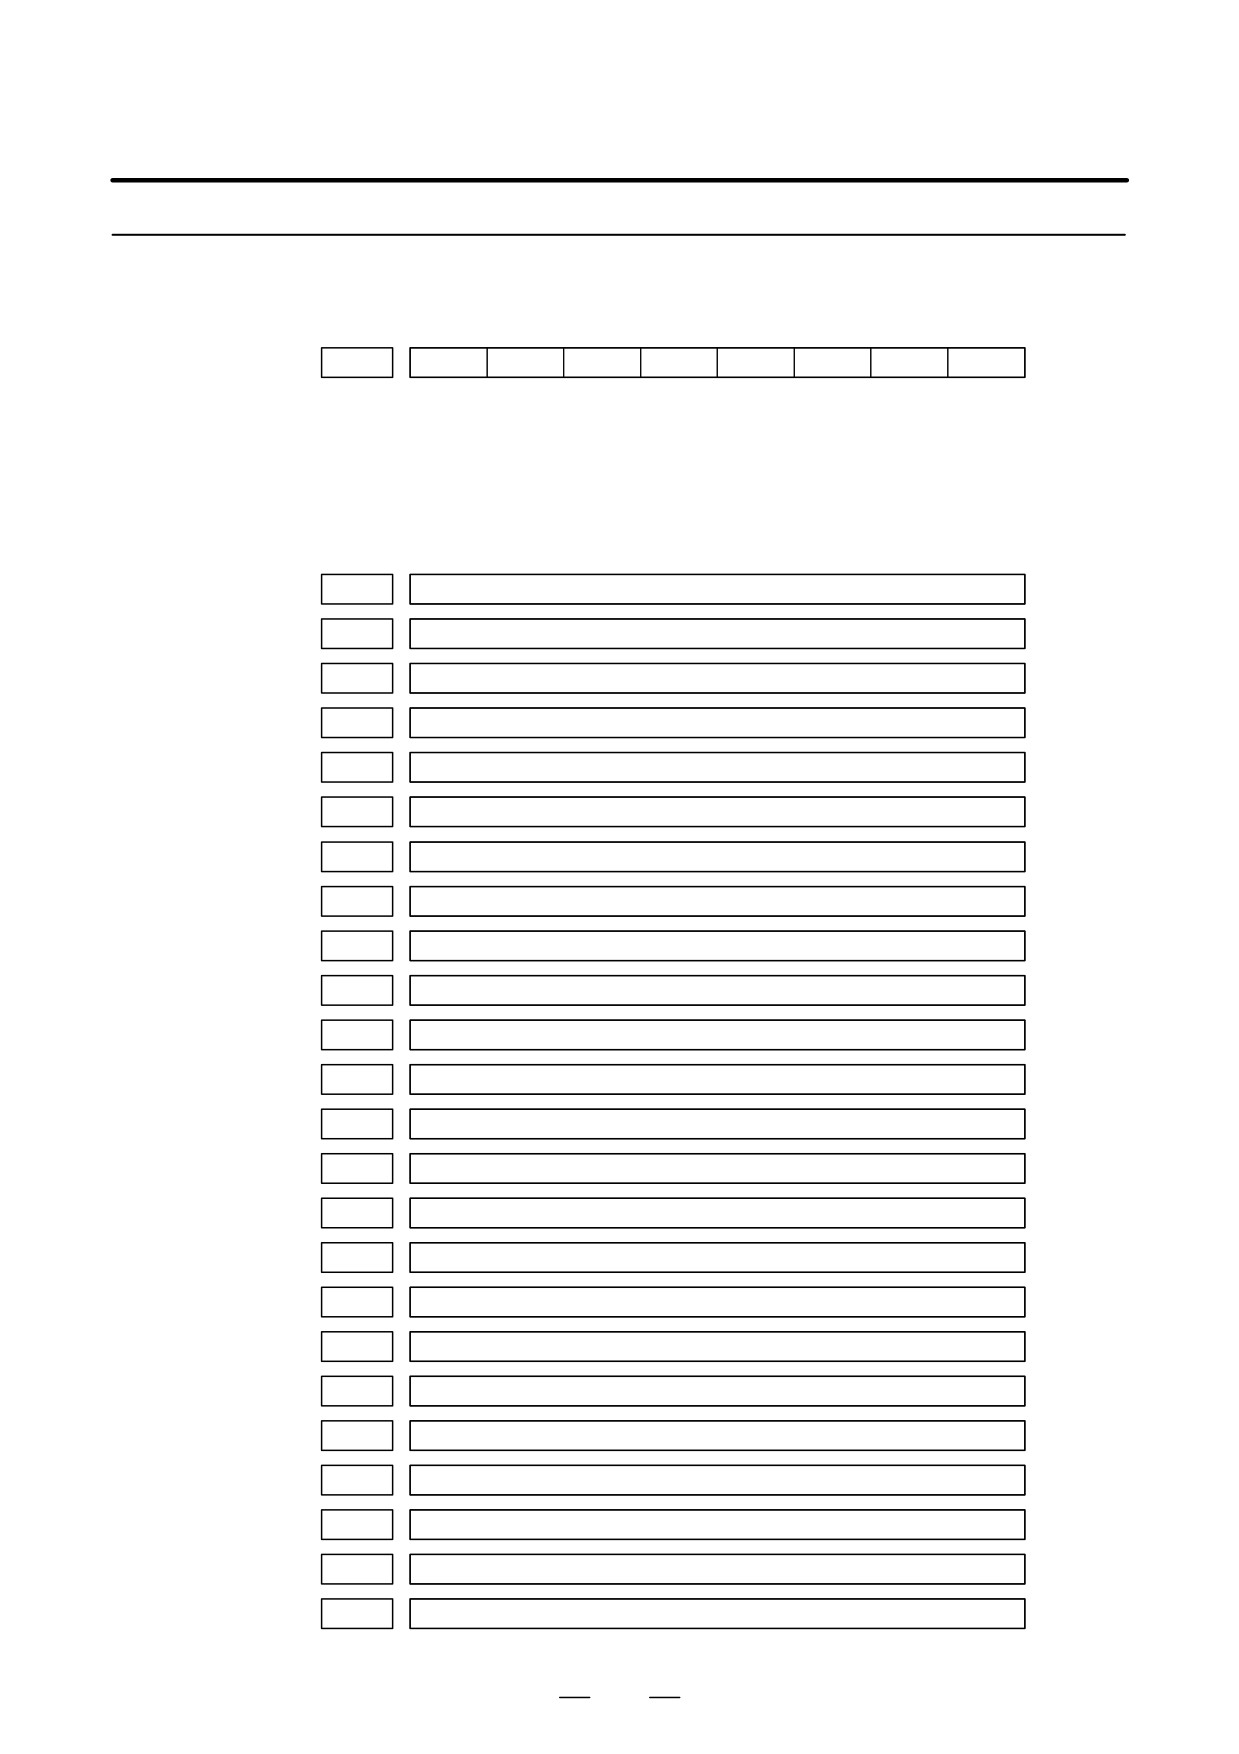
3119
NVG
[Data type]
Bit
NVG
When a color display unit is used, the VGA screen display is:
0 :
Selected.
1 :
Not selected.
(Conventional display)
6561
Standard color data of graphic color 1
6562
Standard color data of graphic color 2
6563
Standard color data of graphic color 3
6564
Standard color data of graphic color 4
6565
Standard color data of graphic color 5
6566
Standard color data of graphic color 6
6567
Standard color data of graphic color 7
6568
Standard color data of graphic color 8
6569
Standard color data of graphic color 9
6570
Standard color data of graphic color 10
6571
Standard color data of graphic color 11
6572
Standard color data of graphic color 12
6573
Standard color data of graphic color 13
6574
Standard color data of graphic color 14
6575
Standard color data of graphic color 15
6581
Standard color data of text color 1
6582
Standard color data of text color 2
6583
Standard color data of text color 3
6584
Standard color data of text color 4
6585
Standard color data of text color 5
6586
Standard color data of text color 6
6587
Standard color data of text color 7
6588
Standard color data of text color 8
6589
Standard color data of text color 9
127

1. DISPLAY AND OPERATION
B-64115EN/02
6590
Standard color data of text color 10
6591
Standard color data of text color 11
6592
Standard color data of text color 12
6593
Standard color data of text color 13
6594
Standard color data of text color 14
6595
Standard color data of text color 15
[Data type] Two-word
[Unit of data] Six-digit number rrggbb (rr: Red component value, gg: Green component
value, bb: Blue component value)
When five digits or less are specified, the missing high-order digits are
assumed as zeros.
[Valid data range] Each color component value: 00 to 15 (Equivalent to the color level on
the color setting screen)
When 16 or a higher value is specified, 15 is assumed.
(Example) When specifying a color having red component value 1, green
component value 2, and blue component value 3, set the
parameter value as 10203.
1.16.4
(1) At power-up, the color scheme of the screen is determined by the
setting in the COLOR1 area (parameters). If no data is stored in the
Notes
COLOR1 area, the last color scheme before power-down is applied.
(2) The standard color data specified in parameters must not be changed
by direct MDI key input. When changing the parameter data, set and
store the new data on the color setting screen.
(3) When a wrong value is specified in a standard color data parameter,
the screen may not be displayed. If this occurs, turn the power on
again, while pressing the
DELETE
and
RESET
keys. This clears the whole
stored color scheme and restores the FANUC standard color scheme
instead.
Be very careful when performing this operation, as all memory
contents such as parameters and programs are lost.
(4) The VGA-support screen is enabled only for the 8.4-inch color LCD
of the Series 0i-C.
128

B-64115EN/02
1. DISPLAY AND OPERATION
Depending on the eye level and the viewing angle of the operator, the LCD
1.17
may be hard to read. This problem can be solved by adjusting the contrast.
CONTRAST
The contrast of a monochrome LCD can be adjusted.
ADJUSTMENT
OFFSET
1. Press the
SETTING
function key.
2. Press the [SETTING] chapter selection soft key.
The LCD contrast item is displayed on the setting (handy) screen.
SETTING(HANDY)
PARAMETER WRITE = 1(0:DISABLE 1: ENABLE)
TV CHECK
= 0(0:OFF 1:ON)
PUNCH CODE
= 0(0:EIA 1:ISO)
INPUT UNIT
= 0(0:MM
1:INCH)
I/O CHANNEL
= 0(0-3:CHANNEL NO.)
SEQUENCE NO.
= 0(0:OFF 1:ON)
TAPE EORMAT
= 0(0:NO CNV 1:F15)
SEQUENCE STOP
= 0(PROGRAM NO.)
SEQUENCE STOP
= 0(SEQUENCE NO.)
[ CONTRAST ]( + = [ ON:1 ] - = [ OFF:0 ])
>_
MDI **** *** *** 00:00:00
[NO.SRH] [ ON:1 ] [OFF:0] [+INPUT] [INPUT]
3. Move the cursor to “CONTRAST”.
4. Adjust the contrast by pressing the operation soft key [ON:1] or
[OFF:0].
129