Network Management System Industrial HiVision 8.2. User Manual (2021) - page 2
Software Overview
2.3 Update
2.3.2
Updating under Linux
To update a version of Industrial HiVision already installed, you install the
new version as described on “Installation under Linux” on page 30.
During the installation, you can choose whether the installation routine
transfers the database contents from a previous installation into the new
installation.
If you want to transfer the database contents from an earlier version, you only
uninstall the earlier version after the update. Industrial HiVision permits the
installation of different versions on a PC.
Note: In order to correctly transfer the data from the previous version,
terminate the previous version before the installation, if it is still active.
Therefore, there is no network monitoring during the update procedure.
If multiple previous versions are installed, Industrial HiVision takes the data
from the latest previous version.
Note: During an update, Industrial HiVision can transfer the data from the
database of the previous version if the previous version is in the specified
installation directory.
Otherwise, you can use the interface functions “Save” on page 257 and
“Open...” on page 257 to transfer the data.
Note: The Industrial HiVision backup is version dependent. Make a backup
file after every software update (see on page 258 “Save Backup”).
34
Software Overview
2.4 Maintenance
2.4
Maintenance
Hirschmann are continually working on improving and developing their
software. You should regularly check whether there is a new version of the
software that provides you with additional benefits.
You will find information about updates and upgrades on the Internet pages
of Hirschmann Automation and Control GmbH.
35

Software Overview
2.5 Starting
2.5
Starting
2.5.1
Starting under Windows
During the installation, the program installation routine installs a program
symbol for the link to the program Industrial HiVision in the following
locations:
on the desktop and
in Start:Programs:Hirschmann:Industrial HiVision 8.2
Start Industrial HiVision with a double-click on the program symbol on
your desktop, or by selecting the program symbol in your start directory.
When starting, Industrial HiVision looks for the server. If Industrial
HiVision does not find the server, Industrial HiVision opens a dialog for
entering the server IP address or the server name. If the server is located
on your local computer, you enter the name localhost.
Note: To be able to connect to the Industrial HiVision server from another
computer, you first permit remote access in the server settings (see on
page 373 “Services Access”).
Figure 2:
“Enter server address” window
36
Software Overview
2.5 Starting
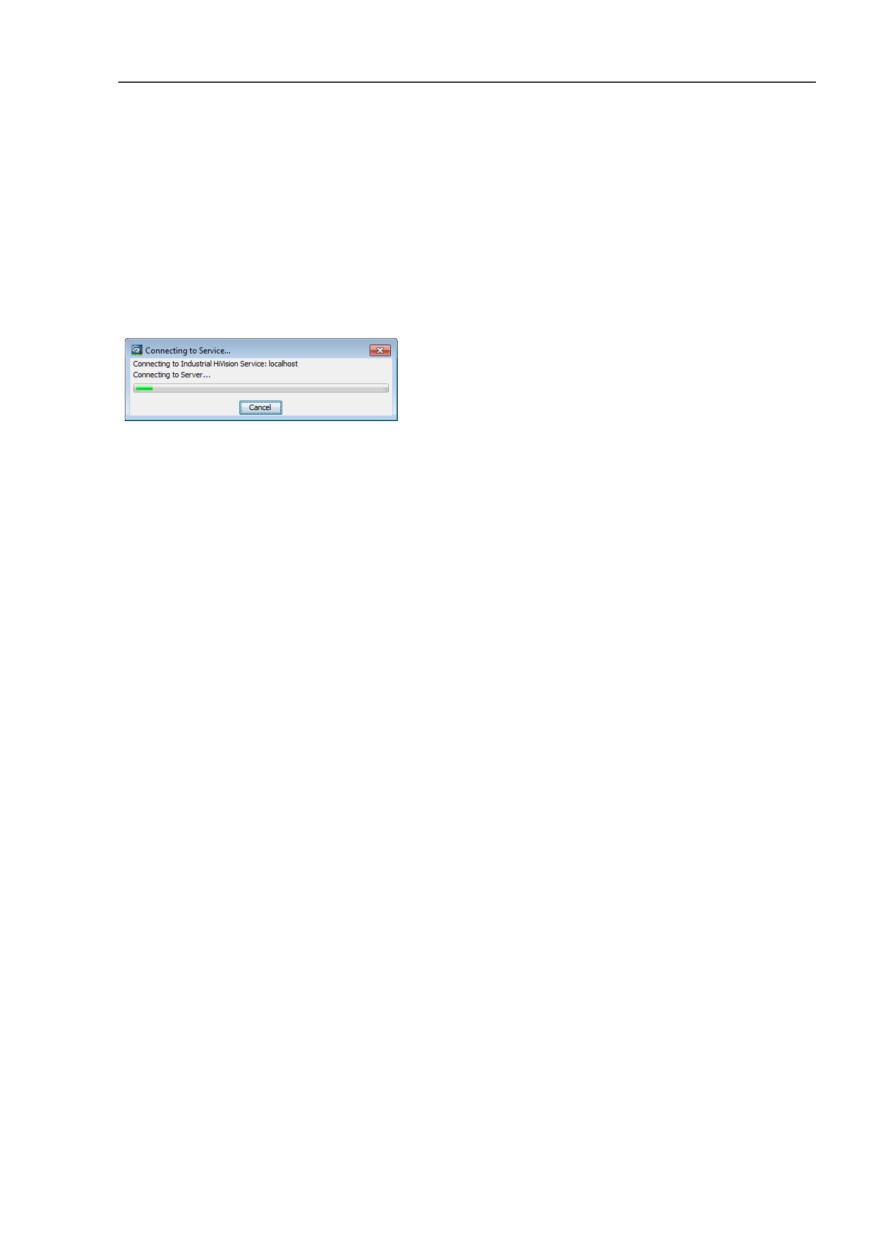
If Industrial HiVision finds the server to which Industrial HiVision was last
connected, Industrial HiVision connects to it again. If you want to connect to
a different server, you click on “Cancel” in the “Connecting to server...”
window. With File > Login you open the dialog for entering the server IP
address.
Figure 3:
“Connecting to server...” window
Connecting to multiple servers
To connect to multiple servers, you copy the program symbol and add
it again as a connection.
Open the properties of the new program icon by right-clicking on the
icon and selecting Properties.
In the Destination row, you enter a blank after
“C:\Programs\Hirschmann\Industrial HiVision
8.2\bin\HiVision.exe”, then the command line parameter -
kernelHost <server name>. For <server name> you enter the IP
address or the name of your server.
Repeat these steps for every server you want to make a connection to.
2.5.2
Starting under Linux
Start the service before you start the graphic interface (see on page 30
“Installation under Linux”).
To be able to start Industrial HiVision from the graphic interface, you put an
icon on the desktop you are using (KDE, Gnome, etc.).
37
Software Overview
2.5 Starting
You will find a suitable image (ihivision_op32x32.png) in /opt/
ihivision8.2/lib.
By double-clicking on the icon, or with the following command /opt/
ihivision8.2/bin/HiVision, any user can start Industrial HiVision.
38
Software Overview
2.6 Deinstallation
2.6
Deinstallation
2.6.1
Deinstallation under Windows
Quit the program Industrial HiVision before you start the deinstallation.
To deinstall Industrial HiVision, select:
Start:Control Panel:Software
Select the program Industrial HiVision.
Click on Change/Remove and follow the instructions of the deinstallation
routine.
2.6.2
Deinstallation under Linux
Quit the Industrial HiVision program before you start the deinstallation.
Log on with the su command so that you have root access rights.
Quit the Industrial HiVision service with the following command: /etc/
init.d/ihivision8.2 stop
Delete the /opt/ihivision8.2 directory with the command rm -rf /
opt/ihivision8.2
Remove the ihivision start script from the run levels of your init sequence
(see on page 30 “Installation under Linux”).
39
Software Overview
2.6 Deinstallation
Note: The database content and the licenses are lost during the
deinstallation.
40
Preparation
3
Preparation
Before you start entering and monitoring your network, set up the necessary
or useful conditions.
One prerequisite to be emphasized here is protecting your network
management station.
The necessary conditions include the accessibility of the devices to be
monitored and the related access authorization.
The useful conditions are the settings related to the presentation, such as
color and font size.
Create a data backup plan. Regularly export the data of your project. You
can thus recreate your project at any time, should adverse circumstances
damage the data stock.
The “Demo Network“ program supplied allows you to simulate a network on
your computer in order to familiarize yourself with Industrial HiVision without
being connected to a network.
41
Preparation
3.1 Improving the security of Industrial
HiVision
3.1
Improving the security of
Industrial HiVision
Increasingly frequent attacks on IT systems, sabotage and espionage
require in-depth knowledge of the targets for attacks on the part of the
operator. The following list provides a selection of potential attack targets in
the environment managed by a network management system:
physical access to the network management station
physical access to the managed devices
manipulated installation files
Ethernet access to the network management station
Ethernet access to the managed devices
Access to configuration and log files
This chapter provides guidelines to help you make it more difficult for
unauthorized persons to access Industrial HiVision and the managed
devices.
The term 'Security' in this manual, means everything related to the security
and protection of your data network infrastructure.
Note: For security reasons, we recommend the use of secure protocols
instead of unsecure protocols:
HTTPS instead of HTTP
SSH instead of Telnet
SNMPv3 instead of SNMPv1
You can configure these protocols in the following “Preferences“ dialogs:
“User Management“
“Services Access“
“Device Credentials“
“Export to InfluxDB®“
42
Preparation
3.1 Improving the security of Industrial
HiVision
3.1.1
Physical protection
Even the best IT security system and matching software security strategies
are useless if an attacker has physical access to a device that you need to
protect. The attacker can, for example, disconnect the device from the power
supply, unplug data lines, sniff data lines, or destroy the device mechanically.
Install devices that need protection in a locked cabinet or room.
3.1.2
Measures before and during the installation
of Industrial HiVision
Take the first steps to help improve the security of your network management
system before and during installation.
Check the installation scope
The more programs there are installed on your system, the more potential
attack vectors for your system the attackers will find. The Industrial
HiVision installation routines offer you several installation program
extensions:
- OPC DA service
- OPC UA service
- ActiveX control
- GUI installation
Check which products and program extensions you need to meet your
needs.
Remove any programs from your system that do not play a direct role
in meeting your requirements.
Only install the programs and program extensions, which you need to
meet your requirements.
Note: Even if you do not install the OPC UA service, the communication
port is open. This is a security risk.
43
Preparation
3.1 Improving the security of Industrial
HiVision
To eliminate the security risk of the open communication port use the
following work steps:
If you have the Industrial HiVision program open, then close the
program and stop the processes.
Click File > Exit and Stop Service.
Open the service.xml file in a text editor for example, Notepad ++. The
service.xml file is in C:\Program Files\Hirschmann\Industrial
HiVision8.2\config.
Search for the OPC service line, <Service Name="OpcUaServer"
Enabled="yes" Path="..." Foreign="yes". This line is located
near the bottom of the file.
Change “yes” to “no” for the OPC UA server for example, <Service
Name="OpcUaServer" Enabled="no" Path="..." Foreign="yes".
Save and close the service.xml file.
Restart the Industrial HiVision program.
Verify the signature of the installation files
One option for attacking IT systems is to contaminate the installation files
with malware. Hirschmann signs the *.exe-, *.ocx-, *.dll- and *.jar files in
Industrial HiVision. The signature allows you to check whether you have
original installation files from Hirschmann.
Check the signature of the *.exe-, *.ocx- and *.dll files in Windows:
The files in the installation path contain a signature.
In the file explorer, open the Properties dialog of the file you want to
check.
In the Properties dialog, switch to the Digital Signatures tab.
Mark the row with the signature and click the Details button.
In the Details dialog, click View Certificate.
Verify that the certificate is issued for “Hirschmann Automation and
Control GmbH.
Verify that the certificate is issued by a trusted authority, and is a Class 3
Code Signing CA.
Verify the signature of *.jar files in Windows and Linux:
The user interface is a Java application.
If you start the user interface in a web browser, the web browser
organizes the display of the signature for the *.jar file. The web browser
also gives you the option to trust the signature or prohibit the execution of
the *.jar file.
See “Web access to Industrial HiVision” on page 239.
44
Preparation
3.1 Improving the security of Industrial
HiVision
Restrict access authorizations to the installation files
Anyone who has write permissions for the installed files on a system can
manipulate these files.
Make it more difficult to access the Industrial HiVision installation
directory by only giving people you can trust access to the directory.
Note: Regarding security:
Anyone who has write permissions to the registry on a system can
manipulate the registry entries. Help protect the registry by assigning
write permission only to people you trust.
Installing a redundant network management system
For high-availability network management, the Industrial HiVision network
management system gives you the option of installing the software in
different locations. The installations access a common database.
This gives you the following redundant design options:
the network management station itself
the connection between the two network management stations
The benefit of redundant availability is offset by additional attack vectors.
These additional attack vectors are as follows:
the redundant network management station itself
the redundant connection between the two network management
stations
Take the same security provisions for the redundant components as
for the main components.
The “Redundant Network Management System Industrial HiVision” user
manual provides details on installing the redundant system.
Web server certificate
Industrial HiVision lets you use a web browser to encrypt communications
with the Industrial HiVision web server. For encrypted communication,
select the HTTPS transmission protocol. Industrial HiVision uses a self-
signed certificate for HTTPS. Trust this certificate only if you are sure that
you addressed the real Industrial HiVision web server with your
connection request.
45
Preparation
3.1 Improving the security of Industrial
HiVision
3.1.3
Industrial HiVision configuration actions
After installing Industrial HiVision, anyone can launch the program without
restriction. The security-specific configuration starts with restricting access
authorizations.
Change login name and password for Edit Mode
You can access Industrial HiVision freely in the newly installed condition.
Industrial HiVision gives you the option of requesting a login when starting
the program interface initially.
After starting the program interface, Industrial HiVision has an “Edit Mode“
and a run mode. See “Edit Mode” on page 84.
Setup the login request.
Set up a password for access to the “Edit Mode“. See “User
Management” on page 327.
Specifying user authorizations
Limiting access with user rights in connection with passwords is a crucial
part of protecting IT systems.
You can define appropriate authorization roles and users with the
matching authorization roles.
In order to limit access to Industrial HiVision, set up a user under
“Local Users“ and/or activate an authorization “Policy“. See “User
Management” on page 327.
Setting up an LDAP
The Lightweight Directory Access Protocol (LDAP) is an application,
whose tasks include authentication (verifying passwords) and
authorization (verifying rights) in a data network. For example, Microsoft
uses LDAP to perform user management in an Active Directory service.
A central server or several distributed servers manage functions including
user names and user roles.
If LDAP is activated, Industrial HiVision sends an inquiry to the LDAP
server, as soon as a user logs on.
46
Preparation
3.1 Improving the security of Industrial
HiVision
Industrial HiVision adopts the user names and authorization roles from
the LDAP server and enters these into the local user directory.
Ask the administrator of your LDAP server, which configuration data
you should enter into the Industrial HiVision LDAP dialog.
Give your LDAP server administrator the following user data to enter
into the LDAP server:
-
“User Name“
–
“Password“
–
“Access Roles“
See “User Management” on page 327.
Radius Authentication
The Remote Authentication Dial-In User Service (RADIUS) is a service for
authentication (verifying passwords) and authorization (verifying rights) in
a data network.
RADIUS is based on a client/server protocol.
If RADIUS is activated, Industrial HiVision sends an inquiry to the
RADIUS server, as soon as a user logs on.
Industrial HiVision adopts the user names and authorization roles from
the RADIUS server and enters these into the local user directory.
Ask the administrator of your RADIUS server, which configuration data
you should enter into the Industrial HiVision RADIUS dialog.
Give your RADIUS server administrator the following user data to
enter into the RADIUS server:
-
“User Name“
–
“Password“
–
“Access Roles“
See “User Management” on page 327.
Monitoring the device configuration settings
The device configuration is an attack target. An attacker who gains
access to the management system can manipulate the device
configuration for example, by disabling a port.
47
Preparation
3.1 Improving the security of Industrial
HiVision
Industrial HiVision gives you the ability to save the configuration of
devices as a reference configuration, and to regularly compare this with
the actual configuration of the device.
Click on the “Properties“ tab in the detail display.
Select the “Configuration File“ property in the “Property:“ drop-down
list.
Industrial HiVision lists the devices on your network that have the property
“Configuration File“.
Select the devices whose configuration you want to monitor.
Right click a selected device and select MultiConfig™.
Industrial HiVision opens the MultiConfig™ dialog.
In the MultiConfig™ menu tree, click on the “Status Config“ dialog.
To download the reference configurations of the devices, select the
function framework of the “Status Config“ dialog “Set current to
reference“.
Select the status for “Value is Reference Value“ for example, “OK“.
Select the status for “Other Value“ for example, “Warning“.
Click “Write“.
To configure polling and status forwarding, select “Property
Properties“ in the menu tree of the MultiConfig™ dialog. Note the
network load caused by this function when setting the polling interval.
One option for being able to react to current events despite large
polling intervals is to send traps using the devices in the network. Enter
the network management station into the devices as a trap target.
If the configuration of the device to be monitored changes, Industrial
HiVision gives you the ability to compare the configuration saved in
Industrial HiVision with the current configuration on the device.
To access the “Configuration File“ device property, double-click the
detail display of the device in question in the list view.
To display the differences, right click the “Configuration File“ device
property and select “Display differences“.
The highlighted sections in the comparison have the following meanings:
Green text on light gray background: Change
Red text on light gray background: Deleted
Blue text on light gray background: Added
Tracking changes to program settings and device
configurations
"Audit Trail" or "Audit Log" is the name for a chronological record of
changes to a system and its environment.
48
Preparation
3.1 Improving the security of Industrial
HiVision
These records give you the opportunity to verify, for example, who made
a configuration change and when.
Audit Trail uses the Windows Event Viewer or Linux syslog function.
Audit Trail runs automatically without any user intervention.
Industrial HiVision logs information for the following events:
MultiConfig™
- Write operations with MultiConfig™ that completed successfully or
did not complete.
Properties dialog
- Write operations in the Properties dialog of a property
Domains
- Issue licenses
- Revoke issued licenses
- Add subdomain
- Remove subdomains
Scheduled actions
- Execution of a task
- Add tasks
Device management
- Set device to "Managed"
- Set device to "Unmanaged"
- Delete device
- Set trap target address
Change IP configuration
Perform actions that require "Edit Mode"
- "Audit Trail" records actions for which Industrial HiVision prompts
the user to enter the "Edit Mode" password before completing the
action.
External programs
- Open or close the web interface of managed devices
- Open or close the device configuration of managed devices
- Open or close the command line interface of managed devices
- Open or close the SNMP browser for querying SNMP MIB
variables of managed devices
Logging of actions carried out by external programs is the
responsibility of those external programs. Industrial HiVision logs the
launch and termination of these external programs.
User-defined actions
- Add user-defined action
- Run user-defined action
49
Preparation
3.1 Improving the security of Industrial
HiVision
Restricting remote GUI access rights
Industrial HiVision gives you the ability to connect with the Industrial
HiVision server remotely from another computer.
Disable remote access if you want to prohibit remote access to the
Industrial HiVision server.
See “Services Access” on page 373.
Restricting web server access rights
Industrial HiVision gives you the ability to use a browser to access the
Industrial HiVision web server using the HTTP or HTTPS protocol. You
can thus monitor your network from anywhere in the world.
To enhance the protection for web server access, assign user
authorizations.
See “User Management” on page 327.
Disable the web server if you want to prohibit browser-based access
to Industrial HiVision.
See “Services Access” on page 373.
Restricting OPC server usage
Industrial HiVision enables you to activate/deactivate the OPC server or
to activate/deactivate the writing of object values in Industrial HiVision
using an OPC write command. Both are deactivated on delivery.
Only activate what you really need.
See “Services Access” on page 373.
Disable the function in the service.xml.
See “Services Access” on page 373.
50
Preparation
3.1 Improving the security of Industrial
HiVision
3.1.4
Restrict File Access
You can help protect your management system by limiting the number of
Industrial HiVision users and by restricting user permissions. To further deny
unauthorized user access, restrict access to the Industrial HiVision “config”,
“var\script”, and “var\report_files” folders.
The Industrial HiVision “config” folder contains the security related files
usermanagement.xml and service.xml.
Industrial HiVision saves script files in the “var\script” folder. If you use
scripts with unencrypted passwords, then a user can open the script file and
see the passwords. The “var\report_files” folder contains the script
results. The results of a script can also contain unencrypted passwords.
The default path to the folders is as follows: “C:\Program
Files\Hirschmann\Industrial HiVision <version number>”
Note: The Industrial HiVision “config” folder contains the
usermanagement.xml file only after you have added users to the
Configuration > Preferences > User Management dialog.
51
Preparation
3.2 Outside the program
3.2
Outside the program
Industrial HiVision requires access to the devices to be monitored. Therefore
keep the following in mind:
Your network management station has access rights to every device to be
monitored. This is the case if the IP address of your network management
station is entered as an IP address with access rights on the device to be
monitored.
Devices with any IP address have access to Hirschmann devices whose
configuration is set to the factory default.
Your network management station is physically connected to every
device to be monitored, directly or indirectly through hubs and switches or
routers.
52
Preparation
3.3 Network structure
3.3
Network structure
Large data networks have hierarchical network structures. Industrial HiVision
is scalable and can be adapted to the hierarchical network structure.
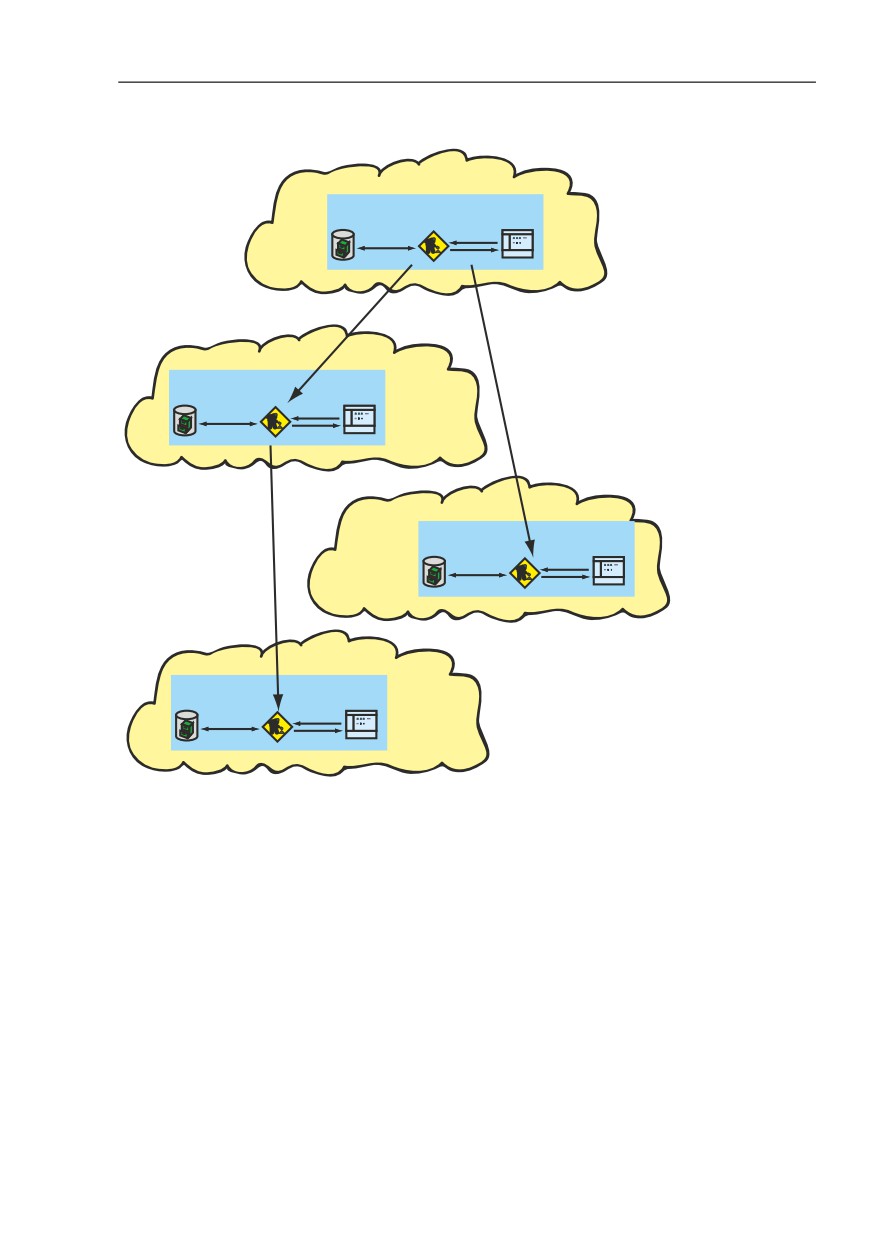
Adapting to the hierarchical network structure means that you can set up a
network management station for each subdomain of your data network (see
figure 55 “Domains”).
3.3.1
Advantages of the hierarchical network
structure
This hierarchical adaptation offers the following advantages to you:
Load distribution
In very large data networks with extensive monitoring, you can easily
reach the limits of your system resources (see on page 222 “Effect on
system resources”). Through the use of multiple network management
stations, you can restrict the utilization of the data network and the
network management station to the domain limits. This significantly
increases the performance.
Smaller projects
Smaller projects make it easier to get an overview.
Organizational structure
Adapting your network management projects to your organizational
structure enables you to create and copy relevant projects individually.
Central administration of Industrial HiVision licenses
Concentrated display of the statuses of the subdomains
53
Preparation
3.3 Network structure
3.3.2
Application Example
The following figure shows an application example of a hierarchical network
structure.
The network consists of the IT domain, with lower-level domains A1, A11,
and B1.
The IT network management station is in the IT network.
The A1 network management station is in production network 1.
The A11 network management station is in production subnetwork 11. In this
case, the A1 network management station is the superdomain of the A11
domain.
The B1 network management station is in distribution network 1.
The domains A1 and B1 are subdomains of the IT domain.
Industrial HiVision allows a nesting depth of 4 layers and 5 subdomains per
domain.
54
Preparation
3.3 Network structure
IT
A1
B1
A11
Figure 4: Domains
55
Preparation
3.3 Network structure
3.3.3
Configuration of the application example
The configuration of hierarchically arranged network management stations
comprises the following steps:
Release subdomains
Connect subdomains to superdomains
Assign licenses from top to bottom
Release subdomains
First you go into the hierarchical levels from bottom to top. In Industrial
HiVision, go into the subdomain interface and release access for the
superdomain on the next higher level.
The following instructions describe this process for the A11 subdomain:
In the “Preferences“ menu tree, open the Advanced > Services
Access dialog.
To allow remote access mark the Project Data Server > Remote
Access checkbox.
To allow the subdomain interface mark the Project Data Server >
Subdomain interface checkbox.
Under Project Data Server > Password, enter a password with
which the superdomain can access this subdomain.
Requirement for the password: 8 to 16 characters.
Repeat these steps for the subdomains A1 and B1.
Connect subdomains to superdomains
To connect the A11 subdomain to the A1 superdomain, on the
superdomain A1 open the “Add New Subdomain“ dialog with File >
New > Subdomain.
Enter the IP address of the subdomain.
Enter a name for the subdomain under which Industrial HiVision
displays the subdomain in the folder frame.
Enter and repeat the subdomain password with which the
superdomain can access the subdomain.
Industrial HiVision shows the subdomain in the upper part of the folder
frame.
Repeat these steps for the IT superdomain with the superdomains A1
and B1.
56
Preparation
3.3 Network structure
You can delete a subdomain from the folder frame by selecting the
subdomain and pressing the Del button.
Assign licenses from top to bottom
Now you assign the Industrial HiVision licenses in the levels of the
hierarchy from top to bottom.
Note: A superdomain requires its own license. The free-of-charge 16
node license cannot be assigned to the superdomain.
In the IT superdomain, enter your license key (see on page 347
“License”).
To assign licenses to the subdomain A1, right-click the subdomain A1
in the folder frame of the IT superdomain.
In the “Lease license nodes“ dialog, enter the number of licenses you
are leasing to subdomain A1.
The number of licenses for the subdomain A1 includes the number of
licenses that you further assign from superdomain A1 to subdomain
A11 in the next step.
To assign licenses to the subdomain A11, right-click subdomain A11
in the folder frame of the A1 superdomain.
In the “Lease license nodes“ dialog, enter the number of licenses you
are leasing to subdomain A11.
Superdomain A1 requires a separate license so that it can issue
licenses to subdomains.
As an alternative, Industrial HiVision offers you the option to enter a
license key directly in the subdomain.
Note: A subdomain maintains the validity of its borrowed licenses using
periodic communication with the superdomain. If this communication is
interrupted for more than an hour, the validity of the subdomains’
borrowed licenses lapses. The lapsed licenses are then available again in
the superdomain.
You will find an overview of the licenses assigned to subdomains in the
Basics > License dialog in the configuration settings (see on page 347
“License”).
57

Preparation
3.3 Network structure
3.3.4
Status display of the subdomains
The superdomain determines the status of its subdomains and indicates this
status with color.
Color
Meaning
Dark gray
Subdomain cannot be reached
Gray
Status determination not available
Green can be configured in the initial settings
OK
Yellow can be configured in the initial settings
Warning
Red can be configured in the initial settings
Error
Table 1: Meaning of the status colors of the subdomains
58
Preparation
3.4 Program default settings
3.4
Program default settings
To take into account the individuality of every user, Industrial HiVision gives
you the option of entering settings relating to the presentation, the function
and the device detection.
IP parameters
Enter the IP parameters of your network management station under
Configuration > Preferences > Advanced > Management Station (see
on page 384 “Management Station”).
Device access
Industrial HiVision independently detects the delivery settings of
Hirschmann devices for the SNMP access.
If for security reasons you have already made changes to the SNMP
settings for the devices to be monitored, then enter the user names and
the passwords under Configuration > Preferences > Advanced >
Device Credentials (see on page 376 “Device Credentials”).
Discover Devices
Industrial HiVision gives you the following options for detecting devices in
the connected network:
Traps: Detecting devices using the alarm messages (traps) sent by
them. Keep in mind that your network management station is entered
as the trap destination address in every device to be monitored (see
on page 210 “Trap destination address”).
HiDiscovery V1: Detecting devices by means of a query using the
HiDiscovery V1 protocol. Select the relevant network card of the
network management station (see on page 384 “Management
Station”).
On delivery, the HiDiscovery V1 protocol on a new Hirschmann device
is active.
Network scan: Discovering devices by means of an IP query for an
entered IP address range (see on page 122 “Device detection”).
59
Preparation
3.4 Program default settings
Select the required method for device detection under Configuration >
Preferences > Basics > Discover Devices (see on page 322
“[Basics]”).
License
To be able to utilize the entire scope of the functions of Industrial HiVision,
enter your license key under Configuration > Preferences > Basics >
License (see on page 347 “License”).
After a new installation or after an update, Industrial HiVision starts fully
functional for the duration of the free 30-day trial period.
After the free 30-day trial period, Industrial HiVision runs as a free version
(see on page 264 “Switch to the free version”).
After you enter a license key, Industrial HiVision runs as the licensed
version.
Font size
Depending on the setting of your screen resolution, some of the text
displayed is too small or incomplete. Adapt the font size under
Configuration > Preferences > Display > Device, Configuration >
Preferences > Display > Device Appearance (see “Appearance” on
page 362 and “Device” on page 359).
Colors
The optimal signal effect of the display depends on your color sensitivity.
Select your color display under Configuration > Preferences >
Display > Status Colors (see on page 364 “Status Colors”).
Devices and port names
Industrial HiVision enables you to select the name of the device/port that
appears in the interface. Select the name of the device/port under
Configuration > Preferences > Advanced > Device/Port Names (see
on page 394 “Device/Port Names”).
60
Preparation
3.4 Program default settings
Default device icons
Industrial HiVision enables you to assign defined default icons to different
device types. Select device icons under Configuration > Preferences >
Display > Device Icon (see on page 365 “Device Icon”).
61
Preparation
3.5 Using Industrial HiVision with
Firewalls
3.5
Using Industrial HiVision
with Firewalls
Industrial HiVision is a management system that allows you to connect
multiple clients to the Industrial HiVision services. You can install the
management station which provides the Industrial HiVision services in the
same network as the clients or in a remote network. You can separate the
networks with a firewall. When a firewall separates the Industrial HiVision
services from the clients, add rules to the firewall to forward the required
Industrial HiVision service data.
Note: Limit “Project Data Server“ access to local users only. To limit access
to the “Project Data Server“, deactivate the “Remote Access“ function.
The following list contains the various types of clients:
Application GUI
The Application GUI client uses the Industrial HiVision executable file to
connect to the Industrial HiVision services.
ActiveX GUI (Windows)
The ActiveX GUI client uses the Industrial HiVision ActiveX control (.ocx)
file to connect to the Industrial HiVision services. An OCX file is an
application that runs on Microsoft's Windows systems.
Industrial HiVision Super Domain Client
This client is the Industrial HiVision service were you add an Industrial
HiVision Subdomain.
62
Preparation
3.5 Using Industrial HiVision with
Firewalls
Note: Activate the “Subdomain interface“ and set the password on the
Industrial HiVision subdomain.
Web GUI
The Web GUI client is available using any web browser.
To access the Industrial HiVision services using a web browser, enter the
IP address of the management station and the “Port“ number. For
example:
https://[IP address of the network management station]:11165
Note: Regarding security:
An attacker can spoof the Industrial HiVision Web GUI client, also known as
the browser client, which can lead to unauthorized access to the Industrial
HiVision kernel/web server. To help protect your network against attack,
verify that every user requiring access has proper credentials. Limit the
number of administrators and users (see on page 327 “User Management”).
HTML GUI
The HTML GUI client is available using any web browser.
To access the Industrial HiVision index using a web browser, enter the IP
address of the management station, the “Port“ number, and idx. For
example:
https://[IP address of the network management
station]:11194/idx
To access the Industrial HiVision events using a web browser, enter the
IP address of the management station, the “Port“ number, and events. For
example:
https://[IP address of the network management
station]:11194/events
HiMobile GUI
The Industrial HiVision HiMobile GUI provides services for mobile
devices.
OPC UA HTTP/HTTPS
You can configure any suitable OPC UA client to access the Industrial
HiVision OPC UA server through the corresponding port.
63

Preparation
3.5 Using Industrial HiVision with
Firewalls
For entries marked with an “X”, activate the service in Industrial HiVision. To
forward the port data add a rule to the firewall. To activate a service, mark the
checkbox for the required service in the Preferences > Advanced >
Services Access dialog.
Note: For the “Project Data Server“ entries, verify that the Industrial HiVision
service is running and accessible (see on page 373 “Services Access”).
Type of Industrial
Web Server
Project Data
OPC UA Server OPC UA Server
HiVision Service /Client
Server
(HTTP)
(HTTPS)
Ports used to connect to the
11194
11195
11196
11197
services
(Configurable)
Application GUI
-
X
-
-
ActiveX GUI (Windows)
-
X
-
-
Industrial HiVision Super
–
X
-
-
Domain Client
Web GUI
X
X
-
-
HTML GUI
X
-
-
-
HiMobile GUI
X
-
-
-
OPC UA HTTP
-
-
X
-
OPC UA HTTPS
-
-
-
X
Table 2: Service-Client settings
64