Sun Microsystems System Administration Guide, Volume 1 (2000) - page 17
TABLE 40-1
Default Directories in the root (/) File System
(continued)
Directory
Description
/dev/cfg
Symbolic links to physical ap_ids
/dev/cua
Device files for uucp
Block disk devices
/dev/dsk
Frame buffer device files
/dev/fbs
/dev/md
Logical volume management meta-disk devices
/dev/fd
File descriptors
/dev/pts
pty slave devices
/dev/rdsk
Raw disk devices
/dev/rmt
Raw tape devices
/dev/sad
Entry points for the STREAMS Administrative Driver
/dev/sound
Audio device and audio device control files
/dev/swap
Default swap device
/dev/term
Serial devices
/etc
Host-specific system administrative configuration files and
databases
/etc/acct
Accounting configuration information
/etc/cron.d
Configuration information for cron
/etc/default
Defaults information for various programs
/etc/dmi
Solstice Enterprise AgentsTM configuration files
/etc/dfs
Configuration information for shared file systems
530
TABLE 40-1
Default Directories in the root (/) File System
(continued)
Directory
Description
/etc/dhcp
Dynamic Host Configuration Protocol (DHCP)
configuration files
/etc/fn
Federated Naming Service and x.500 support files
/etc/fs
Binaries organized by file system types for operations
required before /usr is mounted
/etc/gss
Generic Security Service (GSS) Application Program
Interface configuration files
/etc/inet
Configuration files for Internet services
/etc/init.d
Scripts for changing between run levels
Dynamic linking libraries needed when /usr is not
/etc/lib
available
/etc/llc2
Logical link control (llc2) driver configuration files
/etc/lp
Configuration information for the printer subsystem
/etc/mail
Mail subsystem configuration information
/etc/net
Configuration information for TI (transport- independent)
network services
/etc/nfs
NFS server logging configuration file
/etc/openwin
OpenWindowsTM configuration files
/etc/opt
Configuration information for optional packages
/etc/rc0.d
Scripts for entering/leaving run level 0
/etc/rc1.d
Scripts for entering/leaving run level 1
/etc/rc2.d
Scripts for entering/leaving run level 2
/etc/rc3.d
Scripts for entering/leaving run level 3
UFS File System Reference
531
TABLE 40-1
Default Directories in the root (/) File System
(continued)
Directory
Description
/etc/rcS.d
Scripts for bringing the system up in single user mode
/etc/rpcsec
This directory may contain a NIS+ authentication
configuration file
/etc/saf
Service access facility files (including FIFOs)
/etc/security
Basic Security Module (BSM) configuration files
/etc/skel
Default profile scripts for new user accounts
/etc/tm
Trademark files; contents displayed at boot time
/etc/uucp
uucp configuration information
/export
Default directory for users’ home directories, client file
systems, or other shared file systems
/home
Default directory or mount point for a user’s home
directory on a standalone system. When AutoFS is
running, you cannot create any new entries in this
directory.
/kernel
Directory of platform-independent loadable kernel
modules required as part of the boot process. It includes
the generic part of the core kernel that is platform
independent, /kernel/genunix. See Table 40-3 for the
/platform and /usr/platform directory structure.
/mnt
Convenient, temporary mount point for file systems
/opt
Default directory or mount point for add-on application
packages
/sbin
Essential executables used in the booting process and in
manual system failure recovery
/stand
Standalone programs
/tmp
Temporary files; cleared during boot sequence
532
TABLE 40-1
Default Directories in the root (/) File System
(continued)
Directory
Description
/usr
Mount point for the /usr file system. See Table 40-2 for
more information.
/var
Directory for varying files, which usually includes
temporary, logging, or status files
/var/adm
System logging and accounting files
/var/audit
Basic Security Module (BSM) audit files
/var/crash
Default depository for kernel crash dumps
/var/cron
cron’s log file
/var/dmi
Solstice Enterprise AgentsTM (SEA) Desktop Management
Interface (DMI) run time components
/var/dt
dtlogin configuration files
/var/ftp
FTP server directory
IPv6 router state files
/var/inet
System log files
/var/log
/var/lp
Line printer subsystem logging information
/var/mail
Directory where users’ mail is kept
/var/news
Community service messages (note: not the same as
USENET-style news)
/var/nis
NIS+ databases
NFS server log files
/var/nfs
Network Time Protocol (NTP) server state directory
/var/ntp
/var/opt
Root of a subtree for varying files associated with
software packages
UFS File System Reference
533
TABLE 40-1
Default Directories in the root (/) File System
(continued)
Directory
Description
/var/preserve
Backup files for vi and ex
/var/run
Temporary system files that are not needed across system
reboots. This is a TMPFS-mounted directory.
/var/sadm
Databases maintained by the software package
management utilities
/var/saf
saf (service access facility) logging and accounting files
/var/spool
Directories for spooled temporary files
/var/spool/cron
cron and at spool files
/var/spool/locks
Spooling lock files
/var/spool/lp
Line printer spool files
/var/spool/mqueue
Mail queued for delivery
/var/spool/pkg
Spooled packages
/var/spool/uucp
Queued uucp jobs
/var/spool/uucppublic
Files deposited by uucp
/var/statmon
Network status monitor files
/var/tmp
Directory for temporary files; not cleared during boot
sequence
/var/uucp
uucp log and status files
/var/yp
NIS databases (for backwards compatibility with NIS and
unnecessary after full transition to NIS+)
The table below describes the default directories in the /usr file system.
534
TABLE 40-2
Default Directories in the /usr File System
Directory
Description
4lib
SunOS 4.1 binary compatibility package libraries
5bin
Symbolic link to the /usr/bin directory
Symbolic link to the /usr/openwin directory
X
Symbolic link to the /var/adm directory
adm
aset
Directory for Automated Security Enhancement Tools
(ASET) programs and files
bin
Location for standard system commands
ccs
C compilation programs and libraries
demo
Demo programs and data
Symbolic link to the /usr/share/lib/dict directory,
dict
which contains the dictionary file used by the UNIX spell
program
dt
Directory or mount point for CDE software
games
An empty directory, which is a remnant of the SunOS 4.0/
4.1 software
include
Header files (for C programs, etc.)
java*
Directories containing JavaTM programs and libraries
kernel
Additional kernel modules
kvm
Implementation architecture-specific binaries and libraries
lib
Various program libraries, architecture-dependent
databases, and binaries not invoked directly by the user
local
Commands local to a site
mail
Symbolic link to the /var/mail directory
UFS File System Reference
535
TABLE 40-2
Default Directories in the /usr File System
(continued)
Directory
Description
man
Symbolic link to the /usr/share/man directory
net
Directory for network listener services
Symbolic link to the /var/news directory
news
Files pertaining to the Form and Menu Language
oasys
Interpreter (FMLI) execution environment
old
Programs that are being phased out
openwin
Directory or mount point for OpenWindows software
perl5
Perl 5 programs and documentation
platform
See Table 40-3 for more information
Symbolic link to the /var/preserve directory
preserve
Directory for the proc tools
proc
pub
Files for online man page and character processing
sadm
Various files and directories related to system
administration
sbin
Executables for system administration
sbin/static
Statically linked version of selected programs from /usr/
bin and /usr/sbin
Architecture-independent sharable files
share
share/lib
Architecture-independent databases
share/src
Source code for kernel, libraries, and utilities
snadm
Programs and libraries related to system and network
administration
536

TABLE 40-2
Default Directories in the /usr File System
(continued)
Directory
Description
spool
Symbolic link to the /var/spool directory
src
Symbolic link to the share/src directory
Symbolic link to the var/tmp directory
tmp
Berkeley compatibility package binaries
ucb
ucbinclude
Berkeley compatibility package header files
ucblib
Berkeley compatibility package libraries
vmsys
Directory for Framed Access Command Environment
(FACE) programs
xpg4
Directory for POSIX-compliant utilities
The Platform-Dependent Directories
The table below describes the platform-dependent objects in the /platform and
/usr/platform directories.
TABLE 40-3
The /platform and /usr/platform Directories
Directory
Description
/platform
Contains a series of directories, one per supported platform
that need to reside in the root (/) file system.
/platform/*/kernel
Contains platform-dependent kernel components, including
the file unix, the core kernel that is platform dependent. See
kernel(1M).
UFS File System Reference
537
TABLE 40-3
The /platform and /usr/platform Directories
(continued)
Directory
Description
/usr/platform
Contains platform-dependent objects that do not need to
reside in the root (/) file system. It contains objects which
replace the contents of /usr/kvm, which has been removed.
/usr/platform/*/lib
Contains platform-dependent objects similar to those found
in the /usr/lib directory.
/platform/*/sbin
Contains platform-dependent objects similar to those found
in the /usr/sbin directory.
The Structure of UFS File System
Cylinder Groups
When you create a UFS file system, the disk slice is divided into cylinder groups,
which is made up of one or more consecutive disk cylinders. The cylinder groups are
then further divided into addressable blocks to control and organize the structure of
the files within the cylinder group. Each type of block has a specific function in the
file system. A UFS file system has these four types of blocks:
This Block Type ...
Stores ...
Boot block
Information used when booting the system
Superblock
Detailed information about the file system
Inode
All information about a file
Storage or data block
Data for each file
This section provides additional information about the organization and function of
these blocks.
538
The Boot Block
The boot block stores the procedures used in booting the system. If a file system is
not to be used for booting, the boot block is left blank. The boot block appears only
in the first cylinder group (cylinder group 0) and is the first 8 Kbytes in a slice.
The Superblock
The superblock stores much of the information about the file system. A few of the
more important things it contains are:
Size and status of the file system
Label (file system name and volume name)
Size of the file system logical block
Date and time of the last update
Cylinder group size
Number of data blocks in a cylinder group
Summary data block
File system state: clean, stable, or active
Path name of the last mount point
The superblock is located at the beginning of the disk slice, and is replicated in each
cylinder group. Because the superblock contains critical data, multiple superblocks
are made when the file system is created. Each of the superblock replicas is offset by
a different amount from the beginning of its cylinder group. For multiple-platter disk
drives, the offsets are calculated so that a superblock appears on each platter of the
drive. That way, if the first platter is lost, an alternate superblock can always be
retrieved. Except for the leading blocks in the first cylinder group, the leading blocks
created by the offsets are used for data storage.
A summary information block is kept with the superblock. It is not replicated, but is
grouped with the first superblock, usually in cylinder group 0. The summary block
records changes that take place as the file system is used, and lists the number of
inodes, directories, fragments, and storage blocks within the file system.
Inodes
An inode contains all the information about a file except its name, which is kept in a
directory. An inode is 128 bytes. The inode information is kept in the cylinder
information block, and contains:
The type of the file:
UFS File System Reference
539
Regular
Directory
Block special
Character special
Symbolic link
FIFO, also known as named pipe
Socket
The mode of the file (the set of read-write-execute permissions)
The number of hard links to the file
The user ID of the owner of the file
The group ID to which the file belongs
The number of bytes in the file
An array of 15 disk-block addresses
The date and time the file was last accessed
The date and time the file was last modified
The date and time the file was created
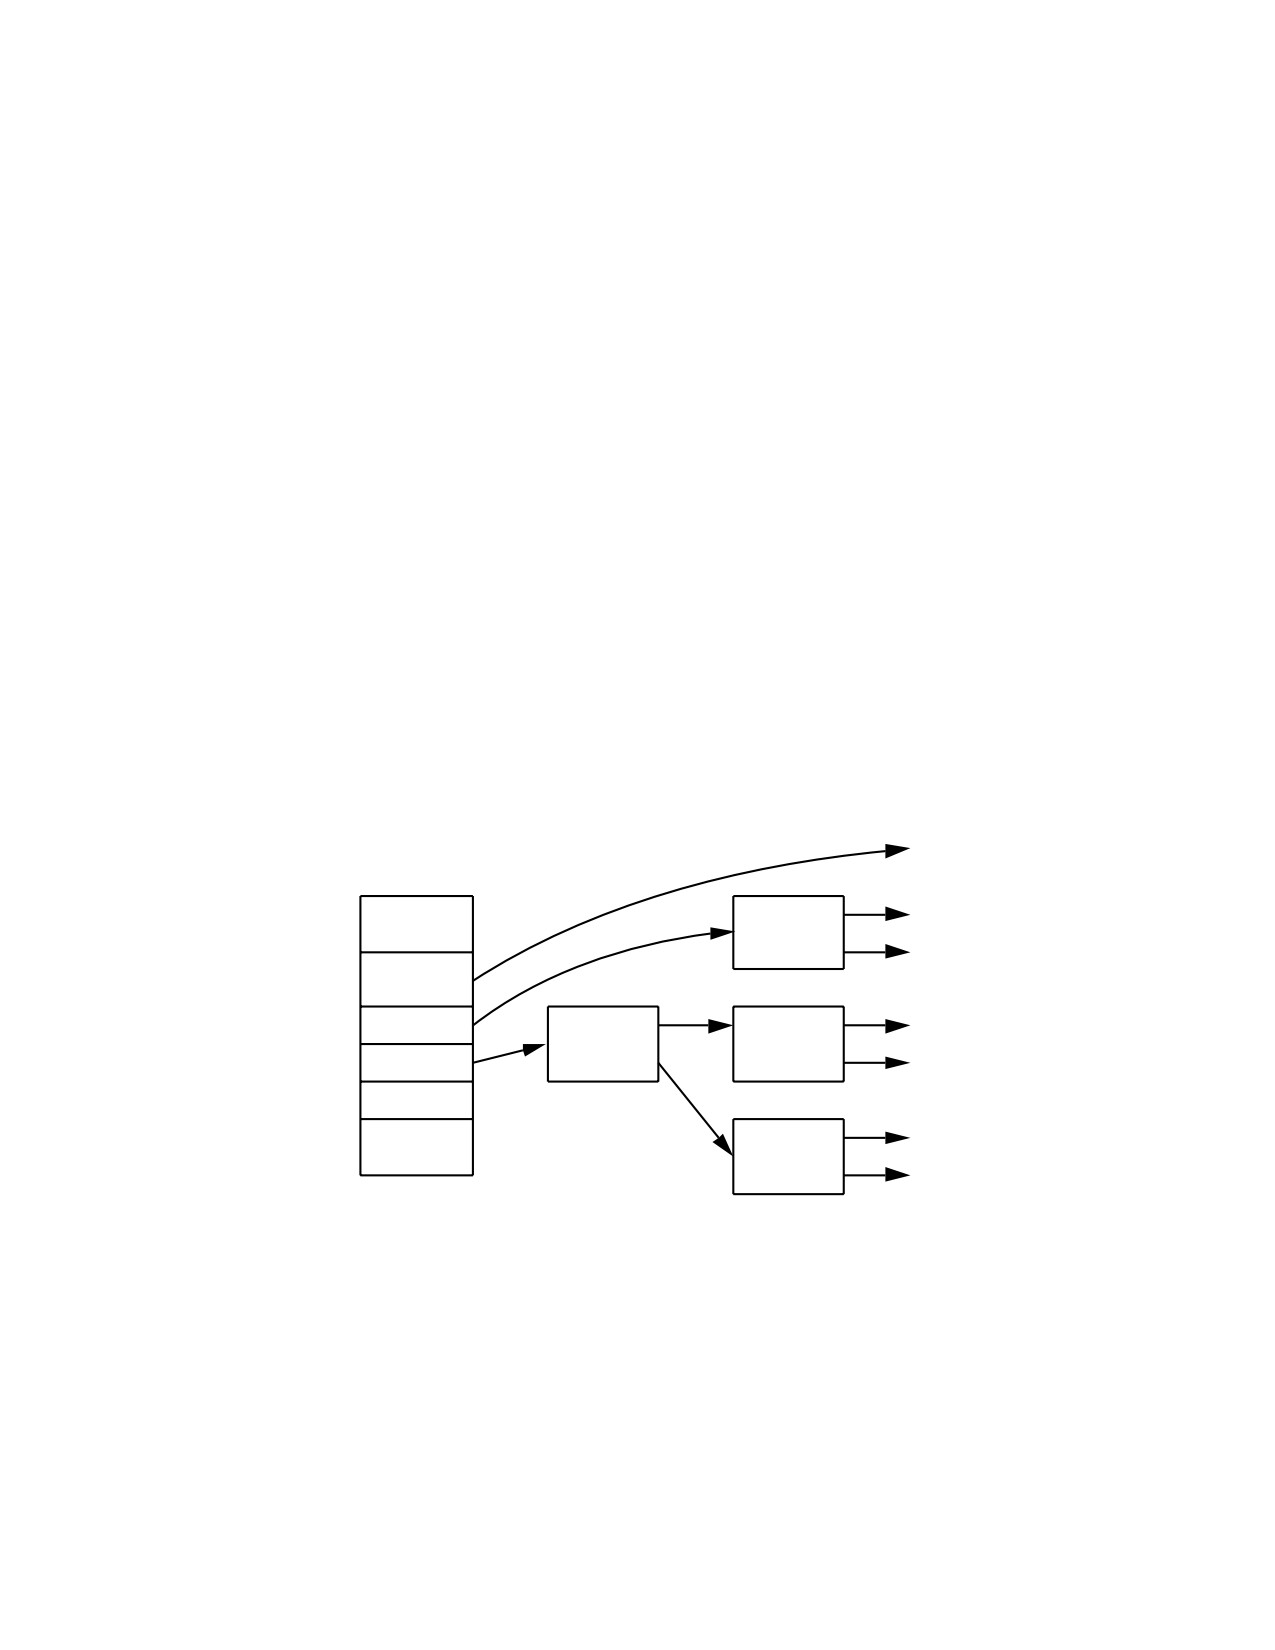
The array of 15 disk addresses (0 to 14) point to the data blocks that store the
contents of the file. The first 12 are direct addresses; that is, they point directly to the
first 12 logical storage blocks of the contents of the file. If the file is larger than 12
logical blocks, the 13th address points to an indirect block, which contains direct
block addresses instead of file contents. The 14th address points to a double indirect
block, which contains addresses of indirect blocks. The 15th address is for triple
indirect addresses, if they are ever needed. The figure below shows this chaining of
address blocks starting from the inode.
Inode
Indirect
Block
Address
0
Array
11
Storage
12
Double
Blocks
Indirect
Indirect
Block
13
Block
14
Indirect
Block
Figure 40-1
The File System Address Chain in a UFS System
540

Data Blocks
The rest of the space allocated to the file system is occupied by data blocks, also
called storage blocks. The size of these data blocks is determined at the time a file
system is created. Data blocks are allocated, by default, in two sizes: an 8-Kbyte
logical block size, and a 1-Kbyte fragmentation size.
For a regular file, the data blocks contain the contents of the file. For a directory, the
data blocks contain entries that give the inode number and the file name of the files
in the directory.
Free Blocks
Blocks not currently being used as inodes, as indirect address blocks, or as storage
blocks are marked as free in the cylinder group map. This map also keeps track of
fragments to prevent fragmentation from degrading disk performance.
To give you an idea of the appearance of a typical UFS file system, The figure below
shows a series of cylinder groups in a generic UFS file system.
Cylinder Group 0
Cylinder Group 1
Cylinder Group n
Bootblock (8 Kbytes)
Storage Blocks
Storage Blocks
Superblock
Cylinder Group Map
Superblock
Inodes
Cylinder Group Map
Superblock
Inodes
Cylinder Group Map
Inodes
Storage Blocks
Storage Blocks
Storage Blocks
Figure 40-2
A Typical UFS File System
UFS File System Reference
541
Deciding on Custom File System
Parameters
Before you choose to alter the default file system parameters assigned by the newfs
command, you need to understand them. This section describes each of these
parameters:
Block size
Fragment size
Minimum free space
Rotational delay
Optimization type
Number of files
Logical Block Size
The logical block size is the size of the blocks that the UNIX kernel uses to read or
write files. The logical block size is usually different from the physical block size
(usually 512 bytes), which is the size of the smallest block that the disk controller can
read or write.
You can specify the logical block size of the file system. After the file system is
created, you cannot change this parameter without rebuilding the file system. You
can have file systems with different logical block sizes on the same disk.
By default, the logical block size is 8192 bytes (8 Kbytes) for UFS file systems. The
UFS file system supports block sizes of 4096 or 8192 bytes (4 or 8 Kbytes). 8 Kbytes is
the recommended logical block size.
SPARC platform only - You can only specify 8192-byte block size on the sun4u
platform.
To choose the best logical block size for your system, consider both the performance
desired and the available space. For most UFS systems, an 8-Kbyte file system
provides the best performance, offering a good balance between disk performance
and use of space in primary memory and on disk.
As a general rule, to increase efficiency, use a larger logical block size for file systems
where most of the files are very large. Use a smaller logical block size for file systems
where most of the files are very small. You can use the quot -c file-system command
on a file system to display a complete report on the distribution of files by block size.
542
Fragment Size
As files are created or expanded, they are allocated disk space in either full logical
blocks or portions of logical blocks called fragments. When disk space is needed to
hold a data for a file, full blocks are allocated first, and then one or more fragments
of a block are allocated for the remainder. For small files, allocation begins with
fragments.
The ability to allocate fragments of blocks to files, rather than just whole blocks, saves
space by reducing fragmentation of disk space resulting from unused holes in blocks.
You define the fragment size when you create a UFS file system. The default fragment
size is 1 Kbyte. Each block can be divided into 1, 2, 4, or 8 fragments, which results
in fragment sizes from 8192 bytes to 512 bytes (for 4-Kbyte file systems only). The
lower bound is actually tied to the disk sector size, typically 512 bytes.
Note - The upper bound might equal the full block size, in which case the fragment
is not a fragment at all. This configuration might be optimal for file systems with
very large files when you are more concerned with speed than with space.
When choosing a fragment size, look at the trade-off between time and space: a small
fragment size saves space, but requires more time to allocate. As a general rule, to
increase storage efficiency, use a larger fragment size for file systems where most of
the files are large. Use a smaller fragment size for file systems where most of the files
are small.
Minimum Free Space
The minimum free space is the percentage of the total disk space held in reserve when
you create the file system. The default reserve is ((64 Mbytes/partition size) * 100),
rounded down to the nearest integer and limited between 1% and 10%, inclusively.
Free space is important because file access becomes less and less efficient as a file
system gets full. As long as there is an adequate amount of free space, UFS file
systems operate efficiently. When a file system becomes full, using up the available
user space, only root can access the reserved free space.
Commands such as df report the percentage of space that is available to users,
excluding the percentage allocated as the minimum free space. When the command
reports that more than 100 percent of the disk space in the file system is in use, some
of the reserve has been used by root.
If you impose quotas on users, the amount of space available to the users does not
include the free space reserve. You can change the value of the minimum free space
for an existing file system by using the tunefs command.
UFS File System Reference
543
Rotational Delay (Gap)
The rotational delay is the expected minimum time (in milliseconds) it takes the CPU
to complete a data transfer and initiate a new data transfer on the same disk
cylinder. The default delay is zero, as delay-based calculations are not effective when
combined with modern on-disk caches.
When writing a file, the UFS allocation routines try to position new blocks on the
same disk cylinder as the previous block in the same file. The allocation routines also
try to optimally position new blocks within tracks to minimize the disk rotation
needed to access them.
To position file blocks so they are “rotationally well-behaved,” the allocation routines
must know how fast the CPU can service transfers and how long it takes the disk to
skip over a block. Using options to the mkfs command, you can indicate how fast
the disk rotates and how many disk blocks (sectors) it has per track. The allocation
routines use this information to figure out how many milliseconds it takes to skip a
disk block. Then using the expected transfer time (rotational delay), the allocation
routines can position or place blocks so that the next block is just coming under the
disk head when the system is ready to read it.
Note - It is not necessary to specify the rotational delay (−d option to newfs) for
some devices.
Place blocks consecutively only if your system is fast enough to read them on the
same disk rotation. If the system is too slow, the disk spins past the beginning of the
next block in the file and must complete a full rotation before the block can be read,
which takes a lot of time. You should try to specify an appropriate value for the gap
so that the head is located over the appropriate block when the next disk request
occurs.
You can change the value of this parameter for an existing file system by using the
tunefs command. The change applies only to subsequent block allocation, not to
blocks already allocated.
Optimization Type
The optimization type is either space or time.
Space - When you select space optimization, disk blocks are allocated to minimize
fragmentation and disk use is optimized.
Time - When you select time optimization, disk blocks are allocated as quickly as
possible, with less emphasis on their placement. When there is enough free space,
it is relatively easy to allocate disk blocks effectively, without resulting in too
much fragmentation. The default is time.
You can change the value of the optimization type parameter for an existing file
system using the tunefs command.
544
Number of Files
The number of inodes determines the number of files you can have in the file
system: one inode for each file. The number of bytes per inode determines the total
number of inodes created when the file system is made: the total size of the file
system divided by the number of bytes per inode. Once the inodes are allocated, you
cannot change the number without recreating the file system.
The default number of bytes per inode is 2048 bytes (2 Kbytes) if the file system is
less than one Gbyte. If the file system is larger than one Gbyte, the following formula
is used:
File System Size
Number of Bytes Per Inode
Less than or equal to 1 Gbyte
2048
Less than 2 Gbytes
4096
Less than 3 Gbytes
6144
3 Gbytes or greater
8192
If you have a file system with many symbolic links, they can lower the average file
size. If your file system is going to have many small files, you can give this
parameter a lower value. Note, however, that having too many inodes is much better
than running out of them. If you have too few inodes, you could reach the maximum
number of files on a disk slice that is practically empty.
Commands for Creating a Customized
File System
This section describes the two commands you use to create a customized file system:
newfs
mkfs
The newfs Command Syntax, Options, and
Arguments
The newfs command is a friendlier version of the mkfs command that is used to
create file systems. The newfs command is located in the /usr/sbin directory.
UFS File System Reference
545
The syntax is:
newfs [-Nv] [mkfs_options] raw_device
The table below describes the options and arguments to the newfs command.
TABLE 40-4
The newfs Command Options and Arguments
Option
Description
Displays the file system parameters that would be used in
−N
creating the file system without actually creating it. This option
does not display the parameters used to create an existing file
system.
Displays the parameters that are passed to the mkfs command.
−v
mkfs-options
Use the following options to set the parameters passed to the
mkfs command. The options are listed below in the order they
are passed to mkfs. Separate the options with spaces.
The size of the file system in sectors. The default is
−s size
automatically determined from the disk label.
The number of tracks per cylinder on the disk. The default is
−t ntrack
determined from the disk label.
The logical block size in bytes to use for data transfers. Specify
−b bsize
the size of 4096 or 8192 (4 or 8 Kbytes). The default is 8192
bytes (8 Kbytes).
The smallest amount of disk space in bytes that is allocated to a
−f fragsize
file. Specify the fragment size in powers of two in the range
from 512 to 8192 bytes. The default is 1024 bytes (1 Kbyte).
The number of disk cylinders per cylinder group. The default
−c cgsize
value is calculated by dividing the number of sectors in the file
system by the number of sectors in a gigabyte, and then
multiplying the result by 32. The default value ranges from 16
to 256.
The minimum percentage of free disk space to allow. The
−m free
default is ((64 Mbytes/partition size) * 100), rounded down to
the nearest integer and limited between 1% and 10%, inclusively.
546
TABLE 40-4
The newfs Command Options and Arguments
(continued)
Option
Description
The speed of the disk, in revolutions per minute. This setting is
−r rpm
driver- or device-specific. If the drive can report how fast it
spins, mkfs uses this value. If not, the default is 3600. This
parameter is converted to revolutions per second before it is
passed to mkfs.
The number of bytes per inode to use in computing how many
−i nbpi
inodes to create. See the section above for the default values.
Optimization type to use for allocating disk blocks to files:
−o opt
space or time. The default is time.
The number of alternate blocks per disk cylinder (SCSI devices
−a apc
only) to reserve for bad block placement. The default is 0.
(Rotational delay) The expected minimum number of
−d gap
milliseconds it takes the CPU to complete a data transfer and
initiate a new data transfer on the same disk cylinder. The
default is zero.
The number of different rotation positions in which to divide a
−n nrpos
cylinder group. The default is 8.
The maximum number of blocks, belonging to one file, that will
−C maxcontig
be allocated contiguously before inserting a rotational delay. The
default varies from drive to drive. Drives without internal
(track) buffers (or drives/controllers that don’t advertise the
existence of an internal buffer) default to 1. Drives with buffers
default to 7.
This parameter is limited in the following way:
blocksize x maxcontig must be <= maxphys
maxphys is a read-only kernel variable that specifies the
maximum block transfer size (in bytes) that the I/O subsystem
is capable of satisfying. (This limit is enforced by mount, not by
newfs or mkfs.)
This parameter also controls clustering. Regardless of the value
of rotdelay, clustering is enabled only when maxcontig is greater
than 1. Clustering allows higher I/O rates for sequential I/O
and is described in tunefs(1M).
The special character (raw) device file name of the partition to
raw_device
contain the file system. This argument is required.
UFS File System Reference
547
Examples—newfs Command Options and Arguments
This newfs example uses the −N option to display file system information, including
the backup superblocks.
# newfs -N /dev/rdsk/c0t0d0s0
/dev/rdsk/c0t0d0s0:
37260 sectors in 115 cylinders of 9 tracks, 36 sectors
19.1MB in 8 cyl groups (16 c/g, 2.65MB/g, 1216 i/g)
superblock backups (for fsck -b #) at:
32, 5264, 10496, 15728, 20960, 26192, 31424, 36656,
#
The Generic mkfs Command
The generic mkfs command calls a file system-specific mkfs, which then creates a
file system of a specified type on a specified disk slice. Although mkfs can support
different types of file systems, in practice you would use it to create UFS or PCFS file
systems. To make other types of file systems, you would have to write the software
for the file system-specific versions of the mkfs command to use. Normally, you do
not run mkfs directly; it is called by the newfs command.
The generic mkfs command is located in /usr/sbin. See mkfs(1M) for a
description of the arguments and options.
UFS Direct Input/Output (I/O)
Direct I/O is intended to boost bulk I/O operations. Bulk I/O operations use large
buffer sizes to transfer large files (larger than 256 Kbytes).
An example of a bulk I/O operation is downloading satellite data, which writes
large amounts of data to a file. Direct I/O data is read or written into memory
without using the overhead of the operating system’s page caching mechanism.
There is a potential penalty on direct I/O startup. If a file requested for I/O is
already mapped by another application, the pages will have to be flushed out of
memory before the direct I/O operation can begin.
See directio(3C) for more information.
Direct I/O can also be enabled on a file system by using the forcedirectio option
to the mount command. Enabling direct I/O is a performance benefit only when a
file system is transferring large amounts of sequential data.
When a file system is mounted with this option, data is transferred directly between
a user’s address space and the disk. When forced direct I/O is not enabled for a file
system, data transferred between a user’s address space and the disk is first buffered
in the kernel address space.
548
The default behavior is no forced direct I/O on a UFS file system. See
mount_ufs(1M) for more information.
How to Enable Forced Direct I/O on a UFS File
System
1. Become superuser.
2. Mount a file system with the forcedirectio mount option.
# mount -F ufs -o forcedirectio /dev/dsk/c0t3d0s7 /datab
3. Verify the mounted file system has forced direct I/O enabled.
# mount
/export/home on /dev/dsk/c0t3d0s7 read/write/setuid/forcedirectio ...
UFS File System Reference
549
550
CHAPTER
41
Backing Up and Restoring Data Topics
This section provides instructions for backing up and restoring data in the Solaris
environment. This section contains these chapters.
Provides guidelines and planning information on
Chapter 42
backing up and restoring data using the ufsdump and
ufsrestore commands.
Provides step-by-step instructions for backing up
Chapter 43
individual files and complete file systems from local or
remote devices.
Provides step-by-step instructions for restoring
Chapter 44
individual files and complete file systems.
Describes how ufsdump works, and the syntax and
Chapter 45
options for the ufsdump and ufsrestore commands.
Provides step-by-step instructions for copying file
Chapter 46
systems to disk, for using the dd, cpio, and tar
commands with different backup media, and copying
files with a different header format.
Provides step-by-step instructions for how to add a tape
Chapter 47
drive, how to determine the type of tape drive, backup
device names, and working with tape drives and
magnetic tape cartridges.
551
552
CHAPTER
42
Backing Up and Restoring File Systems
(Overview)
This chapter provides guidelines and planning information on backing up and
restoring complete file systems using the ufsdump and ufsrestore commands.
Here is a list of concept information in this chapter.
“Where to Find Backup and Restore Tasks” on page 553
“Definition: Backing Up and Restoring File Systems” on page 554
“Why You Should Back Up File Systems” on page 555
“Choosing a Tape Device” on page 555
“Planning Which File Systems to Back Up” on page 556
“Overview of the Backup and Restore Commands” on page 558
“Choosing the Type of Backup” on page 559
“Guidelines for Scheduling Backups” on page 560
“Sample Backup Schedules” on page 562
Where to Find Backup and Restore Tasks
Use Chapter 43 and Chapter 44 to find step-by-step instructions for backing up and
restoring file systems (using the ufsdump and ufsrestore commands).
553
Definition: Backing Up and Restoring
File Systems
Backing up file systems means copying file systems to removable media (such as
tape) to safeguard against loss, damage, or corruption. Restoring file systems means
copying reasonably current backup files from removable media to a working
directory.
This chapter describes the commands for scheduled backup and restore operations
(ufsdump and ufsrestore); however, other commands are available for copying
files and file systems for sharing or transporting files. The table below provides
pointers to all commands that copy individual files and/or file systems to media.
TABLE 42-1
Commands for Copying Files and File Systems
If You Want To ...
Then Use ...
And Go To ...
Back up complete or individual file
Chapter 43 or Chapter
45
systems to a local or remote tape
ufsdump(1M) command
device
Back up complete file systems for
Solstice BackupTM
Solstice Backup
5.1
all systems on a network from a
software
Administration Guide
server
Back up and restore a NIS+ master
nisbackup(1M) and
Solaris Naming
server
nisrestore(1M)
Administration Guide
commands
Copy, list, and retrieve files on tape
Chapter 46
tar(1), cpio(1), or
Copy, list, and retrieve files on
pax(1) command
diskette
tar(1) command
Copy master disk to a clone disk
dd(1M) command
Chapter 46
Restore complete file systems or
ufsrestore(1M)
Chapter 44
individual files from removable
command
media to a working directory
554
Why You Should Back Up File Systems
Backing up files is one of the most crucial system administration functions. You
should perform regularly scheduled backups to prevent loss of data due to:
System crashes
Accidental deletion of files
Hardware failures
Natural disasters (for example, fire, hurricanes, earthquakes)
Problems when reinstalling or upgrading a system
Choosing a Tape Device
The table below shows typical tape devices used for storing file systems during the
backup process. Capacity depends on the type of drive and the data being written to
the tape. For more detailed information on tape devices, see Chapter 47.
TABLE 42-2
Typical Media for Backing Up File Systems
Media
Capacity
1/2-inch reel tape
140 Mbytes (6250 bpi)
2.5-Gbyte 1/4 inch cartridge (QIC) tape
2.5 Gbytes
DDS3 4-mm cartridge tape (DAT)
12 - 24 Gbytes
14-Gbyte 8-mm cartridge tape
14 Gbytes
35 - 70 Gbytes
DLTTM 7000 1/2-inch cartridge tape
Backing Up and Restoring File Systems (Overview)
555
Planning Which File Systems to Back Up
You should back up all file systems that are critical to users, including file systems
that change frequently. The tables below provide general guidelines on the file
systems to back up for standalone systems and servers.
TABLE 42-3
File Systems to Back Up for Standalone Systems
Consider Backing Up
These File Systems ...
Because ...
And At This Interval ...
root (/) - partition 0
The root (/) file system
At regular intervals.
contains the kernel and
might contain the /var
directory in which
frequently modified files
such as mail and
accounting are kept.
/usr - partition 6, /opt
Installing new software
Occasionally.
and adding new
commands typically
affects the /usr and /opt
file systems. /opt is either
part of root (/) or is its
own file system.
/export/home
The /export/home file
More often than root (/) or /usr,
system contains directories
perhaps as often as once a day,
and subdirectories of all
depending on your site needs.
users on the standalone
system.
During installation of
As your site requires.
/export , /var, or other
file systems
Solaris software, you
might have created these
file systems.
556
TABLE 42-4
File Systems to Back Up for Servers
Consider Backing Up
These File Systems ...
Because ...
And at This Interval ...
root (/) - partition 0
These file systems contain
Once a day to once a month
the kernel, major
depending on your site’s needs.
/export - partition
3
commands, and
root (/) - if you frequently add
executables.
/usr - partition
6
and remove clients and hardware
on the network, you have to
change important files in root (/),
including the kernel configuration
file. In this case, you should do a
full backup on the root (/) file
system between once a week and
once a month. If your site keeps
users’ mail in the /var/mail
directory on a mail server (which
client systems then mount), you
might want to back up root (/)
daily (or /var, if it is a separate
file system).
/export - the root (/) directory
of clients is kept in the /export
file system. Because the
information it contains is similar
to the server’s root directory in
slice 0, it does not change
frequently. You need to back up
only occasionally, unless your site
delivers mail to client systems;
then you should back up /
export more frequently.
/usr and /opt - contents are
fairly static and need to be backed
up once a week to once a month.
/export/home -
The /export/home file
Once a day to once a week.
partition 7
system contains the home
directories and
subdirectories of all the
users on the system; its
files are volatile.
Note - You do not need to back up a server’s /export/swap file system.
Backing Up and Restoring File Systems (Overview)
557
Overview of the Backup and Restore
Commands
The ufsdump and ufsrestore commands are the recommended commands for
scheduled backups of complete file systems. The table below lists the tasks you can
perform with them. For information on how these commands work and their syntax,
see Chapter 45.
TABLE 42-5
Tasks You Can Perform With the ufsdump and ufsrestore Commands
With This
Command ...
You Can ...
Comments
ufsdump
Back up complete or partial file
The tape device can be on any
systems to local or remote tape drives
system in the network to which
the user has access. This
command works quickly because
it is aware of the structure of the
UFS file system type, and works
directly through the raw device
interface.
Back up incremental file system
This enables you to back up only
changes
those files that were changed
since a previous backup.
Back up groups of systems over the
You can run ufsdump from one
network from a single system
system on each remote system
through a remote shell or remote
login, and direct the output to the
system on which the drive is
located. Or, you can pipe the
output to the dd command or a
file.
Automate backups
Use the crontab utility to run a
script that starts the ufsdump
command.
Restrict user access to backup tables
Use the −a option.
Determine the size of a backup
Use the −S option.
without actually doing the backup
Keep a log of when each file system
Use the −u option.
was backed up
558
TABLE 42-5
Tasks You Can Perform With the ufsdump and ufsrestore
Commands (continued)
With This
Command ...
You Can ...
Comments
Verify the contents of the tape against Use the −v option.
the source file system
ufsrestore
Restore individual or complete file
systems from a local or remote tape
drive
Choosing the Type of Backup
With the ufsdump command, you can perform full or incremental backups. The
table below lists the differences between these types of backup procedures.
TABLE 42-6
Differences Between Full and Incremental Backups
Backup Type Copies
Advantages
Disadvantages
Full
A complete file system Everything is in one
Requires large numbers
or directory
place
of backup tapes that
take a long time to
write. Takes longer to
retrieve individual files
because the drive has
to move sequentially to
the point on the tape
where the file is
located. You might
have to search multiple
tapes.
Incremental
Only files in the
Easier to retrieve small Finding which
specified file system
changes in file systems incremental tape
that have changed
contains a file can take
since a previous
time. You might have
backup
to go back to last full
dump.
Backing Up and Restoring File Systems (Overview)
559
Guidelines for Scheduling Backups
A backup schedule is the schedule you establish to run the ufsdump command. This
section provides guidelines on the factors to weigh when creating a backup schedule,
guidelines on how often to back up file systems, and sample backup schedules.
What Drives a Backup Schedule
The schedule you create depends on:
Your need to minimize the number of tapes
Time available for doing backups
Time available to do a full restore of a damaged file system
Time available for retrieving individual files that are accidentally deleted
How Often Should You Do Backups?
If you do not need to minimize time and media spent on backups, you can do full
backups every day. However, this is not realistic for most sites, so incremental
backups are used most often. In this case, you should back up your site enough to
restore files from the last four weeks. This requires at least four sets of tapes—one for
each week, which you would reuse each month. In addition, you should archive the
monthly backups for at least a year, and then keep yearly backups for a number of
years.
Using Dump Levels to Create Incremental Backups
The dump level you specify in the ufsdump command (0-9) determines which files
are backed up. Specifying dump level 0 creates a full backup. Numbers 1-9 are used
to schedule incremental backups, but have no defined meanings. Numbers 1-9 are just
a range of numbers used to schedule cumulative or discrete backups. The only
meaning levels 1-9 have is in relationship to each other, as a higher or lower number.
The following examples show the flexibility of the incremental dump procedure
using levels 1-9.
560
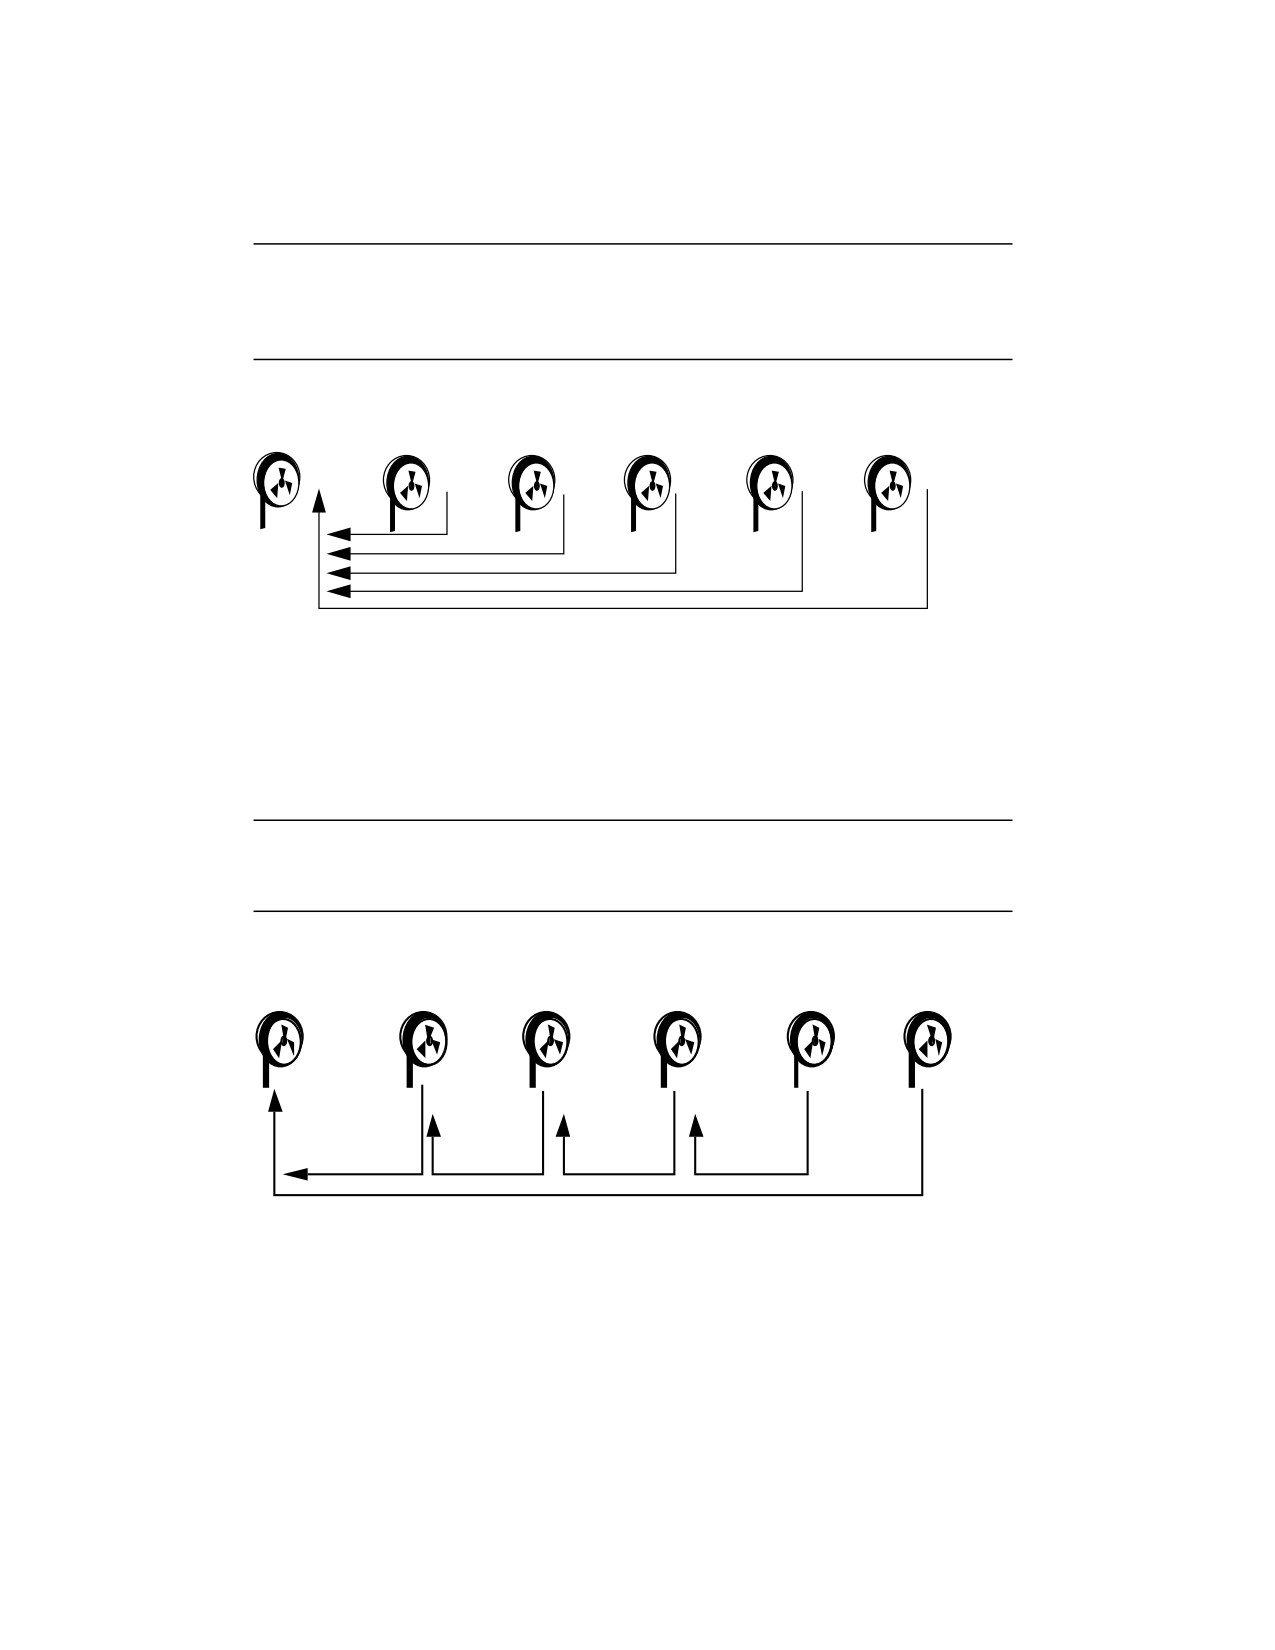
Dump Levels for Daily, Cumulative Backups
Doing daily, cumulative incremental backups is the most commonly used backup
scheme and is recommended for most situations. The following example shows a
schedule using a level 9 dump each day, and a level 5 dump on Friday to restart the
process.
Note - In the following example, you could have used other numbers in the 1-9
range to produce the same results. The key is having the same number each day,
with any lower number on Friday. For example, you could have specified levels 4, 4,
4, 4, 2 or 7, 7, 7, 7, 5.
Monthly
Monday
Tuesday
Wednesday
Thursday
Friday
0
9
9
9
9
5
Figure 42-1
Incremental Backup: Daily Cumulative
Dump Levels for Daily, Discrete Backups
The following example shows a schedule where you capture only a day’s work on
different tapes. In this case, sequential dump level numbers are used during the
week (3,4,5,6) with a lower number (2) on Friday.
Note - In the following example, you could have used the sequence 6,7,8,9 followed
by 2, or 5,6,7,8 followed by 3. Remember, the numbers themselves have no defined
meaning; you attribute meaning by ordering them in a high/low sequence.
Monthly
Monday
Tuesday
Wednesday
Thursday
Friday
0
3
4
5
6
2
Figure 42-2
Incremental Backup: Daily Discrete
Backing Up and Restoring File Systems (Overview)
561
Sample Backup Schedules
This section provides sample backup schedules. All schedules assume you begin
with a full backup (level 0), and that you use the −u option to record each backup.
Example—Daily Cumulative, Weekly Cumulative
Backups
The table below shows the most commonly used incremental backup schedule; it is
recommended for most situations. With this schedule:
All files that have changed since the lower-level backup at the end of the previous
week are saved each day.
For each weekday level 9 backup, the previous level 0 or level 5 is the closest
backup at a lower level. Therefore, each weekday tape contains all the files
changed since the end of the previous week (or the initial level 0 for the first
week).
For each Friday level 5 backup, the nearest lower-level backup is the level 0 done
at the beginning of the month. Therefore, each Friday’s tape contains all the files
changed during the month to that point.
TABLE 42-7
Daily Cumulative/Weekly Cumulative Backup Schedule
Floating
Mon
Tues
Wed
Thurs
Fri
1st of Month
0
Week 1
9
9
9
9
5
Week 2
9
9
9
9
5
Week 3
9
9
9
9
5
Week 4
9
9
9
9
5
The table below shows how the contents of the tapes can change across two weeks
using the previous schedule. Each letter represents a different file.
562