Sun Microsystems System Administration Guide, Volume 1 (2000) - page 14
Determine a file system’s type by using the grep command.
$ grep mount-point fs-table
mount-point
Specifies the mount point name of the file system for
which you want to know the type. For example, the /
var directory.
Specifies the absolute path to the file system table in
fs-table
which to search for the file system’s type. If the file
system is mounted, fs-table should be /etc/mnttab.
If it isn’t mounted, fs-table should be /etc/vfstab.
Information for the mount point is displayed.
Note - If you have the raw device name of a disk slice, you can use the fstyp(1M)
command to determine a file system’s type (if the disk slice contains a file system).
Example—Determining a File System’s Type
The following example uses the /etc/vfstab to determine the type of the
/export file system.
$ grep /export /etc/vfstab
/dev/dsk/c0t3d0s6
/dev/rdsk/c0t3d0s6
/export ufs
2
yes
-
$
The following example uses the /etc/mnttab file to determine the file system type
of the currently mounted diskette (mounted by volume management).
$ grep /floppy /etc/mnttab
/vol/dev/diskette0/unnamed_floppy
/floppy/
unnamed_floppy pcfs rw,nohidden,
nofoldcase,dev=16c0009
89103376
$
Managing File Systems (Overview)
431
432
CHAPTER
35
Creating File Systems (Tasks)
This chapter describes how to create UFS, TMPFS, and LOFS file systems. For UFS
file systems, this chapter shows you how to create a file system on a hard disk using
the newfs command. Because TMPFS and LOFS are virtual file systems, you
actually “access” them by mounting them.
This is a list of the step-by-step instructions in this chapter.
“How to Create a UFS File System” on page 435
“How to Create a TMPFS File System” on page 437
“How to Create a LOFS File System” on page 438
Note - For instructions on how to create UFS and DOS file systems on removable
media, see Chapter 14.
Creating a UFS File System
Before you can create a UFS file system on a disk, the disk must be formatted and
divided into slices. A disk slice is a physical subset of a disk that is composed of a
single range of contiguous blocks. A slice can be used either as a raw device that
provides, for example, swap space, or to hold a disk-based file system. See Chapter
28 for complete information on formatting disks and dividing disks into slices.
Logical volume management products, like Solstice DiskSuite, create more
sophisticated meta devices, that expand beyond single slice or single disk boundaries.
See Solstice DiskSuite
4.2.1
User’s Guide for more information about meta devices.
433
Note - Solaris device names use the term slice (and the letter s in the device name)
to refer to the slice number. Slices are also called “partitions.”
You need to create UFS file systems only occasionally, because the Solaris operating
environment automatically creates them as part of the installation process. You need
to create (or re-create) a UFS file system when you:
Add or replace disks
Change the existing partitioning structure
Do a full restoration of a file system
The newfs command is the standard way to create UFS file systems. The
newfs(1M) command is a convenient front-end to the mkfs(1M) command, which
actually creates the new file system. The newfs command reads parameter defaults,
such as tracks per cylinder and sectors per track, from the disk label that will contain
the new file system, and the options you choose are passed to the mkfs command to
build the file system.
File System Parameters
To make a new file system on a disk slice, you almost always use the newfs
command. The table below shows the default parameters used by the newfs
command.
TABLE 35-1
Default Parameters Used by the newfs Command
Parameter
Default Value
Block size
8 Kbytes
Fragment size
1 Kbyte
Minimum free space
((64 Mbytes/partition size) * 100), rounded down to the
nearest integer and limited to between 1% and 10%,
inclusively
Rotational delay
Zero
Optimization type
Time
Number of inodes
1 for each 2 Kbytes of data space
434
How to Create a UFS File System
1.
Make sure you have met the following prerequisites:
The disk must be formatted and divided into slices before you can create UFS
file systems on it. See Chapter 28 for complete information on formatting disks
and dividing disks into slices.
You need to know the device name of the slice that will contain the file system.
See Chapter 29 for information on finding disks and disk slice numbers.
If you are re-creating an existing UFS file system, unmount it.
You must be superuser.
2.
Create the UFS file system.
# newfs [-N] [-b size] [-i bytes] /dev/rdsk/device-name
Displays what parameters newfs would pass to mkfs
−N
without actually creating the file system. This is a good
way to test the newfs command.
Specifies the file system block size, either 4096 or 8192
−b size
bytes per block. The default is 8192.
Specifies the number of bytes per inode. The default
−i bytes
varies depending on the disk size. See newfs(1M) for
more information.
Specifies the disk device name on which to create the new
device-name
file system.
The system asks for confirmation.
Caution - Be sure you have specified the correct device name for the slice before
performing the next step. If you specify the wrong slice, you will erase its contents
when the new file system is created. This might cause the system to panic.
3. To verify the creation of the UFS file system, check the new file system with
the fsck(1M) command.
# fsck /dev/rdsk/device-name
Creating File Systems (Tasks)
435
device-name
Specifies the name of the disk device containing the new
file system.
The fsck command checks the consistency of the new file system, reports
problems it finds, and prompts you before repairing the problems. See Chapter 39
for more information on fsck.
Example—Creating a UFS File System
The following example creates a UFS file system on /dev/rdsk/c0t1d0s7.
# newfs /dev/rdsk/c0t1d0s7
/dev/rdsk/c0t1d0s7:
725760 sectors in 720 cylinders of 14 tracks, 72 sectors
354.4MB in 45 cyl groups (16 c/g, 7.88MB/g, 3776 i/g)
super-block backups (for fsck -F ufs -o b=#) at:
32, 16240, 32448, 48656, 64864, 81072, 97280, 113488, 129696, 145904, 162112,
178320, 194528, 210736, 226944, 243152, 258080, 274288, 290496, 306704,
322912, 339120, 355328, 371536, 387744, 403952, 420160, 436368, 452576,
468784, 484992, 501200, 516128, 532336, 548544, 564752, 580960, 597168,
613376, 629584, 645792, 662000, 678208, 694416, 710624,
#
Where to Go From Here
To mount the file system and make it available, go to Chapter 36.
Creating a Temporary File System
(TMPFS)
The Temporary File System (TMPFS) uses local memory for file system reads and
writes, which is typically much faster than a UFS file system. Using TMPFS file
systems can improve system performance by saving the cost of reading and writing
temporary files to a local disk or across the network. Files in TMPFS file systems do
not survive across reboots or unmounts.
If you create multiple TMPFS file systems, be aware that they all use the same
system resources. Files created under one TMPFS file system use up the space
available for any other TMPFS, unless you limit TMPFS sizes using the −o size
option of the mount command.
See the tmpfs(7FS) man page for more information.
436
How to Create a TMPFS File System
1. Become superuser.
2. If necessary, create the directory where you want to mount the TMPFS file
system and set permissions and ownership as necessary.
3. Create a TMPFS file system.
To set up the system to automatically create a TMPFS file system when it boots,
see “Example—Creating a TMPFS File System at Boot Time” on page 437.
# mount -F tmpfs [-o size=number ] number swap mount-point
Specifies the size of the TMPFS file system in Mbytes.
−o size=number
The directory on which the TMPFS file system is mounted.
mount-point
4. Look at the output from the mount command to verify that the TMPFS file
system has been created.
# mount -v
Example—Creating a TMPFS File System
The following example creates a new directory, /export/reports, and mounts a
TMPFS file system at that point, limiting it to 50 Mbytes.
# mkdir /export/reports
# chmod 777 /export/reports
# mount -F tmpfs -o size=50 swap /export/reports
Example—Creating a TMPFS File System at Boot Time
You can set up the system to automatically create a TMPFS file system when it boots
by adding an entry to the /etc/vfstab file. The following example shows an entry
in the /etc/vfstab file that will create a TMPFS file system on /export/test
when the system boots. Since the size=number option is not specified, the size of the
TMPFS file system on /export/test is limited only by the available system
resources.
Creating File Systems (Tasks)
437
swap - /export/test tmpfs
- yes
-
For more information the /etc/vfstab file, see “The /etc/vfstab Field
Descriptions” on page 446.
Creating a Loopback File System (LOFS)
A LOFS file system is a virtual file system that provides an alternate path to an
existing file system. When other file systems are mounted onto a LOFS file system,
the original file system does not change.
See the lofs(7FS) man page for more information.
Caution - Be careful when creating LOFS file systems. Because these are virtual file
systems, the potential for confusing both users and applications is enormous.
How to Create a LOFS File System
1. Become superuser.
2. Create the directory where you want to mount the LOFS file system and give it
the appropriate permissions and ownership.
3. Create a LOFS file system.
To set up the system to automatically create a TMPFS file system when it boots,
see “Example—Creating a LOFS File System at Boot Time” on page 439.
# mount -F lofs loopback-directory mount-point
Specifies the file system to be mounted on the loopback
loopback-directory
mount point.
mount-point
Specifies the directory on which to mount the LOFS file
system.
4. Look at the output from the mount command to verify that the LOFS file
system has been created.
438
# mount -v
Example—Creating a LOFS File System
The following example illustrates how to mount and test new software as a loopback
file system without actually having to install it.
# mkdir /tmp/newroot
# mount -F lofs /new/dist /tmp/newroot/usr/local
# chroot /tmp/newroot command
Example—Creating a LOFS File System at Boot Time
You can set up the system to automatically create a LOFS file system when it boots
by adding an entry to the end of the /etc/vfstab file. The following example
shows an entry in the /etc/vfstab file that will create a LOFS file system for the
root (/) file system on /tmp/newroot.
/ - /tmp/newroot lofs
- yes
-
Caution - Make sure the loopback entries are the last entries in the /etc/vfstab
file. Otherwise, if the /etc/vfstab entry for a loopback file system precedes the file
systems to be included in it, the loopback file system cannot be created.
For more information the /etc/vfstab file, see “The /etc/vfstab Field
Descriptions” on page 446.
Creating File Systems (Tasks)
439
440
CHAPTER
36
Mounting and Unmounting File
Systems (Tasks)
This chapter describes how to mount and unmount file systems. This is a list of the
step-by-step instructions in this chapter.
“How to Determine Which File Systems Are Mounted” on page 445
“How to Add an Entry to the /etc/vfstab File” on page 447
“How to Mount a File System (/etc/vfstab File)” on page 449
“How to Mount All File Systems (/etc/vfstab File)” on page 449
“How to Mount a UFS File System” on page 451
“How to Mount an NFS File System” on page 454
“IA: How to Mount a System V (S5FS) File System” on page 454
“IA: How to Mount a PCFS (DOS) File System From a Hard Disk” on page 455
“How to Stop All Processes Accessing a File System” on page 457
“How to Unmount a File System” on page 458
“How to Unmount All File Systems (/etc/vfstab File)” on page 459
Mounting File Systems
After you create a file system, you need to make it available to the system so you can
use it. You make a file system available by mounting it, which attaches the file
system to the system directory tree at the specified mount point. The root (/) file
system is always mounted. Any other file system can be connected or disconnected
from the root (/) file system.
441
The table below provides guidelines on mounting file systems based on how you use
them.
TABLE 36-1
Determining How to Mount File Systems
If You Need to Mount ...
Then You Should Use ...
Local or remote file systems infrequently
The mount command entered manually
from the command line.
Local file systems frequently
The /etc/vfstab file, which will mount
the file system automatically when the
system is booted in multi-user state.
The /etc/vfstab file, which will
Remote file systems frequently, such as home
directories
automatically mount the file system
when the system is booted in multi-user
state.
AutoFS, which will automatically mount
or unmount the file system when you
change into (mount) or out of (unmount)
the directory.
To enhance performance, you can also cache
the remote file systems by using CacheFS.
You can mount a CD-ROM containing a file system by simply inserting it into the
drive (Volume Management will automatically mount it). You can mount a diskette
containing a file system by inserting it into the drive and running the volcheck(1)
command. See Chapter 14 for more information.
Commands Used to Mount and Unmount File
Systems
The table below lists the commands in the /usr/sbin directory that you use to
mount and unmount file systems.
442
TABLE 36-2
Commands for Mounting and Unmounting File Systems
Command
Description
Mounts file systems and remote resources.
mount(1M)
Mounts all file systems specified in the /etc/vfstab file. The
mountall(1M)
mountall command is run automatically when entering
multiuser run states.
Unmounts file systems and remote resources.
umount(1M)
Unmounts all file systems specified in the /etc/vfstab file.
umountall(1M)
The mount commands will not mount a read/write file system that has known
inconsistencies. If you receive an error message from the mount or mountall
command, you might need to check the file system. See Chapter 39 for information
on how to check the file system.
The umount commands will not unmount a file system that is busy. A file system is
considered busy if a user is accessing a file or directory in the file system, if a
program has a file open in that file system, or if the file system is shared.
Commonly Used Mount Options
The table below describes the commonly used mount options that you can specify
with the −o option of the mount command. If you specify multiple options, separate
them with commas (no spaces). For example, −o ro,nosuid.
For a complete list of mount options for each file system type, refer to the specific
mount command man pages (for example, mount_ufs(1M)).
Mounting and Unmounting File Systems (Tasks)
443
TABLE 36-3
Commonly Used −o Mount Options
Option
File System
Description
bg | fg
NFS
If the first attempt fails, retries in the
background (bg) or in the foreground (fg).
This option is safe for non-critical vfstab
entries. The default is fg.
hard | soft
NFS
Specifies the procedure if the server does not
respond. soft indicates that an error is
returned. hard indicates that the retry request
is continued until the server responds. The
default is hard.
intr | nointr
NFS
Specifies whether keyboard interrupts are
delivered to a process that is hung while
waiting for a response on a hard-mounted file
system. The default is intr (interrupts
allowed).
largefiles |
UFS
Enables you to create files larger than 2 Gbytes.
nolargefiles
The largefiles option means that a file
system mounted with this option might contain
files larger than 2 Gbytes, but it is not a
requirement. The default is largefiles. If the
nolargefiles option is specified, the file
system could not be mounted on a system
running Solaris 2.6 or compatible versions.
logging |
UFS
Enables logging for the file system. UFS logging
nologging
is the process of storing transactions (changes
that make up a complete UFS operation) into a
log before the transactions are applied to the
UFS file system. Logging helps prevent UFS
file systems from becoming inconsistent, which
means fsck can be bypassed. Bypassing fsck
reduces the time to reboot a system if it crashes,
or after a system is shutdown uncleanly.
The log is allocated from free blocks on the file
system, and is sized approximately 1 Mbyte
per 1 Gbyte of file system, up to a maximum of
64 Mbytes. The default is nologging.
noatime
UFS
Suppresses access time updates on files, except
when they coincide with updates to the ctime
or mtime. See stat(2). This option reduces
disk activity on file systems where access times
are unimportant (for example, a Usenet news
spool). The default is normal access time
(atime) recording.
444
TABLE 36-3
Commonly Used −o Mount Options
(continued)
Option
File System
Description
remount
All
Changes the mount options associated with an
already-mounted file system. This option can
generally be used with any option except ro,
but what can be changed with this option is
dependent on the file system type.
retry=n
NFS
Retries the mount operation when it fails. n is
the number of times to retry.
ro | rw
CacheFS, NFS,
Specifies read/write or read-only. If you do not
PCFS, UFS, S5FS
specify this option, the default is read/write.
The default option for HSFS is ro.
suid | nosuid
CacheFS, HSFS,
Allows or disallows setuid execution. The
NFS, S5FS, UFS
default is to allow setuid execution.
How to Determine Which File Systems Are
Mounted
You can determine which file systems are mounted by using the mount command.
$ mount [ -v ]
Displays the list of mounted file systems in verbose mode.
−v
Example—Determining Which File Systems Are Mounted
$ mount
/ on /dev/dsk/c0t0d0s0 read/write/setuid/intr/largefiles/onerror=panic on ...
/usr on /dev/dsk/c0t0d0s6 read/write/setuid/intr/largefiles/onerror=panic on ...
/proc on /proc read/write/setuid on Fri Sep 10 16:09:48 1999
/dev/fd on fd read/write/setuid on Fri Sep 10 16:09:51 1999
/etc/mnttab on mnttab read/write/setuid on Fri Sep 10 16:10:06 1999
/var/run on swap read/write/setuid on Fri Sep 10 16:10:06 1999
/tmp on swap read/write/setuid on Fri Sep 10 16:10:09 1999
/export/home on /dev/dsk/c0t0d0s7 read/write/setuid/intr/largefiles/onerror=panic ...
$
Mounting and Unmounting File Systems (Tasks)
445
Mounting File Systems (/etc/vfstab
File)
The /etc/vfstab Field Descriptions
An entry in the /etc/vfstab file has seven fields, which are described in the table
below.
TABLE 36-4
/etc/vfstab Field Descriptions
Field Name
Description
The block device name for a local UFS file system (for example, /
device to mount
dev/dsk/c0t0d0s0).
The resource name for a remote file system (for example,
myserver:/export/home). For more information about NFS, see
System Administration Guide, Volume
3.
The block device name of the slice on which to swap (for example,
/dev/dsk/c0t3d0s1).
The /proc directory for the proc file system type.
device to fsck
The raw (character) device name that corresponds to the UFS file
system identified by the device to mount field (for example, /dev/
rdsk/c0t0d0s0). This determines the raw interface that is used by
fsck. Use a dash (-) when there is no applicable device, such as for a
read-only file system or a remote file system.
mount point
Identifies where to mount the file system (for example, /usr).
FS type
The type of file system identified by the device to mount field.
446
TABLE 36-4
/etc/vfstab Field Descriptions
(continued)
Field Name
Description
fsck pass
The pass number used by fsck to decide whether to check a file
system. When the field contains a dash (-), the file system is not
checked.
When the field contains a zero, UFS file systems are not checked but
non-UFS file systems are checked. When the field contains a value
greater than zero, the file system is always checked.
All file systems with a value of 1 in this field, are checked one at a
time in the order they appear in the vfstab file. When fsck is run on
multiple UFS file systems that have fsck pass values greater than one
and the preen option (−o p) is used, fsck automatically checks the file
systems on different disks in parallel to maximize efficiency.
Otherwise, the value of the pass number does not have any effect.
The fsck pass field does not explicitly specify the order in which file
systems are checked, other than as described above.
Set to yes or no for whether the file system should be automatically
mount at boot
mounted by mountall when the system is booted. Note that this field
has nothing to do with AutoFS. The root (/), /usr and /var file
systems are not mounted from the vfstab file initially. This field
should always be set to no for these file systems and for virtual file
systems such as /proc and /dev/fd.
A list of comma-separated options (with no spaces) that are used in
mount options
mounting the file system. Use a dash (-) to indicate no options. See
Table 36-3 for a list of commonly used mount options.
Note - You must have an entry in each field in the /etc/vfstab file. If there is no
value for the field, be sure to enter a dash (-), otherwise the system might not boot
successfully. Similarly, white space should not be used in a field value.
How to Add an Entry to the /etc/vfstab File
1. Become superuser.
Also, there must be a mount point on the local system to mount a file system. A
mount point is a directory to which the mounted file system is attached.
2. Edit the /etc/vfstab file and add an entry.
Mounting and Unmounting File Systems (Tasks)
447

Note - Since the root (/) file system is mounted read-only by the kernel during
the boot process, only the remount option (and options that can be used in
conjunction with remount) affect the root (/) entry in the /etc/vfstab file.
See Table 36-4 for detailed information about the /etc/vfstab field entries.
Make sure that you:
Separate each field with white space (a space or a tab).
Enter a dash (-) if a field has no contents.
3. Save the changes.
Examples—Adding an Entry to the /etc/vfstab File
The following example mounts the disk slice /dev/dsk/c0t3d0s7 as a UFS file
system attached to the mount point directory /files1 with the default mount
options (read/write). It specifies the raw character device /dev/rdsk/c0t3d0s7 as
the device to fsck. The fsck pass value of 2 means that the file system will be
checked, but not sequentially.
#device
device
mount
FS
fsck
mount
mount
#to mount
to fsck
point
type
pass
at boot
options
#
/dev/dsk/c0t3d0s7 /dev/rdsk/c0t3d0s7 /files1
ufs
2
yes
-
The following example mounts the directory /export/man from the system pluto
as an NFS file system on mount point /usr/man. It does not specify a device to
fsck or a fsck pass because it’s an NFS file system. In this example, mount
options are ro (read-only) and soft. For greater reliability, specify the hard
mount option for read/write NFS file systems.
#device
device
mount
FS
fsck
mount
mount
#to mount
to fsck
point
type
pass
at boot
options
pluto:/export/man
-
/usr/man nfs
-
yes
ro,soft
The following example mounts the root (/) file system on a loopback mount point
named /tmp/newroot. It specifies yes for mount at boot, no device to fsck,
and no fsck pass number. LOFS file systems must always be mounted after the
file systems used to make up the LOFS file system.
448

#device
device
mount
FS
fsck
mount
mount
#to mount
to fsck
point
type
pass
at boot
options
#
/
-
/tmp/
newroot lofs -
yes
-
How to Mount a File System (/etc/vfstab File)
1. Become superuser.
Also, there must be a mount point on the local system to mount a file system. A
mount point is a directory to which the mounted file system is attached.
2. Mount a file system listed in the /etc/vfstab file.
# mount mount-point
Specifies an entry in the mount point or device to
mount-point
mount field in the /etc/vfstab file. It is usually easier
to specify the mount point.
Example—Mounting a File System (/etc/vfstab File)
The following example mounts the /usr/dist file system listed in the
/etc/vfstab file.
# mount /usr/dist
How to Mount All File Systems (/etc/vfstab
File)
1. Become superuser.
Also, there must be a mount point on the local system to mount a file system. A
mount point is a directory to which the mounted file system is attached.
2. Mount the file systems listed in the /etc/vfstab file.
# mountall [-l | -r] [-F fstype]
If no options are specified, all file systems listed in the /etc/vfstab file with
yes in the mount at boot field are mounted.
Mounting and Unmounting File Systems (Tasks)
449
Mounts all the local file systems listed in the /etc/
−l
vfstab file with yes in the mount at boot field.
Mounts all the remote file systems listed in the /etc/
−r
vfstab file with yes in the mount at boot field.
Mounts all file systems of the specified type listed in the /
−F fstype
etc/vfstab file with yes in the mount at boot field.
All the file systems with a device to fsck entry are checked and fixed, if
necessary, before mounting.
Examples—Mounting All File Systems (/etc/vfstab File)
The following example shows the messages displayed if file systems are already
mounted when you use the mountall command.
# mountall
/dev/rdsk/c0t0d0s7 already mounted
mount: /tmp already mounted
mount: /dev/dsk/c0t0d0s7 is already mounted, /export/home is busy,
or the allowable number of mount points has been exceeded
The following example mounts all the local systems listed in the /etc/vfstab file.
# mountall -l
# mount
/ on /dev/dsk/c0t0d0s0 read/write/setuid/intr/largefiles/onerror=panic on ...
/usr on /dev/dsk/c0t0d0s6 read/write/setuid/intr/largefiles/onerror=panic on ...
/proc on /proc read/write/setuid on Fri Sep 10 16:09:48 1999
/dev/fd on fd read/write/setuid on Fri Sep 10 16:09:51 1999
/etc/mnttab on mnttab read/write/setuid on Fri Sep 10 16:10:06 1999
/var/run on swap read/write/setuid on Fri Sep 10 16:10:06 1999
/tmp on swap read/write/setuid on Fri Sep 10 16:10:09 1999
/export/home on /dev/dsk/c0t0d0s7 read/write/setuid/intr/largefiles/onerror=panic on ...
The following example mounts all the remote file systems listed in the
/etc/vfstab file.
450
# mountall -r
# mount
/ on /dev/dsk/c0t0d0s0 read/write/setuid/intr/largefiles/
onerror=panic on ...
/usr on /dev/dsk/c0t0d0s6 read/write/setuid/intr/largefiles/
onerror=panic on ...
/proc on /proc read/write/setuid on Fri Sep 10 16:09:48 1999
/dev/fd on fd read/write/setuid on Fri Sep 10 16:09:51 1999
/etc/mnttab on mnttab read/write/setuid on Fri Sep 10 16:10:06 1999
/var/run on swap read/write/setuid on Fri Sep 10 16:10:06 1999
/tmp on swap read/write/setuid on Fri Sep 10 16:10:09 1999
/export/home on /dev/dsk/c0t0d0s7 read/write/setuid/intr/largefiles/
onerror=panic on ...
/usr/dist on mars:/usr/dist remote/read/write/
setuid on Tue Sep 14 15:32:18 1999
Mounting File Systems (mount
Command)
How to Mount a UFS File System
1. Become superuser.
Also, there must be a mount point on the local system to mount a file system. A
mount point is a directory to which the mounted file system is attached.
2. Mount the UFS file system by using the mount command.
# mount [-o mount-options] /dev/dsk/device-name mount-point
Mounting and Unmounting File Systems (Tasks)
451
Specifies mount options that you can use to mount a UFS
−o mount-options
file system. See Table 36-3 or mount_ufs(1M) for a list
of options.
Specifies the disk device name for the slice holding the file
/dev/dsk/device-name
system (for example, /dev/dsk/c0t3d0s7). See “How
to Display Disk Slice Information” on page 344 to get slice
information for a disk.
Specifies the directory on which to mount the file system.
mount-point
Example—Mounting a UFS File System
The following example mounts /dev/dsk/c0t3d0s7 on the /files1 directory.
# mount /dev/dsk/c0t3d0s7 /files1
Example—Mounting a UFS File System With Logging Enabled
UFS logging eliminates file system inconsistency, which can significantly reduce the
time of system reboots. The following example mounts /dev/dsk/c0t3d0s7 on the
/files1 directory with logging enabled.
# mount -o logging /dev/dsk/c0t3d0s7 /files1
How to Remount a UFS File System Without
Large Files
When you mount a file system, the largefiles option is selected by default, which
enables you to create files larger than 2 Gbytes. Once a file system contains large
files, you cannot remount the file system with the nolargefiles option or mount it
on a system running Solaris 2.6 or compatible versions, until you remove any large
files and run fsck to reset the state to nolargefiles.
This procedure assumes that the file system is in the /etc/vfstab file.
1. Become superuser.
2. Make sure there are no large files in the file system.
452

# cd mount-point
# find . -xdev -size +20000000 -exec ls -l {} \;
mount-point
Specifies the mount point of the file system you want to
check for large files.
If large files exist within this file system, they must be removed or moved to
another file system.
3. Unmount the file system.
# umount mount-point
4. Reset the file system state.
# fsck mount-point
5. Remount the file system with the nolargefiles option.
# mount -o nolargefiles mount-point
Example—Mounting a File System Without Large Files
The following example checks the /datab file system and remounts it with the
nolargefiles option.
# cd /datab
# find . -xdev -size +20000000 -exec ls -l {} \;
# umount /datab
# fsck /datab
# mount -o nolargefiles /datab
Mounting and Unmounting File Systems (Tasks)
453
How to Mount an NFS File System
1. Become superuser.
Also, there must be a mount point on the local system to mount a file system. A
mount point is a directory to which the mounted file system is attached.
2. Make sure the resource (file or directory) is available from a server.
To mount an NFS file system, the resource must be made available on the server
by using the share command. See System Administration Guide, Volume 3 for
information on how to share resources.
3. Mount the NFS file system by using the mount command.
# mount -F nfs [-o mount-options] server:/directory mount-point
Specifies mount options that you can use to mount an
−o mount-options
NFS file system. See Table 36-3 for the list of commonly
used mount options or mount_nfs(1M) for a complete
list of options.
Specifies the server’s host name that contains the shared
server:/directory
resource, and the path to the file or directory to mount.
Specifies the directory on which to mount the file system.
mount-point
Example—Mounting an NFS File System
The following example mounts the /export/packages directory on /mnt from the
server pluto.
# mount -F nfs pluto:/export/packages /mnt
IA: How to Mount a System V (S5FS) File System
1. Become superuser.
Also, there must be a mount point on the local system to mount a file system. A
mount point is a directory to which the mounted file system is attached.
2. Mount the S5FS file system by using the mount command.
# mount -F s5fs [-o mount-options] /dev/dsk/device_name mount-point
454
Specifies mount options that you can use to mount a S5FS
−o mount-options
file system. See Table 36-3 for the list of commonly used
mount options or mount_s5fs(1M) for a complete list of
options.
Specifies the disk device name of the slice holding the file
/dev/dsk/device-name
system (for example, /dev/dsk/c0t3d0s7). See “How
to Display Disk Slice Information” on page 344 to get slice
information for a disk.
Specifies the directory on which to mount the file system.
mount-point
IA: Example—Mounting an S5FS File System
The following example mounts /dev/dsk/c0t3d0s7 on the /files1 directory.
# mount -F s5fs /dev/dsk/c0t3d0s7 /files1
IA: How to Mount a PCFS (DOS) File System
From a Hard Disk
Use the following procedure to mount a PCFS (DOS) file system from a hard disk.
1. Become superuser.
Also, there must be a mount point on the local system to mount a file system. A
mount point is a directory to which the mounted file system is attached.
2. Mount the PCFS file system by using the mount command.
# mount -F pcfs [-o rw | ro] /dev/dsk/device-name:logical-drive mount-point
Mounting and Unmounting File Systems (Tasks)
455
Specifies that you can mount a PCFS file system read/
−o rw | ro
write or read-only. If you do not specify this option, the
default is read/write.
Specifies the device name of the whole disk (for example,
/dev/dsk/device-name
/dev/dsk/c0t0d0p0).
Specifies either the DOS logical drive letter (c through z)
logical-drive
or a drive number 1 through 24. Drive c is equivalent to
drive 1 and represents the Primary DOS slice on the drive;
all other letters or numbers represent DOS logical drives
within the Extended DOS slice.
Specifies the directory on which to mount the file system.
mount-point
Note that the device-name and logical-drive must be separated by a colon.
IA: Examples—Mounting a PCFS (DOS) File System From a
Hard Disk
The following example mounts the logical drive in the Primary DOS slice on the
/pcfs/c directory.
# mount -F pcfs /dev/dsk/c0t0d0p0:c /pcfs/c
The following example mounts the first logical drive in the Extended DOS slice
read-only on /mnt.
# mount -F pcfs -o ro /dev/dsk/c0t0d0p0:2 /mnt
Unmounting File Systems
Unmounting a file system removes it from the file system mount point, and deletes
the entry from the /etc/mnttab file. Some file system administration tasks cannot
be performed on mounted file systems. You should unmount a file system when:
It is no longer needed or has been replaced by a file system that contains more
current software.
You need to check and repair it using the fsck command. See Chapter 39 for
more information about the fsck command.
456

It is a good idea to unmount a file system before doing a complete backup. See
Chapter 43 for more information about doing backups.
Note - File systems are automatically unmounted as part of the system shutdown
procedure.
Prerequisites
The prerequisites to unmounting file systems are:
You must be superuser.
A file system must be available for unmounting. You cannot unmount a file
system that is busy. A file system is considered busy if a user is accessing a
directory in the file system, if a program has a file open in that file system, or if it
is being shared. You can make a file system available for unmounting by:
Changing to a directory in a different file system.
Logging out of the system.
Using the fuser command to list all processes accessing the file system and to
stop them if necessary. See “How to Stop All Processes Accessing a File
System” on page 457 for more details.
Notify users if you need to unmount a file system they are using.
Unsharing the file system
Verifying an Unmounted File System
To verify that you unmounted a file system or a number of file systems, look at the
output from the mount command. This is described in “How to Determine Which
File Systems Are Mounted” on page 445.
How to Stop All Processes Accessing a File System
1. Become superuser.
2. List all the processes that are accessing the file system, so you know which
processes you are going to stop.
# fuser -c [ -u ] mount-point
Mounting and Unmounting File Systems (Tasks)
457

Reports on files that are mount points for file systems and
−c
any files within those mounted file systems.
Displays the user login name for each process ID.
−u
mount-point
The name of the file system for which you want to stop
processes.
3. Stop all processes accessing the file system.
Note - You should not stop a user’s processes without warning.
# fuser -c -k mount-point
A SIGKILL is sent to each process using the file system.
4. Verify that there are no processes accessing the file system.
# fuser -c mount-point
Example—Stopping All Processes Accessing a File System
The following example stops process 4006c that is using the /export/home file
system.
# fuser -c /export/home
/export/home:
4006c
# fuser -c -k /export/home
/export/home:
4006c
# fuser -c /export/home
/export/home:
How to Unmount a File System
Use the following procedure to unmount a file system (except /, /usr, or /var):
458

Note - The root (/), /usr, and /var file systems are special cases. The root (/) file
system can be unmounted only during a shutdown, since the system needs the root
(/) file system to function.
1. Make sure you have met the prerequisites listed on “Prerequisites” on page 457.
2. Unmount the file system.
# umount mount-point
The name of the file system that you want to unmount.
mount-point
This can either be the directory name where the file
system is mounted, the device name path of the file
system, the resource for an NFS file system, or the
loopback directory for LOFS file systems.
Examples—Unmounting a File System
The following example unmounts a local home file system.
# umount /export/home
The following example unmounts the file system on slice 7.
# umount /dev/dsk/c0t0d0s7
How to Unmount All File Systems (/etc/vfstab
File)
Use the following procedure to unmount all the file systems listed in the
/etc/vfstab file, except for the /, /proc, /var, and /usr file systems.
1. Make sure you have met the prerequisites listed on “Prerequisites” on page 457.
2. Unmount all the file systems listed in the /etc/vfstab file.
# umountall
All systems that are unmounted, except those that are busy.
Mounting and Unmounting File Systems (Tasks)
459
3. For the file systems that were busy and not unmounted, make them available
to be unmounted as described in “How to Stop All Processes Accessing a File
System” on page 457.
4. Repeat Step 2 as needed until all file systems are unmounted.
460
CHAPTER
37
The Cache File System (Tasks)
The Cache File System (CacheFS) is a general purpose file system caching
mechanism that improves NFS server performance and scalability by reducing server
and network load. Designed as a layered file system, CacheFS provides the ability to
cache one file system on another. In an NFS environment, CacheFS increases the
client per server ratio, reduces server and network loads and improves performance
for clients on slow links, such as Point-to-Point Protocol (PPP).
The following is a list of the step-by-step instructions in this chapter.
“How CacheFS Works” on page 462
“Setting Up a Cached File System Task Map” on page 463
“How to Create a Cache” on page 464
“How to Specify a File System to Be Mounted in a Cache With mount” on page
465
“How to Mount a File System in a Cache by Editing the /etc/vfstab File” on
page 468
“How to Mount a File System in a Cache With AutoFS” on page 469
“How to Modify File Systems in a Cache” on page 471
“How to Display Information About Cached File Systems” on page 472
“How to Specify Consistency Checking on Demand” on page 473
“How to Delete a Cached File System” on page 473
“How to Check the Integrity of Cached File Systems” on page 475
“CacheFS Statistics” on page 489
“Prerequisites for Setting Up and Viewing the CacheFS Statistics” on page 489
“Setting Up CacheFS Statistics Task Map” on page 490
“How to Set Up the Logging Process” on page 491
461
“Viewing the Cache Size” on page 492
“How to View the Working Set (Cache) Size” on page 492
“Viewing the Statistics” on page 494
“How to View Cache Statistics” on page 494
“The Cache Structure and Behavior” on page 495
“Consistency Checking of Cached File Systems With the Back File System” on
page 496
“Consistency Checking on Demand” on page 496
How CacheFS Works
You create a cache, using the cfsadmin(1M) command, on the client so that file
systems you specify to be mounted in the cache can be accessed by the user locally
instead of across the network. The figure below shows the relationship of the
components involved in using CacheFS.
The back file system is the file system that you specify to be mounted in the cache,
which can be either NFS or HSFS (High Sierra File System). When the user attempts
to access files that are part of the back file system, those files are placed in the cache.
To the user, the initial request to access a file might seem slow, but subsequent uses
of the same file will be faster.
Note - You can mount only file systems that are shared. See share(1M) for
information on sharing file systems.
462
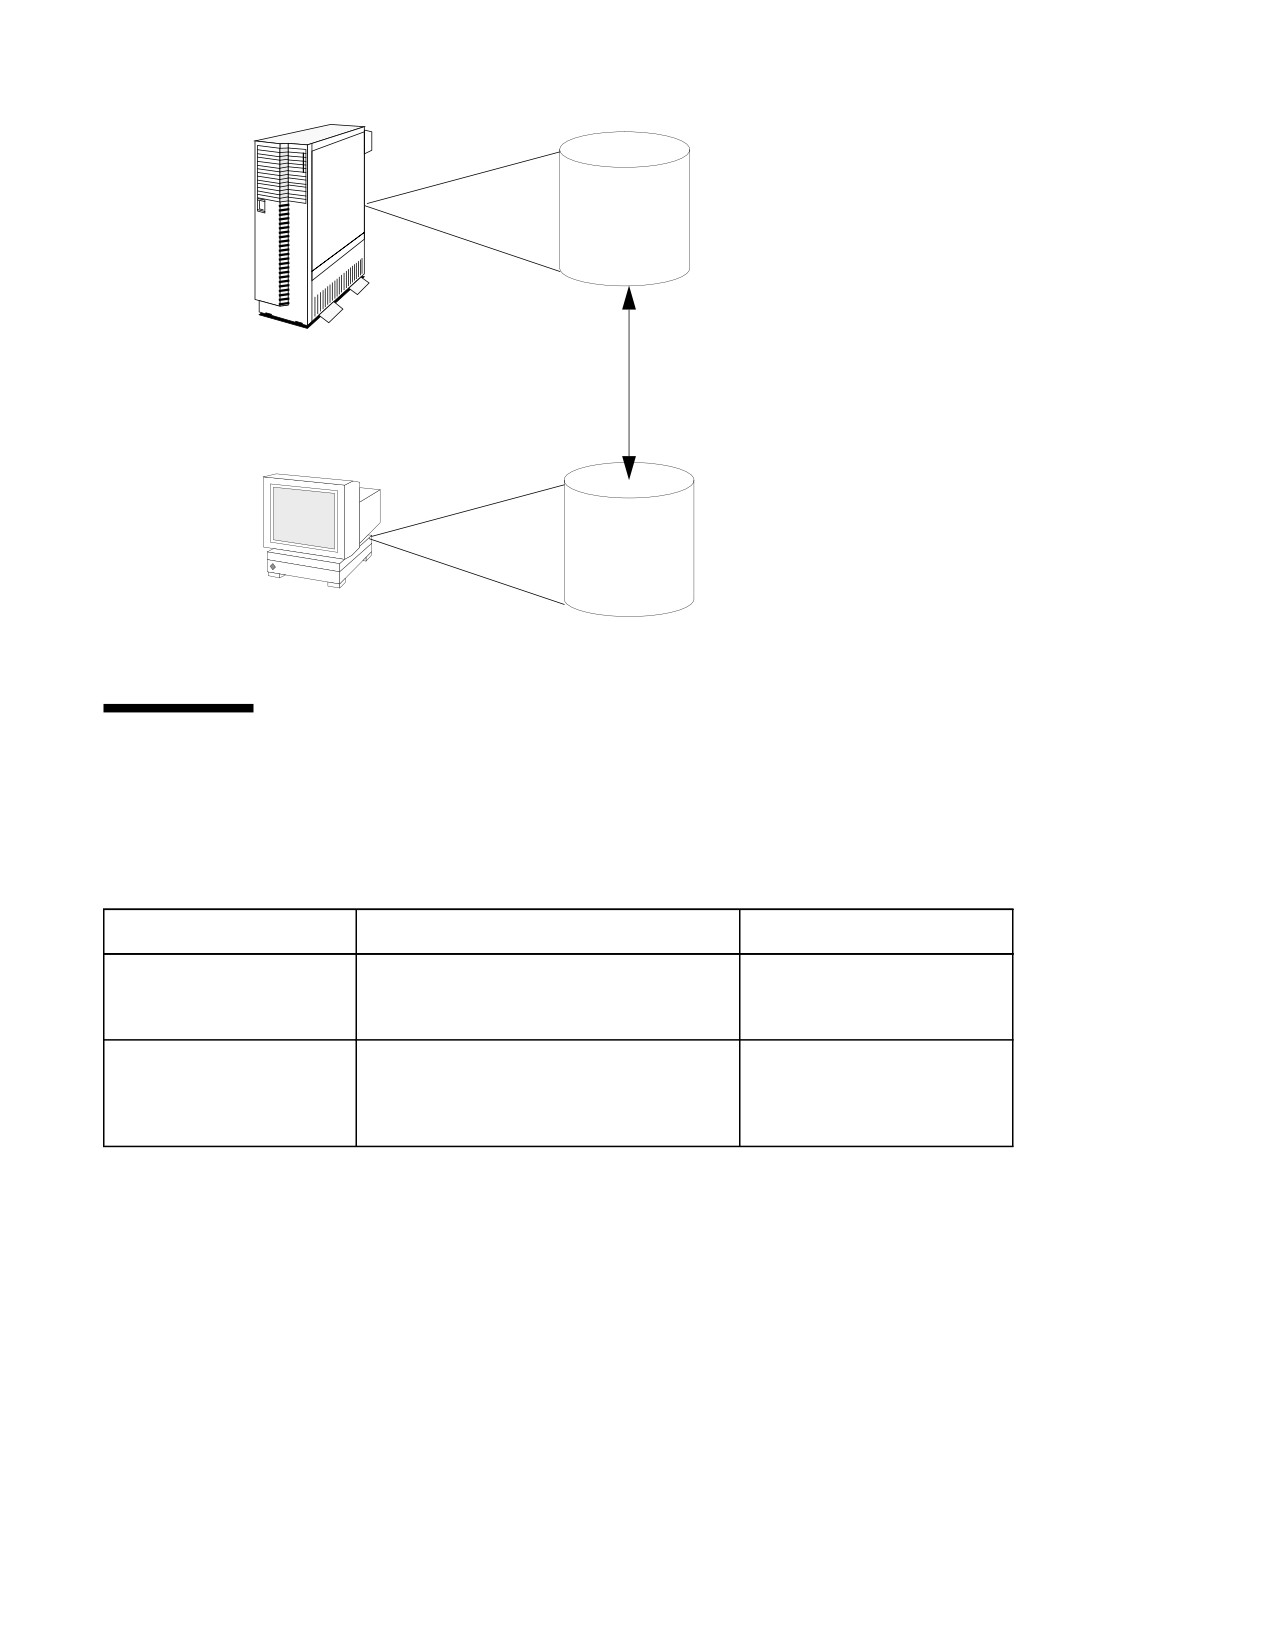
Server
Back file
system
Network
Client
Cached file
systems
Figure 37-1
How CacheFS Works
Setting Up a Cached File System Task
Map
TABLE 37-1
Setting Up a Cached File System Task Map
Task
Description
For Instructions, Go To
1. Create a Cache
Use the cfsadmin command to create a
“How to Create a Cache” on
cache.
page 464
2. Mount File Systems in the
Mount a file system in a cache by using the
“How to Specify a File System
Cache
mount command.
to Be Mounted in a Cache With
mount” on page 465
The Cache File System (Tasks)
463