Sun Microsystems System Administration Guide, Volume 1 (2000) - page 8
If you are not sure whether you have found all users of a PCMCIA memory card
(a renegade shell hidden behind a desktop tool might be accessing it), use the
fuser command, as described in “How to Find Out If a PCMCIA Memory Card
Is Still In Use” on page 232.
2. Eject the PCMCIA memory card.
# eject pcmem0
You’ll have to eject the PCMCIA memory card by hand. If you are running
Windows, look for an onscreen message that says you can now eject the PCMCIA
memory card.
If the PCMCIA memory card is still in use, the following message appears:
/vol/dev/pcmem/noname: Device busy
In this case, return to Step 1 and make sure no one is using the PCMCIA memory
card, then eject it again.
How to Access PCMCIA Memory Cards on Other
Systems
You can access a PCMCIA memory card on another system by mounting it manually
into your file system—provided the other system has shared its PCMCIA memory
card drive according to the instructions in “How to Make Local PCMCIA Memory
Cards Available to Other Systems” on page 235.
1. Select an existing directory to serve as the mount point or create one.
$ mkdir directory
The name of the directory that you create to serve as a
directory
mount point for the other system’s PCMCIA memory
card.
2. Find the name of the PCMCIA memory card you want to mount.
When you manually mount a remote PCMCIA memory card, you cannot use the
pcmem0 or floppy1 variables available with your local PCMCIA memory cards.
You must use the exact PCMCIA memory card name. To find it, use the ls
command on the remote system’s /pcmem directory. If the automounter is
running, you can simply cd to the system whose PCMCIA memory card you
Using PCMCIA Memory Cards From the Command Line (Tasks)
233

want to mount and then use the ls command. If the automounter is not running,
you’ll have to use another method, such as logging in remotely.
3. As superuser, mount the PCMCIA memory card.
# mount -F nfs system-name:/pcmem/PCMCIAmemory-card-name local-mount-point
system-name
The name of the system whose PCMCIA memory card
you want to mount.
PCMCIAmemory-card-name
The name of the PCMCIA memory card you want to
mount.
The local directory onto which you will mount the
local-mount-point
remote PCMCIA memory card.
4. Log out as superuser.
5. Verify that the PCMCIA memory card is indeed mounted by using the ls
command to list the contents of the mount point.
$ ls /pcmem
Example—Accessing PCMCIA Memory Cards on Other
Systems
This example mounts the PCMCIA memory card named myfiles from the remote
system mars onto the /pcmem directory of the local system.
$ cd /net/mars
$ ls /pcmem
pcmem0
myfiles
$ su
Password: password
# mount -F nfs mars:/pcmem/myfiles /pcmem
# exit
$ ls /pcmem
myfiles
234
How to Make Local PCMCIA Memory Cards
Available to Other Systems
You can configure your system to share its PCMCIA memory cards; in other words,
you can make any PCMCIA memory cards in those drives available to other systems.
Once your PCMCIA memory card drives are shared, other systems can access the
PCMCIA memory cards they contain simply by mounting them, as described in
“How to Access PCMCIA Memory Cards on Other Systems” on page 233.
1. Become superuser.
2. Find out whether the NFS daemon (nfsd) is running.
# ps -ef | grep nfsd
root 14533
1 17 10:46:55 ?
0:00 /usr/lib/nfs/nfsd -a 16
root 14656
289
7 14:06:02 pts/3 0:00 grep nfsd
If the daemon is running, a line for /usr/lib/nfs/nfsd will appear, as shown
above. If the daemon is not running, only the grep nfsd line will appear.
3. Select an option from the following table.
If ...
Then ...
nfsd is running
Go to Step 8 on page 236
nfsd is not running
Continue with Step 4 on page 235
4. Create a dummy directory for nfsd to share.
# mkdir /dummy-dir
Can be any directory name; for example, dummy. This
dummy-dir
directory will not contain any files. Its only purpose is
to “wake up” the NFS daemon so that it notices your
shared PCMCIA memory cards.
5. Add the following entry into the /etc/dfs/dfstab file.
share -F nfs -o ro [-d comment] /dummy-dir
Using PCMCIA Memory Cards From the Command Line (Tasks)
235
When you start the NFS daemon, it will see this entry, “wake up,” and notice the
shared PCMCIA memory card drive. Note that the comment (preceded by −d) is
optional.
6. Start the NFS daemon.
# /etc/init.d/nfs.server start
7. Verify that the NFS daemon is indeed running.
# ps -ef | grep nfsd
root 14533
1 17 10:46:55 ?
0:00 /usr/lib/nfs/nfsd -a 16
root 14656
289
7 14:06:02 pts/3 0:00 grep nfsd
8. Eject any PCMCIA memory card currently in the drive.
# eject pcmem0
9. Assign write permissions to /etc/rmmount.conf.
# chmod 644 /etc/rmmount.conf
10. Add the following lines to /etc/rmmount.conf.
# File System Sharing
share floppy*
These lines share any PCMCIA memory card loaded into your system’s PCMCIA
memory card drives.
11. Remove write permissions from /etc/rmmount.conf.
# chmod 444 /etc/rmmount.conf
This step returns the file to its default permissions.
12. Load a PCMCIA memory card.
236
---Insert the PCMCIA memory card---
# volcheck -v
media was found
The PCMCIA memory card you now load, and all subsequent PCMCIA memory
cards, will be available to other systems. To access the PCMCIA memory card, the
remote user must mount it by name, according to the instructions in “How to
Access PCMCIA Memory Cards on Other Systems” on page 233.
13. Verify that the PCMCIA memory card is indeed available to other systems by
using the share command.
If the PCMCIA memory card is available, its share configuration will be
displayed. (The shared dummy directory will also be displayed.)
# share
-
/dummy ro "dummy dir to wake up NFS daemon"
-
/myfiles rw ""
Example—Making Local PCMCIA Memory Cards Available to
Other Systems
The following example makes any PCMCIA memory card loaded into the local
system’s PCMCIA memory card drive available to other systems on the network.
# ps -ef | grep nfsd
root 10127
9986
0 08:25:01 pts/2
0:00 grep nfsd
root 10118
1
0 08:24:39 ?
0:00 /usr/lib/nfs/nfsd -a
# mkdir /dummy
# vi /etc/dfs/dfstab
(Add the following line:)
share -F nfs -o ro
/dummy
# eject pcmem0
# chmod 644 /etc/rmmount.conf
# vi /etc/rmmount
(Add the following line to the File System Sharing section:)
share floppy*
# chmod 444 /etc/rmmount.conf
(Load a PCMCIA memory card.)
# volcheck -v
media was found
# share
-
/dummy
ro
""
(continued)
Using PCMCIA Memory Cards From the Command Line (Tasks)
237
(Continuation)
-
/pcmem/myfiles
rw
""
238
CHAPTER
18
How Volume Management Works
(Reference)
This chapter describes the mount points and symbolic links that Volume
Management creates to accommodate removable media.
This is a list of reference information in this chapter.
“Volume Management Mounts All Removable Media” on page 239
“Volume Management Provides Access to Diskettes” on page 240
“Volume Management Provides Access to CDs” on page 241
“Volume Management Supplies Convenient Mount Points for Easier Access ” on
page 242
“Volume Management Creates Two Sets of Symbolic Links” on page 244
“Volume Management Can Be Limited by UFS Formats” on page 245
Volume Management Mounts All
Removable Media
Volume Management provides access to all CD-ROM and diskette drives under
/vol/dev:
239

/vol/dev
All CD-ROM and diskette drives can
be accessed through this directory
Volume Management Provides Access to
Diskettes
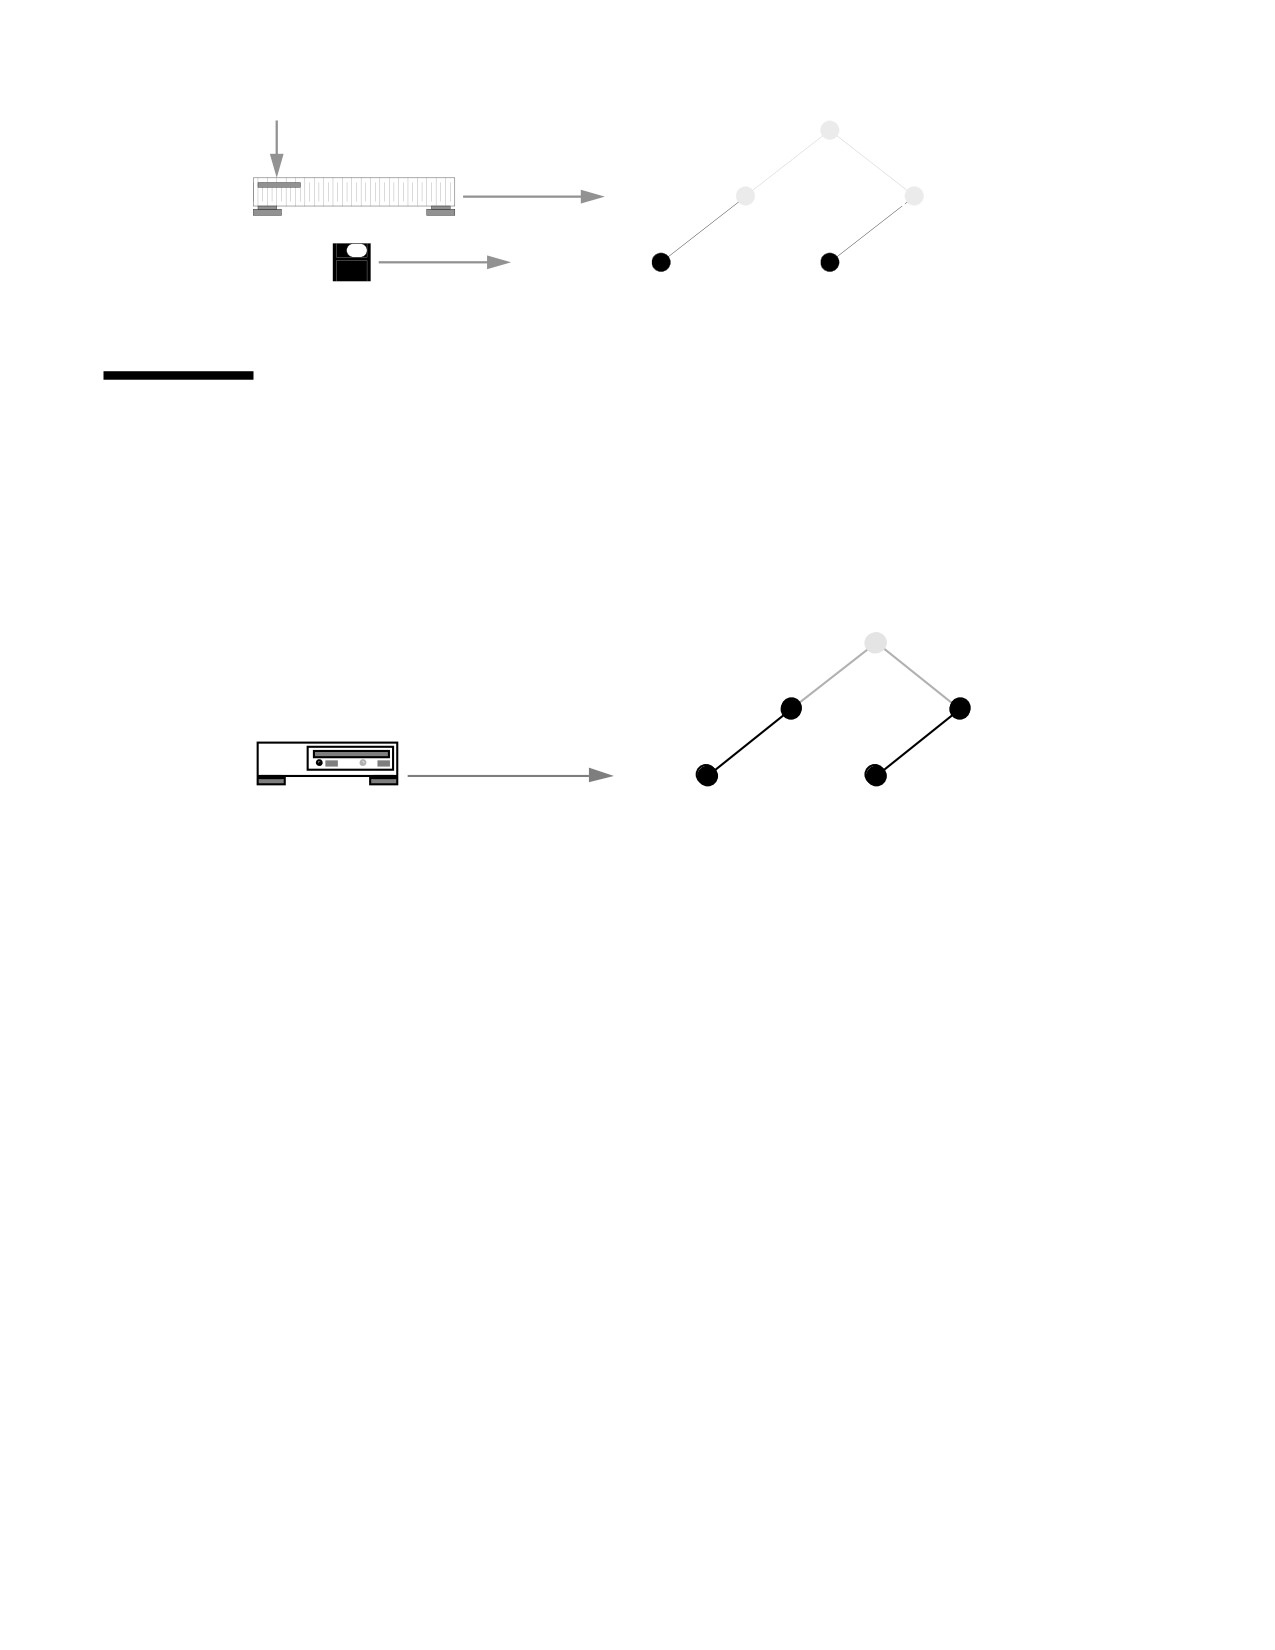
Volume Management provides access to a system’s diskette drive through
subdirectories of /vol/dev; namely, diskette0 and rdiskette0.
/vol/dev
Disk Drive
diskette0
rdiskette0
If a system has a second diskette drive, Volume Management creates a second pair of
directories named diskette1 and rdiskette1. For a third diskette drive, it would
create diskette2 and rdiskette2; and so on for additional drives.
The diskette directories provide access to file systems, and the rdiskette
directories provide access to raw characters. The diskettes themselves appear in
subdirectories beneath the drive directories. (In this and subsequent illustrations,
some nodes are "grayed out" to draw attention to the other nodes. There is no
structural significance to this convention; it is simply a means of highlighting.)
240
Disk Drive
/vol/dev
diskette0
rdiskette0
diskette-name
diskette-name
Diskette
Volume Management Provides Access to
CDs
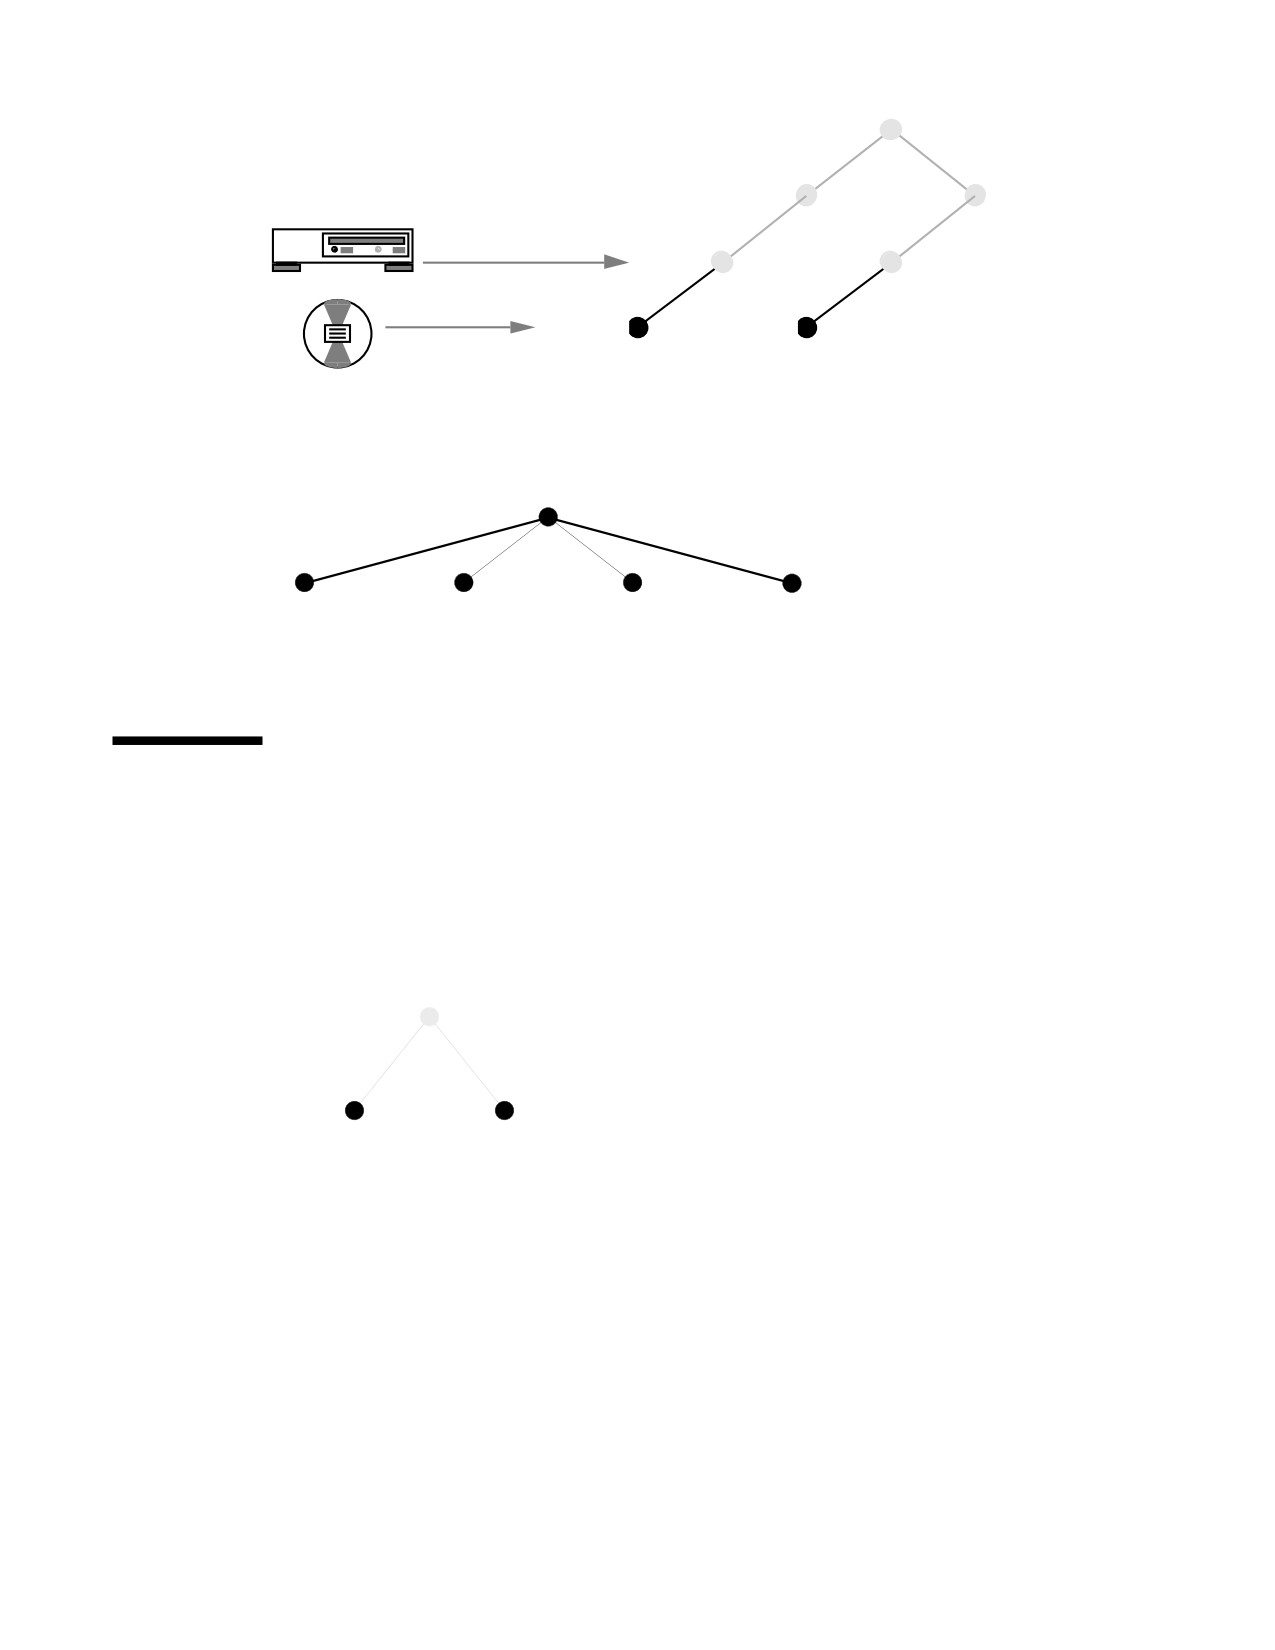
The arrangement for CDs is similar, except that the block and raw directories are
labelled /dsk and /rdsk, respectively, and the CD-ROM device is actually located
one directory beneath them.
/vol/dev
dsk
rdsk
CD-ROM Drive
c0t6
c0t6
In the illustration above, the additional directory is named c0t6. That simply reflects
a particular system’s device naming conventions. The directory name on your system
could be different, though it would have the same format.
The CDs themselves, however, follow a convention similar to diskettes, in that they
are mounted beneath the directory belonging to their device:
How Volume Management Works (Reference)
241
/vol/dev
dsk
rdsk
CD-ROM Drive
c0t6
c0t6
CD-name
/CD-name
CD
As a result of this arrangement, a system with one diskette drive and one CD-ROM
drive would have the following /vol/dev file system:
/vol/dev
diskette0
rdiskette0
dsk
rdsk
(Actually, /vol/dev includes an additional subdirectory named aliases, but that
is described later in this section.)
Volume Management Supplies
Convenient Mount Points for Easier
Access
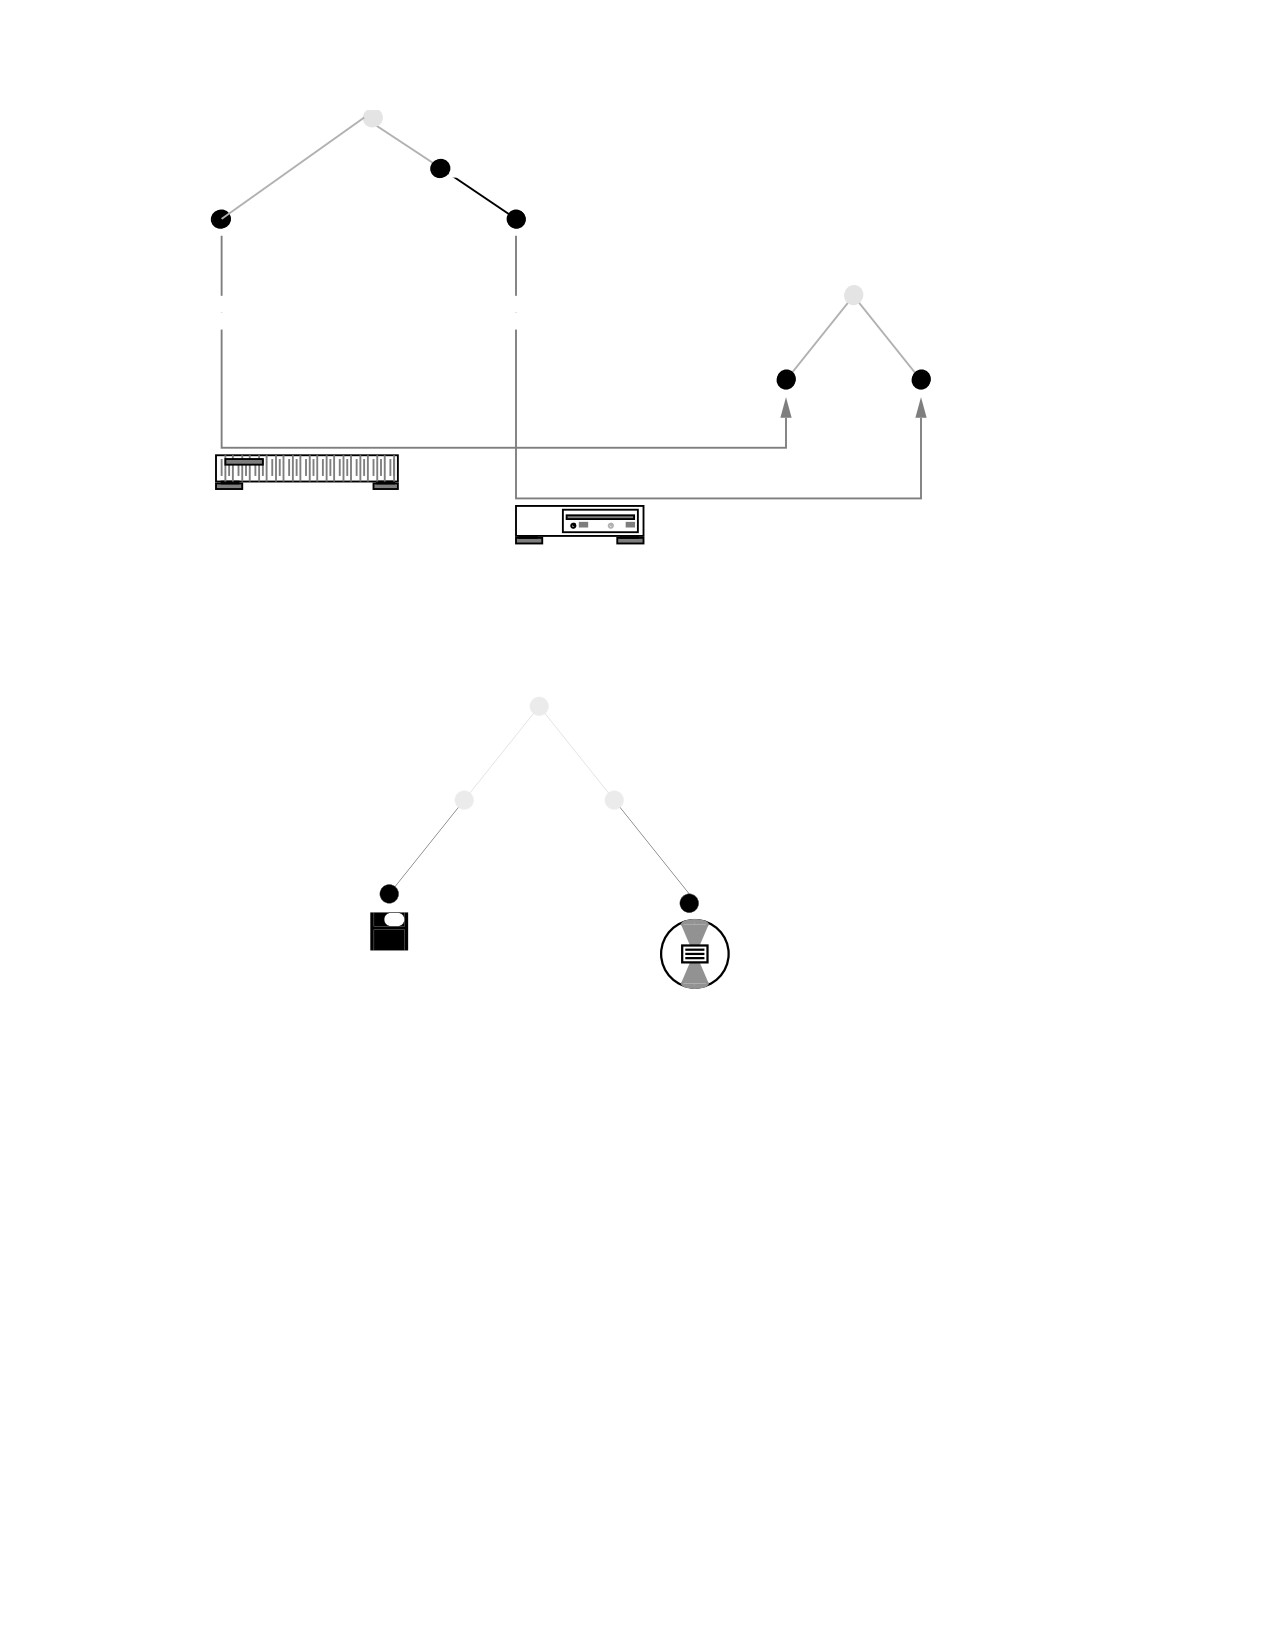
To make access more convenient, Volume Management uses two special mount
points, /floppy and /cdrom.
/
floppy
cdrom
Volume Management mounts the /vol/dev/diskette0 and
/vol/dev/dsk/c0t6 directories onto /floppy and /cdrom:
242
/vol/dev
dsk
diskette0
c0t6
/
Mounted
Mounted
for block access
for block access
floppy
cdrom
Disk Drive
CD-ROM
Because of these mount points, when you insert a diskette, you can access it under
/floppy/diskette-name. Likewise, when you insert a CD, you can access it under
/cdrom/cd-name.
/
floppy
cdrom
diskette-name
cd-name
However, these mount points depend on proper formatting. If a diskette is
formatted, the mount succeeds, but if it is unformatted, the mount fails and the
diskette is only available under /vol/dev/diskette0. You can format diskettes
according to the instructions in “How to Format a UFS Diskette” on page 197 or
“How to Format a DOS Diskette” on page 201.
If a system has multiple drives, they are mounted onto parallel directories such as
/floppy/floppy0, /floppy/floppy1, /cdrom/cdrom0, etc.
How Volume Management Works (Reference)
243
Volume Management Creates Two Sets
of Symbolic Links
As an additional convenience, Volume Management creates two separate sets of
symbolic links:
One for file system access
One for raw device access
Symbolic Links for File System Access
The symbolic links for file system access simply link the directories
/floppy/floppy0 and /cdrom/cdrom0 to the diskette inserted into the first
diskette drive and the CD inserted into the first CD-ROM drive:
/floppy/floppy0 --> /floppy/name --> /vol/dev/diskette0/name
/cdrom/cdrom0 --> /cdrom/cd-name --> /vol/dev/dsk/c0t6d0/cd-name
These links enable you to access floppies and CDs without knowing their names.
You can use the link names, floppy0 or cdrom0, instead.
Diskettes and CDs inserted into subsequent drives would follow the naming
conventions summarized in Table 14-3.
Symbolic Links for Raw Device Access
To make raw device access more convenient, Volume Management creates the
aliases directory, under /vol/dev:
/vol/dev
aliases
rdiskette0
rdsk
Beneath the aliases directory, Volume Management creates a set of symbolic links
similar to those used for block access. In other words, for character access, these
directories are equivalent:
/vol/dev/aliases/floppy0 --> /vol/dev/rdiskette0/diskette-name
/vol/dev/aliases/cdrom0 --> /vol/dev/rdsk/c0t6d0/cd-name
244
Like the symbolic links for file system access, the purpose of these links is to enable
you to access a raw-character diskette or CD without knowing its name; in other
words, by using the /vol/dev/aliases/floppy0 and
/vol/dev/aliases/cdrom0 link names.
The example above shows only one symbolic link for diskettes and one for CDs. If
your system had two diskettes or two CDs, there would be one symbolic link for
each:
/vol/dev/aliases
floppy0
floppy1
cdrom0
cdrom1
Volume Management Can Be Limited
by UFS Formats
UFS formats are not portable between architectures, so they must be used on the
architecture for which they were formatted. For instance, a UFS CD formatted for a
SPARC platform cannot be recognized by an IA platform. Likewise, an IA UFS CD
cannot be mounted by Volume Management on a SPARC platform. The same
limitation applies to diskettes. (Actually, some architectures share the same bit
structure, so occasionally a UFS format specific to one architecture will be recognized
by another architecture, but the UFS file system structure was not designed to
guarantee this compatibility).
Therefore, Volume Management cannot recognize and mount IA UFS media on a
SPARC platform—or SPARC UFS media on an IA platform.
Most CDs are formatted according to the ISO 9660 standard (High Sierra File
System—HSFS), which imposes no limitations on Volume Management, so
incompatibility is seldom a problem with CDs.
With diskettes, UFS incompatibility can occur more often because formats can be
established by the user. Be aware that if you format a UFS diskette on one
architecture, you won’t be able to use it on a different architecture. (For instructions,
see “How to Format a UFS Diskette” on page 197).
What About Mixed Formats?
Some CDs, particularly installation CDs, contain mixed formats; that is, part UFS,
part ISO 9660. To accommodate the different formats, the CD is split into slices,
How Volume Management Works (Reference)
245
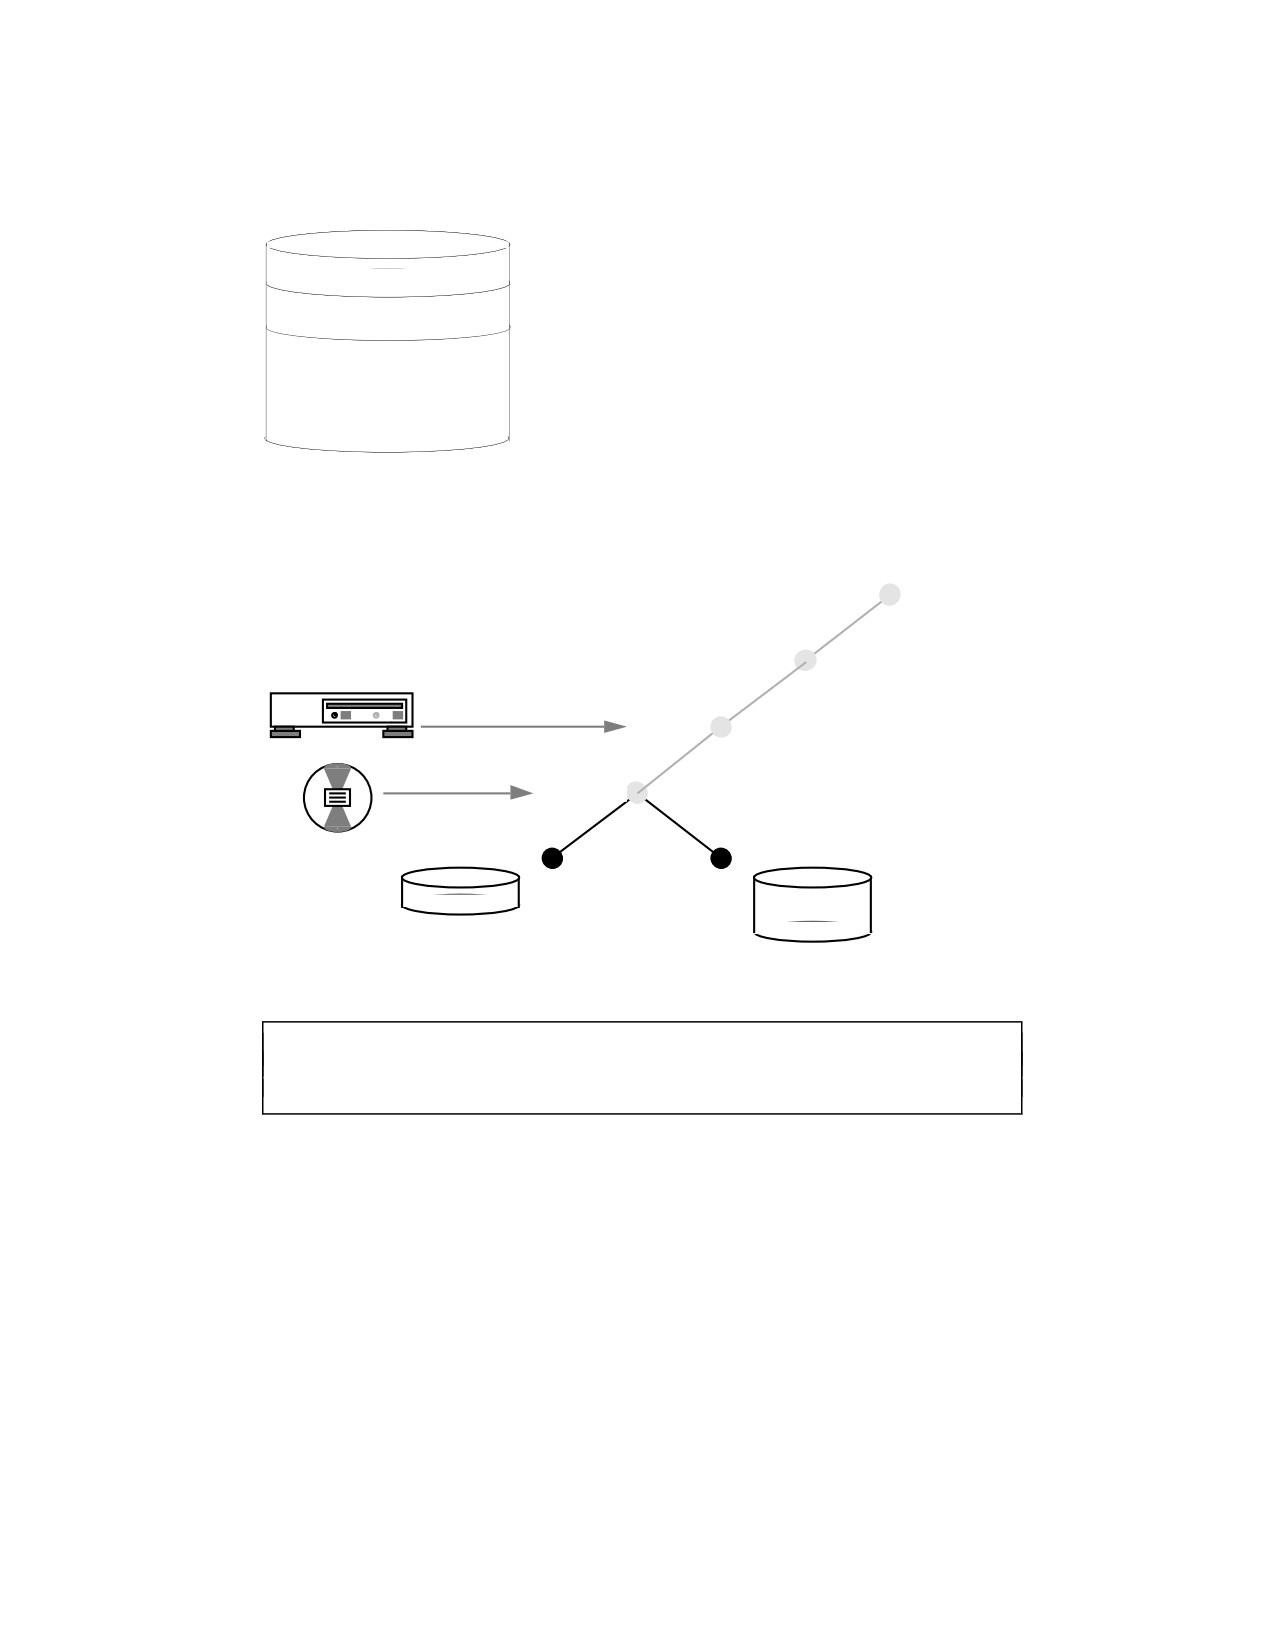
which are similar in effect to partitions on hard disks. The 9660 portion is portable,
but the UFS portion is architecture-specific. Furthermore, to make the CD usable by
several different architectures (as in the case of installation, when different PROM
architectures might be used to boot the system), more than one UFS format is loaded
onto the CD:
Slice 0
UFS — SPARC
Slice 1
UFS — x86
IS0 9660
Slice 2
When Volume Management encounters this arrangement, it simply ignores the UFS
formats not specific to the local system’s architecture and mounts the appropriate
UFS slice and the ISO 9660 slice:
/vol/dev
dsk
CD-ROM Drive
c0t6
CD-name
CD
S0
S2
UFS—SPA
IS0 9660
These slices appear as subdirectories both under /vol/dev/dsk/c0t6 and
/cdrom/cdrom0:
$ ls /cdrom/cdrom0
S0
S2
$ ls /vol/dev/dsk/c0t6
S0 S2
246
CHAPTER
19
Managing Software Topics
This section provides instructions for managing Solaris software packages and
patches. This section contains these chapters.
Provides overview information about adding and removing
Chapter 20
software products in the Solaris operating environment.
Provides step-by-step instructions for installing and removing
Chapter 21
software packages on different client types.
Provides overview information and step-by-step instructions
Chapter 22
about adding and removing patches in the Solaris operating
environment.
247
248
CHAPTER
20
Software Administration (Overview)
Software administration involves adding and removing software from standalone
systems, servers, and their clients. This chapter describes background and other
useful information about installing and managing software. This chapter does not
describe installing the Solaris software, which has its own installation and setup
procedures.
This is a list of the overview information in this chapter.
“Where to Find Software Administration Tasks” on page 249
“Overview of Software Packages” on page 250
“Tools for Managing Software” on page 251
“What Happens When You Add or Remove a Package” on page 252
“What You Should Know Before Adding or Removing Packages” on page 253
“Guidelines for Client Software Administration” on page 253
“Guidelines for Removing Packages” on page 253
“Avoiding User Interaction When Adding Packages” on page 254
Where to Find Software Administration
Tasks
Use this table to find step-by-step instructions for administering software.
249
For Information On ...
See ...
Installing Solaris software
Solaris
8
(SPARC Platform Edition) Installation
Guide or Solaris
8
(Intel Platform Edition) Installation
Guide
Adding or removing Solaris
Chapter 21
software packages after installation
Adding or removing Solaris patches
Chapter 22
after installation
Troubleshooting software
administration problems
“Troubleshooting Software Administration
Problems” in System Administration Guide, Volume 2
What’s New in Software Management?
This Solaris release includes a new software management tool, Solaris Product
Registry. Once the Solaris 8 release is installed, Product Registry provides a list of all
software installed using Solaris Web Start 3.0 or the Solaris package management
commands. To view the Product Registry, type /usr/bin/prodreg at the command
line.
See “Adding and Removing Software With the Product Registry” in Solaris 8
(SPARC Platform Edition) Installation Guide or “Adding and Removing Software
After Installing Solaris 8” in Solaris
8
(Intel Platform Edition) Installation Guide for
more information.
Overview of Software Packages
Software administration involves installing or removing software products. Sun and
its third-party vendors deliver products in a form called a software package. (The
term packaging generically refers to the method for distributing and installing
software products to systems where the products will be used.) In its simplest form,
you can think of a package as a collection of files and directories in a defined format.
This format conforms to the Application Binary Interface (ABI), which is a
supplement to the System V Interface Definition. The Solaris operating environment
250
provides a set of utilities that interpret this format and provide the means to install
or remove a package or to verify its installation.
Tools for Managing Software
There are three tools for adding and removing software from a system after the
Solaris release is installed on a system:
This Tool Enables You To Add,
Remove, And Display Package
Information...
And You Can ...
Package commands (pkgadd, pkgrm,
Incorporate these commands into scripts, set up
pkginfo)
optional files to avoid user interaction or perform
special checks, and copy software packages to
spool directories. If you’re already familiar with
adding and removing packages with these
commands, it’s probably easiest for you to
continue using them.
Admintool
View the online help that provides general
information on using this graphical interface tool.
If you’re unfamiliar with software package
naming conventions, you’re uncomfortable using
command line options, and you’re managing
software only on one system at time, it’s probably
easiest for you to use Admintool to add and
remove software.
Solaris Product Registry
Launch an installer to add products.
The table below describes the advantages of using Admintool rather than the
pkgadd and pkgrm commands to manage software.
TABLE 20-1
Admintool Software Management Capabilities
Software Management Tasks
Performed With Admintool?
Add and remove packages on standalone or Yes
server systems
Easily view all installed software
Yes
Software Administration (Overview)
251
TABLE 20-1
Admintool Software Management Capabilities
(continued)
Software Management Tasks
Performed With Admintool?
Easily view and select packages from an
Yes
installation media
Add packages to a spool directory
No
Eliminate user interaction by using an
No
administration file
In previous Solaris releases, Software Manager (accessed with the swmtool
command) was the graphical tool for adding and removing software. If you use the
swmtool command on a Solaris 2.5 or compatible system, it will start Admintool.
What Happens When You Add or
Remove a Package
The pkgadd and pkgrm commands or Admintool are used to add and remove
software. Admintool is a graphical front-end to the pkgadd and pkgrm commands.
When you add a package, the pkgadd command uncompresses and copies files from
the installation media to a local system’s disk. When you remove a package, the
pkgrm command deletes all files associated with that package, unless those files are
also shared with other packages.
Package files are delivered in package format and are unusable as they are delivered.
The pkgadd command interprets the software package’s control files, and then
uncompresses and installs the product files onto the system’s local disk.
Although the pkgadd and pkgrm commands do not log their output to a standard
location, they do keep track of the product installed or removed. The pkgadd and
pkgrm commands store information about a package that has been installed or
removed in a software product database.
By updating this database, the pkgadd and pkgrm commands keep a record of all
software products installed on the system.
252
What You Should Know Before Adding
or Removing Packages
Before installing or removing packages on your system, you should know:
Package naming conventions - Sun packages always begin with the prefix SUNW,
as in SUNWvolr, SUNWadmap, and SUNWab2m. Third-party packages usually begin
with a prefix that corresponds to the company’s stock symbol.
What software is already installed - You can use the product registry, Admintool,
or the pkginfo command to determine the software already installed on a
system.
How servers and clients share software - Clients might have software that resides
partially on a server and partially on the client. If this is the case, adding software
for the client requires adding packages to both the server and the client. (The
section below describes in more detail how to manage client software.)
Guidelines for Client Software
Administration
Managing software on a standalone system is fairly straightforward, after you’re
familiar with the package installation tools and conventions. You install the software
package on a system’s local disk and that software is then available for use.
However, managing software on client systems can be more difficult—especially
when the software resides partially on the server and partially on the client. (For
example, a piece of software might have a package with files that are installed on the
client’s root file system and a package with files that are installed on the /usr file
system, which the client typically mounts from a server.)
Guidelines for Removing Packages
Because the pkgadd and pkgrm commands update information in a software
products database, it is important when you remove a package to use the pkgrm
command—even though you might be tempted to use the rm command instead. For
example, you could use the rm command to remove a binary executable file, but that
is not the same as using pkgrm to remove the software package that includes that
Software Administration (Overview)
253
binary executable. Using the rm command to remove a package’s files will corrupt
the software products database. (If you really only want to remove one file, you can
use the removef command, which will update the software product database
correctly. See removef(1M) for more information.)
If you intend to keep multiple versions of a package (for example, multiple versions
of a document processing application), install new versions into a different directory
than the already installed package. The directory where a package is installed is
referred to as the base directory, and you can manipulate the base directory by
setting the basedir keyword in a special file called an administration file. See
“Avoiding User Interaction When Adding Packages” on page 254 and admin(4) for
more information on use of an administration file and setting the base directory.
Note - If you use the upgrade option when installing the Solaris software, the Solaris
installation software consults the software product database to determine the
products already installed on the system.
Avoiding User Interaction When
Adding Packages
Using an Administration File
When you use the pkgadd -a command, the pkgadd command consults a special
administration file for information about how the installation should proceed.
Normally, pkgadd performs several checks and prompts the user for confirmation
before actually adding the specified package. You can, however, create an
administration file that indicates to pkgadd it should bypass these checks and install
the package without user confirmation.
The pkgadd command, by default, looks in the current working directory for an
administration file. If pkgadd doesn’t find an administration file in the current
working directory, pkgadd looks in the /var/sadm/install/admin directory for
the specified administration file. The pkgadd command also accepts an absolute path
to the administration file.
Caution - Use administration files judiciously. You should know where a package’s
files are installed and how a package’s installation scripts run before using an
administration file to avoid the checks and prompts pkgadd normally provides.
This is an example of an administration file that will prevent pkgadd from
prompting the user for confirmation before installing the package.
254
mail=
instance=overwrite
partial=nocheck
runlevel=nocheck
idepend=nocheck
rdepend=nocheck
space=nocheck
setuid=nocheck
conflict=nocheck
action=nocheck
basedir=default
Besides using administration files to avoid user interaction when adding packages,
you can use them in several other ways. For example, you can use an administration
file to quit a package installation (without user interaction) if there’s an error or to
avoid interaction when removing packages with the pkgrm command.
You can also assign a special installation directory for a package. (It would make
sense to do this if you wanted to maintain multiple versions of a package on a
system.) To do this, set an alternate base directory in the administration file (using
the basedir keyword), which specifies where the package will be installed. See
admin(4) for more information.
Using a Response File
A response file contains your answers to specific questions asked by an
interactive package. An interactive package includes a request script that asks you
questions prior to package installation, such as whether or not optional pieces of the
package should be installed.
If you know that the package you want to install is an interactive package, prior to
installation, and you want to store your answers to prevent user interaction during
future installations of this package, you can use the pkgask command to save your
response. See pkgask(1M) for more information on this command.
Once you have stored your responses to the questions asked by the request script,
you can use the pkgadd -r command to install the package without user interaction.
Software Administration (Overview)
255
256
CHAPTER
21
Software Administration (Tasks)
This chapter describes how to install, remove, and administer software packages
with Solaris commands and the Admintool graphical interface.
This is a list of step-by-step instructions in this chapter.
“How to Add Packages to a Standalone System” on page 258
“How to Add a Package to a Spool Directory” on page 261
“How to Check the Integrity of an Installed Package” on page 264
“How to List Information About All Installed Packages” on page 263
“How to Display Detailed Information About a Package” on page 265
“How to Remove a Package” on page 266
“How to Remove a Spooled Package” on page 267
“How to Add Packages With Admintool” on page 267
“How to Remove Packages With Admintool” on page 269
Commands for Handling Software
Packages
The table below shows commands to use for adding, removing, and checking the
installation of software packages after the Solaris release is installed.
257
TABLE 21-1
Commands for Adding and Removing Packages
Command
Description
prodreg.1
Installs a software package with an installer
Installs a software package
pkgadd(1M)
Removes a software package
pkgrm(1M)
Checks the installation of a software package
pkgchk(1M)
Lists software package information
pkginfo(1)
Displays software package parameter values
pkgparam(1)
Known Problem With Adding and
Removing Packages
There is a known problem with adding or removing some packages developed
before the Solaris 2.5 release. If adding or removing a package fails during user
interaction, or if you are prompted for user interaction and your responses are
ignored, set the following environment variable:
NONABI_SCRIPTS=TRUE
Adding Packages
How to Add Packages to a Standalone System
1. Log in as superuser.
2. Remove any already installed packages with the same names as the ones you
are adding.
258
This ensures that the system keeps a proper record of software that has been
added and removed. There might be times when you want to maintain multiple
versions of the same application on the system. For strategies on how to do this,
see “Guidelines for Removing Packages” on page 253, and for task information,
see “How to Remove a Package” on page 266.
3.
Add a software package to the system.
# pkgadd -a admin-file-d device-name pkgid ...
(Optional) Specifies an administration file pkgadd
−a admin-file
should consult during the installation. (For details
about using an administration file, see “Using an
Administration File” on page 254 in the previous
chapter.)
Specifies the absolute path to the software packages.
−d device-name
device-name can be the path to a device, a directory, or a
spool directory. If you do not specify the path where
the package resides, the pkgadd command checks the
default spool directory (/var/spool/pkg). If the
package is not there, the package installation fails.
(Optional) Is the name of one or more packages
pkgid
(separated by spaces) to be installed. If omitted, the
pkgadd command installs all available packages.
If pkgadd encounters a problem during installation of the package, it displays a
message related to the problem, followed by this prompt:
Do you want to continue with this installation?
Respond with yes, no, or quit. If more than one package has been specified,
type no to stop the installation of the package being installed. pkgadd continues
to install the other packages. Type quit to stop the installation.
4.
Verify that the package has been installed successfully, using the pkgchk
command.
# pkgchk -v pkgid
If pkgchk determines there are no errors, it returns a list of installed files.
Otherwise, it reports the error.
Software Administration (Tasks)
259
Example—Installing Software From a Mounted CD
The following example shows a command to install the SUNWaudio package from a
mounted Solaris 8 CD. The example also shows use of the pkgchk command to
verify that the package files were installed properly.
# pkgadd -d /cdrom/sol_8_sparc/s0/Solaris_8/Product SUNWaudio
Installation of <SUNWaudio> was successful.
# pkgchk -v SUNWaudio
/usr
/usr/bin
/usr/bin/audioconvert
/usr/bin/audioplay
/usr/bin/audiorecord
Example—Installing Software From a Remote Package Server
If the packages you want to install are available from a remote system, you can
manually mount the directory containing the packages (in package format) and
install packages on the local system. The following example shows the commands to
do this. In this example, assume the remote system named package-server has
software packages in the /latest-packages directory. The mount command
mounts the packages locally on /mnt, and the pkgadd command installs the
SUNWaudio package.
# mount -F nfs -o ro package-server:/latest-packages /mnt
# pkgadd -d /mnt SUNWaudio
Installation of <SUNWaudio> was successful.
If the automounter is running at your site, you do not need to mount the remote
package server manually. Instead, use the automounter path (in this case,
/net/package-server/latest-packages) as the argument to the -d option.
# pkgadd -d /net/package-server/latest-packages SUNWaudio
Installation of <SUNWaudio> was successful.
The following example is similar to the previous one, except it uses the -a option
and specifies an administration file named noask-pkgadd, which is illustrated in
“Avoiding User Interaction When Adding Packages” on page 254. In this example,
260
assume the noask-pkgadd administration file is in the default location,
/var/sadm/install/admin.
# pkgadd -a noask-pkgadd -d /net/package-server/latest-packages SUNWaudio
Installation of <SUNWaudio> was successful.
Using a Spool Directory
For convenience, you can copy frequently installed packages to a spool directory. If
you copy packages to the default spool directory, /var/spool/pkg, you do not
need to specify the source location of the package (−d device-name argument) when
using the pkgadd command. The pkgadd command, by default, looks in the
/var/spool/pkg directory for any packages specified on the command line. Note
that copying packages to a spool directory is not the same as installing the packages
on a system.
How to Add a Package to a Spool Directory
1. Log in as superuser to the server or standalone system.
2. Remove any already spooled packages with the same names as the ones you
are adding.
For information on removing spooled packages, see “How to Remove a Spooled
Package” on page 267.
3. Add a software package to a spool directory.
# pkgadd -d device-name -s spooldir pkgid ...
Software Administration (Tasks)
261

Specifies the absolute path to the software packages.
−d device-name
device-name can be the path to a device, a directory, or a
spool directory.
Specifies the name of the spool directory where the
−s spooldir
package will be spooled. You must specify a spooldir.
(Optional) Is the name of one or more packages
pkgid
(separated by spaces) to be added to the spool directory.
If omitted, pkgadd copies all available packages.
4. Verify that the package has been copied successfully to the spool directory,
using the pkginfo command.
$ pkginfo -d spooldir| grep pkgid
If pkgid is copied correctly, the pkginfo command returns a line of information
about it. Otherwise, pkginfo returns the system prompt.
Example—Setting Up a Spool Directory From a Mounted CD
The following example shows a command to copy the SUNWaudio and SUNWab2m
packages from a mounted SPARC Solaris 8 CD to the default spool directory
(/var/spool/pkg).
# pkgadd -d /cdrom/sol_8_sparc/s0/Solaris_8/Product -s /var/spool/pkg SUNWaudio
Transferring <SUNWaudio> package instance
Example—Setting Up a Spool Directory From a Remote
Package Server
If packages you want to copy are available from a remote system, you can manually
mount the directory containing the packages (in package format) and copy them to a
local spool directory. The following example shows the commands to do this. In the
following example, assume the remote system named package-server has
software packages in the /latest-packages directory. The mount command
mounts the package directory locally on /mnt, and the pkgadd command copies the
SUNWman package from /mnt to the default spool directory (/var/spool/pkg).
# mount -F nfs -o ro package-server:/latest-packages /mnt
# pkgadd -d /mnt -s /var/spool/pkg SUNWman
Transferring <SUNWman> package instance
262

If the automounter is running at your site, you do not have to mount the remote
package server manually. Instead, use the automounter path (in this case,
/net/package-server/latest-packages) as the argument to the −d option.
# pkgadd -d /net/package-server/latest-packages -s /var/spool/pkg SUNWman
Transferring <SUNWman> package instance
Example—Installing a Package From the Default Spool
Directory
The following example shows a command to install the SUNWman package from the
default spool directory. (When no options are used with pkgadd, it searches
/var/spool/pkg for the named packages.)
# pkgadd SUNWman
Installation of <SUNWman> was successful.
Checking the Installation of Packages
You use the pkgchk command to check installation completeness, path name, file
contents, and file attributes of a package. See pkgchk(1M) for more information on
all the options.
Use the pkginfo command to display information about the packages that are
installed on the system.
How to List Information About All Installed
Packages
List information about installed packages with the pkginfo command.
$ pkginfo
Example—Listing All Packages Installed
The following example shows the pkginfo command to list all packages installed
on a local system, whether that system is a standalone or server. The output shows
the primary category, package name, and a description of the package.
Software Administration (Tasks)
263
$ pkginfo
system
SUNWaccr
System Accounting, (Root)
system
SUNWaccu
System Accounting, (Usr)
system
SUNWadmap
System administration applications
system
SUNWadmc
System administration core libraries
How to Check the Integrity of an Installed Package
1. Log in to a system as superuser.
2. Check the status of an installed package with the pkgchk command.
# pkgchk [ -a -c -v ] pkgid ...
# pkgchk -dspooldir pkgid ...
Specifies to audit only the file attributes (that is, the
−a
permissions), rather than the file attributes and contents, which
is the default for pkgchk.
Specifies to audit only the file contents, rather than the file
−c
contents and attributes, which is the default for pkgchk.
Specifies verbose mode, which displays file names as pkgchk
−v
processes them.
Specifies the absolute path of the spool directory.
−d spooldir
pkgid
(Optional) Is the name of one or more packages (separated by
spaces). If you do not specify a pkgid, pkgchk checks all the
software packages installed on the system. If omitted, pkgchk
displays all available packages.
Example—Checking the Contents of an Installed Package
The following example shows how to check the contents of a package.
# pkgchk -c SUNWadmfw
264
If pkgchk determines there are no errors, it returns the system prompt. Otherwise, it
reports the error.
Example—Checking the File Attributes of an Installed Package
The following example shows how to check the file attributes of a package.
# pkgchk -a SUNWadmfw
If pkgchk determines there are no errors, it returns the system prompt. Otherwise, it
reports the error.
Example—Checking Packages Installed in a Spool Directory
The following example shows how to check a software package copied to a spool
directory (/export/install/packages).
# pkgchk -d /export/install/packages
## checking spooled package <SUNWadmap>
## checking spooled package <SUNWadmfw>
## checking spooled package <SUNWadmc>
## checking spooled package <SUNWsadml>
Note - The checks made on a spooled package are limited because not all
information can be audited until a package is installed.
How to Display Detailed Information About a
Package
List information about installed packages with the pkginfo -l command.
$ pkginfo -l pkgid ...
Specifies to display output in long format, which includes
−l
all available information about the package.
(Optional) Is the name of one or more packages
pkgid
(separated by spaces). If omitted, pkginfo displays
information about all available packages.
Software Administration (Tasks)
265