Seat Leon 1M. Service Manual - part 4


  Index      Seat     Seat Leon 1M. Service Manual


Search            copyright infringement  


Content      ..     2      3      4      5     ..


Seat Leon 1M. Service Manual - part 4


-------------------------------------------------------------------------------------------------------------------------------------------------------------
2.14

–––––––––––––––––––––––––––––––––––––––––––––––––––––––––––––––––––––

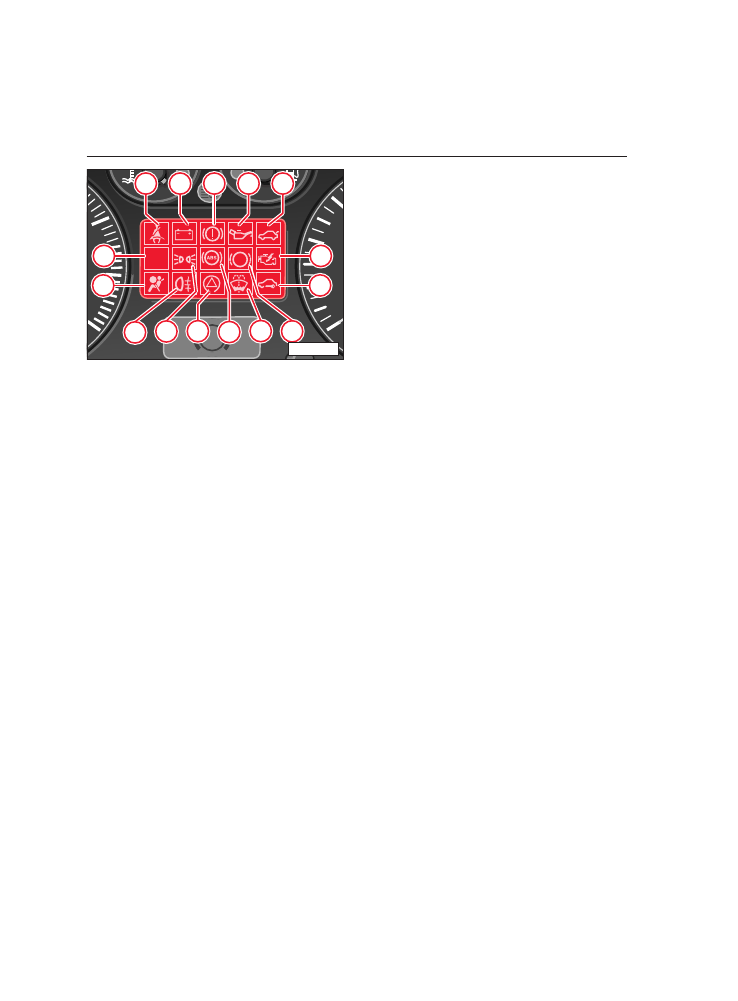
INSTRUMENT PANEL

HANDLING INSTRUCTIONS

Page

8 – Seat belt warning lamp* ...........2.17

9 – Alternator ................................2.17

10 – Brakes/Hand brake ..................2.18

11 – Engine oil pressure/level .........2.18

12 – Tailgate ...................................2.19

13 – Diagnosis*/Excess of pollution .2.19

14 – Electronic immobilizer..............2.19

15 – Brake wear monitor* ................2.19

16 – Windscreen washer water 

level*.......................................2.20

Page

17 – Anti-locking brake system 

(ABS)* .....................................2.20

18 – TCS Wheel spin control*/

ESP Electronic Stability
Program* .................................2.21

19 – Parking light/dipped beam ......2.21

20 – Rear fog light* .........................2.22

21 – Air Bag system

1)

......................2.22

22 – Preheating system/ 

Electronic Accelerator-
Pedal Control (EPC)*.................2.22

1)

This equipment may vary according  to  the
country.

6

7

20

40

10

30

50

!

E P C

P

8

9

10

11

12

17

18

19

13

14

21

22

20

16 15

IB9-024

-------------------------------------------------------------------------------------------------------------------------------------------------------------

-------------------------------------------------------------------------------------------------------------------------------------------------------------

INSTRUMENT PANEL 

–––––––––––––––––––––––––––––––––––––––––––––––––––––––––––––––––––––

2.15

HANDLING INSTRUCTIONS

1

1 –

– IIn

nd

diic

ca

atto

orrs

s

The pilot light flashes at the same time as
the  indicator.  If a  turn  signal fails,  the
warning  lamp  flashes twice  as fast.  (Not
when towing a trailer).

For more data, see "Indicators and dipped
beam lever" chapter.

2

2 –

– C

Co

oo

olla

an

ntt tte

em

mp

pe

erra

attu

urre

e/

lle

ev

ve

ell*

*

The warning lamp lights up for a few sec-
onds as a  functional check when  ignition
is switched on.

If the lamp does not go out afterwards or
lights up  or  flashes when  driving,  either
the coolant temperature is too high or the
coolant level too  low.  An  acoustic signal
will sound 3 times as an additional warn-
ing:

S

Stto

op

p  tth

he

e  v

ve

eh

hiic

clle

e  iim

mm

me

ed

diia

atte

elly

y,,  s

sw

wiittc

ch

h

tth

he

e  e

en

ng

giin

ne

e  o

offff  and  check the  level.  If

necessary, add coolant. For more informa-
tion, see the chapter “Instruments”.

W

Wa

arrn

niin

ng

g n

no

otte

es

s

N

Ne

ev

ve

err  o

op

pe

en

n  tth

he

e  b

bo

on

nn

ne

ett  o

off  y

yo

ou

urr

c

ca

arr  iiff  y

yo

ou

u  s

se

ee

e  s

stte

ea

am

m  o

orr  c

co

oo

olla

an

ntt

c

co

om

miin

ng

g  ffrro

om

m  tth

he

e  e

en

ng

giin

ne

e  c

co

om

mp

pa

arrtt--

m

me

en

ntt –

– R

Riis

sk

k o

off s

sc

ca

alld

diin

ng

g!! W

Wa

aiitt u

un

nttiill

n

no

o  m

mo

orre

e  s

stte

ea

am

m  o

orr  c

co

oo

olla

an

ntt  c

ca

an

n  b

be

e

s

se

ee

en

n..

D

Do

o n

no

ott tto

ou

uc

ch

h tth

he

e ffa

an

n.. T

Th

he

e ffa

an

n c

ca

an

n

s

sw

wiittc

ch

h  o

on

n  s

su

ud

dd

de

en

nlly

y  –

–  e

ev

ve

en

n  w

wh

he

en

n

tth

he

e e

en

ng

giin

ne

e iis

s s

sw

wiittc

ch

he

ed

d o

offff..

P

Plle

ea

as

se

e n

no

otte

e tth

he

e ffo

ollllo

ow

wiin

ng

g p

po

oiin

ntts

s

tto

o a

av

vo

oiid

d s

sc

ca

alld

diin

ng

g w

wiitth

h h

ho

ott c

co

oo

olla

an

ntt::

– E

Ex

xe

errc

ciis

se

e  c

ca

au

uttiio

on

n  w

wh

he

en

n  o

op

pe

en

niin

ng

g

tth

he

e c

co

oo

olla

an

ntt e

ex

xp

pa

an

ns

siio

on

n tta

an

nk

k!! W

Wh

he

en

n

tth

he

e e

en

ng

giin

ne

e iis

s h

ho

ott tth

he

e c

co

oo

olliin

ng

g s

sy

ys

s--

tte

em

m  iis

s  u

un

nd

de

err  p

prre

es

ss

su

urre

e  –

–  D

Da

an

ng

ge

err

o

off  s

sc

ca

alld

diin

ng

g!!  T

Th

he

erre

effo

orre

e  lle

ett  e

en

ng

giin

ne

e

c

co

oo

oll d

do

ow

wn

n b

be

effo

orre

e u

un

ns

sc

crre

ew

wiin

ng

g tth

he

e

c

ca

ap

p!!

– T

To

o  p

prro

otte

ec

ctt  y

yo

ou

urr  ffa

ac

ce

e,,  h

ha

an

nd

ds

s  a

an

nd

d

a

arrm

ms

s y

yo

ou

u s

sh

ho

ou

ulld

d c

co

ov

ve

err tth

he

e c

ca

ap

p o

off

tth

he

e  rra

ad

diia

atto

orr  w

wiitth

h  a

a  lla

arrg

ge

e,,  tth

hiic

ck

k

c

cllo

otth

h tto

o p

prro

otte

ec

ctt a

ag

ga

aiin

ns

stt s

stte

ea

am

m o

orr

h

ho

ott ffllu

uiid

d..

E

En

ns

su

urre

e  tth

ha

att  tth

he

e  c

co

oo

olla

an

ntt  lliiq

qu

uiid

d

d

do

oe

es

s  n

no

ott  d

drro

op

p  o

on

n  tth

he

e  h

ho

ott  e

ex

xh

ha

au

us

stt

o

orr  a

an

ny

y  o

otth

he

err  h

ho

ott  e

en

ng

giin

ne

e  c

co

om

mp

po

o--

n

ne

en

ntts

s.. T

Th

he

e a

an

nttiiffrre

ee

ez

ze

e c

co

on

ntta

aiin

ne

ed

d iin

n

tth

he

e c

co

oo

olla

an

ntt c

co

ou

ulld

d iig

gn

niitte

e..

2

1

3

4

5

6

7

8

0

Rpm x 1000

20

0

Km/h

40

60

80

100

140

180

220

260

10

30

50

70

90

120

160

200

240

km

60

90

120

0

1/2

1/1

1

!

E P C

P R


N


D 3 2 1

0 04

3647

0.0

5

1

2

3

4

1

6

7

LEO-004

-------------------------------------------------------------------------------------------------------------------------------------------------------------

-------------------------------------------------------------------------------------------------------------------------------------------------------------

2.16

–––––––––––––––––––––––––––––––––––––––––––––––––––––––––––––––––––––

INSTRUMENT PANEL

HANDLING INSTRUCTIONS

If the  level is correct the  failure  may be
due to a fan failure. In this case check the
radiator fan fuse and replace if necessary.
See "Fuses" chapter.

If the  warning  lamp  does not go  out
although coolant level and fan fuse are in
order,  d

do

o  n

no

ott  d

drriiv

ve

e  o

on

n –  call in  expert

assistance.

If the trouble is located only in the radia-
tor fan, and assuming the coolant level is
in  order  and  the  temperature  warning
lamp is off, you may drive on to the near-
est Technical Service  Centre  In  order  to
make good use of the air stream for cool-
ing,  do  not let engine  idle  or  drive  very
slowly. 

3

3 –

– T

Trra

aiille

err iin

nd

diic

ca

atto

orrs

s*

*

The warning lamp* flashes when turn sig-
nals are  switched  on  when  towing  a
trailer.

If a turn signal fails on the trailer or vehi-
cle, the warning lamp does not flash.

4

4 –

– F

Fu

ue

ell lle

ev

ve

ell*

*

When  the  ignition  is switched  on,  the
warning  light lights up  as a  functional
check.

The  warning  lamp  comes on  when  there
are about 7 litres left in tank.

5

5 –

– M

Ma

aiin

n b

be

ea

am

The  warning  lamp  comes on  when  main
beam is on or when the headlight flasher
is used.

6

6 –

– W

Wa

arrn

niin

ng

g lla

am

mp

ps

s d

diis

sp

plla

ay

y s

sc

crre

ee

en

n

7

7 –

– S

Se

elle

ec

ctto

orr lle

ev

ve

err p

po

os

siittiio

on

n d

diis

sp

plla

ay

y*

*

The  automatic gearbox selector  lever  is
shown on the display; See the "Automatic
gearbox" chapter.

2

1

3

4

5

6

7

8

0

Rpm x 1000

20

0

Km/h

40

60

80

100

140

180

220

260

10

30

50

70

90

120

160

200

240

km

60

90

120

0

1/2

1/1

1

!

E P C

P R


N


D 3 2 1

0 04

3647

0.0

5

1

2

3

4

1

6

7

LEO-004

-------------------------------------------------------------------------------------------------------------------------------------------------------------

-------------------------------------------------------------------------------------------------------------------------------------------------------------

INSTRUMENT PANEL 

–––––––––––––––––––––––––––––––––––––––––––––––––––––––––––––––––––––

2.17

HANDLING INSTRUCTIONS

8

8 –

– S

Se

ea

att b

be

elltt w

wa

arrn

niin

ng

g lla

am

mp

p*

The  warning  lamp  lights up  (only for  cer-
tain  countries)  for  about 6  seconds after
ignition  as a  reminder  to  fasten  your
safety belt.

If the  seat belt is not fastened,  in  some
countries an  acoustic signal will sound
after  switching  on  the  ignition  which  will
stop  after  approximately 6  seconds or
when the seat belt is fastened.

P

Plle

ea

as

se

e rre

effe

err tto

o c

ch

ha

ap

ptte

err “

“S

Se

ea

att b

be

elltts

s”

”.. 

9

9 –

– A

Alltte

errn

na

atto

orr

The  warning  lamp  comes on  when  the
ignition  is switched  on  and  must go  out
when the engine is started.

The  alternator  is driven  by a  long-life
ribbed belt.

If the warning lamp lights during the jour-
ney,  s

stto

op

p,, s

sw

wiittc

ch

h o

offff e

en

ng

giin

ne

e  and check

ribbed belt.

If it is llo

oo

os

se

e  or broken,  d

do

o  n

no

ott  d

drriiv

ve

e  o

on

n

– the coolant pump is no longer being dri-
ven. The belt must be checked/ renewed.

If the  warning  lamp  comes on  although
the V–belt or ribbed belt is not broken or
loose,  one  can  normally drive  on  to  the
nearest Technical Service Centre.

As the  battery will continue  to  discharge,
all electrical consumers which  are  not
absolutely necessary should  be  switched
off.

6

7

20

40

10

30

50

!

E P C

P

8

9

10

11

12

17

18

19

13

14

21

22

20

16 15

IB9-024

-------------------------------------------------------------------------------------------------------------------------------------------------------------

-------------------------------------------------------------------------------------------------------------------------------------------------------------

2.18

–––––––––––––––––––––––––––––––––––––––––––––––––––––––––––––––––––––

INSTRUMENT PANEL

HANDLING INSTRUCTIONS

1

10

0 –

– B

Brra

ak

ke

es

s/

/H

Ha

an

nd

d b

brra

ak

ke

e

The  warning  lamp  comes on  when  the
brake fluid level is too low.

The ignition must be switched on.

On vehicles with ABS*, the warning lamp
will light up  for  a  few  seconds when  the
ignition  is switched  on  or  the  engine
started. If the ABS system* fails it will also
light up  together  with  the  ABS warning
lamp.

W

Wa

arrn

niin

ng

g

IIff tth

he

e p

piillo

ott lliig

gh

htt d

do

oe

es

s n

no

ott g

go

o o

ou

utt o

orr

iitt  c

co

om

me

es

s  o

on

n  d

du

urriin

ng

g  tth

he

e  jjo

ou

urrn

ne

ey

y,,

tth

he

e ffllu

uiid

d lle

ev

ve

ell iin

n tth

he

e d

de

ep

po

os

siitt iis

s tto

oo

o

llo

ow

w..  H

Ha

av

ve

e  tth

he

e  b

brra

ak

ke

e  s

sy

ys

stte

em

m  s

se

err--

v

viic

ce

ed

d  iim

mm

me

ed

diia

atte

elly

y  a

att  a

a  T

Te

ec

ch

hn

niic

ca

all

S

Se

errv

viic

ce

e C

Ce

en

nttrre

e..

M

Me

ea

an

nw

wh

hiille

e  y

yo

ou

u  w

wiillll  h

ha

av

ve

e  tto

o  p

prre

es

ss

s

h

ha

arrd

de

err  o

on

n  tth

he

e  b

brra

ak

ke

e  p

pe

ed

da

all  a

an

nd

d

b

brra

ak

kiin

ng

g d

diis

stta

an

nc

ce

es

s w

wiillll b

be

e g

grre

ea

atte

err..

IIff  tth

he

e  b

brra

ak

ke

e  s

sy

ys

stte

em

m  a

an

nd

d  A

AB

BS

S  p

piillo

ott

lliig

gh

htts

s  c

co

om

me

e  o

on

n  a

att  tth

he

e  s

sa

am

me

e  ttiim

me

e,,

tth

he

e  rre

ea

arr  w

wh

he

ee

ells

s  m

ma

ay

y  llo

oc

ck

k  p

prre

em

ma

a--

ttu

urre

elly

y  w

wh

hiille

e  b

brra

ak

kiin

ng

g..  G

Go

o  iim

mm

me

ed

dii--

a

atte

elly

y tto

o a

a T

Te

ec

ch

hn

niic

ca

all S

Se

errv

viic

ce

e C

Ce

en

nttrre

e

d

drriiv

viin

ng

g v

ve

erry

y c

ca

arre

effu

ulllly

y a

an

nd

d tta

ak

ke

e p

prre

e--

c

ca

au

uttiio

on

ns

s..

H

Ha

an

nd

d b

brra

ak

ke

e

The pilot light will come on when the hand
brake  is set and  the  ignition  is switched
on. It should go out when the hand brake
is taken off.

1

11

1 –

– E

En

ng

giin

ne

e o

oiill p

prre

es

ss

su

urre

e/

/

lle

ev

ve

ell

The warning light lights up for a few sec-
onds as a functional check when the igni-
tion is switched on.

If the  warning  lamp  is red  or  yellow  or
flashes it indicates that the  engine  oil
pressure  or  level is too  low. This warning
lamp will also light up if there is a defect
in the oil level indicator.

IIff lliig

gh

htts

s u

up

p o

orr fflla

as

sh

he

es

s rre

ed

d

((iin

ns

su

uffffiic

ciie

en

ntt o

oiill p

prre

es

ss

su

urre

e))

Should the warning light flash or light up
while  driving  you  will also  hear  three
times an acoustic warning as soon as the
engine runs at over 1500 r.p.m. You must
stop the car and turn the engine off: check
the  oil level and  top  up  if necessary. See
the "Engine oil" chapter.

If the  warning  lamp  flashes even  though
the  oil level is in  order,  do  not continue
driving.  Do  not even  run  the  engine  at
idling speed. Call in expert assistance.

If while  driving  the  engine  speed  de-
creases below  idling  speed  the  oil pres-
sure warning lamp may light up. Increase
engine speed by accelerating or changing
down gear.

-------------------------------------------------------------------------------------------------------------------------------------------------------------

-------------------------------------------------------------------------------------------------------------------------------------------------------------

INSTRUMENT PANEL 

–––––––––––––––––––––––––––––––––––––––––––––––––––––––––––––––––––––

2.19

HANDLING INSTRUCTIONS

L

Liig

gh

htts

s u

up

p y

ye

ellllo

ow

w ((o

oiill lle

ev

ve

ell*

* tto

oo

o llo

ow

w))

If the pilot light lights up yellow the level
is too  low. Stop  engine  and  refill oil. See
"Engine oil" chapter.

When  opening  the  bonnet the  oil level
warning  is reset.  However,  if you  do  not
refill oil the  warning  will reappear  after
about 100 km.

F

Flla

as

sh

he

es

s y

ye

ellllo

ow

w ((d

de

effe

ec

cttiiv

ve

e o

oiill lle

ev

ve

ell*

*

iin

nd

diic

ca

atto

orr))

If the  oil level indicator  is defective  an
acoustic signal will sound  and  the  warn-
ing lamp will flash several times.

From  the  moment of the  defect to  the
check-up of the engine the oil level needs
to  be  checked  regularly,  preferably when
filling the tank.

1

12

2 –

– T

Ta

aiillg

ga

atte

e

The pilot light* comes on if the tailgate is
open or badly closed.

1

13

3 –

– D

Diia

ag

gn

no

os

siis

s*

*/

/

E

Ex

xc

ce

es

ss

s o

off p

po

ollllu

uttiio

on

n

This pilot light lights up when the ignition
is switched  on  as a  testing  device  and
goes out after a few seconds.

In  case  of failure  due  to  excessive  pollu-
tion it will start to flash.

1

14

4 –

– E

Elle

ec

cttrro

on

niic

c iim

mm

mo

ob

biilliiz

ze

err

When  switching  the  ignition  on,  the  data
from  the  vehicle  key is automatically
processed. This procedure is confirmed by
the warning lamp lighting up briefly.

If an  unauthorized  key is used  the  pilot
light will flash  continuously.  The  vehicle
cannot be  started.  See  also  "Keys with
remote control" chapter.

1

15

5 –

– B

Brra

ak

ke

e w

we

ea

arr m

mo

on

niitto

orr*

The  pilot light comes on  for  about 3  sec-
onds as a check when you switch the igni-
tion  on.  If the  pilot light comes on  while
you  are  driving  you  will also  hear  an
alarm.

If when  you  switch  the  ignition  on  the
pilot light lights up  and  you  hear  the
alarm, it means the brake pads are worn.
IIn

n  tth

hiis

s  c

ca

as

se

e  y

yo

ou

u  s

sh

ho

ou

ulld

d  g

go

o  tto

o  a

a

T

Te

ec

ch

hn

niic

ca

all  S

Se

errv

viic

ce

e  C

Ce

en

nttrre

e  tto

o  h

ha

av

ve

e  tth

he

e

ffrro

on

ntt a

an

nd

d rre

ea

arr b

brra

ak

ke

e p

pa

ad

ds

s c

ch

he

ec

ck

ke

ed

d*

*..

6

7

20

40

10

30

50

!

E P C

P

8

9

10

11

12

17

18

19

13

14

21

22

20

16 15

IB9-024

-------------------------------------------------------------------------------------------------------------------------------------------------------------

-------------------------------------------------------------------------------------------------------------------------------------------------------------

2.20

–––––––––––––––––––––––––––––––––––––––––––––––––––––––––––––––––––––

INSTRUMENT PANEL

HANDLING INSTRUCTIONS

1

16

6 –

– W

Wiin

nd

ds

sc

crre

ee

en

n w

wa

as

sh

he

err 

w

wa

atte

err lle

ev

ve

ell*

*  

When  the  ignition  is switched  on,  this
warning  light lights up  as a  functional
check.

This warning lamp will light up if the water
level in  the  screen  washer  reservoir
becomes too low.

Add  water  to  the  windshield  and  head-
light washers.  See  "Windshield  washer"
chapter.

1

17

7 –

– A

An

nttii--llo

oc

ck

kiin

ng

g b

brra

ak

ke

s

sy

ys

stte

em

m ((A

AB

BS

S))*

*

When  the  ignition  is switched  on,  this
warning  light lights up  as a  functional
check.

This warning lamp monitors the A

AB

BS

S and

E

ED

DL

L* systems.

A

An

nttii--llo

oc

ck

k B

Brra

ak

ke

e S

Sy

ys

stte

em

m ((A

AB

BS

S))*

*

The warning lamp comes on for a few sec-
onds when  the  ignition  is switched  on  or
the  engine  started.  The  lamp  goes out
after  an  automatic test sequence  has
been completed.

If the ABS warning lamp does not come on
when  the  ignition  is switched  on,  does
not go out, or comes on when driving, the
system is faulty.

A  fault in  the  ABS system  is indicated  as
follows:

JJu

us

stt  tth

he

e  A

AB

BS

S  w

wa

arrn

niin

ng

g  lla

am

mp

p  lliig

gh

htts

s

u

up

p..  The  vehicle  can  still be  braked  with

normal braking  system  but without ABS.
T

Th

he

e  v

ve

eh

hiic

clle

e  s

sh

ho

ou

ulld

d  b

be

e  tta

ak

ke

en

n  tto

o  a

a

T

Te

ec

ch

hn

niic

ca

all  S

Se

errv

viic

ce

e  C

Ce

en

nttrre

e  a

as

s  s

so

oo

on

n  a

as

s

p

po

os

ss

siib

blle

e..

A

AB

BS

S  w

wa

arrn

niin

ng

g  lla

am

mp

p  lliig

gh

htts

s  u

up

p

tto

og

ge

etth

he

err  w

wiitth

h  b

brra

ak

ke

e  s

sy

ys

stte

em

m  w

wa

arrn

niin

ng

g

lla

am

mp

p..  Not only is the  ABS system  defec-

tive,  but a  c

ch

ha

an

ng

ge

e  iin

n  n

no

orrm

ma

all  b

brra

ak

kiin

ng

g

c

ch

ha

arra

ac

ctte

erriis

sttiic

cs

s c

ca

an

n a

alls

so

o b

be

e e

ex

xp

pe

ec

ctte

ed

d..

W

Wa

arrn

niin

ng

g

IIff tth

he

erre

e iis

s a

a ffa

au

ulltt iin

n tth

he

e A

AB

BS

S s

sy

ys

stte

em

m

tth

he

e rre

ea

arr w

wh

he

ee

ells

s c

ca

an

n llo

oc

ck

k rre

ella

attiiv

ve

elly

y

q

qu

uiic

ck

klly

y..  IIn

n  c

ce

errtta

aiin

n  c

ciirrc

cu

um

ms

stta

an

nc

ce

es

s

tth

hiis

s  c

co

ou

ulld

d  m

ma

ak

ke

e  tth

he

e  b

ba

ac

ck

k  e

en

nd

d  o

off

tth

he

e c

ca

arr s

sw

wiin

ng

g v

viio

olle

en

nttlly

y..

IIff  tth

hiis

s  h

ha

ap

pp

pe

en

ns

s  d

drriiv

ve

e  w

wiitth

h  u

uttm

mo

os

stt

c

ca

arre

e  tto

o  tth

he

e  n

ne

ea

arre

es

stt  T

Te

ec

ch

hn

niic

ca

all

S

Se

errv

viic

ce

e  C

Ce

en

nttrre

e  tto

o  h

ha

av

ve

e  tth

he

e  ffa

au

ulltt

rre

ep

pa

aiirre

ed

d..

In  versions with  an  anti-skid  regulator  in
the driving wheels, or an electronic stabil-
ity programme,  the  TCS/ESP  pilot light
will also come on if the ABS fails. For more
details see pages 3.11, 3.12 and 3.13.

E

Elle

ec

cttrro

on

niic

c D

Diiffffe

erre

en

nttiia

all L

Lo

oc

ck

k ((E

ED

DL

L))*

*

The EDL system works in conjunction with
the ABS. Failure of the EDL system is indi-
cated  by the  ABS warning  lamp  lighting
up.  T

Th

he

e  v

ve

eh

hiic

clle

e  s

sh

ho

ou

ulld

d  b

be

e  tta

ak

ke

en

n  tto

o  a

a

T

Te

ec

ch

hn

niic

ca

all  S

Se

errv

viic

ce

e  C

Ce

en

nttrre

e  a

as

s  s

so

oo

on

n  a

as

s

p

po

os

ss

siib

blle

e..

Further  details on  EDL are  given  on  page
3.11.

-------------------------------------------------------------------------------------------------------------------------------------------------------------

-------------------------------------------------------------------------------------------------------------------------------------------------------------

INSTRUMENT PANEL 

–––––––––––––––––––––––––––––––––––––––––––––––––––––––––––––––––––––

2.21

HANDLING INSTRUCTIONS

1

18

8 –

– D

Drriiv

ve

e w

wh

he

ee

ells

s s

sp

piin

rre

eg

gu

ulla

atto

orr ((T

TC

CS

S))*

*

The warning light lights up for a few sec-
onds as a functional check when the igni-
tion is switched on; it should go off after a
couple of seconds.

If the  TCS works while  the  vehicle  is in
motion, the pilot light flashes.

If the  system  is disconnected  or  has a
fault, the pilot light will stay on.

As the TCS works in combination with the
ABS, if the ABS breaks down the TCS pilot
light also comes on.

For more information see page 3.11.

1

18

8 –

– E

Elle

ec

cttrro

on

niic

c S

Stta

ab

biilliitty

P

Prro

og

grra

am

m ((E

ES

SP

P))*

*

The warning light lights up for a few sec-
onds as a functional check when the igni-
tion is switched on; it should go off after a
couple of seconds.

If the  ESP  works while  the  vehicle  is in
motion, the pilot light flashes.

If the  system  is disconnected  or  has a
fault, the pilot light will stay on.

As the ESP works in combination with the
ABS, if the ABS breaks down the ESP pilot
light also comes on.

For more information see page 3.13.

1

19

9 –

– P

Pa

arrk

kiin

ng

g lliig

gh

htt/

/

d

diip

pp

pe

ed

d b

be

ea

am

m

Dipped  beam,  parking  or  side  light pilot
light (green). Works with the ignition off.

6

7

20

40

10

30

50

!

E P C

P

8

9

10

11

12

17

18

19

13

14

21

22

20

16 15

IB9-024

-------------------------------------------------------------------------------------------------------------------------------------------------------------

-------------------------------------------------------------------------------------------------------------------------------------------------------------

2.22

–––––––––––––––––––––––––––––––––––––––––––––––––––––––––––––––––––––

INSTRUMENT PANEL

HANDLING INSTRUCTIONS

2

20

0 –

– R

Re

ea

arr ffo

og

g lliig

gh

htt*

The pilot light will light up as soon as the
rear  fog  light is switched  on.  For  further
details see "Switches" chapter.

2

21

1 –

– A

Aiirr B

Ba

ag

g s

sy

ys

stte

em

m

1

1))

When the ignition is turned on, the warn-
ing light will remain lit for a few seconds.

If the  warning  light flashes for  about 12
seconds following  engagement of the
ignition,  this means that at least one  Air
Bag has been disconnected in a Technical
Service.  See  “Deactivation  of the  Air
Bag”.

T

Th

he

erre

effo

orre

e  iiff  tth

he

e  w

wa

arrn

niin

ng

g  lliig

gh

htt  d

do

oe

es

s

n

no

ott  fflla

as

sh

h  o

orr  iitt  lliig

gh

htts

s  o

orr  fflla

as

sh

he

es

s  w

wh

hiille

e

tth

he

e  v

ve

eh

hiic

clle

e  iis

s  iin

n  u

us

se

e,,  iitt  m

me

ea

an

ns

s  tth

ha

att

tth

he

erre

e  iis

s  p

prro

ob

blle

em

m  w

wiitth

h  tth

he

e  A

Aiirr  B

Ba

ag

g..

P

Prro

oc

ce

ee

ed

d  iim

mm

me

ed

diia

atte

elly

y  tto

o  a

a  T

Te

ec

ch

hn

niic

ca

all

S

Se

errv

viic

ce

e tto

o s

so

ollv

ve

e tth

he

e p

prro

ob

blle

em

m..

1)

This equipment may vary according  to  the
country.

2

22

2 –

– P

Prre

eh

he

ea

attiin

ng

g s

sy

ys

stte

em

m

(Diesel engines only)

When  the  engine  is c

co

olld

d  the  warning

lamp  comes on  when  key is turned  to
Drive position (ignition on).

If the  warning  lamp  does not come  on,
there is a defect in the glow plug system –
call in expert assistance.

Once  the  pilot light switched  off switch
engine on immediately. See "Starting the
engine" chapter.

When  the  engine  is w

wa

arrm

m the  glow  plug

lamp does not come on – the engine can
be started straight away.

N

No

otte

e

If while driving a fault occurs in the diesel
engine  management system,  this is indi-
cated  by the  warning  lamp  flashing.  The
engine  must be  checked  as soon  as pos-
sible by a Technical Service Centre.

2

22

2 –

– E

Elle

ec

cttrro

on

niic

c a

ac

cc

ce

elle

erra

atto

orr--

p

pe

ed

da

all c

co

on

nttrro

oll ((E

EP

PC

C))

If there  is a  fault in  the  accelerator  pedal
working,  a  warning  light will switch  on.
Have  the  fault repaired  at a  Technical
Service Centre.

-------------------------------------------------------------------------------------------------------------------------------------------------------------

-------------------------------------------------------------------------------------------------------------------------------------------------------------

OPENING AND CLOSING 

–––––––––––––––––––––––––––––––––––––––––––––––––––––––––––––––––

2.23

HANDLING INSTRUCTIONS

K

Ke

ey

ys

s

The  vehicle  is supplied  with  two  keys A

A

which fit all locks.

In  addition,  plastic key chain  B

B with  the

key number is included.

W

Wa

arrn

niin

ng

g

A

Allw

wa

ay

ys

s  tta

ak

ke

e  tth

he

e  k

ke

ey

y  ffrro

om

m  tth

he

e

iig

gn

niittiio

on

w

wh

he

en

ne

ev

ve

err 

y

yo

ou

lle

ea

av

ve

tth

he

e  v

ve

eh

hiic

clle

e  –

–  e

ev

ve

en

n  iiff  o

on

nlly

y  ffo

orr  a

a

m

mo

om

me

en

ntt.. T

Th

hiis

s iis

s p

pa

arrttiic

cu

ulla

arrlly

y iim

mp

po

orr--

tta

an

ntt iiff c

ch

hiilld

drre

en

n a

arre

e tto

o rre

em

ma

aiin

n iin

n tth

he

e

v

ve

eh

hiic

clle

e..  T

Th

he

ey

y  m

miig

gh

htt  s

stta

arrtt  tth

he

e

e

en

ng

giin

ne

e  o

orr  s

so

om

me

e  o

otth

he

err  e

elle

ec

cttrriic

ca

all

c

co

om

mp

po

on

ne

en

ntt,, e

e..g

g.. e

elle

ec

cttrriic

c w

wiin

nd

do

ow

ws

s..

R

Riis

sk

k o

off a

ac

cc

ciid

de

en

ntt!!

W

Wa

aiitt  u

un

nttiill  tth

he

e  v

ve

eh

hiic

clle

e  h

ha

as

s

s

stto

op

pp

pe

ed

d b

be

effo

orre

e tta

ak

kiin

ng

g tth

he

e k

ke

ey

y o

ou

utt..

O

Otth

he

errw

wiis

se

e tth

he

e s

stte

ee

erriin

ng

g m

ma

ay

y b

bllo

oc

ck

k..

R

Re

ep

plla

ac

ce

em

me

en

ntt k

ke

ey

ys

s

F

Fo

orr  rre

ea

as

so

on

ns

s  o

off  s

se

ec

cu

urriitty

y,,  rre

ep

plla

ac

ce

em

me

en

ntt

k

ke

ey

ys

s  a

arre

e  o

on

nlly

y  a

av

va

aiilla

ab

blle

e  ffrro

om

m  S

SE

EA

AT

T

O

Offffiic

ciia

all S

Se

errv

viic

ce

e C

Ce

en

nttrre

es

s..

K

Ke

ey

y tta

ag

g

The  key tag  contains the  key number  as
well as the  secret code  for  the  immo-
bilizer,  which  are  needed  to  obtain
replacement keys.  With  this number  you
can  order  a  duplicate  of your  key from  a
SEAT Official Service Center.

N

No

otte

e

Y

Yo

ou

u  s

sh

ho

ou

ulld

d  k

ke

ee

ep

p  tth

hiis

s  p

plla

as

sttiic

c  k

ke

ey

y

c

ch

ha

aiin

n  iin

n  a

a  p

pa

arrttiic

cu

ulla

arrlly

y  s

sa

affe

e  p

plla

ac

ce

e

s

siin

nc

ce

e  o

on

nlly

y  w

wiitth

h  tth

hiis

s  n

nu

um

mb

be

err  c

ca

an

n

c

co

op

piie

es

s o

off tth

he

e k

ke

ey

y b

be

e m

ma

ad

de

e..

For this reason you should give the buyer
this key tag if you sell the vehicle.

A

B

B11-002D

-------------------------------------------------------------------------------------------------------------------------------------------------------------

-------------------------------------------------------------------------------------------------------------------------------------------------------------

2.24

–––––––––––––––––––––––––––––––––––––––––––––––––––––––––––––––––

OPENING AND CLOSING

HANDLING INSTRUCTIONS

Vehicles with  remote  control*  have  two
keys.  One  is a  conventional key (see  pre-
vious page).  The  other  incorporates a
remote  control function*  (see  "Radio-fre-
quency remote control" chapter).

N

No

otte

e

In  some  model versions the  remote  con-
trol key may be folded. Its remote control
function is identical to any remote control
key.  See  "Radio-frequency remote  con-
trol" chapter.

F

Fo

olld

da

ab

blle

e k

ke

ey

y*

*

T

To

o u

un

nffo

olld

d the key sword, press button A

A.

It will unfold with a spring.

T

To

o ffo

olld

d the key sword, press button A

A and

guide  it with  your  hand  until it is com-
pletely folded.

LEO-005

A

LEO-006

K

Ke

ey

ys

s w

wiitth

h rre

em

mo

otte

e c

co

on

nttrro

oll*

*

-------------------------------------------------------------------------------------------------------------------------------------------------------------

-------------------------------------------------------------------------------------------------------------------------------------------------------------

OPENING AND CLOSING 

–––––––––––––––––––––––––––––––––––––––––––––––––––––––––––––––––

2.25

HANDLING INSTRUCTIONS

E

Elle

ec

cttrro

on

niic

c iim

mm

mo

ob

biilliis

se

err

The  immobiliser  prevents unauthorised
persons from using your vehicle.

A micro-chip is located in the head of the
key which  automatically deactivates the
immobiliser  when  the  key is inserted  in
the ignition lock.

The  system  is automatically activated
when the ignition is switched off.

N

No

otte

e

The engine can thus only be started with a
correctly coded Genuine SEAT key.

Trouble free operation of your vehicle can
only be  guaranteed  when  using  genuine
keys.

-------------------------------------------------------------------------------------------------------------------------------------------------------------

-------------------------------------------------------------------------------------------------------------------------------------------------------------

D

Do

oo

orrs

s

2.26

–––––––––––––––––––––––––––––––––––––––––––––––––––––––––––––––––

OPENING AND CLOSING

HANDLING INSTRUCTIONS

F

Frro

om

m tth

he

e o

ou

utts

siid

de

e o

off tth

he

e v

ve

eh

hiic

clle

e, it may

be  locked  or  unlocked  using  the  driver
door key.

U

Up

po

on

n o

op

pe

en

niin

ng

g, the latch will rise up (for

vehicles with central locking).

For  vehicles equipped  with  electric win-
dows and  central locking,  if the  key is
maintained in the opening position all of
the electric side windows will open.

U

Up

po

on

n c

cllo

os

siin

ng

g, the latch will descend (for

vehicles with central locking).

In  some  vehicle  models equipped  with
electric windows and  central locking,  if
the key is maintained in the locking posi-
tion on the driver side, any side windows
left open  as well as the  electric sunroof
will close.

For  vehicles without central locking,  the
passenger door and the rear doors may be
locked  from  the  outside  without using  a
key. Just press the button down and close
the door.

The latch on the driver’s door may not be
pushed down while the door is open (only
in  vehicles without central locking).  This
avoids accidentally leaving the keys in the
ignition.

W

Wa

arrn

niin

ng

g!!

E

Ex

xe

errc

ciis

se

e  e

ex

xttrre

em

me

e  c

ca

au

uttiio

on

n  w

wh

he

en

n

c

cllo

os

siin

ng

g  tth

he

e  w

wiin

nd

do

ow

ws

s  a

an

nd

d  tth

he

e  s

su

un

n--

rro

oo

off  ffrro

om

m  tth

he

e  o

ou

utts

siid

de

e  o

off  tth

he

e  v

ve

eh

hii--

c

clle

e..

C

Cllo

os

siin

ng

g  ffrro

om

m  tth

he

e  o

ou

utts

siid

de

e  w

wiitth

h--

o

ou

utt tta

ak

kiin

ng

g c

ca

arre

e o

orr o

ob

bs

se

errv

viin

ng

g a

allll tth

he

e

v

ve

eh

hiic

clle

e  m

ma

ay

y  c

ca

au

us

se

e  b

brru

uiis

siin

ng

g  ffo

orr

o

otth

he

err p

pe

eo

op

plle

e e

es

sp

pe

ec

ciia

alllly

y c

ch

hiilld

drre

en

n..

W

Wh

he

en

n  llo

oc

ck

kiin

ng

g  a

a  v

ve

eh

hiic

clle

e,,  n

ne

ev

ve

err

lle

ea

av

ve

e  c

ch

hiilld

drre

en

n  u

un

na

ac

cc

co

om

mp

pa

an

niie

ed

d

iin

ns

siid

de

e,, a

as

s iitt w

wiillll m

ma

ak

ke

e iitt m

mo

orre

e d

diiffffii--

c

cu

ulltt  tto

o  p

prro

ov

viid

de

e  a

as

ss

siis

stta

an

nc

ce

e  iiff

rre

eq

qu

uiirre

ed

d..

F

Frro

om

m  tth

he

e  iin

ns

siid

de

e  o

off  tth

he

e  v

ve

eh

hiic

clle

e,  all the

doors may be locked by pushing the secu-
rity buttons down  (in  vehicles without
central locking).

W

Wa

arrn

niin

ng

g!!

W

Wh

he

en

n  tth

he

e  d

do

oo

orrs

s  a

arre

e  llo

oc

ck

ke

ed

d,,  a

an

ny

y

iin

nttrru

us

siio

on

n  iis

s  iim

mp

pe

ed

de

ed

d,,  ffo

orr  e

ex

xa

am

mp

plle

e

w

wh

hiille

e s

stto

op

pp

pe

ed

d a

att a

a rre

ed

d lliig

gh

htt..

-------------------------------------------------------------------------------------------------------------------------------------------------------------

-------------------------------------------------------------------------------------------------------------------------------------------------------------

OPENING AND CLOSING 

–––––––––––––––––––––––––––––––––––––––––––––––––––––––––––––––––

2.27

HANDLING INSTRUCTIONS

C

Ce

en

nttrra

all llo

oc

ck

kiin

ng

g*

*

When the key is used in the driver’s door,
all doors and the boot are unlocked at the
same time by the central locking system.

The central locking system is fitted with a
llo

oc

ck

kiin

ng

g  s

se

ec

cu

urriitty

y  s

sy

ys

stte

em

m (double  lock):

When the vehicle is locked with the key or
the remote control from the outside, all of
the  doors are  locked  impeding  any
attempt to force them.

This system  may be  activated  from  the
o

ou

utts

siid

de

e either  by using  the  key or  the

radio-frequency remote control*. 

L

Lo

oc

ck

kiin

ng

g llo

oc

ca

attiio

on

ns

s o

off tth

he

e v

ve

eh

hiic

clle

e

O

Ou

utts

siid

de

e::

Driver’s door  or  by using  the  radio-fre-
quency remote control*.

IIn

ns

siid

de

e::

By using  the  central locking  switch
located on the handle of the driver’s door
(simple closure) (see page  2.29).

O

Op

pe

en

niin

ng

g

To  o

op

pe

en

n your  vehicle  turn  the  key in  the

lock of the  driver’s door  to  the  opening
position  or  use  the  radio-frequency
remote  control*.  All of the  doors will be
unlocked

When  the  vehicle  is opened  using  the
radio-frequency remote control*, the lock-
ing  security system  as well as the  anti
theft alarm* are immediately deactivated.
The indicator on the driver’s door will stop
flashing.  This warning  light is fitted  to
vehicles equipped  with  the  locking  secu-
rity system or the anti theft alarm*.

When the vehicle is opened using the key,
the  locking  security system  (double  lock-
ing) and the anti-theft alarm* are immedi-
ately deactivated.

When  the  vehicle  is opened,  the  interior
lighting will come on for 30 seconds as if
a  door  is open  and  the  indicators will
flash twice.

If,  for  any reason,  the  central locking
ceases to  function  then,  in  general,  the
drivers door  and  boot may be  opened
conventionally using  the  key but neither
the  locking  security system  nor  the  anti
theft alarm can be activated.

If the  key is maintained  in  the  opening
position  in  the  driver’s door  the  electric
windows will open,  in  vehicles equipped
with them.

N

No

otte

es

s

If for  any reason  the  central locking
ceases to function, neither the rear doors
nor the passenger door may be opened.

The  lock mechanism  of the  driver’s door,
the  boot and  the  ignition  locking  mecha-
nism all possess a rro

otta

attiio

on

n m

me

ec

ch

ha

an

niis

sm

m

(which  will turn  freely without the  key)*.
When the locking mechanism is operated
with  any object other  than  the  key,  the
rotation  mechanism  is activated.  The
manipulated  cylinder  will rotate  without
opening  the  vehicle  or  turning  the  igni-
tion on.

If the  rotation  mechanism  is activated
when the key is inserted then remove the
key fully and  then  reinsert it to  open  the
vehicle.  There  will be  no  damage  to  the
locks.

1)

This function may vary according to the model
and country.

-------------------------------------------------------------------------------------------------------------------------------------------------------------

-------------------------------------------------------------------------------------------------------------------------------------------------------------

2.28

–––––––––––––––––––––––––––––––––––––––––––––––––––––––––––––––––

OPENING AND CLOSING

HANDLING INSTRUCTIONS

L

Lo

oc

ck

kiin

ng

g

To  llo

oc

ck

k your  vehicle,  ttu

urrn

n  tth

he

e  k

ke

ey

y

o

on

nc

ce

e (the double lock is activated) to the

locking position in the driver’s door lock.
All of the doors and the boot will lock. The
locking security system (double lock) and
the  anti  theft alarm*  will be  immediately
activated  and  the  indicator  light on  the
driver’s door will begin to flash to indicate
this. This warning light is fitted to vehicles
equipped with the locking security system
or the anti theft alarm*.

When the vehicle is locked, all of the inte-
rior  lights that may be  on  are  turned  off
and the indicator lights flash once.

The activation of the locking security sys-
tem  (double  lock)  is indicated  by the
flashing  of the  indicator  light located  on
the  top  of the  driver’s door  panel at the
level of the  window.  Also,  for  vehicles
equipped  with  the  anti  theft alarm*,  the
indicator  light will indicate  when  the
alarm is on.

W

Wa

arrn

niin

ng

g!!

IIff  tth

he

e  v

ve

eh

hiic

clle

e  iis

s  c

cllo

os

se

ed

d  ffrro

om

m  tth

he

e

o

ou

utts

siid

de

e b

by

y ttu

urrn

niin

ng

g tth

he

e k

ke

ey

y o

on

nc

ce

e tto

o

tth

he

e llo

oc

ck

kiin

ng

g p

po

os

siittiio

on

n ((d

do

ou

ub

blle

e llo

oc

ck

k)),,

n

no

o  p

pe

errs

so

on

n  –

–e

es

sp

pe

ec

ciia

alllly

y  c

ch

hiilld

drre

en

n--

s

sh

ho

ou

ulld

d  rre

em

ma

aiin

n  iin

ns

siid

de

e  tth

he

e  v

ve

eh

hiic

clle

e

d

du

ue

e tto

o tth

he

e ffa

ac

ctt tth

ha

att tth

he

e d

do

oo

orrs

s c

ca

an

n--

n

no

ott  b

be

e  o

op

pe

en

ne

ed

d  ffrro

om

m  tth

he

e  iin

ns

siid

de

e

u

us

siin

ng

g  tth

he

e  d

do

oo

orr  h

ha

an

nd

dlle

e  o

orr  tth

he

e  c

ce

en

n--

ttrra

all  llo

oc

ck

kiin

ng

g  s

sw

wiittc

ch

h  ((s

se

ee

e  c

ce

en

nttrra

all

llo

oc

ck

kiin

ng

g s

sw

wiittc

ch

h iin

ns

sttrru

uc

cttiio

on

ns

s)).. IIff tth

he

e

v

ve

eh

hiic

clle

e  iis

s  e

eq

qu

uiip

pp

pe

ed

d  w

wiitth

h  e

elle

ec

cttrriic

c

w

wiin

nd

do

ow

ws

s,, tth

he

es

se

e c

ca

an

nn

no

ott b

be

e o

op

pe

en

ne

ed

d

ffrro

om

m  tth

he

e  iin

ns

siid

de

e  e

eiitth

he

err  ((s

se

ee

e  tth

he

e

iin

ns

sttrru

uc

cttiio

on

ns

s  ffo

orr  tth

he

e  e

elle

ec

cttrriic

c  w

wiin

n--

d

do

ow

ws

s))..

C

Ch

hiilld

drre

en

n  s

sh

ho

ou

ulld

d  n

ne

ev

ve

err  b

be

e  lle

efftt

a

allo

on

ne

e iin

ns

siid

de

e tth

he

e v

ve

eh

hiic

clle

e d

du

ue

e tto

o tth

he

e

ffa

ac

ctt  tth

ha

att  iiff  tth

he

e  d

do

oo

orrs

s  a

arre

e  a

ac

cc

ciid

de

en

n--

tta

alllly

y  llo

oc

ck

ke

ed

d,,  iitt  w

wiillll  b

be

e  d

diiffffiic

cu

ulltt  tto

o

p

prro

ov

viid

de

e a

as

ss

siis

stta

an

nc

ce

e iiff n

ne

ee

ed

de

ed

d..

If the  key is ttu

urrn

ne

ed

d  ttw

wo

o  c

co

on

ns

se

ec

cu

uttiiv

ve

e

ttiim

me

es

s to the locking position in less than

one  second  then  only the  simple  locking
mechanism  is activate  for  all doors and
the  boot.  The  locking  security system
(double lock) is n

no

ott activated.

If the  locking  security system  (double
lock) is not activated then the vehicle may
be unlocked ffrro

om

m tth

he

e iin

ns

siid

de

e. To do this,

simply pull the  corresponding  door  han-
dle until the door opens.

For  vehicles

1)

fitted  with  electric win-

dows or an electric sunroof, when the key
is maintained  in  the  locking  position  the
electric windows will close  fully followed
by the electric sunroof if it is open.

If the  driver’s door  is iin

nc

co

orrrre

ec

cttlly

y

c

cllo

os

se

ed

d or o

op

pe

en

n (door “ajar”), the vehicle

cannot be  locked.  In  order  to  lock the
doors of the  vehicle,  the  driver’s door
should be completely closed. If any other
door of the vehicle is incorrectly shut then
all doors except this door will be locked. If
properly closed  afterwards,  this door  will
join the locking system of the vehicle.

In  the  case  where  the  vehicle  is opened
using  the  radio-frequency remote  control
and  neither  the  locks or  the  doors are
used,  after  30  seconds the  vehicle  will
automatically be relocked so that it is not
accidentally left open.

1)

This function may vary according to the model
and country.

-------------------------------------------------------------------------------------------------------------------------------------------------------------

-------------------------------------------------------------------------------------------------------------------------------------------------------------

OPENING AND CLOSING 

–––––––––––––––––––––––––––––––––––––––––––––––––––––––––––––––––

2.29

HANDLING INSTRUCTIONS

C

Ce

en

nttrra

all llo

oc

ck

kiin

ng

g b

bu

utttto

on

n*

*

The central locking button makes it possi-
ble to lock/unlock the whole vehicle from
the  inside.  The  button  is located  in  the
door  release  lever  on  the  driver’s door
(see illustration).

L

Lo

oc

ck

kiin

ng

g

By pressing  the  right hand  side  of the
switch  A

A all doors and  the  boot lid/tail-

gate are locked. It is now no longer possi-
ble to open the doors or boot lid/tailgate.
Unwanted  access from  outside  (e.g.  at
traffic lights)  is also  prevented  in  this
way.

If the  driver’s door  is o

op

pe

en

n  it will not be

locked. This is to prevent you from locking
yourself out.

The locking security system (double lock)
and  the  anti  theft alarm*  are  n

no

ott acti-

vated if the push button is used.

A

Au

utto

om

ma

attiic

c L

Lo

oc

ck

kiin

ng

g

The  doors will lock automatically when
the vehicle exceeds speeds of 15 km/h.

N

No

otte

es

s

IIff tth

he

e v

ve

eh

hiic

clle

e iis

s llo

oc

ck

ke

ed

d u

us

siin

ng

g tth

he

e c

ce

en

n--

ttrra

all  llo

oc

ck

kiin

ng

g  s

sw

wiittc

ch

h,,  iin

nd

diiv

viid

du

ua

all  d

do

oo

orrs

s

m

ma

ay

y  b

be

e  u

un

nllo

oc

ck

ke

ed

d..  T

To

o  d

do

o  tth

hiis

s,,  s

siim

mp

plly

y

p

pu

ullll  tth

he

e  c

co

orrrre

es

sp

po

on

nd

diin

ng

g  d

do

oo

orr  h

ha

an

nd

dlle

e

u

un

nttiill tth

he

e d

do

oo

orr o

op

pe

en

ns

s..

A

B

LEO-007A

-------------------------------------------------------------------------------------------------------------------------------------------------------------


Content      ..     2      3      4      5     ..