Scion iQ. Service Manual - part 7
 

  Index      Manuals     Scion iQ. Service Manual


Search            copyright infringement  


Content      ..     5      6      7      8     ..


Scion iQ. Service Manual - part 7


120

2-1. Driving procedures

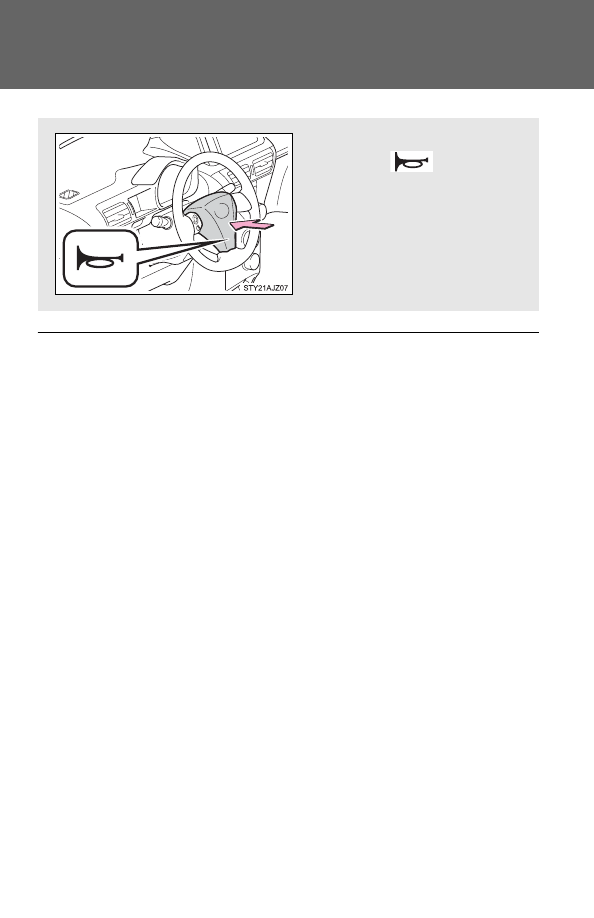
Horn

After adjusting the steering wheel

Make sure that the steering wheel is securely locked. 
The horn may not sound if the steering wheel is not securely locked. 
(

P. 49)

To sound the horn, press on or
close to the 

 mark.

-------------------------------------------------------------------------------------------------------------------------------------------------------------

121

2

Wh

en drivin

g

2-2. Instrument cluster

Gauges and meters

Multi-information display

P. 126

Speedometer

Displays the vehicle speed.

Tachometer

Displays the engine speed in revolutions per minute.

Clock reset button

P. 130

MODE button

P. 127

-------------------------------------------------------------------------------------------------------------------------------------------------------------

122

2-2. Instrument cluster

Instrument panel light control

The brightness of the instrument panel lights can be adjusted.

When the tail lights/headlights
are turned on, the brightness
level can be changed with each
press of the switch.

● Instrument panel light control display

Displays the instrument panel light control display.

NOTICE

To prevent damage to the engine and its components

Do not let the indicator needle of the tachometer enter the red zone, which
indicates the maximum engine speed.

The engine may be overheating if the high engine coolant temperature
warning light flashes or comes on. In this case, immediately stop the vehi-
cle in a safe place, and check the engine after it has cooled completely.
(

P. 312)

-------------------------------------------------------------------------------------------------------------------------------------------------------------

123

2-2. Instrument cluster

2

Wh

en drivin

g

Indicators and warning lights

The indicator and warning lights on the instrument cluster and cen-

ter panel inform the driver of the status of the vehicle’s various sys-

tems.

Instrument cluster

Center panel

-------------------------------------------------------------------------------------------------------------------------------------------------------------

124

2-2. Instrument cluster

Indicators

The indicators inform the driver of the operating state of the
vehicle’s various systems.

*

1

: These lights turn on when the engine switch is turned to the ON posi-

tion to indicate that a system check is being performed. They will turn
off after the engine is started, or after a few seconds. There may be a
malfunction in a system if a light does not come on, or if the lights do
not turn off. Have the vehicle inspected by your Scion dealer.

*

2

: The indicator flashes to indicate that the system is operating.

Turn signal indicator 
(

P. 117)

*

1

VSC OFF indicator 
(

P. 142)

Headlight high beam 
indicator (

P. 134)

*

1

TRAC OFF indicator 
(

P. 142)

Shift position and shift 
range indicators 
(

P. 116)

(if equipped)

Engine immobilizer 
system indicator 
(

P. 62)

Low engine coolant 
temperature indicator 
Indicates the engine 
coolant temperature is 
cool.

*

1

Eco Driving Indicator 
Light (

P. 105, 129)

*

1

AIR BAG ON indicator 
(

P. 81)

*

1,2

Slip indicator (

P. 142)

*

1

AIR BAG OFF indicator 
(

P. 81)

-------------------------------------------------------------------------------------------------------------------------------------------------------------

125

2-2. Instrument cluster

2

Wh

en drivin

g

CAUTION

If a safety system warning light does not come on

Should a safety system light such as ABS and the SRS airbag warning light
not come on when you start the engine, this could mean that these systems
are not available to help protect you in an accident, which could result in
death or serious injury. Have the vehicle inspected by your Scion dealer
immediately if this occurs.

Warning lights

Warning lights inform the driver of malfunctions in any of the
vehicle’s systems. (

P. 277)

*

: These lights turn on when the engine switch is turned to the ON

position to indicate that a system check is being performed. They will
turn off after the engine is started, or after a few seconds. There may
be a malfunction in a system if a light does not come on, or if the
lights do not turn off. Have the vehicle inspected by your Scion
dealer.

(except 

Canada)

(Canada)

(except      

Canada)

(Canada)

(except 

Canada)

(Canada)


(except 

Canada)

*

*

*

*

*

*

*

*

*

*

*

*

*

*

*

-------------------------------------------------------------------------------------------------------------------------------------------------------------

126

2-2. Instrument cluster

Multi-information display

The multi-information display presents the driver with a variety of

driving-related information, including the current outside tempera-

ture and time.

Fuel gauge

Displays the quantity of fuel
remaining in the tank.

Shift position and shift
range/gear display 

(

P. 116)

Displays the shift position
along with the currently
selected shift range or gear.

Clock

(

P. 130)

Displays the time and sets the
clock.

Outside temperature dis-
play

Displays the outside air tem-
perature. 

The temperature range that
can be displayed is from -40°F
(-40°C) to 122°F (50°C).

Trip information

(

P. 127)

Displays odometer, trip meter,
fuel consumption, Stop & Start
system operation time, Stop &
Start system total operation
time and other cruising-related
information.

-------------------------------------------------------------------------------------------------------------------------------------------------------------

127

2-2. Instrument cluster

2

Wh

en drivin

g

Switch the display

Display items can be switched
by pressing the MODE button.

● Odometer

● Trip meter A

*

1

● Trip meter B

*

1

*

1

: Trip meters A and B can be used to record and display different distances

independently.

Displays the total distance the vehicle has been
driven.

Displays the distance the vehicle has been driven
since the meter was last reset.

The function can be reset by pressing the MODE but-
ton for longer than 1 second when the trip meter A is
displayed.

Displays the distance the vehicle has been driven
since the meter was last reset.

The function can be reset by pressing the MODE but-
ton for longer than 1 second when the trip meter B is
displayed.

-------------------------------------------------------------------------------------------------------------------------------------------------------------

128

2-2. Instrument cluster

● Instantaneous fuel consumption

● Average fuel consumption after refueling

*

2

● Setting Eco Driving Indicator Light

● Average vehicle speed

*

2

: When filled with less than 2.6 gal. (10 L, 2.2 Imp.gal.) per refueling, the

“average fuel consumption after refueling” may not be displayed
accurately.

Displays the Eco Driving Indicator Zone Display
and instantaneous fuel consumption.

Displays Eco Driving Indicator Zone Display and
average fuel consumption since the function was
reset.

Use the displayed average fuel consumption as a ref-
erence.

Eco Driving Indicator Light can be switched on
and off.

The display can be switched on or off by pressing the
MODE button for longer than 1 second.

Displays the average vehicle speed since the
engine was started or the function was reset.

-------------------------------------------------------------------------------------------------------------------------------------------------------------

129

2-2. Instrument cluster

2

Wh

en drivin

g

Outside temperature display

In the following situations, the correct outside temperature may not be dis-

played, or the display may take longer than normal to change.

When stopped, or driving at low speeds (less than 12 mph [20 km/h])

When the outside temperature has changed suddenly (at the entrance/

exit of a garage, tunnel, etc.)

Eco Driving Indicator

NOTICE

The multi-information display at low temperatures

Allow the interior of the vehicle to warm up before using the liquid crystal
information display. At extremely low temperatures, the information display
monitor may respond slowly, and display changes may be delayed.

Suggests Zone of Eco driving with current
Eco driving ratio based on acceleration.
During Eco-friendly driving acceleration
(Eco driving), Eco Driving Indicator Light
(

) will turn on.

Vehicle to exceed Zone of Eco driving
(

), the right of Eco Driving Indicator

Zone Display will blink and Eco Driving
Indicator Light will turn off.
Eco Driving Indicator Light will operate in
the following conditions:

• The shift lever in D.
• When the vehicle is at a speed of

approximately 80 mph (130 km/h) or
below.

Zone of Eco driving

Eco driving ratio based 
on acceleration

-------------------------------------------------------------------------------------------------------------------------------------------------------------

130

2-2. Instrument cluster

Setting the clock

Press and hold the clock reset button to enter the adjustment
mode for the clock.

Press the clock reset button to adjust the minutes.

After adjusting the minutes, wait 5 seconds to allow the minutes to
be automatically input.

Press the clock reset button to adjust the hours.

After adjusting the hours, wait 5 seconds to allow the hours to be
automatically input and the mode to return to normal.

-------------------------------------------------------------------------------------------------------------------------------------------------------------

131

2-2. Instrument cluster

2

Wh

en drivin

g

The multi-information display can be operated when

The engine switch is in the ON position.

When disconnecting and reconnecting battery terminals

The following information will be reset.

Clock

Trip meter

Average fuel consumption after refueling

Average vehicle speed

Adjusting to a full hour

If you press the clock reset button, the minute values will be rounded to the
nearest hour. So, minute values from “:00” to “:29” are rounded down, and
values from “:30” to “:59” are rounded up.

*

*

: e.g.

1:00 to 1:29 

 1:00

1:30 to 1:59 

 2:00

-------------------------------------------------------------------------------------------------------------------------------------------------------------

132

2-3. Operating the lights and wipers

Headlight switch

The headlights can be operated manually or automatically.

Type A

Vehicles with day-
time running light
system: 
The daytime running
lights turn on.

The side marker,
parking, tail, license
plate, daytime run-
ning lights (if
equipped) and instru-
ment panel lights turn
on.

The headlights and
all lights listed above
(except daytime run-
ning lights) turn on.

-------------------------------------------------------------------------------------------------------------------------------------------------------------

133

2-3. Operating the lights and wipers

2

Wh

en drivin

g

Type B

Vehicles with day-
time running light
system: 
The daytime running
lights turn on.

The side marker,
parking, tail, license
plate, daytime run-
ning lights (if
equipped) and instru-
ment panel lights turn
on.

The headlights and
all lights listed above
(except daytime run-
ning lights) turn on.

The headlights and
all lights listed above
turn on and off auto-
matically. (When the
engine switch is in
the ON position)

(if equipped)

-------------------------------------------------------------------------------------------------------------------------------------------------------------

134

2-3. Operating the lights and wipers

Turning on the high beam headlights

With the headlights on, push
the lever forward to turn on the
high beams. 

Pull the lever back to the center
position to turn the high beams
off.

Pull the lever toward you to
turn on the high beams. 

Release the lever to turn them off.
You can flash the high beams
with the headlights on or off.

Daytime running light system (if equipped)

To make your vehicle more visible to other drivers, the headlights turn on
automatically (at a reduced intensity) whenever the engine is started and
the parking brake is released. Daytime running lights are not designed for
use at night.

Compared to turning on the headlights, the daytime running light system
offers greater durability and consumes less electricity, so it can help
improve fuel economy.

Headlight control sensor (if equipped)

The sensor may not function properly if
an object is placed on the sensor, or any-
thing that blocks the sensor is affixed to
the windshield.

Doing so interferes with the sensor
detecting the level of ambient light and
may cause the automatic headlight sys-
tem to malfunction.

-------------------------------------------------------------------------------------------------------------------------------------------------------------

135

2-3. Operating the lights and wipers

2

Wh

en drivin

g

Automatic light off system (if equipped)

When the headlights come on: The headlights and tail lights automati-
cally turn off after 30 seconds when a door is opened and closed with the
engine switch turned to the ACC or LOCK position. (The lights turn off

immediately if the 

 button on the wireless remote control is pressed

after all doors are locked.)

When only the tail lights come on: The tail lights turn off automatically
with the engine switch turned to the ACC or LOCK position and the
driver’s door is opened.

Customization that can be configured at Scion dealer

Settings of the light sensor sensitivity can be changed. 
(Customizable features 

P. 343)

NOTICE

To prevent battery discharge

Do not leave the lights on longer than necessary when the engine is not run-
ning.

-------------------------------------------------------------------------------------------------------------------------------------------------------------


Content      ..     5      6      7      8     ..