Lancia Y. Service Manual - part 7
 

  Index      Manuals     Lancia Y. Service Manual


Search            copyright infringement  


Content      ..     5      6      7      8     ..


Lancia Y. Service Manual - part 7


Before replacing a fuse,

make sure the key has
been taken out from the ig-

nition and that all users are
switched off or deactivated.

107

f

G

BOOT LIGHT

To change the 12V-5W (type C5W)

bulb, remove the lens A (fig. 28), by
pushing it in the direction of the arrow.

IF A FUSE BLOWS

GENERAL

The fuse is an element for protecting

the electrical system. It will blow (that
it will break) in the event of a failure
or incorrect interventions on the elec-
trical system.

If an electrical device is not working,

check whether the respective fuse is
blown. The conductor should not be
broken. If it is, replace it with another
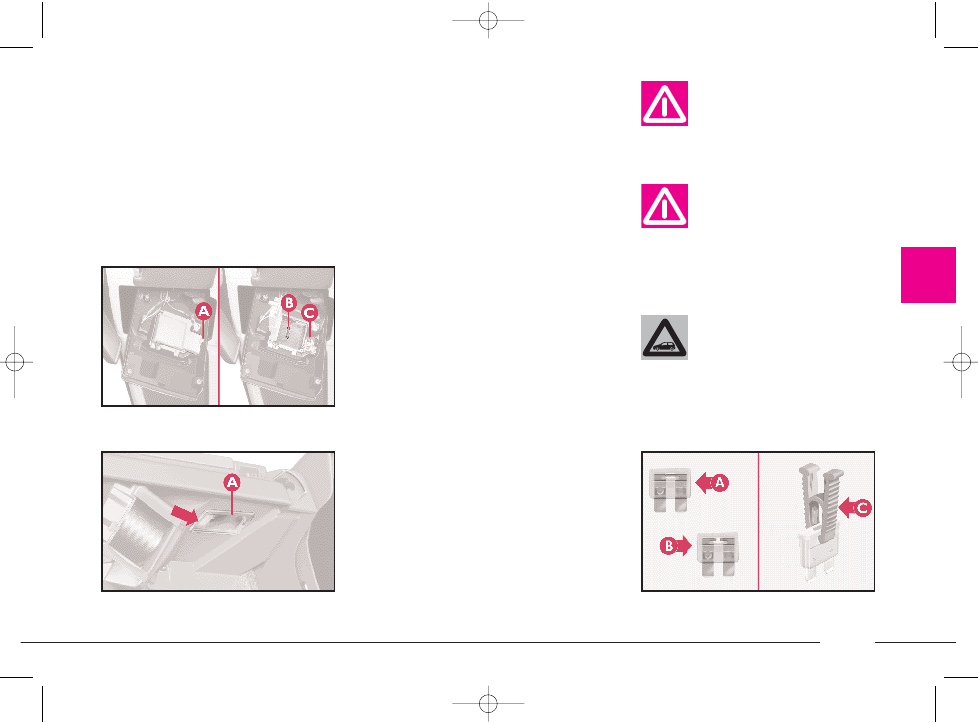
with the same amperage (same
colour) (fig. 29).

- Intact fuse.

- Fuse with broken filament.

Use the tongs C (fig. 29-32) to re-

move the fuse to be replaced. One set
of tongs is to be found in the main
fuse box, while the other is in the en-
gine compartment fuse box.

If the problem re-occurs have the car

seen to at a LANCIA Dealership.

Do not replace a fuse

with another of a higher
amp rating - DANGER OF

FIRE!

Never replace a broken

fuse with anything other
than a new fuse. Always

use an undamaged fuse of the
same colour (same value).

fig. 27

P4C00124

fig. 28

P4C00046

fig. 29

P4C00126

4C090-119 ING  13-03-2008  12:51  Pagina 107

-------------------------------------------------------------------------------------------------------------------------------------------------------------

108

f

G

POSITION OF FUSES

To find the protection fuses, see the

tables on the following pages.

Fuses in the fusebox

The fusebox is situated behind the

glove compartment, to the left of the
steering wheel.

To reach the fuses, unscrew the 2

screws A (fig. 30) securing the glove
compartment.

The icons indicating the main elec-

trical elements corresponding to each
fuse can be seen when the glove com-
partment is open (fig. 31).

Fuses in the glove compartment

Another fusebox is located behind

the glove compartment (fig. 33).

fig. 32

P4C00231

fig. 33

P4C00232

fig. 31

P4C00049

fig. 30

P4C00047

If the fuse blows again,

have the car inspected at a
LANCIA Dealership. 

Do not attempt to repair a

blown MAXI FUSE. Go to a
LANCIA Dealership.

4C090-119 ING  13-03-2008  12:51  Pagina 108

-------------------------------------------------------------------------------------------------------------------------------------------------------------

109

f

G

Fuses in the engine compartment

A fusebox located near the positive

battery terminal contains six high am-
perage fuses which further protect the
car from the risk of fire by preventing
the high intensity current wires from
overheating. To reach the fuses, lift the
two covers as shown (fig. 34 and 35).

IMPORTANT If you need to replace

one of the six above-mentioned fuses,
get in touch with your LANCIA
Dealership
.

A second fusebox (fig. 36) is located

on the right-hand side of the engine
compartment (fig. 36).

Loosen screw to loosen the cover

B.

Two fuses are located under a pro-

tection cap (fig. 37) on the outer side
of the fusebox on the right-hand side
of the engine compartment.

fig. 34

P4C00417

fig. 36

P4C00419

fig. 37

P4C00420

fig. 35

P4C00418

4C090-119 ING  13-03-2008  12:51  Pagina 109

-------------------------------------------------------------------------------------------------------------------------------------------------------------

110

f

G

System / Component

No. fuse

Amperage

Location

Hazard lights
Reverse lights
Brake lights
Direction indicators
Interior light
Map light
Front left side lights
Rear right taillights
Left number plate light
Front right side lights
Rear left taillights
Right number plate light
Rear foglights
Boot light
Radio lighting
Cluster lighting
Heater/climate controls lighting
Dashboard controls lighting
Cigar lighter lighting
Cigar lighter
Digital clock brightness
Right main beam headlight
Left main beam headlight
Right dipped beam headlight
Left dipped beam headlight
Front foglights

2

10A

fig. 32

3

15A

fig. 32

3

15A

fig. 32

3

15A

fig. 32

4

15A

fig. 32

4

15A

fig. 32

9

10A

fig. 32

9

10A

fig. 32

9

10A

fig. 32

10

10A

fig. 32

10

10A

fig. 32

10

10A

fig. 32

13

10A

fig. 32

4

15A

fig. 32

10

10A

fig. 32

10

10A

fig. 32

9

10A

fig. 32

10

10A

fig. 32

10

10A

fig. 32

3

10A

fig. 33

10

10A

fig. 32

14

10A

fig. 32

15

10A

fig. 32

8

10A

fig. 32

12

10A

fig. 32

2

20A

fig. 33

4C090-119 ING  13-03-2008  12:51  Pagina 110

-------------------------------------------------------------------------------------------------------------------------------------------------------------

111

f

G

Headlight warning lamp
Side/taillights warning light - Cellular phone setup system
Heated rear window warning light
Heated rear window
Rear window wiper
Rear window washer
Windscreen wiper
Windscreen washer
Electric mirror control
Electric mirror defroster
Remote control
Radio power supply - Cellular phone radio-navigator 
setup system
Cluster power supply - Cellular phone setup system
Check panel power supply
Door lock/unlock remote control power supply
Horn
Airbag system protection
ABS system protection

Radiator fan protection

Internal climate control fan
Radiator fan
Electric windows
Door lock

System / Component

No. fuse

Amperage

Location

15

10A

fig. 32

10

10A

fig. 32

1

20A

fig. 32

1

20A

fig. 32

6

20A

fig. 32

6

20A

fig. 32

6

20A

fig. 32

6

20A

fig. 32

3

10A

fig. 33

1

20A

fig. 32

3

15A

fig. 32

4

15A

fig. 32

3

15A

fig. 32

3

15A

fig. 32

4

15A

fig. 32

5

20A

fig. 32

15A

fig. 32

6

60A-MAXI FUSE

fig. 35

30A (40A 

2

if climate control

fig. 35

fitted)-MAXI FUSE

7

30A

fig. 32

11

30A

fig. 32

1

30A

fig. 33

5

20A

fig. 33

4C090-119 ING  13-03-2008  12:51  Pagina 111

-------------------------------------------------------------------------------------------------------------------------------------------------------------

112

f

G

System / Component

No. fuse

Amperage

Location

Sunroof
General fusebox
(left side of dashboard)
Fusebox in glove compartment
Key-operated circuits and Lancia CODE
Lancia CODE and engine control circuit

1242 cm

3

version:

Compressor
Auxiliary loads (lambda sensor, evaporation system,
compressor on)
ABS power circuit protection
Engine control unit protection
Lancia CODE

1242 cm

3

16V

version:

Compressor
Auxiliary loads (lambda sensor, evaporation system,
compressor on)
Engine control unit protection
Lancia CODE
Auxiliary loads (injectors, ignition coils, phase sensor)
ABS power circuit protection

4

20A

fig. 33

1

80A-MAXI FUSE

fig. 35

4

50A-MAXI FUSE

fig. 35

5

40A-MAXI FUSE

fig. 35

3

30A-MAXI FUSE

fig. 35

1

7.5A

fig. 36

2

15A

fig. 36

3

10A

fig. 36

4

7.5A

fig. 36

5

7.5A

fig. 36

1

7.5A

fig. 36

2

15A

fig. 36

4

7.5A

fig. 36

5

7.5A

fig. 36

1

15A

fig. 37

2

10A

fig. 37

les
00

ed

az-

ve

4C090-119 ING  13-03-2008  12:51  Pagina 112

-------------------------------------------------------------------------------------------------------------------------------------------------------------

113

f

G

RECHARGING THE BATTERY

You are recommended to recharge

the battery slowly for a period of ap-
proximately 24 hours at a very low
amperage.

Extensive charging could damage

the battery.

Proceed as follows:

1) Disconnect the electrical system

terminals from the battery posts.

2) Connect the charger cables to the

battery terminals.

3) Turn on the charger.

4) When you have finished, turn the

charger off before disconnecting the
battery.

5) Reconnect the terminals to the

battery posts. Make sure the polarity
is correct (connect the negative post
last).

IF THE BATTERY 
IS FLAT

First of all, read the “Car mainte-

nance” section for the steps to be
taken to avoid the battery running
down and to ensure it has a long life.

JUMP STARTING

See “Jump starting” in this section.

The liquid in the battery

is poisonous and corrosive.
Do not let it touch the skin

or eyes. Recharging the battery
should be done in a well-venti-
lated area and away from naked
flames or possible sources of
sparks: explosion and fire risk.

Never try to charge a

frozen battery: first let it
thaw out, otherwise it

could explode.

If the battery has frozen, check

that the internal elements are not
broken (risk of short circuit) and
that the casing is not cracked
causing the acid to leak out. This
acid is poisonous and corrosive.

Under no circumstances

should a battery charger
be used to start the engine:

it could damage the electronic sys-
tems and in particular the control
units governing ignition and fuel
feed.

4C090-119 ING  13-03-2008  12:51  Pagina 113

-------------------------------------------------------------------------------------------------------------------------------------------------------------

114

f

G

WITH A SHOP JACK

Front end

The car may only be raised by plac-

ing the jack arm under the transaxle,
with a block of wood or rubber as il-
lustrated in (fig. 38).

IF THE CAR NEEDS 
TO BE RAISED

WITH THE JACK

See “If a tyre is punctured”, in this

section.

The jack should only be

used to change a wheel on
the vehicle with which it is

supplied or on vehicles of the same
model. All other uses, for example
raising other vehicles, must be ex-
cluded. Under no circumstances
use the jack to carry out repairs
under the vehicle.

If the jack is not used

correctly, the raised vehi-
cle may fall. Do not use the

jack to lift weights above that in-
dicated on the label attached to the
jack itself.

It must be remembered that:

– the jack does not require adjust-

ments;

– the jack cannot be repaired. If it

breaks, it must be changed with an-
other new jack;

– only the jack handle described in

the chapter “If a tyre is punctured”
can be fitted onto the jack.

fig. 38

P4C00393

4C090-119 ING  13-03-2008  12:51  Pagina 114

-------------------------------------------------------------------------------------------------------------------------------------------------------------

115

f

G

Rear end

The car may only be raised by plac-

ing the jack arm at the two anchoring
points of the rear bumper, and posi-
tioning a flat piece of wood as illus-
trated in (fig. 39) (dimensions given
in mm).

Lifting at the sides

The car may only be

raised at the sides if the
hydraulic jack arm is fit-

ted with a special bracket.

Alternatively, a special piece of wood

can be used with a groove that fits on
to the fin on the side member
(fig. 40).

fig. 39

P4C00138

fig. 40

P4C00139

ARM-TYPE HOIST

The car must be raised by placing

the ends of the arms in the areas il-
lustrated in (fig. 41).

fig. 41

P4C00410

4C090-119 ING  13-03-2008  12:51  Pagina 115

-------------------------------------------------------------------------------------------------------------------------------------------------------------

116

f

G

IF THE CAR NEEDS 
TO BE TOWED

The tow ring is supplied as standard

with the car.

How to attach the tow ring to the

car:

1) Take the tow ring out of its sup-

port, located under the boot carpeting.

2) Remove the flap in the bumper,

using a screwdriver to pry it off.

3) Screw ring A (fig. 42) onto the

threaded pin B (fig. 43) or C (fig. 44)
which can be seen when the cover is
removed.

When towing the car, you

must adhere to the specific
traffic regulations regard-

ing the tow hitch and how to tow
on the road.

- front anchorage point (fig. 43).

- rear anchorage point (fig. 44).

fig. 42

P4C00135

fig. 43

P4C00412

fig. 44

P4C00003

4C090-119 ING  13-03-2008  12:51  Pagina 116

-------------------------------------------------------------------------------------------------------------------------------------------------------------

117

f

G

While the car is being

towed with the engine off,
remember that the brake

pedal and steering will require
more effort as you no longer have
the benefit of the brake booster
and power steering. Do not use
flexible cables to tow. Avoid jerk-
ing. Whilst towing, ensure that the
coupling to the car does not dam-
age the surrounding components.

Do not extract the igni-

tion key during towing;
leave it at MAR, to prevent

the steering lock engaging and,
provided the electrical system is
not damaged, keep the brake lights
and direction indicators working.

When the ignition key is re-

moved, the steering lock will cut in
thus preventing the steering wheel
from being turned.

IF AN ACCIDENT
OCCURS

– It is important to keep calm.

– If you are not directly involved,

stop at least ten metres away from the
accident.

– If you are on a motorway do not

obstruct the emergency lane with your
car.

– Turn off the engine and turn on

the hazard lights.

– At night, illuminate the scene of

the accident with your headlights. 

– Act carefully, you must not risk

being run over.

– Mark the accident by putting the

red triangle at the regulatory distance
from the car where it can be clearly
seen.

– If the doors are jammed, do not try

to leave the car by breaking the glass
of the windscreen as the glass is strat-
ified. Side windows and the rear win-
dow can be broken more easily.

4C090-119 ING  13-03-2008  12:51  Pagina 117

-------------------------------------------------------------------------------------------------------------------------------------------------------------

118

f

G

– Call the emergency services mak-

ing the information you give as accu-
rate as you can. On the motorway use
the special column-mounted emer-
gency phones.

– Remove the ignition keys of the ve-

hicles involved.

– If you can smell petrol or other

chemicals, do not smoke and make
sure all cigarettes are extinguished.

– Use a fire extinguisher, blanket,

sand or earth to put out fires no mat-
ter how small they are. Never use
water.

– In pile-ups on the motorway, par-

ticularly when the visibility is bad,
there is a high risk of other vehicles
running into those already immobile.
Get out of the car immediately and
take refuge behind the guard rail.

IF ANYONE IS INJURED

– Never leave the injured person

alone. The obligation to provide as-
sistance exists even for those not di-
rectly involved in the accident.

– Do not congregate around the in-

jured person.

– Reassure the injured person that

help is on its way and will arrive soon.
Stay close by to calm him/her down
in case of panic. 

– Unfasten or cut seat belts holding

injured parties.

– Do not give an injured person any-

thing to drink.

– Never move an injured person ex-

cept in the following cases.

– Pull the injured person from the

car only if it risks catching fire, it is
sinking in water or is likely to fall over
a cliff or similar. Do not pull his/her
arms or legs, never bend the head
and, as far as possible, keep the body
horizontal.

FIRST-AID KIT

The first-aid kit must at least con-

tain (fig. 45):

– sterile gauze for covering and

cleansing wounds

– bandages of different widths

– antiseptic plasters of different sizes

– a roll of plaster

– a packet of cotton wool

– a bottle of disinfectant

– a packet of paper handkerchiefs

– a pair of scissors with rounded tips

– a pair of pincers

– two haemostatic loops.

4C090-119 ING  13-03-2008  12:51  Pagina 118

-------------------------------------------------------------------------------------------------------------------------------------------------------------

119

f

G

It is a good idea to keep a fire extin-

guisher and blanket in the car in ad-
dition to the first-aid kit.

Both the first-aid kit and the fire

extinguisher are available in the
Lineaccessori LANCIA range.

fig. 45

P4C00353

4C090-119 ING  13-03-2008  12:51  Pagina 119

-------------------------------------------------------------------------------------------------------------------------------------------------------------

CAR MAINTENANCE

T

he Lancia Y is brand new throughout, even in

its servicing schedule. Its design and manufactur-
ing process have made the traditional check at
1,500 kilometres unnecessary, which means its
first service schedule coupon is to be used at
20,000 kilometres. Your car, however, still re-
quires a certain amount of care and attention e.g.
the various fluid/liquid levels and tyre pressure
must be systematically checked and topped up if
necessary.

You should nonetheless bear in mind that proper

car maintenance is certainly the best way to keep
your car in tip-top condition for years to come and
safeguard its safety features, its environmentally-
friendly nature and its cheap running costs.

Also remember that the following servicing reg-

ulations marked with the symbol 

∑ are essential

to ensure the warranty remains valid.

SCHEDULED SERVICING ............................. 121
SERVICE SCHEDULE  ................................... 122
ANNUAL INSPECTION SCHEDULE  ............. 124
ADDITIONAL CHECKS  ................................. 124
CHECKING FLUID LEVELS  ......................... 127
AIR CLEANER  ............................................... 131
POLLEN FILTER ........................................... 132
BATTERY ....................................................... 132
ELECTRONIC CONTROL UNITS .................. 134
SPARK PLUGS  ............................................... 135
WHEELS AND TYRES ................................... 136
RUBBER TUBING  .......................................... 137
WINDSCREEN/REAR WINDOW WIPERS  ..... 138
CLIMATE CONTROL SYSTEM ...................... 139
BODYWORK .................................................. 140
INTERIORS .................................................... 142

120

G

4C120-143 ING  11-03-2008  12:01  Pagina 120

-------------------------------------------------------------------------------------------------------------------------------------------------------------

121

G

SCHEDULED
SERVICING

Correct maintenance of the car is es-

sential for ensuring it stays in tip-top
condition for a long time to come.

This is why LANCIA has pro-

grammed a number of service checks
and operations every 20,000 kilo-
metres.

It is however important to remem-

ber that Scheduled Servicing is not all
your car requires. Regular checks -
also in the initial period before the
20 thousand kilometre coupon and
later between coupons - ordinary care
is required, such as checking fluid lev-
els and topping up, checking tyre in-
flation pressure, etc. 

IMPORTANT The Manufacturer re-

quires the Service Schedule coupon-
related checks to be carried out. Fail-
ure to do so could result in the war-
ranty being cancelled.

Scheduled Servicing is performed at

all LANCIA Dealerships and there is
a set time scale for such operations.

If it is seen that further replacements

or repairs are necessary in addition to
the work being carried out, these will
only be done after the customer has
given his/her consent.

IMPORTANT You are recom-

mended to get in touch with a LAN-
CIA Dealership 
immediately if any
small running problems crop up,
without waiting for the next coupon.

4C120-143 ING  11-03-2008  12:01  Pagina 121

-------------------------------------------------------------------------------------------------------------------------------------------------------------

122

G

SERVICE SCHEDULE

thousands of kilometres

Check tyre conditions and wear and adjust inflation pressure,
if required

Check lighting system operation (headlights, direction indicators,
hazard lights, boot, passenger compartment, instrument panel
warning lights, etc.).

Check windscreen wiper/washer operation and adjust nozzles.

Check front and rear wiper blade position and wear

Check front disc brake pad conditions and wear

Check rear drum brake lining conditions and wear

Inspect conditions of: outside bodywork, underbody protection,
piping/hosing (exhaust – fuel lines – brake lines), rubber parts
(boots, sleeves, bushings, etc.)

Check tension and conditions of various control belts and adjust,
if required

Check utility drive belt conditions

Check and adjust tappet clearance (1.2

16V

M

N

blue

and

1.2 LS versions)

Check and adjust handbrake lever stroke

Check evaporation system

Replace air cleaner cartridge

20

40

60

80

100

120

140

160

180

4C120-143 ING  11-03-2008  12:01  Pagina 122

-------------------------------------------------------------------------------------------------------------------------------------------------------------


Content      ..     5      6      7      8     ..