Lancia DELTA. Service Manual - part 6
 

  Index      Manuals     Lancia DELTA. Service Manual


Search            copyright infringement  


Content      ..     4      5      6      7     ..


Lancia DELTA. Service Manual - part 6


88

KNOWING YOUR CAR

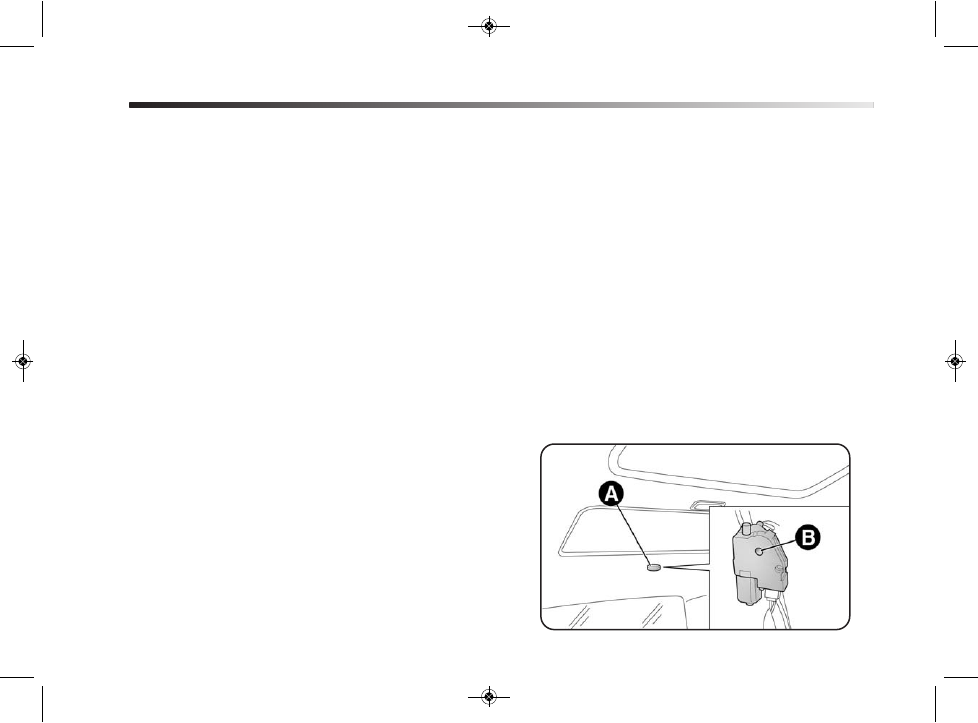
fig. 54

L0E0109m

INITIALISATION PROCEDURE 

After the battery has been disconnected or a fuse has blown,
the operation of the sun roof must be initialised again.

Proceed as follows:

❍ press button A - fig. 53 until the sun roof is complete-

ly closed. Release the button;

❍ press and hold down button A for at least 10 seconds

and/or until the glass panel moves forwards by one
click. Release the button at this point;

❍ press button A within 5 seconds of this operation and

keep it pressed: the glass panel will complete a full
opening and closing cycle. Release the button only at
the end of this cycle.

EMERGENCY MANOEUVRE

If the switch does not work, the sun roof can be operated
manually as follows:
❍ remove protective cap A - fig. 54 on the rear part of

the internal cover;

❍ take the Allen key provided from the container with

the on-board documentation or from the luggage com-
partment (versions with Fix&Go automatic);

❍ fit the key into seat B and turn it:

– clockwise to open the sunroof; 
– anticlockwise to close the roof.

001-154 Delta GB 1ed  03/03/14  10.00  Pagina 88

-------------------------------------------------------------------------------------------------------------------------------------------------------------

KNOWING YOUR CAR

89

1

DOORS

LOCK/RELEASE FROM OUTSIDE fig. 55

Door release

To release all doors: turn the key to position 1. Pull up the
associated handle to open the door. Press button Ë on the
remote control to unlock the doors.

Before opening a door, ensure that you can do
it in conditions of safety. Open the doors on-
ly when the car is stationary.

fig. 55

L0E0042m

Door lock

To lock all doors: turn the key to position 2 with doors ful-
ly closed.
Press button Á on the remote control to lock the doors. If
one of the doors is not shut properly, simultaneous lock-
ing is disabled.

IMPORTANT If one of the doors is not properly closed
or if there is a fault in the system, the central locking will
not engage. If the operation is repeated 10/11 times in
quick succession, the device is excluded for approximate-
ly 30 seconds.

001-154 Delta GB 1ed  03/03/14  10.00  Pagina 89

-------------------------------------------------------------------------------------------------------------------------------------------------------------

90

KNOWING YOUR CAR

LOCK/RELEASE FROM INSIDE fig. 56

Press the door lock/release button A, located in the dash-
board, from inside the car (with the doors shut). If the
electrical system has failed, it is still possible to lock the
doors manually.

fig. 56

L0E0043m

CHILD LOCK SYSTEM B - fig. 57

This system prevents the rear doors from being opened
from the inside.
This device can only be engaged with the doors open:
❍ position 1 - device engaged (door locked);
❍ position 2 - disengaged (door can be opened from in-

side).

The device remains engaged even if the doors are unlocked
remotely.

IMPORTANT The rear doors cannot be opened from the
inside when the child lock system is engaged.

After engaging the child lock on both rear
doors, check for proper engagement by try-
ing to open a rear door with the internal

handle.

Always use this device when carrying chil-
dren. 

001-154 Delta GB 1ed  03/03/14  10.00  Pagina 90

-------------------------------------------------------------------------------------------------------------------------------------------------------------

KNOWING YOUR CAR

91

1

The door lock knob can be realigned (only when the bat-
tery charge has been restored) as follows:
❍ press button Ë on the key;
❍ press door lock/release button ≈ in the dashboard;
❍ open a front door by inserting the key into the key

pawl;

❍ operate the internal door handle.

fig. 57

L0E0291m

PASSENGER SIDE FRONT DOOR AND REAR
DOOR EMERGENCY LOCKING DEVICE

The passenger side front door and the rear doors have a
device to lock them when there is no power.
Proceed as follows:
❍ engage the metal insert of the starting key in position

A - fig. 57 (rear doors) or A - fig. 58 (front passenger
side door);

❍ turn the key counter-clockwise and then remove it from

position A - fig. 57 or A - fig. 58.

fig. 58

L0E0290m

001-154 Delta GB 1ed  03/03/14  10.00  Pagina 91

-------------------------------------------------------------------------------------------------------------------------------------------------------------

92

KNOWING YOUR CAR

IMPORTANT If the battery is disconnected or the pro-
tection fuse blows, the luggage compartment opening/clos-
ing mechanism must be initialised as follows:
❍ shut all the doors;
❍ press button Á on the key or door lock/release button

≈ in the dashboard;

❍ press button Ë on the key or door lock/release button

≈ in the dashboard.

If the child lock was engaged and the previ-
ously described locking procedure carried
out, operating the internal handle will not

open the door but will only realign the door lock
knobs. To open the door, the outside handle must
be used. The door central locking/unlocking but-
ton is not disabled by the engagement of the emer-
gency lock 
.

ELECTRIC WINDOWS

These operate when the ignition key is turned to MAR and
for about 2 minutes after turning the key to STOP or re-
moving it.
The control buttons are located in the door panels (the
driver side door panel can be used to operate all the win-
dows).
An anti-pinch device is operated when the front windows
are lifted.

CONTROLS fig. 59

A. opening/closing left hand front window; “continuous

automatic” operation during window opening/clos-
ing stage;

B. opening/closing right hand front window; “continuous

automatic” operation during window opening/clos-
ing stage;

C. enabling/disabling of rear door electric window con-

trols;

D. opening/closing left hand rear window (for ver-

sions/markets, where provided); “continuous automat-
ic” operation during window opening/closing stage;

E. opening/closing right hand rear window (for ver-

sions/markets, where provided); “continuous automat-
ic” operation during window opening/closing stage;

001-154 Delta GB 1ed  03/03/14  10.00  Pagina 92

-------------------------------------------------------------------------------------------------------------------------------------------------------------

KNOWING YOUR CAR

93

1

Window opening

Push the buttons to open/close the desired window. When
one of the two buttons is pressed briefly, the window moves
in “stages”; if the button is held down, “continuous au-
tomatic” operation is activated. If the button is pressed
again the window will stop in its current position. Hold-
ing the button pressed for a few seconds will automati-
cally raise or lower the window (only with key at MAR). 

Window closing

Lift the buttons to close the desired window.
The window closing stage occurs following the same log-
ic described for the opening stage.

Improper use of the electric windows can be
dangerous. Before and during its operation
ensure that any passengers are not at risk

from the moving roof either by personal objects get-
ting caught in the mechanism or by being injured
by it directly. 

Always remove the ignition key when you get
out of the car to prevent the sunroof from be-
ing operated accidentally and constituting a

danger to the people still on board.

fig. 59

L0E0045m

Passenger side front door/rear doors 

On the passenger side front door control panel, and on
some versions also on the rear doors, buttons F - fig. 59
are provided to control the associated windows.

001-154 Delta GB 1ed  03/03/14  10.00  Pagina 93

-------------------------------------------------------------------------------------------------------------------------------------------------------------

94

KNOWING YOUR CAR

Anti-crush safety device 

The vehicle is equipped with an anti-pinch safety device
for the raising of the front windows.
This safety system detects the presence of an obstacle dur-
ing the window closing travel and cuts in by stopping and
reversing the window travel, depending on its position.
This device is also useful if the windows are activated ac-
cidentally by children on board the vehicle. 
The anti-pinch function is active both during manual and
automatic operation of the electric windows. Following
the intervention of the anti-pinch system, the window trav-
el is immediately interrupted and subsequently reversed
until the lower end of travel is reached. The window can-
not be operated in any way during this time.

IMPORTANT If the anti-pinch protection intervenes 5
consecutive times within a minute or is faulty, the auto-
matic closing operation of the window is inhibited, only
allowing it in steps of half a second; the button is released
for the subsequent manoeuvre.

In order to restore the correct operation of the system, one
of the following manoeuvres must be performed:
❍ switch off and restart the engine;
❍ fully lower the window concerned.

IMPORTANT With ignition key at STOP or removed, the
electric windows remain active for about 3 minutes and
are deactivated when a door is opened.

001-154 Delta GB 1ed  03/03/14  10.00  Pagina 94

-------------------------------------------------------------------------------------------------------------------------------------------------------------

KNOWING YOUR CAR

95

1

Electric window system initialisation

The system must be re-initialised after disconnecting the
battery or if the relevant protection fuse is blown.

Initialisation procedure:
❍ fully close the window to be initialised manually;
❍ once fully closed, keep holding down the closing con-

trol for at least 1 second.

IMPORTANT Where provided, after there has been no
power supply for the control units (battery replaced or dis-
connected or protective fuses for the electric window con-
trol units replaced), the automatic operation of the win-
dows must be restored.

The restoration procedure must be performed as described
below with the doors closed:
1. completely open the driver’s door window keeping the

operating button pressed for at least three seconds af-
ter the (lower) end of travel position;

2. completely raise the driver’s side window and keep the

button pressed for at least three seconds once the end
of travel position (upper end stop) has been reached;

3. repeat stages 1 and 2 for the passenger-side window
4. make sure that the initialisation is correct by checking

that the windows work automatically.

IMPORTANT With central locking on, operating the in-
ternal handle of one of the doors will unlock all the doors.
If there is no electric power supply (fuse blown, battery
disconnected, etc.) it is still possible to operate the door
locking manually; in this case the automatic lowering func-
tion for the windows is not available and to open or close
the door with the window closed it is necessary to exert
pressure on the window towards the inside of the vehicle
to facilitate the movement of the window on the mould-
ing.

001-154 Delta GB 1ed  03/03/14  10.00  Pagina 95

-------------------------------------------------------------------------------------------------------------------------------------------------------------

96

KNOWING YOUR CAR

LUGGAGE COMPARTMENT

OPENING 

When unlocked, the luggage compartment can be opened
from the outside using the handle fig. 60.
The tailgate can be opened at any time, if the doors are
unlocked.
The key with remote control should be used to open the
tailgate.

fig. 60

L0E0046m

If the luggage compartment is not closed correctly, this is
indicated by ´ warning light coming on in the instrument
panel or R icon appearing in the display together with
a dedicated message (see “Instrument panel warning
lights” paragraph in this chapter). 
Opening the tailgate will switch the boot light on: the light
will go off automatically when closing the tailgate.
The light will stay on for about 15 minutes after turning
the key to STOP: if during this time, a door or the tailgate
is opened, the light will switch on again for 15 minutes.

Opening the tailgate using the key with remote 
control

To release the tailgate lock press R. Tailgate opening
is indicated by the double flashing of the direction indi-
cators; tailgate closing is indicated by single flashing (on-
ly with the alarm switched on, where provided). 

001-154 Delta GB 1ed  03/03/14  10.00  Pagina 96

-------------------------------------------------------------------------------------------------------------------------------------------------------------

KNOWING YOUR CAR

97

1

CLOSING fig. 61

To close, lower the tailgate by pressing near the lock un-
til you hear it click. There are handles B provided inside
the tailgate to allow it to be closed more easily.

fig. 61

L0E0047m

If you travel in areas with few filling stations
and you want to transport fuel in a spare
tank, comply with the regulations in force and

use only an approved, suitably secured tank. Any-
way, by doing so, you increase the risk of fire in case
of an accident with your vehicle.

Be careful not to hit objects on the storage
shelf when you open the tailgate.

Never exceed the maximum allowed load in
the luggage compartment; see chapter 6. Al-
so make sure that the objects you place in the

luggage compartment have been properly secured,
to avoid them from being thrown forward conse-
quent to sudden braking and injuring your passen-
gers. Never travel with the tailgate open: exhaust
gases may get into the passenger’s compartment. 

001-154 Delta GB 1ed  03/03/14  10.00  Pagina 97

-------------------------------------------------------------------------------------------------------------------------------------------------------------

98

KNOWING YOUR CAR

fig. 62

L0E0048m

OPENING THE TAILGATE IN AN EMERGENCY 
fig. 62

To open the tailgate from the passenger compartment if
the car battery is flat or the electric tailgate lock is faulty,
proceed as follows (see “Extending the boot” in this chap-
ter)
❍ remove the rear head restraints;
❍ fold over the backrests;
❍ operate lever A to unlock the tailgate mechanically from

inside the luggage compartment.

EXTENDING THE LUGGAGE COMPARTMENT 

IMPORTANT If the rear seat backrest is folded down, re-
leasing the rear curtains of the parcel shelf is strictly com-
pulsory (follow the specific indications in the “Parcel shelf”
paragraph).
The luggage compartment can be partially (1/3 or 2/3)
or totally extended by splitting the rear seat fig. 63.

001-154 Delta GB 1ed  03/03/14  10.00  Pagina 98

-------------------------------------------------------------------------------------------------------------------------------------------------------------

KNOWING YOUR CAR

99

1

Proceed as follows to extend the luggage compartment:
❍ completely lower the rear seat head restraints;
❍ move the seat belt to the side, making sure that it is

fully extended and not twisted;

❍ release the parcel shelf curtains (for versions/markets,

where provided) from the backrests (see paragraph
“Parcel shelf” on the next pages);

❍ adjust one of levers A - fig. 64 to fold the desired back-

rest (to facilitate this operation, slightly move the seat
forwards by operating lever B, for versions/markets
where provided).

fig. 64

L0E0049m

fig. 63

L0E0110m

001-154 Delta GB 1ed  03/03/14  10.00  Pagina 99

-------------------------------------------------------------------------------------------------------------------------------------------------------------

100

KNOWING YOUR CAR

To extend the luggage compartment further, the rear seats
can be pushed forwards by operating handle B - fig. 64 (for
versions/markets where provided).

IMPORTANT In order to achieve a uniformly flat load
platform, the head restraints should be placed in the ful-
ly extended position before the seats are folded back.

REPOSITIONING THE REAR SEAT 

To facilitate the backrest repositioning manoeuvre, it is
helpful to bring the seat cushion completely forward be-
fore folding back the seats. 

Move the seat belts to the side, making sure that they are
correctly extended and not twisted.

Press levers A - fig. 64, lift up the backrests and push them
backwards until you hear a click from both attachment
mechanisms. Use handle B - fig. 64 (for versions/markets
where provided) to move the seats back until you hear a
click.

Make sure the backrest is properly secured
at both sides to prevent it from moving for-
ward in the event of sharp braking, which

may cause injuries to passengers.

001-154 Delta GB 1ed  03/03/14  10.00  Pagina 100

-------------------------------------------------------------------------------------------------------------------------------------------------------------

KNOWING YOUR CAR

101

1

fig. 66

L0E0051m

fig. 65

L0E0284m

❍ grasp the tabs C and guide the curtains in the retrac-

tor;

❍ release attachments A - fig. 66 (one on each side);
❍ release attachments B, rotate the parcel shelf through

90° and slide it out.

To refit the parcel shelf, reverse the removal instructions.

PARCEL SHELF 

To take out the parcel shelf, proceed as follows:
❍ release the curtains of the parcel shelf A - fig. 65 from

the attachments B on the rear seat backrests;

001-154 Delta GB 1ed  03/03/14  10.00  Pagina 101

-------------------------------------------------------------------------------------------------------------------------------------------------------------

102

KNOWING YOUR CAR

fig. 67

L0E0295m

BONNET

OPENING fig. 67

Proceed as follows:
❍ pull lever A in the direction indicated by the arrow;
❍ operate lever B as shown in the figure;
❍ lift the bonnet and, at the same time, release stay rod

C from its catch, then insert the end of the rod into
housing D in the bonnet (larger hole) and push to safe-
ty position (smaller hole), as shown in the diagram. 

Incorrect positioning of the stay rod may
cause the bonnet to drop suddenly. Perform
these operations when the car is stationary

only.

Before lifting the bonnet, ensure that the
wiper arm is not lifted from the windscreen.

001-154 Delta GB 1ed  03/03/14  10.00  Pagina 102

-------------------------------------------------------------------------------------------------------------------------------------------------------------

KNOWING YOUR CAR

103

1

With hot engine, operate with caution inside
the engine compartment to avoid burns. Do
not place your hands near the engine fan as

it may be activated even when the switch is disabled.
Wait for engine cooling.

Pay attention to scarves, ties and other loose
fitting garments. If they accidentally touch
moving parts, they may get dragged with se-

rious risks for those who wear them.

CLOSING fig. 67

Proceed as follows:
❍ Hold the bonnet up with one hand and with the oth-

er remove rod C from housing D and put it back into
its catch;

❍ Lower the bonnet to approximately 20 centimetres

from the engine compartment and let it drop. Make
sure that the bonnet is completely closed and not on-
ly fastened by the safety catch by trying to open it. If
it is not fully closed, open the bonnet and repeat the
procedure. Do not simply press it.

For safety reasons, the bonnet must always
be properly closed while driving. Make sure
that the bonnet is perfectly closed and that

the lock is engaged. If you discover that the bonnet
is not perfectly closed during travel, stop immedi-
ately and close the bonnet in the correct manner.

001-154 Delta GB 1ed  03/03/14  10.00  Pagina 103

-------------------------------------------------------------------------------------------------------------------------------------------------------------


Content      ..     4      5      6      7     ..