Lancia DELTA. Service Manual - part 5
 

  Index      Manuals     Lancia DELTA. Service Manual


Search            copyright infringement  


Content      ..     3      4      5      6     ..


Lancia DELTA. Service Manual - part 5


72

KNOWING YOUR CAR

The rear window wiper stops operating a few strokes af-
ter releasing the stalk; a further “cleaning stroke”, after
a few seconds, completes the wiping operation.

RAIN SENSOR 
(for versions/markets where provided)

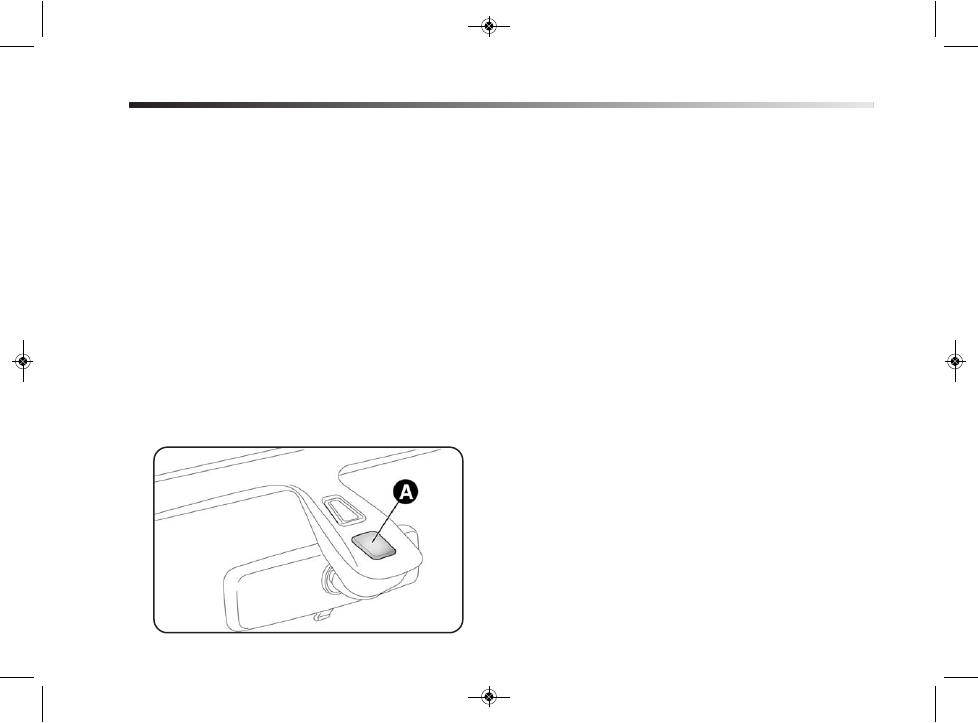
The rain sensor A - fig. 35 is located behind the internal
rear view mirror in contact with the windscreen and au-
tomatically adjusts the frequency of the windscreen wiper
strokes according to the rain intensity during intermittent
operation.
The sensor has an adjustment range that varies progres-
sively from wiper still (no stroke) when the windscreen
is dry, to wiper at first continuous speed (slow continu-
ous operation) with intense rain.

fig. 35

L0E0023m

Activation

Move the right lever down by one click.
The activation of the sensor is signalled by a “stroke” to
show that the command has been acquired.

IMPORTANT Keep the glass in the sensor area clean.

By turning ring nut F - fig. 34 it is possible to increase the
sensitivity of the rain sensor to obtain a more rapid vari-
ation between wiper still (no stroke) when the windscreen
is dry, to wiper at first continuous speed (slow continu-
ous operation).
The increasing of the rain sensor sensitivity is signalled by
a “stroke” to show that the command has been acquired.
Activating the windscreen washers with the rain sensor
activated produces the normal washing cycle at the end of
which the rain sensor resumes its normal automatic op-
eration.

001-154 Delta GB 1ed  03/03/14  10.00  Pagina 72

-------------------------------------------------------------------------------------------------------------------------------------------------------------

KNOWING YOUR CAR

73

1

Deactivation

Turn the ignition key to STOP.
The next time the vehicle is started (ignition key turned
to MAR), the sensor is not reactivated even if the lever is
still in position B - fig. 34. To activate the sensor, move
the lever to position A or C and then back to position B.
Rain sensor activation will be indicated by at least one
wiper “stroke” even if the windscreen is dry.

CRUISE CONTROL
(constant speed regulator) 

(for versions/markets, where provided)

This is an electronically controlled driving assistance de-
vice which allows the vehicle to be driven at a chosen speed
above 30 km/h on long stretches of dry, straight roads with
few variations (e.g. motorways), without having to depress
the accelerator pedal. 
It is therefore not recommended to use this device on ex-
tra-urban roads with traffic. Do not use it in town.

ACTIVATING THE DEVICE

Turn selector wheel A - fig. 36 to ON.
The device must only be switched on in gears higher 
than 4th.

Do not activate the rain sensor when wash-
ing the car in an automatic car wash.

Make sure the device is switched off if there
is ice on the windscreen.

Make sure the device is switched off whenev-
er the windscreen is being cleaned.

fig. 36

L0E0022m

001-154 Delta GB 1ed  03/03/14  10.00  Pagina 73

-------------------------------------------------------------------------------------------------------------------------------------------------------------

74

KNOWING YOUR CAR

When travelling downhill with the device engaged, the ve-
hicle speed may slightly exceed the preset one.
The engagement of the device is signalled by the Ü warn-
ing light coming on in the instrument panel (together with
a message shown on the display) (see “Instrument panel
warning lights” paragraph).

STORING THE CAR SPEED

Proceed as follows:

❍ turn the ring nut A - fig. 36 to ON and press the ac-

celerator pedal until the vehicle reaches the desired
speed; 

❍ turn the ring nut to (+) for at least three seconds, then

release it. The vehicle speed is now memorised and you
can therefore release the accelerator pedal.

If needed (when overtaking for instance), you can accel-
erate simply by pressing the accelerator pedal; when you
release the pedal, the car will return to the speed memo-
rised previously.

RESTORING THE MEMORISED SPEED

If the device has been switched off, for example by de-
pressing the brake or clutch pedal, the memorised speed
can be restored as follows:

❍ accelerate gradually until reaching a speed approach-

ing the memorised speed;

❍ engage the gear selected at the time of speed memo-

rising (fourth, fifth or sixth gear);

❍ press button C - fig. 36.

INCREASING THE MEMORISED SPEED

This can be done in two ways:
❍ by pressing the accelerator and then memorising the

new speed reached;

or
❍ by temporarily turning ring nut B - fig. 36 to (+).
Each movement of the selector wheel will correspond to
a slight increase in speed (about 1 km/h), while keeping
the selector wheel turned will correspond to a continu-
ous speed increase. 

REDUCING THE MEMORISED SPEED

This can be done in two ways:
❍ by disengaging the device and then memorising the

new speed;

or
❍ by keeping ring nut B - fig. 36 turned to (–) until the

new speed is reached; it will then be memorised auto-
matically.

Each movement of the ring nut will correspond to a re-
duction in speed of about 1 km/h, while keeping the ring
nut turned will correspond to a continuous reduction in
speed.

001-154 Delta GB 1ed  03/03/14  10.00  Pagina 74

-------------------------------------------------------------------------------------------------------------------------------------------------------------

KNOWING YOUR CAR

75

1

DEACTIVATING THE DEVICE

Turn the ring nut A - fig. 36 to OFF or turn the ignition
key to STOP. The device is automatically turned off in one
of the following cases:
❍ when the brake or clutch pedal is pressed;
❍ if the ASR or Advanced ESP system cuts in (for ver-

sions/markets where provided);

While travelling with the device engaged, do
not place the gear lever in neutral.

In case of malfunction or if the device is faulty,
turn the control A - fig. 36 to OFF and con-
tact a Lancia Dealership, after checking that

the protective fuse has not blown.

ROOF LIGHTS

FRONT ROOF LIGHT WITH SPOT LIGHTS fig. 37

Switch A is used to switch on/off roof lights.
With the switch A in the middle position, the lights C and
D go on/off when front doors are opened/closed.
With switch A pressed to the left, the lights C and D are
always off. With switch A pressed to the right, the lights
C and D are always on.
Lights switch on/off progressively.
Switch B controls the spot light function; when the roof
light is off, it switches on individually:
❍ the light C when pressed to the left;
❍ the light D when pressed to the right.

fig. 37

L0E0024m

001-154 Delta GB 1ed  03/03/14  10.00  Pagina 75

-------------------------------------------------------------------------------------------------------------------------------------------------------------

76

KNOWING YOUR CAR

For versions/markets, where provided the roof light, some
bulbs light the car interior when the main beam headlights
or dipped beam headlights are on.

IMPORTANT The roof light, for some versions, may also
be in a rear central position (electric sun roof version).

IMPORTANT Before getting out of the car, make sure both
switches are in the middle position; when the doors are
closed, the lights switch off preventing a possible discharge
of the battery. In any case, if the switch is left in on posi-
tion, the roof light switches off automatically 15 minutes
after the engine switching off.

Roof light timing

To make getting in and out the vehicle easier, especially
at night time or in poorly lit areas, two timing logic are
available.

Timing while getting into the vehicle 

The roof lights switch on according to the following modes:
❍ for around 10 seconds when the front doors are un-

locked;

❍ for about 3 minutes when one of the side doors is

opened;

❍ for about 10 seconds when the doors are closed.
The timed period is interrupted when the ignition is turned
to “MAR”.

Timing while getting out of the vehicle
After removing the key from the ignition, the roof lights
switch on according to the following modes:
❍ within 2 minutes of the engine being switched off for

a period of about 10 seconds;

❍ when one of the side doors is opened for a period of

about 3 minutes;

❍ when one of the doors is closed for a period of about

10 seconds.

❍ if the fuel cut off switch operates, they remain on for

about 15 minutes, then they switch off automatically.

Door locking switches the lights off immediately (unless
the fuel cut-off switch is operating). 

fig. 38

L0E0025m

001-154 Delta GB 1ed  03/03/14  10.00  Pagina 76

-------------------------------------------------------------------------------------------------------------------------------------------------------------

KNOWING YOUR CAR

77

1

REAR ROOF LIGHT fig. 38

Press the point indicated by the arrow to switch the lights
on/off (+ sign on the roof light lens cover).
The rear roof lights also come on in conjunction with
events that cause the front roof light to come on.

LUGGAGE COMPARTMENT LIGHT fig. 39

This light comes on automatically when the luggage com-
partment is opened and switches off when it is closed.

fig. 39

L0E0026m

CONTROLS

DUALDRIVE ELECTRIC POWER STEERING 
SYSTEM fig. 40

Press button A to turn the CITY function on (see “Elec-
tric power steering” paragraph). When this function is on,
the wording CITY on the instrument panel will turn on.
Press the button again to turn the function off.

SPORT FUNCTION CONTROL fig. 40 
(for versions/markets, where provided)

Press button B to activate the sports driving setting. This
features more responsive acceleration and increased force
required at the steering wheel to produce a more sporty
feel.

fig. 40

L0E0027m

001-154 Delta GB 1ed  03/03/14  10.00  Pagina 77

-------------------------------------------------------------------------------------------------------------------------------------------------------------

78

KNOWING YOUR CAR

When this function is on (see “SPORT function”), the word
SPORT is lit up in the display. Press the button again to
turn the function off and restore the normal driving set-
ting.

fig. 41

L0E0028m

HAZARD WARNING LIGHTS fig. 41

These lights are switched on by pressing button A, re-
gardless of the position of the ignition key. With the de-
vice on, 

Î

and

¥

warning lights light up in the instru-

ment panel. To switch off the lights, press button A again.
The use of hazard warning lights is governed by the high-
way code of the country you are in. Comply with legal
requirements.

Emergency braking
During emergency braking, the hazard warning lights
come on automatically and lights 

Î

and

¥

on the panel

come on at the same time. The function switches off au-
tomatically when the nature of the braking changes. This
function complies with the relevant legislation currently
in force.

On some versions, with the CITY function ac-
tivated, the SPORT function is not available.

To activate the SPORT function, deactivate the
CITY function and vice versa, because they are rec-
iprocally incompatible.

001-154 Delta GB 1ed  03/03/14  10.00  Pagina 78

-------------------------------------------------------------------------------------------------------------------------------------------------------------

KNOWING YOUR CAR

79

1

FRONT FOG LIGHTS fig. 42 
(for versions/markets, where provided)
Press button A to activate the front fog lights. When the
front fog lights are activated the 

5

warning light is lit

up in the instrument panel. The front fog lights are acti-
vated when the dipped headlights are on.

REAR FOG LIGHTS fig. 42

To turn the lights on press the button B with the dipped
beam headlights on. With lights on, the 4 warning light
on the instrument panel will switch on. Press the button
again to switch the lights off.

fig. 43

L0E0030m

AFS ADAPTIVE LIGHTS 
(Adaptive Xenon Lights) fig. 43

The adaptive lights (see “Headlights” paragraph in this
chapter) are activated automatically when the car is start-
ed. In this situation the LED (amber) on button A will re-
main off.
Press button A to deactivate the adaptive lights (if acti-
vated); they will be deactivated and the LED on button
A will come on constantly. Press AFS button again to turn
the adaptive lights on (LED off on the button).
In the event of a system failure, an indication is provided
on the instrument panel by the flashing of the 

f warn-

ing light or the 

f symbol appearing on the display along

with a dedicated message (for versions/markets where pro-
vided).

fig. 42

L0E0029m

001-154 Delta GB 1ed  03/03/14  10.00  Pagina 79

-------------------------------------------------------------------------------------------------------------------------------------------------------------

80

KNOWING YOUR CAR

FUEL CUT-OFF SYSTEM

This intervenes in the case of an impact causing:
❍ cut off of fuel supply with resultant engine shut down;
❍ automatic door lock release;
❍ activation of all lights inside the car.
The intervention of the system is indicated by a message
shown on the display.
Carefully check the car for fuel leaks, for instance in the
engine compartment, under the car or near the tank area.
Following a collision, turn the ignition key to STOP to
avoid draining the battery.

To restore correct car operation, follow this procedure:
❍ turn the ignition key to MAR;
❍ activate the right hand indicator;
❍ deactivate the right hand indicator;
❍ activate the left hand indicator;
❍ deactivate the left hand indicator;
❍ activate the right hand indicator;
❍ deactivate the right hand indicator;
❍ activate the left hand indicator;
❍ deactivate the left hand indicator;
❍ turn the key to STOP;
❍ turn the ignition key to MAR.

If, after a crash, you smell fuel or notice leaks
from the fuel supply system, do not reset the
system to avoid the risk of fire.

001-154 Delta GB 1ed  03/03/14  10.00  Pagina 80

-------------------------------------------------------------------------------------------------------------------------------------------------------------

KNOWING YOUR CAR

81

1

INTERIOR FITTINGS

SUN VISORS fig. 44

They are located at the sides of the interior rear view 
mirror. 
They can be adjusted forwards and sideways.
A mirror is provided on the back of the sun visors. 
This is illuminated by roof light A. The driver and pas-
senger-side sun visors also feature a document holder.

IMPORTANT On both sides of the passenger side sun vi-
sor there is a label remembering that it is compulsory to
deactivate the airbags if a rearward facing child restraint
system is fitted. Always comply with the instructions 
on the label (see the “Front Airbags” paragraph in chap-
ter “Safety”).

fig. 44

L0E0032m

FRONT ARMREST WITH STORAGE
COMPARTMENTS 

This is located between the front seats. A storage com-
partment and cooled drinks compartment are located in-
side the armrest (for versions/markets, where provided)
(see following paragraphs). The armrest can be moved
backwards and forwards by operating the cover A - fig. 45.

Storage compartment

Lift up cover A - fig. 45: you can thus access the storage
compartment B.

fig. 45

L0E0033m

001-154 Delta GB 1ed  03/03/14  10.00  Pagina 81

-------------------------------------------------------------------------------------------------------------------------------------------------------------

82

KNOWING YOUR CAR

Cooled drinks compartment 
(for versions/markets, where provided)

Press button A - fig. 46 and lift up armrest B: you can then
access the cooled drinks compartment fig. 46.

IMPORTANT The function of the compartment is to main-
tain the temperature of the drinks that are put in which
should be heated or cooled beforehand. The drinks will
remain hot if the heater is switched on or cool if the com-
pressor is switched on. 

fig. 46

L0E0034m

001-154 Delta GB 1ed  03/03/14  10.00  Pagina 82

-------------------------------------------------------------------------------------------------------------------------------------------------------------

KNOWING YOUR CAR

83

1

REAR ARMREST 
(for versions/markets, where provided)

To use the armrest A - fig. 47 lower it as shown in the
figure (for this operation the central head restraint must
be “all up”). 
There are two compartments B in the armrest 
for housing glasses and/or cans. 
To use these, pull C tab in the direction shown by the ar-
row. 
A storage compartment is available inside the armrest; this
can be accessed by raising the flap.

fig. 47

L0E0035m

001-154 Delta GB 1ed  03/03/14  10.00  Pagina 83

-------------------------------------------------------------------------------------------------------------------------------------------------------------

84

KNOWING YOUR CAR

Never travel with the glove compartment
open: it could injure the passenger in the event
of a crash.

GLOVE COMPARTMENT

To open the glove compartment, operate handle A - fig. 48.
When the compartment is opened a courtesy light comes
on inside, which remains on for about 15 minutes, with
the ignition in the STOP position.
If, during this period, a door or the tailgate is opened,
the 15 minute timing is reset.

fig. 48

L0E0037m

CUP/BOTTLE HOLDERS fig. 49

The centre tunnel has two cup/bottle holders.

fig. 49

L0E0038m

001-154 Delta GB 1ed  03/03/14  10.00  Pagina 84

-------------------------------------------------------------------------------------------------------------------------------------------------------------

KNOWING YOUR CAR

85

1

fig. 50

L0E0039m

fig. 51

L0E0040m

Only accessories with a maximum power of
180 W (maximum absorption 15A) can be
connected to the socket.

POWER SOCKET (12 V) 
(for versions/markets, where provided)

Power socket A - fig. 50 is located on the centre tunnel
and is only operational when the ignition key is turned
to MAR. If a smokers kit is requested, the socket is re-
placed by a cigar lighter.
On some versions an additional power socket B is provided
in the luggage compartment.

CIGAR LIGHTER 
(for versions/markets, where provided)

This is located on the central tunnel.
To turn the cigar lighter on, press button A - fig.51 with
the ignition in the MAR position.
After a few seconds the button goes back to its initial po-
sition and the cigar lighter is ready for use. 

IMPORTANT Always make sure the cigar lighter is
switched off.

IMPORTANT The cigar lighter gets very hot. Handle it
carefully and make sure that children don’t touch it: risk
of fire and/or burning.

001-154 Delta GB 1ed  03/03/14  10.00  Pagina 85

-------------------------------------------------------------------------------------------------------------------------------------------------------------

86

KNOWING YOUR CAR

ASHTRAY 

This is a plastic container fig. 52 that can be extracted
with a spring action and placed in the cup/can holder in
the centre tunnel.

IMPORTANT Do not use the ashtray as a waste paper bas-
ket: it might catch fire in contact with cigarette stubs.

fig. 52

L0E0041m

SUNROOF 

(for versions/markets, where provided)

The large electric sun roof comprises two glass panels; the
front one is mobile and the rear one fixed. These are
equipped with two sun blinds (front and rear) that can be
moved manually. With the sun roof closed, the blinds can
be placed in any position.  To open the blinds: grip han-
dle C - fig. 53, and move the blind to the required posi-
tion by following the direction of movement shown by the
arrow. To close them, carry out the procedure in reverse.
The sun roof can be operated only with the ignition key
turned to MAR. The controls A-B fig. 53 on the front cour-
tesy light trim operate the roof opening/closing functions.

Opening

Press and hold down button B - fig. 53. The front glass pan-
el will move into the spoiler position; press button B once
again and hold down for more than half a second to auto-
matically move the sun roof to an intermediate position
(“Comfort” position). If the opening control is pressed again
for more than half a second, the roof will automatically con-
tinue until it reaches the end of travel position; the roof glass
can be stopped in an intermediate position by operating the
button again.

IMPORTANT During the sun roof opening operation, the
blind will follow the movement of the sun roof. 

001-154 Delta GB 1ed  03/03/14  10.00  Pagina 86

-------------------------------------------------------------------------------------------------------------------------------------------------------------

KNOWING YOUR CAR

87

1

Closing

With the roof in the fully open position, press button A -
fig. 53 and, if the button is operated for more than half a
second, the front roof glass will automatically assume the
intermediate position (comfort position).
If the button is operated again for about half a second the
roof will assume the spoiler position. Lastly, if the closing
button is pressed again, the roof will assume the fully closed
position.

fig. 53

L0E0108m

Use the sunroof only at “spoiler” position if
cross roof racks are fitted. Never open the roof
in presence of snow or ice to prevent damage.

When leaving the vehicle, always remove the
key from the ignition to avoid the risk of in-
jury to those still inside the car due to acci-

dental operation of the sunroof. Improper use of the
roof can be dangerous. Before and during operation,
always check that nobody is at risk of being injured
by the moving sun roof or by objects getting caught
or hit by it.

Anti-pinch device

The sun roof has an anti-pinch safety system capable of
detecting the presence of an obstacle whilst the roof is clos-
ing: if this happens, the system intervenes and the move-
ment of the glass is immediately reversed.

IMPORTANT The blind will remain in the fully open posi-
tion when closing the sun roof. If you would like to close it,
this must be done manually.

001-154 Delta GB 1ed  03/03/14  10.00  Pagina 87

-------------------------------------------------------------------------------------------------------------------------------------------------------------


Content      ..     3      4      5      6     ..