MG GS. Service Manual - part 12
 

  Index      Manuals     MG GS. Service Manual


Search            copyright infringement  


Content      ..     10      11      12      13     ..


MG GS. Service Manual - part 12


SEATS & RESTRAINTS

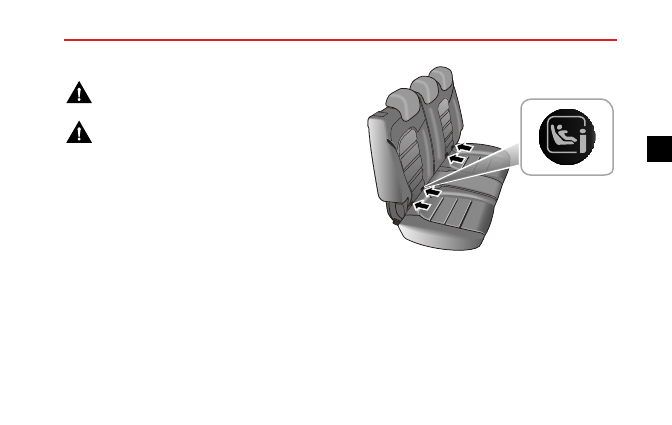
ISOFIX Child Restraint Systems

The ISOFIX anchorages in the rear seat are
designed for use with ISOFIX systems only.

Child

restraint

anchorages

are

designed

to withstand only those loads imposed by
correctly fitted child restraints.

Under no

circumstances are they to be used for adult
seat belts, harnesses, or for attaching other
items or equipment to the vehicle.

Note: When installing and using any child restraint
system, always follow the manufacturer's instructions.

• Fasten vehicle-approved ISOFIX child restraint systems

to the mounting brackets.

• When using ISOFIX mounting brackets for seat

mounting, universally approved child restraint systems
for ISOFIX may be used.

Note: When using seat mounting, universally approved
child restraint systems, Top-tether must be used.

177

3

-------------------------------------------------------------------------------------------------------------------------------------------------------------

SEATS & RESTRAINTS

Note:

Please refer to the child restraint system

manufacturer's instructions for details.

T O P  T E T H E R

T O P  T E T H E R

T O P  T E T H E R

• Fasten the Top-tether of the child restraint system

to the anchor at the rear of the rear passenger seat
backrest.

• After installation apply suitable force to ensure the

restraint is securely fastened.

178

-------------------------------------------------------------------------------------------------------------------------------------------------------------

SEATS & RESTRAINTS

Approved Child Restraint Positions

It is recommended that a child restraint system that complies with UN ECE-R44 standard are fitted in this vehicle. Check
markings on the child restraint system.

Approved Child Restraint Positions (for non ISOFIX Child Restraints)

Seating Positions

Front Passenger

With Front Passenger Airbag

OFF Switch

Mass Group

Without Front

Passenger

Airbag OFF

Switch

Airbag ON

Airbag OFF

Rear

Outboard

Rear Middle

0 group (less than 10 kg)

X

X

U

U

U

0+ group (less than 13 kg)

X

X

U

U

U

I group (9~18 kg)

X

X

U

U

U

II group (15~25 kg)

U

U

U

U

U

III group (22 ~ 36 kg)

U

U

U

U

U

Note: Description of letters in the table:
U = Suitable for universal child restraint systems approved for this mass group;
X = Seat position not suitable for child restraint systems in this mass group.

179

3

-------------------------------------------------------------------------------------------------------------------------------------------------------------

SEATS & RESTRAINTS

Approved Child Restraint Positions (for ISOFIX Child Restraints)

Mass group categories

0 group

0+

group

I group

Rear facing

Forward

facing

Rear facing

Seating Position

Up to 29 lbs(13 kg)

20–40 lbs(9~18 kg)

Size Class

Front Passenger Seat

Seat Type

Not ISOFIX equipped

Size Class

C,D,E

1

A,B, B1

1

C,D

1

Rear Outboard Seat
ISOFIX

Seat Type

IL

2

IL

2

,IUF

3

IL

2

Size Class

Rear Center Seat

Seat Type

Not ISOFIX equipped

Note: IL Suitable for particular ISOFIX child restraints systems of the semi-universal category. Please consult child restraints
systems suppliers' vehicle recommendation lists.
IUF Suitable for ISOFIX forward facing child restraints systems of universal category approved for use in this mass group

180

-------------------------------------------------------------------------------------------------------------------------------------------------------------

SEATS & RESTRAINTS

and ISOFIX size class.

1

The ISOFIX size class for both universal and semi-universal child seat systems is defined by the capital letters grade A~

G. These identification letters are displayed on the ISOFIX child seat.

2

At time of publishing the recommended Group O+ ISOFIX baby safety seat is the Britax Romer Baby Safe. Consult an

MG Authorised Repairer for the latest details relating to our recommended child seats.

3

At time of publishing the recommended Group I ISOFIX child seat is the Britax Romer Duo. Consult an MG Authorised

Repairer for the latest details relating to our recommended child seats.

Table of I- Size child seats

The table gives a recommendation for which I- Size child seats suit which locations, and for what size of child.

The child seat must be approved in accordance with UN Reg R129.

Type of child seat

Front passenger seat

Rear outboard seats

Rear centre seat

I- Size child restraint systems

X

I-U

X

Note: I-U Suitable for use with forward and rear facing I- Size child restraint systems.
X Not suitable for use with I- Size restraint systems.

181

3

-------------------------------------------------------------------------------------------------------------------------------------------------------------

SEATS & RESTRAINTS

Group 0/0+ Child Restraint

When the front passenger airbag is active,
never place a rear facing child restraint on
the front passenger seat,severe injury or even
death can occur.

Child restraints that can be adjusted to lying position
are most suitable for infants who are lighter than 10 kg
(normally for those younger than 9 months) or those who
are lighter than 13 kg (normally for those younger than 24
months).

Group I Child Restraint

When the front passenger airbag is active,
never place a rear facing child restraint on
the front passenger seat,severe injury or even
death can occur.

Backward/forward child restraints are most suitable for
infants whose weight is 9~18 kg (normally for those older
than 9 months and younger than 4 years old).

182

-------------------------------------------------------------------------------------------------------------------------------------------------------------

SEATS & RESTRAINTS

Group II Child Restraint

The diagonal section of the seat belt should
pass across the shoulder and upper body,
away from the neck. The lap section of the
belt should pass across the hips,, away from
the abdomen.

The combination of child restraint and 3 point lap diagonal
seat belt is most suitable for children whose weight is

15~25 kg (normally for those older than 3 years old and
younger than 7 years old).

183

3

-------------------------------------------------------------------------------------------------------------------------------------------------------------

SEATS & RESTRAINTS

Group III Child Restraint

The diagonal section of the seat belt should
pass across the shoulder and upper body,
away from the neck. The lap section of the
belt should pass across the hips, away from
the abdomen.

The combination of child booster seat and vehicle 3 point
lap diagonal seat belt is most suitable for children whose
weight is 22 ~ 36 kg and whose height is below 1.5 m

(normally for those about 7 years old or those older than
7 years old).

184

-------------------------------------------------------------------------------------------------------------------------------------------------------------

-------------------------------------------------------------------------------------------------------------------------------------------------------------

STARTING & DRIVING

Keys

Introduction

Please keep the spare key in a safe place -
not in the car.

It is recommended that spare keys are not
kept on the same key ring

, since this may

cause interference and prevent correct key
recognition and therefore prevent the engine
from starting.

The remote key contains delicate electronic
components and must be protected from
impact and water damage, high temperature
and humidity, direct sunlight and the effects
of solvents, waxes and abrasive cleaners.

Different key kits are provided according to the car
configurations. One kit includes two mechanical keys; one
kit includes a remote key and a mechanical key; and one
kit includes two remote keys. Both of them can operate
all locks.

The keys supplied with your car are programmed to your
security system. Any key that is not programmed to your
vehicle can not start the car.

The remote key will only work within a certain range. It's
working range is sometimes influenced by the key battery
condition, physical and geographical factors. For safety
consideration, after you lock your car using the remote
key, please recheck that the car is locked.

4

1 2

3

5

1 Lock Button

4 Mechanical Key

2 Tailgate Release Button

5 Remote Key

3 Unlock Button

186

-------------------------------------------------------------------------------------------------------------------------------------------------------------

STARTING & DRIVING

If your key is lost/stolen or broken, a replacement can be
obtained from an MG Authorised Repairer. The lost/stolen
key can be deactivated. If the lost key is found, an MG
Authorised Repairer can reactivate it.

Note: Any key made independently outside of MG
Authorised Repairer Network may not start the
engine, and may affect the safety of your car.

To

obtain a suitable key replacement, it is recommended
that you can consult MG Authorised Repairer.

Note:

The new key cannot be offered to you

immediately because it requires programming to the
vehicle by the MG Authorised Repairer.

Note: Avoid operating the remote key close to strong
radio interference devices (such as computer and other
electronic products), or the normal function of the key
may be affected.

Replacing the Battery

*

Please replace remote key battery in the following
conditions:

• The keys locking/unlocking function range is reduced.

• The engine immobilisation warning lamp on the

instrument pack flashes, and the information centre
display shows "Remote Key Low Battery, Please
Replace".

1 Unfold the remote key.

2 Carefully prise off the key cover (1).

187

4

-------------------------------------------------------------------------------------------------------------------------------------------------------------

STARTING & DRIVING

3 Press the battery slightly and push it forward (A) to

remove the battery (2).

4 Position the new battery, ensuring that correct polarity

is maintained (“+” side facing up), slide it backward (B).

Note: Make sure that the polarity of battery is
correct. (Positive is on the top)

Note: It is recommended that you fit a CR2032
replacement battery.

5 Refit the cover and press tightly, check the gap around

the cover is even.

6 Insert the remote key into ignition switch to

resynchronise it.

IMPORTANT

• Use of an incorrect or inappropriate battery may

damage the remote key.

The new replacement’s

rated voltage, sizes and specifications must be the
same as the old one.

• Incorrect fitting of the battery may damage the key.

• Disposal of the used battery must be strictly in

accordance with relevant environmental protection
acts.

188

-------------------------------------------------------------------------------------------------------------------------------------------------------------

STARTING & DRIVING

Child Proof Locks

NEVER leave children unsupervised in the
car.

Lock or Unlock the Child proof Locks

• Open the relevant rear door, insert an appropriate

flat-blade screwdriver into the child lock slot (A).

• Turn the slot to the required position (B).

Note: Turn clockwise for right rear door, and turn
anti-clockwise for left rear door to enable. Turn back
to the vertical position to disable.

With the child proof locks engaged, the rear doors cannot
be opened from inside the car, but can be opened from
outside the car.

189

4

-------------------------------------------------------------------------------------------------------------------------------------------------------------

STARTING & DRIVING

Alarm Systems

Your car is fitted with an electronic antitheft alarm and
engine immobilisation system. To ensure maximum safety
and operation convenience, we strongly recommend you
to carefully read this chapter to fully understand the
activation and deactivation of antitheft systems.

Engine Immobilisation

Engine immobilisation is designed to safeguard the vehicle
from theft. Engine immobilisation can only be deactivated
to start the engine by using the matched key.

Engine Immobiliser

When the matched key is inserted into the ignition
switch and the car is started, engine immobilisation is
deactivated automatically.

When the key is removed

from the ignition switch, the vehicle will automatically
enable engine immobiliser. When the ignition switch is in
position II, if engine immobiliser cannot identify the key
inserted into the ignition switch, the engine immobiliser
warning lamp on the instrument pack illuminates, and
the information centre display of some models will show

Invalid Key

. If the engine can still not be started by

using the spare key, seek an MG Authorised Repairer.

190

-------------------------------------------------------------------------------------------------------------------------------------------------------------

STARTING & DRIVING

Electronic Antitheft Alarm System

Locking and Unlocking

For specific configuration method of "Unlock Mode",
please refer to "Vehicle Settings", "Air Conditioning and
Audio Systems" section.

Operation of Remote Door Lock System

Key Locking

• Using the remote key to lock: press the lock button on

the remote key to lock the car after closing the doors,
engine bonnet and tailgate.

• Using the mechanical key to lock: insert the key into

the driver's door lock and turn clockwise to lock all
doors. If the key remains in the locked state for more
than 2 seconds, all windows and sunroof will be closed
automatically.

Key Unlocking

• Using the remote key to unlock: press the unlock

button on the remote key once to unlock all doors.
Single point entry is only available on some models.

• Using the mechanical key to unlock: insert the key into

the driver's door lock and turn counterclockwise to
unlock all doors. Single point entry is only available on
some models. If the key remains in the unlock state
for more than 2 seconds, all windows will be opened
automatically.

Note: If no panels are opened within 30 seconds after
the vehicle is unlocked by using the remote key, all
doors will automatically relock.

Mislock

If the driver's door is not fully closed when the handset
lock button is pressed, the vehicle horn will sound once,
indicating a mislock. In this case, none of the doors will
lock, the alarm system will not be armed and the direction
indicator lights will not flash.

If the driver's door is closed, the passenger door, bonnet
and tail gate are not fully closed, the horn sounds once to
indicate mislock when the car undergoes locking operation.
However, the ‘partial arming’ attributes of the security
system will enable as much of the system to be armed as
possible (all fully closed doors, bonnet or tailgate apertures

191

4

-------------------------------------------------------------------------------------------------------------------------------------------------------------

STARTING & DRIVING

will be protected, but an open door will not!). The alarm
indicator will flash. As soon as the open aperture is closed,
the system will automatically revert to an armed state.

Antitheft Alarm Indicator

R

P M

X 1 0 0 0

1

2

3

4

5

6

7

8

0

L

o c k

This light indicates the state of the antitheft alarm system.

• Operation of electronic antitheft alarm function:

Engine immobiliser warning lamp will flash as a warning
until the alarm is deactivated.

• Partial operation of electronic antitheft alarm function

(mislock):

If a mislock is caused by the driver's door, the engine
immobiliser warning lamp does not flash, and the car
does not enter the protected state. If mislock is caused
by other doors, the engine immobiliser warning lamp
will flash.

Antitheft Alarm Sound

If the antitheft alarm has been activated, before it is turned
off, the car horn will sound for 10 times; each time will last
for 30 seconds. Press the lock or unlock button on the
remote key. The horn will stop sounding. Once the door is
opened, the information centre display of some models will
show "Alarm Triggered" and the antitheft alarm indicator
light..

192

-------------------------------------------------------------------------------------------------------------------------------------------------------------


Content      ..     10      11      12      13     ..