Buick-Rainier (2004 year). Manual - part 6
 

  Index      Buick     Buick-Rainier (2004 year) - manual in english


Search            copyright infringement  


Content      ..     4      5      6      7     ..


Buick-Rainier (2004 year). Manual - part 6


All-Wheel Drive

Your vehicle may have this feature. There is no lever or
switch to engage or disengage the front axle. It is fully
automatic and adjusts as needed for road conditions.
Your vehicle has an active transfer case allowing
two-wheel-drive operation on dry roads. The transfer
case will shift automatically into all-wheel drive on
slippery surfaces. You may feel an extra shift when
the all-wheel drive engages.

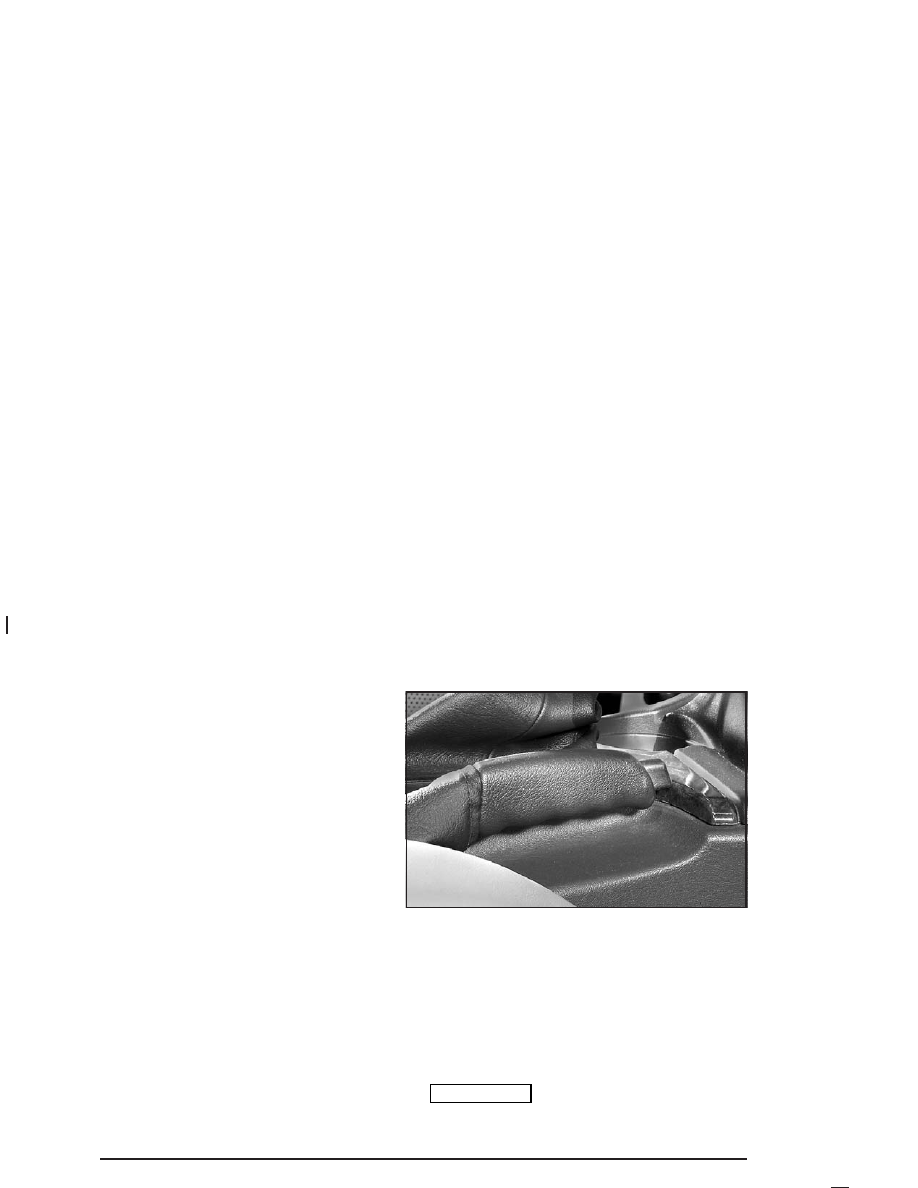
Parking Brake

To set the parking brake, hold the regular brake pedal
down with your foot and pull up on the parking brake
lever located on the center console. If the ignition
is on, the brake system warning light will come on.

To release the parking brake, hold the regular brake
pedal down. Pull the parking brake lever up until you can
press in the button at the end of the lever. Hold the button
in as you move the parking brake lever all the way down.

Notice: Driving with the parking brake on can
overheat the brake system and cause premature
wear or damage to brake system parts. Verify that
the parking brake is fully released and the brake
warning light is off before driving.

If you are towing a trailer and you must park on a hill,
see Towing a Trailer on page 4-53. That section
shows what to do first to keep the trailer from moving.

2-26

-------------------------------------------------------------------------------------------------------------------------------------------------------------

Shifting Into Park (P)

{

CAUTION:

It can be dangerous to get out of your vehicle if
the shift lever is not fully in PARK (P) with the
parking brake firmly set. Your vehicle can roll.
If you have left the engine running, the vehicle
can move suddenly. You or others could be
injured. To be sure your vehicle will not move,
even when you are on fairly level ground,
use the steps that follow. If you are pulling a
trailer, see Towing a Trailer 
on page 4-53.

1. Hold the brake pedal down with your foot and

set the parking brake.

2. Move the shift lever

into PARK (P)
like this:

Press and hold in the
button on the lever.

Push the lever all the
way toward the front
of the vehicle.

3. Turn the ignition key to LOCK.

4. Remove the key and take it with you. If you can

leave your vehicle with the key, your vehicle is
in PARK (P).

2-27

-------------------------------------------------------------------------------------------------------------------------------------------------------------

Leaving Your Vehicle With the Engine
Running

{

CAUTION:

It can be dangerous to leave your vehicle with
the engine running. Your vehicle could move
suddenly if the shift lever is not fully in
PARK (P) with the parking brake firmly set.
And, if you leave the vehicle with the engine
running, it could overheat and even catch fire.
You or others could be injured. Do not leave
your vehicle with the engine running.

If you have to leave your vehicle with the engine running,
be sure your vehicle is in PARK (P) and your parking
brake is firmly set before you leave it. After you’ve moved
the shift lever into PARK (P), hold the regular brake pedal
down. Then, see if you can move the shift lever away
from PARK (P) without first pressing the button on the
console shift lever. If you can, it means that the shift lever
wasn’t fully locked into PARK (P).

Torque Lock

If you are parking on a hill and you don’t shift your
transmission into PARK (P) properly, the weight of the
vehicle may put too much force on the parking pawl in the
transmission. You may find it difficult to pull the shift lever
out of PARK (P). This is called “torque lock.” To prevent
torque lock, set the parking brake and then shift into
PARK (P) properly before you leave the driver’s seat.
To find out how, see Shifting Into Park (P) on page 2-27.

When you are ready to drive, move the shift lever out of
PARK (P) before you release the parking brake.

If torque lock does occur, you may need to have another
vehicle push yours a little uphill to take some of the
pressure from the parking pawl in the transmission,
so you can pull the shift lever out of PARK (P).

Shifting Out of Park (P)

Your vehicle has an automatic transmission shift lock
control system. You have to fully apply the regular
brakes before you can shift from PARK (P) when the
ignition is in RUN. See Automatic Transmission
Operation 
on page 2-24.

2-28

-------------------------------------------------------------------------------------------------------------------------------------------------------------

Parking Over Things That Burn

{

CAUTION:

Things that can burn could touch hot exhaust
parts under your vehicle and ignite. Do not
park over papers, leaves, dry grass or other
things that can burn.

Engine Exhaust

{

CAUTION:

Engine exhaust can kill. It contains the gas
carbon monoxide (CO), which you can not see
or smell. It can cause unconsciousness and
death.

You might have exhaust coming in if:

Your exhaust system sounds strange
or different.

Your vehicle gets rusty underneath.

Your vehicle was damaged in a collision.

Your vehicle was damaged when driving
over high points on the road or over
road debris.

Repairs were not done correctly.

Your vehicle or exhaust system had
been modified improperly.

If you ever suspect exhaust is coming into
your vehicle:

Drive it only with all the windows down
to blow out any CO; and

Have your vehicle fixed immediately.

2-29

-------------------------------------------------------------------------------------------------------------------------------------------------------------

Running Your Engine While You
Are Parked

It is better not to park with the engine running. But if
you ever have to, here are some things to know.

{

CAUTION:

Idling the engine with the climate control
system off could allow dangerous exhaust into
your vehicle. See the earlier Caution under
Engine Exhaust 
on page 2-29.

Also, idling in a closed-in place can let deadly
carbon monoxide (CO) into your vehicle even if
the climate control fan is at the highest setting.
One place this can happen is a garage.
Exhaust — with CO — can come in easily.
NEVER park in a garage with the engine
running.

Another closed-in place can be a blizzard.
See Winter Driving 
on page 4-40.

{

CAUTION:

It can be dangerous to get out of your vehicle
if the shift lever is not fully in PARK (P) with
the parking brake firmly set. Your vehicle can
roll. Do not leave your vehicle when the engine
is running unless you have to. If you have
left the engine running, the vehicle can move
suddenly. You or others could be injured.
To be sure your vehicle will not move, even
when you are on fairly level ground, always
set your parking brake and move the shift
lever to PARK (P).

Follow the proper steps to be sure your vehicle will
not move. See Shifting Into Park (P) on page 2-27.

If you are pulling a trailer, see Towing a Trailer
on page 4-53.

2-30

-------------------------------------------------------------------------------------------------------------------------------------------------------------

Mirrors

Automatic Dimming Rearview Mirror
with OnStar

®

and Compass

Your vehicle has an automatic-dimming rearview mirror
with a compass and the OnStar

®

system.

There are three additional buttons for the OnStar

®

system. See your dealer for more information on the
system and how to subscribe to OnStar

®

. See OnStar

®

System on page 2-35 for more information about the
services OnStar

®

provides.

Mirror Operation

When turned on, this mirror automatically dims to the
proper level to minimize glare from any headlamps
behind you after dark.

O

(On/Off): This is the on/off button for the automatic

dimming feature and compass. Press the far left button,
located below the the mirror face, for up to three
seconds to turn the feature on and off. A light on the
mirror will be lit while the feature is turned on.

Compass Operation

Press the on/off button once to turn the compass
on or off.

There is a compass display in the window in the upper
right corner of the mirror face. The compass displays
a maximum of two characters. For example, “NE” is
displayed for north-east.

2-31

-------------------------------------------------------------------------------------------------------------------------------------------------------------

Compass Calibration

Press and hold the on/off button down for nine seconds
to activate the compass calibration mode. CAL will
be displayed in the compass window on the mirror.

The compass can be calibrated by driving the vehicle
in circles at 5 mph (8 km/h) or less until the display
reads a direction.

Compass Variance

Compass variance is the difference between earth’s
magnetic north and true geographic north. The mirror is
set to zone eight upon leaving the factory. It will be
necessary to adjust the compass to compensate for
compass variance if you live outside zone eight. Under
certain circumstances, such as during a long distance
cross-country trip, it will be necessary to adjust for
compass variance. If not adjusted to account for compass
variance, your compass could give false readings.

To adjust for compass variance, do the following:

1. Find your current location and variance zone

number on the map.

2. Press and hold the on/off button for six seconds.

Release the button when ZONE is displayed.
The number shown is the current zone number.

3. Scroll through the zone numbers that appear in

the compass/temperature window on the mirror
by pressing the on/off button. Once you find your
zone number, release the button. After about
four seconds, the mirror will return to the compass
display, and the new zone number will be set.

2-32

-------------------------------------------------------------------------------------------------------------------------------------------------------------

Outside Power Mirror

The control is located
on the driver’s door.

1. Turn the knob toward the mirror you desire

to adjust.

2. Move the control in the direction you want the

mirror to go.

3. Adjust the mirror in all four directions. Adjust it

so you can see some of the side of your vehicle
and the area behind your vehicle.

4. After you are satisfied with the position of the mirror,

turn the control to the center position or turn it to the
other mirror to adjust that mirror.

If you reach the mirror’s end of the travel position in
any direction, the mirror will enter a ratcheting mode.
This action is harmless. It is a warning that the
mirror can go no further. To stop this action, back the
mirror up by moving the control in the opposite direction.

When the control is turned to the center position,
the mirror can not be moved with the control knob.

Fold the mirror in manually before entering a car
wash. To do this, pull the mirror in toward the vehicle.
Push the mirror back out when finished.

2-33

-------------------------------------------------------------------------------------------------------------------------------------------------------------

Outside Convex Mirror

A convex mirror’s surface is curved so you can see
more from the driver’s seat.

{

CAUTION:

A convex mirror can make things (like other
vehicles) look farther away than they really are.
If you cut too sharply into the right or left lane,
you could hit a vehicle. Check your inside
mirror or glance over your shoulder before
changing lanes.

Outside Heated Mirrors

Your vehicle may have this feature.

When you operate the rear window defogger, a defogger
also warms the heated driver’s and passenger’s
outside rearview mirrors to help clear them of ice,
snow and condensation.

Outside Automatic Dimming Mirror
with Curb View Assist

The driver’s and/or passenger’s outside mirror will
adjust to a preset tilt position while the vehicle is in
REVERSE (R) gear. Curb view assist may be useful
when you are parallel parking. The mirror(s) will return
to normal position when the vehicle is shifted out of
REVERSE (R) gear. Automatic mirror movement
in either direction will follow a short delay.

To change the tilt position, adjust the mirror while the
vehicle is in REVERSE (R) gear with the engine running,
the parking brake engaged and the brake pedal
pressed. The new position will be saved into memory
once the vehicle is shifted out of REVERSE (R).

You may be able to enable/disable this feature
through the Driver Information Center (DIC). See “Mirror
Curb View Assist” under DIC Operation and Displays
on page 3-43.

2-34

-------------------------------------------------------------------------------------------------------------------------------------------------------------

OnStar

®

System

Your vehicle may have this feature. OnStar

®

uses

global positioning system (GPS) satellite technology,
wireless communications, and state of the art call
centers to provide you with a wide range of safety,
security, information and convenience services.

A complete OnStar

®

user’s guide and the terms and

conditions of the OnStar

®

Subscription Service

Agreement are included in your OnStar

®

-equipped

vehicle’s glove box literature. For more information, visit
www.onstar.com, contact OnStar

®

at 1-888-4-ONSTAR

(1-888-466-7827), or press the blue OnStar

®

button

to speak to an OnStar

®

advisor 24 hours a day,

7 days a week.

A completed Subscription Service Agreement is required
prior to delivery of OnStar

®

services and prepaid calling

minutes are also required for OnStar

®

Personal Calling

and OnStar

®

Virtual Advisor use. Terms and conditions

of the Subscription Service Agreement can be found
at www.onstar.com.

OnStar

®

Services

One of the following plans is normally included for
a specific duration with each vehicle equipped with
OnStar

®

. You can upgrade or extend your OnStar

®

service plan to meet your needs.

Safe and Sound Plan

Automatic Notification of Air Bag Deployment

Emergency Services

Roadside Assistance

Stolen Vehicle Assistance

AccidentAssist

Remote Door Unlock

Remote Diagnostics

Online Concierge

Directions and Connections Plan

All Safe and Sound Plan services

Route Support

RideAssist

Information and Convenience Services

2-35

-------------------------------------------------------------------------------------------------------------------------------------------------------------

Luxury and Leisure Plan

All Directions and Connections Plan services

Personal Concierge

OnStar

®

Personal Calling

With OnStar

®

Personal Calling, you have a safer way to

stay connected while driving. It’s a hands-free wireless
phone that’s integrated into your vehicle. You can place
calls nationwide using voice-activated dialing with no
contracts and no additional roaming charges. To find
out more about OnStar

®

Personal Calling, refer to

the OnStar

®

owner’s guide in your vehicle’s glove box,

or call OnStar

®

at 1-888-4-ONSTAR (1-888-466-7827).

OnStar

®

Virtual Advisor

With OnStar

®

Virtual Advisor you can listen to your

favorite news, entertainment and information topics,
such as traffic and weather reports, stock quotes
and sports scores. You listen to your e-mail through
your vehicle’s speakers, and reply with your hands
on the wheel and your eyes on the road.

HomeLink

®

Transmitter

HomeLink

®

, a combined universal transmitter and

receiver, provides a way to replace up to three
hand

held transmitters used to activate devices such

as gate operators, garage door openers, entry door
locks, security systems and home lighting. Additional
HomeLink

®

information can be found on the internet

at www.homelink.com or by calling 1-800-355-3515.

If your vehicle is equipped with the HomeLink

®

Transmitter, it complies with Part 15 of the FCC Rules.
Operation is subject to the following two conditions:
(1) this device may not cause harmful interference,
and (2) this device must accept any interference
received, including interference that may cause
undesired operation.

2-36

-------------------------------------------------------------------------------------------------------------------------------------------------------------

This device complies with RSS- 210 of Industry Canada.
Operation is subject to the following two conditions:
(1) this device may not cause interference, and (2) this
device must accept any interference received, including
interference that may cause undesired operation of
the device.

Changes and modifications to this system by other than
an authorized service facility could void authorization
to use this equipment.

Programming the HomeLink

®

Transmitter

Do not use the HomeLink

®

Transmitter with any garage

door opener that does not have the “stop and reverse”
feature. This includes any garage door opener model
manufactured before April 1, 1982. If you have a newer
garage door opener with rolling codes, please be
sure to follow steps 6 through 8 to complete the
programming of your HomeLink

®

Transmitter.

Read the instructions completely before attempting to
program the HomeLink

®

Transmitter. Because of

the steps involved, it may be helpful to have another
person available to assist you in programming the
transmitter.

Keep the original transmitter for use in other vehicles as
well as for future HomeLink

®

programming. It is also

recommended that upon the sale of the vehicle, the
programmed HomeLink

®

buttons should be erased for

security purposes. Refer to “Erasing HomeLink

®

Buttons”

or, for assistance, contact HomeLink

®

on the internet

at: www.homelink.com or by calling 1-800-355-3515.

Be sure that people and objects are clear of the garage
door or gate operator you are programming. When
programming a garage door, it is advised to park outside
of the garage.

It is recommended that a new battery be installed in
your hand-held transmitter for quicker and more
accurate transmission of the radio frequency.

Your vehicle’s engine should be turned off while
programming the transmitter. Follow these steps to
program up to three channels:

1. Press and hold down the two outside buttons,

releasing only when the indicator light begins to
flash, after 20 seconds. Do not hold down the
buttons for longer than 30 seconds and do not
repeat this step to program a second and/or
third transmitter to the remaining two HomeLink

®

buttons.

2-37

-------------------------------------------------------------------------------------------------------------------------------------------------------------

2. Position the end of your hand-held transmitter about

1 to 3 inches (3 to 8 cm) away from the HomeLink

®

buttons while keeping the indicator light in view.

3. Simultaneously press and hold both the desired

button on HomeLink

®

and the hand-held transmitter

button. Do not release the buttons until Step 4
has been completed.

Some entry gates and garage door openers may
require you to substitute Step 3 with the procedure
noted in “Gate Operator and Canadian
Programming” later in this section.

4. The indicator light will flash slowly at first and then

rapidly after HomeLink

®

successfully receives the

frequency signal from the hand-held transmitter.
Release both buttons.

5. Press and hold the newly-trained HomeLink

®

button

and observe the indicator light.

If the indicator light stays on constantly,
programming is complete and your device should
activate when the HomeLink

®

button is pressed

and released.

To program the remaining two HomeLink

®

buttons,

begin with Step 2 under “Programming HomeLink

®

.”

Do not repeat Step 1 as this will erase all of the
programmed channels.

If the indicator light blinks rapidly for two seconds
and then turns to a constant light, continue with
Steps 6 through 8 following to complete the
programming of a rolling-code equipped device
(most commonly, a garage door opener).

6. Locate in the garage, the garage door opener

receiver (motor-head unit). Locate the “Learn”
or “Smart” button. This can usually be found where
the hanging antenna wire is attached to the
motor-head unit.

7. Firmly press and release the “Learn” or “Smart”

button. The name and color of the button may
vary by manufacturer.

You will have 30 seconds to start Step 8.

8. Return to the vehicle. Firmly press and hold the

programmed HomeLink

®

button for two seconds,

then release. Repeat the press/hold/release
sequence a second time, and depending on the
brand of the garage door opener (or other rolling
code device), repeat this sequence a third time
to complete the programming.

HomeLink

®

should now activate your rolling-code

equipped device.

To program the remaining two HomeLink

®

buttons,

begin with Step 2 of “Programming HomeLink

®

.”

Do not repeat Step 1.

2-38

-------------------------------------------------------------------------------------------------------------------------------------------------------------

Gate Operator and Canadian
Programming

Canadian radio-frequency laws require transmitter
signals to “time out” or quit after several seconds of
transmission. This may not be long enough for
HomeLink

®

to pick up the signal during programming.

Similarly, some U.S. gate operators are manufactured
to “time out” in the same manner.

If you live in Canada, or you are having difficulty
programming a gate operator by using the “Programming
HomeLink

®

” procedures (regardless of where you live),

replace Step 3 under “Programming HomeLink

®

” with

the following:

Continue to press and hold the HomeLink

®

button while

you press and release every two seconds (cycle) your
hand-held transmitter until the frequency signal has been
successfully accepted by HomeLink

®

. The indicator light

will flash slowly at first and then rapidly. Proceed with
Step 4 under “Programming HomeLink

®

” to complete.

Using HomeLink

®

Press and hold the appropriate HomeLink

®

button for

at least half of a second. The indicator light will come
on while the signal is being transmitted.

Erasing HomeLink

®

Buttons

To erase programming from the three buttons do the
following:

1. Press and hold down the two outside buttons until

the indicator light begins to flash, after 20 seconds.

2. Release both buttons. Do not hold for longer than

30 seconds.

HomeLink

®

is now in the train (learning) mode and

can be programmed at any time beginning with Step 2
under “Programming HomeLink

®

.”

Individual buttons can not be erased, but they can
be reprogrammed. See “Reprogramming a Single
HomeLink

®

Button” next.

2-39

-------------------------------------------------------------------------------------------------------------------------------------------------------------

Reprogramming a Single HomeLink

®

Button

To program a device to HomeLink

®

using a HomeLink

®

button previously trained, follow these steps:

1. Press and hold the desired HomeLink

®

button.

Do not release the button.

2. The indicator light will begin to flash after

20 seconds. While still holding the HomeLink

®

button, proceed with Step 2 under “Programming
HomeLink

®

.”

Resetting Defaults

To reset HomeLink

®

to default settings do the following:

1. Hold down the two outside buttons for about

20 seconds until the indicator light begins to flash.

2. Continue to hold both buttons until the HomeLink

®

indicator light turns off.

3. Release both buttons.

For questions or comments, contact HomeLink

®

at 1-800-355-3515, or on the internet
at www.homelink.com.

Storage Areas

Glove Box

To open your glove box, pull the handle on the front
of the glove box and lower the door.

Overhead Console

The overhead console
includes sunglasses
storage, a HomeLink

®

transmitter and a
Travel Note recorder.

2-40

-------------------------------------------------------------------------------------------------------------------------------------------------------------

Sunglasses Storage Compartment

To open the sunglasses storage compartment in the
overhead console, press the release button. Then pull
the compartment down.

Travel Note Recorder

O

(Record): To record a message, press this button

and begin speaking. Press the button again to stop
recording. You may also press and hold this button while
you are speaking and then let it go when you are finished.

w

(Play): To play a recorded message, press this

button. Pressing the button more than once will return
you to previously recorded messages. If you press
and hold this button for more than one second, all of
the recorded messages will be played back.

c

(Stop): To delete messages, press this button

while the message is playing. If you press and hold the
play and record buttons at the same time for a half
of a second, all of the messages will be deleted.

Front Storage Area

Lift the armrest cover of the console compartment to
reveal a coinholder and additional storage.

2-41

-------------------------------------------------------------------------------------------------------------------------------------------------------------


Content      ..     4      5      6      7     ..