Vauxhall Zafira (2016 year). Manual - part 5


  Index      Vauxhall     Vauxhall Zafira (2016 year) - manual in english


Search            copyright infringement  


Content      ..     3      4      5      6     ..


Vauxhall Zafira (2016 year). Manual - part 5


-------------------------------------------------------------------------------------------------------------------------------------------------------------
Storage
73
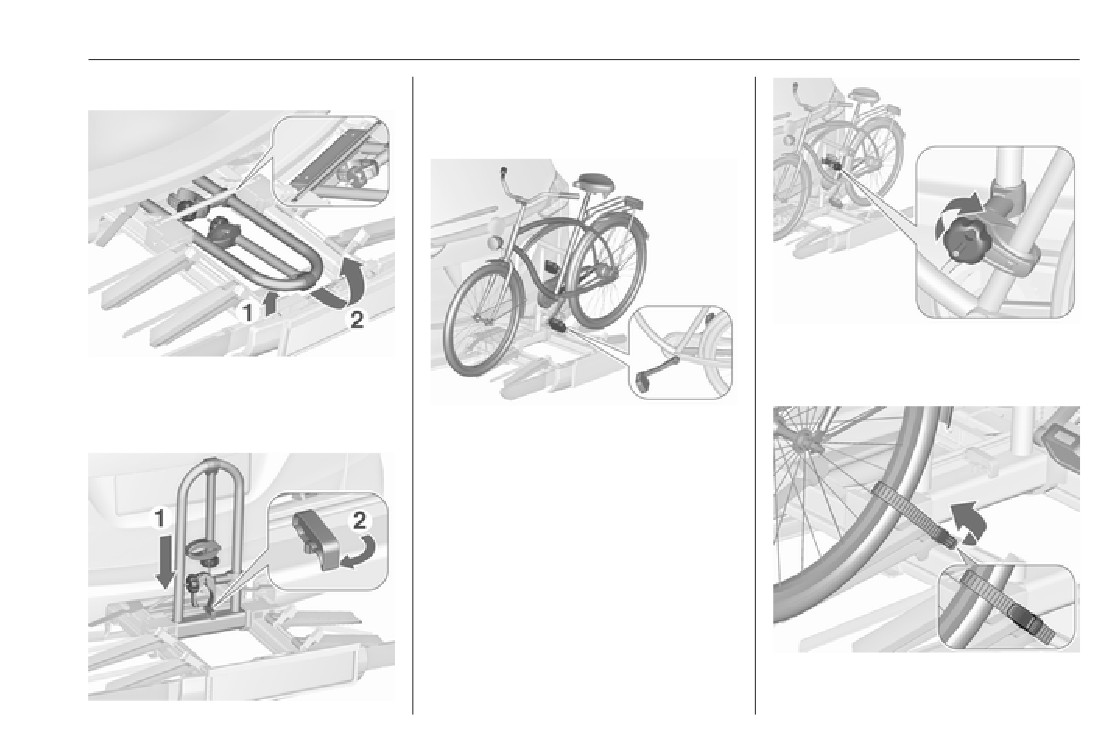
Assembling the bicycle rack
Push down the rack (1) and swivel
handle (2) backwards to engage.
Attaching the first bicycle
2. Attach the short mounting bracket
to the bicycle frame. Turn the
Lift the rack at the rear (1) and pull it
knob clockwise to fasten.
backwards.
Fold up the rack (2).
1. Rotate the pedals into position as
shown in the illustration and put
the bicycle on the foremost wheel
recess.
Make sure that the bicycle stands
centrally on the wheel recesses.

-------------------------------------------------------------------------------------------------------------------------------------------------------------

74
Storage
3. Secure both bicycle wheels to the
1. Attach the adapter to the rear
wheel recesses using the strap
carrier system as shown in the
retainers.
illustration.
4. Check the bicycle to make sure it
is secure.
Caution
Ensure gap between bicycle and
vehicle is at least 5 cm. If
necessary, loosen handlebar and
swivel sideways.
4. Guide the strap attached to the
Attaching the adapter
adapter underneath the lever to
When carrying more than two
fold back the rear carrier system.
bicycles, the adapter must be fixed
Fasten the strap.
2. Turn the lever (1) forwards and
before the second bicycle is attached.
hold, then lower the adapter (2) at
Attaching further bicycles
the rear.
The attachment of further bicycles is
3. Release lever and check if the
similar to the attachment of the first
adapter is engaged securely.
bicycle. Additionally some steps must
be considered:
1. Before putting on the bicycle,
always unfold the wheel recesses
for the next bicycle, if necessary.
2. Always rotate the pedals into an
appropriate position before
putting on the bicycle.

-------------------------------------------------------------------------------------------------------------------------------------------------------------

Storage
75
Use the longer accessory
mounting bracket to attach the
third bicycle to the rack.
3. Position the bicycles on the rear
6. Additionally secure both bicycle
carrier system alternately aligned
wheels of the fourth bicycle to the
to the left and to the right.
wheel recesses using the
Use the short accessory mounting
tensioning straps.
4. Align the bicycles to the one
bracket to attach the fourth
attached before. The wheel hubs
It is recommended to attach a
bicycle. The bracket must be fixed
of the bicycles must not touch
warning sign to the rearmost bicycle
between the frames of the third
each other.
to increase visibility.
and fourth bicycle.
5. Attach the bicycles with mounting
Fold the rear carrier system
brackets and strap retainers as
backwards
described for the first bicycle. The
The rear carrier system can be folded
mounting brackets should be
backwards to gain access to the load
fixed in parallel.
compartment.
Use the long mounting bracket to
attach the second bicycle to the
rack.

-------------------------------------------------------------------------------------------------------------------------------------------------------------

76
Storage
● Without attached adapter:
Removing bicycles
Undo strap retainers on bicycle tyres.
Turn knob anti-clockwise and remove
mounting brackets.
Detaching adapter
Detach the adapter before removing
the last bicycle remaining on the rear
carrier system.
1. Fold in wheel recesses.
Hold frame (1) of rearmost
bicycle with one hand and pull the
Push the lever (1) to disengage
loop (2) to disengage.
and hold.
Hold rearmost bicycle with both
Pull the rack (2) backwards to
hands and fold the rear carrier
fold the rear carrier system.
system backwards.
● With attached adapter:
To increase visibility, the tail lights of
the vehicle are activated when the
9 Warning
rear carrier system is folded back.
Take care when disengaging the
9 Warning
rear carrier system as it will tilt
2. Unbutton the strap.
backwards. Risk of injury.
When folding the rear carrier
system forwards again, take care
that the system is engaged
securely.

-------------------------------------------------------------------------------------------------------------------------------------------------------------

Storage
77
Disassembling the bicycle rack
3. Turn the lever (1) forwards and
Fold the rack backwards, then push
hold.
forwards until it stops (1).
Arrange mounting brackets as shown
4. Lift the adapter (2) at the rear and
Press the rack down at the rear (2).
in the illustration.
remove.
Swivel handle (1) forwards to
Fold in wheel recesses
disengage and lift the rack (2).
Fold in both wheel recesses.

-------------------------------------------------------------------------------------------------------------------------------------------------------------

78
Storage
Fold in tail lamps
Push the release lever up and hold.
Swivel in both tail lamps.
Lift the rear carrier system slightly and
push it into the bumper until it
Fold in number plate holder
engages.
Lift the number plate holder and fold
Release lever must return to original
it forwards.
position.
Retracting the rear carrier system
9 Warning
Caution
If the system cannot be correctly
engaged, please seek the
Take care that all foldable parts,
assistance of a workshop.
e.g. wheel recesses and mounting
Stow the strap retainers accurately.
brackets, are stowed accurately.
Otherwise the rear carrier system
Unlock the rear carrier system
might get damaged when trying to
retract it.
Swivel both clamping levers inwards
as far as they will go.

-------------------------------------------------------------------------------------------------------------------------------------------------------------

Storage
79
Load compartment
Caution
The seats in the third row can be
Before setting up or folding down
folded down separately into the
seats, all components must be
vehicle floor. The seat backrests of
removed from the side rails and
the second row can be folded forward
from the lashing eyes.
separately. Additionally, the backrest
Lashing eyes must be in stored
of the passenger seat can be folded.
position.
A completely flat load bay is created
if all rear seats and backrests and
passenger backrest are folded down.
Depending on the loading, only single
● Insert the latch plate of the seat
seats or backrests can be folded.
belt on each side into the pocket
Rear floor storage cover 3 84.
that is mounted at the belt.
9 Warning
When seats or backrests are being
adjusted or folded, keep hands
and feet away from the moving
area.
Never store objects under the
Folding down the seats of the third
seats.
row
Drive only with engaged seats and
● Push down head restraint by
backrests.
pressing the catch 3 36.

-------------------------------------------------------------------------------------------------------------------------------------------------------------

80
Storage
● Pull the lower loop and
9 Warning
simultaneously swing the
backrest forwards until the seat is
Use vertical position of the
lowered into the vehicle floor.
backrest only for increased
● Install interior floor mat 3 84
luggage volume and not as a
and load compartment cover
seating position.
3 82 if necessary.
Setting up the seats
Folding up backrest
Pull up the seat by the upper loop, fold
out and allow seat to engage in
upright position.
Pull the loop and fold down the
Folding the seat backrests of the
backrest onto the seat cushion.
second row
● Remove the load compartment
Caution
cover if necessary 3 82.
Do not fold the outer seatbacks
● Push down head restraints by
while the seats are in the
pressing the catch 3 36.
lounge seat position 3 44.
● Move front passenger seat to a
Do not pull release lever of the
position that avoids contact with
easy entry function when the
Raise backrest to vertical position.
the head restraints of the folded
backrest is folded down.
Adjust inclination by pulling the loop.
backrests.
The seats could be damaged.
Ensure that all positions are engaged
correctly.
● Alternatively pull the loop and
adjust backrest to vertical
position as cargo position.

-------------------------------------------------------------------------------------------------------------------------------------------------------------

Storage
81
● Push down head restraint by
9 Warning
pressing the catch 3 36.
● Move passenger front seat in a
Only drive the vehicle if the
position that avoids contact of the
backrests are securely locked into
head restraint with the instrument
position. Otherwise there is a risk
panel.
of personal injury or damage to the
load or vehicle in the event of
● Pull lever and fold down the
heavy braking or a collision.
backrest on the seat, then
release lever. The backrest can
Folding backrest of front
be engaged in two positions
passenger seat
before horizontal position. Allow
the backrest to engage audibly.
If the vehicle is equipped with a
To open, release cover in side trim
release mechanism on the front
Folding up backrest
panel and remove.
passenger seat, the seat backrest
● Pull lever and fold up backrest in
can be folded down to horizontal
desired seat position, then
Floor storage
position, e.g. for very long objects.
release lever. Allow the backrest
to engage audibly.
● Adjust seat and head restraint.
Rear storage
On both sides of the load
compartment there are storage
shelves.

-------------------------------------------------------------------------------------------------------------------------------------------------------------

82
Storage
On version without third seat row,
Closing
Opening
there are storage boxes under the
floor cover. Lift up the cover to open.
Load compartment cover
Do not place any heavy or sharp-
edged objects on the load
compartment cover.
Pull the load compartment cover
Remove load compartment cover
towards the rear using the handle and
from side brackets. Hold the handle
engage it in the retainers at the sides.
and guide the load compartment
cover until it is fully rolled up.
Before operating the load
compartment cover, insert the latch
plate of the seat belt on each side into
the pocket that is mounted at the belt.

-------------------------------------------------------------------------------------------------------------------------------------------------------------

Storage
83
Removing
Place the housing so that the upper
side is facing to the front and the part
with the handle points upwards.
Fasten the load compartment cover in
the storage with the Velcro tape.
Open the load compartment cover.
Pull the release lever up and hold. Lift
Installing
Insert the load compartment cover
load compartment cover on right side
into the opening on the right side of
Insert the left side of the load
and remove from retainers.
the storage (1) and turn it until the
compartment cover into the recess,
handle rests flat on the housing (2).
pull the release lever up and hold,
Stowing in the load compartment
insert the right side of the load
If the load compartment cover is not
compartment cover and engage.
used, stow it in the storage in the
vehicle floor.
Open the cover of the storage in front
of the tailgate.
Remove the load compartment cover
and turn it so that the release lever is
directed to the left.

-------------------------------------------------------------------------------------------------------------------------------------------------------------

84
Storage
By folding and expanding the mat
Rear floor storage cover
there are a range of individual
Floor cover
applications possible.
The interior protection mat is
available in two versions:
● Standard protection mat covers
the area between tailgate and
second seat row, when third row
is complete or if one seat is folded
down.
● Flex cover interior protection
mat is double size of standard
Following only a few examples of
protection mat, connected by a
using the mats are described.
zipper. It covers the load
compartment fully, when all or
Before folding and expanding the
single seats of third and second
mat, all components must be
On versions without third seat row,
row are folded down.
removed from the side rails and from
there are storage boxes under the
the lashing eyes. Lashing eyes must
floor cover. To open lift up the cover
Protection mat is foldable
be in stored position.
and fold it upright behind rear seats.
longitudinally in 4 parts (standard) or
8 parts (Flex cover) with a central
Covering the load compartment
Interior protection mat
zipper and transversely foldable in
between tailgate and second seat row
4 parts.
Interior protection mat is a covering
possible with both Standard
and protection feature for the load
protection mat or Flex cover interior
compartment, to be used when all or
protection mat being folded at the
single seats/backrests are folded
zipper to half size (double layer).
down.

-------------------------------------------------------------------------------------------------------------------------------------------------------------

Storage
85
● Expand the parts of the folded
Covering the load compartment up to
mat, so that first part is raised up
the backrests of the front seats
at second row backrest.
Only possible with Flex cover interior
● When folding down second row
protection mat being folded at the
backrests, the mat expands
zipper to half size (double layer).
automatically and covers the
Mat is expanded up to the second row
space between both seat rows.
seats, as described previously.
● To allow one seat in the third row
to be raised up, fold mat in half
lengthways.
Mat is located fourfold flapped behind
the raised up seats of the third row.
● Fold down third row seats.
● Fold down second row backrests.
● Expand the upper parts of the
double layer mat, so that the load
● Pull out the mat a little to protect
compartment is fully covered.
load compartment sill when
The first part of the mat is now
loading heavy objects. Raise up
raised up at the backrests of front
the overlaying part of the mat
seats.
before closing the tailgate.

-------------------------------------------------------------------------------------------------------------------------------------------------------------

86
Storage
● Fold the overlaying rear part
Open the zipper behind the
● Expand the upper part of double
under the mat before closing the
raised up backrest.
layer mat over the folded
tailgate.
backrests.
Pull out the mat until the first part
is flat on the load compartment
● Fold the overlaying rear part
Covering the load compartment
floor.
under the mat before closing the
partially
tailgate.
Raise up lengthways the part that
Only possible with Flex cover interior
is opened by the zipper, and fold
Proceed in the same way when one
protection mat being folded at the
it to the centre.
outer backrest and the centre
zipper to half size (double layer).
backrest are not folded down.
e.g. left outer backrest is not folded
down
e.g. only centre backrest is folded
Mat is expanded up to the second row
down
seats, as described in first section.
Mat is expanded up to the second row
seats, as described in first section.
● Fold down the backrests that
shall be covered.
● Fold down centre backrest to be
covered.

-------------------------------------------------------------------------------------------------------------------------------------------------------------

Storage
87
● Open the zipper from both sides
● Then expand the small upper
Example for long small objects, e.g.
behind the left and right backrest.
part of double layer mat over the
skis.
centre backrest.
● Pull out the mat until the first part
is flat on the load compartment
● Fold the overlaying rear part
floor.
under the mat before closing the
tailgate.
● Raise up lengthways both parts
that are opened by the zipper,
The following illustrations show some
and fold them to the centre.
further examples.
Example for side cover protection.

-------------------------------------------------------------------------------------------------------------------------------------------------------------

88
Storage
Load rails and hooks
Lashing eyes
Example for covering folded backrest
on second row and one folded seat on
third row.
Install the hooks in the desired
The lashing eyes are designed to
position in the rails: insert the hook in
secure items against slippage, e.g.
the upper groove on the rail and press
using lashing straps or luggage net.
in the lower groove.
Cargo management system
The FlexOrganizer is a flexible
system for dividing up the load
compartment.
The system consists of:
● adapters
● mesh pockets
● hooks
● variable partition net

-------------------------------------------------------------------------------------------------------------------------------------------------------------

Storage
89
The components are fitted in rails on
Variable partition net
Net pocket
both side panels using adapters and
hooks.
Installation of adapters in the rails
Insert adapters into the required
position in the rails. Stick together the
position in the rails. The net pocket
halves of the net rods.
can be suspended from the adapters.
To install, push rods together a little
Fold open the handle plate, insert the
and insert into the relevant openings
adapter into the upper and lower
in the adapters.
groove of the rail and move to the
required position. Turn the handle
To remove, press the net rods
plate upwards to lock the adapter. To
together and remove from the
remove, turn the handle plate down
adapters.
and move out of the rail.


Content      ..     3      4      5      6     ..