Vauxhall Astravan (2007 year). Manual - part 16


  Index      Vauxhall     Vauxhall Astravan (2007 year) - manual in english


Search            copyright infringement  


Content      ..     14      15      16      17     ..


Vauxhall Astravan (2007 year). Manual - part 16


242

Self-help, vehicle care

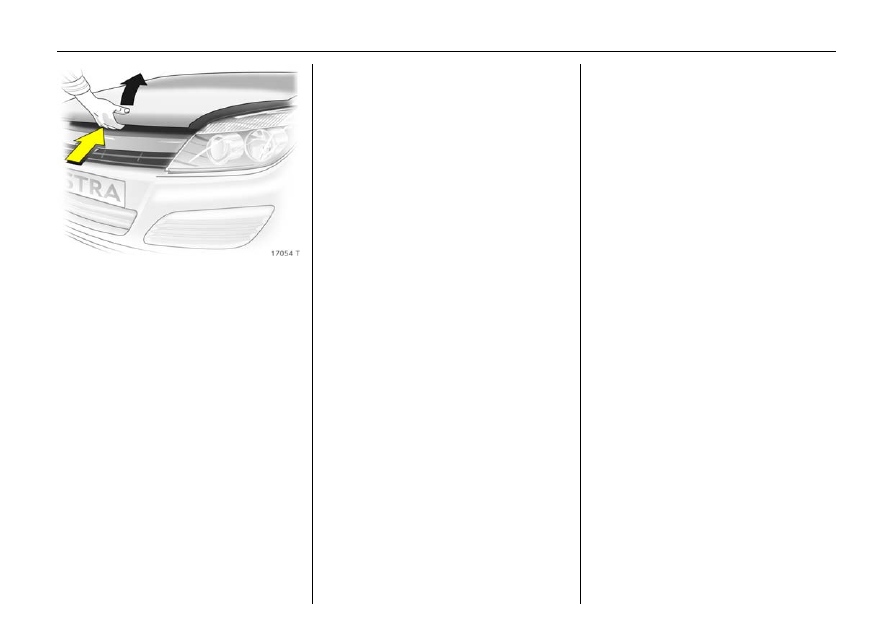
There is a safety catch on the underside of 

the bonnet: lift this upwards and open the 

bonnet. 
Dirt on snow on the bonnet can slide onto 

the windscreen when opened and block the 

air intake. 
Air intake, see page 174. 

The bonnet is held open automatically 3. 
In an alternative version, the bonnet is held 

open by inserting the support that is 

located across the radiator into the small 

elongated hole in the underside of the 

bonnet. 
Push support firmly into holder before 

closing the bonnet. Lower bonnet and 

allow to fall into lock. 
Check that the bonnet is locked in position 

by pulling at its front edge. If it is not 

engaged, repeat the procedure. 

Starting 

Do not start with quick charger 

This prevents damage to electronic 

components. 
Do not start by pushing or towing 

Because your vehicle is fitted with a 

catalytic converter, it must not be started 

by pushing or towing, see page 204. 
Vehicle with the Open&Start system 3 must 

not be started by pushing or towing if the 

battery is discharged, since the steering 

column lock cannot be released. 
The vehicle can only be started using jump 

leads – see following page. 

-------------------------------------------------------------------------------------------------------------------------------------------------------------

243

Self-help, vehicle care

Starting the engine with jump leads 3 

A vehicle with a discharged battery can be 

started using jump leads and the battery of 

another vehicle. 

z Never expose the battery to naked 

flames or sparks. 

z A discharged battery can freeze at 

temperatures of 0 °C. Defrost the frozen 

battery in a warm room before 

connecting jump leads. 

z Do not allow battery fluid to come into 

contact with eyes, skin, fabrics or 

painted surfaces. The fluid contains 

sulphuric acid which can cause injuries 

and damage in the event of direct 

contact. 

z Wear eye protection and protective 

clothing when handling a battery. 

z Use auxiliary battery with same voltage 

(12 volts). Its capacity (Ah) must not be 

considerably less than that of the 

discharged battery. Voltage and 

capacity information can be found on 

the batteries. 

z Use jump leads with insulated terminals 

and a cross section of at least 16 mm

2


(25 mm

2

 for diesel engines). 

z Do not disconnect the discharged 

battery from the vehicle. 

z Switch off all unnecessary electrical 

consumers. 

z Do not lean over the battery during jump 

starting. 

z Do not allow the terminals of one lead to 

touch those of the other lead. 

z The vehicles must not come into contact 

with each other during the jump starting 

process. 

z Apply handbrake. Manual transmission 

or Easytronic 3 in neutral, automatic 

transmission 3 in P

9

 Warning

Be extremely careful when starting with 

jump leads. Any deviation from the 

following instructions can lead to injuries 

or damage caused by battery explosion 

or damage to the electrical systems of 

both vehicles. 

-------------------------------------------------------------------------------------------------------------------------------------------------------------

244

Self-help, vehicle care

Connect the leads in the order – see 

Fig. 17230 T:

1. Connect one end of the first jump lead to 

the positive terminal 1 of the battery 

providing the jump start (identified by 

"+" sign on battery case or terminal). 

2. Connect the other end of this lead to the 

positive terminal 2 of the discharged 

battery ("+" sign). 

3. Connect the first end of the other jump 

lead to the negative terminal 3 of the 

battery providing the start ("–" sign). 

4. Connect the other end of the second 

jump lead 4 to ground on the other 

vehicle, e.g. engine block or screw 

connection in the engine suspension. 

z Do not connect leads to negative 

terminal of discharged battery! 

z The connection point should be as far 

away from the discharged battery as 

possible. 

z Route the leads so that they cannot 

catch on rotating parts in the engine 

compartment. 

z Start the engine of the vehicle providing 

the jump start. 

z After 5 minutes, start the other engine. 

Start attempts should be made at 

intervals of 1 minute not last longer than 

15 seconds. 

z After starting, allow both engines to idle 

for approx. 3 minutes with the leads 

connected. 

z In order to avoid excess voltage in the 

electrical system, before removing a 

lead, switch on an electrical consumer 

(e.g. light, heated rear window) in the 

vehicle receiving the jump start. 

z Reverse above sequence exactly when 

removing leads. 

Towing 

Towing of vehicle

To open the cover concealing the towing 

eye socket at the front right of the vehicle: 

disengage the cover at the bottom and pull 

it off downwards. 
For versions with tyre repair set 3, the 

towing eye is in the stowage compartment 

in the boot below the loading floor cover, 

see page 256.
For versions with spare wheel 3, the towing 

eye is in the stowage compartment for the 

jack 3 and tool kit 3 below the spare 

wheel, see page 251. 

-------------------------------------------------------------------------------------------------------------------------------------------------------------

245

Self-help, vehicle care

Screw in the towing eye anti-clockwise as 

far as it will go until it stops in a horizontal 

position. 
Attach a tow rope 3 – or better still a tow 

rod 3 – to the eye. 
The towing eye must only be used for 

towing, not for recovering the vehicle. 
Switch on ignition to release steering 

column lock and to permit operation of 

brake lights, horn and windscreen wiper. 

Vehicles with the Open&Start system 3 

must not be towed when the battery is 

discharged because the steering column 

lock cannot be released. Towing is only 

possible with the ignition switched on. Use 

jump leads to start the engine if necessary. 
Manual transmission or Easytronic 3 in 

neutral, automatic transmission 3 in N
Drive slowly. Do not drive jerkily. Excessive 

tractive force can damage the vehicle. 

To prevent the entry of exhaust fumes from 

the towing vehicle, switch on the air 

recirculation 3 and close the windows. 

Vehicles with automatic transmission 3 

should be towed facing forward only and 

must not be towed faster than 50 mph 

(80 km/h) or further than 60 miles (100 km). 

If the transmission is defective, or if the 

above speed or distance is to be exceeded, 

the front axle must be raised off the 

ground. 
Contact a workshop for assistance. 
On vehicles with Easytronic 3, if the 

automatic clutch has been released 

manually on a power failure, towing is not 

possible, see page 183. In this case contact 

a workshop immediately for assistance. 
After towing, unscrew the towing eye 

clockwise and refit the cover. 
Towing service 

Entrust your vehicle only to the towing 

service of your choice and obtain an 

estimate on towing costs before employing 

any towing service. In this way you avoid 

unnecessary costs and possible insurance 

problems during claim processing. 

9

 Warning

For braking and steering, significantly 

higher forces are required: brake 

assistance and steering assistance are 

effective only with the engine running. 

-------------------------------------------------------------------------------------------------------------------------------------------------------------

246

Self-help, vehicle care

Towing another vehicle 

To open the cover concealing the towing 

eye socket at the rear right of the vehicle: 

disengage the cover at the bottom and pull 

it off downwards. 

On some versions 3: remove the cover 

concealing the towing eye at the rear right 

of the vehicle by disengaging the tabs at 

the bottom and pulling off the cover from 

the top. 
For versions with tyre repair set 3, the 

towing eye is in the stowage compartment 

in the boot below the loading floor cover, 

see page 256.
For versions with spare wheel 3, the towing 

eye is in the stowage compartment for the 

jack 3 and tool kit 3 below the spare 

wheel, see page 251. 

Screw in the towing eye anti-clockwise as 

far as it will go until it stops in a horizontal 

position. 
Attach a tow rope 3 – or better still a tow 

rod 3 – to the eye. 
The towing eye must only be used for 

towing, not for recovering the vehicle. 
Drive slowly. Do not drive jerkily. Excessive 

tractive force can damage the vehicle. 
After towing, unscrew the towing eye 

clockwise and refit the cover. 
Version with cover 3: install by inserting the 

bottom lugs of the cover 3 in the bumper, 

folding and then press the lugs at the top 

into place.

-------------------------------------------------------------------------------------------------------------------------------------------------------------

247

Self-help, vehicle care

Warning triangle

¨ 3


Hatch, Astra TwinTop 

Store warning triangle in rear luggage 

compartment wall: first fit warning triangle 

into recess on left and the insert in guide on 

right. 
To remove the warning triangle, lift to the 

right and pull out to the right. 
For vehicles with cargo box 3: Lift the 

warning triangle with the right half of the 

cargo box. Pull out the warning triangle to 

the right. 

Estate, Van 

Insert the warning triangle in the retaining 

straps of the tailgate inner panelling. 

First-aid kit (cushion)

+ 3


Hatch 

Secure the first-aid kit to the right luggage 

compartment wall using the retaining 

strap. 

-------------------------------------------------------------------------------------------------------------------------------------------------------------

248

Self-help, vehicle care

Estate 

Fasten the first-aid kit (cushion) to the left 

luggage compartment wall with a 

retaining strap. 

Van 

Place first-aid kit in stowage compartment 

behind driver’s seat. To open the cover, 

press the locking tab. 

Astra TwinTop 

Store the first-aid kit (cushion) in the recess 

behind the strap in the left luggage 

compartment wall. 

-------------------------------------------------------------------------------------------------------------------------------------------------------------

249

Self-help, vehicle care

Spare wheel 

3


Some vehicles are equipped with a tyre 

repair kit instead of a spare wheel – see 

page 256. 

Spare wheel placed in luggage 

compartment 

The spare wheel is in the luggage 

compartment beneath the floor cover. It is 

secured with a nut. 
The estate also has a spacer above the 

securing nut. 

Stowing wheels with wide tyres in the 

spare wheel well 

The spare wheel well is not designed for all 

permitted tyre sizes. If a wheel wider than 

the spare must be stowed in the spare 

wheel well after changing wheels, the floor 

cover can be placed on the projecting 

wheel. 
This must be taken into consideration when 

the luggage compartment is being loaded, 

particularly with the Astra TwinTop – see 

page 60. 

-------------------------------------------------------------------------------------------------------------------------------------------------------------

250

Self-help, vehicle care

Estate

Take adapter 3 and hooks 3 from the 

rails 3 in the luggage compartment walls. 

Raise the rear lashing eyes and lift the floor 

cover to the vertical position so that it rests 

on the roof lining. 
When closing, guide the lashing eyes 

through the slots in the floor cover. 
Vehicles with cargo box 3: Removal – see 

page 81. 
Astra TwinTop

Accessing the spare wheel when the roof is 

open: Engage luggage compartment cover 

on the rear window frame and activate the 

loading aid (see page 82). Raise the floor 

cover in the luggage compartment.

General information 

Depending on version, the spare wheel 

may be in the form of a temporary spare 

wheel 3. Refer to the notes on this page 

and pages 232, 255, 337. 
On vehicles with alloy wheels 3 the spare 

wheel may have a steel rim. 
If you use winter tyres 3, the spare wheel 

may still be fitted with a summer tyre. If you 

use the spare wheel the vehicle’s handling 

may be altered. Obtain a replacement for 

the faulty tyre as soon as possible, and 

have the wheel balanced and fitted to the 

vehicle. 
The spare wheel may have a smaller tyre 

and a smaller rim than the wheels mounted 

on the vehicle

1)

: Using the spare wheel may 

alter vehicle handling. Have the defective 

tyre replaced as soon as possible, balance 

the wheel and have it mounted on the 

vehicle. 

Notes on temporary spare wheel 3 

z Using a temporary spare wheel may 

change the driving behaviour of the 

vehicle, particularly if using winter 

tyres 3. Replace defective tyre as quickly 

as possible, balance wheel and fit to 

vehicle. 

z Fit only one temporary spare wheel. 
z Do not drive faster than 50 mph 

(80 km/h). 

z Take curves slowly. 
z Do not use the temporary spare wheel 

for a lengthy period. 

z Replace temporary spare wheel with full 

specification wheel without delay. 

z Tyre chains are not permitted on the 

temporary spare wheel. If tyre chains are 

necessary after a front wheel puncture, 

fit the temporary spare wheel to the rear 

and a rear wheel to the front. Check tyre 

pressure and adjust if necessary – see 

page 337. 

z Follow temporary spare wheel 

instructions on pages 232, 255, 337. 

1)

Country-specific version: The spare wheel is 

only to be used as a temporary spare wheel. 

-------------------------------------------------------------------------------------------------------------------------------------------------------------

251

Self-help, vehicle care

Notes on directional tyres 

Directional tyres only provide maximum 

performance when they are mounted in the 

correct direction of rotation. If the tyres or 

spare wheel must be mounted opposing 

the specified direction of rotation 

(e.g. after changing a flat tyre), observe 

the following:

z Vehicle handling may change. Have the 

defective tyre replaced as soon as 

possible, and have the wheel balanced 

and mounted on the vehicle.

z Do not drive faster than 50 mph 

(80 km/h).

z Be especially careful when driving in rain 

and snow.

Further information on directional tyres – 

see page 225. 

Jack 

£


and vehicle tools 

3


The jack and the vehicle tools have been 

specially developed for your vehicle and 

must only be used on that vehicle. Only use 

jack for changing wheels. 
On Astra VXR and vehicles with wheelarch 

trims 3 or after-market trims, jacks may not 

be used 3. The vehicle may be damaged. 
Vehicles with tyre repair set 3 

The tool kit and tyre repair set are in a 

storage compartment below the floor 

cover in the luggage compartment. 

Vehicles with spare wheel 

The jack and tool kit are in a stowage 

compartment in the boot below the spare 

wheel. Remove spare wheel, see page 249. 
After use, stow away the jack and tools in 

the compartment as shown in Fig. 17242 T. 
Astra TwinTop: The tools for emergency 

operation of the convertible hardtop are 

stowed in the glove compartment. 

-------------------------------------------------------------------------------------------------------------------------------------------------------------

252

Self-help, vehicle care

Changing wheels 

There may be a tyre repair kit instead of a 

spare wheel, see page 256. 
To ensure your safety, make the following 

preparations and observe the following 

information when changing wheels: 

z Park the vehicle on a level, firm and 

non-skid surface. 

z Switch on hazard warning lights, apply 

handbrake, automatic transmission 3 – 

selector lever in P, manual transmission 

or Easytronic 3 – engage 1st or reverse 

gear. 

z Correctly set up the warning triangle 3. 

Warning triangle, see page 247. 

z Remove spare wheel from luggage 

compartment, see page 249. 

z Before raising the vehicle, set the front 

wheels to the straight-ahead position. 

z On the Astra TwinTop, the roof must be 

closed before the vehicle is raised. 

z Never change more than one wheel at 

once. 

z Block the wheel diagonally opposite the 

wheel to be changed by placing wedge 

blocks or equivalent in front and behind 

the wheel. 

z Use the jack 3 only to change wheels. 
z If the ground on which the vehicle is 

standing is soft, a solid board (max. 1 cm 

thick) should be placed under the jack 3. 

Using a thicker board could damage the 

jack 3 and the vehicle. 

z No people or animals may be in the 

vehicle when it is jacked-up. 

z Never crawl under a jacked-up vehicle. 
z Do not start or run the engine while the 

vehicle is on the jack. 

z Before inserting the wheel bolts when 

changing wheels, lightly grease the cone 

of each bolt. For this reason, carry some 

conventional grease. 

-------------------------------------------------------------------------------------------------------------------------------------------------------------

253

Self-help, vehicle care

1. Prise off the wheel trim using the hook 

included with the vehicle tools 3. For 

vehicle tools, see page 251. 
For wheel trims with visible wheel bolts 3: 

The trim can remain on the wheel. Do not 

remove the retaining washers 3 on the 

wheel bolts. 

Alloy wheels 3: Disengage the wheel bolt 

caps with a screwdriver and remove. 

Protect the wheel by inserting a soft cloth 

between the screwdriver and alloy 

wheel.

2. Turn wheel bolts half a turn using the 

wheel bolt wrench 3, pushing the 

wrench 3 on as far as possible. 

-------------------------------------------------------------------------------------------------------------------------------------------------------------

254

Self-help, vehicle care

3. The location of each jacking point 3 is 

indicated by a mark on the bottom edge 

of the vehicle. 
On Astra VXR and vehicles with 

wheelarch trims 3 or after-market trims, 

jacks may not be used 3. The vehicle 

may be damaged. 

4. Before positioning the jack 3, set it to the 

necessary height by rotating the eye by 

hand. Position the jack 3 at the front or 

rear so that the jack claw spans the 

vertical base and grips in the recess in 

the vertical base. Make sure it is properly 

positioned. 
The jack base must be on the ground 

directly below the jacking point in a 

manner that prevents it from slipping. 

Attach crank to eye of threaded rod and 

turn crank to raise vehicle. 
If this is not the case, carefully lower the 

vehicle immediately and reposition the 

jack. 

5. Unscrew wheel bolts and wipe clean with 

a cloth. Then apply a light coating of 

grease to the wheel bolts. Do not grease 

the thread of the bolts. Do not put the 

wheel bolts down in a location where 

they may become soiled. 
If the wheel bolts have retaining 

washers 3, they must not be removed. 

-------------------------------------------------------------------------------------------------------------------------------------------------------------

255

Self-help, vehicle care

6. Change the wheel. Notes on spare 

wheel, see page 249, notes on 

temporary spare wheel, see page 250. 

7. Screw in wheel bolts and tighten slightly, 

inserting the wheel bolt wrench 3 as far 

as possible. 

8. Lower vehicle. 
9. Tighten wheel bolts crosswise, putting on 

wheel bolt wrench 3 as far as possible. 

10. Before refitting the wheel trim, clean the 

wheel around the retaining clips. Valve 

symbol 3 on back of wheel trim must 

point towards valve on wheel.
Align and refit wheel trim or wheel bolt 

caps 3.
Alloy wheels 3: Align and refit wheel 

bolt caps 3.

11. Stow replaced wheel, tools and warning 

triangle 3 in luggage compartment, see 

pages 247 to 251. 

12. Check the tyre pressure of the newly 

fitted wheel. Adjust as necessary. 

13. Have the tightening torque of the wheel 

bolts on the new wheel checked on the 

vehicle using a torque wrench as soon 

as possible and, if necessary, corrected. 

Tightening torque, see page 337. 

14. Replace the faulty tyre on the wheel 

that was removed. 

15. Replace temporary spare wheel 3 with 

a full specification wheel without delay.

16. Initialise the deflation detection 

system 3 or tyre pressure monitoring 

system 3, see pages 219, 221.

-------------------------------------------------------------------------------------------------------------------------------------------------------------

256

Self-help, vehicle care

Tyre repair kit 

3


Minor damage to the tyre tread or side 

wall, e.g. from foreign bodies, can be 

repaired using the tyre repair kit (does not 

apply to run-flat tyres).
Do not remove the foreign body from the 

tyre.
Tyre damage exceeding 4 mm or damage 

to the wheel rim cannot be repaired with 

the tyre repair kit.

Important information, see page 259.
In the event of a flat tyre: 

z Switch on hazard warning lights, apply 

handbrake, automatic transmission 3 – 

selector lever in P, manual transmission 

or Easytronic 3 - engage 1st or reverse 

gear.

z Correctly set up the warning triangle 3, 

warning triangle, see page 247.

The tyre repair kit is in a compartment 

under the floor cover luggage 

compartment. 
1. Take the pouch with the tyre repair kit 

from the compartment. Carefully remove 

the components from the pouch.

2. Remove the compressor.

3. Remove the electrical connection cable 

and air hose from the stowage 

compartments on the underside of the 

compressor. 

9

 Warning

Vehicles with insufficient or no tyre 

pressure can lead to invisible damage to 

the tyre. This damage cannot be repaired 

with the tyre repair kit. Park the vehicle 

and contact a workshop for assistance. 

-------------------------------------------------------------------------------------------------------------------------------------------------------------

257

Self-help, vehicle care

4. Screw the compressor air hose to the 

connection on the sealant bottle.

5. Fit the sealant bottle into the retainer on 

the compressor. 
Set the compressor near the tyre in such 

a way that the sealant bottle is upright. 

6. Remove the valve cap from the defective 

tyre.

7. Screw the filler hose to the tyre valve.
8. The switch on the compressor must be 

set to §. 

9. Connect the compressor plug to the 

accessory socket or cigarette lighter 

socket. Accessory socket, see page 107.
To avoid discharging the battery, we 

recommend running the engine. 

10. Set the rocker switch on the compressor 

to I. The tyre is filled with sealant.

11. While the sealant bottle drains (approx. 

30 seconds) the pressure indicator on 

the compressor briefly points to 6 bar. 

Pressure then sinks again.

12. All of the sealant is pumped into the 

tyre. Afterwards, the tyre is filled 

with air.

13. The prescribed tyre pressure, see 

page 337, should be reached within 

10 minutes. Switch off the compressor 

when the correct pressure is obtained. 

-------------------------------------------------------------------------------------------------------------------------------------------------------------


Content      ..     14      15      16      17     ..