Saturn Aura (2010 year). Manual - part 10
 

  Index      Saturn     Saturn Aura (2010 year) - manual in english


Search            copyright infringement  


Content      ..     8      9      10      11     ..


Saturn Aura (2010 year). Manual - part 10


2. Write down the eight to 12 switch settings from left

to right as follows:

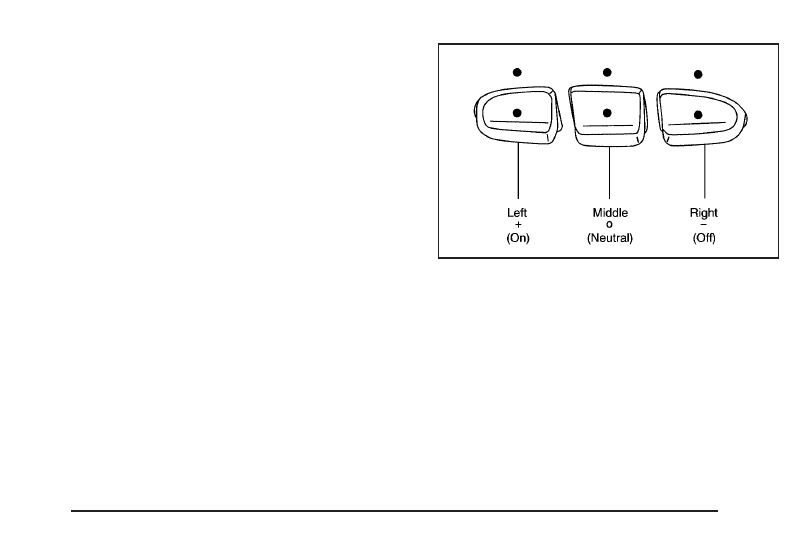
When a switch is in the up position, write “Left.”

When a switch is in the down position, write
“Right.”

If a switch is set between the up and down
position, write “Middle.”

The switch settings written down in Step 2 now
become the button strokes to be entered into the
Universal Home Remote in Step 4. Be sure to
enter the switch settings written down in Step 2, in
order from left to right, into the Universal Home
Remote, when completing Step 4.

3. From inside your vehicle, first firmly press all three

buttons at the same time for about three seconds.
Release the buttons to put the Universal Home
Remote into programming mode.

4. The indicator lights will blink slowly. Enter each

switch setting from Step 2 into your vehicle’s
Universal Home Remote. You will have two and
one-half minutes to complete Step 4. Now
press one button on the Universal Home Remote
for each switch setting as follows:

If you wrote “Left,” press the left button in the
vehicle.

If you wrote “Right,” press the right button in the
vehicle.

If you wrote “Middle,” press the middle button in
the vehicle.

3-39

-------------------------------------------------------------------------------------------------------------------------------------------------------------

5. After entering all of the switch positions, again,

firmly press and release all three buttons at the
same time. The indicator lights will turn on.

6. Press and hold the button that will be used to

control the garage door until the garage door
moves. The indicator light above the selected button
should slowly blink. This button may need to be
held for up to 55 seconds.

7. Immediately release the button when the garage

door moves. The indicator light will blink rapidly
until programming is complete.

8. Press and release the same button again. The

garage door should move, confirming that
programming is successful and complete.

To program another Fixed Code device such as an
additional garage door opener, a security device,
or home automation device, repeat Steps 1-8, choosing
a different button in Step 6 than what was used for
the garage door opener.

Using Universal Home Remote

Press and hold the appropriate button for at least half of
a second. The indicator light will come on while the
signal is being transmitted.

Reprogramming Universal Home
Remote Buttons

Any of the three buttons can be reprogrammed by
repeating the instructions.

Erasing Universal Home Remote
Buttons

The programmed buttons should be erased when the
vehicle is sold or the lease ends.

To erase either Rolling Code or Fixed Code on the
Universal Home Remote device:

1. Press and hold the two outside buttons at the same

time for approximately 20 seconds, until the
indicator lights, located directly above the buttons,
begin to blink rapidly.

2. Once the indicator lights begin to blink, release both

buttons. The codes from all buttons will be erased.

For help or information on the Universal Home Remote
System, call the customer assistance phone number
under Customer Assistance Offices on page 8-5.

3-40

-------------------------------------------------------------------------------------------------------------------------------------------------------------

Storage Areas

Glove Box

Lift up on the glove box lever to open it.

Cupholders

Two removable cupholders and additional storage areas
are located at the rear of the shift lever. Push the
button and the cover will slide back automatically for
access. Slide the cover forward and lock into place
to close.

Pull down the door on the back of the center console to
use the rear seat cupholders.

Center Console Storage

There is a center console with two storage areas. Lift
the passenger side lever to access the upper storage
tray. Lift the driver side lever to access the lower
storage area.

3-41

-------------------------------------------------------------------------------------------------------------------------------------------------------------

Convenience Net

Use the convenience net, located in the rear, to store
small loads as far forward as possible. The net
should not be used to store heavy loads.

Sunroof

On vehicles with a sunroof,
the switch is located on
the headliner between the
map lamps.

The sunroof will only operate while the ignition is in
ON/RUN, ACC/ACCESSORY, or if Retained Accessory
Power (RAP) is active. See Retained Accessory
Power (RAP) 
on page 3-20.

Press the back of the switch and release it to open the
sunroof to the vent position. From the vent position,
press and release the back of the switch to
express-open the sunroof. To stop the sunroof from
express opening, press the switch again. If the
sunshade is closed, it will open automatically when the
sunroof opens past the vented position.

A deflector will automatically raise when the sunroof is
opened. The deflector will retract when the sunroof
is closed.

To close the sunroof, press the front of the switch and
hold it until the sunroof is closed. The sunroof will stop if
the switch is released. Close the sunshade by hand.

The sunroof glass panel cannot be opened or closed if
the vehicle has an electrical failure.

Notice: Forcing the sunshade forward of the
sliding glass panel may cause damage and the
sunroof may not operate properly. Always close the
glass panel before closing the sunshade.

3-42

-------------------------------------------------------------------------------------------------------------------------------------------------------------

Sunshade

The automatic sunshade
control is located on the
headliner, between
the map lamp controls.

The sunshade can be independently opened or closed
while the panoramic sunroof is closed. To express-open
or express-close the sunshade, press and release
the control rearward or forward. The sunshade
will retract to the full-open or closed position. To stop
the movement of the sunshade, press the control
a second time. To close the sunshade to a particular
position, continue to press the control and release
it when the desired position is reached.

The sunshade cannot be opened or closed if the vehicle
has an electrical failure.

3-43

-------------------------------------------------------------------------------------------------------------------------------------------------------------

Instrument Panel Overview ...............................4-3

Hazard Warning Flashers ................................4-3
Horn .............................................................4-3
Tilt and Telescopic Steering Wheel ...................4-3
Turn Signal/Multifunction Lever .........................4-4
Turn and Lane-Change Signals ........................4-4
Headlamp High/Low-Beam Changer ..................4-5
Flash-to-Pass .................................................4-5
Windshield Wipers ..........................................4-5
Windshield Washer .........................................4-6
Cruise Control ................................................4-7
Headlamps ..................................................4-10
Headlamps on Reminder ................................4-10
Headlamps Off in Park ..................................4-10
Delayed Headlamps ......................................4-11
Daytime Running Lamps (DRL) .......................4-11
Automatic Headlamp System ..........................4-11
Fog Lamps ..................................................4-12
Instrument Panel Brightness ...........................4-13
Dome Lamps ...............................................4-13
Entry/Exit Lighting .........................................4-13
Parade Dimming ...........................................4-13
Reading Lamps ............................................4-13

Electric Power Management ...........................4-14
Battery Run-Down Protection ..........................4-14
Accessory Power Outlet(s) .............................4-15

Climate Controls ............................................4-16

Climate Control System .................................4-16
Automatic Climate Control System ...................4-19
Outlet Adjustment .........................................4-23

Warning Lights, Gages, and Indicators ............4-24

Instrument Panel Cluster ................................4-25
Speedometer and Odometer ...........................4-26
Trip Odometer ..............................................4-26
Tachometer .................................................4-26
Safety Belt Reminders ...................................4-26
Airbag Readiness Light ..................................4-28
Passenger Airbag Status Indicator ...................4-29
Charging System Light ..................................4-30
Brake System Warning Light ..........................4-30
Antilock Brake System (ABS) Warning Light .....4-31
Electronic Stability Control (ESC)/Traction

Control System (TCS) Indicator/Warning
Light ........................................................4-32

Engine Coolant Temperature Warning Light ......4-33
Engine Coolant Temperature Gage ..................4-33

Section 4

Instrument Panel

4-1

-------------------------------------------------------------------------------------------------------------------------------------------------------------

Tire Pressure Light .......................................4-34
Malfunction Indicator Lamp .............................4-34
Oil Pressure Light .........................................4-37
Security Light ...............................................4-37
Cruise Control Light ......................................4-38
Highbeam On Light .......................................4-38
Fuel Gage ...................................................4-38

Driver Information Center (DIC) .......................4-39

DIC Operation and Displays ...........................4-40
DIC Warnings and Messages .........................4-42
DIC Vehicle Personalization ............................4-46

Audio System(s) .............................................4-50

Setting the Clock ..........................................4-51
Radio(s) ......................................................4-52
Using an MP3 ..............................................4-61
XM Radio Messages .....................................4-67
Bluetooth

®

...................................................4-68

Rear Seat Audio (RSA) .................................4-79
Theft-Deterrent Feature ..................................4-81
Audio Steering Wheel Controls .......................4-82
Radio Reception ...........................................4-83
Backglass Antenna .......................................4-84
XM™ Satellite Radio Antenna System .............4-84
Chime Level Adjustment ................................4-84

Section 4

Instrument Panel

4-2

-------------------------------------------------------------------------------------------------------------------------------------------------------------

Instrument Panel Overview

Hazard Warning Flashers

|

(Hazard Warning Flasher): Press this button

located on the instrument panel, to make the front and
rear turn signal lamps flash on and off. This warns
others that you are having trouble.

Press

|

again to turn the flashers off.

Horn

Press near or on the horn symbols on the steering
wheel pad to sound the horn.

Tilt and Telescopic Steering Wheel

A tilt and telescope wheel lets the steering wheel
be adjusted.

The lever is located on the left side of the steering
wheel column.

To adjust the steering wheel:

1. Pull the lever down.

2. Move the steering wheel up or down or backward

or forward into a comfortable position.

3. Pull the lever up to lock the steering wheel in place.

Do not adjust the steering wheel while driving.

4-3

-------------------------------------------------------------------------------------------------------------------------------------------------------------

Turn Signal/Multifunction Lever

The lever on the left side of the steering column
operates the following:

G

Turn and Lane-Change Signals

5 3

Headlamp High/Low-Beam Changer

O

Exterior Lamp Control

Flash-to-Pass.

Information for these features is on the pages following.

Turn and Lane-Change Signals

An arrow on the instrument
panel cluster flashes in the
direction of the turn or
lane change.

Move the lever all the way up or down to signal a turn.

Raise or lower the lever until the arrow starts to flash
to signal a lane change. Hold it there until lane change
is complete.

The lever returns to its starting position when it is
released.

If after signaling a turn or lane change the arrows flash
rapidly or do not come on, a signal bulb could be
burned out.

Have the bulbs replaced. If the bulb is not burned out,
check the fuse. See Fuses on page 6-97.

4-4

-------------------------------------------------------------------------------------------------------------------------------------------------------------

Headlamp High/Low-Beam Changer

To change the headlamps from low beam to high
beam, push the turn signal/multifunction lever away
from you.

This instrument panel cluster light

3

comes on if the

high beam lamps are turned on while the ignition is
in ON/RUN.

To change the headlamps from high beam to low beam,
pull the turn signal lever toward you.

Flash-to-Pass

This feature lets the high-beam headlamps be used to
signal a driver in front of you that you want to pass.

Pull the turn signal/multifunction lever toward you until
the high-beam headlamps come on, then release
the lever to turn them off.

Windshield Wipers

The windshield wiper lever is on the right side of the
steering column.

Move the lever to control the windshield wipers.

9

(Off): Turns the windshield wipers off.

&

(Intermittent; Speed Sensitive Wipers): For

intermittent or speed sensitive operation. The amount of
delay time varies between wiping cycles due to the
delay setting selected or the speed of the vehicle. As
vehicle speed is increased or decreased, the wiper
interval also increases or decreases.

4-5

-------------------------------------------------------------------------------------------------------------------------------------------------------------

x

(Delay): Move the lever to the

&

position, then

turn the

x

band up for more frequent wipes or

down for less frequent wipes.

6

(Low Speed): Slow wipes.

1

(High Speed): Fast wipes.

8

(Mist): Single wipe, move the lever down, then

release it. Several wipes, hold the lever down.

Clear ice and snow from the wiper blades before
using them.

If frozen to the windshield, carefully loosen or thaw
them. Damaged wiper blades should be replaced.

Heavy snow or ice can overload the wiper motor. A
circuit breaker stops the motor until it cools. If the motor
gets stuck, turn the wipers off, clear away the snow
or ice, and then turn the wipers back on.

As an added safety feature, if the wipers are on for
more than 15 seconds, the vehicle’s headlamps turn
on automatically. They turn off 15 seconds after
the wipers are turned off.

Windshield Washer

Press the button at the end of the windshield wiper
lever until the washers begin.

{

WARNING:

In freezing weather, do not use your washer until
the windshield is warmed. Otherwise the washer
fluid can form ice on the windshield, blocking
your vision.

When the button is released, the washers stop, but the
wipers continue to wipe about three times or resume
the previous speed.

4-6

-------------------------------------------------------------------------------------------------------------------------------------------------------------

Cruise Control

Cruise control lets a speed of about 40 km/h (25 mph)
or more be maintained without keeping your foot on
the accelerator. Cruise control does not work at speeds
below 40 km/h (25 mph).

{

WARNING:

Cruise control can be dangerous where you
cannot drive safely at a steady speed. So, do not
use the cruise control on winding roads or in
heavy traffic.

Cruise control can be dangerous on slippery roads.
On such roads, fast changes in tire traction can
cause excessive wheel slip, and you could lose
control. Do not use cruise control on slippery roads.

Setting Cruise Control

{

WARNING:

If you leave your cruise control on when you are
not using cruise, you might hit a button and go
into cruise when you do not want to. You could be
startled and even lose control. Keep the cruise
control switch off until you want to use cruise
control.

The cruise control buttons
are located on the steering
wheel.

I

(On/Off): Press to turn the cruise control system

on and off.

4-7

-------------------------------------------------------------------------------------------------------------------------------------------------------------

RES+ (Resume): Press to resume a set speed and to
accelerate the speed.

SET

(Set): Press to set a speed and to decrease the

speed.

To set a speed do the following:

1. Press

I

to turn cruise control on. The indicator

light on the button comes on.

2. Get up to the desired speed.

3. Press the SET

and release it. The cruise symbol

displays in the instrument panel cluster to show the
system is engaged.

4. Take your foot off the accelerator pedal.

When the brakes are applied, the cruise control
shuts off.

If the vehicle is in cruise control and the Traction
Control System (TCS) begins to limit wheel spin, the
cruise control automatically disengages. See Traction
Control System (TCS) 
on page 5-7. When road
conditions allow, the cruise control can be used again.

Resuming a Set Speed

If the cruise control is set at a desired speed and then
the brakes are applied, the cruise control is disengaged.
But it does not need to be reset. The cruise symbol in
the instrument panel cluster also goes out indicating
cruise is no longer engaged. Once the vehicle speed is
40 km/h (25 mph) or more, briefly press the RES+.

The vehicle returns to the previously set speed
and stays there.

Increasing Speed While Using Cruise
Control

There are two ways to increase the vehicle speed while
using cruise control:

If the cruise control system is already engaged,
press and hold the RES+ button until the desired
speed is reached, then release it.

To increase the vehicle speed in small amounts,
briefly press the RES+ and then release it. Each
time this is done, the vehicle goes about 1.6 km/h
(1 mph) faster.

4-8

-------------------------------------------------------------------------------------------------------------------------------------------------------------

Reducing Speed While Using Cruise
Control

If the cruise control system is already engaged:

Press and hold the SET

until the desired lower

speed is reached, then release it.

To slow down in very small amounts, briefly push
the SET

. Each time this is done, the vehicle

goes about 1.6 km/h (1 mph) slower.

Passing Another Vehicle While Using
Cruise Control

Use the accelerator pedal to increase the vehicle’s
speed. When you take your foot off the pedal, the
vehicle slows down to the previously set cruise
control speed.

Using Cruise Control on Hills

How well the cruise control works on hills depends upon
the vehicle’s speed, load, and the steepness of the
hills. When going up steep hills, you might have to step
on the accelerator pedal to maintain the vehicle’s
speed. When going downhill, you might have to brake
or shift to a lower gear to keep the vehicle at a
lower speed. When the brakes are applied this ends the
cruise control.

Ending Cruise Control

There are two ways to disengage the cruise control:

Step lightly on the brake pedal; when cruise control
disengages, the cruise symbol in the instrument
panel cluster goes out.

Press the

I

button, to turn off the cruise control

system.

Erasing Speed Memory

The cruise control set speed memory is erased when
the cruise control or the ignition is turned off.

4-9

-------------------------------------------------------------------------------------------------------------------------------------------------------------

Headlamps

The band on the lever located on the left side of the
steering column, operates the exterior lamps.

The exterior lamp control has the following four
positions:

2

(Headlamps): Turns on the headlamps, parking

lamps, and taillamps.

;

(Parking Lamps): Turns on the parking lamps and

taillamps only.

AUTO (Automatic Headlamp System): Automatically
turns on the Daytime Running Lamps during daytime,
and the headlamps, parking lamps, and taillamps
at night.

P

(Off/On): Turn the band to this position to turn on

the Automatic Headlamp System. In Canada, this
position only works when a vehicle is in the P (Park)
position.

To turn on the Automatic Headlamp System, turn the
switch to off/on. To turn them off, turn the switch to off/on
again. This is a momentary control switch that springs
back when released. The Automatic Headlamp System
always turns on at the beginning of an ignition cycle.

Headlamps on Reminder

If the driver’s door is opened and the ignition is turned
off while leaving the lamps on, a warning chime will
sound.

Headlamps Off in Park

This feature works when the ignition is in the ON/RUN
position and it is dark outside. To turn the headlamps
off when it is dark outside but keep other exterior lights
on, turn the exterior lamp control to the parking lamp
position.

To turn on the headlamps along with the other lamps
when it is dark outside, turn the exterior lamp control to
the AUTO or headlamp position.

This function does not work for vehicles first sold in
Canada.

4-10

-------------------------------------------------------------------------------------------------------------------------------------------------------------

Delayed Headlamps

The delayed headlamps feature keeps the headlamps
on for 20 seconds after the key is turned to LOCK/OFF,
then the headlamps automatically turn off.

To override the 20 second delayed headlamp feature
while it is active turn the turn signal/multifunction
lever up one position and then back to AUTO.

Daytime Running Lamps (DRL)

Daytime Running Lamps (DRL) can make it easier for
others to see the front of your vehicle during the
day. Fully functional DRL are required on all vehicles
first sold in Canada. The vehicle has a light sensor
on top of the instrument panel that controls the DRL.
Do not cover this sensor or the head lamps will be
on when they are not needed.

The DRL system makes the low-beam headlamps come
on at a reduced brightness when the following
conditions are met:

The ignition is on.

The exterior lamps control is in AUTO.

The exterior lamps control is in the parking lamps
only position (This applies only to vehicles that
are first sold in Canada).

The light sensor detects daytime light.

The parking brake is released or the vehicle is not
in P (Park).

When the DRL system is on, the taillamps, sidemarker
lamps, parking lamps, and instrument panel lights
are not on unless you turn the exterior lamps control to
the parking lamp position.

The regular headlamp system should be turned on
when they are needed.

Automatic Headlamp System

When it is dark enough outside, the automatic headlamp
system turns on the headlamps at the normal brightness
along with other lamps such as the taillamps,
sidemarker, parking lamps, and the instrument panel
lights. The radio lights will also be dim.

The vehicle has a light sensor on top of the instrument
panel that controls the automatic headlamp system.
Do not cover the sensor or the automatic headlamp
system will turn on when it is not needed.

There is a delay in the transition between the daytime
and nighttime operation of the DRL and the automatic
headlamp systems so that driving under bridges or
bright overhead street lights does not affect the system.

4-11

-------------------------------------------------------------------------------------------------------------------------------------------------------------


Content      ..     8      9      10      11     ..