Saturn Aura (2010 year). Manual - part 9
 

  Index      Saturn     Saturn Aura (2010 year) - manual in english


Search            copyright infringement  


Content      ..     7      8      9      10     ..


Saturn Aura (2010 year). Manual - part 9


Automatic Transmission Operation
(Six Speed Transmission)

The automatic
transmission has a shift
lever located on the
console between the seats.

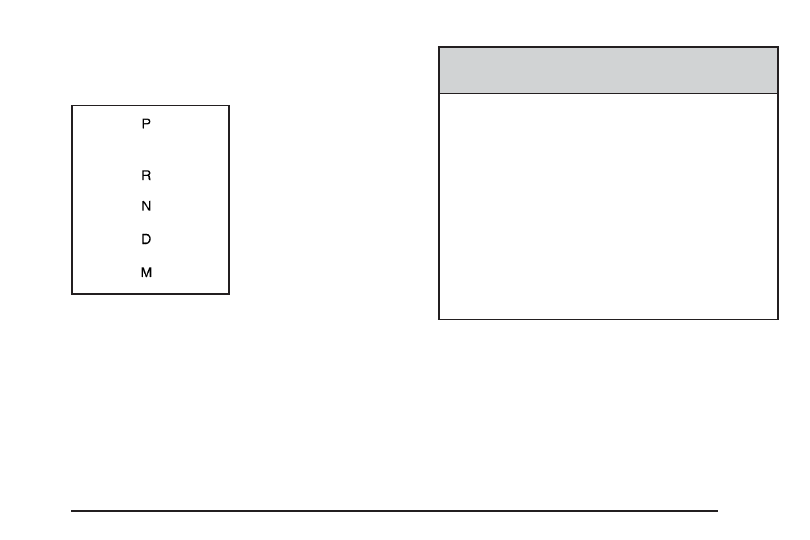
P (Park): This position locks the front wheels. It is the
best position to use when you start the engine
because the vehicle cannot move easily.

{

WARNING:

It is dangerous to get out of the vehicle if the shift
lever is not fully in P (Park) with the parking brake
firmly set. The vehicle can roll.

Do not leave the vehicle when the engine is
running unless you have to. If you have left the
engine running, the vehicle can move suddenly.
You or others could be injured. To be sure the
vehicle will not move, even when you are on fairly
level ground, always set the parking brake and
move the shift lever to P (Park). See Shifting Into
Park 
on page 3-27. If you are pulling a trailer, see
Towing a Trailer on page 5-27.

Make sure the shift lever is fully in P (Park) before
starting the engine. The vehicle has an automatic
transmission shift lock control system. You must fully
apply the brake pedal then press the shift lever
button before you can shift from P (Park) while the
ignition key is in ON/RUN. If you cannot shift out
of P (Park), ease pressure on the shift lever and push
the shift lever all the way into P (Park) as you maintain
brake application. Then move the shift lever into
another gear. See Shifting Out of Park on page 3-28.

3-23

-------------------------------------------------------------------------------------------------------------------------------------------------------------

R (Reverse): Use this gear to back up.

Notice: Shifting to R (Reverse) while the vehicle is
moving forward could damage the transmission.
The repairs would not be covered by the vehicle
warranty. Shift to R (Reverse) only after the vehicle
is stopped.

To rock the vehicle back and forth to get out of snow,
ice, or sand without damaging the transmission,
see If Your Vehicle is Stuck in Sand, Mud, Ice, or Snow
on page 5-18.

N (Neutral): In this position, the engine does not
connect with the wheels. To restart the engine when the
vehicle is already moving, use N (Neutral) only. Also,
use N (Neutral) when the vehicle is being towed.

{

WARNING:

Shifting into a drive gear while the engine is
running at high speed is dangerous. Unless your
foot is firmly on the brake pedal, the vehicle could
move very rapidly. You could lose control and hit
people or objects. Do not shift into a drive gear
while the engine is running at high speed.

Notice: Shifting out of P (Park) or N (Neutral) with
the engine running at high speed may damage
the transmission. The repairs would not be covered
by the vehicle warranty. Be sure the engine is
not running at high speed when shifting the vehicle.

D (Drive): This position is for normal driving. It
provides the best fuel economy. If you need more
power for passing, and you are:

Going less than 35 mph (56 km/h), push the
accelerator pedal about halfway down.

Going about 35 mph (56 km/h) or more, push the
accelerator all the way down.

M (Manual Mode): This position, allows you to change
gears similar to a manual transmission. If the vehicle
has this feature, see Driver Shift Control (DSC).

Driver Shift Control (DSC)

To use this feature, do the following:

1. Move the shift lever from D (Drive) rearward to

M (Manual).

While driving in manual mode, the transmission will
remain in the driver selected gear. When coming
to a stop in the manual position, the vehicle
will automatically shift into 1 (First) gear.

3-24

-------------------------------------------------------------------------------------------------------------------------------------------------------------

2. Press the + (plus) paddle located on top of the

steering wheel controls forward to upshift, or
push the backside of the shift paddle rearward to
downshift.

The Driver Information Center (DIC) in the instrument
cluster will change from the currently displayed message
to the letter “M”, For Manual position, and a number
indicating the requested gear range when moving
the shift lever forward or rearward.

While using the DSC feature the transmission will have
firmer shifting and sportier performance. You can
use this for sport driving or when climbing hills to stay in
gear longer or to downshift for more power or engine
braking.

The transmission will only allow you to shift into gears
appropriate for the vehicle speed and engine revolutions
per minute (RPM):

The transmission will not automatically shift to the
next higher gear if the vehicle speed or engine
RPM is too low.

The transmission will not allow shifting to the next
lower gear if the vehicle speed or engine RPM is
too high.

3-25

-------------------------------------------------------------------------------------------------------------------------------------------------------------

Second or Third Gear Start Feature

When accelerating the vehicle from a stop in snowy and
icy conditions, you may want to shift the gear select
tap switch into Second or Third gear. A higher
gear allows you to gain more traction on slippery
surfaces.

With the DSC feature, the vehicle can be set to pull
away in Second or Third gear.

1. Move the shift lever from D (Drive) into the

M (Manual Mode).

2. With the vehicle stopped, press (+) end of the

button to select Second or Third gear. The
vehicle will start from a stop position in Second or
Third gear.

3. Once moving select the desired drive gear.

Parking Brake

To set the parking brake,
push down the parking
brake pedal. If the ignition
is in ON/RUN, the
brake system warning light
will come on. See Brake
System Warning Light
on page 4-30.

To release the parking brake, hold the regular brake
pedal down, then push down momentarily on the parking
brake pedal until you feel the pedal release. If the
parking brake is not released when you begin to drive,
the brake system warning light will be on and a
chime will sound warning you that the parking brake is
still on.

3-26

-------------------------------------------------------------------------------------------------------------------------------------------------------------

The PUSH PARK PEDAL message will also appear in
the Driver Information Center (DIC) to remind you
to release the parking brake. See DIC Warnings and
Messages 
on page 4-42.

Notice: Driving with the parking brake on can
overheat the brake system and cause premature
wear or damage to brake system parts. Make sure
that the parking brake is fully released and the brake
warning light is off before driving.

If you are towing a trailer and are parking on a hill, see
Towing a Trailer on page 5-27.

Shifting Into Park

{

WARNING:

It can be dangerous to get out of the vehicle if the
shift lever is not fully in P (Park) with the parking
brake firmly set. The vehicle can roll. If you have
left the engine running, the vehicle can move
suddenly. You or others could be injured. To be
sure the vehicle will not move, even when you are
on fairly level ground, use the steps that follow. If
you are pulling a trailer, see Towing a Trailer on
page 5-27
.

1. Hold the brake pedal down and set the parking

brake. See Parking Brake on page 3-26 for more
information.

2. Move the shift lever into P (Park) by holding in the

button on the shift lever and pushing the shift lever
all the way toward the front of the vehicle.

3. Turn the ignition key to LOCK/OFF.

4. Remove the key and take it with you. If you can

leave the vehicle with the ignition key in your
hand, the vehicle is in P (Park).

3-27

-------------------------------------------------------------------------------------------------------------------------------------------------------------

Leaving the Vehicle with the Engine
Running

{

WARNING:

It can be dangerous to leave the vehicle with the
engine running. The vehicle could move suddenly
if the shift lever is not fully in P (Park) with the
parking brake firmly set. And, if you leave the
vehicle with the engine running, it could overheat
and even catch fire. You or others could be
injured. Do not leave the vehicle with the engine
running.

If you have to leave the vehicle with the engine running,
be sure the vehicle is in P (Park) and the parking
brake is firmly set before you leave it. After you have
moved the shift lever into P (Park), hold the regular
brake pedal down. Then, see if you can move the shift
lever away from P (Park) without first pushing the
button.

If you can, it means that the shift lever was not fully
locked in P (Park).

Torque Lock

Torque lock is when the weight of the vehicle puts too
much force on the parking pawl in the transmission.
This happens when parking on a hill and shifting
the transmission into P (Park) is not done properly and
then it is difficult to shift out of P (Park). To prevent
torque lock, set the parking brake and then shift
into P (Park). To find out how, see “Shifting Into Park”
listed previously.

If torque lock does occur, your vehicle may need to be
pushed uphill by another vehicle to relieve the parking
pawl pressure, so you can shift out of P (Park).

Shifting Out of Park

The vehicle is equipped with an electronic shift lock
release system. The shift lock release is designed to:

Prevent ignition key removal unless the shift
lever is in P (Park) with the shift lever button fully
released, and

Prevent movement of the shift lever out of P (Park),
unless the ignition is in ON/RUN or
ACC/ACCESSORY and the regular brake pedal is
applied.

The shift lock release is always functional except in
the case of an uncharged or low voltage (less than
9 volt) battery.

3-28

-------------------------------------------------------------------------------------------------------------------------------------------------------------

If the vehicle has an uncharged battery or a battery with
low voltage, try charging or jump starting the battery.
See Jump Starting on page 6-36 for more information.

To shift out of P (Park):

1. Apply the brake pedal.

2. Press the shift lever button.

3. Move the shift lever to the desired position.

If you still are unable to shift out of P (Park):

1. Fully release the shift lever button.

2. While holding down the brake pedal, press the shift

lever button again.

3. Move the shift lever to the desired position.

If you still cannot move the shift lever from P (Park), see
your dealer/retailer.

Parking Over Things That Burn

{

WARNING:

Things that can burn could touch hot exhaust
parts under the vehicle and ignite. Do not park
over papers, leaves, dry grass, or other things that
can burn.

3-29

-------------------------------------------------------------------------------------------------------------------------------------------------------------

Engine Exhaust

{

WARNING:

Engine exhaust contains Carbon Monoxide (CO)
which cannot be seen or smelled. Exposure to CO
can cause unconsciousness and even death.

Exhaust may enter the vehicle if:

The vehicle idles in areas with poor ventilation
(parking garages, tunnels, deep snow that
may block underbody airflow or tail pipes).

The exhaust smells or sounds strange or
different.

The exhaust system leaks due to corrosion or
damage.

The vehicle’s exhaust system has been
modified, damaged or improperly repaired.

There are holes or openings in the vehicle
body from damage or after-market
modifications that are not completely sealed.

WARNING:

(Continued)

WARNING:

(Continued)

If unusual fumes are detected or if it is suspected
that exhaust is coming into the vehicle:

Drive it only with the windows
completely down.

Have the vehicle repaired immediately.

Never park the vehicle with the engine running in
an enclosed area such as a garage or a building
that has no fresh air ventilation.

3-30

-------------------------------------------------------------------------------------------------------------------------------------------------------------

Running the Vehicle While Parked

It is better not to park with the engine running. But if you
ever have to, here are some things to know.

{

WARNING:

Idling a vehicle in an enclosed area with poor
ventilation is dangerous. Engine exhaust may
enter the vehicle. Engine exhaust contains Carbon
Monoxide (CO) which cannot be seen or smelled.
It can cause unconsciousness and even death.
Never run the engine in an enclosed area that has
no fresh air ventilation. For more information, see
Engine Exhaust on page 3-30.

{

WARNING:

It can be dangerous to get out of the vehicle if the
automatic transmission shift lever is not fully in
P (Park) with the parking brake firmly set. The
vehicle can roll. Do not leave the vehicle when the
engine is running unless you have to. If you have
left the engine running, the vehicle can move
suddenly. You or others could be injured. To be
sure the vehicle will not move, even when you are
on fairly level ground, always set the parking
brake and move the shift lever to P (Park).

Follow the proper steps to be sure the vehicle will not
move. See Shifting Into Park on page 3-27.

If parking on a hill and pulling a trailer, see Towing a
Trailer 
on page 5-27.

3-31

-------------------------------------------------------------------------------------------------------------------------------------------------------------

Mirrors

Manual Rearview Mirror

Hold the inside rearview mirror in the center to move it
for a clearer view of behind your vehicle. Adjust the
mirror to reduce the glare of headlamps from behind
you. Push the tab forward for daytime use and pull it for
nighttime use.

There are also three additional OnStar

®

control buttons

located at the bottom of the mirror. See your dealer/
retailer for more information on the system and how to
subscribe to OnStar

®

. See the OnStar

®

owner’s

guide for more information about the services OnStar

®

provides.

Cleaning the Mirror

Do not spray glass cleaner directly on the mirror. Use a
soft towel dampened with water.

Automatic Dimming Rearview Mirror

The vehicle may have an automatic dimming inside
rearview mirror with a compass display and OnStar

®

.

Vehicles with OnStar

®

have three additional control

buttons located at the bottom of the mirror. See your
retailer/dealer for more information on the system
and how to subscribe to OnStar. See the OnStar

®

owner’s guide for more information about the services
OnStar provides.

O

(On/Off): Press to turn the dimming feature on or

off. This button is located on the lower left side of
the mirror.

Automatic Dimming Mirror Operation

Automatic dimming reduces the glare of lights from
behind the vehicle. The dimming feature comes on and
the indicator light illuminates each time the vehicle is
started.

Cleaning the Mirror

Do not spray glass cleaner directly on the mirror. Use a
soft towel dampened with water.

3-32

-------------------------------------------------------------------------------------------------------------------------------------------------------------

Compass

Compass Operation

There is a compass display in the upper right corner of
the mirror.

Press

O

to turn the compass display on or off.

When the ignition and the compass feature are on, the
compass displays the current compass direction,
after a few seconds.

Compass Calibration

The compass can be calibrated by driving the vehicle in
circles at 5 mph (8 km) or less until the display reads
a direction.

If after a few seconds the display does not show a
compass direction, (N for North for example), there may
be a strong magnetic field interfering with the compass.
Interference can be caused by a magnetic antenna
mount, note pad holder, or similar object. If the letter C
appears in the compass window, the compass may
need to be reset or calibrated.

Compass Variance

The mirror is set to zone eight. If you do not live in zone
eight or drive out of the area, the compass variance
needs to be changed to the appropriate zone.

To adjust for compass variance:

1. Find your current location and variance zone

number on the following zone map.

2. Press and hold

O

until the zone number displays.

The number shown is the current zone number.

3. Scroll through the zone numbers that appear in the

window on the mirror by pressing the

O

button.

Once you find your zone number, release the
button. After about four seconds, the mirror returns

3-33

-------------------------------------------------------------------------------------------------------------------------------------------------------------

to the compass display, and the new zone number
is set. If C appears in the compass window, the
compass may need calibration. See “Compass
Calibration” listed previously.

Outside Power Mirrors

Controls for the outside
power mirrors are located
on the inside of the
vehicle near the driver side
mirror.

Use the selector switch located above the four-way
control panel to choose either the left or right outside
mirror. Then press the control pad to move the selected
mirror in the desired direction.

To maximize the viewing area, adjust each mirror to see
the side of your vehicle and the area beside and
behind your vehicle.

Outside Automatic Dimming Mirror

If the vehicle has this feature, the driver side mirror
adjusts for the glare of headlamps behind you.

Outside Heated Mirrors

For vehicles with heated mirrors:

<

(Rear Window Defogger): Press to heat the

mirrors. See “Rear Window Defogger” under Climate
Control System 
on page 4-16.

Universal Home Remote
System

See Radio Frequency Statement on page 8-17 for
information regarding Part 15 of the Federal
Communications Commission (FCC) Rules and
RSS-210/211 of Industry and Science Canada.

3-34

-------------------------------------------------------------------------------------------------------------------------------------------------------------

Universal Home Remote System
Operation (With Three Round LED)

This vehicle may have the Universal Home Remote
System. If there are three round Light Emitting Diode
(LED) indicator lights above the Universal Home Remote
buttons, follow the instructions below.

This system provides a way to replace up to three
remote control transmitters used to activate devices
such as garage door openers, security systems,
and home automation devices.

Do not use this system with any garage door opener
that does not have the stop and reverse feature.
This includes any garage door opener model
manufactured before April 1, 1982.

Read the instructions completely before attempting to
program the transmitter. Because of the steps involved,
it may be helpful to have another person assist with
programming the transmitter.

Be sure to keep the original remote control transmitter
for use in other vehicles, as well as, for future
programming. Only the original remote control
transmitter is needed for Fixed Code programming. The
programmed buttons should be erased when the
vehicle is sold or the lease ends. See “Erasing Universal
Home Remote Buttons” later in this section.

Park the vehicle outside of the garage when
programming a garage door. Be sure that people and
objects are clear of the garage door or gate that is being
programmed.

Programming Universal Home
Remote — Rolling Code

For questions or help programming the Universal Home
Remote System, call 1-866-572-2728 or go to
learcar2u.com.

Most garage door openers sold after 1996 are Rolling
Code units.

Programming a garage door opener involves
time-sensitive actions, so read the entire procedure
before starting. Otherwise, the device will time out and
the procedure will have to be repeated.

3-35

-------------------------------------------------------------------------------------------------------------------------------------------------------------

To program up to three devices:

1. From inside the vehicle, press the two outside

buttons at the same time for one to two seconds,
and immediately release them.

2. Locate in the garage, the garage door opener

receiver (motor-head unit). Locate the “Learn”
or “Smart” button. It can usually be found where the
hanging antenna wire is attached to the motor-head
unit and may be a colored button. Press this
button. After pressing this button, complete the
following steps in less than 30 seconds.

3. Immediately return to the vehicle. Press and hold

the Universal Home Remote button that will be
used to control the garage door until the garage
door moves. The indicator light, above the selected
button, should slowly blink. This button may
need to be held for up to 20 seconds.

4. Immediately, within one second, release the button

when the garage door moves. The indicator light
will blink rapidly until programming is complete.

5. Press and release the same button again. The

garage door should move, confirming that
programming is successful and complete.

To program another Rolling Code device such as an
additional garage door opener, a security device,
or home automation device, repeat Steps 1 through 5,
choosing a different function button in Step 3 than
what was used for the garage door opener.

If these instructions do not work, the garage door
opener is probably a Fixed Code unit. Follow the
Programming instructions that follow for a Fixed Code
garage door opener.

3-36

-------------------------------------------------------------------------------------------------------------------------------------------------------------

Programming Universal Home
Remote — Fixed Code

For questions or help programming the Universal Home
Remote System, call 1-866-572-2728 or go to
learcar2u.com.

Most garage door openers sold before 1996 are Fixed
Code units.

Programming a garage door opener involves
time-sensitive actions, so read the entire procedure
before starting. Otherwise, the device will time out and
the procedure will have to be repeated.

To program up to three devices:

1. To verify that the garage door opener is a Fixed

Code unit, remove the battery cover on the hand
held transmitter supplied by the manufacturer of the
garage door opener motor. If there are a row of
dip switches similar to the graphic above, the
garage door opener is a Fixed Code unit. If you do
not see a row of dip switches, return to the
previous section for Programming Universal Home
Remote – Rolling Code.

Your hand held transmitter can have between eight
to 12 dip switches depending on the brand of
transmitter.

3-37

-------------------------------------------------------------------------------------------------------------------------------------------------------------

The garage door opener receiver (motor head unit)
could also have a row of dip switches that can
be used when programming the Universal Home
Remote. If the total number of switches on the motor
head and hand held transmitter are different, or if
the dip switch settings are different, use the
dip switch settings on the motor head unit to
program the Universal Home Remote. The motor
head dip switch settings can also be used when the
original hand held transmitter is not available.

The panel of switches might not appear exactly as
they do in the examples above, but they should
be similar.

The switch positions on the hand-held transmitter
could be labeled, as follows:

A switch in the up position could be labeled as
“Up,” “+,” or “On.”

A switch in the down position could be labeled
as “Down,” “

,” or “Off.”

A switch in the middle position could be labeled
as “Middle,” “0,” or “Neutral.”

Example of Eight Dip Switches with Two Positions

Example of Eight Dip Switches with Three Positions

3-38

-------------------------------------------------------------------------------------------------------------------------------------------------------------


Content      ..     7      8      9      10     ..