Pontiac G6 (2005 year). Manual - part 6
 

  Index      Pontiac     Pontiac G6 (2005 year) - manual in english


Search            copyright infringement  


Content      ..     4      5      6      7     ..


Pontiac G6 (2005 year). Manual - part 6


Starting and Operating
Your Vehicle

New Vehicle Break-In

Notice: Your vehicle does not need an elaborate
break-in. But it will perform better in the long run if
you follow these guidelines:

Do not drive at any one speed, fast or slow, for
the first 500 miles (805 km). Do not make
full-throttle starts.

Avoid making hard stops for the first 200 miles
(322 km) or so. During this time your new
brake linings are not yet broken in. Hard stops
with new linings can mean premature wear
and earlier replacement. Follow this breaking-in
guideline every time you get new brake
linings.

Do not tow a trailer during break-in. See Towing
a Trailer 
on page 4-38 for more information.

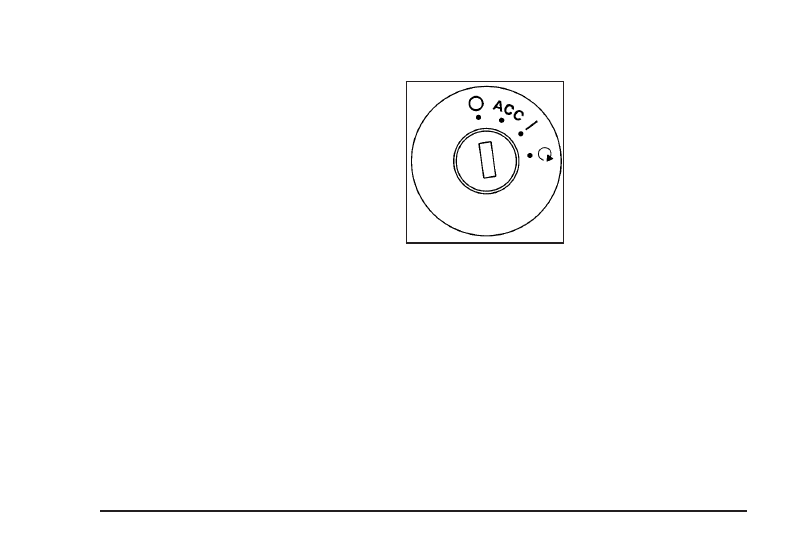
Ignition Positions

With the key in the ignition
switch, you can turn it to
four different positions.

Notice: Using a tool to force the key from the
ignition switch could cause damage or break the
key. Use the correct key and turn the key only with
your hand. Make sure the key is in all the way. If
none of this works, then your vehicle needs service.

9

(OFF): This is the only position from which you

can remove the key. The shift lever must be in PARK (P)
with the ignition in OFF to remove the key. A warning
chime will sound if you open the driver’s door while the
ignition is off and the key is in the ignition.

ACC (ACCESSORY): This position unlocks the
transaxle. It also lets you use things like the radio and
windshield wipers while the engine is not running.

2-20

-------------------------------------------------------------------------------------------------------------------------------------------------------------

To use ACCESSORY, turn the key clockwise to the first
position. Use this position if your vehicle must be
pushed or towed, but never try to push-start your
vehicle. See Recreational Vehicle Towing on page 4-36.

R

(ON): This position is where the key returns to

after you start the engine and release the key. The
ignition switch will stay in this position while the engine
is running. But even while the engine is not running,
you can use ON to operate your electrical accessories
and to display some instrument panel warning lights.

/

(START): This position starts the engine. When the

engine starts, release the key. The ignition switch will
return to the ON position for normal driving.

Retained Accessory Power (RAP)

Your vehicle is equipped with a Retained Accessory
Power (RAP) feature which will allow the radio and
power windows to continue to work up to 10 minutes
after the ignition is turned to OFF.

Your radio and power windows will work when the
ignition key is in ON or ACC. Once the key is turned
from ON to OFF, the radio and windows will continue to
work for up to 10 minutes or until the driver’s door is
opened. Also, while in the RAP mode power window
operation is allowed for up to 10 minutes or until
any door is opened.

Starting Your Engine

Automatic Transaxle

Move your shift lever to PARK (P) or NEUTRAL (N).
Your engine will not start in any other position — that is
a safety feature. To restart when you are already
moving, use NEUTRAL (N) only.

Notice: Shifting into PARK (P) with the vehicle
moving could damage the transaxle. Shift into
PARK (P) only when your vehicle is stopped.

Starting Your 3500 V6 Engine

1. With your foot off the accelerator pedal, turn your

ignition key to START. When the engine starts, let
go of the key. The idle speed will go down as
your engine warms up.

Notice: Holding your key in START for longer than
15 seconds at a time will cause your battery to
be drained much sooner. And the excessive heat
can damage your starter motor. Wait about
15 seconds between each try to help avoid draining
your battery or damaging your starter.

2. If the engine does not start in 10 seconds, push the

accelerator pedal about one-quarter of the way
down while you turn the key to START. Do this until
the engine starts. As soon as it does, let go of
the key.

2-21

-------------------------------------------------------------------------------------------------------------------------------------------------------------

3. If your engine still will not start, or starts but then

stops, it could be flooded with too much gasoline.
Try pushing your accelerator pedal all the way to the
floor and holding it there as you hold the key in
START for a maximum of 15 seconds. This clears
the extra gasoline from the engine. If the engine
still will not start or starts briefly but then stops
again, repeat Step 1 or 2, depending on
temperature. When the engine starts, release the
key and the accelerator pedal.

Notice: Your engine is designed to work with the
electronics in your vehicle. If you add electrical
parts or accessories, you could change the way the
engine operates. Before adding electrical equipment,
check with your dealer. If you do not, your engine
might not perform properly.

Adjustable Throttle and Brake Pedal

If your vehicle has this feature, you can change the
position of the throttle and brake pedals. This feature is
designed for shorter drivers, since the pedals cannot
move farther away from the standard position, but can
move rearward for better pedal reach.

The vehicle must be in PARK (P) or have the ignition off
for this feature to operate. If the system senses unusually
high resistance while the pedals are being adjusted, such

as a driver’s foot pushing the brake pedal, it is designed
to disable the switch. Simply remove the obstruction and
try to adjust the pedals again.

The switch used to adjust
the pedals is located on
the left side of the
instrument panel.

To use your adjustable throttle and brake pedal feature,
do the following:

The adjustable pedal feature is meant to be used with
the adjustable seat and adjustable steering wheel
controls to reach a safe and comfortable position.

1. Adjust your seat to a comfortable position where

you can comfortably reach other controls such as
the radio and climate controls.

2. Adjust the throttle and brake pedals to reach a

comfortable and safe operating position.

3. Adjust the steering wheel to a safe operating

position.

2-22

-------------------------------------------------------------------------------------------------------------------------------------------------------------

Engine Coolant Heater

Your vehicle may have this feature. In very cold
weather, 0°F (

18°C) or colder, the engine coolant

heater can provide easier starting and better fuel
economy during engine warm-up. Usually, the
coolant heater should be plugged in a minimum of
four hours prior to starting your vehicle. At temperatures
above 32°F (0°C), use of the coolant heater is not
required. Your vehicle may also have an internal
thermostat in the plug end of the cord. This will prevent
operation of the engine coolant heater when the
temperature is at or above 0°F (

18°C) as noted

on the cord.

To Use the Engine Coolant Heater

1. Turn off the engine.

2. Open the hood and unwrap the electrical cord. The

engine coolant heater cord is located near the
engine air cleaner/filter. See Engine Compartment
Overview 
on page 5-12 for more information on
location.

3. Plug the cord into a normal, grounded

110-volt AC outlet.

{

CAUTION:

Plugging the cord into an ungrounded outlet
could cause an electrical shock. Also, the
wrong kind of extension cord could overheat
and cause a fire. You could be seriously
injured. Plug the cord into a properly grounded
three-prong 110-volt AC outlet. If the cord will
not reach, use a heavy-duty three-prong
extension cord rated for at least 15 amps.

4. Before starting the engine, be sure to unplug and

store the cord as it was before to keep it away
from moving engine parts. If you do not, it could
be damaged.

How long should you keep the coolant heater plugged
in? The answer depends on the outside temperature, the
kind of oil you have, and some other things. Instead
of trying to list everything here, we ask that you contact
your dealer in the area where you will be parking
your vehicle. The dealer can give you the best advice
for that particular area.

2-23

-------------------------------------------------------------------------------------------------------------------------------------------------------------

Automatic Transaxle Operation

Your automatic transaxle has a shift lever located on
the console between the seats.

PARK (P): This position locks your front wheels. It is
the best position to use when you start your engine
because your vehicle cannot move easily.

{

CAUTION:

It is dangerous to get out of your vehicle if the
shift lever is not fully in PARK (P) with the
parking brake firmly set. Your vehicle can roll.

Do not leave your vehicle when the engine is
running unless you have to. If you have left the
engine running, the vehicle can move suddenly.
You or others could be injured. To be sure your
vehicle will not move, even when you are on
fairly level ground, always set your parking
brake and move the shift lever to PARK (P). See
Shifting Into Park (P) 
on page 2-29. If you are
pulling a trailer, see Towing a Trailer 
on
page 4-38
.

Ensure the shift lever is fully in PARK (P) before starting
the engine. Your vehicle has an automatic transaxle
shift lock control system. You have to apply your regular
brake and press the shift lever button before you can
shift from PARK (P) while the ignition key is in ON. If you
cannot shift out of PARK (P), ease pressure on the
shift lever and push the shift lever all the way into
PARK (P) as you maintain brake application. Then move
the shift lever into another gear. See Shifting Out of
Park (P) 
on page 2-30 later in this section.

SE Model

2-24

-------------------------------------------------------------------------------------------------------------------------------------------------------------

REVERSE (R): Use this gear to back up.

Notice: Shifting to REVERSE (R) while your vehicle
is moving forward could damage the transaxle.
The repairs would not be covered by your warranty.
Shift to REVERSE (R) only after your vehicle is
stopped.

To rock your vehicle back and forth to get out of snow,
ice or sand without damaging your transaxle, see If
You Are Stuck: In Sand, Mud, Ice or Snow 
on
page 4-30
.

NEUTRAL (N): In this position, your engine does not
connect with the wheels. To restart when you are
already moving, use NEUTRAL (N) only. Also, use
NEUTRAL (N) when your vehicle is being towed.

{

CAUTION:

Shifting into a drive gear while your engine is
running at high speed is dangerous. Unless
your foot is firmly on the brake pedal, your
vehicle could move very rapidly. You could
lose control and hit people or objects. Do not
shift into a drive gear while your engine is
running at high speed.

Notice: Shifting out of PARK (P) or NEUTRAL (N)
with the engine racing may damage the transaxle.
The repairs would not be covered by your warranty.
Be sure the engine is not racing when shifting
your vehicle.

2-25

-------------------------------------------------------------------------------------------------------------------------------------------------------------

AUTOMATIC OVERDRIVE (D): This position is for
normal driving. If you need more power for passing, and
you are:

Going less than 35 mph (55 km/h), push your
accelerator pedal about halfway down.

Going about 35 mph (55 km/h) or more, push the
accelerator all the way down.

You will shift down to the next gear and have
more power.

Notice: If your vehicle seems to start up rather
slowly or not shift gears when you go faster, and
you continue to drive your vehicle that way, you
could damage the transaxle. Have your vehicle
serviced right away. You can drive in LOW (L) when
you are driving less than 35 mph (55 km/h) and
AUTOMATIC OVERDRIVE (D) for higher speeds
until then.

THIRD (3): This position is also used for normal driving.
However, it offers more power and lower fuel economy
than AUTOMATIC OVERDRIVE (D). Here are some
times you might choose THIRD (3) instead of
AUTOMATIC OVERDRIVE (D):

When driving on hilly, winding roads.

When towing a trailer, so there is less shifting
between gears.

When going down a steep hill.

LOW (L): This position gives you more power but lower
fuel economy than THIRD (3). You can use LOW (L)
on hills. It can help control your speed as you go down
steep mountain roads, but then you would also want
to use your brakes off and on.

You can use LOW (L) on very steep hills, or in deep
snow or mud. If the shift lever is put in LOW (L),
the transaxle will not shift into first gear until the vehicle
is going slowly enough.

Notice: Driving in SECOND (2) for more than
25 miles (40 km) or at speeds over 55 mph (90 km/h)
may damage the transaxle. Also, shifting into
LOW (L) at speeds above 65 mph (105 km/h) can
cause damage. Drive in THIRD (3) or AUTOMATIC
OVERDRIVE (D) instead of LOW (L).

Notice: Spinning the tires or holding the vehicle in
one place on a hill using only the accelerator
pedal may damage the transaxle. If you are stuck,
do not spin the tires. When stopping on a hill,
use the brakes to hold the vehicle in place.

2-26

-------------------------------------------------------------------------------------------------------------------------------------------------------------

Driver Shift Control (DSC)

For the GT model with an automatic transaxle, you may
have a Driver Shift Control (DSC) feature that allows
you to change gears similar to a manual transmission.
To use this feature, do the following:

1. Move the shift lever from AUTOMATIC

OVERDRIVE (D) rearward into the MANUAL
MODE (M) of the DSC area.

When the transaxle is in the DSC mode the manual
mode light in the instrument panel cluster will
come on.

2. If you do not move the shift lever forward or

rearward, the vehicle will be in manual mode,
THIRD (3) gear. While driving in manual mode, the
transaxle may remain in a gear longer than it
would in normal driving mode based on braking,
throttle input and vehicle lateral acceleration.

3. Press the shift level forward to upshift or rearward

to downshift.

The odometer on the instrument panel cluster will
change to show the requested gear range when moving
the shift lever forward or rearward. While using the
DSC feature the vehicle will have firmer shifting
and increased performance. You can use this for sport
driving or when climbing hills to stay in gear longer
or to downshift for more power or engine braking.

The transaxle will only allow you to shift into gears
appropriate for the vehicle speed and RPM. The
transmission will not automatically shift to the next
higher gear if the engine RPM is too high.

GT Model

2-27

-------------------------------------------------------------------------------------------------------------------------------------------------------------

Parking Brake

To set the parking brake, pull up on the parking brake
handle. If the ignition is on, the brake system warning
light will come on. See Brake System Warning Light on
page 3-28
.

To release the parking brake, hold the brake pedal
down. Pull the parking brake handle up until you can
press the release button. Hold the release button in as
you move the brake handle all the way down.

Notice: Driving with the parking brake on can
overheat the brake system and cause premature
wear or damage to brake system parts. Verify that
the parking brake is fully released and the brake
warning light is off before driving.

If you are towing a trailer and you are parking on a hill,
see Towing a Trailer on page 4-38.

2-28

-------------------------------------------------------------------------------------------------------------------------------------------------------------

Shifting Into Park (P)

{

CAUTION:

It can be dangerous to get out of your vehicle
if the shift lever is not fully in PARK (P) with
the parking brake firmly set. Your vehicle can
roll. If you have left the engine running, the
vehicle can move suddenly. You or others
could be injured. To be sure your vehicle will
not move, even when you are on fairly level
ground, use the steps that follow. If you are
pulling a trailer, see Towing a Trailer 
on
page 4-38
.

Use the following procedure to shift into PARK (P):

1. Hold the brake pedal down with your right foot and

set the parking brake.

2. Move the shift lever into PARK (P) by holding in the

button on the shift lever and pushing the lever all
the way toward the front of the vehicle.

3. Turn the ignition key to OFF.
4. Remove the key and take it with you. If you can

leave your vehicle with the ignition key in your
hand, your vehicle is in PARK (P).

Leaving Your Vehicle With the Engine
Running

{

CAUTION:

It can be dangerous to leave your vehicle with
the engine running. Your vehicle could move
suddenly if the shift lever is not fully in
PARK (P) with the parking brake firmly set.
And, if you leave the vehicle with the engine
running, it could overheat and even catch fire.
You or others could be injured. Do not leave
your vehicle with the engine running.

If you have to leave your automatic transaxle vehicle
with the engine running, be sure your vehicle is in
PARK (P) and your parking brake is firmly set before
you leave it. After you have moved the shift lever
into PARK (P), hold the regular brake pedal down. Then,
see if you can move the shift lever away from PARK (P)
without first pushing the button.

If you can, it means that the shift lever was not fully
locked into PARK (P).

2-29

-------------------------------------------------------------------------------------------------------------------------------------------------------------

Torque Lock

If you are parking on a hill and you do not shift your
automatic transaxle into PARK (P) properly, the weight
of the vehicle may put too much force on the parking
pawl in the transaxle. You may find it difficult to pull the
shift lever out of PARK (P). This is called “torque
lock.” To prevent torque lock, set the parking brake and
then shift into PARK (P) properly before you leave
the driver’s seat. To find out how, see “Shifting Into
Park (P)” previously in the section.

When you are ready to drive, move the shift lever out of
PARK (P) before you release the parking brake.

If torque lock does occur, you may need to have another
vehicle push yours a little uphill to take some of the
pressure from the parking pawl in the transaxle, so you
can pull the shift lever out of PARK (P).

Shifting Out of Park (P)

The automatic transaxle shift lock control system locks
the shift lever in PARK when the ignition is in OFF.
In addition, you have to fully apply your regular brakes
before you can shift from PARK (P) when the ignition
is in ON. See Automatic Transaxle Operation on
page 2-24
.

If you cannot shift out of PARK (P), ease pressure on
the shift lever and push the shift lever all the way
into PARK (P) as you maintain brake application. Then
move the shift lever into the gear you want.

If you hold the brake pedal down but still cannot shift
out of PARK (P), try this:

1. Turn the ignition to ACC. There is no shift interlock

in this key position.

2. Apply and hold the brake until the end of Step 4.

3. Shift the transaxle to NEUTRAL (N).

4. Start the vehicle and then shift to the gear

you want.

5. Have the system fixed as soon as possible.

2-30

-------------------------------------------------------------------------------------------------------------------------------------------------------------

Parking Over Things That Burn

{

CAUTION:

Things that can burn could touch hot exhaust
parts under your vehicle and ignite. Do not
park over papers, leaves, dry grass or other
things that can burn.

Engine Exhaust

{

CAUTION:

Engine exhaust can kill. It contains the gas
carbon monoxide (CO), which you cannot
see or smell. It can cause unconsciousness
and death.

You might have exhaust coming in if:

Your exhaust system sounds strange
or different.

Your vehicle gets rusty underneath.

Your vehicle was damaged in a collision.

Your vehicle was damaged when driving
over high points on the road or over
road debris.

Repairs were not done correctly.

Your vehicle or exhaust system had been
modified improperly.

If you ever suspect exhaust is coming into
your vehicle:

Drive it only with all the windows down to
blow out any CO; and

Have your vehicle fixed immediately.

2-31

-------------------------------------------------------------------------------------------------------------------------------------------------------------

Running Your Engine While You
Are Parked

It is better not to park with the engine running. But if
you ever have to, here are some things to know.

{

CAUTION:

Idling the engine with the climate control
system off could allow dangerous exhaust into
your vehicle. See the earlier caution under
Engine Exhaust 
on page 2-31.

Also, idling in a closed-in place can let deadly
carbon monoxide (CO) into your vehicle even if
the climate control fan is at the highest setting.
One place this can happen is a garage.
Exhaust — with CO — can come in easily.
NEVER park in a garage with the engine
running.

Another closed-in place can be a blizzard. See
Winter Driving 
on page 4-25.

{

CAUTION:

It can be dangerous to get out of your vehicle
if the shift lever is not fully in PARK (P) with
the parking brake firmly set. Your vehicle can
roll. Do not leave your vehicle when the engine
is running unless you have to. If you have left
the engine running, the vehicle can move
suddenly. You or others could be injured. To
be sure your vehicle will not move, even when
you are on fairly level ground, always set your
parking brake and move the shift lever to
PARK (P).

Follow the proper steps to be sure your vehicle will not
move. See Shifting Into Park (P) on page 2-29.

If you are parking on a hill and if you are pulling a
trailer, also see Towing a Trailer on page 4-38.

2-32

-------------------------------------------------------------------------------------------------------------------------------------------------------------

Mirrors

Manual Rearview Mirror

While sitting in a comfortable driving position, adjust the
mirror so you can see clearly behind your vehicle.
Grip the mirror in the center to move it up or down and
side to side. The day/night control at the bottom of
the mirror lets you adjust the mirror to avoid glare from
the lamps behind you. Push or pull the day/night
control for daytime or nighttime conditions.

Manual Rearview Mirror with
OnStar

®

The vehicle may have a rearview mirror with the
OnStar

®

system.

Control buttons for the OnStar

®

system are at the

bottom of the mirror. See your GM dealer for more
information on the OnStar

®

system and how to

subscribe to OnStar

®

. Also, see OnStar

®

System on

page 2-36 for more information about the services
OnStar

®

provides.

Mirror Operation

While sitting in a comfortable driving position, adjust the
rearview mirror so you can see clearly behind your
vehicle. Grip it in the center to move it up or down and
side to side. The day/night control, located at the
bottom of the mirror, adjusts the mirror to reduce
headlamp glare from behind during evening or dark
conditions. Move the control to the right for night
conditions. Return it to the center for daytime.

Automatic Dimming Rearview Mirror

The vehicle may have an automatic dimming inside
rearview mirror.

O

(On/Off): The on/off button, located on the lower

left side of the mirror, is used for the automatic dimming
functions of the rearview mirror.

Mirror Operation

The automatic dimming feature comes on each time the
vehicle is started. Automatic dimming reduces the
glare of lights from behind the vehicle.

To turn the automatic dimming feature on or off, press
and release the on/off button. The indicator light will
illuminate when this feature is on.

2-33

-------------------------------------------------------------------------------------------------------------------------------------------------------------

Cleaning the Mirror

When cleaning the mirror, use a paper towel or similar
material dampened with glass cleaner. Do not spray
glass cleaner directly on the mirror as that may cause
the liquid cleaner to enter the mirror housing.

Automatic Dimming Rearview Mirror
with OnStar

®

The vehicle may have an automatic dimming inside
rearview mirror with OnStar

®

controls. For more

information about OnStar

®

, see OnStar

®

System on

page 2-36.

O

(On/Off): The on/off button, located on the lower

left side of the mirror, is used for the automatic dimming
functions of the rearview mirror.

Mirror Operation

The automatic dimming feature comes on each time the
vehicle is started. Automatic dimming reduces the
glare of lights from behind the vehicle.

To turn the automatic dimming feature on or off, press
and release the on/off button. The indicator light will
illuminate when this feature is on.

Cleaning the Mirror

When cleaning the mirror, use a paper towel or similar
material dampened with glass cleaner. Do not spray
glass cleaner directly on the mirror as that may cause
the liquid cleaner to enter the mirror housing.

2-34

-------------------------------------------------------------------------------------------------------------------------------------------------------------

Outside Power Mirrors

The controls for the
outside power mirrors, are
located on the driver’s
door armrest.

Move the selector switch located below the four-way
control pad to the left or right to choose either the driver’s
side or passenger’s side mirror. To adjust a mirror, use
the arrows located on the four-way control pad to move
the mirror in the desired direction. Adjust each outside
mirror so that a little of the vehicle and the area behind it
can be seen while sitting in a comfortable driving position.
Keep the selector switch in the center position when not
adjusting either outside mirror.

Both mirrors can manually be folded by pulling them
toward the vehicle. This feature may be useful
when going through a car wash or a confined space.
Push the mirrors away from the vehicle, to the normal
position, before driving.

Outside Convex Mirror

{

CAUTION:

A convex mirror can make things (like other
vehicles) look farther away than they really are.
If you cut too sharply into the right lane, you
could hit a vehicle on your right. Check your
inside mirror or glance over your shoulder
before changing lanes.

The passenger’s side mirror is convex. A convex
mirror’s surface is curved so more can be seen from the
driver’s seat. It also makes things, like other vehicles,
look farther away than they really are.

2-35

-------------------------------------------------------------------------------------------------------------------------------------------------------------


Content      ..     4      5      6      7     ..