Oldsmobile Silhouette (2004 year). Manual - part 7


  Index      Oldsmobile     Oldsmobile Silhouette (2004 year) - manual in english


Search            copyright infringement  


Content      ..     5      6      7      8     ..


Oldsmobile Silhouette (2004 year). Manual - part 7


-------------------------------------------------------------------------------------------------------------------------------------------------------------
{

CAUTION:

If you shift the transaxle out of PARK (P) and
accelerate before the power sliding door
latches closed, the door may reverse to the
open position. A child or others could fall out
of the vehicle and be injured. Always make
sure the power sliding door is closed and
latched before you drive away.

If an object obstructs the power sliding door(s) while it is
closing, the door will automatically reverse to the
open position, provided it meets sufficient resistance.
Resistance must be as strong as the force of the closing
door, or stronger. The force of the closing door
increases significantly as the door approaches the
latched position.

The driver’s side sliding door is designed to open only a
little if the fuel door is open. If this ever happens, do
not try to force the sliding door. When the fuel filler door
is closed, the driver’s side sliding door can be opened
normally.

{

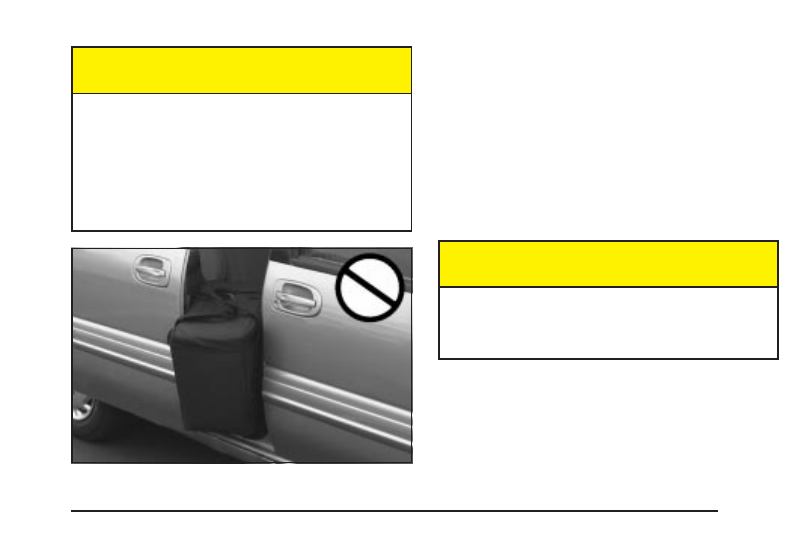
CAUTION:

You or others could be injured if caught in the
path of the sliding door. Make sure the door
path is clear before closing the door.

If you want to open the power sliding door(s) when the
override switch(es) is turned off, pull the inside or
outside handle and let go. The door will open fully.

To open the power sliding door(s) when the power
sliding door override switch(es) is on, pull the inside or
outside handle and slide the door all the way back.

2-19

-------------------------------------------------------------------------------------------------------------------------------------------------------------

-------------------------------------------------------------------------------------------------------------------------------------------------------------

{

CAUTION:

If your vehicle is facing downward on a steep
grade (15 percent or more), the door may not
stay open and could slam shut, possibly
injuring someone. To make sure the door does
not slam shut, turn on the power sliding door
feature. Then if the door closes, it will close
under the control of the power door system.

If you want to close the power sliding door(s) when the
override switch(es) is turned off, pull the inside or outside
handle or the edge of the door. Move the door about
4 inches (10 cm) toward the closed position and release
it. The door will close completely and latch for you.

To close the power sliding door(s) when the override
switch(es) is turned on, pull the inside or outside handle
and slide the door all the way forward to the latched
position.

2-20

-------------------------------------------------------------------------------------------------------------------------------------------------------------

-------------------------------------------------------------------------------------------------------------------------------------------------------------

Resetting the Power Sliding Door

The power sliding door may operate incorrectly or not
at all because of the following conditions:

A low voltage or dead battery

A disconnected battery

If the instrument panel PWR/HEATED SEAT PSD
fuse or the underhood fuse 8, 27, or 29 are
removed or blown.

See

Fuses and Circuit Breakers on page 5-101 for more

information about your fuse panel.

If any of these conditions occur, the power sliding door
will need to be reset. If your vehicle has the dual
power sliding doors, both doors will have to be reset.
To reset a door, do the following:

1. Check to be sure the power sliding door is unlocked

and securely closed.

2. Turn the ignition key to OFF.

3. If the power sliding door override is on, press the

textured end of the power sliding door override
switch to turn it off.

4. Remove fuse 29 from the underhood fuse block.

Leave it out for 30 seconds.

5. Reinstall the fuse and wait 10 seconds.

6. Turn the power sliding door override on by pressing

the end of the switch with the override symbol on it.

7. Press the power sliding door switch(es) to open the

power sliding door.

8. Open the door all of the way.

9. Wait five seconds and close the door by pressing

the power sliding door switch(es).

10. Wait five seconds and repeat Steps 7 through 9.

If the door does not rest in the fully open position after
repeating Step 7, repeat Steps 7 through 9 again. If
the door still does not operate correctly, see your dealer
for service.

Liftgate

To unlock or lock the liftgate from the outside, use the
remote keyless entry transmitter. For more information,
see

Remote Keyless Entry System Operation on

page 2-5.

Open the liftgate using the handle located above the
license plate. Once slightly opened, the liftgate will rise
by itself. Lamps in the rear of the vehicle will come
on, illuminating the rear cargo area. See

Interior Lamps

on page 3-18.

2-21

-------------------------------------------------------------------------------------------------------------------------------------------------------------

-------------------------------------------------------------------------------------------------------------------------------------------------------------

Notice: If you open the liftgate without checking
for overhead obstructions such as a garage
door, you could break the liftgate glass. Always
check to make sure the area above the liftgate
is clear before opening it.

{

CAUTION:

It can be dangerous to drive with the liftgate
open because carbon monoxide (CO) gas can
come into your vehicle. You can’t see or smell
CO. It can cause unconsciousness and even
death. If you must drive with the liftgate open
or if electrical wiring or other cable
connections must pass through the seal
between the body and the liftgate:

Make sure all other windows are shut.

Turn the fan on your heating or cooling
system to its highest speed and select the
control setting that will force outside air
into your vehicle. See

Climate Control

System on page 3-28.

If you have air outlets on or under the
instrument panel, open them all the way.
See

Engine Exhaust on page 2-42.

To close the liftgate, pull down on the handle, then
firmly shut the liftgate. Don’t drive with the liftgate open,
even slightly. See

Engine Exhaust on page 2-42.

A message in your instrument panel cluster will warn
you if the liftgate is not completely closed. See
Rear Hatch Ajar Warning Message on page 3-58.

2-22

-------------------------------------------------------------------------------------------------------------------------------------------------------------

-------------------------------------------------------------------------------------------------------------------------------------------------------------

Windows

{

CAUTION:

Leaving children, helpless adults, or pets in a
vehicle with the windows closed is dangerous.
They can be overcome by the extreme heat
and suffer permanent injuries or even death
from heat stroke. Never leave a child, a
helpless adult, or a pet alone in a vehicle,
especially with the windows closed in warm
or hot weather.

2-23

-------------------------------------------------------------------------------------------------------------------------------------------------------------

-------------------------------------------------------------------------------------------------------------------------------------------------------------

Power Windows

The switches on the driver’s door armrest control the
front windows when the ignition is in RUN, ACCESSORY
or when Retained Accessory Power (RAP) is active.
See “Retained Accessory Power (RAP)” under

Ignition

Positions on page 2-31.

The driver’s power window switch has two down
positions. The first position lowers the window normally.

To raise the window, pull up the front of the switch.

Express-Down Window

To activate the express-down feature, push the AUTO
switch all the way down to the second position, then
release it. The window will lower completely. To stop the
window from lowering all the way, pull up on the front
of the switch.

2-24

-------------------------------------------------------------------------------------------------------------------------------------------------------------

-------------------------------------------------------------------------------------------------------------------------------------------------------------

Power Rear Quarter Windows

Your vehicle may have power rear quarter windows.

This switch, located in
the overhead console
switchbank, is used
for opening and closing
the power rear quarter
windows.

Press the textured part of the switch to open the
windows; both windows will open. The windows will
continue to open as long as the switch is pressed, until
they are fully opened.

Press the part of the switch with the symbol to close
both windows. The windows can be closed fully or
partially, depending on how long the switch is pressed.

The ignition must be in RUN, ACCESSORY, or Retained
Accessory Power (RAP) must be active, to use the
power rear quarter windows. See “Retained Accessory
Power (RAP)” under

Ignition Positions on page 2-31.

Sun Visors

To block out glare, you can swing down the visors.
You can also remove them from the center mount and
swing them to the side.

Visor Vanity Mirror

Your vehicle may have a visor vanity mirror. Pull down
the sun visor to access the vanity mirror.

Lighted Vanity Mirror

Your vehicle may have a lighted vanity mirror. Pull
down the sun visor and flip up the cover to expose the
vanity mirror. The lamps will come on when you flip
up the cover.

2-25

-------------------------------------------------------------------------------------------------------------------------------------------------------------

-------------------------------------------------------------------------------------------------------------------------------------------------------------

Theft-Deterrent Systems

Vehicle theft is big business, especially in some cities.
Although your vehicle has a number of theft-deterrent
features, we know that nothing we put on it can make
it impossible to steal.

Content Theft-Deterrent

Your vehicle may have a theft-deterrent alarm system.

A light located on top of your instrument panel, near the
center of the vehicle next to the windshield, will flash
slowly to let you know that the system has been armed.

While armed, the doors will not unlock with the power
door lock switch.

Once armed, the alarm will go off if someone tries to
enter the vehicle without using the remote keyless entry
transmitter or a key, or turns the ignition to ON. The
horn will sound and the parking lamps will flash for up to
two minutes.

When the alarm is armed, the liftgate may be opened
with the remote keyless entry transmitter.

Arming with the Power Lock Switch

Your alarm system will arm when you use either power
door lock switch to lock the doors while any door or the
liftgate is open and the key is removed from the ignition.
If you would like to turn on power door lock switch arming,
see

Vehicle Personalization on page 2-60.

When the security light flashes quickly the system is
ready to arm with the power door lock switches.
Then the security light will stop flashing and stay
on when you press the rear of the power door
lock switch, to let you know the system is arming.

2-26

-------------------------------------------------------------------------------------------------------------------------------------------------------------

-------------------------------------------------------------------------------------------------------------------------------------------------------------

After all doors and the liftgate are closed and locked,
the security light will begin flashing at a very
slow rate to let you know the system is armed.

Arming with the Remote Keyless Entry
Transmitter

Your alarm system will arm when you use your remote
keyless entry transmitter to lock the doors, if the key
is not in the ignition. The security light will turn on to let
you know the system is arming. After all doors and
the liftgate are closed and locked, the security light will
begin flashing at a very slow rate to let you know
the system is armed.

Arming with Your Key

Your alarm system will arm when you use your key to
lock the driver’s door. The security light will turn on to let
you know the system is arming. After all doors and the
liftgate are closed and locked, the security light will begin
flashing at a very slow rate to let you know the system is
armed. If you would like your key not to arm the system,
see

Vehicle Personalization on page 2-60.

Arming Confirmation

If remote unlock confirmation is on, your parking lamps
will flash briefly to let you know when your alarm system
has disarmed. If you would not like the parking lamps to
flash, see

Vehicle Personalization on page 2-60.

Disarming with the Remote Keyless
Entry Transmitter

Your alarm system will disarm when you use your
remote keyless entry transmitter to unlock the doors.
The security light will stop flashing to let you know the
system is no longer armed.

Disarming with Your Key

Your alarm system will disarm when you use your key
to unlock the driver’s door. The security light will
stop flashing to let you know the system is no longer
armed. If you would like your key not to disarm the alarm
system, see

Vehicle Personalization on page 2-60.

2-27

-------------------------------------------------------------------------------------------------------------------------------------------------------------

-------------------------------------------------------------------------------------------------------------------------------------------------------------

PASS-Key

®

III

Your PASS-Key

®

III system operates on a radio

frequency subject to Federal Communications
Commission (FCC) Rules and with Industry Canada.

This device complies with Part 15 of the FCC Rules.
Operation is subject to the following two conditions:

1. this device may not cause harmful interference, and

2. this device must accept any interference received,

including interference that may cause undesired
operation.

This device complies with RSS-210 of Industry Canada.
Operation is subject to the following two conditions:

1. this device may not cause interference, and

2. this device must accept any interference received,

including interference that may cause undesired
operation of the device.

Changes or modifications to this system by other than
an authorized service facility could void authorization to
use this equipment.

PASS-Key

®

III uses a radio frequency transponder in

the key that matches a decoder in your vehicle.

PASS-Key

®

III Operation

Your vehicle is equipped
with the PASS-Key

®

III

(Personalized Automotive
Security System)
theft-deterrent system.
PASS-Key

®

III is a passive

theft deterrent system.
This means you do
not have to do anything
different to arm or disarm
the system. It works
when you insert or remove
the key from the ignition.

When the PASS-Key

®

III system senses that someone

is using the wrong key, it shuts down the vehicle’s
starter and fuel systems. The starter will not work and
fuel will stop being delivered to the engine. Anyone
using a trial-and-error method to start the vehicle will be
discouraged because of the high number of electrical
key codes.

2-28

-------------------------------------------------------------------------------------------------------------------------------------------------------------

-------------------------------------------------------------------------------------------------------------------------------------------------------------

If the engine does not start and the security message
comes on, the key may have a damaged transponder.
Turn the ignition off and try again.

If the engine still does not start, and the key appears to
be undamaged, try another ignition key. At this time, you
may also want to check the instrument panel PASS KEY
fuse. If the engine still does not start with the other key,
your vehicle needs service. If your vehicle does start, the
first key may be faulty. See your dealer or a locksmith
who can service the PASS-Key

®

III to have a new key

made. See

Fuses and Circuit Breakers on page 5-101.

It is possible for the PASS-Key

®

III decoder to learn the

transponder value of a new or replacement key. Up
to 10 additional keys may be programmed for the
vehicle. This procedure is for learning additional keys
only. If all the currently programmed keys are lost or do
not operate, you must see your dealer or a locksmith
who can service PASS-Key

®

III to have keys made and

programmed to the system.

See your dealer or a locksmith who can service
PASS-Key

®

III to get a new key blank that is cut exactly

as the ignition key that operates the system.

Canadian Owners: If you lose or damage your keys,
only a GM dealer can service PASS-Key

®

III to

have new keys made. To program additional keys you
will need two current driver’s keys, black in color.
You must add a step to the following procedure. After
Step 3, repeat Steps 1 through 3 with the second current
driver’s key. Then continue with Step 4.

To program the new key, do the following:

1. Verify the new key has PK3 stamped on it.

2. Insert the ignition key in the ignition and start the

engine. If the engine will not start, see your dealer
for service.

3. After the engine has started, turn the key to OFF

and remove the key.

4. Insert the key to be programmed and turn it to RUN

within 10 seconds of removing the previous key.

2-29

-------------------------------------------------------------------------------------------------------------------------------------------------------------

-------------------------------------------------------------------------------------------------------------------------------------------------------------

5. The security message will turn off once the key has

been programmed. It may not be apparent that the
security message went on due to how quickly
the key is programmed.

6. Repeat Steps 1 through 4 if additional keys are to

be programmed.

If you are ever driving and the security message comes
on and stays on, you will be able to restart your
engine if you turn it off. Your PASS-Key

®

III system,

however, is not working properly and must be serviced
by your dealer. Your vehicle is not protected by the
PASS-Key

®

III system at this time.

If you lose or damage a PASS-Key

®

III key, see your

dealer or a locksmith who can service PASS-Key

®

III to

have a new key made.

Starting and Operating Your
Vehicle

New Vehicle Break-In

Notice: Your vehicle does not need an elaborate
“break-in.” But it will perform better in the long run
if you follow these guidelines:

Do not drive at any one speed — fast or
slow — for the first 500 miles (805 km).
Do not make full-throttle starts.

Avoid making hard stops for the first
200 miles (322 km) or so. During this time
your new brake linings are not yet broken in.
Hard stops with new linings can mean
premature wear and earlier replacement.
Follow this breaking-in guideline every time
you get new brake linings.

Do not tow a trailer during break-in.
See

Towing a Trailer on page 4-38 for

more information.

2-30

-------------------------------------------------------------------------------------------------------------------------------------------------------------

-------------------------------------------------------------------------------------------------------------------------------------------------------------

Ignition Positions

With the key in the ignition, you can turn it to five different
positions.

A (ACCESSORY): This is the position in which you can
operate your electrical accessories. Press in the ignition
switch as you turn the top of the key toward you.

B (LOCK): This is the only position from which you
can remove the key. This position locks your ignition
and transaxle.

Notice: If your key seems stuck in LOCK and you
can not turn it, be sure you are using the correct
key; if so, is it all the way in? Turn the key only with
your hand. Using a tool to force it could break the
key or the ignition switch. If none of these works,
then your vehicle needs service.

C (OFF): This position unlocks the ignition and
transaxle, but does not send power to any accessories.
Use this position if your vehicle must be pushed or towed,
but never try to push-start your vehicle.

D (RUN): This is the position to which the switch
returns after you start your engine and release the
ignition key. This is the position for driving. Even when
the engine is not running, you can use RUN to
operate your electrical accessories and to display
some instrument panel warning lights.

E (START): This position starts the engine. When the
engine starts, release the ignition key. The switch
will return to RUN for normal driving.

If the engine is not running, ACCESSORY and RUN
are positions that allow you to operate your electrical
accessories, such as the radio.

2-31

-------------------------------------------------------------------------------------------------------------------------------------------------------------

-------------------------------------------------------------------------------------------------------------------------------------------------------------

Retained Accessory Power (RAP)

With RAP, the power windows, power rear quarter
windows, audio system and the automatic level control
will continue to work up to 10 minutes after the ignition
key is turned to OFF and none of the doors are opened.

Starting Your Engine

Move your shift lever to PARK (P) or NEUTRAL (N).
Your engine will not start in any other position — that
is a safety feature. To restart when you are already
moving, use NEUTRAL (N) only.

Notice: Shifting into PARK (P) with the vehicle
moving could damage the transaxle. Shift into
PARK (P) only when your vehicle is stopped.

1. With your foot off the accelerator pedal, turn your

ignition key to START. When the engine starts,
let go of the key. The idle speed will go down as
your engine warms up.

Notice: Holding your key in START for longer than
15 seconds at a time will cause your battery to be
drained much sooner. And the excessive heat can
damage your starter motor. Wait about 15 seconds
between each try to help avoid draining your battery
or damaging your starter.

2. If the engine does not start in 10 seconds, push the

accelerator pedal about one-quarter of the way
down while you turn the key to START. Do this until
the engine starts. As soon as it does, let go of
the key.

3. If your engine still will not start, or starts but then

stops, it could be flooded with too much gasoline.
Try pushing your accelerator pedal all the way to the
floor and holding it there as you hold the key in
START for a maximum of 15 seconds. This clears
the extra gasoline from the engine. If the engine
still will not start, or starts briefly but then stops
again, repeat Step 1 or 2, depending on the
temperature. When the engine starts, release the
key and the accelerator pedal.

Notice: Your engine is designed to work with the
electronics in your vehicle. If you add electrical
parts or accessories, you could change the way the
engine operates. Before adding electrical equipment,
check with your dealer. If you do not, your engine
might not perform properly.

2-32

-------------------------------------------------------------------------------------------------------------------------------------------------------------

-------------------------------------------------------------------------------------------------------------------------------------------------------------

Engine Coolant Heater

Your vehicle may have an engine coolant heater. In
very cold weather, 0°F (

18°C) or colder, the engine

coolant heater can help. You’ll get easier starting
and better fuel economy during engine warm-up.
Usually, the coolant heater should be plugged in a
minimum of four hours prior to starting your vehicle.
At temperatures above 32°F (0°C), use of the coolant
heater is not required.

To Use the Engine Coolant Heater

1. Turn off the engine.

2. Open the hood and unwrap the electrical cord.

The electrical cord is located on the driver’s side
of the engine compartment.

3. Plug it into a normal, grounded 110-volt AC outlet.

{

CAUTION:

Plugging the cord into an ungrounded outlet
could cause an electrical shock. Also, the
wrong kind of extension cord could overheat
and cause a fire. You could be seriously
injured. Plug the cord into a properly grounded
three-prong 110-volt AC outlet. If the cord will
not reach, use a heavy-duty three-prong
extension cord rated for at least 15 amps.

4. Before starting the engine, be sure to unplug and

store the cord as it was before to keep it away from
moving engine parts. If you don’t, it could be
damaged.

2-33

-------------------------------------------------------------------------------------------------------------------------------------------------------------

-------------------------------------------------------------------------------------------------------------------------------------------------------------

How long should you keep the coolant heater plugged
in? The answer depends on the outside temperature, the
kind of oil you have, and some other things. Instead
of trying to list everything here, we ask that you contact
your dealer in the area where you’ll be parking your
vehicle. The dealer can give you the best advice for that
particular area.

Automatic Transaxle Operation

Maximum engine speed is limited when you are in
PARK (P) or NEUTRAL (N), to protect driveline
components from improper operation.

There are several different positions for your shift lever.

PARK (P): This gear position locks your front wheels.
It is the best position to use when you start your engine
because your vehicle cannot move easily.

Ensure the shift lever is fully in PARK (P) before starting
the engine. Your vehicle has an automatic transaxle
shift lock control system. You have to fully apply
your regular brakes before you can shift from PARK (P)
when the ignition key is in RUN. As you step on the
brake pedal while in PARK (P), you may hear a
click from the solenoid of the system. This ensures that
the system is operating properly.

If you cannot shift out of PARK (P), ease pressure on
the shift lever – push the shift lever all the way into
PARK (P) as you maintain brake application. Then move
the shift lever into the gear you wish. See

Shifting Out

of Park (P) on page 2-41.

2-34

-------------------------------------------------------------------------------------------------------------------------------------------------------------


Content      ..     5      6      7      8     ..