Oldsmobile Bravada (2004 year). Manual - part 3


  Index      Oldsmobile     Oldsmobile Bravada (2004 year) - manual in english


Search            copyright infringement  


Content      ..     1      2      3      4      ..


Oldsmobile Bravada (2004 year). Manual - part 3


-------------------------------------------------------------------------------------------------------------------------------------------------------------
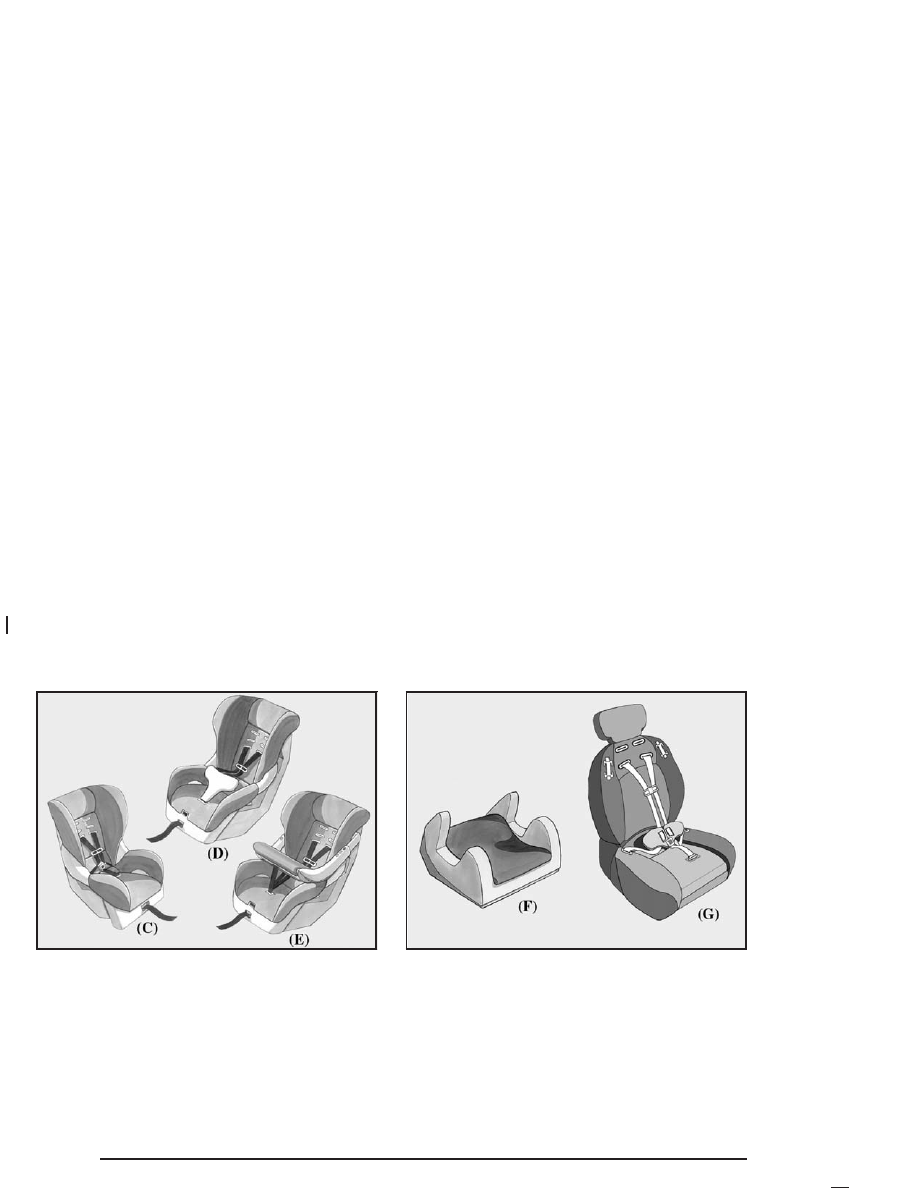
A forward-facing child seat (C-E) provides restraint for
the child’s body with the harness and also sometimes
with surfaces such as T-shaped or shelf-like shields.

A booster seat (F-G) is a child restraint designed to
improve the fit of the vehicle’s safety belt system. Some
booster seats have a shoulder belt positioner, and some
high-back booster seats have a five-point harness. A
booster seat can also help a child to see out the window.

1-34

-------------------------------------------------------------------------------------------------------------------------------------------------------------

-------------------------------------------------------------------------------------------------------------------------------------------------------------

Q:

How do child restraints work?

A:

A child restraint system is any device designed for
use in a motor vehicle to restrain, seat, or position
children. A built-in child restraint system is a
permanent part of the motor vehicle. An add-on
child restraint system is a portable one, which
is purchased by the vehicle’s owner.

For many years, add-on child restraints have used
the adult belt system in the vehicle. To help
reduce the chance of injury, the child also has to be
secured within the restraint. The vehicle’s belt
system secures the add-on child restraint in the
vehicle, and the add-on child restraint’s harness
system holds the child in place within the restraint.

One system, the three-point harness, has straps that
come down over each of the infant’s shoulders and
buckle together at the crotch. The five-point harness
system has two shoulder straps, two hip straps and a
crotch strap. A shield may take the place of hip
straps. A T-shaped shield has shoulder straps that
are attached to a flat pad which rests low against the
child’s body. A shelf- or armrest-type shield has
straps that are attached to a wide, shelf-like shield
that swings up or to the side.

When choosing a child restraint, be sure the child
restraint is designed to be used in a vehicle. If it is, it
will have a label saying that it meets federal motor
vehicle safety standards.

Then follow the instructions for the restraint. You may
find these instructions on the restraint itself or in a
booklet, or both. These restraints use the belt system or
the LATCH system in your vehicle, but the child also
has to be secured within the restraint to help reduce the
chance of personal injury. When securing an add-on
child restraint, refer to the instructions that come with the
restraint which may be on the restraint itself or in a
booklet, or both, and to this manual. The child restraint
instructions are important, so if they are not available,
obtain a replacement copy from the manufacturer.

Where to Put the Restraint

Accident statistics show that children are safer if they
are restrained in the rear rather than the front seat. We,
therefore, recommend that child restraints be secured
in a rear outside seat position including an infant
riding in a rear-facing infant seat, a child riding in a
forward-facing child seat and an older child riding in a
booster seat. Never put a rear-facing child restraint
in the front passenger seat. Here is why:

1-35

-------------------------------------------------------------------------------------------------------------------------------------------------------------

-------------------------------------------------------------------------------------------------------------------------------------------------------------

{

CAUTION:

A child in a rear-facing child restraint can be
seriously injured or killed if the right front
passenger’s air bag inflates. This is because
the back of the rear-facing child restraint
would be very close to the inflating air bag.
Always secure a rear-facing child restraint in a
rear seat outside position.

If you secure a forward-facing child restraint in
the right front seat, always move the front
passenger seat as far back as it will go. It is
better to secure the child restraint in a rear
seat outside position.

Wherever you install it, be sure to secure the child
restraint properly.

Keep in mind that an unsecured child restraint can
move around in a collision or sudden stop and injure
people in the vehicle. Be sure to properly secure
any child restraint in your vehicle – even when no child
is in it.

Top Strap

Some child restraints have a top strap, or “top tether.” It
can help restrain the child restraint during a collision.
For it to work, a top strap must be properly anchored to
the vehicle. Some top strap-equipped child restraints
are designed for use with or without the top strap being
anchored. Others require the top strap always to be
anchored. Be sure to read and follow the instructions for
your child restraint. If yours requires that the top strap
be anchored, do not use the restraint unless it is
anchored properly.

If the child restraint does not have a top strap, one can
be obtained, in kit form, for many child restraints.
Ask the child restraint manufacturer whether or not a kit
is available.

1-36

-------------------------------------------------------------------------------------------------------------------------------------------------------------

-------------------------------------------------------------------------------------------------------------------------------------------------------------

In Canada, the law requires that forward-facing child
restraints have a top strap, and that the strap be
anchored. In the United States, some child restraints
also have a top strap. If your child restraint has a
top strap, it should be anchored.

{

CAUTION:

Each top tether bracket is designed to anchor
only one child restraint. Attaching more than
one child restraint to a single bracket could
cause the anchor to come loose or even break
during a crash. A child or others could be
injured if this happens. To help prevent injury
to people and damage to your vehicle, attach
only one child restraint per bracket.

Anchor the top strap to one of the following anchor
points. Be sure to use an anchor point located on the
same side of the vehicle as the seating position
where the child restraint will be placed.

Raise the head restraint and route the top strap under
it. See Head Restraints on page 1-5.

Once you have the top strap anchored, you will be
ready to secure the child restraint itself. Tighten the top
strap when and as the child restraint manufacturer’s
instructions say.

1-37

-------------------------------------------------------------------------------------------------------------------------------------------------------------

-------------------------------------------------------------------------------------------------------------------------------------------------------------

Top Strap Anchor Location

Anchor brackets for the rear seat positions are located
on the floor in the cargo area of your vehicle. Do
not use the rear tie-down brackets near the liftgate for
top strap tethers. Do not use a child restraint with a
top strap in the right front passenger’s position because
there is no place to anchor the top strap.

Lower Anchorages and Top Tethers
for Children (LATCH System)

Your vehicle has the LATCH system. You’ll find
anchors (A) in the rear outside seat positions.

This system, designed to make installation of child
restraints easier, does not use the vehicle’s safety belts.
Instead, it uses vehicle anchors (A,B) and child
restraint attachments to secure the restraints. Some
restraints also use another vehicle anchor to secure a
top tether strap (C).

1-38

-------------------------------------------------------------------------------------------------------------------------------------------------------------

-------------------------------------------------------------------------------------------------------------------------------------------------------------

In order to use the LATCH system in your vehicle, you
need a child restraint designed for that system.

1-39

-------------------------------------------------------------------------------------------------------------------------------------------------------------

-------------------------------------------------------------------------------------------------------------------------------------------------------------

To assist you in locating the
lower anchors for this child
restraint system, each
seating position with the
LATCH system has a label
on the seatback at each
lower anchor position.

The labels are located near the base of the rear outside
seat positions.

{

CAUTION:

If a LATCH-type child restraint is not attached
to its anchorage points, the restraint will not
be able to protect the child correctly. In a
crash, the child could be seriously injured or
killed. Make sure that a LATCH-type child
restraint is properly installed using the
anchorage points, or use the vehicle’s safety
belts to secure the restraint, following the
instructions that came with that restraint, and
also the instructions in this manual.

Securing a Child Restraint Designed
for the LATCH System

1. Find the LATCH anchorages for the seating

position you want to use, where the bottom of the
seatback meets the back of the seat cushion.

2. Put the child restraint on the seat.

3. Attach and tighten the LATCH attachments on the

child restraint to the LATCH anchorages in the
vehicle. The child restraint instructions will show you
how.

4. If the child restraint is forward-facing, attach and

tighten the top tether to the top tether anchorage.
The child restraint instructions will show you
how. Also see Top Strap on page 1-36.

5. Push and pull the child restraint in different

directions to be sure it is secure.

To remove the child restraint, simply unhook the top
tether from the top tether anchorage and then
disconnect the LATCH attachments from the LATCH
anchorages.

1-40

-------------------------------------------------------------------------------------------------------------------------------------------------------------

-------------------------------------------------------------------------------------------------------------------------------------------------------------

Securing a Child Restraint in a Rear
Outside Seat Position

If your child restraint is equipped with the LATCH
system, see Lower Anchorages and Top Tethers for
Children (LATCH System) 
on page 1-38. See Top Strap
on page 1-36 if the child restraint has one.

If your child restraint does not have the LATCH system,
you will be using the lap-shoulder belt to secure the
child restraint in this position. Be sure to follow the
instructions that came with the child restraint. Secure
the child in the child restraint when and as the
instructions say.

1. Put the restraint on the seat.

2. Pick up the latch plate, and run the lap and shoulder

portions of the vehicle’s safety belt through or
around the restraint. The child restraint instructions
will show you how.

3. Buckle the belt. Make sure the release button is

positioned so you would be able to unbuckle the
safety belt quickly if you ever had to.

1-41

-------------------------------------------------------------------------------------------------------------------------------------------------------------

-------------------------------------------------------------------------------------------------------------------------------------------------------------

4. Pull the rest of the shoulder belt all the way out of

the retractor to set the lock.

5. To tighten the belt, push down on the child restraint,

pull the shoulder portion of the belt to tighten the
lap portion of the belt and feed the shoulder
belt back into the retractor. If you are using a
forward-facing child restraint, you may find it helpful
to use your knee to push down on the child
restraint as you tighten the belt.

6. Push and pull the child restraint in different

directions to be sure it is secure.

1-42

-------------------------------------------------------------------------------------------------------------------------------------------------------------

-------------------------------------------------------------------------------------------------------------------------------------------------------------

To remove the child restraint, just unbuckle the vehicle’s
safety belt and let it go back all the way. The safety
belt will move freely again and be ready to work for an
adult or larger child passenger.

Securing a Child Restraint in the
Center Seat Position

Many child restraints are too wide to be correctly secured
in the center rear seat, although some of them will fit
there. If the center seat position is too narrow for your
child restraint, secure it in a rear outside seat position.

If you secure a child restraint in the center seat position,
follow the instructions in Securing a Child Restraint in
a Rear Outside Seat Position 
on page 1-41.

Securing a Child Restraint in the
Right Front Seat Position

If your child restraint is equipped with the LATCH
system, see Lower Anchorages and Top Tethers for
Children (LATCH System) 
on page 1-38. See Top Strap
on page 1-36 if the child restraint has one.

1-43

-------------------------------------------------------------------------------------------------------------------------------------------------------------

-------------------------------------------------------------------------------------------------------------------------------------------------------------

Your vehicle has a right front passenger air bag. Never
put a rear facing child restraint in this seat. Here is why:

{

CAUTION:

A child in a rear-facing child restraint can be
seriously injured or killed if the right front
passenger’s air bag inflates. This is because
the back of the rear-facing child restraint
would be very close to the inflating air bag.
Always secure a rear-facing child restraint in a
rear seat.

A rear seat is a safer place to secure a forward-facing
child restraint. If you need to secure a forward-facing
child restraint in the right front seat, you will be using the
lap-shoulder belt to secure the child restraint in this
position. Be sure to follow the instructions that came with
the child restraint. Secure the child in the child restraint
when and as the instructions say.

1. Because your vehicle has a right front passenger’s

air bag, always move the seat as far back as it will
go before securing a forward-facing child restraint.
See “Seats” in the Index.

2. Put the restraint on the seat.

3. Pick up the latch plate, and run the lap and shoulder

portions of the vehicle’s safety belt through or
around the restraint. The child restraint instructions
will show you how.

4. Buckle the belt. Make sure the release button is

positioned so you would be able to unbuckle the
safety belt quickly if you ever had to.

1-44

-------------------------------------------------------------------------------------------------------------------------------------------------------------

-------------------------------------------------------------------------------------------------------------------------------------------------------------

5. Pull the rest of the shoulder belt all the way out of

the retractor to set the lock.

6. To tighten the belt, push down on the child restraint,

pull the shoulder portion of the belt to tighten the lap
portion of the belt and feed the shoulder belt back
into the retractor. You may find it helpful to use your
knee to push down on the child restraint as you
tighten the belt.

7. Push and pull the child restraint in different

directions to be sure it is secure.

To remove the child restraint, just unbuckle the vehicle’s
safety belt and let it go back all the way. The safety belt
will move freely again and be ready to work for an adult or
larger child passenger.

1-45

-------------------------------------------------------------------------------------------------------------------------------------------------------------

-------------------------------------------------------------------------------------------------------------------------------------------------------------

Air Bag Systems

This part explains the frontal and side impact air bag
systems.

Your vehicle has air bags – a frontal air bag for the
driver and another frontal air bag for the right front
passenger. Your vehicle may also have side impact air
bags. Side impact air bags are available for the
driver and right front passenger.

If your vehicle has a side impact air bag for the driver
and/or the right front passenger, the words AIR BAG will
appear on the air bag covering on the side of the
seatback closest to the door.

Frontal air bags are designed to help reduce the risk of
injury from the force of an inflating frontal air bag.
But these air bags must inflate very quickly to do their
job and comply with federal regulations.

Here are the most important things to know about the
air bag systems:

{

CAUTION:

You can be severely injured or killed in a crash
if you aren’t wearing your safety belt – even if
you have air bags. Wearing your safety belt
during a crash helps reduce your chance of
hitting things inside the vehicle or being ejected
from it. Air bags are designed to work with
safety belts but don’t replace them.

CAUTION:

(Continued)

1-46

-------------------------------------------------------------------------------------------------------------------------------------------------------------

-------------------------------------------------------------------------------------------------------------------------------------------------------------

CAUTION:

(Continued)

Frontal air bags for the driver and right front
passenger are designed to deploy only in
moderate to severe frontal and near frontal
crashes. They aren’t designed to inflate at all in
rollover, rear or low-speed frontal crashes, or in
many side crashes. And, for some unrestrained
occupants, frontal air bags may provide less
protection in frontal crashes than more forceful
air bags have provided in the past.

The side impact air bags for the driver and right
front passenger are designed to inflate only in
moderate to severe crashes where something
hits the side of your vehicle. They aren’t
designed to inflate in frontal, in rollover or in
rear crashes.

Everyone in your vehicle should wear a safety
belt properly – whether or not there’s an air bag
for that person.

{

CAUTION:

Both frontal and side impact air bags inflate
with great force, faster than the blink of an
eye. If you’re too close to an inflating air bag,
as you would be if you were leaning forward, it
could seriously injure you. Safety belts help
keep you in position for air bag inflation before
and during a crash. Always wear your safety
belt, even with frontal air bags. The driver
should sit as far back as possible while still
maintaining control of the vehicle. Front
occupants should not lean on or sleep against
the door.

1-47

-------------------------------------------------------------------------------------------------------------------------------------------------------------

-------------------------------------------------------------------------------------------------------------------------------------------------------------

{

CAUTION:

Anyone who is up against, or very close to,
any air bag when it inflates can be seriously
injured or killed. Air bags plus lap-shoulder
belts offer the best protection for adults, but
not for young children and infants. Neither the
vehicle’s safety belt system nor its air bag
system is designed for them. Young children
and infants need the protection that a child
restraint system can provide. Always secure
children properly in your vehicle. To read how,
see the part of this manual called “Older
Children” or “Infants and Young Children.”

There is an air bag
readiness light on the
instrument panel cluster,
which shows the air
bag symbol.

The system checks the air bag electrical system for
malfunctions. The light tells you if there is an electrical
problem. See Air Bag Readiness Light on page 3-32
for more information.

Where Are the Air Bags?

The driver’s frontal air bag is in the middle of the
steering wheel.

1-48

-------------------------------------------------------------------------------------------------------------------------------------------------------------

-------------------------------------------------------------------------------------------------------------------------------------------------------------

The right front passenger’s frontal air bag is in the
instrument panel on the passenger’s side.

If your vehicle has a driver’s side impact air bag it is
located in the side of the driver’s seatback closest to
the door.

1-49

-------------------------------------------------------------------------------------------------------------------------------------------------------------


Content      ..     1      2      3      4      ..