Oldsmobile Intrigue (2002 year). Manual - part 10


  Index      Oldsmobile     Oldsmobile Intrigue (2002 year) - manual in english


Search            copyright infringement  


Content      ..     8      9      10      11     ..


Oldsmobile Intrigue (2002 year). Manual - part 10


-------------------------------------------------------------------------------------------------------------------------------------------------------------
3-2

Comfort Controls

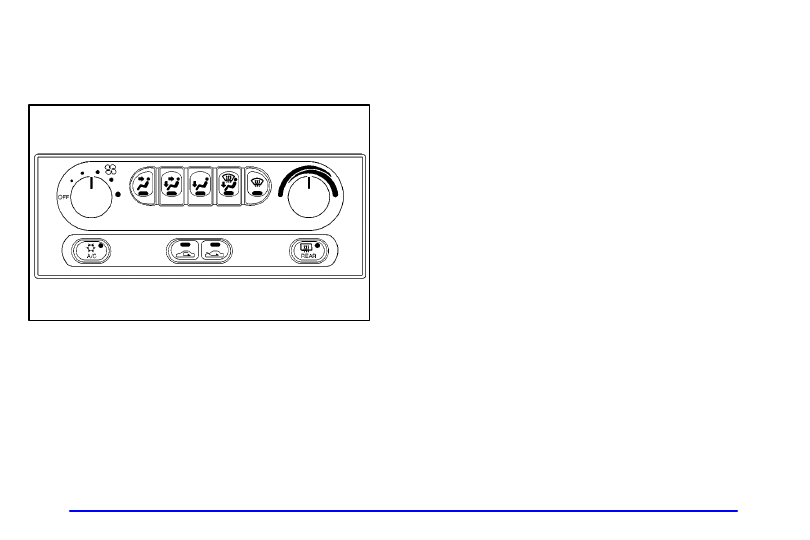
Air Conditioning with Electronic Controls

With this system, you can control the heating, cooling
and ventilation in your vehicle. The system works best if
you keep your windows closed while using it.

Fan Knob

The left knob regulates the amount of air coming into
the vehicle. To turn the fan off, turn the knob to OFF.
The fan must be on for the air conditioning compressor
to operate.

If the airflow seems very low when the fan knob is
turned to the highest setting, regardless of the mode
setting, your passenger compartment air filter (if
equipped) may need to be replaced. See “Maintenance
Schedule” and “Passenger Compartment Air Filter” 
in the Index.

Temperature Knob

The right knob changes the temperature of the air
coming through the system. Turn this knob clockwise
(toward red) for warmer air. Turn it counterclockwise
(toward blue) for cooler air.

-------------------------------------------------------------------------------------------------------------------------------------------------------------

-------------------------------------------------------------------------------------------------------------------------------------------------------------

3-3

Mode Buttons

Each button has an indicator which will glow when the
button is pressed.

 (Vent): This setting directs air through the

instrument panel outlets.

(Bi

-

Level): This setting directs air two ways. Half

of the air is directed through the instrument vent outlets.
Most of the remaining air is directed through the floor
ducts and a little to the defrost and side window vents.

(Floor): This setting sends most of the air 

through the ducts near the floor. The rest comes out 
of the defroster and side window vents. When using 
this setting in the recirculation mode, the windows 
may fog up. See “Recirculation” in the Index for 
more information.

(Defogger): This setting allows half of the air to go

to the floor ducts and half to the defrost and side
window vents. The air conditioning compressor will run
automatically in this setting unless the outside
temperature is below 38

_F (3.3_C). Even when the

compressor is running, you can control the temperature.

(Defroster): This setting directs most of the 

air through the defrost and side window vents. Some 
of the air goes to the floor ducts. The air conditioning
compressor will run automatically in this setting unless
the outside temperature is below 38

_F (3.3_C). Even

when the compressor is running, you can control 
the temperature.

A/C (Air Conditioning): Press this button to

operate the air conditioning compressor. An indicator
light in the button will flash briefly and then stay on to
let you know that the air conditioning is on. If the light
in the A/C button turns off after the flashing has
stopped, the air conditioning is not on. The air
conditioning will not come on for two reasons:
D The outside temperature is below 38_F (3.3)_C).
D The refrigerant pressure is too low or too high. See

“Air Conditioning Refrigerants” in the Index.

-------------------------------------------------------------------------------------------------------------------------------------------------------------

-------------------------------------------------------------------------------------------------------------------------------------------------------------

3-4

 (Recirculation): This button is used to recirculate

much of the air inside your vehicle. This setting is not
available in defogger or defroster. Operating the system
in recirculation may cause the windows to fog up when
the weather is cold and damp. To clear the fog, use the
defog or defrost modes and increase the fan speed. To
avoid refogging of the windows, use the outside air
mode.

(Outside Air): This button is used to bring

outside air into the vehicle.

Air Conditioning

On very hot days, open the windows long enough 
to let hot inside air escape. This reduces the time 
the compressor has to run, which should help with 
fuel economy.

For quick cool

-

down on very hot days, use the 

vent outlets, recirculation with the temperature knob
turned all the way to the blue area, the air conditioner
on, and the fan on a high setting. If this setting is used
for long periods of time, the air in your vehicle may
become too dry.

For normal cooling on hot days, use the vent outlets
with the temperature knob turned to the blue area. With
the A/C button and the outside air button pressed in, the
system will bring in outside air and cool it.

On cool but sunny days, the sun may warm your upper
body, but your lower body may not be warm enough. To
remedy this, you can use bi

-

level with the temperature

knob in the middle with the A/C button and the outside
air button pressed. The system will bring in outside air
and direct it to your upper body, while sending slightly
warmed air to your lower body. You may notice the
temperature difference more at some times than others.

Heating

On cold days turn the fan on and use floor and the
outside air button pressed in with the temperature knob
turned all the way to the red area. The system will bring
in outside air, heat it and send it to the floor ducts.

If your vehicle has an engine coolant heater, you can use
it to help your system provide warm air faster when it’s
cold outside (0

_F (

-

18

_C) or lower). An engine coolant

heater warms the coolant your engine and heating
system use to provide heat. See “Engine Coolant
Heater” in the Index.

-------------------------------------------------------------------------------------------------------------------------------------------------------------

-------------------------------------------------------------------------------------------------------------------------------------------------------------

3-5

Ventilation

For mild outside temperatures when little heating or
cooling is needed, use a fan setting, vent outlets and the
outside air button to direct air through your vehicle.
Your vehicle also has the flow

-

through ventilation

system described later in this section.

Defogging and Defrosting

Your system has two settings for clearing the front 
and side windows. To defrost the windows quickly, 
turn the fan to a high setting and use defrost with the
temperature knob turned all the way to the red area. 
To warm passengers while keeping the windows clear,
use defog.

Air Conditioning with Automatic 
and Auxiliary Temperature Control 
(If Equipped)

With this system, you can control the temperature inside
your vehicle. The air delivery modes, the temperature and
the fan speed can be adjusted manually or you can let the
system make the adjustments for you. The system works
best if you keep your windows closed while using it.

-------------------------------------------------------------------------------------------------------------------------------------------------------------

-------------------------------------------------------------------------------------------------------------------------------------------------------------

3-6

DRIVER (Driver Temperature): This knob regulates
the temperature for the entire vehicle when the PASS
knob is in the center neutral position. Turn the DRIVER
knob clockwise (toward red) to raise the temperature.
Turn it counterclockwise (toward blue) to lower the
temperature. The display will show your selection for a
few seconds, then it will show the outside temperature.

If you press the knob, the set temperature will again 
be displayed for a few seconds, followed by the 
outside temperature.

PASS (Passenger’s
Temperature):
 This knob
adjusts the air temperature
on the passenger’s side 
to be warmer or cooler 
than the temperature set 
by the driver.

Turn the PASS knob clockwise to raise the temperature.
Turn it counterclockwise to lower the temperature. 
The passenger side temperature will not be shown in 
the display.

Off Button

Press the OFF button to turn the system off. The display
will show OFF and outside temperature.

Manual Control of the Automatic System

If you prefer to manually control the heating, cooling
and ventilation in your vehicle, set the system to the
temperature and fan speed you want. Next, press the
mode button to select the desired airflow direction. The
system will try to maintain the temperature you set using
the mode you select. The following suggestions will
help the system run more efficiently in manual mode.

(Fan): The button with the fan symbol and the two

arrows located below the display is used to manually
select the force of air desired. The display will show the
fan speed.

If the airflow seems very low when the fan is turned 
to the highest setting regardless of the setting, your
passenger compartment air filter may need to be
replaced. See “Maintenance Schedule” and 
“Passenger Compartment Air Filter” in the Index.

-------------------------------------------------------------------------------------------------------------------------------------------------------------

-------------------------------------------------------------------------------------------------------------------------------------------------------------

3-7

MODE: The MODE button is used to control 
the direction of airflow when the system is not in
AUTO. The first press will display the current airflow
direction. Repeated pressing of the MODE button will
cycle through the following airflow directions shown in
the display.

 (Vent): This setting directs air through the

instrument panel outlets.

(Bi

-

Level): This setting directs air two ways. 

Half of the air is directed through the instrument panel
outlets. Most of the remaining air is directed through 
the floor ducts and a little to the defrost and side
window vents.

(Floor): This setting sends most of the air through

the ducts near the floor. The rest comes out of the
defrost and side window vents. When using this mode
and recirculation, the windows may fog up when the
weather is cold and damp. See “Recirculation” in the
Index for more information.

 (Defogger): This setting allows half of the air to

go to the floor ducts and half to the defrost and side
window vents. The air conditioning compressor will run
automatically in this setting unless the outside
temperature is below 38

_F (3.3_C). Even when the air

conditioning compressor is running, you can control the
temperature.

(Front Defroster): This setting directs most of the

air through the defrost and side window vents. Some of
the air goes to the floor ducts. The air conditioning
compressor will run automatically in this setting unless
the outside temperature is below 38

_F (3.3_C). Even

when the air conditioning compressor is running, you
can control the temperature.

 (Recirculation): This setting recirculates the 

air inside the vehicle. This setting is not available in the
defogger or defroster settings. When operating the
system in the recirculation mode, the windows may fog
up when the weather is cold and damp. To clear the fog,
select either the defogger or defroster setting and
increase the fan speed. To avoid re

-

fogging of the

windows, use the outside air mode.

(Outside Air): This setting brings outside air into

the vehicle.

-------------------------------------------------------------------------------------------------------------------------------------------------------------

-------------------------------------------------------------------------------------------------------------------------------------------------------------

3-8

Auto Button

For the most efficient operation of the system, press the
AUTO button and set the temperature. The system will
select the best fan speed and airflow settings to keep you
comfortable. The air conditioning compressor will run if
the outside temperature is above 38

_F (3.3_C). You 

may notice a delay of three to four minutes before the
fan comes on. For the automatic system to function, 
the temperature must be set between 61

_F (16_C) 

and 89

_F (31_C).

If the temperature setting of 61

_F (16_C) is chosen, the

system will remain at the maximum cooling setting and
fan speed. If the temperature is set at 89

_F (31_C), the

system will remain at the maximum heat setting and fan
speed. Choosing either maximum setting will not cause
the system to heat or cool any faster.

ECON (Economy Air Conditioning): Press the ECON
button to turn the compressor on and off. The indicator
light is illuminated when the compress is off. AUTO
will not be illuminated, but the system will maintain
automatic air delivery and fan speed control. The system
will attempt to control the temperature without the help
of the compressor.

Off: Press the OFF button to turn the system off. The
display will show OFF and the outside temperature.

Air Conditioning

On very hot days, open the windows long enough to 
let hot, inside air escape. This reduces the time the air
conditioning compressor has to run, which should help
fuel economy.

For quick cool

-

down on very hot days, use the vent

outlets and recirculation, along with the air conditioning.
If this setting is used for long periods of time, the air in
your vehicle may become too dry.

-------------------------------------------------------------------------------------------------------------------------------------------------------------

-------------------------------------------------------------------------------------------------------------------------------------------------------------

3-9

For normal cooling on hot days, use the vent outlets and
outside air with the air conditioning. The system will
bring in outside air and cool it.

On cool but sunny days, the sun may warm your upper
body, but your lower body may not be warm enough. 
To remedy this, you can use bi

-

level with the air

conditioning on. The system will bring in outside air and
direct it to your upper body, while sending slightly
warmed air to your lower body. You may notice this
temperature difference more at some times than others.

Heating

On cold days use the floor mode and the temperature
turned toward red, with a high fan setting. The system
will bring in outside air, heat it and send it to the 
floor ducts.

If your vehicle has an engine coolant heater, you can use
it to help your system provide warm air faster when it’s
cold outside (0

_F (

-

18

_C) or lower). An engine 

coolant heater warms the coolant your engine and
heating system use to provide heat. See “Engine 
Coolant Heater” in the Index.

Ventilation

For mild outside temperatures when little heating or
cooling is needed, use the vent outlets, a fan setting,
ECON and outside air to direct outside air through your
vehicle. Your vehicle also has the flow

-

through

ventilation system described later in this section.

Defogging and Defrosting

Your system has two settings for clearing the front 
and side windows. To defrost the windows quickly, 
use the defrost button. To warm passengers while
keeping the windows clean, select defog by pressing 
the MODE button.

-------------------------------------------------------------------------------------------------------------------------------------------------------------

-------------------------------------------------------------------------------------------------------------------------------------------------------------

3-10

Rear Window Defogger

The rear window defogger uses a warming grid to
remove fog from the rear window.

Press the button marked
REAR to turn the rear
window defogger on. It will
turn itself off after about 
15 minutes (automatic
control) or 10 minutes
(manual control).

If you turn it on again, the rear window defogger will
only run for about seven and one

-

half minutes

(automatic control) or five minutes (manual control)
before turning off. You can also turn it off by turning off
the ignition or pressing the button again.

Do not attach anything like a temporary vehicle license
or decal across the rear window defogger grid.

NOTICE:

Don’t use a razor blade or something else sharp
on the inside of the rear window. If you do, you
could cut or damage the warming grid, and the
repairs wouldn’t be covered by your warranty.

-------------------------------------------------------------------------------------------------------------------------------------------------------------

-------------------------------------------------------------------------------------------------------------------------------------------------------------

3-11

Ventilation System

Change the direction of airflow by adjusting the vents.
To completely shut off airflow to the outlet move the
lever down. To open the outlet for airflow move the
lever up.

Your vehicle’s flow

-

through ventilation system supplies

outside air into the vehicle when it is moving. Outside
air will also enter the vehicle when the air conditioning
fan is running.

Ventilation Tips

D Keep the hood and front air inlet free of ice, snow or

any other obstruction, such as leaves. The heater and
defroster will work far better, reducing the chance of
fogging the inside of your windows.

D When you enter a vehicle in cold weather, set the

mode to floor and the fan to the highest speed for a
few moments before driving off. This helps clear the
intake ducts of snow and moisture and reduces the
chance of fogging the inside of your windows.

D Keep the air path under the front seats clear of

objects. This helps air to circulate throughout 
your vehicle.

-------------------------------------------------------------------------------------------------------------------------------------------------------------

-------------------------------------------------------------------------------------------------------------------------------------------------------------

3-12

Audio Systems

Your audio system has been designed to operate easily
and give years of listening pleasure. You will get the
most enjoyment out of it if you acquaint yourself with it
first. Find out what your audio system can do and how
to operate all of its controls to be sure you’re getting the
most out of the advanced engineering that went into it.

Your vehicle has a feature called Retained Accessory
Power (RAP). With RAP, you can play your audio
system even after the ignition is turned off. See
“Retained Accessory Power (RAP)” in the Index.

Setting the Clock

Press and hold HR until the correct hour appears. 
The letters A or P may appear on the display for AM 
or PM. Then, press and hold MN until the correct
minute appears. The clock may be set with the ignition
on or off.

To set the clock to the time of an FM station
broadcasting Radio Data System (RDS) information,
press and hold HR and MN at the same time until
UPDATED appears on the display. If the time is not
available from the station, NO UPDATE will appear on
the display instead.

-------------------------------------------------------------------------------------------------------------------------------------------------------------

-------------------------------------------------------------------------------------------------------------------------------------------------------------

3-13

AM-FM Stereo with Compact Disc Player
with Programmable Equalization and
Radio Data System (RDS)

Playing the Radio

POWER: Press this knob to turn the system on and off.

VOLUME: Turn the knob clockwise to increase
volume. Turn it counterclockwise to decrease volume.

SCV (Speed

-

Compensated Volume): With SCV, your

audio system adjusts automatically to make up for road
and wind noise as you drive. Set the volume at the
desired level. Press this button to select MIN, MED or
MAX. Each higher choice allows for more volume
compensation at faster vehicle speeds. Then, as you
drive, SCV automatically increases the volume, as
necessary, to overcome noise at any speed. The volume
level should always sound the same to you as you drive.
If you don’t want to use SCV, select OFF.

RCL (Recall): Press this button to display the time with
the ignition on or off. When the radio is playing, press
this knob to display the station frequency.

-------------------------------------------------------------------------------------------------------------------------------------------------------------

-------------------------------------------------------------------------------------------------------------------------------------------------------------

3-14

Finding a Station

BAND: Press this button to switch between AM, FM1
and FM2. The display shows your selection.

TUNE: Turn this knob to select radio stations.

 SEEK  : Press the right or left arrow to go to the

next or previous station and stay there. The radio will
seek to stations with a strong signal only. The sound will
mute while seeking.

 SCAN  : Press and hold either arrow for two

seconds until SC appears on the display and you hear 
a beep. The radio will go to a station, play for a few
seconds, then go on to the next station. Press either
arrow again to stop scanning. The radio will scan to
stations with a strong signal only. The sound will mute
while scanning.

To scan preset stations, press and hold either SCAN
arrow for more than four seconds, PRESET SCAN will
appear on the display. You will hear a double beep and
the P will blink with the preset number. The radio will
go to the first preset station stored on your pushbuttons,
play for a few seconds, then go on to the next preset
station. Press either SCAN arrow again to stop scanning
presets. The radio will scan preset stations with a strong
signal only. The sound will mute while scanning.

Setting Preset Stations

The six numbered pushbuttons let you return to 
your favorite stations. You can set up to 18 stations 
(six AM, six FM1 and six FM2), by performing the
following steps:

1. Turn the radio on.

2. Press BAND to select the band.

3. Tune in the desired station.

4. Press AUTO EQ to select the equalization that best

suits the type of station selected.

5. Press and hold one of the six numbered pushbuttons

until you hear a beep. Whenever you press that
numbered pushbutton, the station you set will return
and the equalization that you selected will also be
automatically selected for that pushbutton.

6. Repeat the steps for each pushbutton.

-------------------------------------------------------------------------------------------------------------------------------------------------------------

-------------------------------------------------------------------------------------------------------------------------------------------------------------

3-15

Setting the Tone (Bass/Treble)

AUDIO: Press and release the AUDIO button until
BASS, MID or TREB appears on the display. Press the
knob above the AUDIO button to extend it, then turn the
knob to increase or decrease. When you use this knob,
the radio’s tone setting will switch to manual. If a station
is weak or noisy, you may want to decrease the treble.

Pressing and holding the AUDIO button for at least two
seconds will return all tone settings, including balance
and fade to flat.

AUTO EQ (Automatic Equalizer): This feature 
allows you to choose preset bass, midrange and treble
equalization settings designed for country, jazz, talk,
pop, rock and classical program types.

The program type last chosen will appear on the display
when you first press AUTO EQ. Each time you press
this button, another program type will appear on the
display and AUTO EQ will switch to one of the preset
program types.

To return to the manual mode, press the AUTO EQ
button until MANUAL appears on the display. Then you
will be able to manually adjust the bass, midrange and
treble using the AUDIO button.

Adjusting the Speakers (Balance/Fade)

AUDIO: To adjust balance between the right and left
speakers, press and release the AUDIO button until
BAL appears on the display. Press the knob above the
AUDIO button to extend it, then turn the knob to adjust
the sound to the left or right speakers. The middle
position balances the sound between the speakers.

To adjust fade between the front and rear speakers, press
and release the AUDIO button until FAD appears on the
display. Press the knob above the AUDIO button to
extend it, then turn the knob to adjust the sound to the
left or right speakers. The middle position balances the
sound between the speakers.

Pressing and holding the AUDIO button for at least two
seconds will return all tone settings, including bass and
treble to flat.

-------------------------------------------------------------------------------------------------------------------------------------------------------------

-------------------------------------------------------------------------------------------------------------------------------------------------------------

3-16

Using RDS

Your audio system is equipped with a Radio Data
System (RDS). RDS mode gives you many useful new
features. With RDS, the radio can do the following:
D Seek only to stations with the types of programs you

want to listen to,

D seek to stations with traffic announcements,
D receive announcements concerning local and

national emergencies and

D receive and display messages from radio stations.
RDS features are only available for use on FM stations
which broadcast RDS information. The RDS features of
your radio rely upon receiving specific RDS information
from these stations. These features will only work when
the RDS information is available. In rare cases, a radio
station may broadcast incorrect information that will
cause the radio features to work improperly. If this
happens, contact the radio station.

When you are tuned to an RDS station, the station 
name will appear on the display, instead of the
frequency. Most RDS stations provide their station
name, the time of day and a Program Type (PTY) 
for their current programming.

Finding a PTY Preset Station

To find a PTY preset station, perform the 
following steps:

1. Press the P

-

TYPE button to turn on PTY select, if it

is not already on. PTY will be displayed and the light
next to the button will turn on. The last selected PTY
will appear on the display for five seconds.

2. Turn the P

-

TYPE knob either clockwise or

counterclockwise to select a program type. The list is
alphabetical. If you select ANY TYPE your radio
will seek to the first PTY available.

3. Push the SEEK button to activate search. The radio

will seek to the first RDS broadcaster of the selected
program type. If the radio cannot find the desired
program type, NOT FOUND will appear on the
display and the radio will return to the last station
you were listening to.

To use the P

-

TYPE interrupt feature, press and hold 

the P

-

TYPE button until you hear a beep on the PTY

you want to interrupt on. An asterisk will appear next to
the PTY name (for example CLASSICAL*). When you
are listening to a compact disc, the last selected RDS
FM station will interrupt play if that selected PTY
format is broadcast.

-------------------------------------------------------------------------------------------------------------------------------------------------------------

-------------------------------------------------------------------------------------------------------------------------------------------------------------

3-17

BAND (Alternate Frequency): Alternate frequency
allows the radio to switch to a stronger station with the
same program type. Press and hold BAND for two
seconds to turn alternate frequency on. AF ON will
appear on the display. The radio may switch to stronger
stations. Press and hold BAND again for two seconds 
to turn alternate frequency off. AF OFF will appear 
on the display. The radio will not switch to other
stations. When you turn the ignition off and then 
on again, the alternate frequency feature will
automatically be turned on.

 SEEK  : Press the right arrow to go to a station with

the last selected PTY; TYPE and the last selected PTY
will appear on the display, if it is not already showing.
Press SEEK a second time to seek. If a station with the
selected PTY is not found, the radio will return to the
original station and display NOT FOUND.

Setting PTY Preset Stations

The six numbered pushbuttons let you return to your
favorite Program Types (PTYs). These pushbuttons 
have factory PTY presets. You can set up to 12 PTYs
(six FM1 and six FM2) by performing the 
following steps:

1. Press BAND to select FM1 or FM2.

2. Press the P

-

TYPE button to activate program type

mode.

3. Turn the P

-

TYPE knob to select a PTY.

4. Press and hold one of the six numbered pushbuttons

until you hear a beep. Whenever you press that
numbered pushbutton, the PTY you set will return.

5. Repeat the steps for each pushbutton.

-------------------------------------------------------------------------------------------------------------------------------------------------------------


Content      ..     8      9      10      11     ..