Oldsmobile Intrigue (2002 year). Manual - part 8


  Index      Oldsmobile     Oldsmobile Intrigue (2002 year) - manual in english


Search            copyright infringement  


Content      ..     6      7      8      9     ..


Oldsmobile Intrigue (2002 year). Manual - part 8


-------------------------------------------------------------------------------------------------------------------------------------------------------------
2-54

Sun Visors

To block out glare, swing down the sun visors. You can
also swing each visor from the front window to the side
window. The sun visors also have extenders located on
the inboard side that can be pulled out for added
anti

-

glare protection.

Visor Vanity Mirror

When the sunvisors are in the down position, the visor
vanity mirror can be used by opening the cover. If the
vehicle has the optional lighted vanity mirrors, the
lamps will come on when the cover is opened.

Accessory Power Outlets

Accessory power outlets can be used to plug in electrical
equipment such as a cellular telephone, a compact disc
player, a CB radio, etc.

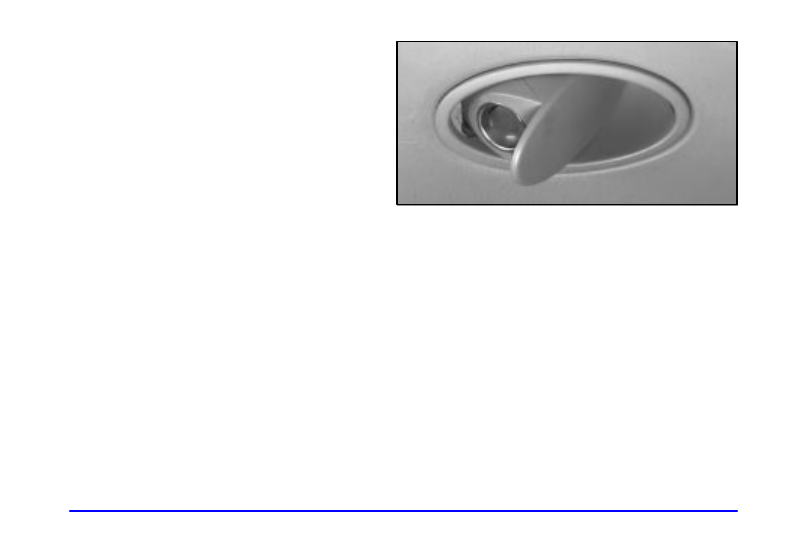
The accessory power outlets are located below the
comfort controls on the instrument panel. Each outlet is
concealed by a pivoting cap. Push the cap to reveal the
outlets. When not using the outlets, be sure the
protective cap is covering them.

The accessory power outlets will only operate while the
ignition is on, and for a few minutes after turning the
ignition off. To use the accessory power outlets for
extended periods of time, see your dealer for 
more information.

-------------------------------------------------------------------------------------------------------------------------------------------------------------

-------------------------------------------------------------------------------------------------------------------------------------------------------------

2-55

NOTICE:

When using accessory power outlets:
Maximum level of any electrical equipment

should not exceed 20 amps

Be sure to turn off any electrical equipment

when not in use. Leaving electrical
equipment on for extended periods can
drain the battery.

Certain electrical accessories may not be compatible
with the accessory power outlets and could result in
blown vehicle or adapter fuses. If you experience a
problem, see your dealer for additional information on
the accessory power outlets.

When adding electrical equipment, be sure to follow 
the proper installation instructions included with 
the equipment.

NOTICE:

Power outlets are designed for accessory plugs
only. Do not hang any type of accessory or
accessory bracket from the plug. Improper use of
the power outlets could cause damage not
covered by your warranty.

-------------------------------------------------------------------------------------------------------------------------------------------------------------

-------------------------------------------------------------------------------------------------------------------------------------------------------------

2-56

OnStar

R

System (If Equipped)

OnStar is a vehicle communications system that offers 
a variety of services and provides a one

-

touch

hands

-

free communication link between you and the

OnStar Center. To receive OnStar services, a service
subscription agreement is required and an additional 
fee may be required. Services are available 24 hours 
a day, 7 days a week. For more information, 
call 1

-

888

-

ONSTAR

-

7 (1

-

888

-

667

-

8277).

(OnStar Services Button): Press this button once

to contact an advisor who will be able to assist you with
these services. If you are not quickly connected, the
system will automatically reset and redial. This ensures
connection to the center; there is no additional action
required. Press the Communication button to cancel the
automatic redial.

(Emergency Button): In an emergency situation,

press the emergency service button. Upon receiving the
call, an advisor at the center will locate your vehicle and
assess the situation. If necessary, the advisor will alert
the nearest emergency service provider.

(Communication Button):  Press this button 

at the end of a call. Also press this button to answer a
call from the center, or cancel a call if one of the other
buttons is accidentally pressed. This button is also 
used to access OnStar Personal Calling and Virtual
Advisor services. See the OnStar owner package for
more information.

-------------------------------------------------------------------------------------------------------------------------------------------------------------

-------------------------------------------------------------------------------------------------------------------------------------------------------------

2-57

Volume Control: You can control the volume of 
the OnStar System using either the volume knob on 
the radio or, if equipped, the steering wheel 
volume controls.

(Telltale Light): This light will indicate the status 

of the system. A solid green light will come on when
you start the vehicle to let you know that the system is
on and is ready to make or receive calls.

If the light blinks green, it means that an incoming or
outgoing call is in progress. Press the Communication
button if you notice the light blinking and you are not 
on a call.

The light will be red in the event of an OnStar system
malfunction. If this occurs press the OnStar Services
button to attempt to contact an advisor. If the connection
is made, the advisor will assist you with steps to take to
make sure that the system is functioning properly. If you
cannot contact the advisor, take your vehicle to your
dealership as soon as possible for assistance.

Cellular Antenna: The cellular antenna on the outside
of your vehicle is critical to effective communications
using the OnStar system. Optimum cellular reception
can be obtained when the mast is straight up and down.

OnStar Services

The following services are available within OnStar
service plans. Your vehicle comes with a specific
one

-

year service plan that allows use of some or 

all of the following services.
Automatic Notification of Air Bag Deployment: If

an air bag deploys, a priority emergency signal is
automatically sent to the center. An advisor will locate
your vehicle’s position, try to contact you and assist
you in the situation. If the center is unable to contact
you, an emergency service provider will be contacted.

Stolen Vehicle Tracking: Call the center at

1

-

888

-

4

-

ONSTAR (1

-

888

-

466

-

7827) to report your

vehicle stolen. The system can then attempt to locate
and track your vehicle and the advisor will assist the
proper authorities.

Roadside Assistance with Location: For vehicle

breakdowns, press the OnStar Services button. An
advisor will contact the appropriate help.

Remote Diagnostics: If an instrument panel 

light comes on, press the OnStar services button. 
An advisor can perform a check of the engine
on

-

board computer, and recommend what action

needs to be taken.

-------------------------------------------------------------------------------------------------------------------------------------------------------------

-------------------------------------------------------------------------------------------------------------------------------------------------------------

2-58

OnStar MED

-

NET: Med

-

Net can store your

personal medical history and provide it to emergency
personnel if necessary. (Requires activation and
additional fee).

Accident Assist: An advisor can provide

step

-

by

-

step guidance following an accident.

Remote Door Unlock: To contact the center, call

1

-

888

-

4

-

ONSTAR. You will be required to provide 

your security information. An advisor will send a
command to your vehicle to unlock itself. The
advisor can delay unlocking your vehicle. Remote
Door Unlock is disabled 48 hours after the vehicle is
parked to maintain the battery charge.

Vehicle Locator Service: To contact the center, call

1

-

888

-

4

-

ONSTAR. You will be required to provide

your security information. An advisor will send a
command to your vehicle to sound the horn and/or
flash the lamps.

Route Support: An advisor can provide directions

or guidance to most places you want to go. In
addition, they can help you locate gas stations, 
rest areas, ATM’s. hospitals, hotels, stores, eateries
and more.

Ride Assist: An advisor can locate transportation in

the event that you are unable to drive.

Concierge Services: The concierge advisor can

obtain tickets, reservations, or help with vacation/trip
planning and other unique items or services.

OnStar System Limitations

Complete limitations can be found on the Subscriber
Services Agreement. In order to provide you with
excellent service, calls with the OnStar Center may be
monitored or recorded.

OnStar service is:
D available in the 48 contiguous United States, Alaska,

Hawaii and Canada;

D available when the vehicle is within the operating

range of a cellular provider;

D subject to limitations caused by atmospheric

conditions, such as severe weather or topographical
conditions, such as mountainous terrain;

D subject to cellular carrier equipment limitations.

-------------------------------------------------------------------------------------------------------------------------------------------------------------

-------------------------------------------------------------------------------------------------------------------------------------------------------------

2-59

Global positioning locating capabilities will not be
available if satellite signals are obstructed.

OnStar will not function if the vehicle’s battery is
discharged or disconnected. It may also be inoperative 
if the vehicle is in an accident and the OnStar or vehicle
electrical system components are damaged.

OnStar is the communication link between you and
existing governmental roadside service providers.
OnStar will receive your call and use reasonable effort
to contact an appropriate provider. OnStar cannot
promise that the providers will respond in a timely
manner or at all.

Power Sunroof (Option)

The sunroof includes a sliding glass panel and 
a sunshade.

The switch to control the sunroof is located in the
headliner on the roof panel. It works only when the
ignition is on or when Retained Accessory Power (RAP)
is active. See “Retained Accessory Power (RAP)” in 
the Index.

Base switch shown, Uplevel similar

To open the sunroof to the vent position only, push and
hold the front of the switch. You will need to open the
sunshade by hand. To close the sunroof from the vent
position, push and hold the rear of the switch.

To open the sunroof, push the rear of the switch once.
The sunroof and sunshade will open by themselves. This
is the express

-

open feature. To close the sunroof, push

and hold the front of the switch until the sunroof motor
stops. The sunshade must be closed by hand.

-------------------------------------------------------------------------------------------------------------------------------------------------------------

-------------------------------------------------------------------------------------------------------------------------------------------------------------

2-60

HomeLink

R

 Transmitter 

(If Equipped)

This device complies with Part 15 of the FCC Rules.
Operation is subject to the following two conditions: 
(1) this device may not cause harmful interference, and 
(2) this device must accept any interference received,
including interference that may cause undesired operation.

This device complies with RSS

-

210 of Industry Canada.

Operation is subject to the following two conditions: 
(1) this device may not cause interference, and (2) this
device must accept any interference, including interference
that may cause undesired operation of the device.

Changes and modifications to this system by other than
an authorized service facility could void authorization to
use this equipment.

Programming the HomeLink Transmitter

Do not use the HomeLink

R

 Transmitter with any garage

door opener that does not have the “stop and reverse”
feature. This includes any garage door opener model
manufactured before April 1, 1982.

Be sure that people and objects are clear of the garage
door you are programming.

It is recommended that a new battery be installed in
your hand

-

held transmitter for quicker and more

accurate transmission of the radio frequency.

-------------------------------------------------------------------------------------------------------------------------------------------------------------

-------------------------------------------------------------------------------------------------------------------------------------------------------------

2-61

Your vehicle’s engine should be turned off while
programming the transmitter. Follow these steps to
program up to three channels.

1. Decide which one of the three channels (one of the

three HomeLink buttons) you want to program.

2. Press and hold the desired button on HomeLink

through Step 3.

3. When the HomeLink indicator light begins to blink

slowly (this may take up to 30 seconds), hold the
hand

-

held transmitter about 1 to 3 inches (3 to 8 cm)

away from HomeLink and then press and hold the
transmit button on the hand

-

held transmitter.

Continue to hold both buttons until the indicator
light on HomeLink begins to flash rapidly. (This may
take up to 90 seconds).

If you have trouble programming HomeLink, make sure
that you have followed the directions exactly as
described and that the battery in the hand

-

held

transmitter is not weak. If you still cannot program it,
move the hand

-

held transmitter to the left or right or

forward or backward or flip it upside down. HomeLink
may not work with older garage door openers that do
not meet current Federal Consumer Safety Standards. 
If you cannot program the transmitter after repeated
attempts, refer to “Training a Garage Door Opener with
Rolling Codes” later in this section or contact the
manufacturer of HomeLink at 1

-

800

-

355

-

3515, or on

the internet at www.homelink.com.

Be sure to keep the original hand

-

held transmitter in

case you need to erase and reprogram HomeLink.

-------------------------------------------------------------------------------------------------------------------------------------------------------------

-------------------------------------------------------------------------------------------------------------------------------------------------------------

2-62

Training a Garage Opener with a 
“Rolling Code” Feature (If Equipped)

If you have not previously programmed the hand

-

held

transmitter of HomeLink, see “Programming the
HomeLink Transmitter” listed previously. If you have
completed this programming already, you now need to
train the garage door opener motor head unit to
recognize HomeLink.

1. Find the “Learn” or “Smart” button, refer to 

your garage door opener owner’s manual or contact
the manufacturer of HomeLink at 1

-

800

-

355

-

3515

or on the internet at www.homelink.com.

Because of the steps involved, it may be helpful 
to have another person assist in programming 
the transmitter.

2. Press the “Learn” or “Smart” button on the garage

door opener motor head unit. An indicator light will
begin to flash when the motor head unit enters the
training mode.

Following this step, you have 30 seconds to start
Step 3.

3. Return to HomeLink in your vehicle and firmly 

press and release the programmed HomeLink 
button three times.

The rolling

-

code garage door opener should now

recognize HomeLink. You may either use HomeLink or
the hand

-

held transmitter to open the garage door.

If after following these instruction, you still have
problems training the garage door opener, contact the
manufacturer of HomeLink at 1

-

800

-

355

-

3515, or on

the internet at www.homelink.com.

-------------------------------------------------------------------------------------------------------------------------------------------------------------

-------------------------------------------------------------------------------------------------------------------------------------------------------------

2-63

Canadian Programming

Canadian Owners: During programming, the
hand

-

held transmitter may automatically stop

transmitting after two seconds. In this case, you should
press and hold the HomeLink button (see Steps 2 and 3
under Programming the HomeLink Transmitter) while
you press and repress (cycle) your hand

-

held transmitter

every two seconds until HomeLink is trained.

Operating the HomeLink Transmitter

Press and hold the appropriate button on HomeLink for
at least a half of a second. The indicator light will come
on while the signal is being transmitted.

Erasing Channels

To erase all three programmed channels, hold down the
two outside buttons on HomeLink until the indicator
light begins to flash (approximately 20 seconds).
Release both buttons.

Resetting Defaults

To reset HomeLink to default settings, hold down the
two outside buttons on HomeLink until the indicator
light begins to flash (approximately 20 seconds).
Continue to hold the buttons until the HomeLink
indicator light turns off and then release both buttons.

Accessories

Accessories for HomeLink are available from the
manufacturer of the unit. If you would like additional
information, please contact the manufacturer of
HomeLink at 1

-

800

-

355

-

3515, or on the internet 

at www.homelink.com.

-------------------------------------------------------------------------------------------------------------------------------------------------------------

-------------------------------------------------------------------------------------------------------------------------------------------------------------

2-64

The Instrument Panel -- Your Information System

-------------------------------------------------------------------------------------------------------------------------------------------------------------

-------------------------------------------------------------------------------------------------------------------------------------------------------------

2-65

The main components of your instrument panel are listed below:

A. Side Window Defogger Vents

B. Instrument Panel Vents

C. Turn Signal/Multifunction Lever

D. Instrument Panel Cluster

E. Windshield Wipers/Washer Fluid Lever

F. Cruise Control (CRUISE) Button

G. Hazard Warning Button

H. Instrument Panel Fuse Block

I. Instrument Panel Brightness Thumbwheel

J. Fog Lamp Switch (If Equipped)

K. Trunk Lid Release Button

L. Storage Bin

M. Trip Odometer

N. Tilt Wheel Lever (located on the steering 

wheel column)

O. Audio Steering Wheel Controls (If Equipped)

P. Horn

Q. Cruise Control Buttons

R. Ignition Switch

S. Heated Seat Switches, (If Equipped)

T. Accessory Power Outlets

U. Comfort Controls

V. Audio System

W. Glove Box

-------------------------------------------------------------------------------------------------------------------------------------------------------------

-------------------------------------------------------------------------------------------------------------------------------------------------------------

2-66

Instrument Panel Cluster

Your instrument panel is designed to let you know at a glance how your vehicle is running. You’ll know how fast
you’re going, about how much fuel is in your tank and many other things you need to drive safely and economically.

United States version shown, Canada similar

Your instrument panel cluster includes indicator warning lights and gages that are explained on the following pages.

-------------------------------------------------------------------------------------------------------------------------------------------------------------

-------------------------------------------------------------------------------------------------------------------------------------------------------------

2-67

Speedometer/Odometer

Your speedometer lets your see your speed in both miles
per hour (mph) and kilometers per hour (km/h). Your
odometer shows you how far your vehicle has been
driven in either miles (used in the United States) or
kilometers (used in Canada).

Your vehicle has a tamper

-

resistant odometer.

If your odometer fails and needs to be replaced, the
entire cluster needs to be replaced. Take your vehicle to
the dealer to have this done. The dealer will have the
new cluster odometer set to the mileage of the old
odometer/cluster if at all possible. But if it can’t, then
it’s set at zero and a label must be put on the driver’s
door to show the old mileage reading when the new
odometer was installed.

Trip Odometer

Use these buttons located on the left side of the
instrument panel to set or reset the trip odometer.

TRIP 000 (Season mode/Trip mode):
D Season mode 

--

 press this button to display the total

vehicle mileage.

D Trip mode 

--

 press this button to display the trip

mileage. It tells you how far you have driven since
you last reset the trip odometer.

TRIP RESET: Press and hold this button for two or
three seconds to set the trip odometer back to zero.

-------------------------------------------------------------------------------------------------------------------------------------------------------------

-------------------------------------------------------------------------------------------------------------------------------------------------------------

2-68

Tachometer

The tachometer displays the engine speed in thousands
of revolutions per minute (rpm).

NOTICE:

Do not operate the engine with the tachometer in
the shaded area, or engine damage may occur.

Warning Lights, Gages 
and Indicators

This part describes the warning lights and gages that
may be on your vehicle. The pictures will help you
locate them.

Warning lights and gages can signal that something is
wrong before it becomes serious enough to cause an
expensive repair or replacement. Paying attention to
your warning lights and gages could also save you or
others from injury.

Warning lights come on when there may be or is a
problem with one of your vehicle’s functions. As you
will see in the details on the next few pages, some
warning lights come on briefly when you start the
engine just to let you know they’re working. If you are
familiar with this section, you should not be alarmed
when this happens.

-------------------------------------------------------------------------------------------------------------------------------------------------------------

-------------------------------------------------------------------------------------------------------------------------------------------------------------

2-69

Gages can indicate when there may be or is a problem
with one of your vehicle’s functions. Often gages and
warning lights work together to let you know when
there’s a problem with your vehicle.

When one of the warning lights comes on and stays on
when you are driving, or when one of the gages shows
there may be a problem, check the section that tells you
what to do about it. Please follow this manual’s advice.
Waiting to do repairs can be costly 

--

 and even

dangerous. So please get to know your warning lights
and gages. They’re a big help.

Safety Belt Reminder Light

When the key is turned to ON, a chime will come on 
for about eight seconds to remind people to fasten 
their safety belts, unless the driver’s safety belt is
already buckled.

The safety belt light will
also come on and stay on
for about 20 seconds, then 
it will flash for about 
55 seconds.

If the driver’s belt is already buckled, neither the chime
nor the light will come on.

-------------------------------------------------------------------------------------------------------------------------------------------------------------


Content      ..     6      7      8      9     ..