MINI Paceman (2016 year). Manual - part 3


  Index      MINI     MINI Paceman (2016 year) - manual in english


Search            copyright infringement  


Content      ..     1      2      3      4      ..


MINI Paceman (2016 year). Manual - part 3


-------------------------------------------------------------------------------------------------------------------------------------------------------------
CONTROLS
Transporting children safely
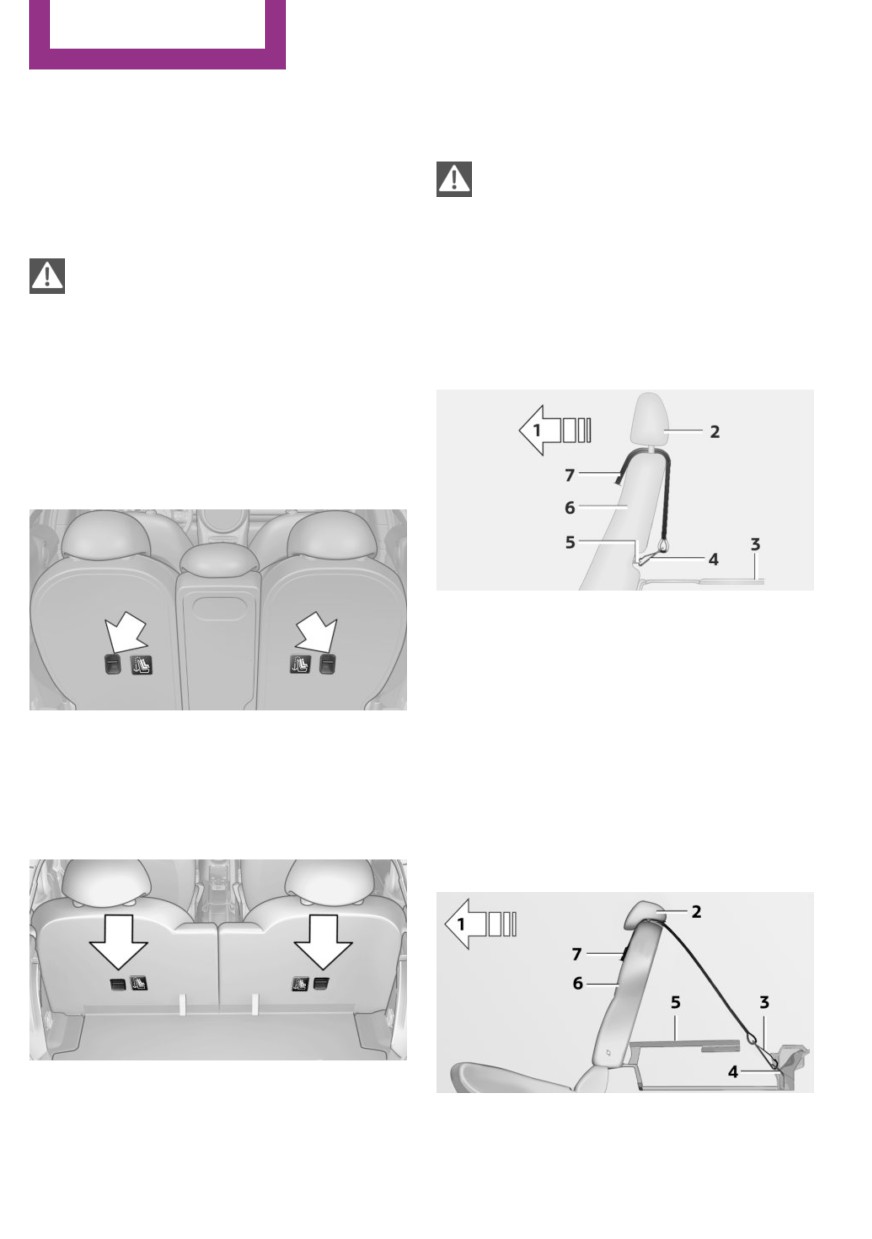
Guide of the upper LATCH retaining
Child restraint fixing
strap
systems with an upper re-
WARNING
taining strap
If the upper retaining strap is incorrectly
used for the child restraint system, the protec-
Mounting points
tive effect can be reduced. There is risk of inju-
CAUTION
ries. Make sure that the upper retaining strap is
not guided across sharp edges and without
The mounting points for the upper retain-
twisting to the upper retaining strap.
ing straps of child restraint systems are only
provided for these retaining straps. When other
objects are mounted, the anchors can be dam-
Outer seats:
aged. There is risk of property damage. Only
mount child restraint systems to the upper re-
taining straps.
MINI Countryman
1
Direction of travel
2
Head restraint
3
Cargo area floor
4
Hook for upper retaining strap
There are two additional mounting points for
5
Mounting point
child restraint fixing systems with an upper re-
6
Backrest
taining strap, arrows.
7
Upper retaining strap of child restraint fix-
ing system
MINI Paceman
MINI Countryman, center seat
There are two additional mounting points for
child restraint fixing systems with an upper re-
1
Direction of travel
taining strap, arrows.
2
Head restraint
48

-------------------------------------------------------------------------------------------------------------------------------------------------------------

Transporting children safely
CONTROLS
3
Hook for upper retaining strap
MINI Countryman: lock-
4
Mounting point
ing doors and windows
5
Cargo area floor
6
Backrest
Rear doors
7
Upper retaining strap of child restraint fix-
ing system
Attaching the upper retaining strap to
the mounting point
1. Slide the head restraint upward.
2. Center seat: fold the cargo area floor for-
ward.
3. Guide the upper retaining strap between
Push the locking lever on the rear doors down.
the supports of the head restraint.
The door can now be opened from the outside
4. Attach the upper retaining strap to the
only.
mounting point with the hook.
5. Slide the head restraint into the bottom po-
Safety switch for power window
sition.
This locks the rear window switches so that the
6. Pull the upper retaining strap taut.
windows cannot be operated from the rear.
Press the safety switch, refer to page 35.
WARNING
If the rear backrest is not locked, the pro-
tective effect of the child restraint system is lim-
ited or there is none. In particular situations,
e.g. braking maneuvers or in case of an acci-
dent, the rear backrest can fold forward. There
is risk of injuries or danger to life. Make sure
that the rear backrests are locked.
49

-------------------------------------------------------------------------------------------------------------------------------------------------------------

CONTROLS
Driving
Driving
Steptronic transmission
Vehicle features and op-
You can only take out the remote control if
tions
transmission position P is engaged: interlock.
This chapter describes all standard, country-
specific and optional features offered with the
series. It also describes features that are not
Start/Stop button
necessarily available in your car, e. g., due to
the selected options or country versions. This
also applies to safety-related functions and sys-
tems.
When using the features and systems described
here, adhere to local regulations.
Ignition lock
Pressing the Start/Stop button switches the ig-
Insert the remote control into the
nition on or off and starts the engine.
ignition lock
The engine starts when the Start/Stop button is
pressed and:
Manual transmission: the clutch pedal is de-
pressed.
Steptronic transmission: the brake pedal is
depressed.
Radio ready state
Individual electrical consumers can operate.
Insert the remote control all the way into the
Radio ready state is switched off automatically:
ignition lock.
When the remote control is removed from
Radio ready state is switched on. Individual
the ignition lock.
electrical consumers can operate.
With Comfort Access, refer to page 28, by
pressing the button on the door handle or
Steering wheel lock
the
button on the remote control.
Removing the remote control from the
After a certain period of time.
ignition lock
Before removing the remote control, push it all
Ignition on
the way in to release the locking mechanism.
All electrical consumers can operate. Most indi-
The ignition is switched off if it was on.
cator and warning lights light up for different
lengths of time.
50

-------------------------------------------------------------------------------------------------------------------------------------------------------------

Driving
CONTROLS
To save battery power when the engine is off,
On uphill grades or on a slope, additionally
switch off the ignition and any unnecessary
secure the vehicle, e.g. with a wheel
electronic systems/power consumers.
chock.
CAUTION
Radio ready state and ignition off
In the case of repeated starting attempts
All indicator and warning lights in the displays
or repeated starting in quick succession, the
go out.
fuel is not burned or is inadequately burned.
The ignition switches off automatically when
The catalytic converter can overheat. There is
the driver's door is opened. Pressing the Start/
risk of property damage. Avoid repeated start-
Stop button again switches the ignition back
ing in quick succession.
on.
Do not wait for the engine to warm-up while
For example, the ignition is not switched off in
the vehicle remains stationary; start driving
the following situations:
right away, but at moderate engine speeds.
Depress the clutch or brake pedal.
Do not depress the accelerator when starting
The low beams are switched on.
the engine.
Starting the engine
Starting the engine
General information
DANGER
If the exhaust pipe is blocked or ventila-
tion is insufficient, harmful exhaust gases can
enter into the vehicle. The exhaust gases con-
tain carbon monoxide, an odorless and color-
less but highly toxic gas. In enclosed areas, ex-
haust gases can also accumulate outside of the
Manual transmission
vehicle. There is danger to life. Keep the ex-
haust pipe free and ensure sufficient ventila-
Remote control in the ignition lock or with
tion.
Comfort Access inside the vehicle, refer to
page 28.
WARNING
1. Depress the brake pedal.
An unsecured vehicle can put itself into
2. Depress the clutch pedal.
motion and roll away. There is risk of an acci-
dent. Before exiting, secure the vehicle against
3. Press the Start/Stop button.
rolling.
The ignition is activated automatically for a cer-
In order to ensure that the vehicle is secured
tain time and is stopped as soon as the engine
against rolling away, observe the following:
starts.
Set the parking brake.
On uphill grades or on a slope, turn the
front wheels in the direction of the curb.
51

-------------------------------------------------------------------------------------------------------------------------------------------------------------

CONTROLS
Driving
Steptronic transmission
On uphill grades or on a slope, additionally
secure the vehicle, e.g. with a wheel
Remote control in the ignition lock or, with
chock.
Comfort Access, inside the vehicle, refer to
page 28.
Before driving into a car wash
1. Depress the brake pedal.
To make it possible for the vehicle to roll in an
2. Move the selector lever to position P or N.
automatic car wash, follow the information on
3. Press the Start/Stop button.
Washing in automatic car washes, refer to
page 190.
The ignition is activated automatically for a cer-
tain time and is stopped as soon as the engine
Switching off the engine
starts.
Manual transmission
1. With the vehicle at a standstill, press the
Engine stop
Start/Stop button.
General information
2. Shift into first gear or reverse.
3. Set the parking brake firmly.
WARNING
4. Remove the remote control from the igni-
Unattended children or animals can move
tion lock.
the vehicle and endanger themselves and traf-
fic, e.g. with the following actions:
Steptronic transmission
Pressing the Start/Stop button.
1. Engage transmission position P with the ve-
Releasing the parking brake.
hicle stopped.
Opening and closing of doors or windows.
2. Press the Start/Stop button.
Shifting the selector lever into neutral.
3. Set the parking brake firmly.
Using vehicle equipment.
4. Remove the remote control from the igni-
There is risk of accidents or injuries. Do not
tion lock.
leave children or animals unattended in the ve-
hicle. Carry remote control along when exiting
and lock the vehicle.
Parking brake
WARNING
The concept
An unsecured vehicle can put itself into
The parking brake is primarily intended to pre-
motion and roll away. There is risk of an acci-
vent the vehicle from rolling while parked; it
dent. Before exiting, secure the vehicle against
brakes the rear wheels.
rolling.
Also follow the instructions under Switching off
In order to ensure that the vehicle is secured
the engine, refer to page 52.
against rolling away, observe the following:
Set the parking brake.
Setting
On uphill grades or on a slope, turn the
The lever engages automatically.
front wheels in the direction of the curb.
52

-------------------------------------------------------------------------------------------------------------------------------------------------------------

Driving
CONTROLS
Releasing
Unusually rapid flashing of the indicator lamp
indicates that a turn signal bulb has failed.
Signaling a turn briefly
Press the lever to the resistance point and hold
it there for as long as you want the turn signal
to flash.
Triple turn signal activation
Press the lever to the resistance point.
Pull up slightly, press the button, and lower the
The turn signal flashes three times.
lever.
This function can be activated or deactivated:
1. Switch on the ignition, refer to page 50.
Information
2. Press the button on the turn indicator lever
If for once use during driving is required, en-
repeatedly until "SET/INFO" is displayed.
gage the parking brake slightly and hold the
button down.
The brake lights do not light up when the park-
ing brake is pulled.
Turn signal, high-beams,
headlight flasher
3. Press and hold the button until the display
changes.
4. Press the button repeatedly until the sym-
bol and "SET" are displayed.
1
Turn signal
2
Switching on the high-beams
3
Switching off the high-beams/headlight
flasher
5. Press and hold the button until the display
Turn signal
changes.
Press the lever beyond the resistance point.
To switch off manually, press the lever to the
resistance point.
53

-------------------------------------------------------------------------------------------------------------------------------------------------------------

CONTROLS
Driving
6. Press the button repeatedly until the sym-
Overview
bol shown is displayed, arrow.
1
Switching on wipers
7. Press and hold the button until the display
2
Switching off wipers or brief wipe
changes.
3
Activating/deactivating intermittent wipe or
8. Press the button to select:
the rain sensor
4
Cleaning the windshield and headlights
Turn signal flashes once.
Switching on wipers
Triple turn signal.
Press the wiper lever upward, arrow 1.
9. Press and hold the button until the display
The lever automatically returns to its initial po-
changes.
sition when released.
Settings are stored for the remote control cur-
rently in use.
Normal wiper speed
Press up once.
The system switches to operation in the inter-
Washer/wiper system
mittent mode when the vehicle is stationary.
Information
Fast wiper speed
Do not use the wipers if the windshield is dry,
Press up twice or press once beyond the resist-
as this may damage the wiper blades or cause
ance point.
them to become worn more quickly.
The system switches to normal speed when the
CAUTION
vehicle is stationary.
If the wipers are frozen to the windshield,
Switching off wipers or brief wipe
the wiper blades can be torn off and the wiper
motor overheat on switching on. There is risk of
Press the wiper lever down, arrow 2.
property damage. Defrost the windshield prior
The lever automatically returns to its initial po-
to switching the wipers on.
sition when released.
Brief wipe: press down once.
To switch off normal wipe: press down
once.
To switch off fast wipe: press down twice.
54

-------------------------------------------------------------------------------------------------------------------------------------------------------------

Driving
CONTROLS
Intermittent wipe or rain sensor
4.
Press the button repeatedly until the sym-
bol and "SET" are displayed.
If the car is not equipped with a rain sensor, the
intermittent-wipe time is a preset.
If the car is equipped with a rain sensor, the
time between wipes is controlled automatically
and depends on the intensity of the rainfall.
The rain sensor is mounted on the windshield,
directly in front of the interior rearview mirror.
CAUTION
If the rain sensor is activated, the wipers
can accidentally start moving in car washes.
5.
Press and hold the button until the display
There is risk of property damage. Deactivate
changes.
the rain sensor in car washes.
Activating intermittent wipe or rain
sensor
Press the button, arrow 3.
The symbol is shown in the tachometer.
Setting the sensitivity of the rain sensor
6. Press the button to select the desired sensi-
1. Switch on the ignition, refer to page 50.
tivity.
2. Press the button on the turn indicator lever
7. Wait or hold the button until the display
repeatedly until "SET/INFO" is displayed.
changes.
The settings were stored.
Deactivating intermittent wipe or rain
sensor
Press the button again, arrow 3.
Cleaning the windshield and headlights
Pull the lever, arrow 4.
The system sprays washer fluid on the wind-
3. Press and hold the button until the display
shield and activates the wipers briefly.
changes.
When the vehicle lighting system is switched
on, the headlights are cleaned at regular and
appropriate intervals.
55

-------------------------------------------------------------------------------------------------------------------------------------------------------------

CONTROLS
Driving
WARNING
Turn the cap further to level 2 and hold.
The washer fluid can freeze onto the win-
3
Cleaning the rear window in the resting po-
dow at low temperatures and obstruct the
sition
view. There is risk of an accident. Only use the
Turn the cap to level 3 and hold.
washer systems, if the washer fluid cannot
freeze. Use antifreeze if needed.
The rear window wiper does not move if the
cap is in position 1 before the ignition is
CAUTION
switched on.
When the wiper water container is empty,
To switch on the rear window wiper:
the wash pump cannot work as intended.
There is risk of property damage. Do not use
1. Move the cap to its basic position.
the washer system when the wash water con-
2. Select the required position again.
tainer is empty.
CAUTION
CAUTION
When the wiper water container is empty,
Use of the washer system with the hood
the wash pump cannot work as intended.
open may damage the headlamp washer sys-
There is risk of property damage. Do not use
tem. There is a risk of property damage. Only
the washer system when the wash water con-
use the washer system if the hood is fully
tainer is empty.
locked.
Windshield washer nozzles
Washer fluid
The windshield washer nozzles are heated au-
tomatically while the engine is running or the
General information
ignition is switched on.
WARNING
Rear window wiper
Some antifreeze agents can contain
harmful substances and are flammable. There
is risk of fire and risk of injuries. Observe the in-
structions on the containers. Keep antifreeze
away from ignition sources. Do not refill oper-
ating materials into different bottles. Store op-
erating materials out of reach of children.
United States: The washer fluid mixture ratio is
regulated by the U.S. EPA and many individual
states; do not exceed the allowable washer
fluid dilution ratio limits that apply. Follow the
0
Resting position
usage instructions on the washer fluid con-
1
Switching on intermittent wipe
tainer.
Turn the cap to level 1.
Use of BMW’s Windshield Washer Concentrate
When reverse gear is engaged, the system
or the equivalent is recommended.
switches to continuous operation.
2
Cleaning the rear window with intermittent
wipe
56

-------------------------------------------------------------------------------------------------------------------------------------------------------------

Driving
CONTROLS
WARNING
Manual transmission
Washer fluid may catch fire if it comes
into contact with hot engine parts. There is risk
of injuries or risk of property damage. Only refill
washer fluid after the engine has cooled down.
Then fully close the cap of the washer fluid res-
ervoir.
Washer fluid reservoir
CAUTION
When shifting to a lower gear, excessive
speeds can damage the engine. There is risk of
property damage. When shifting into 5th or 6th
gear, press the gearshift lever to the right.
Reverse gear
All washer nozzles are supplied from one reser-
Select only when the vehicle is stationary. When
voir.
the gearshift lever is pressed to the left, a slight
resistance needs to be overcome.
The recommended minimum filling quantity is
0.2 US gal/1 liter.
Fill with a mixture of window washing concen-
Steptronic transmission
trate and water; if needed, add antifreeze ac-
In addition to the fully automatic mode, gears
cording to the manufacturer instructions.
can also be shifted manually, refer to
Mix the washer fluid before adding to maintain
page 58, using Steptronic.
the correct mixing ratio.
Do not fill in undiluted window washing con-
Parking the vehicle
centrate and do not fill in pure water; this could
Before exiting the vehicle, make sure that se-
damage the washer system.
lector lever position P is set. Otherwise, the ve-
Do not mix window washing concentrate from
hicle may begin to roll.
different manufacturers; this could cause the
washer nozzles to clog.
Disengaging the remote control
To remove the remote control from the ignition
lock, first move the selector lever to position P
and switch off the engine: interlock. Remove
the remote control from the ignition lock, refer
to page 50.
Selector lever positions
P R N D M/S + -
57

-------------------------------------------------------------------------------------------------------------------------------------------------------------

CONTROLS
Driving
Displays in the tachometer
R is Reverse
Select only when the vehicle is stationary.
N is Neutral
For example, engage this position in a car
wash. The vehicle can roll.
D Drive
Position for normal vehicle operation. All for-
ward gears are selected automatically.
The selector lever position is displayed and the
Under normal operating conditions, fuel con-
engaged gear, such as M4, is displayed in
sumption is lowest when you are driving in po-
manual mode.
sition D.
Changing selector lever positions
Kickdown
To prevent the vehicle from creeping after
Kickdown is used to achieve maximum driving
you select a gear, maintain pressure on the
performance. Press on the accelerator beyond
brake pedal until you are ready to start.
the resistance point at the full throttle position.
With the ignition switched on or the engine
Sport program and manual mode M/S
running, the selector lever can be moved
out of position P.
Activating the Sport program
When the vehicle is stationary, step on the
brake before shifting out of P or N; other-
wise, the selector lever is locked: shiftlock.
Move the selector lever from position D toward
the left into the M/S shifting slot.
A lock prevents accidental shifting into selector
The Sport program is activated and DS is dis-
lever positions R and P.
played. This position is recommended for a per-
formance-oriented driving style.
To override the lock, press the button on the
front of the selector lever, see arrow.
To deactivate the Sport program or manual
mode M/S, move the selector lever to the right
into position D.
P Park
Select only when the vehicle is stationary. The
Activating the M/S manual mode
front wheels are blocked.
Move the selector lever from position D toward
the left into the M/S shifting slot.
58

-------------------------------------------------------------------------------------------------------------------------------------------------------------

Driving
CONTROLS
Push the selector lever forward or backward.
The transmission shifts down.
Manual mode becomes active and the gear is
The vehicle only shifts up or down at suitable
changed.
engine and road speeds, e.g., it does not shift
The tachometer displays the engaged gear,
down if the engine speed is too high. The se-
e. g. M1.
lected gear is briefly displayed in the instru-
To shift up: press the selector lever back-
ment panel, followed by the current gear.
ward.
Manually unlocking the selector lever
To shift down: press the selector lever for-
lock
ward.
If the selector lever is locked in position P al-
The vehicle only shifts up or down at suitable
though the ignition is switched on, the brake is
engine and road speeds, e.g., it does not shift
depressed, and the button on the selector lever
down if the engine speed is too high. The se-
is pressed, the selector lever lock can be over-
lected gear is briefly displayed in the instru-
ridden:
ment panel, followed by the current gear.
1.
Switch off the ignition.
Shifting gears using the shift paddles
2.
Unclip the sleeve of the selector lever.
on the steering wheel
3.
Pull the sleeve up over the selector lever
The shift paddles on the steering wheel allow
until the sleeve is inside out.
you to shift gears quickly while keeping both
Pull off the plug-in cable connector if nec-
hands on the steering wheel.
essary.
When the shift paddles on the steering
wheel are used to shift gears while in auto-
matic mode, the transmission switches to
manual mode.
If the shift paddles are not used to acceler-
ate or shift gears for a certain amount of
time, the transmission switches back to au-
tomatic mode.
If the selector lever is in the M/S gear plane,
manual mode remains active.
4.
Insert the pulling hook 1 into the loop on
the passenger side.
The pulling hook is found in the vehicle
document portfolio or in the pouch of the
wheel change set, refer to page 181.
5.
Pull the loop upward.
6.
Move the selector lever into the desired po-
sition, pressing the button on the front of
the selector lever.
Pull one of the two shift paddles:
The transmission shifts up.
Press one of the two shift paddles:
59

-------------------------------------------------------------------------------------------------------------------------------------------------------------

CONTROLS
Driving
WARNING
If the transmission lock is released man-
ually, the vehicle may begin to roll. There is risk
of an accident. Before manually unlocking the
transmission lock, set the parking brake to pre-
vent the vehicle from rolling away.
60

-------------------------------------------------------------------------------------------------------------------------------------------------------------

Displays
CONTROLS
Displays
Trip odometer
Vehicle features and op-
tions
Displaying the trip odometer
This chapter describes all standard, country-
Press button 3 briefly.
specific and optional features offered with the
series. It also describes features that are not
Resetting the trip odometer
necessarily available in your car, e. g., due to
1. Press button 3 briefly.
the selected options or country versions. This
The trip odometer is displayed.
also applies to safety-related functions and sys-
2. Press button 3 again.
tems.
The trip odometer is reset.
When using the features and systems described
here, adhere to local regulations.
Time
Set the time, refer to page 65.
Odometer, external tem-
External temperature, external
perature display, clock
temperature warning
If the display drops to +37 ℉/+3 ℃, a signal
Overview
sounds and a warning light lights up. There is
the increased danger of ice.
WARNING
Even at temperatures above +37 ℉/+3 ℃
there can be a danger of icy roads, e.g. on
bridges or shady sections of road. There is risk
of an accident. Adjust your driving style to the
weather conditions at low temperatures
1
Current speed
Units of measure
To set the respective units of measure, miles or
2
Odometer, trip odometer, external temper-
km for the odometer and ℃ or ℉ for the exter-
ature, time
nal temperature, refer to page 64.
3
Resetting the trip odometer
Press the button on the turn indicator lever to
open information in display area 2.
The following information is displayed consecu-
tively:
Trip odometer
Time
External temperature
61

-------------------------------------------------------------------------------------------------------------------------------------------------------------

CONTROLS
Displays
The remaining LEDs change from orange to
Tachometer
red, arrow.
The remaining range is shown on the tach-
ometer.
When a dynamic driving style is used, such
as when corners are taken rapidly, engine
functions are not ensured.
A warning light lights up below a range of ap-
prox. 30 miles/50 km.
CAUTION
It is imperative that you avoid engine speeds in
With a range of less than 30 miles/50 km
the red warning field. In this range, the fuel
it is possible that the engine will no longer have
supply is interrupted to protect the engine.
sufficient fuel. Engine functions are no longer
ensured. There is risk of property damage. Re-
fuel promptly.
Coolant temperature
A warning light will come on if the coolant, and
Computer
therefore the engine, becomes too hot.
Check the coolant level, refer to page 170.
Opening information in the tachometer
Fuel gauge
Press the button on the turn indicator lever.
Overview of the information
The arrow next to the fuel pump symbol on the
The following information is displayed consecu-
fuel gauge indicates the side of the vehicle with
tively by repeatedly pressing the button on the
the fuel filler flap.
turn indicator lever:
The vehicle inclination may cause the display to
Range.
vary.
Average fuel consumption.
Notes on refueling, refer to page 150.
Current fuel consumption.
Filling capacities, refer to page 211.
Average speed.
Range
To set the corresponding units of measure, re-
fer to page 64.
After the reserve range is reached:
62

-------------------------------------------------------------------------------------------------------------------------------------------------------------

Displays
CONTROLS
Information in detail
Range
Displays the estimated cruising range available
with the remaining fuel.
It is calculated based on your driving style over
the last 18 miles/30 km.
Average fuel consumption
1
Button for:
This is calculated for the period during which
Selecting the display.
the engine is running.
Setting values.
To reset the average consumption: press the
button on the turn indicator lever for ap-
Confirming the selected display or set
prox. 2 seconds.
values.
Calling up computer information
62.
Current fuel consumption
Displays the current fuel consumption. You can
Symbol
Function
check whether you are currently driving in an
Set the rain sensor, refer to
efficient and environmentally-friendly manner.
page 55.
Average speed
Periods in which the vehicle was parked and
the engine was switched off manually are not
Open Check-Control, refer to
included in the average speed calculations.
page 67.
To reset the average speed: press the button
on the turn indicator lever for approx. 2 sec-
onds.
View service requirement dis-
Radio MINI Boost CD: displays on the
play, refer to page 66.
radio
Some computer functions can also be shown
on the radio display, refer to page 127.
Initialize Flat Tire Monitor, refer
to page 78.
Settings and information
Resetting the Tire Pressure
Monitor, refer to page 80.
Operating concept
Some settings and information can only be cre-
Set the formats and units of
ated or opened while the ignition is switched
measure, reset to the factory
on, the vehicle is standing, and the doors are
settings, refer to page 64.
closed.
63

-------------------------------------------------------------------------------------------------------------------------------------------------------------

CONTROLS
Displays
Symbol
Function
2. Hold the button down.
Direct change to the next setting or piece of in-
Personal Profile settings, refer
formation.
to page 21.
Formats and units of
Exit the menu.
measure
The formats and units of measure can be set.
The settings are stored for the remote control
in use.
1. Switch on the ignition, refer to page 50.
Exiting displays
2. Press the button on the turn indicator lever
repeatedly until "SET/INFO" is displayed.
1. Press the button on the turn indicator lever
repeatedly until "HOME" is displayed.
3. Press and hold the button until the display
2. Hold the button down.
changes.
The current speed is displayed again.
4. Press the button repeatedly until the sym-
bol and "SET" are displayed.
Displays are also exited if no entries are made
within approx. 8 seconds.
Next setting or information
5. Press and hold the button until the display
changes.
6. Press the button repeatedly until the sym-
1. Within a setting or information display,
bol shown is displayed, arrow.
press the button on the turn indicator lever
Fuel consumption: l/100 km, mpg,
repeatedly until "NEXT" is displayed.
km/l
64


Content      ..     1      2      3      4      ..