Iran Khodro Dena. Service Manual - part 3


  Index      Manuals     Iran Khodro Dena. Service Manual


Search            copyright infringement  


Content      ..     1      2      3      4      ..


Iran Khodro Dena. Service Manual - part 3


-------------------------------------------------------------------------------------------------------------------------------------------------------------
37

2

*If equipped

CHILDREN SAFETY

WARNING

- Never place an object on floor of the 

vehicle, because when the vehicle 

brakes, there is a risk of placing the 

object beneath the pedals which may 

cause severe dangers.

- Never let the children to seat on your 

foot because there is a risk of severe 

dangers. Never fasten a seat belt for 

more than one passenger.

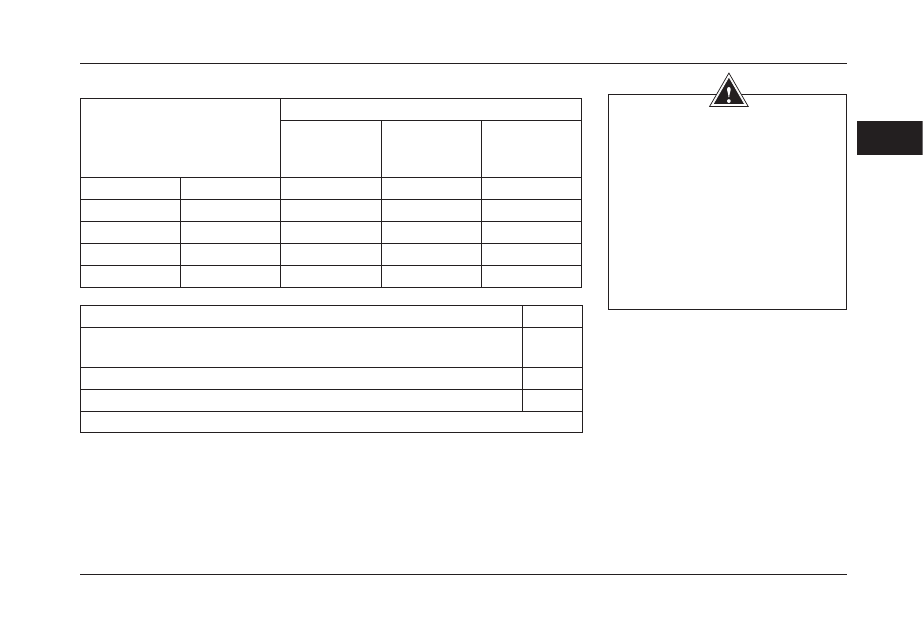
The appropriate place of fastening baby seats equipped with seat belt hooks.

Weight groups

Seat Position

Bach central 

seat

Back side 

seat

Front 

passenger 

seat

Group O

Up to 10 Kg

X

U

X

Group O+

Up to 13 Kg

X

U

X

Group I

9 to 18 Kg

UF

UF

X

Group II

15 to 25 Kg

UF

UF

X

Group III

22 to 36 Kg

UF

UF

X

Suitable for UNIVERSAL baby seat, approved for this weight group

U

Suitable for UNIVERSAL baby seat, with front-design approved for this 

weight group

UF

Suitable for special baby seats

L

Not suitable for this weight group

X

UNIVERSAL baby seat is suitable to be installed in all vehicles

-------------------------------------------------------------------------------------------------------------------------------------------------------------

-------------------------------------------------------------------------------------------------------------------------------------------------------------

38

2

Position of ISOFIX

Type of fixture Dimension class Weight group

Back central seat Back side seat

Front passenger’s seat

N

X

N

ISO/L1

F

Child carrier

N

X

N

ISO/L2

G

N

X

N

ISO/R1

E

O to 10 Kg

N

X

N

ISO/R1

E

O+ to 13 Kg

N

X

N

ISO/R2

D

N

X

N

ISO/R3

C

N

X

N

ISO/R2

D

Group I

9 to 18 Kg

N

X

N

ISO/R3

C

N

IUF

N

ISO/R2

B

N

IUF

N

ISO/F2X

B1

N

IUF

N

ISO/F3

A

Suitable for UNIVERSAL baby seat, with front-design approved for this weight group

IUF

Suitable for special baby seats equipped with ISOFIX

L

Not suitable for this weight group with this ISOFIX position 

X

ISOFIX fixture is not available for this position

N

For more information on dimension class and type of fixtures, refer to baby seat user’s manual

Appropriate place of baby seat installation with ISOFIX connectors

Explanation :

CHILDREN SAFETY

-------------------------------------------------------------------------------------------------------------------------------------------------------------

-------------------------------------------------------------------------------------------------------------------------------------------------------------

39

2

WARNING

- Make sure the appropriate fixture of above hooks to the belt of baby seat located on back niche . Refer to installation manual. Or, 

appropriate safety may not be provided in case of any accident.

- ISOFIX fixtures shall be used only when the baby seat is installed on back seat side area, not when it is installed on central back 

seat. If the baby seat is installed on back central seat, just fastening passenger’s seat belt is enough for safety.

- Pay attention to different types of fastening upper hook based on different positions of the headrest.

- Baby seats endure for the forces inflicted by the children and for the determined amount of forces, not for adults. Actually adults 

who fix their seat belt to the baby board will cause severe risks and dangers in the accidents because of baby seat overload.

- Never make use of audio systems which cause releasing the upper hooks of the baby seat.

- Accidents may cause damages to the vehicle ISOFIX system, damaged ISOFIX systems will not procure enough safety and will 

cause severe dangers at the times of accidents. So, ensure the appropriate operation of ISOFIX system as soon as possible, and 

make sure that the system is operating mechanically true and plan for periodical checkups for this system.

CHILDREN SAFETY

-------------------------------------------------------------------------------------------------------------------------------------------------------------

-------------------------------------------------------------------------------------------------------------------------------------------------------------

40

2

The baby board up to 9 months-old, (up 

to 10 Kgr), shall be installed in back side 

from three connection points to the seat 

belt (belt with locker roll).

People under 7 or 8 years because of 

difference of the head weight as compared 

with, body are considered child. In sudden 

decrease of speed head weight can cause 

a serious injuries to the  spinal column due  

to the weakness of children neck muscles. 

Children can bring serious damage to the 

Only when passengers are 13 years old or 

their height is 137 cm can be considered 

teenager.

That is why in most countries certain laws 

have been predicted for traveling and for 

the use of safety devices for children.

Caution

For safety considerations, the child 

less than 13 years-old shall seat on 

back seats.

Never let the children less than 13 

years-old to seat on front seat.

Never fix baby seat, installed on front 

side, on the front seats.

WARNINGS

Never put an object on floor of vehicle, 

especially on driver’s side, because 

there may move beneath the pedals 

on brake times and cease pedals 

operations which may cause severe 

dangers.

CHILDREN SAFETY

The baby board for 9-months to 3-years, 

(up to 18 Kgr) shall be installed on front 

side, at back seat, with 2 or 3 connection 

points to the seat belt (simple belt or belt 

with locker roll).

-------------------------------------------------------------------------------------------------------------------------------------------------------------

-------------------------------------------------------------------------------------------------------------------------------------------------------------

41

2

WARNINGS

Never let and put Infants and children 

in front seats on your foot, because 

there is a high risk of severe dangers. 

Never fasten a seat belt for more than 

one person simultaneously.

*If equipped

Children more than 3 years old with over 

15 Kg weights can seat in back seat with 

special care in front side in a way that the 

belt is fasten in two or three points to the 

protector. (This method is also useful for 

children between 3 to 6 years old)

CHILDREN SAFETY

Children with large body older than 3 can 

seat with an additional mat (seat booster) in 

back seat in front side in a way that the belt 

is fasten in 2 or 3 points to the additional 

mat. This method is useful specially or 

children between 3 to 6 years old.

-------------------------------------------------------------------------------------------------------------------------------------------------------------

-------------------------------------------------------------------------------------------------------------------------------------------------------------

42

2

SAFETY BELT

Safety points for seat belts

The seat belts designed on your vehicle is only for mature persons and each for just one person. Always make sure than all passengers 

have seat belts and pay attention to the following cautions. 

- Never let all passengers to bend their seats more than standards level. The seat belts have their best functionality only when the 

backward or forward angle of passengers with the vertebral line is ±25 degrees.

- Fix the seat belts in a way that they have no free spaces. Never move the belt far from your body when the vehicle is moving. The 

seat belts shall always have close contact with the body. 

- The lower belt shall not pass the stomach, but it shall pass the pelvic region. The diagonal belt shall pass the shoulder and chest 

without any force to the neck.

- Get rid of sharp objects like blades, pen, pencil, etc. from your clothes before moving. Pay attention that the seat belts never rotate 

wrongly which may cause its lack of operation. 

- You shall replace the seat belts which are damaged or erode. 

- You can make use of back seat belts to make the back objects fixed, so in accidents they will not be thrown towards you. 

- In most of the countries, fastening seat belts is a mandatory, except for a few persons with medical limitations. 

- The pregnant ladies shall pass the seat belts from their shoulder, between breasts and one side of their stomach, please refer your 

physician in this regard. 

- The seats belts are equipped with pretension systems to pull back the belts and location appropriate position. 

- The seat belts are equipped with force limiter system in order to control the inflicted force to the chest of passengers at accidents. 

-------------------------------------------------------------------------------------------------------------------------------------------------------------

-------------------------------------------------------------------------------------------------------------------------------------------------------------

43

2

Caution 

In order to ensure the appropriate 

functioning of seat belts, always 

make sure that the belts are passing 

your shoulder and make sure on 

appropriate angle of seats and its 

back.

Caution 

- Never let adhesive materials to 

penetrate on seat belt locker hole 

because it may loss it’s functioning. 

- Always keep the front seat belts as 

closed so as to help the air bags 

function at their best.

- Never let infants and/or children 

to seat down on your foots in 

front seats, because it may cause 

severe risks of damages. Never 

fasten a seat belt for more than 

one person.

SAFETY BELT

Caution 

The seat belts have their appropriate 

functionality only when the seats 

are vertical. Never let the front 

passengers to bend their seats more 

than standard angle. Doing so will 

cause to the warning light of belts to 

be turned on.

Fastening seat belts

Pass the seat belts slowly from the 

shoulder and chest and make sure that 

they are not rotated. Then fasten its metal 

hook to the special hole and hear the click 

sound to ensure its locking.

Adjusting the height of front seat belts

To adjust its height, pull out the height 

adjusting key or move it upward or 

downward. From safety points of view, it's 

always better to put the children on back 

seats.

-------------------------------------------------------------------------------------------------------------------------------------------------------------

-------------------------------------------------------------------------------------------------------------------------------------------------------------

44

2

PRETENSION SEAT BELT

WARNING

Service and maintenance of seat 

belts pretension system and the 

related wiring system shall be only 

done by the experts of Iran Khodro 

Co.


Careless  modifications  or 

repair may cause  

t h e i r 

malfunctioning which may cause 

severe  

dangers.

The seat belts have their appropriate 

functionality only when they are tightly 

fastened on body. The pretension 

system of seat belts will operate 

simultaneously with the air bags in 

proportionate to the level and type of 

accidents.

In case of malfunctioning in one of 

the abovementioned items or error 

in the system, the warning light of air 

bags will turn on which you can see in 

vehicle's digital display.

Force pretension and limiter

On crashes from the front side, the safety 

of front seats were improved brilliantly 

because of existing pretension and force 

limiter systems in the seat belts. The 

pretension system will operate more 

severely in proportion of level of accidents 

and pull it more strongly to the side of seat 

and driver.

1. The initial traction system will be 

activated with the switch ON.

2. Seat belt's force limiters:

This mechanism will reduce the force 

inflicted  on  the  passenger's  seat  at 

crashes and accidents.

Pretension seat belt

The seat belts with the mechanism of 

air bags will be only activating on severe 

accidents from front side. Actually, they 

are not designed for crashes from back, 

side, overturning or light accidents, so that 

they will not be activated in such cases.

The pretension system of seat belts will 

operate just once, in case it operates, you 

shall refer authorized Iran Khodro Office 

to replace them.

-------------------------------------------------------------------------------------------------------------------------------------------------------------

-------------------------------------------------------------------------------------------------------------------------------------------------------------

45

2

FIRE EXTINGUISHER

Standard fire extinguishers

Dear uses shall study its user's manual 

before using.

Product characteristics 

1. This type of capsule is filled with dry 

chemical powder with 16 gr of Co2 under 

pressure. 

After pulling the clamp, the gas will be 

mixed up with the dry chemical power 

and will cause releasing of chemical 

materials. 

2. The maintenance degree centigrade 

in Iran is between -30 to 90 degrees 

centigrade.

3. Having special cartridge, this capsule 

will not need periodical monitoring up to 5 

years. The capsule will be easily charges 

in case of its termination. 

4. Never hunk of powder in case of 

vibrations arising from severe crashes 

and enduring temperature are deemed 

as some of its characteristics. 

Application 

The activation method is written in 

Persian on the body of extinguisher 

which shall be studies exactly. 

- Pull the clamp

- Pull the upper door's clamp upwards.

- Hold the sprayer in central direction of 

the fire and push the handle down to 

release chemical materials.

Notice

In case of firing in engine compartment, 

never open the compartment completely 

so as to avoid reaching air there. After 

pulling the extinguisher's clamp, open 

up the engine compartment for 10 to 15 

cm, and release the chemical materials 

slowly there for 1 to 2 minutes, then open 

it up completely and continue releasing. 

Pay attention that the capacity of this 

capsule is one Kgr and its release time is 

7 to 10 seconds. Hence, take care not to 

waste the material.

CAUTION

The basic condition of using the fire extinguishers is skill and patience. The company 

will not borne any responsibility in respect of negligent using of the fire extinguishers

-------------------------------------------------------------------------------------------------------------------------------------------------------------

-------------------------------------------------------------------------------------------------------------------------------------------------------------

46

2

FIRE EXTINGUISHER

Necessary tips 

1. Never open the drainage valve of the 

fire  extinguisher  heedlessly,  because 

this will cause malfunctions at necessary 

emergency times.

2.  At  firing  or  emergency  situations,  in 

case of locking doors or windows, you 

can make use of capsule to crash the 

windows, then get out of the vehicle to 

eliminate the fire.

3. Although the capsule materials are not 

toxic, but never contact them with your 

eyes and face.

4. Make sure that the capsule is located 

in appropriate place in the vehicle and its 

plastic hook is locked appropriately.

WARNING

Skill and patience at the time of using fire extinguishers are deemed as integral conditions 

and the automotive company will not bear any responsibility in case of careless using of 

fire extinguishers.

This is to be mentioned that in other case, 

there will be a risk of releasing capsule 

at accidents which may cause severe 

dangers. 

5. Keep patience at firing and do the fire 

fighting steps carefully. 

6. It is worth mentioning that the present 

fire extinguisher is designed to eliminate 

fire at its initial steps, in case of blazing 

and big fires, instantly call the emergency 

forces to take action for eliminating fire.

-------------------------------------------------------------------------------------------------------------------------------------------------------------

-------------------------------------------------------------------------------------------------------------------------------------------------------------

47

2

MIRRORS

Adjusting electric mirrors

1. After opening the ignition switch, select 

the mirror to be adjusted in left or right 

direction by turning the key.

2. Moving the adjustment key in four 

directions will adjust the electric mirrors 

accordingly in those four sides.

CAUTION

The objects image in the mirror seems 

far than their real distance.

Front mirror

After adjusting the seat and steering 

wheel, you can adjust the front mirror 

for night mode to get rid of headlights of 

vehicles on opposite direction by pressing 

the night mode key of the mirror, or vice 

versa. 

Note:

Adjusting the front mirror in night mode 

will decrease the vision of rear vehicles, 

and sometimes the lack of enough vision 

may being some dangers because lack 

of appropriate diagnosis of rear vehicles 

position.

-------------------------------------------------------------------------------------------------------------------------------------------------------------

-------------------------------------------------------------------------------------------------------------------------------------------------------------

48

2

Pressing the “unlock” button on remote 

control for one time will unlock all doors, and 

the next pressing will unlock the mirrors.

MIRRORS

Make-up mirror

Pull down the sun visor to make use of 

the make-up mirror.

WARNING 

Never bend the electric mirror by 

hand in order to prevent damages to 

its electrical motor.

WARNING 

please don't adjust the mirrors while 

you're driving .it's very dangerous.

1

Folding electric mirror

Most of drivers are informed of advantages 

of folding electric mirrors especially when 

the vehicle is parked in busy places. Some 

of its advantages are more safety for mirrors 

especially when it is parked in small spaces. 

To fold the mirrors, it is enough to rotate the 

key 1 to 180 degree and push it down.

To unfold the mirrors, you shall push it up. 

This is to be mentioned that the electric 

mirrors will fold automatically by powering 

the engine off and closing the vehicle doors, 

then will be opened by opening doors with 

the remote control.

Pressing the “lock” button on remote control 

for one time will lock all doors, and the next 

pressing will fold the mirrors. (in a time less 

than 10 seconds)

Note

In some models the mirrors are 

opened or closed alternatively by 90 

degree rotating of key no 1 clockwise 

or anti-clockwise.

-------------------------------------------------------------------------------------------------------------------------------------------------------------

-------------------------------------------------------------------------------------------------------------------------------------------------------------

49

2

NOTICE 

Never leave your vehicle when a child (or a pet), or key card is remained in the 

vehicle. Actually,. The children or pet are able to activate the electric windows and 

cause damages to their body which may result is severe injuries. In this case, 

immediately open the windows to eliminate the issue.

WARNING 

Remaining some parts of body 

including hands, head, and fingers on 

the way of electric mirrors may cause 

severe injuries. 

Closing the windows inappropriately 

may cause severe injuries and/or 

damages.

GLASS LIFTER

Side Glasses

Adjustment keys in drover’s side:

1. Front glass on left side

2. Front glass on right side

3. Back glass on left side

4. Back glass on right side

The Driver is able to lock all back glasses.

Locking key of back windows

5. When the driver presses this key, all 

back windows keys will be inactivated. This 

mechanism is also designed to protect 

children against risks.

Windows key

Each passenger is able to regulate and 

adjust his/her own side windows by the 

related designed keys.

Back windows keys will not function if the 

driver pressed the back windows lock key.

-------------------------------------------------------------------------------------------------------------------------------------------------------------

-------------------------------------------------------------------------------------------------------------------------------------------------------------

50

2

*If installed on your vehicle

GLASS LIFTER

Smart windows lifters *

The modern smart windows lifters 

designed on your vehicle includes 

an electrical circuit with the following 

functions:

1. Safety anti-pinch system;

2. Automatic windows closing after 

leaving the vehicle;

3. Lift up / down command of four doors 

windows; and

4. Slow opening windows at the end of 

route.

Caution 

The Anti-pinch system designed 

in this vehicle prevents damages 

against severe obstacles, so careful 

action in this regard is always 

advised.

WARNING 

Make sure the automatic closing 

of all windows before completely 

leaving the vehicle at park.

Anti-Pinch safety system *

This is a safety system to prevent locating 

parts of your body or objects between 

the windows when the windows is lifting 

up. Having been equipped with this 

mechanism, the windows will come back 

down if they impact with any object and 

result in more safety in this regard.

Furthermore, this mechanism causes 

useful time prolongation of vehicle’s 

windows.

Automatic lifting up of windows*

This mechanism helps the driver to 

checkup the windows one by one when 

he or she left the vehicle, and lift them up 

if they are not.

Pressing key 1 on remote control for 

one time will lock all doors, and the next 

pressing of the same key will lift up the 

windows.

This safety system will eliminate the risks of 

careless leaving of vehicles and will cause the 

driver to be relaxed if he or she is not sure of 
closing the windows.


Lift up/down command of four 

windows* 

This mechanism enables the person to lift up or 

open the windows of four doors simultaneously 

in both automatic and manual methods. 

In ordinary designs, just drivers windows have 
this capability.


Manual mode

Press the windows key up and release it, the 
windows will stop when you released the key.

Automatic mode

Shortly press the key and enjoy its automatic 

move.

This mechanism enables the person to lift up or 

open the windows of four doors simultaneously 

in both automatic and manual methods.

Shortly pressing will do it automatically and 

holding the key will do it manually for both up 

and down directions.

Pressing and holding key will stop the 

movement at the moment you released the 

key for both up and down directions. Shortly 

pressing of the key will make it automatically 

up to its complete movement.

-------------------------------------------------------------------------------------------------------------------------------------------------------------

-------------------------------------------------------------------------------------------------------------------------------------------------------------

51

2

*If installed on your vehicle

GLASS LIFTER

Slow stop of windows at the end of 

route *

In this mechanism, the windows speed at 

the end of rout will become slow and slow 

and will stop without inflicting any damage 

to the doors.

This mechanism omits the sound of this 

task and will increase the useful life of 

internal components.

Needless to say that the anti-pinch system 

is active in both manual and automatic 

mode and the windows move will be 

cancelled if there is an object on the way, 

and the windows will move on contrary 

way.

Reminder

The Anti-Pinch system is not 

activated at the time of setting up the 

system. 

Reminder

The smart windows lifter is equipped with 

a sensor which registers the position of 

windows in each moment, and this is to 

diagnose the start and end range of the 

windows movement. The initial settings 

are set in the automotive plant. For any 

reason including dismantling the battery 

or if in case of cutting off the initial power 

of windows lifter, the initial settings will 

be deleted and new capacities of smart 

windows lifters will be omitted.

You shall do the initial settings once 

against after connecting the battery 

resource. Follow the easy three steps 

below to do this:

1. Move the windows completely up to the 

end.

2. Move the windows completely up 

by manual mode of lifting (note that the 

automatic mode is not activated now) .

3. Press and hold the key for 1 second 

after the windows was reached to the end 

completely.

-------------------------------------------------------------------------------------------------------------------------------------------------------------

-------------------------------------------------------------------------------------------------------------------------------------------------------------

52

2

INTERNAL LAMPS

Front roof light

1. Front light of Drier

2. Front light of passenger

3. The light which will be turned on after 

opening a door. It will be turned off after 12 

seconds if the ignition switch is OFF.

One of doors is open : Light on

Light off

Light on

Back roof light

This light will be turned off by opening 

each of doors. It will be turned off after 12 

seconds if the ignition switch is OFF.

-------------------------------------------------------------------------------------------------------------------------------------------------------------


Content      ..     1      2      3      4      ..