Tractors X60 Series. Manual - part 51
 

  Index      Tractors     Tractors X60 Series - service repair manual 2012 year


Search            


Content   ..  49  50  51  52   ..


Tractors X60 Series. Manual - part 51


203

Maintenance

7

9

Change Fuel/Water Separator Filter Element - Electronic engine
X60.50

The following operations must be carried out with the engine off. Check that the gear and the parking brake are both
engaged and that the ignition key has been removed.

WARNING: Always use specific personal safety devices for each operation.
If you need to open the bonnet, follow the procedure indicated under “How to open the bonnet”.
Beware of burns caused by hot water and engine parts.

 [4.1.n]

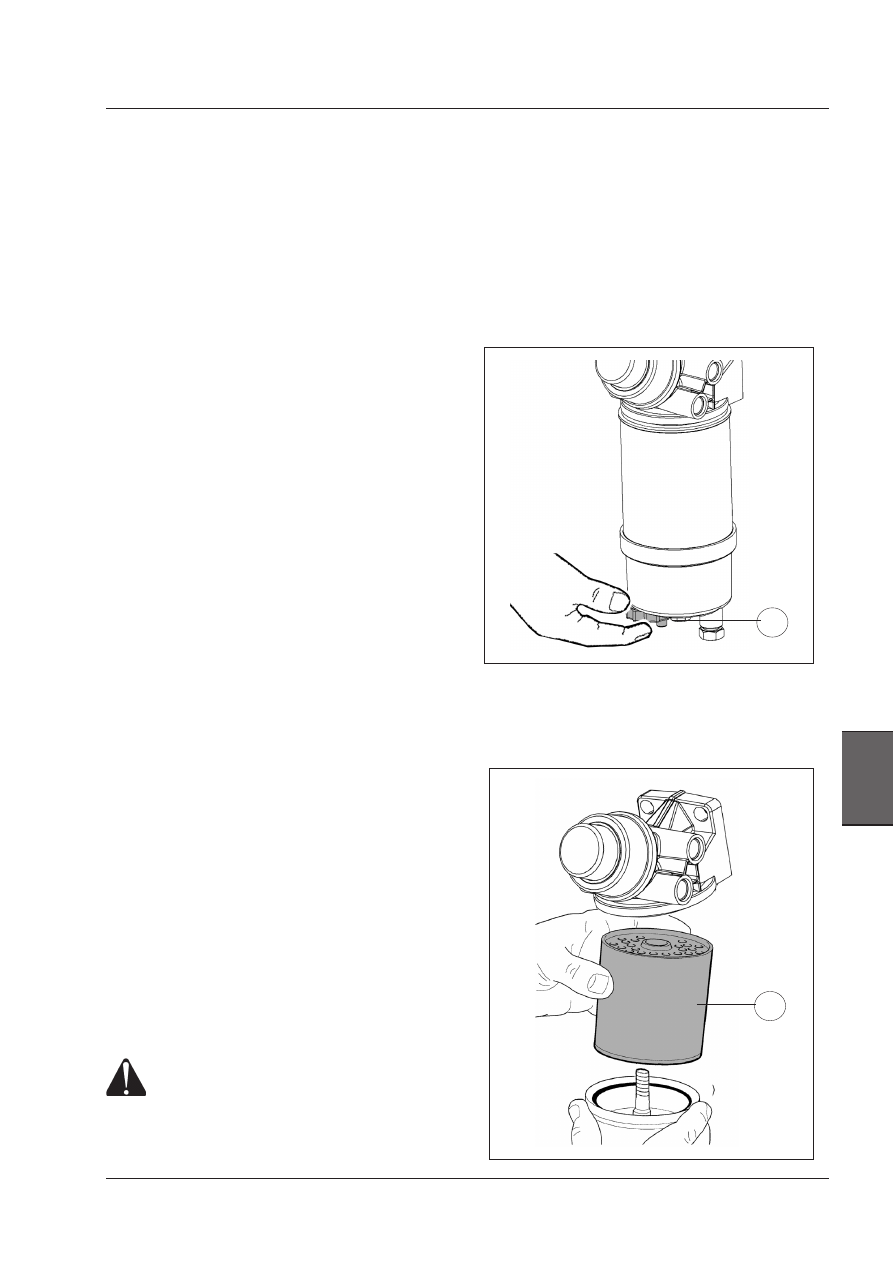
OPERATION 1
Clean the filter head, filter and engine area next to the
filter before removing the filter.

OPERATION 2
Loosen the drain plug (1) on the bottom of the filter to
drain any water into a suitable container.

OPERATION 3
Support the filter and remove the retaining screw. Lower
the bottom glass bowl and element (2). Remove the ele-
ment from the glass bowl and discard.

IMPORTANT:  Dispose  of  filter  in  accordance  with  local 
regulations.  DO  NOT  drain  fuel  onto  the  ground,  into  a 
drain or into a container that can leak. Be responsible for 
the environment.

OPERATION 4
Clean  the  inside  of  the  filter  housing  and  install  new
seals/”O” rings. Lubricate with clean fuel.

OPERATION 5
Install the filter element into the glass bowl and assemble
into the filter head.

NOTE: Make sure the element is installed in the centre 
against the seal in the filter head.

IMPORTANT: Only use as original fuel filter. These filters 
have been specifically designed to provide superior 
engine protection.

OPERATION 6
Install the retaining screw. DO NOT over tighten.

OPERATION 7
Fill the fuel tank and remove air from the fuel system. See
following pages.

IMPORTANT: DO NOT crank the engine before removing 
all the air from the fuel system or the fuel injection pump 
can be damaged.

WARNING: Engine fuel is flammable and can 
cause a fire or an explosion. DO NOT fill the 
fuel tank or service the fuel system near an 
naked flame, welding, burning cigars, ciga-
rettes etc.

 [4.1.l]

1

2

500 HOUR MAIN SERVICE

204

Maintenance

500 HOUR MAIN SERVICE

Remove Air From Fuel System - Electronic engine
X60.50

Air can enter the fuel system in the following situations:

A. If the fuel tank becomes empty or is low on fuel.

B.  After fuel system parts have been removed for service

or repairs.

C. If the tractor has been in a garage for a long period

of time.

IMPORTANT: DO NOT crank the engine before removing 
all the air from the fuel system or the fuel injection pump 
can be damaged.

Mod.X60.50

On Mod.X60.50 tractors use the following procedure to
remove air from the fuel system.

OPERATION 1

Make sure there is fuel in the tank.
Turn the key switch to ON to energize the cut off solenoid.

OPERATION 2

Operate the hand primer pump (1) until pressure is felt
against the pump.

OPERATION 3

Start the engine and check for fuel leaks around the filter,
the fuel lines and fittings.

If the engine fails to start operate the hand primer pump
again. If the engine still fails to start see your dealer.

WARNING: Never start the engine in a closed 
building. Proper ventilation is required un-
der all circumstances.

WARNING: If you need to open the bonnet, follow the 
procedure indicated under “How to open the bonnet”.
Two persons are required to carry out this operation 
safely.

Shift the gear to neutral and engage the parking brake.

WARNING: Always use specific personal safety devices 
for each operation. Beware of burns caused by hot 
water and engine parts.

 [4.1.n]

205

Maintenance

7

9

500 HOUR MAIN SERVICE

Check function of the operator 
presence switch

Check the switch for correct function every 500 hours of
operation or at least once annually. When doing the fol-
lowing checks, do so in a clear open area with no other
persons or objects near the tractor:

OPERATION 1
Engage the parking brake and a gear. Get up from the
seat: the buzzer should sound.

OPERATION 2
While sitting on the operator's seat, with the engine run-
ning at low idle speed, and the F-N-R lever in NEUTRAL,
without engaging the parking brake, engage the 1st gear
and the slow range, and release the clutch pedal. Stand up
out of the operator's seat while holding onto the steering
wheel and move the F-N-R lever from NEUTRAL to either
FORWARD or REVERSE. The buzzer sounds and the indi-
cators N (neutral) and the forward or reverse arrow blink
on the instrument cluster. The tractor MUST NOT move.
If the tractor moves, see your dealer for repair.

OPERATION 3
While sitting on the operator's seat, with the engine run-
ning at low idle speed, put the F-N-R lever in FORWARD,
the transmission in 1st gear and slow range range and
release the clutch pedal to start the tractor moving. The
tractor should start slowly. Stand up out of the operator's
seat  while  holding  onto  the  steering  wheel,  and  move
the  FNR  lever  out  of  the  FORWARD  position  into  the
REVERSE position. The buzzer sounds and the indicator
N (neutral) blinks on the instrument cluster. The tractor
MUST  stop  (default  to  Neutral).  If  the  tractor  does  not
default to Neutral, see your dealer immediately for repair.

IMPORTANT:  DO  NOT  bypass  the  operator 
presence circuit. Otherwise the situation can 
be risky both for the operator and the people 
near the tractor.
If  the  operator  presence  switch  circuit  is 
bypassed,  the  electronic  system  will  sense 
the change and transmit the error code. The 
exclamation point in the instrument cluster 
will light up. The circuit must be enabled in 
any case.

WARNING: Always use specific personal safety devices 
for each operation.

206

Maintenance

500 HOUR MAIN SERVICE

CAUTION: If you need to open the bonnet, follow the procedure indicated under “How to open the bonnet”.
WARNING: Always use specific personal safety devices for each operation. 
WARNING:  Maintenance operations must be carried out with the engine off. Check that the gear and the parking 
brake are both engaged and that the ignition key has been removed.
WARNING: Beware of burns caused by hot tractor and engine parts.

 [4.1.n]

Change front PTO oil and clean the oil filter

OPERATION 1

Put the tractor on level ground.

Remove the hose (1) and allow the oil to drain into a suit-
able container.

For best results drain the oil after operation when the oil
is warm. Once the oil has completely drained re-attach
the hose.

IMPORTANT:  Dispose  of  oil  in  accordance  with  local 
regulations. DO NOT DRAIN THE OIL ON THE GROUND 
OR INTO A DRAIN.  Be responsible for the environment.

OPERATION 2

Remove the circlip (2) and loosen the bolt (3).

OPERATION 3

Remove the pump cover (4). Remove the oil filter (5) from
the pump unit and clean the filter.

OPERATION 4

Install the clean oil filter, the pump cover (4) and tighten
the bolt (3). Install the circlip (2).

OPERATION 5

Add the recommended oil type through the fill/level plug
hole (6) until the oil is level with the bottom edge of the
hole.

Wait approximately 5 minutes. Check the oil level again
and add oil as necessary. Install the fill/level plug.


Content   ..  49  50  51  52   ..