Tractors X60 Series. Manual - part 49
 

  Index      Tractors     Tractors X60 Series - service repair manual 2012 year


Search            


Content   ..  47  48  49  50   ..


Tractors X60 Series. Manual - part 49


195

Maintenance

7

9

250 HOUR MAIN SERVICE

WARNING: To open the bonnet, follow the procedure indicated under “How to open the bonnet”.
WARNING: Always use specific personal safety devices for each operation. Beware of burns caused by hot water 
and engine parts

.

 [4.1.n]

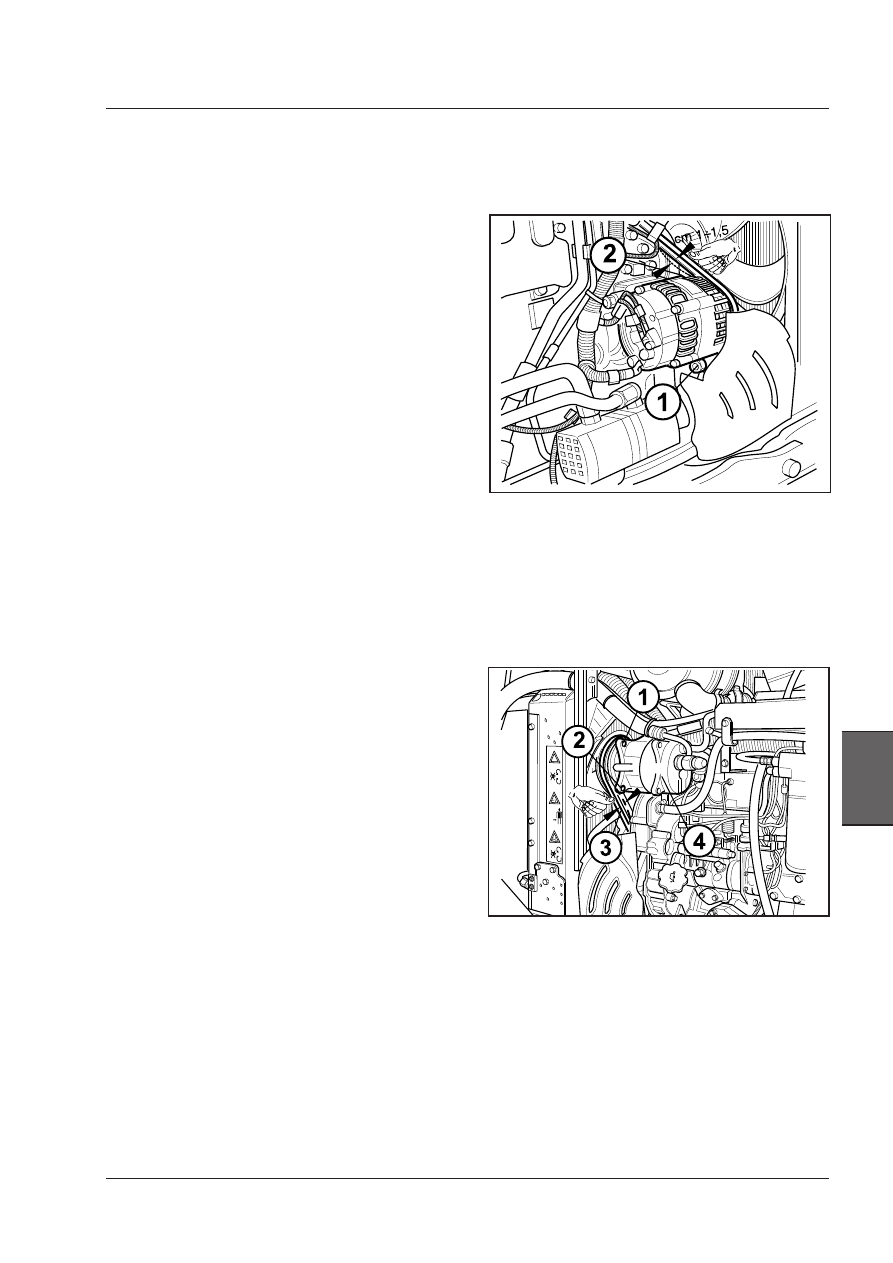
Fan and alternator belts

Periodically check the tension of the alternator and fan
belts in the middle of its long side. It should give 10 - 15
mm.

To adjust the belt tension, loosen the fixing screws and
check nut (1) on the idler and move the alternator until
the correct tension has been obtained.
Now tighten all the screws and check nuts.
Also check the tension on the air conditioning compres-
sor belt.

NOTE: Check the belt tension frequently. The belt must 
be replaced if it is cracked or needs to be frequently 
adjusted. This operation must be carried out by authori-
zed service personnel.

Compressor drive belt 

Regularly check the tension of the A/C compressor drive
belt and adjust in the following way if necessary.

1 -  Loosen the fixing nuts (2).

2 - Loosen  the  nut  of  the  slotted  support  (1),  position

the compressor (4) so that the belt (3) gives 15 mm
in the center of its longest side.

3 - Tighten all the nuts (1 and 2).

4 - Also make sure that the alternator-fan belt is correctly

adjusted.

196

Maintenance

250 HOUR MAIN SERVICE

Oil filters of the transmission and 
of the steering and power lift circu-

its

The following operations for the transmission oil filters
must be carried out not only at the prescribed intervals,
but also whenever the indicator lights on the instrument
panel come on.

Warning lights for transmission and hydraulic cir-
cuit oil filter blockage.

1 - Fixed light: Orange warning light for blockage of the 

oil filter of transmission and hydraulic circuit. The filter 
is mounted on the intake part of the hydraulic pumps.

2  -  Fixed  light:  Red  warning  light  for  low  pressure  in 

transmission hydraulic circuit. A warning buzzer will
start operating when this light comes on during work.
In this case, ask your Dealer’s specialized workshop
for help.

Oil filter of the transmission, stee-
ring and power lift circuit, mounted 
on the intake part of the hydraulic 
pumps

WARNING: Clean thefilter on the intake part of the 
hydraulic pumps of the steering and power lift cir-
cuits after the first 50 hours. Following this, it should 
be cleaned after every 250 hours service. 

1.  Loosen the screws (1) and remove the cover (3) of

the intake filter (2).

2.  Remove the filter cartridge (2) and wash it in a

suitable solvent. Be sure to remove any metallic
fragments from the filter cover and housing.

NOTE: Replace the cartridge if damaged or excessive-
lyclogged.

3.  Clean and fit the filter cover.
4.  Check the oil level. Top up if necessary with oil of

the prescribed type.

NOTE: After you have fitted the filter, allow the engine 
to run and make sure that there are no leaks. Check the 
oil level and top up if necessary.

NOTE: Use the oil indicated in the Lubricants and Fuels 
chart.

NOTE: Make sure that the hydraulic equipment con-
nected to the tractor’s hydraulic circuit uses the same 
type of oil. Use of different types of oil could damage 
the hydraulic circuit.

WARNING: Always use specific personal safety devices 
for each operation. Beware of burns caused by hot 
tractor parts.

 [4.1.n]

NOTE: When oil is cold, the red indicator might point 

out that the filter is clogged. Wait for the oil to heat to 
normal operation temperature: change the filter if the in-
dicator is still lit, otherwise no replacement is required.

197

Maintenance

7

9

250 HOUR MAIN SERVICE

Filter on the delivery of the steering 
circuit.

WARNING:  Change  the  paper  filter  on  the  delivery 
after the first 50 hours service and then after every 
250 hours.
Also  change  the  filter  whenever  the  red  indicator 
lights on the instrument panel come on.

Change the element of the filter on the delivery of the
steering circuit:
a -  Unscrew the holder (1), remove and discard the filter

element (3).

b - Fit  the  new  filter  element  (3)  into  the  cover  of  the

filter (2).

To  prevent  the  filter  element  from  being  dirtied  (with
mud, etc.) only completely remove the plastic protection
after fitting.

c -  Mount the holder (1) after having oiled its threaded

part, the washer (4) and seal (5) with clean new oil.
Take great care to fit the individual parts in the right
directions.

Change the seal (5) and the washer (4) every 1000 
hours service or whenever necessary.

d - Fully screw on the holder (1) by hand.

NOTE: After changing the oil and filters, run the engine 
for a while and make sure there are no leaks. Check the 
oil level again and top up if necessary.

NOTE: Use the oil indicated in the Lubricants and Fuels 
chart.

NOTE: Make sure that the hydraulic equipment con-
nected to the tractor’s hydraulic circuit uses the same 
type of oil. Use of different types of oil could damage 
the hydraulic circuit.

Oil filter of transmission and of the steering and power
lift circuits.
1 - Holder.
2 - Cover.
3 - Filter element.
4 - Washer.
5 - Seal.

WARNING: Always use specific personal safety devices 
for each operation. Beware of burns caused by hot 
tractor parts.

 [4.1.n]

198

Maintenance

250 HOUR MAIN SERVICE

WARNING: Always use specific personal safety devices 
for each operation. Beware of burns caused by hot 
tractor parts.

 [4.1.n]

Grease Points - Pick up Hitch ( if 

equipped)

Locking latches for auto hitch

Locking latches and rear pivot points.

NOTE: Use lithium grease of the prescribed type.

NOTE: In severe conditions lubricate these points more 
frequently.

1. The hitch should be carefully cleaned every 250 hour

operation, and the moving parts (also inner slide rails)
should be greased to avoid corrosion.

2. Make sure that all moving parts move freely and operate

correctly.

NOTE: In heavy duty operating conditions, the hitch could 
require  a  more  frequent  greasing  to  ensure  it  operates 
correctly.

IMPORTANT:  The  hitch  clevis  and  pin  are  copiously 
greased before delivery from the manufacturing plant to 
ensure a correct operation for a long time. In heavy duty 
conditions, however, a more frequent lubrication of these 
points could be required. In this case, the operation must 
be performed EXCLUSIVELY by your Dealer.

Greasing points - Rear tow hooks 
(according to fitted type)

Various types of rear tow hooks are available depending
on approvals and regulations valid in each country.
Moving parts should be cleaned and greased according
to the fitted type of tow hook and drawbar.

Check torque of bolts and nuts of 

the tow hook (according to the fit-

ted type)

Check the torque values of all bolts and nuts for ALL
hitch types before the delivery, then every 250 hours.

Check torque of bolts and nuts of 
the support bracket of the drawbar 

(according to the fitted type)

Check the torque of the drawbar support bracket bolts
and nuts every 250 hours.


Content   ..  47  48  49  50   ..