Yamaha XV1700P, XV1700PC. Service Manual - part 17
 

  Index      Manuals     Yamaha XV1700P, XV1700PC. Service Manual


Search            copyright infringement  


Content      ..     15      16      17      18     ..


Yamaha XV1700P, XV1700PC. Service Manual - part 17


4 - 81

CHAS

10

6

7

12

11

3

4

5

2

1

14

8

11

13

9

T


R

.

.

59 Nm (5.9 m 


kg, 43 ft


Ib)

T


R

.

.

125 Nm (12.5 m 

 kg, 90 ft 

 lb)

T


R

.

.

7 Nm (0.7 m


 kg, 5.1 ft 

 Ib)

T


R

.

.

16 Nm (1.6 m 


kg, 11 ft


Ib)

T


R

.

.

10 Nm (1.0 m 


kg, 7.2 ft


Ib)

LS

Order

Job/Part

Q’ty

Remarks

8

Brake hose holder

2

Refer to “REMOVING THE REAR 
SHOCK ABSORBER AND SWINGARM” 
and “INSTALLING THE REAR SHOCK 
ABSORBER AND SWINGARM”.

9

Self-locking nut

1

10

Bolt (shock absorber-connecting arm-
frame)

1

11

Cover (left and right)

2

12

Pivot shaft nut/washer

1/1

13

Pivot shaft

1

14

Rear shock absorber and swingarm 
assembly

1

For installation, reverse the removal 
procedure.

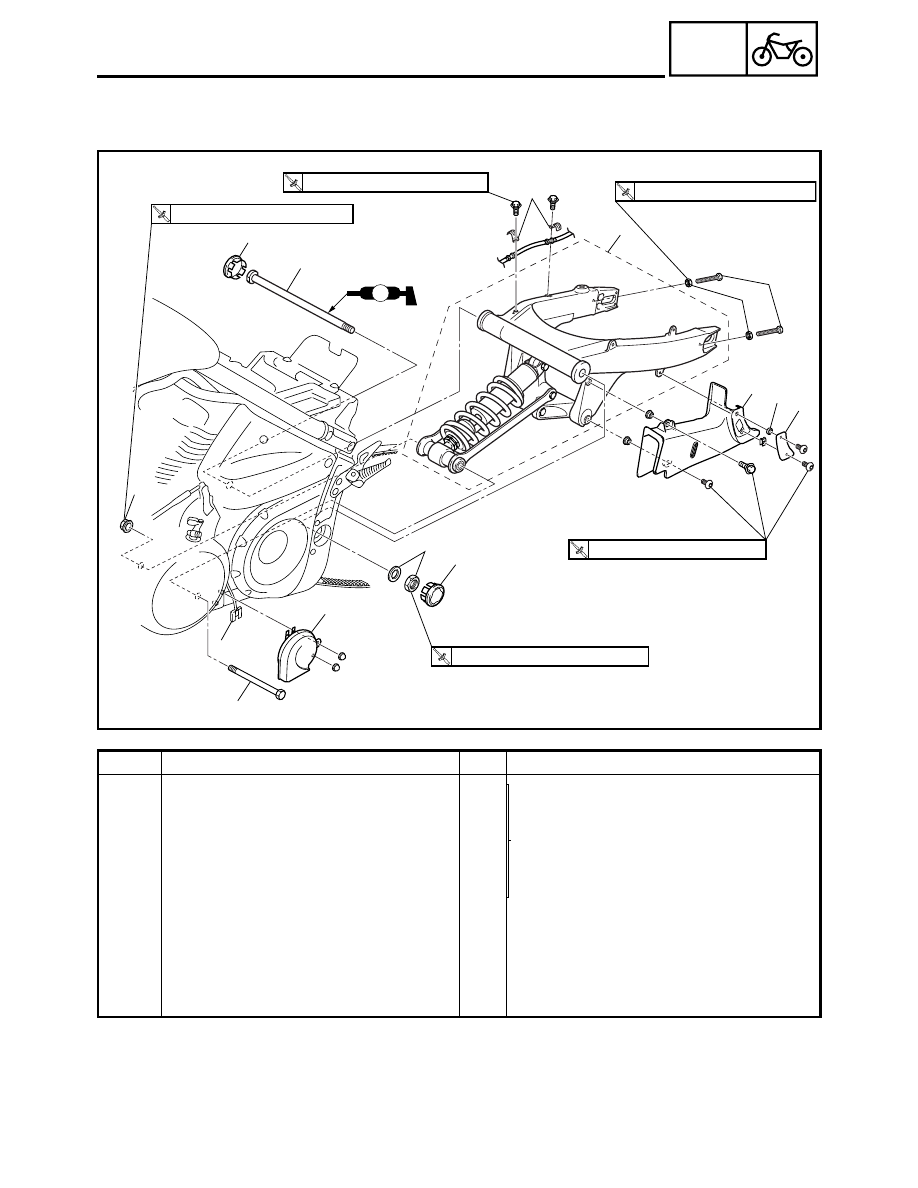
REAR SHOCK ABSORBER AND SWINGARM

4 - 82

CHAS

13

15

7

1

2

3

4

4 6

6

4

4

3

2

11

10

8

11

10

9

7

14

13

15

LS

LS

LS

LS

1

LS

LS

LS

9

T


R

.

.

40 Nm (4.0 m 


kg, 29 ft


Ib)

T


R

.

.

59 Nm (5.9 m 


kg, 43 ft


Ib)

T


R

.

.

59 Nm (5.9 m 


kg, 43 ft


Ib)

LS

5

12

Order

Job/Part

Q’ty

Remarks

Removing the rear shock absorber 
and swingarm

Remove the parts in the order listed. 

1

Self-locking nut/washer/bolt

1/1/1 Bolt 

 = 100 mm (3.94 in)

2

Self-locking nut/washer/bolt

1/1/1 Bolt 

 = 124 mm (4.88 in)

3

Connecting arm

2

4

O-ring

4

5

Rear shock absorber

1

6

Spacer/O-ring

1/2

7

Self-locking nut/washer/bolt

1/2/1 Bolt 

 = 77 mm (3.03 in)

8

Relay arm

1

Refer to “INSTALLING THE REAR 
SHOCK ABSORBER AND SWINGARM”.

9

Spacer/oil seal/bearing

1/2/1

10

Spacer/bearing

1/2

11

Spacer/bearing

1/1

REAR SHOCK ABSORBER AND SWINGARM

4 - 83

CHAS

13

15

7

1

2

3

4

4 6

6

4

4

3

2

11

10

8

11

10

9

7

14

13

15

LS

LS

LS

LS

1

LS

LS

LS

9

T


R

.

.

40 Nm (4.0 m 


kg, 29 ft


Ib)

T


R

.

.

59 Nm (5.9 m 


kg, 43 ft


Ib)

T


R

.

.

59 Nm (5.9 m 


kg, 43 ft


Ib)

LS

5

12

Order

Job/Part

Q’ty

Remarks

12

Swingarm

1

13

Dust cover

2

14

Spacer

1

15

Bearing

2

For installation, reverse the removal 
procedure.

REAR SHOCK ABSORBER AND SWINGARM

4 - 84

CHAS

EAS00686

HANDLING THE REAR SHOCK ABSORBER

WARNING

This rear shock absorber contains highly
compressed nitrogen gas. Before handling
the rear shock absorber, read and make
sure you understand the following informa-
tion. The manufacturer cannot be held
responsible for property damage or per-
sonal injury that may result from improper
handling of the rear shock absorber. 
• Do not tamper or attempt to open the rear

shock absorber. 

• Do not subject the rear shock absorber to

an open flame or any other source of high
heat. High heat can cause an explosion
due to excessive gas pressure. 

• Do not deform or damage the rear shock

absorber in any way. Rear shock
absorber damage will result in poor
damping performance. 

EAS00689

DISPOSING OF A REAR SHOCK 
ABSORBER AND GAS CYLINDER

Gas pressure must be released before dispos-
ing of a rear shock absorber and gas cylinder.
To release the gas pressure, drill a 2 ~ 3-mm
hole through the gas cylinder at a point 15 ~ 20
mm from its end as shown.

WARNING

Wear eye protection to prevent eye damage
from released gas or metal chips. 

REAR SHOCK ABSORBER AND SWINGARM

4 - 85

CHAS

EAS00703

REMOVING THE REAR SHOCK ABSORBER 
AND SWINGARM

1. Stand the motorcycle on a level surface.

WARNING

Securely support the motorcycle so that
there is no danger of it falling over. 

NOTE:

Place the motorcycle on a suitable stand so
that the rear wheel is elevated. 

2. Remove: 

• bolt (shock absorber-connecting arm-

frame) 

1


NOTE:

When removing the bolt (shock absorber-con-
necting arm-frame) 

1

, hold the swingarm so

that it does not drop down. 

3. Measure: 

• swingarm free play 
• swingarm vertical movement

▼▼▼

▼ ▼▼▼

▼ ▼▼▼

▼ ▼▼▼

▼ ▼▼▼

▼ ▼▼▼

▼▼▼

a. Measure the tightening torque of the pivot

shaft nut.

b. Measure the swingarm side play 

È

 by mov-

ing the swingarm from side to side. 

c. If the swingarm side play is out of specifica-

tion, check the spacers, bearings, washers,
and dust covers.

d. Check the swingarm vertical movement 

É

by moving the swingarm up and down. 
If swingarm vertical movement is not
smooth or if there is binding, check the
spacers, bearings, washers, and dust cov-
ers.

▲▲▲

▲ ▲▲▲

▲ ▲▲▲

▲ ▲▲▲

▲ ▲▲▲

▲ ▲▲▲

▲▲▲

T


R

.

.

Pivot shaft nut 

125 Nm (12.5 m • kg, 90 ft • lb)

Swingarm side play (at the end of 
the swingarm) 

1 mm (0.04 in)

1

É

È

REAR SHOCK ABSORBER AND SWINGARM

4 - 86

CHAS

REAR SHOCK ABSORBER AND SWINGARM

EAS00696

CHECKING THE REAR SHOCK ABSORBER

1. Check: 

• rear shock absorber rod 

Bends/damage 

 Replace the rear shock

absorber assembly. 

• rear shock absorber 

Gas leaks/oil leaks 

 Replace the rear

shock absorber assembly. 

• spring 

Damage/wear 

 Replace the rear shock

absorber assembly. 

• gas cylinder 

Damage/gas leaks 

 Replace. 

• bushings 

Damage/wear 

 Replace. 

• O-ring 

Damage/wear 

 Replace. 

• bolts 

Bends/damage/wear 

 Replace.

CHECKING THE RELAY ARM AND 
CONNECTING ARM

1. Check: 

• relay arm 

1


• connecting arms 

2

Damage/wear 

 Replace. 

• bearings
• oil seals

Damage/pitting 

 Replace. 

• spacers

Damage/scratches 

 Replace. 

CHECKING THE SWINGARM

1. Check: 

• swingarm

Bends/cracks/damage 

 Replace. 

2. Check: 

• pivot shaft

Roll the pivot shaft on a flat surface. 
Bends 

 Replace. 

WARNING

Do not attempt to straighten a bent pivot
shaft. 

4 - 87

CHAS

REAR SHOCK ABSORBER AND SWINGARM

3. Wash: 

• pivot shaft
• dust covers
• spacer
• bearings

Recommended cleaning solvent

Kerosine

4. Check: 

• dust covers
• spacer
• oil seals

Damage/wear 

 Replace. 

• bearings 

Damage/pitting 

 Replace. 

EAS00711

INSTALLING THE REAR SHOCK 
ABSORBER AND SWINGARM

1. Lubricate: 

• bearings 
• spacers 
• dust covers 
• O-rings
• pivot shaft

2. Install: 

• bearings 

1

2

3


(to relay arm)

Recommended lubricant 

Lithium-soap-based grease

Installed depth 

a


4.5 mm (0.18 in)

Installed depth 

b


1.0 mm (0.04 in)

Installed depth 

c


2.0 mm (0.08 in)

1

2

2

3

b

a

b

c

4 - 88

CHAS

REAR SHOCK ABSORBER AND SWINGARM

3. Install: 

• bolt (shock absorber-connecting arm-

frame) 

1


NOTE:

When installing the bolt (shock absorber-con-
necting arm-frame), hold the swingarm so that
it does not drop down. 

1

4. Adjust: 

• drive belt slack

Refer to “ADJUSTING THE DRIVE BELT
SLACK” in chapter 3.

4 - 89

CHAS

DRIVE BELT AND DRIVE SPROCKET

DRIVE BELT AND DRIVE SPROCKET

Order

Job/Part

Q’ty

Remarks

Removing the drive belt and drive 
sprocket

Remove the parts in the order listed. 

Rear wheel

Refer  to  “REAR WHEEL, BRAKE DISC,
AND REAR WHEEL PULLEY”.

Rear shock absorber and swingarm 
assembly

Refer to “REAR SHOCK ABSORBER
AND SWINGARM”.

1

Drive sprocket cover

1

2

Slider

2

3

Dowel pin

2

4

Transfer gear case bracket

1

5

Drive  belt

1

6

Drive sprocket nut

1

7

Lock washer

1

8

Drive sprocket

1

For installation, reverse the removal 
procedure.

4 - 90

CHAS

DRIVE BELT AND DRIVE SPROCKET

REMOVING THE DRIVE BELT AND DRIVE 
SPROCKET

NOTE:

Loosen the drive sprocket nut before remove
the rear wheel. 

1. Straighten the lock washer tab.

2. Loosen: 

• drive sprocket nut 

1


NOTE:

When loosening the drive sprocket nut, press
down on the brake pedal so the drive sprocket
does not move. 

CHECKING THE DRIVE BELT

1. Clean: 

• drive belt

▼▼▼

▼ ▼▼▼

▼ ▼▼▼

▼ ▼▼▼

▼ ▼▼▼

▼ ▼▼▼

▼▼▼

a. Wipe the drive belt with a clean cloth.
b. Put the drive belt in a mixture of mild deter-

gent and water. Then, remove any dirt from
the drive belt.

c. Remove the drive belt from the mixture and

rinse it off with clean water. Then, let the
drive belt thoroughly dry.

▲▲▲

▲ ▲▲▲

▲ ▲▲▲

▲ ▲▲▲

▲ ▲▲▲

▲ ▲▲▲

▲▲▲

2. Check: 

• drive belt

CAUTION:

• To protect the drive belt from damage,

handle it with care.

• The drive belt can not be bent smaller

than 127 mm (5 in) 

a

.

• The removed drive belt can not be twisted

inside out.

4 - 91

CHAS

DRIVE BELT AND DRIVE SPROCKET

3. Check: 

• drive sprocket
• rear wheel pulley

Bent teeth 

 Replace the drive belt and

pulleys as a set. 

INSTALLING THE DRIVE BELT AND DRIVE 
SPROCKET

1. Install: 

• drive sprocket 

1


• lock washer 

2

• drive sprocket nut 

3


New

2. Install: 

• drive belt

CAUTION:

Install the drive belt facing the same way it
was removed. 
Do not twist the drive belt when installing
it.

3. Install: 

• rear shock absorber and swingarm 

assembly
Refer to “REAR SHOCK ABSORBER AND
SWINGARM”.

• rear wheel

Refer to “REAR WHEEL, BRAKE DISC,
AND REAR WHEEL PULLEY”.

4. Tighten: 

• drive sprocket nut

NOTE:

When tightening the drive sprocket nut, press
down on the brake pedal so the drive sprocket
does not move. 

5. Bend the lock washer tab along a flat side of

the nut.

T


R

.

.

100 Nm (10.0 m  •  kg, 72 ft  •  lb)

5 - 1

ENG

EAS00188

ENGINE

ENGINE

5

5

2

3

1

(2)

(2)

(3)

(2)

(2)

(2)

T


R

.

.

24 Nm (2.4 m 


kg, 17 ft


Ib)

T


R

.

.

12 Nm (1.2 m 


kg, 8.7 ft


Ib)

T


R

.

.

12 Nm (1.2 m 


kg, 8.7 ft


Ib)

T


R

.

.

20 Nm (2.0 m 


kg, 14 ft


Ib)

T


R

.

.

53 Nm (5.3 m 


kg, 38 ft


Ib)

4

4

4

T


R

.

.

20 Nm (2.0 m 


kg, 14 ft


Ib)

Order

Job/Part

Q’ty

Remarks

Removing the muffler and exhaust 
pipes

Remove the parts in the order listed.

1

Muffler

1

2

Rear exhaust pipe

1

3

Front exhaust pipe

1

4

Gasket

2

5

Gasket

2

For installation, reverse the removal 
procedure.

ENGINE

5 - 2

ENG

8

7

1

2

6

5

4

3

T


R

.

.

10 Nm (1.0 m 


kg, 7.2 ft


Ib)

T


R

.

.

7 Nm (0.7 m


 kg, 5.1 ft 

 Ib)

T


R

.

.

7 Nm (0.7 m


 kg, 5.1 ft 

 Ib)

T


R

.

.

70 Nm (7.0 m 


kg, 50 ft


Ib)

LT

Order

Job/Part

Q’ty

Remarks

Removing the oil filter bracket and 
horn

Remove the parts in the order listed.

Seat/side covers

Refer to “SEAT AND SIDE COVERS” in 
chapter 3.

Fuel tank

Refer to “FUEL TANK” in chapter 3.

Air filter case

Refer to “AIR FILTER CASE” in 
chapter 3.

Silencer air filter case

Refer to “SILENCER AIR FILTER CASE” 
in chapter 3.

Throttle bodies/intake manifold

Refer to “FUEL INJECTION SYSTEM” in 
chapter 6.

Air induction system parts

Refer to “AIR INDUCTION SYSTEM” in 
chapter 6.

Starter motor

Refer to “STARTER MOTOR” in 
chapter 7.

ENGINE

1

2

3

4

5

5 - 3

ENG

8

7

1

2

6

5

4

3

T


R

.

.

10 Nm (1.0 m 


kg, 7.2 ft


Ib)

T


R

.

.

7 Nm (0.7 m


 kg, 5.1 ft 

 Ib)

T


R

.

.

7 Nm (0.7 m


 kg, 5.1 ft 

 Ib)

T


R

.

.

70 Nm (7.0 m 


kg, 50 ft


Ib)

LT

Order

Job/Part

Q’ty

Remarks

Engine oil/oil filter cartridge

Drain.
Refer to “CHANGING THE ENGINE OIL”
in chapter 3.

Sub fuel tank

Refer to “SUB FUEL TANK”.

Transfer gear oil

Drain.
Refer to “CHANGING THE TRANSFER
GEAR OIL” in chapter 3.

Transfer gear case

Refer to “TRANSFER GEAR CASE”.

Rider footrest (left)

Refer to “ROCKER ARMS, PUSH RODS
AND VALVE LIFTERS”.

Rider footrest (right)/oil delivery pipe

Refer to “GENERATOR AND STARTER 
CLUTCH”.

1

Oil filter bolt

1

2

Oil filter bracket

1

ENGINE

5 - 4

ENG

8

7

1

2

6

5

4

3

T


R

.

.

10 Nm (1.0 m 


kg, 7.2 ft


Ib)

T


R

.

.

7 Nm (0.7 m


 kg, 5.1 ft 

 Ib)

T


R

.

.

7 Nm (0.7 m


 kg, 5.1 ft 

 Ib)

T


R

.

.

70 Nm (7.0 m 


kg, 50 ft


Ib)

LT

Order

Job/Part

Q’ty

Remarks

3

Rectifier/regulator coupler

1

Disconnect.

4

Stator coil assembly coupler

1

Disconnect.

5

Rectifier/regulator

1

6

Rectifier/regulator bracket

1

7

Horn  2

1

8

Lean angle cut-off switch

1

For installation, reverse the removal 
procedure.

ENGINE

5 - 5

ENG

12

3

10

11

9

1

2

1

5

7

8

6

4

T


R

.

.

4 Nm (0.4 m


 kg, 2.9 ft 

 Ib)

T


R

.

.

10 Nm (1.0 m 


kg, 7.2 ft


Ib)

Order

Job/Part

Q’ty

Remarks

Disconnecting the leads and hoses

Disconnect the parts in the order listed.

1

Spark plug caps

4

2

Cylinder head breather hose

1

3

Oil tank breather hose

1

4

Clutch cable

1

5

Plastic  clamp

1

6

Decompression solenoid coupler

2

7

Crankshaft position sensor coupler

1

8

Cylinder identification coupler

1

9

Engine temperature sensor coupler

1

10

Neutral switch cover

1

11

Neutral switch

1

12

Speed sensor

1

For connecting, reverse the disconnec-
tion procedure.

ENGINE


Content      ..     15      16      17      18     ..