SINUMERIK 840D sl. Basesoftware and operating software. Manual (2019) - page 13
Getting Started
2.2 Project example
2.2.4
Creating the online help (example)
Create the HTML file "sinumerik_md_1.html". The example under "Content of the online help"
shows the context-sensitive help call via name="20060[0]" and name="20060[1]".
Notes
You can find notes on creating HTML files in Chapter Generating HTML files (Page 72).
Notes regarding the integration of online help are provided in Section Integrating the online help
and saving the files to the OEM directory (example) (Page 25).
SINUMERIK Integrate Run MyScreens
22
Programming Manual, 06/2019, A5E40869575B AC
Getting Started
2.2 Project example
Content of the online help
The example has no comments.
SINUMERIK Integrate Run MyScreens
Programming Manual, 06/2019, A5E40869575B AC
23
Getting Started
2.2 Project example
<html><head><meta http-equiv="Content-Type" content="text/html; charset="UTF-8"/><title></
title></head>
<body>
<table border="1" cellspacing="0" cellpadding="2" width="100%">
<tr>
<td><a name="20060[0]"><b>20060[0]</b></a></td>
<td colspan="3">AXCONF_GEOAX_NAME_TAB</td>
<center>
<img src="../picture/bitmap3.png">
</center>
<td>-</td>
<td>-</td>
</tr>
<tr>
<td>-</td>
<td colspan="3">Geometry axis name in channel</td>
<td>DWORD</td>
<td>POWER ON</td>
</tr>
<tr>
<td colspan="6">This MD is used to enter the names of the geometry axes
separately for each channel.<br />
<tr>
<td>-</td>
<td colspan="5"> </td>
</tr>
<tr>
<td width="16*">System</td><td width="16*">Dimension</td><td width="16*">Default
value</td>
<td width="16*">Minimum value</td><td width="16*">Maximum value</td>
<td width="16*">Protection</td>
</tr>
<tr>
<td>-</td>
<td>-</td>
<td>60</td>
<td>0</td>
<td>180</td>
<td>7/3</td>
</tr>
</table>
<p></p>
<table border="1" cellspacing="0" cellpadding="2" width="100%">
<tr>
<td><a name="20060[1]"><b>20060[1]</b></a></td>
<td colspan="3">AXCONF_GEOAX_NAME_TAB</td>
<td>-</td>
<td>-</td>
</tr>
<tr>
<td>-</td>
<td colspan="3">Geometry axis name in channel</td><td>BYTE</td>
<td>POWER ON</td>
</tr>
<tr>
SINUMERIK Integrate Run MyScreens
24
Programming Manual, 06/2019, A5E40869575B AC
Getting Started
2.2 Project example
<td colspan="6">This MD is used to enter the names of the geometry axes
separately for each channel.<br />
<tr>
<td>-</td>
<td colspan="5"> </td>
</tr>
<tr>
<td width="16*">System</td>
<td width="16*">Dimension</td>
<td width="16*">Default value</td>
<td width="16*">Minimum value</td>
<td width="16*">Maximum value</td>
<td width="16*">Protection</td>
</tr>
<tr>
<td>-</td>
<td>-</td>
<td>0</td>
<td>0</td>
<td>2</td>
<td>7/3</td>
</tr>
</table>
<p></p>
</body>
</html>
2.2.5
Integrating the online help and saving the files to the OEM directory (example)
Integrating the online help
The syntax to integrate the online help is analogous to SINUMERIK Operate.
DEF RFP=(R//1/,"RFP","RFP"///////"sinumerik_md_1.html","9006")
Note
As a result of LINUX, the HTML file must be written in lower case letters!
Storage path
Save the HTML file "sinumerik_md_1.html" for the English help under the following path:
[System oem directory]/hlp/eng
You must create a folder for additional languages (e.g. chs, deu, esp, fra, ita …).
A list of language codes is provided in the Appendix "Reference lists".
SINUMERIK Integrate Run MyScreens
Programming Manual, 06/2019, A5E40869575B AC
25
Getting Started
2.2 Project example
Further information
Detailed information about creating OEM-specific online help files is provided in
Chapter Configuring the online help (Page 71).
2.2.6
Copying "easyscreen.ini" into the OEM directory (example)
Storage path
Copy the file "easyscreen.ini" from the directory
[System SIEMENS directory]/cfg
to the directory
[System oem directory]/cfg
2.2.7
Registering the COM file in "easyscreen.ini" (example)
Adaptation of the "easyscreen.ini"
Make the following change in the "easyscreen.ini" in the OEM directory. You have thus
registered the "diag.com" configuration file.
;########################
;# AREA Diagnosis
#
;########################
;<===============================================================>
;< OEM Softkey on first horizontal Main Menu
>
;< SOFTKEY position="7"
>
;<===============================================================>
StartFile28 = area := AreaDiagnosis, dialog:= SlDgDialog, menu := DgGlobalHu, startfile := diag.com
2.2.8
Testing the project (example)
Testing the dialog call
Switch to the diagnostics operating area. Click the "START" horizontal softkey.
If "Run MyScreens" detects errors when interpreting the configuration files, these errors will be
written to the "easyscreen_log.txt" text file. Further information can be found in Chapter
Troubleshooting (log book) (Page 36).
SINUMERIK Integrate Run MyScreens
26
Programming Manual, 06/2019, A5E40869575B AC
Getting Started
2.2 Project example
Testing context sensitive help screens and online help
Test the context sensitive help screens and the online help. If errors occur, then check the paths
where files have been saved.
SINUMERIK Integrate Run MyScreens
Programming Manual, 06/2019, A5E40869575B AC
27
Getting Started
2.2 Project example
SINUMERIK Integrate Run MyScreens
28
Programming Manual, 06/2019, A5E40869575B AC
Fundamentals
3
3.1
Structure of configuration file
Introduction
The description of new user interfaces is stored in configuration files. These files are
automatically interpreted and the result displayed on the screen. Configuration files are not
stored in the software supplied and must be set up by the user.
A UTF-8-capable editor (e.g. the integrated editor of the user interface or Notepad) is used to
create the configuration files and language files. The description can also be explained using
comments. A ";" is inserted as comment character before every explanation.
Note
When saving configuration and language files, ensure that the coding is set to UTF-8 for the
editor you are using.
However, keywords - also in an UTF-8-coded COM file - may only comprise characters that are
contained in the ASCII character set. Otherwise the interpretation and therefore the display of
the screen forms/dialogs cannot be guaranteed.
Configuration
Each HMI operating area has permanent start softkeys which can be used to access newly
generated dialogs.
In the event of a "Load a screen form" (LM) or a "Load softkey menu" (LS) call in a configuration
file, a new file name containing the object called can be specified. This makes it possible to
structure the configuration, e.g. all functions in one operating level in a separate configuration
file.
Structure of the configuration file
A configuration file consists of the following elements:
1. Description of the start softkeys
2. Definition of the dialogs
3. Definition of the variables
4. Description of the methods
5. Definition of the softkey menus
SINUMERIK Integrate Run MyScreens
Programming Manual, 06/2019, A5E40869575B AC
29
Fundamentals
3.1 Structure of configuration file
Note
Sequence
The specified sequence in the configuration file must be maintained.
Example:
//S (START)
; Definition of the start softkey (optional)
//END
//M (
)
; Definition of the dialog
DEF
; Definition of the variables
LOAD
; Description of the blocks
END_LOAD
UNLOAD
END_UNLOAD
//END
//S (...)
; Definition of a softkey menu
//END
Storage location for configuration files
The configuration files are located in the [System user directory]/proj directory and also
correspondingly stored in the [System add_on directory] and [System oem directory]
directories.
Converting texts from other HMI applications
Procedure to convert a text file with code page coding to text-coding UTF-8:
1. Open the text file on a PG/PC in a text editor.
2. When saving, set the UTF-8 coding.
The read-in mechanism via code page code is still supported.
SINUMERIK Integrate Run MyScreens
30
Programming Manual, 06/2019, A5E40869575B AC
Fundamentals
3.2 Structure of the menu tree
3.2
Structure of the menu tree
Menu tree principle
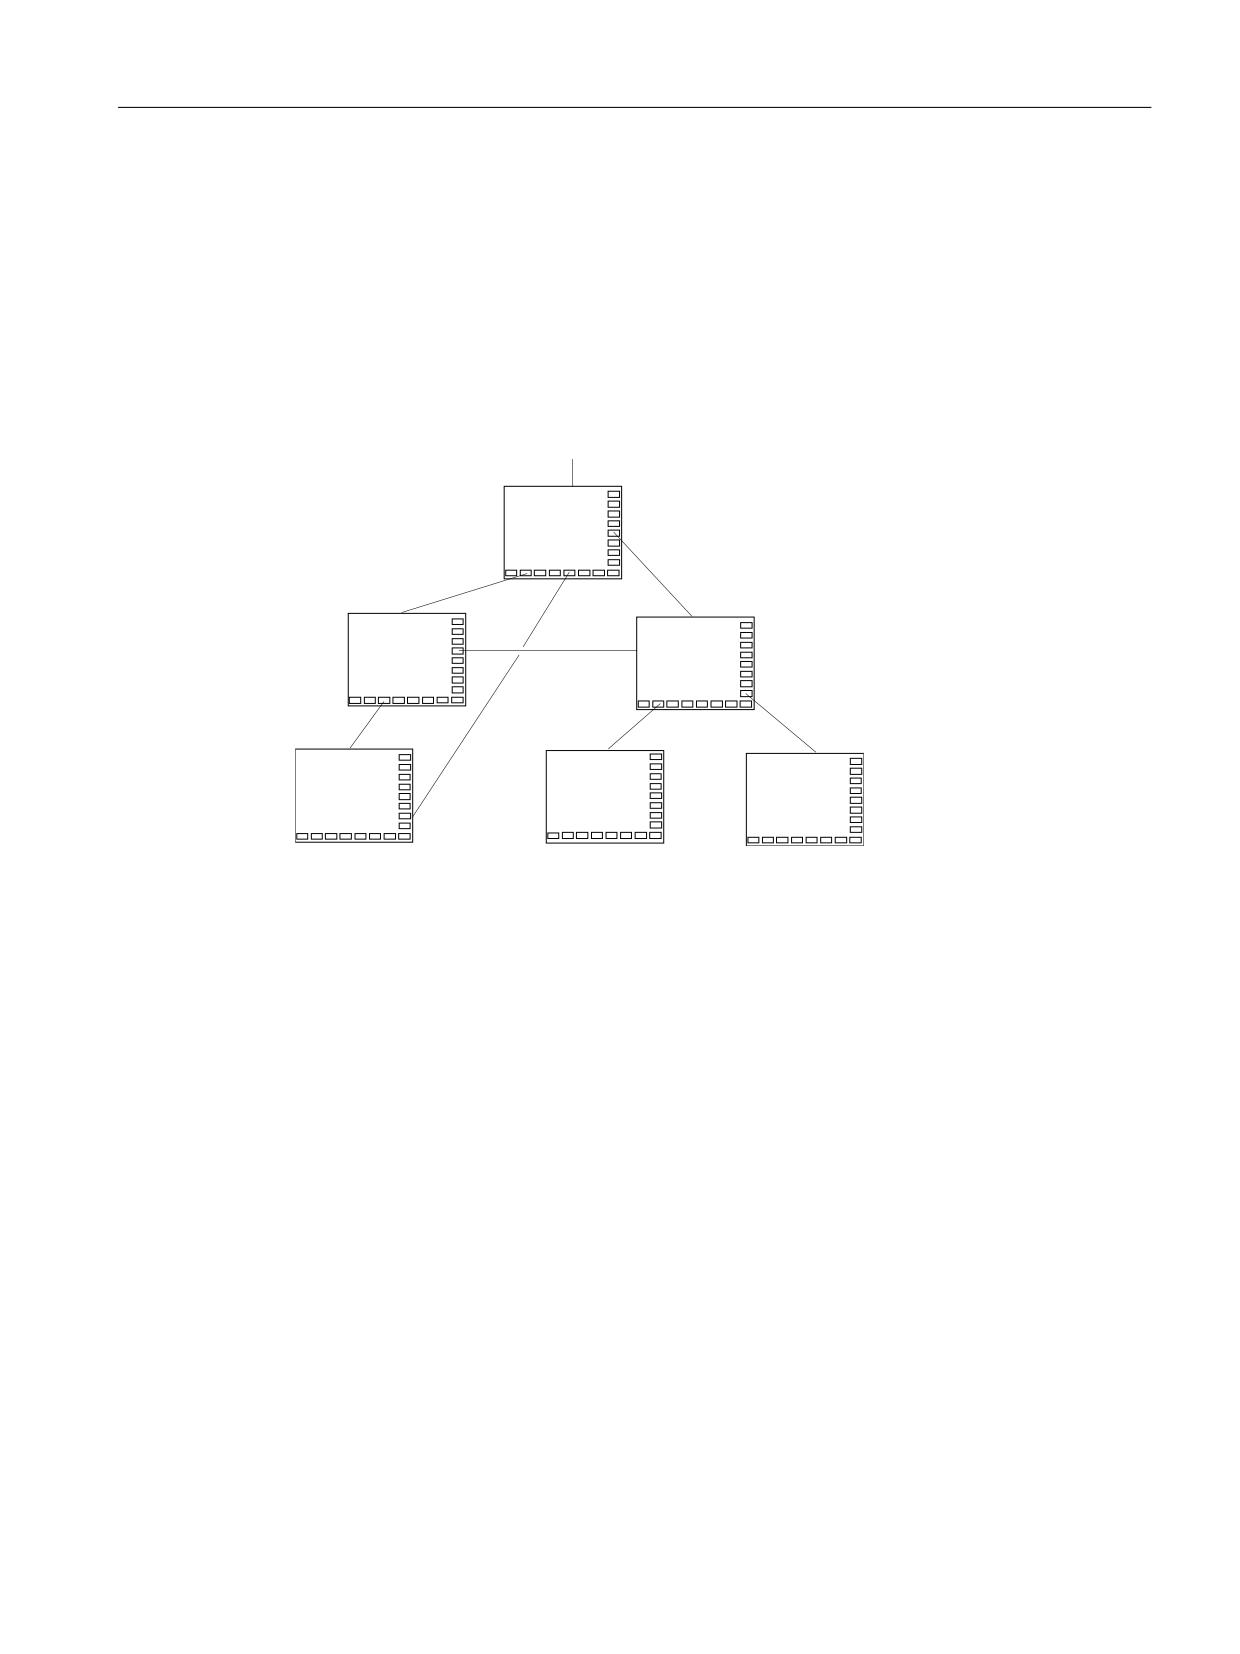
Several interlinked dialogs create a menu tree. A link exists if you can switch from one dialog
to another. You can use the newly defined horizontal/vertical softkeys in this dialog to call the
preceding or any other dialog.
A menu tree can be created behind each start softkey:
6WDUW VRIWNH\
Figure 3-1
Menu tree
Start softkeys
One or more softkeys (start softkeys), which are used to initiate your own operating sequences,
are defined in the configuration files specified in "easyscreen.ini".
The loading of a dedicated dialog is associated with a softkey definition or another softkey
menu. These are then used to perform the subsequent actions.
Pressing the start softkey loads the assigned dialog. This will also activate the softkeys
associated with the dialog. Variables will be output to the standard positions unless specific
positions have been configured.
Reverting to the standard application
You can exit the newly created dialog and return to the standard operating area.
SINUMERIK Integrate Run MyScreens
Programming Manual, 06/2019, A5E40869575B AC
31
Fundamentals
3.2 Structure of the menu tree
You can use the <RECALL> key to close new user interfaces if you have not configured this key
for any other task.
Note
Calling dialogs in the PLC user program
Dialogs can be selected from the PLC as well as via softkeys: An interface signal is available
in DB19.DBB10 for signal exchange between the PLC → HMI.
SINUMERIK Integrate Run MyScreens
32
Programming Manual, 06/2019, A5E40869575B AC

Fundamentals
3.3 Definition and functions for start softkeys
3.3
Definition and functions for start softkeys
3.3.1
Defining the start softkey
Dialog-independent softkey
Start softkeys are dialog-independent softkeys which are not called from a dialog, but which
have been configured before the first new dialog. In order to access the start dialog or a start
softkey menu, the start softkey must be defined.
Programming
The definition block for a start softkey is structured as follows:
//S(Start)
; Start identifier of start softkey
HS1=(...)
; Define the start softkey: Horizontal SK 1
PRESS(HS1)
; Method
LM...
; LM or LS function
END_PRESS
; End of method
//END
; End identifier of start softkey
Permissible positions for start softkeys
The following positions for "Run MyScreens" start softkeys are permissible in the operating
areas:
Operating area
Position
Machine
HSK6
Parameter
HSK7
Program
HSK6 and HSK15
Measuring cycles: HSK13 and HSK14
Program manager
HSK2-8 and HSK12-16, if not assigned to drives.
Diagnostics
HSK7
Startup
HSK7
Start softkeys are configured in special files. The names of these files are stated in the
"easyscreen.ini" file. They usually have a name which is specific to an operating area (e.g.
"startup.com" operating area for the startup area). The machine operating area represents an
exception. There are several mode-specific files in the machine operating area ("ma_jog.com",
"ma_auto.com").
The softkey menu with the start softkeys is called "Start". Existing configurations for start
softkeys can still be used. The function whereby start softkeys are merged with the softkeys for
the respective HMI application (operating area) in the start softkey menu is not supported.
SINUMERIK Integrate Run MyScreens
Programming Manual, 06/2019, A5E40869575B AC
33
Fundamentals
3.3 Definition and functions for start softkeys
This means that until the first dialog call is made - in other words, the time at which full
functionality becomes available (e.g. execution of PRESS blocks) - menus or softkey menus
can only be replaced by others in their entirety.
Template for configuration of the start softkey
A detailed description of all permissible positions for start softkeys and their configuration is
located in the "easyscreen.ini" file in the following directory:
[System SIEMENS directory]/cfg
This file is used as a template for your own configuration of the start softkey.
See also
Lists of start softkeys (Page 305)
3.3.2
Functions for start softkeys
Functions for dialog-independent softkeys
Only certain functions can be initiated with start softkeys.
The following functions are permitted:
● The LM function can be used to load another dialog: LM("Identifier"[,"File"])
● The LS function can be used to display another softkey menu: LS("Identifier"[, "File"][,
Merge])
● You can use the "EXIT" function to exit newly configured user interfaces and return to the
standard application.
● You can use the "EXITLS" function to exit the current user interface and load a defined
softkey menu.
PRESS method
The softkey is defined within the definition block and the "LM" or "LS" function is assigned in the
PRESS method.
If the start softkey definition is designated as a comment (semicolon (;) at beginning of line) or
the configuration file removed, the start softkey will not function.
//S(Start)
; Start identifier
HS6=("1st screen form")
; Horizontal SK 6 labeled "1st screen form"
PRESS(HS6)
; PRESS method for horizontal SK 6
LM("Screen form1")
; Load screen form1 function, where screen form 1
must be defined within the same file.
SINUMERIK Integrate Run MyScreens
34
Programming Manual, 06/2019, A5E40869575B AC
Fundamentals
3.3 Definition and functions for start softkeys
END_PRESS
; End of PRESS method
HS7=("2nd screen form")
; Horizontal SK 7 labeled "2nd screen form"
PRESS(HS7)
; PRESS method for horizontal SK 7
LM("Screen form2")
; Load screen form2 function, where screen form2
must be defined within the same file.
END_PRESS
; End of PRESS method
//END
; End identifier of entry block
Example
HS1 = ("new softkey menu")
HS2=("no function")
PRESS(HS1)
LS("Menu1")
;Load new softkey bar
END_PRESS
PRESS (HS2)
; Empty PRESS method
END_PRESS
Various configurations of the start softkeys
Various configurations of the start softkeys are merged. In this case, initially the name of the file
to be interpreted is read-out of "easyscreen.ini". A search is made for *.com files in the following
directories:
● [System user directory]/proj
● [System oem directory]/proj
● [System add_on directory]/proj
● [System Siemens directory]/proj
The configurations included for the start softkeys are now merged to form a configuration, i.e.
the individual softkeys are compared. If there are two or more configurations for a softkey, the
higher order configuration is always transferred into the merge version.
Softkey menus or dialogs that are possibly included are ignored. If a softkey has a command
without file information, e.g. LM ("test"), as the required softkey menu or dialog is contained in
the same file, then the corresponding file name is supplemented in the internal merge version
so that in this case, no changes are required. The merge configuration contained is then
subsequently displayed.
SINUMERIK Integrate Run MyScreens
Programming Manual, 06/2019, A5E40869575B AC
35
Fundamentals
3.4 Troubleshooting (log book)
3.4
Troubleshooting (log book)
Overview
If "Run MyScreens" detects errors when interpreting the configuration files, these errors will be
written to the "easyscreen_log.txt" text file. Only errors of the currently selected dialog are
entered. Error entries from previously selected dialogs are deleted.
The file indicates:
● The action during which an error occurred.
● The line and column number of the first faulty character.
● The entire faulty line of the configuration file.
● The entries made by the DEBUG function.
Note
Each entry has a prefix with the current time stamp in square brackets. This can be helpful,
for example, when analyzing time-critical configurations.
Saving "easyscreen-log.txt"
The file "easyscreen_log.txt" is saved in the following directory:
[System user directory]/log
Syntax
The system does not start to interpret the syntax until the start softkey has been defined and a
dialog with start and end identifiers as well as a definition line has been configured.
//S(Start)
HS6=("1st screen")
PRESS(HS6)
LM("Maske1")
END_PRESS
//END
//M(Maske1)
DEF Var1=(R)
DEF VAR2 = (R)
LOAD
VAR1 = VAR2 + 1
; Error message in log book, as VAR2 has no value
//END
SINUMERIK Integrate Run MyScreens
36
Programming Manual, 06/2019, A5E40869575B AC
Fundamentals
3.4 Troubleshooting (log book)
; The right entry would be,
for example:
//M(Maske1)
DEF Var1=(R)
DEF VAR2 = (R)
LOAD
VAR2 = 7
VAR1 = VAR2 + 1 ;
SINUMERIK Integrate Run MyScreens
Programming Manual, 06/2019, A5E40869575B AC
37
Fundamentals
3.5 Notes on "easyscreen.ini"
3.5
Notes on "easyscreen.ini"
As of SINUMERIK Operate V4.7, "easycreen.ini" has been extended by the entries described
in this chapter. The "easyscreen.ini" can be found in the [System Siemens directory]/cfg
directory.
Help screen start position
Entry in "easyscreen.ini":
[GENERAL]
HlpPicFixPos=true
Note:
The start position of help displays is positioned at the configured pixel position independent of
the resolution (default=true).
Elongation behavior, default line height and line spacing
Entry in easyscreen.ini:
[GENERAL]
SymmetricalAspectRatio=false
DefaultLineHeight=18
DefaultLineSpacing=3
Notes:
● The "SymmetricalAspectRatio" entry determines whether the same aspect ratio is used in
the X and Y direction when adapting a configuration to a specific screen resolution.
- "false" (default): Fields and graphics are shortened in widescreen resolution in the Y
direction (asymmetrical elongation in relation to 640x480). For example, a square
configured in 640x480 is shortened vertically for a widescreen panel and becomes a
rectangle.
- "true": The same aspect ratio is used in the X and Y direction and fields and graphics
retain their originally configured proportions in relation to 640x480. For example, a
square configured in 640x480 remains a square in a widescreen panel.
● The entries "DefaultLineHeight" and "DefaultLineSpacing" can be used to specify the
default line height (default: 18 pixels) and the default line spacing (default: 3 pixels) in
relation to 640x480. They only take effect when no Y position or height is specified in the
configuration for the position of the short text or the input/output field.
SINUMERIK Integrate Run MyScreens
38
Programming Manual, 06/2019, A5E40869575B AC
Fundamentals
3.5 Notes on "easyscreen.ini"
Cycles in the Machine main screen
● Entry to machine operating mode JOG via HS6 with the possibility to generate a cycle call
into the Machine main screen with section [JOBSHOPINTEGRATION]:
[JOBSHOPINTEGRATION]
Integration = true
or via the starting block in the configuration
LM("screen form1",,1)
PRESS(VS8)
GC("MOVE_RIDE") ; cycle call is being generated
EXIT
END_PRESS
● Retention of the operate menus with section [Integration]:
If the dialog only includes vertical softkeys, the horizontal standard softkey bar incl. the start
softkey is retained when the dialog is displayed. If the dialog contains horizontal and vertical
softkeys, the horizontal bar from the dialog replaces the horizontal bar with the start softkey.
[Integration]
OperateMenusEnabled = true
Resolution-dependent screen position: Form panels
Entry in "easyscreen.ini":
[640x480]
MyPanel = x:=0, y:=220, width:=340, height:=174
[800x480]
MyPanel = x:=0, y:=220, width:=420, height:=174
Notes:
SINUMERIK Integrate Run MyScreens
Programming Manual, 06/2019, A5E40869575B AC
39
Fundamentals
3.5 Notes on "easyscreen.ini"
The screen position can be defined as follows:
● The screen position can be specified in "Pixels in relation to 640x480".
Example:
//M(MyMask/"MyCaption"/"\\myhelp.png"/0,219,335,174)
● The screen position can be coupled to the resolution-dependent position of a form panel
from an Operate standard screen layout, e.g. "Form panel4" ("auxiliary functions") from the
screen layout "slmastandardscreenlayout.SlMaStandardScreenLayout" of the "Machine"
area
//M(MyMask/"MyCaption"/"\
\myhelp.png"/"slmastandardscreenlayout.SlMaStandardScreenLayout.FormPanel4")
It is therefore easy to superimpose standard forms from Operate or position Easyscreen
screens precisely at their position.
Example:
//M(Mask/"Mask"//"slstandardscreenlayout.SlStandardScreenLayout.LowerForm")
Any other screen layout can also be used.
● The screen position can be coupled to a self-defined, resolution-dependent definition of
form panels in the "easyscreen.ini" file.
Example:
//M(MyMask/"MyCaption"/"\\myhelp.png"/"MyPanel")
SINUMERIK Integrate Run MyScreens
40
Programming Manual, 06/2019, A5E40869575B AC
Fundamentals
3.6 Notes for personnel changing over to "Run MyScreens"
3.6
Notes for personnel changing over to "Run MyScreens"
Note
When using HMI Operate in the NCU, note that all file names are saved in lower case letters on
the CF card (com, png, txt).
Note
Make sure that the coding is set to UTF-8 in the editor that you are using when saving the
configuration and language files.
Image files
Always save image files in the PNG format "*.png".
The data must be saved, e.g. for OEM modifications, under
[System oem directory]/ico/[Resolution]
Further information can be found in Chapter Using display images/graphics (Page 61).
Adapting the configuration file
Check your configuration files regarding the following points:
● Compare the start softkeys with the currently permissible softkeys and adapt them, if
required.
● Rename the integrated image files corresponding to the "Image files" point above.
The data is stored, e.g. for OEM modifications, in the following directory:
[System oem directory]/proj
[System user directory]/proj
[System add_on directory]/proj
Adapting the help files
All help files must be saved in UTF-8. Check your existing files, and resave them accordingly
with a suitable editor.
The HTML files are saved in the following directory, e.g. for English:
[System oem directory]/hlp/eng
[System user directory]/hlp/eng
[System add_on directory]/hlp/eng
SINUMERIK Integrate Run MyScreens
Programming Manual, 06/2019, A5E40869575B AC
41
Fundamentals
3.6 Notes for personnel changing over to "Run MyScreens"
You must create the directories for additional languages corresponding to the language codes.
Checking the "Run MyScreens" license
Check whether the number of dialogs that you have entered exceeds the basic scope of a
maximum of five dialogs.
To expand the number of dialogs, you require one of the following software options:
● SINUMERIK 828D/840D sl, SINUMERIK Integrate Run MyScreens
(6FC5800-0AP64-0YB0)
● SINUMERIK 840D sl, SINUMERIK Integrate Run MyScreens + Run MyHMI
(6FC5800-0AP65-0YB0)
● SINUMERIK 840D sl, SINUMERIK Integrate Run MyHMI / 3GL
(6FC5800-0AP60-0YB0)
● SINUMERIK 840D sl, SINUMERIK Integrate Run MyHMI / WinCC
(6FC5800-0AP61-0YB0)
SINUMERIK Integrate Run MyScreens
42
Programming Manual, 06/2019, A5E40869575B AC
Fundamentals
3.7 Extended configuration syntax
3.7
Extended configuration syntax
As of SINUMERIK Operate V4.7, a simplified syntax is available for the definition of screens,
variables, softkeys and for table columns. Reading and servicing are improved with this
alternative syntax. The properties and attributes can be specified in any order, empty entries
are omitted. Instead of with round brackets "(" and ")" as in the previous syntax, the listing of the
properties and attributes is now enclosed in curly brackets "{" and "}".
The properties and attributes are specified as follows:
{<Name> = <Value>, <Name> = <Value>, …}
The previous syntax remains compatible.
Extended syntax for the definition of screens
//M {<Mask name> [,HD=<Title>] [,HLP=<Graphic>] [,X=<X position>] [,Y=<Y position>]
[,W=<Width>] [,H=<Height>] [,VAR=<> System or user variable] [,HLP_X=<X position help
screen] [,HLP_Y=<Y position help screen>] [,CM=<Column alignment>] [,CB= Response
when opening the dialog] [,XG=<Interpret help screen as X3d graphic>] [,PANEL=<Name of
the linked FormPanel>][,MC=<Mask backg14round color:>][,HD_AL=<Alignment of the mask
header>] [,LANGFILELIST=<List of the mask-specific language files>]}
Example:
//M{VariantTest, HD="My Mask"}
Extended syntax for the definition of variables
DEF <Variable name> = {[TYPType] [,MIN=<Minimum value>] [,MAX=<Maximum value>]
[,TGL=<Toggle values>] [,VAL=<Preassignment>] [,LT=<Long text>] [,ST=<Short text>]
[,GT=<Graphic text>] [,UT=<Unit text>] [,TT=<ToolTip text>] [,TG=<Toggle option>]
[,WR=<Input mode>] [,AC=<Access level>] [,AL=<Text alignment>] [,FS=<Font size>]
[,LI=<Limit value handling>] [,UR=<Refresh rate>] [,CB=<Text align when opening the dialog>]
[,HLP=<Help screen>] [,VAR=<System or user variable>] >] [,TXT_X=<X position short text>]
[,TXT_Y=<Y position short text>] [,TXT_W=<Width short text>] [,TXT_H=<Height short text>]
[,X=<X position input/output field>] [,Y=<Y position input/output field>] [,W=<Width input output
field>] [,H=<Height input/output field>] [,UT_DX=<Distance between input field and unit field>]
[,UT_W=<Width unit field>] [,BC=<Background color input/output field>] [,FC=<Foreground
color input/output field>] [,BC_ST=<Background color short text>] [,FC_ST=<Foreground color
short text>] [,BC_GT=<Background color graphic text>] [,FC_GT=<Foreground color graphic
text>] [,BC_UT=<Background color unit text>] [,FC_UT=<Foreground color unit text>]
[,SC1=<Signal color 1 for progress bar>] [,SC2=<Signal color 2 for progress bar>]
[,SVAL1=<Threshold value 1 for progress bar>] [,SVAL2=<Threshold value 2 for progress
bar>] [,DT=<Display type>] [,DO=<Display alignment>] [,OHLP=<Online help>]
[,LINK_TGL=<Name of the linked toggle v]}
Examples:
DEF MyVar5={TYP="R2", ST="MyVar5", VAL=123.4567, OHLP="myhelp.html", MIN=100.1,
MAX=200.9}
DEF MyVar2={TYP="I", TGL="*1,2,3", VAL=1}
DEF MyVar3={TYP="R2", TGL="*0=""Off"", 1=$80000", VAL=1}
SINUMERIK Integrate Run MyScreens
Programming Manual, 06/2019, A5E40869575B AC
43
Fundamentals
3.7 Extended configuration syntax
DEF MyVar4={TYP="R2", TGL="*MyArray",VAL=1}
DEF MyVar1={TYP="R2", TGL="%grid99", X = 0, W=300, H=200}
DEF MyVar6={TYP="R2", TGL="+$80000", VAR="$R[10]", ST="Text offset"}
Extended syntax for the definition of softkeys
SK = {[ST=<Label>] [,AC=<Access level>] [,SE=<Status>]}
Examples:
HS1={ST="""MySk""", AC=6, SE=1}
HS3={ST="SOFTKEY_CANCEL"}
HS5={ST="[$81251,""\\sk_ok.png""]"}
HS8={ST="[""Test"",""\\sk_ok.png""]"}
Extended syntax for the definition of table columns
{[TYP=<Type>] [,MIN=<Minimum value>] [,MAX=<Maximum value>] [,LT=<Long text>]
[,ST=<Short text>] [,WR=<Input mode>] [,AC=<Access level>] [,AL=<Text alignment>]
[,FS=<Font size>] [,LI=<Limit value handling>] [,UR=<Refresh rate>] [,HLP=<Help screen>]
[,VAR=<System or user variable>] >] [,W=<Column width>] [,OF1=<Offset1>]
[,OF2=<Offset2>] [,OF3=<Offset3>]}
Example:
DEF MyGridVar={TYP="R", TGL="%MyGrid1", X=10, W=550, H=100}
//G(MyGrid1/0/5)
{TYP="I", ST="Index", WR=1, VAR="1", W=80, OF1=1}
{TYP="S", LT="LongText2", ST="Text", WR=1, VAR="$80000", AL=2, W=330, OF1=1}
{TYP="R3", LT="LongText1", ST="R9,R11,R13,R15", WR=2, VAR="$R[1]", W=110, OF1=2}
//END
SINUMERIK Integrate Run MyScreens
44
Programming Manual, 06/2019, A5E40869575B AC
Fundamentals
3.8 SmartOperation and MultiTouch operation
3.8
SmartOperation and MultiTouch operation
You have the following setting options for specific adjustment to SmartOperation and for
MultiTouch operation:
● Automatic adjustment of the field height and field width to the so-called minimum usable
field size and the line spacing (mask attribute MA).
● Optimized and pixel-precise stretching of the fields for higher resolutions (mask attribute
PA).
● Setting of the field height and line spacing proportional to the font (mask attribute FA).
● Allows free scrolling so that the input field is not covered by the virtual keyboard (mask
attribute KM).
Further details can be found in Chapter Defining dialog properties (Page 49), Section
"Programming".
SINUMERIK Integrate Run MyScreens
Programming Manual, 06/2019, A5E40869575B AC
45
Fundamentals
3.8 SmartOperation and MultiTouch operation
SINUMERIK Integrate Run MyScreens
46
Programming Manual, 06/2019, A5E40869575B AC
Dialogs
4
4.1
Structure and elements of a dialog
4.1.1
Defining a dialog
Definition
A dialog is part of a user interface consisting of a display line, dialog elements and/or graphics,
an output line for messages and 8 horizontal and 8 vertical softkeys.
Dialog elements are:
● Variables
- Limits/toggle field
- Default setting of variables
● Help display
● Texts
● Attributes
● System or user variable
● Position of short text
● Position of input/output field
● Colors
Dialog properties:
● Header
● Graphic
● Dimension
● System or user variable
SINUMERIK Integrate Run MyScreens
Programming Manual, 06/2019, A5E40869575B AC
47
Dialogs
4.1 Structure and elements of a dialog
● Graphic position
● Attributes
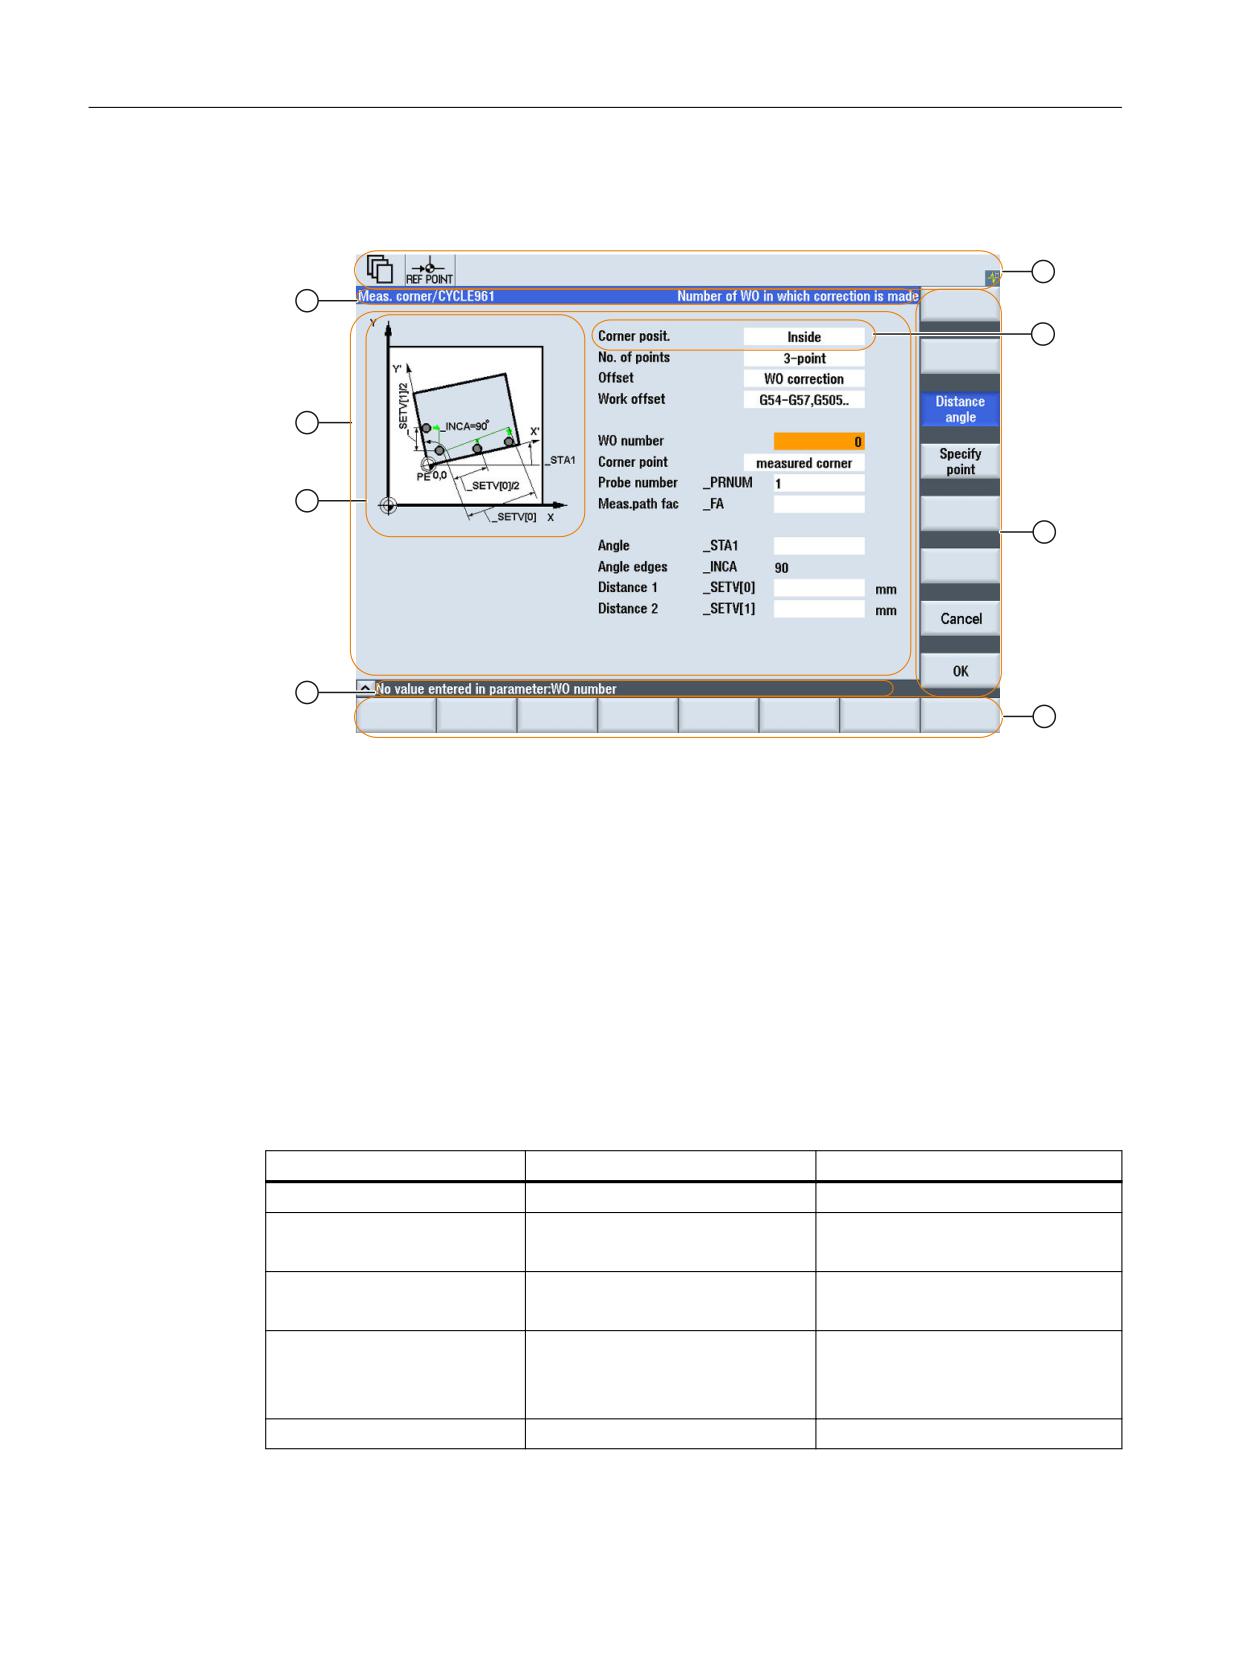
① Machine status display ("header")
② Dialog element
③ 8 vertical softkeys
④ 8 horizontal softkeys
⑤ Output of diagnostic messages
⑥ Graphic
⑦ Dialog
⑧ Header line of the dialog with header and long text
Figure 4-1
Structure of the dialog
Overview
The definition of a dialog (definition block) is basically structured as follows:
Definition block
Comment
Chapter reference
//M...
;Dialog start identifier
DEF Var1=...
;Variables
Variables (Page 81)
HS1=(...)
;Softkeys
Defining softkey menus (Page 62)
PRESS(HS1)
;Method start identifier
LM...
;Actions
Methods (Page 126)
END_PRESS
;Method end identifier
//END
;Dialog end identifier
SINUMERIK Integrate Run MyScreens
48
Programming Manual, 06/2019, A5E40869575B AC
Dialogs
4.1 Structure and elements of a dialog
Within the dialog definition block, various variables that appear as dialog elements in the dialog,
as well as horizontal and vertical softkeys, are defined first. Different types of actions are then
configured in methods.
Note
In operating area "Machine", for a dialog change, the following sequence should be observed:
Under the precondition that the dimensions of the following mask are smaller than the previous
mask - or the position of the following mask is different than the previous mask, dialog change
only functions if the following mask is exited before returning to the first mask, and only then is
the first mask reloaded.
4.1.2
Defining dialog properties
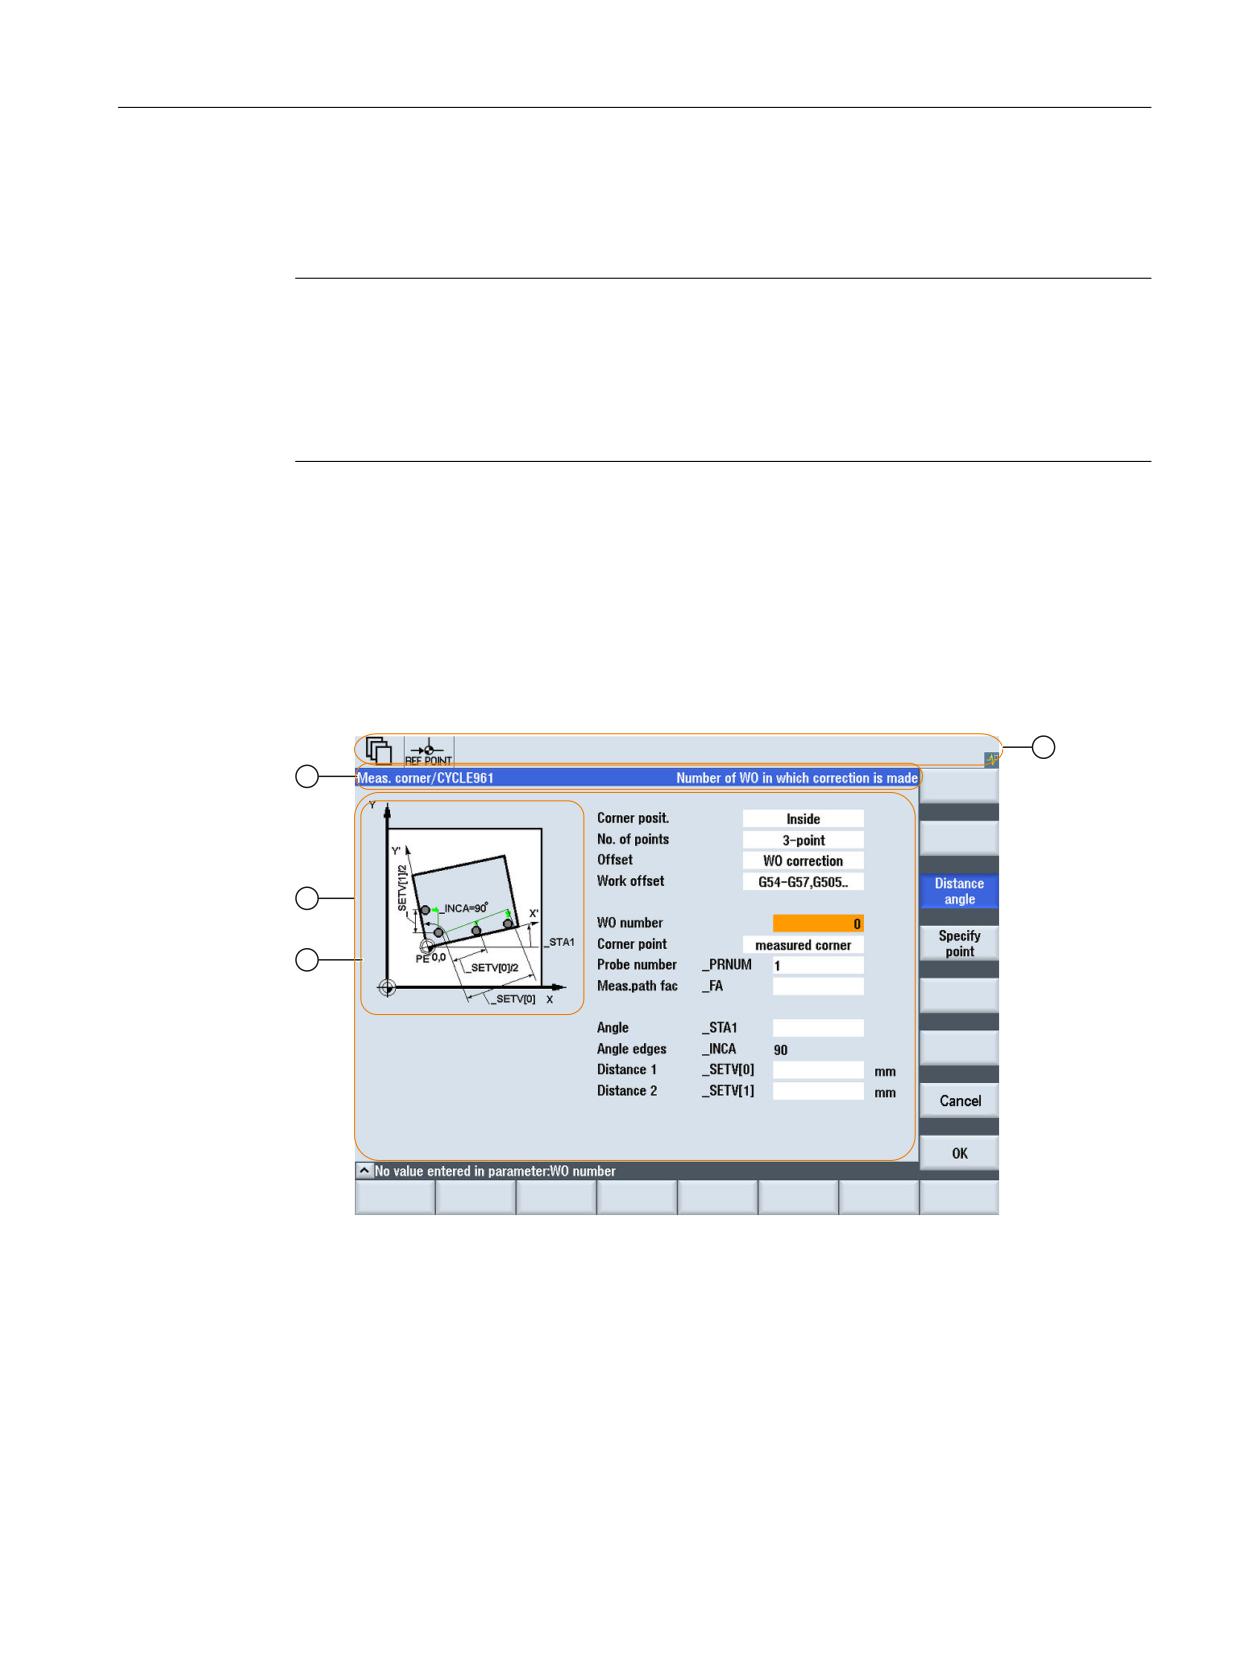
Description
The properties of the dialog are defined in the start identifier line of the dialog.
① Machine status display ("header")
② Graphic
③ Dialog
④ Header line of the dialog with header and long text
Figure 4-2
Dialog properties
SINUMERIK Integrate Run MyScreens
Programming Manual, 06/2019, A5E40869575B AC
49
Dialogs
4.1 Structure and elements of a dialog
Programming
Syntax:
//M(Identifier/[Title]/[Graphic]/[Dimension]/[System or user variable]/[Position graphic]/[Attribute]/List of the
mask-specific language files)
See also Chapter Extended configuration syntax (Page 43).
Description:
Defines a dialog
SINUMERIK Integrate Run MyScreens
50
Programming Manual, 06/2019, A5E40869575B AC
Dialogs
4.1 Structure and elements of a dialog
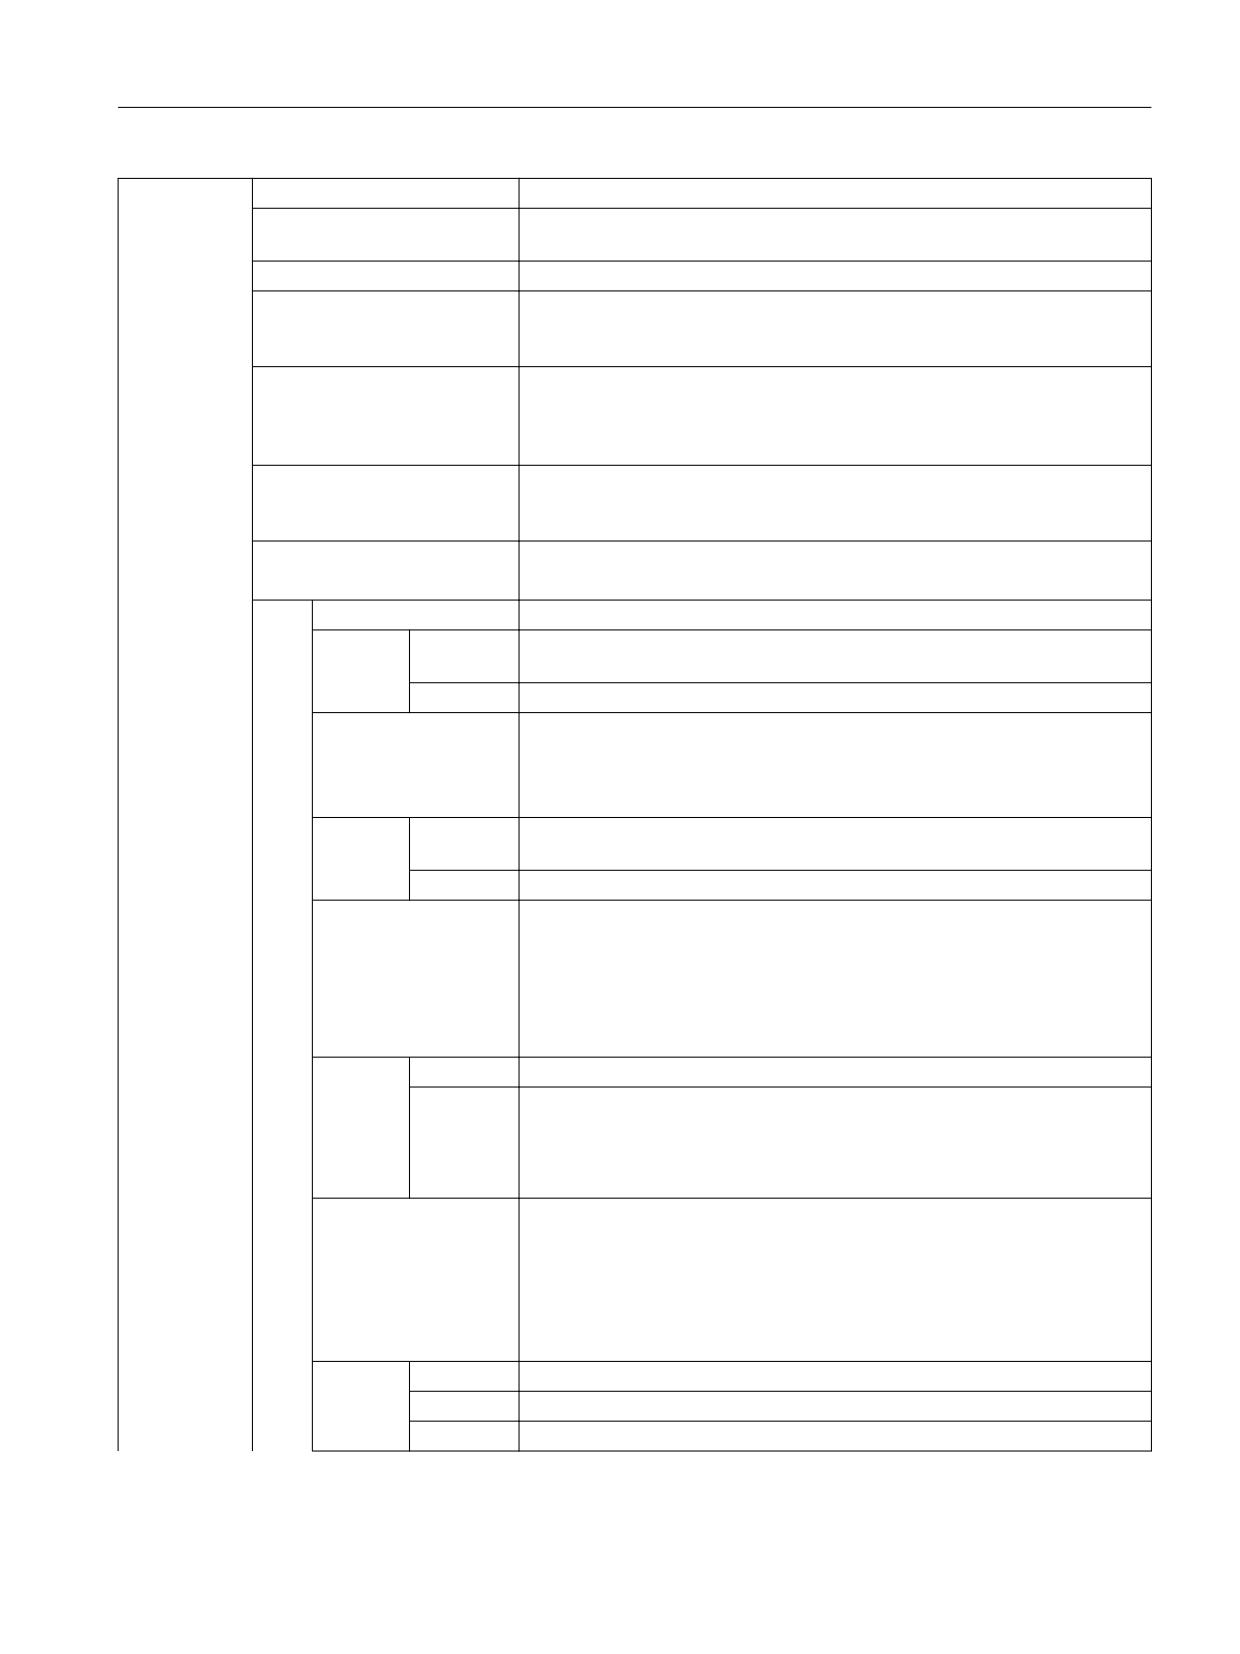
Parameter:
Identifier
Name of the dialog
Header
Dialog header as text or call for text (e.g. $85011) from a language-specific
text file.
Graphic
Graphics file with path in double quotation marks.
Dimension
Position and size of the dialog in pixels (distance from left-hand side, dis-
tance from top, width, height), in relation to the upper left-hand corner of the
screen. The entries are separated by a comma.
System or user variable
System or user variable to which the current cursor position is assigned. The
NC or PLC can be provided with the cursor position via the system or user
variable. The first variable has index 1. The order corresponds to the con-
figuration order of the variables.
Graphic position
Position of the graphic in pixels (distance from left-hand side, distance from
top), in relation to the upper left-hand corner of the dialog. The entries are
separated by a comma.
Attributes
The specifications of the attributes are separated by a comma.
Possible attributes are:
CM
Column mode: Column alignment
CM0
Default setting: The column distribution is carried out separately for each
line.
CM1
The column distribution of the line with the most columns applies to all lines.
CB
CHANGE block: Response when dialog is opened: cb attributes specified
for a variable in a variables definition take priority over the default setting in
the dialog definition.
See also Behavior when opening the dialog (attribute CB) (Page 314).
CB0
Default setting: All CHANGE blocks associated with the dialog are pro-
cessed when it is opened.
CB1
CHANGE blocks are then only processed if the relevant value changes.
XG
Integration of an X3D animation as help display (only in the machining step
programming).
Example:
//M(Meas/
$85605/"myx3dhelpfile.hmi,,Z_Animation,,G17"///30,10/
XG1)
XG0
Default setting = 0
XG1
The mask attribute XG must already be set to 1 in the mask definition, a
change during runtime is not possible.
Note:
The specification in the mask property HLP must also be set accordingly.
AL
The alignment of the mask header can be influenced with the mask attribute
AL.
Example:
Central setting of the "Set password" window header:
//M(MY_PWD_SET/”Set password”//"EasyPwdModalLayout"//
AL2)
AL0
Left-justified, default
AL1
Right-justified
AL2
Centered
SINUMERIK Integrate Run MyScreens
Programming Manual, 06/2019, A5E40869575B AC
51
Dialogs
4.1 Structure and elements of a dialog
KM
Freely scrolling in the mask (SlGfwScrollArea), if the virtual keyboard is to be
displayed for MultiTouch, can be influenced as follows:
● In the mask definition line with mask attribute "KM" (KeyboardMode)
Example:
//M(MyMTMask/"MultiTouch Mask"/////KM1)
● As global setting for all Run MyScreens masks in the "easyscreen.ini"
Example:
[GENERAL]
DefaultVirtualKeyboardMode=1
Note:
If, when configuring the masks, the mask attribute KM is explicitly set, then
this has a higher priority than the global setting in "easyscreen.ini".
(See also Chapter SmartOperation and MultiTouch operation (Page 45))
KM1
Free scrolling active (default)
KM0
Free scrolling inactive
PG
Alignment and appearance of the window title in conjunction with PNG im-
ages (only effective in the editor!)
Example:
//M(MyPg1SampleMask/"My PG1 Sample Mask"/////PG1)
PG0
(Default)
PG1
Alignment and appearance of the window title in conjunction with PNG im-
ages
Path specification (on the far left), mask name (on the right)
The display of the long text is no longer possible in this mode. Alternatively,
you can work with tooltips.
MA
Automatic adjustment of the field height for MultiTouch operation (Mutli-
Touch Adjustment)
If required, the adjusment for a MultiTouch operator panel includes the nec-
essary enlargement to the so-called minimum usable size (width, height) of
the fields (exceptions: progress bar, animated GIF, CustomWidget) and the
line spacing.
The MultiTouch adjustment can be made
● globally for all Run MyScreens mask in "easyscreen.ini", e.g.
[GENERAL]
DefaultMultiTouchAdjustmentLevel=1
● or mask-specifically in the mask definition line with the mask property
"MA" in order to overwrite the global setting in "easyscreen.ini", e.g.
//M(MyMTMask/"MultiTouch Mask"/////MA1)
If the mask attribute MA is set explicitly in the mask configuration, then this
has a higher priority than the global setting in "easyscreen.ini".
(See also Chapter SmartOperation and MultiTouch operation (Page 45))
MA0
There is no adjustment
MA1
Only those fields are adjusted for which no spacing from the top and/or field
height/width has been configured - i.e. the fields that use default positions
and therefore for which Run MyScreens calculates the spacing from the top
and/or field height/width. (Default)
SINUMERIK Integrate Run MyScreens
52
Programming Manual, 06/2019, A5E40869575B AC
Dialogs
4.1 Structure and elements of a dialog
MA2
All fields are adjusted irrespective of the configured field sizes.
PA
Optimized and pixel-precise stretching of the fields for higher resolutions
(Pixel Fine Adjustment)
Previously all field positions were calculated in relation to 640x480 and then
zoomed with the appropriate horizontal and vertical stretch factors. This
process has the disadvantage that rounding errors can occur with "unfav-
orable stretch factors". For example, the field height or line spacing can
"jump" by a pixel from line-to-line. The "Pixel Fine Adjustment" mode can be
used to prevent this as the field positions are determined directly in the
current resolution.
//M(MyMask/"My Mask"/////PA1)
This setting can also be made globally for all Run MyScreens masks in
"easyscreen.ini", e.g.
[GENERAL]
DefaultPixelFineAdjustment=1
If the mask attribute PA is set explicitly in the mask configuration, it has a
higher priority than the global setting in "easyscreen.ini".
If a mask is displayed with Font Adjustment = FA1, then the Pixel Fine
Adjustment mode is also automatically active for this mask.
(See also Chapter SmartOperation and MultiTouch operation (Page 45))
PA0
Stretching as previously, i.e. the positions are calculated in relation to
640x480 and then stretched.
(For compatibility reasons: Default)
PA1
Optimized and pixel-precise stretching of the fields for higher resolutions
FA
Field height and line spacing proportional to the font (Font Adjustment)
This setting can also be made globally for all Run MyScreens masks in
"easyscreen.ini", e.g.
[GENERAL]
DefaultFontAdjustment=1
If the mask attribute FA is set explicitly in the mask configuration, then this
has a higher priority than the global setting in "easyscreen.ini".
The settings for the DefaultLineHeight and DefaultLineSpacing have no
significance when Font Adjustment mode is active.
(See also Chapter SmartOperation and MultiTouch operation (Page 45))
FA0
Field height and line spacing are stretched as previously. (For compatibility
reasons: Default)
FA1
Field height and line spacing are set proportional to the font (automatically
sets mask attribute PA=1)
FA2
Same as FA1, but the X coordinate and the field width are also stretched
proportionally to the font
(Automatically sets mask attribute PA=1)
(Only possible in conjunction with attribute XG=1!)
NT
Navigation Type
NT0
NT0 = standard mode
The navigation is analogous to the masks of the operating area in which Run
MyScreens mask is integrated. This means in the cycle masks in the editor,
navigation is line-oriented (see NT2), in all other "normal" masks, it is a
geometrical (see NT1).
SINUMERIK Integrate Run MyScreens
Programming Manual, 06/2019, A5E40869575B AC
53
Dialogs
4.1 Structure and elements of a dialog
NT1
Geometrical navigation (top, bottom, left, right), until the borders of the mask
are reached (standard in a normal Run MyScreens environment, e.g. area
"Custom")
NT2
Line-oriented, i.e. within the line to the right until the end of the line is
reached (standard, in the cycle masks of the editor)
NR
Navigation direction when pressing the Enter key (Return Navigate Direc-
tion)
NR0
NR0 = off (default), i.e. when pressing the Enter key, navigation is realized
within the mask in a tabular sequence (standard in the normal Run
MyScreens environment)
NR1
When pressing the Enter key, navigation is the same as when pressing the
up arrow key
NR2
As for NR1, however, downward
NR3
As for NR1, however, to the left
NR4
As for NR1, however, to the right
TA
Tooltip alignment
TA0
Automatic (default)
TA1
Left
TA2
Right
TA3
Top
TA4
Bottom
TA5
Top left
TA6
Bottom left
TA7
Top right
TA8
Bottom right
MC
Mask backg14round color (mask color)
Example:
Set mask backg14round color blue (= 6)
//M(MyMask/"MyMask"//////6)
or
PRESS(HS1)
MC=6
END_PRESS
List of the mask-specific lan-
separated by a comma
guage files
Accessing the dialog properties
Read and write access to the following dialog properties is permitted within methods (e.g.
PRESS block).
● HD = Header
● HLP = Help display
● VAR = System or user variable
● MC = Mask backg14round color
● CM = Column alignment (read-only)
SINUMERIK Integrate Run MyScreens
54
Programming Manual, 06/2019, A5E40869575B AC
Dialogs
4.1 Structure and elements of a dialog
● CB = Behavior when opening (read-only)
● XG = Integration of X3d (read-only)
● AL = Mask header alignment (read-only)
Example
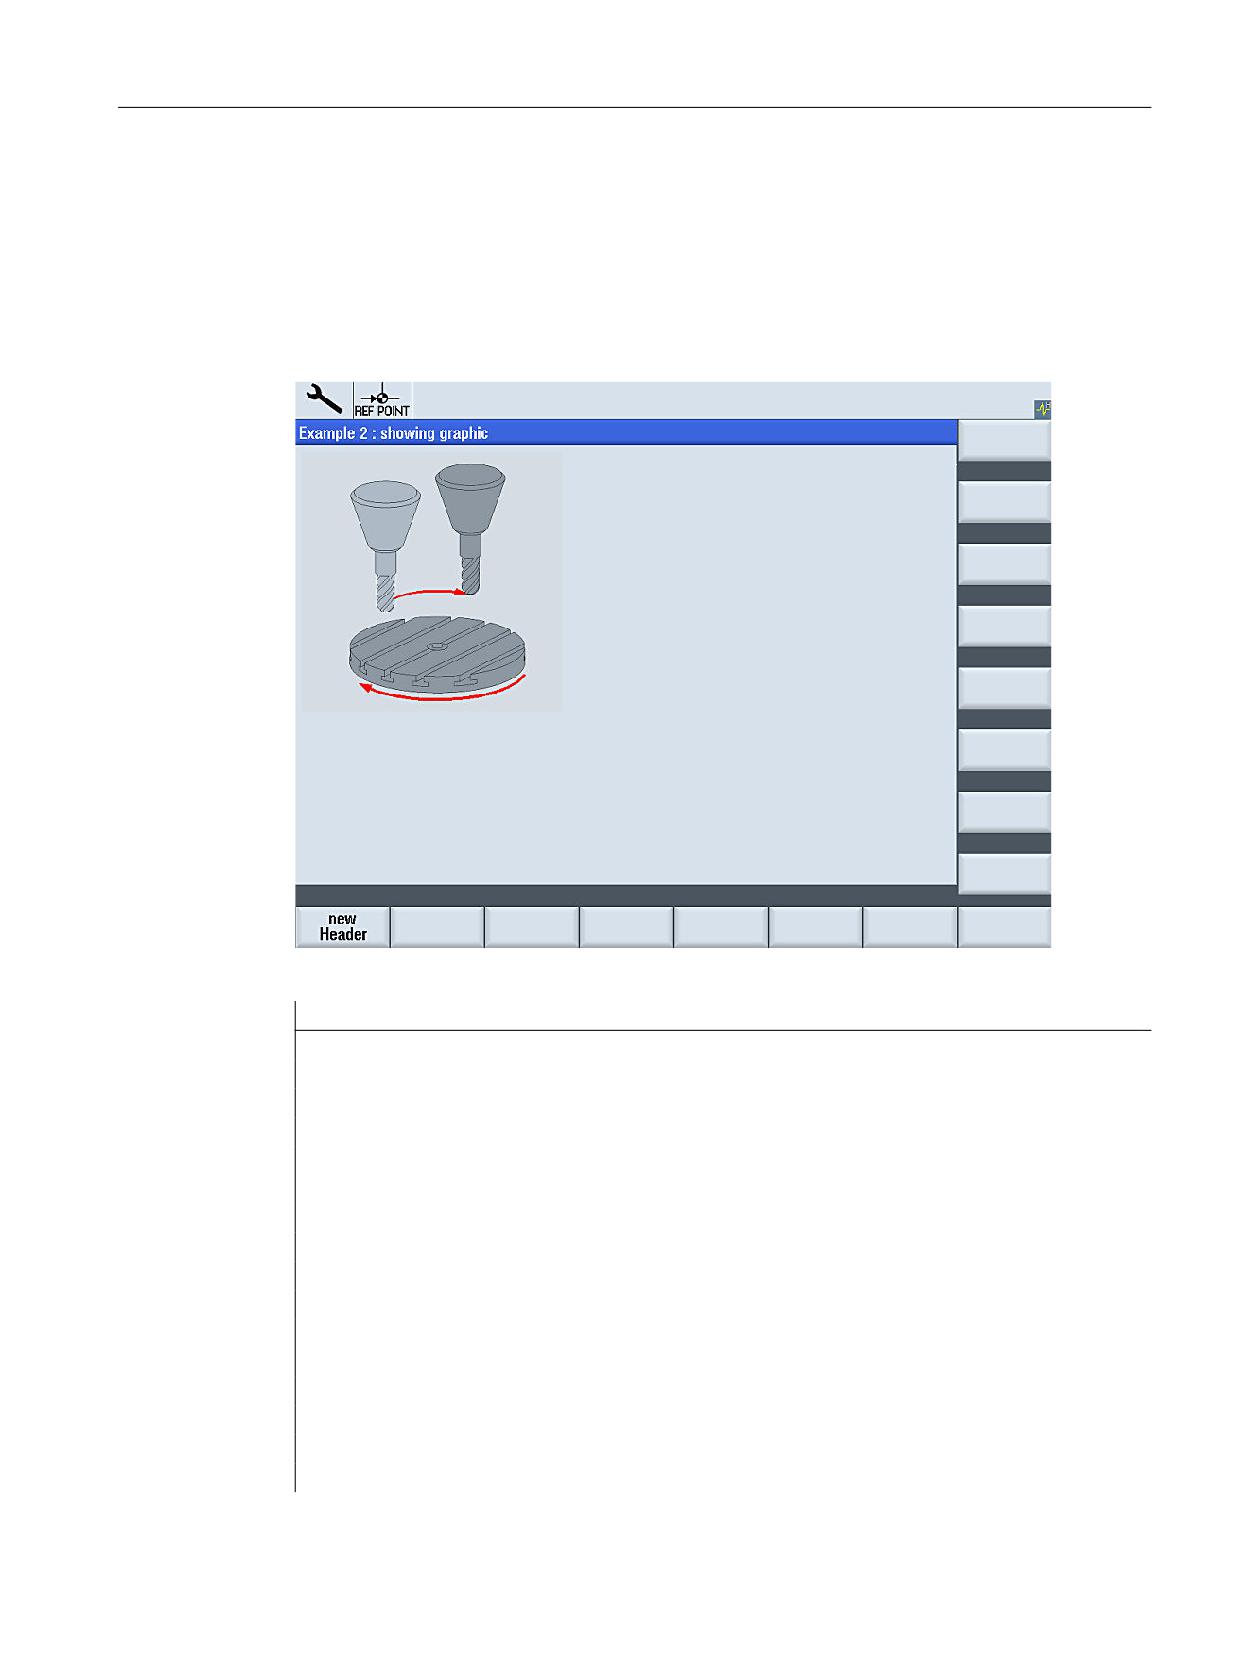
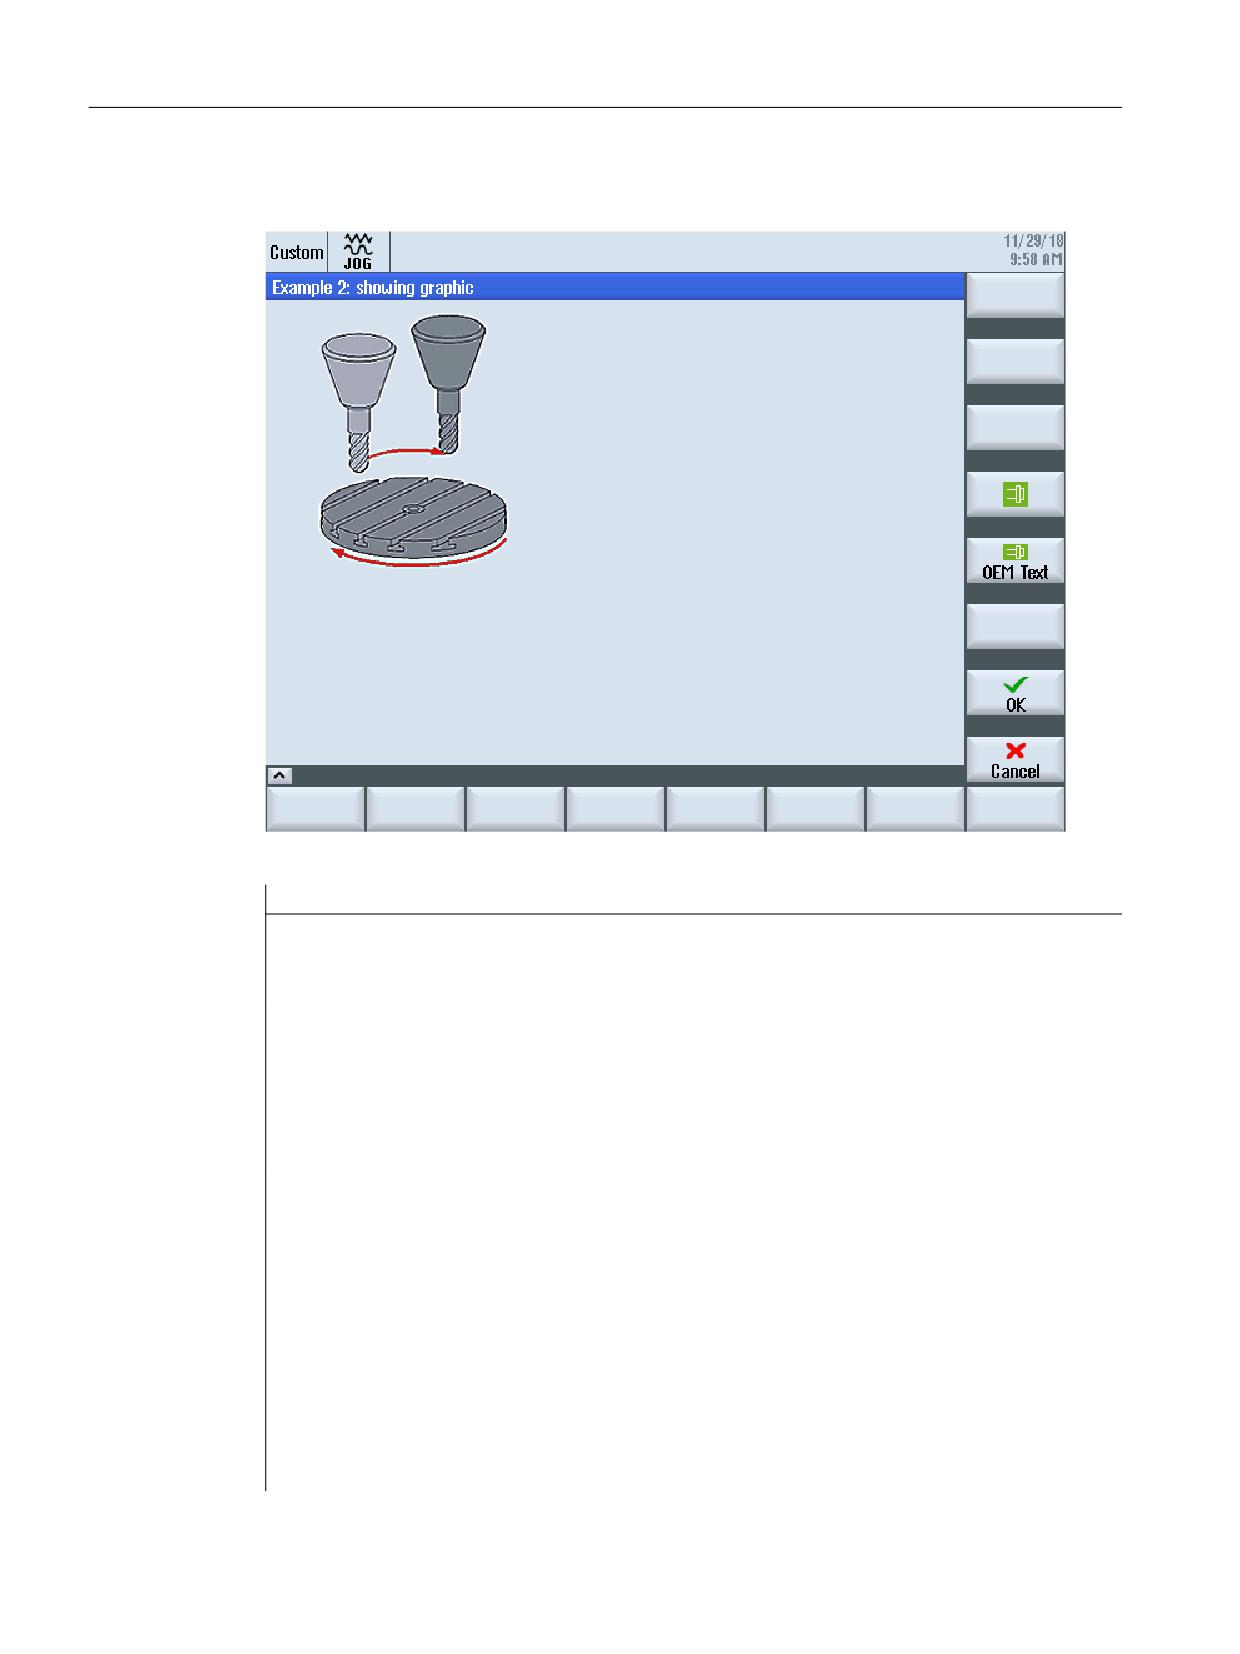
Figure 4-3 "Example 2: showing graphic"
//S(Start)
HS7=("Example", se1, ac7)
PRESS(HS7)
LM("Mask2")
END_PRESS
//END
//M(Mask2/"Example 2 : showing graphic"/"example.png")
HS1=("new%nHeader")
HS2=("")
HS3=("")
HS4=("")
HS5=("")
HS6=("")
HS7=("")
SINUMERIK Integrate Run MyScreens
Programming Manual, 06/2019, A5E40869575B AC
55
Dialogs
4.1 Structure and elements of a dialog
HS8=("")
VS1=("")
VS2=("")
VS3=("")
VS4=("")
VS5=("")
VS6=("")
VS7=("")
VS8=("")
PRESS(HS1)
Hd= "new Header"
END_PRESS
//END
See also
Programming example for the "Custom" area (Page 276)
4.1.3
Defining dialog elements
Dialog element
The term "dialog element" refers to the visible part of a variable, i.e. short text, graphics text,
input/output field, unit text and tooltip. Dialog elements fill lines in the main body of the dialog.
One or more dialog elements can be defined for each line.
SINUMERIK Integrate Run MyScreens
56
Programming Manual, 06/2019, A5E40869575B AC
Dialogs
4.1 Structure and elements of a dialog
Variable properties
All variables are valid in the active dialog only. Properties are assigned to a variable when it is
defined. The values of dialog properties can be accessed within methods (e.g. a PRESS
method).
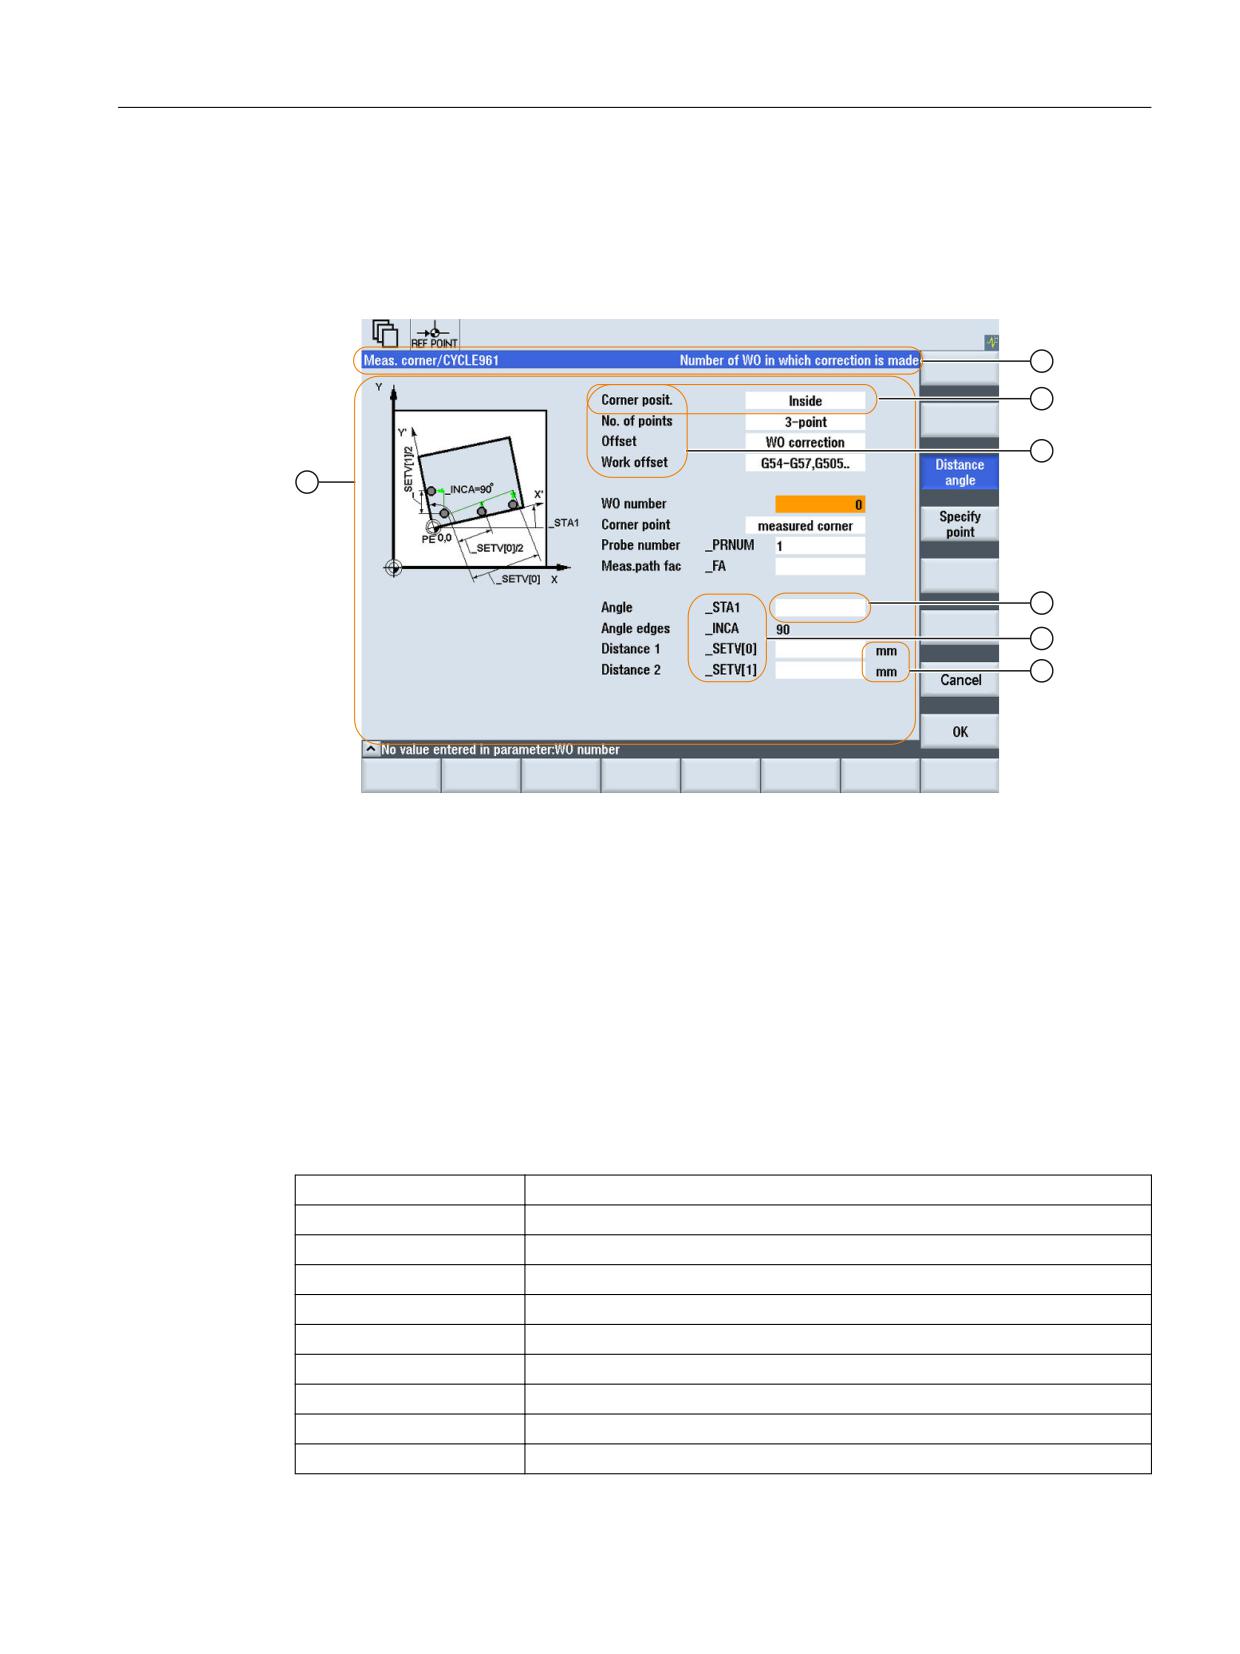
① Header line of the dialog with header and long text
② Dialog element
③ Short text
④ Input/output field
⑤ Graphic text
⑥ Text for units
⑦ Main body of the dialog
Figure 4-4
Elements of a dialog
Programming - Overview
The single parameters to be separated by commas are enclosed in round brackets:
DEF Identifier =
Identifier = Name of variable
Variable type
/[Limit values or toggle field]
/[Default]
/[Texts (Long text, Short text|Image, Graphic text, Units text)]
/[Attributes]
/[Help display]
/[System or user variable]
/[Position of short text]
/[Position of I/O field(Left, Top, Width, Height)]
SINUMERIK Integrate Run MyScreens
Programming Manual, 06/2019, A5E40869575B AC
57
Dialogs
4.1 Structure and elements of a dialog
/[Colors]
/[online help]
See also
Variable parameters (Page 92)
4.1.4
Defining dialogs with multiple columns
Overview
Multiple variables can also be represented in a dialog on one line. In this case, the variables are
all defined in the configuration file on a single definition line.
DEF VAR11 = (S///"Var11"), VAR12 = (I///"Var12")
To make individual variables in the configuration file more legible, the definition lines can be
wrapped after every variables definition and following comma.
The key word "DEF" always indicates the beginning of a new line:
DEF Tnr1=(I//1/"","T ",""/wr1///,,10/20,,50),
TOP1=(I///,"Type="/WR2//"$TC_DP1[1,1]"/80,,30/120,,50),
TOP2=(R3///,"L1="/WR2//"$TC_DP3[1,1]"/170,,30/210,,70),
TOP3=(R3///,"L2="/WR2//"$TC_DP4[1,1]"/280,,30/320,,70),
TOP4=(R3///,"L3="/WR2//"$TC_DP5[1,1]"/390,,30/420,,70)
DEF Tnr2=(I//2/"","T ",""/wr1///,,10/20,,50),
TOP21=(I///,"Typ="/WR2//"$TC_DP1[2,1]"/80,,30/120,,50),
TOP22=(R3///,"L1="/WR2//"$TC_DP3[2,1]"/170,,30/210,,70),
TOP23=(R3///,"L2="/WR2//"$TC_DP4[2,1]"/280,,30/320,,70),
TOP24=(R3///,"L3="/WR2//"$TC_DP5[2,1]"/390,,30/420,,70)
Note
When configuring multi-column dialogs, please observe that a large number of columns might
slow down the system!
SINUMERIK Integrate Run MyScreens
58
Programming Manual, 06/2019, A5E40869575B AC
Dialogs
4.1 Structure and elements of a dialog
4.1.5
Password dialogs
Using the standard password dialogs
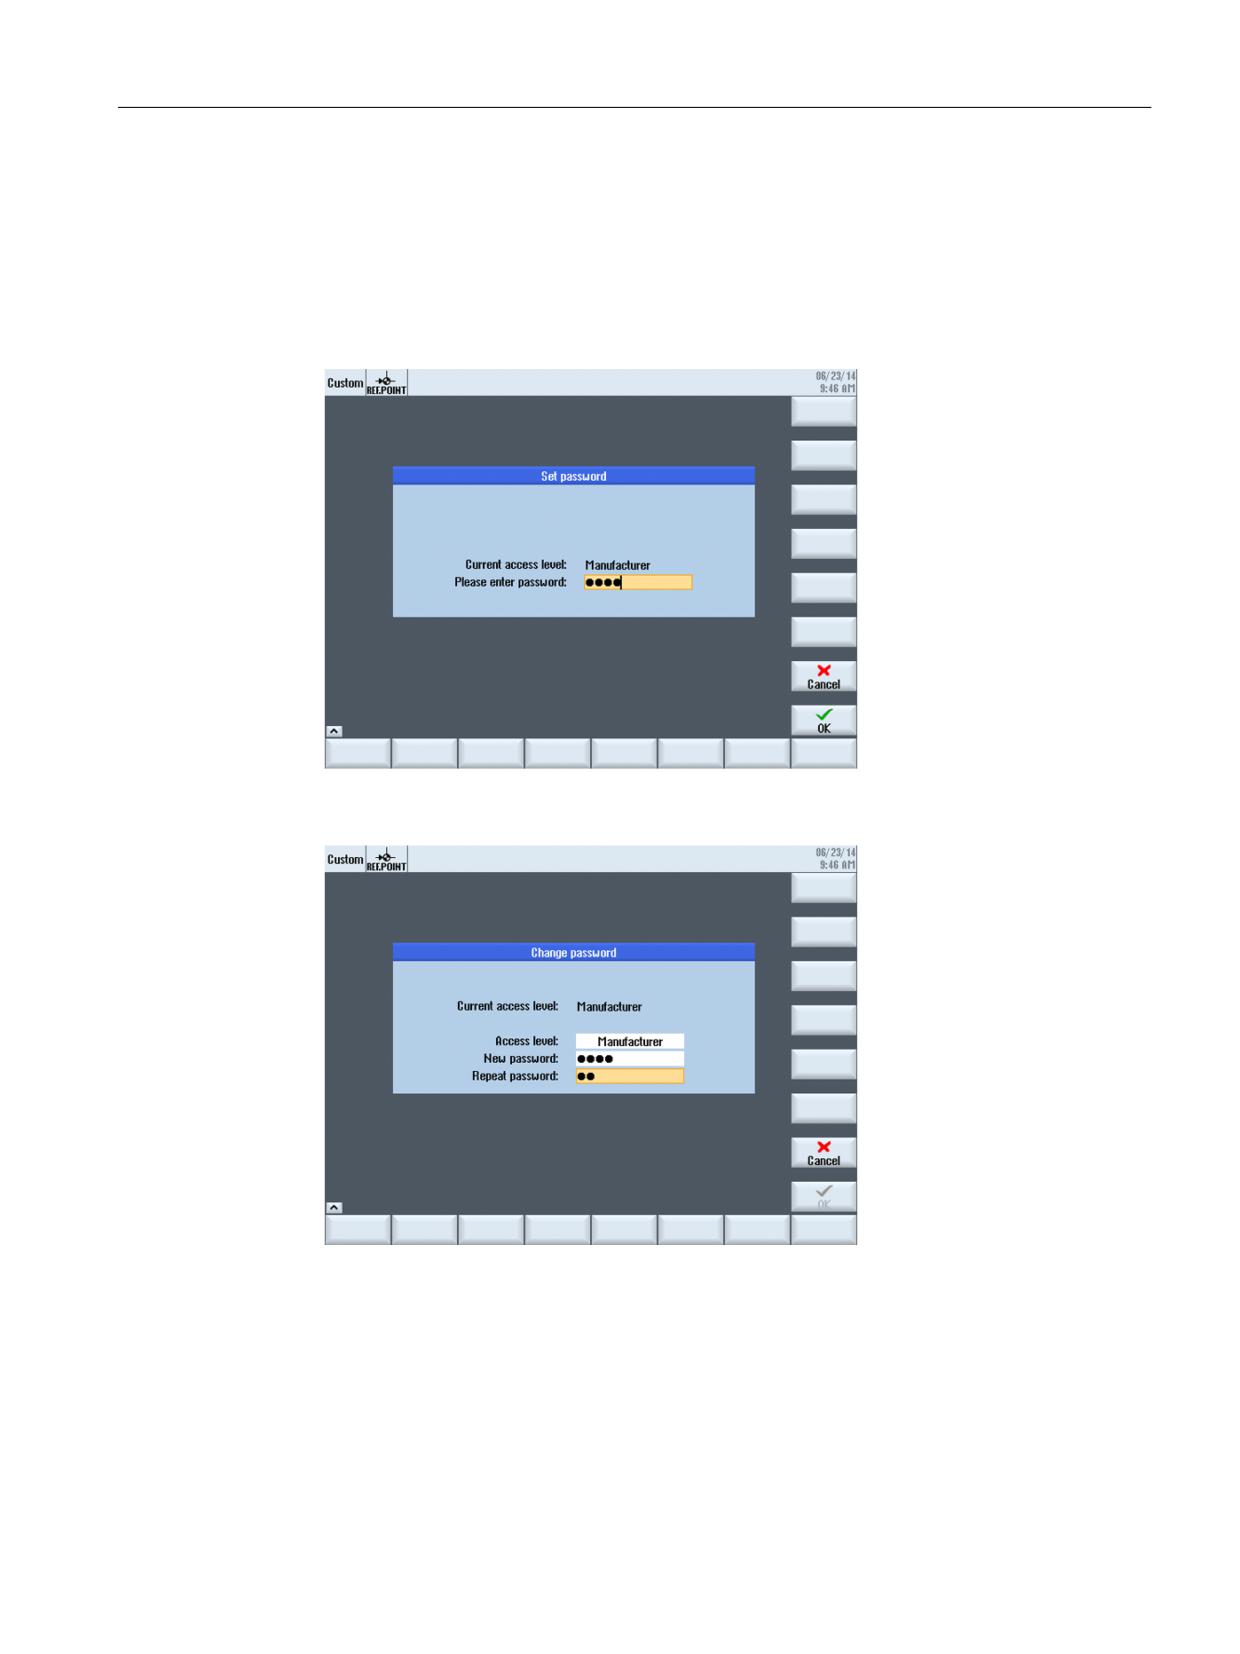
You can integrate the following predefined password dialogs in the screen configuration:
● Set password
Figure 4-5
Set password dialog
● Change password
Figure 4-6
Change password dialog
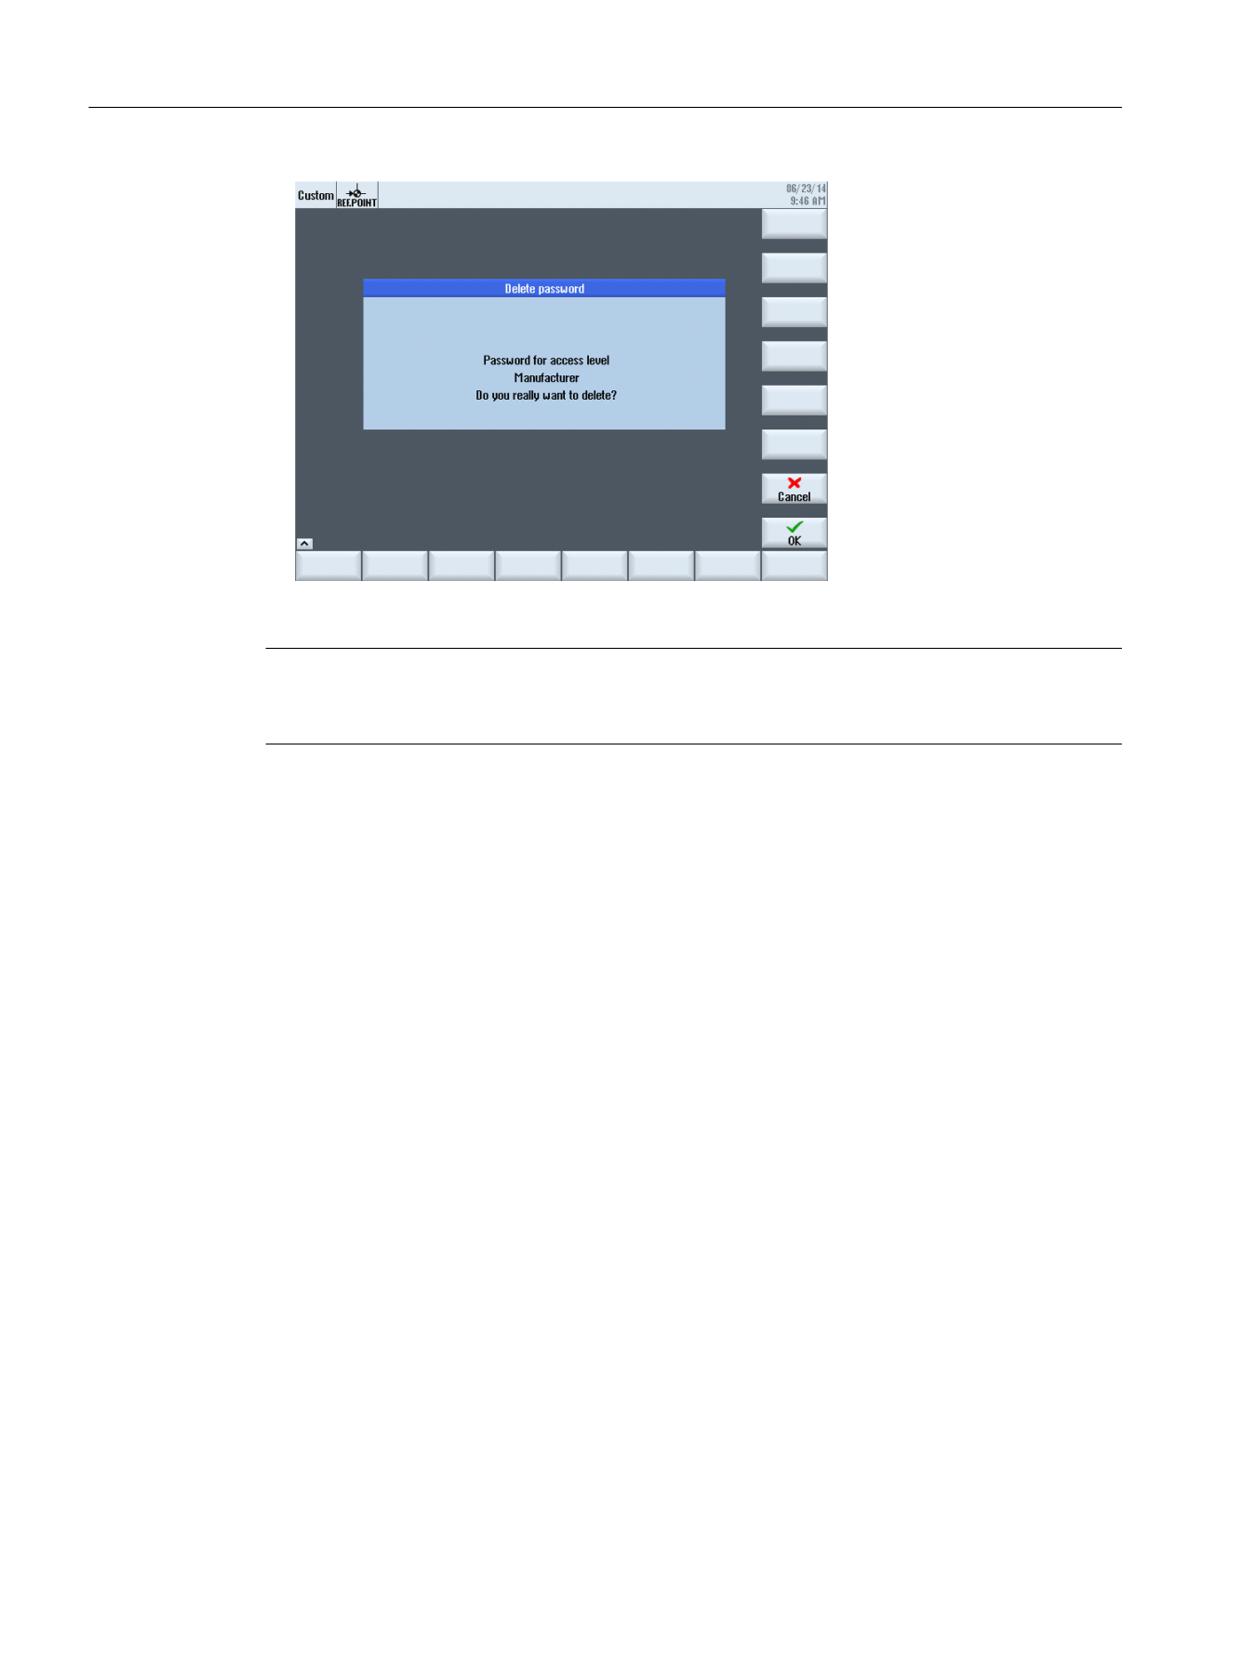
● Delete password
SINUMERIK Integrate Run MyScreens
Programming Manual, 06/2019, A5E40869575B AC
59
Dialogs
4.1 Structure and elements of a dialog
Figure 4-7
Delete password dialog
Note
Password functionality is provided with these dialogs. The dialogs do not correspond to the
dialogs of SINUMERIK Operate.
The dialogs can be called either via the Load softkey (LS) function or the Load mask (LM)
function:
1. Call via the Load softkey (LS) function:
LS("Passwd","slespasswd.com",1)
Extension of the vertical softkeys:
- Softkey 1: Set password
- Softkey 2: Change password
- Softkey 3: Delete password
2. Alternatively, the three masks can be directly jumped to by calling the (LM) function:
- Set password: LM("PWD_SET", "slespasswd.com",1)
- Change password: LM("PWD_CHG", "slespasswd.com",1)
- Delete password: LM("PWD_CLEAR", "slespasswd.com",1)
SINUMERIK Integrate Run MyScreens
60
Programming Manual, 06/2019, A5E40869575B AC
Dialogs
4.1 Structure and elements of a dialog
4.1.6
Using display images/graphics
Use of graphics
A distinction is made between:
● Display images / graphics in the graphic area.
● Help displays illustrating, for example, individual variables, which are superimposed in the
graphic area.
● More Help displays can be configured instead of short text or an input/output field, which you
position where you like.
Storage locations
The image matching the resolution of the connected monitor is searched for in the associated
resolution directories in the following sequence:
[System user directory]/ico/ico<Resolution>
[System oem directory]/ico/ico<Resolution>
[System add_on directory]/ico/ico<Resolution>
If the image is not displayed or not found, copy it into one of the following directories for a
resolution of 640 x 480 pixels:
[System user directory]/ico/ico640
[System oem directory]/ico/ico640
[System add_on directory]/ico/ico640
Note
With the different panel resolutions, the images are positioned proportionally.
SINUMERIK Integrate Run MyScreens
Programming Manual, 06/2019, A5E40869575B AC
61
Dialogs
4.2 Defining softkey menus
4.2
Defining softkey menus
Definition
The term softkey menu is used to refer to all the horizontal and vertical softkeys displayed on
a mask. In addition to the existing softkey menus, it is possible to define other menus, which
partially or completely overwrite the existing menus.
The names of the softkeys are predefined. Not all softkeys need to be assigned.
HSx x 1 - 8, Horizontal softkeys 1 to 8
VSy y 1 - 8, Vertical softkeys 1 to 8
The definition of a softkey menu (softkey menu definition block) is basically structured as
follows:
Definition block
Comment
Section reference
//S...
;Start identifier of softkey menu
HSx=...
;Define softkeys
PRESS(HSx)
;Method start identifier
See Chapter Methods
(Page 126)
LM...
;Actions
END_PRESS
;Method end identifier
//END
;End identifier of softkey menu
Description
Properties are assigned to softkeys during definition of the softkey menu.
Programming
Syntax:
//S(Identifier)
;Start identifier of softkey menu
//END
;End identifier of softkey menu
See also Section Extended configuration syntax (Page 43).
Description:
Defines the softkey menu
Parameter:
Identifier
Name of the softkey menu
Text or image file name
Syntax:
SK = (Text[, access level][, Status][, Alignment of the softkey image][, text align-
ment referred to the softkey image])
Description:
Define softkey
Parameter:
SK
Softkey, e.g. HS1 to HS8, VS1 to VS8
SINUMERIK Integrate Run MyScreens
62
Programming Manual, 06/2019, A5E40869575B AC
Dialogs
4.2 Defining softkey menus
Text
Enter text
Image file name
"\\my_pic.png"
or via separate text file $85199, e.g. with the following
text in the (language-specific) text file: 85100 0 0 "\
\my_pic.png".
The image size which can be displayed on a softkey
depends on the OP used:
OP 08:
640 x 480 mm → 25 x 25 pixels
OP 010:
640 x 480 mm → 25 x 25 pixels
OP 012:
800 X 600 mm → 30 x 30 pixels
OP 015:
1024 X 768 mm → 40 x 40 pixels
OP 019:
1280 x 1024 mm → 72 x 72 pixels
Access level
ac0 to ac7 (ac7: default)
Status
se1: visible (default)
se2: disabled (gray text)
se3: displayed (last softkey used)
Alignment of the soft-
PA (PictureAlignment)
key image
Valid values:
0: Left
1: Right
2: Centered
3: Top (default)
4: Bottom
Text alignment in re-
TP (TextAlignedToPicture)
lation to the softkey
Valid values:
image
0: Text is not aligned to the image
1: Text is aligned to the image (default)
Note
Enter %n in the softkey text to create a line break.
A maximum of 2 lines with 9 characters each are available.
Assigning access level
Operators can only access information on this access level and lower access levels (see
also List of access levels (Page 310)).
Example
//S(Menu1)
; Start identifier of softkey menu
HS1=("NEW", ac6, se2)
; Define softkey HS1, assign the label "NEW", protec-
tion level 6, and the status "disabled"
SINUMERIK Integrate Run MyScreens
Programming Manual, 06/2019, A5E40869575B AC
63
Dialogs
4.2 Defining softkey menus
HS2=("\\image1.png")
; Assign a softkey to the graphic
HS3=("Exit")
HS4=(["Confirm","\\sk_ok.png"],PA0,TP1)
; Softkey with text and graphic, Text="Confirm", Im-
age="sk_ok.png", Alignment of the softkey image: Left,
text is aligned to the image
VS1=("sub mask")
VS2=($85011, ac7, se2)
; Define softkey VS2, assign the text from the lan-
guage file, protection level 1, and the status "disa-
bled"
VS3=("Cancel", ac1, se3)
; Define softkey VS3, assign the label "Cancel", pro-
tection level 1 and the status "highlighted"
VS4=("OK", ac6, se1)
; Define softkey VS4, assign the label "OK", protec-
tion level 6 and the status "visible"
VS5=(SOFTKEY_CANCEL,,se1)
; Define cancel standard softkey VS5 and assign the
status "visible"
VS6=(SOFTKEY_OK,,se1)
; Define OK standard softkey VS6 and assign the status
"visible"
VS7=(["\\image1.png","OEM text"],,se1)
; Define softkey VS7, assign an image, assign the la-
bel "OEM Text" and the status "visible"
VS8=(["\\image1.png",$83533],,se1)
; Define softkey VS8, assign an image, assign text
from language file and the status "visible"
PRESS(HS1)
; Method start identifier
HS1.st=" Calculate"
; Assign a label text to the softkey
END_PRESS
; Method end identifier
PRESS(RECALL)
; Method start identifier
LM("Maske21")
; Load dialog
END_PRESS
; Method end identifier
//END
; End identifier of softkey menu
4.2.1
Changing softkey properties during runtime
Description
The softkey properties Text, Access Level and Status can be changed in the methods during
runtime.
SINUMERIK Integrate Run MyScreens
64
Programming Manual, 06/2019, A5E40869575B AC
Dialogs
4.2 Defining softkey menus
Programming
Syntax:
SK.st = "Text"
;Softkey with label
SK.ac = Access level
;Softkey with protection level
SK.se = Status
; Softkey with status
SK.pa = "Alignment of the softkey image"
;Softkey with image
SK.tp = "Text alignment in relation to the soft-
;Softkey with image and label
key image"
Description:
Assign properties
Parameter:
Text
Label text in inverted commas
Access level
Range of values: 0 ... 7
Status
1:
Visible and operator-controllable
2:
Disabled (gray text)
3:
Highlighted (last softkey used)
Alignment of the
0:
Left
softkey image
1:
Right
2:
Centered
3:
Top (default)
4:
Bottom
Text alignment in
0:
Text is not aligned to the image
relation to the
1:
Text is aligned to the image (default)
softkey image
SINUMERIK Integrate Run MyScreens
Programming Manual, 06/2019, A5E40869575B AC
65
Dialogs
4.2 Defining softkey menus
Example
Figure 4-8
Example 3: Graphics and softkeys
//S(Start)
HS7=("Example", ac7, se1)
PRESS(HS7)
LM("Maske3")
END_PRESS
//END
//M(Maske3/"Example 2: showing graphic"/"example.png")
HS1=("")
HS2=("")
HS3=("")
HS4=("")
HS5=("")
HS6=("")
HS7=("")
HS8=("")
VS1=("")
VS2=("")
SINUMERIK Integrate Run MyScreens
66
Programming Manual, 06/2019, A5E40869575B AC
Dialogs
4.2 Defining softkey menus
VS3=("")
VS4=("\\sp_ok.png",,SE1)
VS5=(["\\sp_ok_small.png","OEM Text"],,SE1)
VS6=("")
VS7=(SOFTKEY_OK,,SE1)
VS8=(SOFTKEY_CANCEL,,SE1)
PRESS(VS4)
EXIT
END_PRESS
PRESS(VS5)
EXIT
END_PRESS
PRESS(VS7)
EXIT
END_PRESS
PRESS(VS8)
EXIT
END_PRESS
//END
4.2.2
Language-dependent text
Overview
Language-dependent texts are used for:
● Softkey labels
● Headings
● Help texts
● Any other texts
The language-dependent texts for dialogs are stored in text files.
The text files are stored in the following directories:
● [System user directory]/lng
● [System oem directory]/lng
● [System add_on directory]/lng
SINUMERIK Integrate Run MyScreens
Programming Manual, 06/2019, A5E40869575B AC
67
Dialogs
4.2 Defining softkey menus
Note
The text files must be saved in the same way as the project files.
For example:
[System user directory]/lng/[Text file]
[System user directory]/proj/[Configuration file]
alsc.txt
Language-dependent texts for the Siemens standard cycles
almc.txt
Language-dependent texts for the Siemens measuring cycles
The text files used during program runtime are specified in the "easyscreen.ini" file:
[LANGUAGEFILES]
LngFile03 = user.txt
;->user<_xxx>.txt (e.g.: user_eng.txt)
In this instance, the "user.txt" file has been chosen as an example of a text file. The name can
always be freely selected. Depending on the language of the texts within the file, the relevant
language code must be added using the following syntax. An underscore followed by the
relevant language identifier is added after the name e.g. "user_eng.txt".
Note
You must not use LngFile01 and LngFile02 for user texts because they are already assigned
in the standard "easyscreen.ini".
See also
List of language codes used in file names (Page 312)
Mask-specific language files
In order to avoid overlaps for the number ranges used in the language files, only certain
language files can be used in a specific mask.
This is the reason that the language files to be used are listed in the mask definition line,
separated by a comma. The file listed at the last location has the highest priority (analogous to
the logic in "easyscreen.ini").
All of the language-dependent texts used in the mask are predominantly searched for in these
language files. If the text is not found in these, then a search is made in text files configured in
"easyscreen.ini".
SINUMERIK Integrate Run MyScreens
68
Programming Manual, 06/2019, A5E40869575B AC
Dialogs
4.2 Defining softkey menus
If no language files have been defined in the mask, then a search is only made in the language
files specified in "easyscreen.ini".
Note
The English language file is used (default) if a language file is not available in the currently
selected language.
Examples:
//M(MyMask/$85597///// //"mytexts.txt, general.txt, mask.txt")
DEF ….
You can also use this procedure for the start softkeys:
//S(Start, "mytexts.txt, general.txt, mask.txt")
VS1=($85597)
PRESS(VS1)
LM("MyMask","masks.com")
END_PRESS
Format of text files
The text files must be saved in UTF-8 format.
Note
Make sure that the coding is set to UTF-8 in the editor that you are using when saving the
configuration and language files.
Format of a text entry
Syntax:
8xxxx 0 0 "Text"
Description:
Assignment between text number and text in the file
Parameter:
xxxx
85,000 to 89,999
Text identification number range reserved for
users. You must assign unique numbers.
900,000 to 999,999
"Text"
Text that appears in the dialog
%n
Control characters in the text for creating a line
break
Parameters 2 and 3 are separated by blanks and act as control characters for alarm text output.
To ensure that the text format is identical to that of the alarm texts, you must set zero.
SINUMERIK Integrate Run MyScreens
Programming Manual, 06/2019, A5E40869575B AC
69
Dialogs
4.2 Defining softkey menus
Examples of language-dependent texts:
85000 0 0 "Retraction plane"
85001 0 0 "Drilling depth"
85002 0 0 "Pitch"
85003 0 0 "Pocket radius"
SINUMERIK Integrate Run MyScreens
70
Programming Manual, 06/2019, A5E40869575B AC
Dialogs
4.3 Configuring the online help
4.3
Configuring the online help
4.3.1
Overview
In addition to the existing extensive online help, you also have the option of generating a
manufacturer-specific online help and then linking this into SINUMERIK Operate.
This online help is generated in the HTML format, i.e. it comprises HTML documents that are
linked with one another. The subject being searched for is called in a separate window from a
contents or index directory. Similar to a document browser (e.g. Windows Explorer), a list of
possible selections is displayed in the left-hand half of the window and when you click on the
required subject, the explanation is displayed in the right hand half of the window.
Context sensitive selection of online help pages is not possible.
Procedure
1. Generating HTML files
2. Generating a help book
3. Integrating the online help in SINUMERIK Operate
4. Saving help files
Other application cases
Online help for the following OEM-specific expansions can be created and used to supplement
the SINUMERIK Operate online help system:
● Online help for cycles and/or M functions of the machine manufacturer which extend the
programming options for SINUMERIK control systems. This online help is called in just the
same way as the SINUMERIK Operate online help "Programming".
● Online help for OEM-specific variables of the machine manufacturer. This online help is
called from the variable view of SINUMERIK Operate.
Programming online help
You can use the "SINUMERIK HMI programming package sl" for additional options for
configuring the online help. Using this programming package, it is possible to develop high-
level language applications in the C++ programming language for SINUMERIK Operate on the
NCU 7x0.
Note
The "SINUMERIK HMI programming package sl" must be ordered separately as a software
option. The associated documentation is provided together with the programming package.
SINUMERIK Integrate Run MyScreens
Programming Manual, 06/2019, A5E40869575B AC
71

Dialogs
4.3 Configuring the online help
4.3.2
Generating HTML files
Generating help files in the HTML format. It is possible to save all information in a single HTML
file or to distribute the information over several HTML files.
You can assign the file names yourself, however, you must observe the following:
● References within HTML files should always be specified with relative paths. Only then can
it be ensured that the references function in precisely the same way on both the
development computer as well as on the target system.
● If jumps are to be made to certain points within an HTML file per link, then so-called anchors
must be defined for this purpose.
Example of an HTML anchor:
<a name="myAnchor">This is an anchor</a>
● The contents of HTML documents must be saved with the UTF-8 coding. Only then is it
guaranteed that the HTML documents are correctly displayed in all of the country languages
supported by SINUMERIK Operate.
● The following sub-sets of the HTML functional scope are supported:
HTML tags
Tag
Description
Comment
a
Anchor or link
Supported attributes: href and name
address
Address
big
Larger font
block quote
Indented paragraph
body
Document body
Supported attributes: bgcolor (#RRGGBB)
br
Line break
center
Centered paragraph
cite
Inline citation
Same effect as tag i
code
Code
Same effect as tag tt
dd
Definition data
dfn
Definition
Same effect as tag i
div
Document division
The standard block attributes are supported
dl
Definition list
The standard block attributes are supported
dt
Definition term
The standard block attributes are supported
em
Emphasized
Same effect as tag i
font
Font size, family, color
Supported attributes: size, face, and color (#RRGGBB)
h1
Level 1 heading
The standard block attributes are supported
h2
Level 2 heading
The standard block attributes are supported
h3
Level 3 heading
The standard block attributes are supported
h4
Level 4 heading
The standard block attributes are supported
h5
Level 5 heading
The standard block attributes are supported
h6
Level 6 heading
The standard block attributes are supported
head
Document header
SINUMERIK Integrate Run MyScreens
72
Programming Manual, 06/2019, A5E40869575B AC

Dialogs
4.3 Configuring the online help
Tag
Description
Comment
hr
Horizontal line
Supported attributes: width (can be specified as absolute or
relative value)
html
HTML document
i
Italic
img
Image
Supported attributes: src, width, height
kbd
User-entered text
meta
Meta information
li
List item
nobr
Non-breakable text
ol
Ordered list
The standard attributes for lists are supported
p
Paragraph
The standard block attributes are supported (default setting:
left-aligned)
pre
Preformatted text
s
Strikethrough
samp
Sample code
Same effect as tag tt
small
Small font
span
Grouped elements
strong
Strong
Continuous text is heavily emphasized, replaces tag b
sub
Subscript
sup
Superscript
table
Table
Supported attributes: border, bgcolor (#RRGGBB), cellspac-
ing, cellpadding, width (absolute or relative), height
tbody
Table body
No effect
td
Table data cell
The standard attributes for table cells are supported
tfoot
Table footer
No effect
th
Table header cell
The standard attributes for table cells are supported
thead
Table header
This is used to print tables that extend over several pages
title
Document title
tr
Table row
Supported attributes: bgcolor (#RRGGBB)
tt
Typewrite font
u
Underlined
ul
Unordered list
The standard attributes for lists are supported
var
Variable
Same effect as tag tt
Block attributes
The following attributes are supported by the tags div, dl, dt, h1, h2, h3, h4, h5, h6, p:
● align (left, right, center, justify)
● dir (ltr, rtl)
SINUMERIK Integrate Run MyScreens
Programming Manual, 06/2019, A5E40869575B AC
73

Dialogs
4.3 Configuring the online help
Standard attributes for lists
The following attributes are supported by tags ol and ul:
● type (1, a, A, square, disc, circle)
Standard attributes for tables
The following attributes are supported by tags td and th:
● width (absolute, relative, no-value)
● bgcolor (#RRGGBB)
● colspan
● rowspan
● align (left, right, center, justify)
● valign (top, middle, bottom)
CSS properties
The following table includes the supported CSS functional scope:
Property
Values
Description
backg14round color
<color>
Background color for elements
backg14round-image
<uri>
Background image for elements
color
<color>
Foreground color for text
text-indent
<length>px
Indent the first line of a paragraph in pixels
white-space
normal | pre | nowrap | pre-
Defines how whitespace characters are handled
wrap
in HTML documents
margin-top
<length>px
Width of the upper edge of the paragraph in pixels
margin-bottom
<length>px
Width of the lower edge of the paragraph in pixels
margin-left
<length>px
Length of the left hand edge of the paragraph in
pixels
margin-right
<length>px
Width of the right-hand edge of the paragraph in
pixels
vertical-align
baseline | sub | super | mid-
Vertical alignment for text (in tables, only the val-
dle | top | bottom
ues middle, top and bottom are supported)
border-color
<color>
Border color for text tables
border-style
none | dotted | dashed | dot-
Border style for text tables
dash | dot-dot-dash | solid |
double | groove | ridge | inset
| outset
backg14round
[ <'backg14round-color'> ||
Short notation for backg14round property
<'backg14round-image'> ]
page-break-before
[ auto | always ]
Page break before a paragraph/table
page-break-after
[ auto | always ]
Page break after a paragraph/table
backg14round-image
<uri>
Background image for elements
SINUMERIK Integrate Run MyScreens
74
Programming Manual, 06/2019, A5E40869575B AC
Dialogs
4.3 Configuring the online help
Supported CSS selectors
All of the CSS 2.1 selector classes are supported, with the exception of so-called pseudo-
selector classes, such as :first-child, :visited and :hover.
4.3.3
Generating the help book
The help book is an XML file in which the structure of the online help is defined. In this file, you
define:
● HTML documents
● Contents and subject index
Syntax for the help book
Tag
Number
Meaning
HMI_SL_HELP
1
Root element of the XML document
I-BOOK
Identifies a help book. The name can be freely selected under the
I
constraint that no name predefined by the system is used (such as
I
sinumerik_alarm_plc_pmc).
I
In the example, the name of the help book is "hmi_myhelp"
I
Attributes:
I
+
I
ref
Identifies the HTML document that is displayed as the en-
I
try page for the help book.
I
title
Title of the help book that is displayed in the table of con-
I
tents.
helpdir
Directory that contains the online help of the help book.
I-ENTRY
Section of the online help
II
Attributes:
II
ref
Identifies the HTML document that is displayed as entry
II
page for the section.
II
*
II
title
Title of the section that is displayed in the table of contents.
II
II
II-INDEX_ENTRY
Subject (keyword) to be displayed
II
Attributes:
II
ref
Identifies the HTML document that is jumped to for this
II
*
subject index entry.
II
II
title
Title of the subject that is displayed in the subject index.
II
II
The following applies for the "Number" column:
* means 0 or more
+ means 1 or more
SINUMERIK Integrate Run MyScreens
Programming Manual, 06/2019, A5E40869575B AC
75
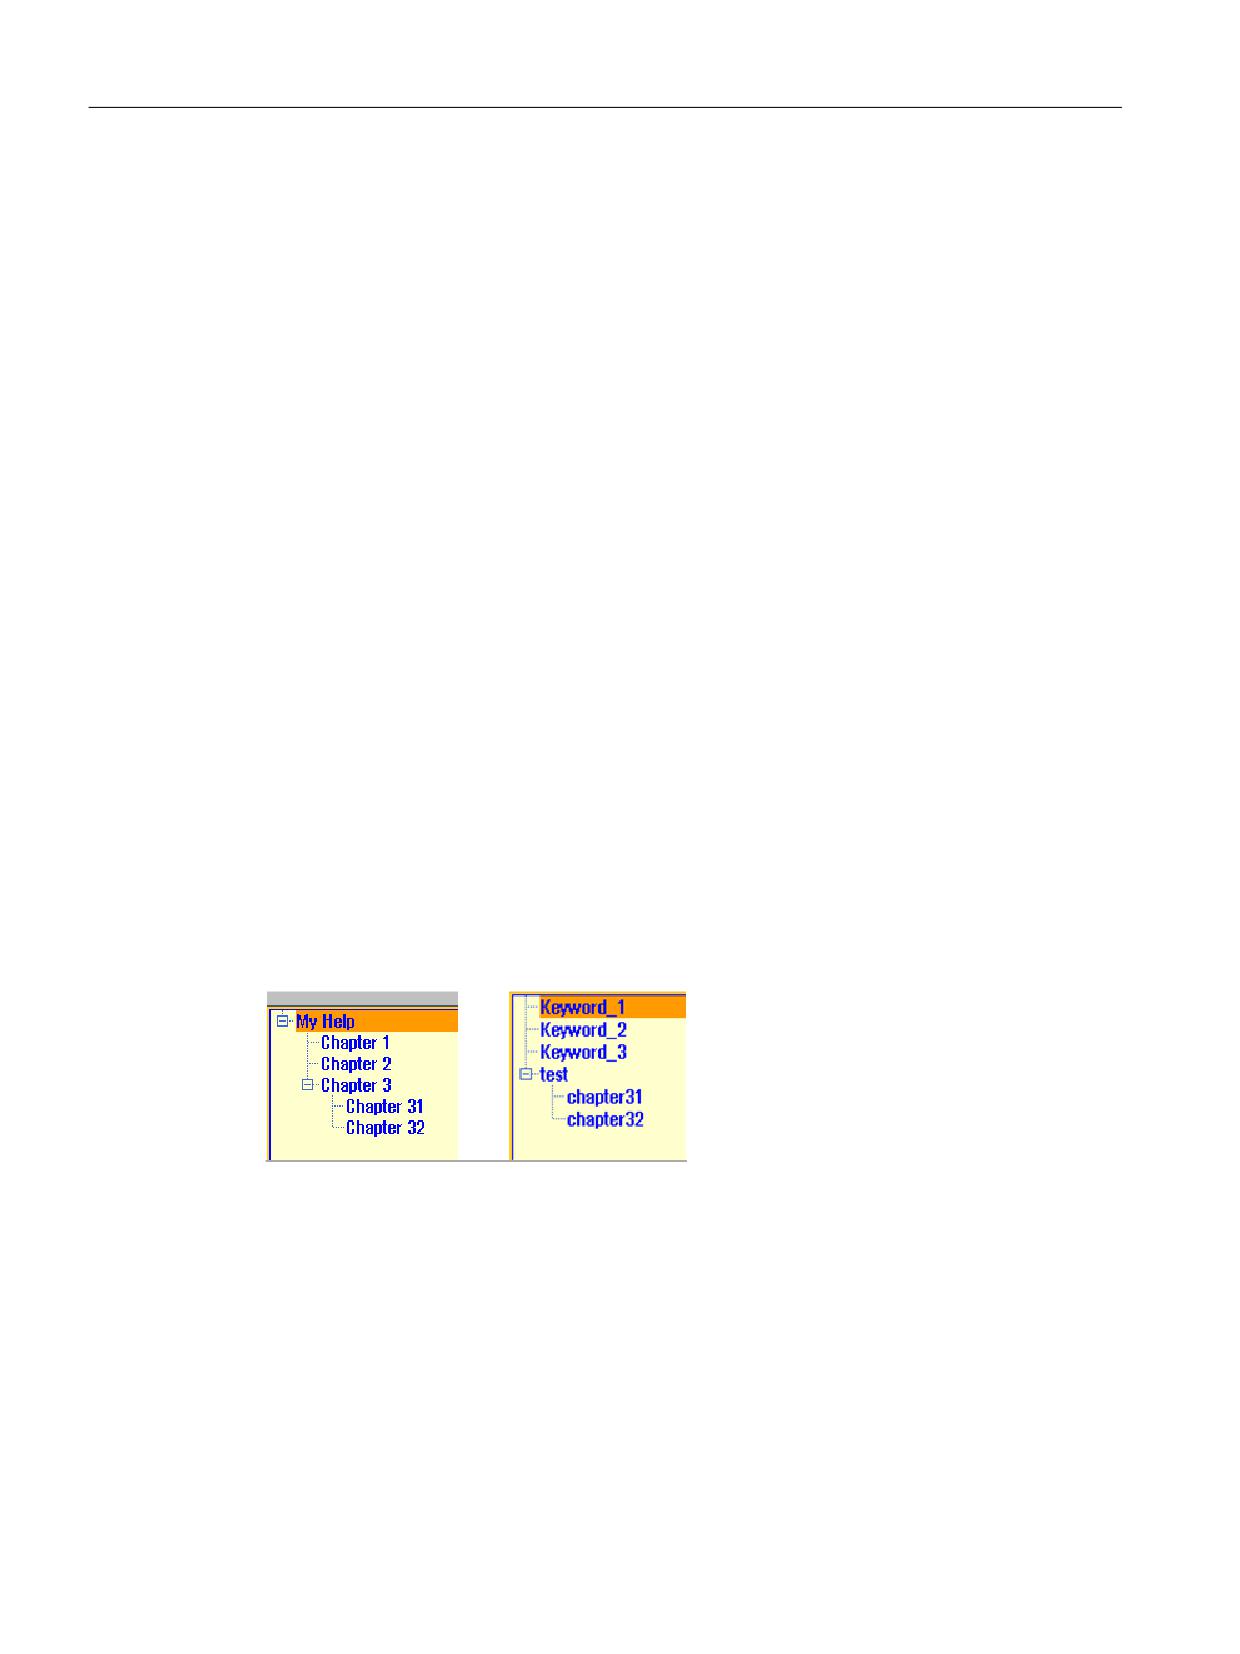
Dialogs
4.3 Configuring the online help
Example for a help book
In the following example, the structure of a help book with the "My Help" name is described.
Further, it forms the basis for the table of contents and subject index.
<?xml version="1.0" encoding="utf-8"?>
<HMI_SL_HELP language="en-US">
<BOOK ref="index.html" title="My Help" helpdir="hmi_myhelp">
<ENTRY ref="section_1.html" title="Section 1">
<INDEX_ENTRY ref="section_1html#Keyword_1" title="Keyword_1"/>
<INDEX_ENTRY ref="section_1.html#Keyword_2" title="Keyword_2"/>
</ENTRY>
<ENTRY ref="section_2.html" title="Section 2">
<INDEX_ENTRY ref="section_2.html#Keyword_3" title="Keyword_3"/>
</ENTRY>
<ENTRY ref="section_3.html" title="Section 3">
<ENTRY ref="section_31.html" title="Section 31">
INDEX_ENTRY ref="section_31.html#test" title="test;section31"/>
</ENTRY>
<ENTRY ref="section_32.html" title="Section 32">
INDEX_ENTRY ref="section_32.html#test" title="test;section32"/>
</ENTRY>
</ENTRY>
</BOOK>
</HMI_SL_HELP>
The book comprises three sections, whereby the third section has two subsections. The
various subject words (keywords) are defined within the section.
SINUMERIK Integrate Run MyScreens
76
Programming Manual, 06/2019, A5E40869575B AC
Dialogs
4.3 Configuring the online help
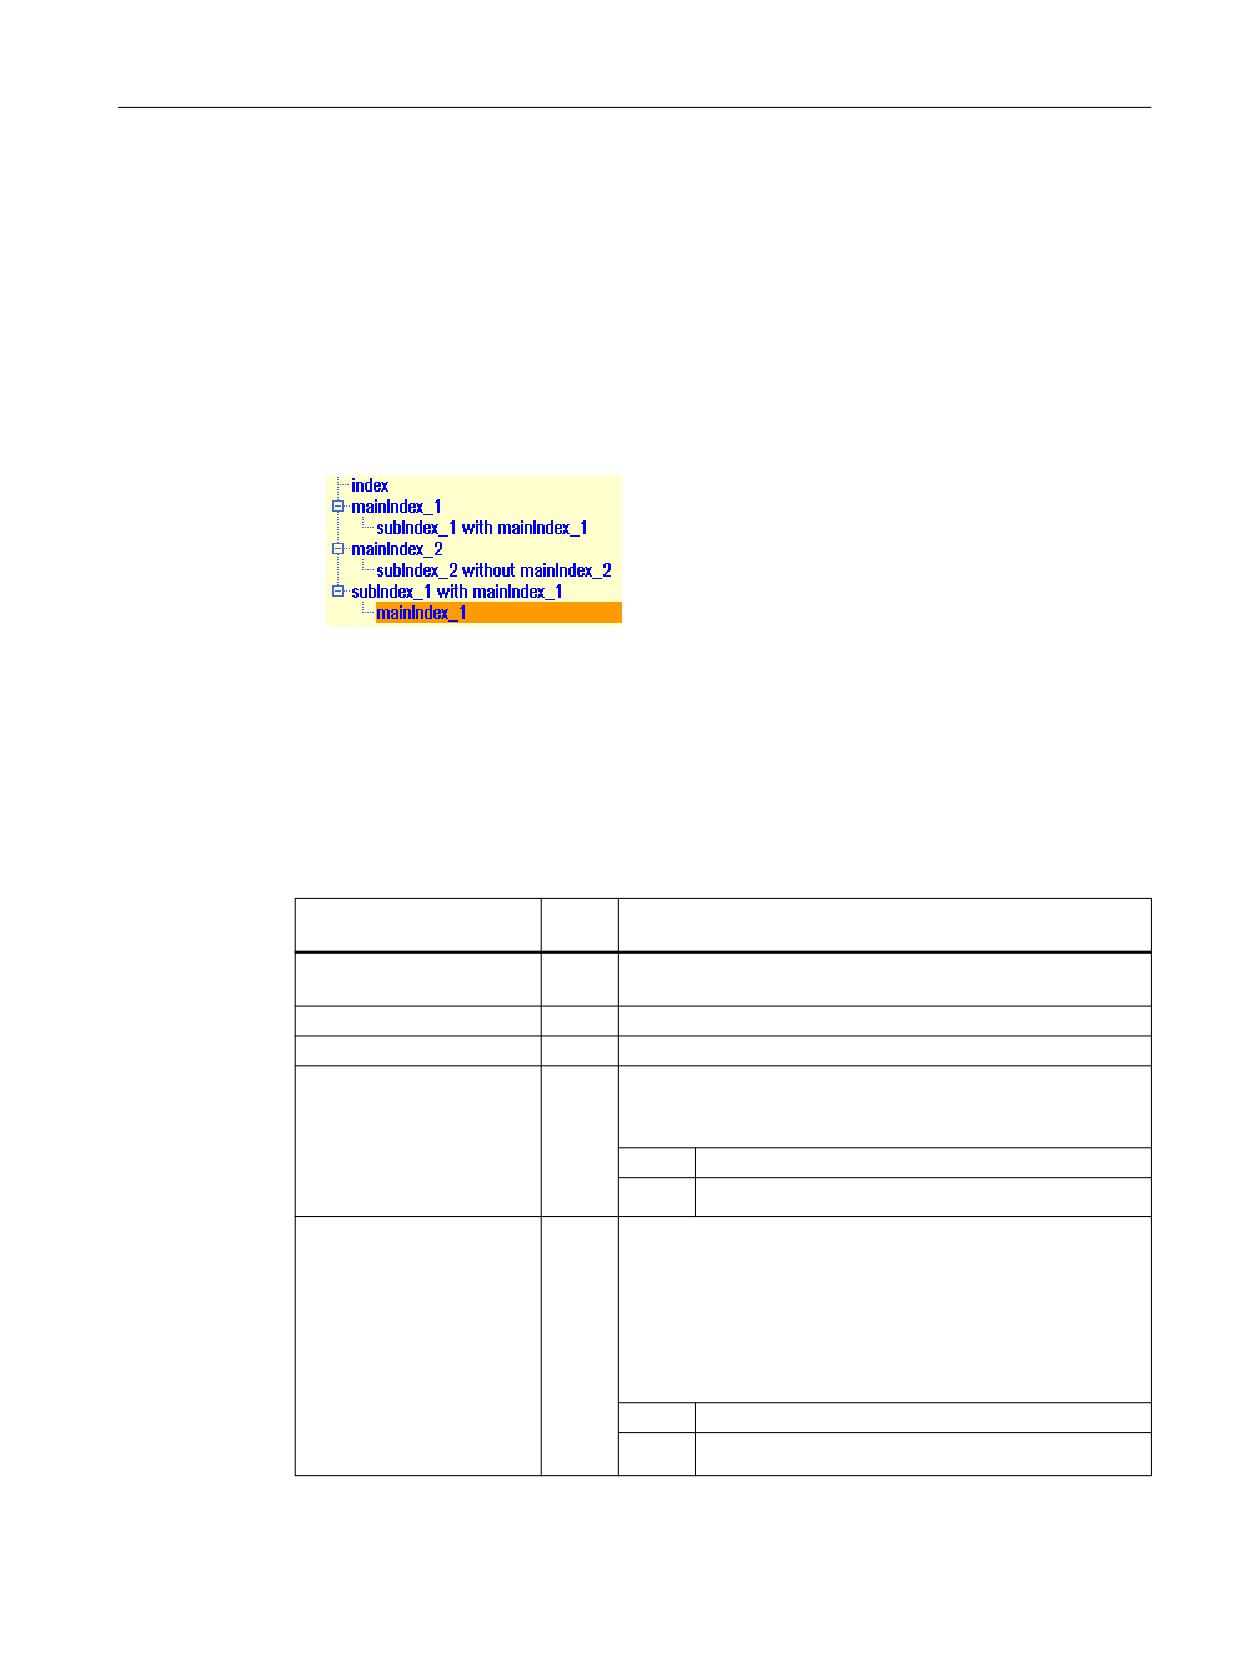
You have the following three options to format the subject index:
1. Single entry:
<INDEX_ENTRY ...title="index"/>
2. Two two-stage entry, whereby each title has a main and a subentry. Separate the entries
from one another using a comma.
<INDEX_ENTRY ...title="mainIndex_1,subIndex_1 with mainIndex_1"/>
3. Two-stage entry, whereby the first title is the main entry and the second title is the subentry.
Separate the entries from one another using a semicolon.
<INDEX_ENTRY ...title="mainIndex_2;subIndex_2 without
mainIndex_1"/>
4.3.4
Integrating the online help in SINUMERIK Operate
If you wish to integrate the generated help book into the online help system of
SINUMERIK Operate, then you require the "slhlp.xml" file.
Format description of the "slhlp.xml"
Tag
Num-
Meaning
ber
CONFIGURATION
1
Root element of the XML document. Designates that this in-
volves a configuration file.
I-OnlineHelpFiles
1
Introduces the section about the online help books.
II-<help_book>
*
Introduces the section of a help book.
III-EntriesFile
File name of the help book with the list of contents and subject
III
(keyword) entries.
III
Attributes:
1
III
value
Name of the XML file
III
type
Data type of the value (QString)
III
III-Technology
Specifies the technology that applies to the help book.
III
"All" applies to all technologies.
III
If the help book applies to several technologies, then the tech-
III
nologies are listed separated by comma.
III
0, 1
Possible values:
III
All, Universal, Milling, Turning, Grinding, Stroking, Punching
III
III
Attributes:
III
value
Technology data
III
type
Data type of the value (QString)
IIII
SINUMERIK Integrate Run MyScreens
Programming Manual, 06/2019, A5E40869575B AC
77
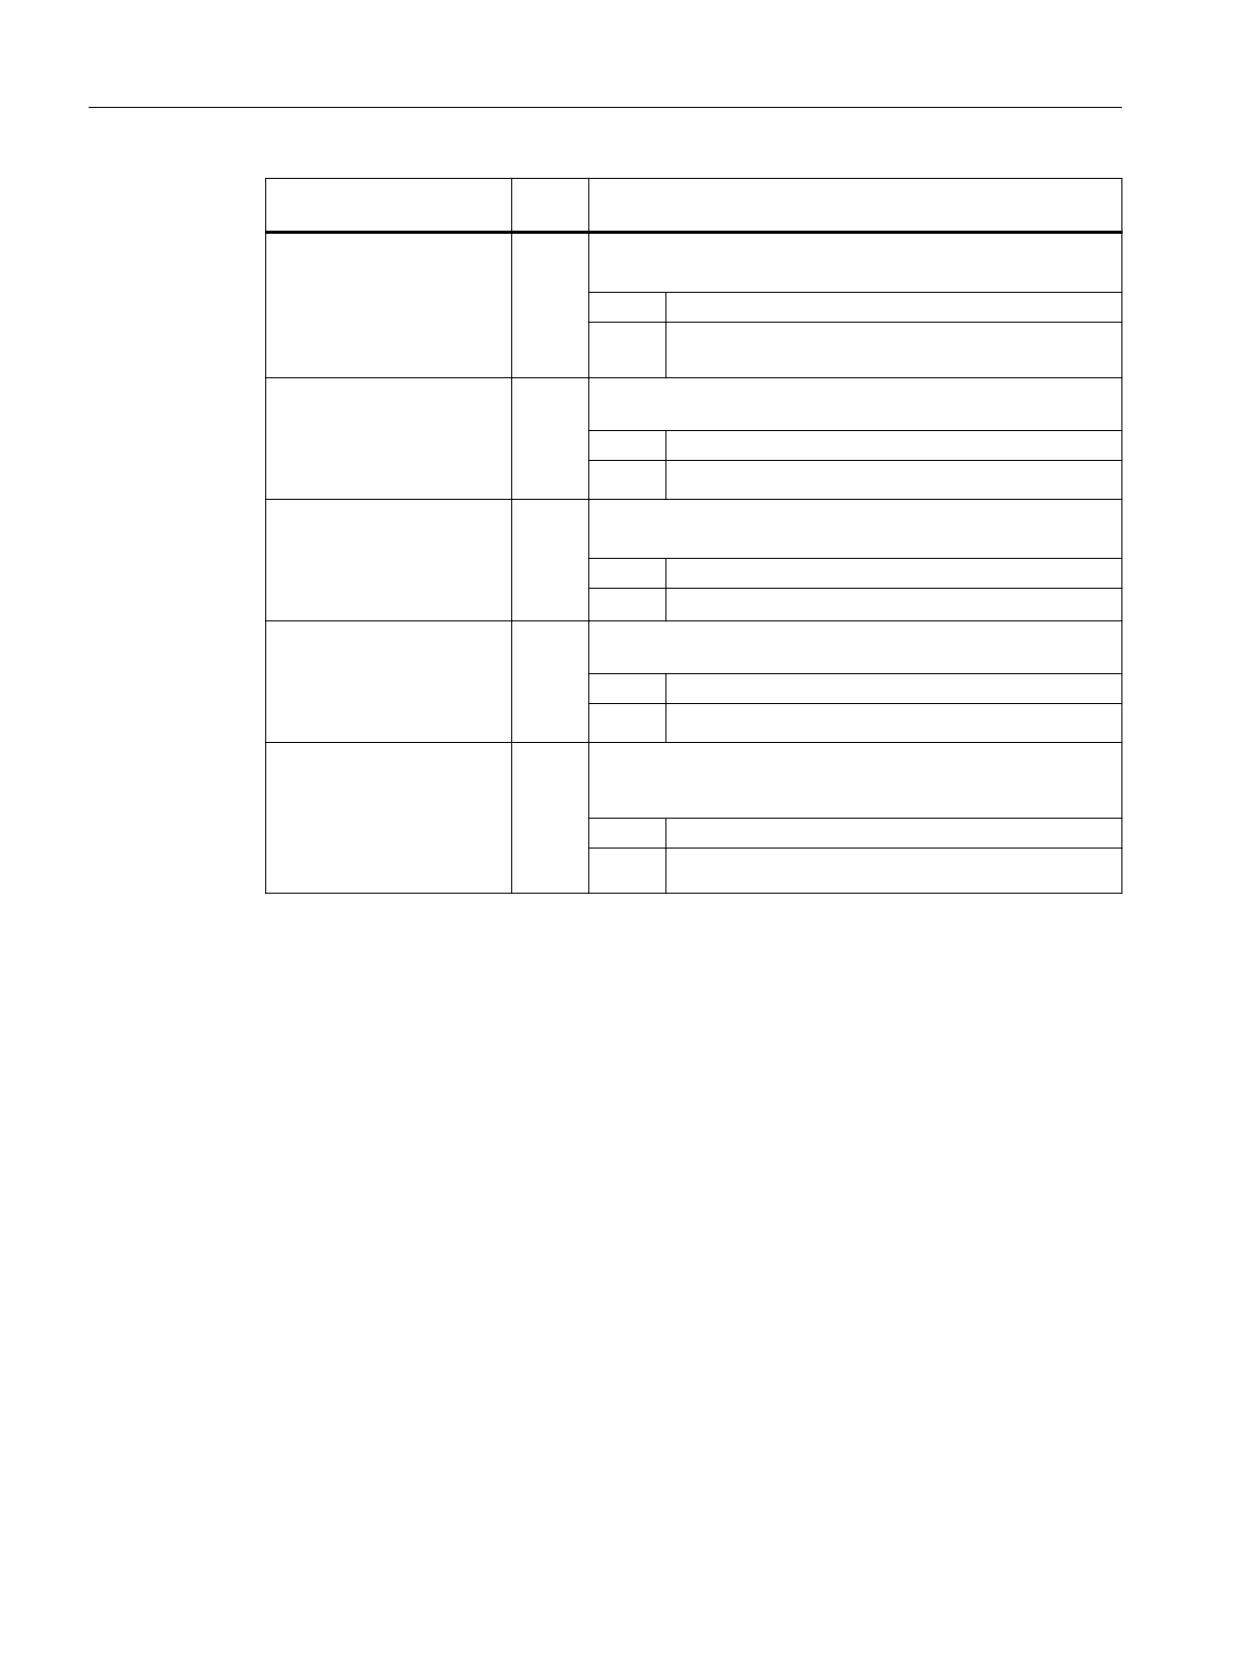
Dialogs
4.3 Configuring the online help
Tag
Num-
Meaning
ber
III -DisableSearch
Disable the subject (keyword) search for the help book.
III
Attributes:
III
0, 1
value
true, false
III
III
type
type, data type of the value (bool)
III
III-DisableFullTextSearch
Disable the full text search for the help book.
III
Attributes:
III
value
true, false
0, 1
III
type
type, data type of the value (bool)
III
III-DisableIndex
Disable the subject index for the help book.
III
Attributes:
III
0, 1
value
true, false
III
III
type
type, data type of the value (bool)
III-DisableContent
Disable the table of contents for the help book.
III
Attributes:
0, 1
III
value
true, false
III
type
type, data type of the value (bool)
III
III-DefaultLanguage
Abbreviation for the language that should be displayed if the
III
actual country language is available for the help book.
III
Attributes:
0, 1
III
value
chs, deu, eng, esp, fra, ita, ...
III
type
Data type of the value (QString)
III
The following applies for the "Number" column:
* means 0 or more
Example of a file "slhlp.xml"
The help book "hmi_myhelp.xml" is made known to SINUMERIK Operate in the following
example.
The subject index has not been activated for the help book.
<?xml version="1.0" encoding="UTF-8" standalone="yes"?>
<!DOCTYPE CONFIGURATION>
<CONFIGURATION>
<OnlineHelpFiles>
<hmi_myHelp>
<EntriesFile value="hmi_myhelp.xml" type="QString"/>
<DisableIndex value="frue" type="bool"/>
</hmi_myHelp>
</OnlineHelpFiles>
</CONFIGURATION>
SINUMERIK Integrate Run MyScreens
78
Programming Manual, 06/2019, A5E40869575B AC
Dialogs
4.3 Configuring the online help
4.3.5
Saving help files
Saving help files in the target system
1. Open the /oem/sinumerik/hmi/hlp directory and create a new folder for the required
language. For this purpose, use the specified language code.
It is mandatory that the folder names are written in lower-case letters.
For instance, if you are integrating a help function for German and English, then create the
"deu" and "eng" folders.
2. Place the help book, e.g. "hmi_myhelp.xml" in the "deu" and "eng" folders.
3. Copy the help files into the directories, e.g. /oem/sinumerik/hmi/hlp/deu/hmi_myhelp for
German and /oem/sinumerik/hmi/hlp/eng/hmi_myhelp for English help files.
4. Place the configuration file "slhlp.xml" into the directory /oem/sinumerik/hmi/cfg.
5. Restart the HMI.
Note
When displaying the list of contents and subject index of a help book, the help files are saved
in the binary format (slhlp_<Hilfe-Buch_*.hmi) under the directory /siemens/sinumerik/
sys_cache/hmi/hlp for faster use. If you change the help book, you must always delete these
files.
4.3.6
Help files in PDF format
In addition to help files in HTML format, you can also include PDF-format information in the
operating software. Individual PDF helps can be opened with links from the table of contents or
index, or directly from HTML files.
Storing PDF helps
Copy the PDF helps to one of the following directories:
/oem/sinumerik/hmi/hlp/<lng>/<hmi_myhelp>
/user/sinumerik/hmi/hlp/<lng>/<hmi_myhelp>
Including PDF helps
Bind in dialog configurations or configurations of table of contents and indexes with the
extension "pdf" in the same manner as for the "html" extension:
<ENTRY ref="myFile.pdf" title="Help 1">
Create a link from HTML files to the PDF help:
SINUMERIK Integrate Run MyScreens
Programming Manual, 06/2019, A5E40869575B AC
79
Dialogs
4.3 Configuring the online help
<a href="myFile.pdf">My Help File</a>
Note
It is not possible to select context-sensitive jump labels in the PDF help, select jump labels or
make jumps to other HTML or PDF files.
The search function is possible only within a PDF file. A higher-level search over multiple PDF
helps is not supported.
SINUMERIK Integrate Run MyScreens
80
Programming Manual, 06/2019, A5E40869575B AC
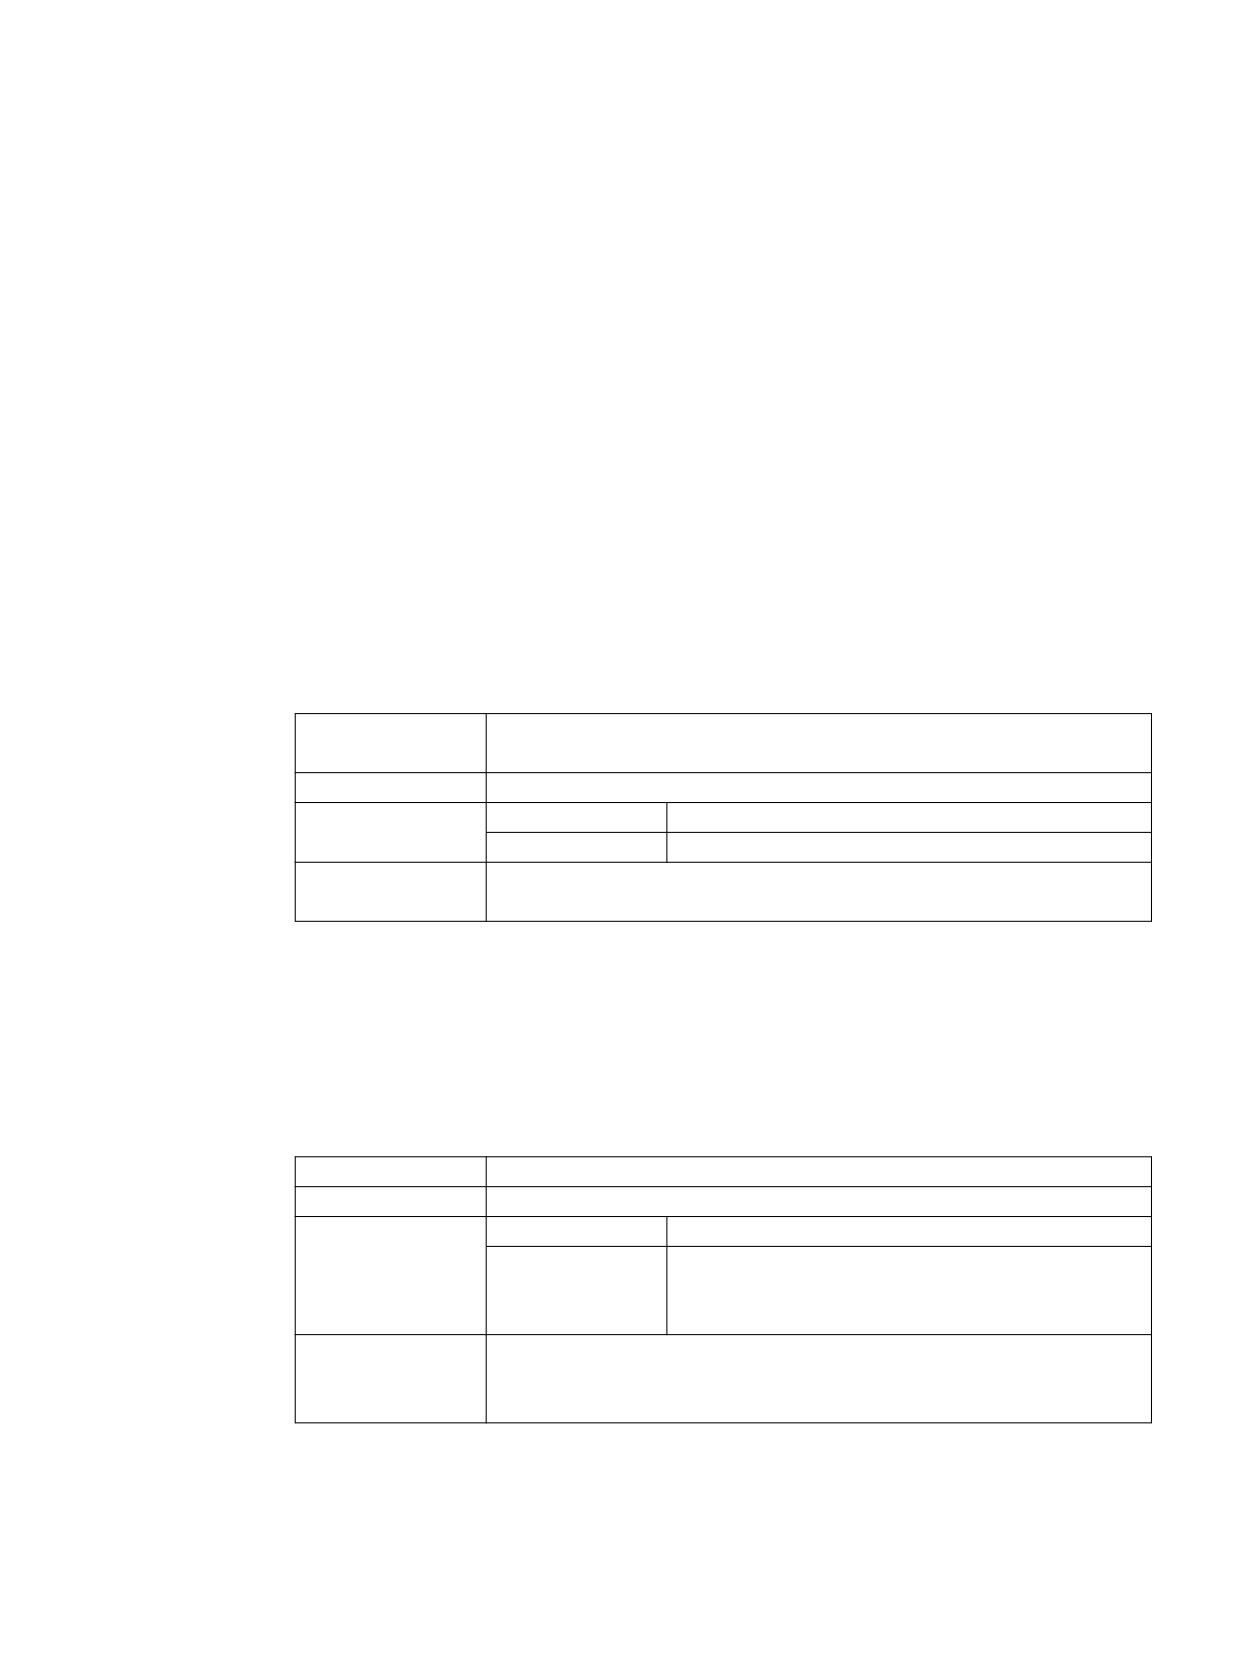
Variables
5
5.1
Defining variables
Variable value
The major property of a variable is its value.
The value of variables can be assigned by means of:
● Default settings when defining variables
● Assignment to a system or user variable
● A method
Programming
Syntax:
Identifier.val = Variable value
Identifier = Variable value
Description:
Variable value val (value)
Parameter:
Identifier:
Name of the variable
Variable value:
Value of the variable
Example:
VAR3 = VAR4 + SIN(VAR5)
VAR3.VAL = VAR4 + SIN(VAR5)
Variable status
The "Variable status" property scans a variable for valid content during runtime. This property
can be read and written with the value FALSE = 0.
Programming
Syntax:
Identifier.vld
Description:
Variable status vld (validation)
Parameter:
Identifier:
Name of the variable
The result of the scan can be:
FALSE =
invalid value
TRUE =
valid value
Example:
IF VAR1.VLD == FALSE
VAR1 = 84
ENDIF
SINUMERIK Integrate Run MyScreens
Programming Manual, 06/2019, A5E40869575B AC
81
Variables
5.2 Application examples
5.2
Application examples
Help variables
Help variables are internal arithmetic variables. Arithmetic variables are defined like other
variables, but have no other properties apart from variable value and status, i.e. Help variables
are not visible in the dialog. Help variables are of the VARIANT type.
Programming
Syntax:
DEF Identifier
Description:
Internal arithmetic variables of the VARIANT type
Parameter:
Identifier:
Name of the Help variable
Example:
DEF OTTO ;Definition of a Help variable
Syntax:
Identifier.val = Help variable value
Identifier = Help variable value
Description:
A value is assigned to a Help variable in a method.
Parameter:
Identifier:
Name of the Help variable
Help variable value:
Content of the Help variables
Example:
LOAD
OTTO = "Test"
; The value "Test" is assigned to help variable Otto.
END_LOAD
LOAD
OTTO = REG[9].VAL
; The value of the register is assigned to help variable
Otto
END_LOAD
Calculation with variables
Variables are calculated every time you exit an IO field (by pressing the ENTER or TOGGLE
key). The calculation is configured in a CHANGE method that is processed every time the value
changes.
You can scan the variable status to ascertain the validity of the value of the variable, e.g.
IF VAR1.VLD == FALSE
VAR1 = 84
ENDIF
SINUMERIK Integrate Run MyScreens
82
Programming Manual, 06/2019, A5E40869575B AC
Variables
5.2 Application examples
Addressing system variables indirectly
A system variable can also be addressed indirectly, i.e. as a function of another variable:
PRESS(HS1)
ACHSE=ACHSE+1
WEG.VAR="$AA_DTBW["<<ACHSE<<"]"
;Address axis address via variable
END_PRESS
Changing softkey labels
Example:
HS3.st = "New text"
;Change softkey label
SINUMERIK Integrate Run MyScreens
Programming Manual, 06/2019, A5E40869575B AC
83
Variables
5.3 Example 1: Assigning the variable type, texts, help display, colors, tooltips
5.3
Example 1: Assigning the variable type, texts, help display, colors,
tooltips
Example 1a
The following example defines a variable for which the properties variable type, texts, help
display and colors are set.
DEF Var1 = (R///,"Actual value",,"mm"//"Var1.png"////8,2)
Variable type:
REAL
Texts:
Short text:
Actual value
Unit text:
mm
Help screen:
Var1.png
Colors:
Foreground color:
8 (brown)
Background color:
2 (orange)
Example 1b
The following example defines a variable for which the properties variable type, default setting,
texts, tooltip, input mode and position of short text are set.
DEF Var2 = (I//5/"","Value","",""," Tooltip text"/wr2///20,250,50)
Variable type:
INTEGER
Default setting:
5
Texts:
Short text:
Value (possible language text ID)
Tooltip:
ToolTipText
Attributes:
Input mode:
Reading and writing
Position of short text:
Distance from left:
20
Distance from top:
250
Width:
50
See also
Variable parameters (Page 92)
SINUMERIK Integrate Run MyScreens
84
Programming Manual, 06/2019, A5E40869575B AC

Variables
5.4 Example 2: Assigning the Variable Type, Limits, Attributes, Short Text Position properties
5.4
Example 2: Assigning the Variable Type, Limits, Attributes, Short Text
Position properties
Example 2
The following example defines a variable for which the properties variable type, limits, input
mode, alignment and position are set.
DEF Var2 = (I/0,10///wr1,al1///,,300)
Variable type:
INTEGER
Limits or toggle field entries:
MIN: 0
MAX: 10
Attributes:
Input mode:
Read-only
Alignment of short text:
Right-justified
Position of short text:
Width:
300
See also
Variable parameters (Page 92)
SINUMERIK Integrate Run MyScreens
Programming Manual, 06/2019, A5E40869575B AC
85
Variables
5.5 Example 3: Assigning the Variable Type, Default, System or User Variable, Input/Output Field Position
properties
5.5
Example 3: Assigning the Variable Type, Default, System or User
Variable, Input/Output Field Position properties
Example 3
The following example defines a variable for which the properties variable type, default setting,
system or user variable and position are set.
DEF Var3 = (R//10////"$R[1]"//300,10,200//)
Variable type:
REAL
Default setting:
10
System or user variable:
$R[1] (R-Parameter 1)
Position of short text:
Default position in relation to input/output field
Position of input/output field:
Distance from left:
300
Distance from top:
10
Width:
200
See also
Variable parameters (Page 92)
SINUMERIK Integrate Run MyScreens
86
Programming Manual, 06/2019, A5E40869575B AC
Variables
5.6 Example 4: Toggle field and list field
5.6
Example 4: Toggle field and list field
Example 4a
Various entries in the toggle field:
DEF Var1 = (I/* 0,1,2,3)
;Simple toggle field to toggle numeric values
DEF Var2 = (S/* "On", "Off")
;Simple toggle field to toggle strings
DEF Var3 = (B/* 1="On", 0="Off")
;Extended toggle field to toggle numeric values whereby a
display text is assigned to each numeric value
DEF Var4 = (R/* ARR1)
;Toggle field, which obtains its values to be toggled from an
array
Example 4b
The list field corresponds to the configuration of a toggle field, but the display type for the list
field (variable attribute DT = 4) must also be set.
DEF VAR_LISTBOX_Text = (S/*$80000,$80001,$80002,$80003,$80004/$80001//DT4////200,,340,60)
Variable type:
STRING
Limits / toggle field:
*$80000,$80001,$80002,$80003,$80004
(list of the language-dependent texts to be dis-
played)
Default setting:
$80001
Attributes:
Display type:
4 (list field)
Position of input/output field:
Distance from left:
200
Width:
340
Height:
60
Colors:
Foreground color:
6 (blue)
Background color:
10 (white)
SINUMERIK Integrate Run MyScreens
Programming Manual, 06/2019, A5E40869575B AC
87
Variables
5.7 Example 5: Image display
5.7
Example 5: Image display
Example 5
Displaying an image instead of a short text: The size and position of the image is defined under
"Position of input/output field (left, top, width, height)".
DEF VAR6= (V///,"\\image1.png" ////160,40,50,50)
Variable type:
VARIANT
Texts:
Short text:
image1.png
Position of input/output field:
Distance from left:
160
Distance from the top:
40
Width:
50
Height:
50
SINUMERIK Integrate Run MyScreens
88
Programming Manual, 06/2019, A5E40869575B AC
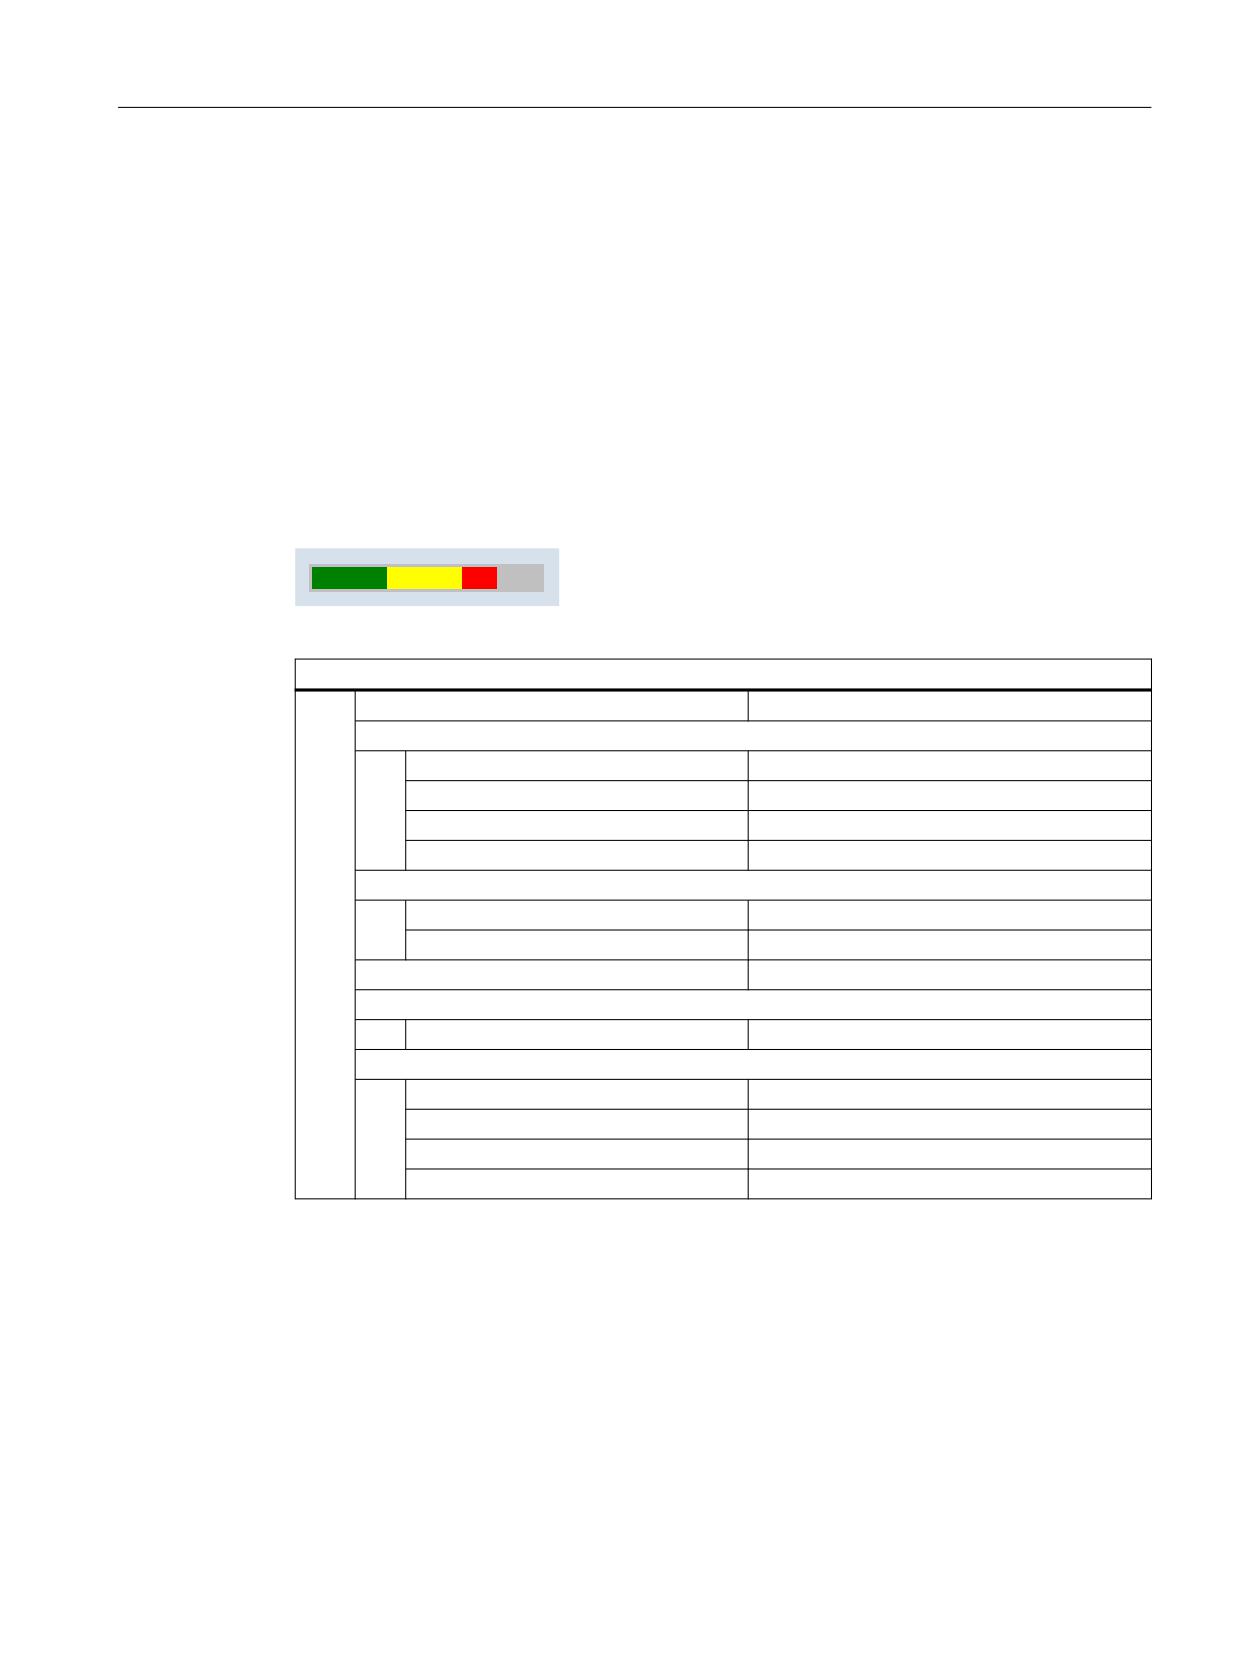
Variables
5.8 Example 6: Progress bar
5.8
Example 6: Progress bar
The progress bar is a special display type of the input/output field and is designed for display
without input.
Basically there are two progress bar types:
1. Progress bars with up to two color changes, e.g. for temperature or utilization display (see
example 6a)
2. Progress bars to display progress (no color change) in the Operate style (see example 6b)
Example 6a
Progress bar with two color changes:
Figure 5-1
Progress bar with two color changes
DEF PROGGY0 = (R/0,150,50,100///DT1,DO0//"$R[10]"//,,150/3,4,,,,,,,9,7)
Variable type:
REAL
Limits / toggle field:
MIN:
0
MAX:
150
Signal value SVAL1:
50
Signal value SVAL2:
100
Attributes:
Display mode DT:
1 (progress bar)
Display option DO:
0 (from left to right (default))
System or user variable:
$R[10]
Position of input/output field:
Width:
150
Colors:
Foreground color:
3 (dark green)
Background color:
4 (light gray)
Signal color SC1:
9 (yellow)
Signal color SC2:
7 (red)
To use a progress bar with color change, the display mode DT (DisplayType) must be set to 1.
The orientation of the progress bar is determined via the attribute display option DO
(DisplayOption):
0: From left to right (default)
1: From right to left
2: From bottom to top
3: From top to bottom
SINUMERIK Integrate Run MyScreens
Programming Manual, 06/2019, A5E40869575B AC
89
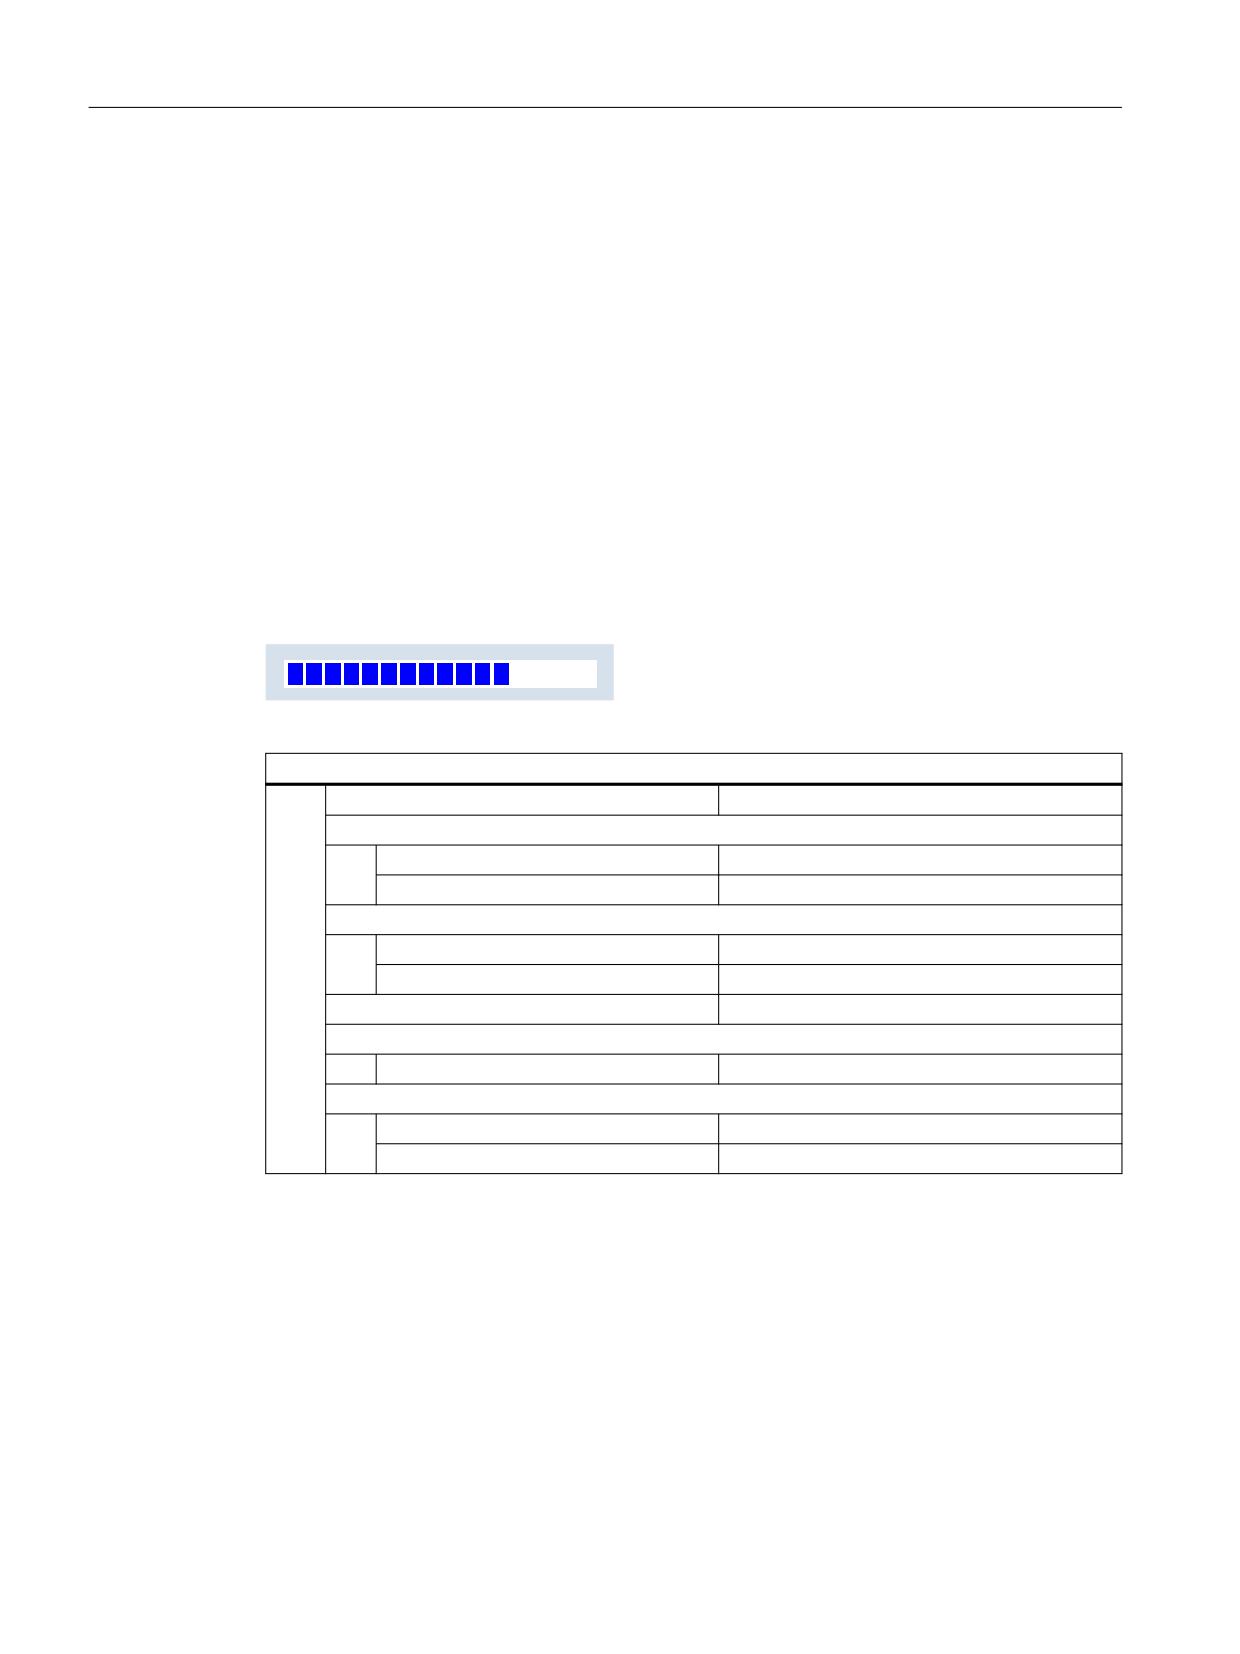
Variables
5.8 Example 6: Progress bar
A MIN and a MAX value must be specified for the display of the progress bar (in the example
MIN: 0, MAX: 150).
Depending on the current value of the variable PROGGY0, this setting already displays a
progress bar with the foreground color 3 (= dark green) and the backg14round color 4 (= light
gray).
Optionally, one or two signal values SVAL1 and SVAL2 (limit parameters) can be defined (in
the example SVAL1: 50 and SVAL2: 100). With these signal values, the foreground color of the
progress bar changes. The appropriate signal colors are specified via parameters SC1 and
SC2 (in the above example SC1: 9 (= yellow) and SC2: 7 (=red)).
The following rule applies when specifying limit values for the progress display:
MIN < SVAL1 < SVAL2 < MAX.
Example 6b
Progress bar without color change:
Figure 5-2
Progress bar
DEF PROGGY0 = (R/0,150///DT2,DO0//"$R[10]"//,,150/6,10)
Variable type:
REAL
Limits / toggle field:
MIN:
0
MAX:
150
Attributes:
Display type DT:
2 (progress bar)
Display option DO:
0 (from left to right (default))
System or user variable:
$R[10]
Position of input/output field:
Width:
150
Colors:
Foreground color:
6 (blue)
Background color:
10 (white)
To use a progress bar without color change, the display mode DT (DisplayType) must be set
to 2.
The orientation of the progress bar is determined via the attribute display option DO
(DisplayOption) (see description for example 6a).
A MIN and a MAX value must be specified for the display of the progress bar (in the example
MIN: 0, MAX: 150).
Depending on the current value of the variable PROGGY0, this setting displays a progress bar
with the foreground color 6 (= blue) and the backg14round color 10 (= white).
SINUMERIK Integrate Run MyScreens
90
Programming Manual, 06/2019, A5E40869575B AC