Maserati Ghibli (2018 year). Manual in english - page 4
In an Emergency
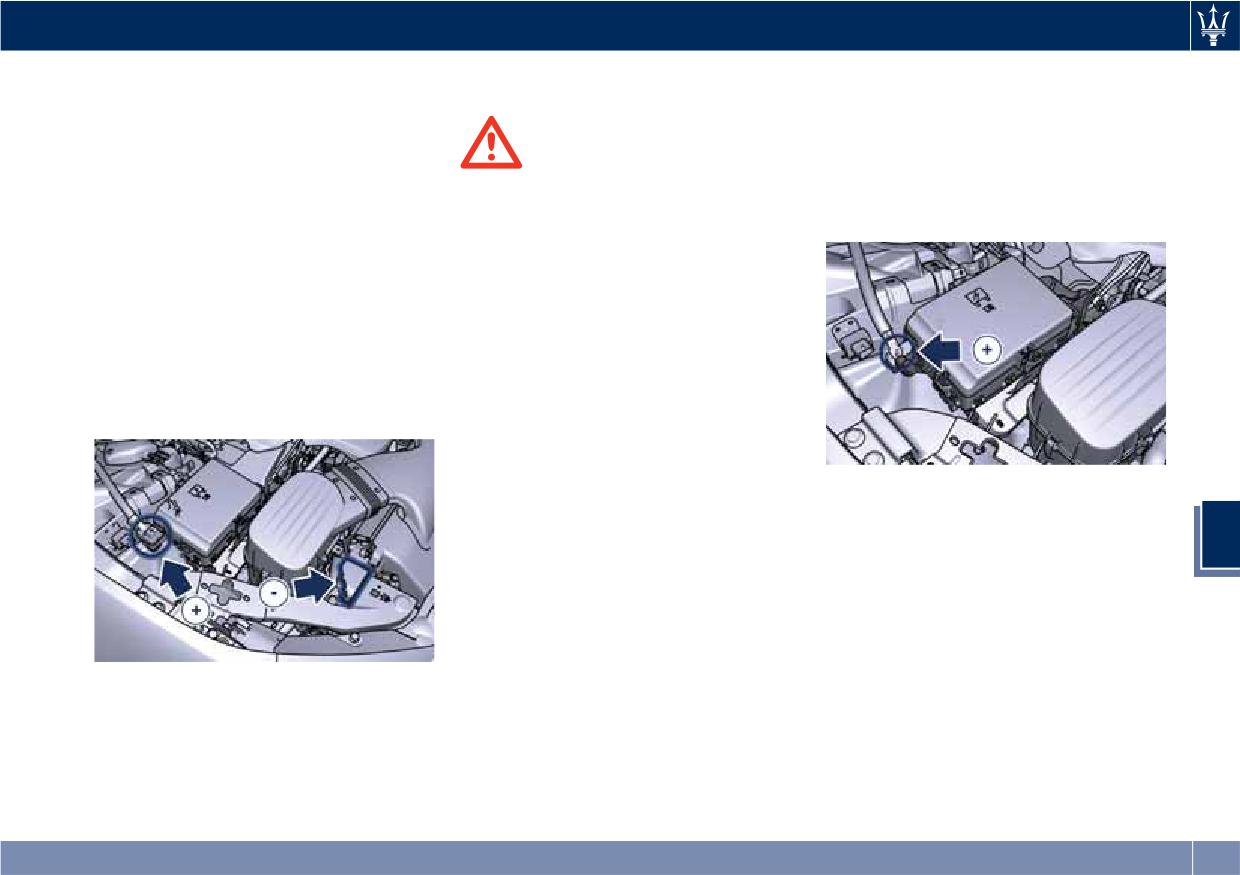
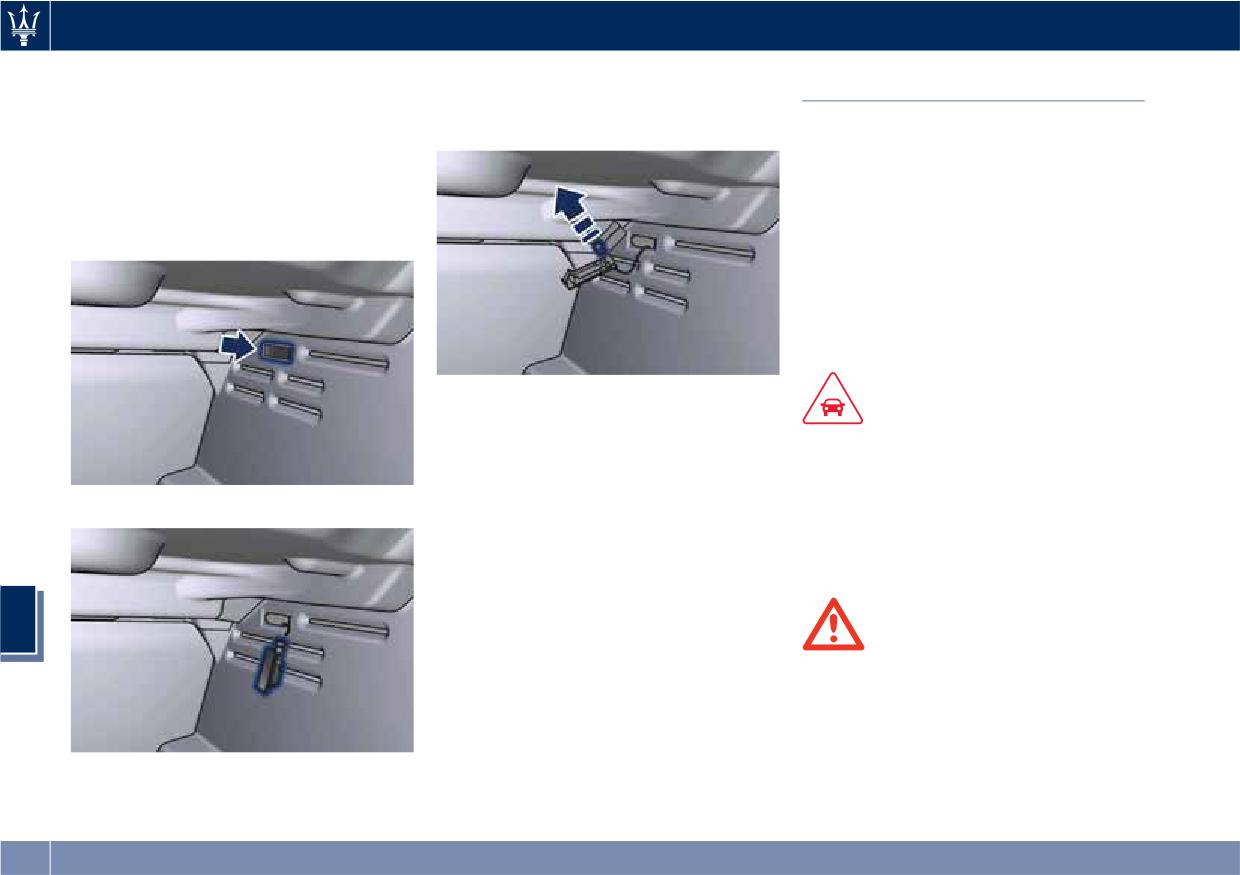
Jump-Start Procedure
• Connect one terminal clamp of the
vehicle
positive jumper cable to the positive
(+) remote post of the vehicle with
Battery Remote Posts Position
the discharged battery after lifting
WARNING!
the protection cap of the cable
For easier operation, remote battery
• Stay clear of the radiator cooling fan
indicated on the external side of the
posts for jumpstarting are located in
whenever the engine hood is raised.
integrated power module.
the engine compartment while the
It can start anytime the ignition
battery is stored in the trunk.
switch is on. You could be injured by
Open the engine hood (see “Hood
the moving fan blades.
Operation” in section “Before
• Remove any metal jewelry such as
Starting”) the positive remote post (+)
watch bands or bracelets that might
and the negative remote post (-) are
make an inadvertent electrical
easily recognizable by the icons
contact. You could be seriously
labeled on the integrated power
injured.
module.
• Do not allow the vehicles involved
in the jumpstarting operation to
touch each other as this could
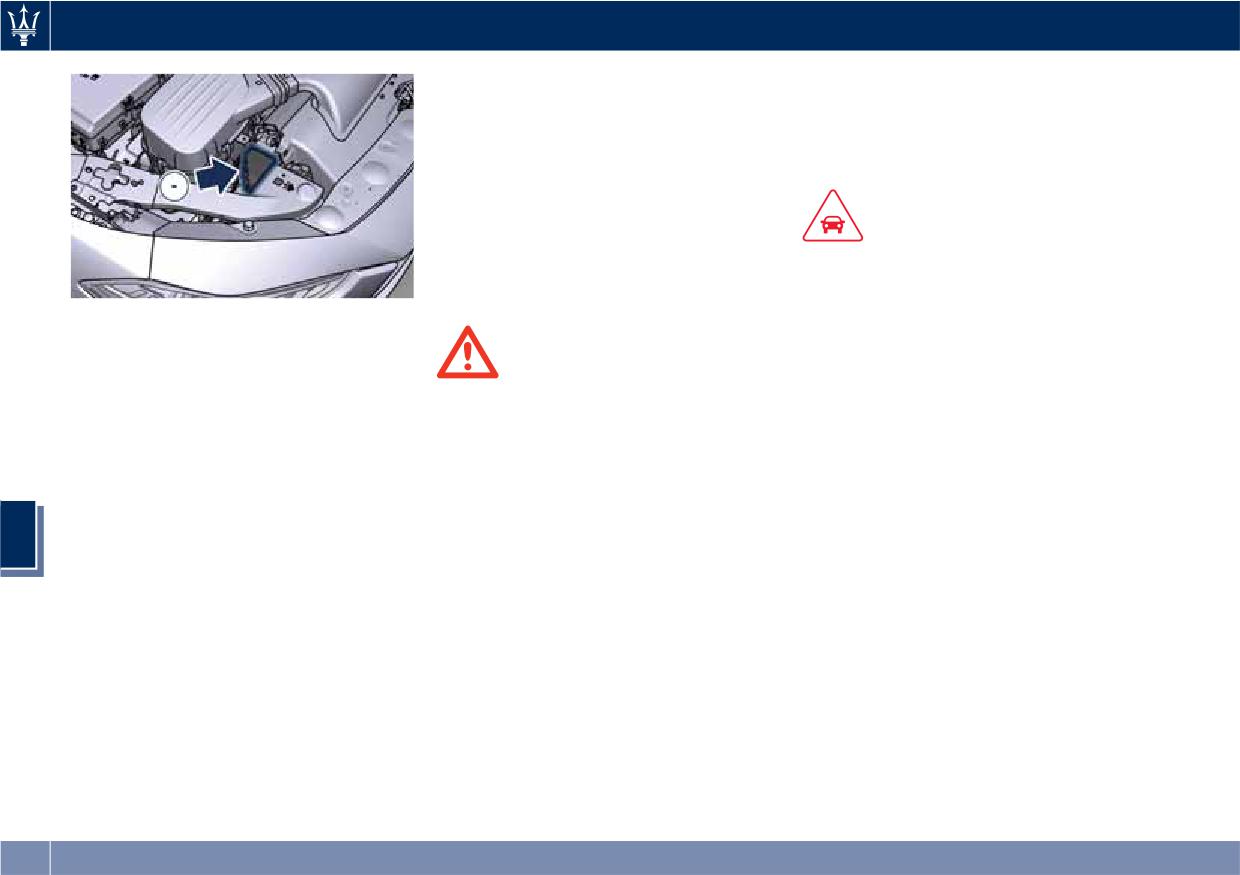
• Connect the other terminal clamp of
establish a ground connection and
the positive (+) jumper cable to the
cause personal injury.
positive (+) post of the booster
6
battery.
• Turn off the heater, radio, and all
unnecessary electrical accessories.
• Connect one terminal clamp of the
negative jumper cable to the
• Set the parking brake, shift the
negative (-) post of the booster
automatic transmission into P (Park)
battery.
and turn the ignition to OFF.
• Connect the other terminal clamp of
• If using another vehicle to jumpstart
the negative (-) jumper cable to the
the battery, park the vehicle within
remote negative (-) post of the
the jumper cables reach and set the
vehicle with the discharged battery
parking brake and make sure the
as rendered.
ignition is off.
303
In an Emergency
• Disconnect the terminal clamp of the
Towing a Disabled Vehicle
positive jumper cable from the
remote positive (+) post of the
Proper towing or lifting equipment is
discharged vehicle.
required to prevent damage to your
vehicle.
NOTE:
If frequent jump-starting is required to
start your vehicle you should have the
CAUTION!
battery and charging system inspected at
Any improper maneuver and use of
an Authorized Maserati Dealer center.
unsuitable equipment for recovering
vehicle in an emergency from off road
• Start the engine in the vehicle that
location could seriously damage the
has the booster battery, let the
vehicle. Contact an Authorized
engine idle a few minutes, and then
WARNING!
Maserati Dealer.
start the engine in the vehicle with
California Proposition 65
the discharged battery. If using a
Operating, servicing and maintaining
Manual Release of Transmission
portable battery booster, wait a few
a passenger vehicle or off-road vehicle
with Low Battery
seconds after connecting the cables,
can expose you to chemicals including
before starting the booster vehicle.
In order to push or tow the vehicle if
such as, engine exhaust, carbon
Once the engine is started, remove the
unable to shift the transmission out of
monoxide, phthalates and lead, that
jumper cables in the reverse sequence.
P (Park) (such as a discharged battery),
which are know to the State of
6
a manual park release is available. In
• Disconnect the terminal clamp of the
California to cause cancer and birth
this case it is necessary to manually
negative (-) jumper cable from the
defects or other reproductive harm. To
release the shift lever and release the
remote negative (-) post of the
minimize exposure, avoid breathing
parking brake if inserted (see
vehicle with the discharged battery.
exhaust, do not idle the engine except
“Emergency Release of the Parking
• Disconnect the other terminal clamp
as necessary, service your vehicle in a
Brake” in this section).
of the negative jumper cable from
well-ventilated area and wear gloves
Follow the steps as indicated in
the negative (-) post of the booster
or wash your hands frequently when
“Transmission Manual Release of P
battery.
servicing your vehicle. For more
(Park) Position” in this section to
information go to:
• Disconnect the terminal clamp of the
manually disengage the transmission.
positive (+) jumper cable from the
vehicle
positive (+) post of the booster
battery.
304
In an Emergency
Vehicle Towing Conditions
If this is not observed, when the ESC is
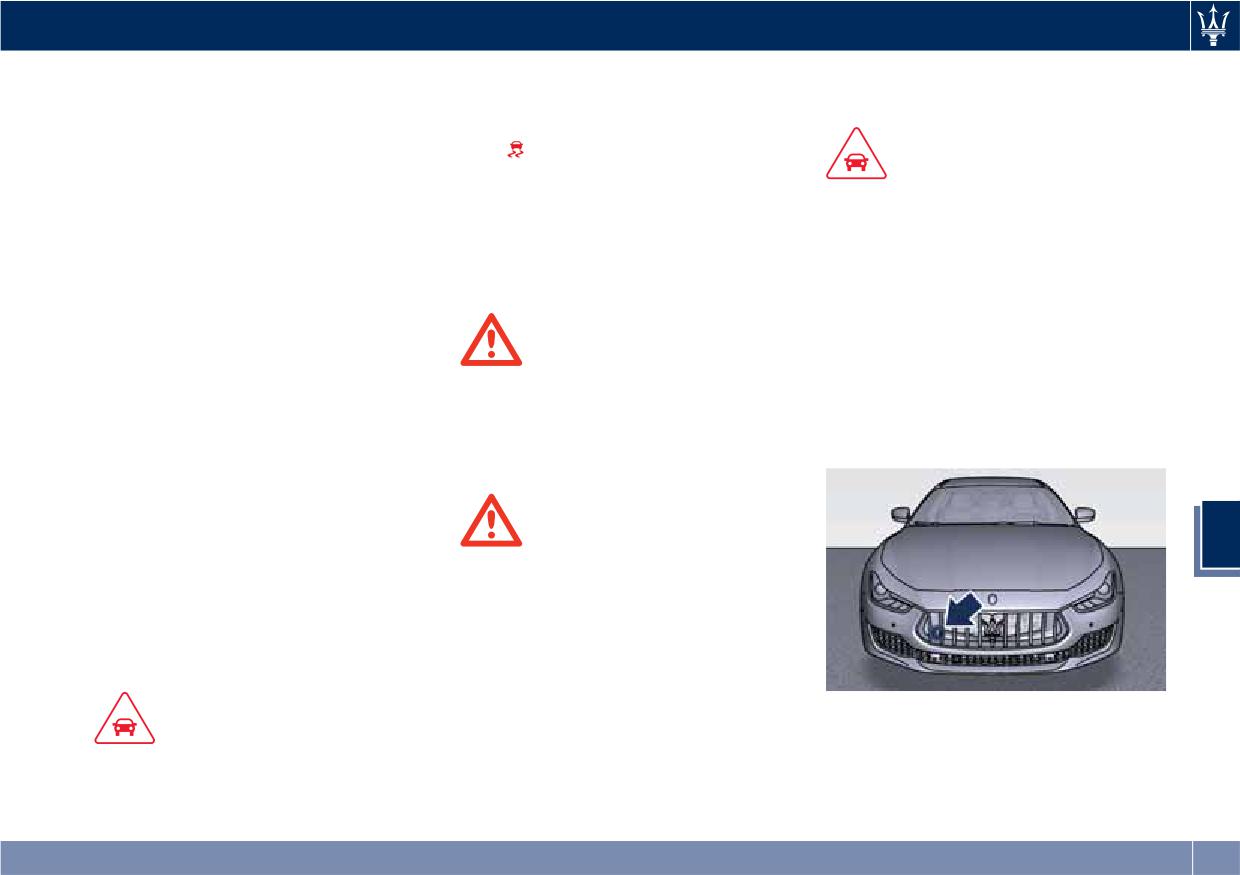
Use the Tow Hook of the Tool
active, the ECU will store a
Kit
Maserati only allows vehicle towing
malfunction and the relative warning
either on a flatbed or with all four
light
will illuminate on the
wheels off the ground.
instrument cluster display. This
CAUTION!
Towing an RWD Vehicle
requires the intervention of an
The tow hook should only be used for
If flatbed equipment is not available,
Authorized Maserati Dealer to reset
towing the car on flat roads. Do not
and the transmission is still operable, a
the system.
use the tow hook to remove the car
RWD vehicle may be flat towed (with
that is stuck on off road stretches.
Towing an AWD Vehicle
all four wheels on the ground) under
The tow hook is also used to tow the
the following conditions.
vehicle on the platform of a tow truck.
• The shift lever must be in N
WARNING!
The tow hook is contained in the tool
(Neutral).
kit (see “Tool Kit” in this section) and
Single axle towing or use of a tow
• The distance to be traveled must not
must be screwed in its seat accessible
dolly is not allowed since it will
exceed 30 mi (50 km).
behind the front grille, right-hand
severely damage components of an
• The towing speed must not exceed
side.
AWD vehicle.
30 mph (50 km/h).
If the transmission is not operable, or
the RWD vehicle must be towed faster
than 30 mph (50 km/h) or farther than
WARNING!
6
30 mi (50 km) (for example on a
Use of a tow dolly on front wheels is
highway), tow with the rear driving
strictly forbidden since front wheels
wheels off the ground and on a
may still receive a residual amount of
platform of a rescue vehicle, or with
torque and disengage the vehicle
the rear wheels raised using a wheel
from the tow dolly and affect safety
lift.
of both rescuers and other road users.
• Carefully clean the threaded seat
CAUTION!
before screwing the hook.
If you have to tow the RWD vehicle
• Screw the tow hook into its seat for
with 2 wheels raised, ensure that the
at least 11 turns.
ignition switch is in the OFF position.
305
In an Emergency
NOTE:
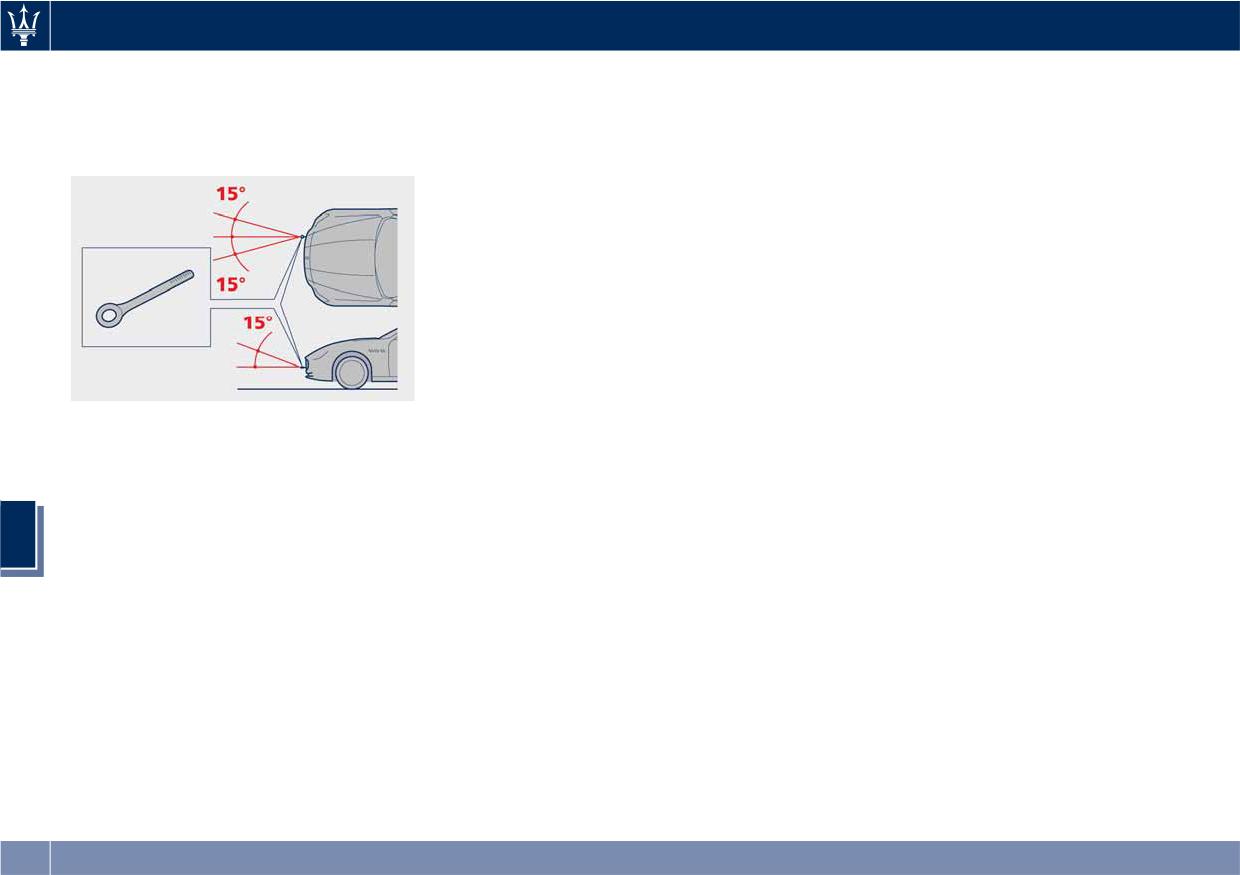
Maximum work angle of towing cable:
15°.
6
306
7 - Maintenance and Care
Scheduled Maintenance Service
308
Scheduled Service Plan
309
Maintenance Procedures
314
Maintenance-Free Battery
322
Fuse Replacement
327
Bulb Replacement
334
A/C System Maintenance
338
Wheels Maintenance
339
Bodywork Maintenance and Care
341
Interior Maintenance and Care
344
Vehicle Stored for Long Periods
345
Restarting the Vehicle
345
Battery Statement
346
307
Maintenance and Care
• Under no circumstances should oil
Scheduled Maintenance
change intervals exceed 12,500 mi
Service
CAUTION!
(20,000 km) or at least after 1 year.
The Scheduled Maintenance services
Correct maintenance is clearly the best
are prescribed by the Manufacturer.
way to guarantee vehicle performance
Failure to have the services carried out
and safety features, ensure respect for
CAUTION!
can affect your warranty.
the environment and low operating
Failure to perform the required
costs.
The Scheduled Maintenance service is
maintenance items may result in
provided by an Authorized Maserati
damage to the vehicle.
NOTE:
Dealer. In the event that, when a
Also remember that the observance of
service is performed, further
Scheduled Maintenance
the maintenance procedures is
replacements or repairs are found to
(Service) Indicator
essential for keeping your vehicle
be necessary in addition to the
operating properly. Not adhering to
The service indicator system will
scheduled operations, these can be
the “Scheduled Service Plan” can
remind you the deadline for the
carried out only with the specific
impact your vehicle’s warranty.
maintenance program.
consent of the Customer.
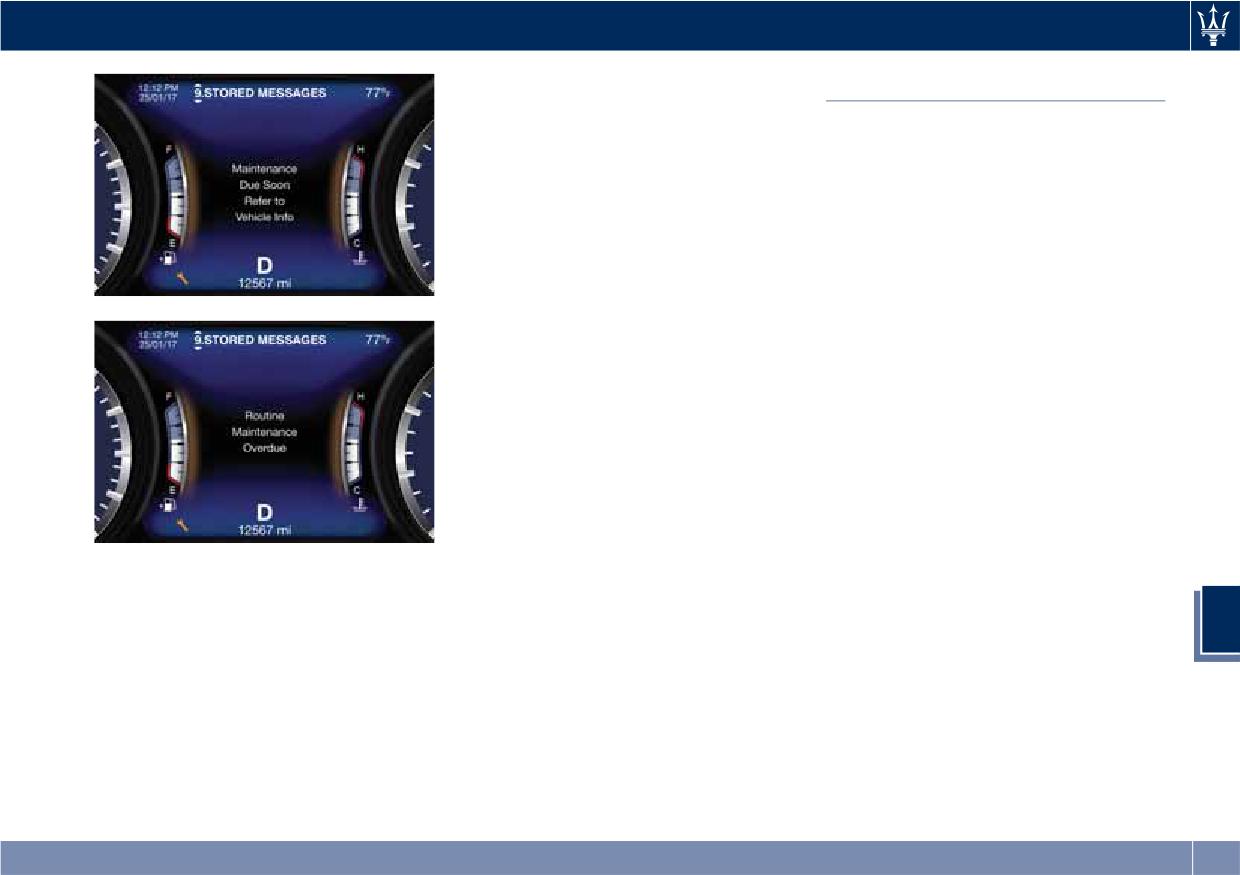
The indicator light
on the
instrument cluster flashes for approx. 5
Interval Running Coupons
CAUTION!
seconds displaying the message backed
Maserati has therefore provided for a
You are advised to notify the
by a beeping sound, indicating that
series of checks and maintenance
Authorized Maserati Dealer of any
the next scheduled maintenance is due
operations involving the 1st service
minor operating problem, without
or has already overdue (see paragraph
when the vehicle mileage reaches
waiting for the next scheduled service.
”TFT Display: Warning/Indicator Lights
12,500 mi (20,000 km) or after 1 year
of the Set Modes/ Functions” in
7
of the vehicle's life, and subsequently
NOTE:
chapter “Instrument Cluster” of
every 12,500 mi (20,000 km) or every
• Change your vehicle's oil if it has
section “Dashboard Instruments and
year.
been 1 year since your last oil
Controls” for more details).
After the 6th service, maintenance
change.
must be restarted with the operations
• Change your engine oil more often if
scheduled for the 1st, 2nd and 3rd
you drive your vehicle off-road for an
service.
extended period of time or short
trips without reaching operating
temperature.
308
Maintenance and Care
An Authorized Maserati Dealer will
Scheduled Service Plan
reset the service indicator message
after completing the scheduled
The Scheduled Maintenance services
maintenance operations.
listed in this manual must be done at
the times or mileages specified to
protect your vehicle warranty and
ensure the best vehicle performance
and reliability.
More frequent maintenance may be
needed for vehicles in operating
conditions, such as dusty areas and
very short trip driving.
Inspection and service should also be
done anytime a malfunction is
suspected.
Maserati recommends that these
maintenance intervals be performed
at an Authorized Maserati Dealer. The
technicians at your dealership know
your vehicle best, and have access to
factory-approved information,
The service indicator and message will
genuine Maserati parts, and specially
illuminate approximately from 620 mi
designed electronic and mechanical
(1000 km) or 30 days to the next
tools that can help prevent future
costly repairs.
7
scheduled maintenance.
Have your vehicle serviced as soon as
possible.
NOTE:
The service indicator will not monitor
the time elapsed from the last
scheduled maintenance.
309
Maintenance and Care
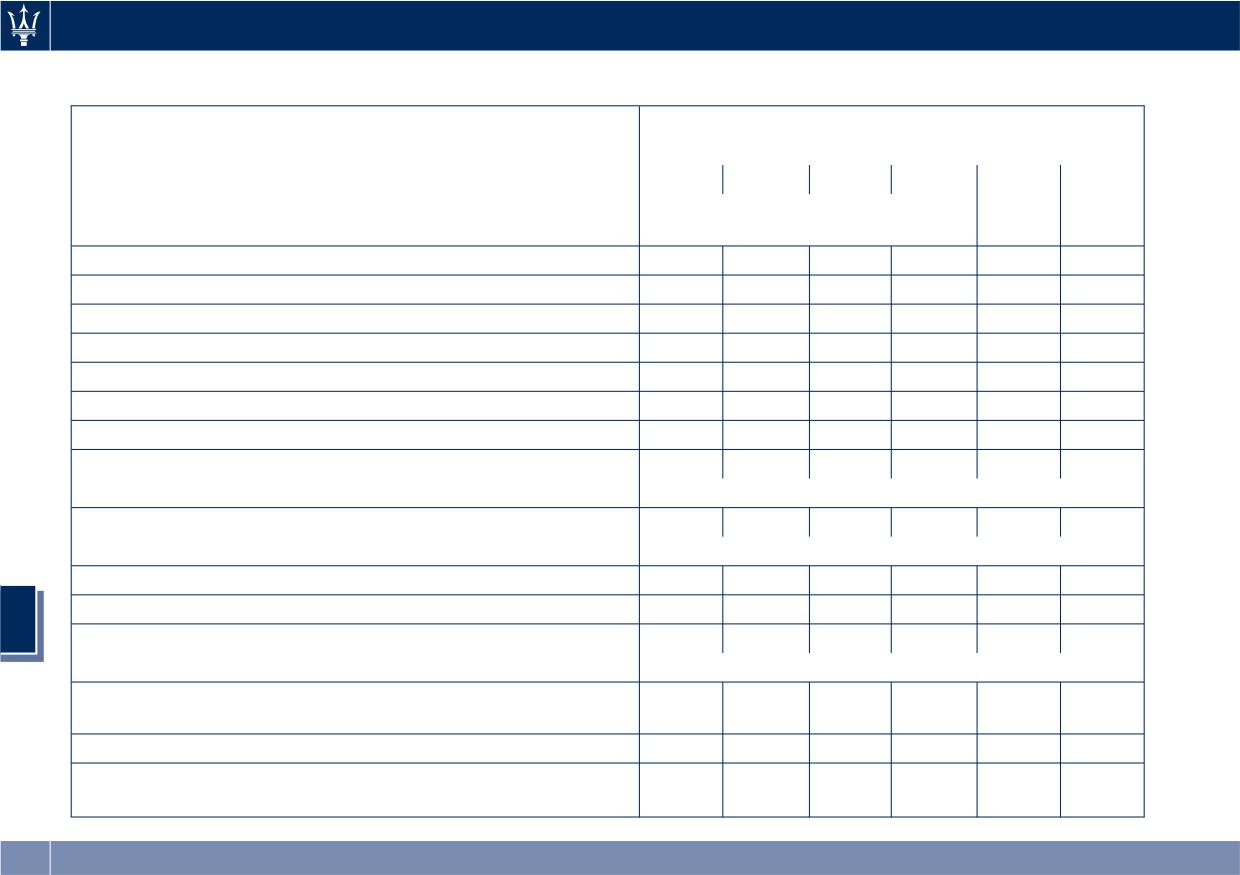
Main Operations/Service Coupons
Interval running coupons: every 12,500 mi (20,000 km)
or 1 year
Service coupons
1°
2°
3°
4°
Available Pre-Paid Maintenance
5°
6°
Main operations
Program
Vehicle road test
I
I
I
Check with Maserati Diagnosis
I
I
I
I
I
I
Engine oil and filter
R
R
R
R
R
R
Engine coolant level
I
I
I
I
I
I
Engine check for leaks
I
I
I
I
I
I
Cooling system connections and lines (check for leaks)
I
I
I
Air filter
R
I
I
I
R
I
I
Belt for alternator
Replace every time the part is removed
I
I
I
R
I
I
Belt for water pump and air conditioning compressor
Replace every time the part is removed
Spark plugs
R
R
Intercooler check for leaks
I
I
I
I
I
I
7
I
I
I
I
I
I
Brake fluid
Replace every 2 years
Brake system (lines, calipers, connections) - Instrument cluster
I
I
I
I
I
I
warning light efficiency - Parking brake operation
Tire wear, tire and spare tire (if equipped) pressure check
I
I
I
I
I
I
Joints, rods for front and rear suspensions, front and rear
I
I
I
under-chassis
310
Maintenance and Care
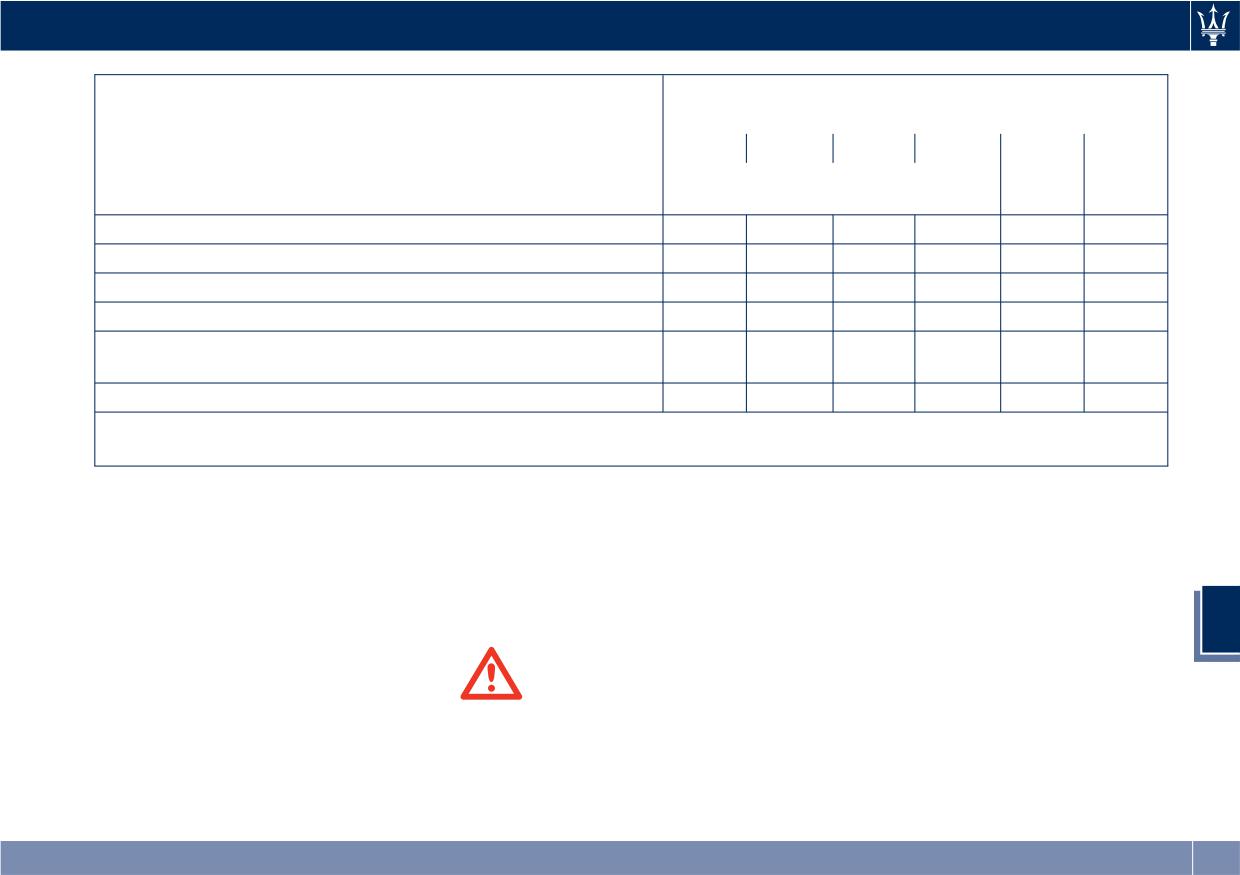
Interval running coupons: every 12,500 mi (20,000 km)
or 1 year
Service coupons
1°
2°
3°
4°
Available Pre-Paid Maintenance
5°
6°
Main operations
Program
Correct operation and reliability of the seats and seat belts
I
I
I
I
I
I
Pollen filter
R
R
R
Windshield fluid level - Windshield washer
I
I
I
I
I
I
Headlight leveling
I
I
I
I
I
I
Controls and adjustment systems in general, hinges, doors,
I
I
I
engine compartment lid and luggage compartment
Condition of leather interiors
I
I
I
I = Inspect and carry out any other necessary operation.
R = Replace.
Periodic Maintenance
• operation of windshield
monoxide, phthalates and lead, that
washer/wiper system and wear of
which are know to the State of
Every 600 mi (1,000 km) or before
windshield wiper blades.
California to cause cancer and birth
long journeys
defects or other reproductive harm. To
Check:
Every 1,900 mi (3,000 km)
minimize exposure, avoid breathing
Check and top up, if required, the
• engine coolant;
exhaust, do not idle the engine except
engine oil level.
7
• brake fluid;
as necessary, service your vehicle in a
well-ventilated area and wear gloves
• windshield washer fluid level;
or wash your hands frequently when
• tire inflation pressure and condition;
WARNING!
servicing your vehicle. For more
• operation of lighting system
California Proposition 65
information go to:
(headlights, direction indicators,
Operating, servicing and maintaining
hazard warning flashers, etc.);
a passenger vehicle or off-road vehicle
vehicle
can expose you to chemicals including
such as, engine exhaust, carbon
311
Maintenance and Care
Heavy-Duty Vehicle Use
• check and, if necessary, replace
On Board Diagnostic System
pollen filter of the A/C system;
If the car is mainly used under one of
Your vehicle is equipped with a
• check and, if necessary, replace air
the following conditions:
sophisticated on board diagnostic
cleaner filter.
system called OBD II. This system
• off-road;
monitors the performance of the
• short, repeated journeys (less than
emissions, engine, and automatic
4-5 mi/7-8 km) at sub-zero outside
CAUTION!
transmission control systems. When
temperatures;
All maintenance operations for the
these systems are operating properly,
• engine often idling or driving long
vehicle must be carried out by an
your vehicle will provide excellent
distances at low speeds or long
Authorized Maserati Dealer. For
performance and fuel economy, as
periods of idleness;
routine and minor maintenance
well as engine emissions suited to
you should perform the following
operations which you can carry out
current government regulations.
inspections more frequently than
yourself, make sure that you have the
If any of these systems require service,
recommended on the “Scheduled
necessary experience and always use
the OBD II system will turn on the
Service Plan”:
suitable equipment, original Maserati
Malfunction Indicator Light
on the
spare parts and the prescribed fluids.
• check front disc brake pad conditions
instrument cluster display (refer to
Shall this not be the case, do not carry
and wear;
“Instrument Cluster” in section
any operation on your own and
“Dashboard Instruments and
• check cleanliness of hood and trunk
contact an Authorized Maserati
Controls”). The system stores as well
locks, cleanliness and lubrication of
Dealer.
diagnostic codes and other
linkage;
information to assist your service
• visually inspect conditions of: engine,
technician by performing repairs.
transmission, pipes and hoses
Although the vehicle will be driveable
(exhaust - fuel system - brakes) and
and will not need towing, contact an
7
rubber elements (boots - sleeves -
Authorized Maserati Dealer for service
bushes - etc.);
as soon as possible.
• check battery charge;
• visually inspect condition of the
accessory drive belts;
CAUTION!
• check and, if necessary, change
• Prolonged driving with the MIL
engine oil and replace oil filter;
on could cause further damage to
the emissions control system. It could
312
Maintenance and Care
also affect fuel economy and
To check if your vehicle's OBD II system
for your OBD II system to update. A
driveability. The vehicle must be
is ready, you must do the following:
recheck with the above test routine
serviced before any emissions tests
may then indicate that the system is
1. Press the ignition device to the
can be performed.
now ready.
RUN position, but do not crank or
• If the MIL
is flashing while the
Regardless of whether your vehicle's
start the engine.
engine is running, severe catalytic
OBD II system is ready or not, if the
2. As soon as you press the ignition
converter damage and power loss
MIL
is illuminated during normal
device to turn the engine On, you
will soon occur. Immediate service at
vehicle operation you should have
will see the MIL remain
an Authorized Maserati Dealer is
your vehicle serviced before going to
illuminated for 15 seconds, this is a
required.
the I/M station. The I/M station can fail
normal bulb check.
your vehicle because the MIL
is on
3. Approximately 15 seconds later,
with the engine running.
Emissions Inspection and
one of two things will happen:
Maintenance Programs
Spare Parts
•
The MIL
will remain
In some localities, it may be a legal
Use of genuine Maserati parts for
illuminated and a message error
requirement to pass an inspection of
normal or scheduled maintenance and
will appear on your instrument
your vehicle's emissions control
repairs is highly recommended to
cluster. This means that your
system. Failure to pass could prevent
ensure excellent performance.
vehicle's OBD II system is not
vehicle registration. For states that
Damage or failures caused by
ready and you should not
require an Inspection and
non-genuine spare parts used for
proceed to the I/M station.
Maintenance (I/M), this check verifies
maintenance and repairs will not be
•
the “Malfunction Indicator Light
”
The MIL
will turn Off. This
covered by the manufacturer's warranty.
is functioning and is not on when the
means that your vehicle's OBD II
Dealer Service
engine is running, and that the OBD II
system is ready and you can
system is ready for testing.
proceed to the I/M station.
An Authorized Maserati Dealer has
7
Normally, the OBD II system will be
the qualified service personnel, special
ready. The OBD II system may not be
If your OBD II system is not ready, you
tools, and equipment to perform all
ready if your vehicle was recently
should see an Authorized Maserati
service operations in an expert
serviced, recently had a dead battery
Dealer or repair facility. If your vehicle
manner. Service Manuals are available
or a battery replacement. If the OBD II
was recently serviced or had a battery
which include detailed service
system should be determined not
failure or replacement, you may need
information for your vehicle. Refer to
ready for the I/M test, your vehicle
to do nothing more than drive your
these Service Manuals before
may fail the test.
vehicle as you normally would in order
attempting any procedure yourself.
313
Maintenance and Care
Intentional tampering with emissions
vehicle and also allow extended
Maintenance Procedures
control systems may void your
maintenance intervals. Do not use
warranty and could result in civil
The following pages contain the
chemical flushes for washing as the
penalties.
“required” maintenance standards
chemicals can damage your engine,
determined by Maserati engineers.
transmission, power steering or air
Besides those maintenance items
conditioning. Such damages are not
WARNING!
specified in the “Scheduled Service
covered by the New Vehicle Limited
You can be badly injured working on
Plan”, there are other components
Warranty. If a flush is needed
or around a motor vehicle. Take your
which may require service or
because of component malfunction,
vehicle to an Authorized Maserati
replacement in the future.
use only the specified fluid for the
Dealer.
To perform most of the services, it is
flushing procedure.
necessary to open the hood (see
“Hood Operation” in section “Before
Maintenance Service
WARNING!
Starting”).
Components
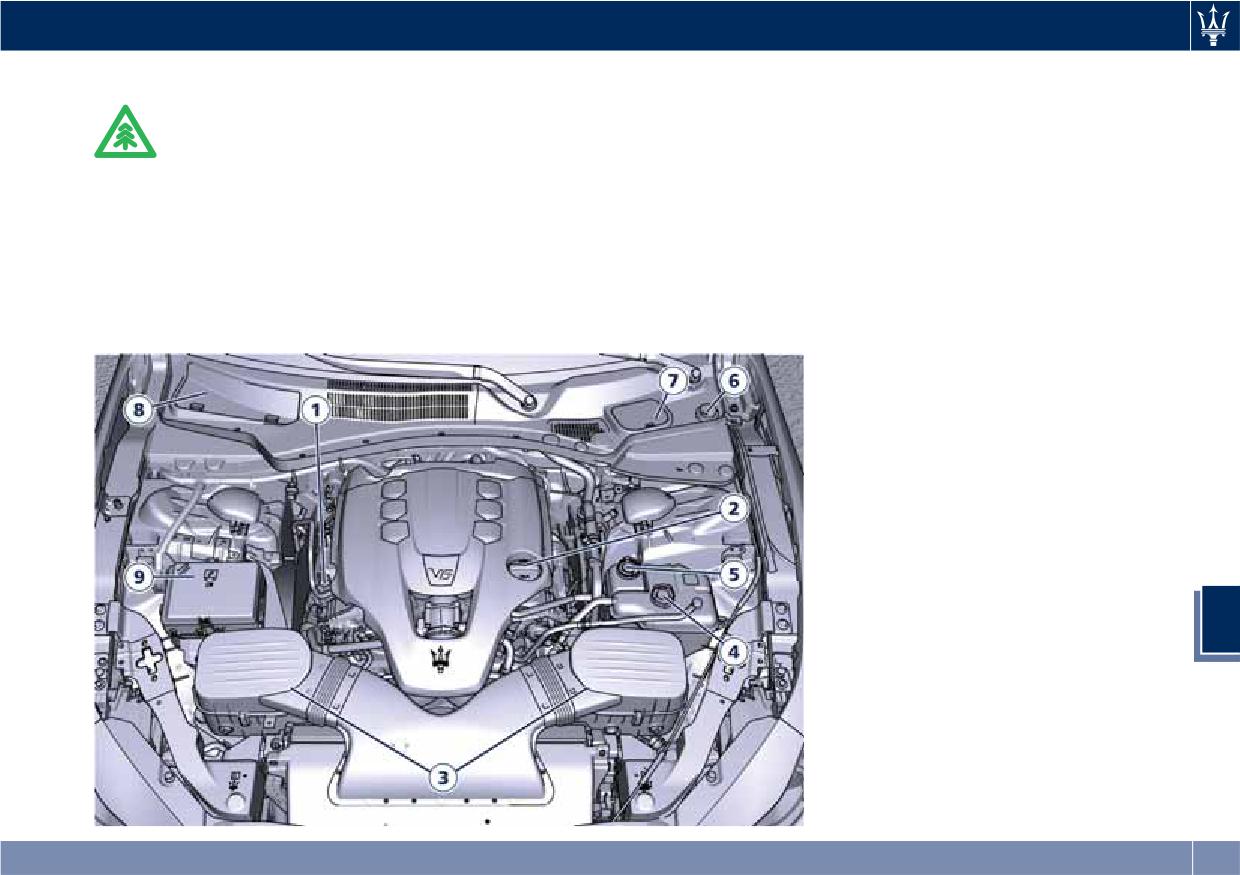
The following images show the
California Proposition 65
position of the components involved in
Operating, servicing and maintaining
the maintenance service.
1
Engine oil dipstick.
a passenger vehicle or off-road vehicle
2
Engine oil filler neck.
can expose you to chemicals including
such as, engine exhaust, carbon
3
Air cleaner filters.
CAUTION!
monoxide, phthalates and lead, that
4
Engine coolant expansion
which are know to the State of
• Failure to properly maintain your
reservoir cap.
California to cause cancer and birth
vehicle or perform repairs and service
5
Coolant reservoir cap for
defects or other reproductive harm. To
when necessary could result in more
transmission cooling system.
minimize exposure, avoid breathing
costly repairs, damage to other
7
exhaust, do not idle the engine except
components or negatively impact
6
Washer fluid reservoir cap.
as necessary, service your vehicle in a
vehicle performance. Immediately
7
Brake fluid reservoir access
well-ventilated area and wear gloves
have potential malfunctions
cover.
or wash your hands frequently when
examined by an Authorized Maserati
8
A/C pollen filter access cover.
servicing your vehicle. For more
Dealer or a qualified repair center.
9
Integrated power module
information go to:
• Your vehicle has been equipped with
(fuses).
improved fluids that protect the
vehicle
performance and durability of your
314
Maintenance and Care
Level Checks
the used oil and fluids in compliance
Engine Coolant Level Check
with the regulations in force and in
Your vehicle has been equipped with
an environment-friendly manner.
an improved engine coolant
ENVIRONMENTAL!
• All equipment used for fluids
(antifreeze) that offers high
• The engine oils and fluids used
replacement (gloves, cloths,
protection against corrosion, freezing
contain substances that are
containers, etc) must be disposed of
and allows extended maintenance
dangerous to the environment. For
in compliance with the regulations
intervals. To prevent reducing
replacement you are advised to
in force.
extended maintenance periods, it is
contact the Authorized Maserati
important to use original engine
Dealer, where all the necessary
coolant (antifreeze) when adding
equipment is available to dispose of
coolant throughout the life of your
vehicle.
When adding engine coolant
(antifreeze) use pure water only, such
as distilled or deionized water when
mixing the water/engine coolant
(antifreeze) solution. The use of
impure water will reduce the amount
of corrosion protection in the engine
cooling system.
• Mix a minimum solution of 50%
engine coolant (antifreeze) and
distilled water. Use higher
concentrations (do not exceed 70%)
7
if temperatures below -35°F (-37°C)
are forecast.
Please note that it is the owner's
responsibility to maintain the proper
level of protection against freezing
according to the temperatures
occurring in the circulation area of the
vehicle.
315
Maintenance and Care
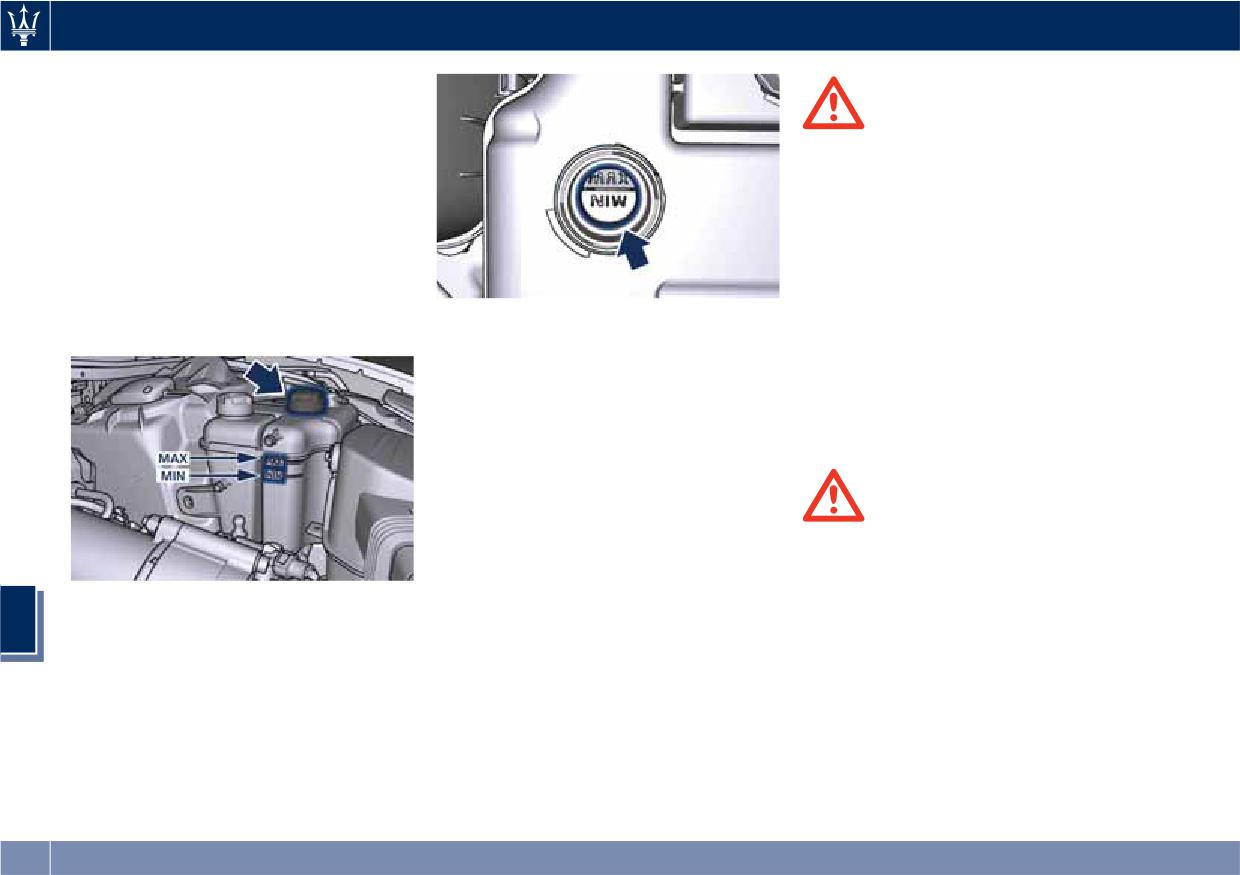
The coolant bottle provides a quick
visual method to determine that the
WARNING!
coolant level is adequate. As long as
the engine operating temperature is
• Never add engine coolant
satisfactory, the coolant bottle only
(antifreeze) when the engine is hot.
needs to be checked once a month.
Do not loosen or remove the cap of
With the engine off and cold, the level
the engine coolant bottle to cool a
of the coolant in the bottle on the left
hot engine. Heat causes pressure to
side of the engine compartment
build up in the cooling system. To
should be between the ranges
prevent scalding or injury, do not
indicated on the bottle and inside the
remove the pressure cap while the
• When additional engine coolant
filler neck.
system is hot or under pressure.
(antifreeze) is needed to maintain
• When adding coolant do not use a
the proper level, it should be added
pressure cap other than the one
to the coolant bottle after removing
specified for your vehicle. Personal
the cap. Do not overfill.
injury or engine damage may result.
• Once the desired level is reached,
reassemble and firmly close cap of
the bottle.
• If frequent engine coolant
WARNING!
(antifreeze) additions are required,
California Proposition 65
or if the level in the coolant recovery
Operating, servicing and maintaining
bottle does not drop when the
a passenger vehicle or off-road vehicle
engine cools, the cooling system
can expose you to chemicals including
7
should be tested by an Authorized
such as, engine exhaust, carbon
Maserati Dealer.
monoxide, phthalates and lead, that
• Keep the front of the radiator and
which are know to the State of
the condenser clean.
California to cause cancer and birth
defects or other reproductive harm. To
minimize exposure, avoid breathing
exhaust, do not idle the engine except
as necessary, service your vehicle in a
316
Maintenance and Care
well-ventilated area and wear gloves
fluid (see “Refillings” in section
or wash your hands frequently when
“Features and Specifications”).
WARNING!
servicing your vehicle. For more
• Once the correct level is reached,
information go to:
• To avoid contamination from foreign
firmly close the cap.
materials or moisture, use only new
vehicle
brake fluid or fluid that has been in
a tightly closed container. Keep the
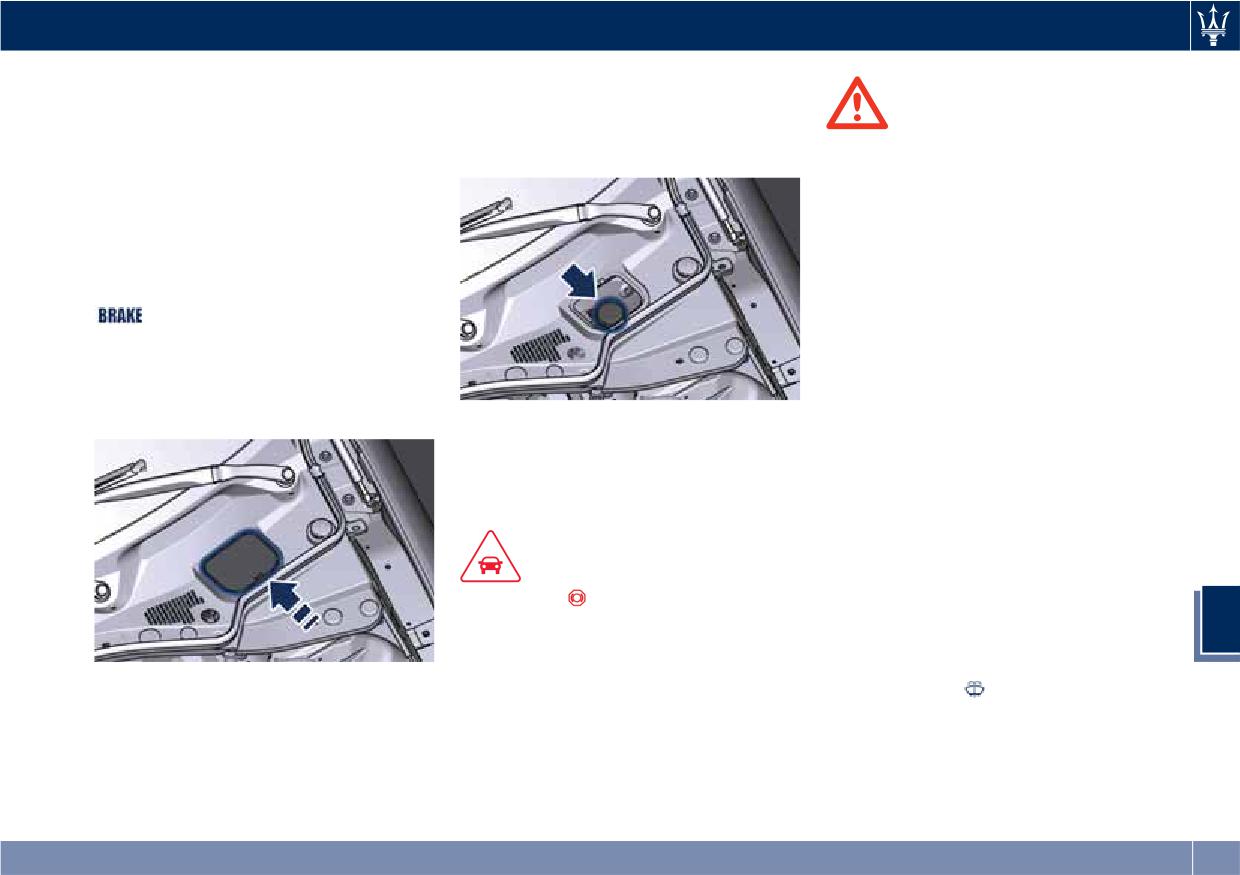
Brake Fluid Level Check
master cylinder reservoir cap
secured at all times.
Check the fluid level immediately if
the brake system warning light
• Overfilling the brake fluid reservoir
(USA) and the related message
can result in spilling brake fluid.
turn on indicating a low level of brake
Brake fluid can also damage painted
fluid.
and vinyl surfaces, make sure it does
not spill over these surfaces.
• Remove the brake fluid reservoir
• Do not allow petroleum based fluid
access cover.
Normal brake pad wear could cause
to contaminate the brake fluid.
the fluid level to fall. However, low
Brake seal components could be
fluid level may be caused by a leak
damaged.
too, and requires accurate checkup of
the braking system.
Adding Washer Fluid
The reservoir on the left side of the
CAUTION!
engine compartment contains the
The symbol
on the tank cap
fluid to wash the windshield.
identifies the synthetic type of brake
During scheduled services or when the
7
fluid, distinguishing it from the
message of low level of the washer
mineral type. Using mineral fluids
fluid appears together with the
• Clean the top of the master cylinder
damages the special rubber linings of
related telltale
add more fluid as
reservoir before removing the cap.
the brake system irreparably.
soon as possible.
• Add fluid to bring the level up to the
The fluid reservoir may contain nearly
“MAX” mark on the side of the
3.2 Quarts (3 liters) of washer fluid.
master cylinder reservoir. Use only
manufacturer's recommended brake
317
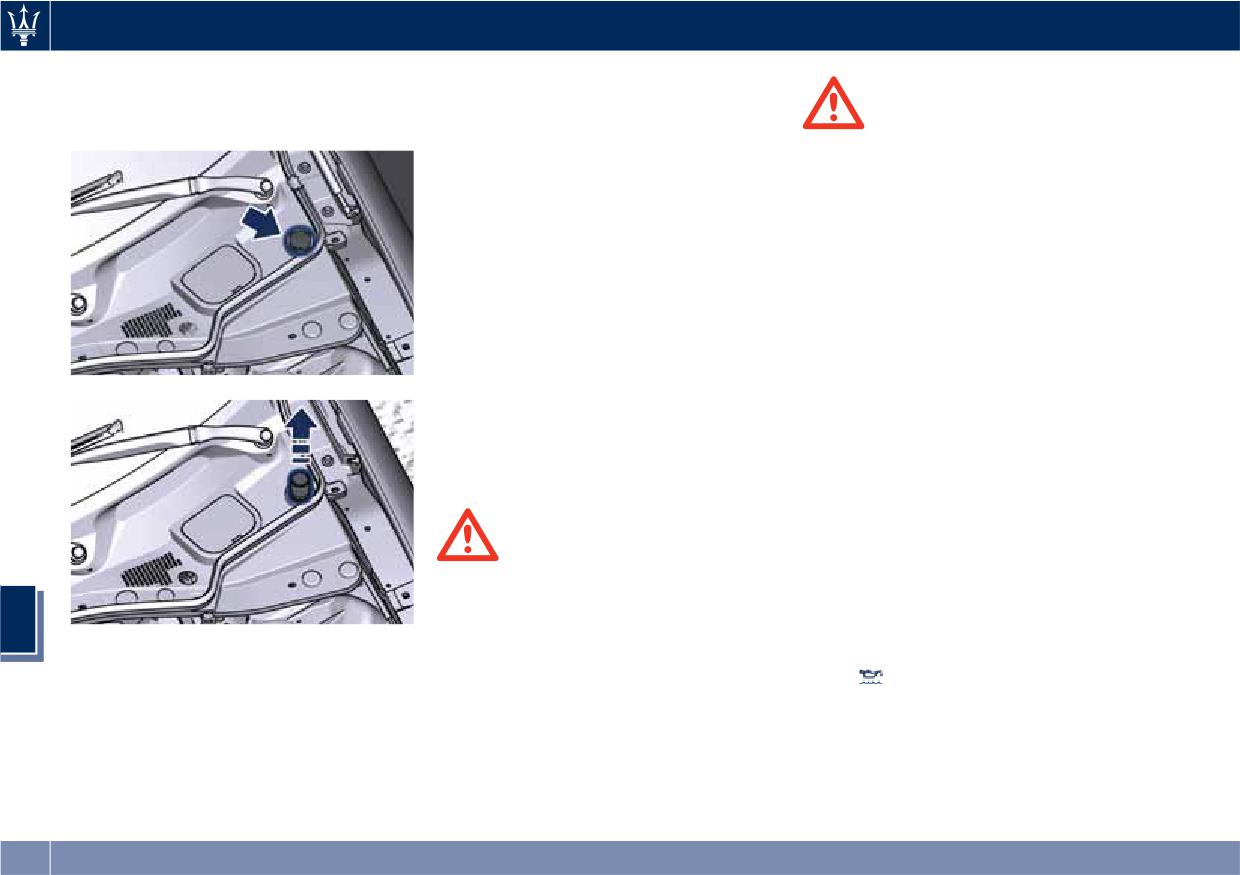
Maintenance and Care
• Remove the reservoir cap in the
a cloth or towel and wipe the wiper
engine compartment and lift the
blades clean. This will help blade
WARNING!
filler neck.
performance.
To prevent freeze-up of your
California Proposition 65
windshield washer system in cold
Operating, servicing and maintaining
weather, select a solution or mixture
a passenger vehicle or off-road vehicle
that meets or exceeds the temperature
can expose you to chemicals including
range of your climate. This rating
such as, engine exhaust, carbon
information can be found on most
monoxide, phthalates and lead, that
washer fluid containers.
which are know to the State of
California to cause cancer and birth
NOTE:
defects or other reproductive harm. To
The Authorized Maserati Dealer can
minimize exposure, avoid breathing
provide you with information about
exhaust, do not idle the engine except
the Maserati recommended
as necessary, service your vehicle in a
“Windshield Washer Fluid” with
well-ventilated area and wear gloves
antifreeze, available in the “Genuine
or wash your hands frequently when
Accessories” catalog.
servicing your vehicle. For more
information go to:
vehicle
WARNING!
• Commercially available windshield
Engine Oil Level Check
washer solvents are flammable. They
To assure proper lubrication of your
7
could ignite and burn you. Care must
vehicle's engine, the engine oil must
• Fill the reservoir with windshield
be exercised when filling or when
be maintained at the correct level.
washer solvent (refer to “Refillings”
working around the windshield
If the
warning light illuminates
in section “Features and
washer system.
and the related message of low oil
Specifications”) and operate the
• Do not drive with the windshield
level displays, or during scheduled
system for a few seconds to flush out
washer reservoir empty: the action
services (see “Scheduled Maintenance
the residual water.
of the washer is essential for
Service” in this section) it is necessary
• When refilling the washer fluid
improving visibility when driving.
to check the engine oil level.
reservoir, apply some washer fluid to
318
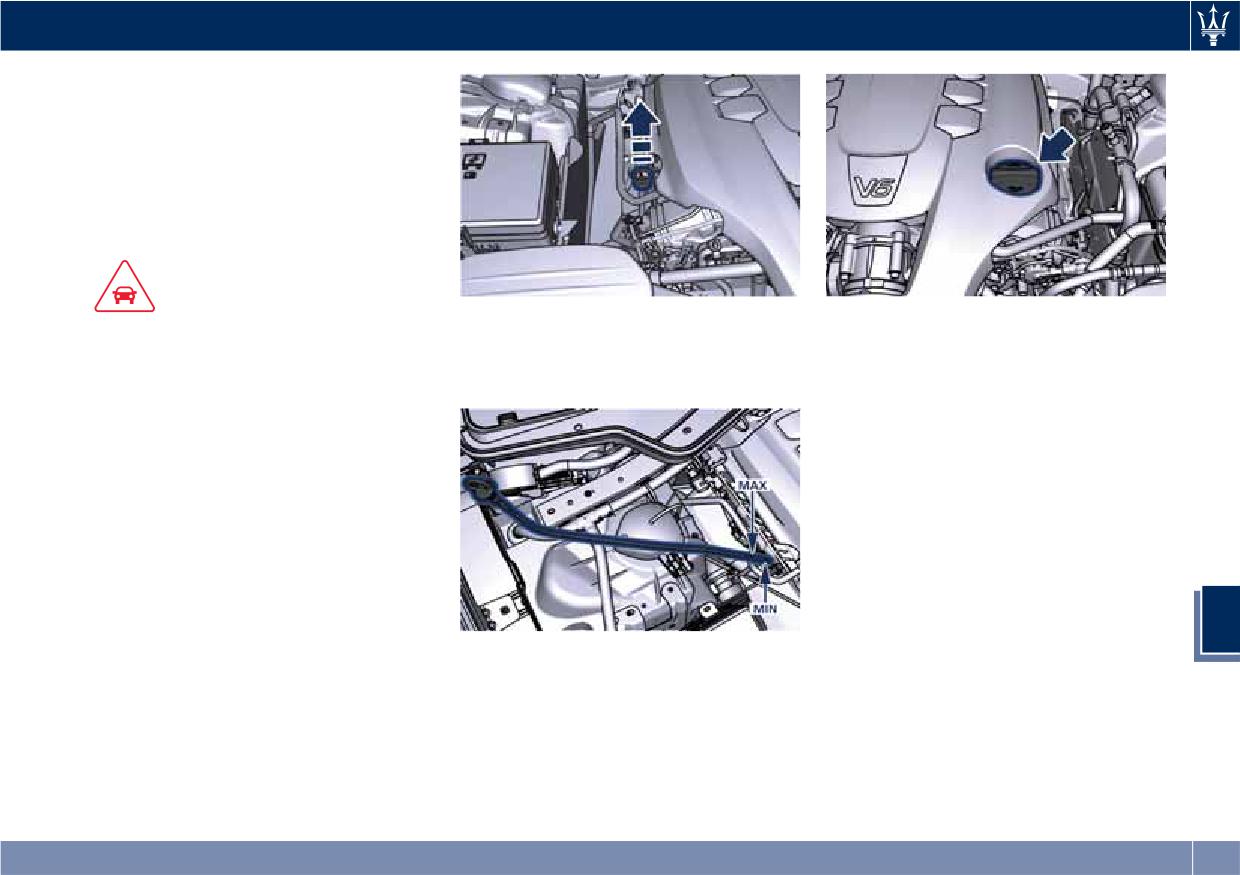
Maintenance and Care
The best time to check the engine oil
level is about five minutes after a fully
warmed up engine is shut off or
before starting the engine after it has
sat overnight. In both cases the vehicle
should be parked on level ground to
improve the accuracy of the oil level
readings.
CAUTION!
• Re-insert the dipstick completely and
• Adding 1.1 Quart (1 liter) of oil
• Do not top up with oil with different
remove: the oil level should maintain
when the level is at the bottom of
characteristics than the engine one
between the “MIN” and “MAX”
the SAFE range will result in the
(refer to “Refillings” in section
reference ranges (SAFE range).
level being at the top of the SAFE
“Features and Specifications”).
range.
• Overfilling or underfilling the oil pan
will cause aeration or loss of oil
• Return the cap and dipstick to their
pressure. This could damage your
position and wait for a few minutes
engine.
to allow the oil to reach the oil pan.
• Do not add any supplemental
• Check the level again.
materials to the engine oil. Engine
Engine Oil Filter Replacement
oil is an engineered product, and its
performance may be impaired by
The engine oil filter should be
supplemental additives.
replaced with a new filter at every oil
change.
7
• Remove the dipstick and clean it
Contact the Authorized Maserati
with a dry and clean cloth.
• If a refilling is necessary: unscrew the
Dealer to perform this service.
filler neck cap.
Automatic Transmission Oil Check
Contact the Authorized Maserati
Dealer for the oil level check.
319
Maintenance and Care
Fluid Level Check for Coolant
Engine Air Filters Replacement
Transmission System
Contact an Authorized Maserati
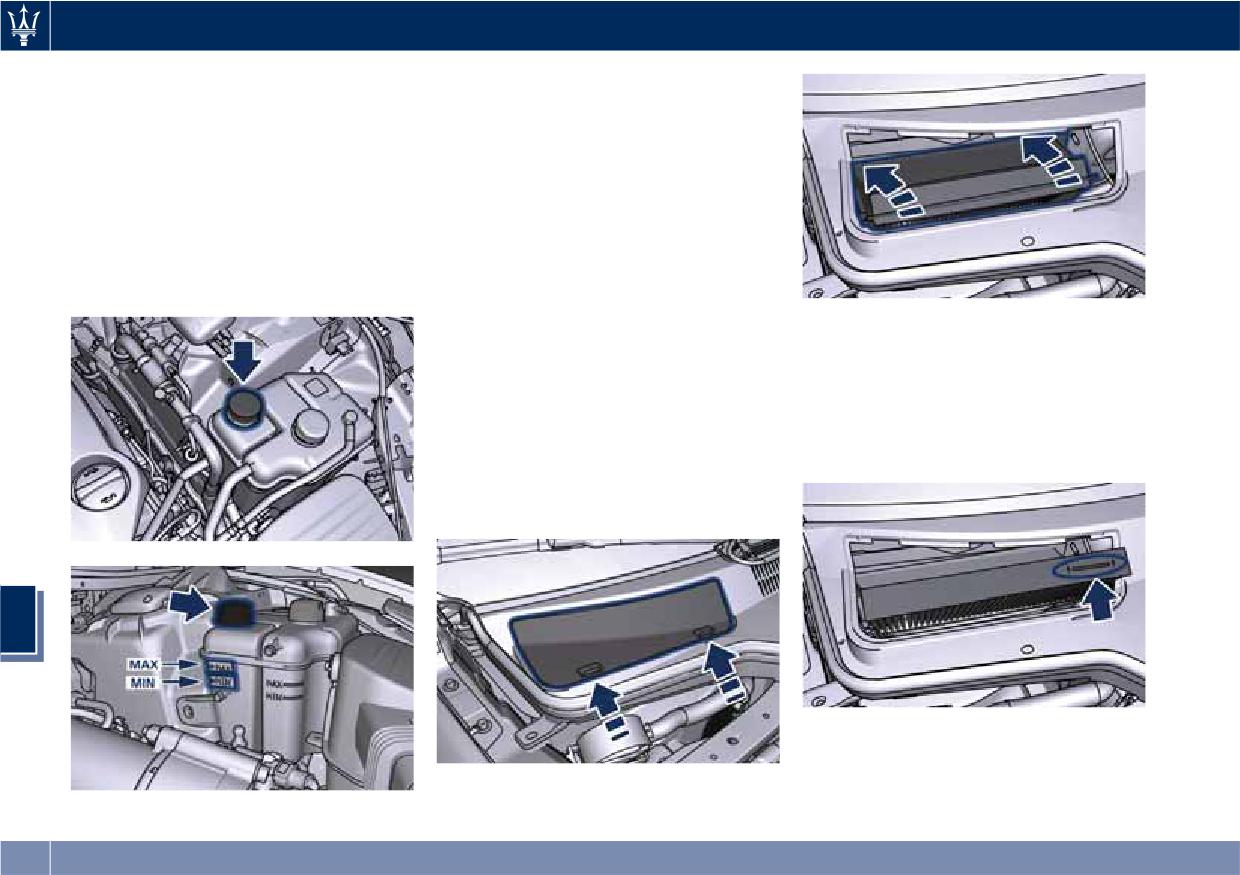
The coolant contained in the bottle of
Dealer to have the air filters replaced.
this system is the same as the one used
for the cooling system of the engine.
A/C Air Filter Replacement
For the preparation of the mixture of
This filter performs mechanic/
water and antifreeze and for the
electrostatic air filtering, provided that
control of the level, proceed as shown
windows and doors are closed.
in the “Engine Coolant Level Check” of
The filter is located under the hood in
this chapter.
the external A/C system air inlet, on
• Remove the used filter slipping it off
the passenger side of the vehicle, next
from within the air intake.
to the windshield wipers.
To replace the filter during the
• Install the new filter with arrows
scheduled maintenance services or
pointing in the direction of airflow,
after the vehicle has been heavily used
which is toward the rear of the
on dusty roads, proceed as follows:
vehicle (text and arrows on the filter
will indicate this).
• Remove the access door in the cowl
screen by pressing the retaining clips
indicated.
7
• Close the filter retaining cover and
reinstall the access door.
• Unsnap both ends and lift the filter
retaining cover.
320
Maintenance and Care
use the “Service” position for any
Spray nozzles
intervention on the windshield wiper
If the jet does not work, first check
CAUTION!
blades.
that there is fluid in the tank (see
Failure to replace the filter may
paragraph “Level checks” in this
considerably reduce the air
Windshield Wiper Maintenance
section) then check that the nozzles
conditioning and heating system
are not clogged.
Life expectancy of wiper blades varies
efficiency.
depending on the geographical area’s
Windshield Wiper Blades Replacement
weather conditions where the car is
• Move the wiper arms into “Service”
Wiper Maintenance and Blades
used and frequency of use. Poor
position, (see chapter “Windshield
Replacement
performance of blades may be present
Wipers and Washers” in section
with chattering, marks on the glass,
Windshield Wiper Arms Lifting
“Understanding the Vehicle”) and
water lines or wet spots. If any of
When the windshield wiper arms are
lift them.
these conditions are present, clean the
in rest position it is not possible to
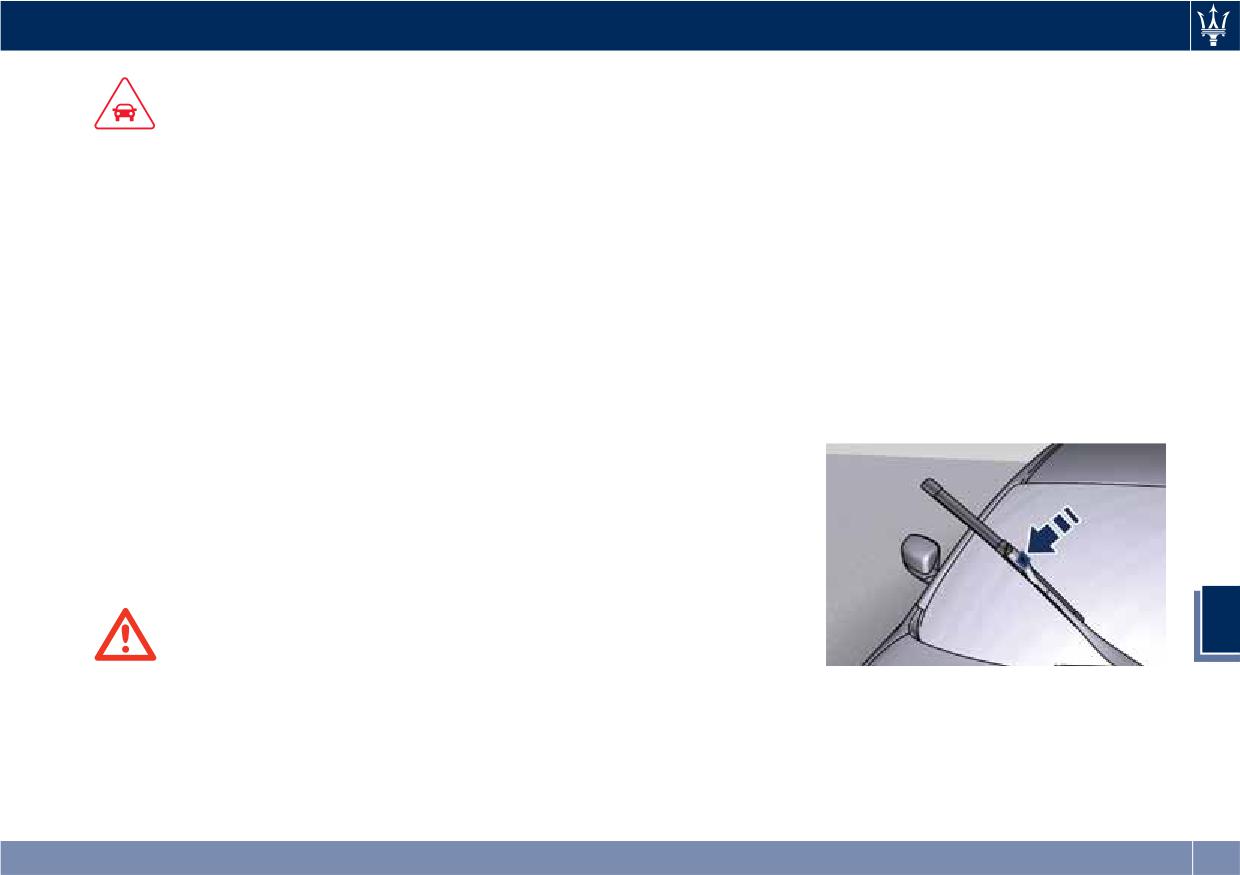
• Press the indicated button, slip off
wiper blades or replace if necessary.
check or replace the blades as they
the blade support from the arm and
Clean the rubber edges of the wiper
remain under the engine hood.
replace it.
blades and the windshield/rear
To service the blades it is necessary to
window glasses periodically with a
move the wiper arms in “Service”
sponge or soft cloth and a mild
position (see chapter “Wipers and
nonabrasive cleaner. This will remove
Washers” in section “Understanding
accumulations of salt or road film.
the Vehicle”). In this way it is possible
Operation of the wipers on dry glass
to lift the arms for cleaning or
for long periods may cause
replacing the wiper blades.
deterioration of the wiper blades.
Always use washer fluid when using
7
the wipers to remove salt or dirt from
WARNING!
a dry windshield.
It is dangerous to operate or service
Avoid using the wiper blades to
• Return the blade to its original
the wiper blades with the windshield
remove frost or ice from the
position on the windshield.
wipers in an active position (any
windshield. Keep the blade rubber out
• Turn the multifunction lever to one
position different from “OFF”) and
of contact with petroleum products
of the automatic settings (see
with the ignition switch in the RUN
such as engine oil, gasoline, etc.
chapter “Windshield Wipers and
position. The rain sensors may
Washers” in section “Understanding
suddenly activate the wipers. Always
321
Maintenance and Care
the Vehicle”) and move the ignition
NOTE:
Maintenance-Free Battery
switch to the RUN position: the wiper
Remote battery terminals for starting
arms will return to the resting
This vehicle is equipped with a sealed
are located in the engine
position.
type maintenance-free battery. You
compartment for jump-starting to be
will never have to add water, nor is
used with an auxiliary battery or a
NOTE:
periodic maintenance required.
battery from another vehicle (see
Due to the difficulty of this operation,
“Auxiliary Jump-Start Procedure”
we recommend that you contact an
chapter in section “In an Emergency”).
Authorized Maserati Dealer for
WARNING!
replacement of the blades.
• Battery fluid is a corrosive acid
To Disconnect the Battery
solution and can burn or damage the
eyes. Do not allow battery fluid to
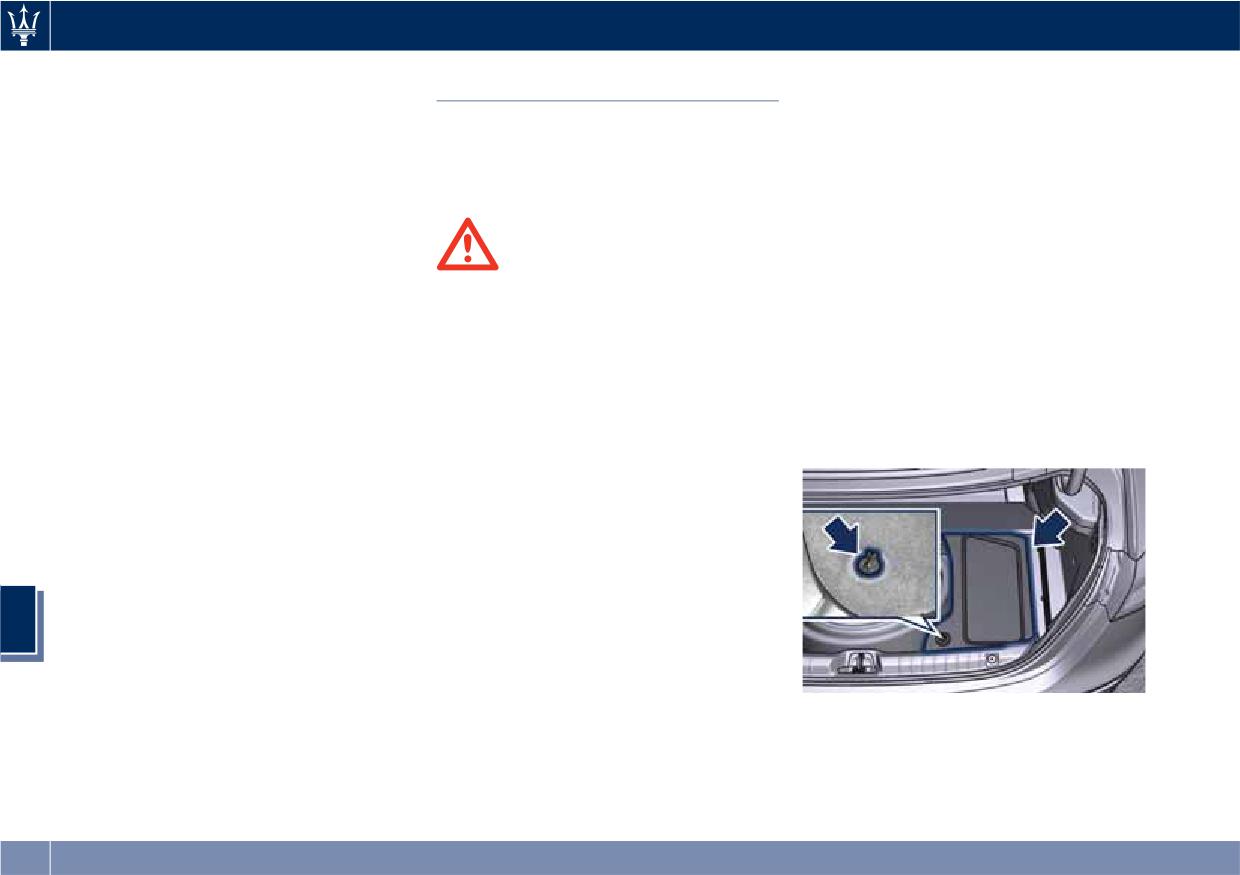
The battery is located on the inner
contact your eyes, skin, or clothing.
right side of the trunk compartment.
If acid splashes in eyes or on skin,
To access the battery it is necessary to
flush the area immediately with
lift the ground coverage of the trunk
large amounts of water.
compartment and remove the access
cover turning the release latch shown.
• Battery gas is flammable and
explosive. Keep flame or sparks
away from the battery. Do not use a
booster battery or any other booster
source with an output greater than
12 Volts. Do not allow cable clamps
to touch each other.
7
• Battery posts, terminals, and related
accessories contain lead and lead
compounds. Wash hands after
handling the battery.
• The battery in this vehicle has a vent
hose that should not be disconnected
and should only be replaced with a
component of the same type (vented).
322
Maintenance and Care
• If the battery needs to be removed
from its compartment, you must first
CAUTION!
detach the terminal clamp to the
• Before disconnecting the battery,
negative post (-) and then the other
open the trunk and lower the
terminal clamp to the positive post
windows a few centimeters, to avoid
(+), after removing the protective
damaging the seal when opening
cover. Battery posts are marked
and closing the door. When the
positive (+) and negative (-) and are
battery is connected, the lowering of
identified on the battery case.
the window is performed
automatically when the door is
opened and closed. The trunk lid
WARNING!
must remain open and the windows
California Proposition 65
lowered until the charged battery is
Operating, servicing and maintaining
reconnected.
a passenger vehicle or off-road vehicle
• Never disconnect the battery from
can expose you to chemicals including
the electrical system when the
such as, engine exhaust, carbon
engine is running.
monoxide, phthalates and lead, that
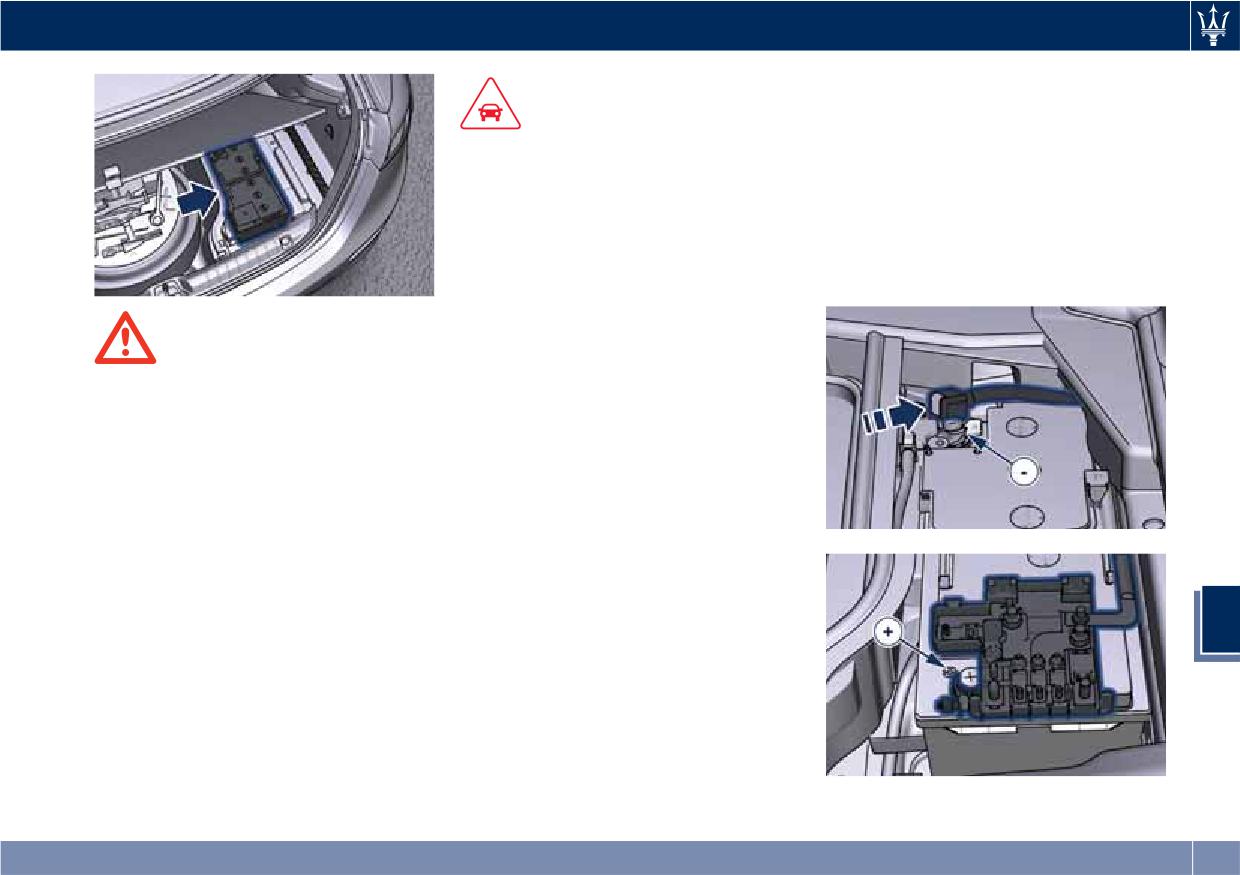
• To temporarily disconnect the vehicle
which are know to the State of
electrical system from the battery,
California to cause cancer and birth
simply remove the cable end with
defects or other reproductive harm. To
quick coupling from the negative
minimize exposure, avoid breathing
post (-) of the battery.
exhaust, do not idle the engine except
7
as necessary, service your vehicle in a
well-ventilated area and wear gloves
or wash your hands frequently when
servicing your vehicle. For more
information go to:
vehicle
323
Maintenance and Care
To Reconnect the Battery
with Power Trunk Lid/Hands Free,
manually perform the complete
NOTE:
CAUTION!
closure. Then move the lid
When the battery cables have been
automatically, using the buttons on
• Every time the battery is
disconnected and the trunk lid has
the lid itself, performing a complete
reconnected, wait at least 30 seconds
been locked, it is necessary to pull the
cycle of opening and closing.
with the ignition switch turned to
emergency release lever in order to
• Initialize the climate control system
RUN before starting the engine, in
re-open it. To access the trunk and
by activating the system and pressing
order to allow the electronic system
operate the emergency release fold
the “AUTO” control as described in
that manages the motor-driven
one of the rear seatbacks (see “Cargo
chapter “Air Conditioning Controls”
throttles to run a self-learning cycle.
Area” chapter in section
in section “Dashboard Instruments
At the same time, you can run the
“Understanding the Vehicle”).
and Controls”.
date and time set up procedure for
• Turn on the MTC+ and set the date
the MTC+.
and time (see “MTC+ Settings” in
• Every time the battery is reconnected
CAUTION!
section “Dashboard Instruments and
the warning light
flash for about
• It is essential when replacing the
Controls”).
10 seconds and then go off.
cables on the battery that the
• Lift, release and lift again the lever
positive cable is attached to the
on the central console to initialize
positive post (+) and the negative
the electric parking brake. Following
cable is attached to the negative
WARNING!
this operation the
warning light
post (-).
California Proposition 65
on the instrument cluster will turn
• Cable clamps should be tight on the
Operating, servicing and maintaining
off.
terminal posts and free of corrosion.
a passenger vehicle or off-road vehicle
• For correct activation of the
can expose you to chemicals including
7
After the battery has been
approach lights on the external
such as, engine exhaust, carbon
disconnected and re-connected and
mirrors, press at least once the tilt
monoxide, phthalates and lead, that
before starting the engine it is
button on the driver's door panel so
which are know to the State of
necessary to proceed as follows:
that the door mode recognizes the
California to cause cancer and birth
mirrors position.
• Unlock and lock the doors using the
defects or other reproductive harm. To
Key fob RKE Transmitter.
minimize exposure, avoid breathing
• Unlock the trunk lid with the key fob
exhaust, do not idle the engine except
RKE transmitter and then lock it
as necessary, service your vehicle in a
manually. If the vehicle is equipped
324
Maintenance and Care
well-ventilated area and wear gloves
This check should be carried out more
• Never charge or recharge a frozen
or wash your hands frequently when
frequently if the vehicle is used mainly
battery.
servicing your vehicle. For more
for short trips or if it is equipped with
• Ensure that any sparks or open
information go to:
power-absorbing devices that remain
flames are kept well away from the
permanently on even when the
battery while it is charging.
vehicle
ignition switch is off. This applies
• Before using a charger to charge or
above all if these devices have been
maintain the battery charge status,
Useful Advice to Extend
retrofitted ("Aftermarket" services).
carefully follow the instructions
If the vehicle is not used for long
Battery Life
provided to ensure the charger is
periods of time, please see “Vehicle
When parking the vehicle, make sure
connected to the battery safely and
Stored for Long Periods” in this
that the doors, front, rear lids and
correctly.
section.
flaps are properly closed. All interior
lights should be off.
Battery Recharge
It is possible to recharge the battery
When the engine is turned off, do not
without disconnecting the cables of
keep the connected devices switched
the vehicle electrical system.
on for a long time (such as radio,
• To access the battery lift the ground
WARNING!
hazard warning flashers, fan, etc.).
coverage of the trunk compartment
The process of charging or recharging
and remove the access cover as
the battery produces hydrogen, a
previously shown (see paragraph “To
flammable gas that can explode and
CAUTION!
Disconnect the Battery" in this
cause serious injuries. When charging
If the battery charge remains below
chapter.
or recharging the battery, follow the
50% for a long period of time, it will
recommended precautions at all
• Remove the protection cover and
be damaged due to sulfation; its
times.
connect the terminal clamp of the
performance and starting power will
7
charger positive cable (typically in
be reduced and it will be more subject
• Before using a charger device
red) to the positive post (+) of the
to freezing.
always check that this tool is
battery.
suitable for the installed battery,
We recommend you to have the
• Connect the terminal clamp of the
with constant voltage (lower than
battery charge condition checked,
charger negative cable (typically in
14.0 V) and low amperage
preferably at the beginning of the
black) to the nut located by the
(maximum limit 15 A).
cold season, to prevent the electrolyte
negative post (-) on the battery,
• Recharge the battery in a
from freezing.
indicated in the picture.
well-ventilated environment.
325
Maintenance and Care
• Turn the charger on and follow the
information go to:
instructions on its user manual to
completely recharge the battery.
vehicle
• When the battery is recharged, turn
off the battery charger before
disconnecting it from the battery.
• Disconnect first the terminal clamp
of the charger black cable from the
battery and then the terminal clamp
of the red cable.
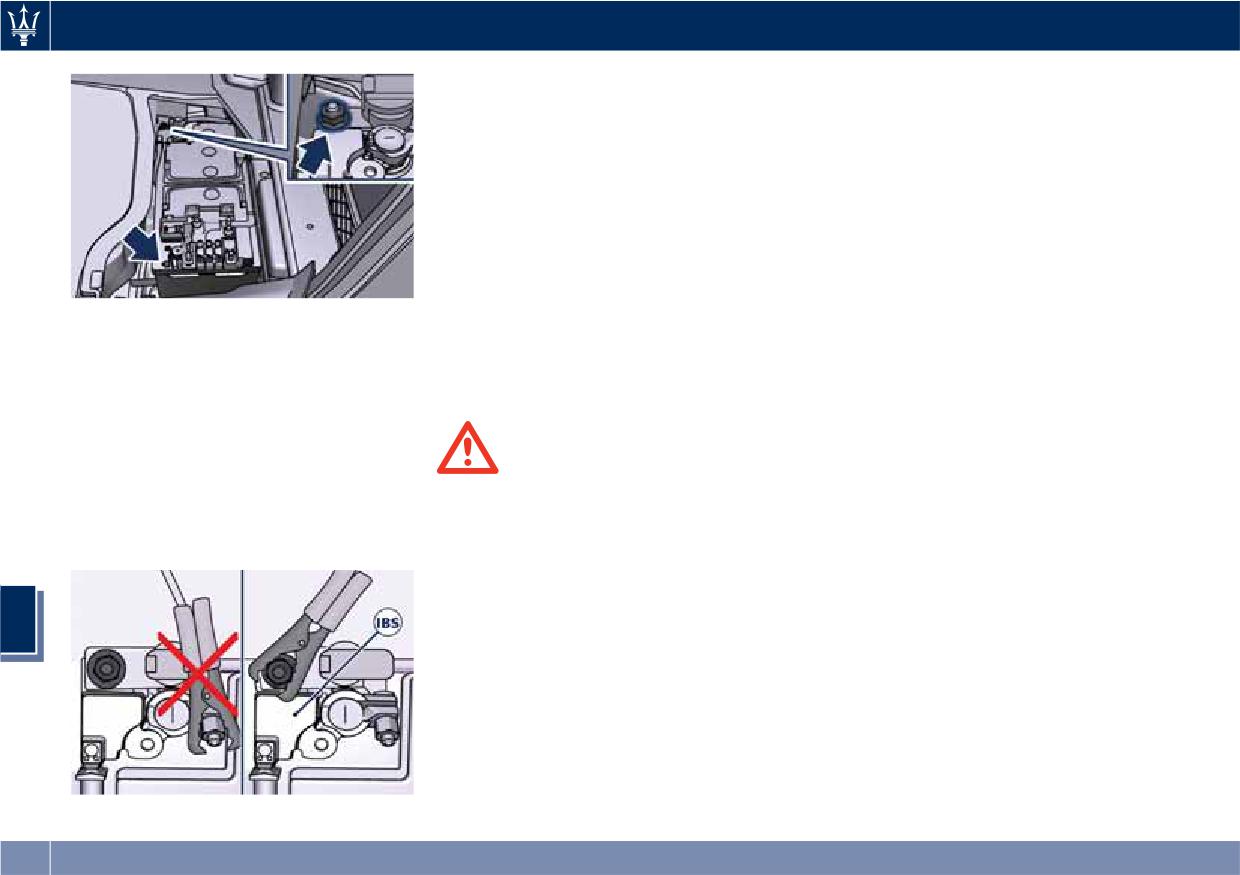
The vehicle is equipped with an IBS
• Reassemble the protection cover on
(Intelligent Battery Sensor) sensor able
the battery positive post and the
to measure charging and discharging
other parts removed for this
currents and to calculate the state of
operation.
charge and state of health of the
battery. This sensor is located at the
negative post (-) of the battery.
WARNING!
For a successful charge/recharge
California Proposition 65
operation, the charging current must
Operating, servicing and maintaining
flow through the IBS sensor as shown
a passenger vehicle or off-road vehicle
in the picture.
can expose you to chemicals including
such as, engine exhaust, carbon
monoxide, phthalates and lead, that
7
which are know to the State of
California to cause cancer and birth
defects or other reproductive harm. To
minimize exposure, avoid breathing
exhaust, do not idle the engine except
as necessary, service your vehicle in a
well-ventilated area and wear gloves
or wash your hands frequently when
servicing your vehicle. For more
326
Maintenance and Care
using appropriate forceps added in
Fuse Replacement
the integrated power module and
Used Fuses Characteristics
inside the cover of the rear power
CAUTION!
distribution center.
When an electrical device is not
• Never replace a blown fuse with
functioning, check that the
anything other than a new and
corresponding fuse is in proper
suitable fuse (same rating).
working order (intact).
• After replacing a fuse, if the fault
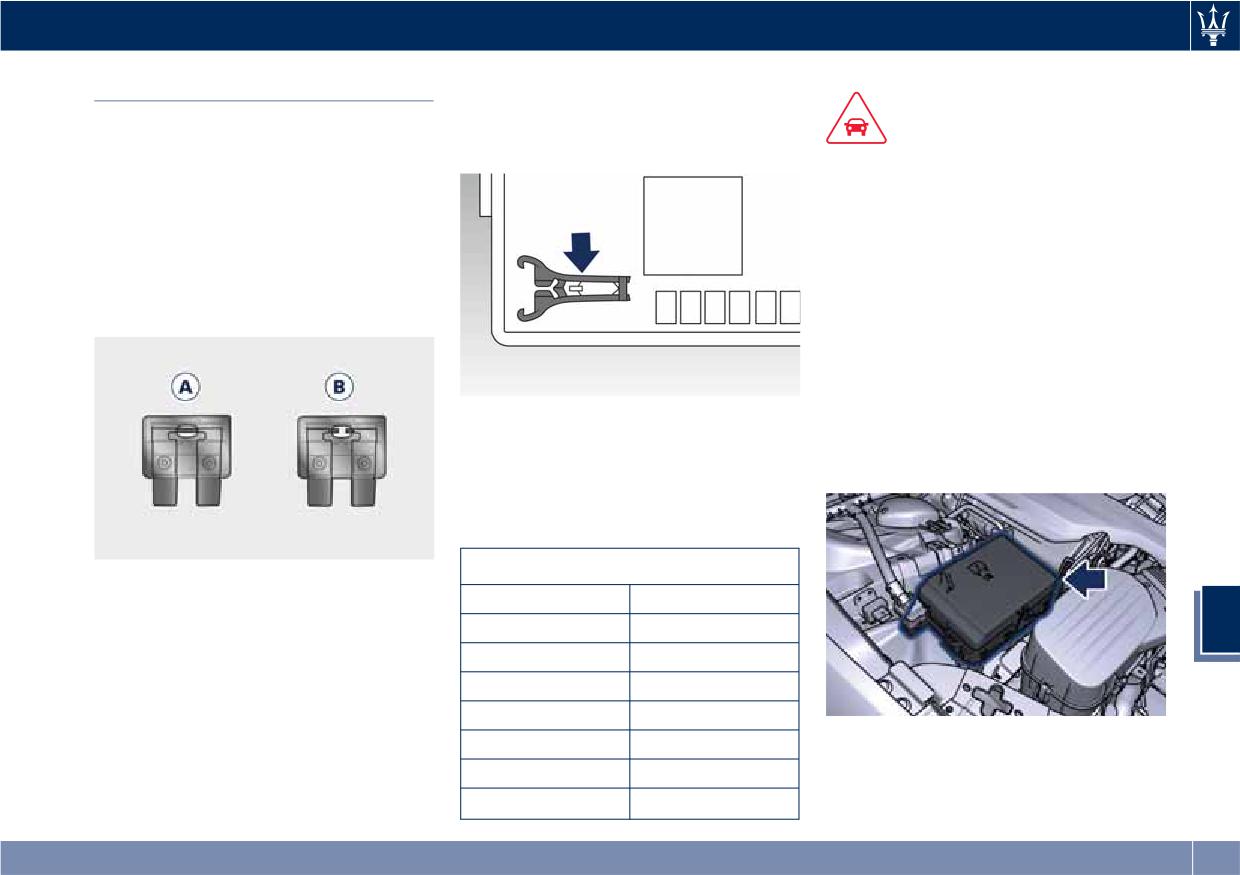
A Fuse intact
recurs, contact an Authorized
B Fuse blown
Maserati Dealer.
Position of Fuses
The fuses are located in three parts of
the vehicle, namely:
The color identifies the value of the
• inside the integrated power module,
fuses in amperes which is also
on the right hand side of the engine
reported on them.
compartment;
The table shows the match between
color and amperage of mini and maxi
fuses.
Type
The vehicle mainly uses mini-and
maxi-fuses with blade engagement.
Mini Fuse
Maxi Fuse
Besides these there are other types of
Beige - 5
Yellow - 20
7
fuses provided with holes for
Brown - 7,5
Green - 30
attaching to the cable connection
Red - 10
Orange - 40
terminals.
For the replacement of these fuses
Blue - 15
Red - 50
contact an Authorized Maserati
• inside the rear power distribution
Yellow - 20
Blue - 60
Dealer.
center, behind the battery, on the
White - 25
Replace the faulty fuse with a new
right hand side of the trunk
Green - 30
compartment;
one featuring the same rating, by
327
Maintenance and Care
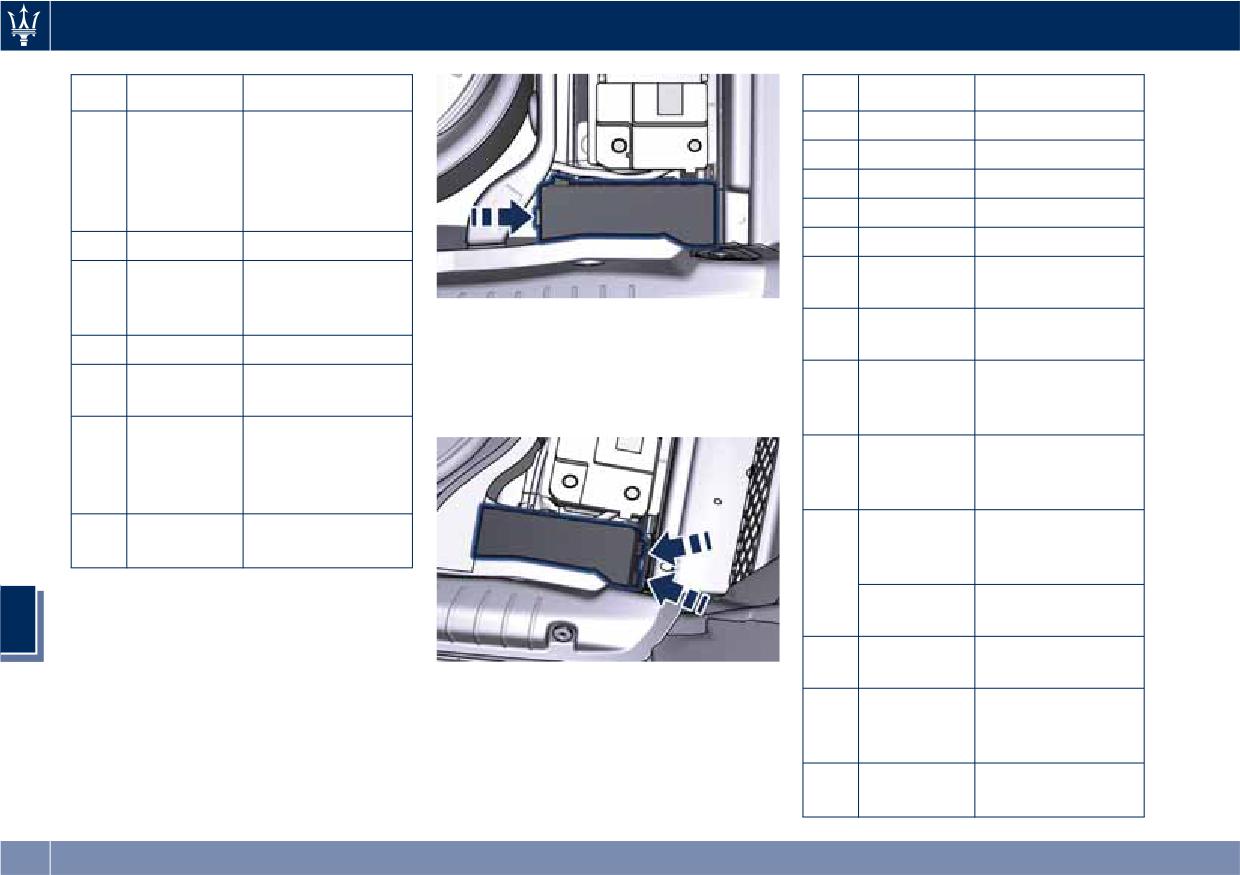
• If you need to wash the engine
compartment, do not direct the
water for too long directly on the
module.
Ref.
Type
Function
2
-
-
3
-
-
Starter motor
4
Maxi - 30A
relay input
• on the fuse and relay box located in
a covered area, behind the glove
ABS-ESP pump
5
Maxi - 40A
compartment on the dashboard left
feed
side.
AWD module
6
Maxi - 30A
(AWD only)
Integrated Power Module
7
-
-
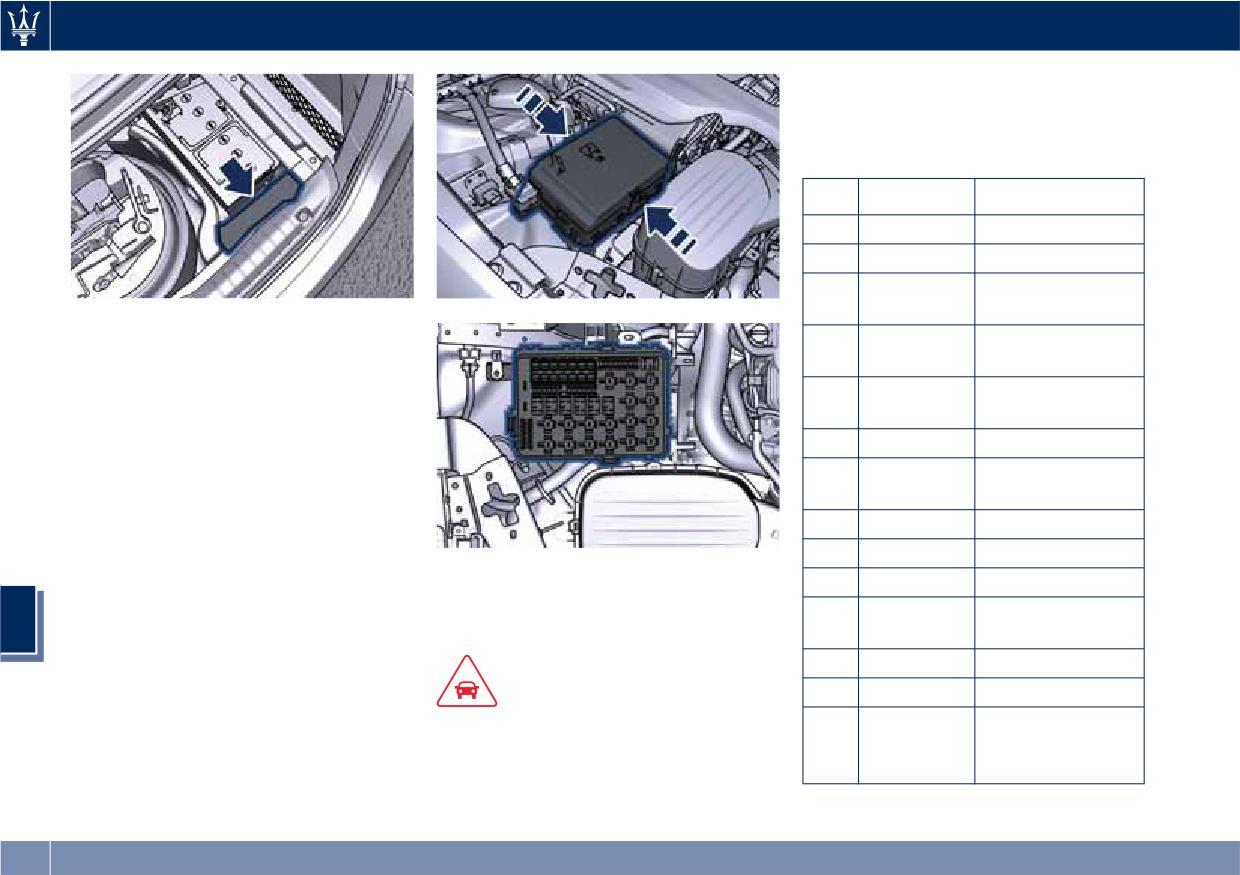
• To access the module it is necessary
ABS-ESP valve
to lift the hood (see “Hood
8
Maxi - 40A
feed
Operation” in section “Before
Starting”).
9
-
-
• To access the fuses remove the
10
-
-
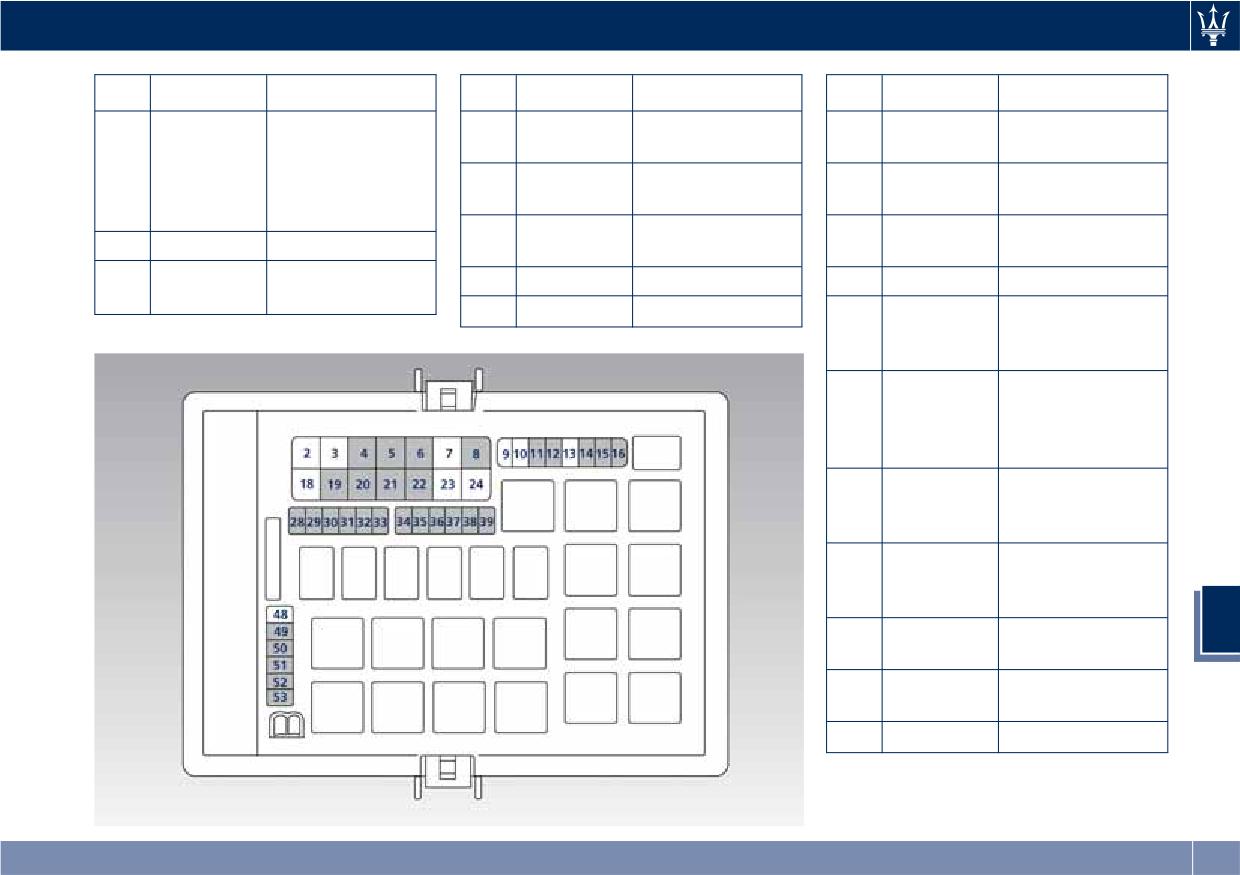
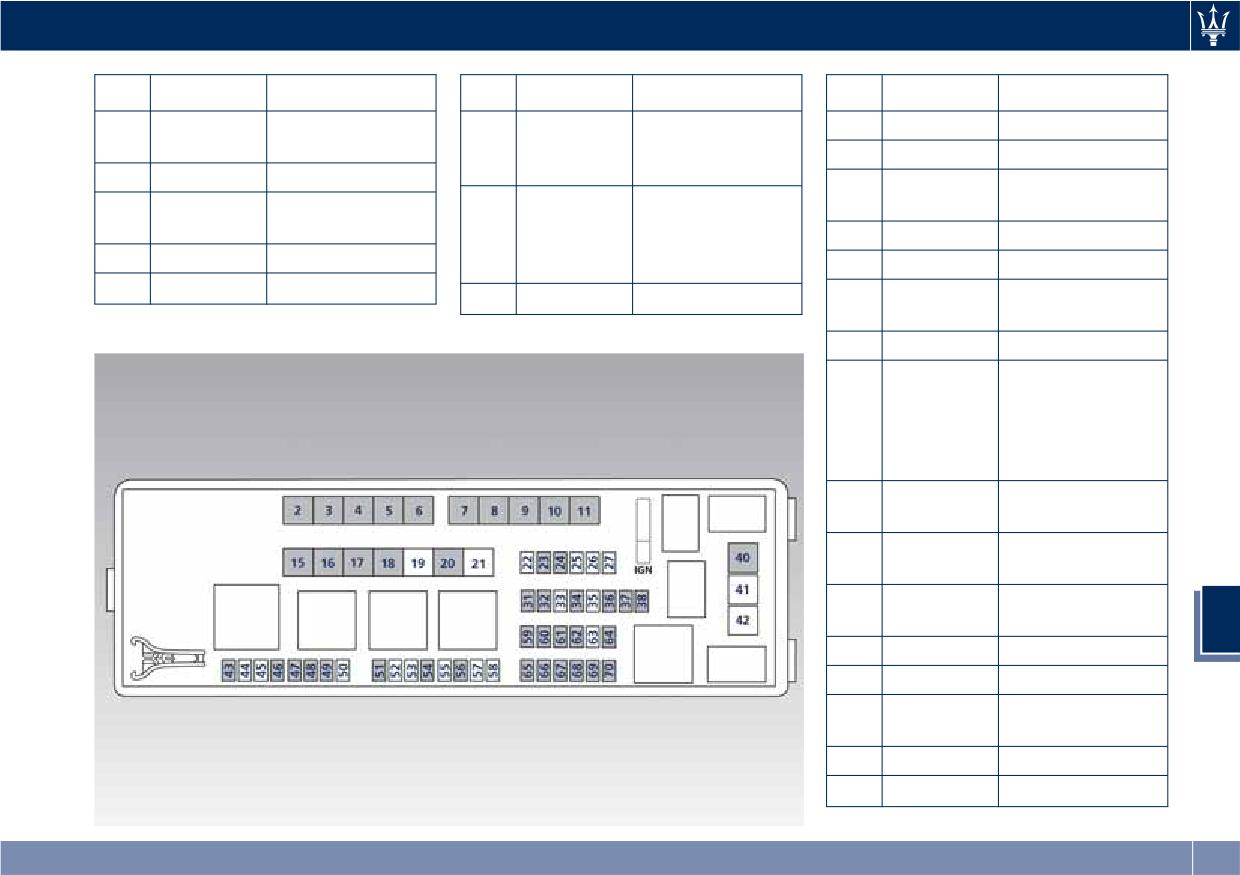
The table points out the position as
module cover unhooking the lateral
11
Mini - 20A
Horn relay input
featured in the figure, the type and
locks as shown in the picture.
function of the fuses included in the
AC compressor
7
12
Mini - 10A
integrated power module.
relay input
13
-
-
14
Mini - 7,5A
Alarm siren
CAUTION!
• After replacement, refit the
Washer heated
protective cover of the module.
15
Mini - 10A
nozzles relay
input
328
Maintenance and Care
Ref.
Type
Function
Ref.
Type
Function
Ref.
Type
Function
Enable cooling
Wiper motor
IPC Instrument
20
Maxi - 30A
28
Mini - 7,5A
fan relay input
relay output
Panel Control
16
Mini - 10A
and enable
LH low beam
Primary load to
cooling oil pump
21
Maxi - 20A
29
Mini - 10A
relay input
PCM module
relay input
RH low beam
ORC- Air bag
18
-
-
22
Maxi - 20A
30
Mini - 5A
relay input
module
Headlamp washer
23
-
-
31
Mini - 5A
ABS-ESP module
19
Maxi - 30A
relay input
24
-
-
SCCU, AWD
32
Mini - 5A
module, EPS and
AQS
HDLP LED
Headlights (All
33
Mini - 20A
Xenon version
AFLS)
Primary load to
34
Mini - 15A
engine harness
LH side
Primary load to
35
Mini - 15A
engine harness
RH side
7
PCM module
36
Mini - 30A
primary load
Engine secondary
37
Mini - 15A
load
38
Mini - 15A
Lambda sensor
329
Maintenance and Care
Ref.
Type
Function
Ref.
Type
Function
Flow meters,
2
Maxi -
40A
BCM module
tank lackage,
3
Maxi -
40A
BCM module
39
Mini - 7,5A
canister, exhaust
4
Maxi -
30A
BCM module
by-pass valve and
relay coil
5
Maxi -
30A
BCM module
48
-
-
6
Maxi -
20A
Sunroof module
Pedal brake
Driver door
7
Maxi -
30A
49
Mini - 10A
switch-TCM
module
module
• Press the release latch and lift the lid
Passenger door
8
Maxi -
30A
from this side.
module
50
Mini - 15A
+30 PCM module
• Push the lid toward the right side to
Start&Stop:
Fuel pump relay
51
Mini - 30A
release the indicated latches on the
input
9
Maxi -
40A
voltage stabilizer,
unit.
dashboard
Starter solenoid
signal for PCM
Start&Stop:
52
Mini - 5A
and voltage
10
Maxi -
40A
voltage stabilizer,
stabilizer
body
AWD module
High Premium
53
Mini - 10A
(AWD only)
Maxi -
40A
stereo amplifier
11
unit
Premium stereo
Rear Power Distribution Center
Maxi -
20A
7
amplifier unit
• To access the center it is necessary to
HVAC front
lift the ground coverage of the trunk
15
Maxi -
40A
blower relay coil
compartment and remove the access
The table points out the position as
cover (refer “Maintenance Free
featured in the figure, the type and
Rear window
Battery” in this section).
function of the fuses on the rear area
16
Maxi -
40A
defrost relay coil
distribution control unit.
(HVAC module)
• To access the fuses, unhooking the
cover lock shown in picture.
Rear LH door
17
Maxi -
30A
module
330
Maintenance and Care
Ref.
Type
Function
Ref.
Type
Function
Ref.
Type
Function
Rear RH door
Fuel door relay,
26
-
-
18
Maxi - 30A
module
23
Mini - 10A
RF Hub module,
27
-
-
ELSD
19
-
-
LH front seat
ITM module,
31
Mini -
25A
Premium stereo
movement
20
Maxi - 20A
ceiling light units
amplifier unit (2)
24
Mini - 10A
32
Mini -
30A
ELSD module
(front and rear),
21
-
-
rain/lights sensor
33
-
-
22
-
-
25
-
-
Soft Door Close
34
Mini -
20A
latch
35
-
-
Transmission
lever, TPMS
36
Mini -
10A
module, Navtrak,
Hands Free access
module
Power trunk lid
37
Mini -
50A
module
RH front seat
38
Mini -
25A
movement
Trunk power
40
Maxi -
20A
outlet
7
41
-
-
42
-
-
Seat passenger
43
Mini -
20A
heater module
44
-
-
45
-
-
331
Maintenance and Care
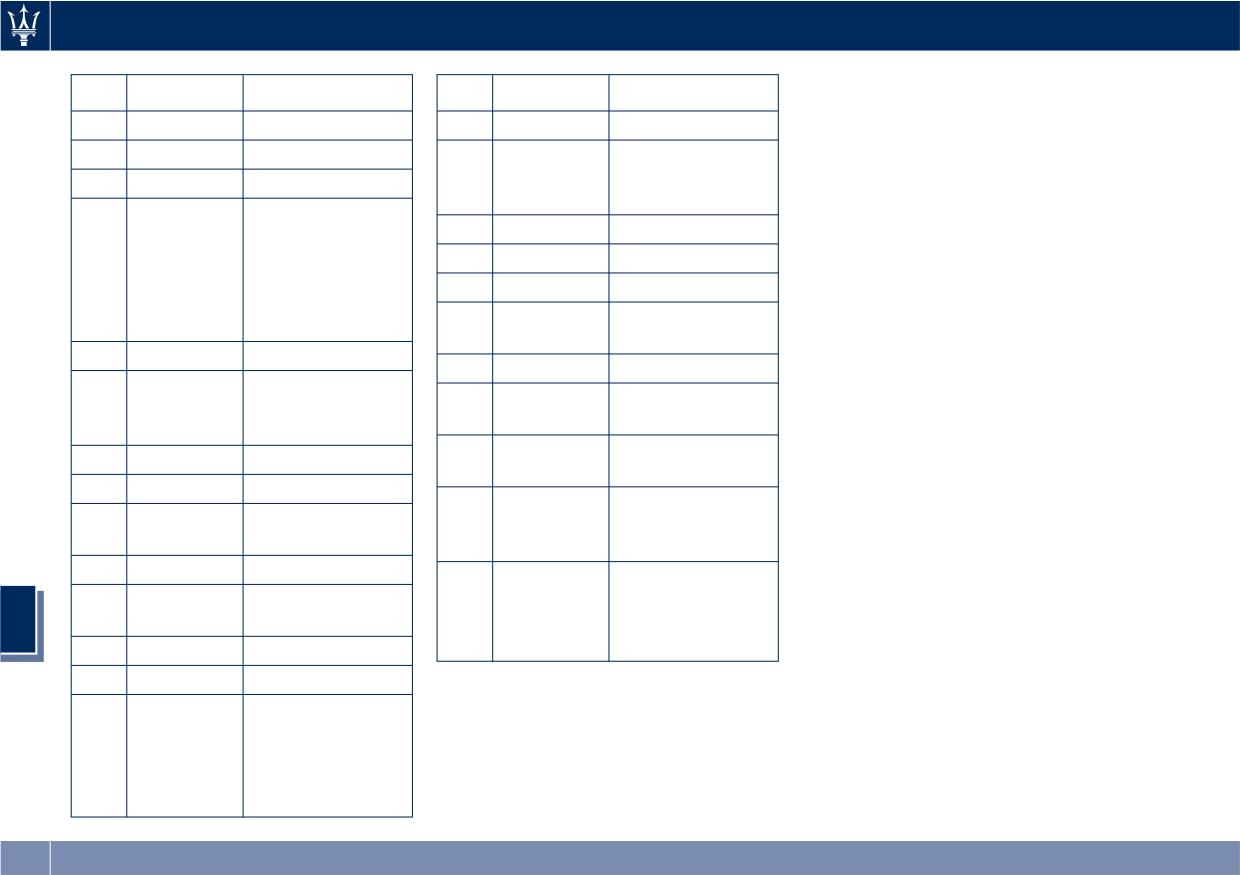
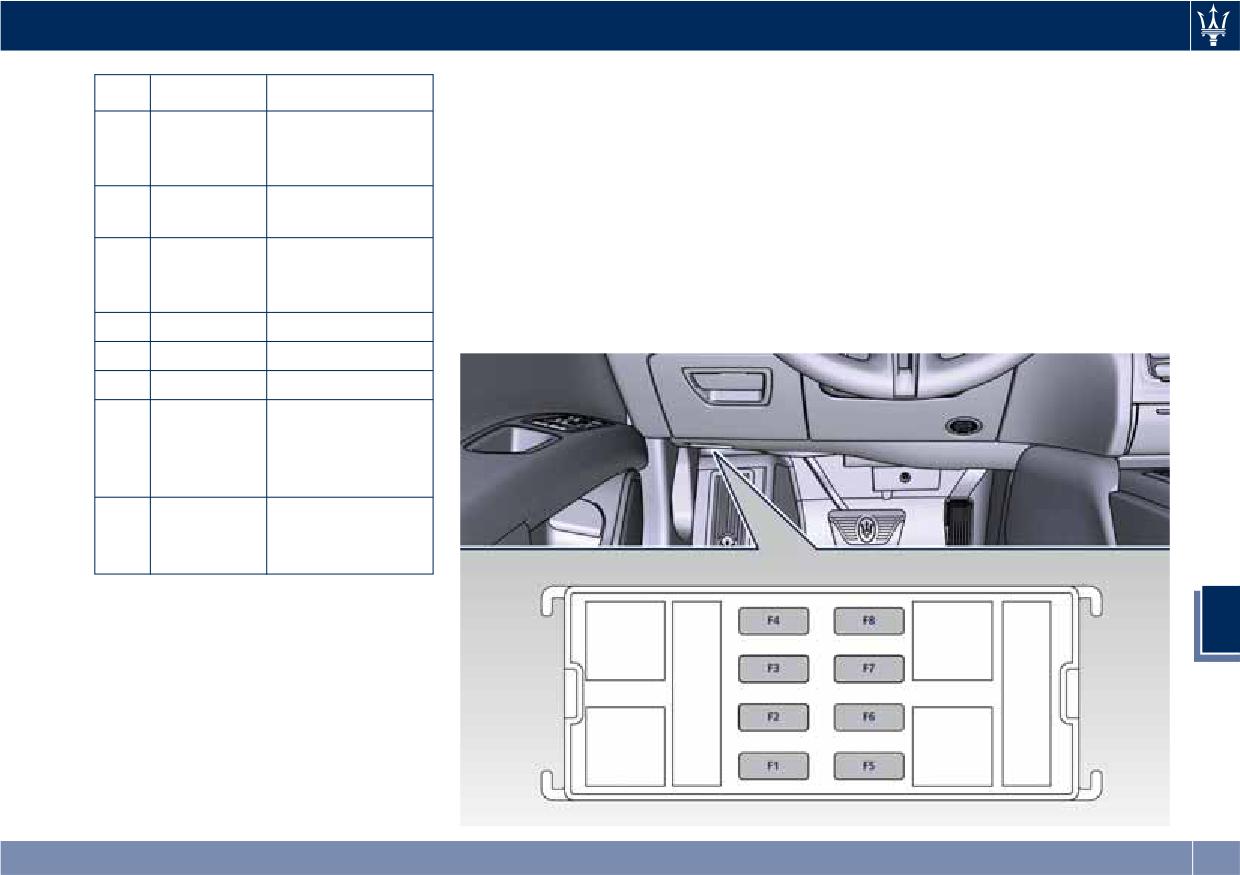
Fuse Box under the Dashboard
Ref.
Type
Function
Ref.
Type
Function
This box is located in an internal area
46
Mini - 5A
Rear camera
60
Mini - 10A
SDC module
that can be accessed only by removing
47
Mini - 5A
Navtrak
Front console
the glove compartment on the
61
Mini - 25A
power outlet and
48
Mini - 5A
Surround view
dashboard left side. Considering the
cigar lighter
Internal
complexity of this operation, we
62
Mini - 7,5A
HVAC module
recommend having the fuses replaced
temperature
sensor, umidity
63
-
-
by an Authorized Maserati Dealer.
49
Mini - 10A
sensor, internal
The table points out the position as
64
Mini - 10A
Wi-fi
mirror, rain/lights
featured in the figure, the type and
Intelligent
sensor, HALF
65
Mini - 10A
function of the fuses in the box under
battery sensor
the dashboard.
50
-
-
66
Mini - 10A
Wi-fi
Rear seat and
USB charge
51
Mini - 25A
steering wheel
67
Mini - 7,5A
outlet, sunroof
heater module
Rear sunshade
52
-
-
68
Mini - 20A
module
53
-
-
Rear console
Blind Spot
54
Mini - 7,5A
69
Mini - 25A
power outlet and
module
cigar lighter
55
-
-
HVAC module,
Blower front
Parking Aid
56
Mini - 7,5A
70
Mini - 10A
7
HVAC coil relay
Module PAM,
ELSD
57
-
-
58
-
-
SDC module,
transmission
59
Mini - 10A
lever, ASBM, rear
tunnel stack
switch
332
Maintenance and Care
Ref.
Type
Function
Cluster module,
1
Mini - 7,5A
CSS, SGW, DSRC -
Japan version
Cluster module,
2
Mini - 15A
clock
DSRC, DTV
3
Mini - 10A
system (Japan
version only)
4
Mini - 5A
E-call
5
Mini - 5A
Security Gateway
6
Mini - 25A
Radio
Column software
module, CSS,
7
Mini - 10A
USB auxiliary
port
Start & Stop
8
Mini - 10A
switch,
diagnostic outlet
7
333
Maintenance and Care
Full-LED Version
Bulb Replacement
1
Low-beam light LED.
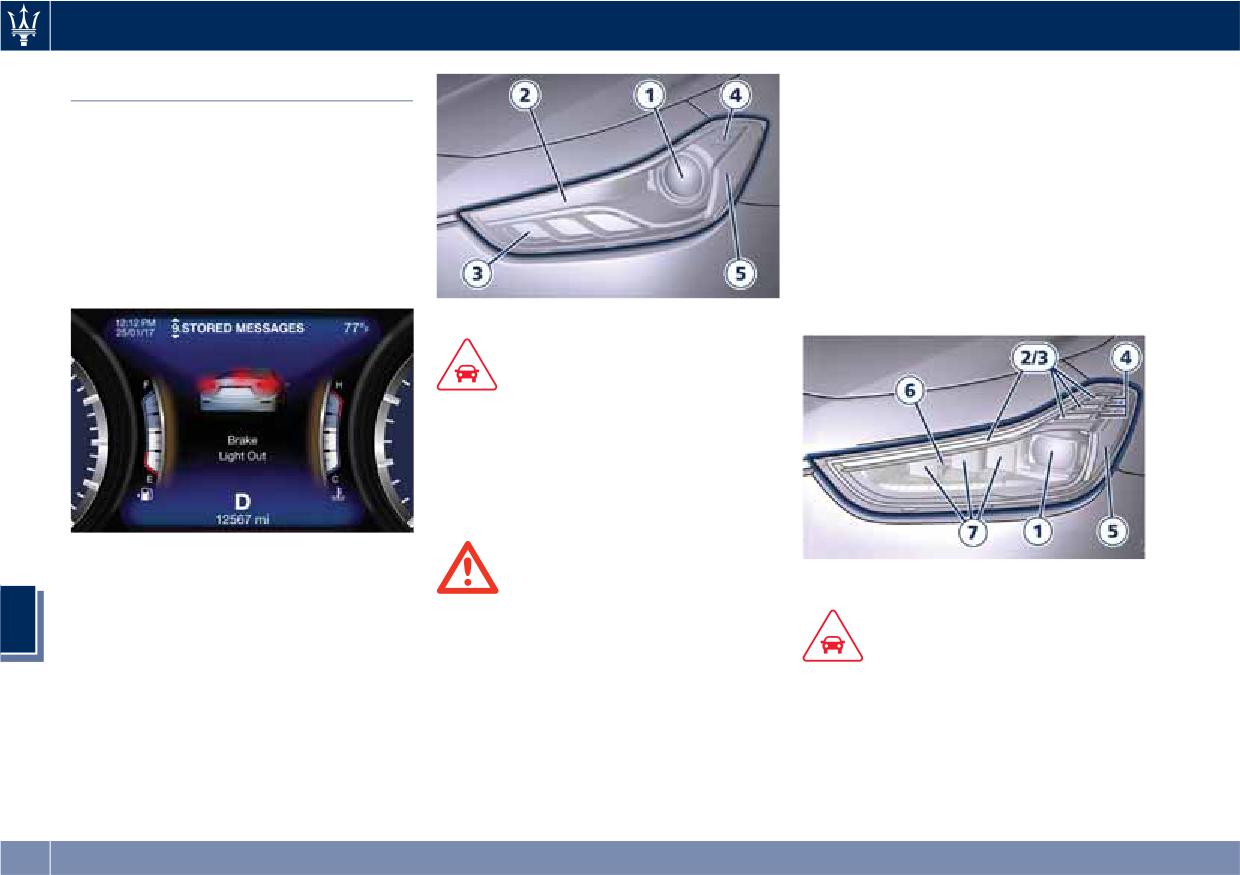
The signal failure of an external light
(turn signal, low beam and high beam,
2
Position and DRL light LED.
number plate light, reverse light and
3
Direction indicator LED.
brake light) is communicated to the
4
Side-marker LED.
instrument cluster that displays on the
5
Side reflex-reflector.
TFT screen in a graphical form and
with a text message which light is
6
Bending light LED.
faulty (see example in the figure).
7
Matrix high-beam light LED.
Bi-Xenon Version
CAUTION!
Due to the complexity of the
operation, for the replacement of the
headlight clusters light bulbs, we
recommend that you contact an
Authorized Maserati Dealer.
Front Headlights
Full-LED Version
The lights are arranged as follows:
WARNING!
The Bi-Xenon bulbare a type of high
Bi-Xenon Version
7
voltage discharge tube. High voltage
1
Low-beam/high-beam light:
can remain in the circuit even with the
CAUTION!
Bi-Xenon bulb 25W.
ignition switch off. Because of this,
It is not possible replace a single LED
2
Position and DRL light LED.
you should not attempt to replace a
of the headlight cluster: we
Bi-Xenon bulb yourself, but take the
recommend that you contact an
3
Direction indicator LED.
vehicle to a center of the Authorized
Authorized Maserati Dealer for the
4
Side-marker LED.
Maserati Dealer for service.
replacement of the entire cluster.
5
Side reflex-reflector.
334
Maintenance and Care
Taill-Light Clusters
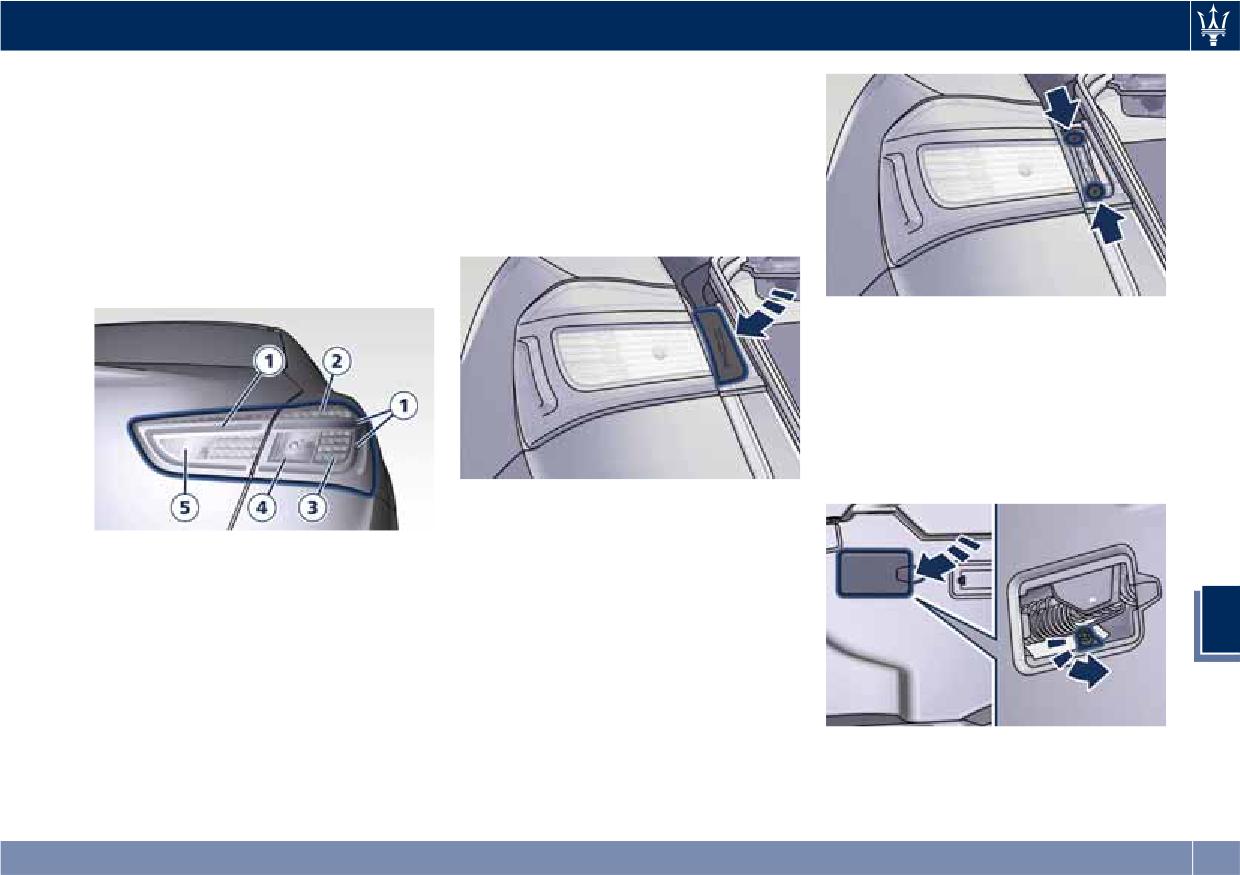
Reverse Light
The lights are arranged as follows:
In order to replace the reverse light
bulb, open the trunk lid and proceed
1
Position light guide LED.
as follows:
2
Stop light LED.
• Remove the cover on the fastening
3
Turn signal LED.
screws by levering from below on
4
Reverse light bulb (W16W).
the indicated point.
5
Rear fog light bulb (W16W).
• Remove the inspection cover from
the trunk compartment by levering
on the specific point.
• Using the 8 mm Allen wrench
contained in the tool kit (see chapter
“Tool Kit” in section “In an
Emergency”), undo and remove the
light fastening nut.
• Using the screwdriver with torx-head
contained in the tool kit (see chapter
“Tool Kit” in section “In an
Light Clusters Replacement
Emergency”), undo and remove the
Most of the lights in the front and
two indicated fastening screws.
rear clusters and those integrated in
7
the exterior mirrors are LED powered
and cannot be replaced individually.
The only exceptions are the front fog
light bulbs.
Contact an Authorized Maserati
Dealer to locate the correct parts and
• From behind the vehicle, separate
replace them.
the light cluster from the body by
gently pulling it out; do not tension
the connecting cable.
335
Maintenance and Care
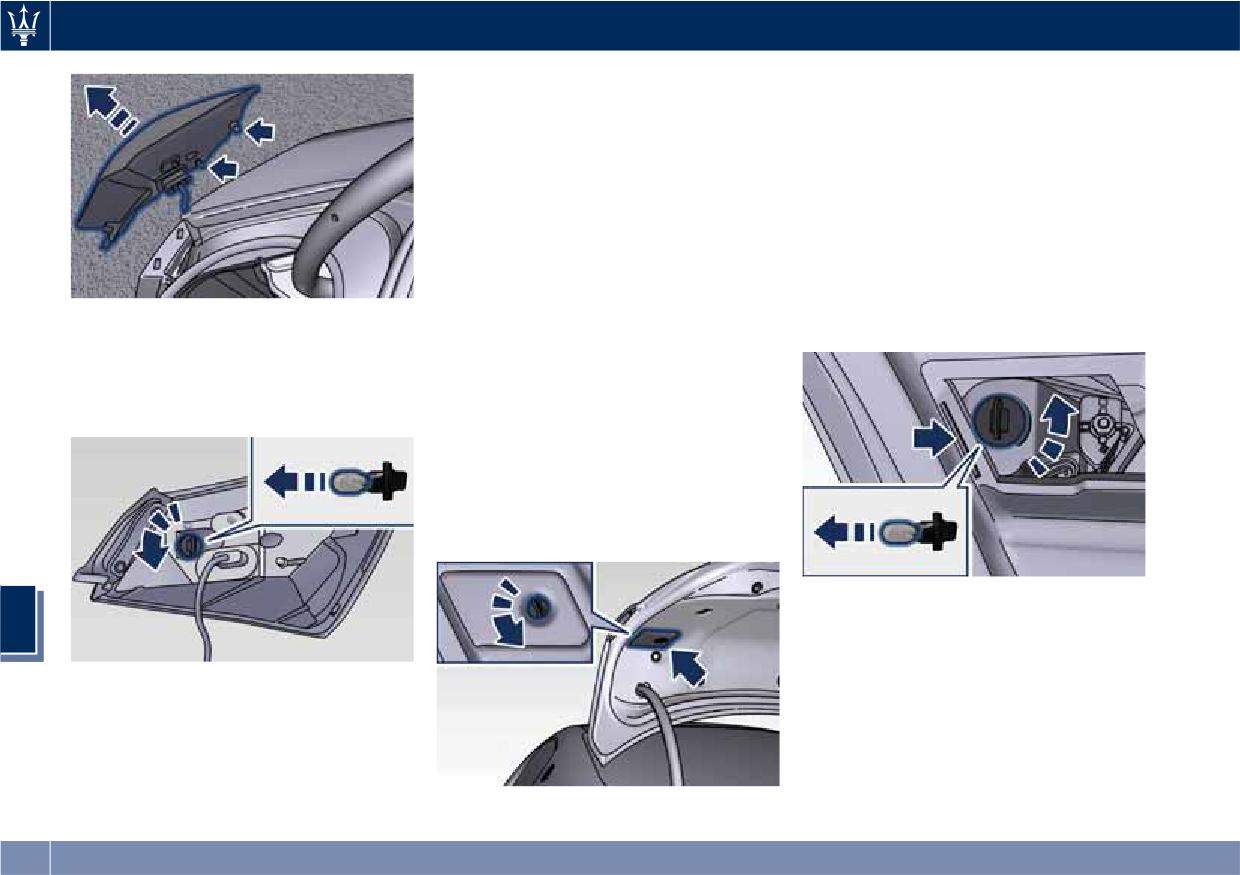
NOTE:
• Rotate the bulb holder anti-clockwise
and extract it from the light cluster.
• The light cluster has two centering
pins, during re-assembly they must
• Extract the bulb from the bulb
be inserted in their respective seats
holder and replace it.
on the body. In this phase use
NOTE:
particular attention to prevent that
When refitting the access cover, insert
the connecting cable remain pinched
first the side tab in the trunk lid
between light cluster and body, as
opening indicated in the picture, and
this could cause electric interruption.
then rotate the unlock device
• To avoid damages to the light cluster,
clockwise.
• Rotate the bulb holder anti-clockwise
do not fasten too much the two Torx
and extract it from the light cluster.
fastening screws.
• Extract the bulb from the bulb
holder and replace it with a
Rear fog light
corresponding one.
In order to replace the rear fog light
bulb, open the trunk lid and proceed
as follows:
• Remove the access cover by rotating
the unlock device anti-clockwise as
shown in the picture.
License Plate Lights
7
To replace the license plate light bulb
(C 5W):
• use a screwdriver positioned at the
indicated point to lever out the light
fixing frame;
336
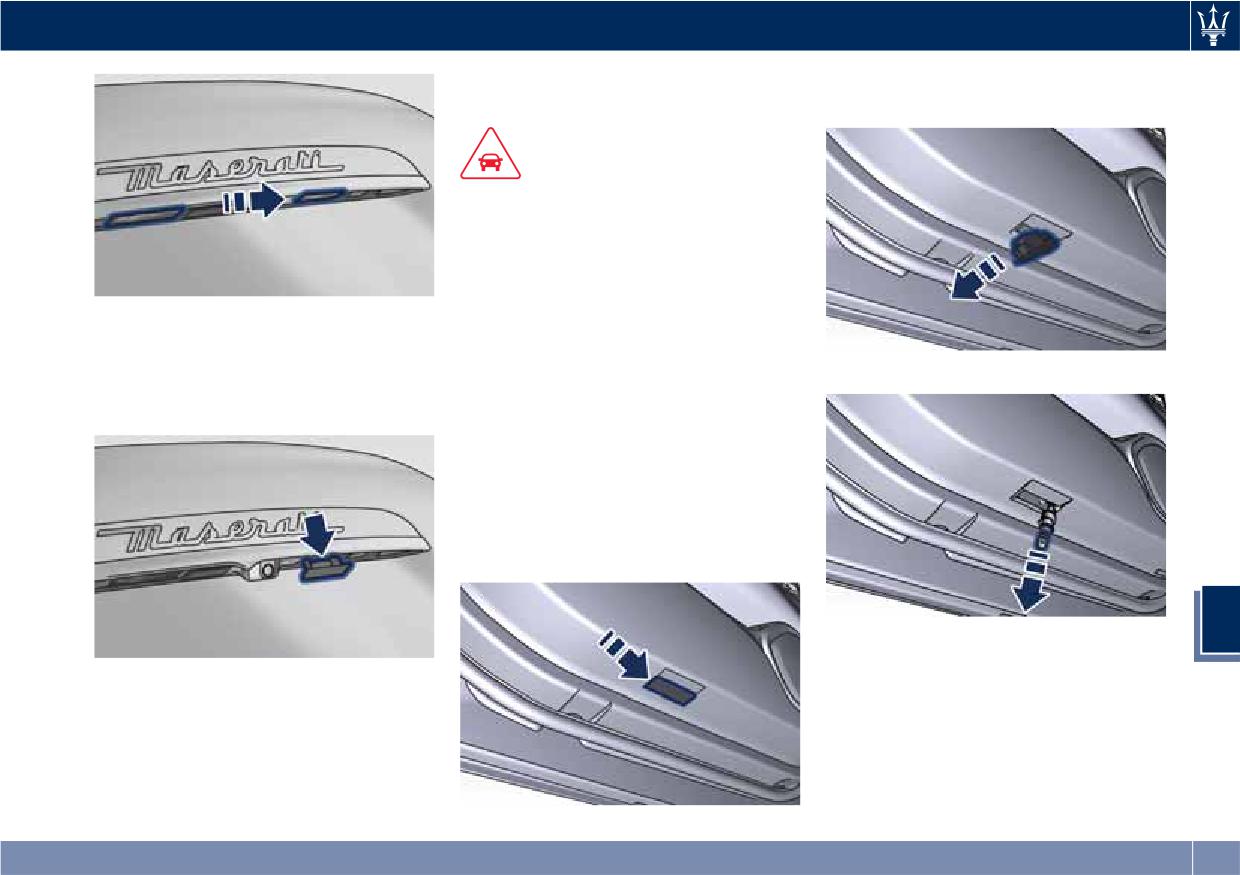
Maintenance and Care
Passenger Compartment
• rotate the bulb holder and take it
Interior Lights
out;
CAUTION!
Before replacing a bulb, ensure that
the matching fuse is intact. For
replacement, use only original new
light bulbs having the same rating as
the old one.
• replace the pressure-fitted bulb;
Lamps inside the glove box
• refit the bulb holder inserting first
compartments of the dashboard are
the electrical connector side and
• replace the pressure-fitted bulb;
LED powered and cannot be replaced
then pressing on the other side to
by the owner. Contact an Authorized
hook up the clip.
Maserati Dealer to replace them.
Courtesy Lights (below Door)
To replace the bulb (W5W):
• use a screwdriver positioned at the
indicated point to lever out the light
fixing frame;
7
• refit the bulb holder inserting first
the electrical connector side and
then pressing on the other side to
hook up the clip.
337
Maintenance and Care
Trunk Compartment Light
• Refit the lens cover, inserting first the
A/C System Maintenance
electrical connector side and then
To replace the bulbs (W5W) inside the
pressing on the other side.
For the best performance, the air
trunk, proceed as follows after trunk
conditioning system should be checked
lid opening.
and serviced by an Authorized
• Remove the light fixing frame by
Maserati Dealer at the beginning of
levering it out gently at the indicated
the warm season.
point with a screwdriver.
This service should include cleaning of
the condenser, check of the drive belt
tension and a performance test.
During the winter, the air conditioning
system should be operated at least
once a month for about 10 minutes.
CAUTION!
Do not use chemical flushes in your air
conditioning system as the chemicals
can damage your air conditioning
• Raise the lens cover.
components. Such damage is not
covered by the New Vehicle Limited
Warranty.
7
WARNING!
California Proposition 65
Operating, servicing and maintaining
a passenger vehicle or off-road vehicle
can expose you to chemicals including
such as, engine exhaust, carbon
• Replace the pressure-fitted bulb.
monoxide, phthalates and lead, that
which are know to the State of
338
Maintenance and Care
California to cause cancer and birth
Periodically remove any leaves and
Wheels Maintenance
defects or other reproductive harm. To
insects that may build up and obstruct
minimize exposure, avoid breathing
the inlet of external air in the air
Tires Maintenance
exhaust, do not idle the engine except
conditioning system through the grille
as necessary, service your vehicle in a
present underneath the rear part of
well-ventilated area and wear gloves
the hood.
CAUTION!
or wash your hands frequently when
To access the grille, lift the hood as
To obtain the best performances and
servicing your vehicle. For more
described in “Hood Operation” in
the longest mileage from the tires,
information go to:
section “Before Starting”.
take the following precautions during
the first 310 mi (500 km):
vehicle
• do not drive at the vehicle’s
maximum speed;
• drive at low speed on curves;
WARNING!
• Use only refrigerants and
• avoid sudden steering;
compressor lubricants approved by
• avoid sudden braking;
the manufacturer for your air
• avoid sudden acceleration;
conditioning system. Some
• do not drive at high speeds for too
unapproved refrigerants are
long.
flammable and can explode, causing
injuries. Other unapproved
The tires inflation pressure must
refrigerants or lubricants can cause
correspond to the prescribed values
the system to fail, requiring costly
(see the chapter “Tire Inflation
repairs.
Pressure” in section “Features and
7
• The air conditioning system contains
Specifications”) and should be
refrigerant under high pressure. To
checked only when the tires have
avoid risk of personal injury or
cooled down. In fact, the pressure
damage to the system, adding
increases as the tire temperature
refrigerant or any repair requiring
progressively increases.
lines to be disconnected should be
Never reduce the pressure if tires are
done by an Authorized Maserati
hot (see “Tires - General Information”
Dealer.
chapter in section “Driving”).
339
Maintenance and Care
Insufficient tire inflating pressure can
Winter Tires
cause tire overheating and possible
These tires are specially designed for
WARNING!
internal damage.
driving on snow and ice and are fitted
• Check the inflating pressure of the
to replace the ones supplied with the
tires when cold, at least every two
vehicle.
CAUTION!
weeks and before long trips.
The specific features of the winter tires
After inspecting or adjusting the tire
• Have old tires inspected by an
lead to lower performance under
pressure, always reinstall the valve
experienced technician, to make sure
normal environmental conditions or
stem cap. This will prevent moisture
they can still be used safely. If the
on long highway trips, compared to
and dirt from entering the valve stem,
same tire has been on your vehicle
the standard tires.
which could damage it.
for 4 or 5 years, have it inspected
Therefore, their use should be limited
Impacts with curbs, holes, and
anyway by an experienced
to the situations and performance for
obstacles in the road, and prolonged
technician.
which they have been type-approved.
trips on rough roads can cause tire
• Never fit tires of uncertain origin.
The Authorized Maserati Dealer can
damage which may not be visible to
provide all necessary information
• “Directional” tires have an arrow on
the naked eye.
about fitting winter tires on the
their side showing the rolling
Check your tires regularly for any signs
vehicle.
direction. To keep the best
of damage (e.g. scratches, cuts, cracks,
performance when replacing a tire,
NOTE:
bulges, etc.). If sharp objects penetrate
make sure that the rolling direction
• We recommend fitting winter tires
the tires, they can cause structural
corresponds to the one shown by
on the vehicle at temperatures below
damage which is only visible when the
the arrow.
45 °F (7°C) since the driving
tire is removed.
• During the tire life, the rolling
performance of summer tires is
In any case, any possible damage must
direction used for the first fitting
reduced at low temperatures.
be inspected by an experienced
7
should always be observed, also in
Summer tires may be permanently
technician, as it may seriously reduce
case of “nondirectional” tires.
damaged at extremely low
the tire life.
temperatures.
Remember that tires deteriorate with
• Check the depth of the tire tread at
regular intervals. The thinner is the
• Comply with all state and local laws
time, even if used little or not at all.
tread, the greater is the risk of
governing snow tire and tread depth
Cracks in the tire tread and sides,
skidding.
requirements.
alongside possible bulging, are a sign
of deterioration.
• Drive carefully on wet roads to
decrease the risk of aquaplaning.
340
Maintenance and Care
Wheel Rims Maintenance
wax products having high protective
Bodywork Maintenance
power;
All wheel trims should be cleaned
and Care
• spraying of plastic materials, with a
regularly with a mild soap and water.
protective function, in the most
To remove heavy soil and/or excessive
Protection from Atmospheric
exposed points: underneath the
brake dust, use a nonabrasive,
Agents
doors, inside part of the mud guards,
non-acidic cleaner.
The main causes of corrosion are:
edges, etc.;
Do not use scouring pads, steel wool,
a bristle brush, or metal polishes.
• atmospheric pollution;
• use of ventilated box sections,
Do not use oven cleaner that may
coated with protective wax products,
• salinity and humidity in the
affect and damage the brake calipers.
to avoid condensation and trapped
atmosphere (marine areas or a damp
Avoid automatic car washes that use
water which could encourage the
climate);
acidic solutions or harsh brushes that
formation of internal rust.
• seasonal environmental conditions;
may damage the wheel rim protective
• salt scattered on the roadbed to
Useful Advice to Keep the
finish.
melt ice and snow.
Bodywork in Good Condition
The abrasive action of wind-carried
Paint
atmospheric dust and sand, mud and
stones should not be underestimated.
The paintwork does not only have an
On this vehicle, Maserati has adopted
aesthetic function but also protects
the best technological solutions to
the underlying metal sheets. In the
protect the bodywork from corrosion.
event of abrasions or deep scratches,
The main measures are:
we recommend to have the necessary
touch-ups made immediately, to avoid
• paint products and systems that give
any rust formation. Touch-ups do not
the vehicle particular resistance to
feature particular difficulties, even on
7
corrosion and abrasion;
metallic finishes.
• use of galvanized (or pre-treated)
For all paint touch-ups, use only
metal sheets which are highly
original products indicated on the
resistant to corrosion in the most
plate applied on the lower left side of
exposed parts;
the hood.
• spraying of the underbody, engine
compartment, insides of wheel
housings, and other structures with
341
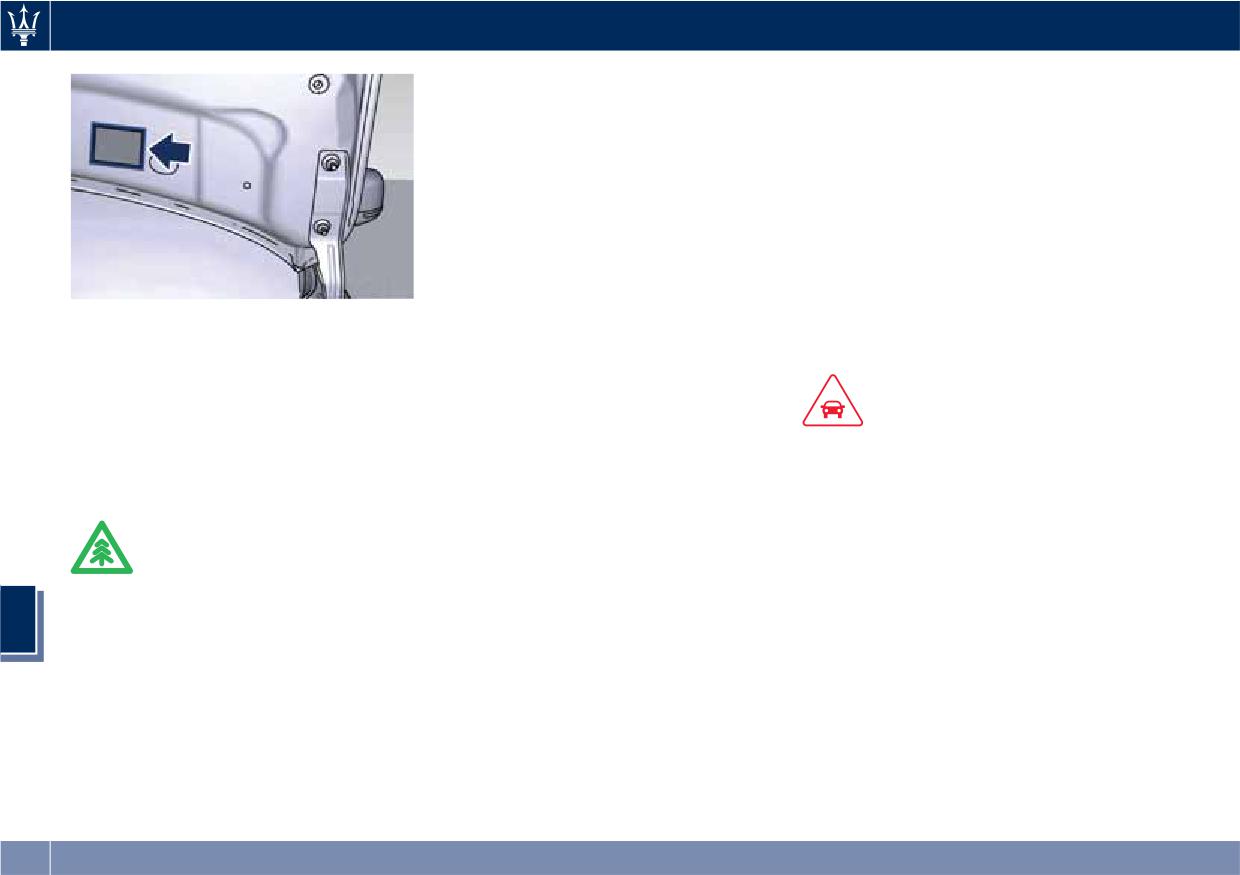
Maintenance and Care
NOTE:
External plastic parts must be cleaned
with the same procedure followed for
The use of alcohol-based products for
the normal washing of the bodywork.
cleaning the metal surfaces in the
Avoid, as far as possible, parking the
engine compartment and/or the trunk
vehicle under trees; the resinous
may deteriorate the protective paint. It
substances that very often drop from
is recommended to use water-based
the trees give the paint a dull
products.
appearance and increase the possibility
Car Wash
of originating corrosive processes.
It is important that the drain holes in
For correct washing:
the lower sides of the doors, rocker
Normal paint maintenance consists in
• wet the bodywork with a low
panels, and trunk bottom be kept clear
washing, the frequency of which
pressure water jet;
and open.
depends on the conditions of use and
• pass a sponge with a light detergent
of the environment. For example, if
solution over the bodywork,
driving the vehicle in areas where
CAUTION!
frequently rinsing the sponge;
there is high atmospheric pollution or
• rinse well with water and dry with an
• Bird droppings must be washed off
the roads are spread with anti-freeze
air jet or chamois leather.
immediately and thoroughly, since
salt, it is advisable to wash the vehicle
When drying, take particular care with
their acidity is particularly corrosive.
more frequently.
the parts that are less visible, such as
• To provide better protection for the
the door and lids bays, headlight
paint, polish the vehicle at intervals
ENVIRONMENTAL!
edges, in which water can be trapped
with a suitable product leaving a
Detergents pollute water. Therefore
more easily.
protective film on the paint.
the vehicle should be washed in areas
You are recommended not to take the
7
• If the vehicle is washed using
equipped for the collection and
vehicle immediately into an enclosed
high-pressure water jets or cleaners,
purification of the fluids used for
environment, but leave it in the open
it is important that the nozzle of the
washing.
air so as to allow the water to
jet be kept at a distance of at least
evaporate.
16 in (40 cm) from the bodywork to
Do not wash the vehicle after it has
avoid damaging it.
been left in the sun or when the hood
is hot: the paint gloss could be
affected.
342
Maintenance and Care
Glass Surfaces
Do not use abrasive cleaning
To perform this operation, you must
components, solvents, steel wool or
contact an Authorized Maserati
All glass surfaces should be cleaned on
other aggressive material to clean the
Dealer.
a regular basis with any commercial
lenses.
household-type glass cleaner.
Pre-Short Drop Function
Never use an abrasive type cleaner.
Moldings and Aluminum Trims
Use caution when cleaning the inside
When in a car wash, if the driver keeps
• For cleaning moldings and aluminum
rear window equipped with electric
the RKE Transmitter in his/her pocket,
trims, avoid the use of acidic or
defrosters. Do not use scrapers or
or in any place outside the vehicle
alkaline cleaning agents that can
other sharp instrument that may
within 3.3 ft (1 m) distance, the front
destroy the protecting surface
scratch the elements.
windows will perform a pre-short
treatment.
When cleaning the rearview mirror,
drop. This is a shorter drop compared
• After washing aluminum trim with
spray cleaner on the towel or rag that
to the normal short drop performed
warm water, apply the cleaning
you are using. Do not spray cleaner
by the “Passive Entry” function when
agent with a clean tissue or a soft
directly on the mirror.
you grab the door handle to enter the
sponge on the surface. Do not use
Labels can be peeled off after soaking
vehicle.
any other equipment such as
with warm water.
In order to prevent water from
brushes, steel wool, abrasives or any
When cleaning is performed, keep all
entering the vehicle between the
other equipment for cleaning.
metal objects at a safe distance from
upper edge of the glass window and
• After cleaning, please rinse the
the door outline on the bodywork,
the window.
aluminum trim with a lot of clear
while the car is being washed, it is
Cleaning Headlights
water.
advisable to disable the “Passive
Your vehicle has plastic headlights that
• While cleaning in the car, please
Entry” from the MTC+ System, for
are lighter and less susceptible to
make sure that the moldings and
further information refer to chapter
stone breakage than glass headlights.
aluminum trims only get in contact
“MTC+ Settings” in section
Plastic is not as scratch-resistant as
7
with soft brushes or textiles.
“Dashboard Instruments and
glass and therefore different lens
controls”. When deactivating the
Engine Compartment
cleaning procedures must be followed.
“Passive Entry”, also the “Pre-Short
To minimize the possibility of
At the end of each winter season,
Drop” function will be disabled.
scratching the lenses and reducing
carefully wash the engine
light output, avoid wiping with a dry
compartment, remembering to avoid
cloth. To remove road dirt, wash with
directing the jet of water for too long
a mild soap solution followed by
on the electric parts.
rinsing.
343
Maintenance and Care
transparent dome, the MTC+ display,
which are know to the State of
Interior Maintenance and
the analog clock and the leather
California to cause cancer and birth
Care
upholstery. We recommended the use
defects or other reproductive harm. To
of “Car Care” products approved by
minimize exposure, avoid breathing
Interior trim should be cleaned
Maserati for the maintenance and care
exhaust, do not idle the engine except
starting with a damp cloth. Do not use
of the interior.
as necessary, service your vehicle in a
harsh cleaners.
well-ventilated area and wear gloves
The leather upholstery can be best
preserved by regular cleaning with a
Leather Upholstery Treatment
or wash your hands frequently when
servicing your vehicle. For more
damp soft cloth. Small particles of dirt
Have the leather upholstery only
information go to:
can act as an abrasive and damage the
treated, as provided in the Scheduled
leather upholstery and should be
Service Plan, by an Authorized
vehicle
removed promptly with a damp cloth.
Maserati Dealer which has the
Stubborn soils stains can be removed
required specific products.
easily with a soft cloth and
appropriate products. Avoid soaking
Parts in Premium Quality Wood
the leather upholstery with any liquid.
Remove any dirt with a damp cloth.
Please do not use polishes, oils,
cleaning fluids, solvents, detergents, or
NOTE:
ammonia-based cleaners to clean your
The Authorized Maserati Dealer can
leather upholstery.
provide you with any information
Application of a leather conditioner is
about the Maserati approved “Car
not required to maintain the original
Care” products, available in the
condition.
“Genuine Accessories” range.
Check at regular intervals that there is
7
no water trapped under the mats (due
to drips off shoes, umbrellas etc.)
which may cause the metal parts to
WARNING!
oxidize.
California Proposition 65
Operating, servicing and maintaining
a passenger vehicle or off-road vehicle
CAUTION!
can expose you to chemicals including
Do not use alcohol, petrol or solvents
such as, engine exhaust, carbon
to clean the instrument cluster's
monoxide, phthalates and lead, that
344
Maintenance and Care
• Clean and protect polished metal
Vehicle Stored for Long
Restarting the Vehicle
parts with special products available
Periods
on the market.
Before restarting the vehicle after a
long period of inactivity, we
If the vehicle is going to be stored for
• Cover the vehicle with a long cloth
recommend that you carry out the
long periods of time, follow the below
in breathable fabric (available from
following operations.
precautions:
an Authorized Maserati Dealer). Do
not use thick plastic sheets, which do
• Check the tires for pressure and for
• Wash and dry the vehicle
not allow the humidity on the
any damages, cuts or cracks. If this is
thoroughly.
vehicle surface to evaporate.
the case, have them replaced.
• Store the vehicle on a level surface in
• Inflate the tires up to a pressure
• Do not dry-rub the external surface
a covered, dry and, if possible,
which must be 14.5 psi (1 bar) higher
of the vehicle: use a damp cloth.
ventilated area.
than the normally prescribed one,
• Visually inspect if there are any fluid
• Select P (Park) and turn off the
and check it at regular intervals.
leaks (oil, brake and clutch fluid,
engine.
engine coolant etc.).
NOTE:
• Disconnect the battery (refer
• Have the engine oil and filter
“Maintenance-Free Battery” in this
The Authorized Maserati Dealer can
replaced.
section) or connect a battery charger
provide you with any information
(refer to paragraph “Maintaining
about the available “Indoor and
• Check the fluid levels in the brake
Battery Charge” of chapter “Battery
Outdoor Car Covers”, available in the
system, as well as the engine coolant
Statement” in this section).
“Genuine Accessories” range.
level.
• Check the battery charge status.
• Check the air filters and have them
During parking, this check must be
replaced if necessary.
carried out every three weeks.
• Reconnect the battery after checking
WARNING!
Recharge the battery if the open
the charge status (refer to
7
The tire pressure must be brought
circuit voltage is lower than 12.2 V.
“Maintenance-Free Battery” in this
back to the prescribed value before
• Check that the parking brake is NOT
section) and perform the initializing
reusing the vehicle (see “Tire Inflation
engaged.
procedure if applicable. You can
Pressure” in section “Features and
consult the paragraph “Battery
• Do not empty the engine cooling
Specifications”).
Reconnection” in this chapter for
system.
further information on this subject.
• Clean and protect the painted parts
applying protective wax.
345
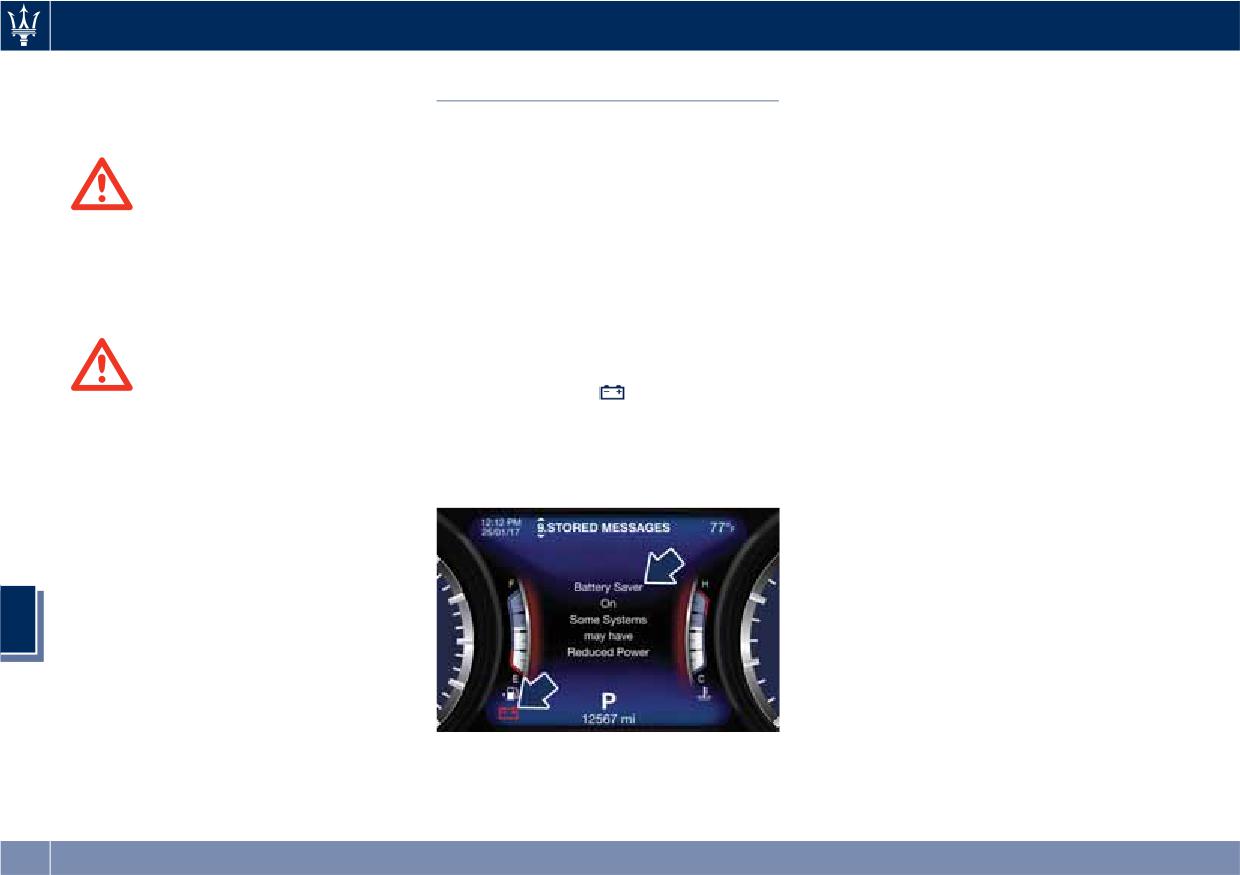
Maintenance and Care
• With the transmission in N (Neutral),
consume power even when the
Battery Statement
let the engine idle for several
ignition switch is in the OFF position
minutes.
Battery Statement Status of
and the vehicle is not being used.
Therefore, it is fundamental that the
Charge
battery is properly charged to ensure
To avoid problems with ignition and/or
that the engine starts properly and
WARNING!
the electrical system in general when
that all the electrical/electronic systems
The engine idle must be performed
you are driving, the battery charge
in the vehicle work efficiently.
outdoors. Exhaust gases contain
status is constantly maintained and
carbon monoxide which is strongly
guaranteed by the vehicle's recharge
Maintaining Battery Charge
toxic and potentially lethal.
circuit; the main component of which
If you perform short daily trips
is the alternator. This circuit is only
(approximately 10 miles/16 km), which
able to supply voltage to the battery
correspond to an annual total of 4000
when the vehicle is traveling.
WARNING!
miles/6000 km, or when the vehicle is
The warning light
on the
California Proposition 65
not going to be used for one week or
instrument cluster, will indicate any
Operating, servicing and maintaining
more, Maserati recommends
malfunctions in the recharge circuit or
a passenger vehicle or off-road vehicle
connecting the vehicle to a battery
an insufficient battery charge status
can expose you to chemicals including
charger, to save you the trouble of
(example in figure).
such as, engine exhaust, carbon
having to recharge the battery. The
monoxide, phthalates and lead, that
battery charger will keep the battery
which are know to the State of
charged properly and at the correct
California to cause cancer and birth
voltage levels required by the systems
defects or other reproductive harm. To
and devices in the vehicle.
minimize exposure, avoid breathing
Before using and/or connecting the
7
exhaust, do not idle the engine except
battery charger, carefully follow the
as necessary, service your vehicle in a
instructions provided.
well-ventilated area and wear gloves
If you do not use a battery charger to
or wash your hands frequently when
prevent the battery from going dead
servicing your vehicle. For more
when you are not going to use the
information go to:
The vehicle contains advanced
vehicle for long periods of time, you
electronic systems, such as, for
need to check and recharge the
vehicle
example, the alarm system and various
battery at least once every three
weeks. Make this check if you perform
electronic control modules, which
346
Maintenance and Care
short daily trips (approximately 10
miles/16 km) which correspond to an
WARNING!
annual total of 4000 miles/6000 km.
Please note that allowing the battery
The process of charging or recharging
to go dead repeatedly can cause
the battery produces hydrogen, a
premature wear on the internal cells
dangerous gas that can explode and
and greatly reduce their life, leading
cause serious injuries. When charging
to problems with the ignition system
or recharging the battery, follow the
and other electrical/electronic systems.
recommended precautions at all
The Authorized Maserati Dealer is
times:
available to advise you on how to
• always charge or recharge the
recharge your battery correctly and
battery in a well-ventilated
give you useful information on battery
environment;
care and maintenance.
• never charge or recharge a battery
NOTE:
that has frozen;
The Authorized Maserati Dealer can
• ensure that any sparks or open
provide you with any information
flames are nowhere near the battery
about the Maserati approved “Battery
while it is charging;
Charger and Conditioner”, available in
• before using a charger to charge or
the “Genuine Accessories” range.
maintain the battery charge status,
carefully follow the instructions
provided to ensure the charger is
connected to the battery safely and
correctly.
7
347
8 - Features and Specifications
Refillings
350
Fuel Consumption
353
Technical Data
354
Tire Inflation Pressure
360
349
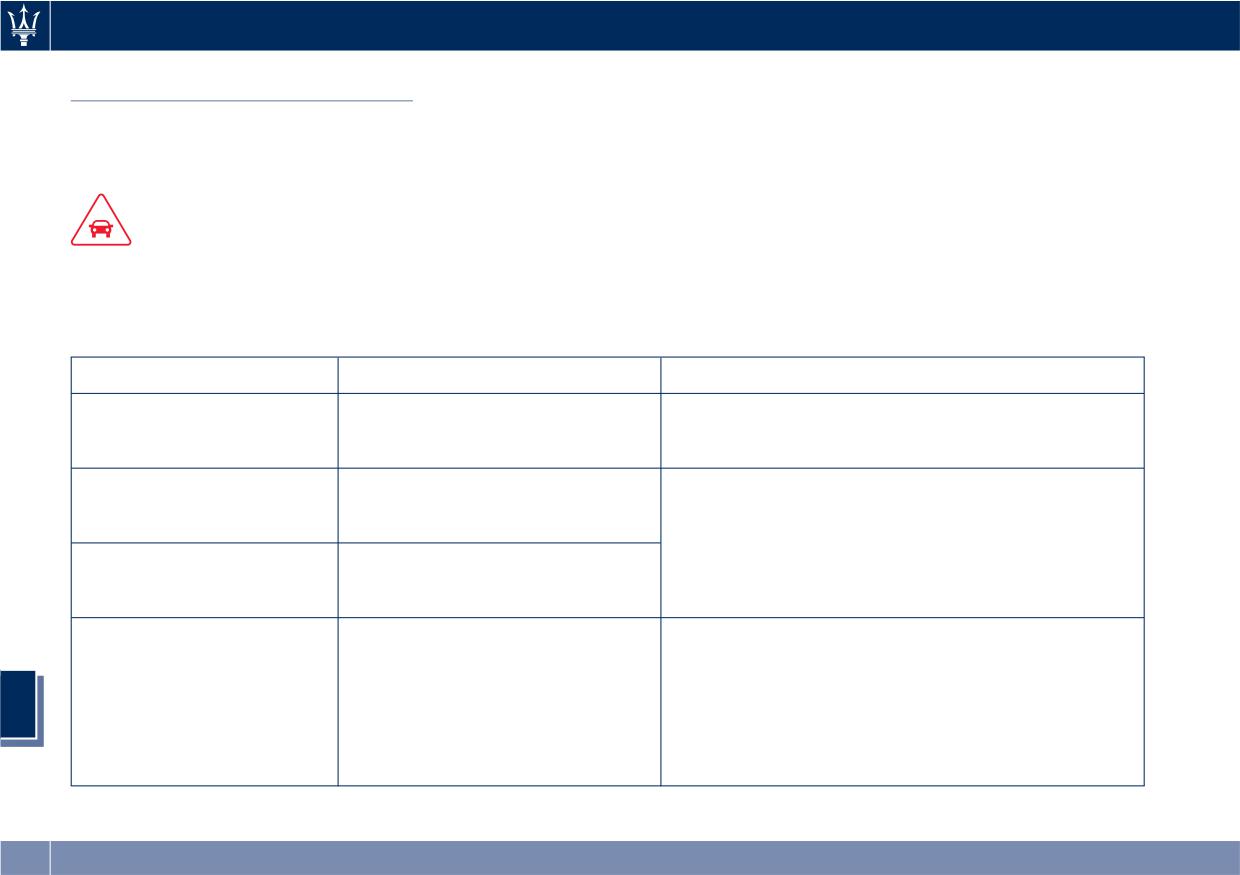
Features and Specifications
Refillings
NOTE:
Maserati reserves the right to change or revise specifications without prior notification.
CAUTION!
To guarantee vehicle’s integrity and maintain performance level always use genuine parts approved and recommended by
Maserati.
Refillings and Recommended Products
Parts to be refilled
Quantity
Product specifications
Fuel tank
21 Gallons/80 litres
Premium unleaded fuel with no less than 95 RON/85
(including 4.2 Gallons/16 litres of
MON (91 CLC or AKI).
reserve)
Engine
7.6 Quarts/7.2 litres (max)
(Difference among MIN and MAX
Synthetic multigrade lubricants SAE 10W/60 that
level: 1.1 Quarts/1 litre)
meet API SN/CF and ACEA A3, B3, B4 specifications.
Engine
8.8 Quarts/8.3 litres (max)
Recommended oil: PENNZOIL Platinum Racing
(AWD version)
(Difference among MIN and MAX
10W-60.
level: 1.1 Quarts/1 litre)
Mix of water and detergent fluid, in the proportions
indicated on the product package. If the temperature
is below -4°F (-20°C), use pure detergent fluid.
Windshield washer fluid
3.7 Quarts/3.5 litres
Detergent fluid: Mix of CUNA NC 956-II surfactants
8
reservoir
and alcohols.
Recommended fluid: WUERTH Windshield Washer
Fluid with antifreeze or AREXONS DP1.
350
Features and Specifications
Parts to be refilled
Quantity
Product specifications
Mixture of water and coolant, proportionally
50/50%.
Engine cooling circuit
9.7 Quarts/9.2 litres
Coolant: protective, antifreeze action and ethylene
glycol-based with organic inhibitors compatible with
regulations:
Automatic transmission
2.64 Quarts/2.5 litres
• ASTM D 3306, ASTM D 2570
cooling circuit
• ASTM D 4340, ASTM D 2809
• SAE J 1034
• CUNA NC 956/16.
Recommended fluid: PETRONAS Paraflu Up 50/50.
(*) Automatic transmission
8 Quarts/7.6 litres
First equipment oil: SHELL ATF L- 12108 or ZF
Lifeguard 8.
(*) Differential
1.4 Quarts/1.3 litres
Synthetic Axle Lubricant SAE 75W-90 - FE Hypoid
Gear Lubricant.
(*) Front differential
0.47 Quarts/0.45 litres
First equipment oil: SHELL TF 0951B.
(AWD version)
(*) Transfer case
0.65 Quarts/0.62 litres
First equipment oil: SHELL TF 0870.
(AWD version)
Braking system
0.93 Quarts/0.8 litres +/- 4%
Synthetic fluid: FMVSS 116 DOT 4, ISO 4925 Class 4,
ENSAYOS INTA-UNE 26-109-88, SAE J1703, SAE J1704,
CUNA NC 956-01.
Recommended fluid: PETRONAS Tutela TOP 4/S.
CAUTION!
For each oil refilling and/or replacement, please contact an Authorized Maserati Dealer.
8
Air conditioning system
24 oz +/-0.7 oz
Coolant: r134a.
680 g +/-20 g
(*) No change and/or topping up expected in scheduled maintenance.
351
Features and Specifications
WARNING!
California Proposition 65
Operating, servicing and maintaining a passenger vehicle or off-road vehicle can expose you to chemicals including such
as, engine exhaust, carbon monoxide, phthalates and lead, that which are know to the State of California to cause cancer
and birth defects or other reproductive harm. To minimize exposure, avoid breathing exhaust, do not idle the engine
except as necessary, service your vehicle in a well-ventilated area and wear gloves or wash your hands frequently when
servicing your vehicle. For more information go to: www.P65Warnings.ca.gov/passenger-
vehicle
Engine Oil Identification
Engine Oil Viscosity
Symbol
(SAE Grade)
This symbol means that the oil
SAE 10W-60 engine oil is
has been certified by the
recommended for all operating
American Petroleum Institute
temperatures.
(API). Maserati only
The engine oil filler cap also shows the
recommends API Certified engine oils.
recommended engine oil viscosity for
your engine. For information on
engine oil filler cap location, refer to
CAUTION!
chapter “Maintenance Procedures” in
Do not use chemical flushes in your
section “Maintenance and Care”.
engine oil as the chemicals can
Lubricants that do not have both the
damage your engine. Damage caused
engine oil certification mark and the
by use of non-approved chemicals is
correct SAE viscosity grade number
not covered by the new Vehicle
should not be used.
Limited Warranty.
8
352
Features and Specifications
• The specifications described below
Fuel Consumption
can change without prior
NOTE:
notification.
• The technical data, values and
The fuel consumption values shown
specifications in this Owner’s Manual
(Miles Per Gallon - MPG) are
are provided as guidance only. The
established using EPA test guidelines.
vehicle specific data can deviate
from the information provided, for
example, as a result of optional or
special equipment ordered with the
vehicle, vehicle loads, and country
specific measurement methods.
Ghibli S Q4 (AWD version)
Ghibli S
Ghibli
City
19.8 MPG
20.1 MPG
20.7 MPG
Highway
33.1 MPG
32.7 MPG
33.5 MPG
Combined
24.1 MPG
24.3 MPG
25 MPG
CAUTION!
• Actual fuel economy results will vary for many reasons, including driving conditions and how you drive and maintain
your vehicle.
• The type of route, traffic and weather conditions, driving style, general condition of the vehicle, equipment/accessories
in the vehicle, use of the air conditioning system, vehicle load and other items or situations which may negatively affect
the vehicle aerodynamics or wind resistance lead to consumption ratios differing from the indicated ones.
8
353

Features and Specifications
Technical Data
NOTE:
The technical data, values and specifications in this Owner’s Manual are provided as guidance only. The vehicle specific
data can vary from the information provided, for example, as a result of optional or special equipment ordered with the
vehicle, vehicle loads, and country specific measurement methods.
Engine Data
Data
Ghibli S Q4 (AWD version)
Ghibli
Ghibli S
Cylinder number and position
6 - 60° V
6 - 60° V
Number of valves per cylinder
4
4
Bore x stroke
86.5 x 84.5 mm
86.5 x 84.5 mm
Total displacement
2,979 cm3
2,979 cm3
Compression ratio
9.7 : 1
9.7 : 1
Maximum power output (EC)
316 kW - 424 HP
257 kW - 345 HP
- corresponding RPM
5,750 g/min
5,500 g/min
Peak and overboost torque (EC)
428 ft-lb (580 N-m)
369 ft-lb (500 N-m)
- corresponding RPM
1,750 - 4,500 g/min
1,600 - 4,500 g/min
Properties
Timing
The timing system uses two overhead camshafts with timing variator.
Timing system control
Timing chain.
8
Supply
Over-supplied with turbocompressor and related intercooler for each bank.
Injection - Ignition
High pressure 2900 PSI (200 bar) direct fuel injection system. Static ignition with digital
electronic control system included and controlled by a single microprocessor ECU.
354
Features and Specifications
Brakes
Steering
Self-ventilating disc brakes on the four
Electric Power Steering (EPS) system,
wheels. The Electric Parking Brake
axis parallel type.
(EPB) acts on the rear wheels.
Steering diameter = 12.9 yd (11.8 m).
No. of steering wheel turns = 1.37 (to
the left and right).
Braking System
Dual Cast
Base
Front disc diameter
14 in (360 mm)
13.6 in (345 mm)
Rear disc diameter
13.6 in (345 mm)
13 in (330 mm)
Transmission
ZF automatic transmission with 8
speeds, torque converter, lock-up
clutch and anti-slip function.
Sequential and traditional control
type.
Automatic transfer case (AWD
version).
TRANSAXLE-type transmission.
Traction system equipped with rear
self-locking differential.
Suspension
Front suspensions with double
wishbone independent wheels.
Multilink system rear suspensions on
8
independent wheels.
Optional Skyhook active suspensions
with electronic controlled dampening.
355

Features and Specifications
Wheels
NOTE:
• Maserati recommends Maserati Genuine Tires marked with “MGT” logo specifically designed for its models.
• In order to maintain high performance and safety level, Maserati recommends to use tires equivalent to the original
size.
WARNING!
• The maximum speed reachable with the tires is indicated by the tire manufacturer. Always comply with the regulations
in force in the Country you are driving in.
• Never exceed the maximum speed indicated for the tires: failure to respect the max. speed may damage these tires.
Danger: risk of accident!
Allowed tires size with standard wheel rims
For all models
Light alloy rims
19” x 8,5J (front)
19” x 10J (rear)
- Front tires
245/45 ZR 19 (98Y)
- Rear tires
275/40 ZR 19 (101Y)
- Front winter tires
245/45 ZR 19 102W XL M+S
- Rear winter tires
275/40 ZR 19 101W M+S
- Front all-season tires
245/45 R 19 98V M+S
- Rear all-season tires
275/40 R 19 101V M+S
8
356

Features and Specifications
Allowed tires size with optional wheel rims
For all models
Light alloy rims
20” x 8,5J (front)
20” x 10,5J (rear)
- Front tires
245/40 ZR 20 (99Y) XL
- Rear tires
285/35 ZR 20 (100Y)
- Front winter tires
245/40 R 20 99W XL M+S
- Rear winter tires
285/35 R 20 100W M+S
- Front all-season tires
245/40 R 20 99W XL M+S
- Rear all-season tires
285/35 R 20 100W M+S
Light alloy rims
21” x 8,5J (front)
21” x 10,5J (rear)
- Front tires
245/35 ZR 21 (96Y) XL
- Rear tires
285/30 ZR 21 (100Y) XL
- Front winter tires
245/35 R 21 96W XL M+S
- Rear winter tires
285/30 R 21 100W XL M+S
8
357

Features and Specifications
Performance
NOTE:
The specifications described can change without prior notification.
Ghibli S Q4 (AWD version)
Ghibli S
Ghibli
Maximum speed
176.5 mph (284 km/h)
177 mph (285 km/h)
166 mph (267 km/h)
Accelerations from 0 to 60 mph
4.7 seconds
4.9 seconds
5.5 seconds
Weights
NOTE:
The specifications described can change without prior notification.
Ghibli S Q4 (AWD version)
Ghibli S
Ghibli
Unladen vehicle weight (with
4,565 lb (°)
4,400 lb (°)
4,400 lb (°)
tank and reservoirs filled, tools
and accessories)
Approved Gross Vehicle Weight
5,573 lb
5,420 lb
5,420 lb
Rating (GVWR)
(2,621 lb front axle -
(2,468 lb front axle -
(2,468 lb front axle -
2,952 lb rear axle)
2,952 lb rear axle)
2,952 lb rear axle)
(°) Base configuration without options.
8
358

Features and Specifications
Dimensions
Wheel base
118 in (2,998 mm)
Total length
195.7 in (4,971 mm)
Width without mirrors
76.5 in (1,945 mm)
Width with mirrors
82.6 in (2,100 mm)
Front track
64.3 in (1,635 mm)
Rear track
65 in (1,653 mm)
Front overhang
36.8 in (935 mm)
Rear overhang
40.8 in (1,038 mm)
Height (*)
57.5 in (1,461 mm)
Trunk volume
17.6 cu. ft. (500 l)
(*) With standard rims and tires.
8
359
Features and Specifications
Tire Inflation Pressure
Cold tire inflation pressure value under the following loading conditions listed in the table below:
• PLC (Partial Loading Condition): considering 2 passengers + luggage.
• FLC (Full Loading Condition): considering 4 or 5 passengers + luggage.
(*) Speed driving higher than
124 mph (200 km/h)
Load
PLC
FLC
PLC - FLC
Wheel
Front and rear
Front and rear
Front and rear
Pressure
220 kPa - 32 PSI (2.2 bar)
260 kPa - 38 PSI (2.6 bar)
260 kPa - 38 PSI (2.6 bar)
Spare tire pressure
350 kPa - 51 PSI (3.5 bar)
(*) Not for winter and all-season tires.
NOTE:
• The pressure values indicated in the table are also indicated on the driver-side door pillar information label.
• For more information about the pressure check methods, see “Tires - General Information” in section “Driving”.
WARNING!
• Improperly inflated tires are dangerous.
• Under-inflation increases tire flexing and can result in tire overheating and failure.
• Over-inflation reduces a tire's ability to cushion shock. Objects on the road and potholes can cause damage that results
in tire failure.
8
• Over-inflated or under-inflated tires can affect vehicle handling and can fail suddenly, resulting in loss of vehicle control.
• Unequal tire pressures can cause steering problems.
• Unequal tire pressures from one side of the vehicle to the other can cause the vehicle to drift to the right or left.
• Always drive with each tire inflated to the recommended cold tire inflation pressure.
360
Index
Abbreviations
8
A/C Distribution
138
Pre-Short Drop Function
343
Accessories
Alarm, Vehicle Security
26
Protection from Atmospheric
Aftermarket Parts and Accessories
ALR (Automatic Locking Retractor). .60
Agents
341
Statement
13
Anti-Lock Braking System (ABS) and
Useful Advice to Keep the
Active Blind Spot Assist - ABSA
262
Electronic Brake-force Distribution
Bodywork in Good Condition . . .341
Adaptive Cruise Control (ACC)
239
(EBD)
230
Brakes
Activation/Deactivation
241
Assistance
11
Brake and Stability Control
Display Warnings and
Assistance, if you need
11
System (ESC)
229
Maintenance
246
ATC (Automatic Temperature
Brake Overheating
233
Precautions while Driving with
Control)
197
Brake System
229
ACC
247
Audio Controls
172
Manual Release of Parking
Setting the Following Distance . .244
Audio Controls on Central
Brake
301
Setting the Speed
242
Console
172
Parking Brake
224
Air bag
63
Steering Wheel Audio Controls . .172
Using the Brakes
232
Advanced Front Air Bag
Audio, setting
186
Properties
64
Audio System
173
Capacity/Refillings
350
Air Bag Deployment Result
68
Automatic Transmission
Cargo Area
129
Air Bag Deployment Sensors and
Manual Release of
Loading with Rear Seatbacks
Controls
15
Transmission
304
Folded Down
130
Air Bag System Components
63
AWD
Vehicle Load Carrying Capacity . .129
Front Air Bag Inflator Units
67
All-Wheel Drive, drive mode
213
Child Restraint Systems
71
Passenger Air bag Labels
19
Children too large for Booster
Supplemental Driver Side Knee Air
BAS (Brake Assist System)
231
Seats
72
bag
66
Battery
322
Infants and Child Restraints
71
Supplemental Restraint System
Battery Recharge
325
Installing Child Restraint Systems
(SRS)
63
Battery Remote Posts Position. . .303
using the Vehicle Seat Belt
Supplemental Seat-mounted Side
Maintaining Battery Charge
346
equipped with ALR
73
Air Bags (SAB)
65
To Disconnect the Battery
322
Lower Anchors and Tether for
Supplemental Side Air Bag
To Reconnect the Battery
324
Children (LATCH)
73
Inflatable Curtain (SABIC)
65
Blind Spot Alert
257
Older Children and Child
Transport of persons with
RCP - Rear Cross Path
260
Restraints
72
disability
70
Bluetooth, Customer settings
187
Tips on getting the most out of
9
Air Conditioning (A/C) System
193
Bodywork Maintenance and Care . .341
your child restraint
72
362
Index
Climate Control
193
Setting the Drive Mode
214
Fuel
Clock, analog
181
Driving Conditions
289
Carbon Monoxide Warning
287
Console
Before the Trip
289
Emergency Fuel Filler Door
Central Console Components
91
Driving at Night
290
Release
289
Front Dome Console
Driving in Fog
291
Emissions Inspection and
Components
91
Driving in the Mountains
291
Maintenance Programs
313
Controls Screen
175
Driving in the Rain
290
Fuel Consumption
353
Cruise Control
Driving on Snow or Ice
291
Fuel Filter Service
318
Cruise Control Adaptive (ACC) . .239
Safe Driving
290
Fuel Requirements
285
Electronic Cruise Control (CC) . . .235
DRL (Daytime Running Light)
108
Fuel System Warnings
286
Cupholders
122
Gasoline/Oxygenate Blends
286
Front Passengers Cupholders . . .123
EDR (Event Data Recorder)
70
Low Fuel Indicator
162
Rear Passengers Cupholders . . .124
Electronic Cruise Control
235
Materials Added to Fuel
286
Emergency
5
MMT in Gasoline
286
Dashboard Compartment
189
Hazard Warning Lights
117
Reformulated Gasoline
285
Dashboard Components
90
In the Event of an Accident
295
Fuses
327
Defroster
47
Jump Starting
302
Fuses Position
327
Doors
Trunk Lid Emergency Release
53
Fuses Replacement
327
Child Protection Door Lock
Engine
System
39
Engine Coolant Level Check
315
Glove Box Feature Lock
Doors Locking
38
Engine Oil Level Check
318
(Passenger Side)
190
Doors Manual Lock
38
Hood
54
Glove Box Lock Feature
Front Doors Components
92
Normal Starting of the Engine . .202
Handholds and Cloth Hooks
126
Lock/Unlock Door Flashlight
32
Use of the Engine
233
Power Doors Locking/Unlocking . .38
Entry/Exit, lights on
28
Hazard Warning Flashers
295
Rear Doors Components
93
EPB (Electric Parking Brake)
224
Head Restraints
94
Soft Door Close System
40
ESC (Electronic Stability Control) . .229
Highway Assist - HAS
266
Unlock Driver Door/All Doors with
HomeLink
134
Remote Key 1st Press
32
Filters
Security
137
DPF System
A/C System Air Filter
Troubleshooting Tips
137
DPF Filter Replacement
318
Replacement
320
Using HomeLink
137
“Drive Away Inhibit” strategy
228
Engine Air Filter Replacement . .320
Hood
9
Drive Mode, controls
214
Forward Collision Warning (FCW). .249
Open and Close the Hood
54
363
Index
Hood Operation
54
Preventing Inadvertent Locking of
High Beam and Flashing
112
HSA (Hill Start Assist)
231
key fob RKE Transmitter Inside the
Interior Lights
113
Vehicle
42
Light Switch
106
Identification Labels
19
Replacement
25
Multifunction Lever
111
Illuminated Entry/Exit
28
Requiring and setting Additional
Turn Signals
111
Immobilizer (Sentry Key)
24
Key Fobs
33
Loading the Vehicle
Indicator Lights
Unlock the Vehicle with Key fob . .31
Loading with Rear Seatbacks
Air Bag Warning Light
82
Keys
22
Down
130
TFT Display: Menus and
Vehicle Load Carrying Capacity . .129
Settings
147
Lane Departure Warning (LDW) . . .253
TFT Display: Warning/Indicator
Level Checks
315
Main- and Submenu
148
Lights of Set Modes/Functions. . .159
Adding Windshield
317
Maintenance
5
Warning and Indicator Lights on
Brake Fluid Level Check
317
A/C System Maintenance
338
Analog Instrument
142
Engine Coolant Level Check
315
Air Bag System Maintenance
69
Infotainment System
165
Engine Oil Level Check
315
Bodywork Maintenance and
Infotelematic System
Fluid Level Check for Coolant
Care
341
Main Menu Bar on MTC+
Transmission System
320
Emissions Inspection and
Display
167
Transmission Oil Check
319
Maintenance Programs
313
Manual Controls and Devices . . .166
Liftgate
Interior Maintenance and Care . .344
Personalized the Main Menu
Liftgate and Hood Ajar
Maintenance Procedures
314
Bar
168
Indicators
162
Periodic Maintenance
311
Instrument Cluster
142
Unlatch the Trunk Lid
32
Scheduled Maintenance Service
.308
Interior Components
90
Lights
106
Scheduled Service Plan
309
Interior Maintenance and Care
344
Automatic High Beam
109
Wheels Maintenance
339
Interiors Features
121
Bi-Xenon Headlight
108
Maserati Roadside Assistance
iPad Holder
127
Bulb Replacement
334
Program
16
iPod Connection
125
Cargo Lamps
117
Mesh Pockets
127
Dome Lights
116
Messages on Main Display Area . . .147
Jump Start Procedure
303
DRL, Daytime Running Lights . . .108
MIL (Malfunction Indicator Light) . .143
Fog Lights
111
Mirrors
103
Key Fob
23
Full-LED Headlight with
External Mirrors
103
Key Fob Battery Replacement
33
Cornering Function
109
Folding Mirrors
105
9
Headlight Time Delay
108
364
Index
Integrated External Rearview
Pets, transporting
76
Scheduled Service Plan
Mirror Lights
117
Phone and Voice Controls on
Scheduled Maintenance
Internal Rearview Mirror
105
Steering Wheel
199
Indicator
308
Mirrors Positioning
104
Phone Mode
200
Seat Belt
55
Rearview Mirrors
103
Phone/Bluetooth, Customer
Automatic Locking Retractor (ALR)
Tilt Mirrors in Reverse
104
settings
187
Mode
60
MTC+ “Controls” Screen
175
Power Outlets
121
Enhanced Seat Belt Use Reminder
MTC+ Settings - Customer
Power Outlet Inside the Central
System (SBR)
61
Programmable Features
178
Console
122
Passenger Seat Belts
59
Auto-On Comfort & Remote
Power Outlet Inside the
Seat Belt Reminder Light
146
Start
185
Cupholder
121
Seat Belts and Pregnant
Clear Personal Data
189
Power Outlet Inside the Trunk . .122
Women
62
Clock & Date
181
Rear Power Outlets
122
Seat Belts Pretensioners
61
Display
180
Three-Point Seat Belts
56
Doors & Locks
184
Rear Parking Camera
76
Three-Point Seat Belts Height
Engine Off Options
186
Refueling
287
Adjustment
58
Lights
183
Fuel Filler Neck Access
287
Three-Point Seat Belts Untwisting
Restore Settings
189
Remote Start System
35
Procedure
59
Safety and Driving Assistance . . .182
Restarting the Vehicle
345
Three-Point Seat Belts Use
Voice Commands
181
Restraint System
63
Instructions
57
Child Restraint Systems
71
Using the Seat Belt in Automatic
Occupant Restraint System
55
RKE (Remote Keyless Entry)
Locking Retractor Mode (ALR) . . .60
On Board Diagnostics
234
Transmitter
22
Seats
93
ORC (Occupant Restraint
Roadside Assistance Program
16
Driver Memory Seat
97
Controller)
66
Roll-Over Warning
15
Easy Entry/Exit Seats
98
Front Heated Seats
95
Park Assist
84
Safety
Front Power Seats
93
Enabling and Disabling Park
Child Restraint Systems
71
Front Ventilated Seats
96
Assist
87
Reporting Safety Defects
12
Power Lumbar Seats
94
Parking
227
Safety Tips
55
Rear Armrest
100
Parking Brake
224
Scheduled Maintenance Service . . .308
Rear Head Restraints
99
Passive Entry System
40
Rear Seats
99
9
Pedals, adjustable
103
Rear Side Heated Seats
100
365
Index
Seat Adjustment
94
Sunshades
132
Towing
Service
10
Power Sunshades
47
Towing a Disabled Vehicle
304
Siri Smart Personal Assistant
200
Sun Visors
125
Towing the Vehicle
304
Smoking Kit
126
Surround View Camera System
78
Vehicle Towing Conditions
305
Snow Chains
279
Symbols
14
TPMS System
280
Spare parts service
Danger Symbols
14
Tire Pressure Low Warning
282
Genuine Parts
13
Symbols of Prohibitions and
TPMS Deactivation
284
Scheduled Maintenance
13
Compulsory Measures
14
Traffic Sign Assist - TSA
272
Spare Parts Service
13
Transmission, Automatic
207
SRS (Supplemental Restraint
TCS (Traction Control System)
231
Automatic Transmission Lever. . .208
System)
63
Technical Data
354
Automatic Transmission Range . .209
Start&Stop System
204
Telltales
Malfunction and Overheating
Occupant Safety Function
206
Telltales on Speedometer
142
Conditions
211
Start&Stop Active Indicator
144
Telltales on Tachometer
144
Transmission Manual Release of
Start&Stop Disable Indicator
163
Warning/Indicator Lights of Set
P (Park) Position
301
Start&Stop Failure Indicator
Modes/Functions on Display
159
Transmitter, Key fob RKE
Light
163
TFT Display: Menus and Settings. . .147
Preventing Inadvertent Locking of
Start&Stop Function Disabling
Tires
Key fob RKE Transmitter Inside the
Indicator
206
Change a Tire
296
Vehicle
42
Start&Stop Menu
154
Compact spare tire
280
Radio Frequency RKE
Start&Stop System Failure
207
Department of Transportation
Transmitter
35
Start the Engine
Uniform Tire Quality Grades
276
Trunk
Engine Start Failure
203
General Information
274
Power Trunk Lid/Hand Free
Engine Turn Off
204
Inflation Pressure
360
(optional)
49
Steering Wheel
Punctured Tire, use
296
Trunk Safety
53
Heated Steering Wheel
102
Replacement Tires
278
Trunk Lid
Phone and Voice Controls on
Tire Pressure
277
Power Trunk Lid/Hand Free
Steering Wheel
199
Tire Pressure Checkup
277
(optional)
49
Sunroof
Tire Safety Information
274
Trunk Lid Emergency Release from
Pinch Protect Feature
133
TPMS - Tire Pressure Monitoring
inside the Trunk
53
Slide Opening Sunroof
133
System
280
Trunk Lid Operation
48
Sunroof Maintenance
134
Winter Tires
279
9
Venting Sunroof
133
Tool Kit
294
366
Index
Updating
9
Vehicle Identification Number
(VIN)
18
Vehicle Stored for Long Periods . . .345
Voice Commands
200
Warning icons
8
Warnings when Driving
15
Warranty
10
Accessories
10
Warranty Information
12
Wheels
339
Wheels Maintenance
339
Windows
45
Auto Down/Auto Up Feature
45
Defroster
47
Open the Windows with RKE
Transmitter and Ignition Off
46
Rear Window
47
Reset Auto-Up/Down
46
Window and Sunshade Lockout
Button
46
Wipers and Washers
118
Headlight On with Windshield
Wipers
119
Rain Sensing Windshield
Wipers
118
Windshield Washers
120
Windshield Wipers
118
Wipers Blades Maintenance
119
9
367