Western Canada Mine Rescue Manual Ministry of Energy and Mines Office of the Chief Inspector of Mines (2017) - page 1

Western Canada Mine Rescue Manual
Ministry of Energy and Mines
Office of the Chief Inspector of Mines
Victoria
British Columbia
Canada
December 31, 1998
Revised 2014-15 (minor correction update - December 2016)
This manuscript is for educational purposes only. Nothing herein is to be regarded
as indicating approval or disapproval of any specific product or practice.

Foreword
Every mine has to maintain a mine rescue team to help ensure the safety of workers and property on
mine sites throughout B.C., Yukon, Northwest Territories and Nunavut. This manual has been crafted to
demonstrate the basic equipment, procedures, practices, and principles that mine rescue trainees need
to know before they respond to incidents at surface and underground mining operations.
Mine Rescue teams have bravely responded to incidents and disasters throughout northern and western
Canada for more than a century. It is through their training and practice that they have been able to
come back safe and sound. Likewise, mine officials must also be familiar with their roles and
responsibilities in the event of an emergency. Proper instruction must be complemented by individual
and collective efforts to master the skills, equipment, and knowledge needed to execute a mine
emergency response. This manual and training course represent the first steps you will take toward
being able to answer that call.
There are all sorts of incidents and emergencies that Mine Rescue teams can encounter, including
electrical fires, gas leaks, avalanches, and motor vehicle accidents. Mine Rescue can be dangerous work,
especially if it is not performed properly. Rescuers are responsible first for their safety and the safety of
their team, but some responses will also require that they tend to casualties in need of assistance. In
consulting the most up-to-date research as well as experts in government and industry, the committee
who created this manual have endeavoured to make certain that the information found in these pages
is as reliable, applicable, and above all, safe as possible.
Your Mine Rescue training will not end when you finish this manual and course. Being a part of a Mine
Rescue team means committing to a practice regime with your fellow Mine Rescuers to establish the
cohesion, communication, and trust needed to function in the stressful environment of an emergency
response. At times you may be called upon to assist in responses at other mining operations or to
emergencies off-site. Wherever your Mine Rescue training takes you, wear the “MINE RESCUE” sticker
on your hat with the pride and responsibility that it deserves.
Al Hoffman
Bruce Milligan
Peter Bengts
Chief Inspector of Mines,
Director,
Chief Inspector of Mines,
Ministry of Energy and Mines
Occupational Health and Safety
Worker’s Safety &
British Columbia
Yukon Workers' Compensation
Compensation Commission
Yukon
Northwest Territories and
Nunavut
Contents
Chapter 1 Introduction
1-1
INTRODUCTION
1-2
FUNDAMENTAL PRINCIPLES OF MINE RESCUE TRAINING
1-2
REQUIREMENTS FOR MINE RESCUE TRAINING
1-2
MINIMUM QUALIFICATIONS
1-3
MINE RESCUE CERTIFICATION
1-3
ACKNOWLEDGEMENTS
1-3
Chapter 2 Mine Rescue Organization
2-1
OBJECTIVES
2-2
CONCEPTS AND DEFINTIONS
2-2
THE MINE RESCUE TEAM
2-2
COMMUNICATION BY TEAM MEMBERS
2-5
DECISION-MAKING PROCESSES
2-5
PERSONAL PROTECTIVE EQUIPMENT
2-7
FRESH-AIR BASE/ZONE
2-7
FIRST REPSONSE TO HAZARDOUS MATERIALS
2-8
PHYSICAL/EMOTIONAL STRESS IN CRITICAL INCIDENTS
2-8
Chapter 3 Environmental Conditions
3-1
OBJECTIVES
3-2
CONCEPTS AND DEFINITIONS
3-2
AVALANCHE RESCUE GEAR
3-4
ICE TRAVEL
3-4
THERMAL STRESS
3-6
Chapter 4 Electrical Hazards
4-1
OBJECTIVES
4-2
CONCEPTS AND DEFINITIONS
4-2
INJURIES CAUSED BY SHOCKS AND ELECTROCUTIONS
4-5
ELECTRICAL HAZARDS ENCOUNTERED BY SPECIFIC WORK GROUPS
4-8
GUIDELINES FOR ELECTRICAL EMERGENCIES
4-9
Chapter 5 Gases and Hazardous Atmospheres
5-1
OBJECTIVES
5-2
i
CONCEPTS AND DEFINITIONS
5-2
ATMOSPHERIC HAZARDS DURING AND AFTER FIRES
5-21
Chapter 6 Rescue Tools
6-1
OBJECTIVES
6-2
CONCEPTS AND DEFINITIONS
6-2
GENERAL SAFETY CONSIDERATIONS
6-2
ROTATING TOOLS
6-3
PUSHING, PULLING, AND LIFTING TOOLS
6-3
PRYING AND SPREADING TOOLS
6-4
STRIKING TOOLS
6-4
CUTTING TOOLS
6-5
ENERGY SOURCES
6-5
HAZARDOUS ATMOSPHERE AND SPILL TOOLS
6-6
FIRE APPLIANCES
6-6
MISCELLANEOUS TOOLS
6-7
Chapter 7 Gas Detection Instruments
7-1
OBJECTIVES
7-2
SELECTING GAS DETECTION EQUIPMENT
7-2
GAS DETECTOR TYPES
7-3
PRACTICAL SKILLS FOR GAS DETECTION
7-5
Chapter 8 Respiratory Protective Equipment
8-1
OBJECTIVES
8-2
APPARATUS CONCEPTS
8-3
SELF-RESCUERS
8-4
SELF-CONTAINED SELF-RESCUERS (SCSR)
8-6
SELF-CONTAINED BREATHING APPARATUS
8-8
CYLINDER TESTING AND CHARGING
8-9
Chapter 9 Oxygen Therapy
9-1
OBJECTIVES
9-2
SAFE STORAGE, TRANPSORT, AND USE
9-2
WHEN TO USE OXYGEN THERAPY
9-3
BENEFITS OF OXYGEN THERAPY
9-3
ii
OXYGEN THERAPY EQUIPMENT
9-4
INSPECTING CYLINDERS AND ASSEMBLING COMPONENTS
9-7
ADMINISTERING OXYGEN
9-7
SHUT DOWN PROCEDURE
9-8
OXYGEN CYLINDER DURATION
9-8
Chapter 10 Fire
10-1
OBJECTIVES
10-2
PERSONAL PROTECTIVE EQUIPMENT
10-2
FIRE BEHAVIOUR
10-3
CLASSIFICATION OF FIRES
10-9
PHASES OF FIRE
10-10
HAZARDS OF FIRE DEVELOPMENT
10-11
VENTILATION
10-17
EQUIPMENT FIRES
10-18
BLEVE (BOILING LIQUID EXPANDING VAPOUR EXPLOSION)
10-18
Chapter 11 Rope Rescue
11-2
OBJECTIVES
11-3
PERSONAL PROTECTION EQUIPMENT
11-4
HARDWARE
11-8
KNOTS, BENDS, AND HITCHES
11-12
HARNESSES
11-16
ANCHORS
11-36
MECHANICAL ADVANTAGES
11-41
BELAYS
11-47
RAPPELLING
11-51
Chapter 12 Underground Operations
12-1
OBJECTIVES
12-2
A GUIDE FOR PLANNING MINE EMERGENCY PROCEDURES
12-2
FIRE CONTROL AND VENTILATION
12-4
INSTRUMENTS USED IN VENTILATION WORK
12-8
MINE DRAWINGS
12-9
UNDERGROUND MINE FIRES - CONTROL AND SUPPRESSION
12-11
iii
Chapter 13 Operations Skills
13-1
OBJECTIVES
13-2
USE OF PORTABLE FIRE EXTINGUISHERS
13-2
SEARCH AND RESCUE
13-2
STANDARD SEARCH PROCEDURE
13-3
CASUALTY MANAGEMENT
13-5
EXTRICATION FROM VEHICLES AND EQUIPMENT
13-5
SUPPLEMENTARY RESCUE TECHNIQUES
13-6
Appendix
iv
v

Western Canada Mine Rescue Manual
Chapter 1 Introduction
1-1
INTRODUCTION
This manual is designed to provide basic training in the rescue procedures to be followed in the event of
an incident requiring emergency response at a surface or underground mining operation. The mining
laws of all jurisdictions in Western Canada require that trained, properly equipped mine rescue teams
be maintained at all surface and underground mining operations.
It is the management’s responsibility to appoint a qualified person as a trainer for mine rescue training
and to ensure that all mine rescue team members practice as a team. The appointed rescue trainer is
responsible for maintaining a log of dates, times, training material, and equipment used at practice
sessions. All records must be signed off by employers and trainees. A properly planned training agenda
should be constructed so as to achieve the maximum training results for the allotted training time, as
stipulated by local legislation.
FUNDAMENTAL PRINCIPLES OF MINE RESCUE TRAINING
The fundamental principles of mine rescue training are, in order of importance:
Ensuring the safety of self and rescue team
Endeavouring to rescue or ensuring the safety of trapped or injured workers
Protection of the mine property from further damage
Rehabilitation of the affected work area and salvage of equipment
Through training, mine rescue teams will become familiar with:
Mine rescue equipment
Mining equipment that may be useful in an emergency (cranes, loaders, scoop trams, etc.)
Hazards involved in mine rescue work (toxic and flammable gases, electricity, rock-falls, etc.)
The most common dangerous occurrences, such as those involving fire, machinery, or electricity
REQUIREMENTS FOR MINE RESCUE TRAINING
Mine rescue work is physically and mentally demanding, and at times dangerous. Members of mine
rescue teams must not only have an intimate knowledge of their equipment but must also be physically
sound and fit to perform strenuous work while wearing a breathing apparatus. In addition, they must
maintain good judgement and temperament. They should be selected carefully and must receive
thorough training.
Frequent additional training and instruction should be given in an irrespirable atmosphere to ensure
that both crew and equipment are in condition to respond to an emergency. Training exercises involving
a recovery problem should be conducted occasionally. Many hours of training and practice are needed
to develop a competent mine rescue team that can work effectively with other teams to accomplish
rescue objectives in the event of a mine emergency.
It is also most important that mine officials receive periodic instruction and training in the duties they
must perform, both individually and collectively, should an incident arise requiring a mine rescue
response. They must know where tools, equipment and materials can be obtained, both on the mine
site and from outside sources.
1-2
All supervisory staff should be instructed that, in the absence of higher authority, they must take charge,
and act on matters requiring immediate attention. They must notify all persons required to assist at a
disaster, particularly the regulator responsible for the district in which the mine is located, the mine
rescue team, and any other help that may be available.
MINIMUM QUALIFICATIONS
Candidates for mine rescue training must meet the following minimum requirements:
Minimum age of 18 years
Speak, read, and write English*
Be in good physical and mental condition*
Be familiar with mining conditions, practices, hazards and equipment
Have no perforated eardrums (tympanic membrane)*
Hold a valid Standard First Aid Certificate with spinal immobilization training or its equivalent
Clean-shaven, with no facial hair to interfere with the seal on the breathing apparatus.
Hold any additional certifications as required by your jurisdiction
Whether a candidate is trained in underground mine rescue, surface mine rescue, or first aid, the
applicant must be mentally and physically capable and prepared to render assistance whenever called
upon to do so.
* = Subject to the discretion of the mine manager
MINE RESCUE CERTIFICATION
The Basic Underground or Surface Mine Rescue Certificate will be issued to candidates who successfully
complete the training course. The candidate must attain a grade of 70% upon examination to pass.
Continuous participation in mine rescue service while maintaining the above minimum requirements
will ensure that the certification does not expire. A rescuer may apply for an advanced certificate after
five years of service in addition to fulfilling further competencies.
ACKNOWLEDGEMENTS
This Mine Rescue Manual has evolved from integrating revised editions of the General Underground
Mine Rescue Manual (British Columbia Ministry of Energy, Mines and Petroleum Resources, Paper
1977-2) and the Surface Mine Rescue Manual (British Columbia Ministry of Energy, Mines and
Petroleum Resources, Paper 1981-4). The manual was compiled by Mike Barber and Haley Kuppers, in
cooperation with a steering committee drawn from the coal- and metal-mining industries in British
Columbia, Yukon, Northwest Territories, and Nunavut. The compilers gratefully acknowledge the
contribution made by members of the steering committee in 2013-14, specifically:
Jerrold Jewsbury British Columbia Ministry of Energy and Mines
Gerry Wong
Teck Highland Valley Copper
Nathan Pitre
Diavik Diamond Mines (2012) Inc.
Lex Lovatt
Workers Safety and Compensation Commission of the Northwest Territories and Nunavut
Ron Ratz
Yukon Workers Compensation Health and Safety Board
1-3
Considerable assistance in creating and reviewing content for the manual was provided by:
East Kootenay Mining Industry Safety Association (B.C.)
North/Central/South Mine Rescue (B.C.)
Northern Mine Safety Forum
Yukon Mine Producers Group
The manual also draws on a number of earlier publications, including:
The Handbook of Training in Mine Rescue and Recovery Operations, Ontario Ministry of Labour
Mine Rescue Crisis Response Manual, Yukon Territorial Government
Occupational First Aid Manual, British Columbia Workers’ Compensation Board
Electrical Safety for Policemen and Firemen, B.C. Hydro
Rigging for Rescue, Dynamic Rescue Systems
Operation Recharge Inspection and Maintenance Manual - Cartridge Dry Chemical Fire
Extinguishers, ANSUL
Manitoba Mine Rescue Training and Reference Manual, Manitoba Ministry of Mineral Resources
Alberta Mine Rescue Manual, Alberta Mine Safety Association
Saskatchewan Mine Emergency Response Program, Saskatchewan Labour Occupational Health
and Safety
The Canadian Electrical Code, Canadian Standards Association
Various publications of American Congress of Governmental Industrial Hygienists (ACGIH),
National Institute for Occupational Safety, and Health (NIOSH), Environment Canada, Canadian
Centre for Occupational Health and Safety (CCOHS), and Health Canada
A number of photos in this manual are used courtesy of the manufacturers and rights holders, including:
Draeger Canada
vRigger
AnimatedKnots.Com
Ferno Canada
Canadian Safety
Carleton Rescue
CMC Rescue
Equipment
Gastec
Biomarine Inc.
Scott Safety
Industrial Scientific
MSA Canada
Honeywell Analytics
O-Two
These sources are gratefully acknowledged.
This manual is intended to cover basic mine rescue principles, techniques, and equipment. Familiarize yourself
with site-specific procedures, manufacturer’s instructions, and other training programs available to supplement
this course.
1-4

Western Canada Mine Rescue Manual
Chapter 2 Mine Rescue
Organization
2-1
OBJECTIVES
Before learning the skills necessary to complete mine rescue operations, trainees must understand how
teams and rescue operations are organized. Upon completing this chapter, the trainee shall be able to
demonstrate competency in:
Mine Rescue Team Structure
Communications by Team Members
Decision-making Processes
Personal Protective Equipment requirements
Fresh Air Bases/Zones
First Response to Hazardous Materials
Physical/Emotional Stress in Critical Incidents
CONCEPTS AND DEFINTIONS
A Mine Emergency Response Plan (MERP) is the company’s guide to all procedures and plans of action
in the case of an emergency on-site. This plan describes roles and responsibilities for management,
rescue teams, and support personnel.
An Incident Management System, such as Incident Command System (ICS), allows for command,
control, and co-ordination during emergency response. The incident management system is a
component of a MERP.
THE MINE RESCUE TEAM
Mine rescue teams are called upon to respond to many different kinds of emergencies. Time will be an
important factor, and the following practices will help teams work efficiently in an emergency:
1. The first and foremost is team structure. This leads to successful efforts in disciplines such as
extrication techniques, first aid methods and firefighting procedures that require a team effort.
2. The team should plan and practice basic procedures prior to an emergency situation.
The Captain
The Captain is the No. 1 member on the team. Above all, the Captain must be a competent leader who
has the confidence and respect of team members. The Captain must be in good physical and mental
condition and experienced in every aspect of emergency response. The Captain’s responsibilities
include:
Ensuring team is response-ready
Ensuring breathing apparatus and auxiliary equipment are response-ready
Ensuring safe operation of all rescue equipment
Communicating within the emergency response structure
Knowledge of all facilities at the mine and relevant fire, explosive, electrical, mechanical, and
chemical hazards
Knowledge of ventilation principles
Knowledge of mine gases
Directing and assisting the work of team members at the scene
Determining and inspecting all aspects of a rescue operation
Establishing and maintaining incident scene security and control
2-2
The Vice-Captain
The Vice Captain of a surface mine rescue team is the No. 2 member. In underground teams, the Vice-
Captain is the No. 5 member. In the event that the Captain is unable to perform the assigned
responsibilities, the Vice-Captain must take control of the team and therefore must have the same
qualifications as the Captain.
Vice-Captains are also responsible for monitoring members of the team and warning the Captain if any
member shows signs of distress or fatigue during a response. They must also make certain that team
members rotate while carrying a stretcher over distances to prevent fatigue.
Team Members
A standard mine rescue team has six members including the Captain. The sixth member of an
underground team is the Co-ordinator and provides direction from the surface incident command
centre to the underground team Captain. All team members are responsible for recognizing hazards and
relaying that information to other team members. The team must be rested regularly and be constantly
observed for signs of distress in any member. Work must be distributed as evenly as possible among all
members. Team Captains will delegate duties among the other team members, such as:
Exploring affected area of the mine
Rope work and rigging
Firefighting
First Aid
Extrication
Teams may add members during a response based on their requirements or the members’ specific skill
set. Any additional team members must have a number assigned to them in sequence beyond the six
original members.
Mutual Aid
Large incidents may require assistance from other mines or emergency agencies. This collaboration is
known as mutual aid and is a component of a MERP. When collaborating with mine rescue teams, it is
imperative to follow the same numbering format for team designations. This will ensure that
communications between incident management and each responding team are aligned with the MERP
and that all responsibilities are assigned in an orderly manner. If extra personnel are added to a team,
each rescuer will be assigned team numbers continuing from the basic six (team member 7, 8, 9, etc.).
Mine Rescue Unit
The mine rescue unit consists of a minimum of three mine rescue teams summoned to a mine disaster.
If the operation extends beyond six hours, additional teams must be called in. To reduce fatigue, the
teams rotate to allow one team at work, one team on hand as backup, and the third team at rest.
Typical rotations for a three-, six-, and nine-team units are as follows:
Active Team (Max. 2 hrs.)
Back-up Team
Team at Rest
A-team
B-team
C-team
B-team
C-team
A-team
C-team
A-team
B-team
2-3

Fig 2.1: This table shows a rotation of mine rescue teams in a six-team arrangement. The arrangement allows for each rotation
to have six hours on duty (two hours active, two hours standby and two hours reserve) followed by six hours of rest.
DATE:
TIME
TEAM
DESCRIPTION
#
1
ACTIVE
RESERVE
STAND BY
ACTIVE
RESERVE
STAND BY
2
STAND BY
ACTIVE
RESERVE
STAND BY
ACTIVE
RESERVE
3
RESERVE
STAND BY
ACTIVE
RESERVE
STAND BY
ACTIVE
4
RESERVE
STAND BY
ACTIVE
RESERVE
STAND BY
ACTIVE
5
RESERVE
STAND BY
ACTIVE
RESERVE
STAND BY
ACTIVE
6
RESERVE
STAND BY
ACTIVE
RESERVE
STAND BY
ACTIVE
SIGNED:
Fig. 2.2: This table shows a rotation of Mine Rescue teams in a nine-team arrangement. With a nine-team rotation, the rest time
will be extended to match the teams deployed to the mine emergency.
DATE:
TIME
DESCRIPTION
TEAM #
1
ACTIVE
RESERVE
STAND BY
ACTIVE
2
STAND BY
ACTIVE
RESERVE
STAND BY
ACTIVE
3
RESERVE
STAND BY
ACTIVE
RESERVE
STAND BY
ACTIVE
4
RESERVE
STAND BY
ACTIVE
RESERVE
STAND BY
5
RESERVE
STAND BY
ACTIVE
RESERVE
6
RESERVE
STAND BY
ACTIVE
7
RESERVE
STAND BY
ACTIVE
8
RESERVE
STAND BY
ACTIVE
9
RESERVE
STAND BY
ACTIVE
SIGNED:
2-4
COMMUNICATION BY TEAM MEMBERS
All members of a mine rescue team must observe strict discipline and must obey all directions given to
them by the Team Captain. Primary communication is done via electronic devices, such as phones or
intrinsically safe radios where required.
Surface team members should all carry whistles for secondary communication. On underground teams,
the Captain and the Vice-Captain will both carry a horn, bell, whistle, or use other site-specific methods
or devices. A standard set of signals has been established.
Standard Code of Signals
One
To advance if stopped; to stop if in motion.
Two
To rest.
Three (Distress)
This signal will often be given by the Vice-Captain as he is observing the team
members during travel and will be first to notice signs of distress.
Four (Attention)
At this signal, all team members will look at the person giving the signal and receive
further instructions
Five (Retreat)
At this signal, the team will immediately retreat in the direction from which they
have come. The Vice-Captain (underground) may lead the team in retreat for short
distances through areas already explored, but should not lead the team into
unexplored areas. As soon as circumstances permit, the Captain should resume the
responsibility of leading the team.
DECISION-MAKING PROCESSES
Mine rescue responsibilities can be very demanding. Mine rescue members may be the first trained
personnel to arrive at the incident scene. They are required to:
Control the scene
Ensure the MERP is initiated
Ensure the safety of self and team, casualties, and bystanders
Assist with casualty extrication and first aid
Fight fires
Control chemical spills
Response and Size Up
Response begins when a rescue team is alerted to an incident. It involves safely travelling to and arriving
at the incident scene, then staging and securing equipment and vehicles. Response elements include:
Preparation: Ensuring equipment, including PPE, is in its designated location; familiarity with
facilities, response procedures, and pre-incident plans
Method of alert/notification: Alarms, two-way radio, telephone, pager
Establish communication within the rescue team and between team and command structure
Safe travel to incident: Seatbelts, route, site specific traffic rules, exiting the vehicle
Arrival at the scene:
o Accountability: Under the command structure, account for the responding rescue team
members first then for all personnel at the incident scene.
o Freelancing: Acting independently of command instruction is unacceptable and must
not be tolerated.
2-5
Identify the Problem
Size up is a systematic process of gathering information and situational evaluation that continues
throughout the operation. Size up is essential to accomplish a safe and efficient rescue operation. There
are four parts to size up:
1. Information gathered from the initial call:
o Nature and location of emergency
o Number of people/injuries involved
o Weather conditions
o Time of day
o Equipment involved and access to the scene
2. Details observed en route:
o Power blackouts
o Smoke in the direction of the emergency
o Traffic (unusual flow or congestion) and bystanders
3. Details observed at the scene:
o Signs of hazardous conditions observed while establishing perimeter
o Confirm / compare observations to information given in the initial call
o Gasoline or fuel, chemical release or spill
o Location of casualties
o Actions that may have been taken by people already at the scene
4. Information gathered during size up is either factual (known or confirmed) or probable
(assumptions made based on situation). For example, building occupancy based on time of
day would be classified as probable.
Hazard assessment involves identifying and evaluating hazards that may be encountered during the
rescue operation. These hazards include:
Fire
Hazardous atmospheres (e.g., chemical hazards, toxic gases, oxygen displacement)
Energy sources (e.g., electrical, gas, nuclear)
Physical (e.g., structure, traffic, topography)
Biological
Environmental
Evaluate all influencing factors (e.g., time, location, environment, weather)
Formulate an objective based on known information and resources
Determine what resources are required to accomplish the task (e.g., offensive or defensive)
Risk-based decision-making based on the fundamental principles of mine rescue
Select one or more alternatives from the available options
Choose priorities based on the task and the resources available.
Take appropriate action
Conduct all activities in a manner that ensures the safety of team members, casualties, and
bystanders.
Analyze results
Continuous process throughout the response
Be prepared to choose an alternative action if results are unsatisfactory.
2-6

PERSONAL PROTECTIVE EQUIPMENT
The environment in which mine rescue teams
perform their duties demands that they be
provided with the appropriate personal
protective equipment.
The provision and use of appropriate protective
equipment will not, by themselves, assure
individual safety. All protective equipment
components have limitations that must be
recognized so that users will not overextend
their range of protection.
Extensive training in the care, use, and maintenance of protective equipment is essential to assure that
it will provide optimum protection. All members should be aware of the type of equipment needed for
different situations and know where to find it.
All equipment used must meet relevant health and safety legislation, standards, and regulations.
Head protection
Eye and face protection
Hearing protection
Respiratory protection
Hand protection
Foot protection
Protective clothing
Specialized equipment and tools (e.g., chainsaw chaps, extrication tools)
FRESH-AIR BASE/ZONE
A fresh-air base/zone is an area in which good respirable air has been established and can be
maintained indefinitely. It is the point of departure for the mine rescue team and no one should proceed
beyond the fresh-air base/zone without wearing respiratory protection. In choosing the base/zone,
consideration should be given to providing the following:
A clean area with good lighting
A safe location as close to the incident as possible
An area for briefing and debriefing mine rescue teams
Adequate space to perform the necessary work
Necessary tools and supplies to carry out the work at hand
For underground fresh-air bases, consideration should also be given to make sure that:
The travel way from the base to surface must always be assured of good air.
Underground-to-surface communication is uninterrupted.
2-7

FIRST REPSONSE TO HAZARDOUS MATERIALS
Rescue members should be competent in site-specific response procedures. In the event of any incident
involving hazardous materials, rescuers can refer to:
The Emergency Response Guidebook for Incidents Involving Hazardous Materials
Material Safety Data Sheets (MSDS) or Information Sheets provided by the manufacturer for all
products on-site
CANUTEC (Canadian Transport Emergency Centre, a 24-hour national emergency response
advisory service) and WISER (Wireless Information System for Emergency Responders)
On-site expertise
PHYSICAL/EMOTIONAL STRESS IN CRITICAL INCIDENTS
A critical incident is an event that is outside the range of usual human experience and is psychologically
traumatic to the person.
Critical incidents may produce a wide range of stress reactions, which can appear immediately at the
scene, a few hours later or within a few days of the event. Stress reactions usually occur in four different
categories:
Cognitive (thinking)
Physical (body)
Emotional (feelings)
Behavioural (actions)
The more reactions experienced, the greater the impact on the individual. The longer the reactions last,
the more potential there is for permanent harm. These stresses can cause a wide variety of reactions:
Category
Symptoms
Cognitive
Poor concentration
Memory problems
Poor attention span
Difficulty with calculations
Indecision
Slowed problem solving
Emotional
Loss of emotional control
Feeling lost or overwhelmed
Depression
Anxiety/Fear
Guilt
Grief
Physical
Muscle tremors
Chest pains
Gastrointestinal distress
Difficulty breathing
Headaches
Elevated blood pressure
Behavioural
Excessive silence
Atypical behaviour
Withdrawal from contact
Sleep disturbance
Change in eating habits
Change in work habits
These conditions result from the effects of the body’s chemical emergency response system.
Following the completion of a mine rescue emergency response, mine rescue teams must hold a
debriefing. A Critical Incident Stress Debriefing (CISD) or other counselling procedures should be
conducted with all personnel directly involved in a Critical Incident. The debriefing should be held
immediately at the end of the emergency response and be facilitated by qualified professionals.
2-8
Western Canada Mine Rescue Manual
Chapter 3 Environmental
Conditions
3-1
OBJECTIVES
Mine rescue teams should be aware of the special dangers associated with environmental conditions.
This chapter will provide a basic understanding of:
Avalanche terms, concepts, and equipment
Ice travel
Thermal stress
CONCEPTS AND DEFINITIONS
Mines operating in avalanche-prone areas must develop an avalanche emergency response plan
tailored to their mine. Mine rescue personnel may be required to perform emergency response
activities that expose them to avalanche hazards. This chapter is intended to only provide basic
avalanche awareness.
A qualified avalanche safety officer must be identified, consulted, and lead the safe emergency
response in an active avalanche situation. The avalanche safety officer must conduct an avalanche risk
assessment and establish active avalanche safety measures prior to planning emergency operations.
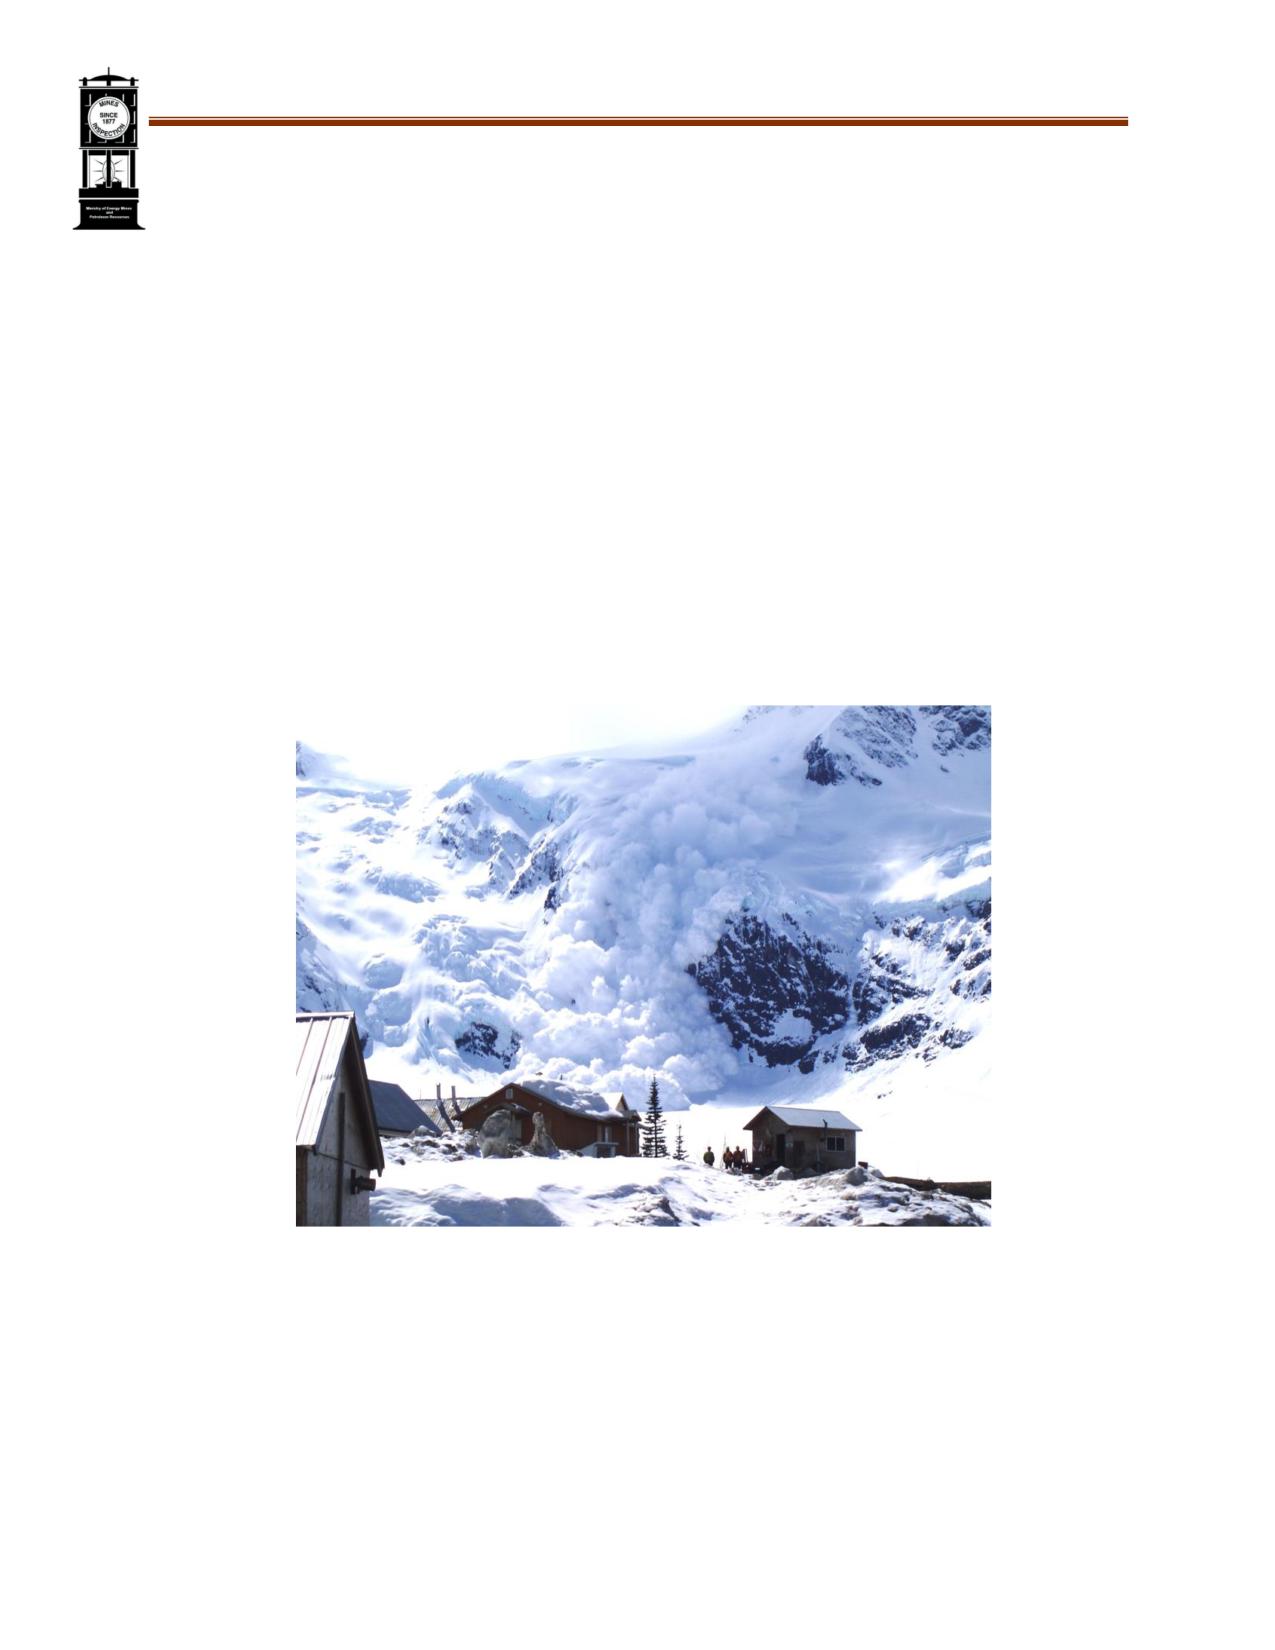
An avalanche is a rapid flow of snow down a sloping surface that can occur at any time provided the
right conditions are present. Avalanches have three main parts:
Starting zone (point of origin): Where the unstable snow first breaks away. An avalanche path
may have several starting zones. Characteristics of starting zones include: incline, slope aspect,
exposure to wind, elevation, exposure to sun, natural ground condition.
Track (zone of transition): Below the starting zone, where the avalanche accelerates and
typically reaches maximum destructive potential. It will have the potential to overrun terrain
features and previous avalanche tracks. Avalanche areas can contain one or more tracks. These
tracks may be poorly or clearly defined.
Run-out zone: Where the avalanche decelerates and finally comes to rest. It can be identified as
a zone where the bulk of the snow is deposited.
Avalanches may occur anywhere given the following
conditions:
Geography, such as the natural topography of the
area, engineered land forms, and slope orientation.
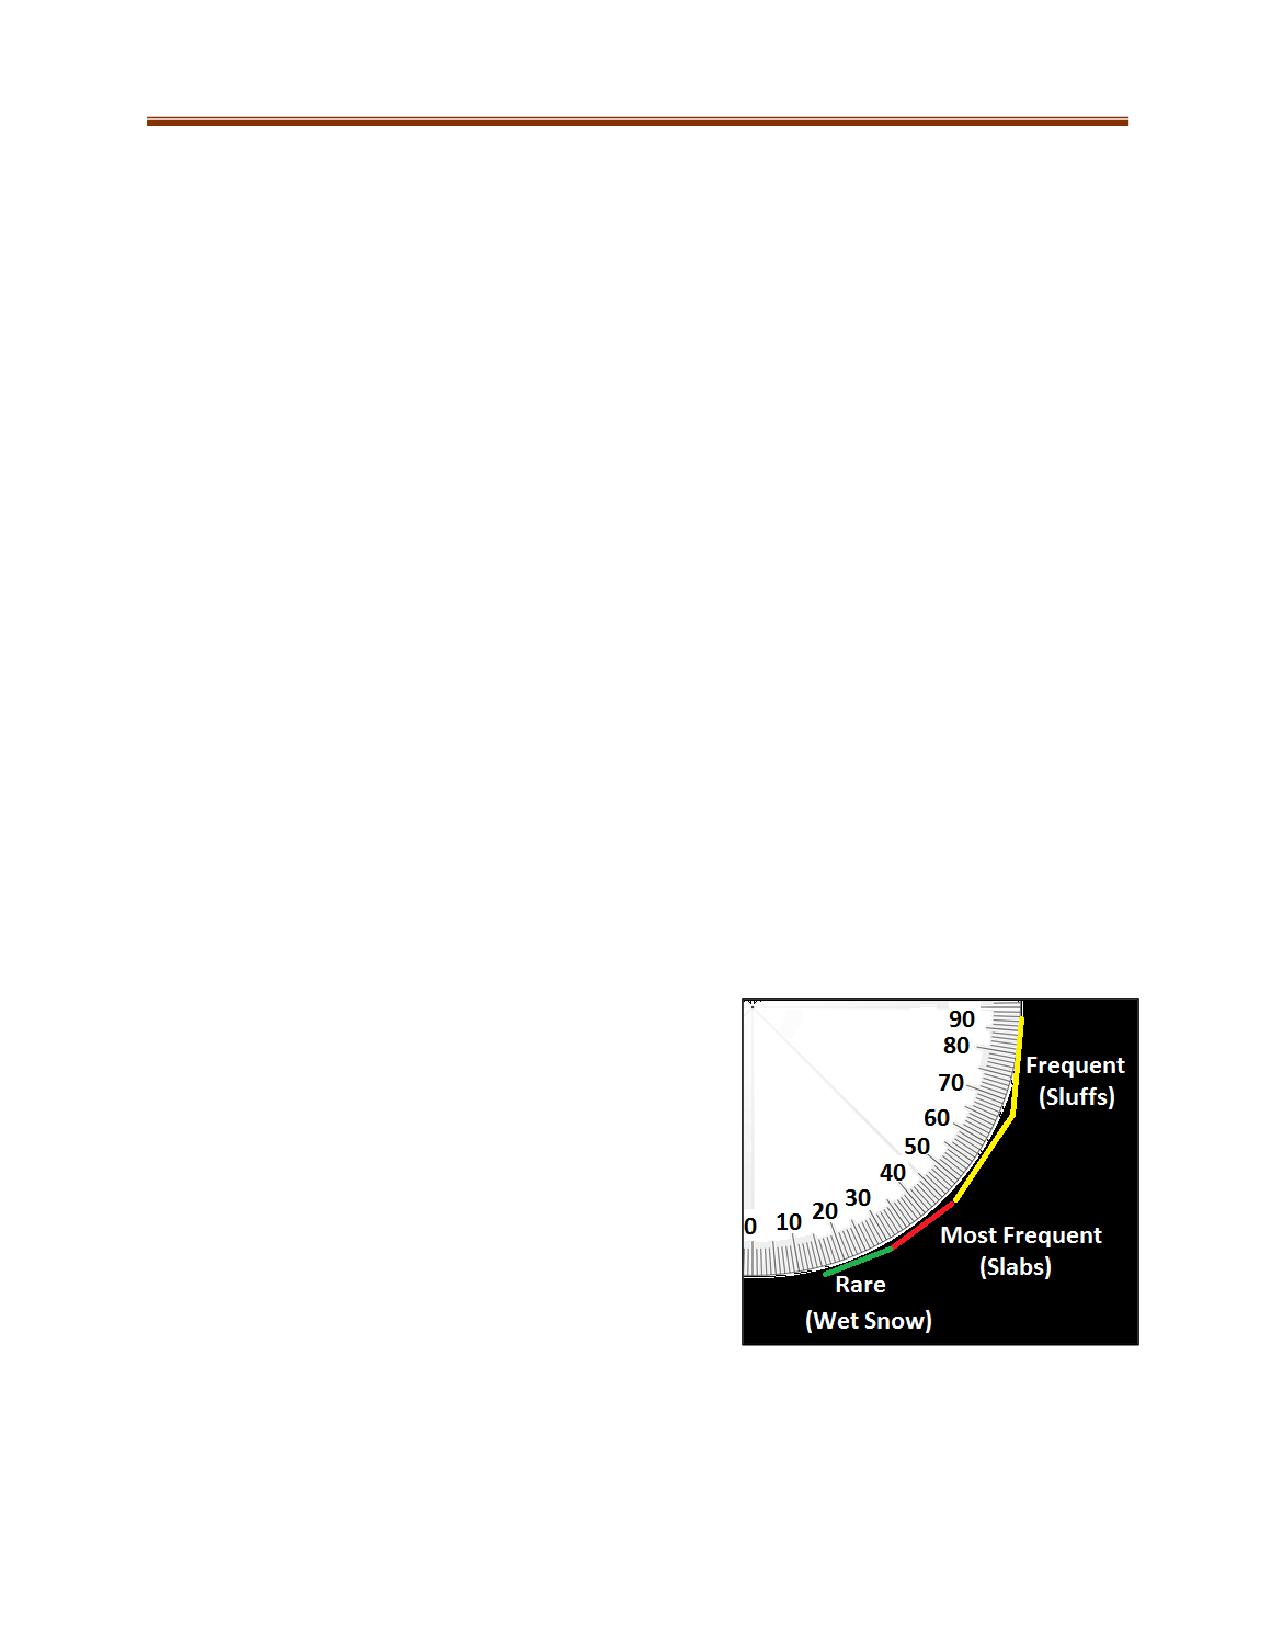
Snow accumulates on a moderate to steep slope
(30°-45°). Avalanches rarely start on slopes steeper
than 45° as snow sloughs off continuously rather
than accumulating.
Snow conditions, such as:
o Snow pack (accumulation)
o Mass
o Layers of snow and bonding between facet
Fig 3.1 Slope steepness and avalanches
layers
o Environmental effects: Variation in temperature, wind, humidity
3-2
An external event that triggers the slide. These can be:
o Natural: New snow, transported snow (wind), temperature changes, sun, rain, thawing
and animals.
o Human: Explosives, working on a slope, working below a slope, mobile equipment, and
recreational activities.
o Trigger points: Snow conditions, shallow areas/variable depth snow packs, points of
weakness (e.g., trees, rock outcrops) may all contribute to the development of
avalanche conditions.
Two types of avalanche are commonly recognized:
Loose Snow Avalanches may consist of dry powder snow or
wet snow. Dry snow avalanches are most common in
winter after storms and rare in spring or summer. Wet
snow avalanches consist of heavy, wet, sun-heated or rain-
rotted snow or wet new snow and are most common in
spring and summer, particularly on south-facing slopes.
These avalanches:
Start from a point
Are set in motion progressively
Require snow with poor cohesion, similar to that of
dry sand
Are usually confined to surface layers and therefore
relatively small
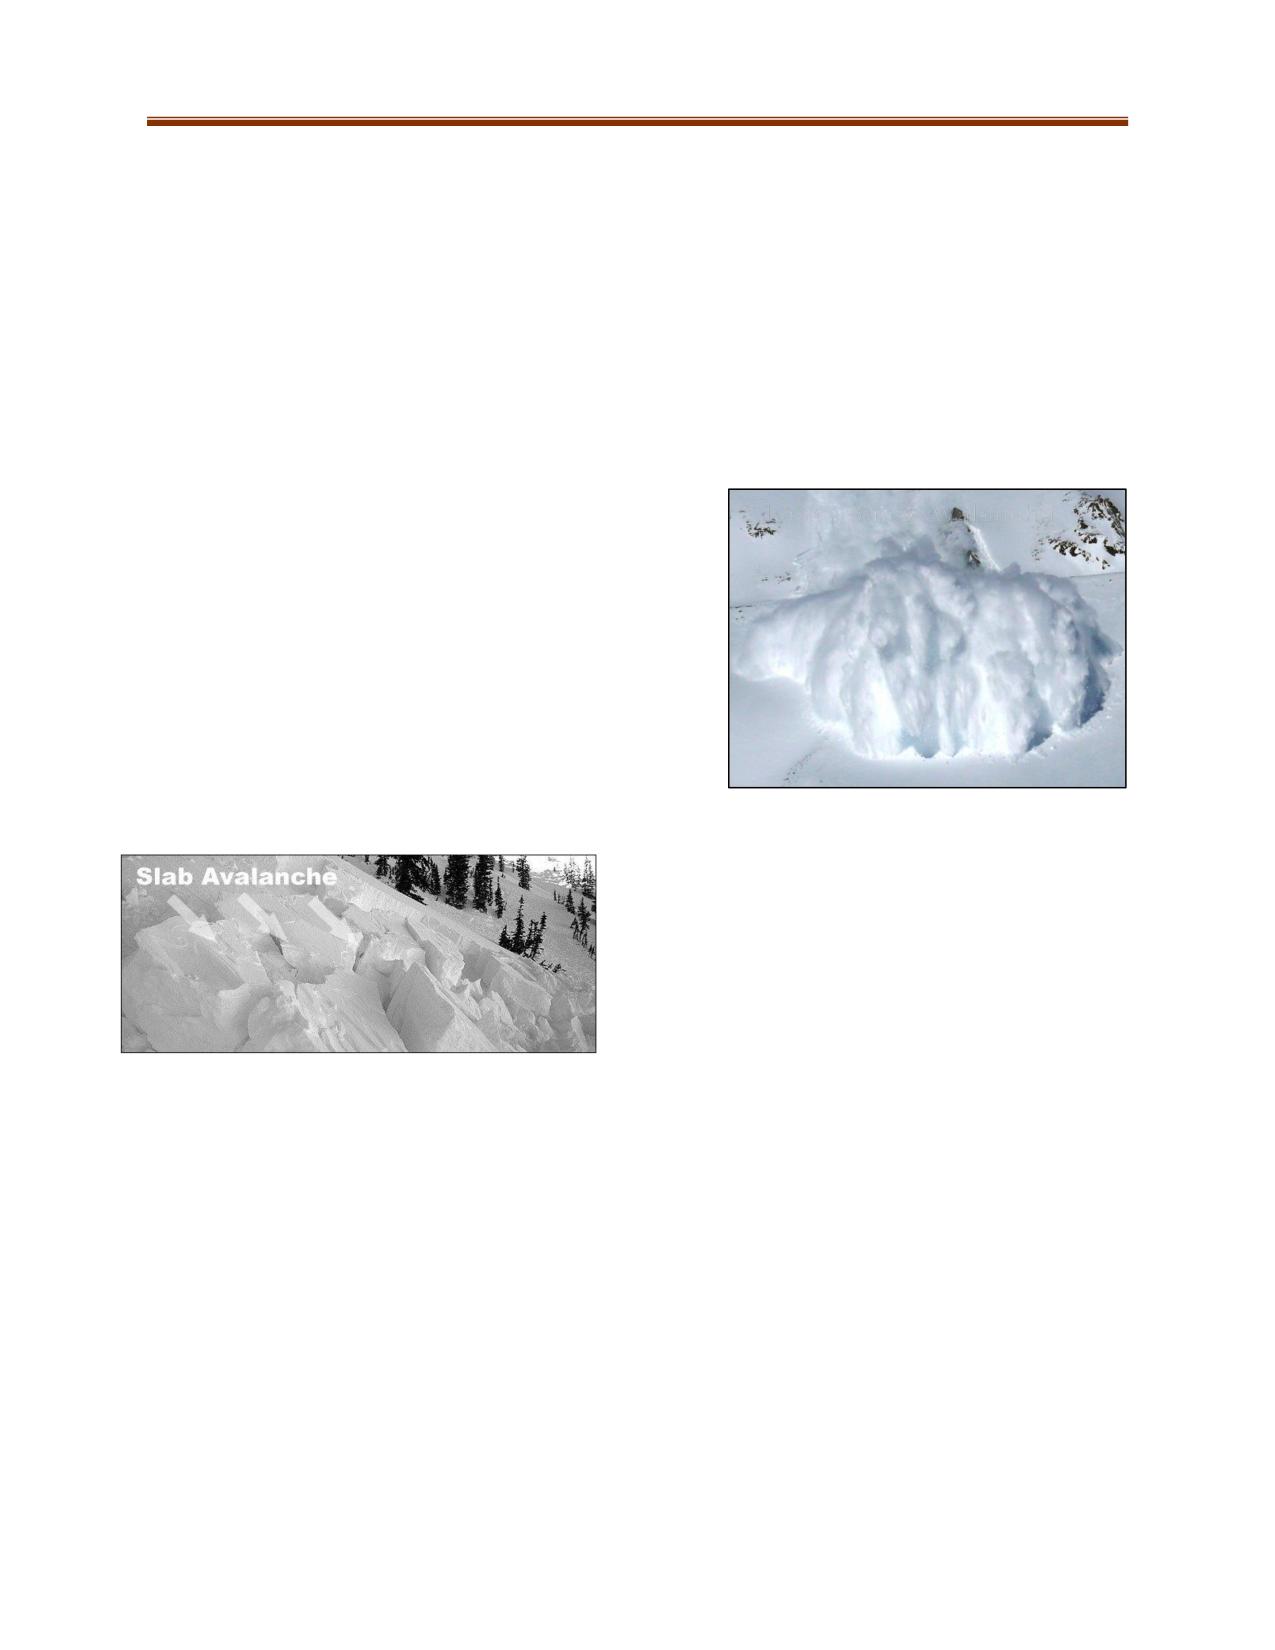
Slab Avalanches occur when a slab of fairly cohesive
Slab Avalanche
layers of snow, poorly bonded to the snow
underneath, breaks off along a fracture line. These
avalanches are by far the most dangerous. They are
set in motion simultaneously, over a large area and
may start in either shallow or deep snow layers.
Safety in Avalanche Zones
The successful rescue of a person buried in an avalanche very often depends upon actions taken by
unburied survivors. Teams performing rescue operations in an avalanche area must be mentally
prepared for the possibility that they too may be overtaken by an avalanche.
If crossing an avalanche track cannot be avoided, take the following precautions:
Select the shortest possible route high on the slope or low in the run-out zone
Plan an escape route.
Wear mitts and hats. Tighten clothing and smaller packs. Loosen larger packs in case they need
to be quickly removed.
Assign a spotter at the top and bottom of the track and agree on a warning signal.
Cross quickly. If the crossing is narrow, one person crosses at a time. Otherwise, maintain space
between rescuers to minimize the risk of exposure to an avalanche track.
3-3
AVALANCHE RESCUE GEAR
Probe, Avalanche transceiver (beacon), and Shovel: These three items
work together and are the minimum required equipment for every
avalanche rescuer. For proper use of avalanche rescue gear, refer to
manufacturer’s guidelines.
L-R: Probe, Shovel, Transceiver (bottom)
ICE TRAVEL
Some mining operations in remote northern locations are accessed by ice roads built on frozen lakes
and rivers.
Prior to travelling on ice
The thickness of the ice must be tested frequently in various locations. The smallest thickness is what is
used to determine the strength of the ice. Table 3.1 indicates the weight that will be supported by
varying thicknesses of clear blue lake-ice, provided the load remains in motion.
Type of ice:
o River or lake (movement of water beneath ice). Clear blue river-ice, with moving water
beneath it, is not as strong as lake-ice. Loads should be reduced by at least 15%
o Clear or natural ice (black or blue hue). This is considered the strongest form of ice.
o Slush ice (white hue) is snow saturated with water. It is commonly found as new ice
floating after a heavy snowfall. It is much weaker than clear blue lake-ice.
Cracks in ice may affect its ability to support a load.
While traveling on ice
As a vehicle travels on ice it creates a resonance wave in the underlying water. The weight and
speed of the vehicle, as well as the depth of the water, influence the size and speed of the wave.
The resonance wave can affect the strength of the ice, potentially resulting in a blowout, or an
ice failure.
Unless otherwise posted, the speed limit on ice roads is 25 km/h for a loaded vehicle and 35
km/h for an empty vehicle.
3-4

The following table shows the maximum allowable mass of a vehicle in motion for ice of various
thicknesses. Gold’s Formula for determining the maximum allowable mass is:
M=4 ×ℎ2
where M is the mass of the vehicle (kg) and h is the thickness of the ice (cm)
Ice Thickness - Clear Blue Lake Ice
Ice Thickness (cm)
Capacity (kg)
Ice Thickness (cm)
Capacity (kg)
Ice Thickness (cm)
Capacity (kg)
2.5
25
37.5
5,625
75
22,500
3.5
49
40
6,400
77.5
24,025
5
100
42.5
7,225
80
25,600
7.5
225
45
8,100
82.5
27,225
10
400
47.5
9,025
85
28,900
12.5
625
50
10,000
87.5
30,625
15
900
52.5
11,025
90
32,400
17.5
1,225
55
12,100
92.5
34,225
20
1,600
57.5
13,225
95
36,100
22.5
2,025
60
14,400
97.5
38,025
25
2,500
62.5
15,625
100
40,000
27.5
3,025
65
16,900
102.5
42,025
30
3,600
67.5
18,225
105
44,100
32.5
4,225
70
19,600
107.5
46,225
35
4,900
72.5
21,025
110
48,400
Table 3.1 - Ice Strength
3-5

THERMAL STRESS
Thermal stress refers to a range of physiological reactions to adverse temperature conditions. There are
many factors that contribute to these stresses. Mine rescuers must be able to recognize and adequately
respond to these conditions.
Hypothermia is a condition of lowered internal body-core temperature (exposure sickness). Failure to
recognize symptoms of hypothermia is the leading cause of death for people in the outdoors.
Hypothermia is caused by overexposure to a cold environment and can develop very quickly if proper
precautions are not taken. Hypothermia results from chilling by cold, wind, or water such that the body
loses heat faster than it can produce it.
Factors contributing to the development of hypothermia include:
Inadequate clothing
Alcohol or drugs in the body
Hypothermia and Water Immersion
Wetness (perspiration, rain)
Exhaustion, dehydration, and
If water
Exhaustion or
Expected survival
lack of nutrition
temperature (C) is...
Unconsciousness
time
Wind and water
0
< 15 minutes
15-45 minutes
1-5
15-30 minutes
30-90 minutes
Temperature
5-10
30-60 minutes
1-3 hours
Duration of exposure
10-15
1-2 hours
1-6 hours
15-20
2-7 hours
2-40 hours
Symptoms of Hypothermia
20-25
3-12 hours
3 hours-indefinitely
Visible symptoms indicate the onset of
25-30
Indefinitely
Indefinitely
hypothermia. Its advance is marked by
recognizable stages.
Core
Stage
Temperature
Signs & Symptoms
(C)
Mild
37.2-36.1
Normal, shivering can begin
Hypothermia
36.1-35.0
Cold sensation, goose bumps, unable to perform complex tasks with hands,
shiver can be mild to severe, hands numb
Moderate
35.0-33.9
Shivering, intense, lack of muscle coordination becomes apparent, movements
Hypothermia
slow and labored, stumbling pace, mild confusion, may appear alert. Use
sobriety test: if unable to walk a 30 foot straight line, the person is hypothermic.
33.9-32.2
Violent shivering persists, difficulty speaking, sluggish thinking, amnesia starts to
appear, gross muscle movements sluggish, unable to use hands, stumbles
frequently, difficulty speaking, signs of depression, withdrawn.
Severe
32.2-30.0
Shivering stops, exposed skin blue of puffy, muscle coordination very poor,
Hypothermia
inability to walk, confusion, incoherent/irrational behavior, but may be able to
maintain posture and appearance of awareness
30.0-27.8
Muscle rigidity, semiconscious, stupor, loss of awareness of others, pulse and
respiration rate decrease, possible heart fibrillation
27.8-25.6
Unconscious, heart beat and respiration erratic, pulse may not be palpable
25.6-23.9
Pulmonary oedema, cardiac and respiratory failure, death. Death may occur
before this temperature is reached.
3-6
Bodily Heat Loss
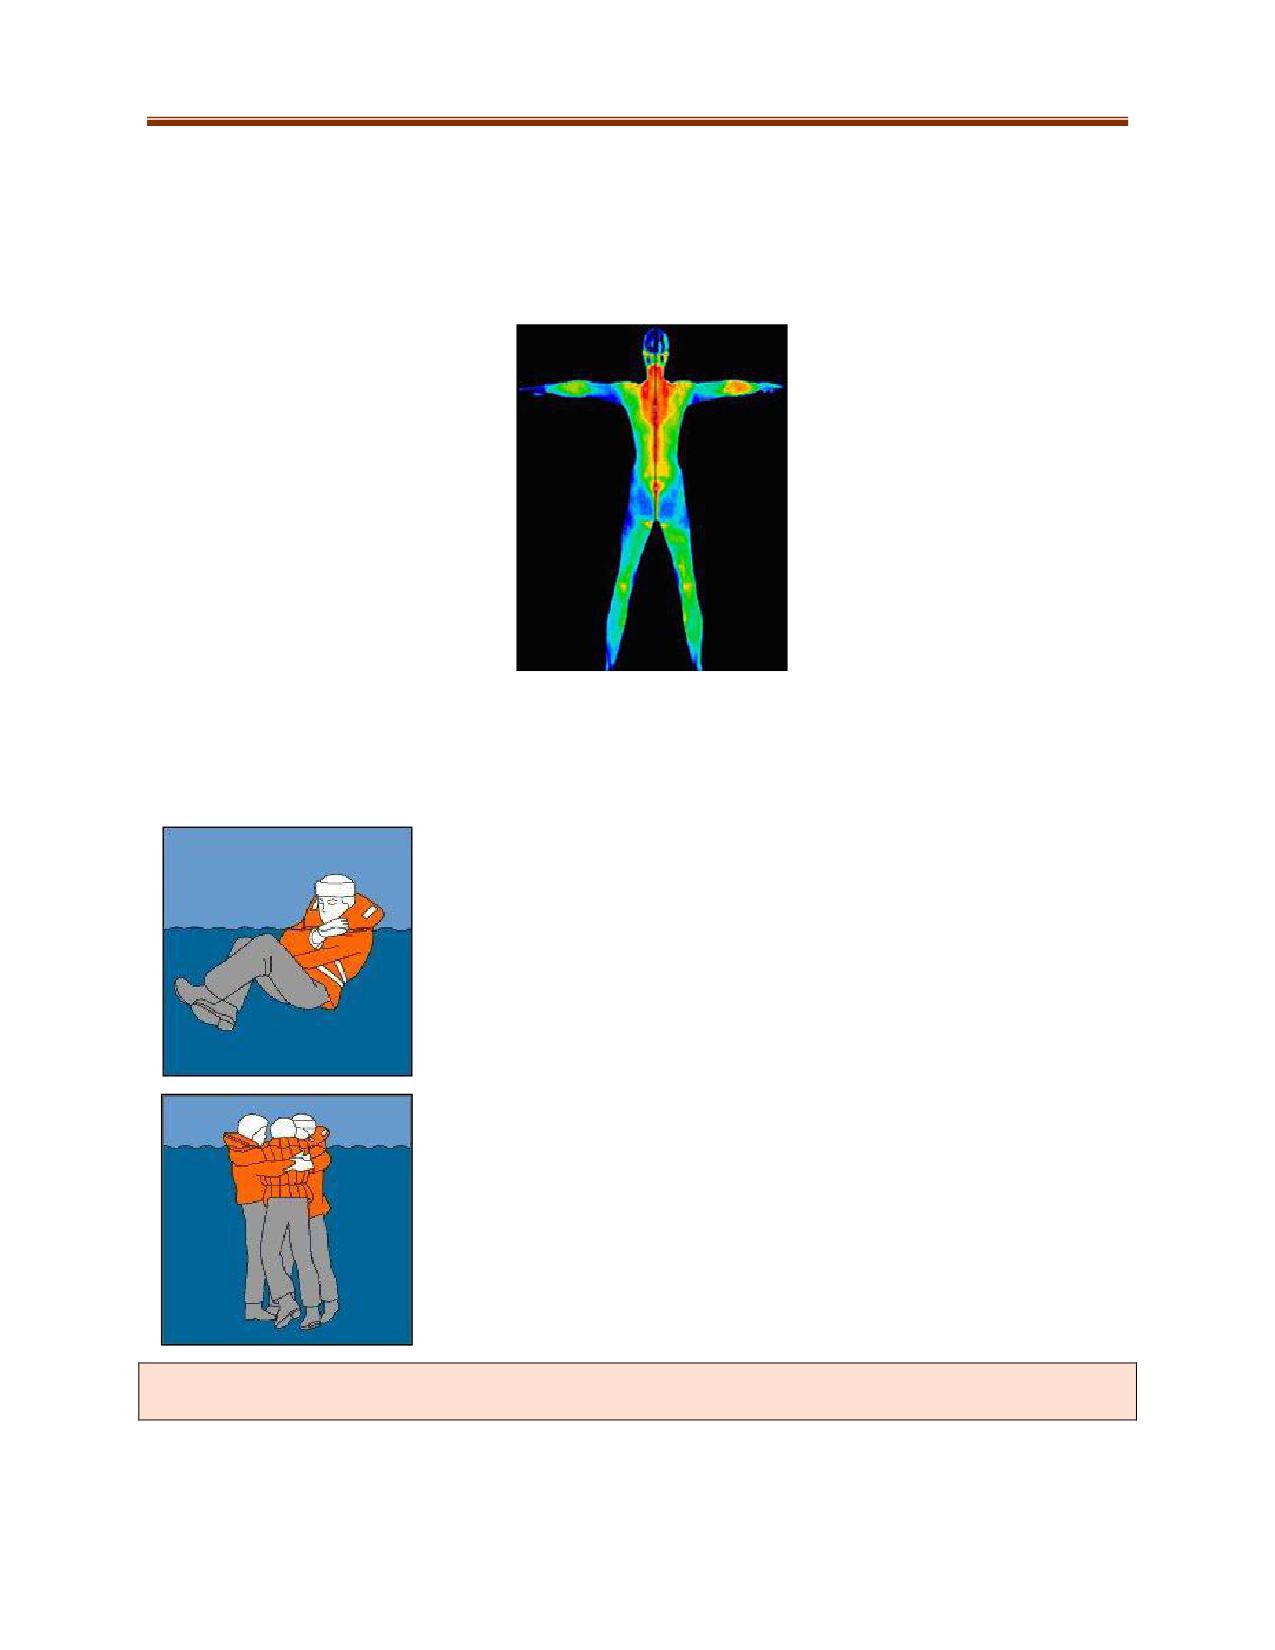
The head and neck are the most critical heat-loss areas. Other body areas have high rates of heat loss
while a subject is holding still in cold water. Infrared pictures show that the sides of the chest (where
there is little muscle or fat) are the major routes for heat loss from the warm chest cavity. The groin area
also loses much heat due to the large blood vessels near the surface. If an effort is made to conserve
body heat, these regions deserve special attention.
Fig 3.2: This infrared
image of a body shows
high-heat areas (red) and
low-heat areas (blue)
Cold Water Survival Techniques
Mine rescuers that work near water require personal floatation devices (PFD). The onset of hypothermia
is much quicker for people immersed in cold water. These two techniques can extend predicted survival
times:
H.E.L.P. (Heat Escape Lessening Position)
This technique for cold water survival protects the parts of the body that
lose heat fastest. It increases predicted survival time by up to 50%. This
position requires a floatation device that maintains upper-body buoyancy.
Huddle Position
Predicted survival time can be increased by up to 50% if survivors huddle
together. In this position, the sides of the survivors’ chests are held close
together to prevent heat loss.
In cold water (<10 C), the average person can swim no more than one-tenth the distance they can in
warm water.
3-7
Cold Stress Conditions
Exposure to cold environments or water for a prolonged period can result in a number of adverse
conditions. Particularly during winter months, precautions should be taken to avoid these conditions
during mine rescue work.
Condition
Cause
Symptoms (may or may not be present)
Chilblains
Prolonged and repeated exposure
Affected skin area there will have redness,
for several hours to air
swelling, tingling, and pain
temperatures from above freezing
to as high as 16 C
Frostnip
Ear lobes, noses, cheeks, fingers,
Affected skin turns white and may feel
or toes are exposed to the cold
numb.
and the top layers of skin freeze
Top layer of skin feels hard but the deeper
tissue still feels soft
Frostbite
Exposure to extreme cold or by
Mild cases: Inflammation of the skin in
contact with extremely cold
patches accompanied by slight pain
objects (especially those made of
Severe cases: Tissue damage without pain,
metal). It may also occur in normal
or there could be burning or prickling
temperatures from contact with
sensations resulting in blisters
cooled or compressed gases.
Blood vessels may be severely and
Frostbite occurs when tissue
permanently damaged, and blood
temperature falls below the
circulation may stop in the affected tissue
freezing point, or when blood flow
Frostbitten skin is highly susceptible to
is obstructed.
infection, and gangrene (local death of
soft tissues due to loss of blood supply)
may develop
Immersion
Occurs when feet have been wet,
Tingling and numbness
Foot/Trench
but not freezing cold, for
Itching, pain, or swelling of the legs, feet,
Foot
prolonged periods of time
or hands
Can occur at temperatures up to
Blisters
10 C
Skin turns red then blue or purple
Trench foot is more likely to occur
Gangrene may develop
at lower temperatures
Immersion foot is more likely to
occur at higher temperatures and
longer exposure times.
Hands can be affected if a person
wears wet gloves for a prolonged
period under cold conditions
3-8
Heat Stress Conditions
As with cold stress conditions, the severity of heat stress conditions depends on duration and intensity
of exposure and activity, as well as the patient’s fitness and health.
Condition
Cause
Symptoms (may or may not be present)
Heat Rash
Hot, humid environment
Red bumpy rash with severe itching
Plugged sweat glands
Heat Cramps
Heavy sweating from strenuous
Painful cramps occur in the most
physical activity drains a person’s
commonly worked muscles (arms, legs,
body of fluid and salt.
abdominals)
Onset can be immediate or delayed.
Heat syncope
Fluid loss
Sudden fainting after at least two hours of
(fainting)
Inadequate water intake
work
Standing still resulting in decreased
Cool, moist skin
blood flow to brain
Weak pulse
Heat
Fluid loss and inadequate salt and
Heavy sweating
Exhaustion
water intake causes the body’s
Cool, moist skin
cooling system to start to break
Elevated body temperature
down.
Weak pulse
Normal or low blood pressure
Fatigue, weakness, nausea and vomiting
Thirst
Panting or rapid breathing
Blurred vision
Dizziness
Oedema
Light headedness
Heat Stroke
If a person’s body has used up all its
High body temperature (higher than 41 C)
water and salt reserves, it will stop
Any one of the following may indicate heat
sweating. This can cause body
stroke:
temperatures to rise.
o Hot, dry, flushed skin
Heat stroke may develop suddenly
o Person is weak, confused, upset or
or may follow from heat exhaustion.
acting strangely;
o has hot, dry, red skin;
o a fast pulse;
o headache or dizziness.
In later stages a person may pass out and
have convulsions
Fast breathing
Absence of sweating
Shock
Cardiac arrest
3-9
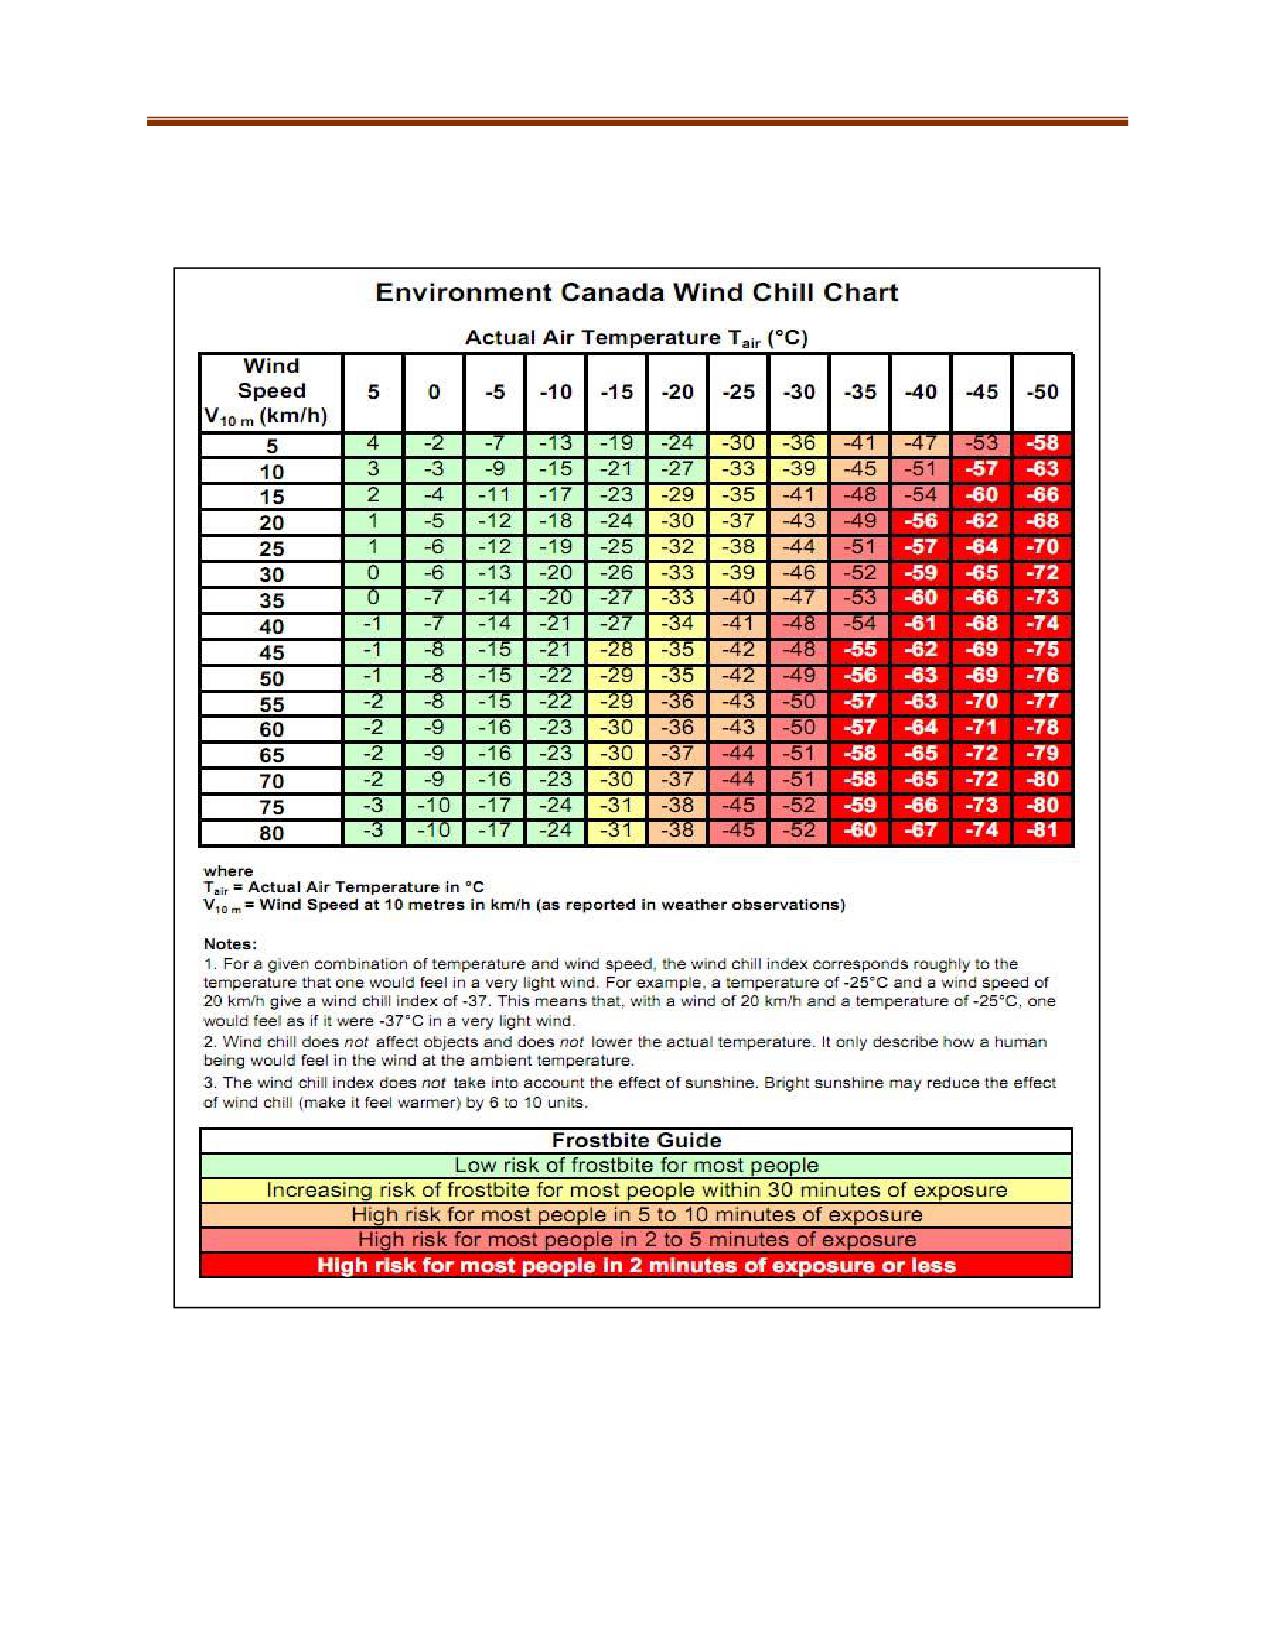
Wind Chill is the perceived decrease in air temperature felt by the body on exposed skin due to wind. It
must be considered an additional hazard when working in cold environments. The wind chill table
should be posted wherever the wind and temperature recorder is mounted.
3-10
Western Canada Mine Rescue Manual
Chapter 4 Electrical Hazards
4-1
OBJECTIVES
This chapter is intended to educate and protect rescuers who are called upon to respond to
emergencies involving electrical systems. Upon completion of this chapter, the trainee shall be able to
demonstrate competency in:
Concepts and definitions
Injuries caused by electrocution and factors affecting severity
Special considerations for emergencies involving electrical equipment
Guidelines for responding to emergencies involving electrical equipment
Introduction
The widespread use of electric power, carried by a vast network of energized wires, has resulted in
many injuries and deaths due to exposure to electricity. Many factors influence the severity of electrical
injuries. Although high voltages and amperages are dangerous, contact with low voltages can also be
fatal. Moisture on the skin decreases the body’s resistance and increases the severity of the injury,
whereas partial insulation by dry clothing lessens the effect. Electrocution at heights may result in a fall that
can further injure the casualty.
Electrical Installations
Electricity is generated by power plants. This voltage is stepped up for efficient transmission over long
distances to substations near the load centres. Transmission lines operate between 69,000 volts and
500,000 volts.
At the substations, voltage is reduced and power is sent through distribution lines to industrial,
commercial, and residential customers. These lines operate between 5,000 V and 25,000 V.
Some mines, especially those in more remote locations, have their own on-site power-generating
capabilities. These facilities present unique circumstances during emergencies.
CONCEPTS AND DEFINITIONS
Voltage is the difference in electrical potential between two points in an electrical field. It is the force
that causes the flow of electricity, and it is measured in volts (V). Because mines require high voltages,
kilovolts (kV, 1 kV = 1,000 V) are often used to express the difference in electrical potential.
Current is a flow of electrical charge. It can be compared to the rate of water in a pipe. Current is
typically measured in amperes (A). (1 ampere = 1000 milliamperes (mA)).
Alternating Current (AC) refers to when a current in a circuit reverses polarity or changes
direction in current flow 60 times per second (60 Hz).
Direct Current (DC) refers to a current flowing only from positive to negative.
Resistance is similar to the effect of friction on the flow of water in a pipe. Water flows more freely in a
large pipe than in a small one, and different materials have different resistances to the flow of
electricity. Resistance is measured in ohms (Ω).
4-2
Grounding is the process of mechanically connecting isolated wires and equipment to the earth, with
sufficient capacity to carry the fault current and to ensure the wires and equipment remain at the same
potential (same voltage) as the earth (ground).
Bonding is the process of joining together two conductors that do not carry currents. These may be two
wires, a wire and a pipe, or these may be two pieces of equipment. Bonding is done by connecting all
the metal parts that are not supposed to be carrying current during normal operations, thereby bringing
them to the same electrical potential. Grounding is still required after bonding as bonding itself does not
protect anything.
Insulators are materials of high resistance that conduct electricity in such small quantities that it cannot
normally be detected. Examples of insulators include glass, ceramic, and porcelain.
Conductors are materials of low resistance that conduct electricity in large amounts. Examples of
conductors include copper, aluminum, iron, salt water (brine), and most other metals.
Semiconductors are materials that have a value of resistance between those of insulators and
conductors. Examples of semiconductors include wood, earth, and rubber tires.
Arcing: An electrical arc is a sudden release of electrical energy bridging a gap between two conductors.
An arc can be extremely hot. Arcing is usually associated with a short circuit, a current interruption at a
switch point, or loose terminal.
Overheating: Loose connections and overloaded electrical conductors or motors cause overheating.
Exceeding the amount of current that conductors and equipment are designed to carry is dangerous and
can be avoided by using properly-sized overload and short-circuit protection devices.
Low Voltage: Most electrically caused fires originate in equipment operating below 750 V. In the
electrical industry, anything below 750 V is commonly referred to as low voltage or secondary voltage.
High Voltage: Electricity can arc through the air to a person, tool, or other conductor if they get too
close. All rescuers, tools, and equipment including aerial devices and extension ladders must maintain a
minimum distance known as the safe limit of approach.
Canadian Electrical Code’s Safe Limits of Approach
Voltage of Live Power
Minimum Distance
0-750 V
1 M (3 ft)
750-150,000 V
3 M (10 ft)
150,000-250,000 V
4.5 M (15 ft)
Greater Than 250,000 V
6 M (20 ft)
Voltage Gradient on the Ground
Because electricity always seeks the path with the least resistance to the ground, electrical systems use
conductive grounding rods to ensure that any stray current is returned to earth safely. These rods are
typically driven 2.5 m (8 ft) or more into the ground to ensure good contact with the ground. However, if
4-3
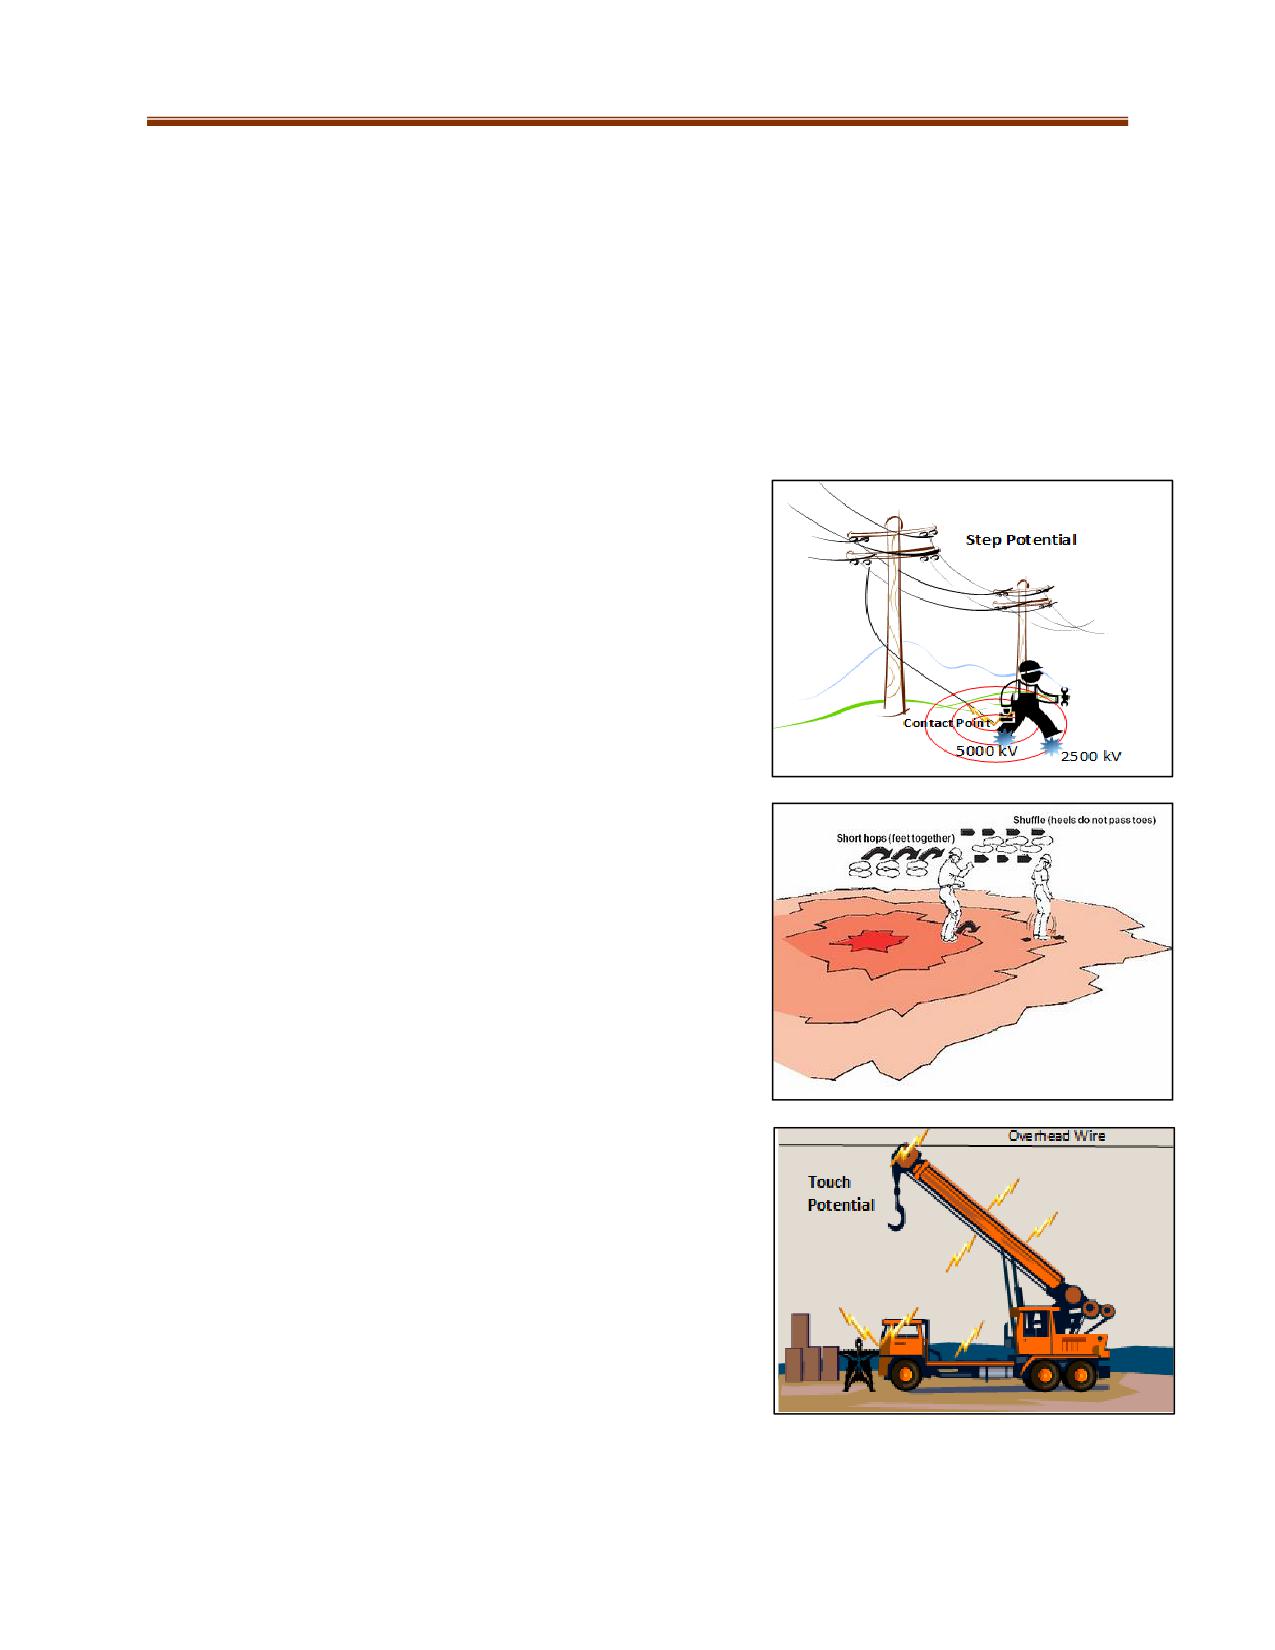
electricity is released onto the surface, such as when a "live” wire lies on the ground, the electricity will
fan out from the point of contact.
During a fault to the ground, there is a rippling effect that can be likened to dropping a pebble into calm
water. In the pool of water, the wave created at the point of contact gets smaller as it spreads outward.
Similarly, in a "pool" of electricity, the energy is at full system voltage at the point of ground contact, but
as you move away from the contact point, the voltage drops progressively. This effect is known as
ground gradient.
Step and Touch Potential
The ground gradient, or voltage drop, creates two problems: step potential and touch potential.
Assume that a live downed wire is touching the ground and has
created a pool of electricity. If you stand with one foot near the
point of ground contact (at x voltage) and your other foot a step
away (at y voltage), the difference in voltage will cause electricity
to flow through your body. This effect is referred to as step
potential.
If rescuers find themselves within a ground gradient, they must
safely exit it. To do so, keep both feet in contact with each other
and hop or shuffle out of the affected area. When shuffling,
make certain that the feet are always in contact with one
another.
Similarly, electricity will flow through a body if it touches an
energized source with the hands, but the feet are at some
distance from the source. The difference in potential voltage
in this case is referred to as touch potential.
4-4

INJURIES CAUSED BY SHOCKS AND ELECTROCUTIONS
WARNING: Electricity always seeks the easiest path to the ground. People, who place themselves
between any two energized conductors, or any energized conductor and ground, will become part
of an electrical circuit that can kill or cause serious injury.
Effects of Electricity on the Body
The path electricity takes through the body is critical. For example, current passing through the heart or
brain is more life-threatening than current passing through the fingers. The expected effects from just a
fraction of this current for a few seconds are illustrated below.
Current level=mA
Probable Effect on Human Body
(Milliamperes)
1 mA
Slight tingling sensation.
Slight shock felt; not painful but disturbing. Average individual can let go. However,
5mA
strong involuntary reactions to shocks in this range may lead to injuries.
Painful shock, begin to lose muscular control. Commonly referred to as the freezing
6mA-16mA
current or “Can’t let go" range.
Extreme pain, respiratory arrest, severe muscular contractions. Fractures can occur.
17mA-99mA
Individual cannot let go. Death is possible.
Ventricular fibrillation (uneven, uncoordinated pumping of the heart.) Muscular
100mA-2000mA
contraction and nerve damage begins to occur. Burns will occur. Death is likely.
> 2,000mA
Cardiac arrest, internal organ damage, and severe burns. Death is probable.
Any electrical hazards must be controlled before approaching a casualty. Electrical energy casualties
will require prompt and appropriate medical treatment.
Factors Affecting Severity of Injury
It is the current (amperage) that kills or injures. But the voltage, which pushes the current through the
body, also has an important effect. Persons exposed to household voltages may suffer a muscle spasm
and become locked-on to the electrical source until the current is turned off, or until they are dragged
clear by the weight of their body falling away from the contact. Relatively long periods of contact with
low voltage current cause many electrical fatalities.
At very high voltages, such as from power lines, the casualty is often quickly blown clear of the circuit.
This results in less internal damage, such as heart failure, but serious surface burns where the current
enters and leaves the body. Exposure to a large electric arc can result in injury from the intense heat or
from ultraviolet rays, which can cause serious eye damage.
Path of
Pressure
Degree of
electricity
Length of
of body
skin
Current
Voltage
Frequency
AC/DC
through
exposure
against
resistance
the body
source
4-5
SPECIAL CONSIDERATIONS FOR ELECTRICAL EMERGENCIES
Combustible Materials
Fires involving electrical equipment often result from the presence of combustible materials. For
example, most fires that break out in electrical generating plants originate in fuel systems, oil systems,
flammable gaseous atmospheres, combustible dust, accumulated waste material, or in buildings
constructed of combustible material.
Faulty Electrical Equipment
Electricity is safe in normal operating conditions. However, hazards are created when electrical
equipment or wires have become faulty due to:
Wear or other deterioration
Improper installation
Inadequate maintenance
Improper use
Damage or breakage
Lightning
Any one of these factors may cause arcing or overheating of electrical equipment.
Substation and Generator Fires
Substations and generating facilities contain transformers, large quantities of oil, energized electrical
equipment and, in some cases, cylinders of compressed gas. Some older transformers still in service
might contain polychlorinated biphenyls (PCBs), many of which release toxic by-products when heated.
Upon arrival at a substation or generator fire, rescuers should stand ready to protect adjacent
properties. Authorized personnel will inform rescuers when the substation has been made electrically
safe. Once electrical energy isolation is completed and locked out, rescuers can then proceed to
extinguish the fire.
Electrical Arc Flash Hazard
An arc flash hazard can exist when energized electrical conductors or
circuit parts are exposed or are within equipment in a guarded or enclosed
condition. The hazard is present when a person is using electrical
equipment improperly, or when someone breaches the safe limits of
approach. Under normal operating conditions, enclosed energized
equipment that has been properly installed and maintained should not
pose an arc flash hazard.
4-6
Vehicles in Contact with Live Wires
Emergency Situation
Action to be taken by emergency personnel
Do not touch any part of the vehicle. You could be
A fallen wire lies under a vehicle with
electrocuted, even if you are wearing rubber gloves.
occupants…
Instruct occupants to stay where they are until
electrical crews arrive.
Instruct the operator to move the vehicle clear of the
wire, and clear of any pools of water which may be
energized by the live wire.
The operator is unhurt and can move the
Make sure you are not in a position to be injured if
vehicle…
the wire springs up after being released when the
vehicle moves.
Make sure no one else is standing in a dangerous
location.
Do not touch any part of the vehicle. Instruct
A fallen wire lies across a vehicle with
occupants to stay where they are until electrical
occupants…
crews arrive.
If the operator is injured and cannot move the
Instruct the operator to stay in the vehicle until
vehicle…
electrical crews arrive.
Direct contact with power lines is not necessary to pose an arcing hazard as power can arc from the
lines to a crane or other piece of equipment.
4-7
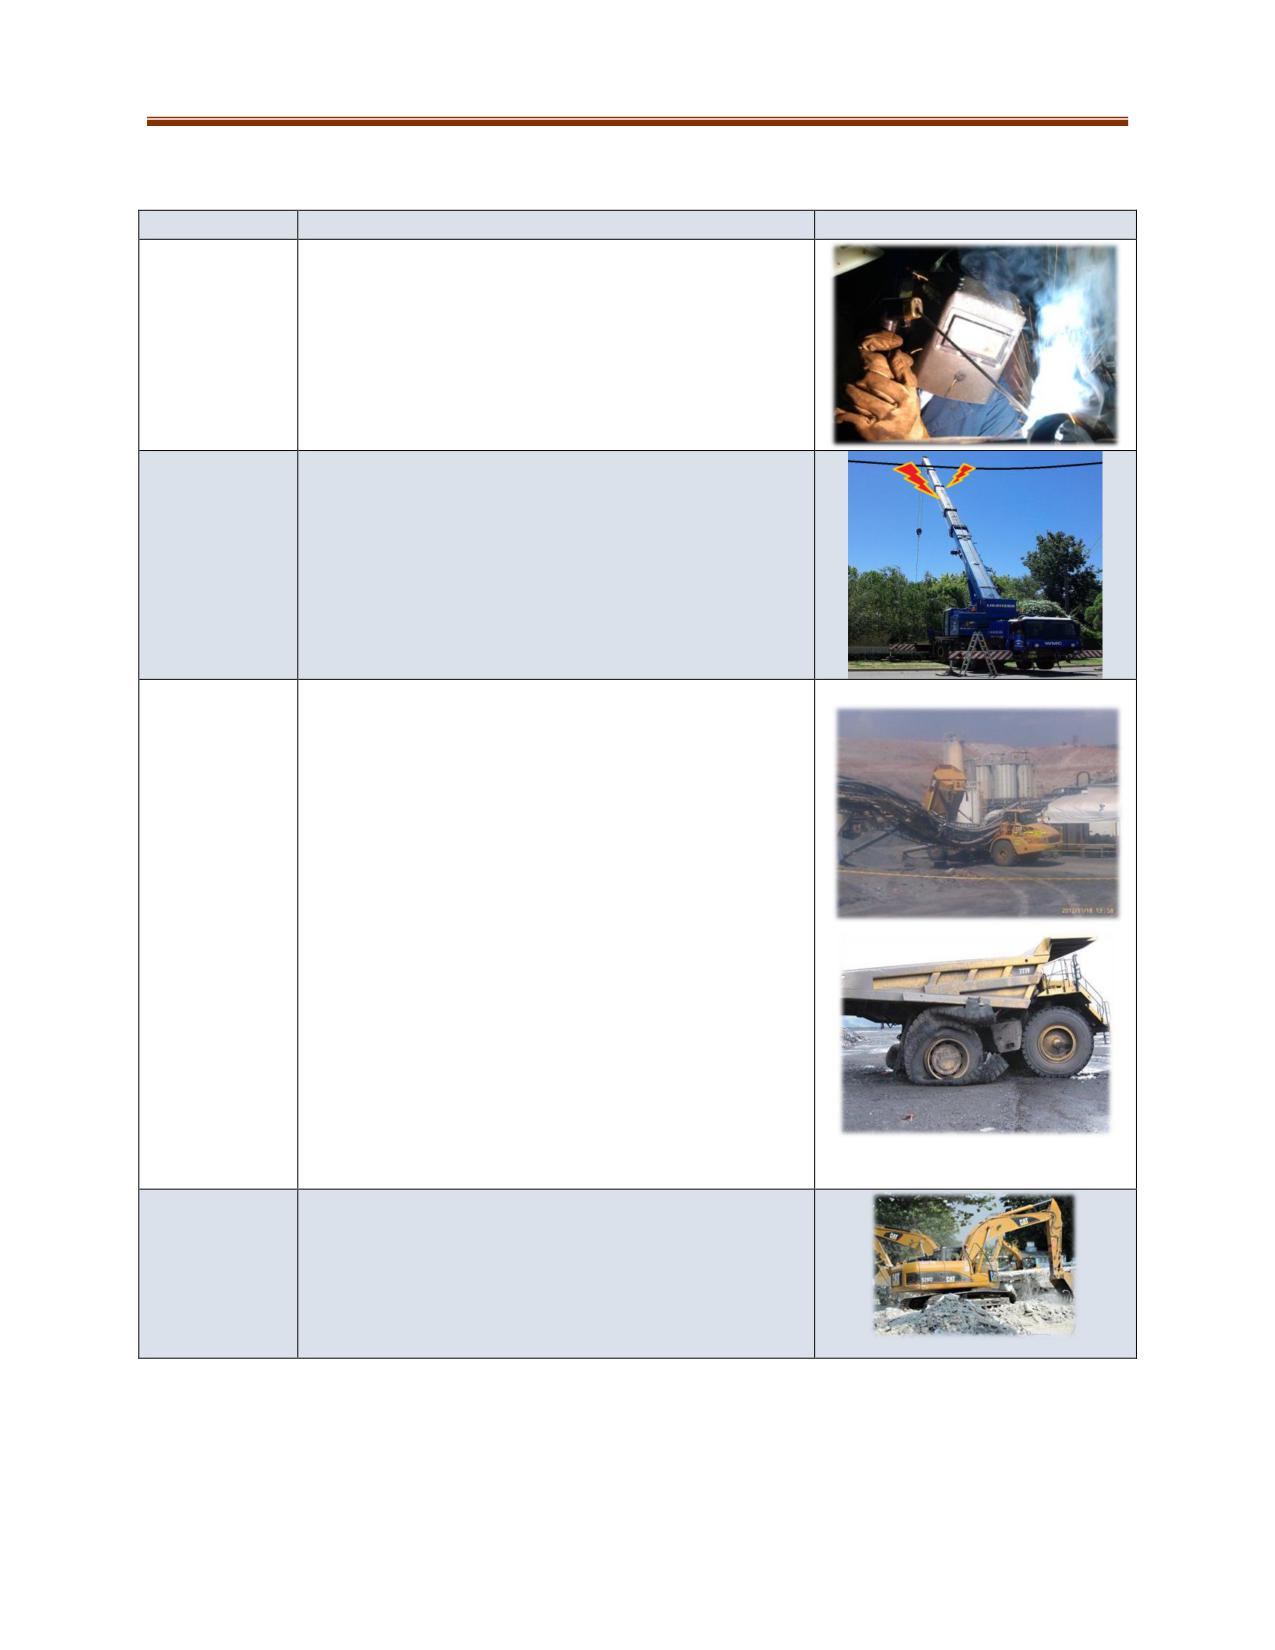
ELECTRICAL HAZARDS ENCOUNTERED BY SPECIFIC WORK GROUPS
Work Groups
Hazards
Photo
Welders
Responders should know all welders use electrical
systems to “Weld, Cut, or Braze”. They must be
aware of the electrical hazards and take positive
steps to eliminate and/or mitigate those hazards.
Crane
Contact with overhead power lines is a major cause
Operators
of fatalities in the industry. Electricity can travel
from a power line to a worker touching any part of
the crane or the load.
Haul Trucks
Tires can explode during or after contact with power
and Other
lines / lightning.
Heavy
If a vehicle contacts overhead power lines there may
Equipment
be a massive electrical current flowing through the
vehicle and its tires:
• This can cause the tires to explode on contact or
could cause the tires to start burning inside. Rescue
teams must consider their approach angle, safe
distances, and the size of the tire.
• This creates a build-up of gases and heat which
could cause the tire to explode at a later time, even
as much as 24 hours after the incident.
• The resulting explosion could potentially injure
persons in the proximity with flying debris.
• The vehicle should be isolated for a period of time
at a safe distance to avoid injury.
Ground
Buried power and communication lines pose a
Engagement
hazard to operators of equipment used during
Tools
trenching and excavation activities. Operators need
(excavators,
to be aware of the hazards posed by penetration of
dozers,
energized power lines and take positive steps to
graders, etc.)
eliminate the hazard before digging.
4-8
GUIDELINES FOR ELECTRICAL EMERGENCIES
Always assume that all electrical wires and equipment are energized until proven otherwise. Mine
rescue teams must ensure that energy isolation is complete prior to conducting rescue operations.
When arriving at the incident scene, stage response vehicles at a distance that avoids exposure
to electrical hazards.
Control the incident scene to eliminate unauthorized access and prevent exposure to electrical
hazards.
Wait for authorized personnel to isolate power. Use lock-out/tag-out devices when working
near energy sources as per site-specific isolation procedures.
Guard against electrical shocks, burns, and eye injuries from electrical arcs.
Establish an exclusion zone equal to the length of the distance between two poles (i.e., one
span) in all directions from downed power lines.
Be aware that damaged electrical lines can move significant distances by themselves when
energized or as a result of the wire’s coil memory.
Be aware that other wires may have been weakened and may fall at any time.
Exercise caution while raising or lowering ladders, elevated work platforms, and booms near
power lines.
Do not touch any vehicle or apparatus that is in contact with electrical wires.
Do not use solid or straight water streams on fires in energized electrical equipment.
Be aware that wire-mesh, chain-link, barbed wire, and steel-rail fences can be energized by
wires outside of your field of view.
Where wires are down, heed any tingling sensation, as this indicates a ground gradient.
4-9
4-10
Western Canada Mine Rescue Manual
Chapter 5 Gases and
Hazardous Atmospheres
5-1
OBJECTIVES
Mine rescue teams will find themselves in environments where toxic and hazardous substances pose
threats to their health. Being able to identify and respond safely to these substances is a fundamental
aspect of mine rescue. Upon completion of this chapter, the trainee shall be able to demonstrate
understanding of:
Terms, concepts, and formulae
The properties and effects of mine gases
Introduction
Many gases found in a mine during normal operating conditions can have a harmful effect on the human
body if inhaled for a period of time in concentrations above the recognized safe limit.
Emergencies such as fires can emit large quantities of toxic or explosive gases and create an oxygen-
deficient atmosphere. The first priority for miners at the time of a mine fire is to protect themselves
from these conditions.
CONCEPTS AND DEFINITIONS
On The Threshold of Understanding: Toxic Chemicals
Deadly concentrations of toxic gases may be only a few parts per million (ppm). For many of us, 1 ppm
is about as hard to visualize as the national debt. The following examples will help grasp what one part
per million really represents and also help you think in metric units. One ppm is the same as:
1 metre step in 1,000 kilometres
1 millilitre per 1,000 litres of liquid
1 square centimetre in 100 square metres
1 cent in 10,000 dollars
Threshold limit values (TLVs) are airborne concentrations of substances and to which most workers may
be repeatedly exposed day after day without adverse effect. Because of the wide variation in individual
susceptibility, however, a small percentage of people may experience discomfort from some substances
at concentrations at or below the threshold limit. A smaller percentage may be affected more seriously
by aggravation of a pre-existing condition or by development of an occupational illness.
The categories of TLVs are specified, as follows:
Threshold Limit Value - Time Weighted Average (TLV-TWA) is the time-weighted average
concentration for a normal eight-hour workday and a 40-hour workweek, to which nearly all workers
may be repeatedly exposed without adverse health effects.
Note: When TWA is not indicated, refer to the 8-hour TLV.
A Concentration Equivalent (Ceq) formulae must be used for shifts longer than an eight-hour workday
and a 40-hour workweek. The formula used depends on the jurisdiction in which the mine is located.
5-2
Threshold Limit Value - Short Term Exposure Limit (TLV-STEL) is the concentration to which workers
can be exposed for a short period of time without suffering from:
Irritation
Chronic or irreversible tissue damage, or
Narcosis of sufficient degree to increase the likelihood of accidental injury, impair self-rescue or
materially reduce work efficiency, provided that the daily TLV-TWA is not exceeded.
The STEL is not a separate independent exposure limit. Rather, it supplements the time-weighted
average (TWA) limit where there are recognized acute effects from a substance whose toxic effects are
primarily of a chronic nature. STELs are recommended only where toxic effects have been reported from
high short-term exposures in either humans or animals.
A STEL is defined as a 15-minute exposure which should not be exceeded at any time during a work day
even if the eight-hour time-weighted average is within the TLV.
Exposures at the STEL should not be longer than 15 minutes and should not be repeated more than four
times per day. There should be at least 60 minutes between successive exposures at the STEL. A period
other than 15 minutes may be recommended when this is warranted by observed biological effects.
Threshold Limit Value - Ceiling (TLV-C) is the concentration that should not be exceeded during any
part of the working exposure.
Combined Threshold Limit Values
The air in a mine may contain a combination of different gases, which when combined may cause
adverse effects and therefore must be taken into account. When two or more hazardous substances
have a similar toxicological effect on the same target or system, their combined effect, rather than that
of either individually, should be given primary consideration. The equation for determining the
combined TLV is:
C1
C2
Cn
T1
+ T2 + ⋯Tn = Dose
Where C is the concentration and T is the threshold limit value.
If Dose is greater than 1, the TLV for the mixture has been exceeded.
Median Lethal Dose (LD 50) refers to the dose of a toxic substance that would be fatal for 50% of a test
population.
Median Lethal Concentration (LC 50) refers to how concentrated a toxic substance must be in an
atmosphere to be fatal for 50% of a test population.
Immediately Dangerous to Life and Health (IDLH) refers to a condition posing immediate danger to life
or health, or a condition posing an immediate threat of severe exposure to contaminants. If a
concentration of a contaminant is above the IDLH, only positive-pressure breathing apparatus should be
used to enter such an atmosphere or to move someone through that atmosphere.
5-3
Airborne particulate concentrations are generally measured in milligrams per cubic metre of air
(mg/m3) and gaseous concentrations are measured as parts per million or % by volume.
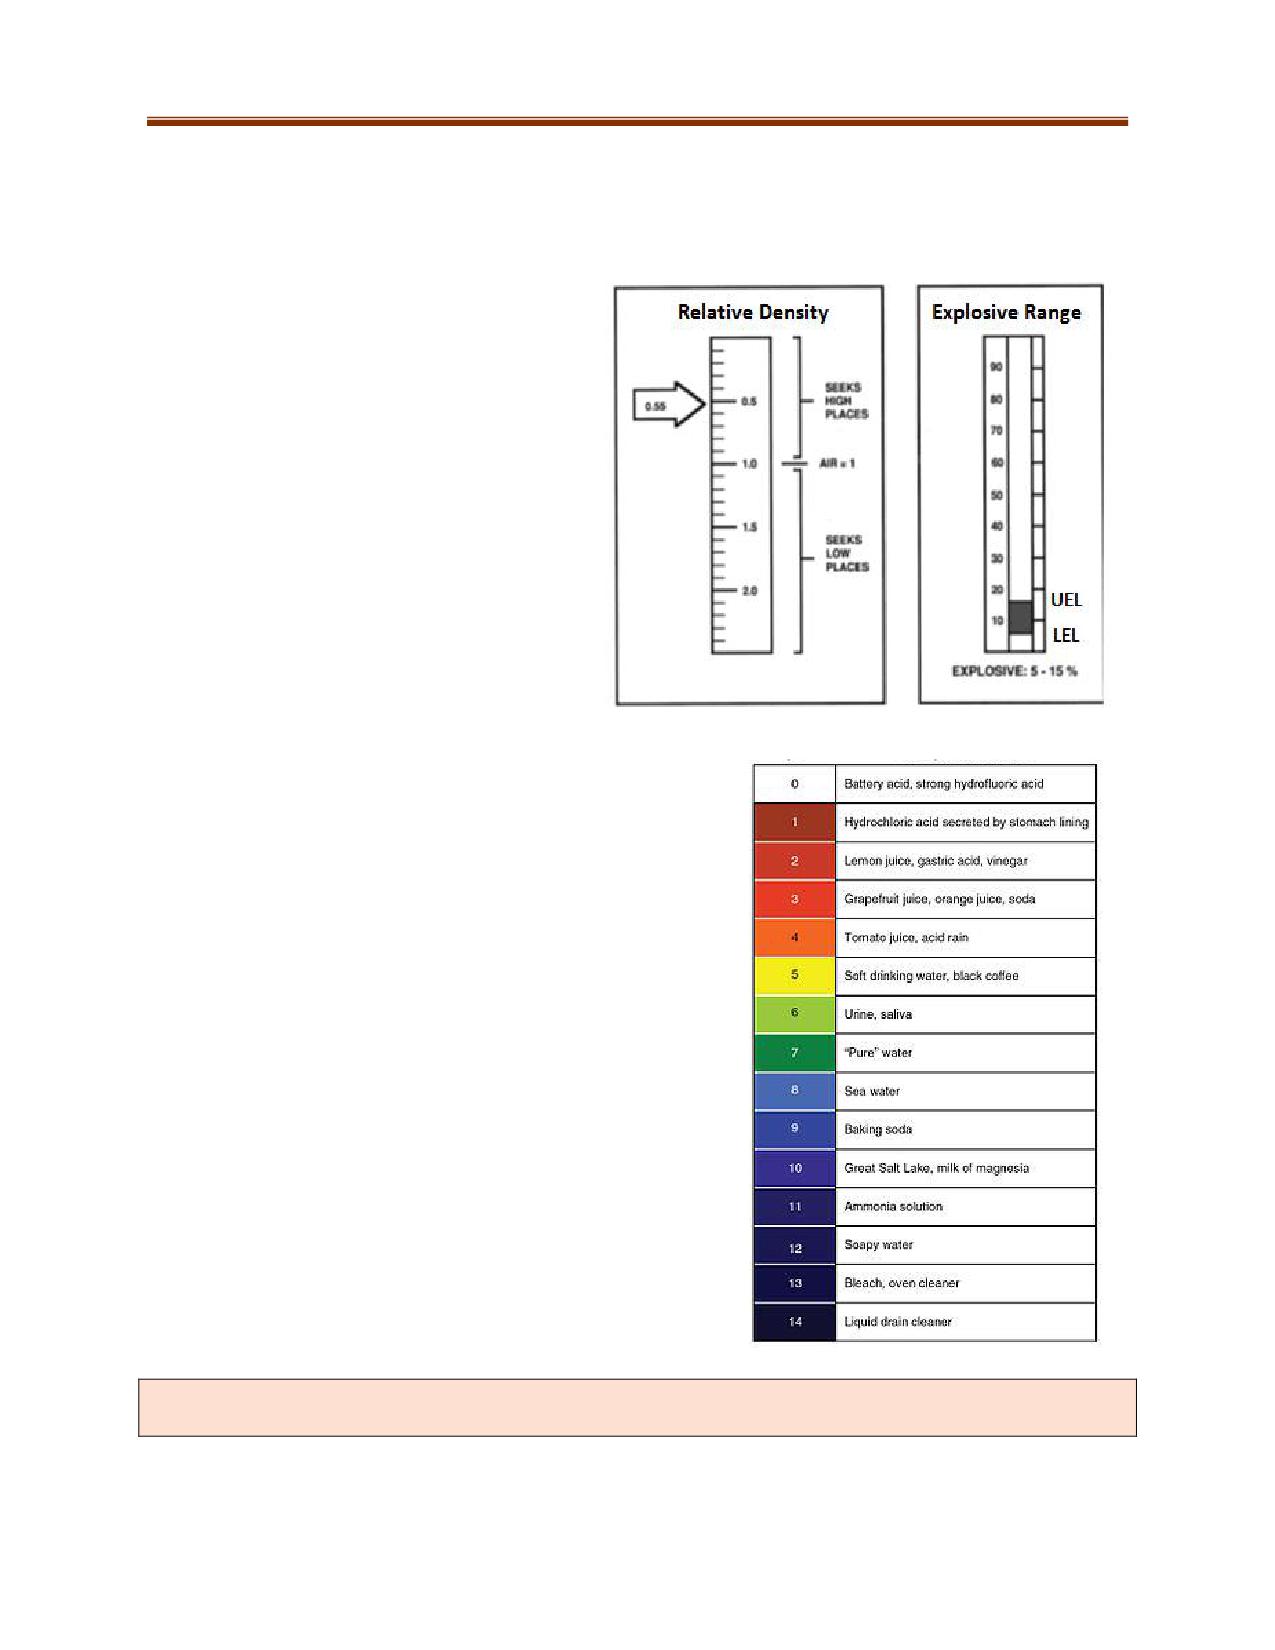
Lower and Upper Explosive Limits refer to the
minimum (LEL) and maximum (UEL)
concentrations of a gas or vapour in air that
will ignite when exposed to an ignition source
provided there is sufficient oxygen to support
combustion.
Relative density (vapour density or specific
gravity) is the ratio of the density of a
substance to the density of a standard
substance under specified conditions. For
liquids and solids the standard is usually
water. For gases the standard is often air.
Fig 5.1 Relative density and Explosive range for Methane
The pH scale is a means of measuring a substance’s acidity or
alkalinity. The scale is broken down into 14 degrees. Pure
water has a pH of 7. A pH below 7 indicates that a substance
is acidic, while a pH above 7 indicates that a substance is basic
or alkaline. Both acidic and basic substances are corrosive,
but the severity increases the further away one gets from a
pH of 7.
Regulatory requirements and site-specific procedures dictate special precautions required for any
gases stored or transported in pressurized containers.
5-4
NAME OF GAS
Air Gas Mixture (AIR)
PROPERTIES
Gases in Air
Air is colourless, odourless, tasteless and non-flammable. It is a
mixture of several gases that, though ordinarily invisible, can be
weighed, compressed to a liquid or frozen to a solid. Pure, dry air at
20.94
%
sea level contains several gases, in the following proportions by
volume %: nitrogen (N2), 78.09; oxygen (O2), 20.94; argon (Ar), 0.94
0.03%
78.09
and carbon dioxide (CO2), 0.03. Traces of other gases, such as
0.94%
%
hydrogen and helium, are also present. The air in a well ventilated
mine seldom shows any depletion of the oxygen content.
HOW FORMED
Nitrogen
Oxygen
Air is the invisible envelope surrounding the earth, in which plants,
Carbon Dioxide
Argon
animals, and human beings live and breathe.
EFFECTS ON HUMANS
Mine air may be contaminated by the presence of other gases such as carbon monoxide, sulphur
dioxide, hydrogen sulphide, methane, oxides of nitrogen and excess carbon dioxide. The presence of
these gases may be due to any of the following:
Blasting or other explosions
Mine fires
Diffusion from ore or country rock, as with methane or radon
Decay of mine timber
Absorption of oxygen by water or oxidation of timber or ore
Use of diesel motors underground
Gas released from thermal water - carbon dioxide, hydrogen sulphide
Except in the case of fire, adequate positive ventilating currents will prevent any dangerous
accumulation of these gases. Gases may affect people either by their combustible, explosive or toxic
properties, or, if inert, by the displacement of oxygen. The effects may be due to a variety of conditions
including:
Altitude: Breathing becomes more laborious due to the decrease in oxygen content as the
altitude increases. This is not dangerous unless conditions are extreme or the work arduous.
Humidity: High temperatures with high humidity are very enervating and cause considerable
discomfort.
Temperature: High temperatures with low humidity are not dangerous except from the
blistering effect of heat.
Impure Air
Non-toxic gaseous impurities are not dangerous unless they have displaced oxygen to a level below
19.5%. Regardless of the oxygen level, some toxic gases have deadly effects, even in very low
concentrations. Effects may be sudden or gradual, depending on the concentration of the impurity.
5-5
NOTE: The Physiological Effects charts included with each gas sheet are general levels associated with
the effects, not specific ranges. The data contained comes from many different resource materials.
Care has been taken to use the most consistent and recent data possible.
NAME OF GAS and CHEMICAL SYMBOL
Acetylene (C₂H₂)
PROPERTIES:
Acetylene is colourless, has a faint odour of ether, and is tasteless. Acetylene is a highly flammable
hydrocarbon fuel that produces industry’s hottest flame (3,260 C/5,900 F) when combined with oxygen
in the oxyacetylene process.
Acetylene is very unstable and can become dangerously explosive if compressed above 100 kilopascals
(kPa) (15 psi) in the free state. Acetylene cylinders are therefore packed with porous material that is
saturated with acetone in which the acetylene is dissolved. Acetylene can thus be safely stored and
transported at a pressure of 1,700 kPa (250 psi). Never use acetylene above 100 kPa (15 psi). Acetylene
has an explosive range of 2.8%-81%.
HOW FORMED
Product of mixing water with calcium carbide
EFFECTS ON HUMANS
Can displace oxygen
OTHER INFORMATION
Acetylene forms an explosive compound with copper and alloys containing more than 67% copper. The
hazard is carefully avoided in the manufacture of welding torches, tips, and regulators.
If an acetylene cylinder has been laid on its side, place the cylinder upright and wait at least one hour
before using, as per the Canadian Centre for Occupational Health and Safety.
Some welders call acetylene “gas” and oxygen “air”. This dangerous habit could cause death or injury
under certain circumstances. Call all gases by their proper names.
5-6
NAME OF GAS and CHEMICAL SYMBOL
Ammonia (NH₃)
PROPERTIES
Ammonia is colourless, has a very pungent odour characteristic of drying urine, and is tasteless.
Ammonia (also known as anhydrous ammonia or ammoniac) is a flammable caustic gas with a strong
and distinctive smell detectable at concentrations of 1 to 50 ppm. Ammonia has an explosive range of
16%-25%.
HOW FORMED
It is formed by the reaction of nitrogen with hydrogen in the presence of a catalyst. It is stored in
commercial cylinders as a compressed liquefied gas. It is corrosive and also explosive when exposed to
heat and oxidizing substances. It can also be formed by contact between ammonium nitrate and
cement.
EFFECTS ON HUMANS
Ammonia’s corrosive qualities will irritate the eyes, nose, throat, lungs, or moist skin and may cause
considerable distress. Even brief exposure to concentrations of 5,000 ppm or more may cause rapid
death due to suffocation or oedema in the lungs.
OTHER INFORMATION:
Specific clean-up procedures:
Move the leaking cylinder to an exhaust hood or safe outdoor area for venting. Mark the empty
cylinder DEFECTIVE.
Use a water spray or fog to reduce the gas cloud from a serious leak or spill, but do not aim a
water jet directly at the source of the leak.
If possible, turn the leaking cylinder so that gas rather than liquid escapes. Isolate the area until
the gas has dispersed.
Firefighting procedures for fires involving ammonia:
Carbon dioxide and powder extinguishers are suitable for fighting fires in which ammonia is involved.
Stop the flow of gas or liquid and move ammonia cylinders from the fire area if it is safe to do so. Use a
water spray to keep containers cool but do not direct water at the source of an ammonia leak or a
venting safety device. Pressurized containers may explode in a fire, releasing irritating ammonia gas; be
prepared by wearing self-contained breathing apparatus. Ammonia is not readily ignited, but explosions
of air-ammonia mixtures have occurred, particularly in confined spaces.
Physiological Effects of Ammonia
NH₃ in the Atmosphere (PPM)
Symptoms
>1
Detectable odor
1-3
Mild irritation of mucus membranes
5-15
Moderate irritation of mucus membranes
30
Chest pain, shortness of breath, coughing
40-60
Fluid in the lungs (oedema), pneumonitis
400
Fatal in 30 minutes
1,000
Fatal in a few minutes
5-7
NAME OF GAS and CHEMICAL SYMBOL
Carbon Dioxide (CO₂)
PROPERTIES
Carbon dioxide is a colourless, odourless gas that when breathed in large quantities may cause a
distinctly acidic taste. The gas will not burn or support combustion. Carbon dioxide is heavier than air
and is often found in low places and abandoned mine workings.
HOW FORMED
Carbon dioxide, an inert gas, is a normal constituent of mine air. It is a product of the decomposition or
combustion of organic compounds in the presence of oxygen as well as respiration of humans and
animals. The proportion of carbon dioxide in mine air is increased by the process of breathing, by open
flame, explosions and blasting, or by escape from thermal water. It is also used as an extinguishing agent
and is also released from dry ice.
EFFECTS ON HUMANS
Clinical investigations indicate that carbon dioxide influences the respiratory rate. This rate increases
rapidly with increasing amounts of carbon dioxide.
Physiological Effects of Carbon Dioxide
CO₂ in the Atmosphere (ppm)
Increase in respiration
500
Slight
20,000
50%
30,000
100%
50,000
300% & Laborious
100,000
Survivable for only a few minutes
5-8
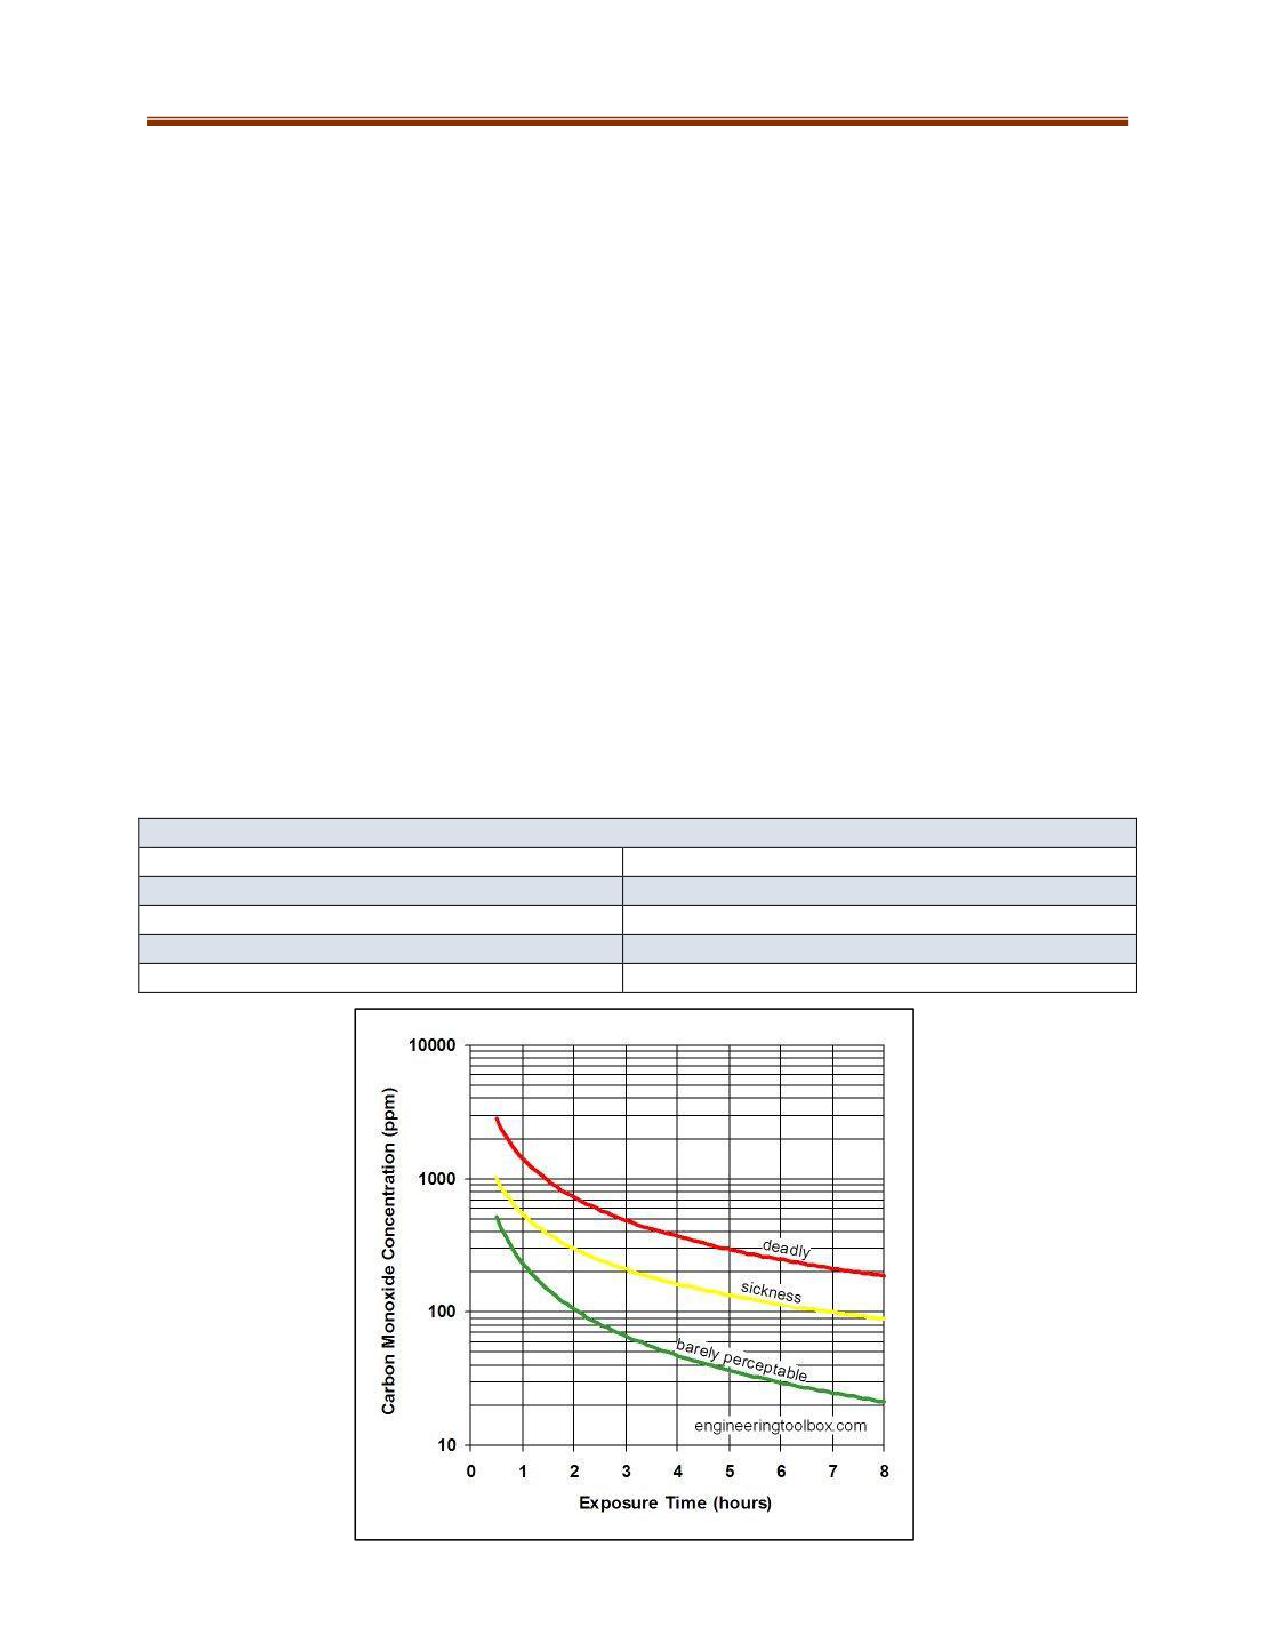
NAME OF GAS and CHEMICAL SYMBOL
Carbon Monoxide (CO)
PROPERTIES
Carbon monoxide is a colourless, odourless, tasteless gas that, when breathed in even low
concentrations, will produce symptoms of poisoning. Carbon monoxide has an explosive range of
12.5%-74%. It is only slightly soluble in water and is not removed from the air to any extent by water
sprays. It is slightly lighter than air.
HOW FORMED
Carbon monoxide gas is one of the greatest chemical hazards to humans. It is a product of combustion in
normal blasting operations and the operation of internal combustion engines. It is also produced by
occurrences such as mine fires or gas explosions. It can be formed wherever organic compounds are
burned in an atmosphere with insufficient oxygen to carry the process of burning or oxidation to
completion.
EFFECTS ON HUMANS
When carbon monoxide is absorbed it reduces the capacity of the haemoglobin for carrying oxygen to
the tissues. The affinity of haemoglobin for carbon monoxide is about 300 times its affinity for oxygen.
This means that when even a small amount of carbon monoxide is present in the air breathed, the
haemoglobin will absorb the carbon monoxide in preference to the oxygen. It is this interference with
the oxygen supply to the body that produces the symptoms of poisoning.
Physiological Effects of Carbon Monoxide
CO in the Atmosphere (PPM)
Symptoms
0-35
No symptoms
36-200
Flu-like symptoms: runny nose, headache
201-800
Dizziness, drowsiness, vomiting in less than an hour
801+
Unconsciousness, brain damage, and death
5-9
NAME OF GAS and CHEMICAL SYMBOL
Chlorine (Cl₂)
PROPERTIES
Chlorine is a heavy, greenish yellow, non-flammable gas that has an odour similar to chlorine bleach and
is tasteless. Chlorine is easily liquefied and is supplied commercially as a liquid under pressure in
cylinders and larger containers.
HOW FORMED
Electrolysis of common salt and other chemical reactions involving chlorine compounds. Some of its
uses include treating potable water and milling processes.
EFFECTS ON HUMANS
Because of its fairly low solubility in water, chlorine is a severe irritant to the eyes, skin, and respiratory
system (oedema).
OTHER INFORMATION
Chlorine itself is not flammable, but it may react to cause fire or explosions upon contact with
turpentine, ether, ammonia, hydrocarbons, hydrogen, or steel pipes and vessels.
Refer to site-specific procedures for handling and storing chlorine. Only specially trained workers should
manage incidents involving chlorine. Special considerations for handling leaking chlorine containers:
If chlorine is escaping as a liquid, turn the container so that chlorine gas escapes. The amount of
gas escaping from a leak is about one-fifteenth the amount of liquid which will escape through a
hole of the same size.
Do not apply water to a chlorine leak.
Pinhole leaks in cylinders and large containers may sometimes be temporarily stopped by
tapered hardwood pegs or metal drift pins driven into the holes. First turn the container so that
only gas is escaping. Use extreme care in driving the plug because the wall area surrounding the
hole may be thin and crumble. After taking this emergency measure, empty the cylinder as
quickly as possible.
Physiological Effects of Chlorine Gas
Cl₂ in the Atmosphere (PPM)
Symptoms
0-6
Eye irritation
7-15
Throat and lung irritation
16-30
Chest pain, vomiting, coughing, difficulty
breathing, excess fluid in lungs (oedema)
430+
Fatal in 30 minutes
5-10
NAME OF GAS and CHEMICAL SYMBOL
Hydrogen (H₂)
PROPERTIES
Hydrogen is a colourless, odourless and tasteless gas. It is highly flammable. Hydrogen has an explosive
range of 4%-74% with as little as 5% oxygen in the air.
HOW FORMED
Hydrogen can be produced when rock is heated to incandescence. It is a product of incomplete
combustion or distilling coal. The most common source of hydrogen at mines is battery charging.
EFFECTS ON HUMANS
Hydrogen may cause an oxygen-deficient atmosphere resulting in asphyxiation.
5-11
NAME OF GAS and CHEMICAL SYMBOL:
Hydrogen Cyanide (HCN)
PROPERTIES
Hydrogen cyanide is a colourless, tasteless gas with a distinctive odour of bitter almonds. Many people
cannot detect presence by odour therefore the scent alone does not provide adequate warning of
hazardous concentration. It condenses to a colourless liquid at temperatures below -26 C. Hydrogen
cyanide has an explosive range of 5.6%-40%.
HOW FORMED
Hydrogen cyanide is formed by the reaction of hydrochloric acid on cyanide compounds, such as
potassium/sodium cyanide. It may occur in concentrator areas where cyanide is used as a reagent in the
milling of gold ore, and other places where cyanide compounds are used. It may also be released from
cyanide-bearing concentrator tailings. A solution of hydrogen cyanide in water is called hydrocyanic acid
or prussic acid.
EFFECTS ON HUMANS
Hydrogen cyanide is a fast-acting and deadly poison that causes paralysis of the respiratory system and
chemical asphyxiation. It interferes with the normal use of oxygen by nearly every organ of the body. It
is particularly dangerous as it can be absorbed through the skin as well as by inhalation.
Physiological Effects of Hydrogen Cyanide
HCN in the
Symptoms of Exposure
Atmosphere (PPM)
0-20
May detect odour. Minor symptoms.
20-50
Depending on amount and exposure time, may have initially experience
restlessness and increased respiratory rate. Other early symptoms may
include weakness, giddiness difficulty breathing, heart palpitations,
headache. Onset of signs and symptoms is usually rapid after inhalation
and may continue for several hours after exposure
>50
Immediately dangerous to life and health (IDLH). Symptoms include
nausea, vomiting, convulsions, respiratory failure, unconsciousness.
>110
Can be quickly fatal
5-12
NAME OF GAS and CHEMICAL SYMBOL
Hydrogen Sulphide (H₂S)
PROPERTIES
Hydrogen sulphide is colourless, tasteless, highly toxic, and highly soluble in water. In low
concentrations its distinctive rotten-egg smell is noticeable, but in high concentrations the sense of
smell is quickly paralyzed by the action of the gas on the respiratory system and cannot be relied upon
as a warning. Hydrogen sulphide has an explosive range of 4.3%-45%.
HOW FORMED
Dust explosions occurring in blasting operations in sulphide ore bodies can create hydrogen sulphide. It
is also formed from burning sulphide ores or in the reaction of hydrochloric acid on sulphide
concentrations. It may also be released from coal or country rock pockets, or from vegetable matter
decomposing in water.
EFFECTS ON HUMANS
Hydrogen sulphide is highly toxic and has neurotoxic effects. It immediately paralyzes the sense of smell
and progresses to respiratory paralysis then death. It is an irritant that may cause pulmonary oedema.
Physiological Effects of Hydrogen Sulphide
H₂S in the Atmosphere (PPM)
Effects of Exposure
<1
Odour (rotten egg) can be detected
10
No known adverse health effects; respiratory protection
required above this limit
20-50
Eye, nose, throat, and lung irritation
50-100
Prolonged exposure can cause a runny nose, cough,
hoarseness, and shortness of breath
>100
Immediately dangerous to life and health (IDLH)
5-13
NAME OF GAS and SYMBOL
MAPP - Mixture of Methylacetylene, Propadiene,
Propylene, Propane
PROPERTIES
MAPP is colourless, tasteless, slightly soluble in water and may smell slightly fishy. MAPP has all the best
features of acetylene, natural gas and propane, and is extremely safe to use. It is a very stable gas.
MAPP has an explosive range of 1.8%-11.7%.
HOW FORMED
Man-made combination of gases stored as a liquid under pressure.
EFFECTS ON HUMANS
MAPP may cause an oxygen deficient atmosphere and in high concentrations may have an
anaesthetizing effect. MAPP is a slight irritant to the skin and, due to its high evaporation rate, may
cause tissue freezing or frostbite on skin contact with the liquid.
5-14
NAME OF GAS and CHEMICAL SYMBOL:
Methane (CH₄)
PROPERTIES
Methane is a colourless, odourless and tasteless gas. An odour caused by the presence of other gases
such as hydrogen sulphide often accompanies it. Methane is lighter than air and has an explosive range
of 5%-15%.
Guidelines for methane in work environments:
≥1% methane (20% of the LEL): No blasting or shot firing.
≥1.25% methane (25% of the LEL): Isolate electrical circuits.
≥2.5% methane (50% of the LEL): All workers are withdrawn from any work.
HOW FORMED
It is formed by the decomposition of organic matter in the presence of water and the absence of
oxygen. It may be seen as bubbles in pools of water. It is a component of natural gas. Methane gas may
be trapped in hardrock and released through diamond drilling operations. Methane is also produced by
decaying timber.
EFFECTS ON HUMANS
Methane may cause an oxygen-deficient atmosphere resulting in asphyxiation.
5-15
NAME OF GAS and CHEMICAL SYMBOL
Nitrogen (N₂)
PROPERTIES
Nitrogen is a colourless, odourless, tasteless and inert gas.
HOW FORMED
Nitrogen is a naturally occurring constituent of the atmosphere. It is used in industry in either liquid or
compressed gas form.
EFFECTS ON HUMANS
Nitrogen itself has no physiological effect on humans. However, increased nitrogen levels may cause an
oxygen-deficient atmosphere resulting in asphyxiation.
5-16
NAME OF GAS and CHEMICAL SYMBOL
Nitrogen Dioxide (NO₂)
PROPERTIES
No colour in small concentrations, reddish brown in high concentrations. May smell like blasting fumes.
Acidic taste if inhaled in high concentrations. It is one of many oxides of nitrogen.
HOW FORMED
Nitrogen dioxide is formed when nitric oxide (NO) is exposed to air, such as in electric arcing, oxy-gas
welding, internal combustion engines, and burning or detonating explosives.
EFFECTS ON HUMANS
Nitrogen dioxide corrodes the respiratory passages and inhaling relatively small quantities may cause
death. Symptoms from low doses of nitrogen dioxide may have a delayed onset. Its effects on the
respiratory passages include oedema and swelling. This irritation may be followed by bronchitis or
pneumonia, with potentially fatal results.
Physiological Effects of Nitrogen Dioxide
NO₂ in the
Effects of Exposure
Atmosphere (PPM)
60
Minimum causing immediate throat irritation
100
Minimum causing coughing
100-150
Dangerous for even short exposure
200-700
Quickly fatal after short exposure
5-17
NAME OF GAS and CHEMICAL SYMBOL
Oxygen (O₂)
PROPERTIES
Oxygen is a colourless, odourless and tasteless gas. It is required to support life and combustion.
HOW FORMED
Found in the atmosphere as a product of photosynthesis.
EFFECTS ON HUMANS
Any reduction from normal oxygen levels affects human physiology. Increased levels of oxygen reduce
fatigue, but may have other effects over long periods of time that could occur with the use of an oxygen
breathing apparatus. Atmospheres in the workplace should contain at least 19.5% oxygen.
Physiological Effects of Oxygen Deficiency
% O₂ in the Atmosphere
Effects of Exposure
(PPM)
>23 (230,000)
Will accelerate combustion
21 (210,000)
Normal breathing
17 (170,000)
Breathing faster and deeper
15 (150,000)
Dizziness, buzzing noise, rapid pulse, headache, blurred vision.
9 (90,000)
May faint or become unconscious.
6 (60,000)
Movement convulsive, breathing stops. Shortly afterwards, the
heart stops.
5-18
NAME OF GAS and CHEMICAL SYMBOL
Propane (C₃H₈)
PROPERTIES
Propane is colourless, odourless but commercially scented, tasteless, and flammable. Propane is a
liquefied petroleum gas. Propane vapour is heavier than air. Any escaping gas will seek out low places,
such as excavations, which may result in the accumulation and creation of flammable mixtures. Propane
has an explosive range of 2.4%-9.5%.
HOW FORMED
Propane is extracted from natural and refinery gases. It is compressed into a liquid state and will remain
as a liquid when stored under pressure.
EFFECTS ON HUMANS
Propane may cause an oxygen-deficient atmosphere resulting in asphyxiation.
OTHER INFORMATION
When converting to vapour, liquid propane will expand to about 270 times its liquid volume. Therefore,
escaping liquid gas is more dangerous than vapour escaping from a leak of the same size.
5-19
NAME OF GAS and CHEMICAL SYMBOL
Sulphur Dioxide (SO₂)
PROPERTIES
Sulphur dioxide is colourless, has an acidic taste and has a strong sulphurous smell with a low odour
threshold. Sulphur dioxide is soluble in water. It is a heavy gas and will accumulate in low places.
HOW FORMED
Sulphur dioxide is a gas produced by heating, burning, or blasting sulphide ores. It is also produced in
explosions of sulphide ore dust. Some diesel fuels also produce low amounts of sulphur dioxide when
burned.
EFFECTS ON HUMANS
Sulphur dioxide may cause noxious effects before it becomes toxic. Irritation of the respiratory tract and
lungs will cause oedema.
Physiological Effects of Sulphur Dioxide Exposure
Concentrations of SO₂ in
Effects of Exposure
the Atmosphere (PPM)
0 - 0.25
Mild to severe irritation to eyes, nose and throat
> 0.25
Sulphur dioxide can cause a life-threatening condition from accumulation
of fluid in the lungs (pulmonary oedema). Exposure to high concentrations
can cause coughing, nausea, vomiting, shortness of breath, tightness in
chest, stomach pain and corrosive damage to the airways and lungs
(symptoms may be delayed). May cause long term respiratory effects.
Skin contact may cause burns, but signs and symptoms may vary (e.g.,
stinging pain, redness of the skin and blisters). Contact with eyes can cause
mild irritation to severe burns.
>100 ppm
Immediately dangerous to life and health (IDLH)
5-20
ATMOSPHERIC HAZARDS DURING AND AFTER FIRES
During and following fires, the two greatest hazards to life are carbon monoxide poisoning and oxygen
deficiency. The conditions that cause contamination of mine atmospheres are as follows, listed in order
of the seriousness of the hazard:
Carbon monoxide: This gas is always present at the time of a fire and gives little or no warning of
its presence.
Oxygen deficiency: This condition occurs when oxygen is consumed by combustion or chemical
reaction and is replaced by toxic or inert gases. Precautions must always be taken against it.
Explosive gases and smoke: Irritating qualities and obstructs vision
Methane: This gas is not produced by mine fires or explosions but may cause them. Its presence
in a mine during rescue or recovery operations creates a major hazard.
Sulphur Dioxide: This gas is present when a fire occurs in a sulphide ore body. Because of its
irritating qualities, it may give advance warning in low concentrations.
Other gases: Hydrogen sulphide, nitrous oxides, hydrogen cyanide, etc., are not likely to be
encountered but the possibility of their occurrence should be kept in mind. Hydrogen sulphide
sometimes indicates the presence of methane.
Burning Conveyor Belts and Rubber Tires
Polyvinylchloride (PVC)-covered belting is practically non-flammable, but when heated, PVC, synthetic
rubber, and neoprene (found in rubber tires) give off chlorine gas. Other gases produced by burning
rubber are listed below.
GASES PRODUCED BY BURNING RUBBER,
NEOPRENE AND PVC
Carbon Monoxide
Chlorine
Hydrogen Chloride
Phosgene
Sulphur Dioxide
Hydrogen Sulphide
Nitrogen Dioxide
Ammonia
Hydrogen Cyanide
Arsine
Phosphine
Radiation Sources
One source of radiation is nuclear gauges used for measuring. When responding to an incident involving
this source, contact the site Radiation Safety Officer (RSO).
Another source of radiation is radon, a naturally occurring element released into the mine’s
atmosphere. As it is released, it continues to decay and forms airborne radioactive atoms. If radon levels
in an area are very high, breathing protection may be required to reduce radiation exposure. Refer to
site-specific safety procedures for all radiation emissions.
5-21

MINE RESCUE GAS CHART - For General Reference Only (non-regulatory)
Substance
Chem.
Relative
Explosive
T.L.V.
I.D.L.H.
Properties
How Formed
Symbol
Density
Range
ACGIH
NIOSH
COT = Colourless,
(See individual gas sheet for further
Air = 1
%
Odourless,
information)
Tasteless
Asphyxiant
Not
COT
Incomplete comb. electrolysis of
Hydrogen
H2
0.07
4-74
Listed
water, battery charging
YES
Not
COT
Decomposition of organic matter,
Methane
CH4
0.55
5-15
Listed
carbonaceous rock, decaying timber,
component of natural gas
Ammonia
NH3
0.60
16-25
YES
YES
Colourless,
Reaction of nitrogen & hydrogen in the
Strong odour
presence of a catalyst
Lighter
Acetylene
C2H2
0.91
2.8-81
Asphyxiant
Not
Colourless,
Water on calcium carbide
Listed
Distinct odour
Than
Air
YES
YES
Colourless, Bitter
Acid on sodium or potassium cyanide,
Hydrogen
HCN
0.94
5.6-40
Almond odour
produced during heat treating of drill
Cyanide
steel, may be released from tailings
where cyanide was used for mineral
recovery
YES
YES
COT
Fires, gas explosions, blasting,
Carbon
CO
0.97
12.5-74
incomplete combustion, diesel and gas
Monoxide
engine exhaust
Asphyxiant
Not
COT
Constituent of air,
Nitrogen
N2
0.97
N/A
Listed
Commercial liquid or gas
AIR
1.00
N/A
Nitrogen 78.09 %, Oxygen 20.94%, Carbon Dioxide 0.03%, Argon & Other
Gasses 0.94%
N/A
Not
COT
Constituent of air, From
Oxygen
O2
1.10
N/A
Listed
photosynthesis
YES
YES
Colourless,
Decomposition of some sulphur
Hydrogen
H2S
1.19
4.3-45
Rotten Egg Odour
compounds, blasting sulphide ores,
Sulphide
decomposition of vegetable matter in
water, hydrochloric acid on sulphide
Carbon
CO2
1.53
N/A
YES
YES
COT,
Constituent of air, breathing of
Heavier
Taste in high
humans & animals, decomposition or
Dioxide
concentration
combustion of organic compounds
Than
with presence of oxygen
Air
YES
Not
COT
Petroleum distillate
Propane
C3H8
1.56
2.4-9.5
Listed
Commercially
Scented
N/A
Not
Distinct fishy
Commercially manufactured
MAPP
N/A
1.58
1.8-11.7
Listed
Odour
YES
YES
Colourless,
Heating, burning or blasting sulphide
Sulphur
SO2
2.20
N/A
Sulphur smell,
ores, burning of some diesel fuels
Dioxide
Acid taste
YES
YES
Green yellow,
Principally from electrolysis of salt
Chlorine
Cl2
2.49
N/A
Bleach smell
YES
YES
Colourless to
One of the many oxides of nitrogen,
Nitrogen
NO2
2.62
N/A
redden brown,
associated with burning & blasting,
Dioxide
Acid taste in high
arching, welding, diesel exhaust
concentration
Fig 5.1 General gas information for most commonly encountered gases
5-22
Western Canada Mine Rescue Manual
Chapter 6 Rescue Tools
6-1
OBJECTIVES
Dozens of different tools are commonly used in mine rescue operations. Upon completion of this
chapter, the trainee shall be able to demonstrate competency in:
Concepts and definitions
General safety considerations
Tool classes
The tools most commonly used in mine rescue
CONCEPTS AND DEFINITIONS
The type of incident will dictate which tools are used to endeavor to rescue and ensure the safety of
trapped and injured worker while minimizing risk to the rescuer and casualty. Tool selection should also
account for maintaining and protecting mine property (e.g., to vehicles, infrastructure, equipment) from
further damage as well as facilitating the rehabilitation of affected work areas while preserving the
incident scene for investigation.
This chapter is not an exhaustive inventory of every tool that could be encountered on a mine site.
Trainees must be familiar with which tools are available at their mine site.
Rescue tools can be organized into two general categories: hand tools and power tools.
Hand tools are tools that require manual force. They extend the range or force of body actions.
Power tools are operated by external or internal power sources. They are typically pneumatic (air-
powered), hydraulic (fluid-powered), or electric (internal (battery) or external (plug-in) power source).
Tools within these two categories can be grouped into sub-categories according to their function:
Rotating
Pushing, Pulling, and Lifting
Prying and Spreading
Striking
Cutting
Fire Appliances
Hazardous Materials/Spill
Energy Sources
Miscellaneous
GENERAL SAFETY CONSIDERATIONS
Safety is the primary consideration for the use of any tool. It avoids accidental injury to rescuers,
casualties, and bystanders.
Always wear the appropriate PPE when operating any tool.
Training and practice in the proper use and functions of rescue tools is required prior to use.
Special consideration must be paid to the unique demands of power tools, e.g., combustion,
sparking, fumes, noise.
Adequate lighting is essential to properly operate tools.
6-2
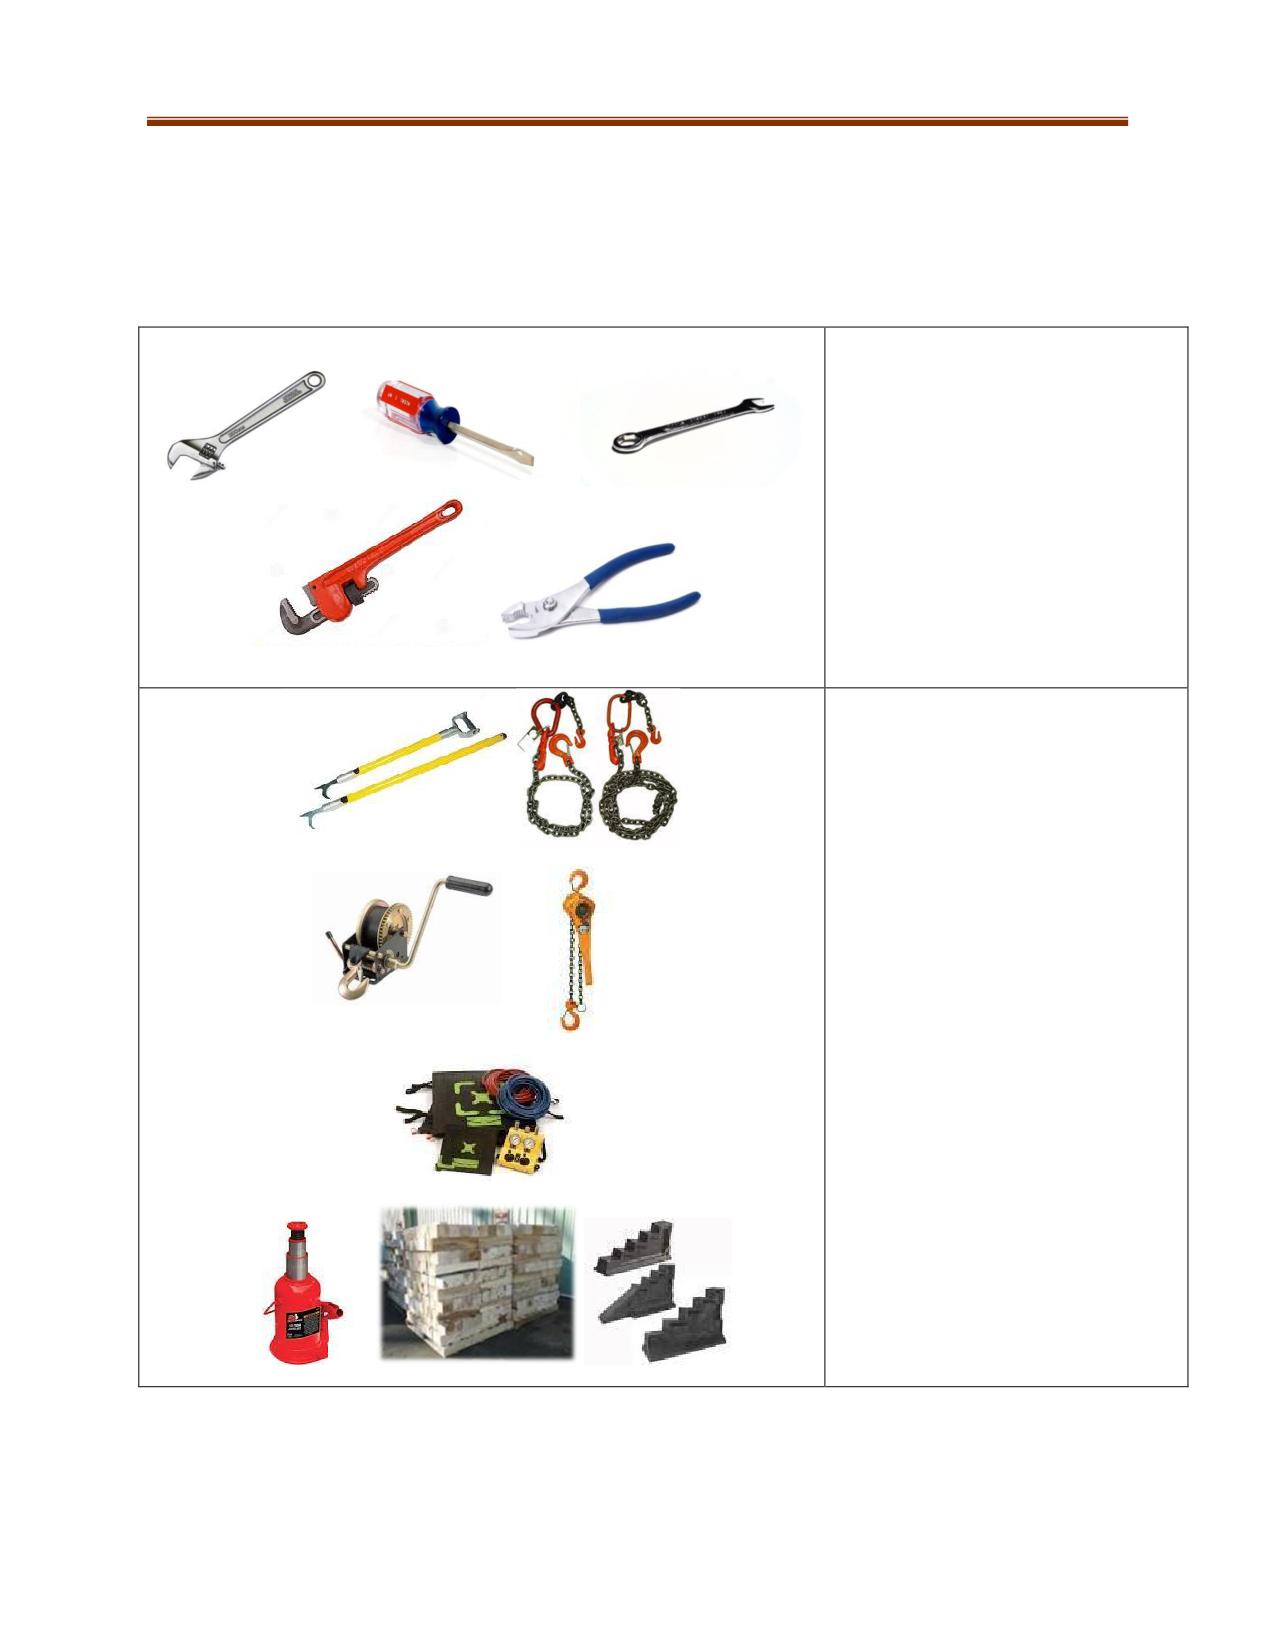
Evaluate the consequences of operation before beginning.
Examine the tool for damage before each use and keep all tools in good working order.
Use the tool only for tasks for which it is designed.
Always follow the manufacturer’s instructions when operating any tool.
ROTATING TOOLS
Used to assemble and disassemble
Common rotating tools include (L-R,
top to bottom) wrenches,
screwdrivers, pliers
PUSHING, PULLING, AND LIFTING
TOOLS
Use to extend reach or to exert
extra force on an object
Common tools include pike poles,
closet hooks, chains, winches,
come-alongs, lifting bags, hydraulic
jacks, cribbing and shoring
Rope Rescue Equipment (See Ch.
11)
6-3

PRYING AND SPREADING TOOLS
Used for gaining access
Common tools include pry bars,
scaling bars, hydraulic spreaders,
rams, claw bars/crow bars, rock
splitters, halligans, K tools
STRIKING TOOLS
Used to apply impact force or to
gain access
Common tools include axes,
hammers, sledgehammers, mallets,
pick heads, centre punches, and
chisels
6-4
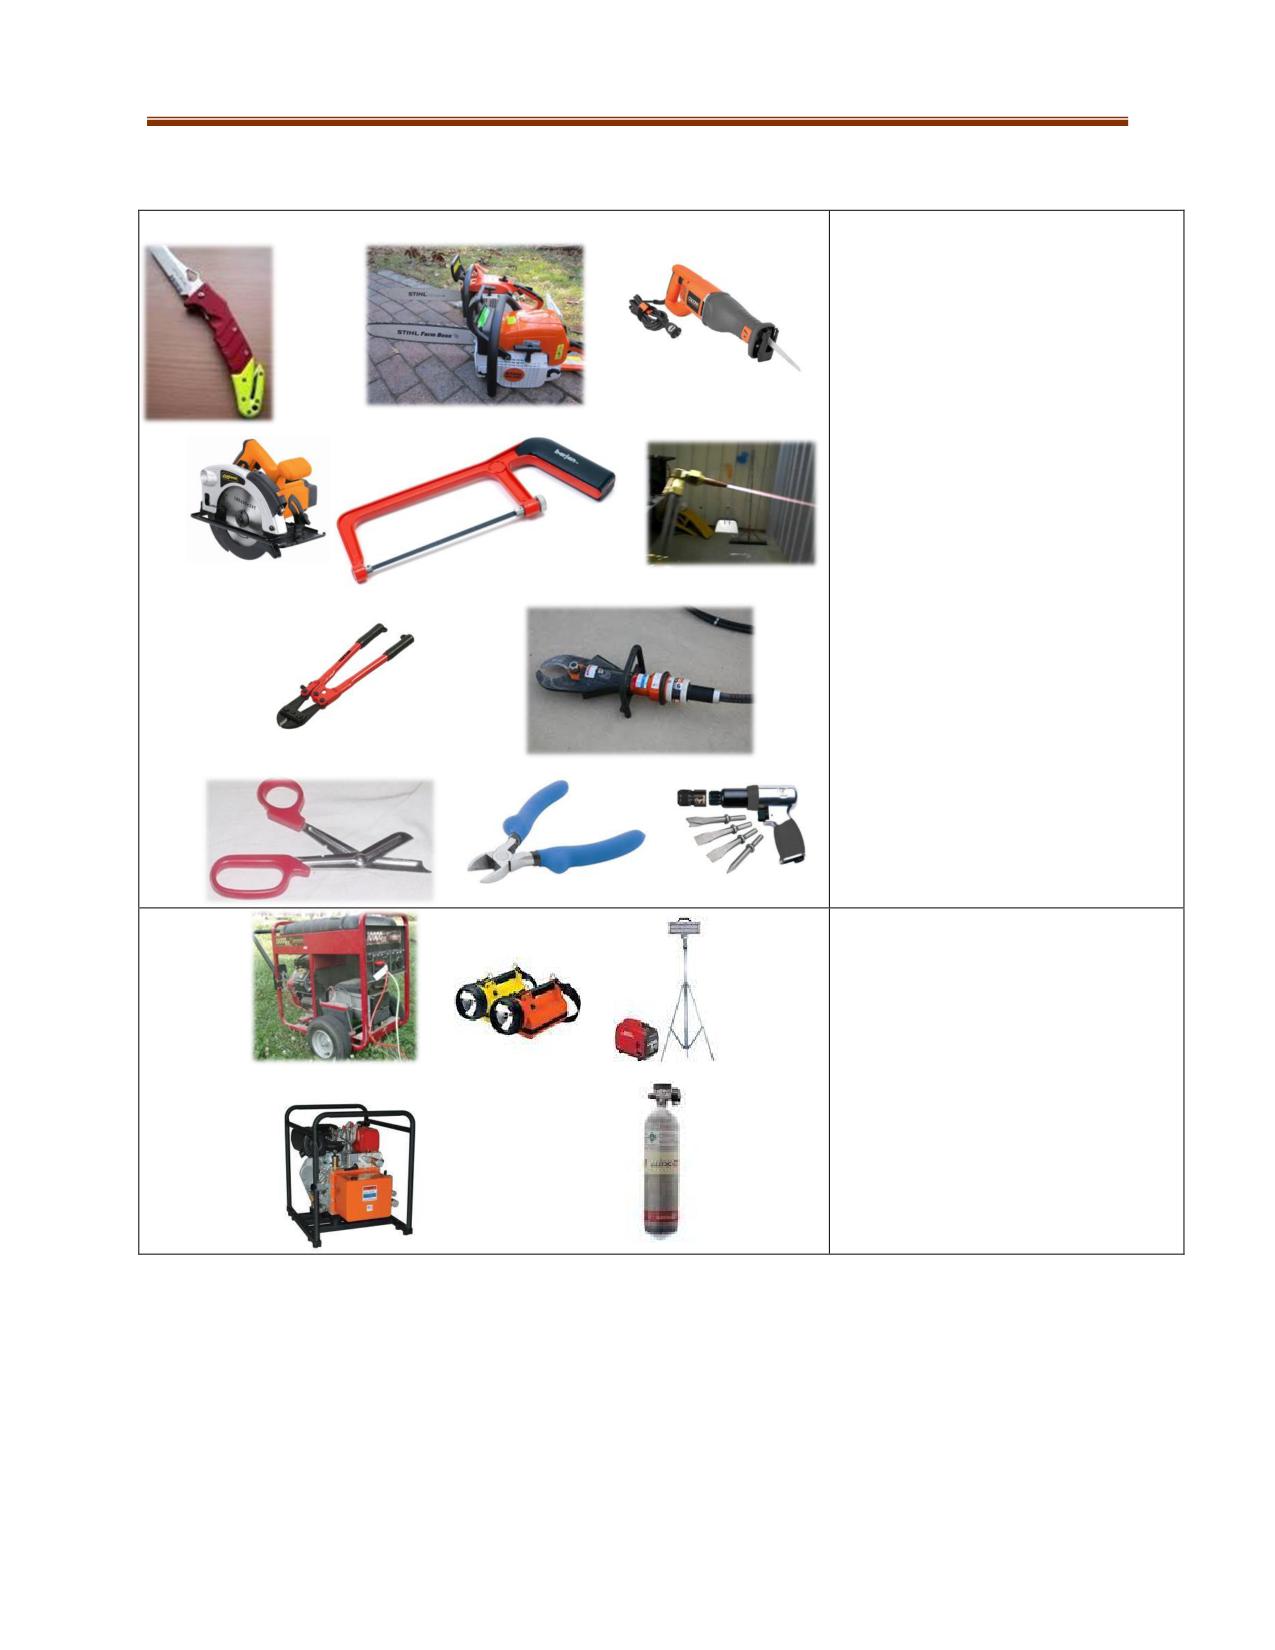
CUTTING TOOLS
Used to sever an object
Common cutting tools include
knives, chain saws, reciprocating
saws, rotary saws, hacksaws,
cutting torches, bolt cutters,
hydraulic shears, scissors, diagonal
cutters, air chisels
ENERGY SOURCES
Provide independent energy in the
field
Common tools include power
generators, lighting plants,
hydraulic power source,
compressed air cylinder
6-5
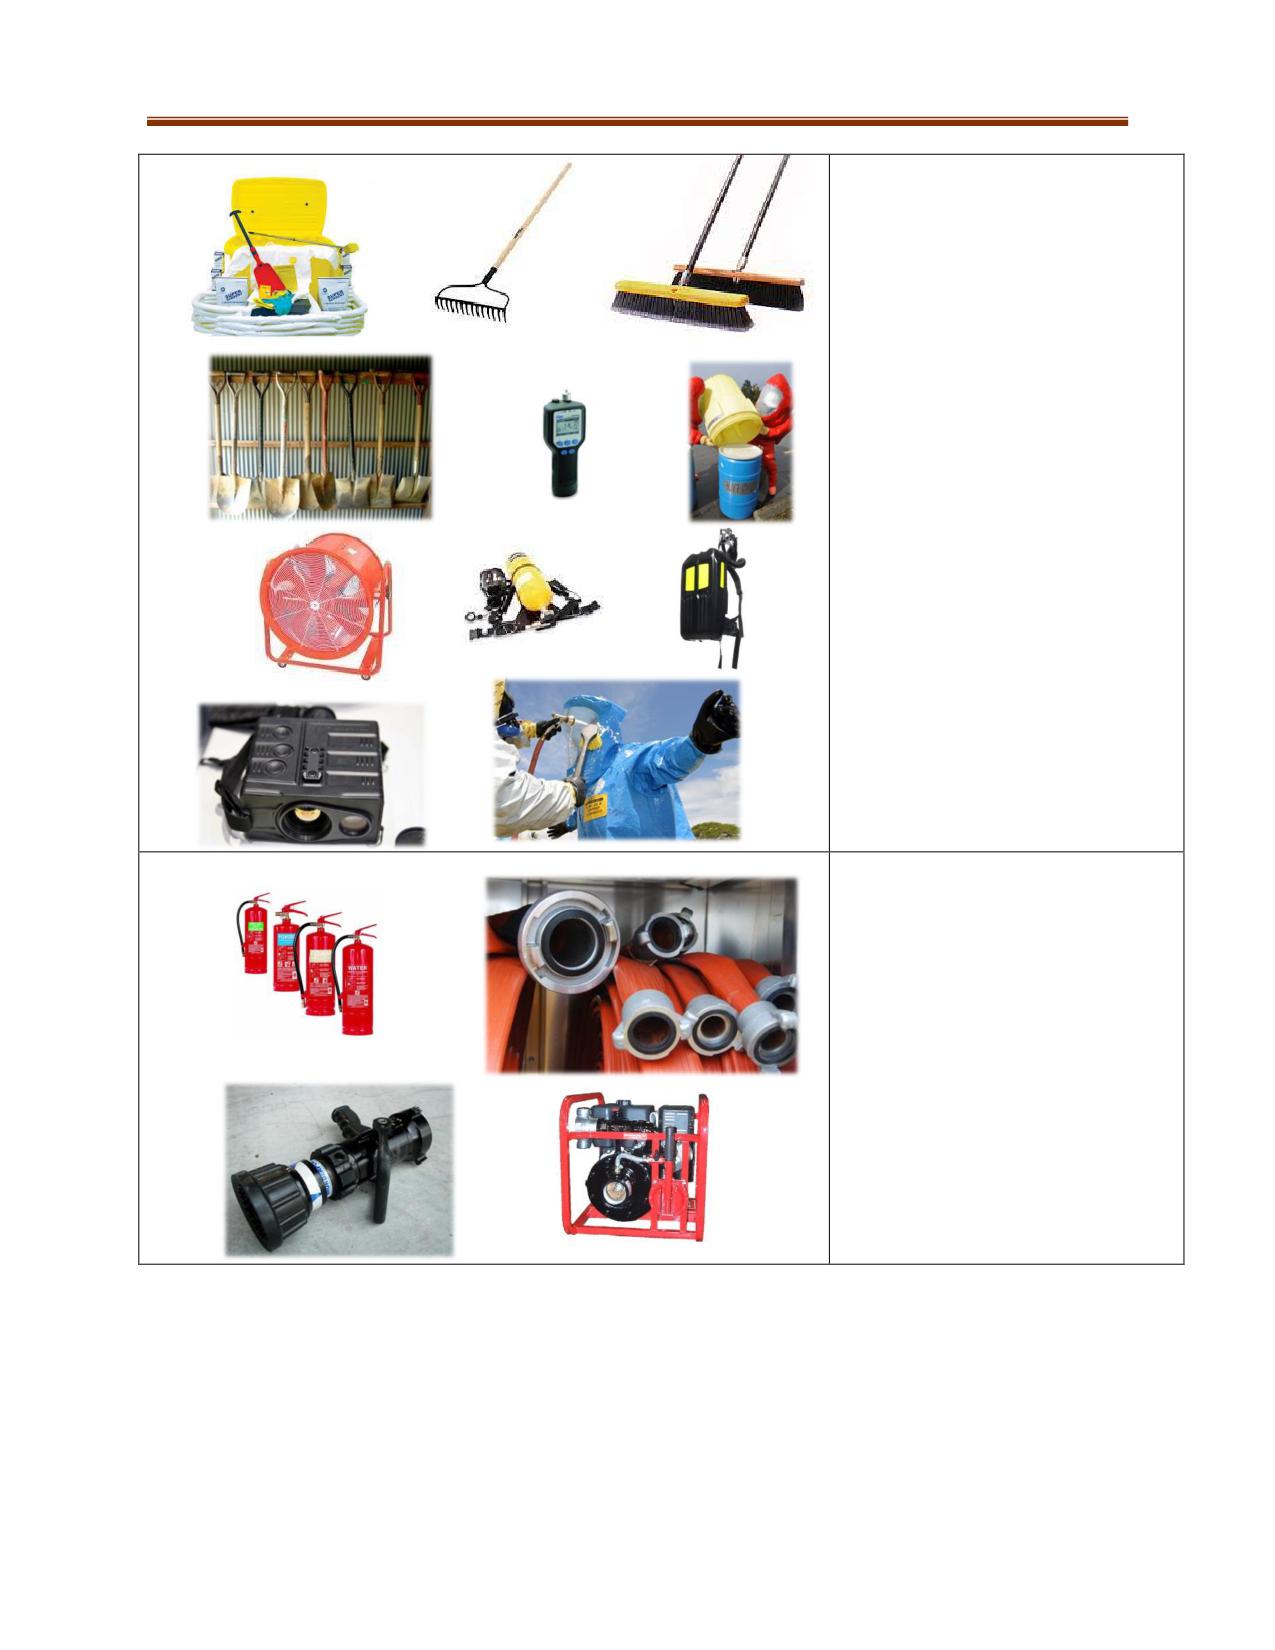
HAZARDOUS ATMOSPHERE AND
SPILL TOOLS
Used to protect responders and
help with clean up
Common hazardous atmosphere
and spill tools include spill kits,
rakes, brooms, shovels, gas
detectors, overpack drums,
ventilation, respiratory
apparatuses, thermal imaging
devices, hazardous atmosphere
PPE and decontamination
equipment
FIRE APPLIANCES
Used to assist in fire suppression
Common fire appliances include
fire extinguishers, fire hoses,
nozzles and pumps
6-6
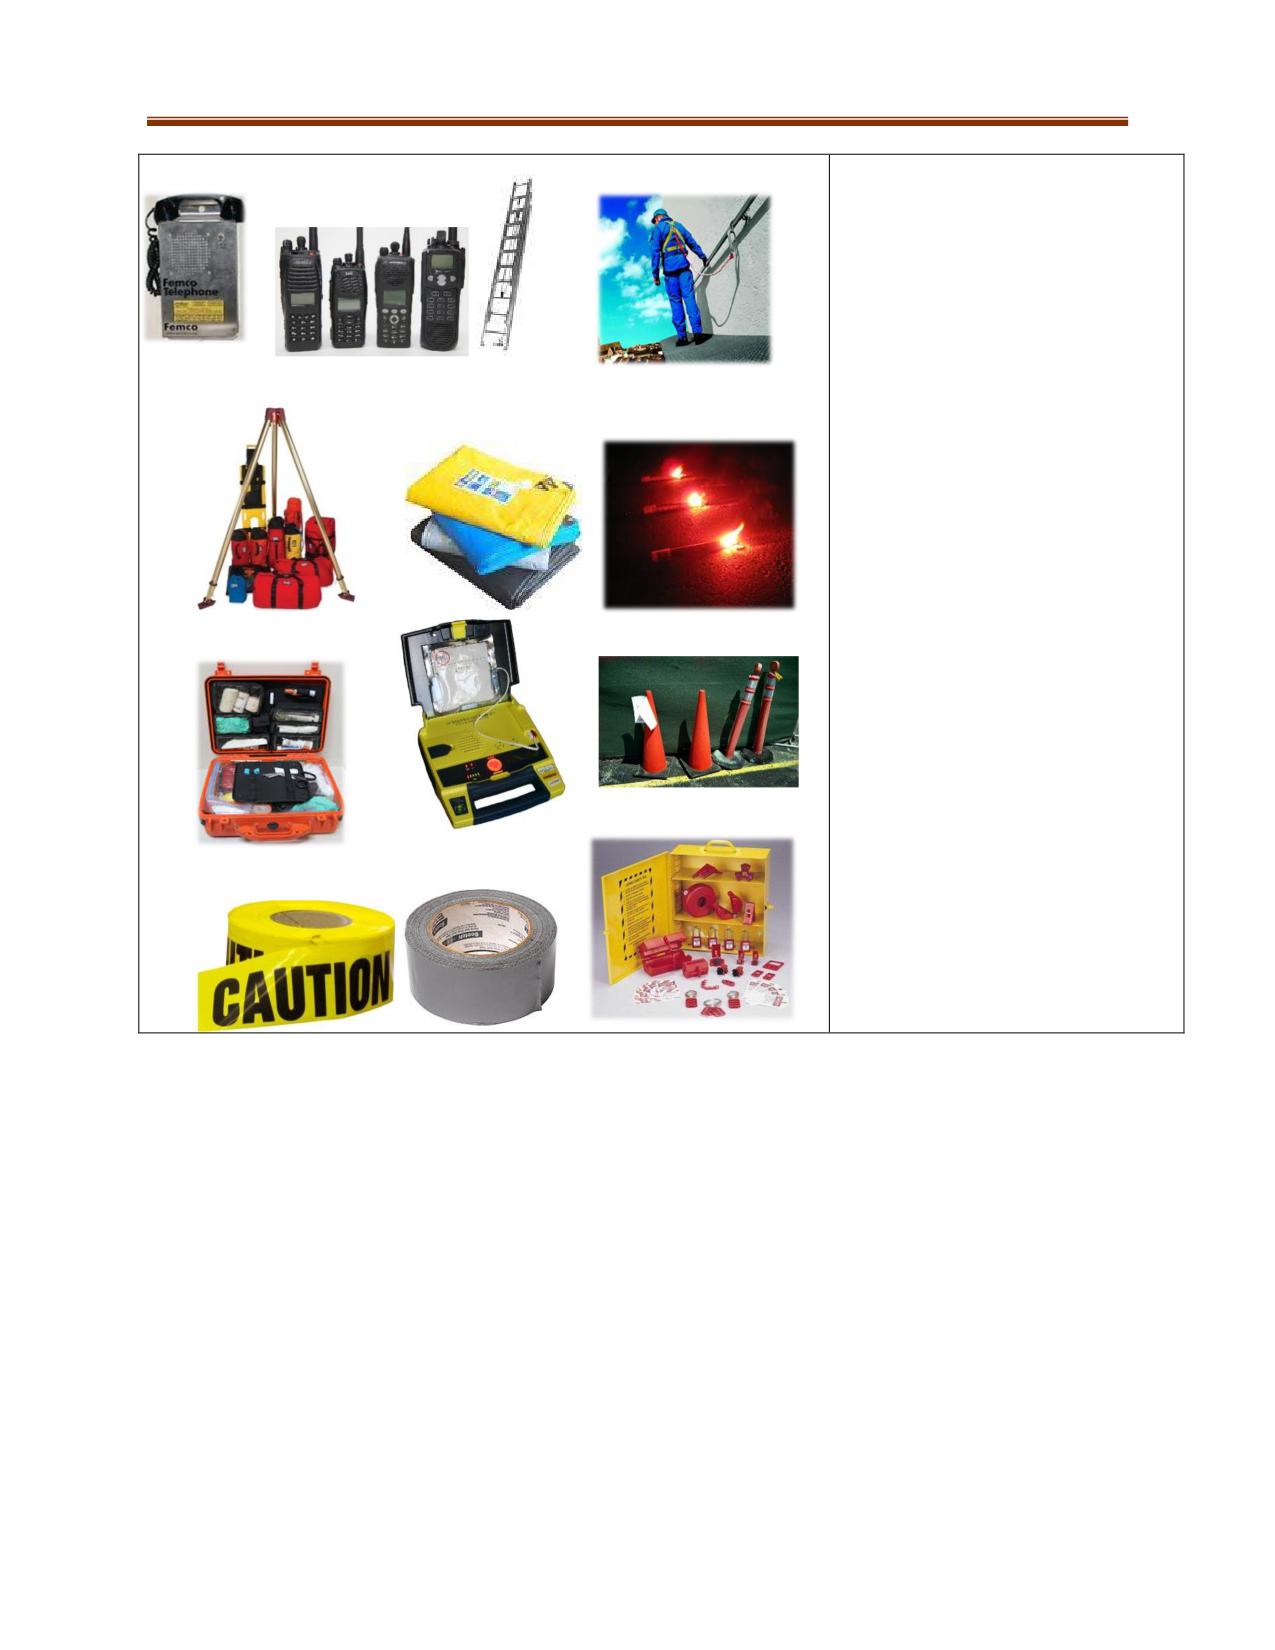
MISCELLANEOUS TOOLS
Other tools encountered in mine
rescue include communication
devices, ladders, life lines, confined
space equipment (tripods,
harnesses, ventilation equipment),
tarpaulins, flares, first aid
equipment, traffic and hazard
control, tape, lock out devices
6-7
6-8
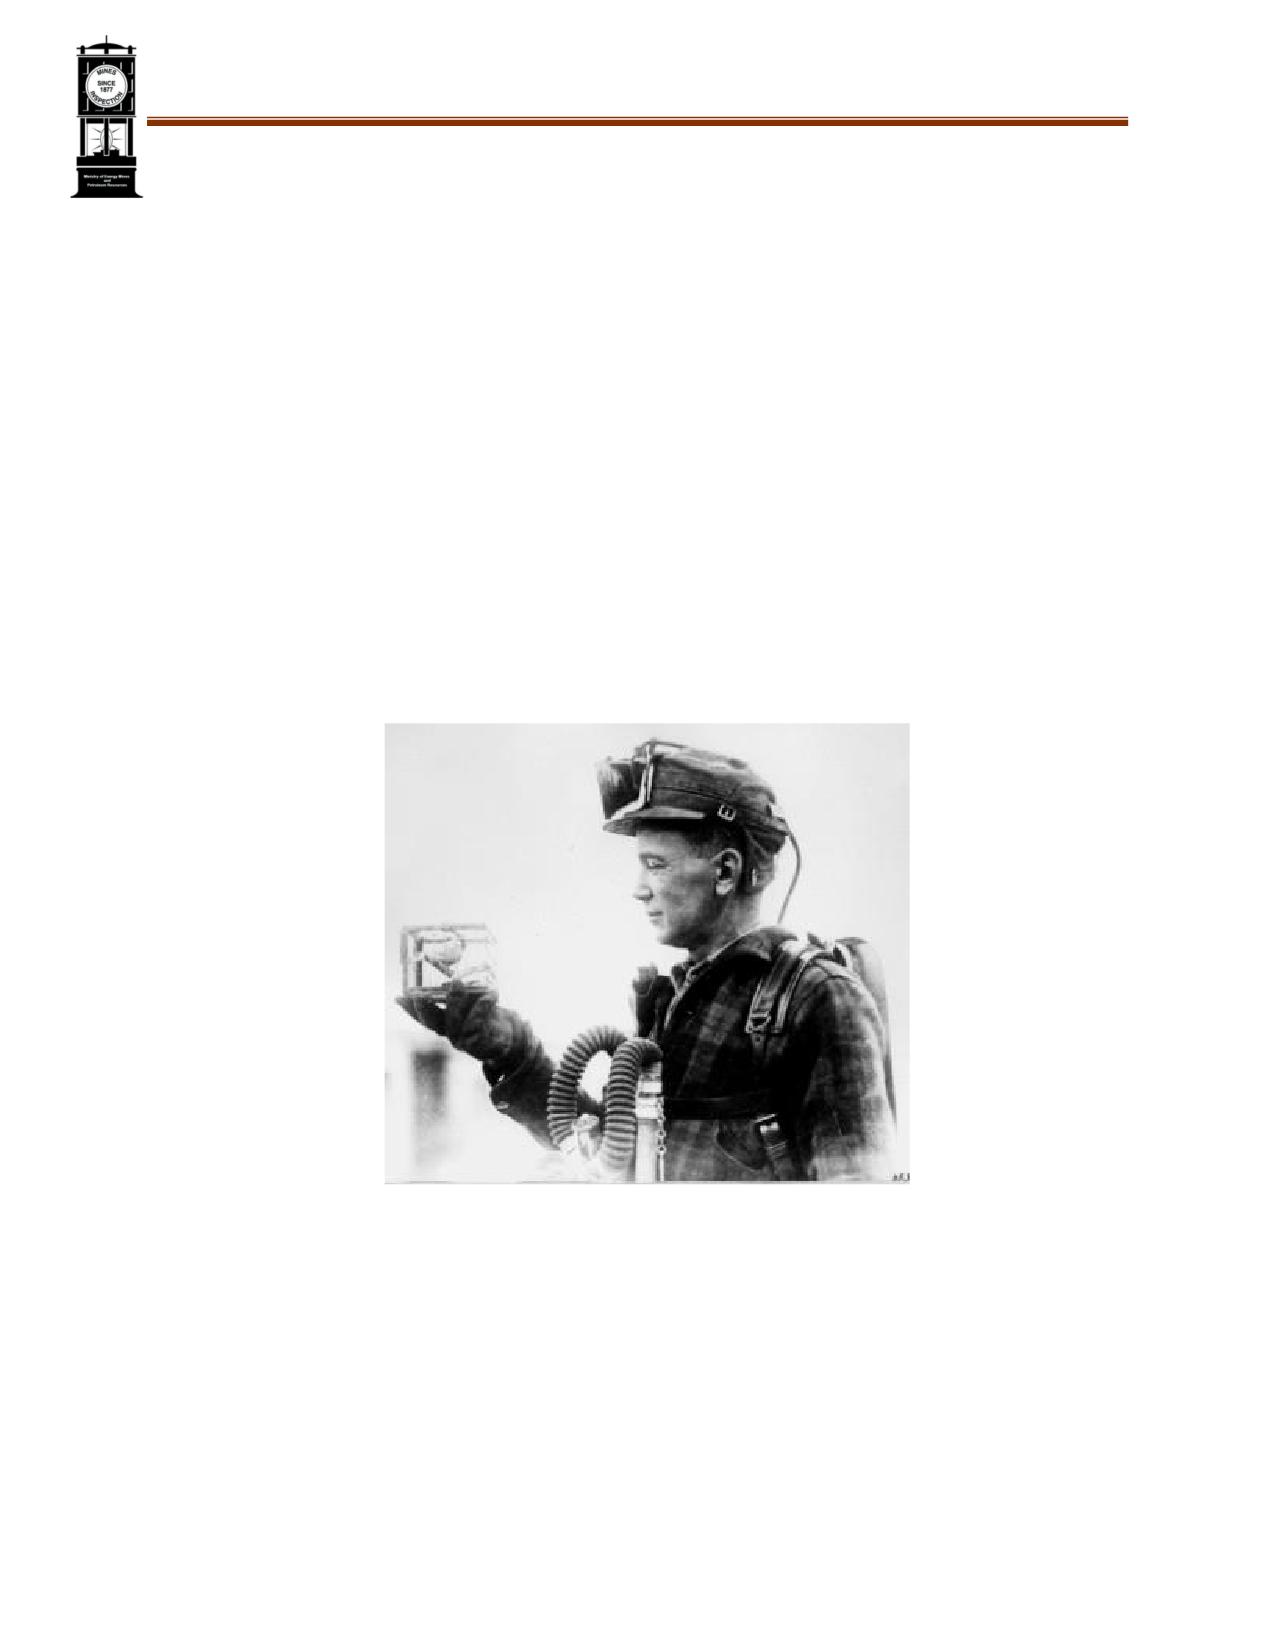
Western Canada Mine Rescue Manual
Chapter 7 Gas Detection
Instruments
7-1
OBJECTIVES
Rescue teams can determine the gases and vapours present in an atmosphere using a few different
methods and tools. Upon completion of this chapter, the trainee shall be able to demonstrate
competency in:
What gases could be encountered during an emergency response
Selecting monitoring equipment and methods suitable for the incident
Practical skills for an effective gas detection program
Introduction
There are four categories of hazardous atmospheres:
Toxic
Oxygen deficiency/Asphyxiating gases
Explosive/ flammable gases or vapours
Smoke, aerosols, fumes (particulate contaminants)
Intrinsic Safety is a design applied to electrical equipment and wiring for hazardous locations. The
technique is based on limiting energy, both electrical and thermal, to a level below that required to
ignite a specific hazardous atmospheric mixture.
All personal protective equipment must be considered before any and all gas testing. Always check
that any monitoring equipment or other electrical devices are intrinsically safe.
SELECTING GAS DETECTION EQUIPMENT
It is important to select gas detection equipment that fits the specific needs of the incident. Mine rescue
gas detection involves the use of direct-reading instruments (DRI). These instruments provide
information at the time of sampling, thus enabling rapid decision-making.
All equipment must meet relevant health and safety legislation, standards, and regulations.
When selecting gas detection equipment, the user should:
Check for conditions that could interfere with the equipment
o Cross Sensitivity: Sensor’s reaction to an interfering gas. The response of a sensor to a
gas that is not the target of the sensor.
o Some gases, such as acetylene, can interfere with the instrument sensor and mask the
presence of sulphur dioxide (SO2).
o Other common interferences: Electromagnetic fields, humidity, atmospheric
pressure/altitude, low temperatures, saturation and high concentrations.
Consider performance criteria/specifications of the instrument
o Response Time: Ability to react to its specific gas in the time specified (Ex. 90% of
reading in 30 seconds).
o Noise/Drift: How much readings fluctuate when the quantity or concentration of a
substance stays the same.
o Limit of Detection (LOD): The lowest quantity or concentration of a substance that the
instrument can register within a margin of confidence.
o Accuracy: The degree to which the measurement of a quantity of a substance matches
up with that quantity’s actual value.
7-2
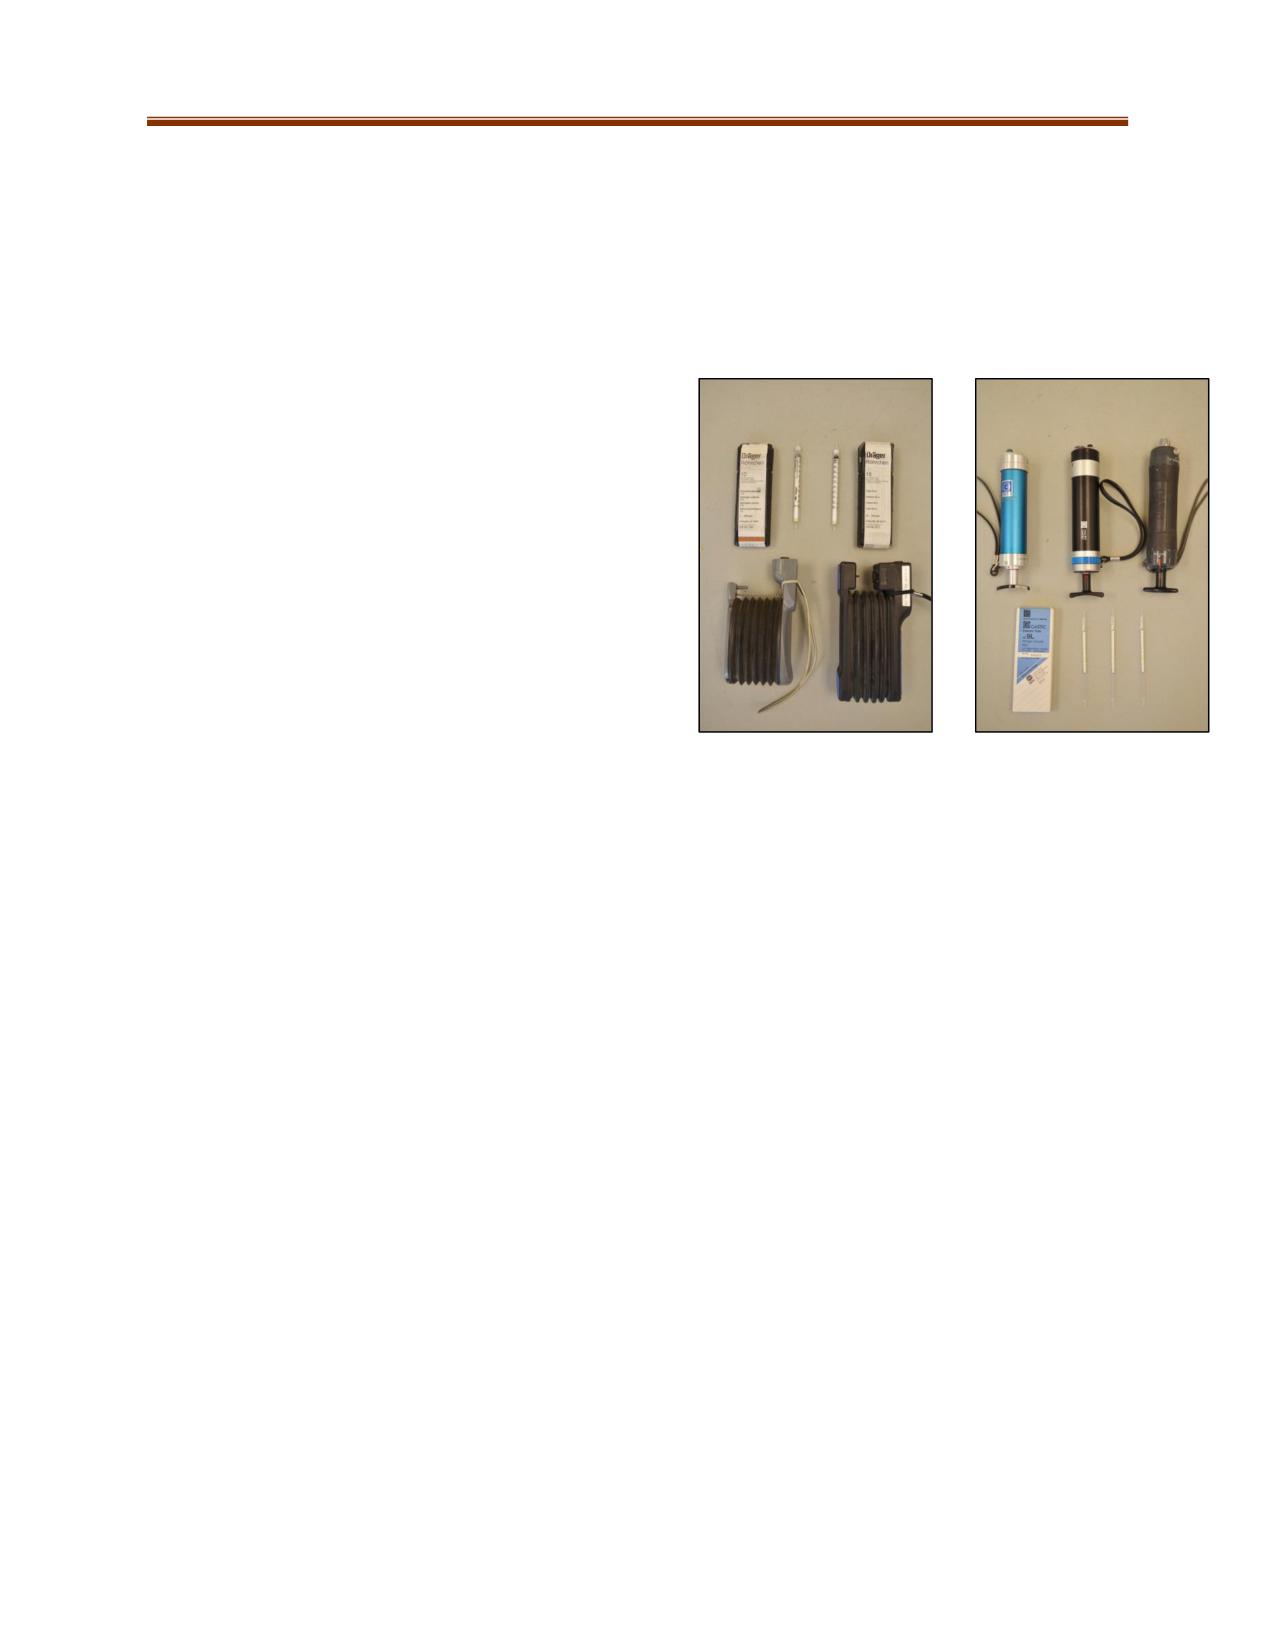
o Precision: The degree to which repeated measurements under unchanged conditions
show the same results.
o Dynamic Range: The ratio between the largest and smallest possible signals. The
smallest is the LOD and the largest is sensor saturation.
o Note: Follow all manufacturer’s specifications for application and use.
GAS DETECTOR TYPES
Colorimetric (Tube-style) indicators measure more than
200 organic and inorganic gases and vapours in the air.
The sealed glass tubes are filled with a granular material
coated with a chemical that changes colour when it
reacts to a particular gas or vapour.
Before Use: Refer to manufacturer’s
instructions for the particular tube type.
o Perform a pump leak test.
o Ensure the direction arrow is oriented
toward the pump.
Operation: A portable pump draws a known
volume of air through a detector tube designed
to measure the concentration. The colour
change is then read on a scale printed on the tube.
Drager (L) and Gastec (R) colorimetric tubes
Considerations: Measurement accuracy, limits of detection, interferences,
temperature/humidity, shelf life, time period for which the colour stain is stable after sampling.
Readings from a short-term indicator tube should be compared to the appropriate short-term exposure
limits, such as TLV-STEL and TLV-C.
Tube Storage and Shelf Life:
o Tubes have a shelf life. These expiration dates are printed on the box.
o Store properly by avoiding excessively low or high temperatures and direct sunlight.
Advantages:
o Operation with one hand.
o Low weight and simple operation.
o Always ready for use (no batteries).
o Tubes for more than 200 different gases and vapours.
o Printed measuring scale on the tubes provide immediate reading of the result.
o Low maintenance.
Limitations:
o Tubes and pumps are manufacturer-specific.
o No alarm system, therefore not recommended for continuous monitoring
o Dependent upon operator’s interpretation of results
o Application can require longer periods of time in atmospheres for results to appear (up
to several minutes)
o Limited shelf-life
o Only accurate within +/- 20%
o Many cross-sensitivities
7-3

o Range of application is dependent on humidity and temperature
o Requires proper storage, handling, and disposal
Common types of detectors include Drager, Gastec
Drager CMS
This variety of gas tube tester follows the same chemical reaction
principles. The major differences are:
Small tubes are contained within a plastic chip with a bar
code identifier
Battery operated pump and tube reader
Display screen indicating gas being tested, range, sampling
duration status and actual reading
The chip has 10 individual sample tubes. Each tube can only be used once. The tester scans the chip
when inserted into the reader and indicates the gas and range for which the chip is designed.
Electronic gas detectors
An electronic gas detector is a complex system that includes a sensor(s) surrounded by sensitive
electronics, alarms (visual, audible, vibrating), a battery and a display. All electronic gas detectors must
meet regulated manufacturer standards. Electronic gas detectors are available as single, multi-gas,
stationary (non-portable), and specialized units.
Advantages:
o Multi-gas detectors use separate sensors for oxygen and combustible atmospheres.
o They can register multiple toxic gases in the same hand-held monitor.
o Many models have interchangeable-sensor capabilities.
o Will provide low-level and high-level alarms.
o Accidental power-off protection: requires the power-off button to be held continuously
for at least 3-5 seconds.
o Many are capable of internal data-logging
o Portable field docking stations are also available for several models
o Can have an internal motorized pump or a diffusion monitor with attachable pump that
allow the instrument to be used in a variety of applications including confined space
entry or to measure from greater distance or height
o More accurate than colorimetric tubes - accurate within +/- 10%
Limitations:
o Sensor sensitivity and response to gas will degrade over time; Limited shelf life
o Gases recognized are sensor-specific
o Requires time to perform a pre-use procedure
o Sensors and batteries have a finite life
o Environmental conditions such as temperature, humidity, dust, dirt and rough handling
all contribute to premature sensor degradation
BW GasAlert Quattro
Industrial Scientific Ventis MX4
Drager MX
7-4
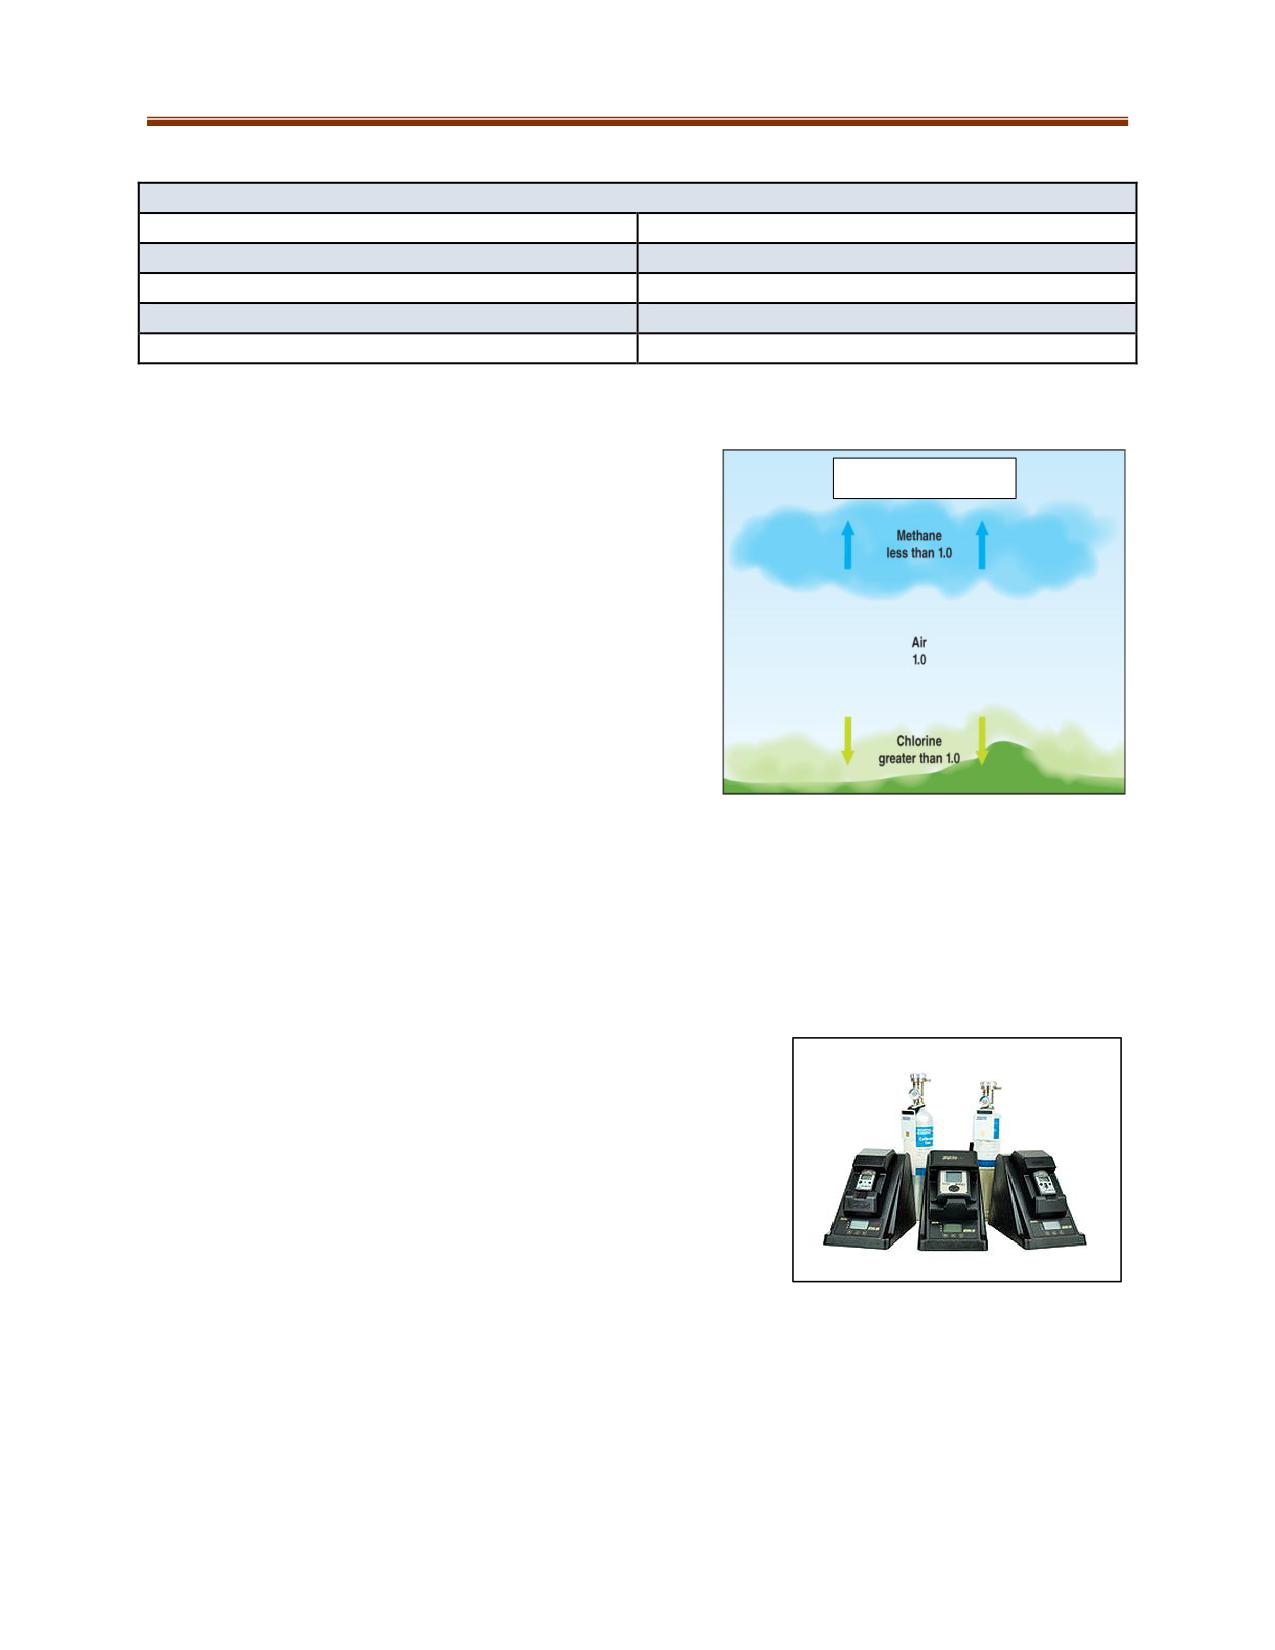
Typical Life Span of Various Sensor Types
Oxygen sensors
1-5 years
Catalytic bead combustible gas sensors
3-5 years
Electrochemical toxic gas sensors
1-4 years (depending on type)
Infrared gas sensors
5-10 years
Photoionization gas sensors
2-4 years
PRACTICAL SKILLS FOR GAS DETECTION
Atmospheric sampling
Relative Density
The operator performing the sample tests is responsible
for:
Following all manufacturer’s specifications and
guidelines
Making sure that proper sampling techniques are
performed due to the stratification of gases that
may be present
Proper sampling: the operator must sample prior
to entry, prior to re-entry, and continuously while
work is being completed.
During underground exploration, gas testing
should be performed at intersections or where
conditions change.
Sampling at the top, middle, and bottom of a space must be done in accordance with
manufacturer specifications.
o Sample every 1-2 metres (3-7 ft) due to the weights of gases. Some are lighter than air
(methane), some are slightly lighter (carbon monoxide), and some are heavier than air
(chlorine).
Bump Testing and Calibration
The most important elements of gas detector maintenance are
function (“bump”) testing and calibration. These tests can be
done either automatically via a docking station or manually.
Functional (“bump”) testing involves a brief exposure of the
monitor to a known concentration of gas(es) for the purpose of
verifying sensor and alarm operation.
Manufacturers recommend that a bump test be
performed on every instrument prior to each day’s use.
Bump tests are not measures of the instrument’s accuracy.
Docking stations used for bump tests
Any time an instrument fails to respond properly during a bump test, a full calibration should be
completed successfully prior to use.
7-5
Steps for Gas Detector Operation
1. Visually inspect for damage and contamination
2. Turn on instrument in good atmosphere and check battery level
3. Zero the instrument
4. Bump test (functionally check) instrument
5. Clear the peaks if applicable
Bump Test Procedure
This check is performed by applying a known concentration of gas to verify sensor performance and
alarm operation. Following the simple steps below will aid you in performing your bump check.
1. Turn the instrument on and warm-up
2. Zero the instrument
3. Apply calibration gas
4. Allow sensors to respond to calibration gas
5. Verify proper alarm function
6. Remove gas and allow the monitor to clear
7. If any of the sensors fail to respond, remove from service
Calibration ensures that detectors perform properly. The process uses a calibration gas with a specific
concentration.
Refer to manufacturer’s recommended protocols for calibration.
It is recommended to perform full instrument calibration using calibration gas(es) monthly to
ensure maximum accuracy.
Establishes a point of measurement accuracy
Provides insight into the condition of the sensors in the instrument
Adjusts the readings to account for changes due to sensor degradation
Calibration Gases are certified and traceable mixtures of gas concentration. Calibration gas cylinders are
identified by:
Gases and Concentrations
Part Number
Expiration Date
Follow manufacturer’s recommendations when using regulators for disposable gas cylinder and
disposing cylinders.
7-6
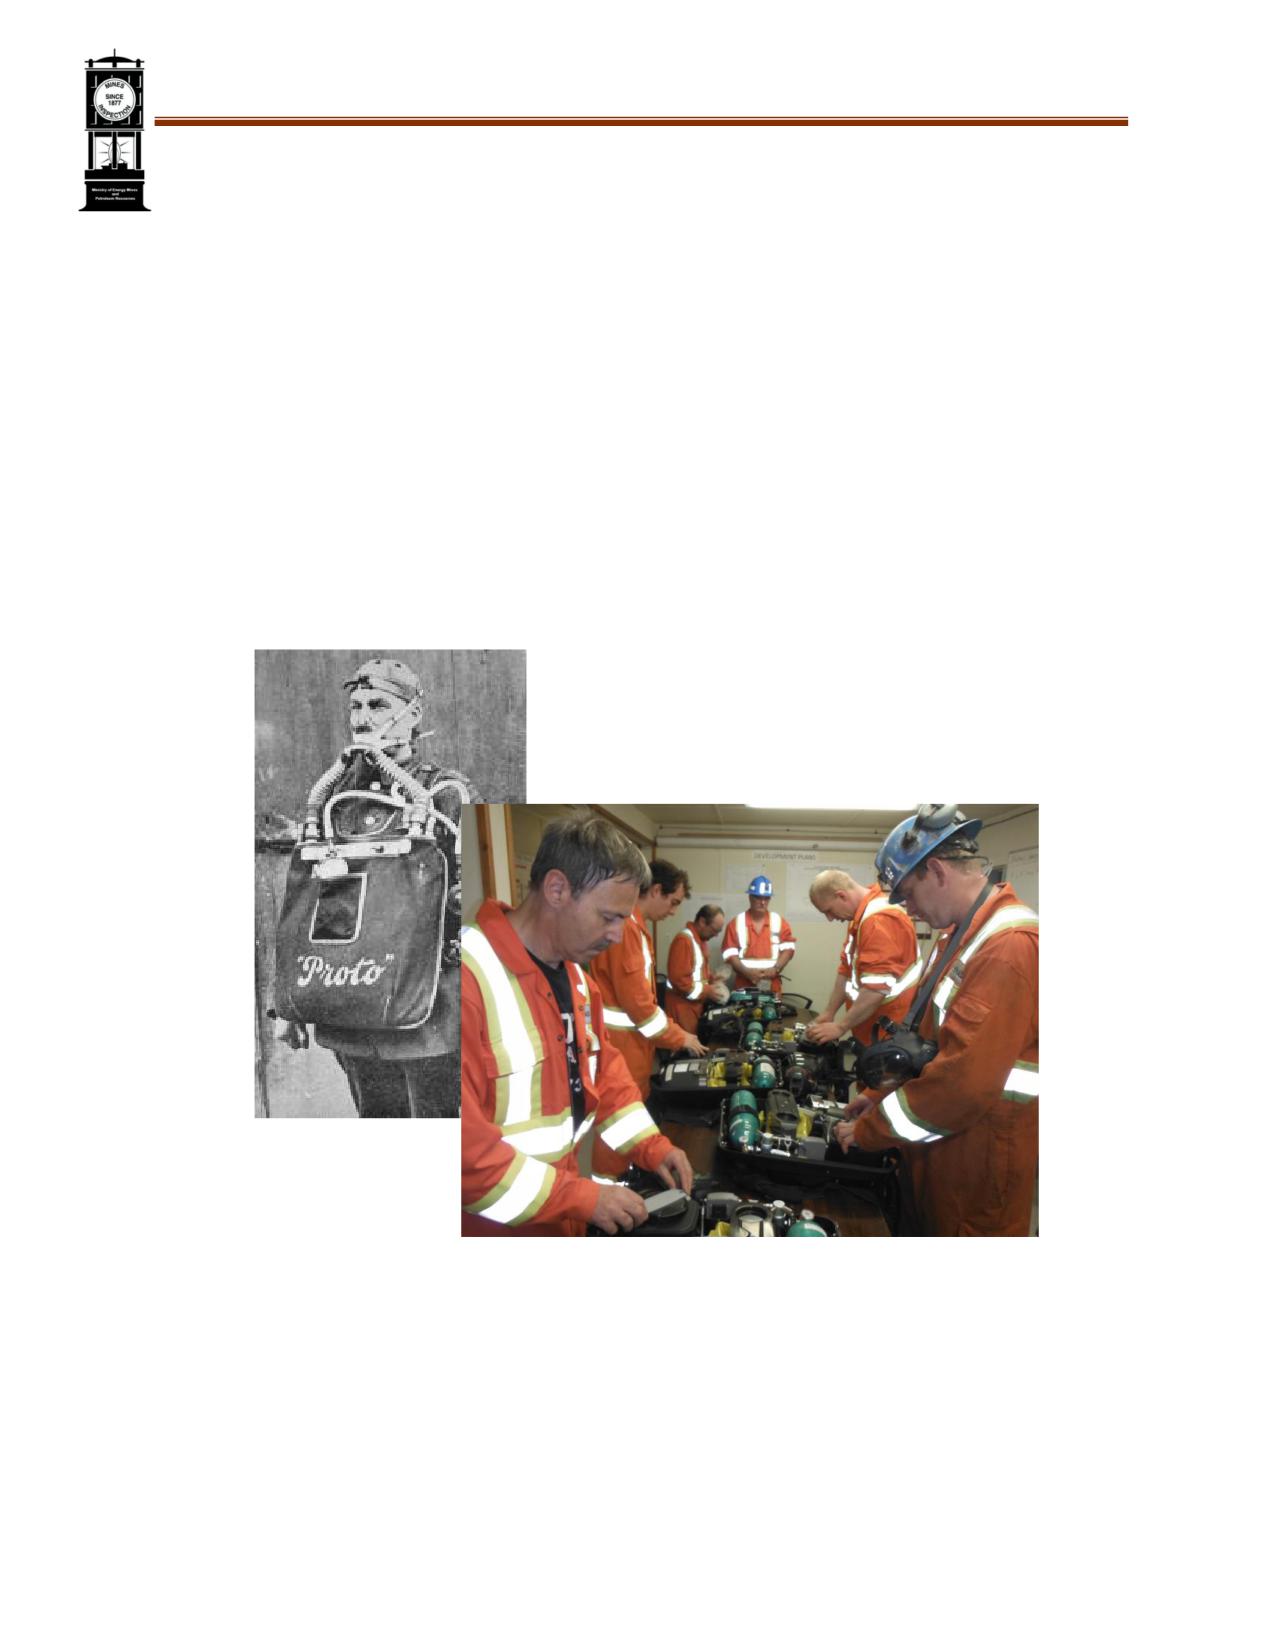
Western Canada Mine Rescue Manual
Chapter 8 Respiratory
Protective Equipment
8-1
OBJECTIVES
Selecting the right protective equipment can mean the difference between life and death when
responding to incidents in dangerous environments. Upon completion of this chapter, the trainee shall
be able to demonstrate competency in:
The hazardous respiratory environments encountered in mine rescue work
Breathing apparatus concepts
Limitations and safety features of breathing apparatus
Recharging and hydrostatic testing of compressed gas cylinders
Refer to manufacturer’s guidelines and site-specific procedures for a comprehensive overview of care,
use, specifications, and handling of breathing apparatus.
Introduction
People who are exposed to a dangerous atmosphere may not be aware that the danger exists nor of the
need to protect themselves. Proper and adequate ventilation is the best solution to a dangerous
atmosphere. (An exception to this rule is when fire is involved.) Proper respiratory equipment must be
used if a mine rescue team cannot ventilate an area and lives or property are at risk.
Oxygen content can reach dangerous levels in hazardous scenarios, such as in:
Incidents involving fire
Confined spaces, including buildings, manholes, tunnels, vaults, chemical tanks, oil tanks,
storage bins, silos, equipment, and sumps
Mine workings
Hazardous atmospheres:
Toxic gases or vapours
Oxygen deficiency/ asphyxiating gases
Explosive/flammable gases or vapours
Smoke, aerosols, fumes (particulate contaminants)
The lungs and respiratory tract are more vulnerable to injury from hazardous atmospheres than any
other part of the body. Inhaling heated gases may cause oedema (fluid collection) in the lungs, which
can cause death by asphyxiation. If the air is heated or moist, the damage can be much worse. The
tissue damage from hot air is not immediately reversible by introducing fresh, cool air. When taken
quickly into the lungs, it may cause a serious decrease in blood pressure and failure of the circulatory
system.
8-2
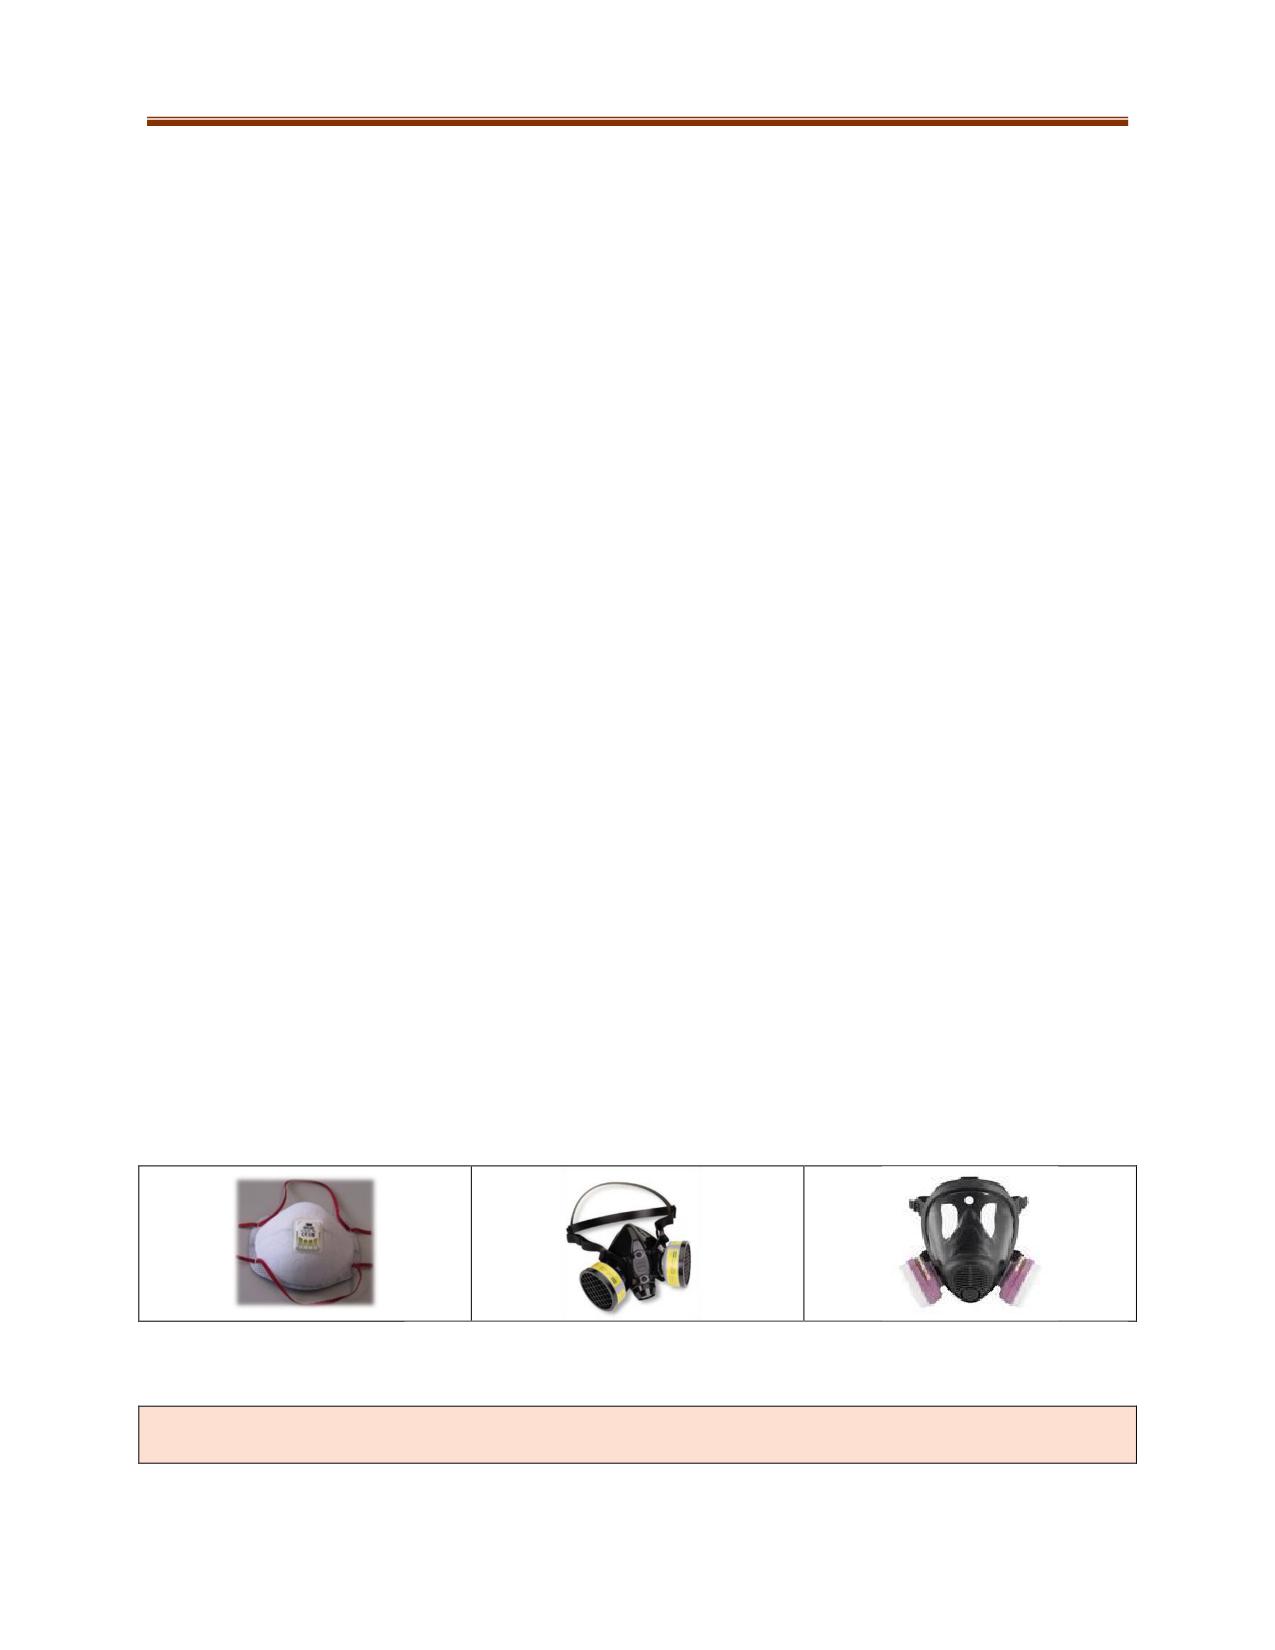
APPARATUS CONCEPTS
Mine rescue teams use both open-circuit and closed-circuit breathing apparatus.
In a non-self-contained breathing apparatus, oxygen from the atmosphere is drawn through a filter to
the rescuer’s breathing apparatus. In environments in which carbon monoxide is present, there must be
adequate oxygen in the atmosphere for a non-self-contained breathing apparatus to function properly.
In a self-contained breathing apparatus, breathable air is supplied from a cylinder or released as a
product of a chemical reaction that occurs in a component of the apparatus.
In an open-circuit apparatus, exhaled air is released into the surrounding atmosphere.
In a closed-circuit apparatus, exhaled air is recirculated within the system.
Positive Pressure versus Negative Pressure
The apparatus will deliver breathable oxygen/air to the wearer under positive pressure. A positive
pressure system will maintain an internal pressure higher than the external pressure.
The advantages of positive pressure:
Reduces the potential for external atmospheric toxins (smoke, gases) to penetrate into the
system, i.e. if the facepiece seal is broken.
No added breathing effort is required by the wearer (unrestricted).
A negative pressure system’s internal pressure is lower than the external pressure.
All makes and models of breathing apparatuses have manufacturer’s instructions for donning (putting
the apparatus on) and doffing (taking the apparatus off). Rescuers must train to the manufacturers’
procedures of the models used on their site.
Air-Purifying Respirators (APRs)
(non-self-contained, open-circuit)
APRs remove contaminants in the air by filtering out particulates (e.g., dusts, fumes, mists), gases, and
vapours. They require an adequate amount of oxygen (i.e., 19.5%) in the atmosphere to be used as they
do not create or supply oxygen for the wearer. They have a limited protection factor. Cartridge versions
are colour-coded for their respective atmospheric contaminant.
The masks come in a variety of forms, including (from L-R) disposable, half-face cartridge and full-face cartridge models.
Fit tests shall be performed for all mask type respirators. Ensure compliance with local regulations,
standards, and legislation.
8-3
SELF-RESCUERS
(non-self-contained, open-circuit)
MSA W65
This is a respirator strictly designed for self-rescue to protect the
wearer against carbon monoxide gas. It is small and easily carried on
the underground miner’s belt.
The MSA Model W65 is sealed with nitrogen. If the seal is broken,
the unit should be removed from service because the chemicals in
the apparatus deteriorate. Users should always examine their self-
rescuers for damage before use.
Operation
Air is drawn in through the bottom of the self-rescuer and passes through the coarse-dust filter
bag.
The air then passes through a fine-dust filter in the bottom of the canister.
The air then passes through a drying agent that removes excess moisture that reduces the
effectiveness and deteriorates the Hopcalite. The Hopcalite is not consumed in the reaction as it
is a catalyst.
The air flows through the Hopcalite, which causes a catalytic reaction changing the carbon
monoxide to carbon dioxide, creating heat in the process.
The air, which can be dangerously hot, passes through a heat exchanger to be cooled.
When exhaled, the air again passes through the heat exchanger and out through a check valve,
which does not allow air from the outside back into the respirator. The heat exchanger
incorporates both the outside atmosphere and exhaled breath to cool the inhaled air.
The W65 self-rescuer will:
Require at least 19.5% oxygen in the air
Function in an environment with no more than 95% humidity
Protect the wearer against 1% (10,000 PPM) carbon monoxide for one hour
Generate heat when exposed to higher levels of carbon monoxide, thereby shortening the unit’s
duration. Wearers must be in a respirable atmosphere before removing the unit.
Have a service life of 10 years and a shelf life of 15 years when properly stored
Require testing as per manufacturer’s specifications
8-4
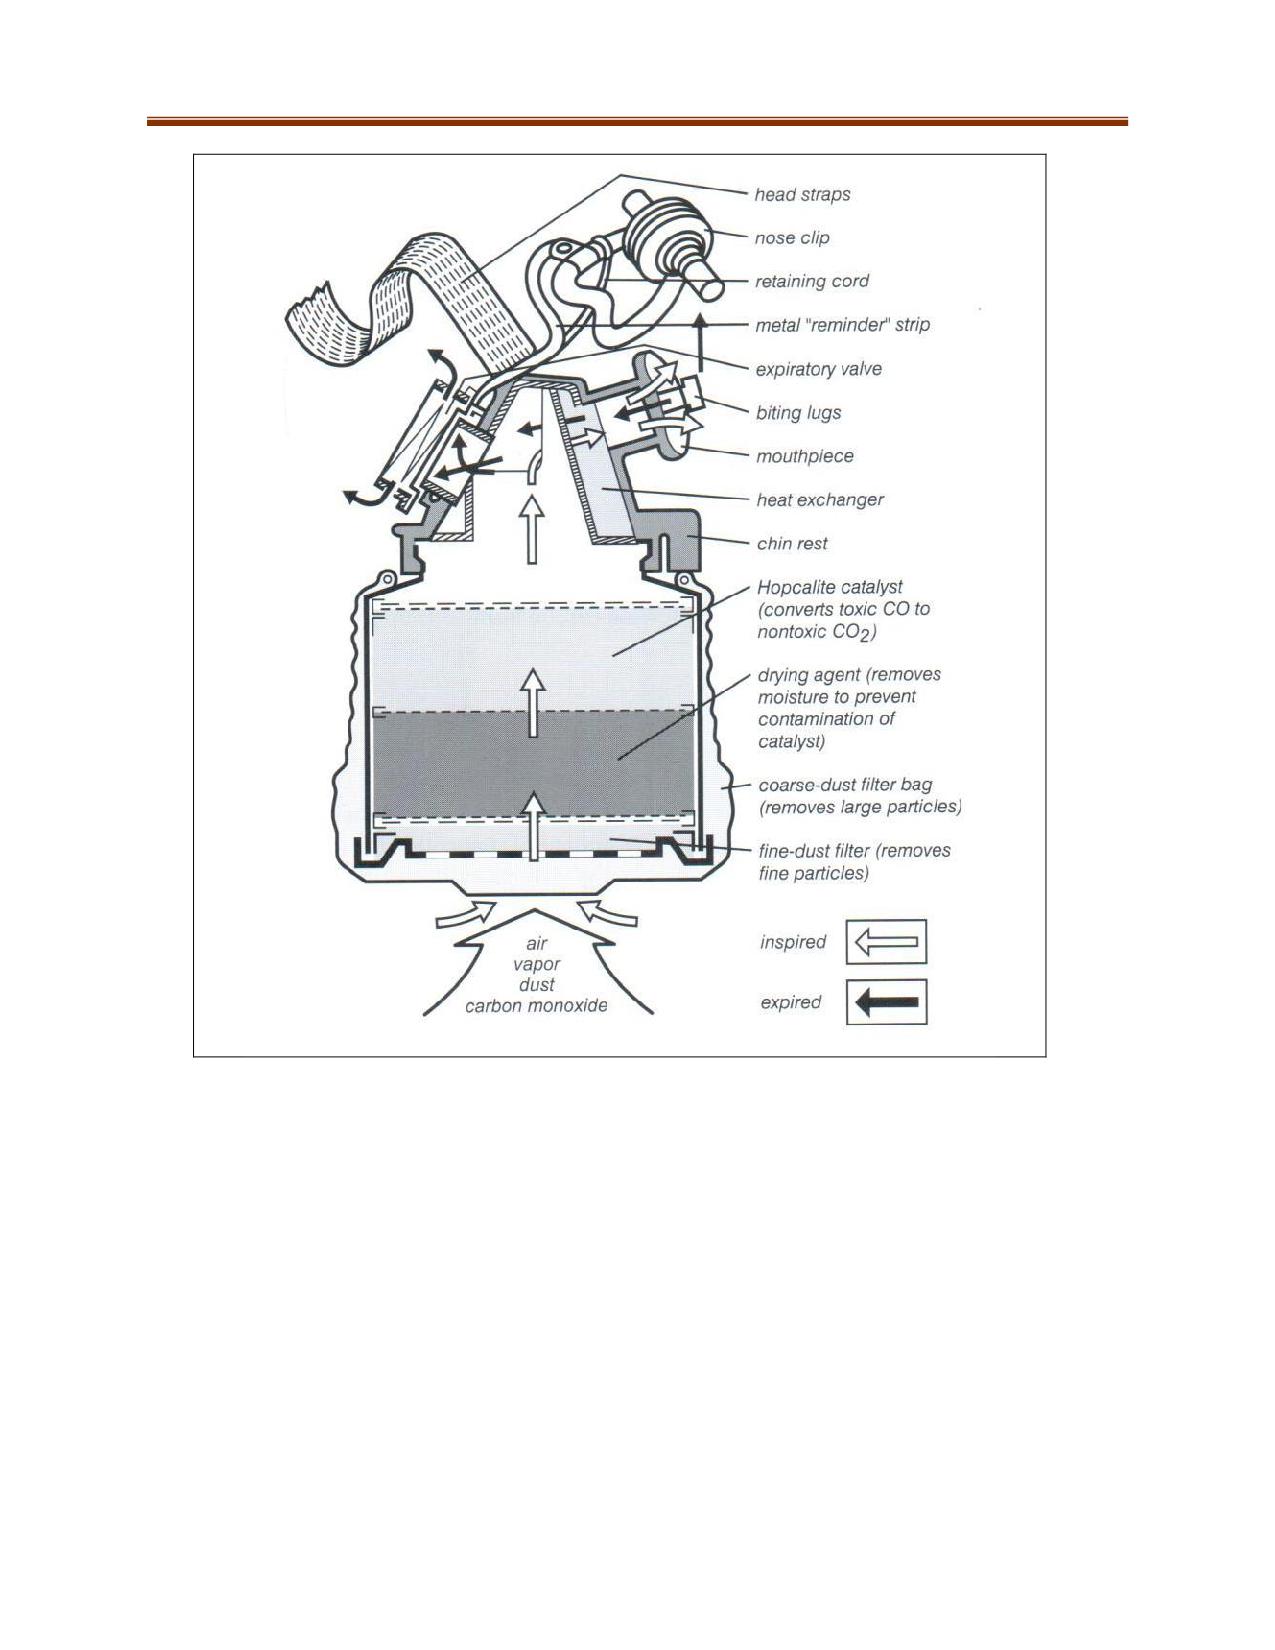
Fig 8-1: How a Self-Rescue functions
8-5
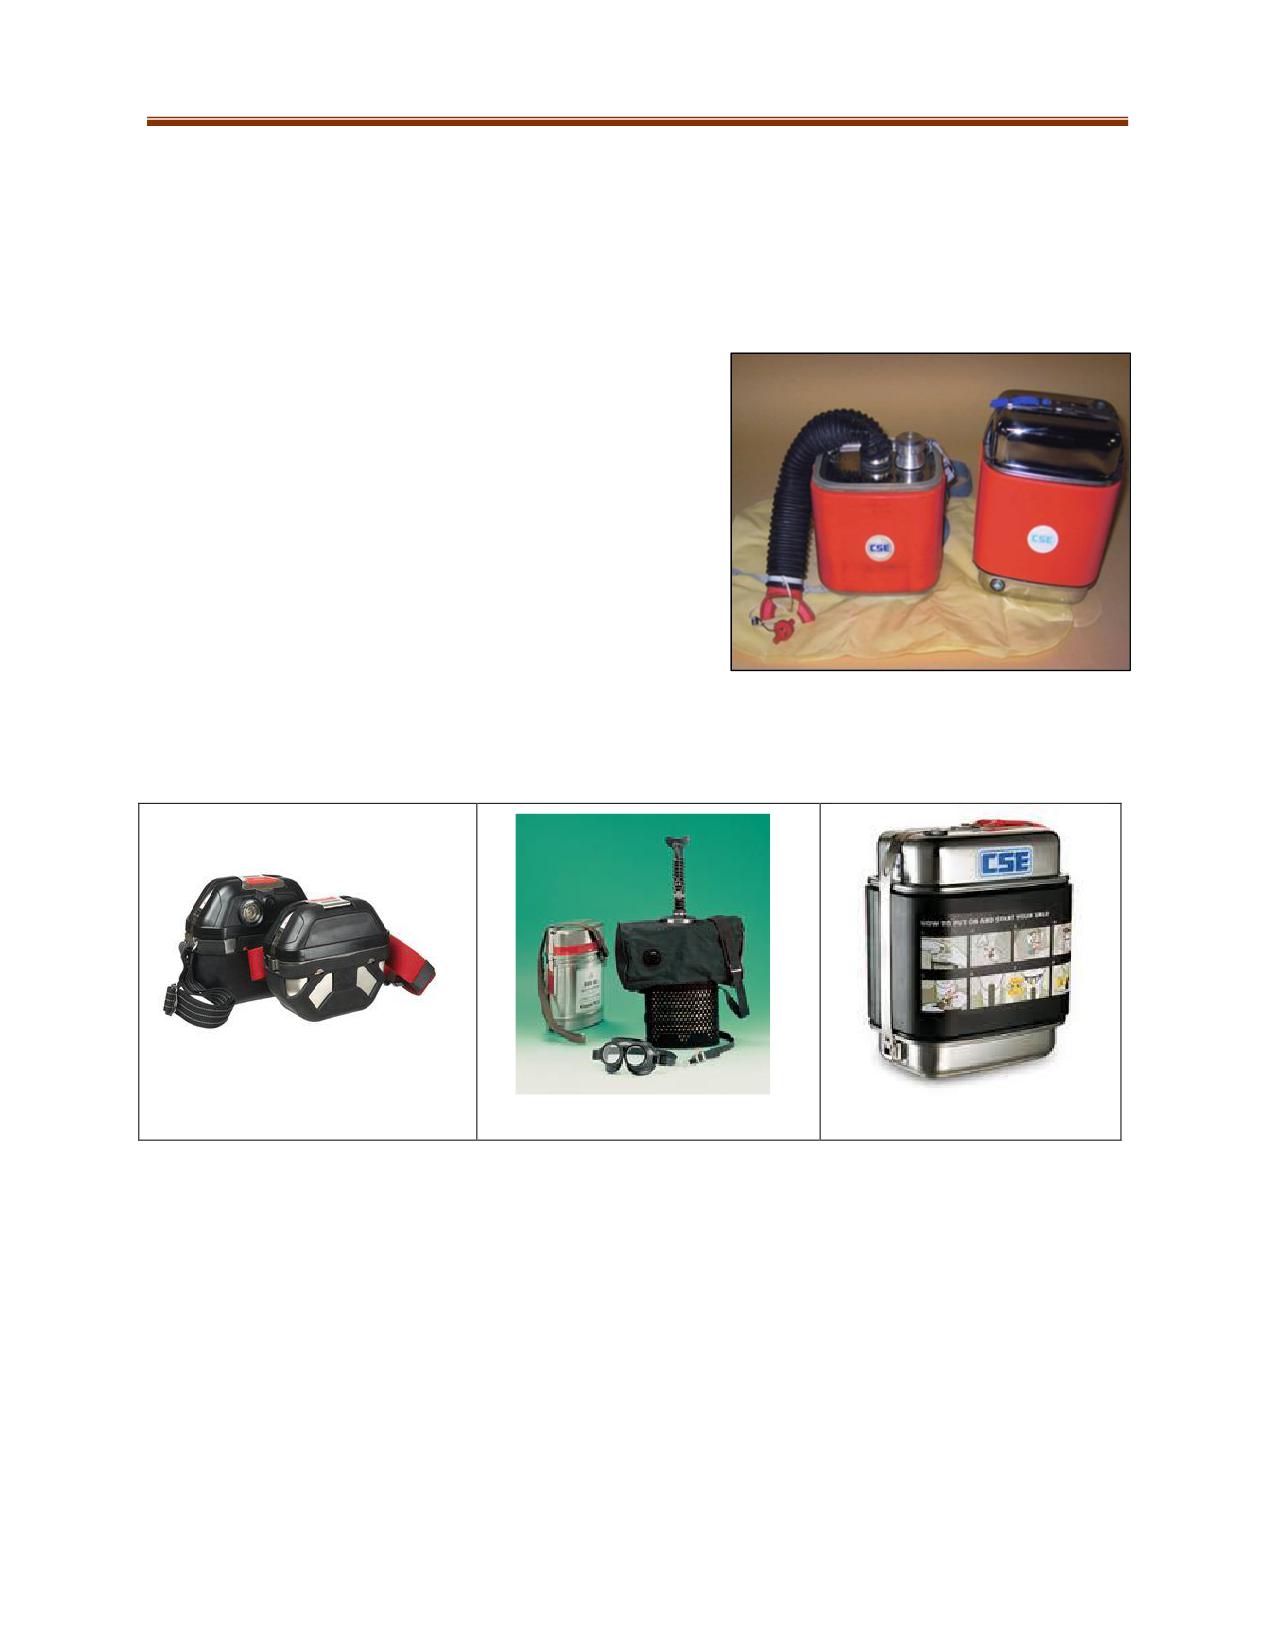
SELF-CONTAINED SELF-RESCUERS (SCSR)
(Closed Circuit, Self-Contained)
Oxygen-generating self-rescuers are designed strictly for self-rescue and to function completely
independent of the surrounding atmosphere.
Operation
Oxygen is released by the chemical reaction of
moisture from the exhaled breath mixing with the
potassium superoxide (KO2). This reaction produces
heat. A second reaction takes place between the
newly created potassium hydroxide and the carbon
dioxide from the exhaled breath, which
retains/absorbs the carbon dioxide.
The oxygen is inhaled from the breathing bag,
which also serves as a breathing air reservoir.
A heat exchanger is built into the breathing tube to
cool the air before inhalation.
A quick-start system covers the immediate oxygen
requirements of the user until the chemical of the canister becomes activated.
A number of oxygen generating self-rescuers are available on the market today. Some include:
From L-R: Drager Oxy 3000/6000, Drager Oxy SR 90 and CSE Self-Rescuer Long Duration
8-6
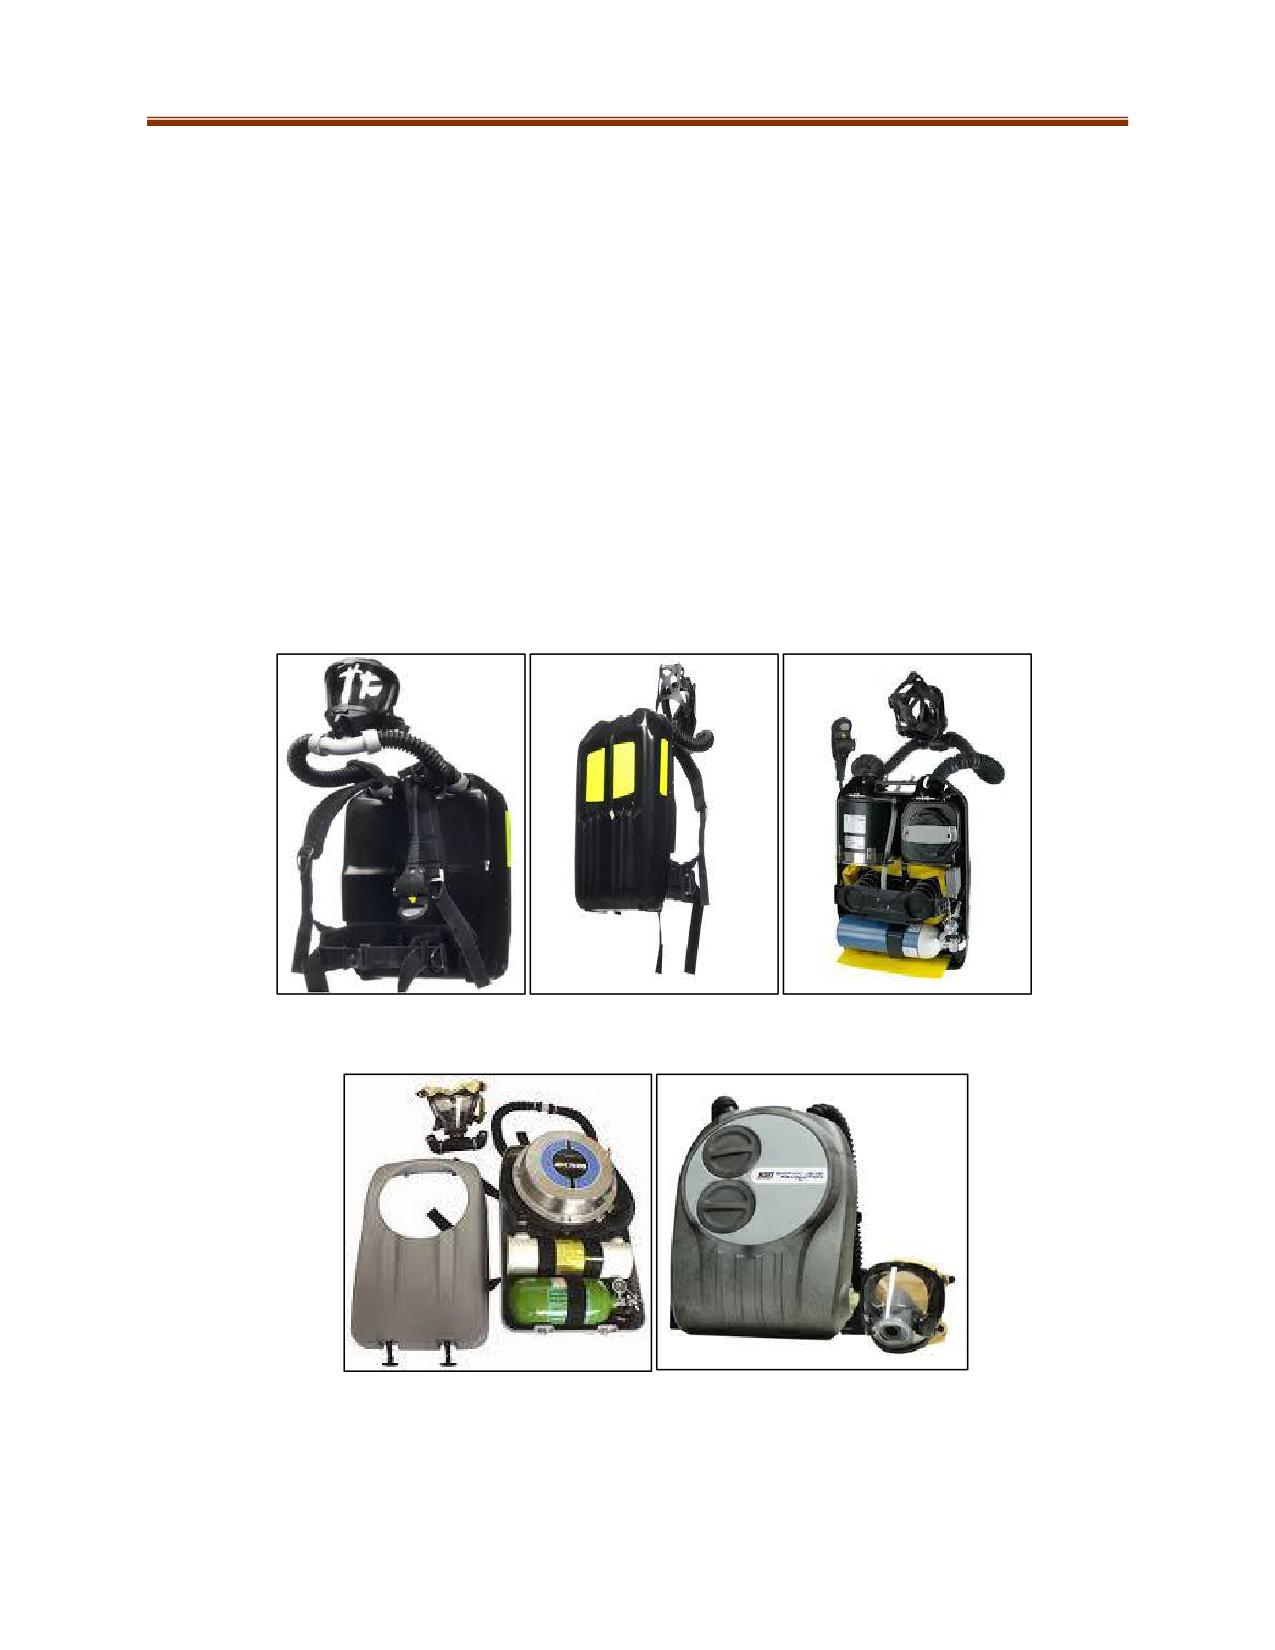
CLOSED-CIRCUIT BREATHING APPARATUS (CCBA)
(Closed circuit, self-contained, positive pressure, re-breather)
A CCBA’s main functions are to absorb carbon dioxide and provide oxygen. CCBAs also recycle the
unused oxygen from the wearer’s exhaled breath. The recycled air is enriched with oxygen from a
compressed oxygen cylinder prior to inhalation.
The positive pressure inside the facepiece protects the wearer from a potentially toxic environment.
Modern CCBAs maintain positive pressure by using springs on the breathing bag/chamber and a demand
valve when the internal volume of oxygen in the system has decreased.
The increased duration for the wearer (rated up to four hours) allows CCBAs to be used in incidents at
both surface and underground mines.
Two common positive pressure CCBAs are:
Dräger - PSS BG4
Bio Marine - BioPak 240R
Drager PSS BG4
Bio Marine BioPak 240R
8-7
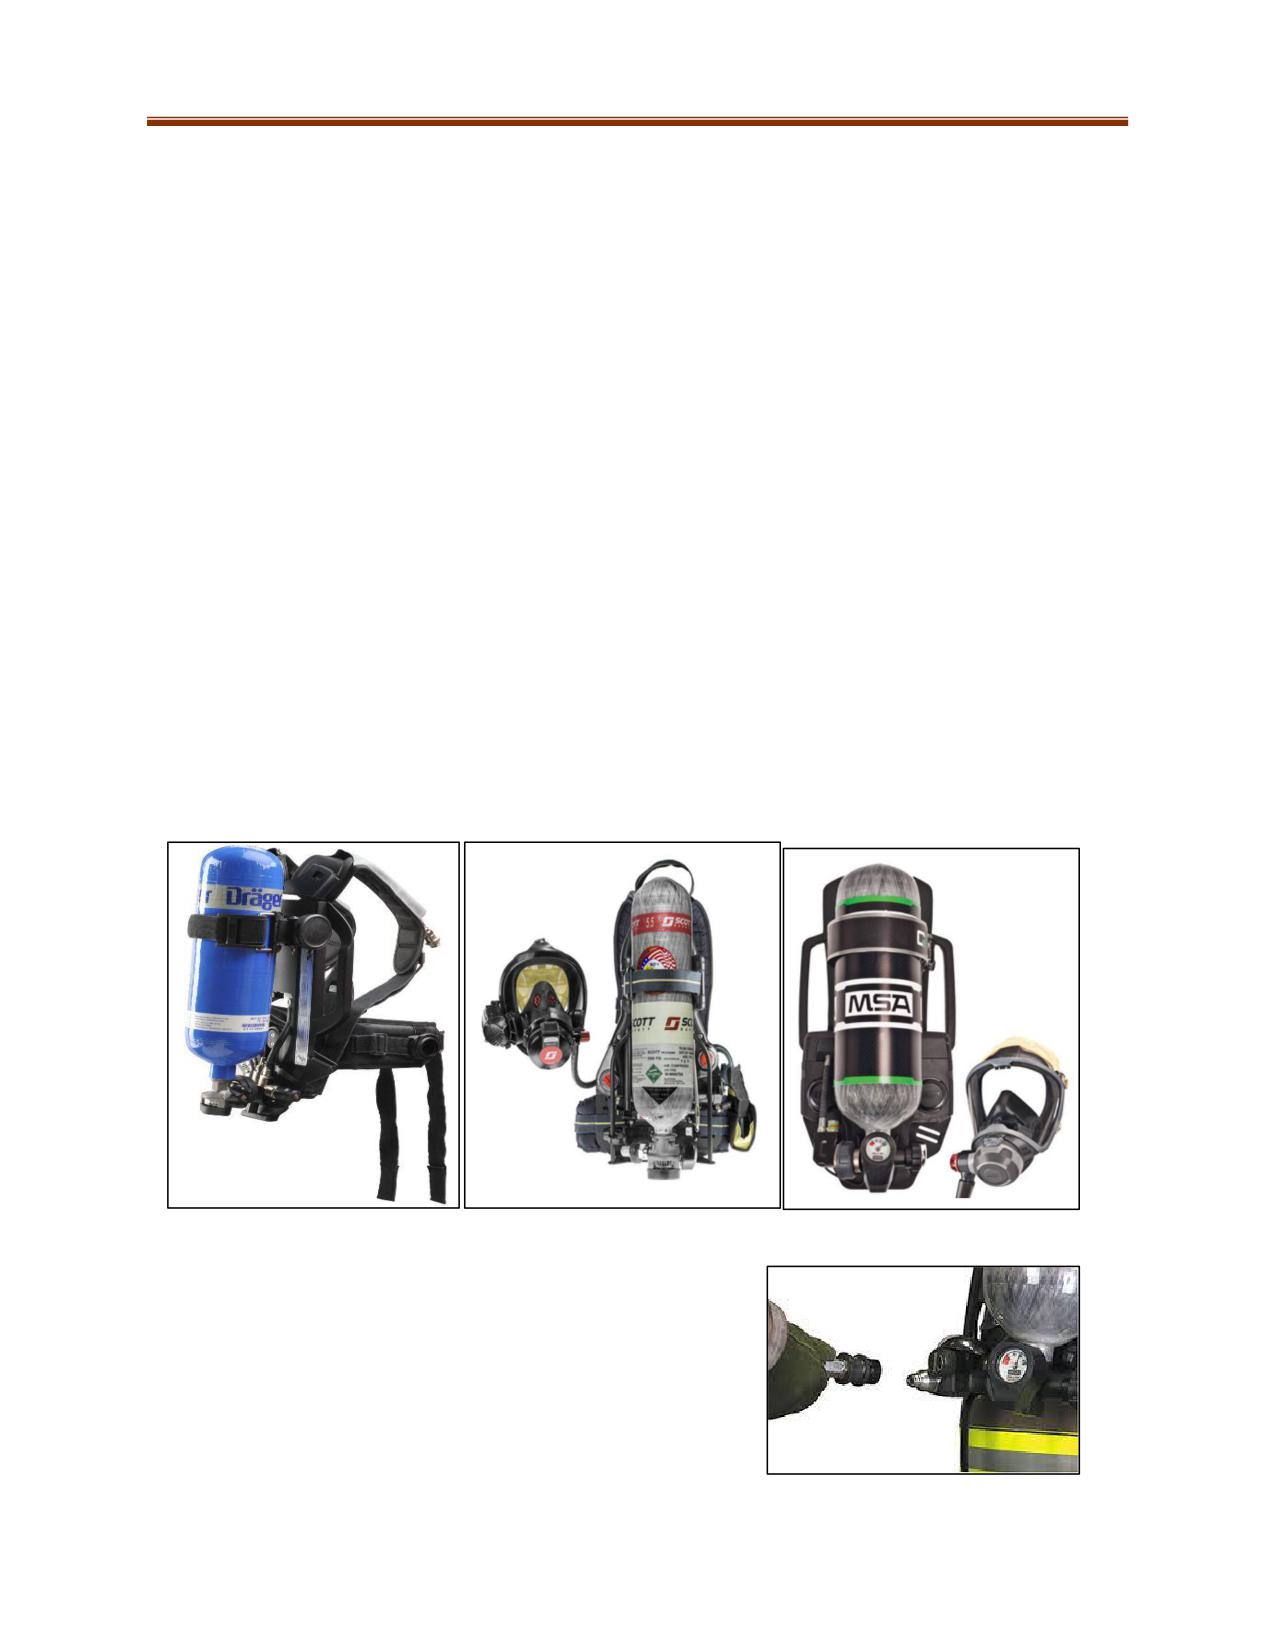
SELF-CONTAINED BREATHING APPARATUS (SCBA)
(Open Circuit, Self-Contained, Positive Pressure)
SCBAs protect the wearer from hazardous atmospheres by providing breathable air.
Several manufacturers build SCBAs for emergency response and industrial use. There are many models
of the control configuration but the basic components and operating principles remain the same.
Open-circuit SCBAs use filtered, compressed air. Most open-circuit systems have two regulators: a first-
stage regulator to reduce the pressure of the compressed air in the cylinder and a second stage
regulator to reduce it even further to a level just above atmospheric pressure. This air is then fed to the
facepiece via a demand valve which is activated by inhalation. When the wearer exhales, the breath
exits the facepiece via the exhalation valve to the outside atmosphere thus making it an open circuit.
SCBAs have purge/bypass valves for emergency situations.
The four major components of the SCBA are:
Backpack assembly: Designed to hold the air cylinder on the rescuer’s back.
Regulator: Reduces the cylinder pressure to flow and pressure levels required for inhalation.
Facepiece (mask): Designed to deliver low-pressure air from the regulator into the mouth and
nose of the rescuer. It may also provide some protection from facial burns and contact of smoke
and fire gases with the eyes.
Air cylinder: Designed to store a quantity of breathable air under pressure. Depending on
construction and size, cylinders may be rated for 30-90 minutes at pressures between 2,216-
5,500 psi.
Drager PSS 7000, Scott Safety Air Pak X3, MSA G1 SCBA
Rapid Intervention Crew/Company Universal Air Connections
(RIC UACs) allow teams to directly attach two air cylinders of
any kind to provide air to SCBAs worn by casualties or other
rescuers when their supply is low. It is not for quick charging,
buddy-breathing or any other unapproved use. If the unit has a
RIC connection, it is a standard fitting that is dedicated for
emergency use: the Rapid Intervention Crew/Company
Universal Air Connection (RIC UAC), NFPA 1981 (2013 edition).
8-8
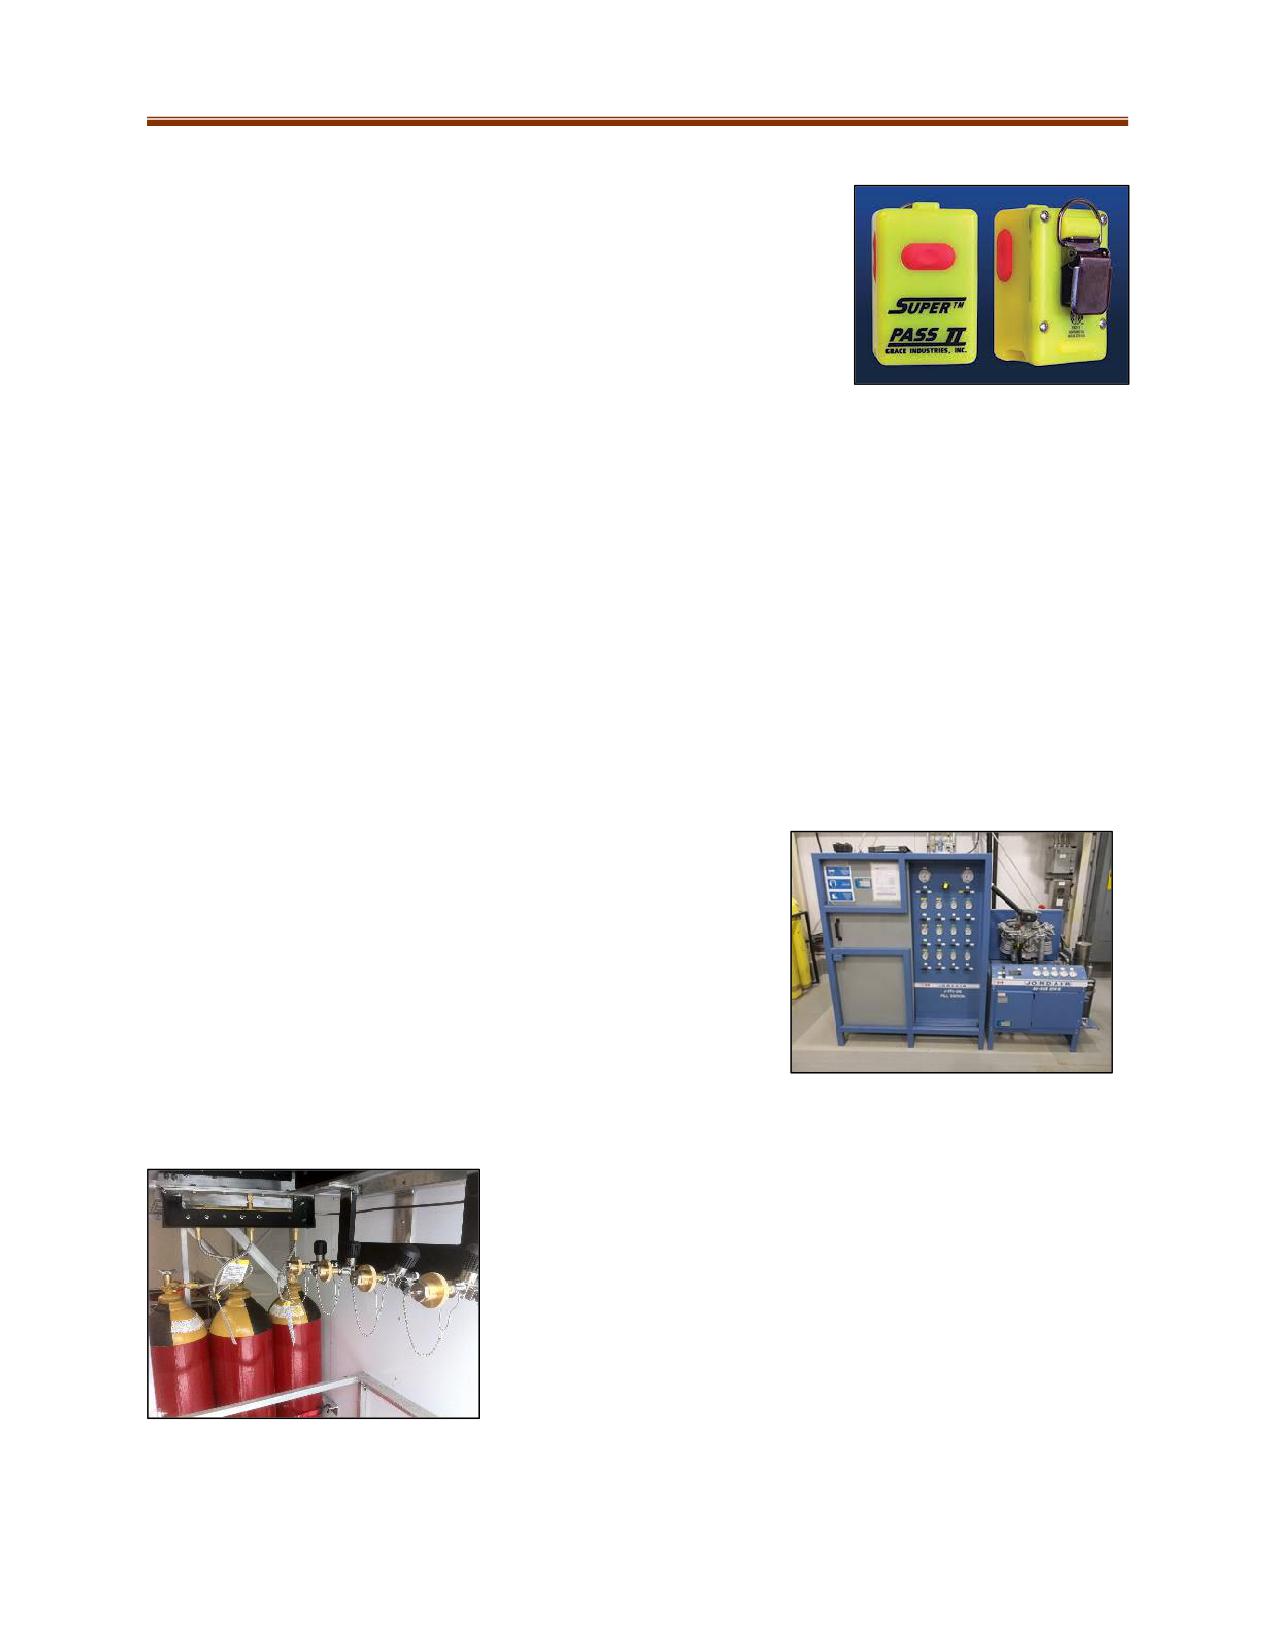
Personal Alert Safety System (PASS)
A PASS device is used by the wearer of an SCBA as a safety alarm with a
high volume siren if the wearer remains motionless, such as when the
wearer has collapsed or is trapped (usually set at pre-alarm when
motionless; full alarm of motionless for 30 seconds). It can also be
triggered manually. The loud noise provides a location for the rescue
personnel to follow. NFPA-compliant SCBA models have the PASS system
built into the unit. It is activated automatically when the SCBA air is
turned on. Some non-built-in models have a key which turns on the
device. The key is then given to the person in charge of team entry before the SCBA team enters a
building or structure.
The duration of an SCBA’s air supply is based on a number of factors:
The user’s level of exertion.
The user’s physical condition.
The degree to which the user’s breathing is affected by excitement, fear or other emotions.
The degree of training or experience.
The type of apparatus.
The purity of the compressed air (possible presence of carbon dioxide)
Work at pressures above or below normal atmosphere
CYLINDER TESTING AND CHARGING
Recharging Compressed Air Cylinders
In a cascade storage system, several large cylinders are used to
bring a small cylinder up to a desired pressure. This is achieved by
always using the supply cylinder with the lowest usable pressure
first, then the cylinder with the next lowest pressure, etc. A
cascade system may be connected to a purification system and air
compressor approved for breathable air (CSA Standard Z-180.1-
00).
Breathing air cylinders may also be charged directly from an
approved breathable air compressor or compressor/storage tank
configuration.
Recharging Oxygen Cylinders
Oxygen cylinders are recharged by transferring oxygen from large-
capacity medical-grade oxygen cylinders via high-pressure pump.
Hydrostatic testing involves pressurizing a cylinder above its
operating pressure to established safety standards to ensure
durability of the cylinder over time. The frequency of hydrostatic
testing for a compressed cylinder depends on the material and
model used.
8-9
8-10
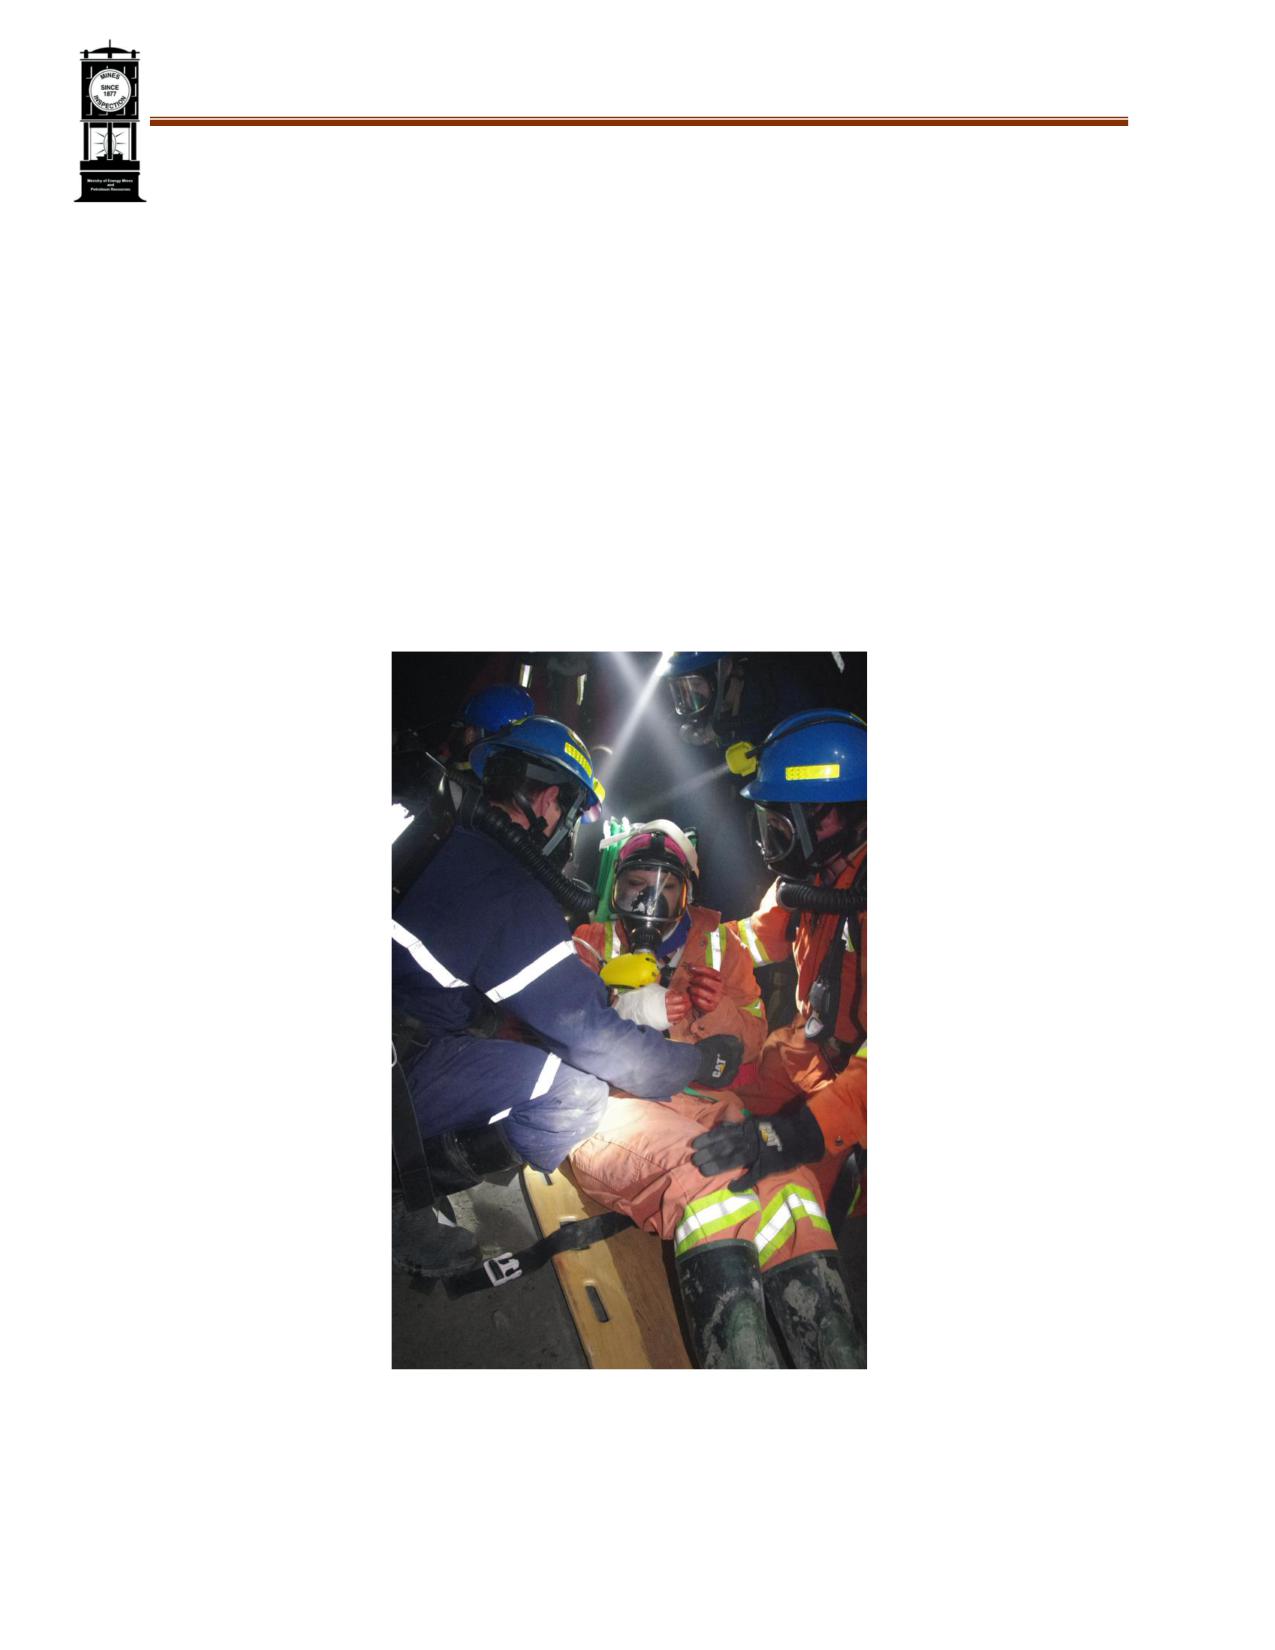
Western Canada Mine Rescue Manual
Chapter 9 Oxygen Therapy
9-1
OBJECTIVES
Oxygen therapy is administered to assist a casualty’s breathing. Mine rescuers must know when and
how to use it. In some jurisdictions, oxygen therapy is included as part of first aid training. Upon
completion of this chapter, the trainee shall be able to demonstrate competency in:
Safe practices for oxygen storage, transport, and use
Recognizing when to use oxygen therapy
The benefits of oxygen therapy
The components and assembly of oxygen-therapy equipment
Administering oxygen therapy
Calculating duration based on flow from an oxygen cylinder
Oxygen under high pressure can dangerously lower the flash points and ignition temperatures of
petroleum products.
SAFE STORAGE, TRANPSORT, AND USE
Following these guidelines for medical oxygen cylinders will help prevent incidents.
Storage
Ensure the equipment is clean and in good working order. Check that connections are tight and
that controls operate freely.
Keep cylinders secure at all times.
The valve protection cap must be in place to protect it from damage whenever large-capacity
cylinders are in storage.
Store all cylinders in a cool, well ventilated, specifically designated place.
Keep oxidizers, corrosives, and combustibles well separated.
All cylinders are subject to hydrostatic testing as per manufacturer’s specifications.
Transport
Cylinders must be secured and capped when being transported.
Never use a cylinder as a roller or support.
Use
Strictly enforce no smoking or open flame when in use. Post signage when practicable, such as
in first aid rooms.
When changing cylinders, open valves slowly and check for leaks.
While in use, always keep cylinders secure and well away from heat and flame.
If a leaking cylinder cannot be corrected by tightening the valve, it must be clearly tagged and
taken outside to a safe location away from ignition sources, open flame, and petroleum. Secure
the cylinder and allow the pressure to bleed completely. The clearly labelled cylinder must be
returned to the supplier for repair. Never ship a leaking cylinder.
All cylinders must be refilled by a qualified person.
9-2
WHEN TO USE OXYGEN THERAPY
Oxygen is essential to normal cell function and life itself. Any condition that affects the supply, exchange
or transport of oxygen between the atmosphere and the body’s cells results in hypoxia, a condition
defined as inadequate oxygenation of the body tissues.
Supplementary oxygen given during pre-hospital treatment of injuries may significantly improve a
casualty’s recovery and even the chances of survival. Oxygen therapy is not a substitute for clearing the
airway. More extensive training is required to use advanced techniques.
The body needs a continuous supply of oxygen but is unable to store it. Any casualty with the following
history, signs, and symptoms will be suffering from hypoxia:
Pale, cool, clammy skin (shock)
Spinal cord injuries
Cyanosis (blue lips, earlobes or fingernails)
Allergic reactions
Shortness of breath (dyspnea) or absence
History of serious trauma, even if there are
of breath
no obvious injuries
Problems with heart function
Nausea and vomiting
Blood loss (internal or external)
Headache
Loss of consciousness
Agitation, irritability or confusion
Extensive burns
Drowsiness
Crush injuries
Pregnant casualties
BENEFITS OF OXYGEN THERAPY
The benefits of oxygen therapy include:
Increased oxygen supply to the brain, reducing loss of the central nervous system and
maintaining control of vital body functions
Increased oxygen supply to the heart
Reduced work load on the heart by enriching the oxygen load in the blood, thus reducing the
volume of blood that must be pumped
Stabilized rate and depth of breathing
Reduced movement of an injured chest will reduce the pain associated with attempts to breathe
Enriched oxygen content of the air reaching the lungs in the event of partial airway obstruction
Improved gaseous exchange within lungs congested with fluid (oedema or pneumonia) or
particulate by providing more oxygen in the limited volume
Improved gaseous exchange at the tissue level
Improved muscle tone, particularly within artery walls
Generally reduced pain and anxiety
Improvement in the casualty’s condition may be indicated by:
Improved skin colour, temperature, and condition
Reduced breathing effort
Stabilized pulse rate
Reduced pain
Reduced anxiety, apprehension and restlessness
Improved level of consciousness
9-3
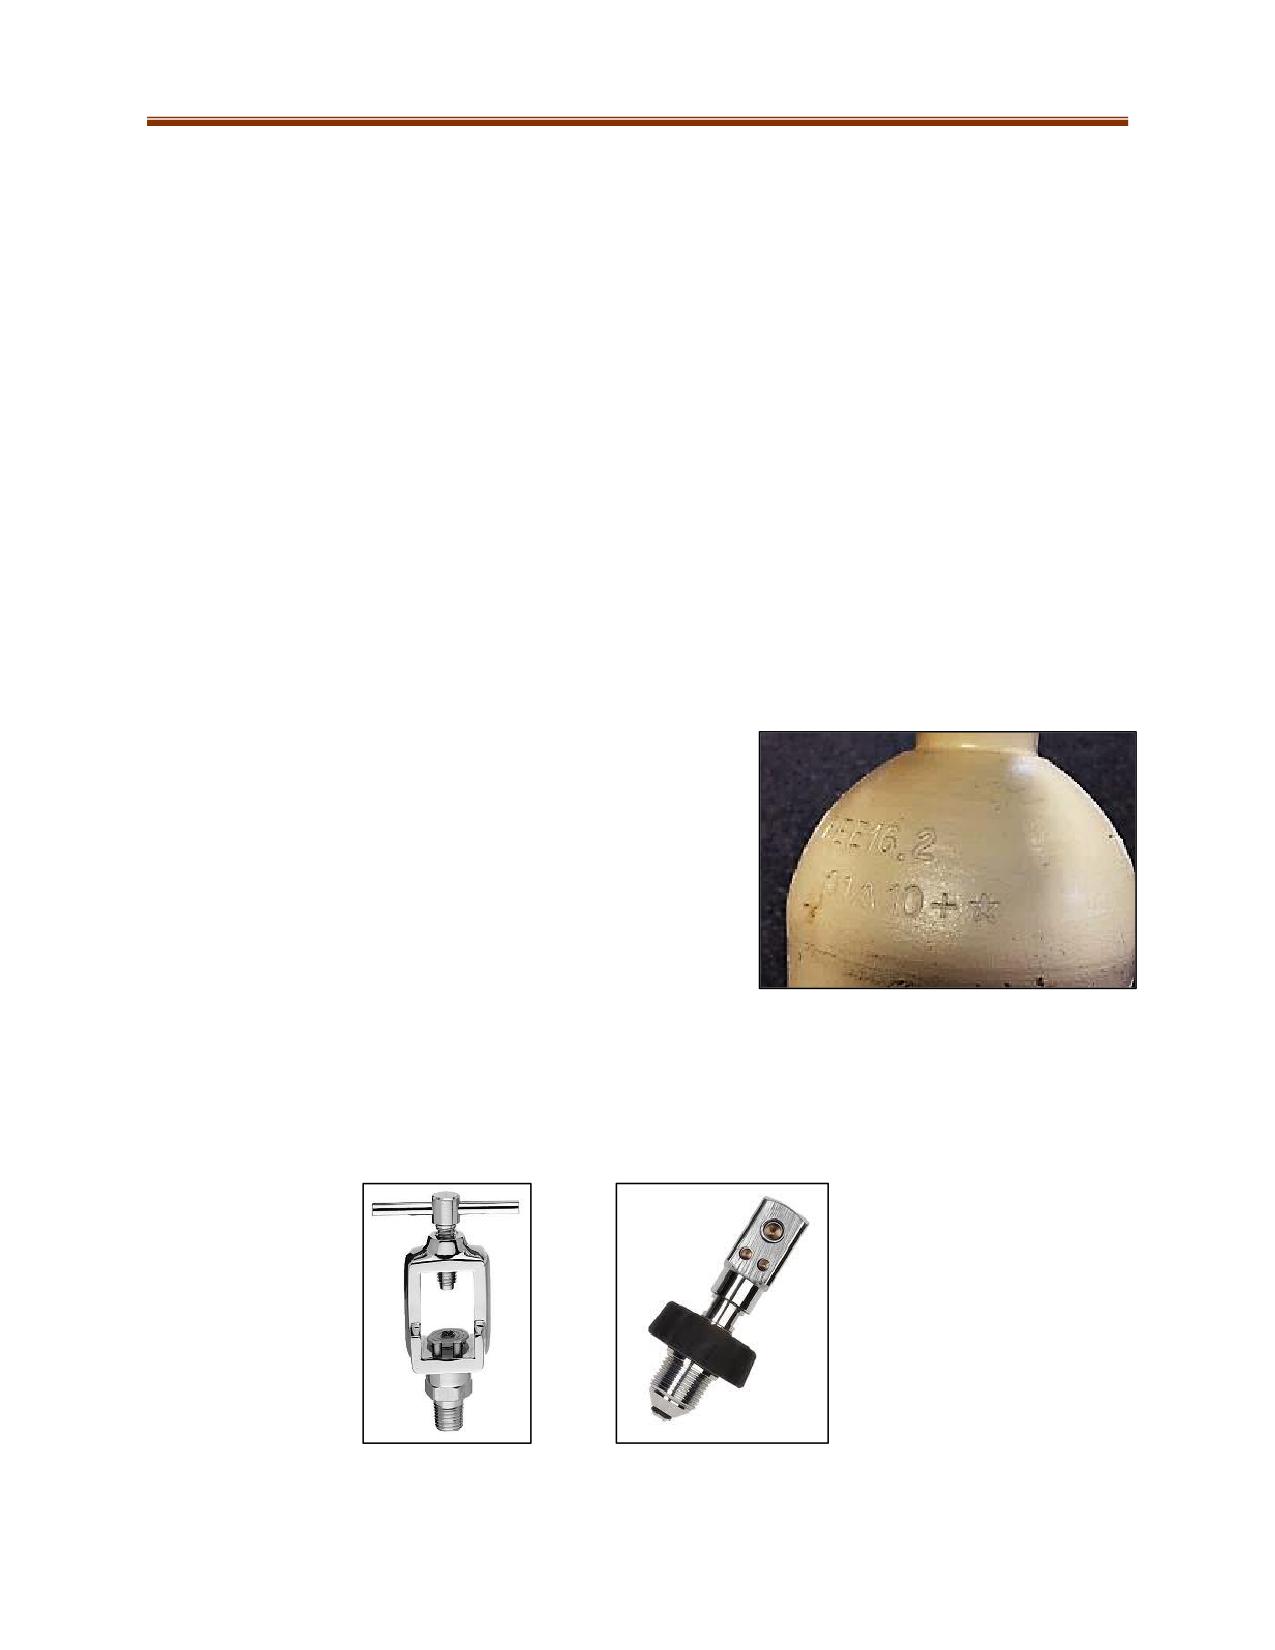
Casualties with Chronic Breathing Problems
People with ongoing or chronic obstructive pulmonary disease (COPD) are chronically short of breath
and have difficulty breathing. People at the severe stages of this condition are rarely found in a working
environment. If providing first aid and oxygen therapy is needed, administer as one would to any other
casualty but monitor breathing very closely. If required, reduce flow rate but do not stop oxygen therapy
once it has been started.
OXYGEN THERAPY EQUIPMENT
The Oxygen Therapy Unit
An oxygen therapy unit has three main components: an oxygen cylinder, a regulator, and a delivery
tube with a facemask. Portable units also require a carrying case designed to protect the unit.
Oxygen cylinders
Medical-grade oxygen (approximately 99% oxygen) is supplied as a compressed gas at 2,000 psi in a
variety of standard cylinder sizes. The sizes of cylinders are:
D (412 L)
E (682 L)
M (3,540 L)
K (6,900 L)
Note: A “+” sign stamped at the top of the cylinder indicates
that pressure can be increased by 10% to 2,200 psi.
Whatever the size of the cylinder used, they are subject to
the requirements of hydrostatic testing. The hydrostatic test
date is stamped on the cylinder. A five-pointed star stamped
at the top of the cylinder indicates that the hydrostatic test
date has been extended an additional five years, and then
must be tested every 10 years afterward.
Cylinder markings
D and E cylinders have a pin-indexed medical post outlet with a valve operated by a purpose-specific
wrench. Others have a special CGA-540 oxygen threaded outlet and a hand valve. Both connections are
designed to be unique and prevent inadvertent connection to any gas other than oxygen.
Pin-indexed medical post outlet (L), threaded outlet (R)
9-4
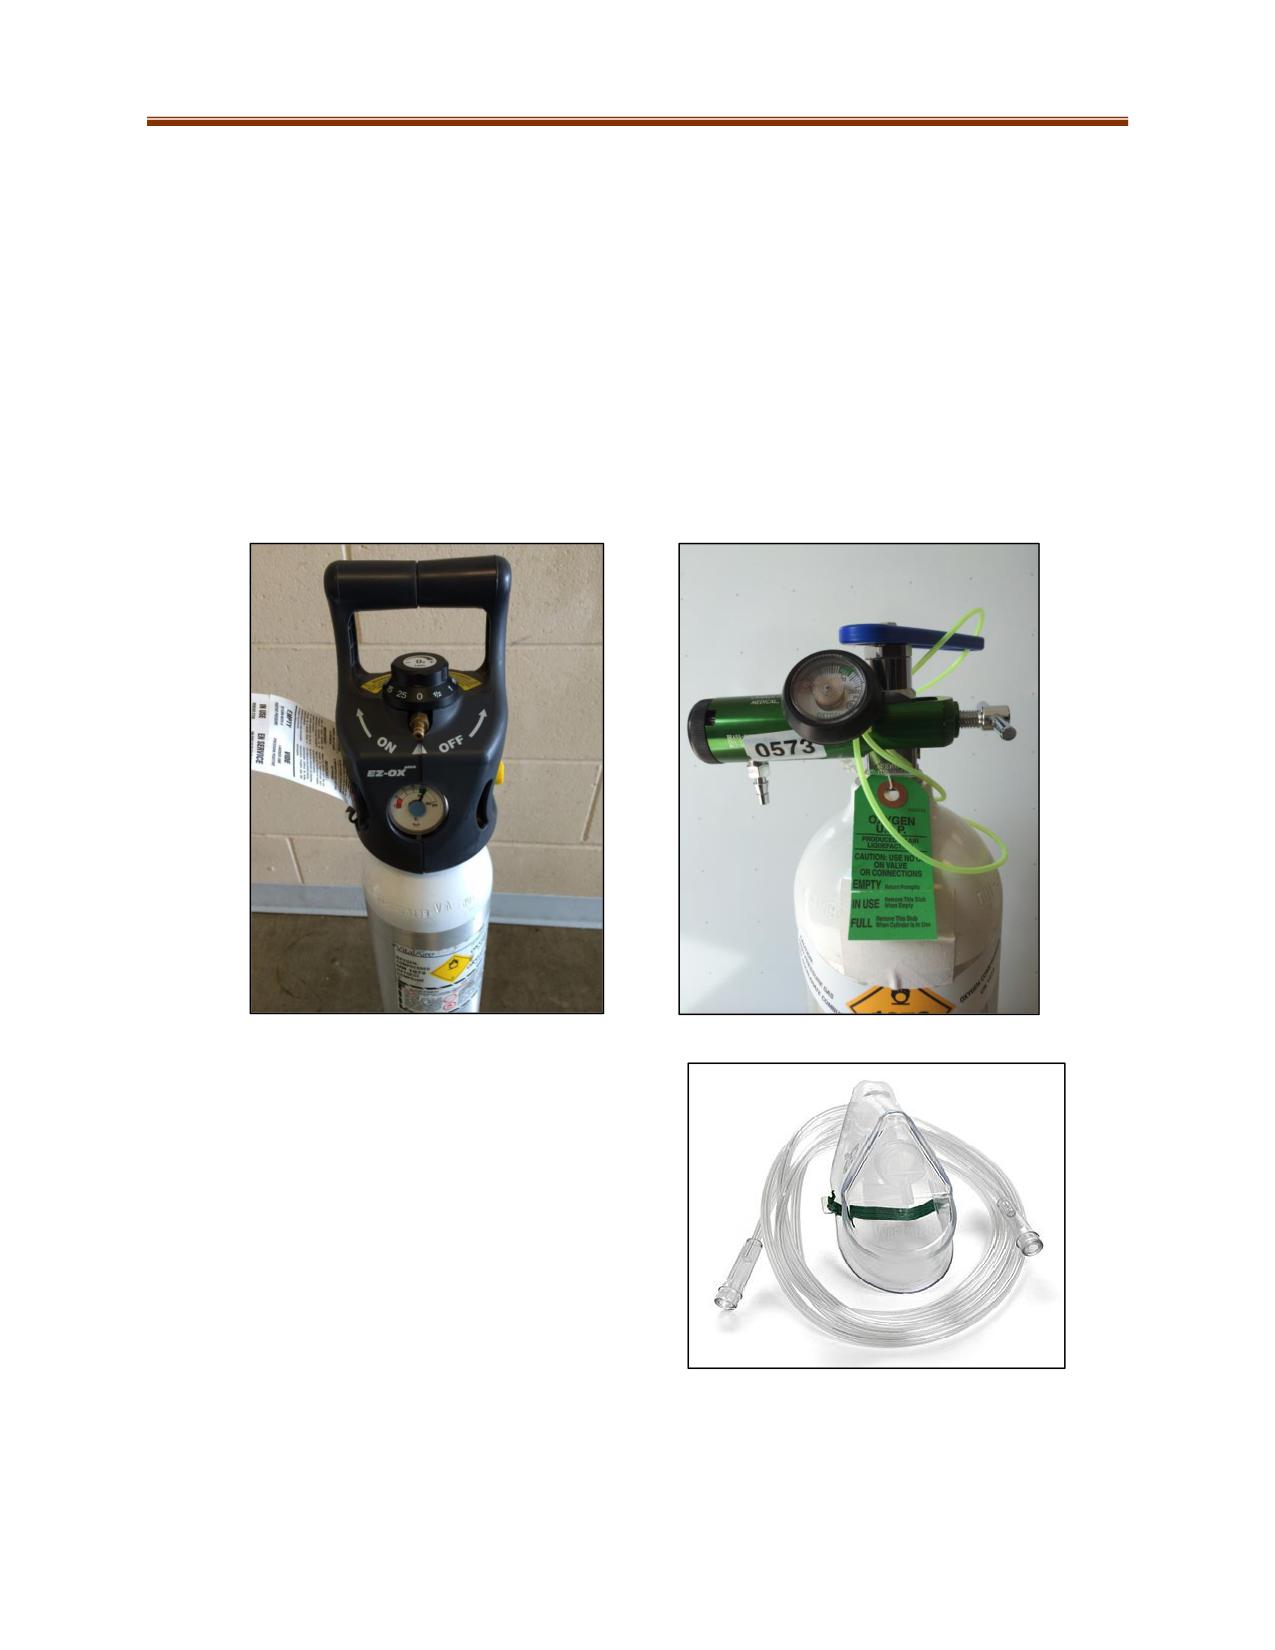
Pressure Regulators
The regulator assembly has two purposes:
Reduces the pressure of oxygen delivered from the cylinder to between 40 and 70 psi.
Regulates the rate of flow (in litres per minute or Lpm) of the delivered oxygen.
The regulator assembly attaches to the cylinder with a yoke containing corresponding pins that fit the
medical post and a screw-clamping device. Cylinders with a threaded connection are attached via a
corresponding female thread on the regulator assembly. Adaptors are available to attach threaded and
yoke-type connections together.
The adaptor used to fit a yoke-type regulator assembly onto a threaded cylinder can be particularly
valuable in a major emergency situation. Using these adaptors will prevent gases other than oxygen
from being connected.
Oxygen Mask and Delivery Tube
There are several models of delivery masks available.
Delivery tubes are included with the masks. All but the
one-time-use simple mask require more extensive
training.
9-5
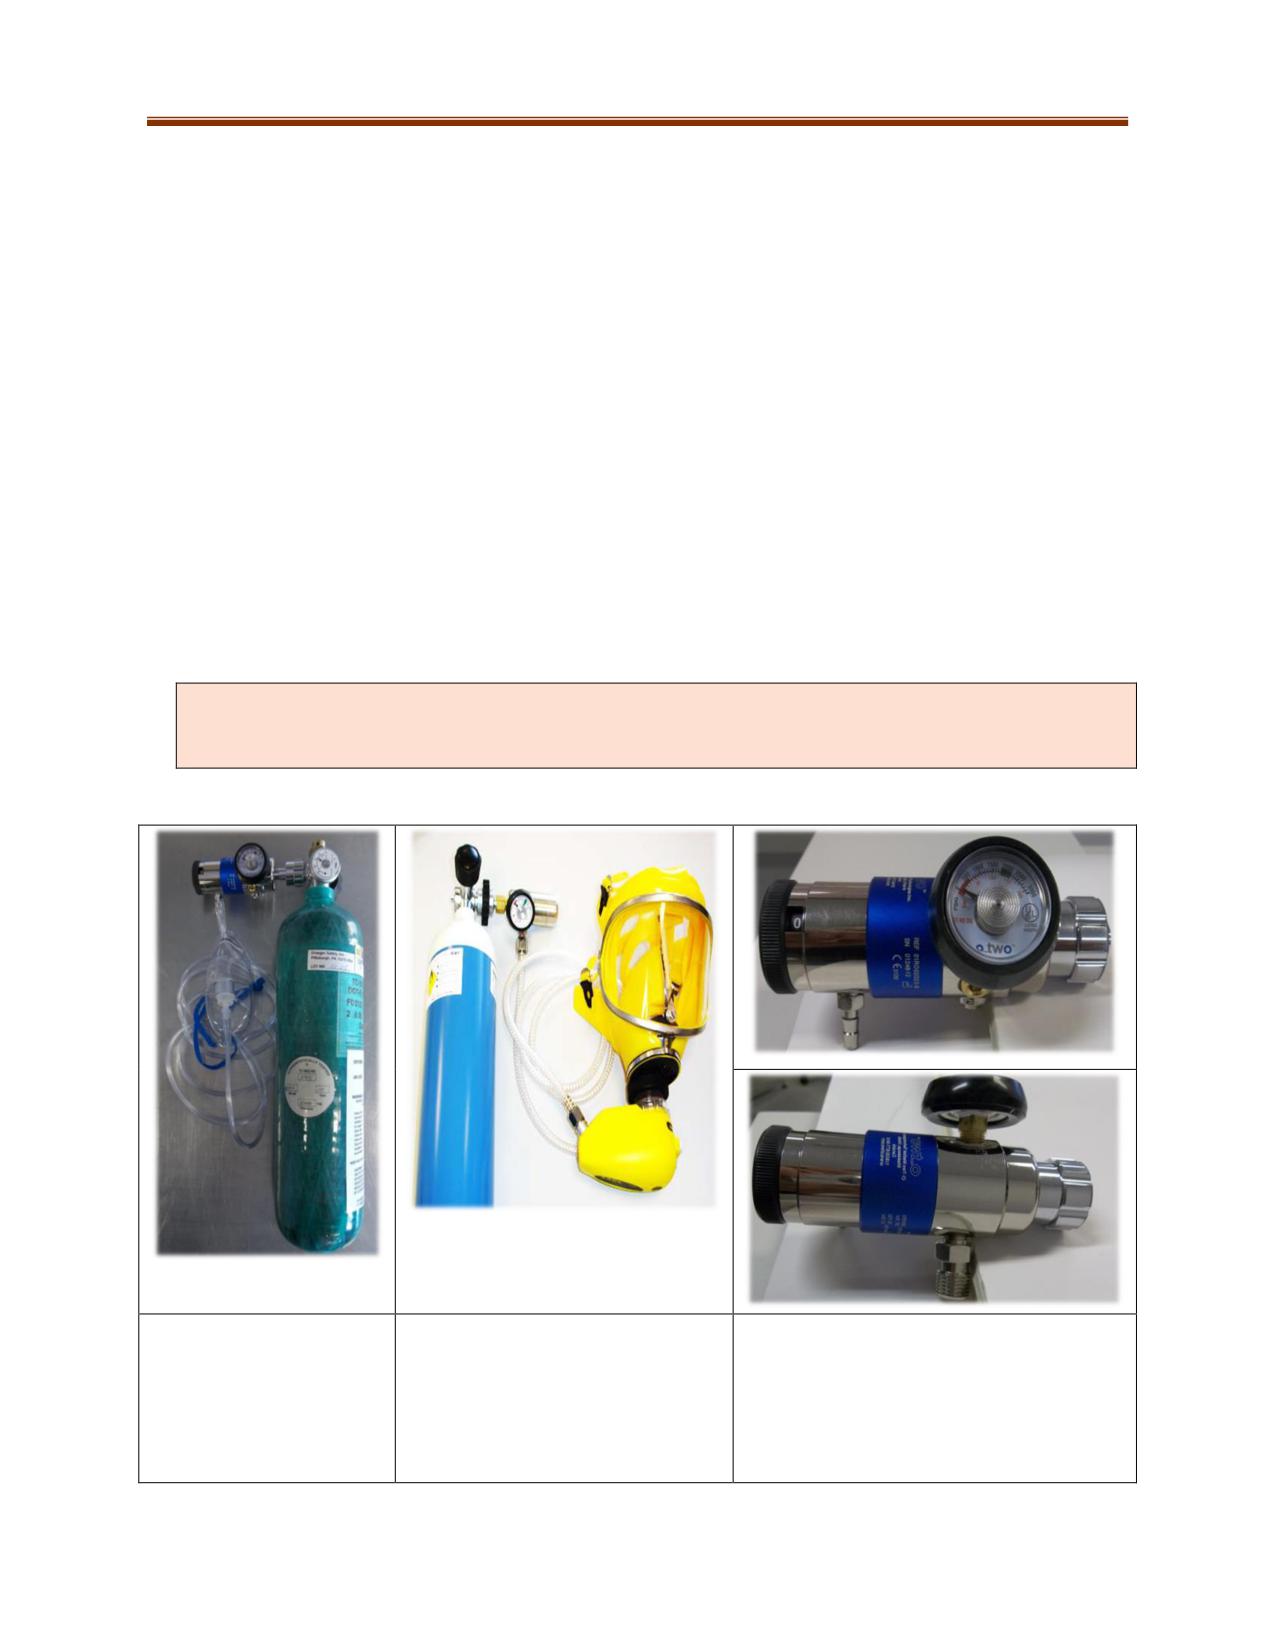
CAREvent
To use this device for oxygen therapy, follow the same steps as one would for the normal oxygen
therapy unit. The only difference is that a 3,000-psi Drager BG4 cylinder can be used. The delivery hose
and mask used with the normal oxygen therapy unit will work on this regulator.
The handheld resuscitator can also be used for oxygen therapy on a breathing casualty. The device will
act in the “on demand” mode much like a self-contained breathing apparatus (SCBA). As the casualty
inhales, a valve opens allowing the oxygen to flow into the face piece or nose cup.
Follow these steps to prepare the handheld resuscitator for use:
1. Ensure oxygen flow adjustment is set at zero
2. Connect the supply cylinder to the regulator
3. Connect the resuscitator delivery hose to the regulator
4. Connect the delivery hose to the resuscitator
5. Attach the resuscitator to the face piece or nose cup
6. Turn oxygen supply cylinder on
7. Place face piece or nose cup on casualty (Adjust straps accordingly)
Note: All connections should be “finger” tightened only
This manual will not describe the functions the CAREvent® DRA handheld rescuer can provide for
a non-breathing casualty. Please refer to site specific training and always follow the
manufacturer’s recommendations.
Oxygen delivery hose
Oxygen delivery hose, CAREvent®
Oxygen regulator for use for use with a
and mask connected to
resuscitator and face piece
CAREvent® resuscitator
regulator with BG4
connected to a DSS outlet on
oxygen cylinder. (Ready
regulator with oxygen cylinder
for “normal” oxygen
therapy delivery)
9-6
INSPECTING CYLINDERS AND ASSEMBLING COMPONENTS
Inspecting
All components must be visually inspected for damage and contamination before use. If there
are any deficiencies noted, tag the component and remove it from service.
Look for an in-service tag or markings denoting cylinder status.
Check hydrostatic testing stamp on the cylinder as per manufacturer’s guidelines.
Assembling
Certain types of cylinders come with a plastic breakaway strap over the new gasket. There is
also a metal version with a rubber centre that can be used more than once. Ensure that the
gasket does not get doubled by removing the old gasket. If it is not removed, alignment
problems can arise.
Secure the cylinder in an upright position.
Point the aperture in a safe direction away from people or ignition hazards.
The cylinder must be quickly opened and closed, or “cracked” to ensure there are no
contaminants in the aperture.
As the yoke is positioned on the medical post, check that the gasket is in place and that the pins
on the yoke are aligned with the holes in the post (pin indexing).
Tighten the screw clamp to secure the regulator, hand-tightened only.
Check that the regulator flow control is fully off before opening the cylinder. (In some models,
this requires turning counter-clockwise.)
Open the cylinder valve slowly to stabilize the gauge and then continue to open one full turn.
Conduct leak test:
o Close the cylinder valve
o Observe the gauge for drops in pressure for five minutes
o Open the cylinder valve
o Observe for gauge movement
o If there is any drop in the pressure reading, re-tighten the regulator to the cylinder and
repeat the test
o If there is no drop in pressure, close the cylinder, bleed off the pressure in the regulator
using the flow control
Unit is now field-ready and should be securely stored in a designated area.
ADMINISTERING OXYGEN
Observe the following steps and precautions when administering oxygen:
No smoking or open flame must be strictly enforced.
Ensure face mask and tubing are attached to the regulator assembly. Open the cylinder valve
gently and slowly.
Turn the flow control on the regulator to the desired flow rate.
Allow the oxygen to flow for several seconds to clear any foreign material from the hose and
mask.
Ask the casualty if they have had oxygen therapy while reassuring the casualty about the use
and benefits of oxygen therapy prior to administering.
9-7