Takeuchi Hydraulic excavator TB1160W (Serial No. 514500002~). Operator's Manual (2016) - page 2

SAFETY
PRECAUTIONS ON MAINTENANCE
Secure the working equipment
Cautions when refueling
To prevent unexpected movement, firmly
secure the working equipment when
repairing or replacing the bucket teeth or
side cutter.
Secure the engine hood or cover when
opened
Be sure to secure the engine hood or cover
before working the inside. Do not keep the
hood or cover open on a windy day or if the
• Do not smoke or permit open flames while
machine is parked on a slope.
fueling or near fueling operations.
• Never remove the fuel cap or add fuel
when the engine is running or still hot. Do
Place heavy objects in a stable position
not spill fuel on the hot surface of the
machine.
• Fill the fuel tank in a well ventilated place.
• Do not fill the fuel tank to capacity. Allow
room for oil expansion.
• Clean up spilled fuel immediately.
• Securely tighten the fuel filler cap. If the fuel
cap is lost, replace it only with the genuine
cap. Use of a non-approved cap without
proper venting may result in pressurization
of the tank.
• Never use fuel for cleaning.
AG7A078
• Use the correct grade of fuel for the
When it is necessary to temporally place a
operating season.
heavy object or an attachment on the ground
during removal or installation, be sure to
place it in a stable position. Keep off
Handling of hoses
unauthorized persons from the storage place
for such object.
Oil leak or fuel leak can cause a fire.
• Do not twist, bend or hit the hoses.
• Never use twisted, bent or cracked pipes,
tubes or hoses; otherwise, they may burst.
• Retighten loose connection.
1-31

SAFETY
PRECAUTIONS ON MAINTENANCE
Be careful with hot and pressurized
Be careful with hot cooling systems
components
AG7A082
AG7A081
Do not remove the radiator cap or the drain
Stop the engine and allow the machine to
plug when the cooling water is hot. Stop the
cool down before performing maintenance.
engine and wait until the engine and the
• The engine, muffler, radiator, hydraulic
cooling water cool. Then, slowly loosen the
lines, sliding parts and many other parts of
radiator cap to release the internal pressure
the machine are hot immediately after the
and remove it.
engine is stopped. Touching these parts
will cause burns.
• The engine coolant, hydraulic oil and other
oils are also hot and under high pressure.
Be careful not to touch the hydraulic oil
when loosening the cap or plug. Working
on the machine under these conditions
could result in burns or injuries due to the
hot oil spurting out.
• The DPD and the exhaust gas emitted from
the exhaust line can be very hot while the
engine is running or the regeneration is
under way, as well as immediately after the
engine is stopped. Be careful not to
accidentally touch them; doing so could
cause burns.
1-32

SAFETY
PRECAUTIONS ON MAINTENANCE
Be careful with oil internal pressure
Release pressure before working on the
hydraulic system
Pressure is maintained in the hydraulic circuit
long after the engine has been shut down.
Oil may spurt out if caps or filters are
• Completely relieve the internal pressure
removed or pipes are disconnected before
before performing maintenance work.
releasing the pressure in the hydraulic
system.
• Immediately after the engine stops, and
while the safety lock lever is still in the
unlock position, turn the starter switch to
ON, move all the control levers, pedal and
auxiliary hydraulic switches several times in
each direction to release the pressure from
the working equipment circuitry.
• Press the air breather button to relieve the
internal pressure from the tank.
• When removing plugs or screws, or when
disconnecting hoses, stand to the side and
• The hydraulic oil is high enough pressure to
loosen them slowly to gradually release the
penetrate the skin or eyes and cause
internal pressure before removing.
serious injury, blindness or death.
• Oil or plug may spurt out according to the
Remember that the hydraulic oil escaping
pressure in the travel motor case. Loosen
from a small hole is almost invisible. When
the plug slowly and release the internal
checking for leaks, wear protective goggle
pressure.
and thick gloves, and use a paperboard or
plywood to keep your skin from oil spurting.
If oil penetrates the skin, it must be
Be careful with debris when the hammer
surgically removed within a few hours by a
is being used
doctor familiar with this type of injury.
When using a hammer, pins may fly out or
metal particles may be scattered. This may
lead to serious injury.
• If hard metal parts such as pins, bucket
teeth, side cutter or bearings are hit with a
hammer, wear protective gear such as
safety goggles and gloves.
• When hitting pins or bucket teeth, always
check that there is no one in the
surrounding area.
1-33

SAFETY
PRECAUTIONS ON MAINTENANCE
Tire maintenance
• Never cut or weld on a wheel with an
inflated tire mounted on it. This could
cause an explosive decompression.
• Tires should be replaced only by an
authorized person using the proper
procedures and safety equipment. New or
replacement tires and wheels should
always be checked for proper size before
mounting.
• Always use a cable restraint device or
safety cage when reinflating a repaired tire.
• Disassembling a tire or rim can cause an
explosion, resulting in serious injury or
death. Always ask a service shop or dealer
for maintenance.
• Special tools and procedures are required
to change tires. To do it safely, it must be
done correctly. Changing tires is a job
better done by your tire service company.
• Always maintain the correct tire pressure.
Do not inflate the tires above the
recommended pressure.
• Inspect tires and wheels every day. Do not
operate the machine if the tire is
underinflated or has cuts or bubbles, or if
the rim is damaged.
• Replace the tire with a new one if there is a
portion with no grooves.
• A rise in tire pressure during operation is
normal, and should NOT be reduced.
• When putting air in a tire, do so from a
distance. Use a long hose with self-
attaching chuck. Always stand behind the
tread when adjusting tire pressure.
• Do not inflate tires with flammable gases or
from systems using an alcohol injector.
1-34

SAFETY
PRECAUTIONS ON MAINTENANCE
Handling of the accumulator
Cautions when servicing the air
conditioner
If the refrigerant comes in contact with eyes,
it damages your eyesight. If the refrigerant
comes in contact with skin, it may cause
frostbite. Never touch the refrigerant.
Be sure to handle the high-pressure nitrogen
gas enclosed in the accumulator with care. If
handled incorrectly, it could explode and
cause serious injury. Strictly observe the
following precautions:
• Do not disassemble.
• Do not allow flame near or throw it into a
fire.
• Do not drill, weld or fuse.
• Do not subject it to physical shock such as
hitting, rolling or dropping.
• Before disposing of the unit, the sealed gas
must be drained. Contact a Takeuchi
service agent for help.
1-35

SAFETY
PRECAUTIONS ON MAINTENANCE
Disconnect the battery wiring
• Do not charge a battery or jump-start the
engine if the battery is frozen; otherwise it
may explode. Warm the frozen battery to
15°C (60°F) before use.
• Do not use the battery when the fluid level
is below the lower level limit. Doing so will
hasten the deterioration of the internal
portions of the battery and shorten the
battery life. It also can cause rupturing
(explosion).
• Do not add the distilled water above the
upper level limit. Doing so could cause the
AG7A090
fluid to leak. This fluid can cause skin
Disconnect the battery wiring before working
damage if contacted, or can cause the
on the electrical system or doing electric
machine components to corrode.
welding. Disconnect the negative (-) battery
• Use a dampened cloth to clean around the
cable first. When reconnecting, connect the
fluid level line and check the fluid level. Do
negative (-) battery cable last.
not clean with a dry cloth; otherwise it
could cause static electricity to build up,
resulting in ignition or explosion.
Use caution when handling batteries
• Batteries contain sulfuric acid which will
damage the eyes or skin in case of
contact.
· If eye contact occurs, flush immediately
with clean water and get prompt medical
attention.
· If accidentally swallowed, drink large
quantities of water or milk and call a
physician immediately.
· If acid contacts skin or clothing, wash off
immediately with a lot of water.
• Wear protective goggle and gloves when
working with batteries.
• Batteries generate flammable hydrogen
gas which may explode. Keep away from
flame, sparks, fire or lighted cigarettes.
• When checking the level of the battery
fluid, use a flashlight.
• Be sure to stop the engine by turning off
the starter switch before inspecting or
handling the battery.
• Be careful not to let metal tools or any
metal objects come into contact with the
battery terminals and cause a short circuit.
• Loose battery terminals may result in
sparks. Be sure to fasten terminals tightly.
• Make sure the battery caps are tightened
securely.
1-36
SAFETY
PRECAUTIONS ON MAINTENANCE
Periodically replace the safety-critical
Jump starting with booster cables
parts
• When starting the engine using the booster
• To use the machine safely for a longer
cables, be sure to connect the cables in
period, periodically add oil and perform
the proper order described below. Wrongly
inspection and maintenance. To improving
connected cables can result in sparking
the safely, replace the safety-critical parts
and battery explosion.
like hoses and seat belts periodically. Refer
· Do not allow the “machine in trouble” and
to “Safety-critical parts to be replaced
“rescue machine” to touch each other.
periodically” for further details.
· Do not allow the positive (+) and negative
• The “Safety-critical parts to be replaced
(-) clips of the booster cables to touch
periodically” are the parts which
each other or to come in contact with the
deteriorate, wear and fatigue after repeated
machine.
use and whose properties change over
· When connecting, attach the positive
time. While these characters of these parts
booster cable to the positive (+) terminals
could cause serious physical or personal
first. When disconnecting, remove the
damage, judging the remaining life of these
negative cable from the negative (-)
part are difficult from external inspection or
terminal (ground) first.
the feeling when operating.
· Be sure to connect the clips securely.
• Replace the “Safety-critical parts to be
· Connect the last clip of the booster cable
replaced periodically” if any defect is found
to a point as far away from the battery as
from external inspection, even when they
possible.
have not reached the time specified
• Always wear the protective goggle and
interval.
gloves when starting the engine by using
the booster cables.
• Use the booster cables and clips of a size
suited to the capacity of battery. Do not
use damaged or corroded booster cables
and clips.
• Be sure that the battery of the “rescue
machine” has the same capacity as the
battery of the “machine in trouble”.
1-37

SAFETY
PRECAUTIONS ON MAINTENANCE
Have a Takeuchi service agent repair
Disposing of wastes
welding
If welding must be performed, make sure
that it is done by a qualified person in a
properly equipped workplace. To prevent any
part from breaking down or being damaged
due to overcurrent or sparks, observe the
following.
• Disconnect the wiring from the battery
before doing electric welding.
• Do not continuously apply 200 V or more.
• The earth ground must be connected
within one meter from the welding section.
• Always collect oil that is drained from the
Do not connect the earth ground near to
machine in containers. Improperly
an electronically controlled device/
disposed waste oil can cause
instrument or connectors.
environmental harm.
• Make sure that there are no seals or
• Follow appropriate laws and regulations
bearings between the welding section and
when disposing of harmful objects such as
the earth ground.
oil, fuel, coolant, solvent, filters and
• Do not connect the earth ground around
batteries.
the pins for the working equipment or
hydraulic cylinders.
• When welding is to be done on the
Handling of poisonous chemicals
machine body, disconnect the connectors
for the electronically controlled devices
Poisonous chemicals will cause serious injury
before working.
if directly contacted.
Poisonous chemistry used in this machine
includes grease, battery solution, coolant,
Vibrations operators are subject to
paint and adhesive agent.
Handle the poisonous chemicals properly
According to the results of the tests
with care.
conducted to determine the vibrations
transmitted to the operator by the machine,
the upper limbs are subjected to vibrations
lower than 2.5 m/s2(8.2 ft/s2) while the
seated part of the body is subjected to
vibrations lower than 0.5 m/s2 (1.64 ft/s2).
Checks after maintenance
• Gradually increase the engine speed from a
low idle to maximum speed and check that
there is no oil or water leaking from the
serviced parts.
• Operate each control lever and check that
the machine is operating properly.
1-38
SAFETY
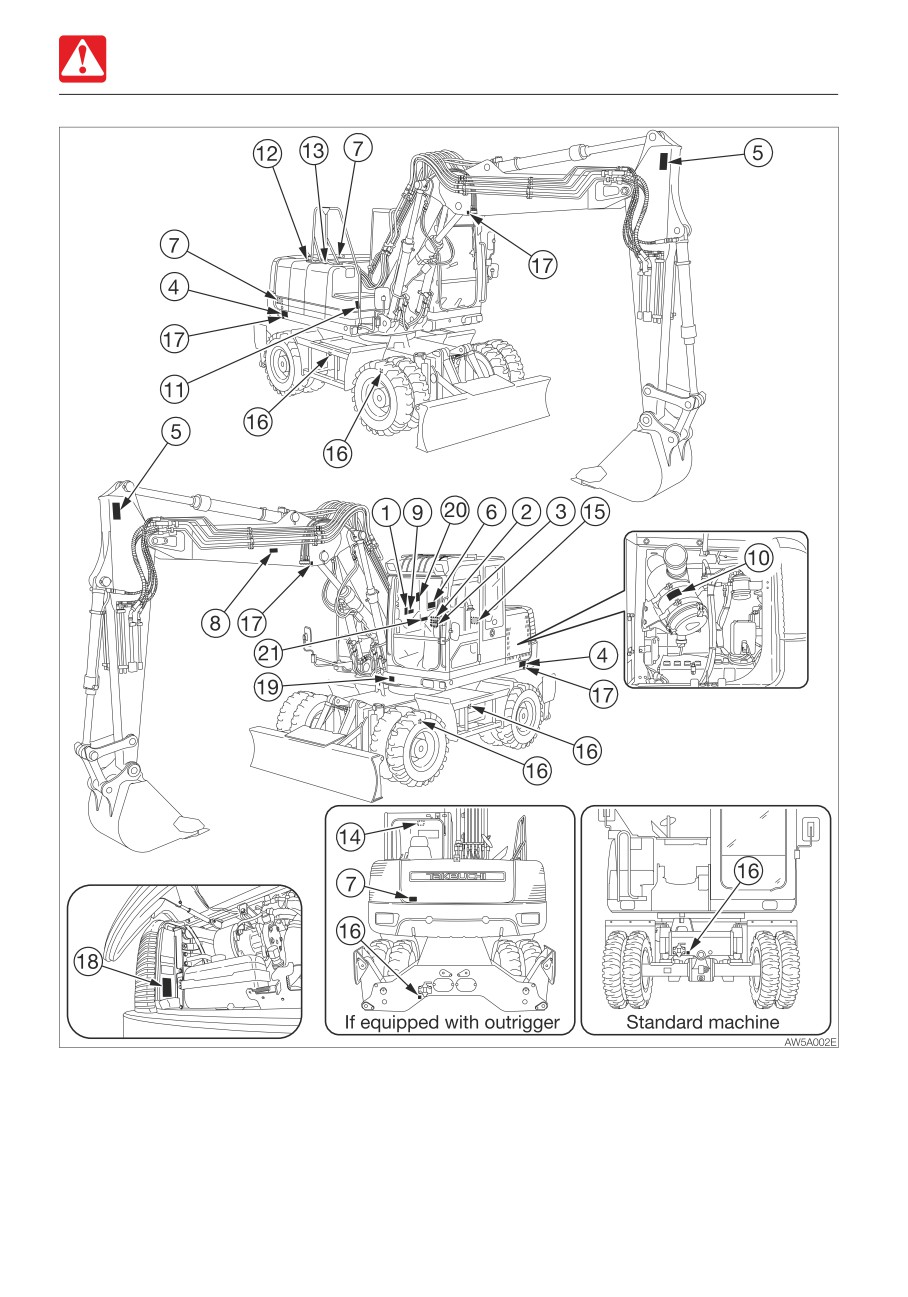
SAFETY SIGNS (DECALS)
SAFETY SIGNS (DECALS)
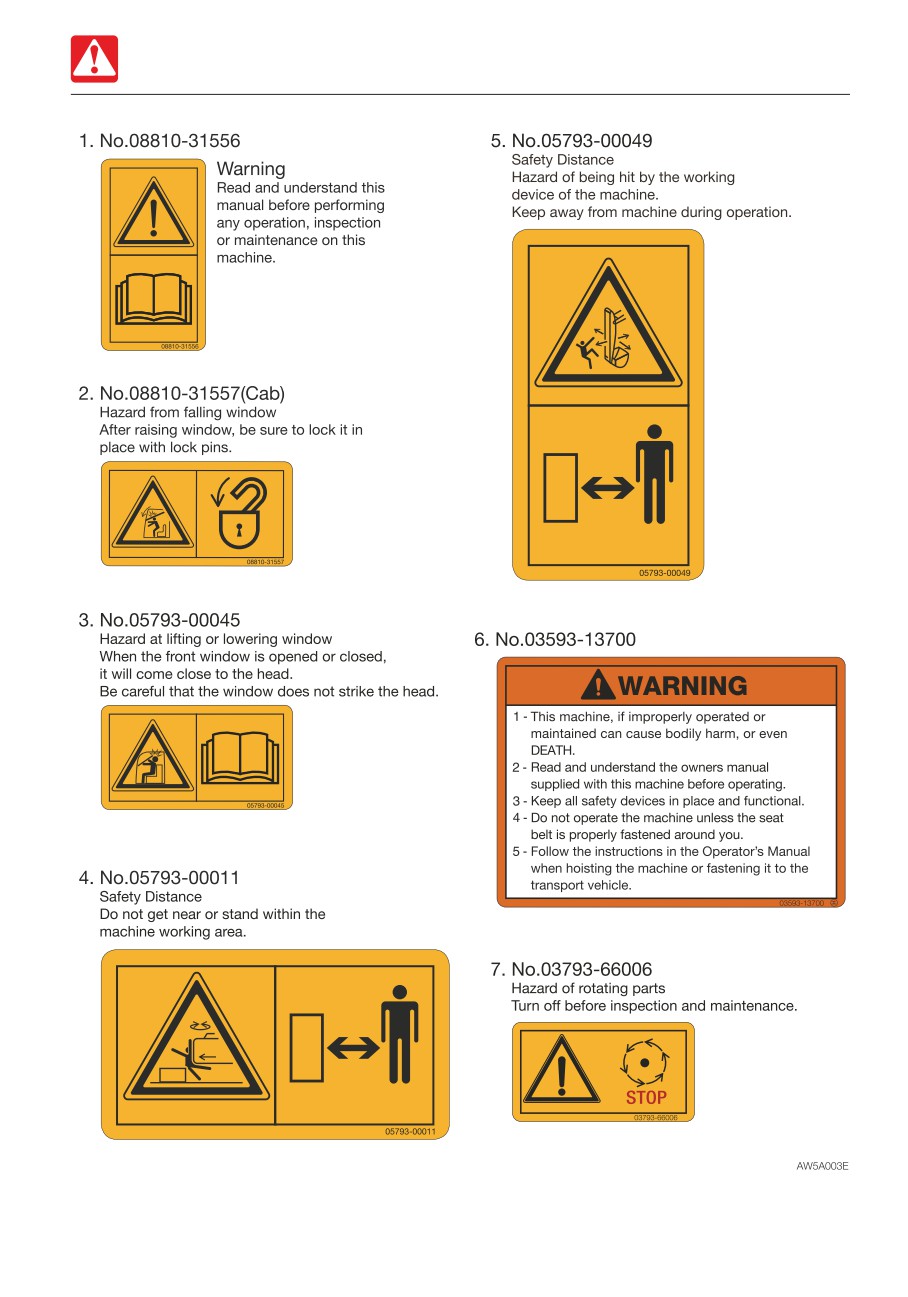
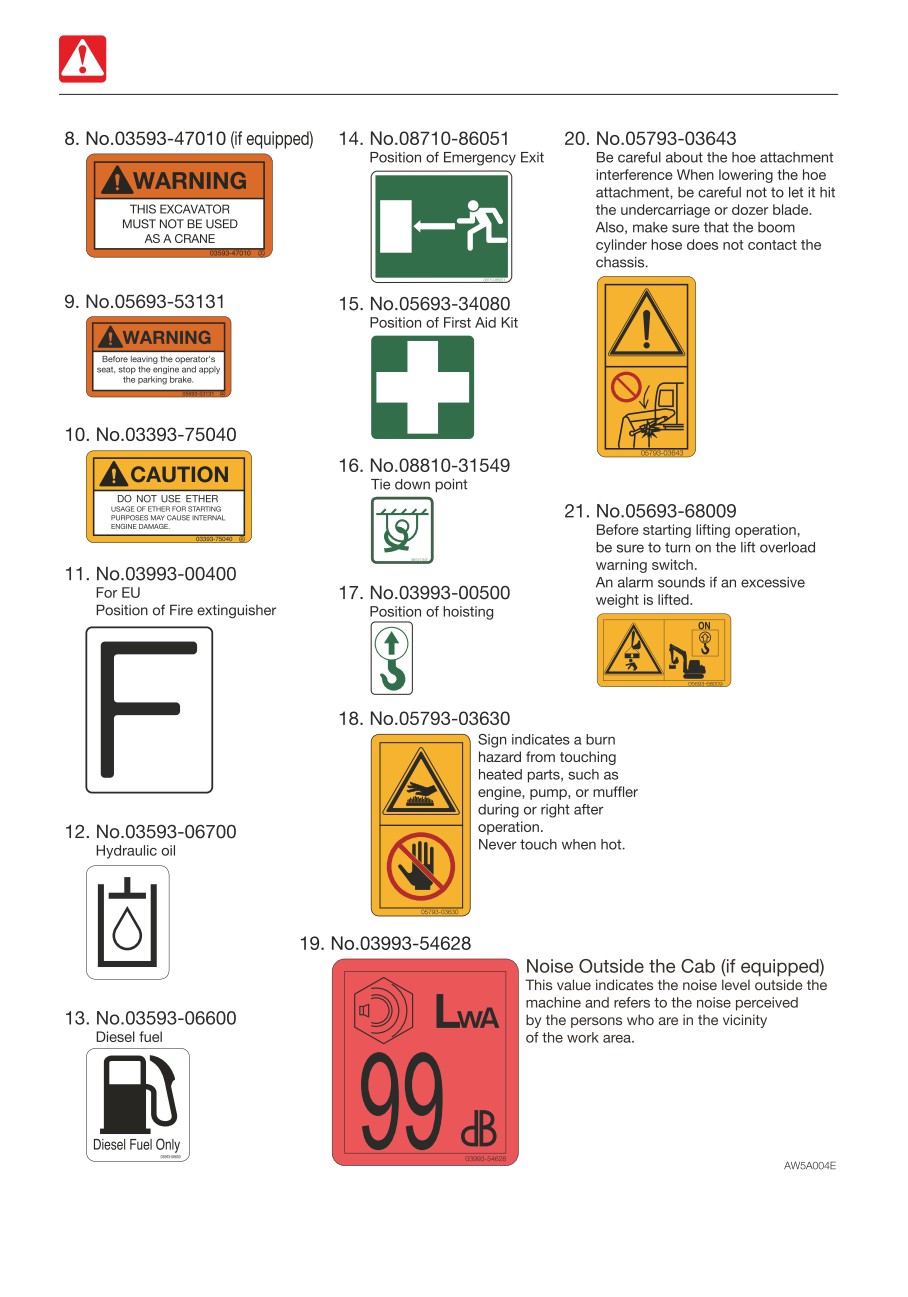
For the safety of the operator and the personnel working around the site, safety signs (decals)
are placed at certain locations on the machine as shown below. Walk around the machine with
this manual, and check the content and location of these safety signs. Review these signs and
the operating instructions in this manual with your machine operators.
• Keep the signs clean and legible. If any of the safety labels is peeling or damaged and
becomes difficult to read, replenish it with a new one. Please include your product serial
number when ordering a new sign from the Takeuchi service agent.
• When a part/unit to which a safety sign is attached is replenished, a new sign must be
attached to the new part/unit.
1-39
SAFETY
SAFETY SIGNS (DECALS)
1-40
SAFETY
SAFETY SIGNS (DECALS)
1-41
SAFETY
SAFETY SIGNS (DECALS)
1-42
CONTROLS
2-1
CONTROLS
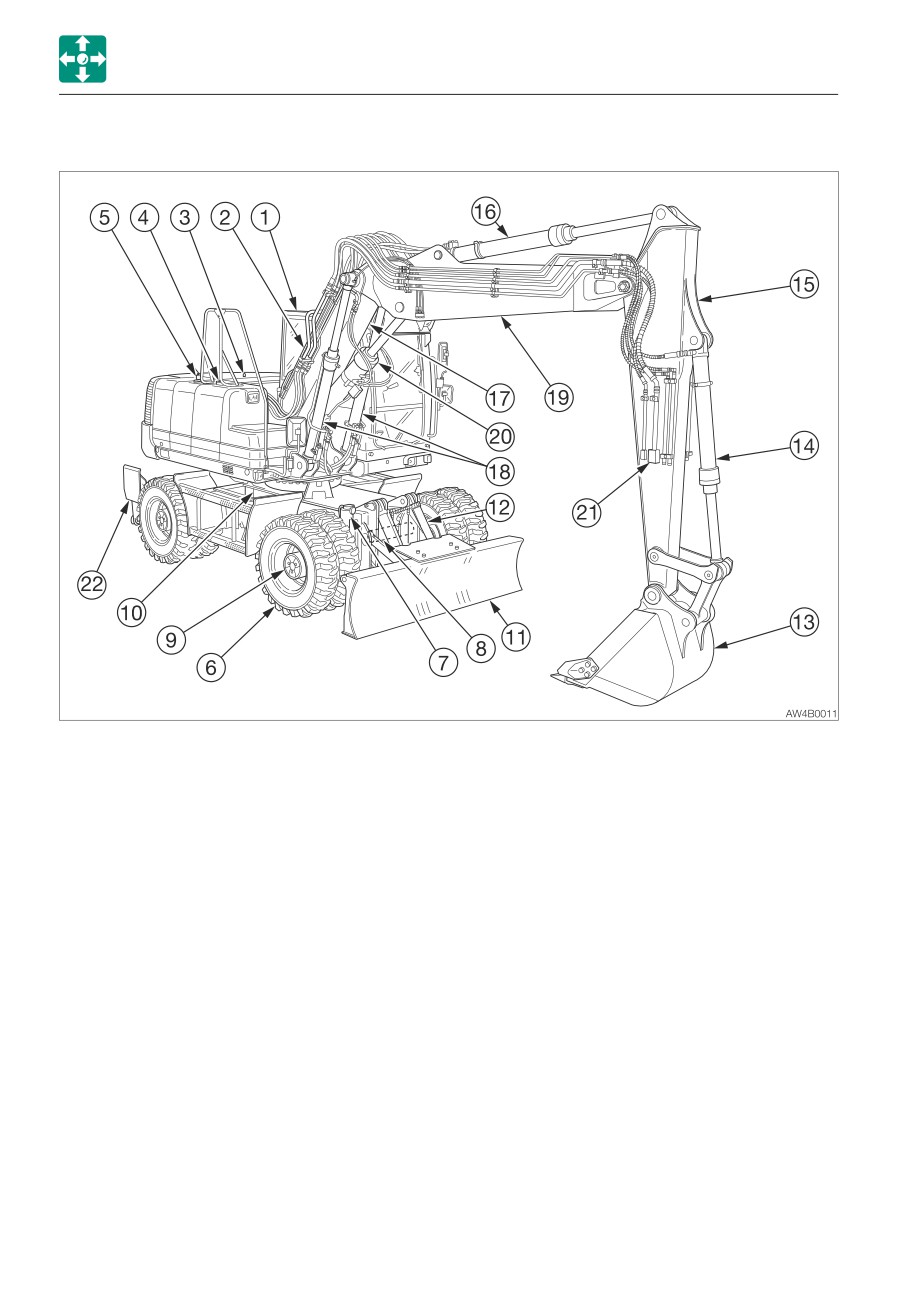
NAMES OF COMPONENTS
NAMES OF COMPONENTS
Upperstructure
Undercarriage
Working equipment
1. Cab
6. Tire
11. Dozer blade
2. Seat
7. Ram lock cylinder
12. Blade cylinder
3. Engine hood
8. Steering device
13. Bucket
4. Fuel tank
9. Hub
14. Bucket cylinder
5. Hydraulic oil tank
10. Chassis
15. Arm
16. Arm cylinder
17. Boom
18. Boom cylinder
19. Second boom
20. Second boom cylinder
21. Auxiliary hydraulic line
22. Outrigger (option)
2-2
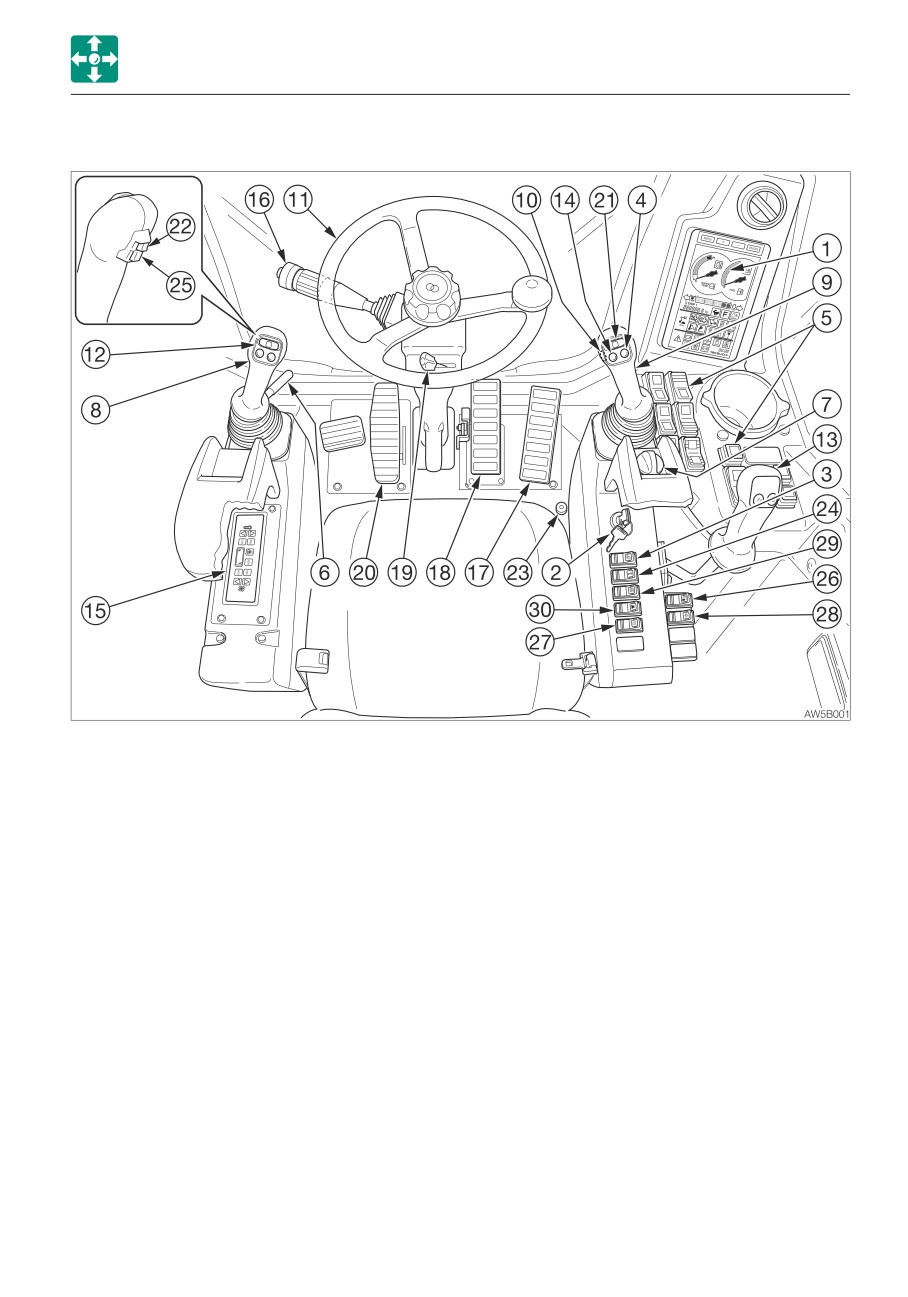
CONTROLS
NAMES OF COMPONENTS
1. Multi-information display
16. Turn signal lever
2. Starter switch
17. Travel pedal
3. Working light switch
18. Brake pedal
4. Deceleration button
19. Tilt steering lever
5. Control console
20. Second boom pedal*
6. Safety lock lever
21. Second /Fourth auxiliary hydraulic switch*
7. Throttle controller
22. Third auxiliary hydraulic button*
8. Left operating lever
23. Third auxiliary hydraulic switch*
9. Right operating lever
24. Over load warning switch*
10. Travel select button
25. Aux. 2/4 select button*
11. Steering wheel
26. Wiper switch (lower)*
12. First auxiliary hydraulic switches
27. Beacon lamp switch*
13. Blade /Outrigger lever*
28. Image select switch (CAMERA)
14. Horn button
29. Auxiliary 1st flow rate select switch
15. AC Control panel
30. Detent mode switch
*: Subject to the specifications or optional products selected
2-3
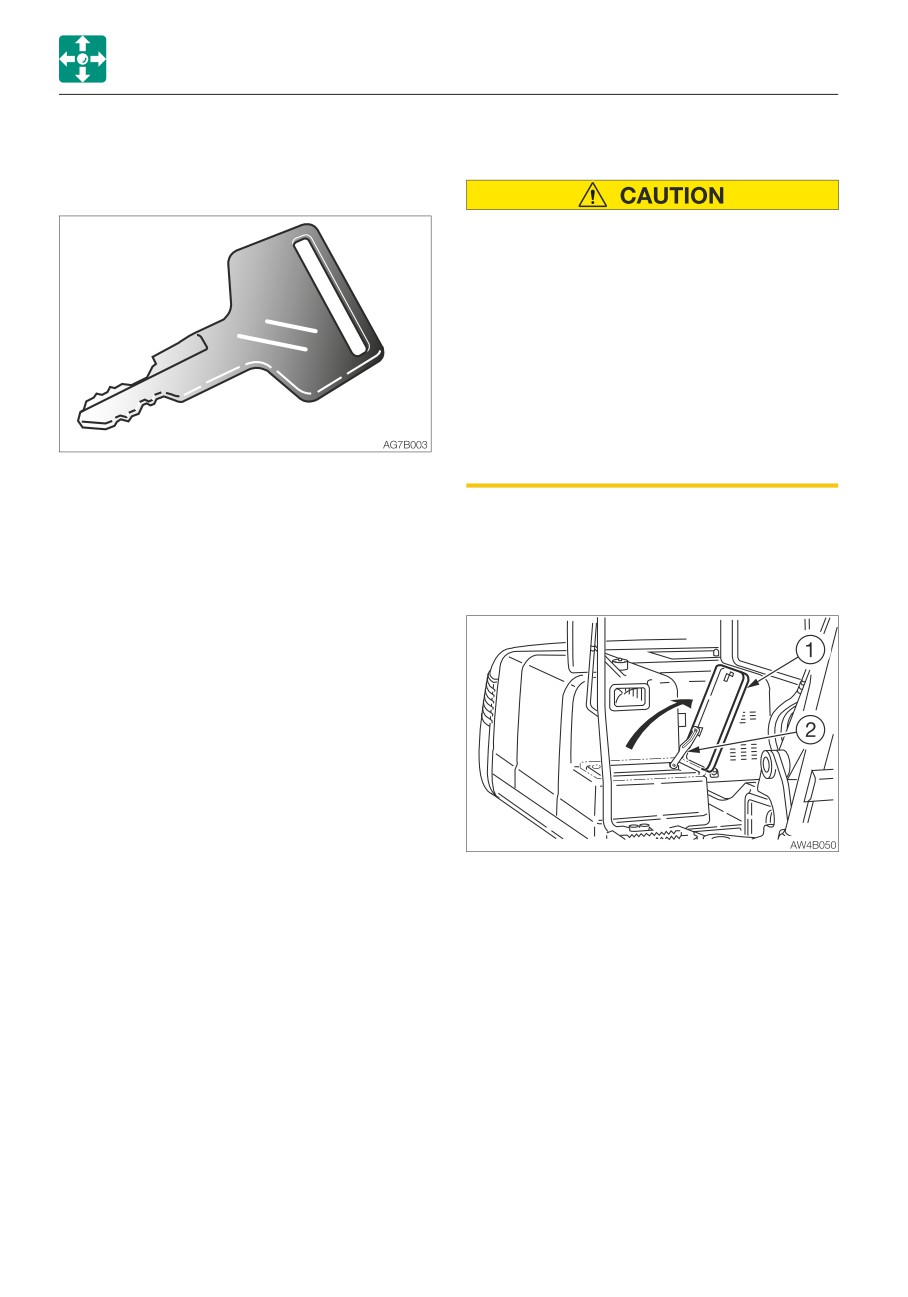
CONTROLS
COVERS
FRONT COVER (TOOL BOX)
COVERS
STARTER KEY
• Never jump down from the machine.
Use the steps and handrails when
climbing up and down the machine, and
always support your body at three
points with your hands and feet.
• When opening the front cover, open it
all the way to the position where it is
securely stopped.
• When opening or closing the front
cover, be careful not to get your hands
or other parts of your body caught by
The starter key is used to start and stop the
the cover.
engine, as well as to lock and unlock the
following components:
The grease gun and tools are stored under
• Fuel filler cap
the cover.
• Cab door
• Covers
Opening
1. Insert the starter key and turn it
counterclockwise to unlock the front cover
(1).
2. Open the front cover (1) until it stops.
Closing
1. Support the front cover (1) by hand and
release the stay (2).
2. Close the front cover (1).
3. Insert the starter key and turn it clockwise
to lock the front cover (1).
2-4
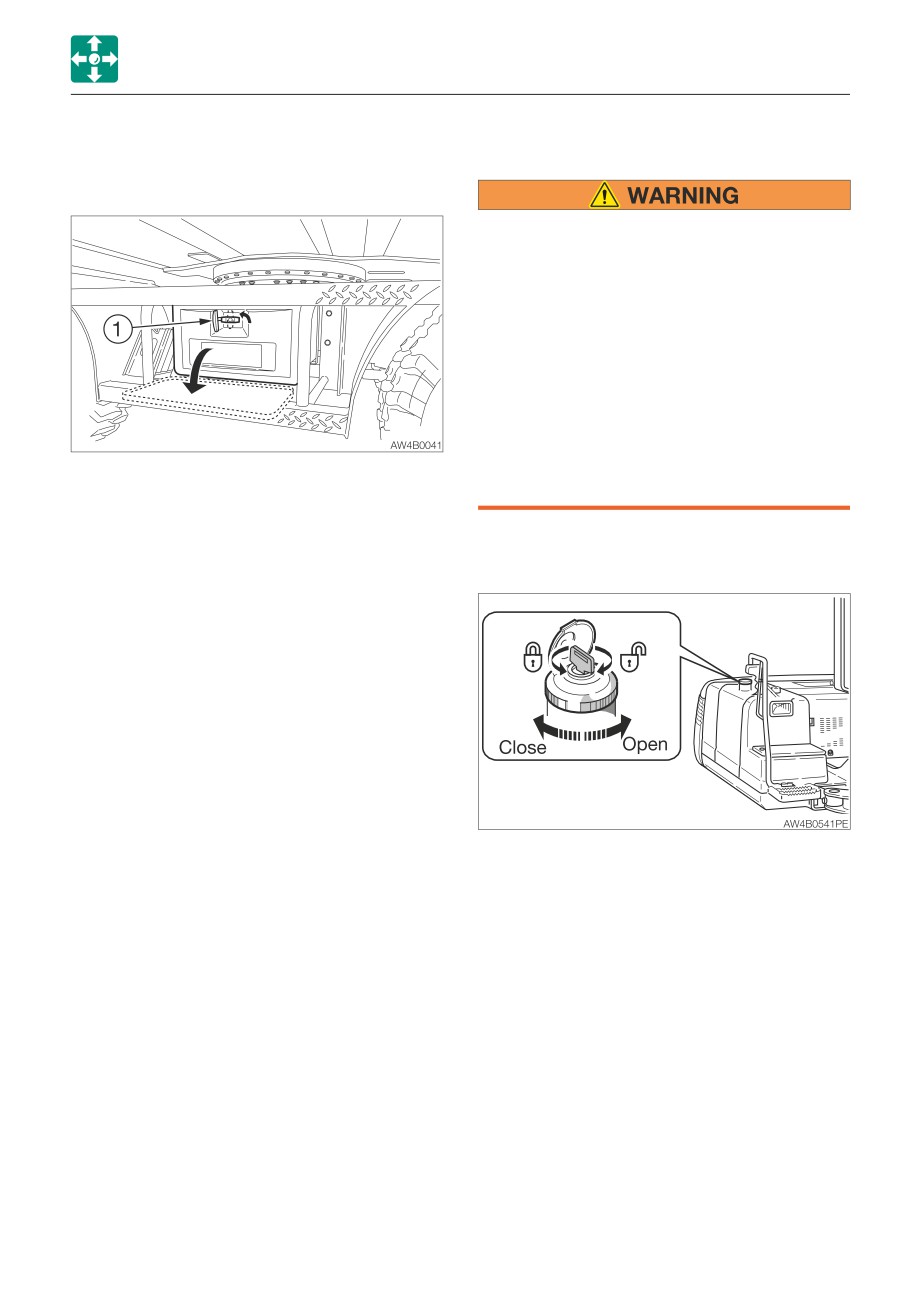
CONTROLS
COVERS
TOOL BOX
FUEL FILLER PORT
Opening
• Never jump down from the machine.
Use the steps and handrails when
climbing up and down the machine, and
always support your body at three
points with your hands and feet.
• Do not smoke and keep away from heat
or flame while filling the fuel tank.
• Fill the fuel tank in a well ventilated
place, with the engine turned off.
• Clean up spilled fuel immediately.
• Do not fill the fuel tank to capacity.
1. Remove the cover (1) from the knob.
Allow room for oil expansion.
2. Insert the starter key and turn it
• Securely tighten the fuel filler cap.
counterclockwise to unlock the tool box.
3. Open the cover.
Opening
Closing
1. After using tools, store them back in the
tool box.
2. Close the cover (1).
3. Insert the starter key and turn it clockwise
to lock the tool box.
4. Install the cover (1) on the knob.
1. Open the cover, insert the key and turn it
clockwise to unlock.
2. Turn the fuel filler cap counterclockwise
and remove it.
Closing
1. Install the fuel filler cap to the fuel filler
port, and then turn the cap clockwise to
close it.
2. Lock the fuel filler cap.
2-5
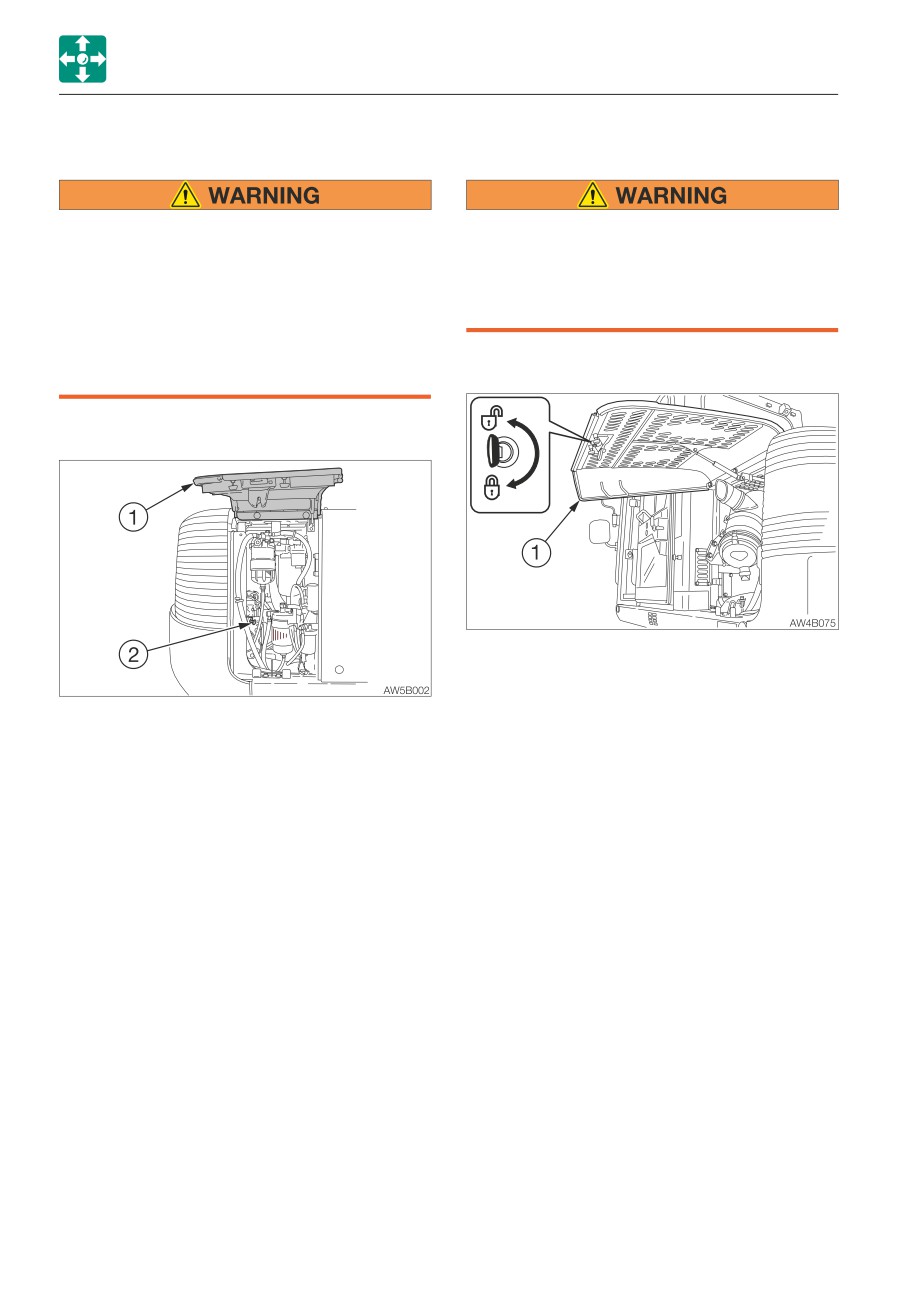
CONTROLS
COVERS
RIGHT SIDE COVER
LEFT SIDE COVER
• Before opening the side cover, be sure
• Before opening the side cover, be sure
to stop the engine.
to stop the engine.
• Do not keep the side cover open on a
• When opening or closing the side cover,
windy day or if the machine is parked
be careful not to get your hands or other
on a slope.
parts of your body caught by the cover.
• When opening or closing the side cover,
be careful not to get your hands or other
Opening
parts of your body caught by the cover.
Opening
1. Insert the starter key and turn it
counterclockwise to unlock the side cover
(1).
1. Insert the starter key and turn it
2. Lift the side cover (1) all the way.
counterclockwise to unlock the side cover
(1).
Closing
2. Lift the side cover (1) all the way.
1. Close the side cover (1) and press it down
Engine hood unlock knob (2) is located
until a click is heard.
behind the right side cover.
Closing
1. Close the side cover (1) and press it down
until a click is heard.
2-6
CONTROLS
COVERS
ENGINE HOOD
• Before performing maintenance on the
top of the machine, clean the place you
will work on and observe the following
to prevent falling.
Before opening the engine hood, be sure
· Do not spill oil or grease.
to stop the engine. If a hand or tool
· Do not leave tools scattered around.
becomes trapped in the rotating or
· Watch your step when walking.
moving part, serious injury could result.
• Never jump down from the machine.
Use the steps and handrails when
Opening
climbing up and down the machine, and
always support your body at three
points with your hands and feet.
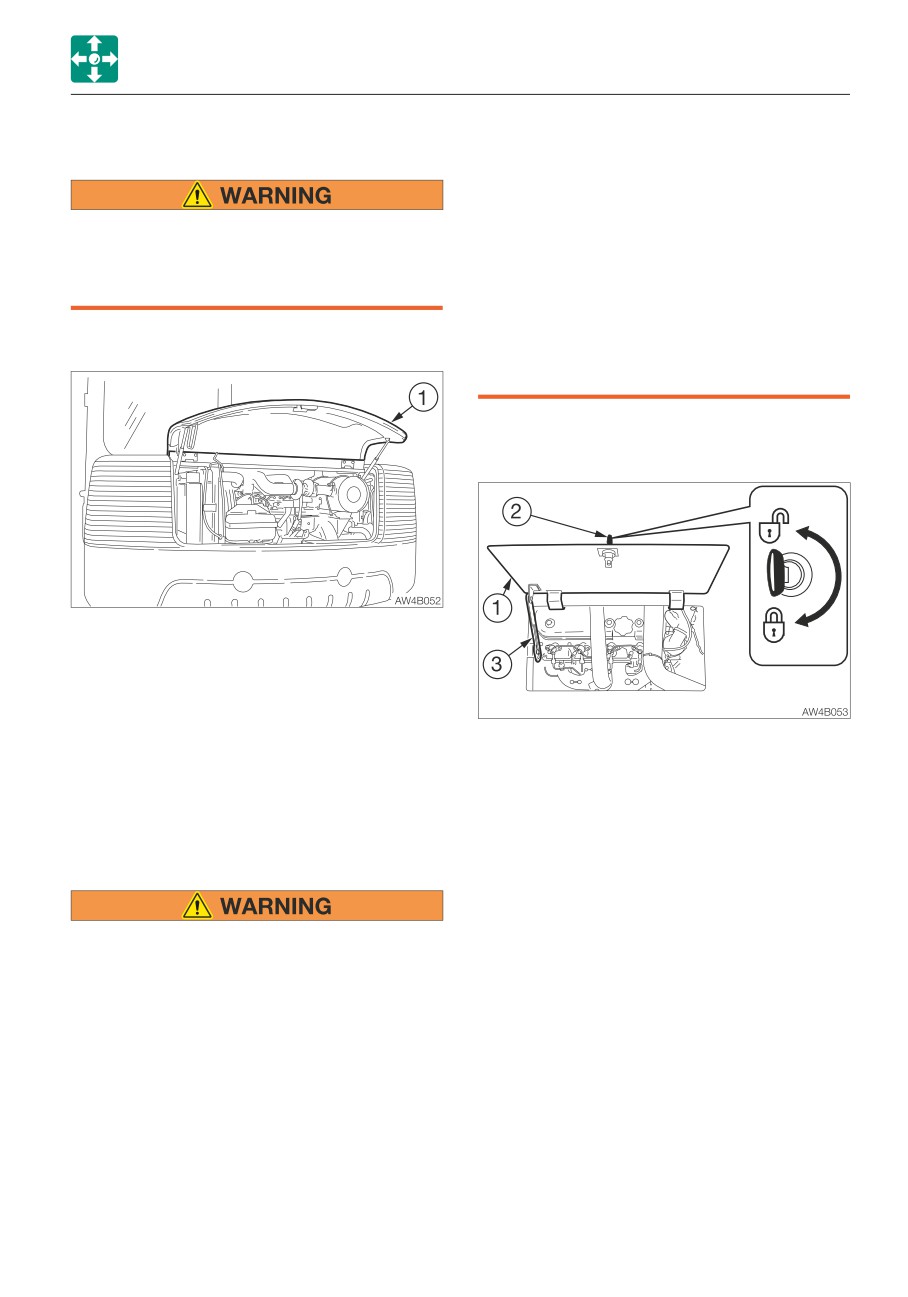
For inspection and maintenance of the
engine, open this cover.
1. Open the right side cover and pull the
engine hood unlock knob (2).
Refer to “Right side cover”.
2. Open the engine hood (1).
Closing
Opening
1. Close the engine hood (1) and press down
1. Insert the starter key (2) and turn it
the edge of it until a click is heard.
counterclockwise to unlock the
maintenance cover (1).
2. Pull the key (2), and then lift the
MAINTENANCE COVER
maintenance cover (1) until it stops.
3. Make sure it is properly secured with the
stay (3).
• Before opening the maintenance cover,
Closing
be sure to stop the engine. If a hand or
1. Hold the maintenance cover (1) and lift up
tool becomes trapped in the rotating or
the stay (3) to release it.
moving part, serious injury could result.
2. Close the maintenance cover (1) and lock
• When opening the maintenance cover,
it.
open it all the way to the position where
it is securely stopped.
• When opening or closing the
maintenance cover, be careful not to get
your hands or other parts of your body
caught by the cover.
2-7
CONTROLS
CAB
CAB
CAB DOOR
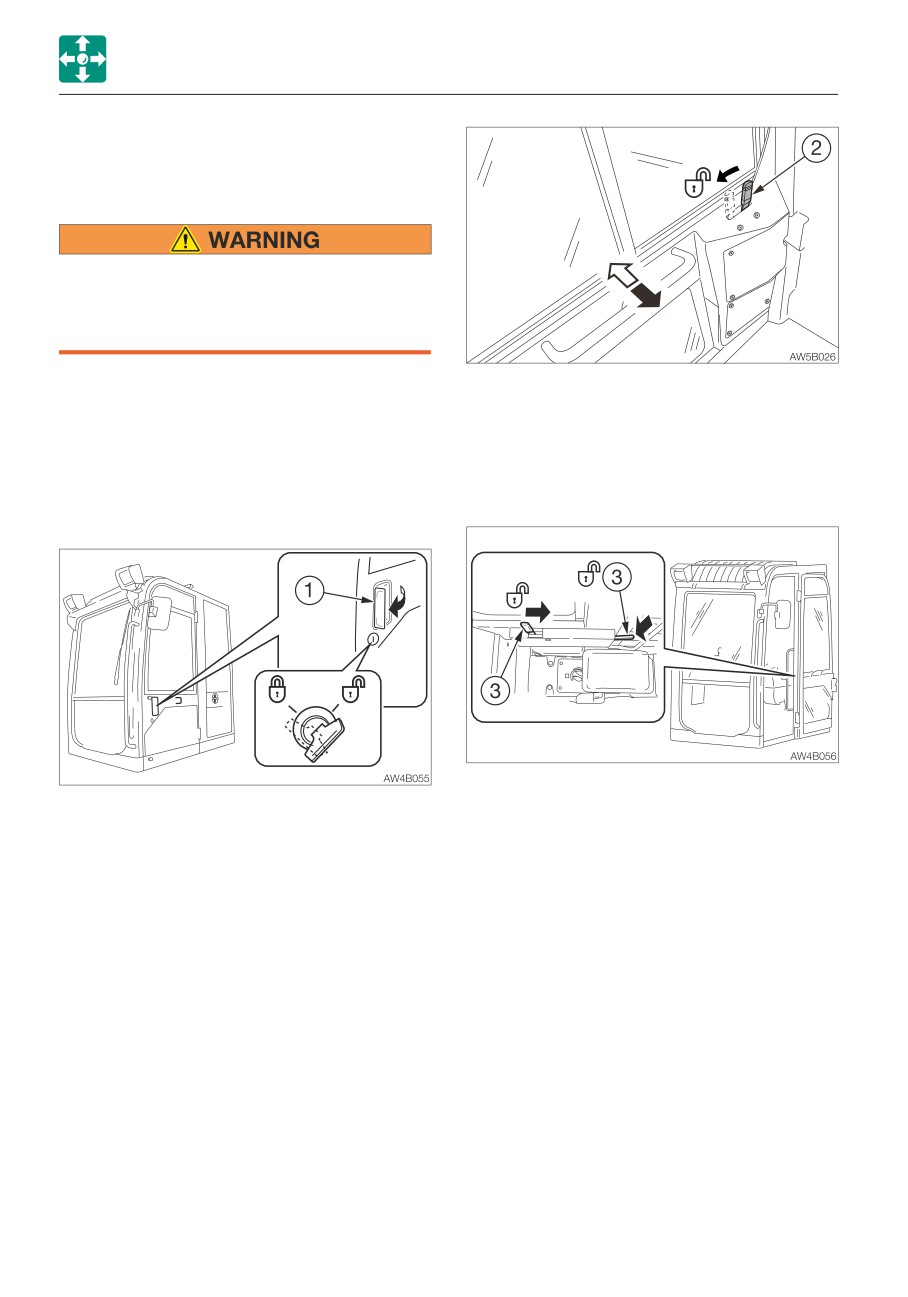
When getting on or off the cab, first open
the door all the way until it is secured in
the catch and check that it does not
move.
Open the door fully and press it against the
To open the door from inside the cab, pull
catch at the back of the door to secure it in
the lever (2).
place.
2. Open the door fully and press it against
The door must be locked when getting on or
the cab to secure it in place.
off the machine and while in operation.
Closing
Locking and unlocking
1. Push the release lever (3) downward.
Insert the starter key and turn it.
2. Close the released door.
Opening
1. Pull the knob (1) towards you and open
the door.
2-8
CONTROLS
CAB
FRONT WINDOW
4
2
• Grasp the handles firmly with both
2
hands when opening and closing the
front window. Your head or hands may
get caught if it slips from your hands.
• when the front window is opened or
closed, it will come close to the head.
3
Be careful that the window does not
AG7B015
strike the head.
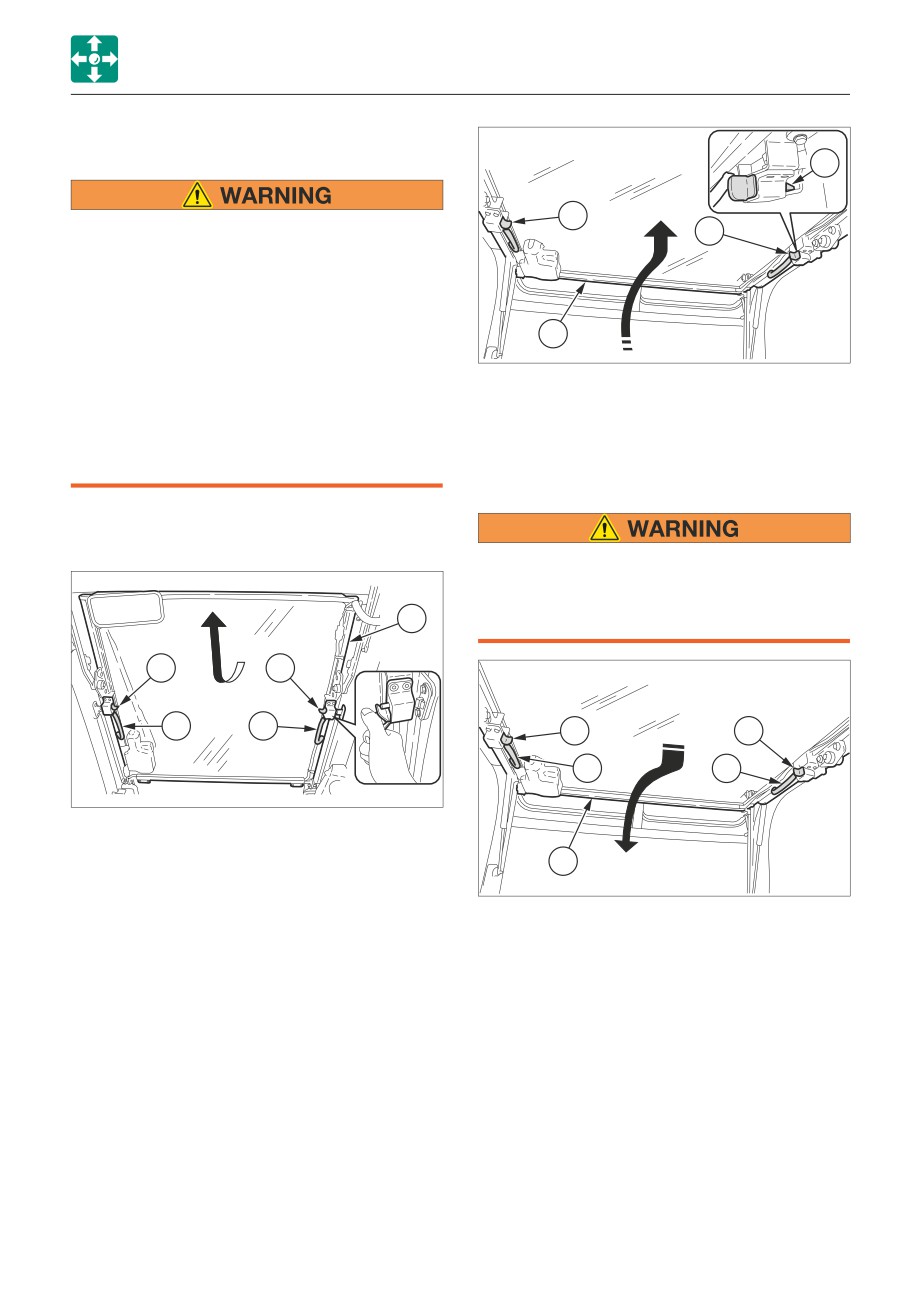
5. Release your thumb from the knobs (2)
• When you open the front window, be
and then lift the front window (3) fully and
sure to lock it in place with the lock pins
lock the front window with lock pin (4).
on the left and right sides. The window
may fall if it is not locked in place.
Closing
Opening
When closing the front window slowly so
as not to hit your head. Lowering the
window abruptly may result injury or
3
damage the front window.
2
2
1
1
2
2
1
1
AG7B014
1. Park on a level surface and stop the
engine.
3
2. Set the safety lock lever to the locked
position.
AG7B016
3. Grasp the left and right handles (1) and
1. Grasp the left and right handles (1) and
press the knobs (2) with your thumb to
press the knobs (2) with your thumb to
release the lock.
release the lock.
4. Pull the front window (3) toward you and
2. Pull down the front window (3) and while
lift while doing so.
doing so, slide it to the front and slowly
lower it.
2-9
CONTROLS
CAB
LOWER FRONT WINDOW
3
Removing
2
2
4
AG7B017
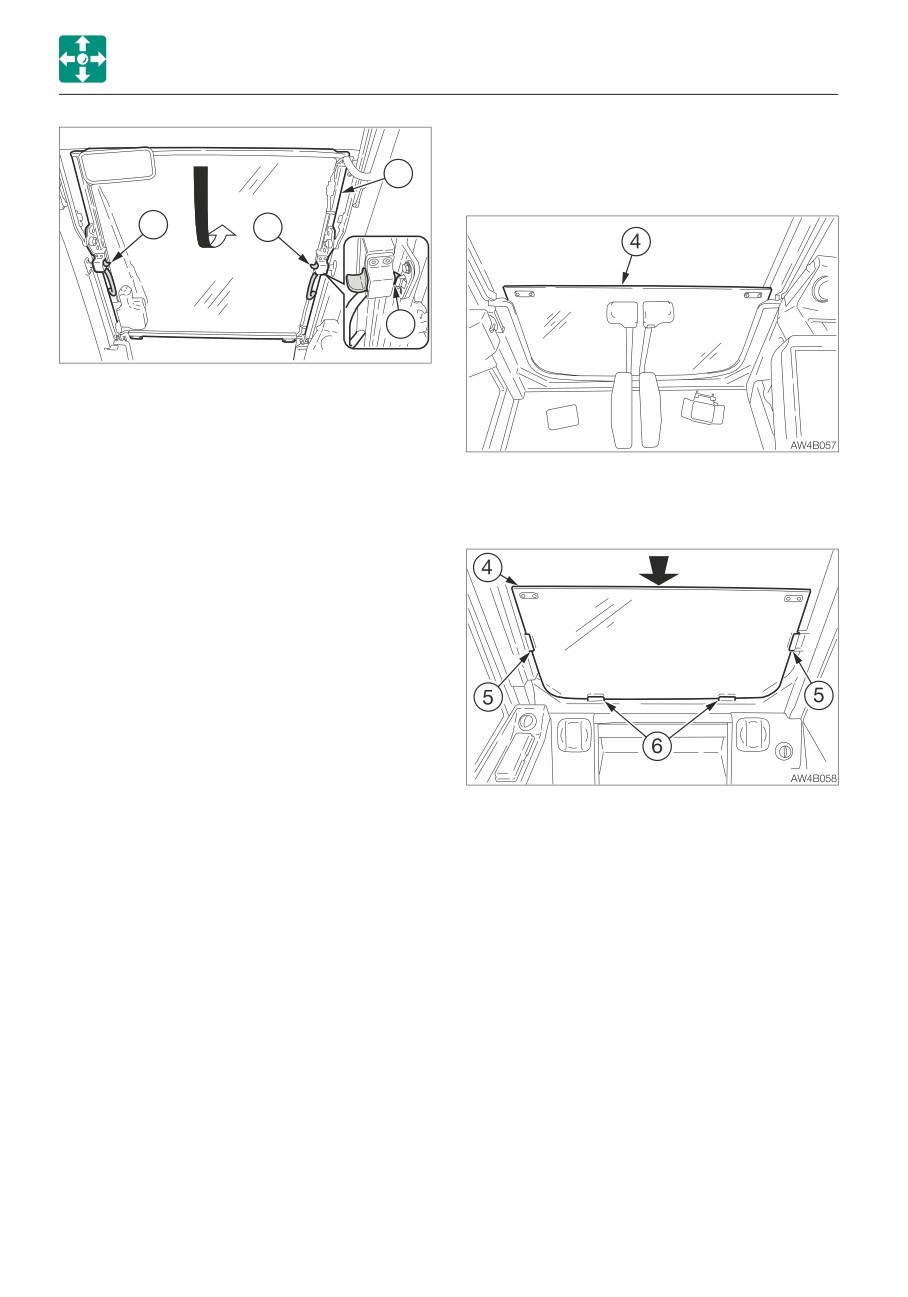
3. Release your thumb from the knobs (2)
and then press the front window toward
front and lock the front window with lock
pin (4).
1. Open the front window and stow it in the
ceiling.
2. Slowly lift the lower front window (4).
3. Place the lower front window (4) through
the guides (5) at the rear, and then set it
on the guide (6).
2-10
CONTROLS
CAB
SIDE WINDOW
EMERGENCY EXIT
Rear window
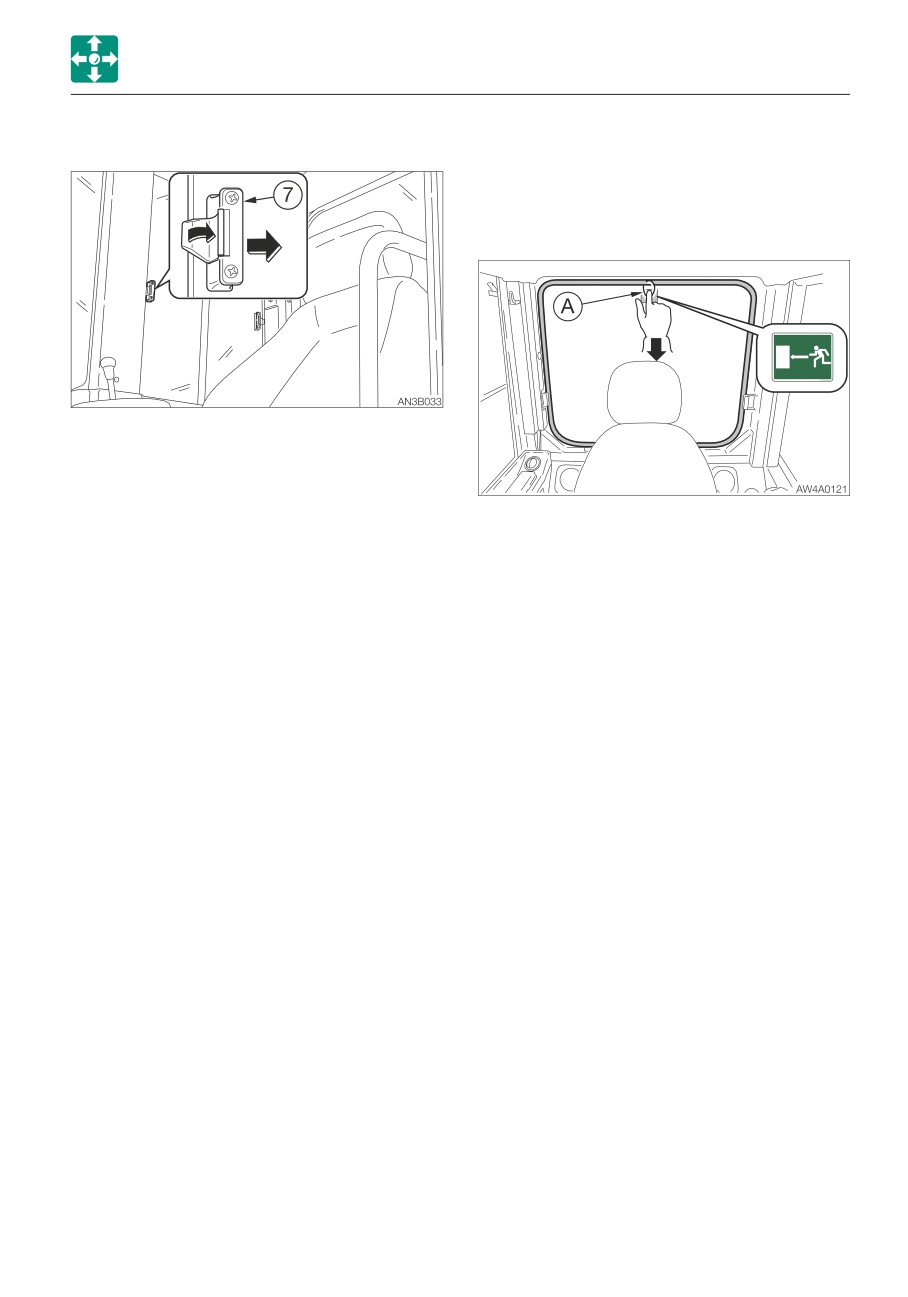
If you should become trapped inside the
cab, remove the rear window to get out.
1. Grasp the catch (7), unlock it and open
the side window.
2. To close the side window, close it until a
click is heard.
1. Pull off the ring (A) and remove the tip of
the rubber wedge.
2. Grasp and pull the tip of the rubber wedge
to remove the entire rubber wedge.
3. Kick out the rear window. Note that the
glass may break. Be careful not to get
injured.
2-11
CONTROLS
SEAT AND SEAT BELT
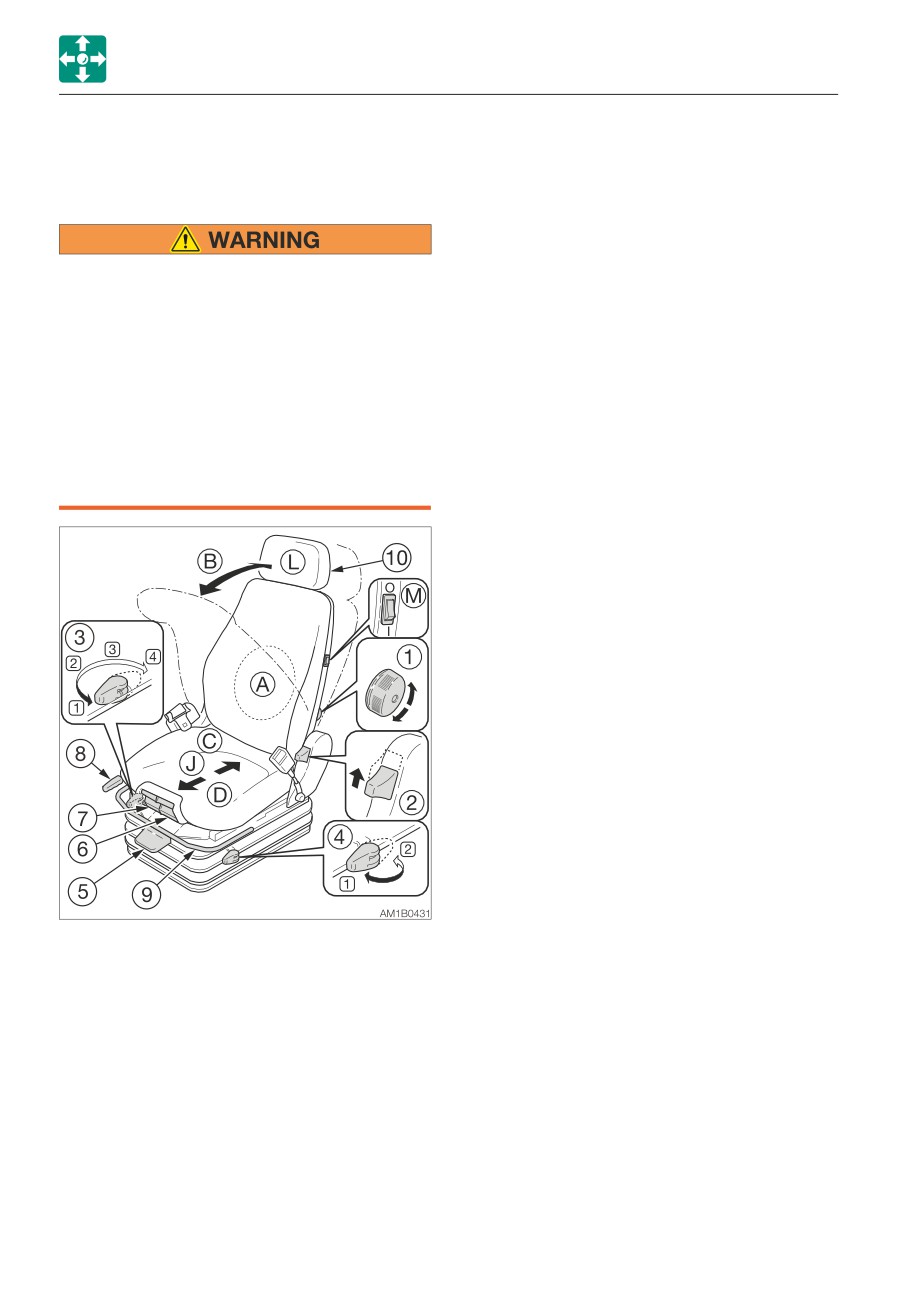
(A) Adjusting the lumber support
SEAT AND SEAT BELT
1. Turning the knob (1) in the direction of the
AIR SUSPENSION SEAT
arrow causes the lumber of the backrest
to curve outwards.
2. Turning the knob (1) further removes the
curve and returns the seat to its original
• Adjust and secure the seat.
position.
• Do not make any adjustments while
operating the machine.
(B) Adjusting the backrest angle
• Do not set the backrest to its maximum
1. Sit up and sit back in the chair.
reclining position and slide the seat
2. Pull up the lever (2), adjust the backrest
backwards at the same time. Doing so
rear angle by using the spring force on the
may damage the rear window or cause
chair back. Release the lever (2) at the
injury.
desired angle to secure the backrest.
• Remember that the backrest returns to
the forward position abruptly due to the
(C) Adjusting the absorber
spring force.
The seat adjustment using the absorber is
applicable for various traveling conditions on
roads or off roads. The cushioning effect can
be individually set for each case.
Turn the lever (3) to the desired position and
release.
Positions between
1: Soft cushioning
and
4: Hard cushioning
2-12
CONTROLS
SEAT AND SEAT BELT
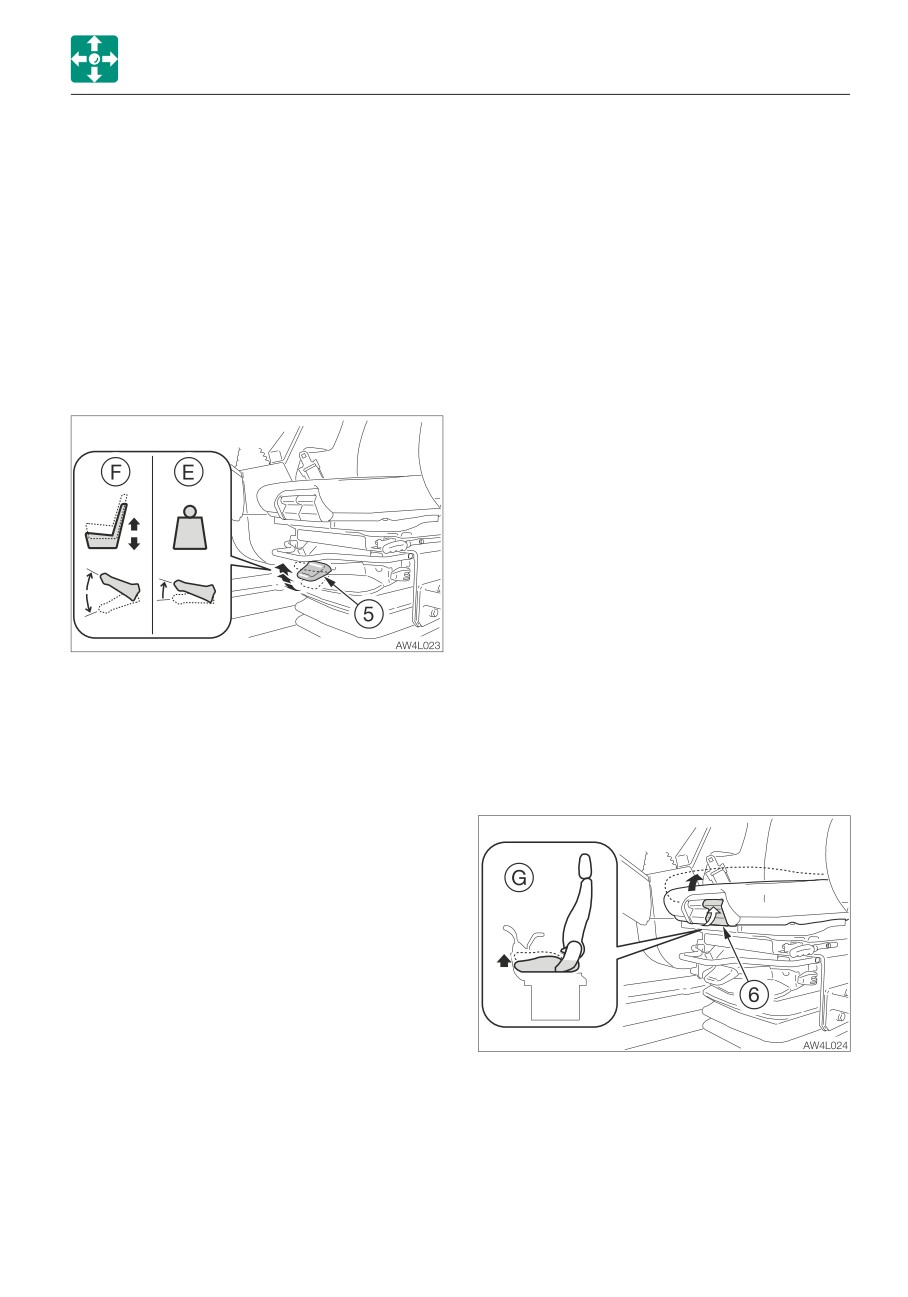
(D) The fore /aft isolator
(F) Adjusting the seat height
It is activated under certain conditions such
as crashing. Impacts of crash applied in the
IMPORTANT: Be sure to set the absorber
operating direction can be well absorbed by
to the soft position (1) when performing
the operator’s seat. Switching can be done
the height adjustment.
with the lever (4).
IMPORTANT: Do not operate the lever (5)
(compressor) for one minute or more.
Position 1: Fore /aft isolator on
Doing so will cause compressor failure.
Position 2: Fore /aft isolator off
To protect the compressor, wait for at
least three minutes before operating the
(E) Adjusting according to operator’s
lever (5) again.
weight
IMPORTANT: If the height adjustment
function fails, first lower the seat to the
lowest position. Then, adjust the height
again.
The seat height can be steplessly adjusted
using the pneumatic mechanism.
To adjust, push up or push down the lever (5)
all the way up or down. When the seat
reaches the level where it cannot be raised
anymore even the lever (5) is pushed up, that
level is the highest. If this happens, the
IMPORTANT: Before performing the
height is automatically lowered a small
adjustment by weight, stop the machine
distance to maintain the stroke of
and remain seated. Otherwise, the weight
suspension.
cannot be detected, resulting in
Adjustment stroke: 80 mm (3.1 in.)
malfunction.
IMPORTANT: Be sure to set the absorber
(G) Adjusting the seat pan angle
to the soft cushioning position (1) when
performing the adjustment by weight.
The seat should be adjusted according to
the operator’s weight. Briefly pull the actuator
lever (5) of the automatic weight and height
adjuster.
The angle of the seat pan can be individually
adjusted.
To adjust, lift the left side handle (6). Use the
pressure applied to the seat to set the seat
pan to the desired angle.
2-13
CONTROLS
SEAT AND SEAT BELT
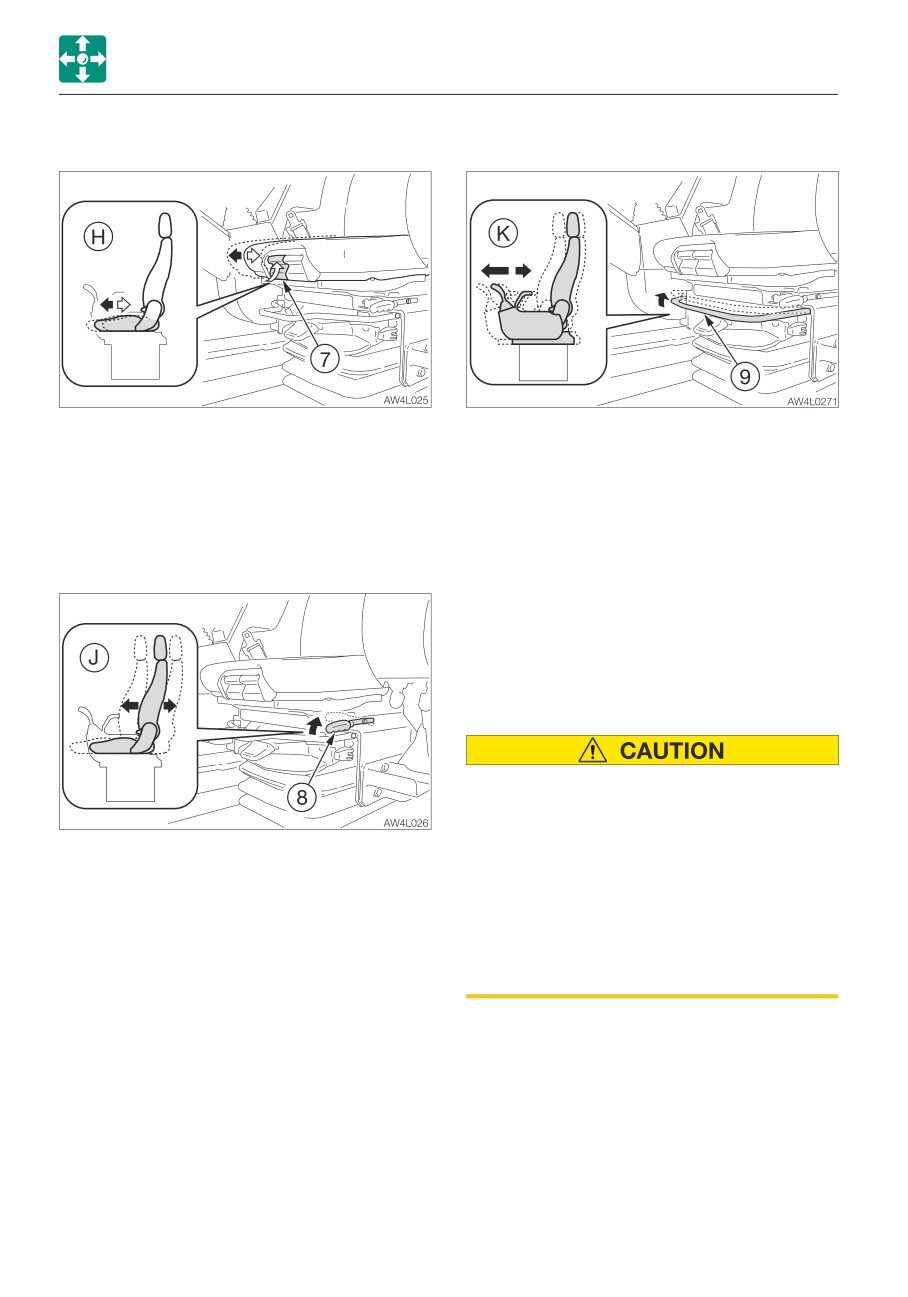
(H) Adjusting the seat depth
(K) Adjusting the operating lever stand
The depth of the seat pan can be individually
1. Pull up the lever (9) and slide the lever
adjusted.
stand (seat).
To adjust, lift the right side handle (7). Move
2. Release the lever (9) at the optimum
the seat cushion forward or backward until
position to secure the lever stand (seat).
the desired seat depth is obtained.
Adjustment range: 7 positions, in 70 mm
(2.8 in.)
(J) Adjusting fore-and-aft
(L) Adjusting the headrest height
1. Grab the headrest (10) with both hands,
and move upward and downward. Adjust
the height so that the headrest center is
positioned behind your ears.
(M) Seat heater
• Using the seat heater over an extended
period of time may cause burns. People
feeling ill or having sensitive skin, in
1. Pull up the lever (8) and slide the seat
particular, should be careful not to do
backward or forward to the optimum
so.
position for operation.
• Do not use it with a blanket or cushion
2. Release the lever (8) at the optimum
placed on the seat.
position to secure the seat.
• Clean up spilled water or soft drink
Adjustment range: 17 positions, in 170
immediately with a dry cloth. Dry the
mm (6.7 in.)
seat well before using the heater again.
IMPORTANT: The battery voltage
becomes low if the seat heater is left on
for a long time when the engine is
stopped.
O
OFF
I
ON
2-14
CONTROLS
SEAT AND SEAT BELT
SEAT BELT
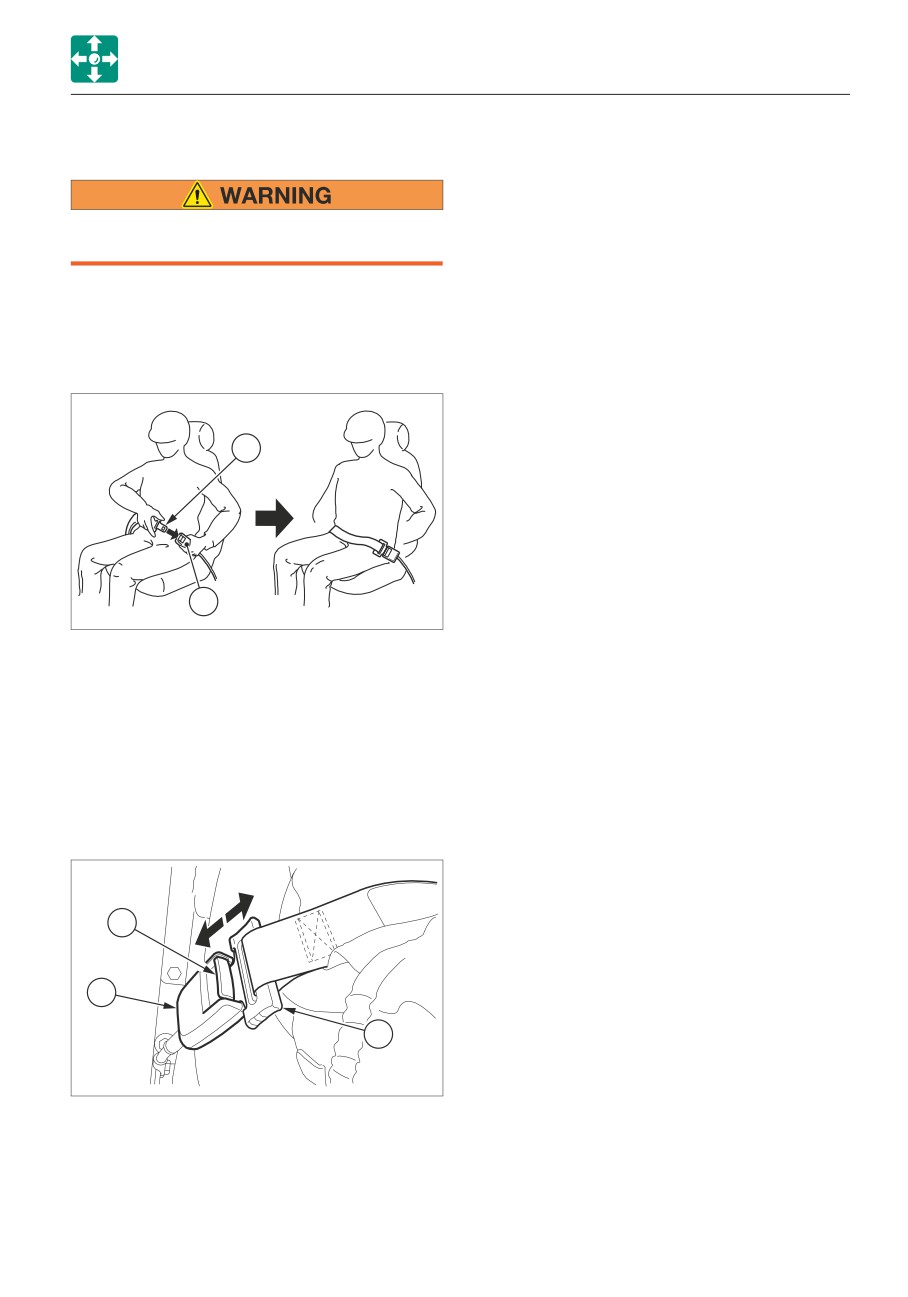
Be sure to fasten the seat belt securely
before starting the engine.
Fastening the seat belt
1. Adjust the seat to the desired position for
operation, sit up and sit back in the chair.
2. Pull the seat belt to the desired length.
A
B
AG7B023
3. Make sure that the belt is not twisted and
then insert the tongue plate (A) into the
buckle (B) of the seat belt until you hear a
clicking sound as it locks in place.
4. Check if the belt is securely locked by
pulling it, and arrange the belt around your
waist.
Releasing the seat belt
C
B
A
AG7B024
1. Grasp the tongue plate (A) and press the
button (C) on the buckle (B).
The seat belt retracts back into its original
position.
2-15
CONTROLS
MULTI-INFORMATION DISPLAY
MULTI-INFORMATION DISPLAY
MAIN MENU SCREEN
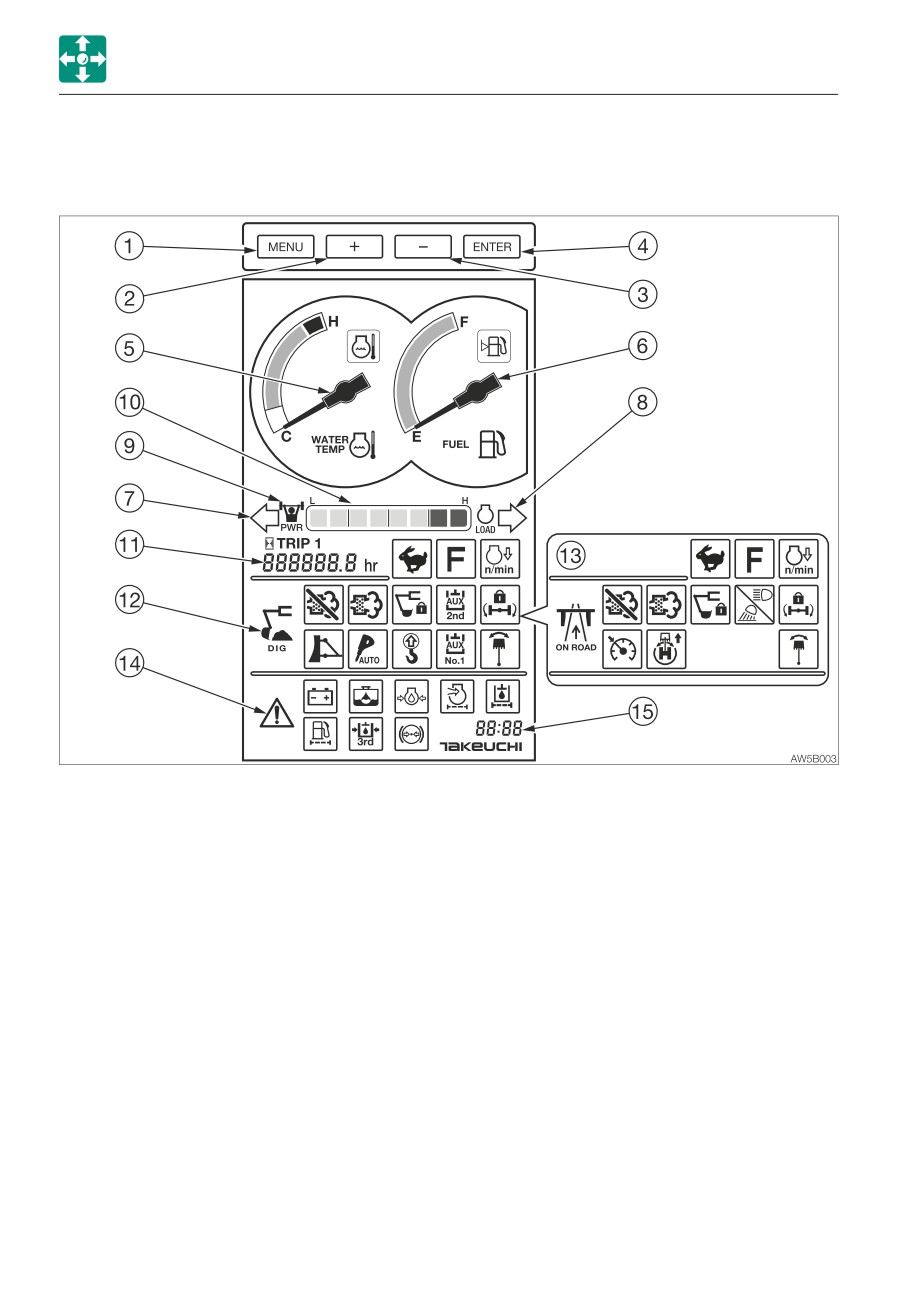
For explanation purposes, all items on this page are in the lit condition. This screen image is
quite different from that of the real operation. In the actual operation, if a warning is given or
any function is selected, the corresponding symbol appears.
When the starter switch is set to ON, the battery charge warning lamp and the engine oil
pressure warning lamp turn on with an alarm sound. The machine system is normal if the
lamps turn off after the engine is started.
1. Menu key
8. Turn signal indicator lamp (R)
2. Plus (+) cursor key
9. Power mode indicator lamp
3. Minus (-) cursor key
10. Engine load factor indicator
4. Enter key
11. Hour meter /Trip meter
5. Water temperature gauge /Coolant
12. Digging mode display (Function lamps)
temperature warning lamp
13. Traveling mode display (Function lamps)
6. Fuel gauge /Fuel level warning lamp
14. Warning lamps
7. Turn signal indicator lamp (L)
15. Clock
2-16
CONTROLS
MULTI-INFORMATION DISPLAY
1. Menu key
6. Fuel gauge /Fuel level warning lamp
Use this key to switch between the Main
· Fuel gauge
Menu screen and the Setting Menu
Indicates the amount of fuel in the tank.
screen. This key is also used to cancel
Be sure to fill up the tank before running
changes made in each setting. The screen
out of fuel.
returns to the Main Menu, if this key is
· Fuel level warning lamp
pressed while the screen is displaying
Fuel level warning lamp flashes when the
data.
fuel level is low while the starter switch is
in the ON position.
2. Plus (+) key
Use this key to move the cursor upward
7. Turn signal indicator lamp (L)
and to increase the value in each setting.
This lamp lights to indicate that the left
Press and hold this key for one second to
turn signal indicator is flashing.
rapidly increase the value.
8. Turn signal indicator lamp (R)
3. Minus (-) key
This lamp lights to indicate that the right
Use this key to move the cursor
turn signal indicator is flashing.
downward and to decrease the value in
each setting. Press and hold this key for
9. Power mode indicator lamp
one second to rapidly decrease the value.
This lamp turns on when the power mode
switch is pressed. The maximum engine
4. Enter key
output is maintained for as long as this
Use this key to confirm or execute the
lamp is lit.
setting made by each key.
To clear the trip meter being displayed,
press and hold this key for three seconds.
5. Water temperature gauge /Coolant
temperature warning lamp
· Water temperature gauge
Indicates the temperature of the engine
coolant water.
The needle should be within the green
range during machine operation. The red
range indicates overheating.
· Coolant temperature warning lamp
Coolant temperature warning lamp
flashes and an alarm is sounded if the
engine coolant temperature becomes
abnormally high while the engine is
running.
2-17
CONTROLS
MULTI-INFORMATION DISPLAY
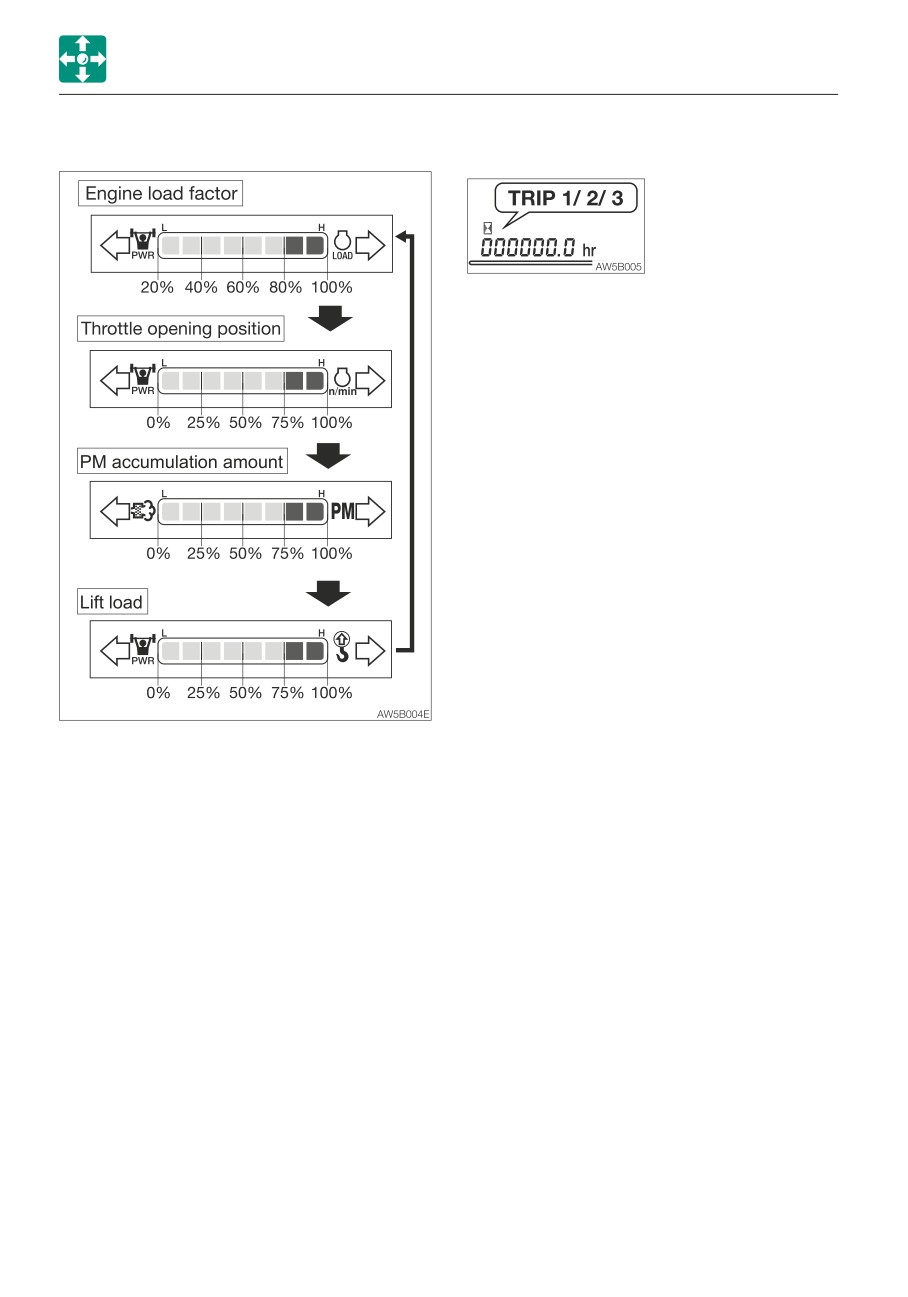
10. Engine load factor indicator
11. Hour meter /Trip meter
• Hour meter
Displays the total
engine running time in
hours.
The rightmost digit
indicates tenths of
hours (6 minutes).
Set the inspection and maintenance
intervals according to the time displayed
on the hour meter.
• Trip meter
Three patterns of desired operating hours
can be displayed.
Refer to “Trip meter setting” on page 2-29.
This gauge displays the load condition of the
work. When the gauge is in the green range,
the work load is light to medium. When the
gauge is in the red range (75% or more), the
work load is high. When the Enter key is
pressed in a normal screen, the display
changes in the following order: the engine
load factor, throttle opening position, PM
accumulation amount display, and lift load
factor.
Note: The machine is not faulty if the gauge
is in the red range. Operating the machine
with the gauge being in the green range is
energy-saving and will help conserve the
global environment.
• The lift load factor is displayed if there is
no change in the throttle opening position
for five seconds after the lift alarm switch
is turned on.
• The throttle opening position is displayed if
there is a change in the throttle opening
position.
2-18
CONTROLS
MULTI-INFORMATION DISPLAY
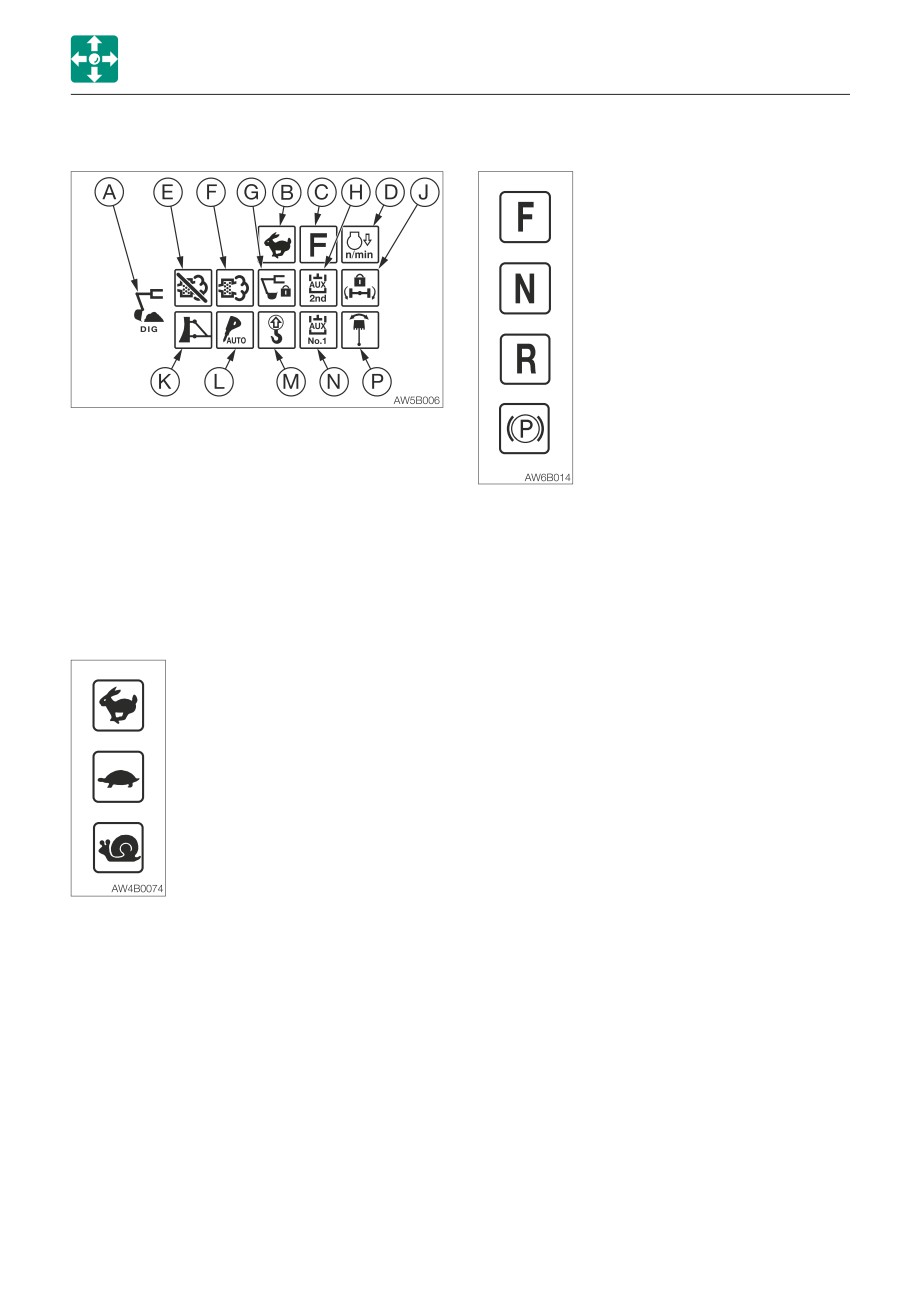
12. Digging mode display
C.Travel gear position /PB indicator lamp
Travel Forward
Neutral
Travel in Reverse
A. Digging mode symbol
Parking brake is on.
This symbol indicates that the machine is
in the digging mode, and the icon suitable
for the digging work is displayed.
The machine enters the digging mode
when the creeping travel switch is pressed
or the brake pedal is depressed to the
lock position.
B. Travel speed indicator lamps
........ High-speed travel
........ Low-speed travel
........ Creeping travel
2-19
CONTROLS
MULTI-INFORMATION DISPLAY
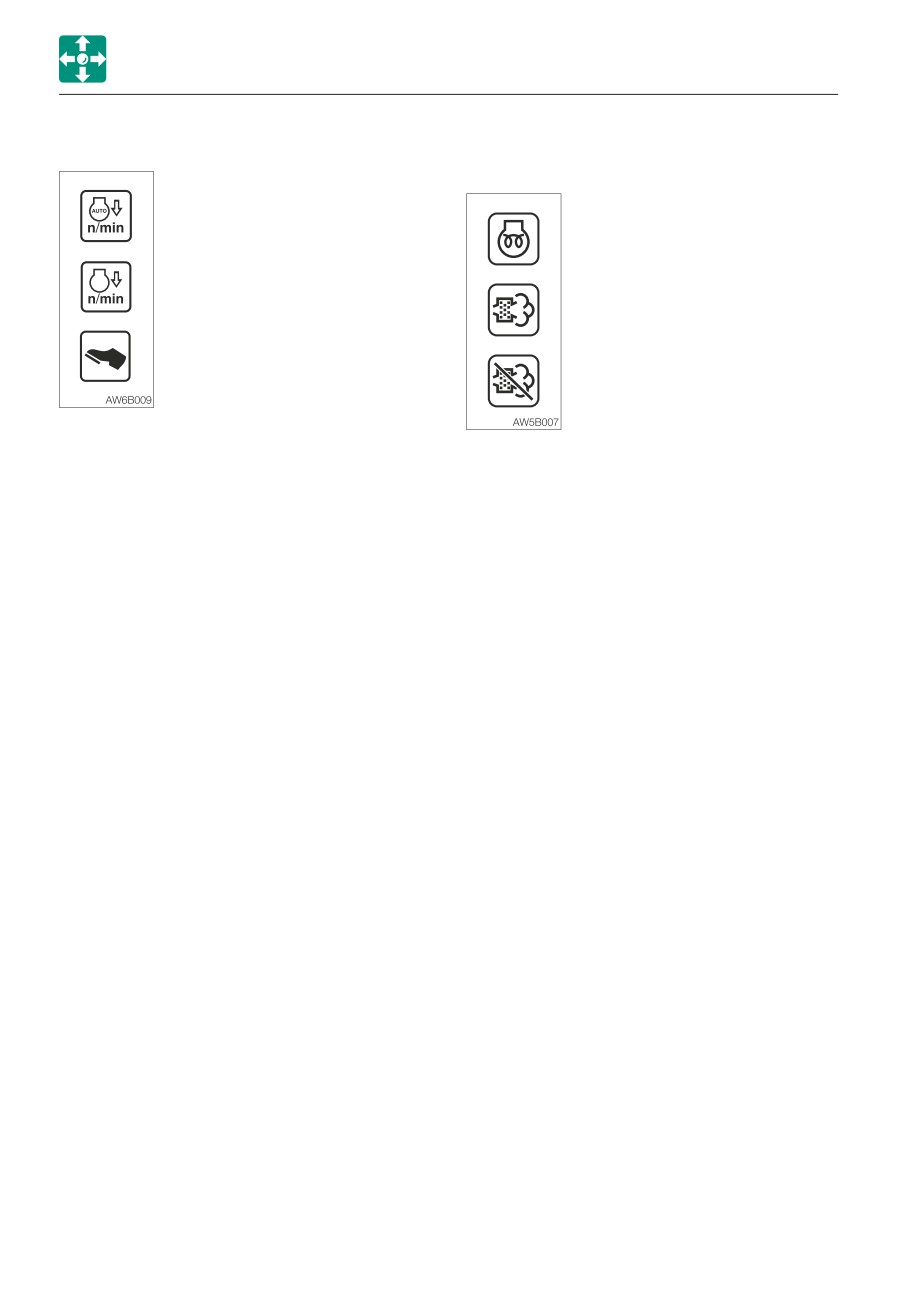
D.Deceleration indicator lamp
E. Glow & DPD auto regeneration /inhibit
indicator lamp
Automatic deceleration
mode
Engine being preheated
Deceleration mode
DPD auto regeneration
under way
Travel pedal mode
DPD auto regeneration
inhibit
•
Automatic deceleration mode
It flashes when the automatic deceleration
•
Glow indicator lamp
switch is pressed and remains lit while in
This indicator lamp turns off when the
the deceleration mode.
engine preheating is completed.
Refer to “Deceleration button” on page
2-42.
•
DPD auto regeneration under way
Refer to “Automatic deceleration switch”
The DPD regeneration is automatically
on page 2-39.
performed by the engine, when certain
criteria are met. The operator only has to
•
Deceleration mode
check the display.
This lamp turns on when the deceleration
button is pressed. The lamp lights up to
•
DPD auto regeneration inhibit
indicate that the engine is in the
The DPD manual regeneration inhibit
deceleration mode at low idling speed
symbol appears on the display when the
(1000 rpm).
DPD manual regeneration under way or
the DPD auto regeneration under way is
•
Travel pedal mode
cancelled.
This lamp turns on when the travel pedal
Refer to “DPD manual regeneration /inhibit
button is pressed. The engine RPM can
select switch” on page 2-37.
be controlled with the travel pedal while
this lamp is on.
2-20
CONTROLS
MULTI-INFORMATION DISPLAY
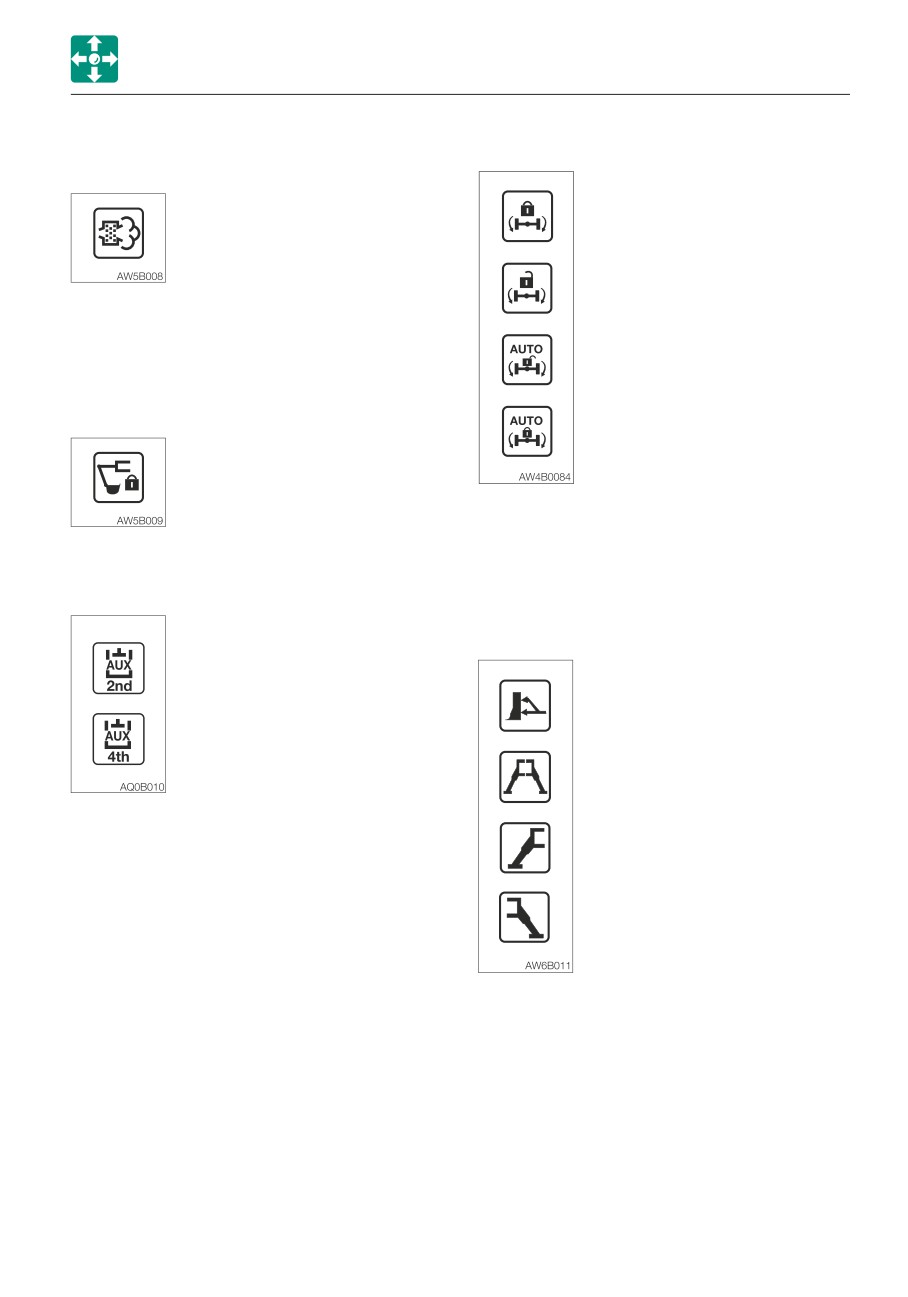
F. DPD manual regeneration under way
J. Ram lock indicator lamps
/regeneration promoting indicator
The indicator starts flashing and
Lock: Digging
an alarm starts sounding, if the
accumulated PM exceeds the
limited amount on the DPD.
Release: Traveling
Immediately perform the manual
DPD regeneration.
Refer to “DPD manual regeneration/inhibit
Automatic (blue): Traveling
select switch” on page 2-37.
at low speed (ram lock)
G.Attachment lock indicator lamp
Automatic (orange):
This lamp lights to indicate that
Traveling at low speed (ram
the operation of working
lock release) <Applicable
equipment is locked.
machine models
514500042 or later>
H.Auxiliary 2nd /4th select indicator lamp
Refer to “Ram lock switch” on page 2-36.
(digging mode)
K. Blade /Outriggers indicator lamp
(Digging mode)
Auxiliary 2nd is selected.
Dozer blade operation
Auxiliary 4th is selected.
Outrigger operation
(both sides)
Outrigger operation
(left side)
Outrigger operation
(right side)
This lamp turns on when the blade or
outrigger button is pressed. It remains lit
while in the blade or outrigger mode.
Refer to “Blade /Outrigger lever (if equipped)”
on page 2-52.
2-21
CONTROLS
MULTI-INFORMATION DISPLAY
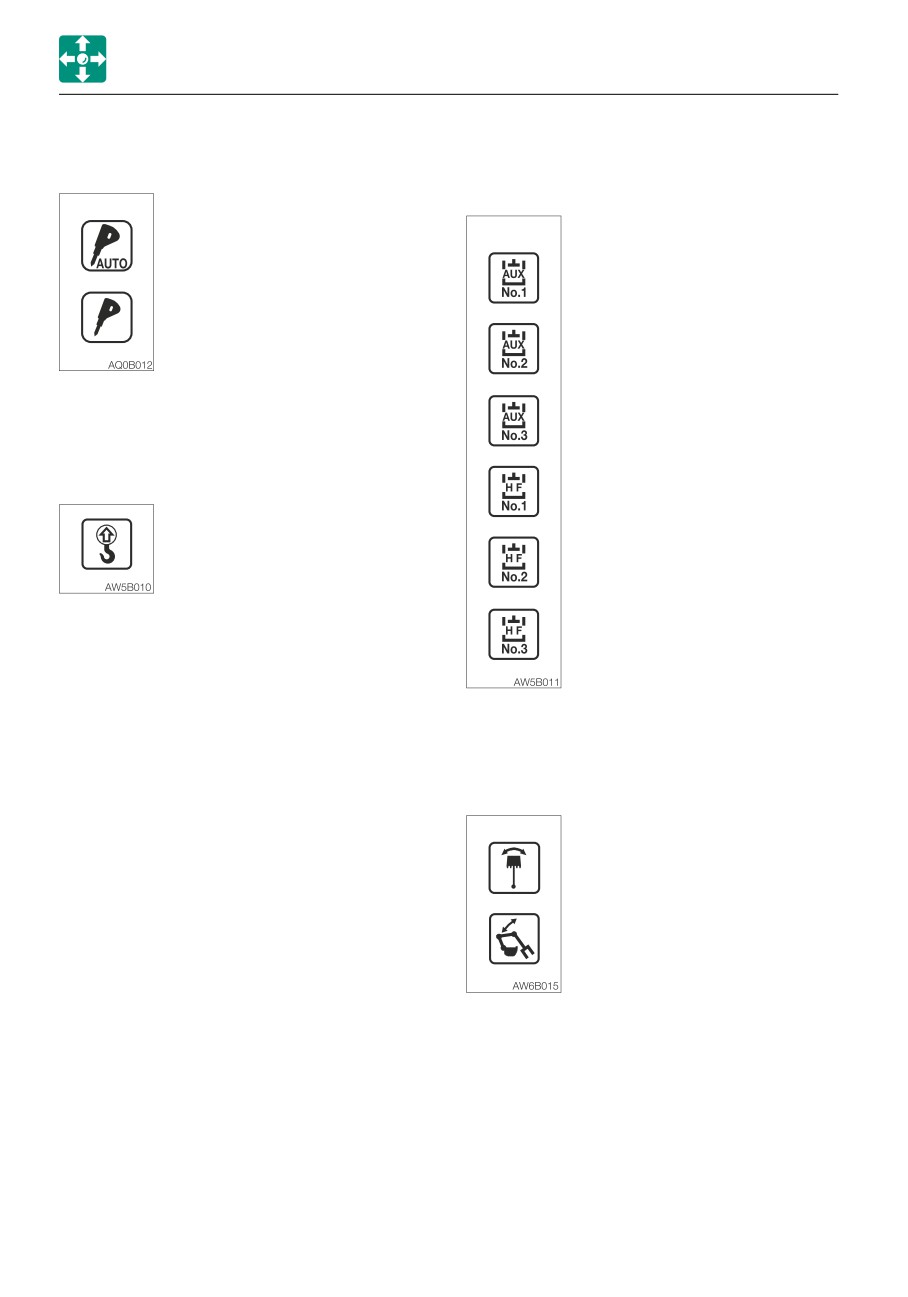
L. Auxiliary 1st one-way (one-way circuit)
N.Auxiliary 1st flow rate indicator lamp
indicator lamp
This lamp lights up to indicate which flow
rate setting is selected in the auxiliary 1st.
Auxiliary 1st auto tank is
selected.
Flow rate setting 1
Auxiliary 1st one-way is
selected.
Flow rate setting 2
No display: Two-way (two-way circuit) is
Flow rate setting 3
selected.
M.Lifting overload warning lamp
High-flow setting 1
Lifting overload switch is
ON.
High-flow setting 2
High-flow setting 3
Refer to “Auxiliary line flow rate setting” on
page 2-30.
P. Swing /Second boom indicator lamp
Swing is selected.
Second boom is selected.
2-22
CONTROLS
MULTI-INFORMATION DISPLAY
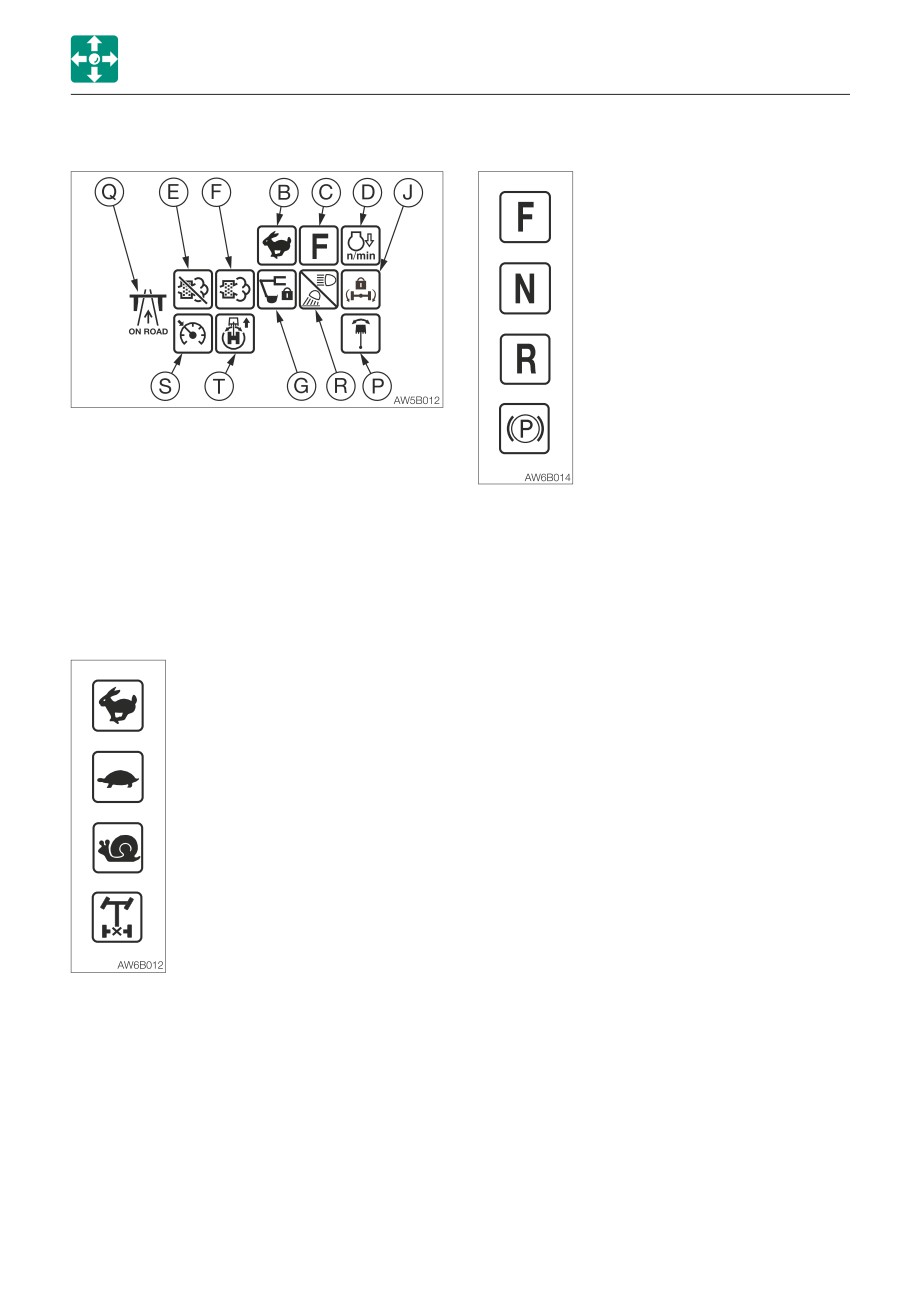
13. Traveling mode display
C.Travel gear position /PB indicator lamp
Travel Forward
Neutral
Travel in Reverse
Parking brake is on.
Q.Traveling mode symbol
This symbol indicates that the machine is
in the traveling mode, and the icon
suitable for the traveling is displayed.
To enter the traveling mode, set the
creeping travel switch to OFF, and release
the brake pedal lock.
B. Travel speed /Diff- lock indicator lamp
High-speed travel
Low-speed travel
Creeping travel
Differential gear lock
(Diff-lock)
This lamp turns on either when the travel
speed is changed or the Diff-lock switch is
pressed.
2-23
CONTROLS
MULTI-INFORMATION DISPLAY
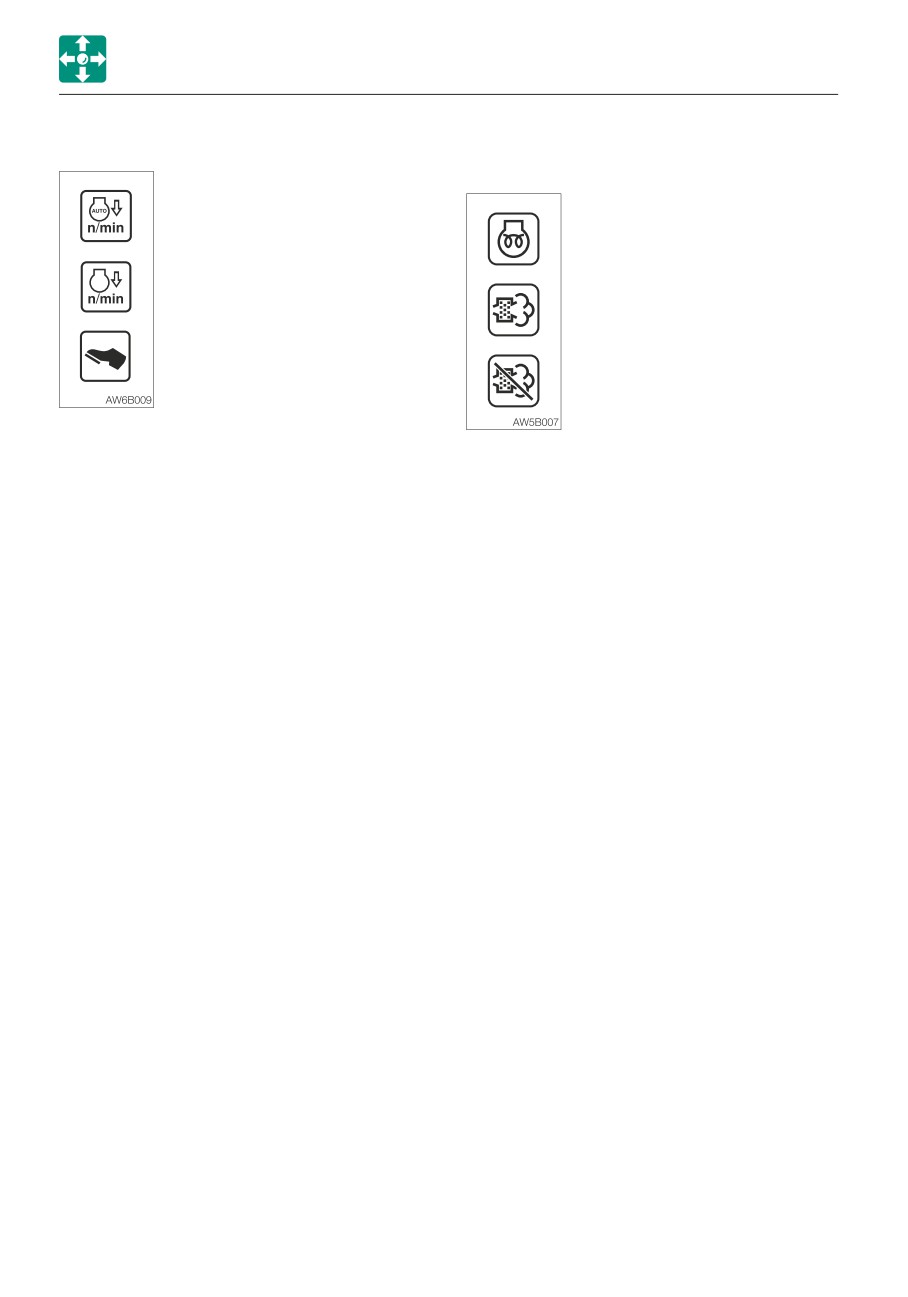
D.Deceleration indicator lamp
E. Glow & DPD auto regeneration /inhibit
indicator lamp
Automatic deceleration
mode
Engine being preheated
Deceleration mode
DPD auto regeneration
under way
Travel pedal mode
DPD auto regeneration
inhibit
•
Automatic deceleration mode
It flashes when the automatic deceleration
•
Glow indicator lamp
switch is pressed and remains lit while in
This indicator lamp turns off when the
the deceleration mode.
engine preheating is completed.
Refer to “Deceleration button” on page
2-42.
•
DPD auto regeneration under way
Refer to “Automatic deceleration switch”
The DPD regeneration is automatically
on page 2-39.
performed by the engine, when certain
criteria are met. The operator only has to
•
Deceleration mode
check the display.
This lamp turns on when the deceleration
button is pressed. The lamp lights up to
•
DPD auto regeneration inhibit
indicate that the engine is in the
The DPD manual regeneration inhibit
deceleration mode at low idling speed
symbol appears on the display when the
(1000 rpm).
DPD manual regeneration under way or
the DPD auto regeneration under way is
•
Travel pedal mode
cancelled.
This lamp turns on when the travel pedal
Refer to “DPD manual regeneration /inhibit
button is pressed. The engine RPM can
select switch” on page 2-37.
be controlled with the travel pedal while
this lamp is on.
2-24
CONTROLS
MULTI-INFORMATION DISPLAY
F. DPD manual regeneration under way /
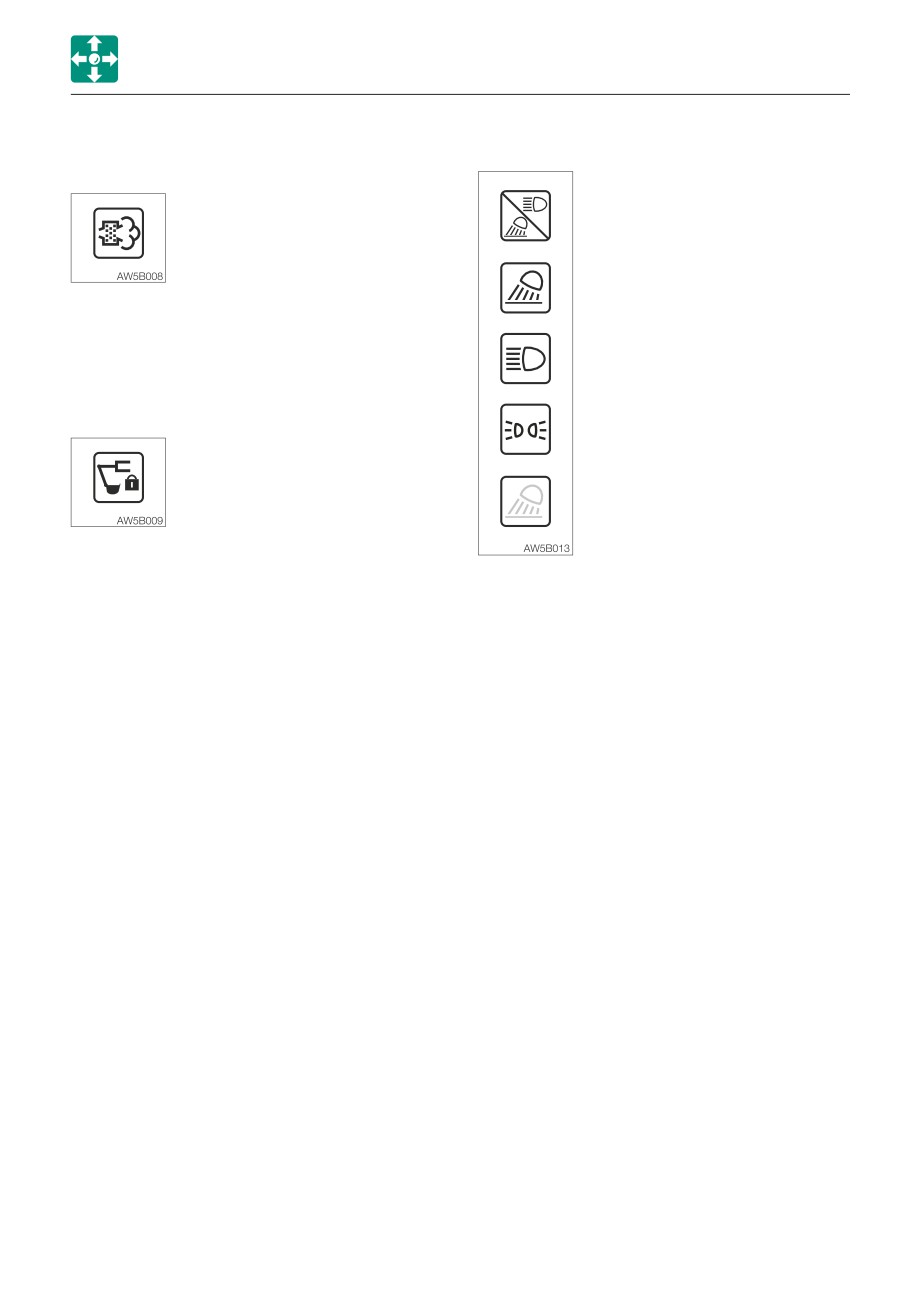
R. Lamp /light indicator lamp
regeneration promoting indicator
The indicator starts flashing and
Working light /high beam is
an alarm starts sounding, if the
lit
accumulated PM exceeds the
limited amount on the DPD.
Working light is lit.
Immediately perform the manual
DPD regeneration.
Refer to “DPD manual regeneration /inhibit
select switch” on page 2-37.
High beam is lit.
G.Attachment lock indicator lamp
Position lamp is lit.
This lamp lights to indicate that
the operation of working
equipment is locked.
Lamp /light is out.
• Working light /high beam indication
Displays that the working light or the high
beam is lit.
• Working light indicator
Lights up when the working light is turned
on.
• High beam indicator lamp
This lamp lights to indicate that the high
beams are lit. It also lights when the
passing operation is in progress.
• Position lamp indication
Lights up when the position lamp side of
the light switch is pressed.
• Lamp /light is out.
Indicates that all of the working lights /high
beams/position lamps are out.
2-25
CONTROLS
MULTI-INFORMATION DISPLAY
S. Auto-cruise indicator lamp
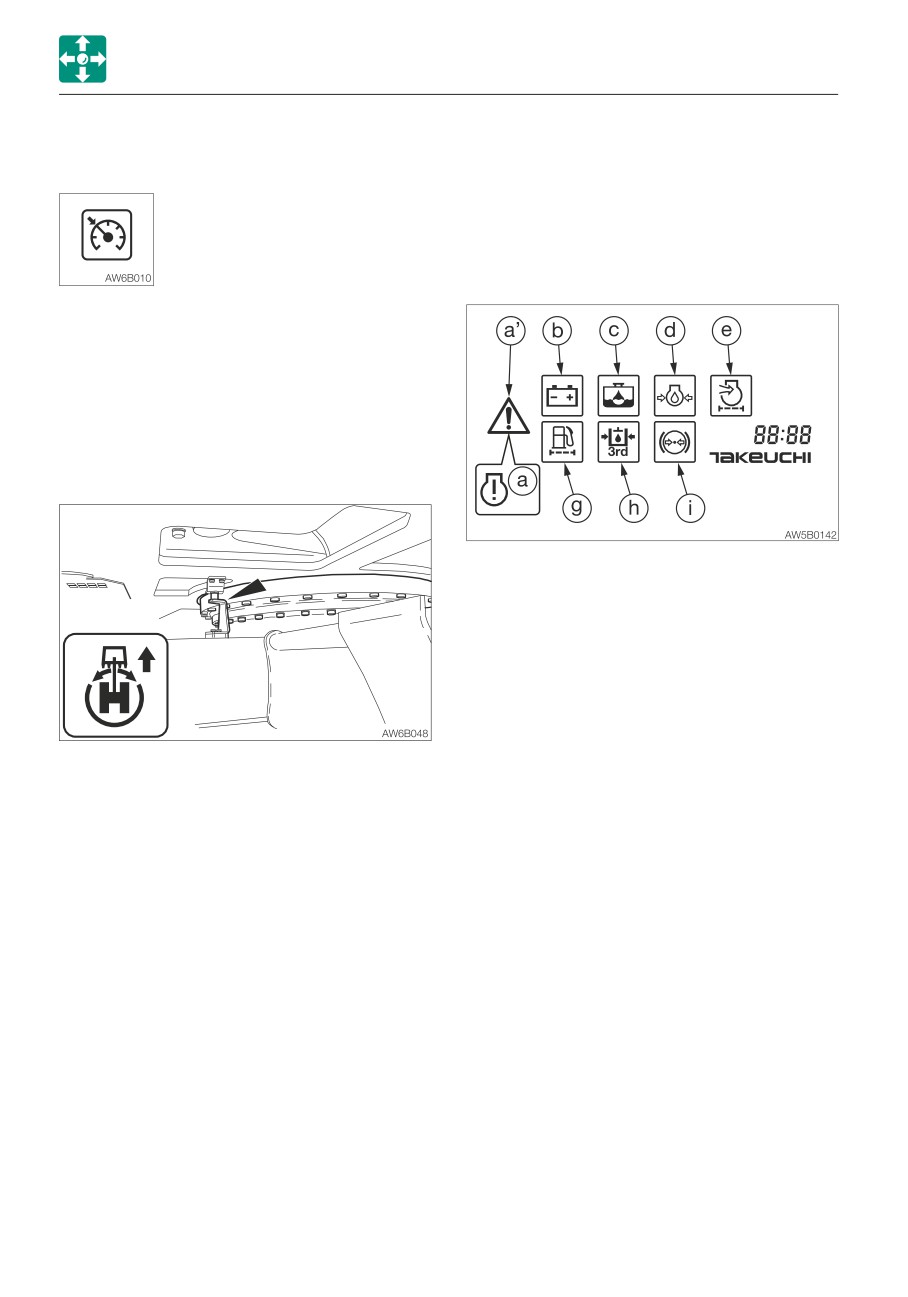
14. Warning lamps
(Traveling mode)
IMPORTANT: If a warning lamp flashes
and an alarm is sounded, immediately
stop all operations and check the
corresponding component.
Auto-cruise is on.
Refer to “If a warning lamp flashes” on
pages 6-12 and 6-13.
This lamp turns on when the auto-cruise
button is pressed. It remains lit as long as
the auto-cruise is on.
Refer to “Auto-cruise button” on page
2-40.
T. Upperstructure position indicator lamp
(traveling mode)
a. ECM warning lamp
This warning lamp flashes if the Electronic
Control Module (ECM) detects an engine
problem while the starter switch is in the
ON position. The problem detected is
recorded as an ECM error.
Refer to “Engine error code list” on pages
6-16 to 6-19.
This lamp lights if the upperstructure and
a’.Vehicle and engine emergency lamp
the undercarriage become misaligned to
This lamp flashes and an alarm sounds if
the right or left while traveling.
there is a problem with the machine. Go to
the (5) Data /Error code display from the
Menu screen, get the vehicle or engine
error code number, and consult your sales
or service dealer referring to the “Vehicle
error code list” or “Engine error code list” in
this manual.
Refer to “Menu screen” on page 2-28.
Refer to “(5) Data /Error code display” on
page 2-31.
Refer to “Vehicle error code list” on page
6-14 to 6-15.
Refer to “Engine error code list” on pages
6-16 to 6-19.
b. Battery charge warning lamp
This lamp flashes and an alarm is sounded
if a problem rises in the charging system
while the engine is running.
2-26
CONTROLS
MULTI-INFORMATION DISPLAY
c. Water separator warning lamp
15. Date and time indicator
This lamp flashes if the water is detected
within the water separator while the starter
Displays the date and
switch is in the ON position.
time set.
Refer to “Date and time
d. Engine oil pressure warning lamp
setting” on page 2-32.
This lamp flashes and an alarm is sounded
if the lubricant oil pressure abnormally low
while the engine is running.
e. Air cleaner warning lamp
This lamp flashes and an alarm is sounded
if the air cleaner filter is clogged while the
engine is running.
g. Fuel filter warning lamp
This lamp flashes and an alarm is sounded
if the fuel filter is clogged while the engine
is running.
h. Third auxiliary hydraulic warning lamp
This lamp starts flashing and an alarm
sounds if the fixed side (left “e”) pressure
of the auxiliary 3rd drops abnormally while
the engine is running, or while the quick-
hitch is being removed or installed.
i. Brake oil pressure warning lamp
Wait five seconds after this lamp goes out
before operating the machine.
If this lamp is lit while traveling on a road,
pull off the road as soon as possible.
This lamp lights when the brake oil pressure
becomes abnormally low while the engine is
running.
2-27
CONTROLS
MULTI-INFORMATION DISPLAY
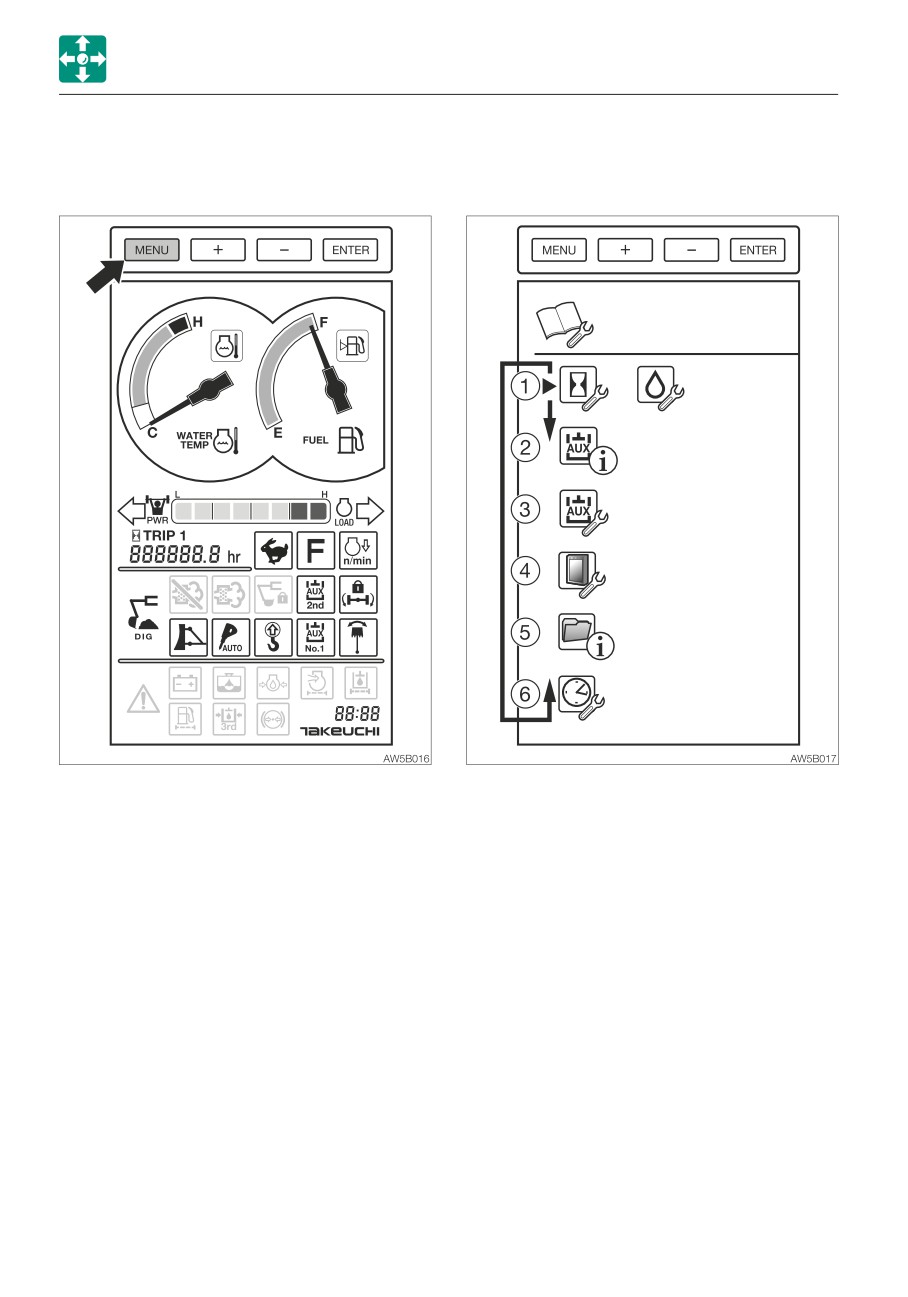
SCREEN NAVIGATION
• Main Menu screen
• Menu screen
Press the Menu key to go the Menu screen
(1) Trip meter setting
while in the Home screen.
(2) Auxiliary line flow rate display
(3) Auxiliary line flow rate setting
(4) LCD setting
(5) Data /Error code display
(6) Date and time setting
Use the plus (+) or minus (-) key to go to the
desired item to be set, and then press the
Enter key to confirm. To return to the Menu
screen, press the Menu key.
The wrench symbol indicates the “setting is
possible state” and the ( i ) mark indicates
information only.
2-28