Takeuchi Mini excavator TB215R (Serial No.215000003~). Operators Manual (2013) - page 5
MAINTENANCE
WHEN REQUIRED
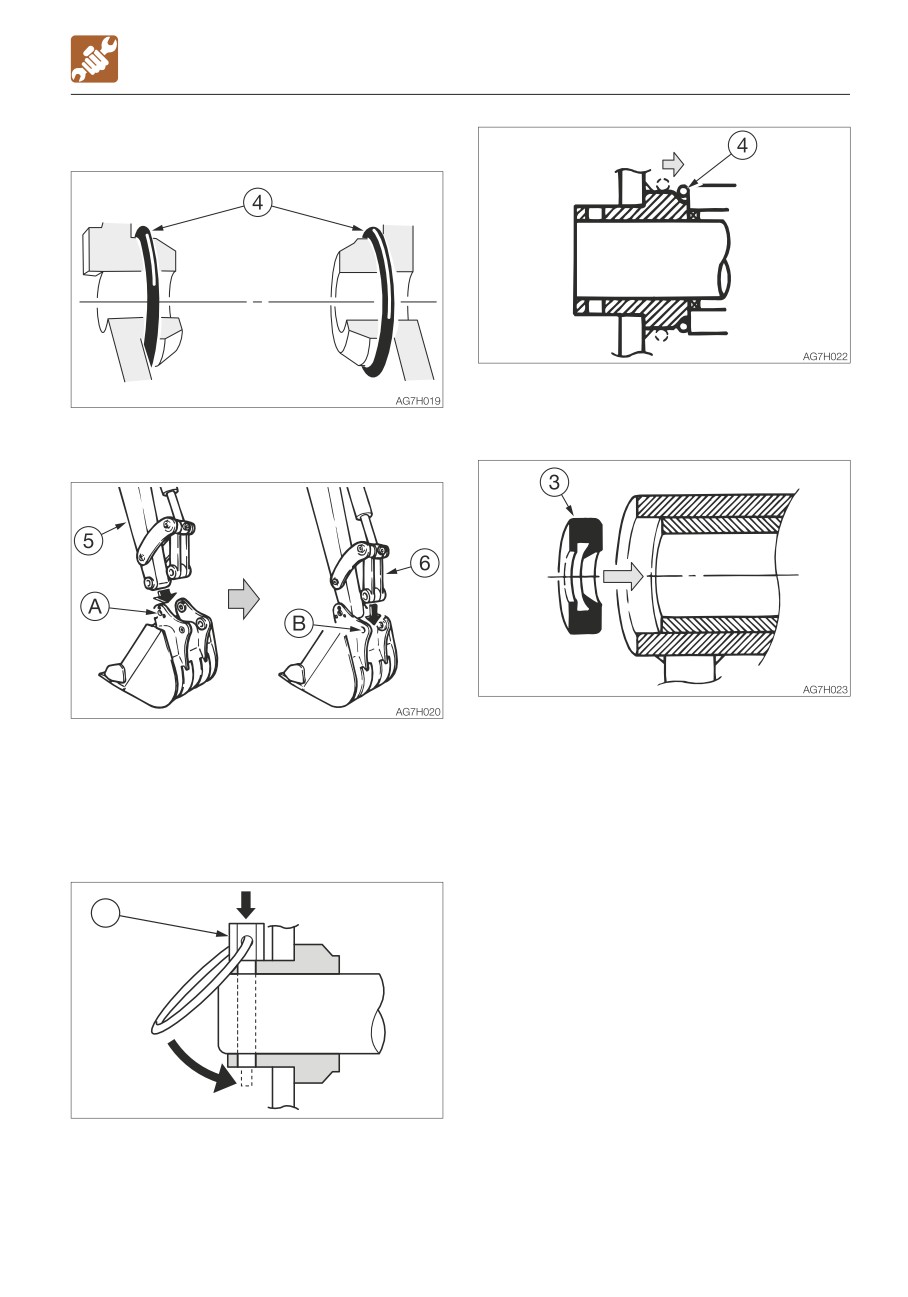
Installation
5. Slide the O-ring (4).
1. Set the O-ring (4) on the bucket as shown
Replacing the pin seal
on the figure above.
1. Set the pin seal (3) in the direction shown
2. Align the pin hole (A) on the bucket with
on the figure above.
the pin hole on the arm (5), and install the
2. Use a mallet to slowly press the pin seal
pin (2).
in. Be careful not to damage the seal.
3. Operate the cylinder, align the pin hole (B)
on the bucket with the pin hole on the link
arm (6), and install the pin (2).
1
AD6G034
4. Align the turn prevention holes, install the
lock pin (1), and then engage the ring
inside.
5-51
MAINTENANCE
WHEN REQUIRED
LUBRICATING THE LEVERS
Set the machine to the parking posture,
stop the engine, remove the starter key
and store it. Failure to do so may result in
the machine moving abruptly, leading to
serious injury or death.
If the levers or pedals no longer move
smoothly, grease them.
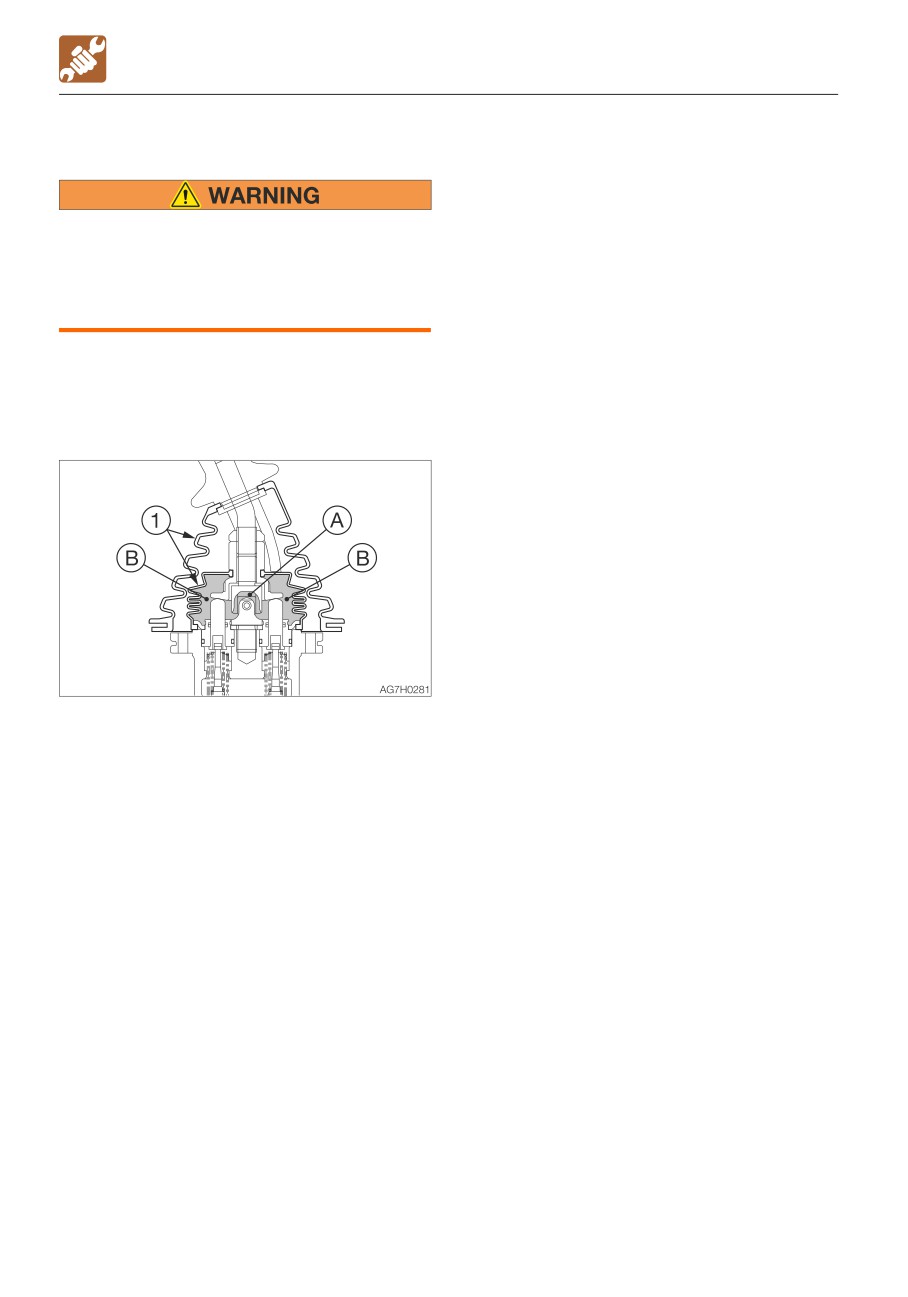
Operating levers
1. Remove the lower mount section of the
boot (1) and turn it upward.
2. Wipe off the old grease.
3. Apply grease to points (A) and (B).
4. Set the boot (1) back as it was.
5-52
MAINTENANCE
WHEN REQUIRED
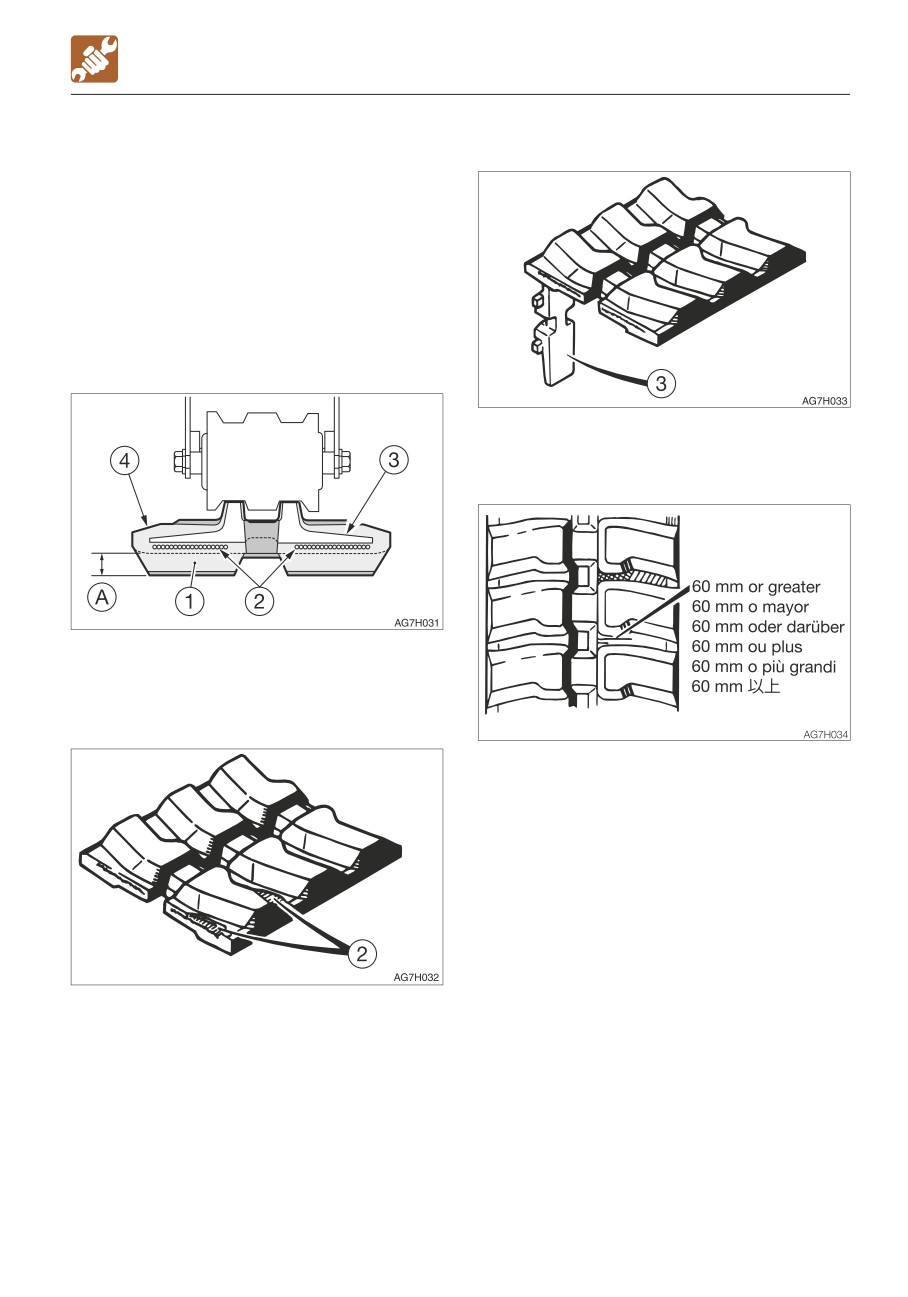
INSPECTING THE RUBBER CRAWLERS
(3) Metal core
Repair or replace the rubber crawlers if their
condition becomes as described below.
Consult your sales or service dealer for repair
or replacement.
Rubber crawler
Replace the crawler if the entire crawler is
stretched and cannot be adjusted.
(1) Lug
Replace if even one metal core is off.
(4) Rubber
Replace if the height of (A) is 5 mm (0.2 in.)
or below.
(2) Steel cord
Repair if there are cracks of 60 mm (2.4 in.)
or greater in length.
If the steel cord is visible, repair as soon as
possible, regardless of the length of the
crack.
Replace if the steel cord is exposed for two
links or more.
Replace if the half or more of the steel cords
on one side are cut.
5-53
MAINTENANCE
WHEN REQUIRED
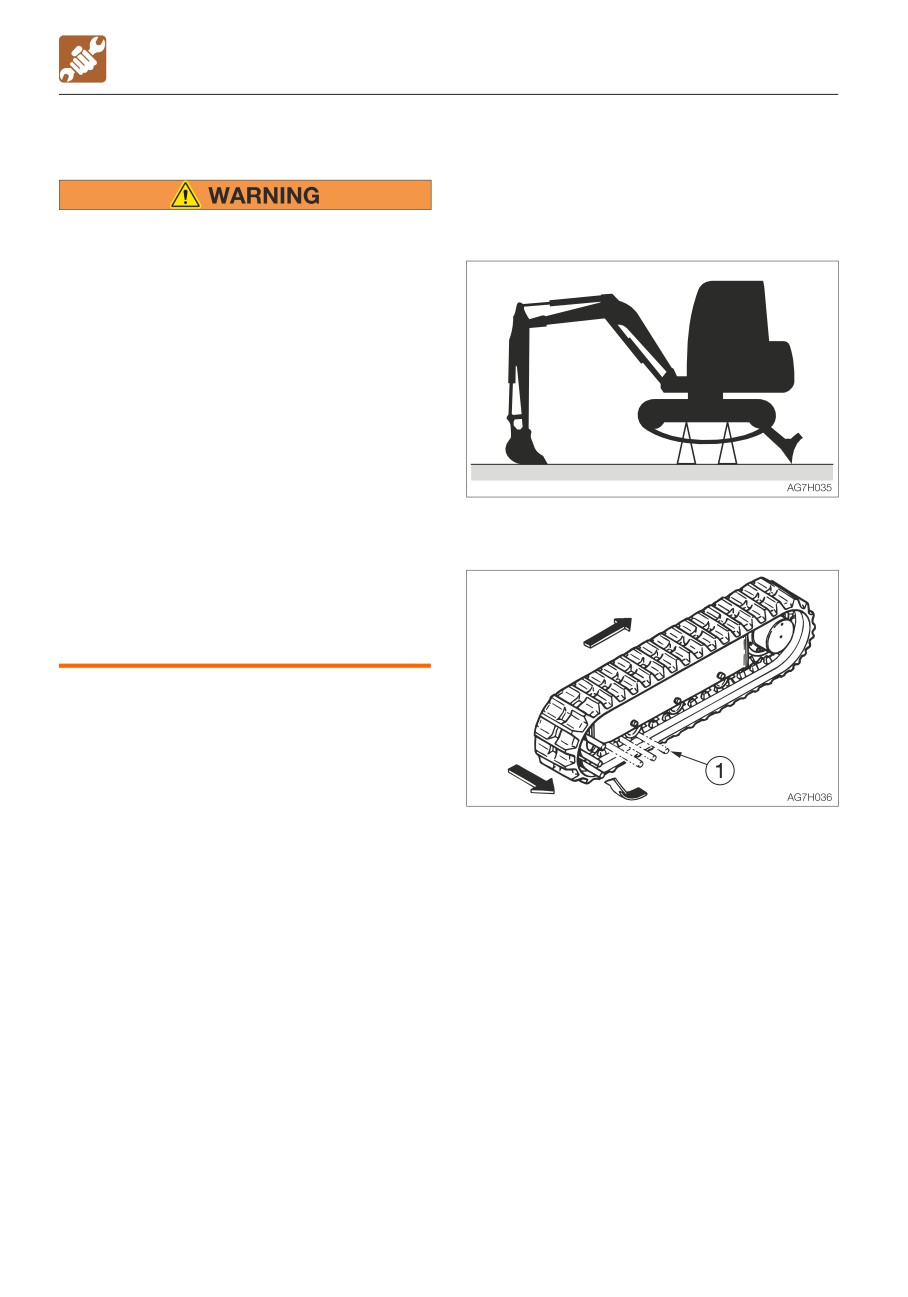
REPLACING THE RUBBER CRAWLERS
Removal
1. Fully release the tension of the rubber
crawler.
Refer to “Inspecting and adjusting the
• If you must work beneath the raised
crawler tension” on page 5-26.
machine or working equipment, always
use wood blocks, jack-stands or other
rigid and stable supports. Never get
under the machine or working
equipment if they are not sufficiently
supported.
• If maintenance must be performed with
the engine running, always work as a
two person team communicating each
other.
· One person must sit in the operator’s
seat so that he/she can immediately
stop the engine when necessary. He/
2. Use the working equipment to lift the
she must take care not to touch the
body.
lever or pedal unless necessary.
· The one who performs maintenance
must make sure to keep his/her body
or clothing away from the moving part
of the machine.
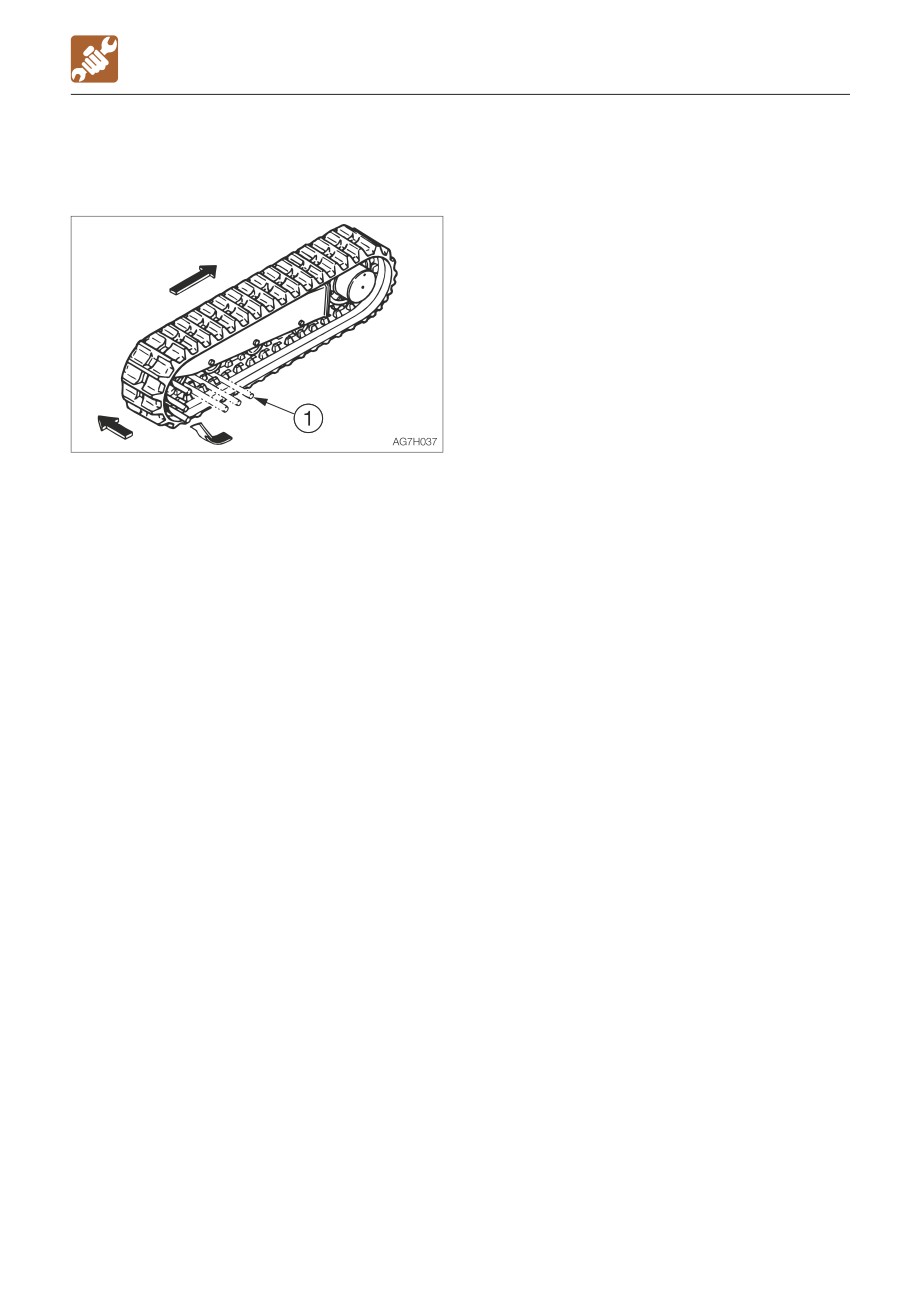
3. Set an iron pipe (1) in the rubber crawler
and turn the sprocket slowly in the reverse
direction.
4. Turn until the iron pipe (1) is directly next to
the idler and the rubber crawler lifts away
from the idler, then stop turning the
sprocket.
5. Slide the rubber crawler sideways and
remove it from the crawler frame.
Remove the other rubber crawler using
the same procedure.
5-54
MAINTENANCE
WHEN REQUIRED
Installation
1. Use the working equipment to lift the
body.
2. Set the rubber crawler on the sprocket.
3. Set an iron pipe (1) in the rubber crawler
and turn the sprocket slowly in the reverse
direction.
4. Turn until the iron pipe (1) is directly next to
the idler and the rubber crawler lifts away
from the idler, then stop turning the
sprocket.
5. Slide the rubber crawler inward, engage it
on the idler, then pull out the iron pipe.
6. Check that the rubber crawler is securely
engaged on the sprocket and idler.
7. Tighten the rubber crawler to the standard
tension.
Refer to “Inspecting and adjusting the
crawler tension” on page 5-26.
8. Install the other rubber crawler using the
same procedure.
5-55
MAINTENANCE
MAINTENANCE DURING EXTENDED STORAGE PERIOD
Starting the machine after storage
MAINTENANCE DURING
IMPORTANT: If the above “Storage
EXTENDED STORAGE PERIOD
procedures” have not been followed
Storage procedures
during the extended storage periods,
If the machine is to be stored for 30 days or
consult your sales or service dealer
more, store it indoors. If it must be stored
before starting the machine again.
outdoors, park the machine on a surface laid
with lumber on a flat ground, and place a
1. Wipe off the rust-inhibiting oil that was
waterproof cover over it so that it stays dry.
applied on the piston rods of the hydraulic
1. Clean the machine.
oil cylinders.
2. Inspect for oil leakage, water leakage,
2. Add oil or grease as necessary.
cracks and loose nuts and bolts.
3. Add fuel and replace the hydraulic oil and
Returning the engine to service
oil.
1. Perform the daily checks.
4. To prevent rusting and freezing, replace
2. The engine should be pre-oiled before
the engine coolant with long-life coolant
startup.
(LLC).
a. Crank the engine, leaving the fuel
Refer to “Cleaning the engine cooling
system shut off so the engine will not
system” on page 5-40.
start, for 15 seconds.
5. Use the grease gun to lubricate the grease
b. Then pause for 30 seconds.
fittings.
c. Repeat the procedure until you have
6. Fully retract the bucket and arm cylinders
cranked the engine for a total of one
and lower the bucket and dozer blade to
minute. This will circulate the oil in the
the ground.
engine’s lubrication system.
7. Apply rust-inhibiting oil to the hydraulic
3. Prime the fuel system.
cylinder rods.
4. Start the engine. Allow the engine to idle
8. Disconnect the negative cable from the
for approximately 15 minutes while you
battery and cover the battery to prevent
check for:
freezing.
· Proper oil pressure
· Fuel, engine oil or coolant leaks
During storage
· Proper operation of the indicators and/or
gauges
5. Avoid prolonged operation at minimum or
• Do not operate the machine in an
maximum engine speeds and loads for the
enclosed area without adequate
remainder of the first hour of operation.
ventilation.
• If natural ventilation is not possible,
install ventilators, fans, exhaust
extension pipes or other venting
devices.
1. To prevent rusting, operate the machine
once a month so that the oil can be
circulated throughout the system.
2. Inspect the battery and recharge it as
necessary.
Ask your sales or service dealer for
recharging.
5-56
TROUBLESHOOTING
6-1
TROUBLESHOOTING
SYMPTOMS THAT ARE NOT MALFUNCTIONS
• It becomes less easy to operate the
SYMPTOMS THAT ARE NOT
machine when an attachment weighing
more than a standard arm or bucket is
MALFUNCTIONS
installed.
The symptoms listed below are not
malfunctions.
AG7J002
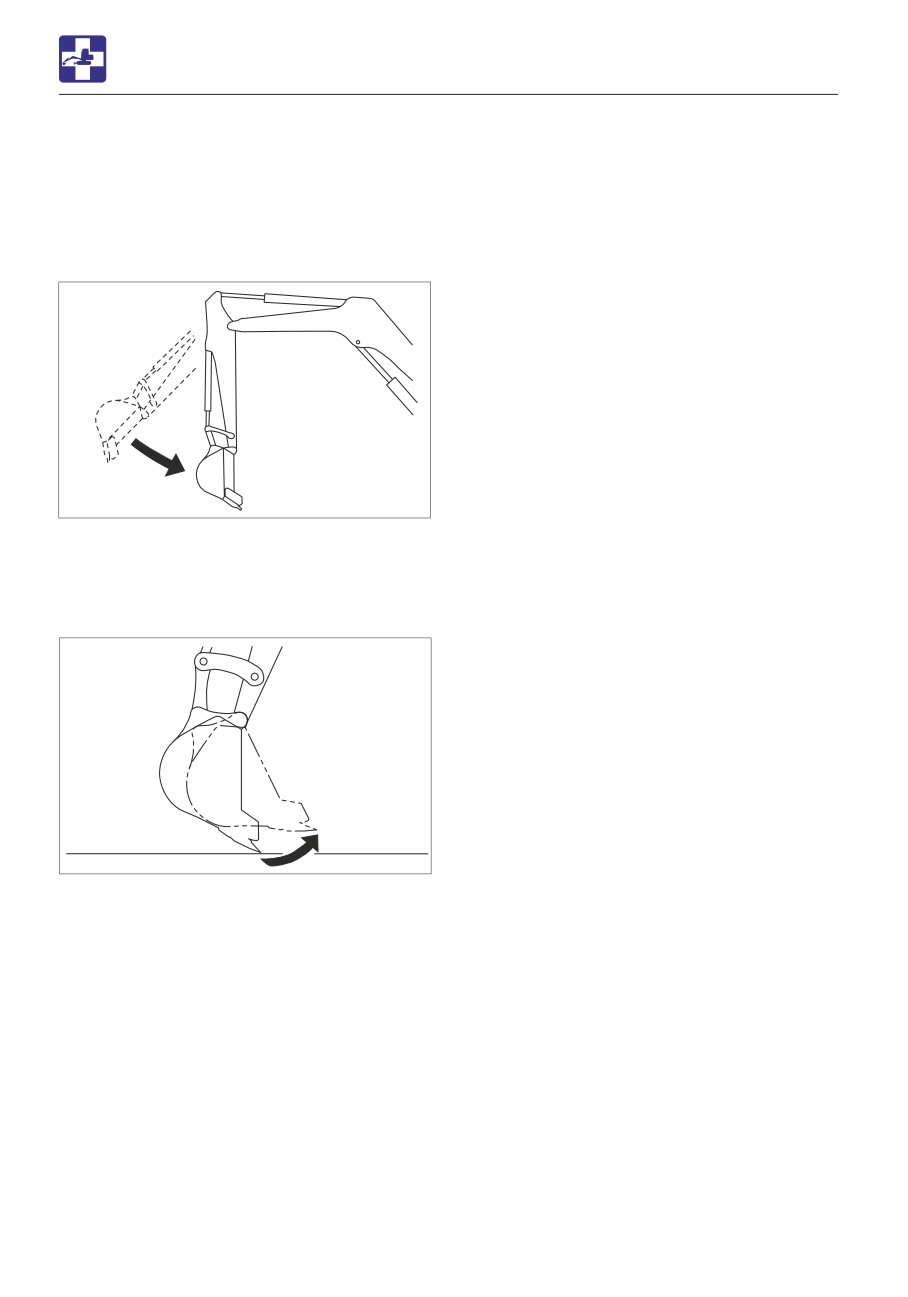
• The arm retracting speed momentarily
slows down when it reaches an almost
vertical position while the engine is running
at low speed.
AG7J003
• The bucket teeth moving speed
momentarily slows down when it reaches
an almost horizontal position while the
engine is running at low speed.
• The slew motor produces noise at the
beginning and end of the slewing.
• The travel motor produces noise when
stopped suddenly from its high speed
traveling.
• The control valve produces noise if
excessive force is applied to the working
equipment or when it moved to the stroke
end.
6-2
TROUBLESHOOTING
IF THE ENGINE OVERHEATS
Remedy procedure
IF THE ENGINE OVERHEATS
1. Park the machine in a safe place.
2. Check if steam is coming out of the closed
engine hood and covers.
• Do not open the engine hood and
3. If there is steam, stop the engine
covers when steam is coming from it.
immediately and contact your sales or
The steam or hot water may spurt out
service dealer for repair. If steam, is not
and cause burns.
coming out run the engine at low idle and
• Do not try to remove the radiator cap or
let the water temperature cool down.
the drain plug when the cooling water is
4. When the water temperature gauge LED
hot. Stop the engine, wait until the
drops in the green zone, stop the engine.
engine and the radiator cool, and then
5. Perform the inspections and the remedies
slowly loosen the radiator cap to release
listed below once the engine cools down.
the internal pressure.
· Fan belt slack
Adjust
• Before performing maintenance, stop
Refer to page 5-23.
the engine and allow the machine to
· Coolant level
Add
cool down.
Refer to page 5-16.
· Water leakage
Repair
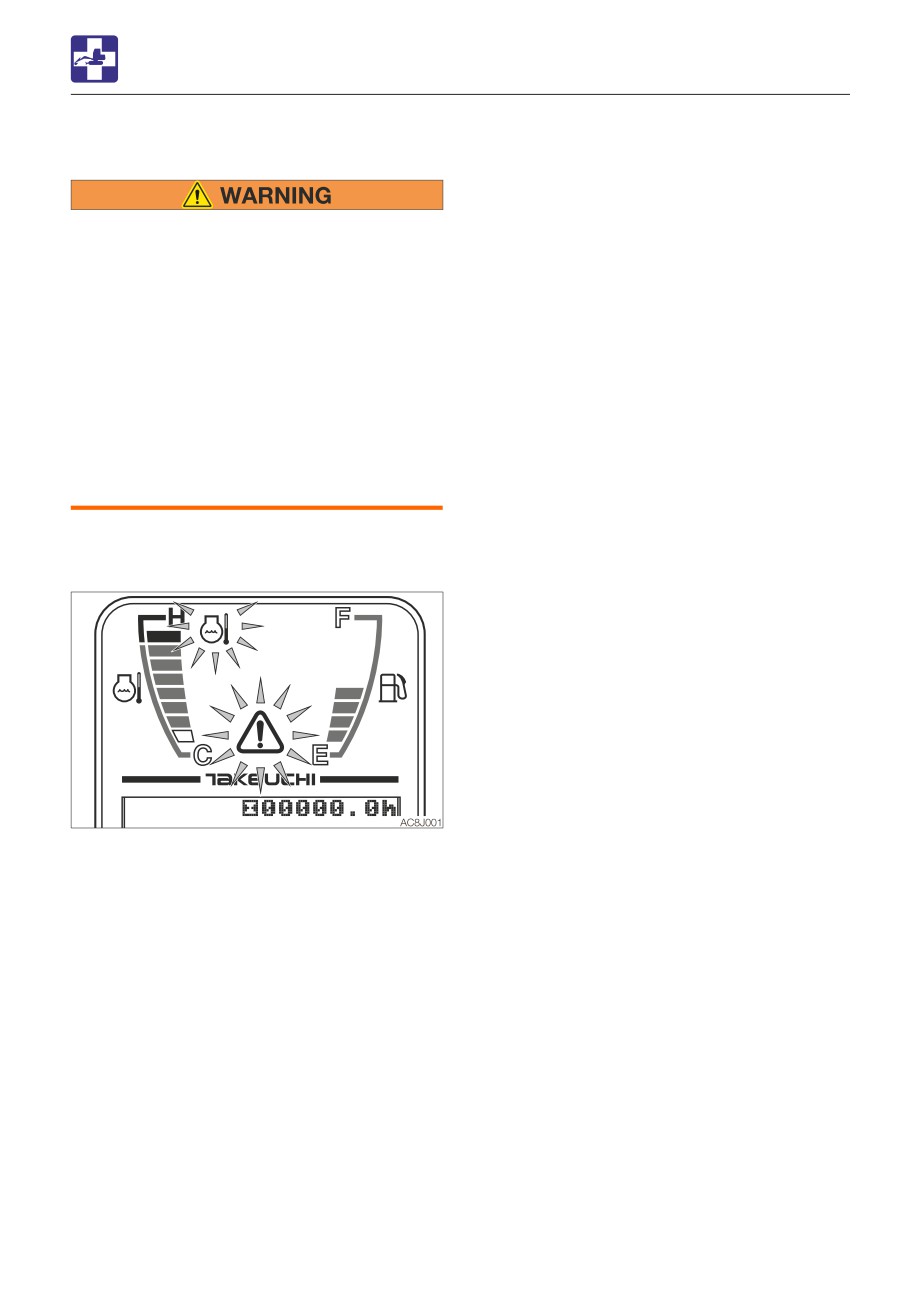
The symptoms listed below indicate
· Radiator fins
Clean
overheating.
Refer to page 5-36.
· Sediment in cooling system
............................... Clean
Refer to page 5-40.
If the problem persists after the above
remedies, contact your sales or service
dealer for repair.
• An alarm is sounded and the engine
emergency lamp and the coolant
temperature warning lamp start flashing.
• The water temperature gauge LED is in the
red zone.
• The engine slows down and the engine
power decreases.
• Steam comes from the engine room.
6-3
TROUBLESHOOTING
IF THE BATTERY GOES DEAD
Connecting the jumper cables
IF THE BATTERY GOES DEAD
The symptoms below indicate that the
IMPORTANT: Set the starter keys of the
battery is dead.
booster vehicle and the dead machine to
• The starter motor does not turn or fails to
the OFF position.
start the engine.
• The horn is too weak.
Remedy procedure
Start the engine using the booster battery on
the other vehicle (booster vehicle) and the
jumper cables.
• When starting the engine using the
jumper cables, be sure to connect the
cables by following the proper steps.
Improper use of jumper cables can
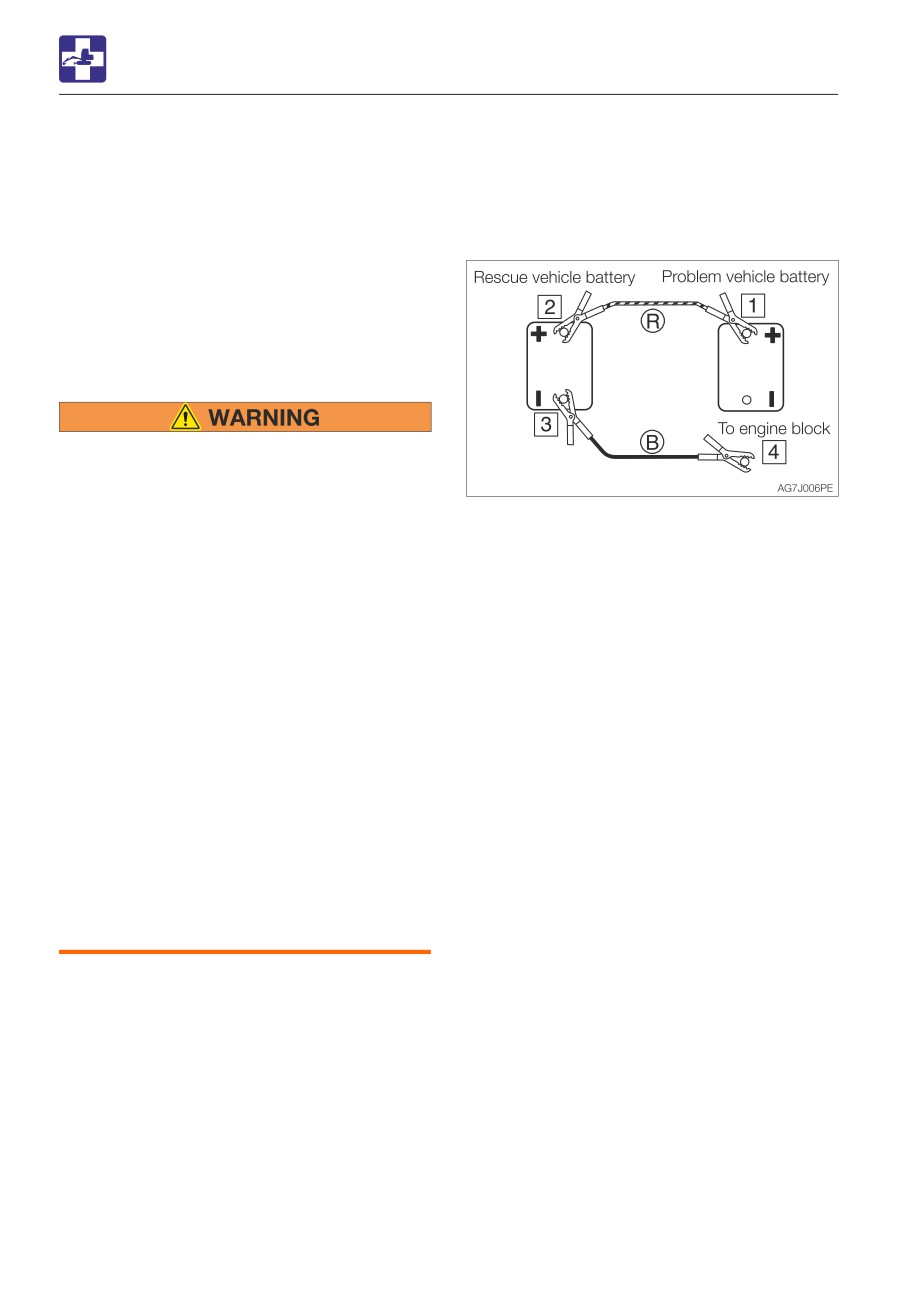
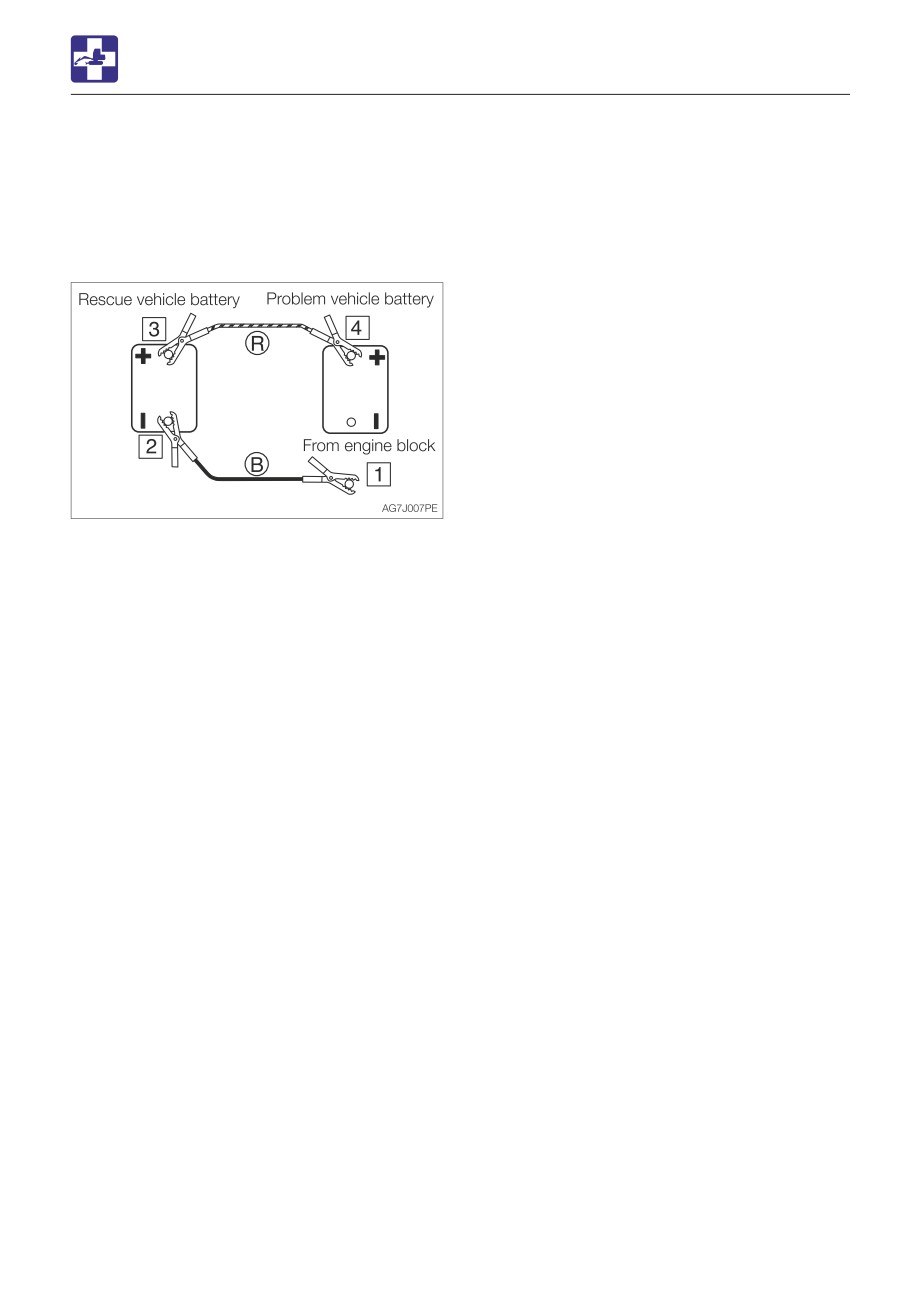
1. Connect the clip of jumper cable (R) to the
result in battery explosion or
positive (+) battery terminal of the dead
unexpected machine motion.
machine.
· Do not allow the booster vehicle and
2. Connect the other clip of jumper cable (R)
the machine with a dead battery (dead
to the positive (+) battery terminal of the
machine) to touch each other.
booster vehicle.
· Do not allow the positive (+) and the
3. Connect the clip of jumper cable (B) to the
negative (-) clips of the jumper cables
negative (-) battery terminal of the booster
to touch each other.
vehicle.
· When connecting, attach the jumper
4. Connect the other clip of jumper cable (B)
cable to the positive (+) terminals first.
to the engine block of the dead machine.
When disconnecting, remove the
Connect the clip to a place as far from the
cable from the negative (-) terminal
battery as possible.
(ground) first.
· Connect the last clip of the jumper
Starting the engine
cable to a point as far away from the
1. Check that the clips are securely
battery as possible.
connected to the terminals.
• Always wear the protective goggle when
2. Start the engine of the booster vehicle and
jump starting the engine by using the
run it at high speed.
jumper cables.
3. Start the engine of the dead machine.
IMPORTANT: Use the jumper cables and
clips of a size suited to the capacity of
battery. Do not use damaged or corroded
jumper cables and clips.
IMPORTANT: Be sure that the battery of
the booster vehicle has the same
capacity as the battery of the dead
machine.
IMPORTANT: Be sure to connect the clips
securely.
6-4
TROUBLESHOOTING
IF THE BATTERY GOES DEAD
Disconnecting the jumper cables
Once the dead machine is successfully
running, remove the jumper cables by
following the same steps as for connection in
the reverse order.
1. Disconnect the clip of jumper cable (B)
from the engine block of the dead
machine.
2. Disconnect the other clip of jumper cable
(B) from the negative (-) battery terminal of
the booster vehicle.
3. Disconnect the clip of jumper cable (R)
from the positive (+) battery terminal of the
booster vehicle.
4. Disconnect the clip of jumper cable (R)
from the positive (+) battery terminal of the
dead machine.
Recharging
Ask your sales or service dealer for
recharging the dead battery.
6-5
TROUBLESHOOTING
IF A FUSE BLOWS
Fuse layout and circuits protected
IF A FUSE BLOWS
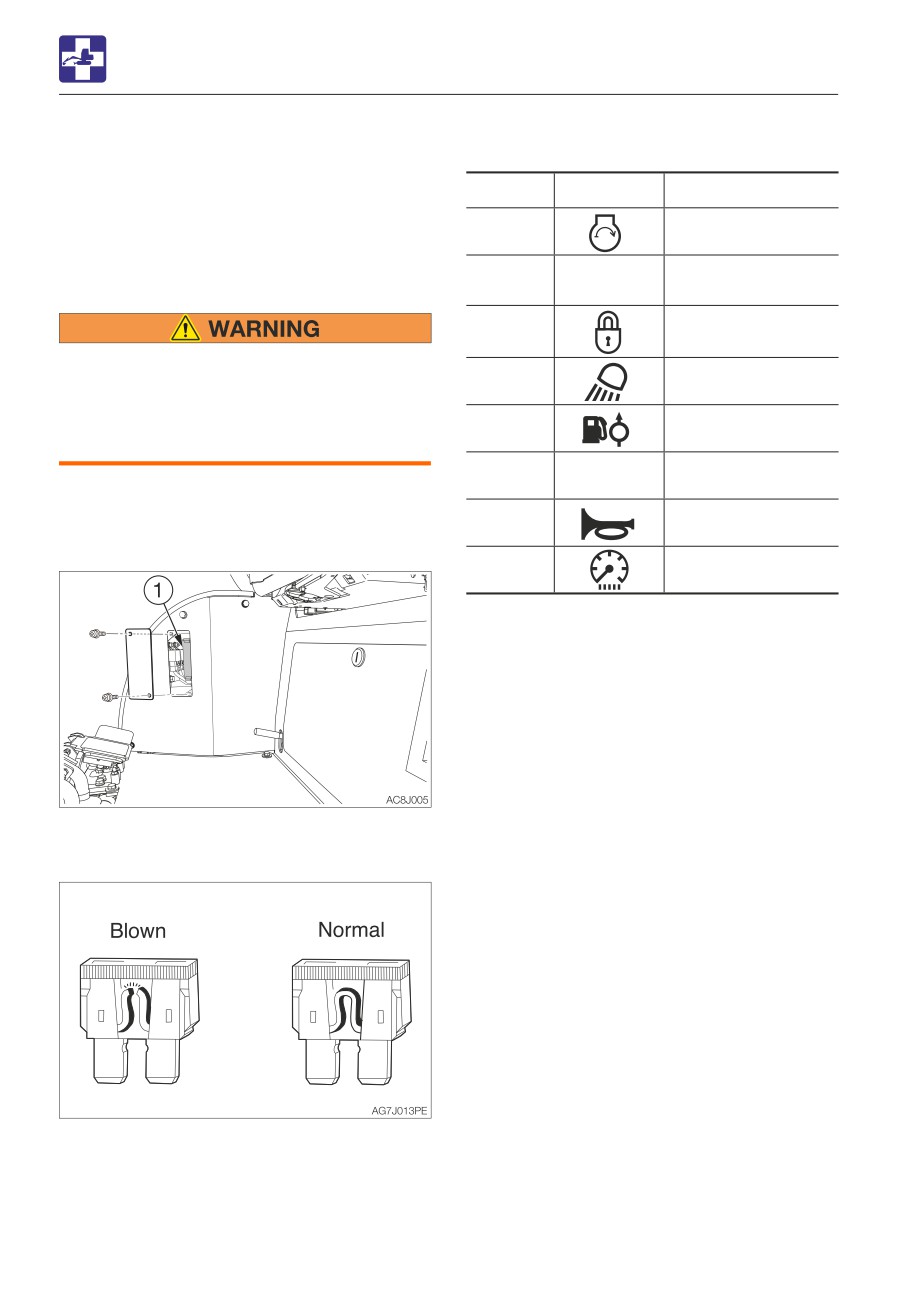
If a light does not come on or the electrical
Capacity
Symbol
Protected circuit
system does not work, a fuse may be blown.
Inspect the fuses.
25A
Starter switch
INSPECTING AND REPLACING THE FUSE
Third auxiliary
10A
AUX3
hydraulic
5A
Lever lock
If the fuse blows again soon after
replacement, then the electric system is
15A
Light
likely faulty. It may pose a fire hazard if
not properly repaired. Contact your sales
15A
Feed pump
or service dealer for advice.
15A
OPT
Option
1. Turn the starter key to the OFF position to
stop the engine.
10A
Horn
2. Open the maintenance cover B.
15A
Cluster
3. Open the fuse box cover (1).
4. Check for any blown fuses.
5. If a fuse is blown, replace it with a spare
fuse of the same capacity.
6-6
TROUBLESHOOTING
IF A FUSE BLOWS
INSPECTING THE FUSIBLE LINK
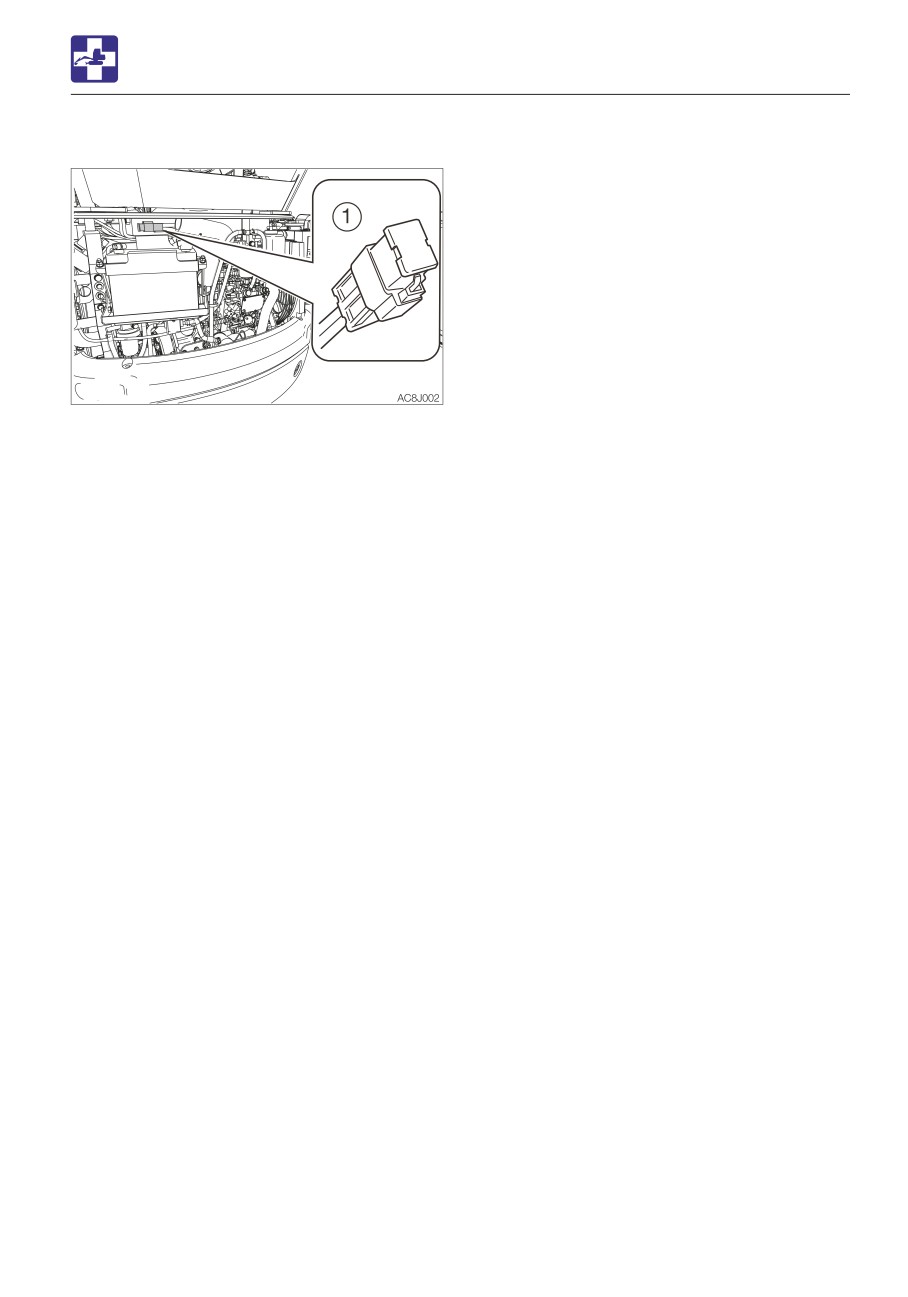
If the machine is not turned on after turning
the starter switch to the ON position, the
cartridge type fusible link (1) is likely blown.
Open the maintenance cover and inspect. If
the fusible link is blown, please contact your
sales or service dealer.
Note: Fusible links are large type fuses used
in high current applications. Like a regular
fuse, they act as fuses by protecting the
electric components and wirings from
damage caused by excessive current draw.
6-7
TROUBLESHOOTING
RESTARTING AFTER ADDING FUEL
RESTARTING AFTER ADDING
FUEL
BLEEDING AIR FROM THE FUEL SYSTEM
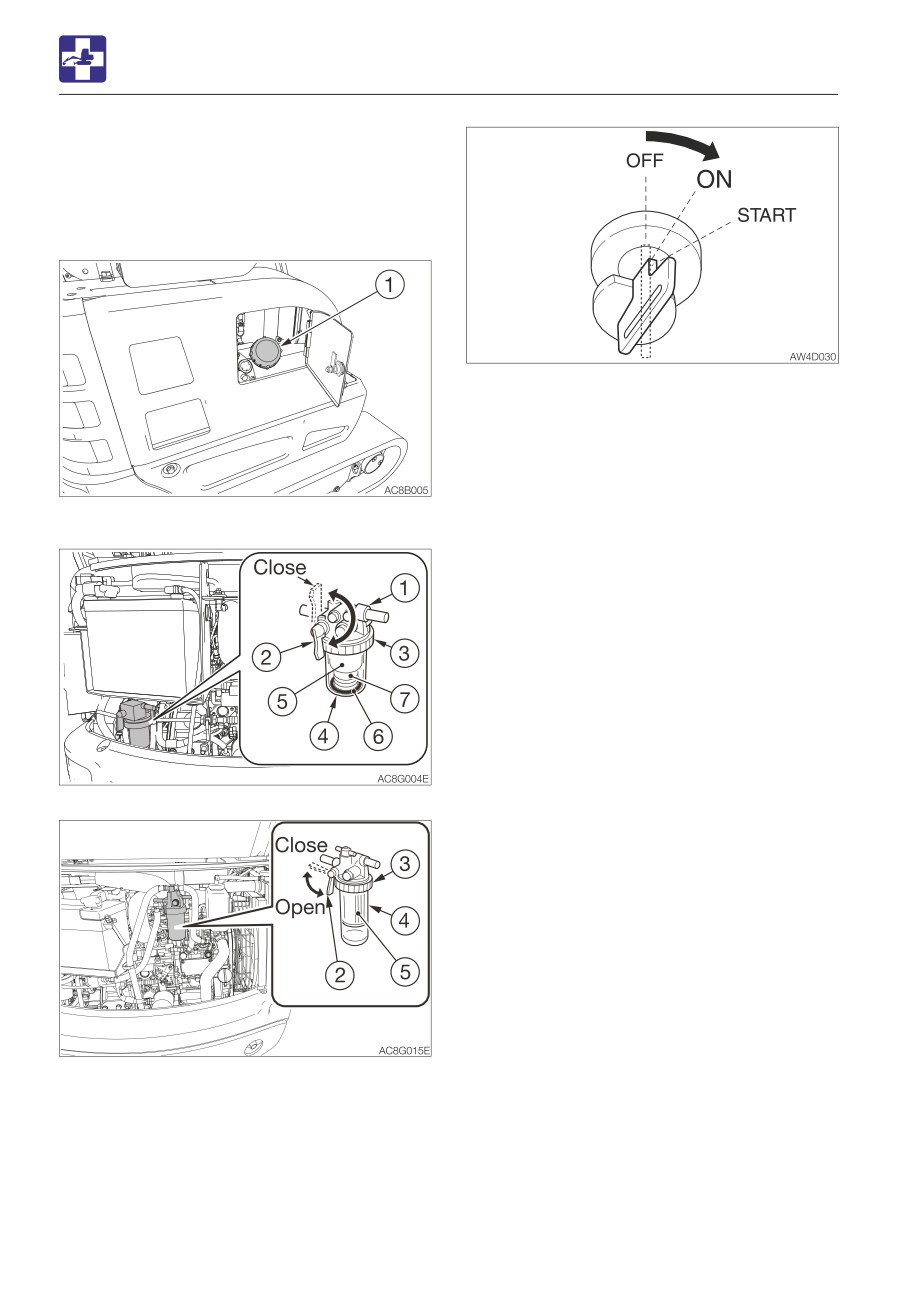
3. Turn the starter key to the ON position and
hold it for about 10 to 15 seconds.
The automatic air bleeder bleeds air from
the fuel system.
Note: Air in the fuel system causes the
1. Add fuel.
engine to fail to start or to have other
problems. Always bleed air when the fuel
tank is emptied or when there is air in the
fuel system.
2. Open the valve (2) of the water separator
and the fuel filter.
6-8
TROUBLESHOOTING
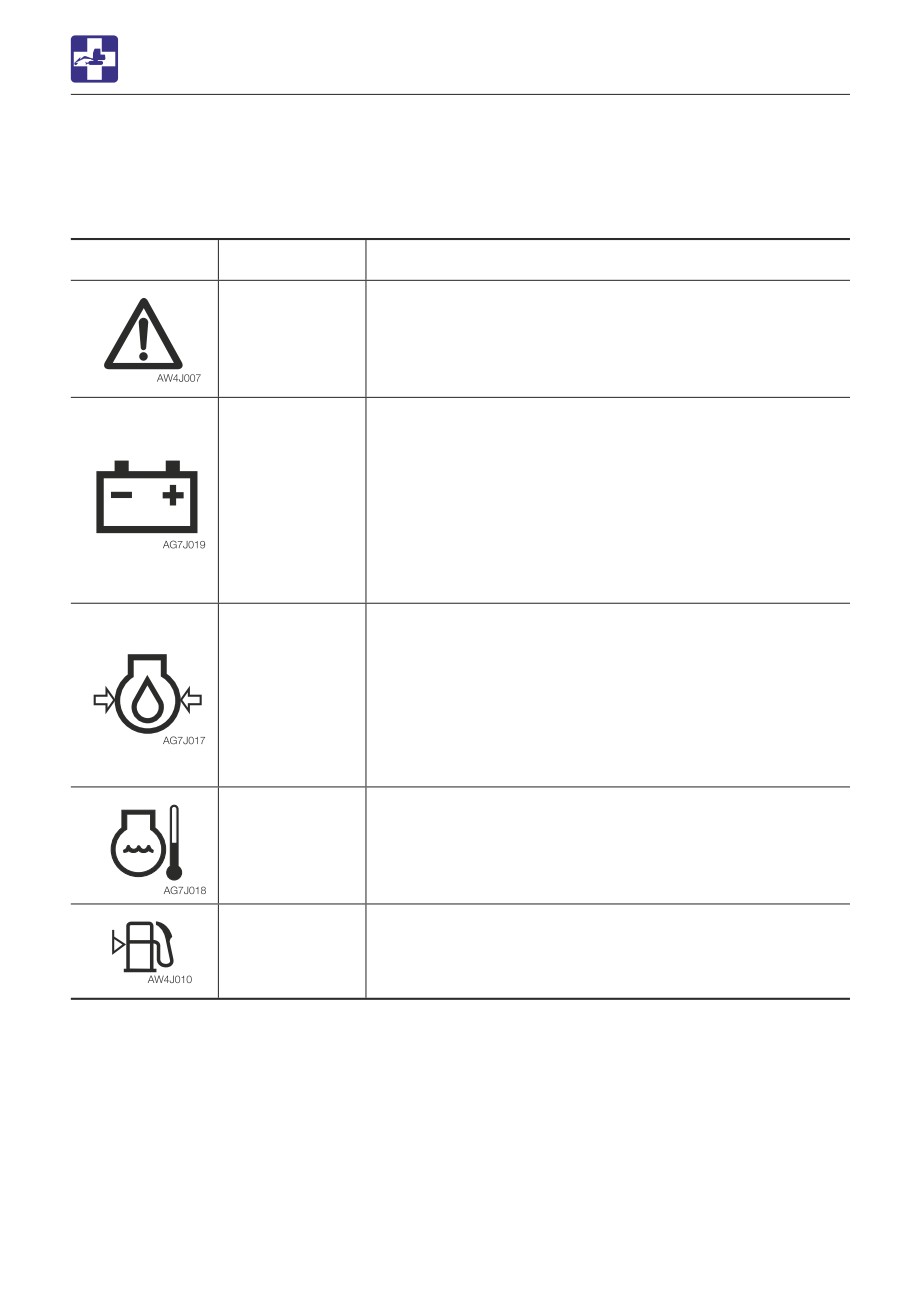
IF A WARNING LAMP FLASHES
IF A WARNING LAMP FLASHES
If an alarm is sounded or a warning lamp starts flashing during operation, park the machine in
a safe place and perform the remedy procedures described below.
Warning lamp
Lamp name
Causes and remedies
Engine
There is a problem in the engine.
emergency
lamp
Refer to the respective warning lamp below.
Battery charge
There is a problem with the fan belt or charger.
warning lamp
Check the fan belt for slack or breakage and adjust as
necessary.
If the lamp continues flashing after maintenance, there is
likely a problem with the charger. Consult your sales or
service dealer for help.
Refer to “Inspecting and adjusting the fan belt” on page
5-23.
Engine oil
A problem has occurred in the engine lubrication system.
pressure
Inspect the engine oil level.
warning lamp
If the lamp is flashing when the oil is normal or if it
continues flashing after replenishment of oil, consult your
sales or service dealer.
Refer to “Inspecting and replenishing the engine oil” on
page 5-17.
Coolant
The coolant temperature is too high and the engine is
temperature
overheating.
warning lamp
Refer to “If the engine overheats” on page 6-3.
Fuel level
The fuel level is too low. Add fuel.
warning lamp
Refer to “Inspecting the fuel level” on page 5-18.
6-9

TROUBLESHOOTING
OTHER SYMPTOMS
OTHER SYMPTOMS
For symptoms not included in the table below or if the problem persists after the proper
remedies have been taken, consult your sales or service dealer.
Symptoms
Major causes
Remedies
Left and right operating levers
• Insufficient grease on the
• Grease the levers.
do not move smoothly
left and right operating
Refer to page 5-52.
levers
Blade lever and throttle lever
• Wire is stretched too lose
• Adjust or replace (ask your
do not move smoothly
sales or service dealer).
Hoe attachment, slewing or
• Safety lock lever is raised
• Lower (release) the safety
traveling operation not
(locked)
lock lever.
possible
Refer to page 2-19.
• Fuse is blown
• Replace the fuse.
Refer to page 6-6.
• Adjustment of travel lock is
• Adjust the travel lock (ask
faulty
your sales or service dealer).
Digging force is insufficient
• Hydraulic oil level too low
• Add to the specified level.
Refer to page 5-19.
• Hydraulic oil is not warm
• Perform the warm-up.
enough
Refer to page 3-8.
• Air cleaner is clogged
• Clean the air cleaner.
Refer to page 5-34.
• Hydraulic oil is not of
• Replace the hydraulic oil.
suitable type
Refer to page 5-46.
Traveling is not possible or
• Stones or foreign objects
• Remove the foreign object.
not smooth
are stuck
Machine veers to the right/left
• Stones or foreign objects
• Remove the foreign object.
are stuck
• Faulty crawler tension
• Adjust the crawler to the
adjustment
prescribed tension.
Refer to page 5-26.
Travel speed cannot be
• Fuse is blown
• Replace the fuse.
changed
Refer to page 6-6.
6-10

TROUBLESHOOTING
OTHER SYMPTOMS
Symptoms
Major causes
Remedies
Slewing is not possible or not
• Insufficient grease on slew
• Grease the bearing.
smooth
bearing
Refer to page 5-28.
Hydraulic oil temperature is
• Hydraulic oil level too low
• Add up to the specified
too high
level.
Refer to page 5-19.
Starter motor turns but
• Insufficient fuel
• Add fuel.
engine does not start
Refer to page 5-18.
• Air in fuel system
• Bleed air.
Refer to page 6-8.
• Water in fuel system
• Drain water.
Refer to page 5-29.
Crawlers come off
• Crawlers too loose
• Increase the tension.
Refer to page 5-26.
Engine exhaust is white or
• Excessive engine oil
• Adjust to the specified level.
bluish
Refer to page 5-17.
• Poor fuel
• Replace the fuel.
Engine exhaust is
• Air cleaner is clogged
• Clean the air cleaner.
occasionally black
Refer to page 5-34.
Irregular noise is produced
• Low quality fuel is being
• Replace the fuel.
from the engine
used
(combustion or mechanical
• Engine is overheating
• Refer to “If the engine
noise)
overheats” on page 6-3.
• Damage inside the muffler
• Replace the muffler.
For replacement, ask your
sales or service dealer.
6-11
TROUBLESHOOTING
LOWERING THE BOOM TO THE GROUND
LOWERING THE BOOM TO
THE GROUND
If the hoe attachment must be lowered to the
ground while the engine is stopped, use the
following procedure.
This operation is dangerous and requires
experience. Ask your sales or service dealer
for it.
Procedure
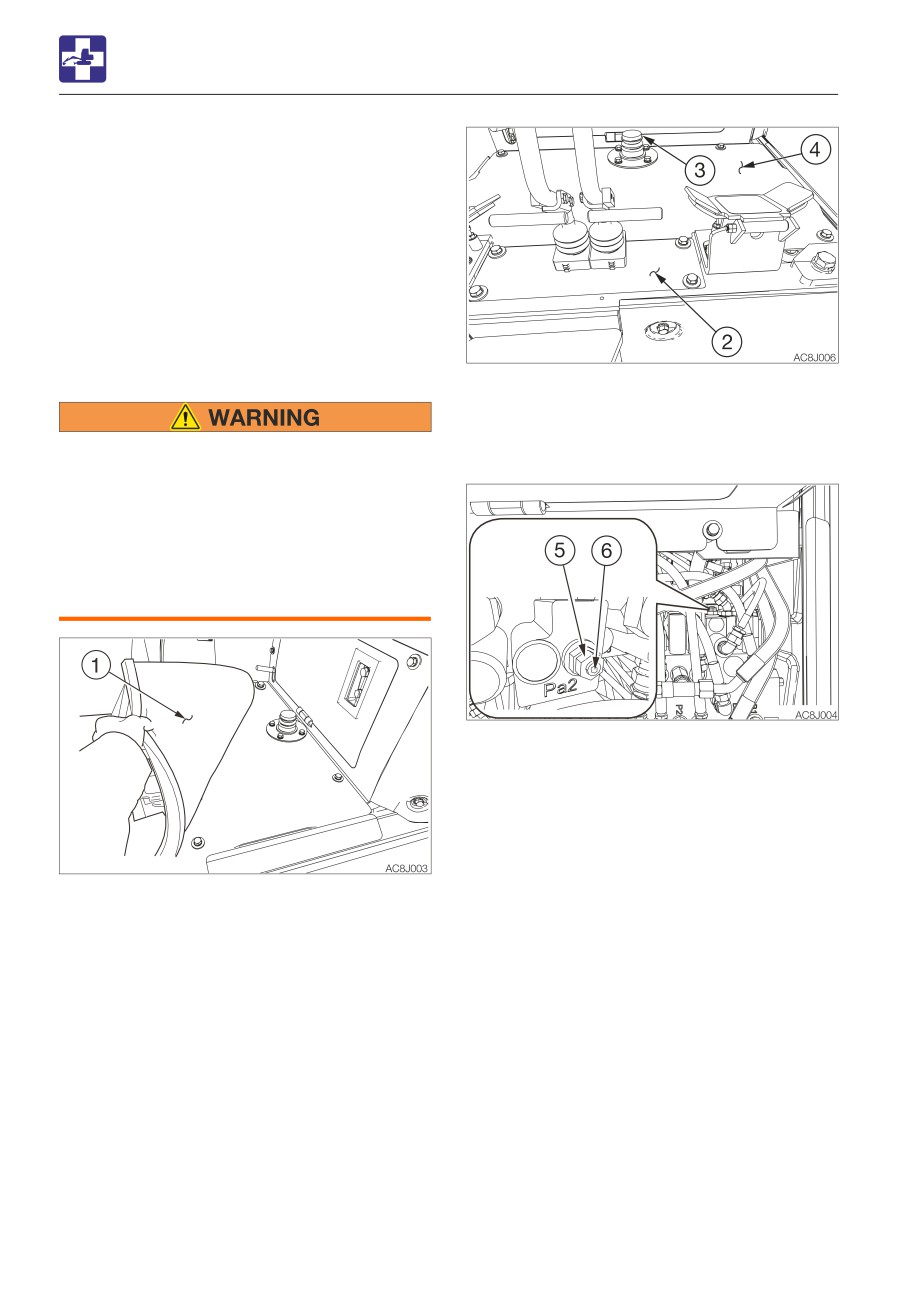
2. Remove the cover (2).
3. Remove the cover (4). Remove the
harness of the auxiliary 3rd switch (3)
• Keep away from the working area when
together with the cover (4).
the hoe attachment is lowered. You may
be hit by dirt falling out of the bucket or
the hoe attachment as it drops.
• Gradually lower the boom slowly by
slowly turning the set screw on the
shut-off valve. Do not turn the screw
more than the specified amount.
4. Loosen the lock nut (5) while holding the
adjust screw (6) in place with a hexagonal
wrench so that the adjust screw (6) will not
be loosened together with the lock nut (5).
5. Turn the adjust screw (6) slowly 1/4 turn to
lower the boom.
6. Check for safety and stability of the
1. Remove the floor mat (1).
machine.
7. Return the adjust screw (6) to the original
position.
8. Tighten the lock nut (5) while holding the
adjust screw (6) in place with a hexagonal
wrench so that the adjust screw (6) will not
be loosened together with the lock nut (5).
· Lock nut (5) tightening torque: 12.4 to
13.6 N·m (9.1 to 10 ft-lb.)
· Adjust screw (6) tightening torque: 6.3 to
7.5 N·m (4.6 to 5.5 ft-lb.)
9. Reinstall the floor mat (1), cover (2), cover
(4) and the harness of the auxiliary 3rd
switch (3).
6-12
TROUBLESHOOTING
TOWING
Towing the machine
TOWING
Use the procedure described below to tow
heavy objects or the machine itself if it
should get stuck in the mud and not be able
When towing, serious injury or death
to get out on its own.
could result, if performed incorrectly or
the wire rope being used is inappropriate
or not properly inspected.
• It becomes dangerous if the wire rope
breaks or becomes disengaged. Use a
wire rope appropriate for the required
tractive force.
• Do not use a wire rope that is kinked,
twisted or otherwise damaged.
• Do not apply heavy loads abruptly to
the wire rope.
• Wear safety gloves when handling the
wire rope.
• Permissible forces: 23.2 kN (5208 lbf)
• Make sure there is an operator on the
machine being towed as well as on the
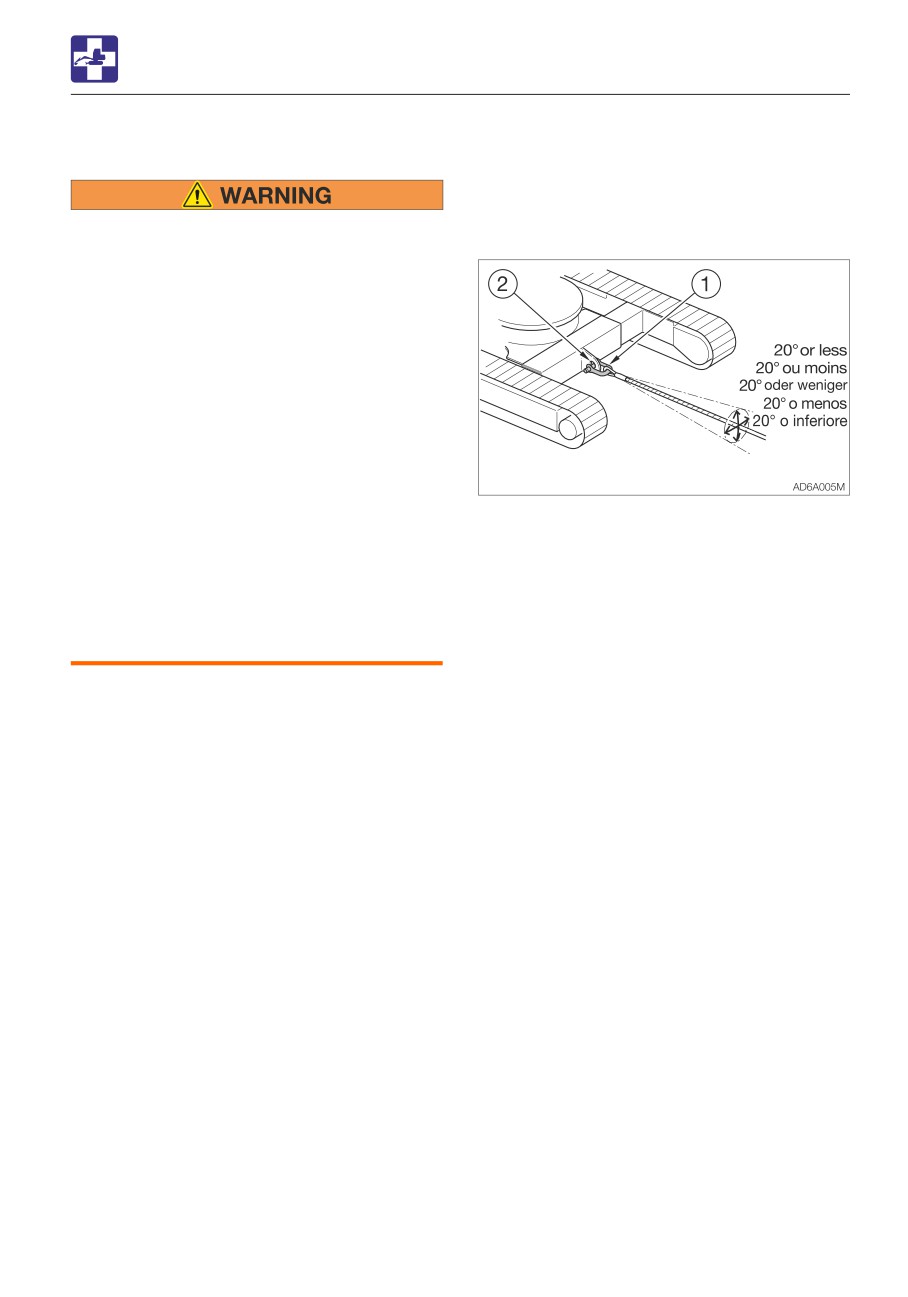
1. Attach the wire rope to the shackle (1).
machine that is towing.
2. Fasten the shackle (1) to the towing holes
• Never tow on slopes.
(2).
• Do not let anyone come near to the wire
3. Make sure that the wire rope is at a cone
rope while towing.
angle of 20° or less to the travel frame.
4. Move the machine to tension the wire
IMPORTANT: Do not tow a machine if its
rope.
engine does not start or if the machine
5. Operate the machine slowly and tow.
does not run. Doing so could damage the
machine being towed.
IMPORTANT: Be sure to follow the steps
below closely when using the towing hole
to tow. Failure to heed even one of the
steps may cause damage to the towing
hole or other parts of the frame.
6-13
TROUBLESHOOTING
IF THE CAB OR CANOPY IS DAMAGED
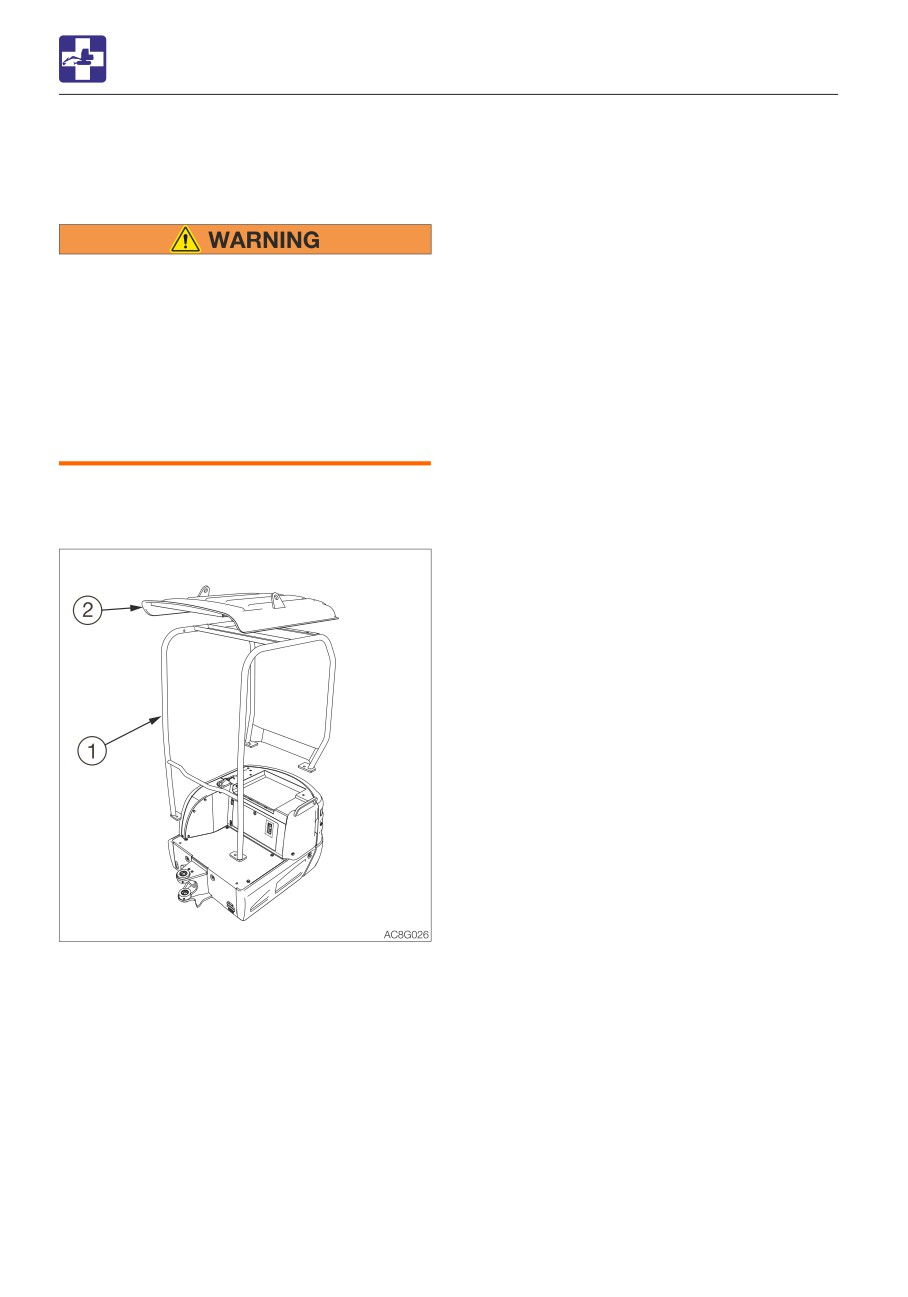
IF THE CAB OR CANOPY IS
DAMAGED
Immediately replace the damaged cab or
canopy. Serious injury or death may occur
if the machine is operated with damaged
cab/canopy.
Do not operate the machine until the
replacement is complete. Do not try to
repair the damaged cab or canopy by
welding. Doing so could endanger the
safety of the cab/canopy.
Canopy parts No.(1): 03384-00031
Canopy parts No.(2): 03384-00039
6-14
SPECIFICATIONS
7-1
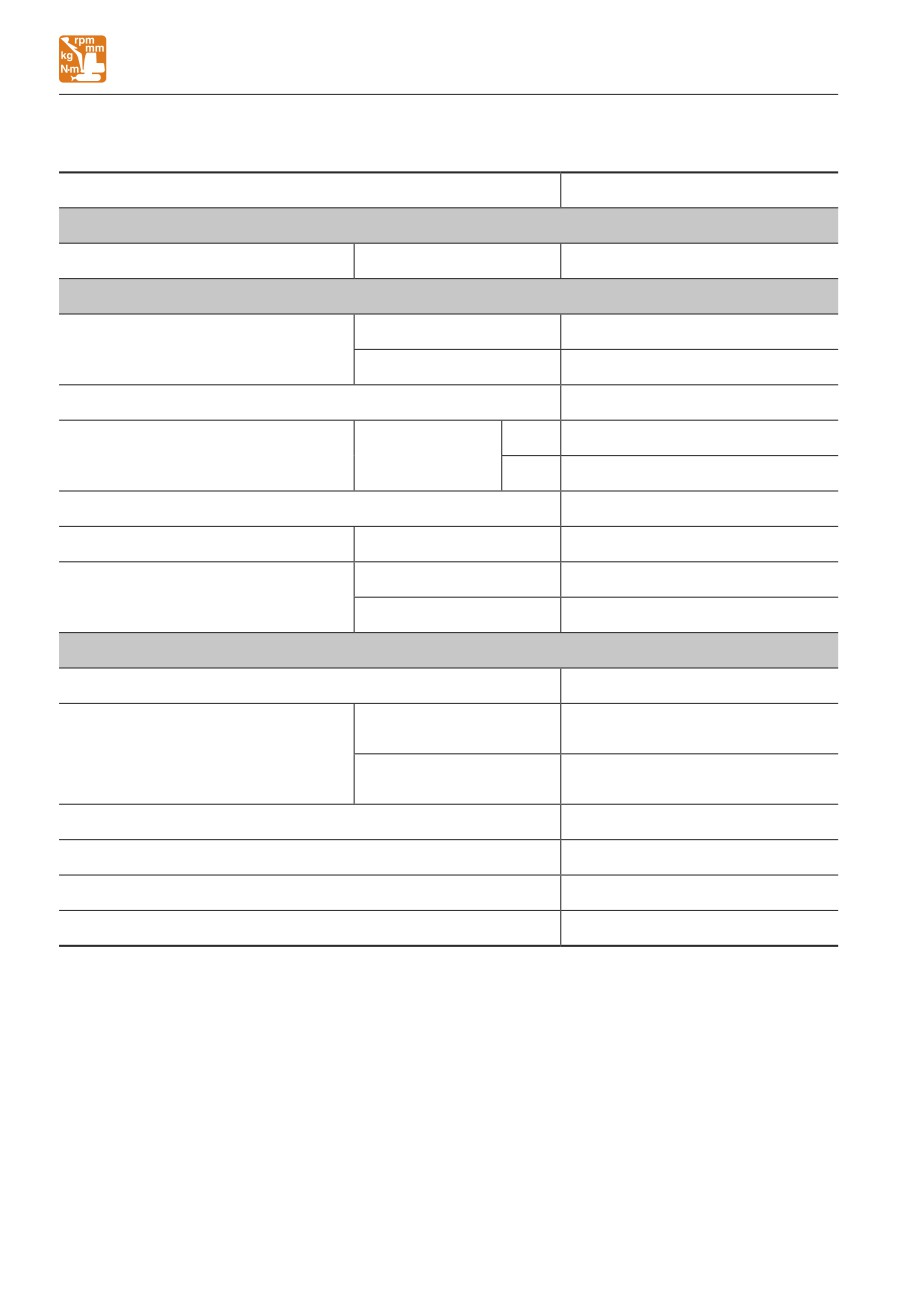
SPECIFICATIONS
BASIC SPECIFICATIONS
BASIC SPECIFICATIONS
Type
Canopy
MASS
Operating mass
kg (lb)
Rubber crawlers
1575 (3470)
PERFORMANCE
Heaped
0.038
(1.34)
Bucker capacity
m3 (cu. ft.)
(Standard bucket)
Struck
0.028
(0.99)
Slew speed
min-1 (rpm)
9.2
(9.2)
1st
2.2
(1.37)
Travel speed
km/h (mph)
Rubber crawlers
2nd
4.2
(2.61)
Gradeability
(degrees)
30
Ground pressure
kPa (psi)
Rubber crawlers
26.2
(3.8)
Sound power level
LWA 93
Noise level
dB (A)
Sound pressure level
LpA 80
ENGINE
Manufacturer and model
Yanmar 3TNV70-PTB1R
Net (ISO 14396)
11.5/2400 (15.4/2400)
kW/min-1 (hp/rpm)
Rated output
Net (ISO 9249/SAEJ 1349)
10.9/2400 (14.6/2400)
kW/min-1 (hp/rpm)
Displacement
ml (cu.in.)
854 (52.1)
Starter
V-kW
12-1.0
Alternator
V-kW
12-0.48
Battery
V-A·h
12-38
7-2
MEMO
7-3
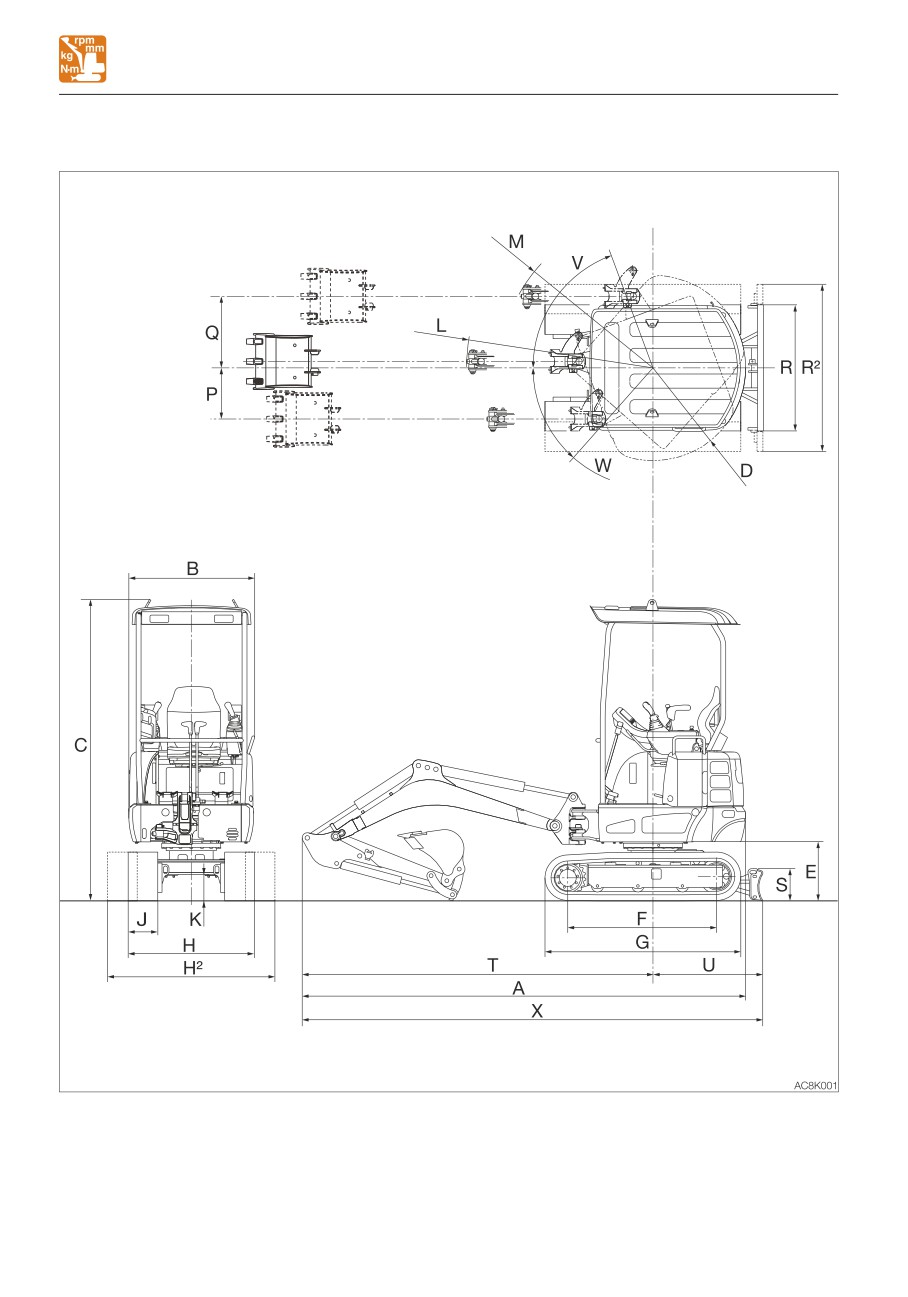
SPECIFICATIONS
MACHINE DIMENSIONS
MACHINE DIMENSIONS
7-4
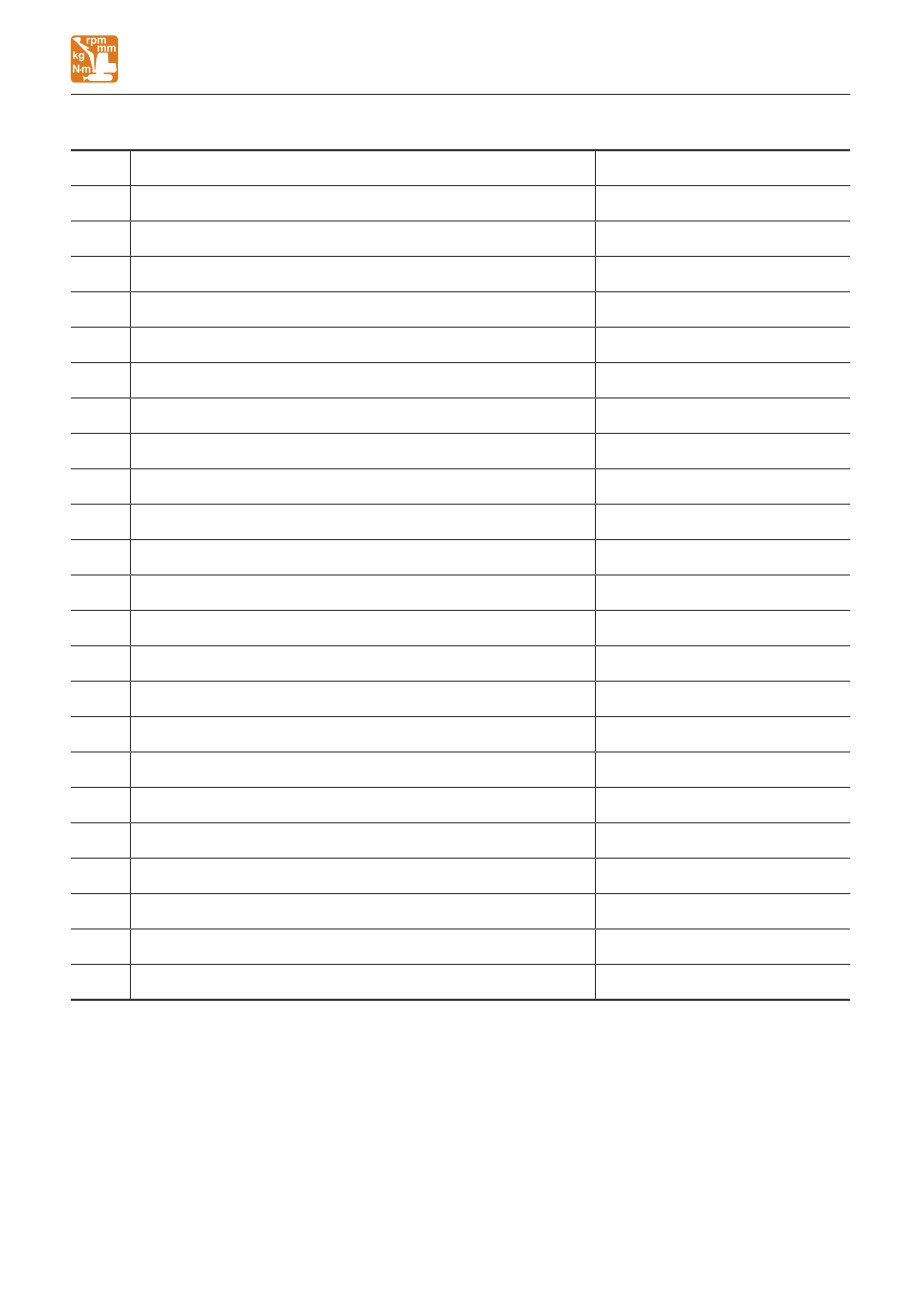
SPECIFICATIONS
MACHINE DIMENSIONS
Unit: mm (inch)
Item
Rubber crawlers
A
Overall length
3445 (135.6)
B
Upperstructure overall width
980 (38.5)
C
Overall height
2345 (92.2)
D
Slew radius
720 (28.3)
E
Clearance height under upperstructure
460 (18.1)
F
Crawler base
1155 (45.6)
G
Crawler overall length
1520 (59.9)
H
Crawler overall width (narrow)
980 (38.6)
H2
Crawler overall width (wide)
1300 (51.2)
J
Crawler shoe width
230 (9.1)
K
Ground clearance of undercarriage
205 (8.0)
L
Minimum radius of equipment and attachment
1450 (57.0)
M
Minimum radius of equipment at maximum front offset
1185 (46.7)
P
Offset distance of bucket (Left)
395 (15.6)
Q
Offset distance of bucket (Right)
555 (21.9)
R
Dozer blade width (narrow)
980 (38.6)
R2
Dozer blade width (wide)
1300 (51.2)
S
Dozer blade height
250 (9.8)
T
Front distance to axis of rotation
2725 (107.3)
U
Dozer blade distance to axis of rotation
855 (33.6)
V
Boom swing angle (Left)
70°
W
Boom swing angle (Right)
50°
X
Overall length (dozer blade at rear)
3585 (141.1)
7-5
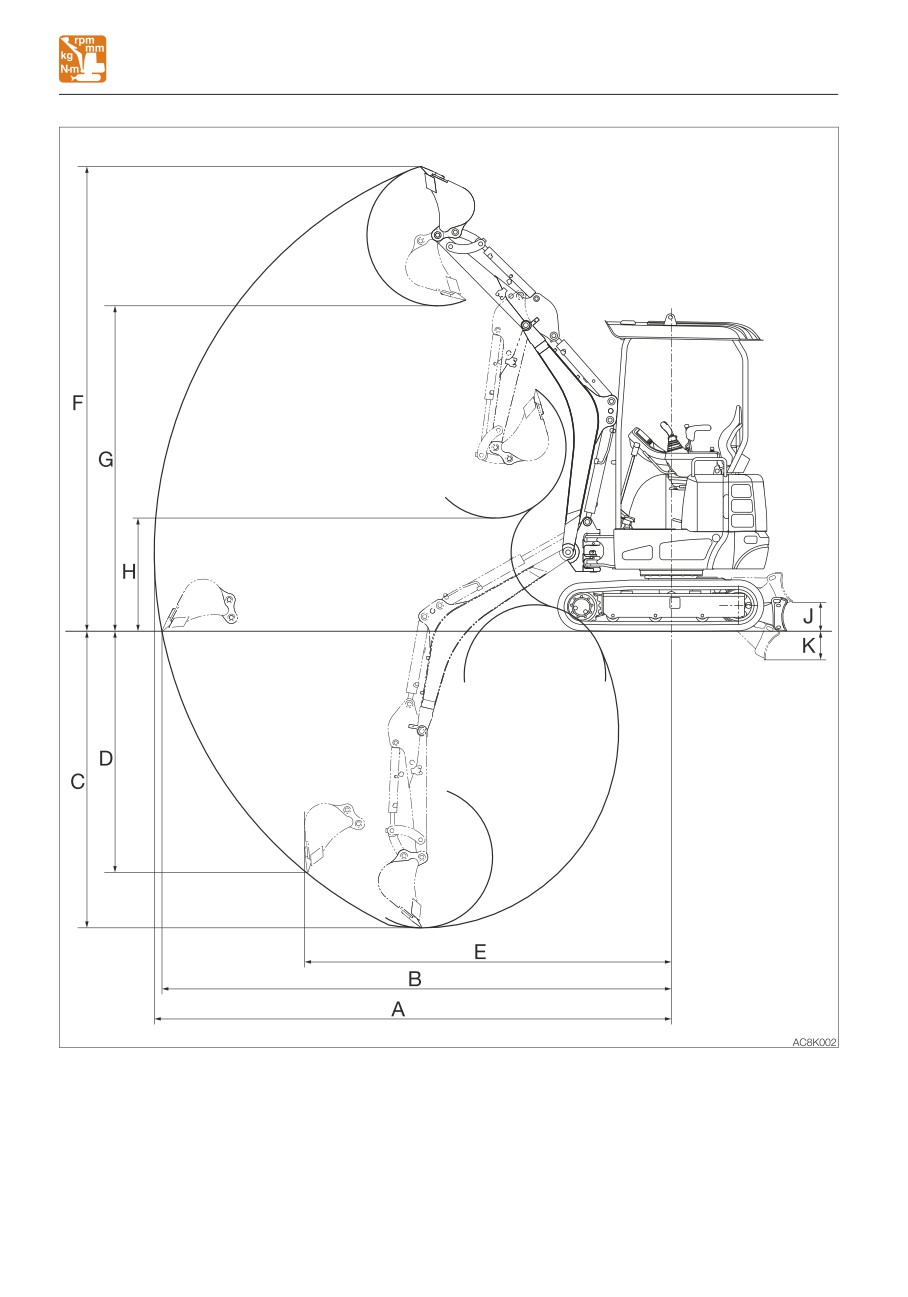
SPECIFICATIONS
OPERATING RANGES
7-6
SPECIFICATIONS
OPERATING RANGES
Unit: mm (inch)
Item
Rubber crawlers
A
Maximum reach
3815 (150.2)
B
Maximum reach at ground reference plane
3760 (148.0)
C
Maximum digging depth
2190 (86.2)
D
Maximum vertical digging depth
1780 (70.1)
E
Reach at maximum vertical digging depth
2705 (106.5)
F
Maximum height of cutting edge
3430 (135.1)
G
Maximum dumping height
2400 (94.6)
H
Minimum dumping height
835 (32.9)
J
Dozer blade maximum lifting
215 (8.4)
K
Dozer blade maximum lowering
210 (8.3)
7-7
MEMO
7-8
SPECIFICATIONS
LIFTING CAPACITIES
LIFTING CAPACITIES
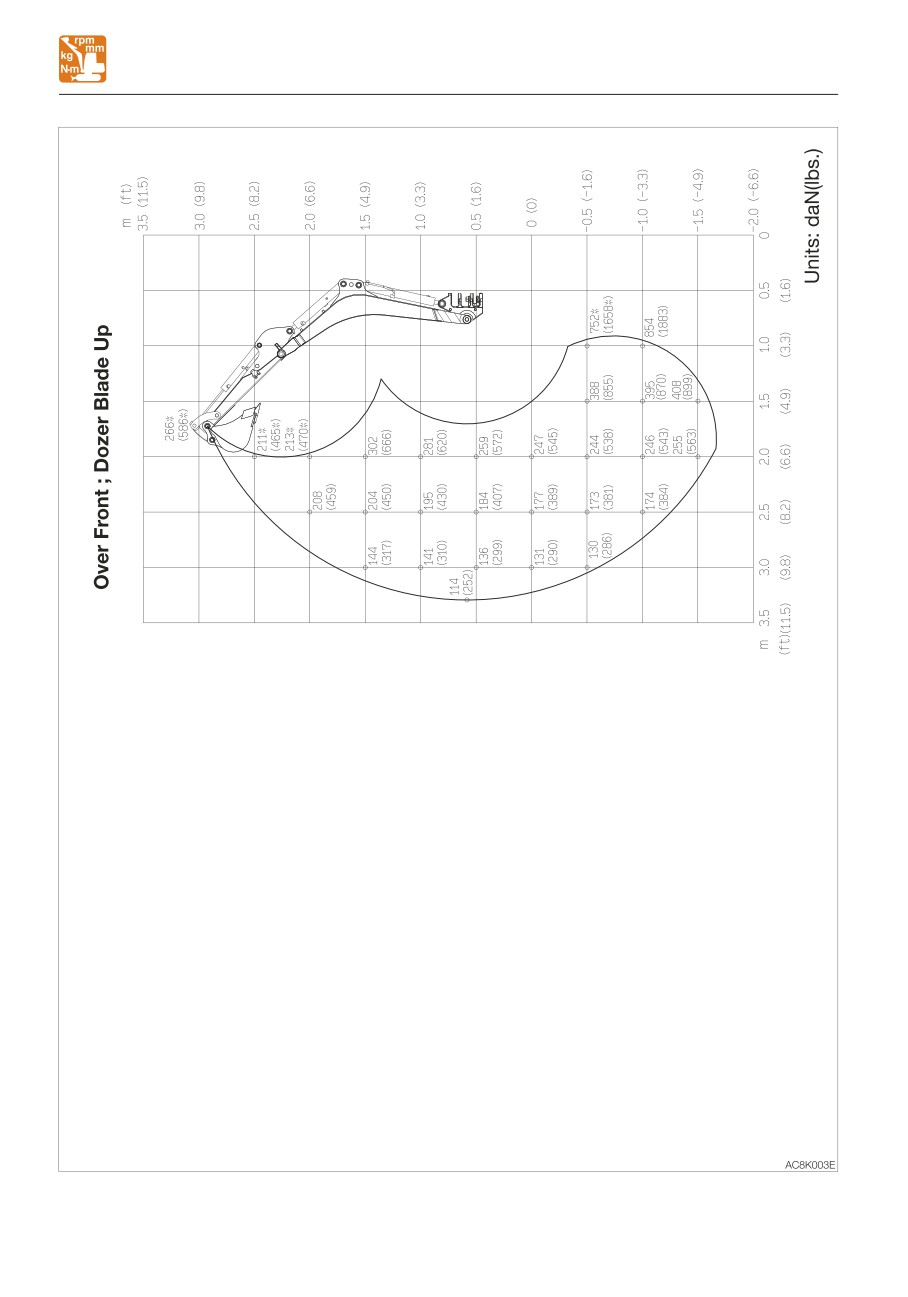
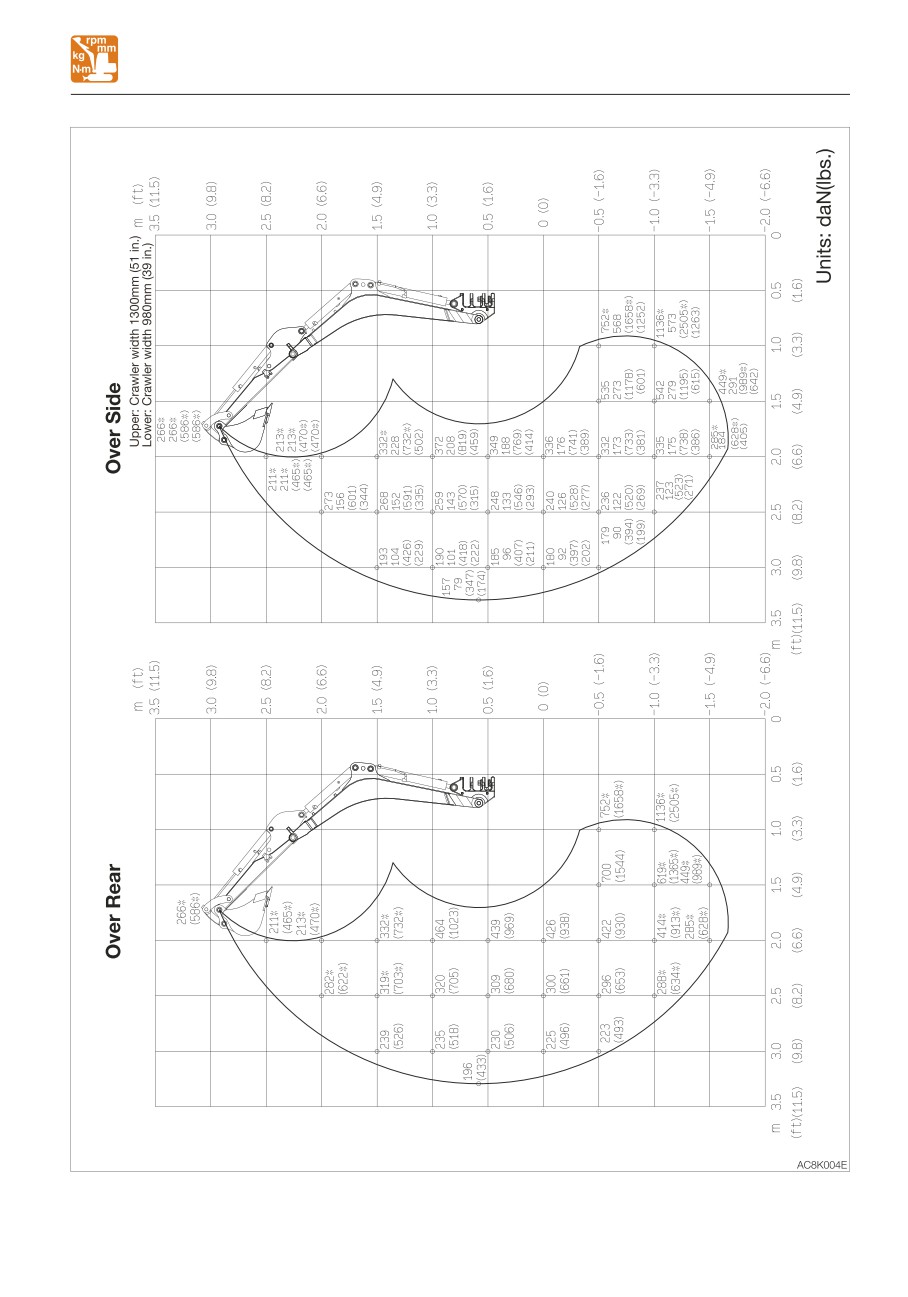
Rated lift capacity chart
• Do not attempt to lift or hold any load
• The loads in the charts do not exceed 87%
that is greater than these rated values at
of hydraulic lift capacity or 75% of tipping
their specified load radii and height.
load.
• The rated lift capacities are based on
• Figures marked with an asterisk (*) are
the machine being level and situated on
hydraulically-limited capacities.
a firm supporting surface. For safe
• The mass of slings and any other lifting
lifting, the operator is expected to make
devices shall be deducted from the rated
due allowance for the particular job
load to determine the net load that may be
conditions such as soft or uneven
lifted.
ground, non-level condition, side loads,
• The load point is the bucket hinge pin, and
hazardous conditions, experience of
the bucket posture is with the standard
personnel, etc. The operator and other
bucket completely retracted under the arm.
personnel should fully acquaint
• Unit: daN (lbs)
themselves with the operator’s manual
furnished by the manufacturer before
Load hooking system
operating this machine. When operating
A load hooking system must be provided
the machine, the safety rules of the
with the following capabilities.
equipment must also be followed.
1. A system which can withstand twice the
• Do not travel while lifting a load; It is
rated lift capacity no matter at what
very dangerous.
position the load is applied.
2. A system that poses no risk of the lifted
load falling from the hooking device. For
example, equipped with a hook slippage
prevention device.
3. A system that poses no risk of the hooking
system slipping from the hoe attachment.
7-9
SPECIFICATIONS
LIFTING CAPACITIES
7-10
SPECIFICATIONS
LIFTING CAPACITIES
7-11
OPTIONS
GENERAL PRECAUTIONS
• Use the proper procedure when
GENERAL PRECAUTIONS
mounting a boom or arm; otherwise
SAFETY PRECAUTIONS
serious damage could result. Consult
your sales or service dealer for help.
When removing or installing an
attachment or optional part, take the
CAUTIONS WHEN INSTALLING
following precautions.
ATTACHMENTS
• Consult with Takeuchi before installing
an optional attachment.
Be sure to perform a test operation after an
• Do not use any attachments not
optional or other special attachment has
approved by Takeuchi. Doing so may
been replaced. Inspect the hydraulic oil level
cause safety problems. Or, it may
and recharge it as necessary. Consult your
adversely affect the machine’s operation
sales or service dealer for detailed
or service life.
procedures on installing/removing
• We will not be held responsible for any
attachments.
injuries, accidents or damage to its
products caused by the use by a non-
approved attachment.
• Select a firm, level work area. Also, be
sure to park in a well ventilated place.
• Clear obstacles and dangerous objects,
and clean up spilled fuel immediately.
• When hoisting, be sure to designate a
person to act as a signalman.
Follow the instructions of the signalman
regarding the procedure and measures.
• When it is necessary to temporally
place a heavy object or an attachment
on the ground during removal or
installation, be sure to place it in a
stable position.
• Keep everyone out of the area when
hoisting. There is a hazard of objects
falling or contacting with people in the
area.
• Use a crane to move heavy objects (25
kg (55 lb.) or greater).
• Before removing a heavy object, be sure
to put a support to it. When lifting with a
crane, pay attention to the center of
gravity of the load to keep the machine
in balance.
• Do not operate the machine while the
load is lifted by a crane stand.
8-2
OPTIONS
GENERAL PRECAUTIONS
CAUTIONS WHEN OPERATING
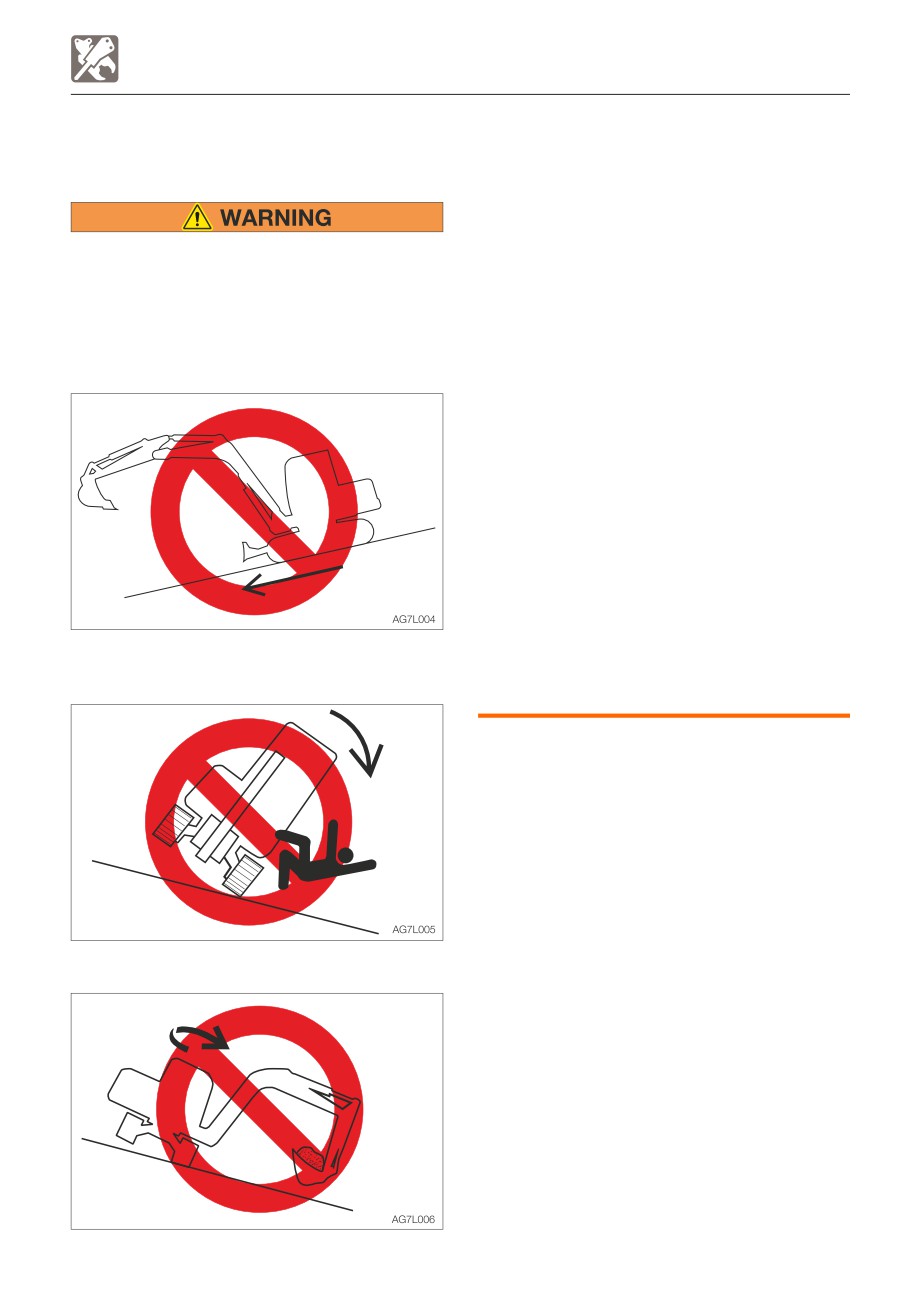
• Slewing on slopes
ATTACHMENTS
• If there is a heavy attachment is
installed, the machine takes longer
distance than usual to come to a
complete stop when the stopping
Long attachments reduce stability of the
operation is performed. Carefully judge
machine. The machine may tip over if it
the distance so as not to bump into an
loses the balance when traveling or
object around the machine. Keep a safe
slewing on slopes.
distance from surrounding obstacles.
Never perform the operations listed below
When a heavy attachment is installed,
as they are extremely dangerous.
natural drop (the gradual dropping of
the attachment under its own weight
when it is stopped in midair) increases.
• The machine can tip over more easily in
the lateral direction than in the
longitudinal direction.
· Do not slew sideways with a heavy
load at the how attachment. In
particular, do not slew sideways on
slopes.
· The attachment is heavier for
machines equipped with breakers or
crushers than for machines equipped
• Traveling down the slopes with the
with the standard bucket. Do not
attachment raised
operate such machines sideways,
especially digging downhill.
• Traveling across slopes
8-3
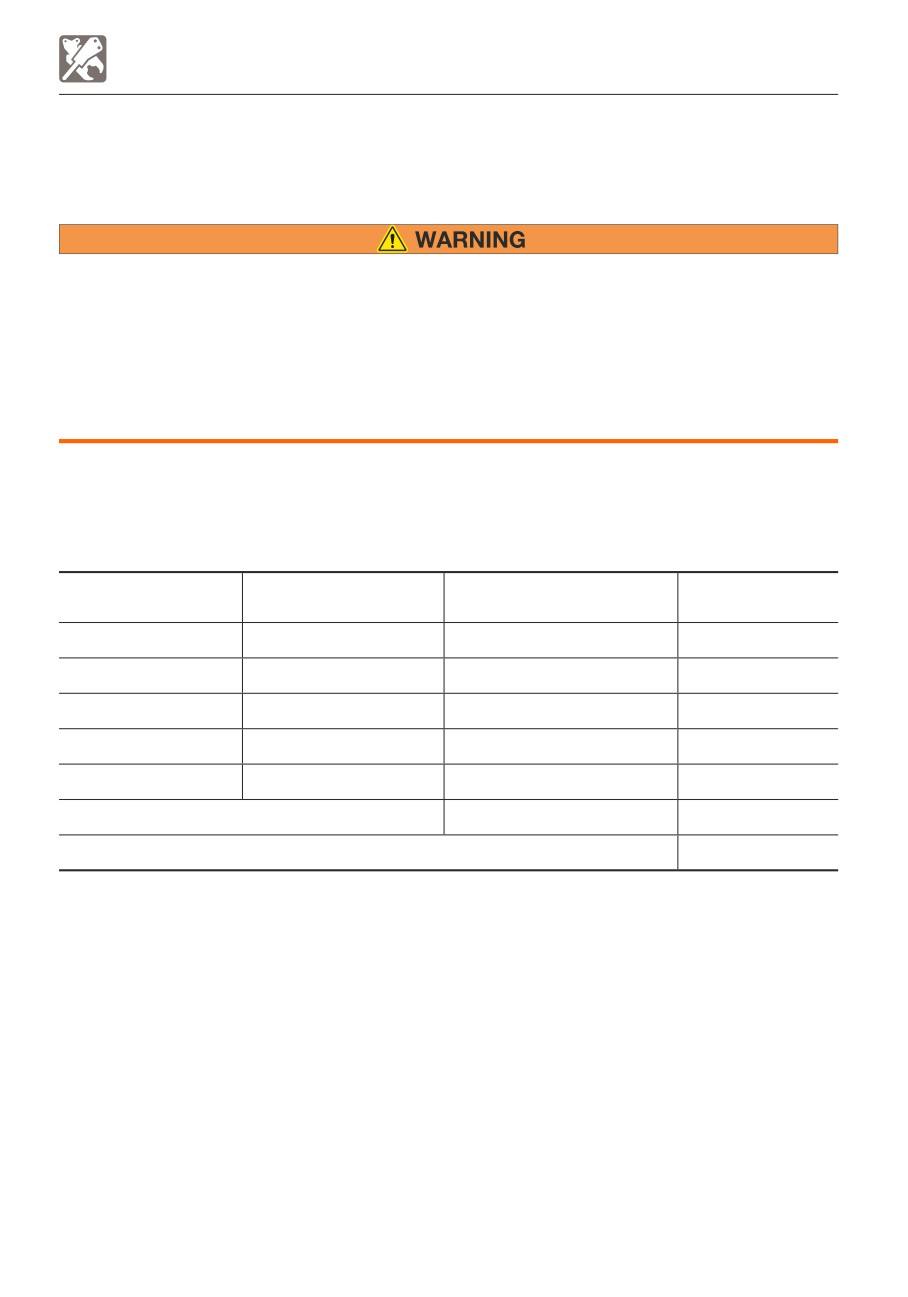
OPTIONS
ATTACHMENT COMBINATION TABLE
ATTACHMENT COMBINATION TABLE
The table below shows which bucket should be installed when the machine is using a
standard arm or long arm. Select a proper bucket by following the table.
• Consult with Takeuchi before installing an optional attachment.
• Do not use any attachments not approved by Takeuchi. Doing so may cause safety
problems. Or, it may adversely affect the machine’s operation or service life.
• We will not be held responsible for any injuries, accidents or damage to its products
caused by the use by a non-approved attachment.
• The swing stopper must be mounted when a bucket wider than a 450W bucket is
mounted. Failure to mount the swing stopper may result in the bucket hitting the
machine body.
√ :Can be used.
∆ :Can be used only for light operations (digging and loading of dry and loose soil or mud)
— :Cannot be used.
Rated capacity
Bucket cutting width
Standard arm
Bucket
m3 (cu. yd.)
mm (inch)
930mm (37 in.)
260W
0.020
(0.026)
265 (10.4)
√
350W
0.027
(0.035)
335 (13.2)
√
450W (Standard)
0.038
(0.049)
435 (17.1)
√
500W
0.043
(0.056)
485 (19.1)
√
3-hole bucket
0.049
(0.064)
457 (18.0)
—
Total bucket weight = Within 116 (255 lb.)
Within 485 (19.1)
√
Hydraulic Breaker (TKB-72)
√
8-4
OPTIONS
SELECTING A LEVER PATTERN
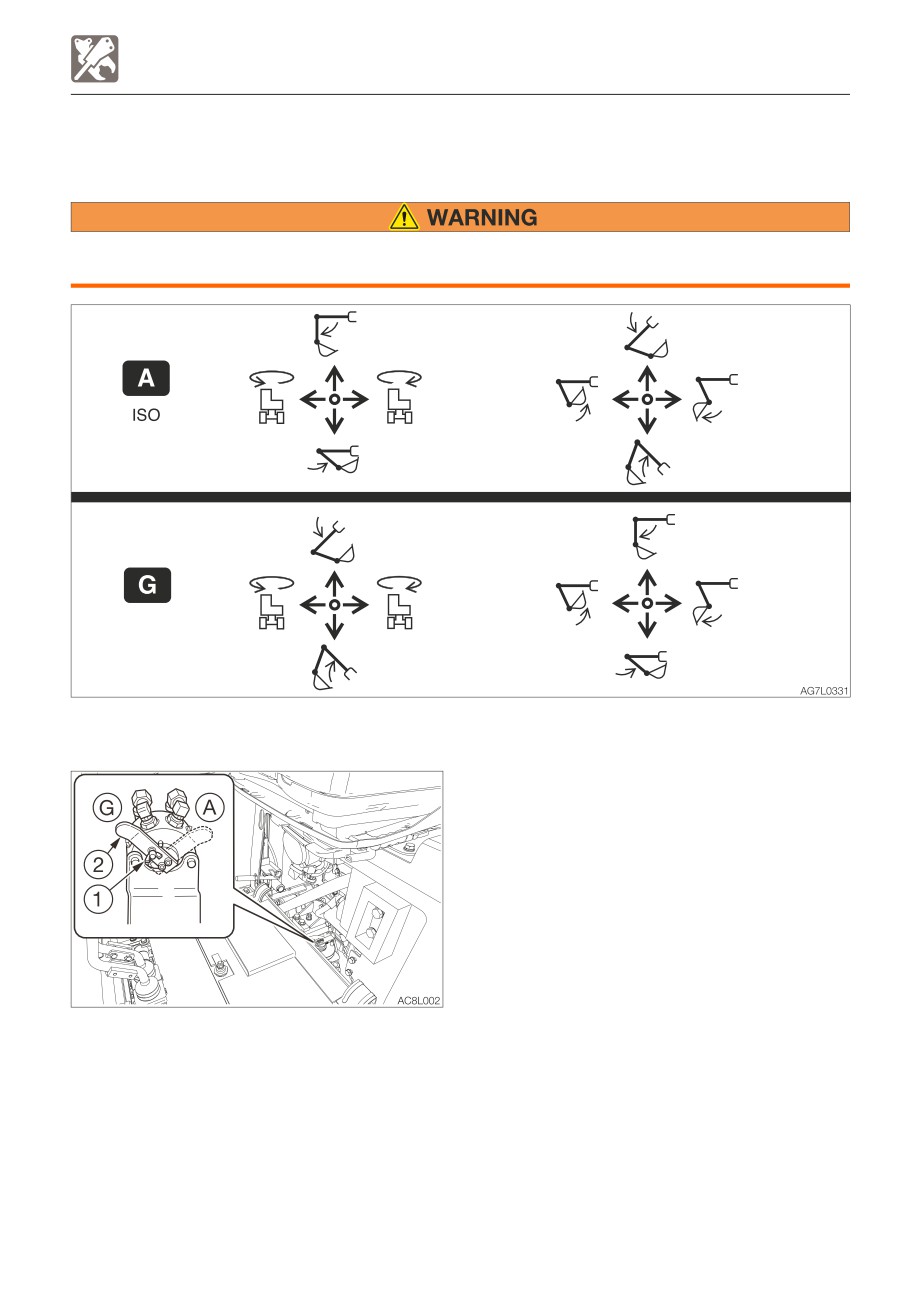
SELECTING A LEVER PATTERN
The operating pattern of the left and right operating levers can be changed.
Before starting the engine, check the selector to see which operating pattern the left
and right operating levers are set.
SWITCHING THE LEVER PATTERN
1. Park the machine on a flat and rigid
ground, and stop the engine.
2. Open the maintenance cover A.
3. Loosen the wing bolt (1).
4. Turn the selector valve lever (2) to switch
the pattern.
5. Tighten the wing bolt (1) and fasten the
lever (2) in place.
6. Close the maintenance cover A.
7. Confirm the lever pattern.
(A) : ISO pattern
(G) : G pattern
8-5
OPTIONS
HYDRAULIC BREAKER
Cautions on operating
HYDRAULIC BREAKER
For handling of the breaker, read the
hydraulic breaker’s manual, provided
separately.
• Start the engine and run it at 75% of the
maximum speed.
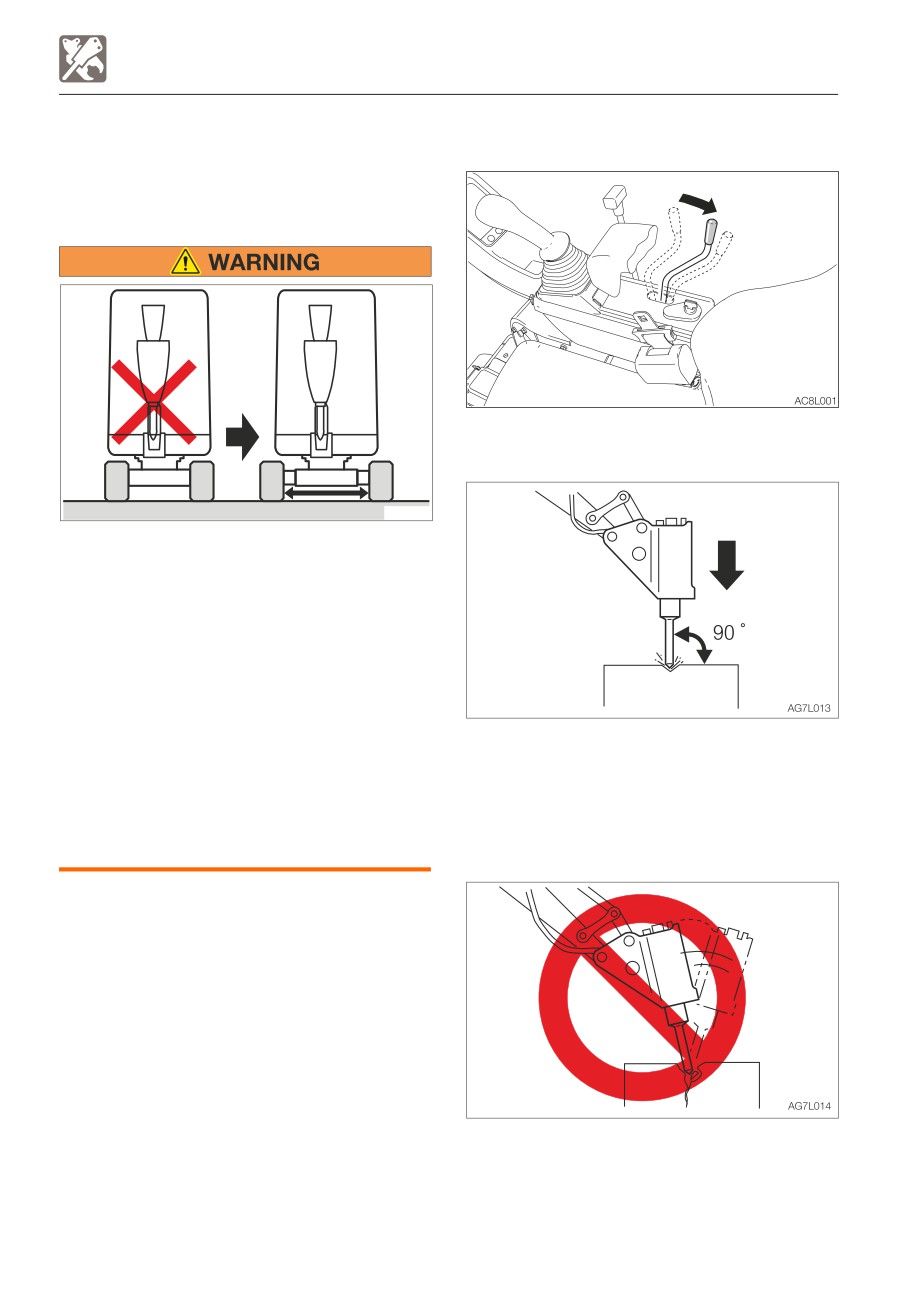
Do not use the breaker when the crawler
width is narrowed!
• Always operate the machine with the
crawler width extended to 1300 mm
(51.2 in.) to maximize the machine
stability. If the machine is operated with
the crawler width narrowed (980 mm,
38.6 in.), the machine may tip over due
to its poor stability.
• Pound with the chisel pressed
• If the machine must be operated with
perpendicular to the surface to be
the narrowed crawler width (980 mm,
pounded.
38.6 in.), traveling should be done after
• When pounding, press the chisel properly
folding the hoe attachment, lowering the
against the object to be broken so as to
boom to lower the center of gravity and
avoid pounding the air.
keeping the machine facing forward.
When an optional attachment, such as a
breaker, tilted bucket or clamshell, is
operated, be sure that the crawler width is
extended to 1300 mm (51.2 in.).
IMPORTANT: When installing an
attachment, make sure that it is
appropriate for the machine being used.
Contact your sales or service dealer for
advice on selecting attachments.
• Do not pry with the chisel or do not pry
while pounding.
• Do not move the chisel while pounding.
• Do not pound continuously for over 30
seconds on the same surface.
8-6
OPTIONS
HYDRAULIC BREAKER
REPLACING THE HYDRAULIC OIL
REGULARLY
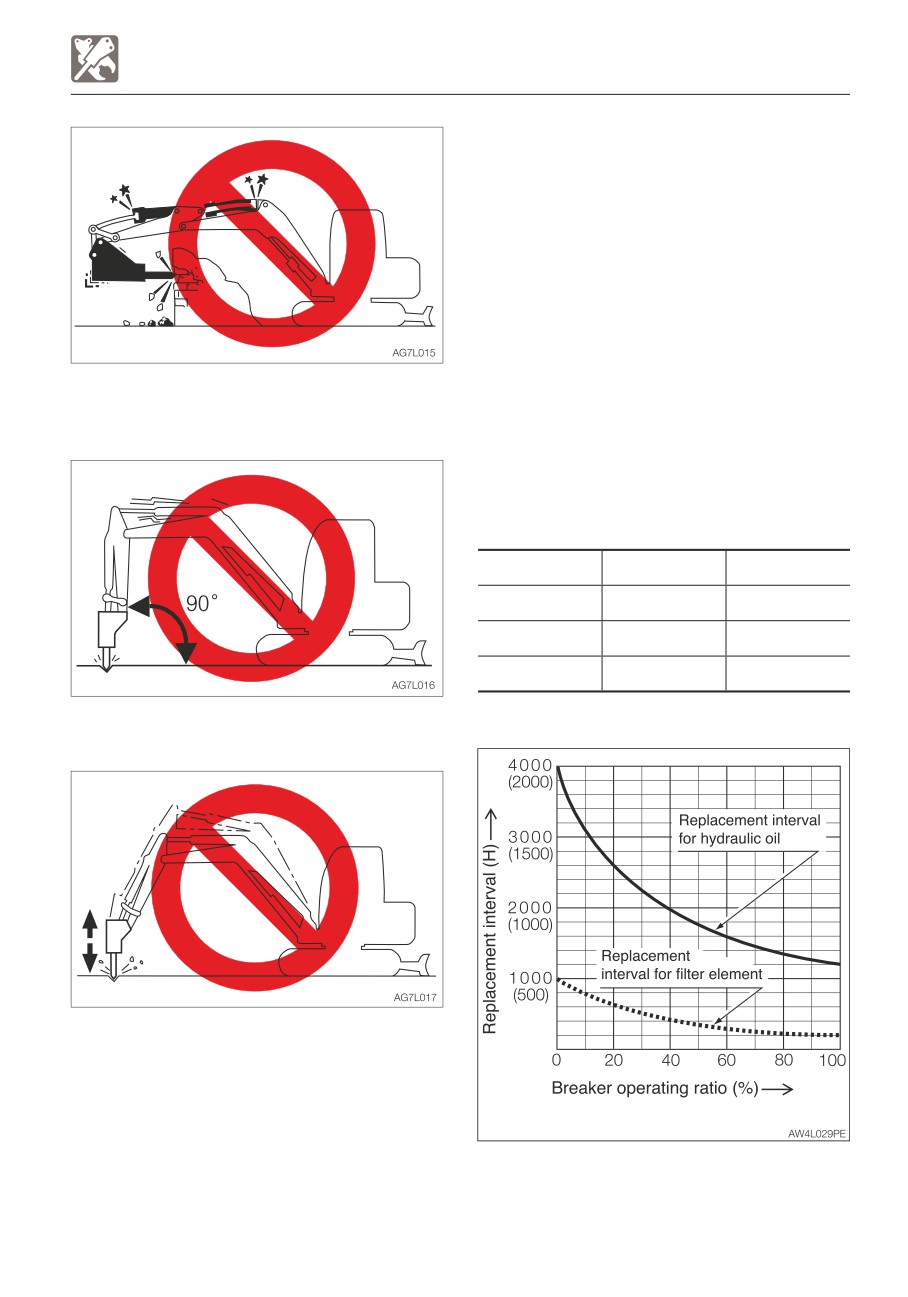
When a hydraulic breaker is used, the oil
deteriorates more quickly than that used for
a usual operation. Be sure to replace the
hydraulic oil and the return filter elements.
• Failure to replace these in time can lead to
damage to the machine and the breaker
hydraulic system. To improve the service
life of the hydraulic systems, be sure to
• Do not pound with the cylinder fully
replace the hydraulic oil and return filter
extended or retracted (at the stroke end).
element after the number of hours shown
Leave a margin of at least 50mm(2 in).
on the diagram below.
• When replacing the hydraulic oil, clean the
suction strainer.
Replacement interval (hours)
Item
Hydraulic oil
Filter element
1st time
—
25
2nd time
—
100
Periodically
1200 (600)
200
• Do not pound with the arm placed
When the breaker operating ratio is 100%.
perpendicular to the ground surface.
• Do not drop the breaker itself on the object
to be broken in order to break it.
• Do not move objects to be broken or rocks
with the breaker itself.
• Slew the machine occasionally to cool the
engine.
• If a hydraulic hose is vibrating abnormally,
(
): When using conventional antiwear
nitrogen gas may be leaking from the
hydraulic oil.
accumulator. Ask for an inspection early.
8-7
OPTIONS
BIODEGRADABLE OIL
4. Bleed the air from the hydraulic oil system.
BIODEGRADABLE OIL
5. Operate the hydraulic devices for 30
Biodegradable oil is a new type of hydraulic
minutes.
oil that is decomposed into carbon dioxide
6. Drain the biodegradable oil from the tank
and water by microorganisms in the soil and
and cylinders.
water. It is highly safe for living organisms
7. Replace the hydraulic oil return filter with a
and offers advantages in term of
new filter.
environmental protection.
8. Repeat steps 3 and 4.
• Recommended biodegradable oil: Mobile
9. Operate the hydraulic devices for 30
EAL Envirosyn 46H (an ester synthetic oil).
minutes.
When replacing the hydraulic oil with
10. Drain the biodegradable oil from the tank
biodegradable oil, use the above or an
and cylinders.
equivalent oil.
11. Repeat steps 3 and 4.
Note that other oils, even other brands of
12. Operate the hydraulic devices for 1 hour.
ester synthetic oils, may damage O-rings,
13. Drain the biodegradable oil from the tank
packings and seals. Takeuchi products
and cylinders.
shipped with the optional biodegradable oil
14. Replace the return filter with a new filter.
are shipped with the above brand of oil.
15. Repeat steps 3 and 4.
• When switching from a mineral oil to a
16. Operate the hydraulic devices, then
biodegradable oil, the parking brake torque
check for oil leakage.
decreases by about 30%.
There is no need to flush the hydraulic oil
system when switching from biodegradable
to mineral hydraulic oil.
REPLACING THE HYDRAULIC OIL WITH
BIODEGRADABLE OIL
Mixing mineral oil with biodegradable oil will
result in a decrease of the hydraulic oil’s
performance as well as a decrease in
biodegradability and safety. The hydraulic oil
system must be flushed as described below
before supplying the biodegradable oil. This
operation is dangerous and requires
experience. Have it performed by a Takeuchi
sales or service outlet.
Flushing
To be performed by a Takeuchi sales or
service outlet
1. Drain the hydraulic oil (mineral oil) from the
hydraulic tank and clean the inside of the
tank and suction strainer.
Refer to “Replacing the hydraulic oil and
cleaning the suction strainer” on pege 5-
46.
2. Remove the cylinder hoses and drain the
hydraulic oil (mineral oil) from inside the
cylinders.
3. Supply new biodegradable oil to the
hydraulic tank.
8-8
CALIFORNIA
PROPOSITION 65 WARNING
Diesel engine exhaust and some of its constituents are known to the State of California
to cause cancer, birth defects, and other reproductive harm.
Battery posts, terminals and related accessories contain lead and lead compounds,
chemicals known to the State of California to cause cancer and birth defects or other
reproductive harm. Wash hands after handling battery.
EC-CONFORMITY CERTIFICATE
We herewith declare that following named machine, based on its conception and design
and in the form brought into service is in accordance with the relevant, basic safety and
health requirements of the following EC directives. In case of any alteration of the
machine not coordinated with us, this certificate loses its validity.
Designation of the machine Compact Excavator
Manufacturer
TAKEUCHI MFG. CO., LTD
205 Uwadaira, Sakaki-machi, Hanishina-gun, Nagano
389-0605, Japan
Model
TB215R
Engine type
3TNV70-PTB1R
Engine power
11.5 kW @ 2400 rpm
The machine is in accordance with the requirements of EC regulations:
1) Machine directive 2006/42/EC and appendix
2) Electromagnetic compatibility-regulation 2004/108/EC and appendix
3) Noise directive 2000/14/EC (Evaluation procedure according to appendix VI),
2005/88/EC and appendices.
4) Regulations on engine emissions: 2004/26/EC and appendices.
Harmonized norms: EN474-1:2006+A1:2009, EN474-5:2006+A1:2009.
Complier of the technical files:
Adam Geiss
Oliver Scharschmidt
Wilhelm Schafer Gmbh
68307 Manheim-Sandhofen GERMANY
Issued in Sakaki, Japan
Akio Takeuchi, President