BMW AG Motorcycle (R 850 C, R 1200 C). Manual - part 10
 

  Index      Manuals     BMW AG Motorcycle (R 850 C, R 1200 C). Repair Manual


Search            


Content   ..  8  9  10  11   ..


BMW AG Motorcycle (R 850 C, R 1200 C). Manual - part 10


11.46

Installing crankshaft

e

 Caution:

Oil the bearings.

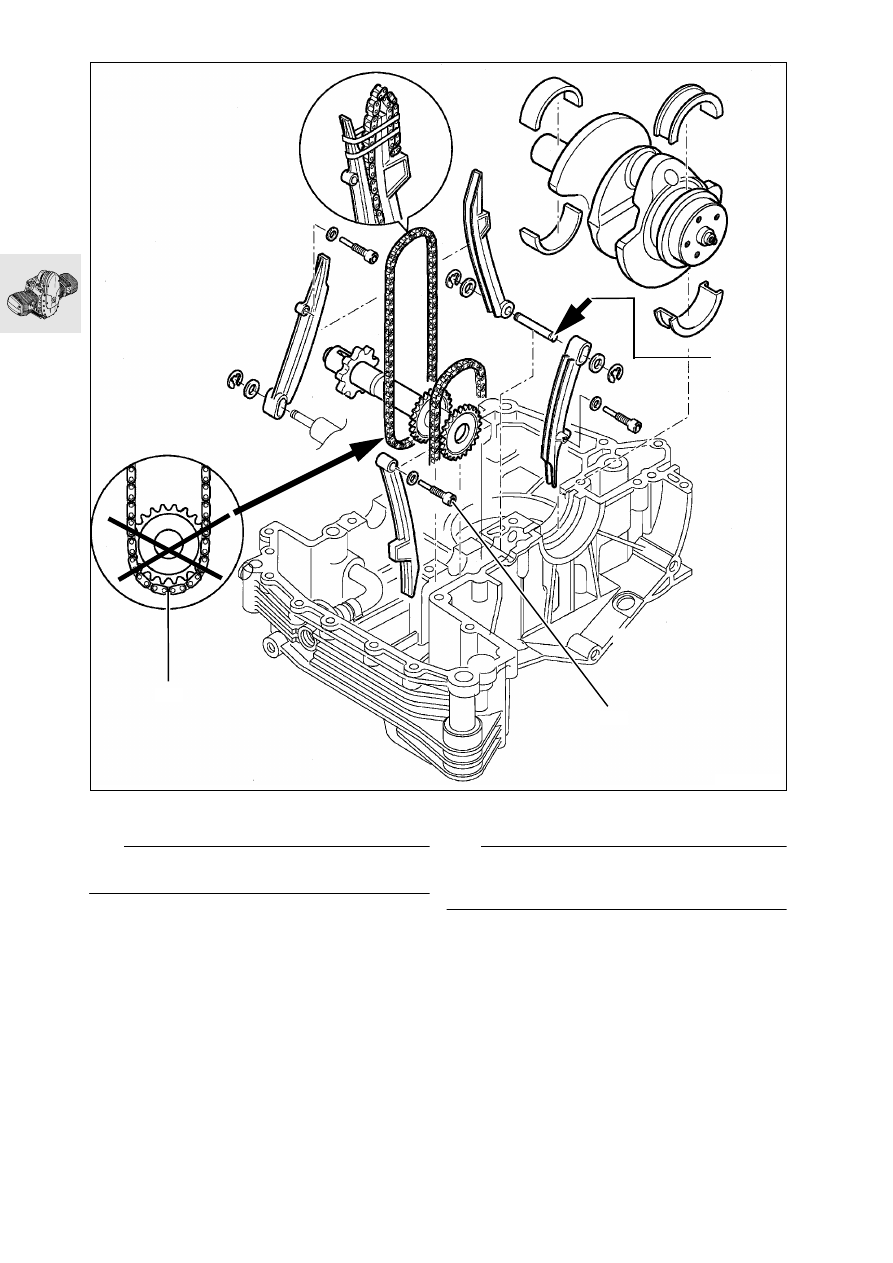
Installing timing chain tensioning and 
slide rails

Seal pivot pin for tensioning rail/slide rail at 
clutch side (arrow) with 3-Bond 1209.

Insert pivot screw (1) into chain tensioner rail, using 
a new seal.

Tightening torque:

Chain guide rail pivot pin .............................. 18 Nm

Installing auxiliary shaft/timing chains

e

 Caution:

Timing chains (2) must mesh fully with auxiliary shaft 
sprockets.

RS110291

u

2

1

11.47

Assembling engine block

Coat clean, grease-free sealing faces (arrow) 
with 3-Bond 1209.

Secure the timing chain with rubber band (1) to 
the timing chain tensioning and slide rail.

RS110920

M1

0 x

 10

0

M1

0 x

 10

0‹

M6

 x

 5

0

M6

 x

 5

0

M6

 x

 5

0

M6

 x

 5

0

M6

 x

 50

M6

 x

 50

M6

 x

 5

0

M6

 x

 5

0

M6

 x

 2

5

M6

 x

 2

5

M6 x

 2

5

M6 x

 3

5

M6

 x

 3

5

M6

 x

 3

5

M6

 x

 3

5

M6 x

 3

5

M6

 x

 3

5

M6

 x

 5

0

M6

 x

 3

5

1

u

11.48

Bolt the crankcase sections together.

Tightening torque/tightening order:

1. M10 screw (oiled) ..................................... 45 Nm
2. M 8 screw (oiled) ...................................... 20 Nm
3. M 6 screw .................................................. 9 Nm

RS110391

M10

 x

 10

0

M1

0 x

 100

M8

 x

 8

0

M8

 x

 8

0

M8

 x

 3

5

M8

 x

 3

5

11.49

Installing the crankshaft radial seal

Pre-form the lip of the radial shaft seal carefuilly 
by hand (1).

Oil the radial shaft seal at the sealing/contact 
surface.

Place radial seal over sliding sleeve (2)/remove 
sliding sleeve (3).

Drive the radial shaft seal in with handle, 
BMW No. 00 0 500, and drift with sliding sleeve, 
BMW No. 11 5 660 (4).

RS110400

1

2

3

4

11 5 660

11.50

Installing clutch housing

e

 Caution:

Always use new bolts for housing and cover.

Install clutch housing with mark (1) aligned with 
crankshaft mark (2).

Lock the clutch housing with special tool 
BMW No. 11 5 640

Insert all screws by hand and tighten down.

Tightening torque:

Clutch housing
to crankshaft (screw threads oiled) ............... 40 Nm 
Additional wrench angle .................................... 32°

C210010

11 5 640

2

1

11.51

Installing oil pump

e

 Caution:

Oil the sliding-contact faces.

Install outer rotor (1) of oil pump in pump hous-
ing.

Install oil pump housing with cooling oil pipe (2).

e

 Caution:

O-ring (3) must be in good condition.

Install Woodruff key (4), outer rotor (5) and inner 
rotor (6) in cooling oil pump.

Screw housing cover (7) on to oil pump.

e

 Caution:

Note different lengths of screw.

Tightening torque:

M 6 screw ...................................................... 9 Nm
Pressure relief valve ..................................... 35 Nm
Oil pressure switch....................................... 30 Nm

RS110411

4

5

6

7

5

1

3

2

M6 x 50

M6 x 45

M6 x 45

M6 x 50

M6 x 45

11.52

Installing auxiliary shaft drive

Set crankshaft mark against mark on auxiliary 
shaft.

e

 Caution:

Adjust according to the adjusting instructions.

a

............................ See “Installing cylinder head”.

Lock the clutch housing with special tool 
BMW No. 11 5 640.

Install chain sprocket (1).

Tightening torque:

M 6 screw .................................................... 10 Nm

Install drive-shaft chain with chainwheel (2) and 
rotor (3).

Tightening torque:

Retaining screw at chainwheel ..................... 70 Nm

Install/secure chain guide rail (4).

Install/secure chain tensioner rail (5).

Install chain tensioner housing (6) with piston and 
spring.

Tightening torque:

M 6 screw ...................................................... 9 Nm

Tighten down cooling oil line (7).

e

 Caution:

Use a new sealing ring.

Tightening torque:

M 6 screw .................................................... 10 Nm
Banjo screw for cooling oil line
with oil vent valve ......................................... 25 Nm

11 5 640

RS110250

4

2

3

1

5

6

7

11.53

Installing piston

Turn joint in oil scraper ring (arrow) so that it fac-
es upwards.

Install piston ring gap offset by 120° in each 
case.

Production locating point X = install on exhaust side.

e

 Caution:

Ensure that retaining rings are properly seated on 
piston pin. 
Oil the sliding-contact faces. 
Always use pistons of the same weight class in any 
one engine.

Markings:  .................................................... + or —

a

............................................See Technical data

e

 Caution:

Always install pistons and cylinders in pairs. 
Do not accidentally confuse pistons or piston pins.

Piston size identification:
On piston crown A, B, AB (for either A or B cylinder), 
and on cylinder A, B.

RS110430

X


Content   ..  8  9  10  11   ..