BMW AG Motorcycle (R 850 C, R 1200 C). Manual - part 8


  Index      Manuals     BMW AG Motorcycle (R 850 C, R 1200 C). Repair Manual


Search            


Content   ..  6  7  8  9   ..


BMW AG Motorcycle (R 850 C, R 1200 C). Manual - part 8


11.30

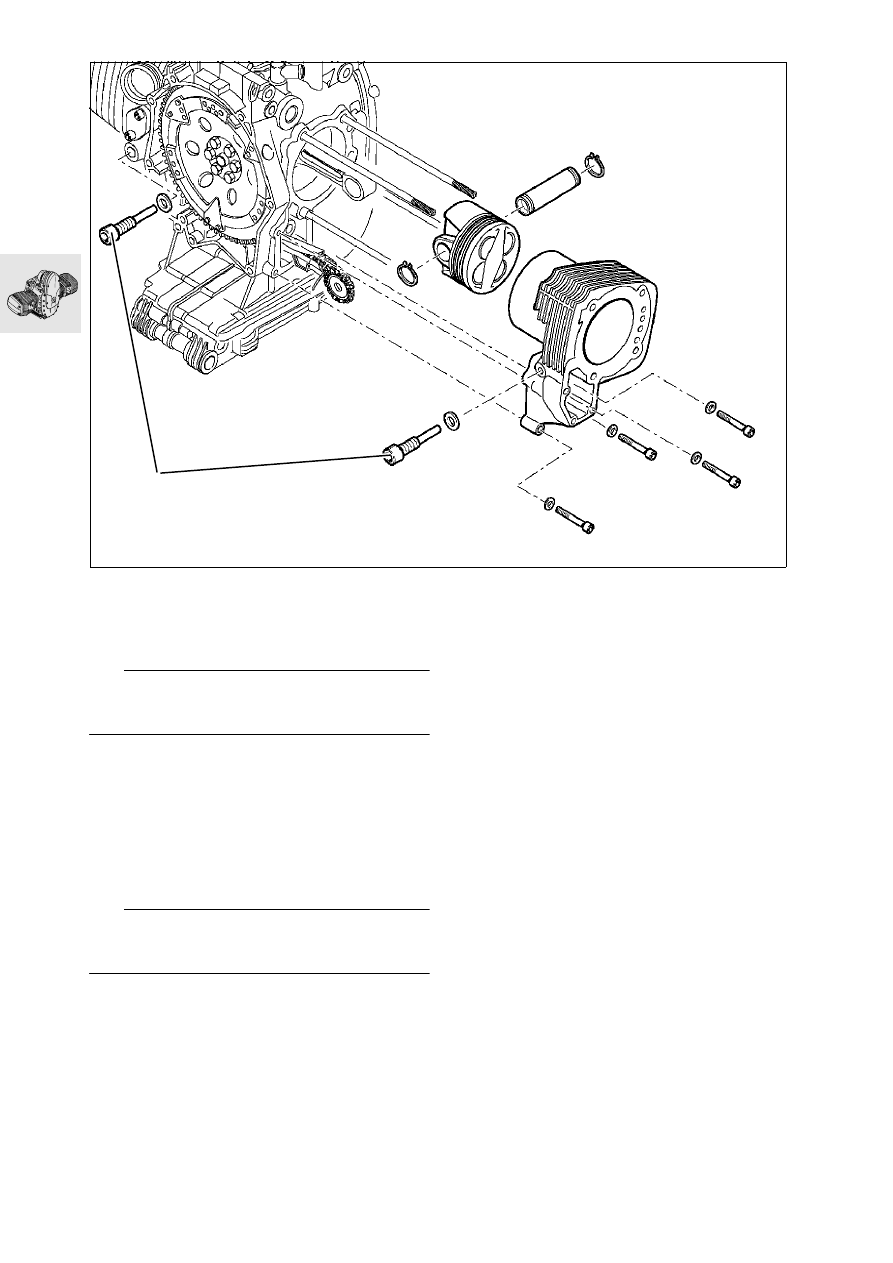
Removing cylinder barrel

Unscrew and remove guide rail bearing screw (1).

Unscrew and remove cylinder retaining screws, 
and remove cylinder.

e

 Caution:

When removing cylinder, ensure that the piston 
does not strike the engine block.

Removing/dismantling piston

Remove both retaining rings on piston pin.

Press out piston pin by hand.

Remove piston.

Carefully remove piston rings with piston ring 
pliers.

Remove carbonized oil from base of piston/clean 
the piston.

e

 Caution:

Do not accidentally confuse pistons, piston pins or 
piston rings.

RS110170

1

11.31

Checking pistons and cylinders

Reference 
temperature for measurements:
 ...... 20 °C (68 °F)

Measure cylinder bore with internal probe at 
20 mm (0.79 in) and 100 mm (3.94 in) from the 
top in direction of piston pin, and again at a right 
angle to the first measurement.

a

............................................See Technical data

Measuring plane A:......................... 6 mm (0.24 in)

a

............................................See Technical data

Install piston rings in cylinder.

Determine piston ring clearance using feeler 
gauge.

a

............................................See Technical data

Assembling pistons

Carefully fit piston rings to piston in the following 
sequence, using piston ring pliers: 
3rd groove - equal chamfer ring 
2nd groove - micro-chamfer ring 
1st groove - asymmetric, convex oval-section

a

............................................ See Technical data

e

 Caution:

The tubular-spring ring gap must be at 180° to the 
equal-chamfer ring gap. 
Install with “Top” uppermost.

RS110180

100

20

RS110970

A

RS110200

RS110190

1.

R 850

1.

2.

3.

11.32

Removing/installing conrod

Turn crankshaft to TDC position.

Lock the clutch housing with special tool 
BMW No. 11 5 640.

Remove conrod.

L

 Note:

Conrods can also be removed/installed with the 
crankshaft removed.

e

 Caution:

Do not accidentally interchange conrods or bearing 
shells.

Install conrods.

Installed direction of conrods: ..lettering facing up

e

 Caution:

Oil the bearings.

Screw the big end bolts in by hand, then tighten 
them with a tightening angle indicator, 
BMW No. 11 2 500.

e

 Caution:

Use big end bolts once only.

Tightening torque:

Big end bolts oiled
Joint torque.................................................. 20 Nm
Wrench angle ................................................... 80 °

11 5 640

RS110210

TDC

11 2 500

11.33

Removing and installing alternator cover 
with engine installed

e

 Caution:

Disconnect earth (ground) lead from battery. 
Insulate earth (ground) lead.

Detach the horn.

Remove the oil cooler line.

Separate the Hall-effect signal transmitter plug.

Remove the starter motor.

Remove rear leading link mount.

Removing alternator mount cover

Detach the alternator.

Remove rotary breather line (1).

Lock the clutch housing with special tool 
BMW No. 11 5 640.

Remove pulley (2).

Remove magnetic gate (3).

L

 Note:

If complete alternator mount cover is removed, 
leave magnetic gate (3) installed.

Remove alternator mount cover (4).

11 5 640

RS110230

4

3

1

2

11.34

Renewing radial shaft seal in alternator 
mount cover

Carefully lever radial shaft seal out, using a 
screwdriver.

Drive in the new radial shaft seal with drift and 
sliding sleeve, BMW No. 11 5 680.

L

 Note:

Slide new radial shaft seal over taper on sliding 
sleeve, pre-shape and pull off.

Renewing radial shaft seal for rotary 
breather

Carefully lever radial shaft seal out, using a 
screwdriver.

Carefully pre-form the lip of the radial shaft seal 
by hand.

Oil the new radial shaft seal lightly and drive it in 
with handle, BMW No. 00 5 550, and drift, 
BMW No. 11 5 650.

11 5 680

RS110240

00 5 550

RS110241

11 5 650

11.35

Removing auxiliary shaft drive

Align markings (arrows) on timing pinion and 
chain sprocket.

Unscrew and remove cooling oil pipe (1)/swing 
the pipe forwards.

Remove chain tensioner (2).

Remove chain tensioning rail (3).

Remove chain guide rail (4).

Lock clutch housing with special tool 
BMW No. 11 5 640.

Unscrew and remove chain sprocket retaining 
bolt (5).

Remove rotor (6) with chain sprocket (7) and tim-
ing chain (8).

If necessary, remove chain sprocket (9).

11 5 640

RS110251

1

8

2

4

9

6

7

5

3

RS110961

11.36

Removing oil pump

Remove oil pump cover (1).

Remove complete oil pump (2) together with 
cooling oil pipe (3), and dismantle.

e

 Caution:

Check installed positions of parts which have al-
ready been run together.

RS110410

M6 x 45

M6 x 50

M6 x 45

M6 x 45

M6 x 50

3

1

2

11.37

Removing radial shaft seal on 
crankshaft with engine installed

Lock clutch housing with special tool 
BMW No. 11 5 640.

Remove the clutch. 

Carefully lever radial shaft seal out, using a 
screwdriver.

e

 Caution:

Avoid damaging the sealing faces on the housing 
and the crankshaft.

L

 Note:

When the crankcase is dismantled, the radial shaft 
seal can be taken out.

C210010

11 5 640

RS110270


Content   ..  6  7  8  9   ..