BMW AG Motorcycle (R 850 C, R 1200 C). Manual - part 3


  Index      Manuals     BMW AG Motorcycle (R 850 C, R 1200 C). Repair Manual


Search            


Content   ..  1  2  3  4   ..


BMW AG Motorcycle (R 850 C, R 1200 C). Manual - part 3


00.16

Checking battery acid level/topping 
up if necessary, cleaning/greasing 
battery posts

(Inspections III and IV)

Release the rubber strap holding the battery.

Raise the battery and check its acid level.

Top up battery acid level with distilled water as 
far as the MAX mark.

Protective 
battery-post grease: 
...............e.g. Bosch Ft 40 V1

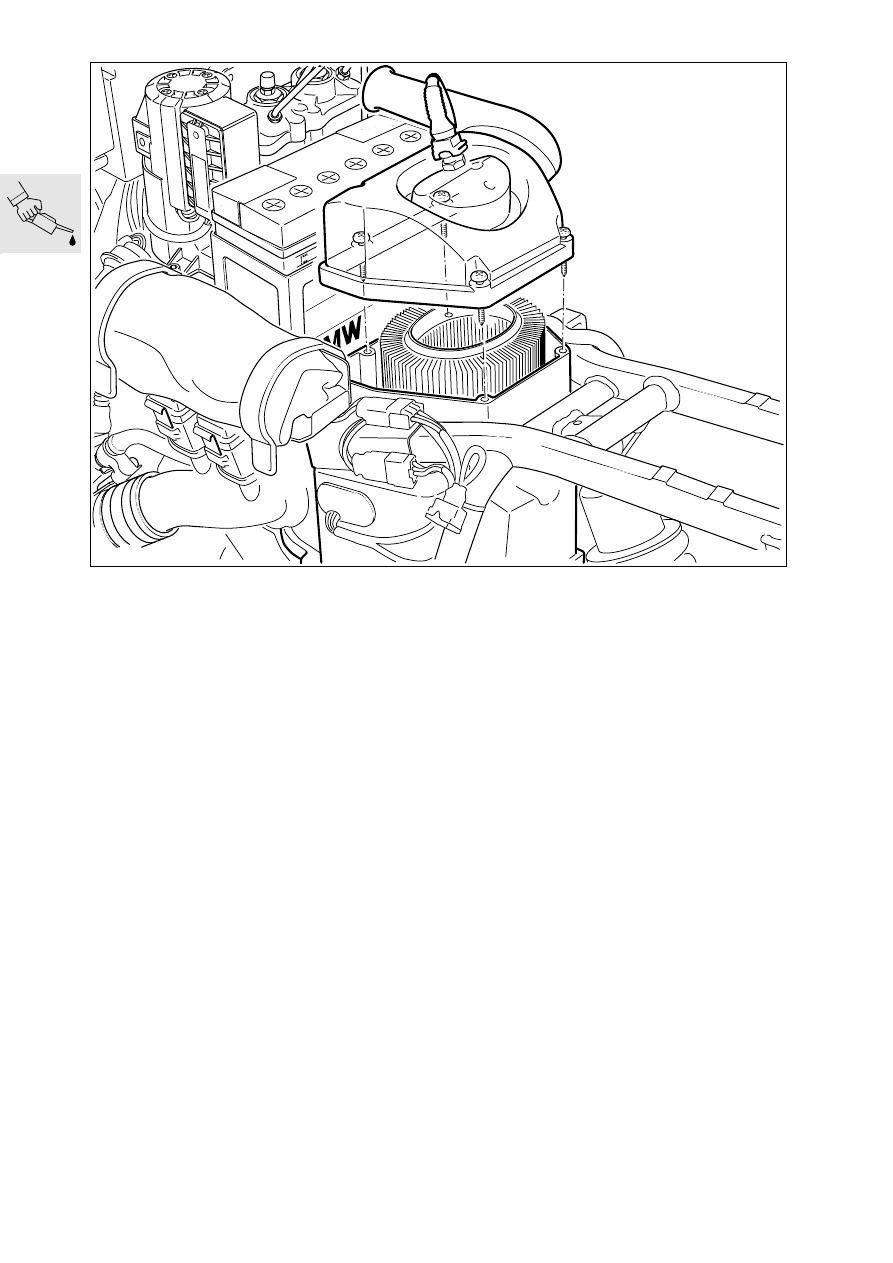
Renewing intake air cleaner 
element

(Inspection III)
In very dirty and dusty operating conditions, 
renew every 10 000 km (6 000 miles) or even 
more frequently if necessary

Detach and raise the upper part of the air cleaner 
housing.

Renew air cleaner element.

Install the fuel tank.

Note correct path of vent lines.

Install the left/right trim panels.

Tightening torque:

Fuel tank to rear frame ................................. 10 Nm

C000020

00.17

Renewing Poly-V belt 

(every 60 000 km/36 000 miles)

(Inspection III)

Remove the cover.

Use the spark plug cap assembly tool from the 
toolkit to pull off the spark plug caps.

Use spark plug wrench, BMW No. 12 3 510, to 
unscrew and remove the spark plugs.

Remove the horn with its mount.

Remove front cover.

Remove vent line (1).

Slacken off alternator mounting screws (1,3,4) 
and install a new Poly-V belt if necessary.

Poly-V belt adjusting procedure:
Poly-V belt installation procedure:

Place the Poly-V belt in position, tension it and 
turn the engine over once, then release belt ten-
sion.

Poly-V belt tensioning procedure:
1. Screw hex nut (1) on adjusting screw (2) up 

handtight (no tools to be used)

2. Tighten adjusting screw (2) with a torque wrench 

and keep it under tension.

3. Tighten upper retaining nut (3), then release the 

tension at the adjusting screw.

4. Tighten all screws and nuts. 

Tightening torque:

Poly-V belt preload......................................... 8 Nm
Alternator to alternator support cover........... 20 Nm
Vent line at generator mount cover:
Banjo screw ................................................. 25 Nm
Machine screw............................................. 10 Nm

e

 Caution:

Install the vent line with new O-ring seals.

C000060

12 3 510

C000070

1

TDC

RS110480

1

2

3

4

00.18

Checking brake system for correct 
operation and freedom from leaks; 
repairing/renewing if necessary

(Inspection III)

Checking brake system for leaks.

Checking brake fluid level

L

 Note:

The brake fluid volume (between MIN and MAX) is 
sufficient for the complete range of pad wear from 
new to the wear limit.
It is not normally necessary to add fluid to compen-
sate for pad wear.
If the level drops below the minimum mark, this indi-
cates some other fault.

(Inspections I, II and III)

Front brake

Make sure that the specified setting (distance 
between handlebar and fuel tank 30-50 mm/
1.2-2 in) is correct.

Check with the motorcycle on its side (prop) 
stand.

Turn the handlebar fully to the left.

The brake fluid must not drop below the mini-
mum level 2 mm (0.08 in) below the ring mark (ar-
row).

Brake fluid grade .........................................DOT 4

Rear brake

Position the motorcycle horizontally with auxiliary 
stand, BMW No. 00 1 550.

Brake fluid must not drop below the minimum 
level (arrow).

Brake fluid grade .........................................DOT 4

CUB0110

C000090

00.19

Checking brake pads and discs for 
wear/renewing

(Inspections II and III)

Checking front brake pad wear

Examine the wear limit marks (arrows).

e

 Caution:

Brake pad thickness must not fall below the minimum 
value.
Change pads only as a complete set.

Minimum lining thickness: .......... 1.5 mm (0.06 in)

Checking rear brake pad wear

It should not be possible to see the brake disc 
through the hole (arrow) in the inner brake pad.

If the brake disc is visible, the wear limit has been 
reached and the pads must be renewed.

Checking brake disc wear

Examine the brake discs carefully for cracks, 
damage, distortion, wear and score-marks.

Brake disc wear limit:
front:
........................................... 4.5 mm (0.177 in)
rear:............................................ 4.6 mm (0.181 in)

C000100

C000110

C000120

C000130

00.20

Renewing brake pads


Front brake

Detach/remove brake caliper from mounting (ar-
row).

Remove the split-pin keeper (1) from the retain-
ing pin (2).

Drive out retaining pin (2).

Remove brake pads by pulling downwards.

Install by following the above work instructions in 
the reverse order.

Before installing the brake caliper, force the pis-
tons fully back with resetting tool, 
BMW No. 34 1 500.

Tightening torque:

Brake caliper at fork slider tube.................... 40 Nm

Renewing brake pads
Rear brake

Loosen the rear wheel.

Unfasten/remove brake caliper.

Remove circlip (arrow) at retaining pin.

Drive the retaining pin out towards the wheel 
side.

Remove brake pads.

Install by following the above work instructions in 
the reverse order.

Before installing the brake caliper, depress the 
piston fully.

Tightening torque:

Brake caliper to rear wheel drive .................. 40 Nm
Screw the rear wheel studs in handtight, then
tighten them in a crosswise pattern.
Initial tightening ............................................ 50 Nm
Final tightening........................................... 105 Nm

C000100

C000230

2

1

C000140

00.21

Renewing brake fluid and bleeding 
brake system

Renew the brake fluid annually
(Inspection IV)

[ABS Inspection II and III]

Bleeding front brake circuit/renewing 
brake fluid

L

 Note:

This description applies to brake filling and bleeding 
devices with vacuum extraction of the brake fluid at 
the brake caliper.
If other devices are used, comply with their manu-
facturers’ instructions.

Turn the steering to the left.

e

 Caution:

When bleeding the brakes, always start on the  right 
side.

Take off the brake caliper.

Remove the brake pads.

Force the pistons fully back with resetting tool, 
BMW No. 34 1 500.

e

 Caution:

Do not allow brake fluid to come into contact with 
painted parts of the motorcycle, because brake fluid 
destroys paint.

Take off reservoir cover with rubber diaphragm.

Release the right handlebar switch.

Loosen the clamp screw for the handbrake fitting 
and turn the fitting until the brake fluid reservoir 
is horizontal.

e

 Caution:

When adding brake fluid, do not allow it to enter the 
holes for the reservoir lid screws.

Add brake fluid up to the MAX mark (arrow).

Connect the brake bleeding device to the bleed 
screw on the right brake caliper.

Open the bleed screw by half a turn.

Draw off brake fluid until it emerges clear and 
free from air bubbles.

Close the bleed screw on the right brake caliper.

Repeat the bleeding process at the left brake 
caliper.

When installing:

L

 Note:

Clean the rim of the reservoir, the rubber gaiter and 
the cover to remove brake fluid, and re-assemble 
the components with great care.

e

 Next check brake fluid level with the motorcy-

cle on its side (prop) stand and the handlebar turned 
to the left, and ensure that no air bubbles are visible 
in the sight glass.

C000150

34 1 500

KR340280

00.22

Additionally with [ABS]

Connect the brake bleeding device to the pres-
sure modulator for the front brake (arrow); this is 
marked  VR.

Open the bleed screw by half a turn.

Draw off brake fluid until it emerges clear and 
free from air bubbles.

Close the bleed screw.

Bleed the left brake caliper in precisely the same 
way as on the right.

If necessary, repeat the brake bleeding proce-
dure at the right/left.

Tightening torque:

Bleed screw on pressure modulator............... 9 Nm

Take out the resetting tool and insert spacer, 
BMW No. 34 1 520, in its place.

Press the pistons back in the second brake cali-
per, but do not remove the resetting tool.

Fill and bleed the front brake circuit.

Installation takes place in the reverse order of re-
moval.

Brake fluid grade .........................................DOT 4

Tightening torque:

Brake caliper to fork tube ............................. 40 Nm
Bleed screw at brake caliper .......................... 7 Nm

C000160

34 1 520

C000170

00.23

Bleeding rear brake circuit/renewing 
brake fluid

L

 Note:

On motorcycles with ABS, start at the pressure 
modulator.

Use the auxiliary stand, BMW No. 00 1 550.

Loosen the rear wheel studs.

Remove the cover for the line at the swinging 
arm.

Take off the brake caliper.

Remove the inner brake pad.

e

 Caution:

Do not allow brake fluid to come into contact with 
painted parts of the motorcycle, because brake fluid 
destroys paint.

Move the brake caliper to a horizontal position.

Connect the bleed line and open the bleed 
screw.

Force the pistons fully back with resetting tool, 
BMW No. 34 1 500.

Press the brake pedal down several times until 
brake pressure is felt to build up.

Fill the rear brake circuit and bleed it.

Take off the reservoir cover.

Add brake fluid up to the MAX mark (arrow).

Connect the brake bleeding device to the bleed 
screw on the brake caliper.

Open the bleed screw by half a turn.

e

 Caution:

During brake bleeding, make sure that the fluid re-
plenishing hole is always below the level of the brake 
fluid, or else air will be drawn into the brake system. 
If this occurs, repeat the bleeding operation.

Draw off brake fluid until it emerges clear and 
free from air bubbles.

Close the bleed screw.

Installation takes place in the reverse order of re-
moval.

Tightening torque:

Brake caliper to rear wheel drive .................. 40 Nm
Rear wheel to rear wheel drive
Initial tightening ............................................ 50 Nm
Final tightening........................................... 105 Nm
Bleed screw at brake caliper .......................... 4 Nm

34 1 500

C000180

C000090


Content   ..  1  2  3  4   ..