Kawasaki Ninja 650R, ER-6f ABS, ER-6f Motorcycle. Service Manual (2006-2008 year) - page 2
FUEL SYSTEM (DFI) 3-49
Inlet Air Pressure Sensor (Service Code 12)
then
Pv = Pl - Pg
For example, suppose the following data is obtained:
Pg = 8 cmHg (Vacuum gauge reading)
Pl = 70 cmHg (Varometer reading)
Vv = 3.2 V (Digital volt meter reading)
then
Pv = 70 - 8 = 62 cmHg (Abs.)
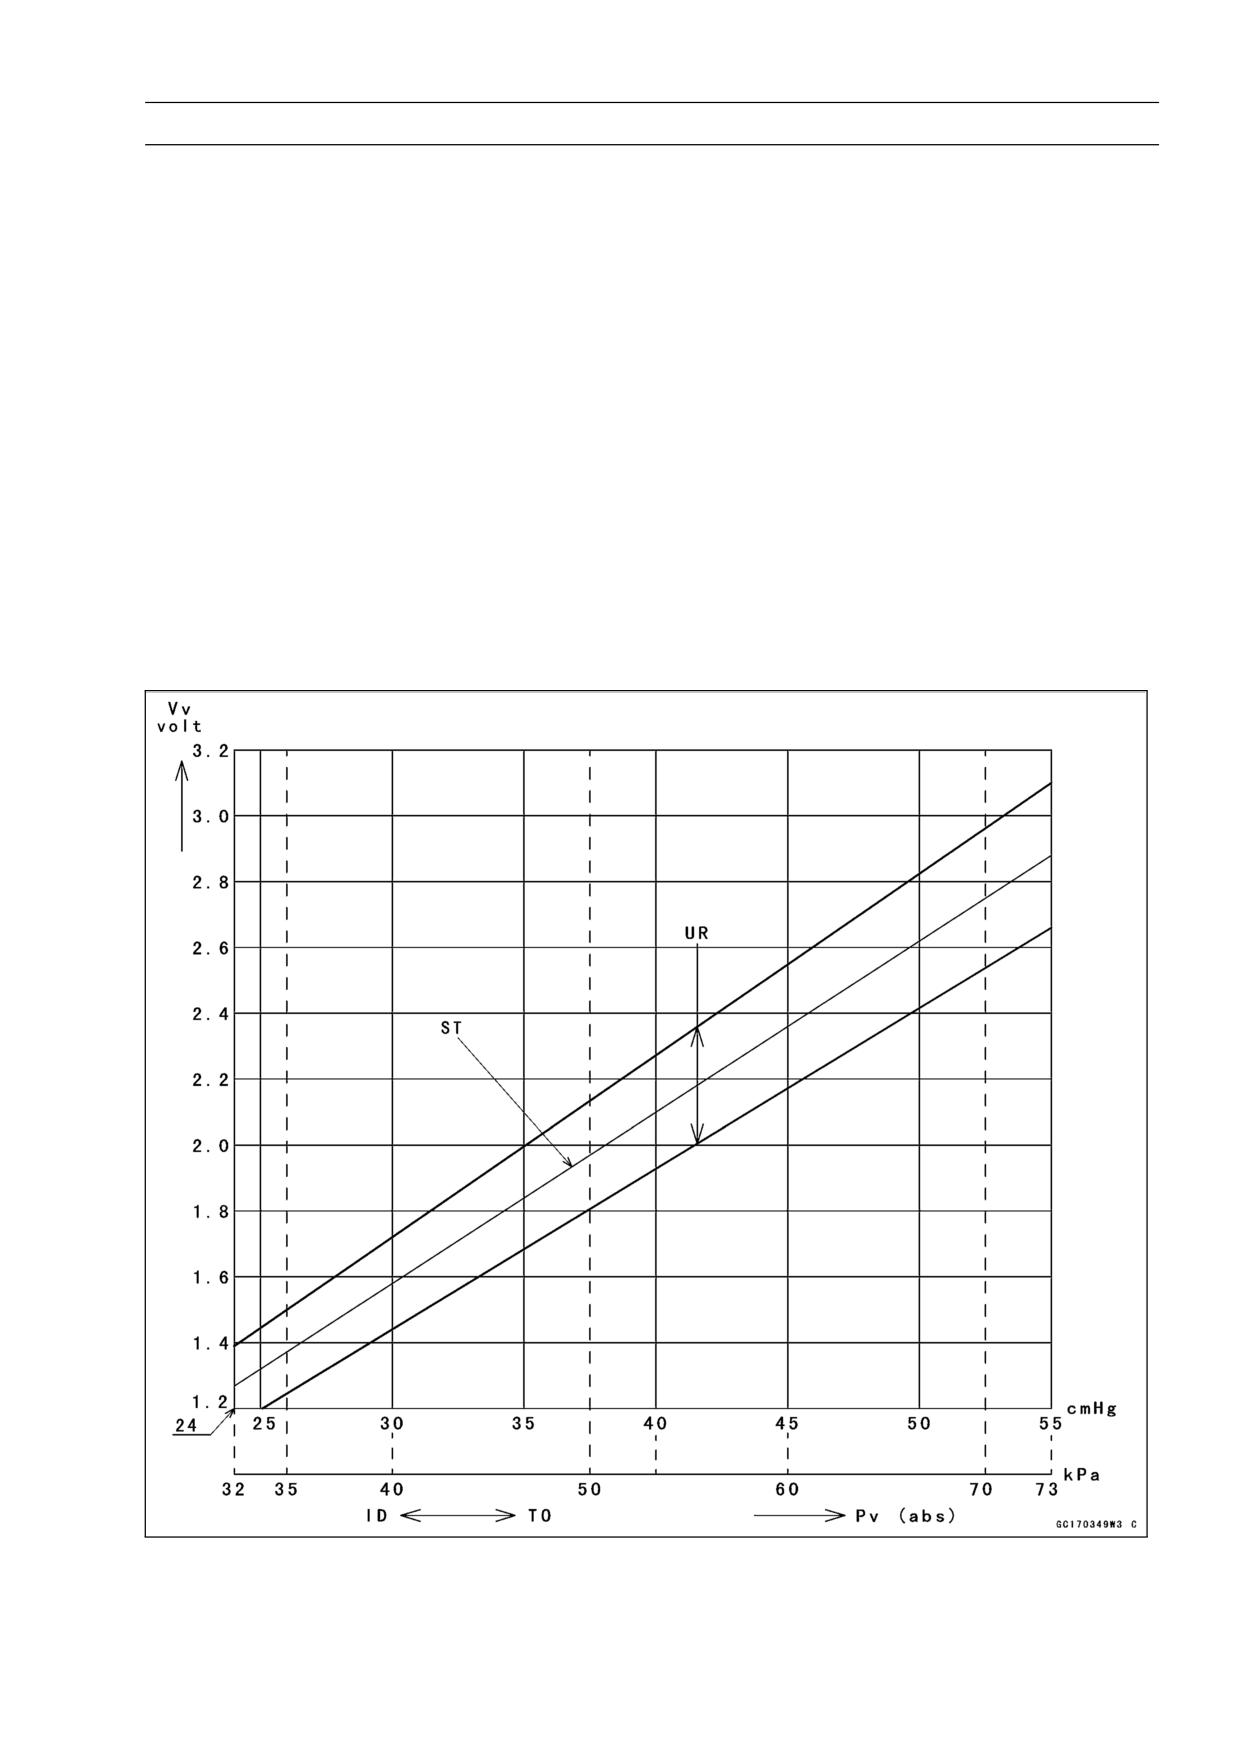
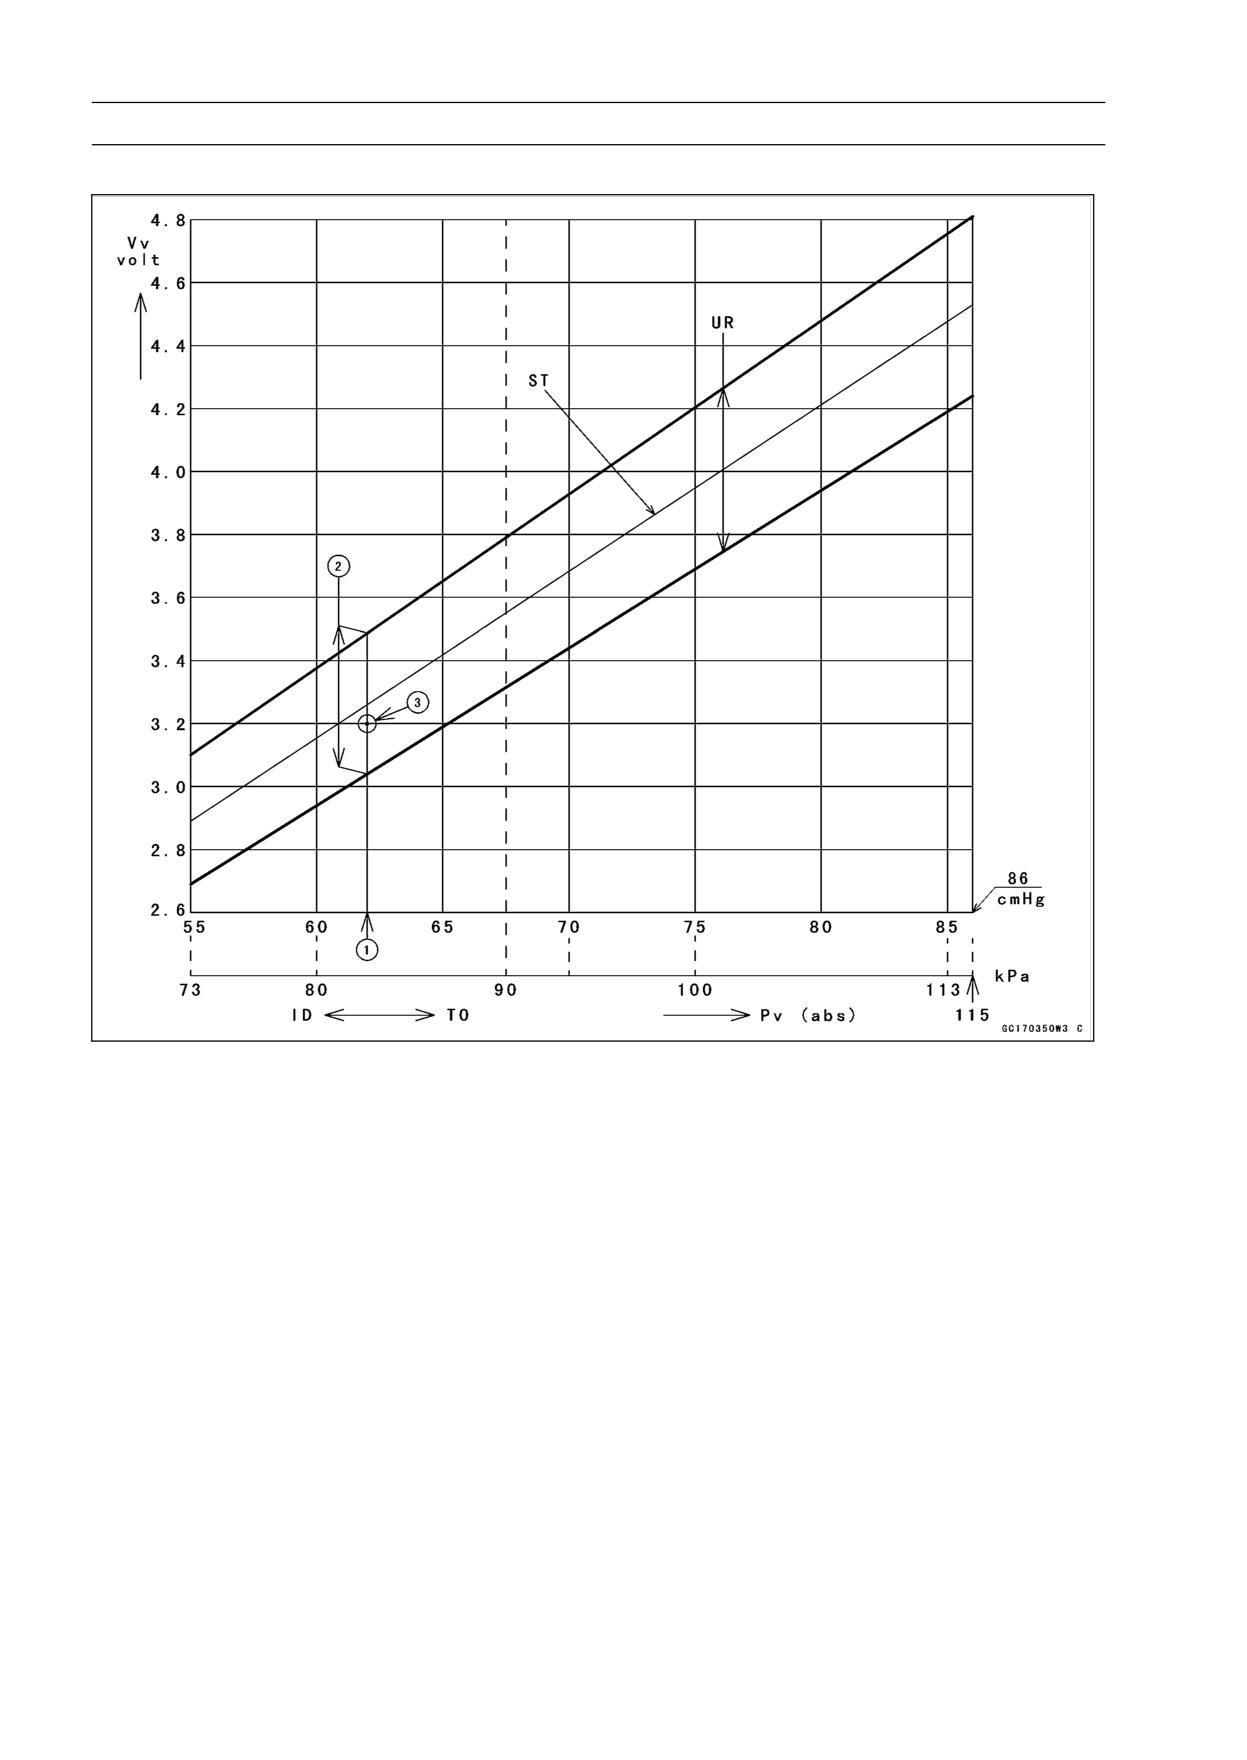
Plot this Pv (62 cmHg) at a point [1] on the chart and draw a vertical line through the point. Then, you
can get the usable range [2] of the sensor output voltage.
Usable range = 3.04 ∼ 3.49 V
Plot Vv (3.2 V) on the vertical line. → Point [3].
Results: In the chart, Vv is within the usable range and the sensor is normal.
Pv = 24 ∼ 55 cmHg
3-50 FUEL SYSTEM (DFI)
Inlet Air Pressure Sensor (Service Code 12)
Pv = 55 ∼ 86 cmHg
ID: Idling
Ps: Standard Atmospheric Pressure (Absolute)
Pv: Throttle Vacuum Pressure (Absolute)
ST: Standard of Sensor Output Voltage (V)
TO: Throttle Full Open
UR: Usable Range of Sensor Output Voltage (V)
Vv: Inlet Air Pressure Sensor Output Voltage (V) (Digital Meter Reading)
FUEL SYSTEM (DFI) 3-51
Inlet Air Pressure Sensor (Service Code 12)
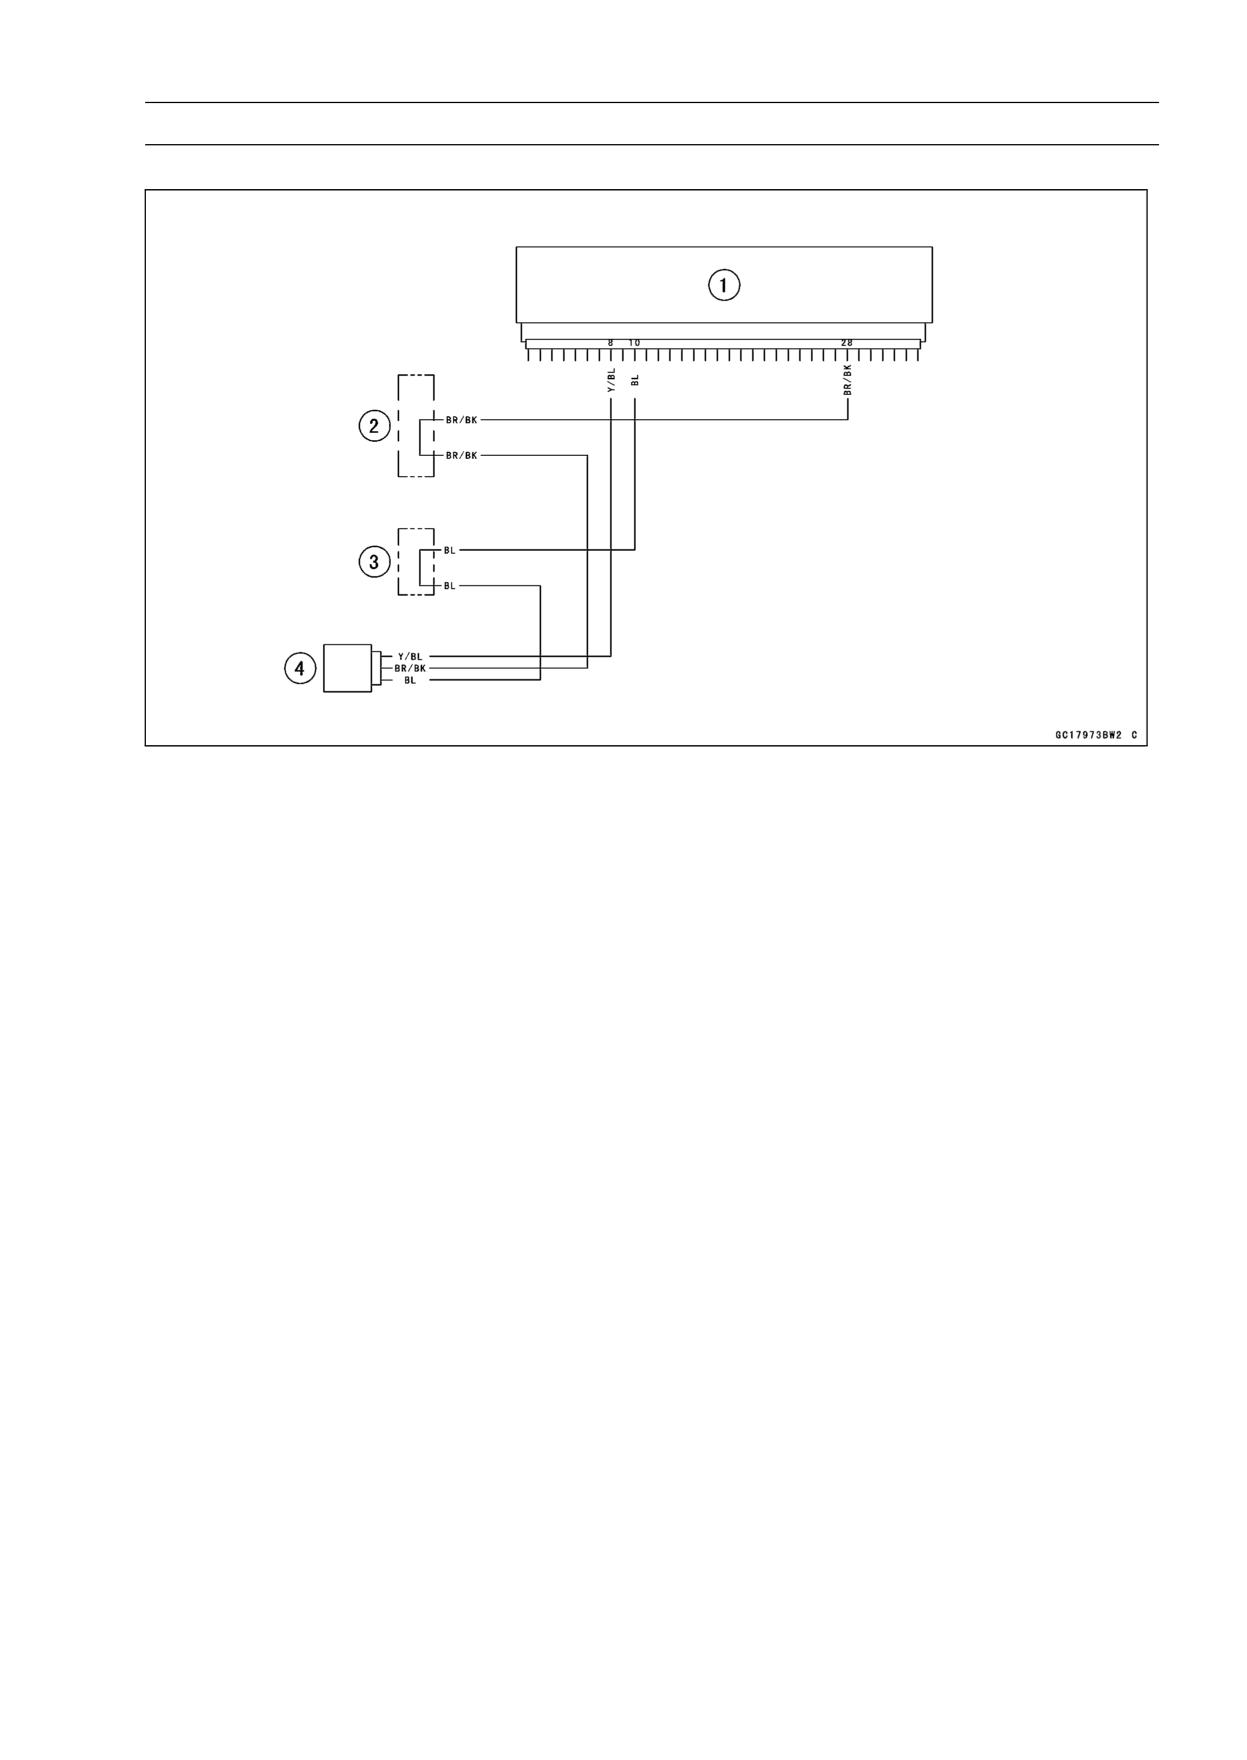
Inlet Air Pressure Sensor Circuit
1. ECU
2. Water-proof Joint E
3. Water-proof Joint D
4. Inlet Air Pressure Sensor
3-52 FUEL SYSTEM (DFI)
Inlet Air Temperature Sensor (Service Code 13)
Inlet Air Temperature Sensor Removal/Installation
CAUTION
Never drop the sensor, especially on a hard surface.
Such a shock to the sensor can damage it.
• Remove the fuel tank (see Fuel Tank Removal).
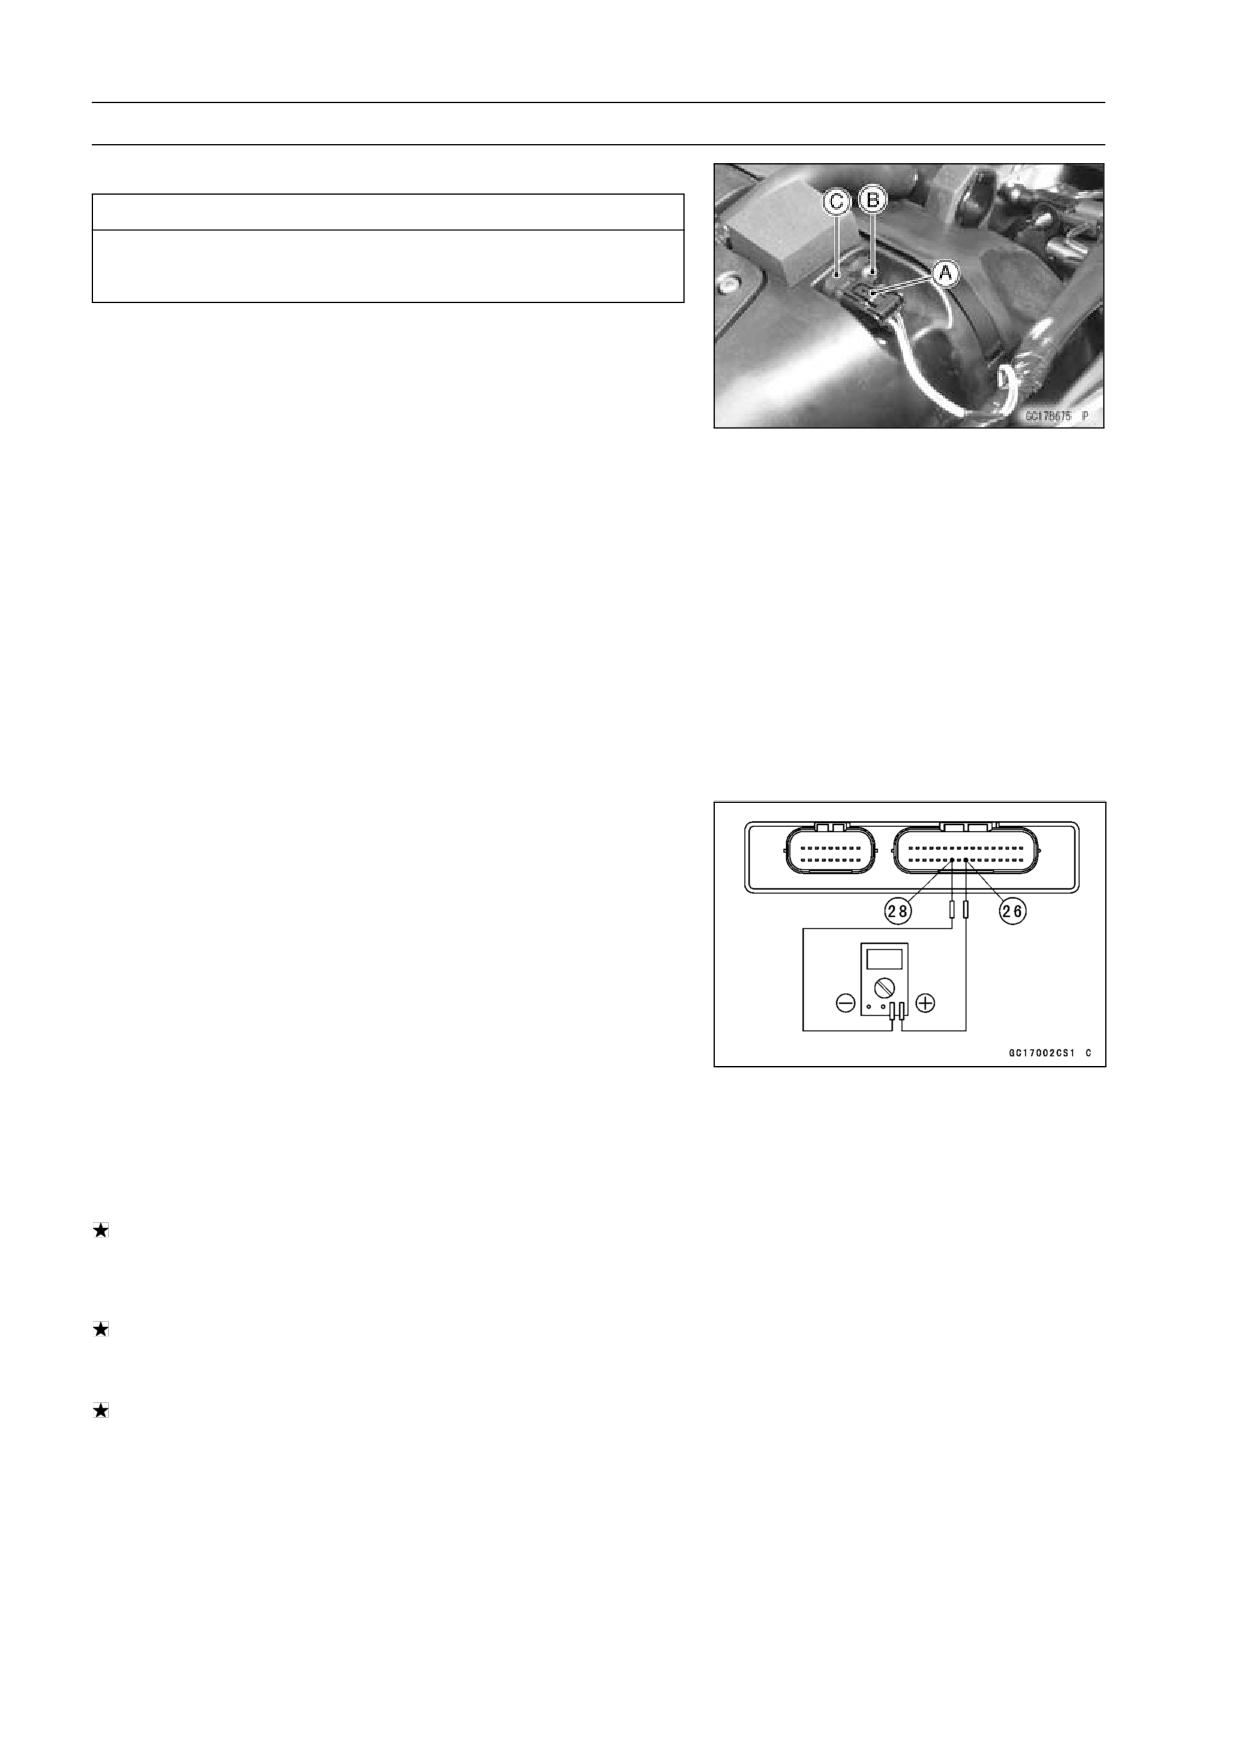
• Disconnect the connector [A] from the inlet air tempera-
ture sensor.
• Remove the screw [B].
• Pull out the inlet air temperature sensor [C].
• Put the inlet air temperature sensor into the air cleaner
housing.
• Tighten the screw securely.
Inlet Air Temperature Sensor Output Voltage
Inspection
NOTE
○Be sure the battery is fully charged.
○The output voltage changes according to the inlet air
temperature.
• Remove the ECU (see ECU Removal). Do not disconnect
the ECU connectors.
• Connect a digital voltmeter to the ECU connector, using
needle adapter set.
Special Tool - Needle Adapter Set: 57001-1457
• Measure the sensor output voltage with the engine
stopped and the connector joined.
• Turn the ignition switch ON.
Inlet Air Temperature Sensor Output Voltage
Connections to ECU Connector
Meter (+) → Y lead (terminal 26)
Meter (-) → BR/BK lead (terminal 28)
Standard: About 2.25 ∼ 2.50 V at inlet air temperature
20°C (68°F)
• Turn the ignition switch OFF.
If the output voltage is out of the standard, remove the
fuel tank and check the wiring. And if the output voltage
is 4.8 V, the ECU is normal.
If the output voltage is within the standard, check the ECU
for its ground, and power supply (see ECU Power Supply
Inspection).
If the wiring is good, check the sensor resistance.
• Remove the needle adapter set, and apply silicone
sealant to the seals of the connector for waterproofing.
Sealant - Kawasaki Bond (Silicone Sealant): 56019-120
FUEL SYSTEM (DFI) 3-53
Inlet Air Temperature Sensor (Service Code 13)
Inlet Air Temperature Sensor Resistance
Inspection
• Remove the inlet air temperature sensor (see Inlet Air
Temperature Sensor Removal/Installation).
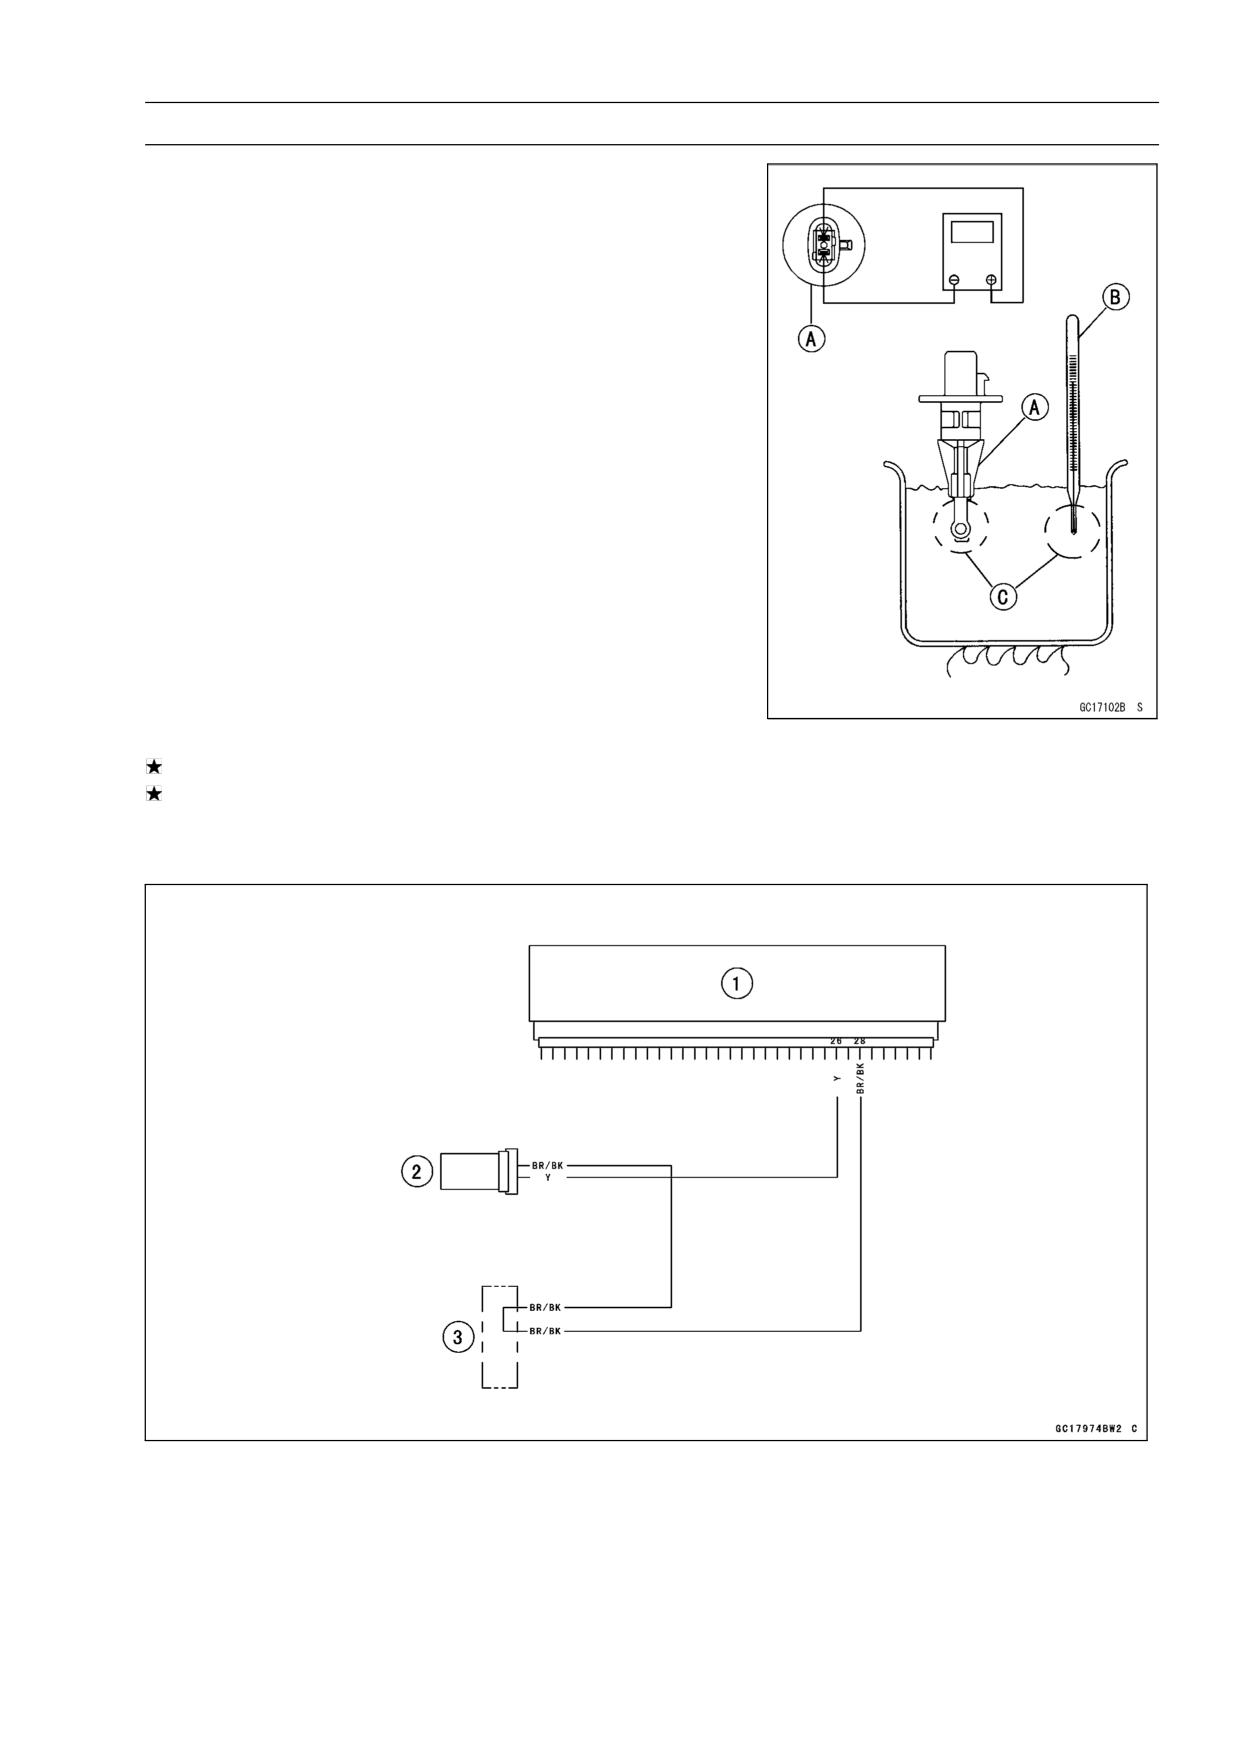
• Suspend the sensor [A] in a container of machine oil so
that the heat-sensitive portion is submerged.
• Suspend a thermometer [B] with the heat-sensitive por-
tion [C] located in almost the same depth with the sensor.
NOTE
○The sensor and thermometer must not touch the con-
tainer side or bottom.
• Place the container over a source of heat and gradually
raise the temperature of the oil while stirring the oil gently
for even temperature.
• Using a digital meter, measure the internal resistance
of the sensor across the terminals at the temperatures
shown in the table.
Inlet Air Temperature Sensor Resistance
Standard:
5.4 ∼ 6.6 kΩ at 0°C (68°F)
0.29 ∼ 0.39 kΩ at 80°C (176°F)
If the measurement is out of the range, replace the sensor.
If the measurement is within the specified, replace the
ECU.
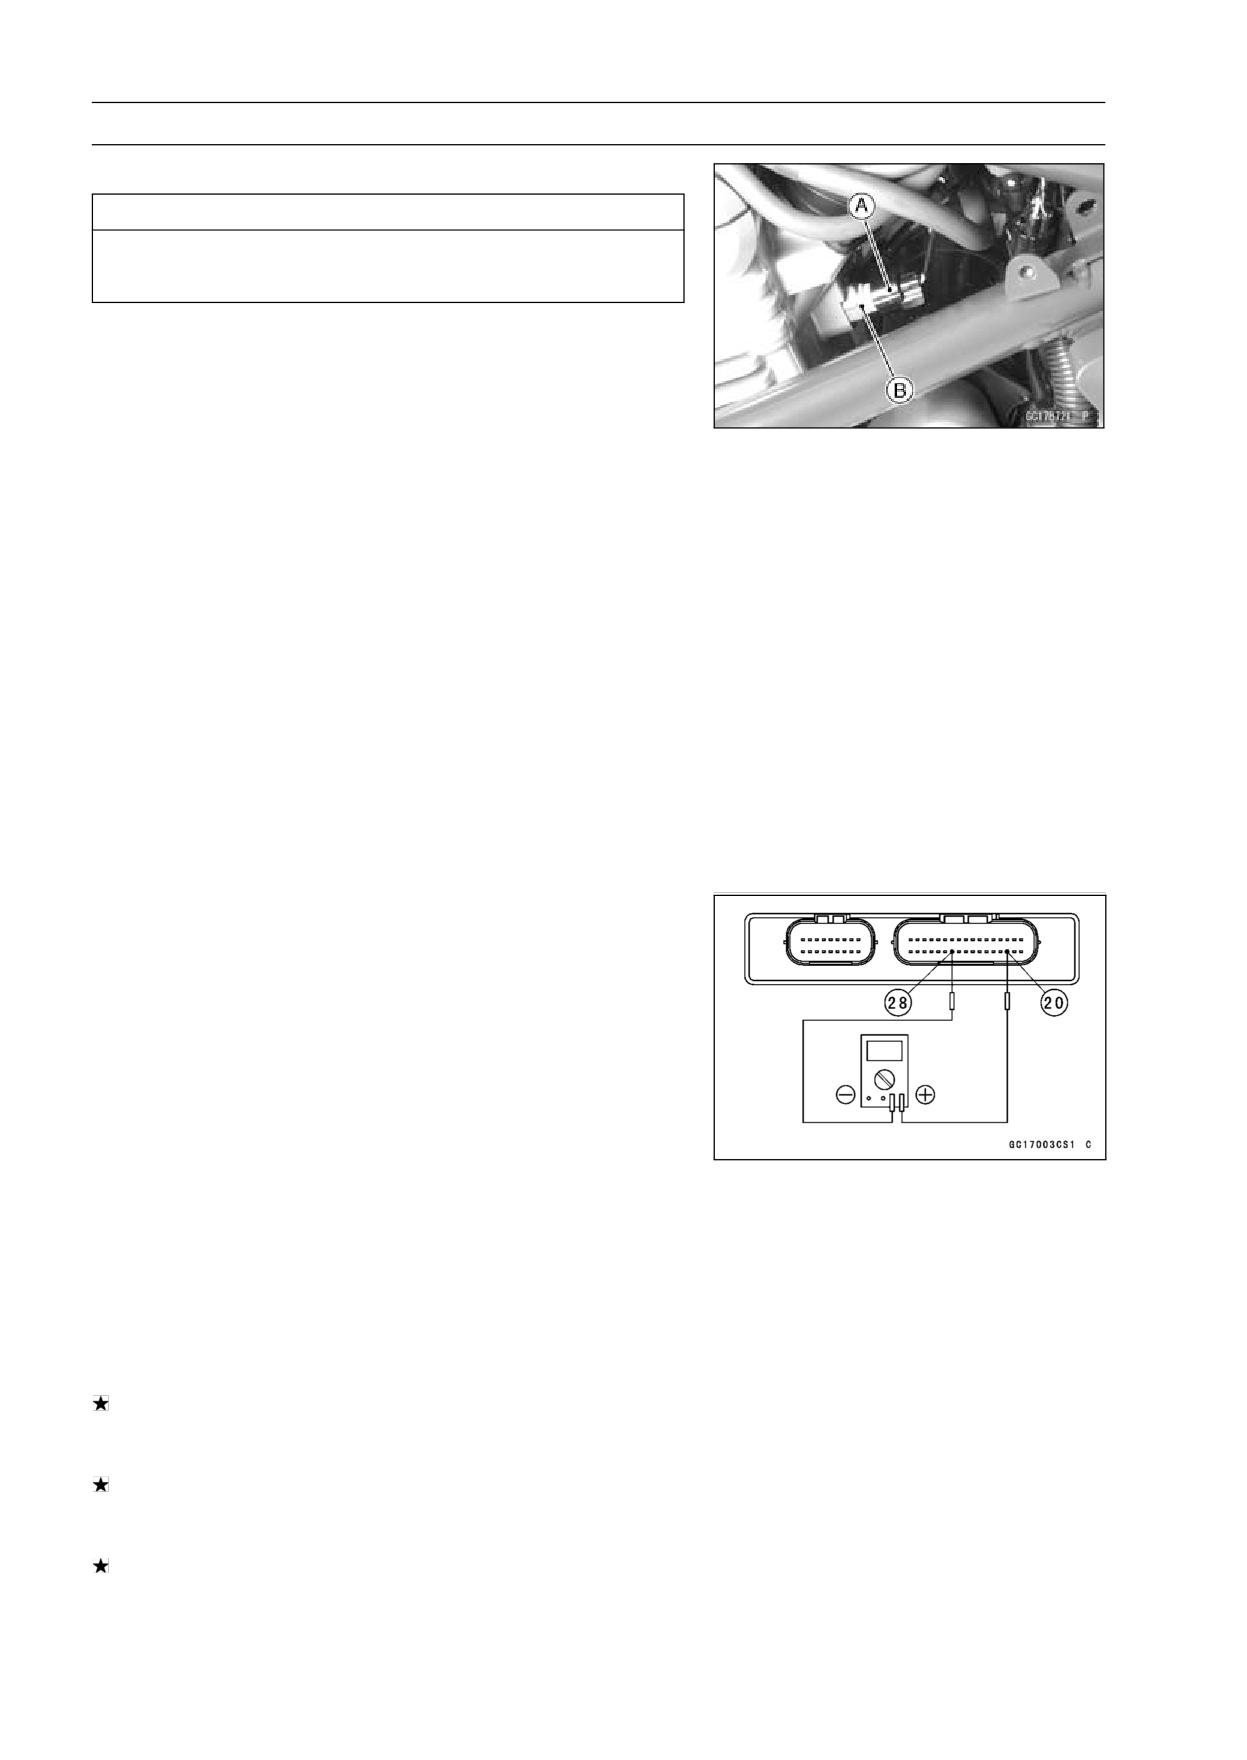
Inlet Air Temperature Sensor Circuit
1. ECU
2. Inlet Air Temperature Sensor
3. Water-proof Joint E
3-54 FUEL SYSTEM (DFI)
Water Temperature Sensor (Service Code 14)
Water Temperature Sensor Removal/Installation
CAUTION
Never drop the sensor, especially on a hard surface.
Such a shock to the sensor can damage it.
• Drain the coolant (see Coolant Change in the Periodic
Maintenance chapter).
• Remove the left center fairing (see Center Fairing Re-
moval in the Frame chapter).
• Disconnect the sensor connector [A], and unscrew the
water temperature sensor [B].
Torque - Water Temperature Sensor: 12 N·m (1.2 kgf·m, 106
in·lb)
• Apply grease to new O-ring on the water temperature sen-
sor.
• Fill the engine with coolant and bleed the air from the cool-
ing system (see Coolant Change in the Periodic Mainte-
nance chapter).
Water Temperature Sensor Output Voltage
Inspection
NOTE
○Be sure the battery is fully charged.
• Remove the ECU (see ECU Removal). Do not disconnect
the connectors.
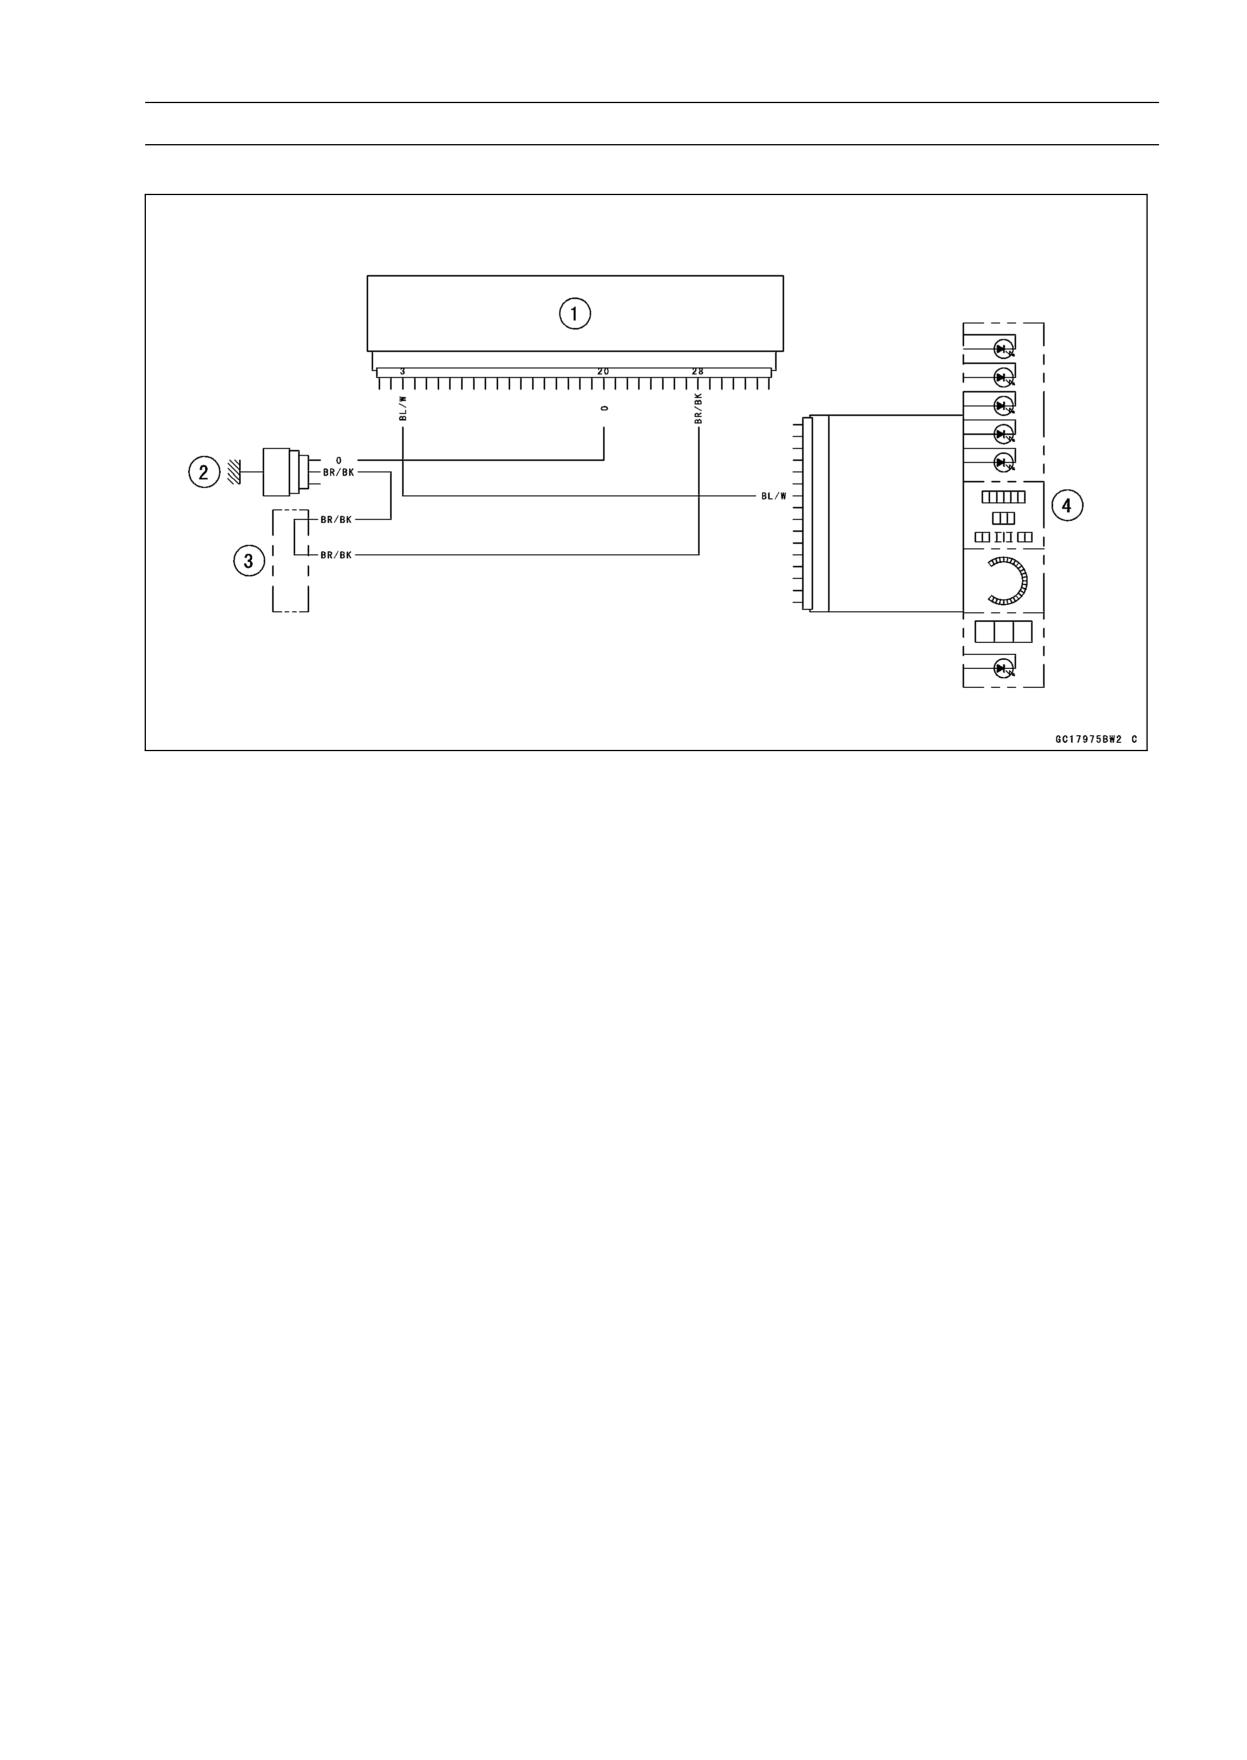
• Connect a digital voltmeter [A] to the ECU connector [B]
with the needle adapter set.
Special Tool - Needle Adapter Set: 57001-1457
• Measure the sensor output voltage with the engine
stopped and the connector joined.
• Turn the ignition switch ON.
Water Temperature Sensor Output Voltage
Connections to ECU
Meter (+) → O lead (terminal 20)
Meter (-) → BR/BK lead (terminal 28)
Standard:
About 2.80 ∼ 2.97 V at 20°C (68°F)
NOTE
○The output voltage changes according to the coolant
temperature in the engine.
• Turn the ignition switch OFF.
If the output voltage is within the standard, check the ECU
for its ground, and power supply (see ECU Power Supply
Inspection).
If the output voltage is out of the standard, check the
wiring. And if the output voltage is 4.8 V, the ECU is nor-
mal.
If the wiring is good, check the water temperature sensor
resistance.
• Remove the needle adapter set, and apply silicone
sealant to the seals of the connector for waterproofing.
Sealant - Kawasaki Bond (Silicone Sealant): 56019-120
FUEL SYSTEM (DFI) 3-55
Water Temperature Sensor (Service Code 14)
Water Temperature Sensor Circuit
1. ECU
2. Water Temperature Sensor
3. Water-proof Joint E
4. Meter Unit
Water Temperature Sensor Resistance Inspection
• Remove the water temperature sensor (see Water Tem-
perature Sensor Removal/Installation).
• Refer to the Water Temperature Sensor Inspection in the
Electrical System chapter.
3-56 FUEL SYSTEM (DFI)
Crankshaft Sensor (Service Code 21)
Start the engine and switch the diagnosis mode to Dealer
1 mode to know all the problem that the DFI system has at
the time of self-diagnosis. If the engine cannot be started,
the self-diagnosis system does not detect dynamic condi-
tion of the crankshaft sensor. In this case, turn off the igni-
tion switch and turn it on again to enter the Dealer 2 mode.
In this mode, the system tells all the troubles which the DFI
system had in both static and dynamic conditions.
Crankshaft Sensor Removal/Installation
• Refer to the Crankshaft Sensor Removal/Installation in
the Electrical System chapter.
Crankshaft Sensor Inspection
○The crankshaft sensor has no power source, and when
the engine stops, the crankshaft sensor generates no sig-
nals.
• Crank the engine and measure the peak voltage of the
crankshaft sensor (see Crankshaft Sensor Inspection in
the Electrical System) in order to check the sensor.
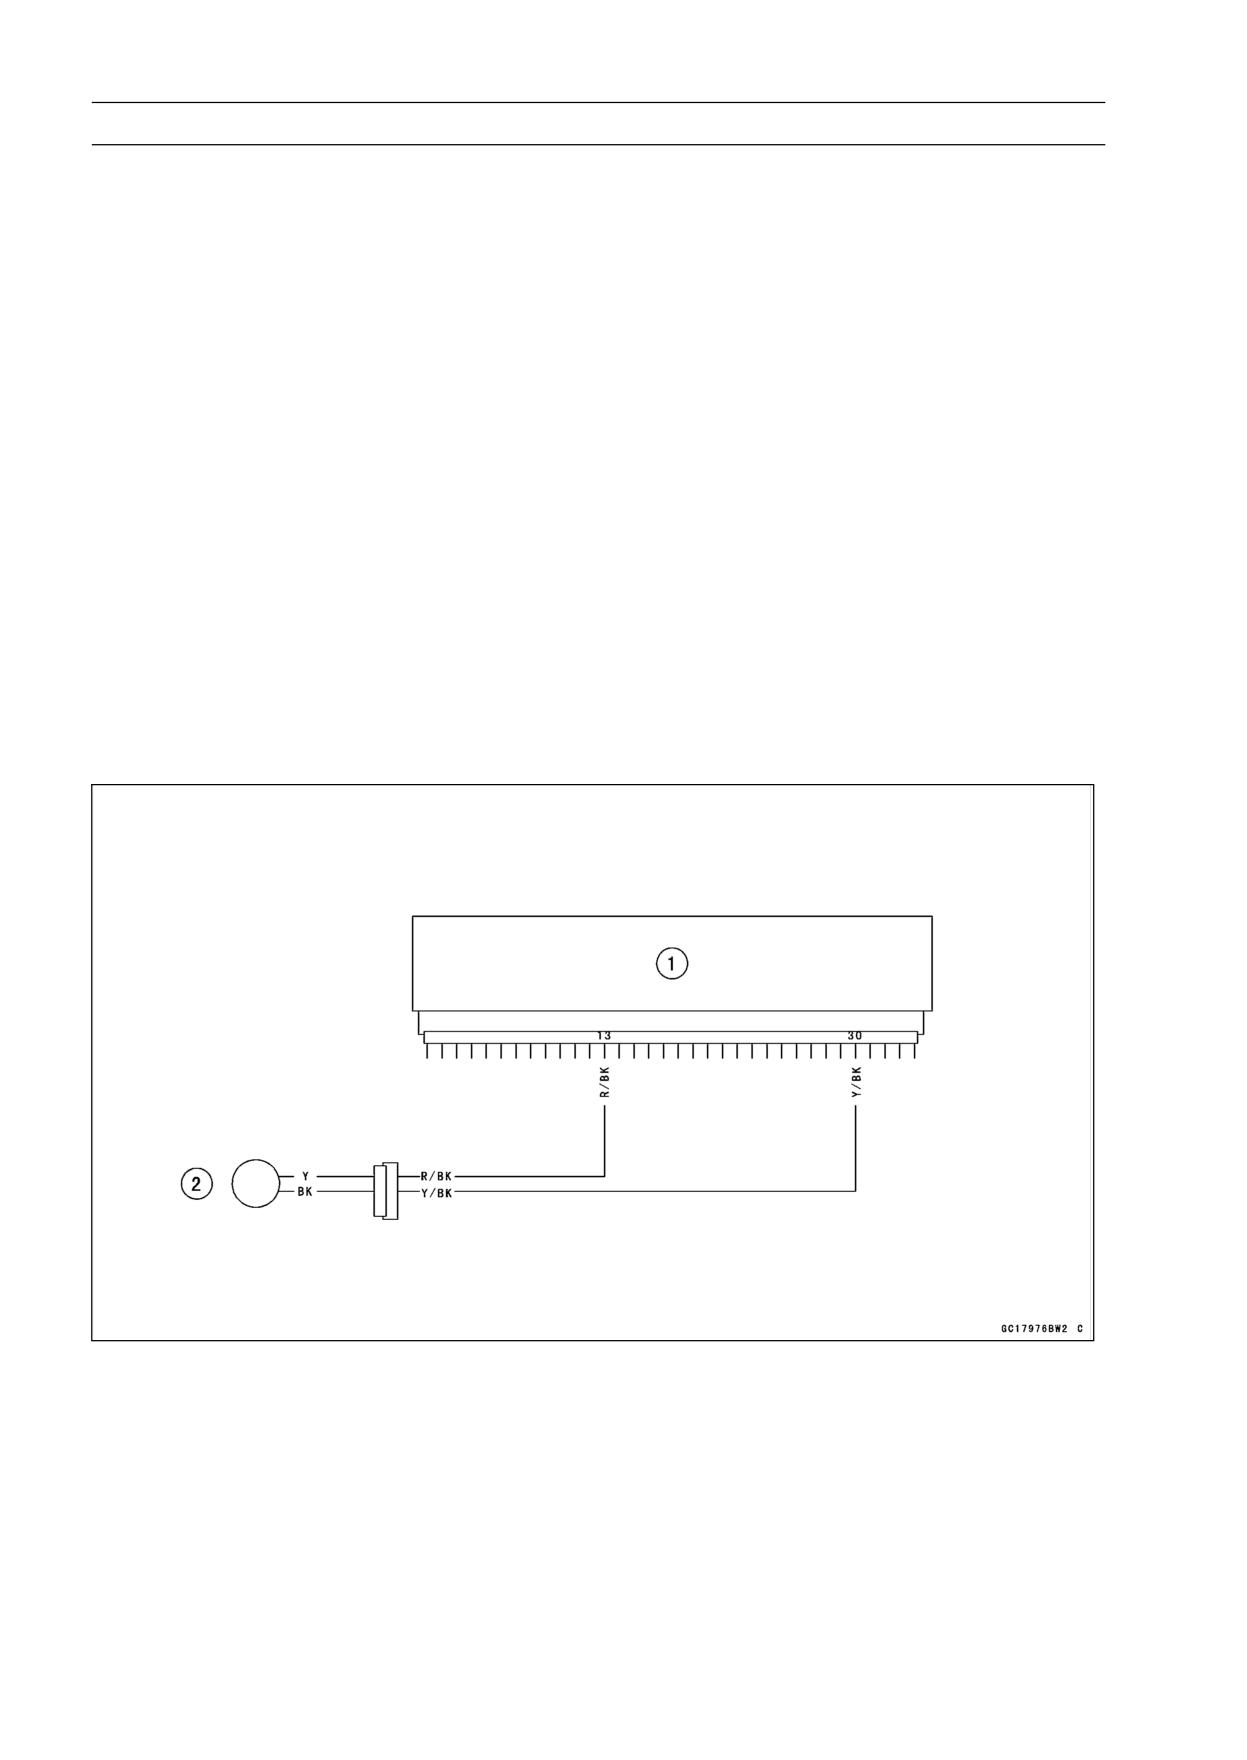
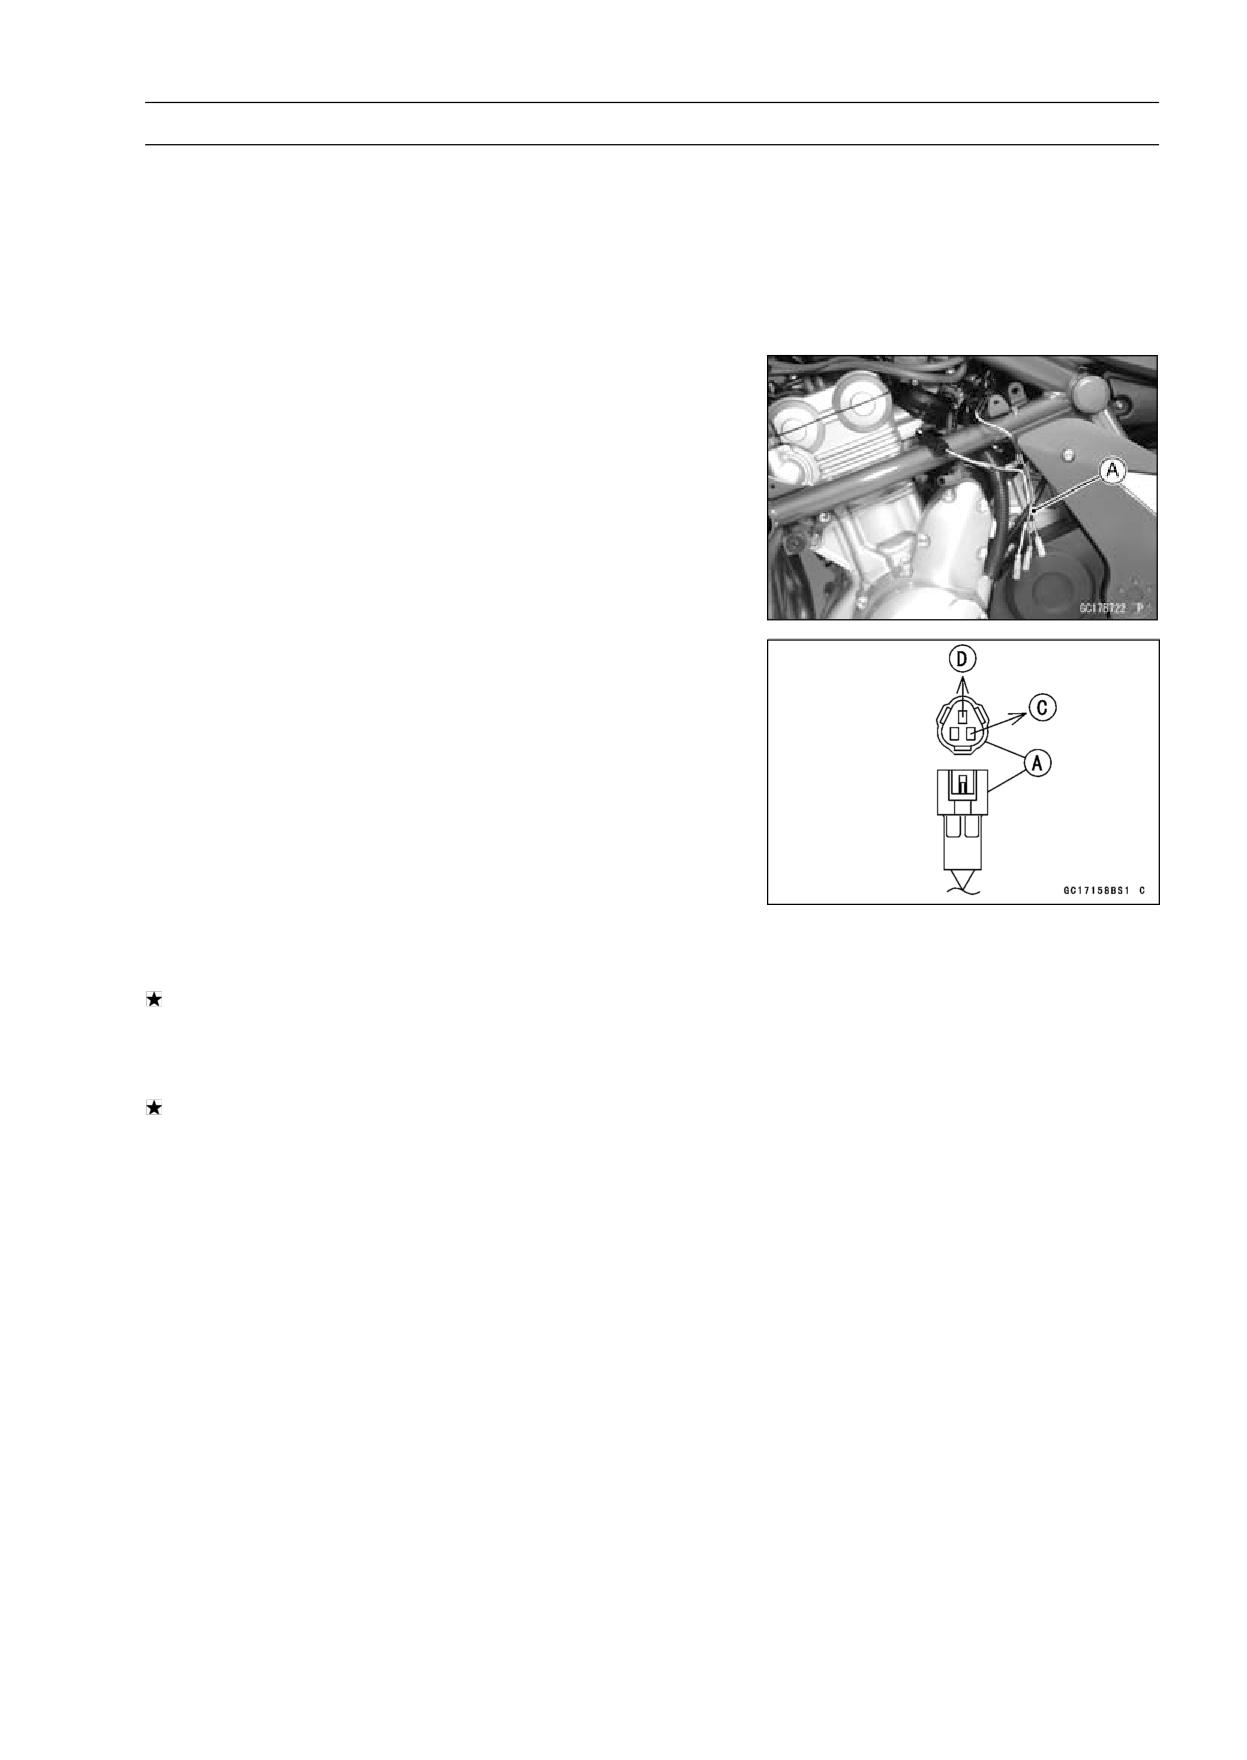
• Check the wiring for continuity, using the following dia-
gram.
Crankshaft Sensor Circuit
1. ECU
2. Crankshaft Sensor
FUEL SYSTEM (DFI) 3-57
Speed Sensor (Service Code 24, 25)
Speed Sensor Removal/Installation
• Refer to the Speed Sensor Removal/Installation in the
Electrical System chapter.
Speed Sensor Inspection
• Refer to the Speed Sensor Inspection in the Electrical
System chapter.
Speed Sensor Input Voltage Inspection
NOTE
○Be sure the battery is fully charged.
• Turn the ignition switch OFF.
• Remove the left center fairing (see Center Fairing Re-
moval in the Frame chapter).
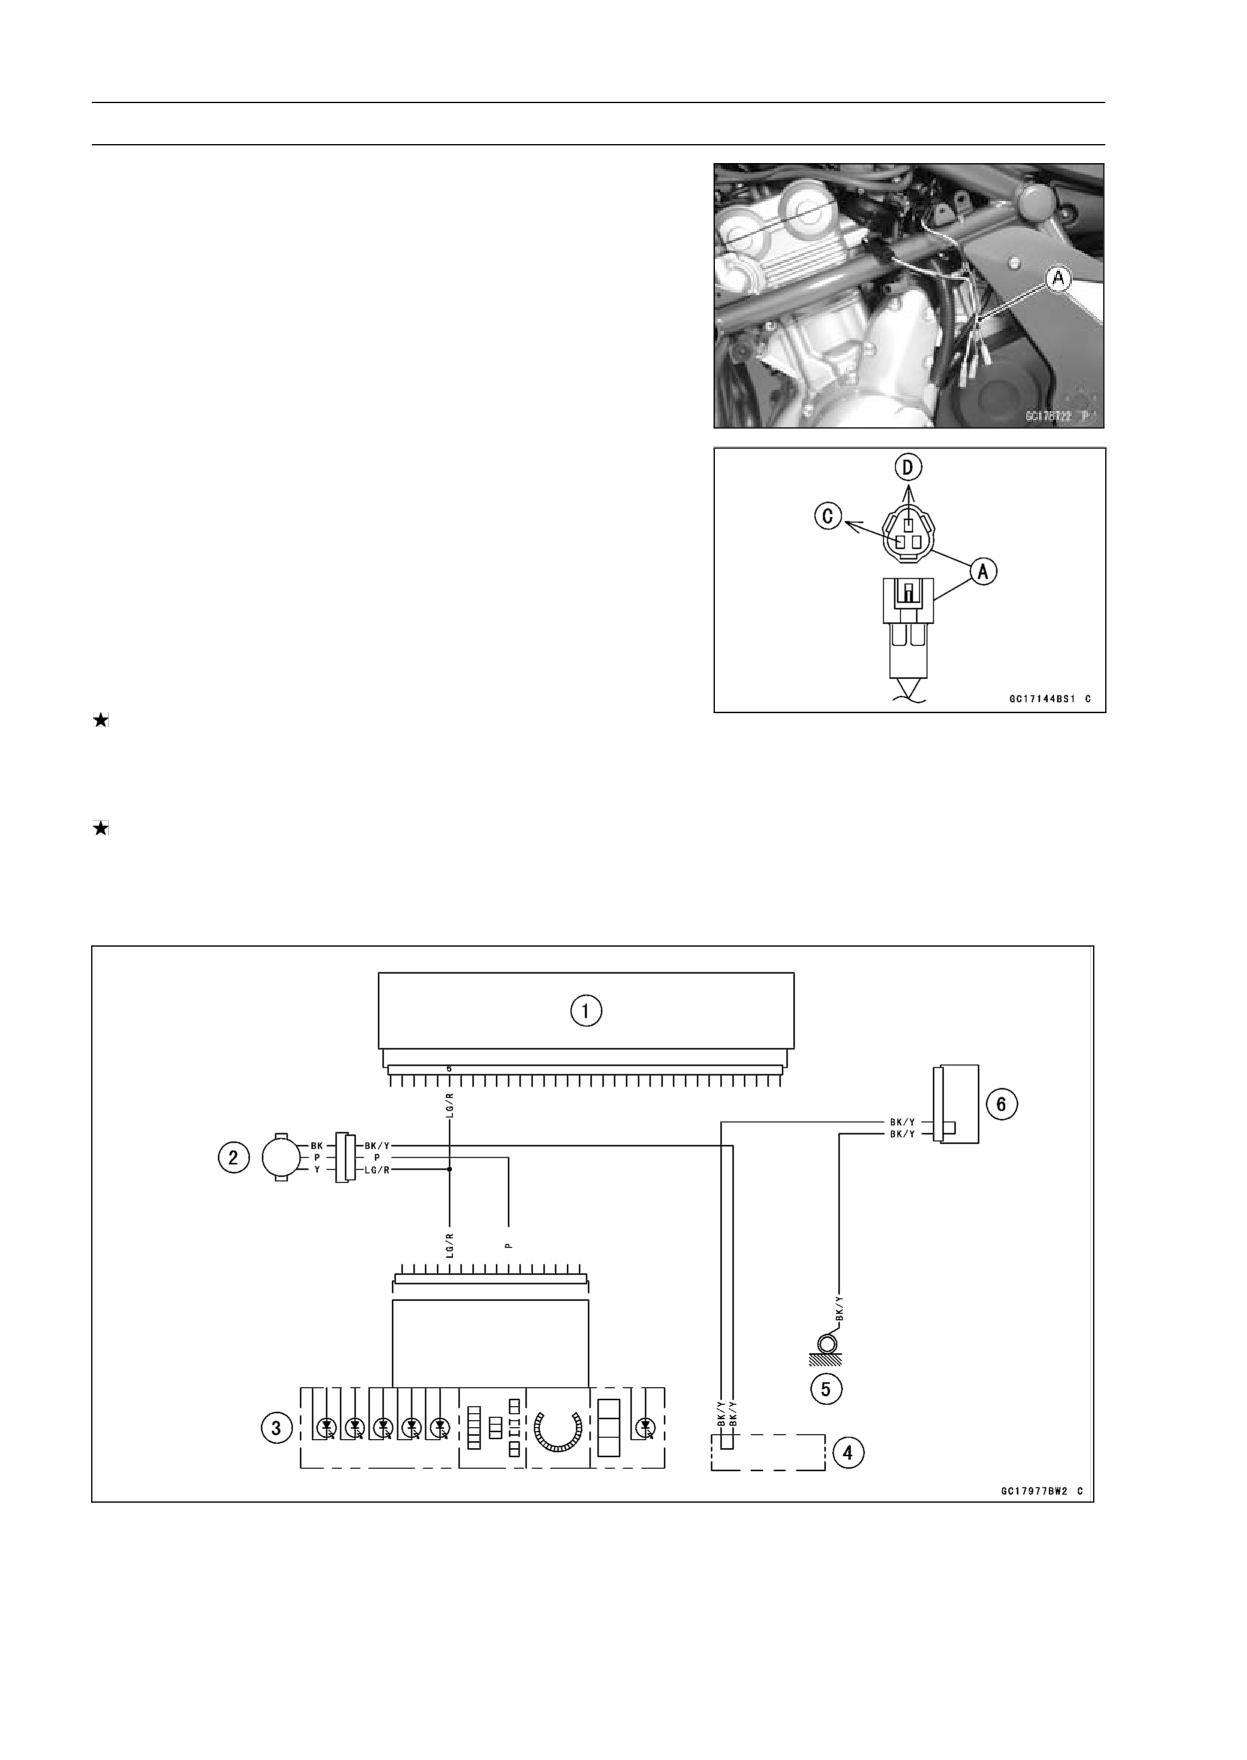
• Disconnect the speed sensor connector and connect the
harness adapter [A] between the harness connector and
speed sensor connector.
• Connect a digital meter to the harness adapter leads.
Special Tool - Throttle Sensor Setting Adapter #1: 57001
-1400
• Measure the sensor input voltage with the engine
stopped, and with the connector joined.
• Turn the ignition switch ON.
Speed Sensor Input Voltage
Connection to Adapter
Meter (+) → BL (sensor P) lead [C]
Meter (-) → BK (sensor BK/Y) lead [D]
Standard:
About 9 ∼ 11 V DC at Ignition Switch ON
If the reading is out of the range, check the wiring (see
wiring diagram in this section), and meter (see Electronic
Combination Meter Unit Inspection in the Electrical Sys-
tem chapter).
If the reading is good, check the output voltage.
• Turn the ignition switch OFF.
Speed Sensor Output Voltage Inspection
• Before this inspection, inspect the input voltage (see
Speed Sensor Input Voltage Inspection).
NOTE
○Be sure the battery is fully charged.
• Turn the ignition switch OFF.
3-58 FUEL SYSTEM (DFI)
Speed Sensor (Service Code 24, 25)
• Disconnect the speed sensor connector and connect the
harness adapter [A] between the harness connector and
speed sensor connector.
• Connect a digital meter to the harness adapter leads.
Special Tool - Throttle Sensor Setting Adapter #1: 57001
-1400
• Measure the sensor output voltage with the engine
stopped, and with the connector joined.
• Turn the ignition switch ON.
Speed Sensor Output Voltage at Sensor
Connections to Adapter
Meter (+) → Y/W (sensor LG/R) lead [C]
Meter (-) → BK (sensor BK/Y) lead [D]
Standard:
About 0.05 ∼ 0.07 V DC
NOTE
○If you rotate the engine sprocket, the output voltage will
be increased.
If the reading is out of the range, check the speed sensor
operation (see Speed Sensor Inspection in the Electrical
System chapter) and the wiring to ECU (see wiring dia-
gram in this section).
If the reading, speed sensor operation and wiring are
good, check the ECU for its ground, and power supply
(see ECU Power Supply Inspection).
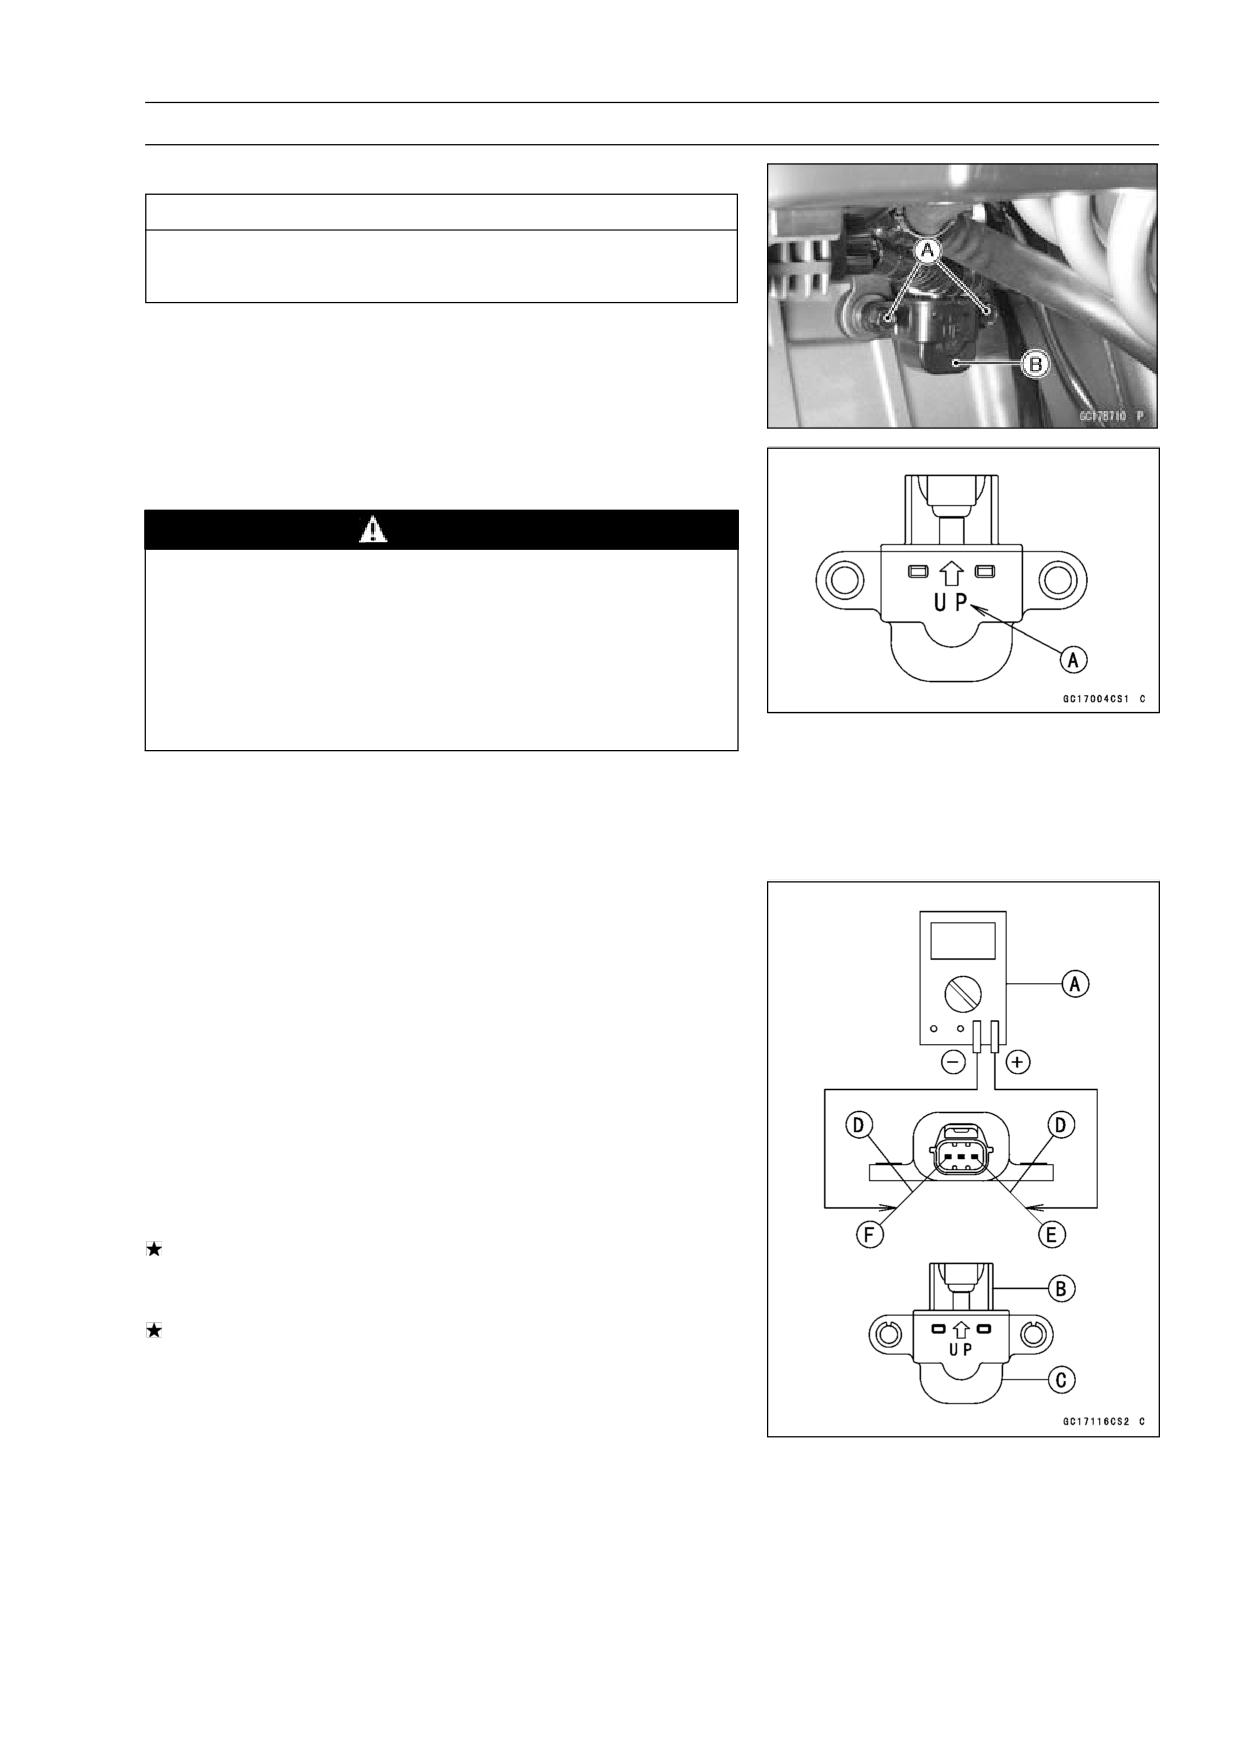
Speed Sensor Circuit
1. ECU
2. Speed Sensor
3. Meter Unit
4. Water-proof Joint B
5. Frame Ground
6. Joint Connector
FUEL SYSTEM (DFI) 3-59
Vehicle-down Sensor (Service Code 31)
Vehicle-down Sensor Removal
CAUTION
Never drop the down-sensor, especially on a hard
surface. Such a shock to the sensor can damage it.
• Remove:
Bolts [A]
Connector and Vehicle-down Sensor [B]
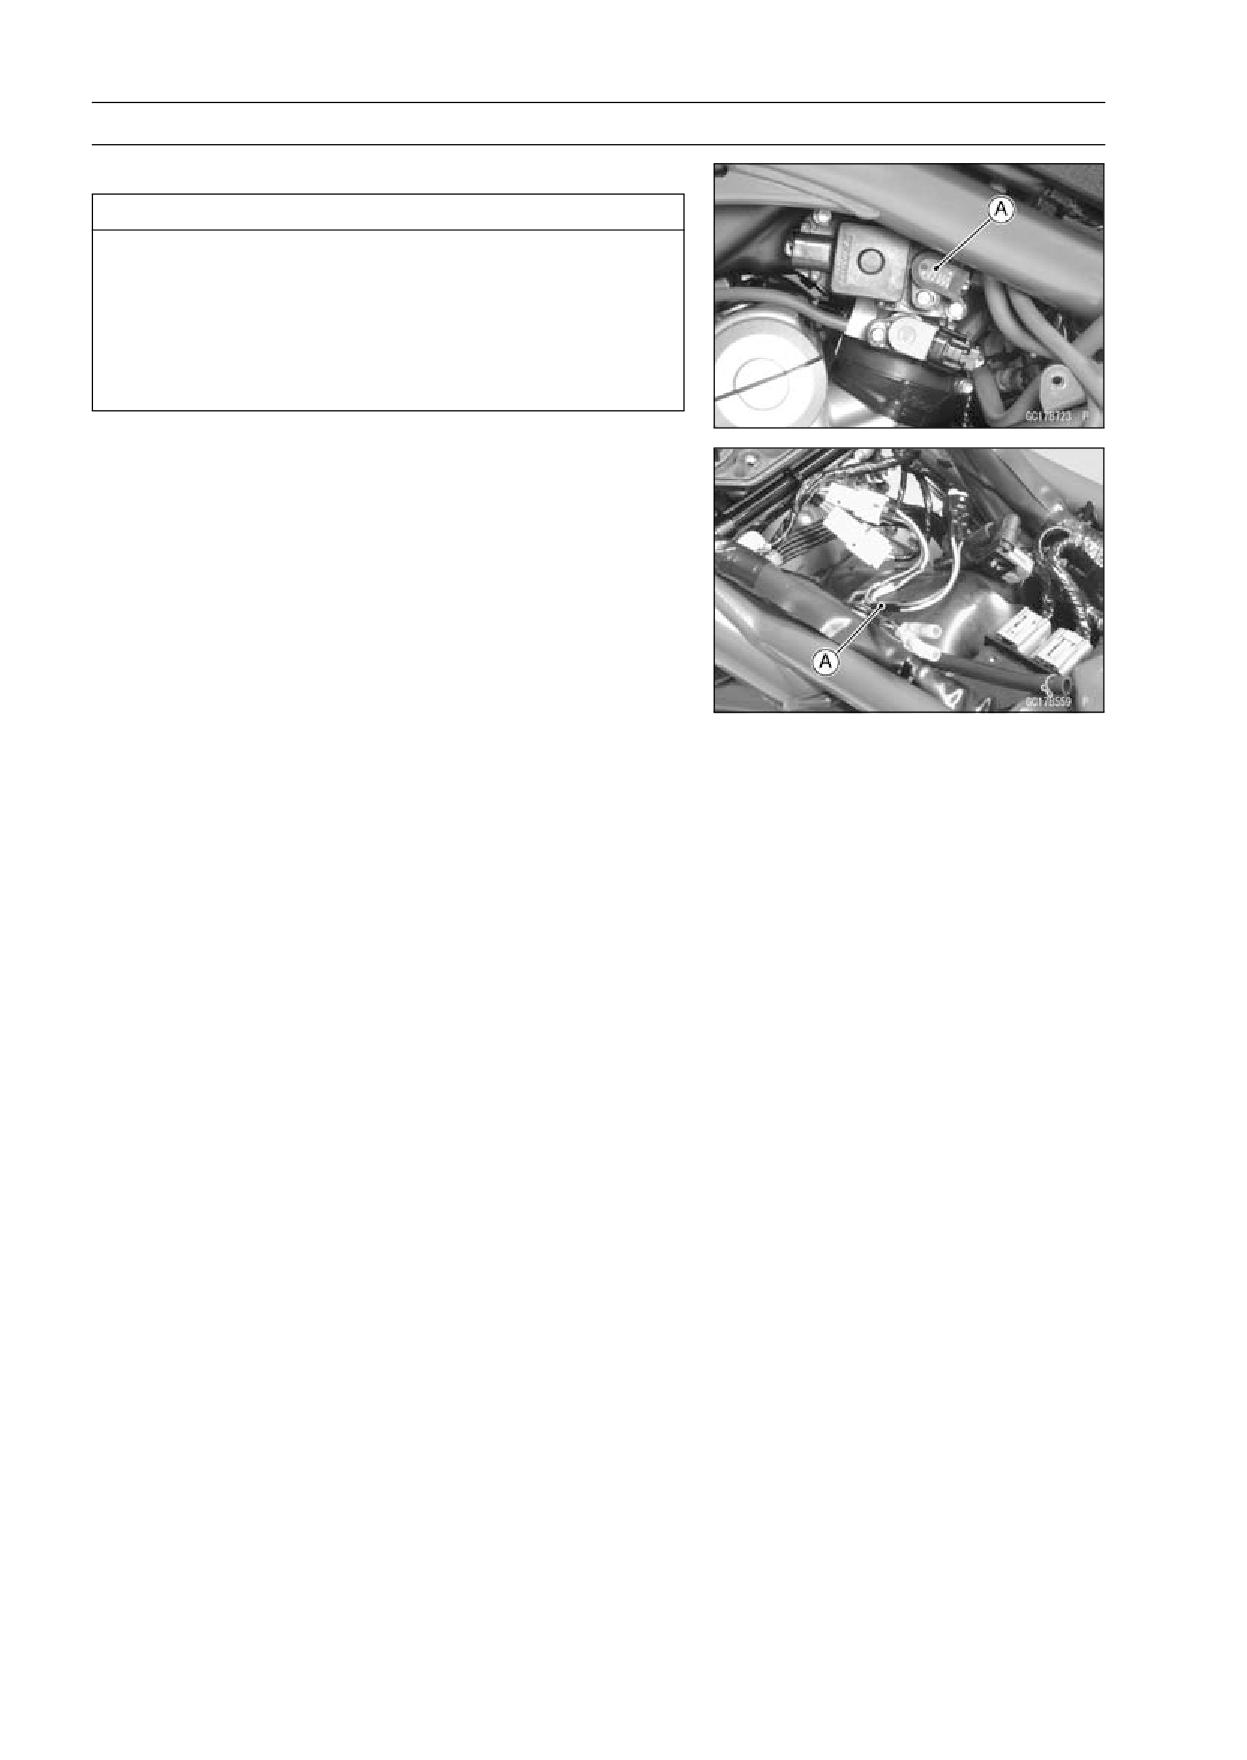
Vehicle-down Sensor Installation
• The UP mark [A] of the sensor should face upward.
WARNING
Incorrect installation of the vehicle-down sensor
could cause sudden loss of engine power. The
rider could lose balance during certain riding situ-
ations like leaning over in a turn with the potential
for an accident resulting in injury or death. Ensure
that the down sensor is held in place by the sensor
brackets.
Vehicle-down Sensor Inspection
NOTE
○Be sure the battery is fully charged.
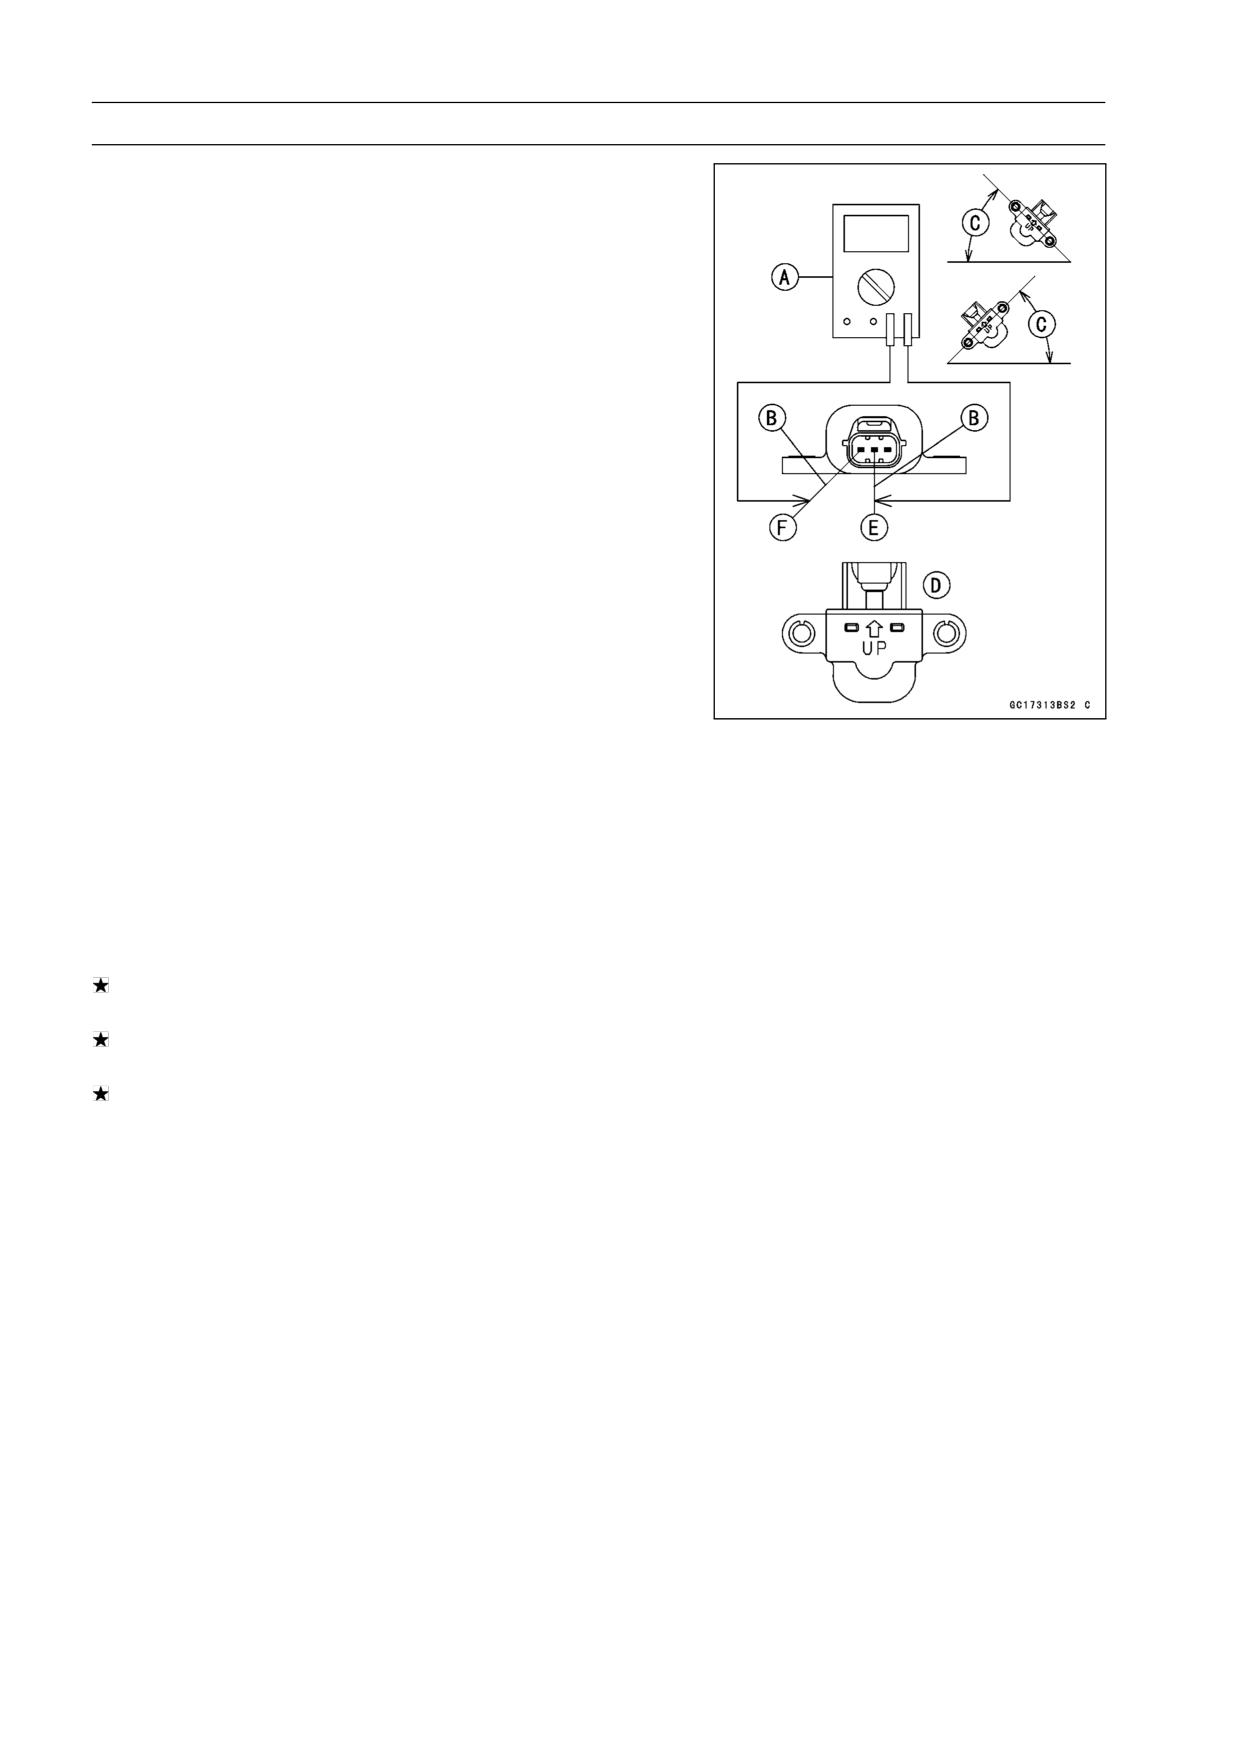
• Connect a digital volt meter [A] to the connector [B] of the
vehicle-down sensor [C] with the needle adapter set [D].
Vehicle-down Sensor Power Source Voltage
Connections to Sensor
Meter (+) → BL lead [E]
Meter (-) → BR/BK lead [F]
• Turn the ignition switch ON, and measure the power
source voltage with the connector joined.
Vehicle-down Sensor Input Voltage
Standard:
4.75 ∼ 5.25 V DC
• Turn the ignition switch OFF.
If the reading of input voltage is less than the standard,
check the ECU for its ground, power supply and wiring
shorted.
If the power source is normal, check the output voltage.
3-60 FUEL SYSTEM (DFI)
Vehicle-down Sensor (Service Code 31)
• Remove the sensor (see Vehicle-down Sensor Removal).
• Connect a digital volt meter [A] to the connector with nee-
dle adapter set [B].
Special Tool - Needle Adapter Set: 57001-1457
Vehicle-down Sensor Output Voltage
Connections to Sensor
Meter (+) → Y/G lead [E]
Meter (-) → BR/BK lead [F]
• Hold the sensor vertically.
• Turn the ignition switch ON, and measure the output volt-
age with the connector joined.
○Tilt the sensor 60 ∼ 70° or more [C] right or left, then hold
the sensor almost vertical with the arrow mark pointed up
[D], and measure the output voltage.
Output Voltage at Sensor
Standard:
with sensor tilted 60 ∼ 70° or more right
or left: 0.65 ∼ 1.35 V
with sensor arrow mark pointed up:
3.55 ∼ 4.45 V
NOTE
○If you need to test again, turn the ignition switch OFF,
and then ON.
• Turn the ignition switch OFF.
• Remove the needle adapter set, and apply silicone
sealant to the seals of the connector for waterproofing.
Sealant - Kawasaki Bond (Silicone Sealant): 56019-120
If the output voltage is normal, the wiring is suspect.
Check the wiring.
If the wiring is good, check the ECU for its ground and
power supply (see ECU Power Supply Inspection).
If the output voltage is out of the specified, replace the
vehicle-down sensor.
FUEL SYSTEM (DFI) 3-61
Vehicle-down Sensor (Service Code 31)
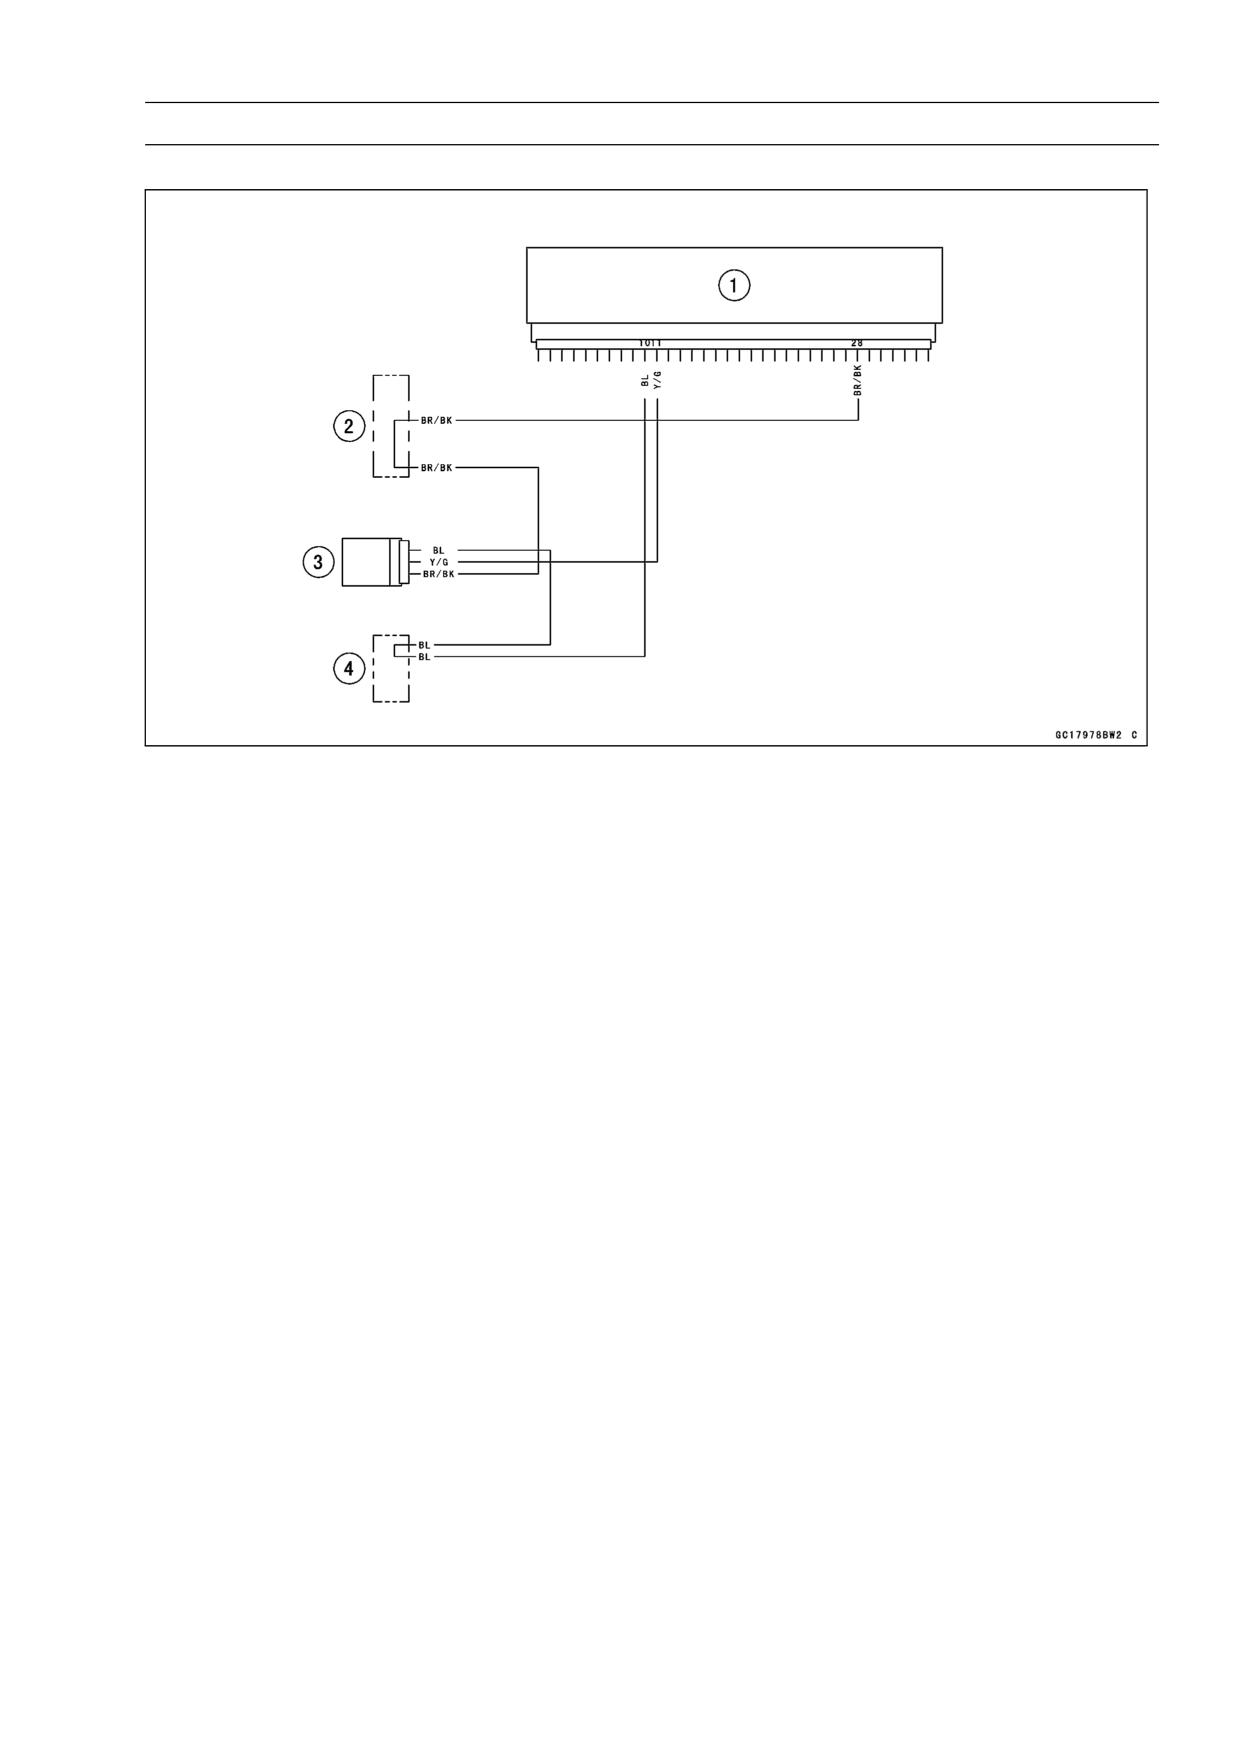
Vehicle-down Sensor Circuit
1. ECU
2. Water-proof Joint E
3. Vehicle-down Sensor
4. Water-proof Joint D
3-62 FUEL SYSTEM (DFI)
Subthrottle Sensor (Service Code 32)
Subthrottle Sensor Removal/Adjustment
CAUTION
Do not remove or adjust the subthrottle sensor [A]
since it has been adjusted and set with precision at
the factory.
Never drop the throttle body assy, especially on a
hard surface. Such a shock to the sensor can dam-
age it.
Subthrottle Sensor Input Voltage Inspection
NOTE
○Be sure the battery is fully charged.
• Remove the air cleaner housing (see Air Cleaner Housing
Removal).
• Turn the ignition switch OFF.
• Disconnect the subthrottle sensor connector and connect
the harness adapter [A] between these connectors.
• Connect a digital meter to the harness adapter lead.
Special Tool - Throttle Sensor Harness Adapter:
57001
-1400
• Measure the sensor input voltage with the engine stopped
and with the connector joined.
• Turn the ignition switch ON.
Subthrottle Sensor Input Voltage
Connections to Adapter
Meter (+) → BL (sensor BL) lead
Meter (-) → BK (sensor BR/BK) lead
Standard: 4.75 ∼ 5.25 V DC
FUEL SYSTEM (DFI) 3-63
Subthrottle Sensor (Service Code 32)
• Turn the ignition switch OFF.
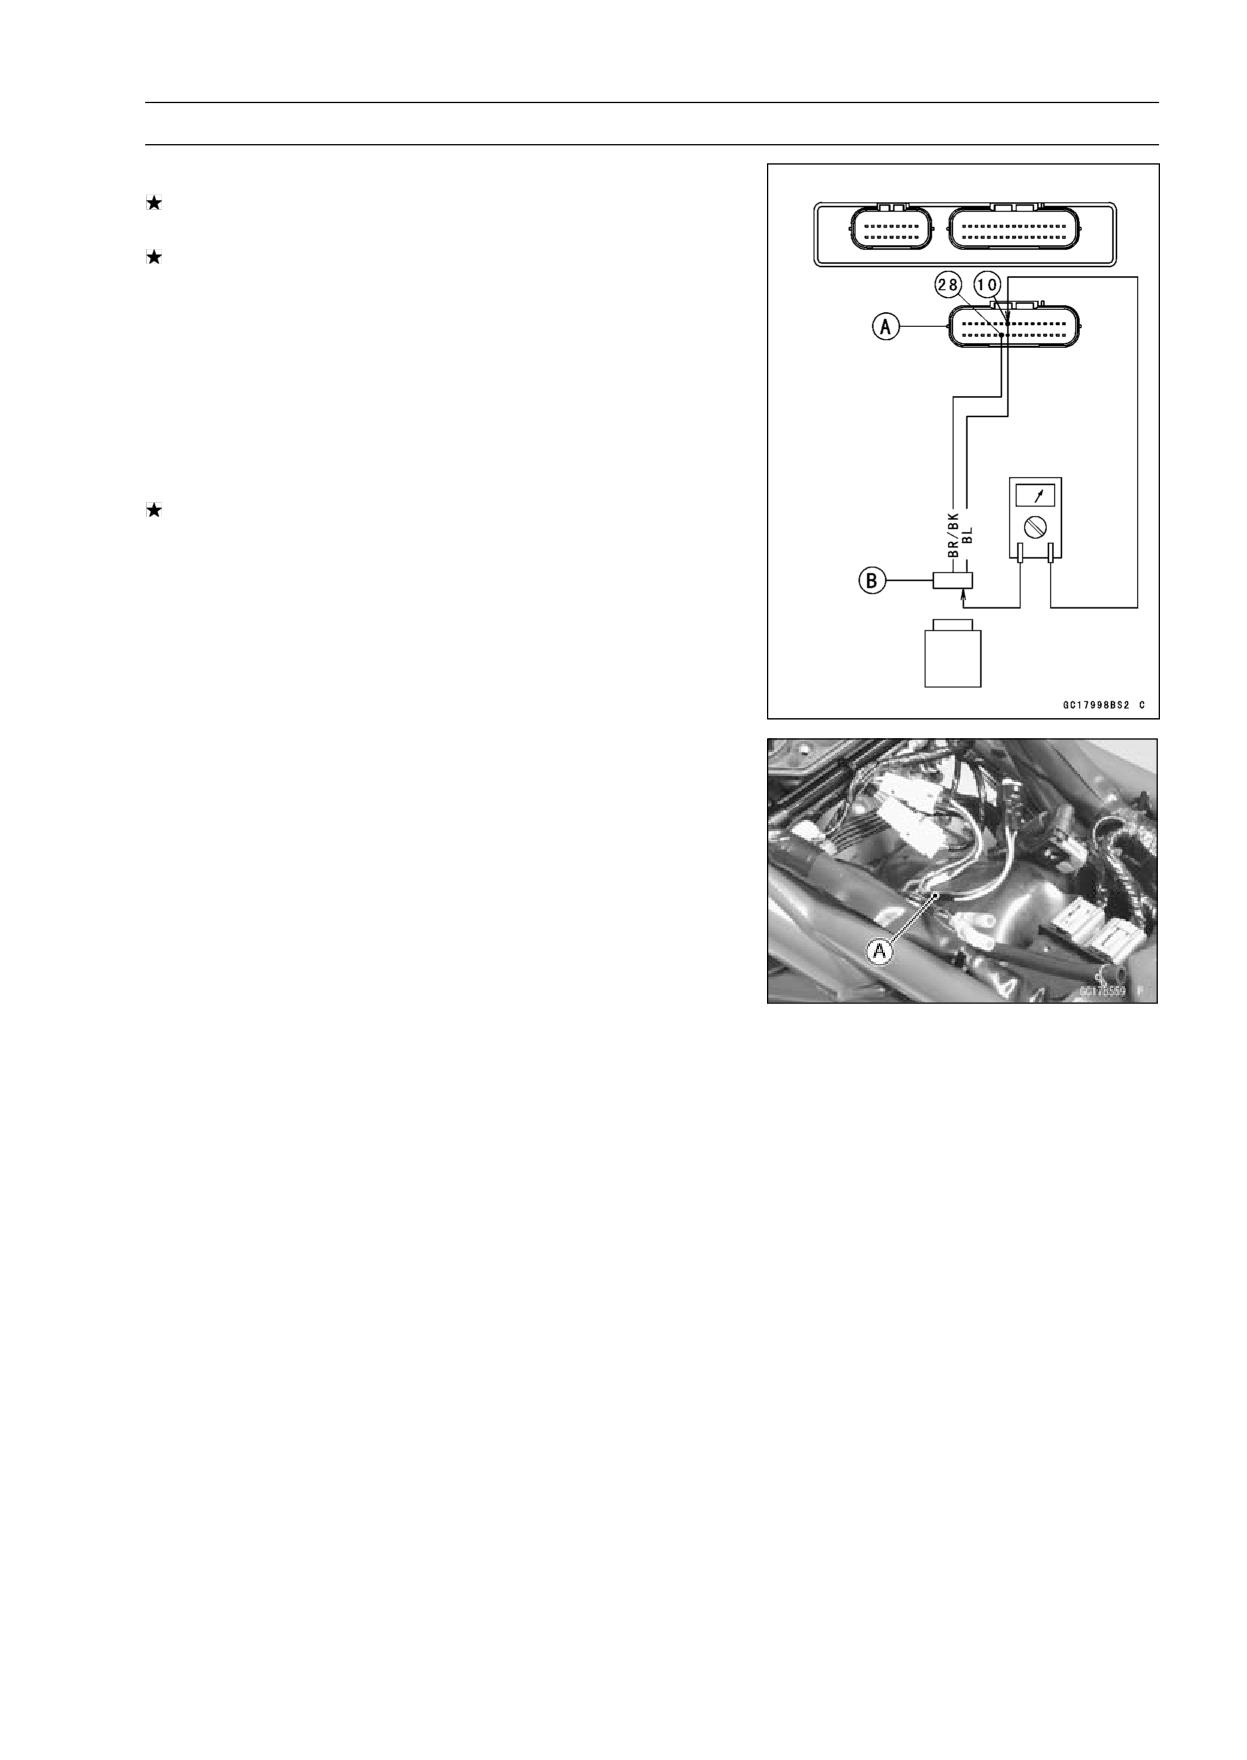
If the input voltage is normal, check the sensor output
voltage.
If the input voltage is less than the standard, remove the
ECU and check the wiring between these connectors.
○Disconnect the ECU and sensor connectors.
Wiring Connection
ECU Connector [A] ←→
Subthrottle Sensor Connector [B]
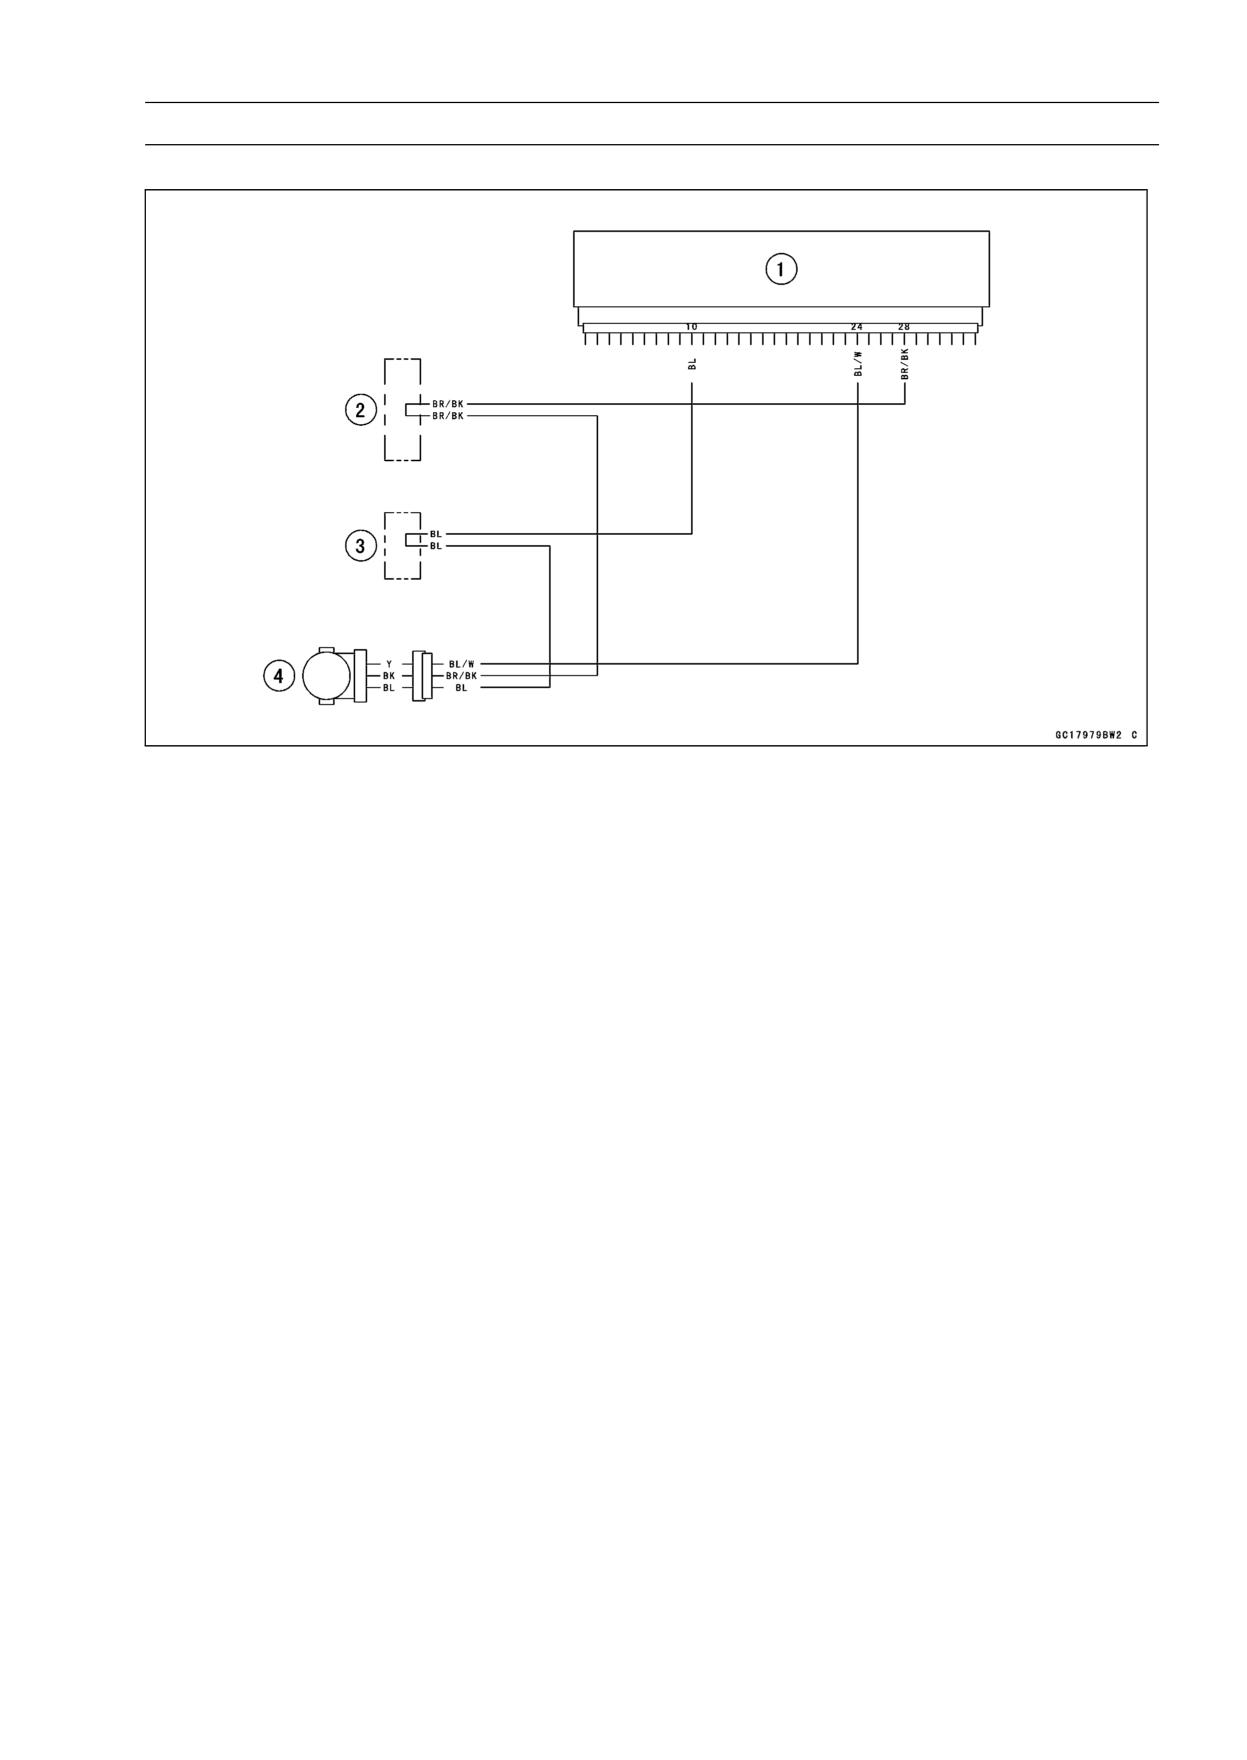
BL lead (terminal 10)
BR/BK lead (terminal 28)
If the wiring is good, check the ECU for its ground and
power supply (see ECU Power Supply Inspection).
Subthrottle Sensor Output Voltage Inspection
• Remove the air cleaner housing (see Air Cleaner Housing
Removal).
• Measure the output voltage at the subthrottle sensor in
the same way as input voltage inspection. Note the fol-
lowing.
• Disconnect the subthrottle sensor connector and (black)
connect the harness adapter [A] between these connec-
tors.
Special Tool - Throttle Sensor Harness Adapter:
57001
-1400
• Measure the output voltage of the sensor with the engine
stopped, and with the connector joined.
• Turn the ignition switch ON.
• Measure the output voltage when the subthrottle valve is
fully opened or completely closed by hand.
Subthrottle Sensor Output Voltage
Connections to Adapter
Meter (+) → Y (sensor BL/W) lead
Meter (-) → BK (sensor BR/BK) lead
Standard:
0.4 ∼ 0.6 V DC (at idle throttle opening)
3.625 ∼ 3.775 V DC (at full throttle opening)
3-64 FUEL SYSTEM (DFI)
Subthrottle Sensor (Service Code 32)
If the output voltage is out of the standard, inspect the
subthrottle sensor resistance.
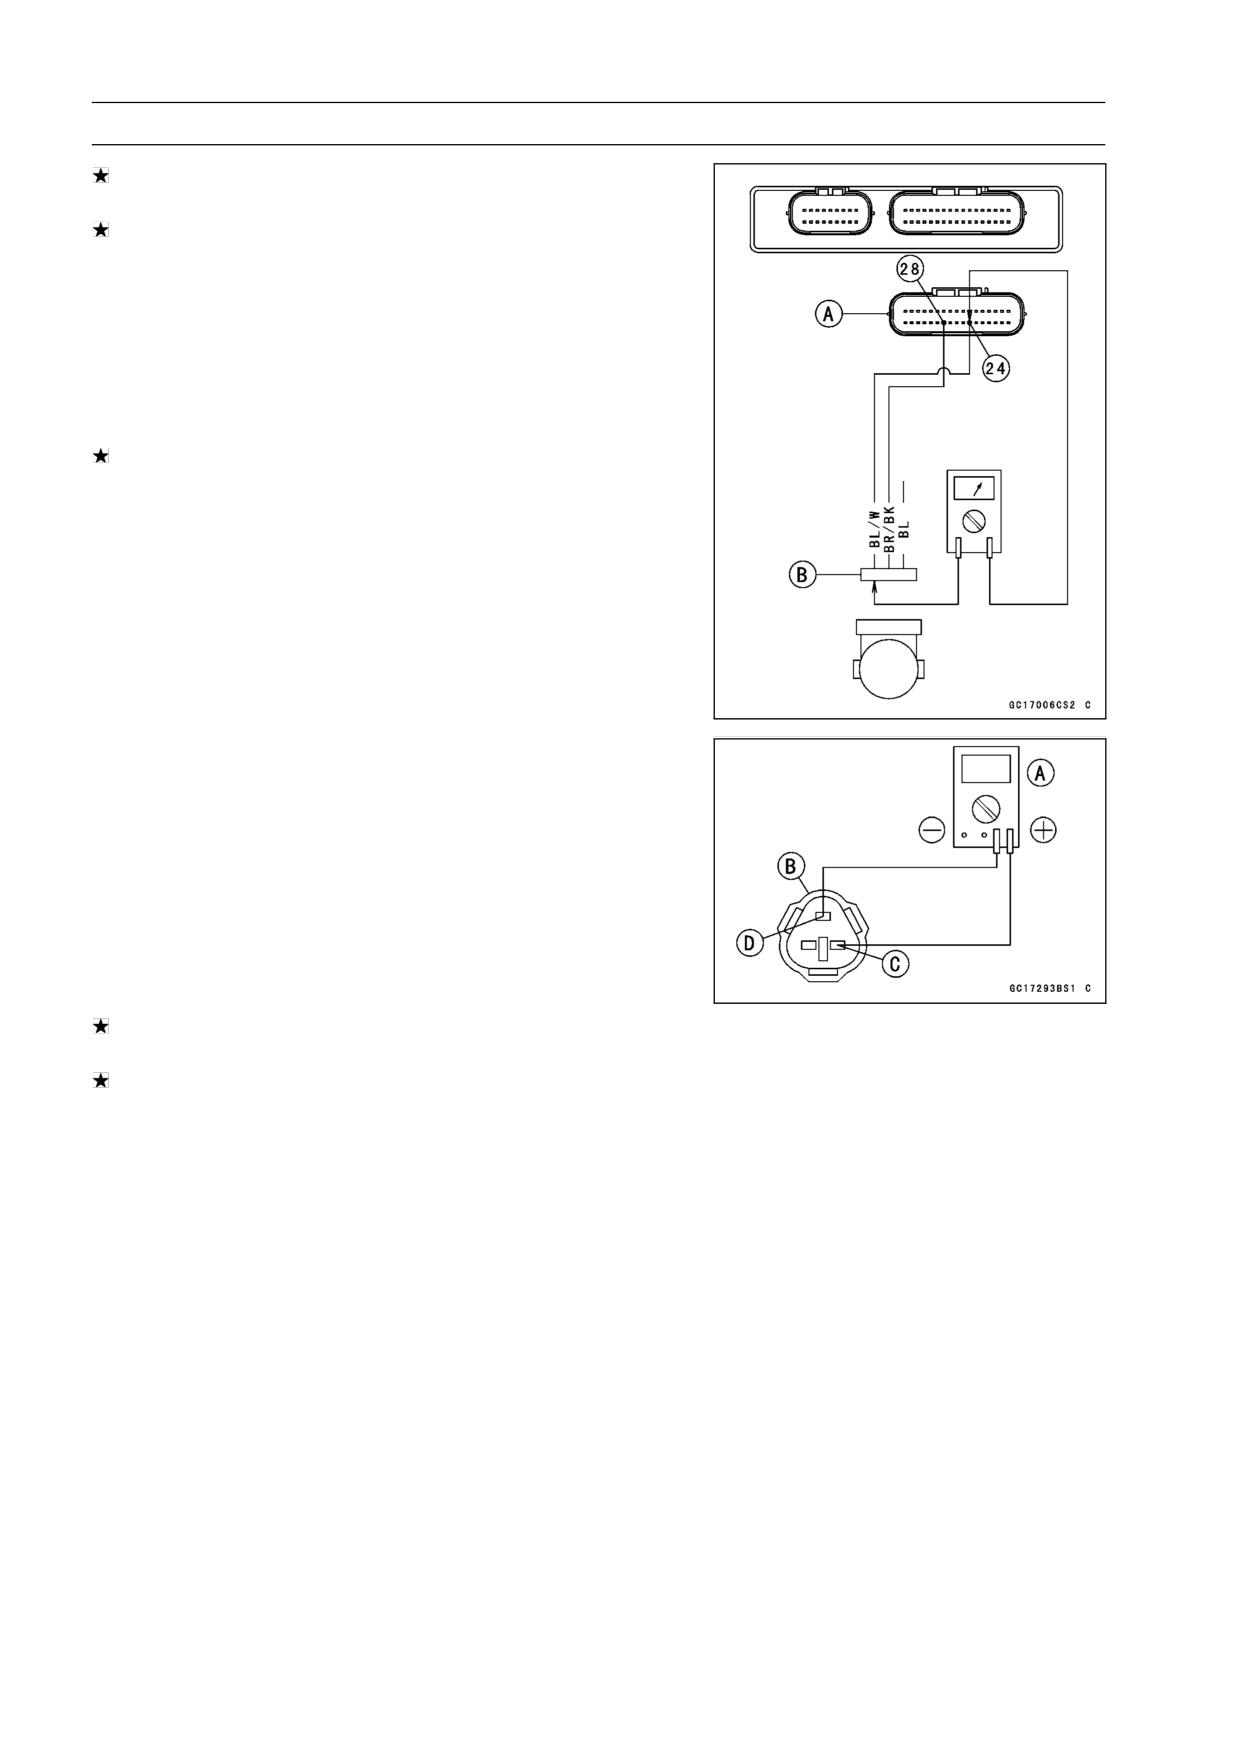
If the output voltage is normal, check the wiring for conti-
nuity.
Wiring Connection
ECU Connector [A] ←→
Subthrottle Sensor Connector [B]
BL/W lead (terminal 24)
BR/BK lead (terminal 28)
If the wiring is good, check the ECU for its ground and
power supply (see ECU Power Supply Inspection).
Subthrottle Sensor Resistance Inspection
• Turn the ignition switch OFF.
• Disconnect the subthrottle sensor connector.
• Connect a digital meter [A] to the subthrottle sensor con-
nector [B].
• Measure the subthrottle sensor resistance.
Throttle Sensor Resistance
Connections: BL lead [C] ←→ BK lead [D]
Standard:
4 ∼ 6 kΩ
If the reading is out of the range, replace the throttle body
assy.
If the reading is within the range, but the problem still
exists, replace the ECU (see ECU Removal/Installation).
FUEL SYSTEM (DFI) 3-65
Subthrottle Sensor (Service Code 32)
Subthrottle Sensor Circuit
1. ECU
2. Water-proof Joint E
3. Water-proof Joint D
4. Subthrottle Sensor
3-66 FUEL SYSTEM (DFI)
Oxygen Sensor-not activated (Service Code 33) (Europe Models)
Oxygen Sensor Removal/Installation
• Refer to the Oxygen Sensor Removal/Installation in the
Electrical System chapter.
Oxygen Sensor Inspection
• Warm up the engine thoroughly until the radiator fan
starts.
• Turn the ignition switch OFF.
• Remove:
Left Lower Fairing (see Lower Fairing Removal in the
Frame chapter)
Engine Sprocket Cover (see Engine Sprocket Removal
in the Final Drive chapter)
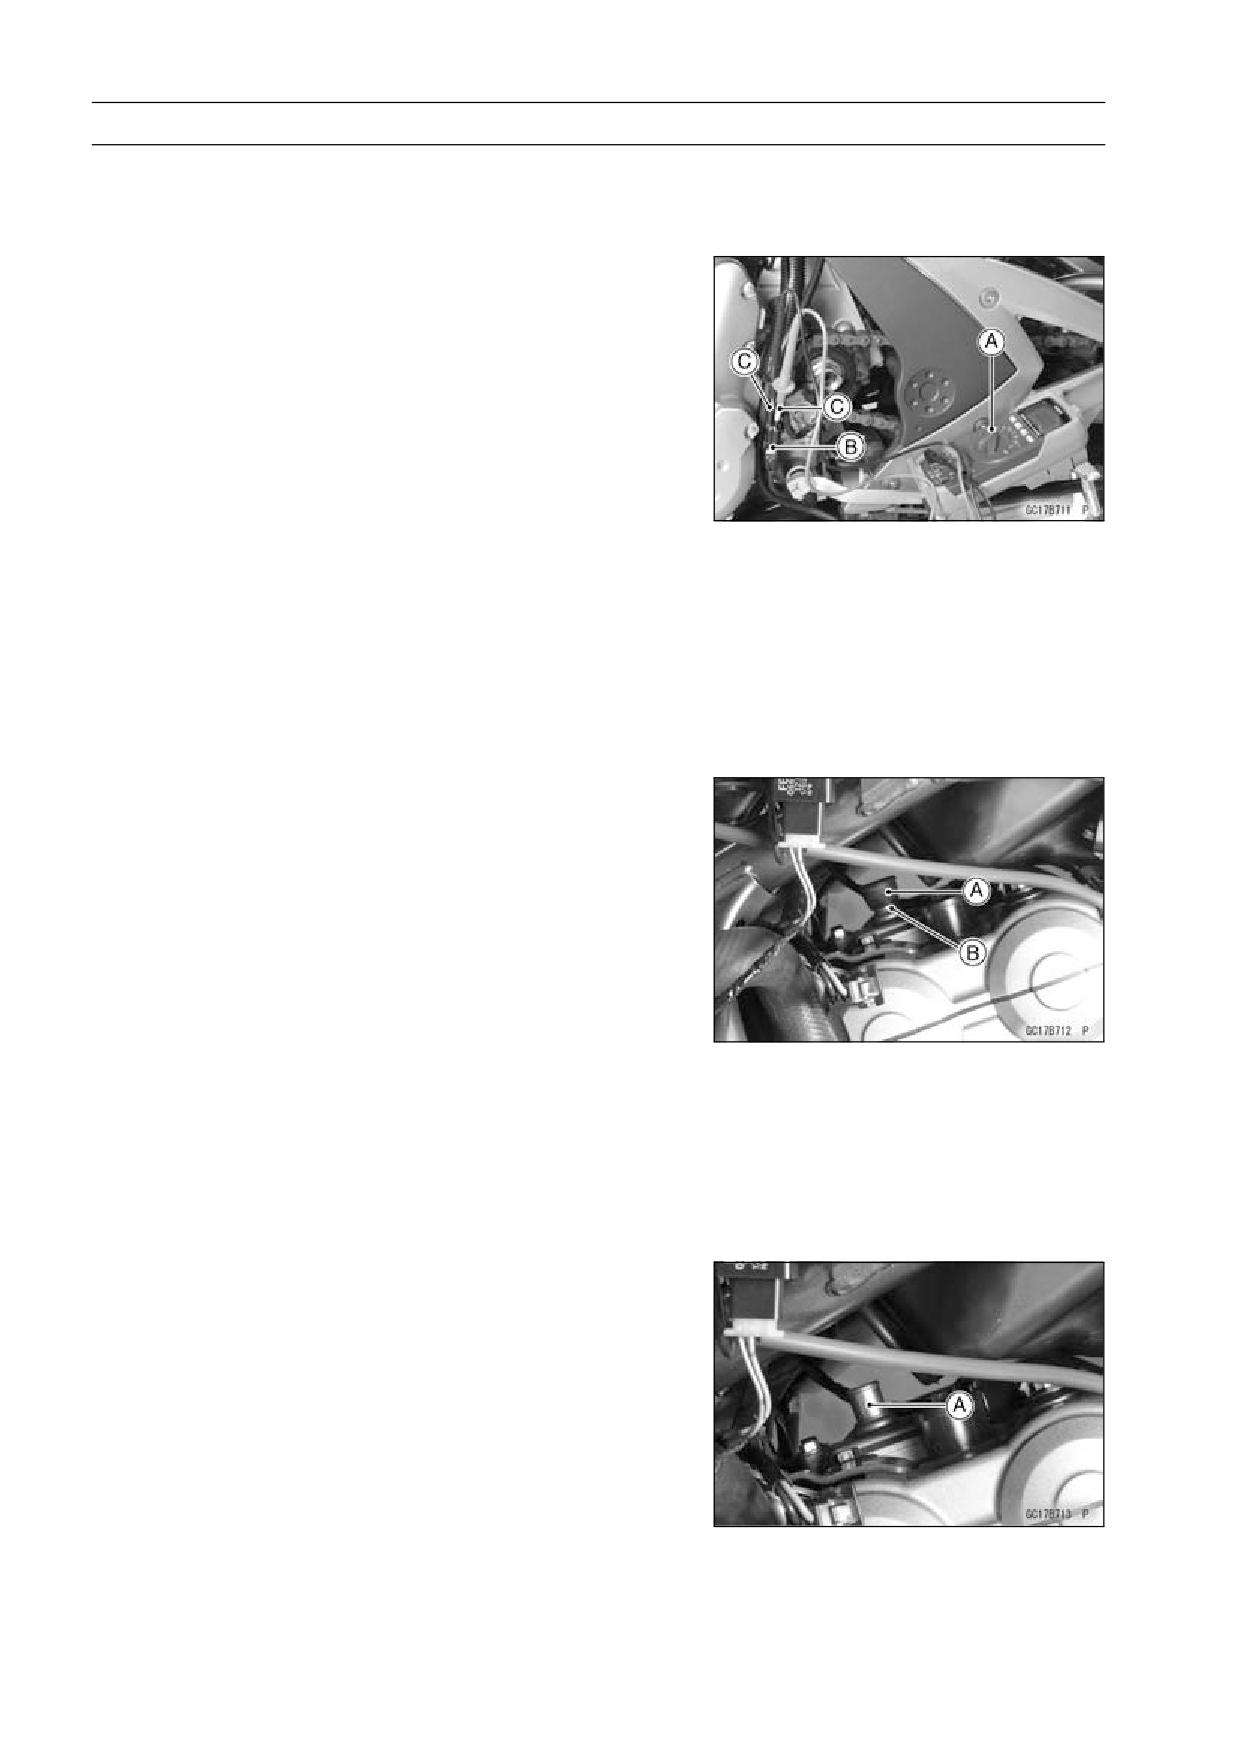
• Connect a digital voltmeter [A] to the oxygen sensor con-
nector [B] (main harness side), using the needle adapter
set [C].
Special Tool - Needle Adapter Set: 57001-1457
Oxygen Sensor Output Voltage
Connections to Oxygen Sensor Connector
Meter (+) → BL/Y lead
Meter (-) → BR/BK lead
• Remove the air switching valve hose from the fitting.
• Install the suitable plugs [A] on the fitting [B] and shut off
the secondary air.
• Turn the ignition switch ON.
• Start the engine, and let it idle.
• Measure the output voltage of the sensor with the con-
nector joined.
Oxygen Sensor Output Voltage (with Plugs)
Standard:
0.7 V or more
• Next, remove the plugs from the fitting [A] with idling.
FUEL SYSTEM (DFI) 3-67
Oxygen Sensor-not activated (Service Code 33) (Europe Models)
• Measure the output voltage of the sensor with the con-
nector joined.
Oxygen Sensor Output Voltage (without Plugs)
Standard:
0.2 V or less
If the reading is within range (with plugs: 0.7 V or more,
without plugs: 0.2 V or less), the oxygen sensor is good.
If the reading is without range, replace the oxygen sensor
(see Oxygen Sensor Removal/Installation in the Electrical
System chapter).
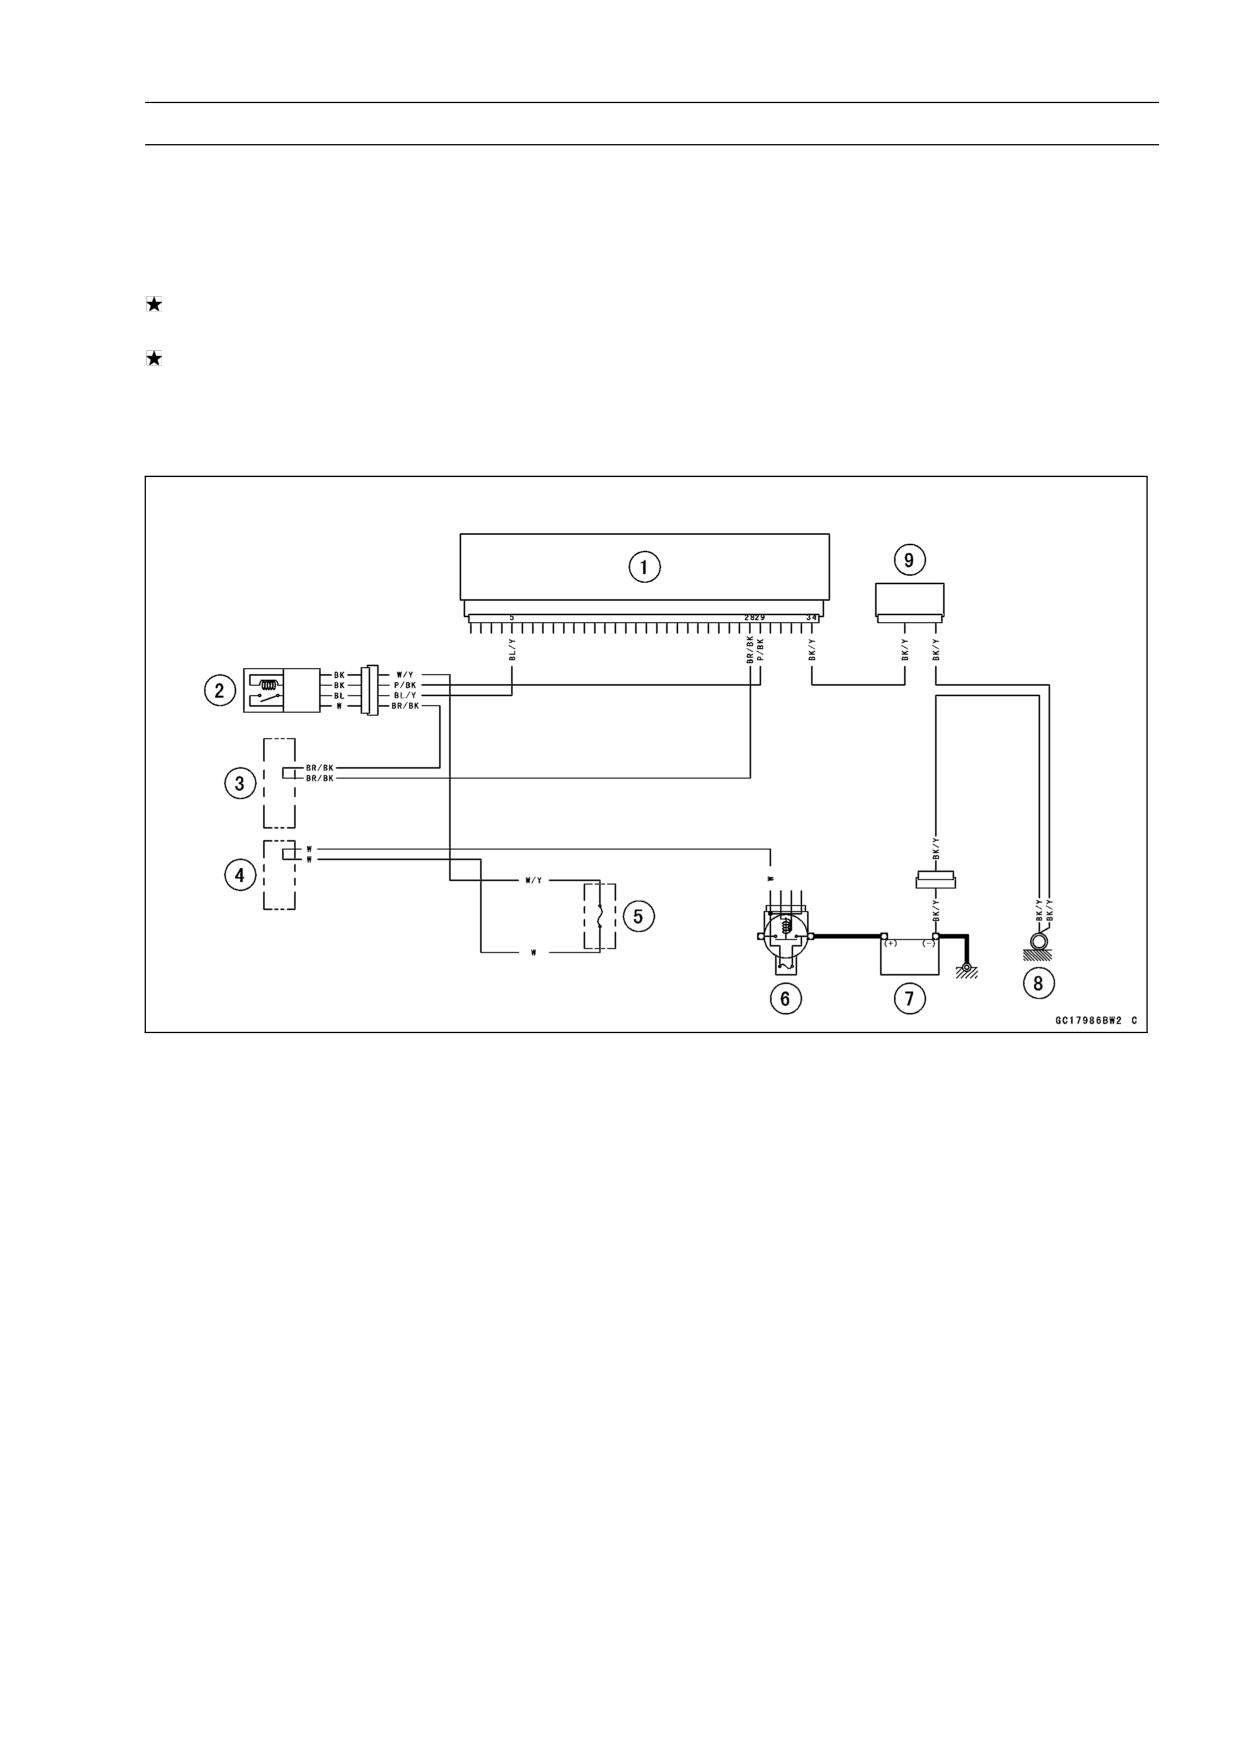
Oxygen Sensor Circuit
1. ECU
2. Oxygen Sensor
3. Water-proof Joint E
4. Water-proof Joint D
5. Oxygen Sensor Heater Fuse 10 A
6. Main Fuse 30 A
7. Battery
8. Frame Ground
9. Joint Connector
3-68 FUEL SYSTEM (DFI)
Stick Coils #1, #2: (Service Code 51, 52)
Stick Coil #1: Service Code 51
Stick Coil #2: Service Code 52
Stick Coil Removal/Installation
CAUTION
Never drop the stick coils, especially on a hard sur-
face. Such a shock to the stick coil can damage it.
• Refer to the Stick Coil (Ignition Coil together with Spark
Plug Cap) Removal/Installation in the Electrical System
chapter.
Stick Coil Input Voltage Inspection
NOTE
○Be sure the battery is fully charged.
• Turn the ignition switch OFF.
• Remove the ECU (see ECU Removal). Do not disconnect
the ECU connector.
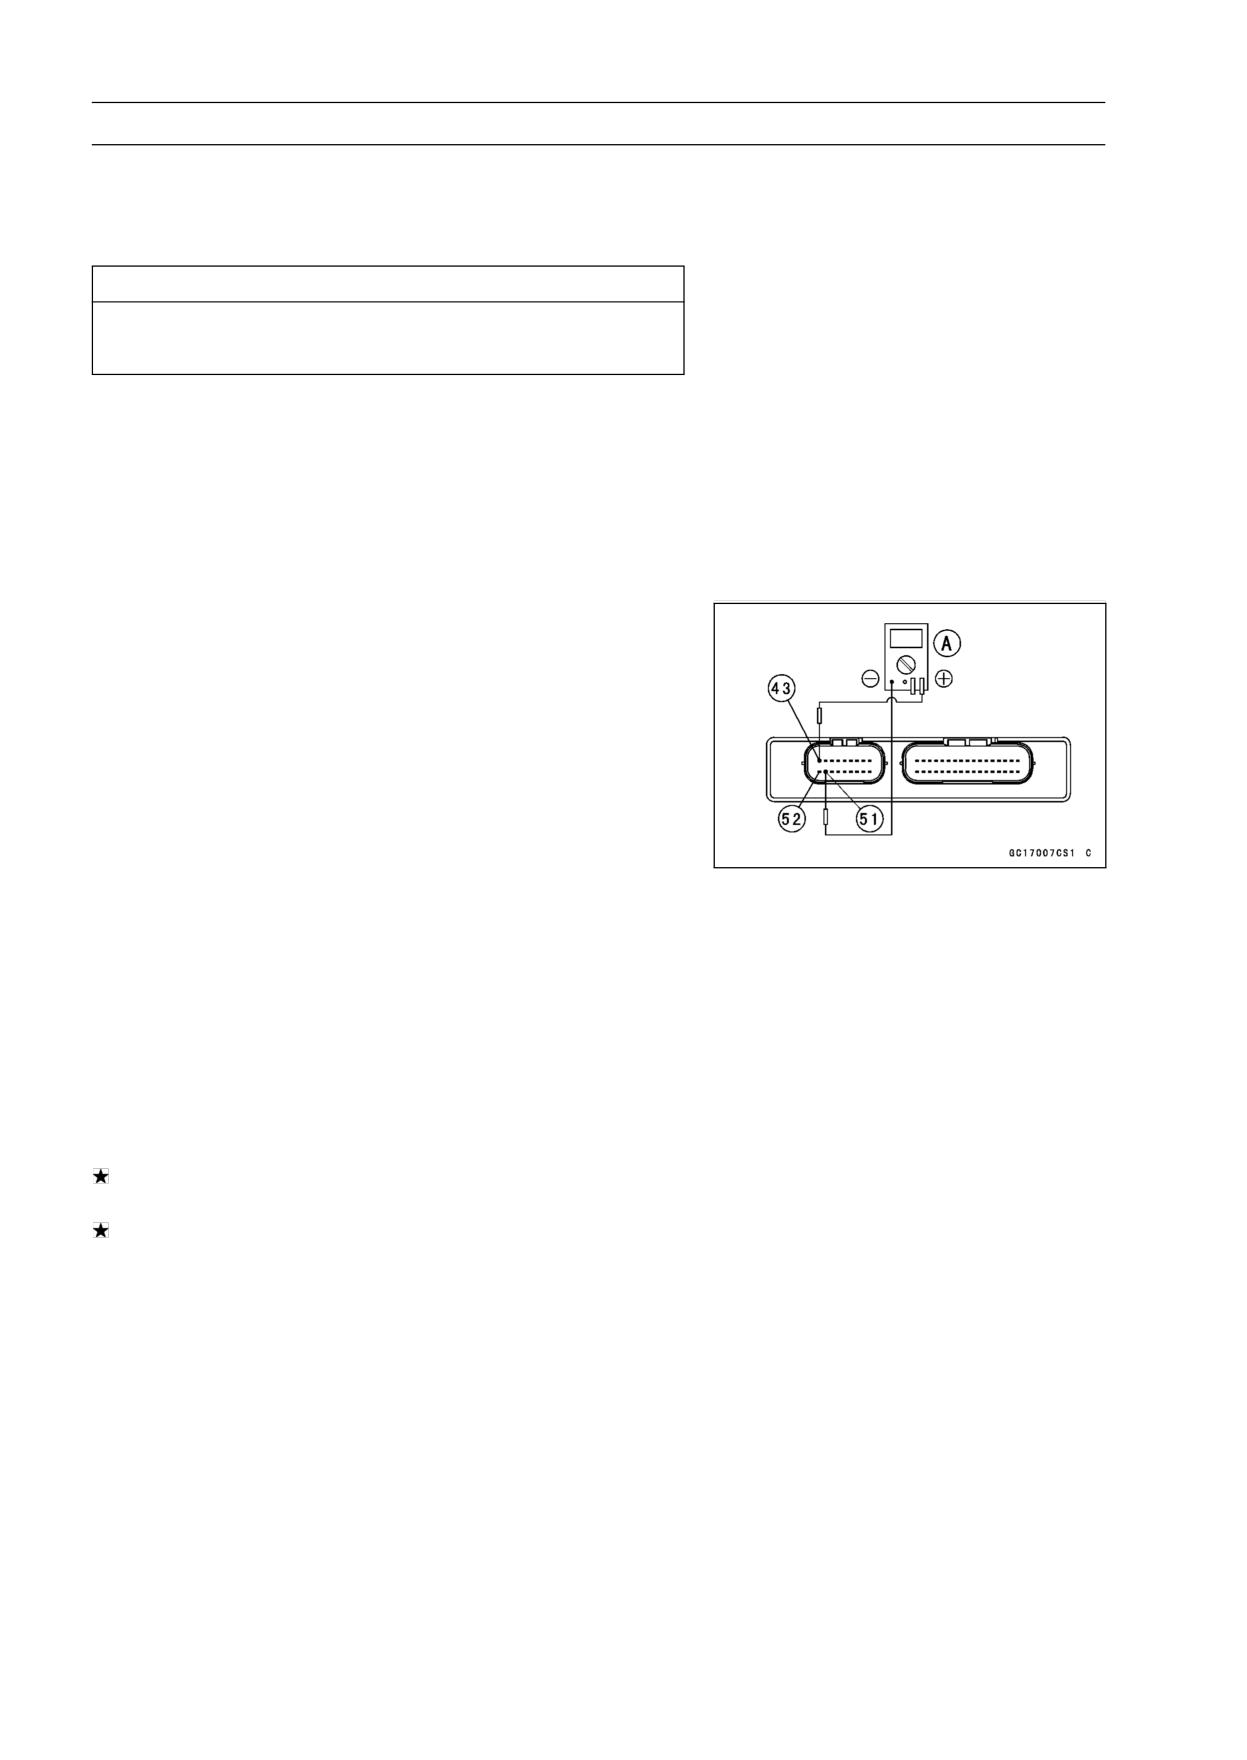
• Connect a digital voltmeter [A] as shown, with the needle
adapter set [B].
○Measure the input voltage to each primary winding of the
ignition coils with the engine stopped, and with the con-
nectors joined.
• Turn the ignition switch ON.
Stick Coil Input Voltage at ECU
Connections for Stick Coil #1
Meter (+) → BK lead (terminal 43)
Meter (-) → BK/Y lead (terminal 51)
Connections for Stick Coil #2
Meter (+) → BK/G lead (terminal 52)
Meter (-) → BK/Y lead (terminal 51)
Input Voltage at ECU
Standard:
Battery Voltage (12.8 V or more)
If the reading is out of the standard, check the wiring (see
next wiring diagram).
If the reading is good, the input voltage is normal. Crank
the engine, and check the peak voltage of the stick coils
(see Stick Coil Primary Peak Voltage in the Electrical Sys-
tem chapter) in order to check the primary coils.
FUEL SYSTEM (DFI) 3-69
Stick Coils #1, #2: (Service Code 51, 52)
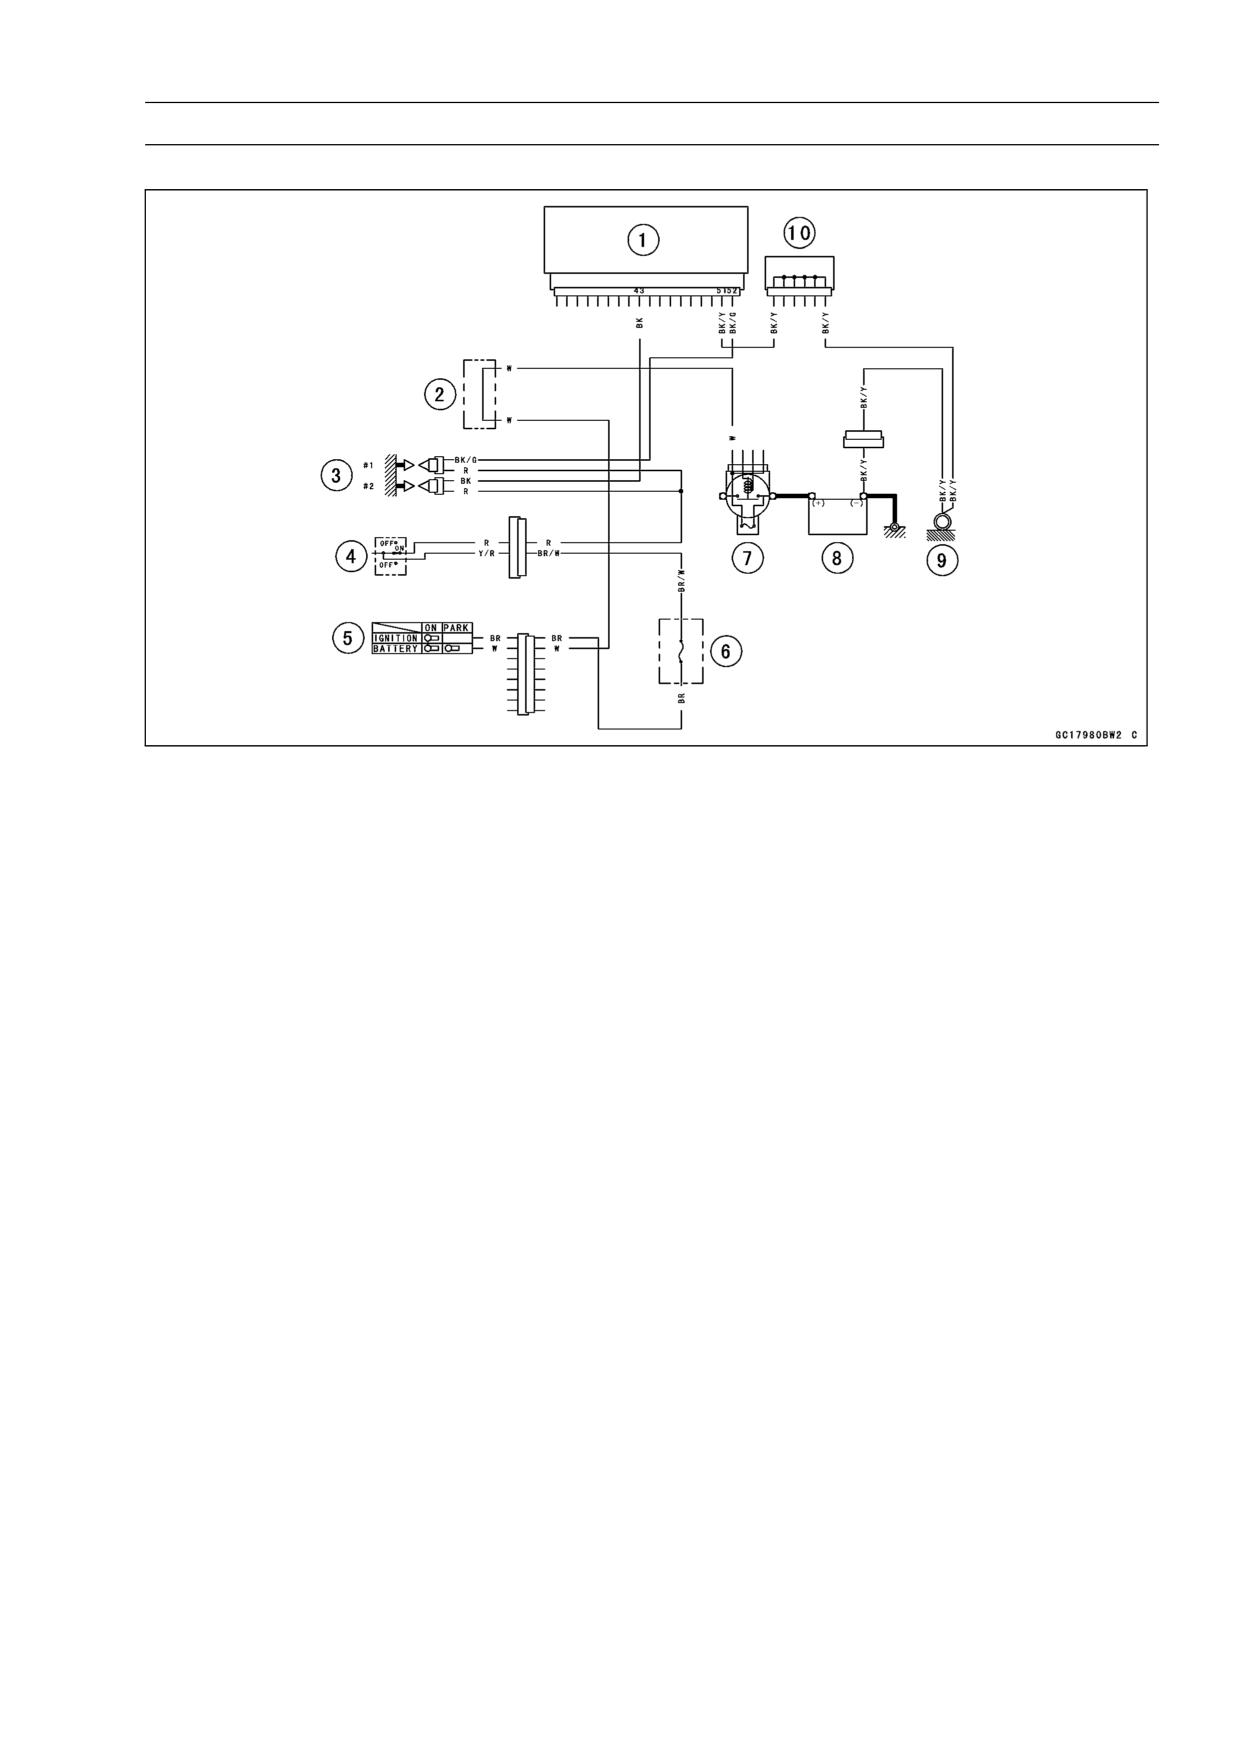
Stick Coil Circuit
1. ECU
2. Water-proof Joint C
3. Stick Coils
4. Engine Stop Switch
5. Ignition Switch
6. Ignition Fuse 10 A
7. Main Fuse 30 A
8. Battery
9. Frame Ground
10. Joint Connector
3-70 FUEL SYSTEM (DFI)
Radiator Fan Relay (Service Code 56)
Radiator Fan Relay Removal/Installation
• Radiator fan relay is built in the relay box.
• Remove the relay box (see Relay Box Removal in the
Electrical System chapter).
Radiator Fan Relay Inspection
• Refer to the Relay Circuit Inspection in the Electrical Sys-
tem chapter.
• Remove the relay box and ECU (see ECU Removal). Do
not disconnect the relay box and ECU connectors. Check
the wiring for continuity, using the following diagram.
If wiring and radiator fan relay are good, check the ECU
for its ground, and power supply (see ECU Power Supply
Inspection). If the ground and power supply are good,
replace the ECU (see ECU Removal/Installation).
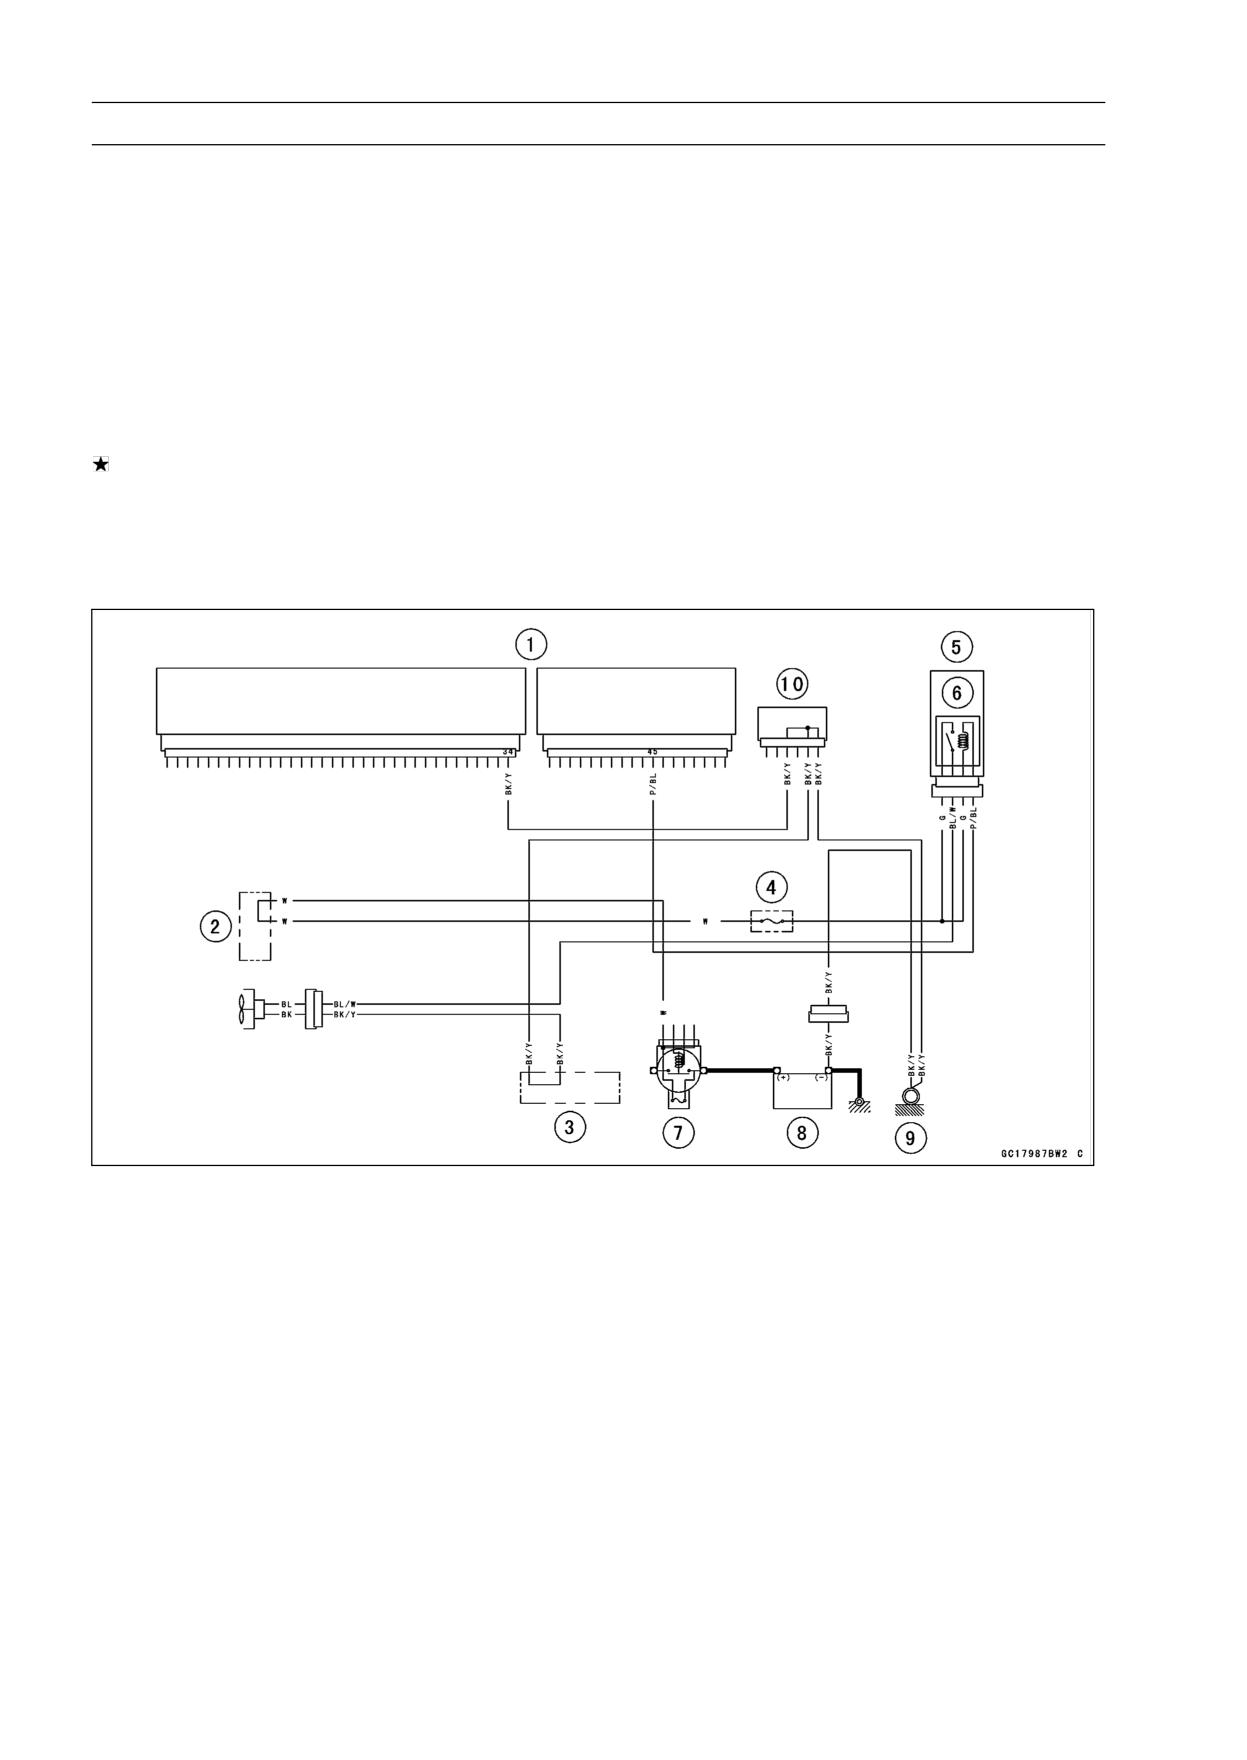
Radiator Fan Relay Circuit
1. ECU
2. Water-proof Joint C
3. Water-proof Joint B
4. Radiator Fan Fuse 15 A
5. Relay Box
6. Radiator Fan Relay
7. Main Fuse 30 A
8. Battery
9. Frame Ground
10. Joint Connector
FUEL SYSTEM (DFI) 3-71
Subthrottle Valve Actuator (Service Code 62)
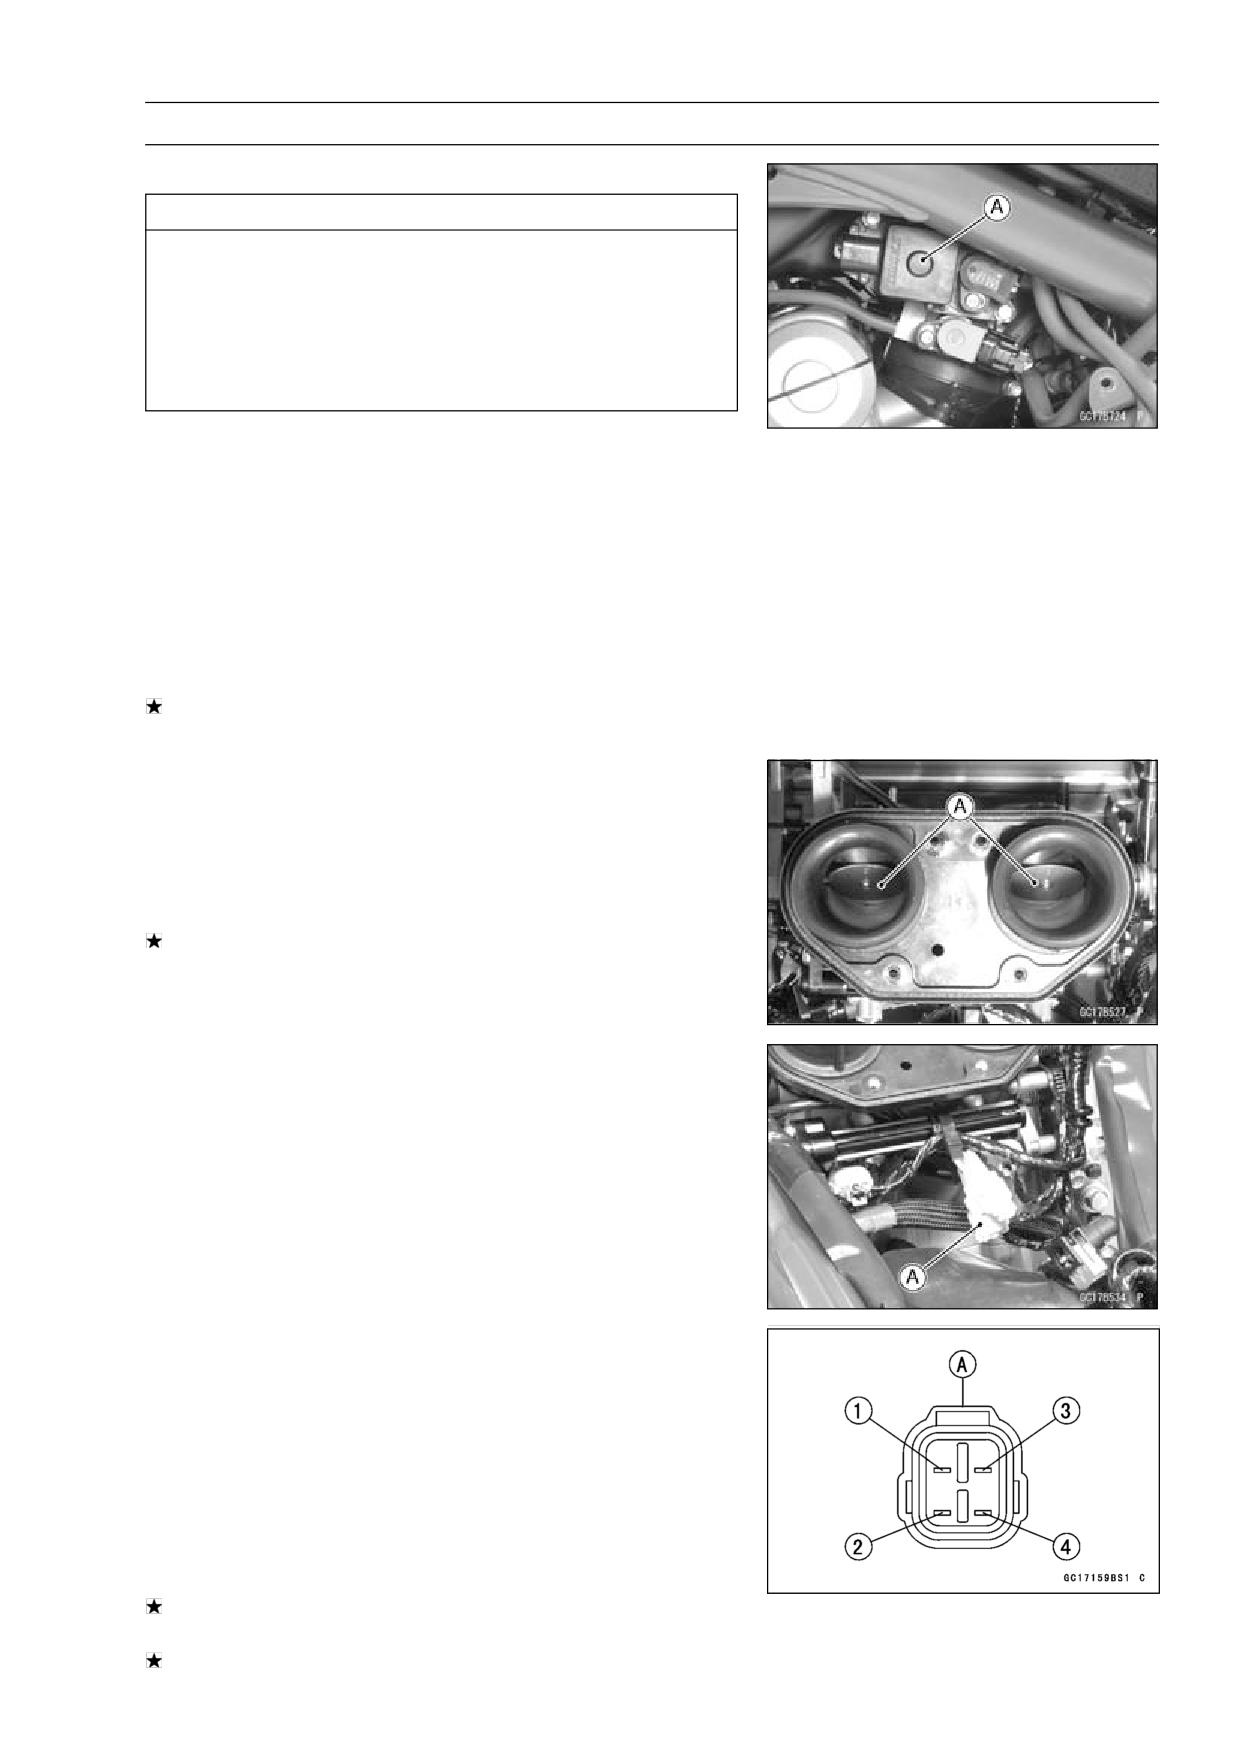
Subthrottle Valve Actuator Removal
CAUTION
Do not remove the subthrottle valve actuator [A]
since it has been adjusted and set with precision
at the factory.
Never drop the throttle body assy, especially on a
hard surface. Such a shock to the actuator can
damage it.
Subthrottle Valve Actuator Audible Inspection
NOTE
○Be sure the battery is fully charged.
• Turn the ignition switch ON and ensure that the actuator
valves open and close (make light sounds) several times
within seconds, and then close at the idle throttle opening
position.
• Turn the ignition switch OFF.
If the actuator does not work as described above, do the
visual inspection.
Subthrottle Valve Actuator Inspection
• Remove the air cleaner housing (see Air Cleaner Housing
Removal).
• Turn the ignition switch ON.
• Check to see that all the subthrottle valves [A] open and
close smoothly.
If the subthrottle valves do not operate, check the actuator
internal resistance (see Subthrottle Valve Actuator Resis-
tance Inspection).
Subthrottle Valve Actuator Resistance Inspection
• Turn the ignition switch OFF.
• Remove the air cleaner housing (see Air Cleaner Housing
Removal).
• Disconnect the subthrottle valve actuator connector [A].
• Connect a digital meter to the subthrottle valve actuator
connector [A].
• Measure the subthrottle valve actuator resistance.
Subthrottle Valve Actuator Resistance
Connections: BK lead [1] ←→ P lead [2]
G lead [3] ←→ W/BL lead [4]
Standard:
About 5.5 ∼ 7.5 kΩ
Special Tool - Hand Tester: 57001-1394
If the reading is out of the range, replace the actuator
along with the throttle body assy.
If the reading is within the range, check the input voltage
(see Subthrottle Valve Actuator Input Voltage Inspection).
3-72 FUEL SYSTEM (DFI)
Subthrottle Valve Actuator (Service Code 62)
Subthrottle Valve Actuator Input Voltage
Inspection
NOTE
○Be sure the battery is fully charged.
• Turn the ignition switch OFF.
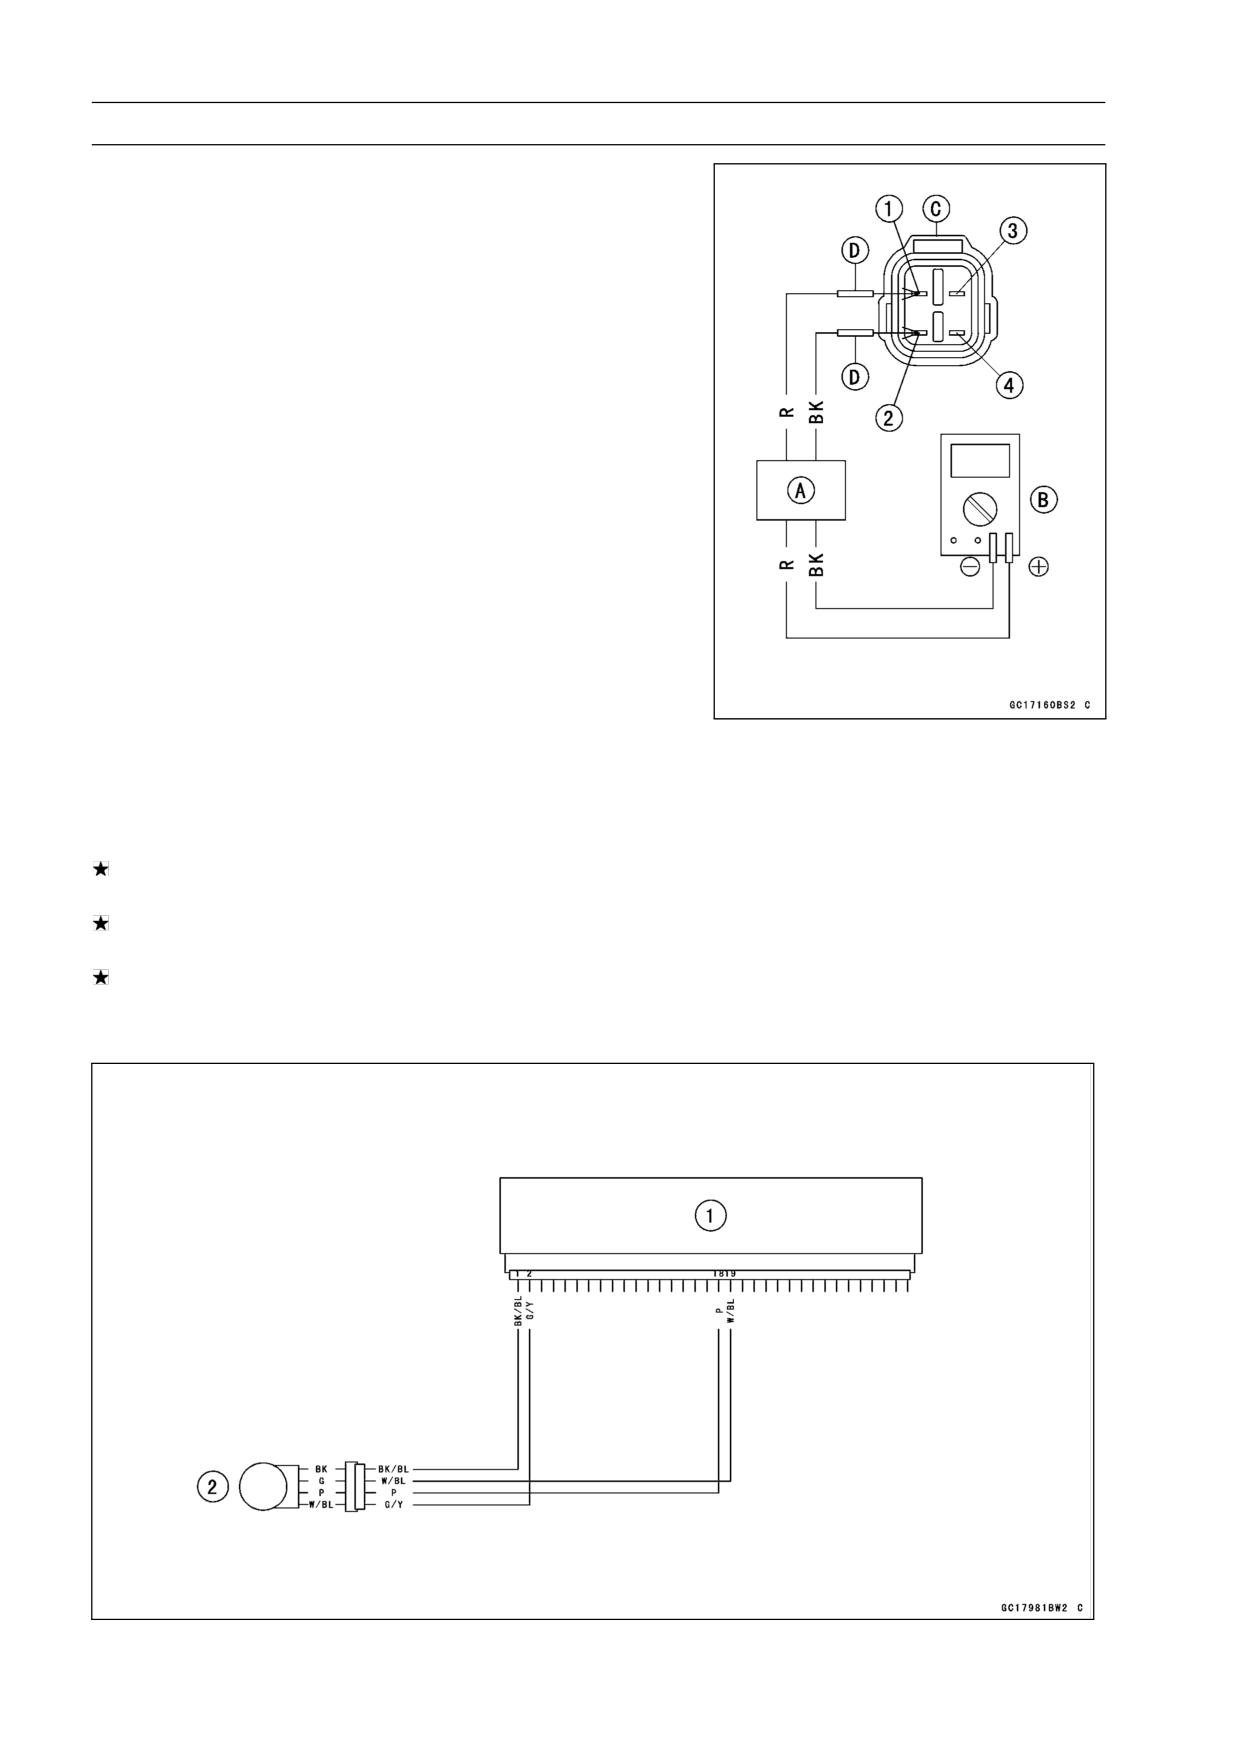
• Connect the peak voltage adapter [A] and a digital meter
[B] to the connector [C], using the needle adapter set [D].
Special Tools - Peak Voltage Adapter: 57001-1415
Type: KEK-54-9-B
Brand: KOWA SEIKI
Needle Adapter Set: 57001-1457
Subthrottle Valve Actuator Input Voltage
Connections to Harness Connector
(I)
Meter (+) → BK/BL lead [1]
Meter (-) → P lead [2]
(II)
Meter (+) → W/BL lead [3]
Meter (-) → G/Y lead [4]
• Measure the actuator input voltage with the engine
stopped, and with the connector joined.
• Turn the ignition switch ON.
Input Voltage at Actuator
Standard:
About 8.5 ∼ 10.5 V DC
If the reading is within the standard but the actuator
doesn’t operate, replace it.
If the reading is out of the range, check the wiring to ECU
(see wiring diagram in this section).
If the wiring is good, check the ECU for its ground and
power supply (see ECU Power Supply Inspection).
Subthrottle Valve Actuator Circuit
1. ECU
2. Subthrottle Valve Actuator
FUEL SYSTEM (DFI) 3-73
Air Switching Valve (Service Code 64)
Air Switching Valve Removal/Installation
• Refer to the Air Switching Valve Removal/Installation in
the Engine Top End chapter.
Air Switching Valve Inspection
• Refer to the Air Switching Valve Operation Test/Unit Test
in the Electrical System chapter.
• Remove the fuel tank (see Fuel Tank Removal) and check
the wiring continuity, using the following diagram.
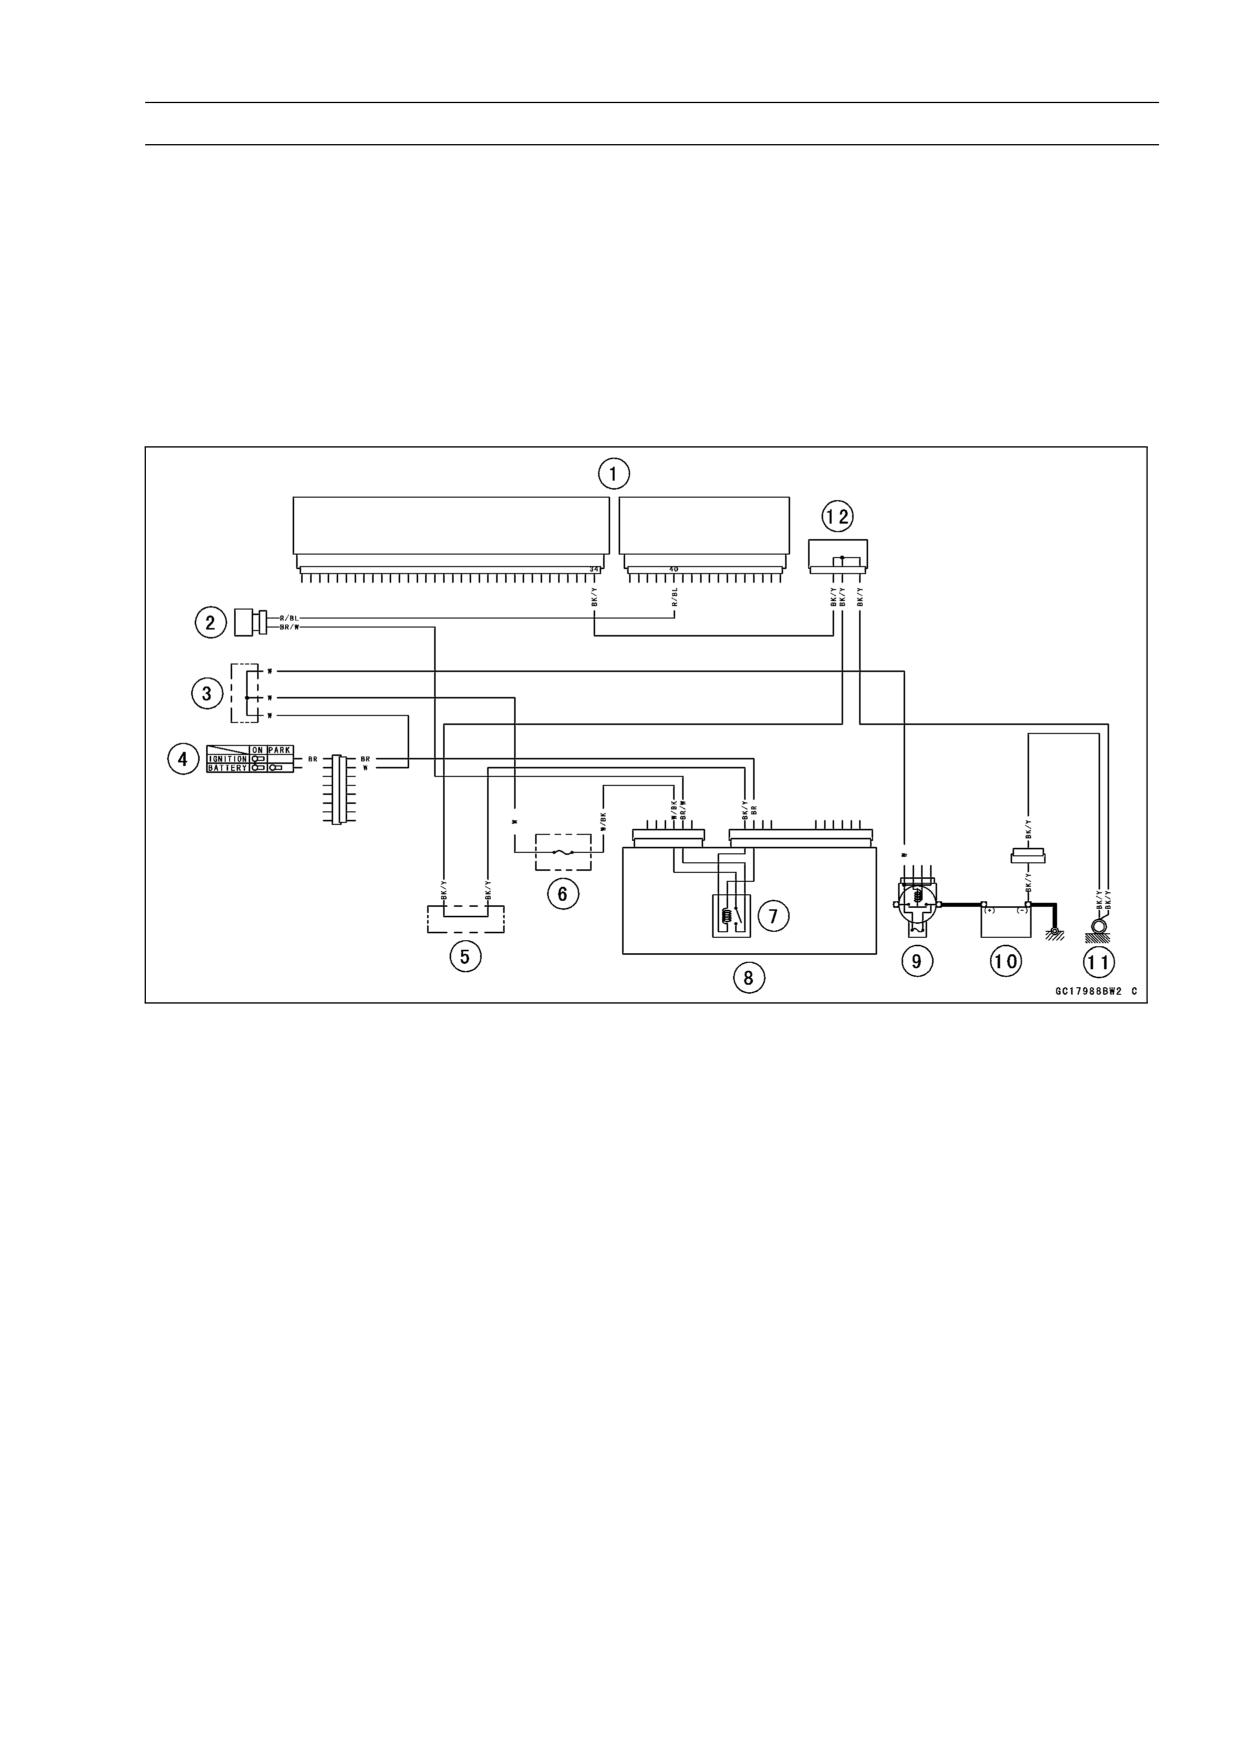
Air Switching Valve Circuit
1. ECU
2. Air Switching Valve
3. Water-proof Joint C
4. Ignition Switch
5. Water-proof Joint A
6. ECU Fuse 15 A
7. ECU Main Relay
8. Relay Box
9. Main Fuse 30 A
10. Battery
11. Frame Ground
12. Joint Connector
3-74 FUEL SYSTEM (DFI)
Oxygen Sensor Heater (Service Code 67) (Europe Models)
Oxygen Sensor Heater Removal/Installation
The oxygen sensor heater is built in the oxygen sensor.
So, the heater itself can not be removed. Remove the oxy-
gen sensor (see Oxygen Sensor Removal in the Electrical
System chapter).
Oxygen Sensor Heater Inspection
• Remove the engine sprocket cover (see Engine Sprocket
Removal in the Final Drive chapter).
• Disconnect the oxygen sensor lead connector [A].
• Set the hand tester [A] to the × 1 Ω range and connect it
to the terminals in the oxygen sensor lead connector [B].
Black [C]
Black [D]
Special Tool - Hand Tester: 57001-1394
Oxygen Sensor Resistance
Standard:
11.7 ∼ 14.5 Ω at 20°C (68°F)
If the tester reading is not as specified, replace the oxygen
sensor with a new one.
If the tester reading is specified, check the power source
voltage Inspection.
NOTE
○Be sure the battery is fully charged.
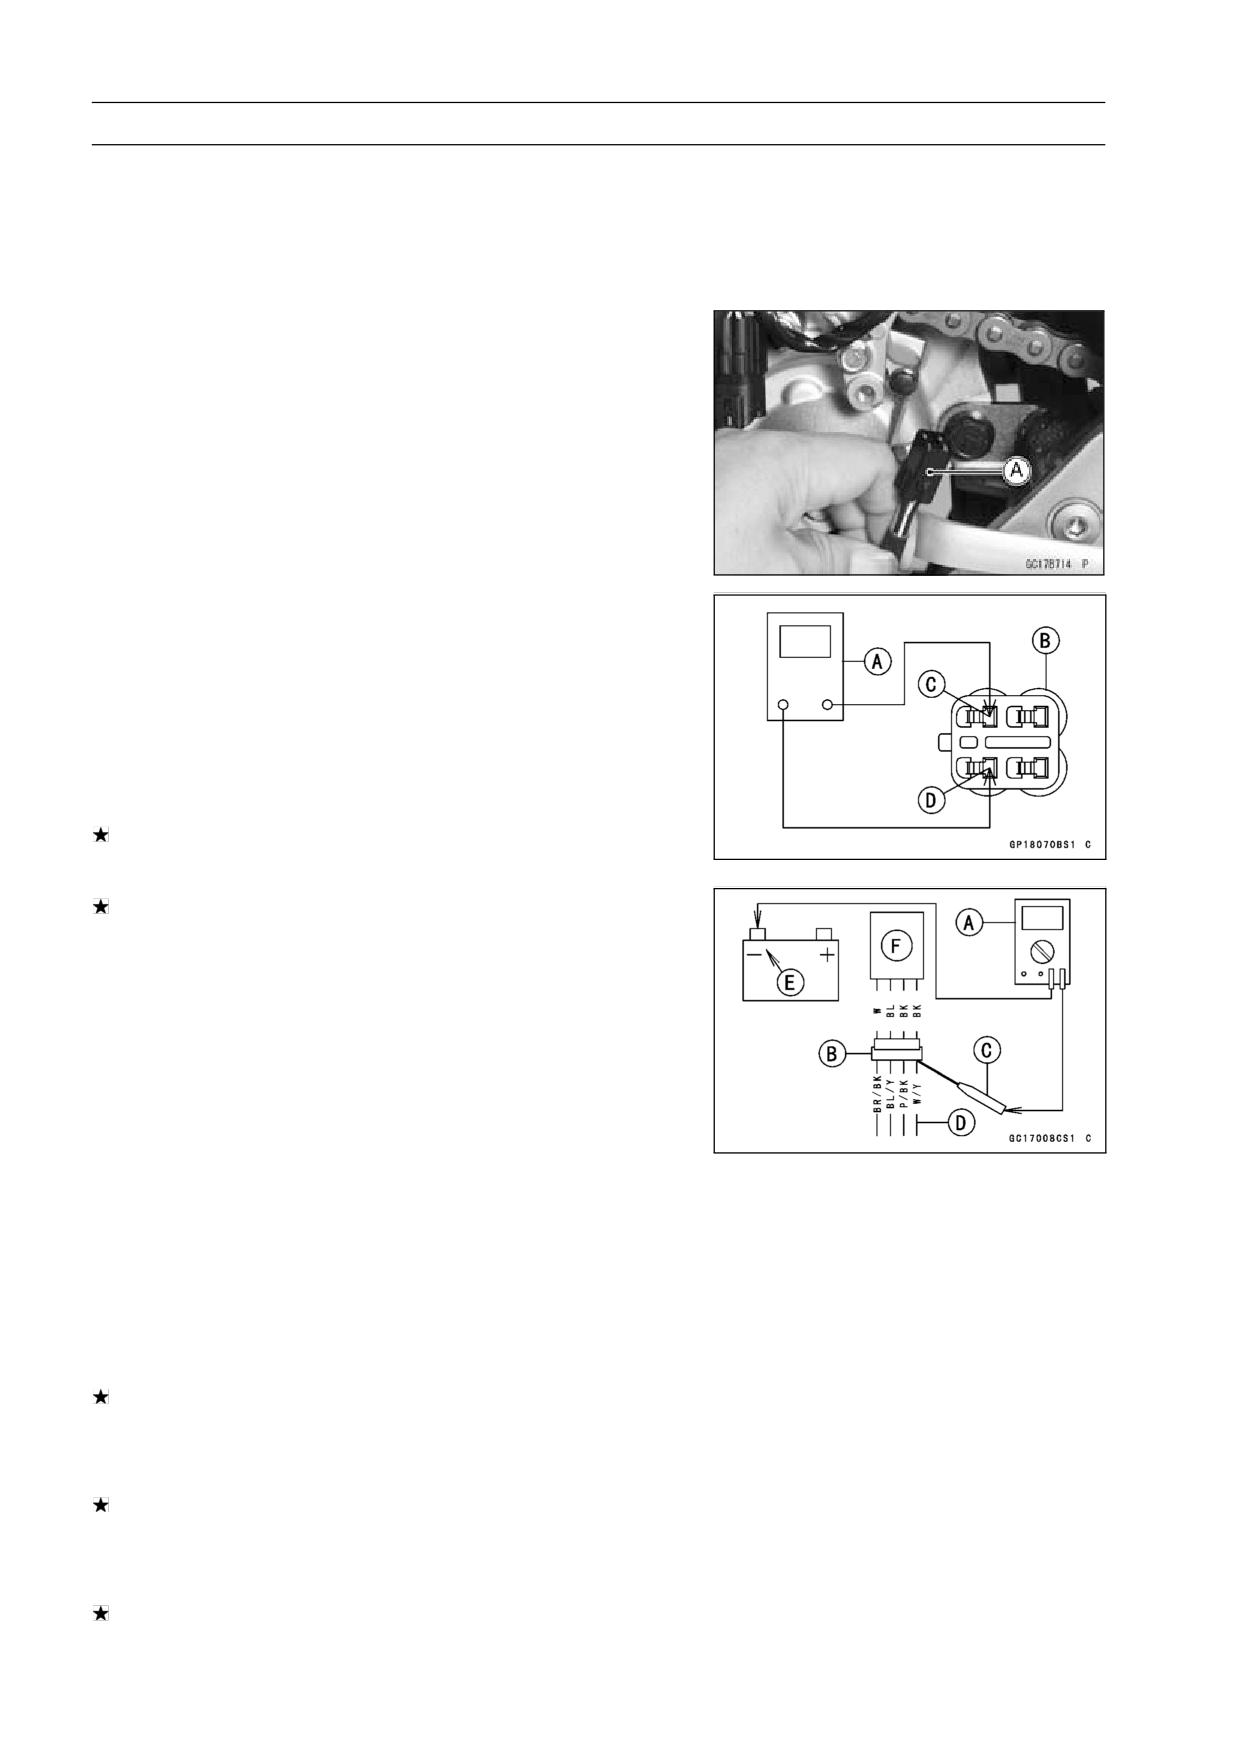
• Connect a digital voltmeter [A] to the oxygen sensor con-
nector [B], using the needle adapter [C].
Special Tool - Needle Adapter Set: 57001-1457
• Measure the power source voltage with the engine
stopped, and with the oxygen sensor connector joined.
Oxygen Sensor Power Source Voltage
Connections to Oxygen Sensor Connector
Tester (+) → W/Y lead [D]
Tester (-) → Battery (-) Terminal [E]
Standard:
Battery Voltage (12.8 V or more)
Oxygen Sensor [F]
If the reading is incorrect, check the following.
Battery
Main Fuse 30 A
Oxygen Sensor Heater Fuse 10 A
If the reading is good, the power source voltage is normal,
Inspect the Red/Black lead between the oxygen sensor
connector and the ECU for continuity, using the following
diagram.
If the wiring is good, inspect the ECU for its ground, and
power supply (see ECU Power Supply Inspection). If the
ground and power supply are good, replace the ECU (see
ECU Removal/Installation).
FUEL SYSTEM (DFI) 3-75
Oxygen Sensor Heater (Service Code 67) (Europe Models)
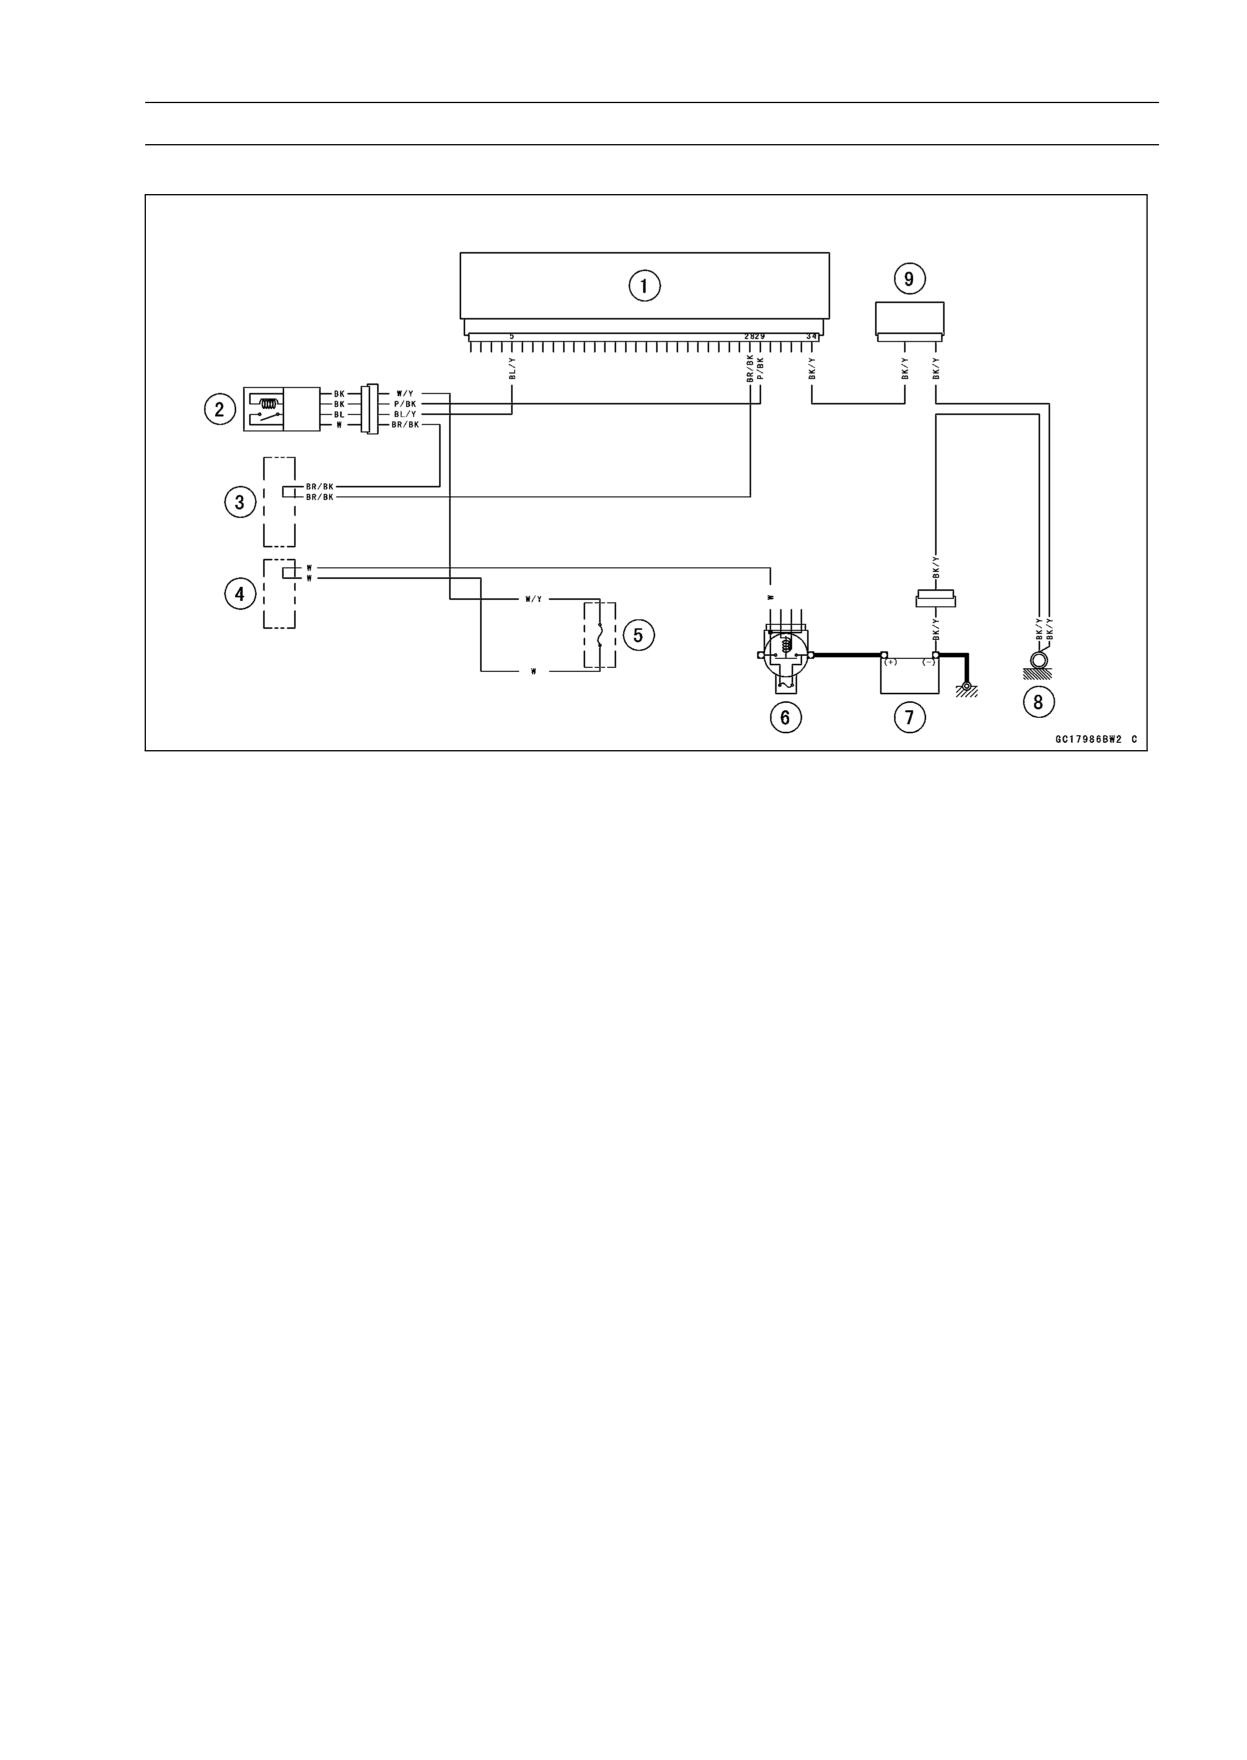
Oxygen Sensor Circuit
1. ECU
2. Oxygen Sensor
3. Water-proof Joint E
4. Water-proof Joint D
5. Oxygen Sensor Heater Fuse 10 A
6. Main Fuse 30 A
7. Battery
8. Frame Ground
9. Joint Connector
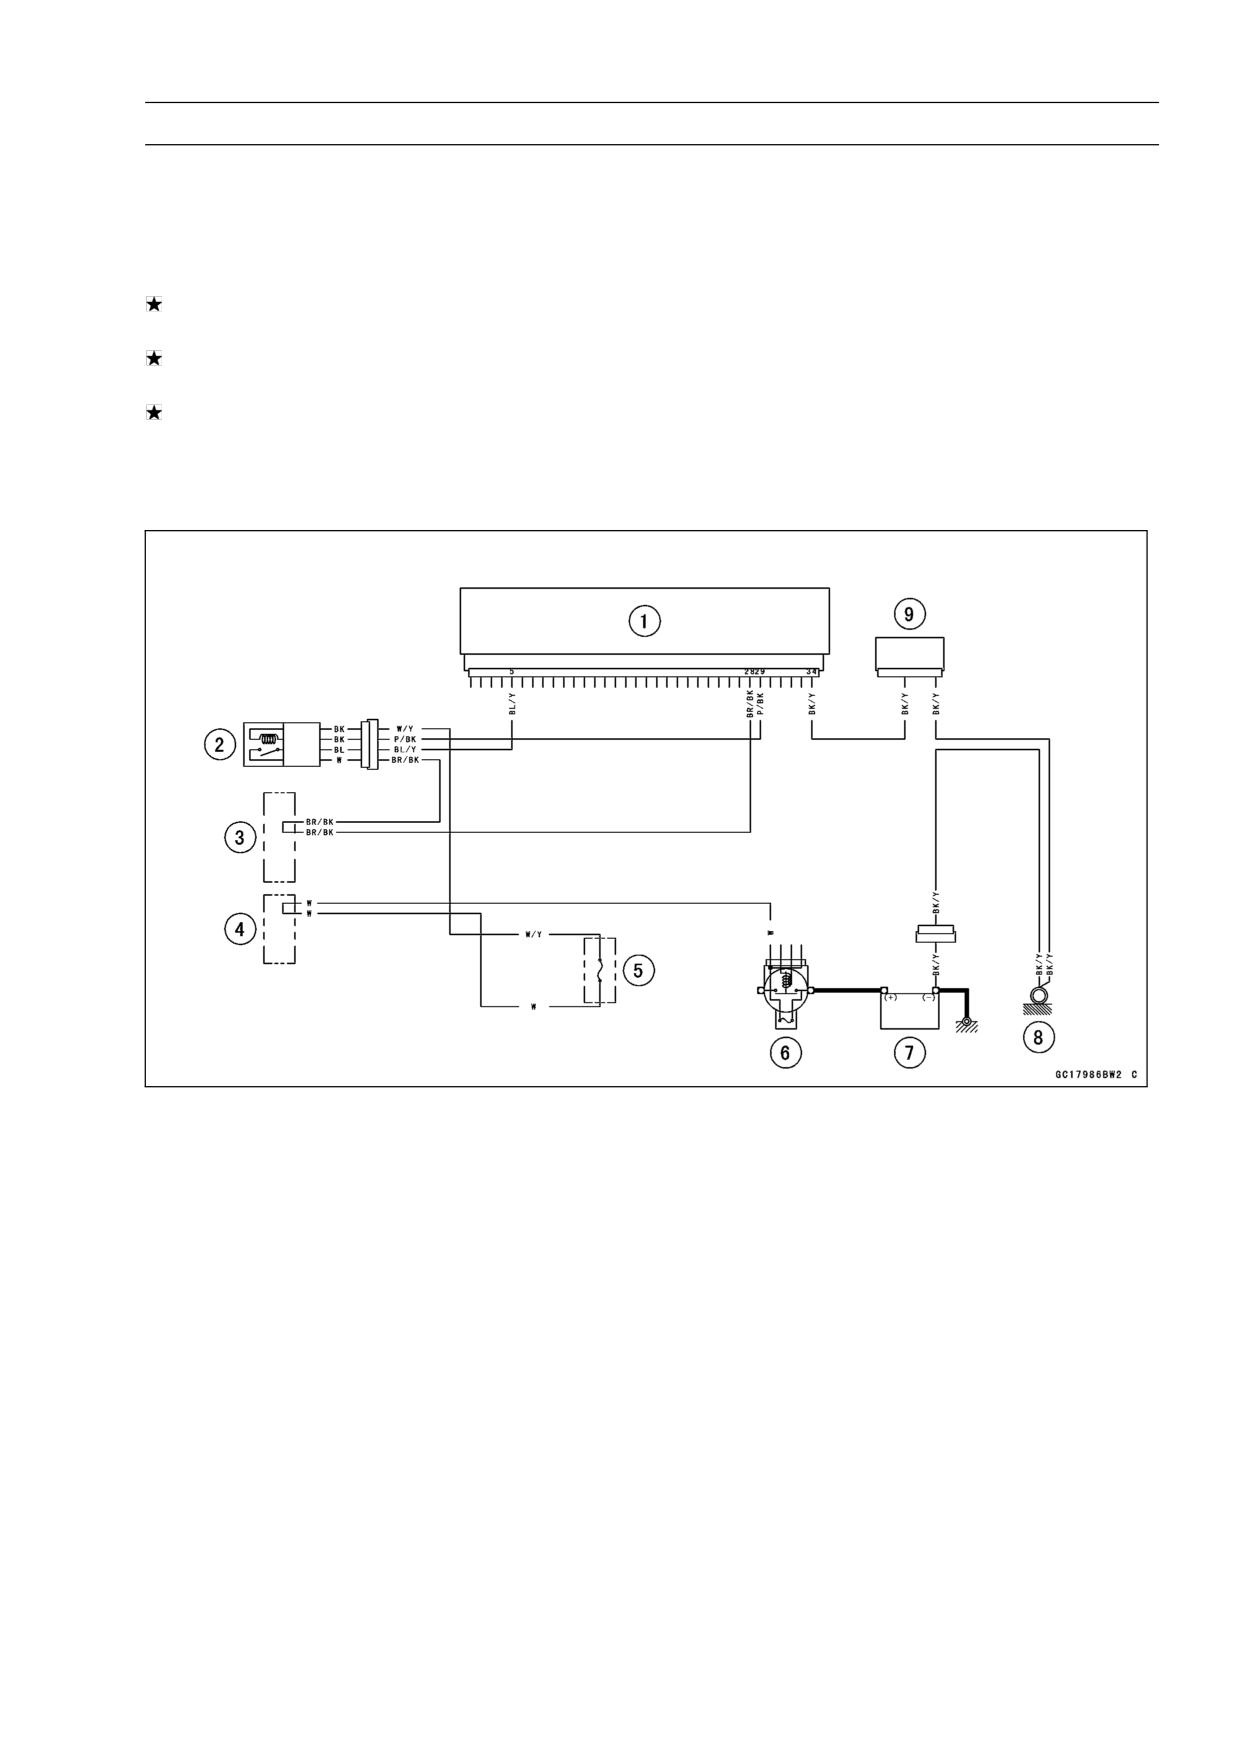
3-76 FUEL SYSTEM (DFI)
Oxygen Sensor-Incorrect Output Voltage (Service Code 94) (Europe Models)
Oxygen Sensor Removal/Installation
• Refer to the Oxygen Sensor Removal/Installation in the
Electrical System chapter.
Oxygen Sensor Inspection
• Warm up the engine thoroughly until the radiator fan
starts.
• Turn the ignition switch OFF.
• Remove:
Left Lower Fairing (see Lower Fairing Removal in the
Frame chapter)
Engine Sprocket Cover (see Engine Sprocket Removal
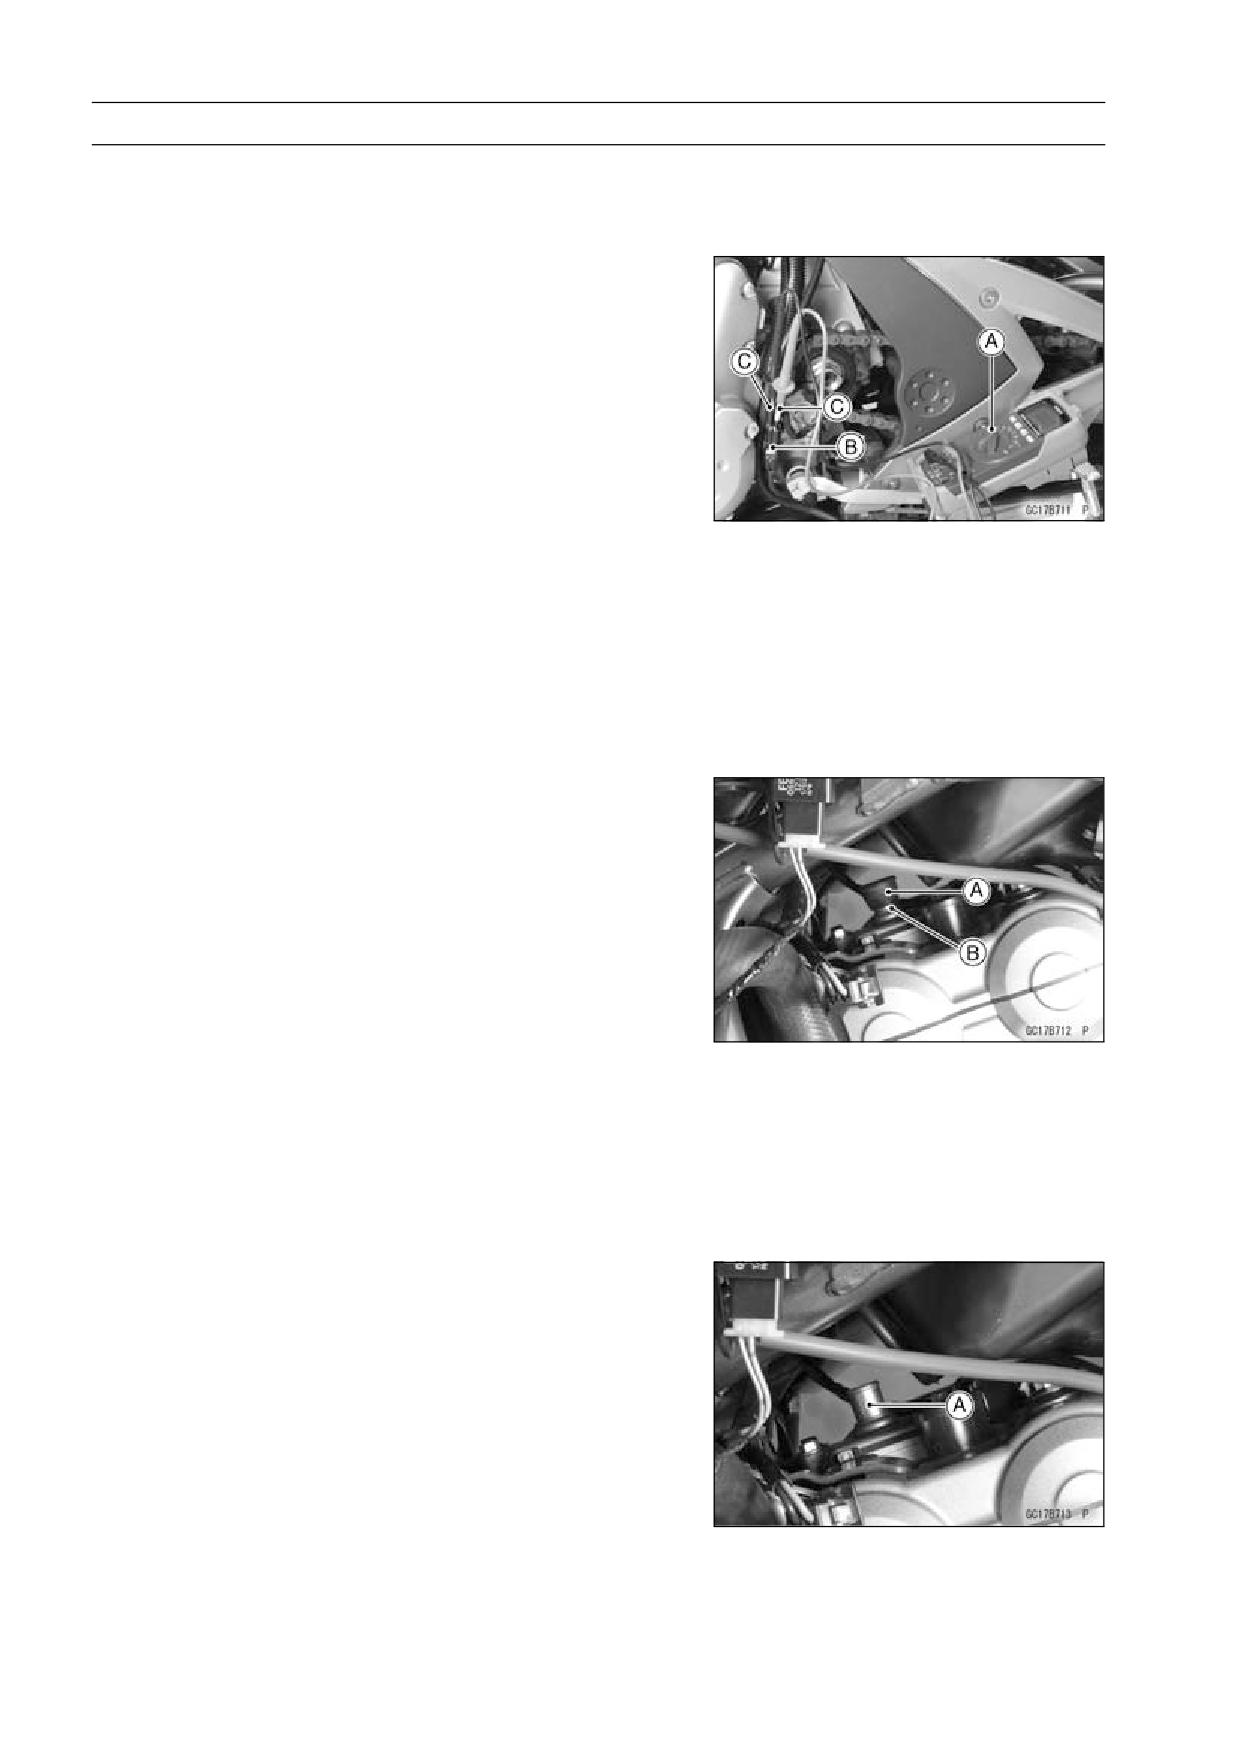
in the Final Drive chapter)
• Connect a digital voltmeter [A] to the oxygen sensor con-
nector [B] (main harness side), using the needle adapter
set [C].
Special Tool - Needle Adapter Set: 57001-1457
Oxygen Sensor Output Voltage
Connections to Oxygen Sensor Connector
Meter (+) → BL/Y lead
Meter (-) → BR/BK lead
• Remove the air switching valve hose from the fitting.
• Install the suitable plugs [A] on the fitting [B] and shut off
the secondary air.
• Turn the ignition switch ON.
• Start the engine, and let it idle.
• Measure the output voltage of the sensor with the con-
nector joined.
Oxygen Sensor Output Voltage (with Plugs)
Standard:
0.7 V or more
• Next, remove the plugs from the fitting [A] with idling.
FUEL SYSTEM (DFI) 3-77
Oxygen Sensor-Incorrect Output Voltage (Service Code 94) (Europe Models)
• Measure the output voltage of the sensor with the con-
nector joined.
Oxygen Sensor Output Voltage (without Plugs)
Standard:
0.2 V or less
If the reading is within range (with plugs: 0.7 V or more,
without plugs: 0.2 V or less), the oxygen sensor is good.
If the reading is without range, inspect the engine and fuel
supply system.
If the engine and fuel supply system good, replace the
oxygen sensor (see Oxygen Sensor Removal/Installation
in the Electrical System chapter).
Oxygen Sensor Circuit
1. ECU
2. Oxygen Sensor
3. Water-proof Joint E
4. Water-proof Joint D
5. Oxygen Sensor Heater Fuse 10 A
6. Main Fuse 30 A
7. Battery
8. Frame Ground
9. Joint Connector
3-78 FUEL SYSTEM (DFI)
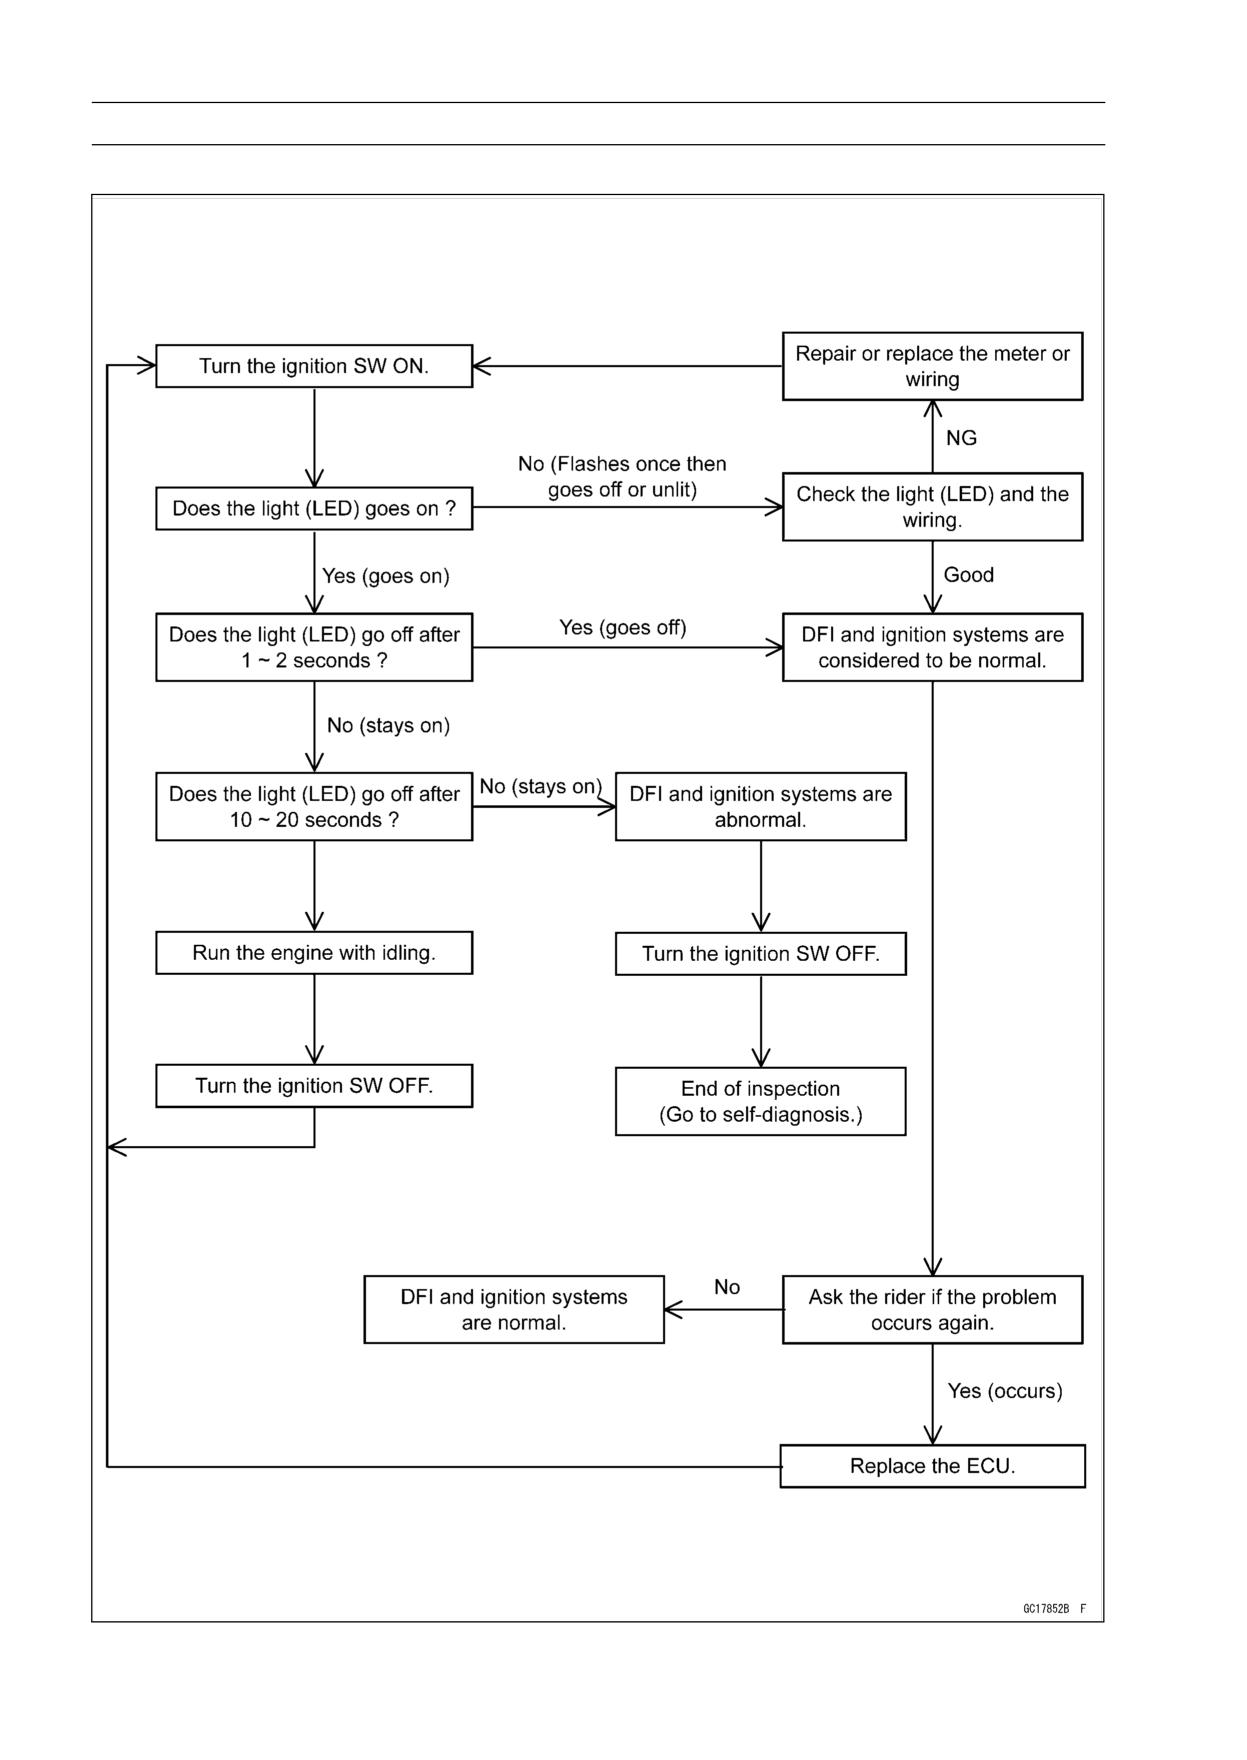
FI Indicator Light (LED)
Inspection Flow Chart
FUEL SYSTEM (DFI) 3-79
FI Indicator Light (LED)
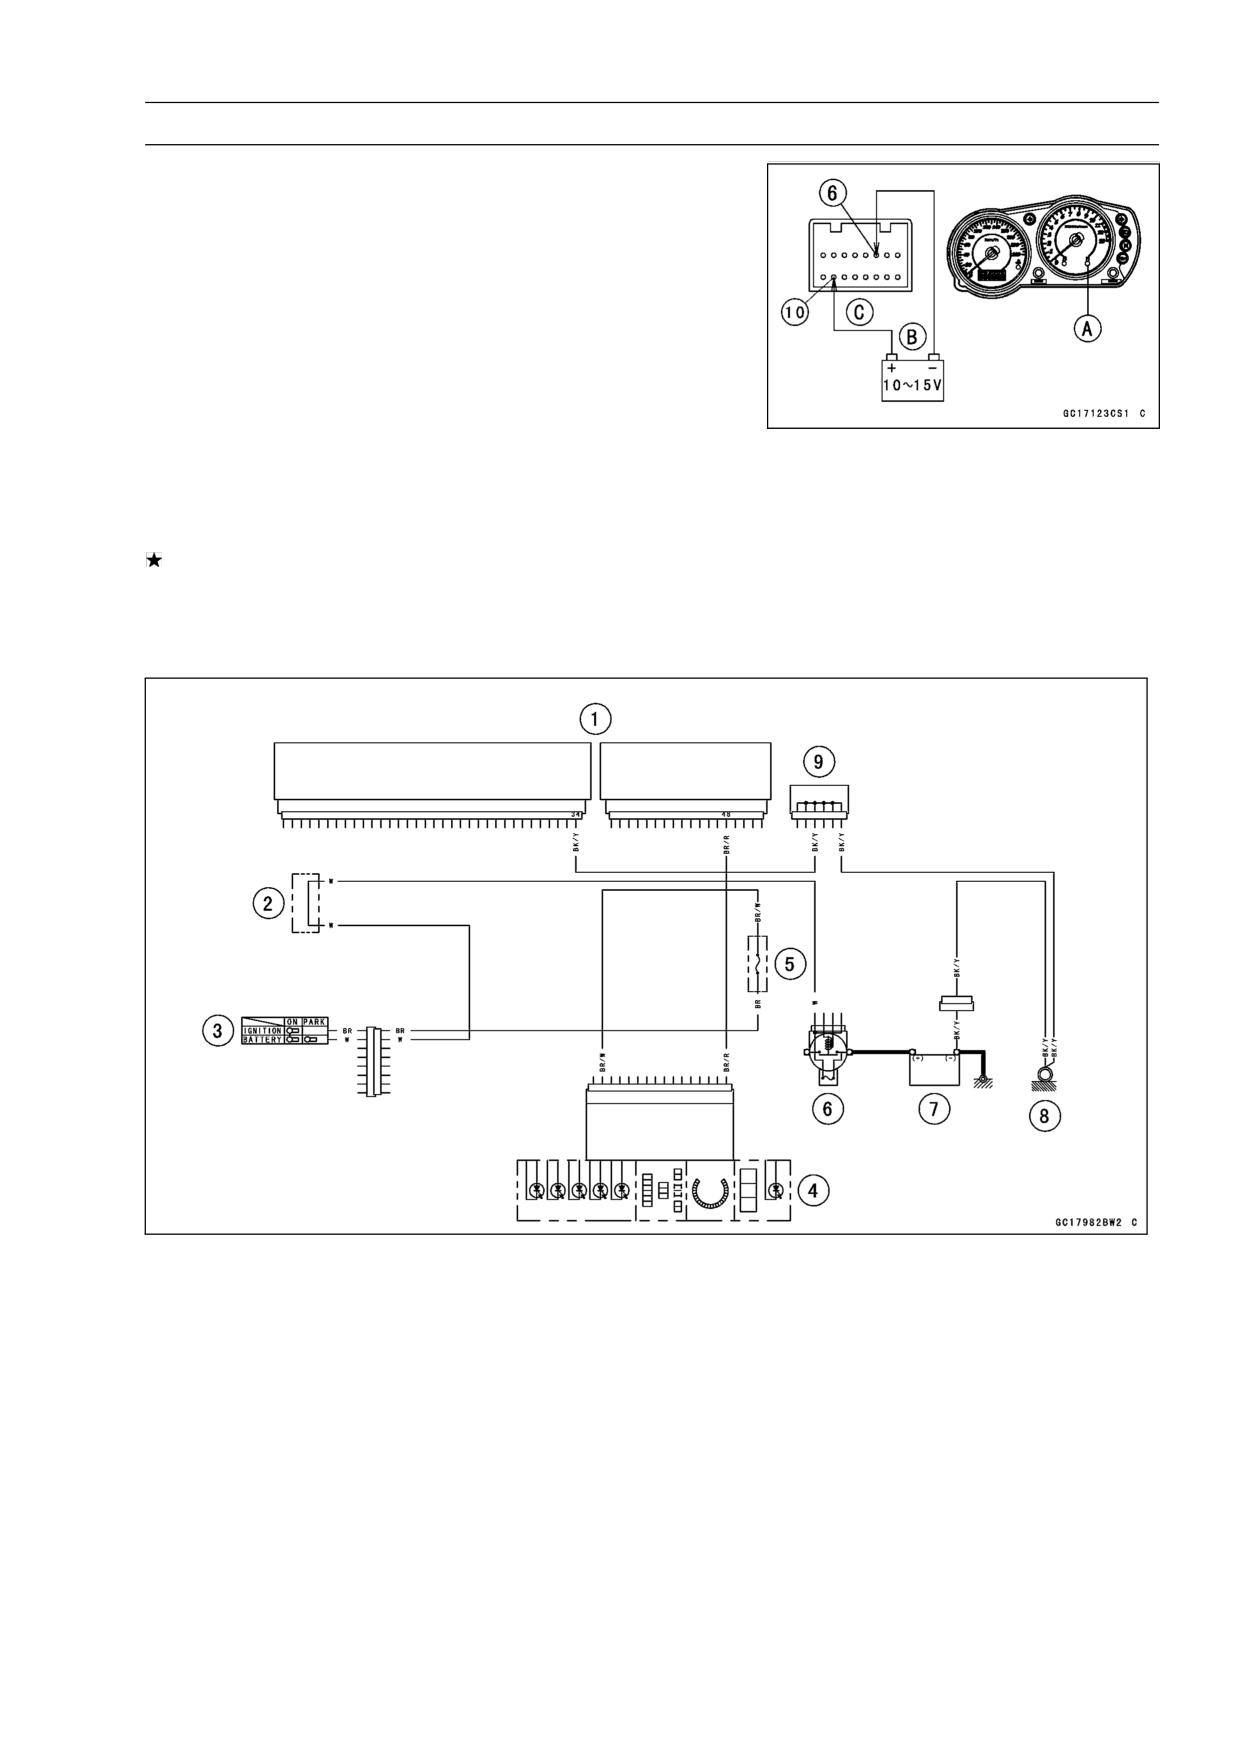
FI Indicator Light (LED) Inspection
• Remove the meter unit (see Meter Unit Removal in the
Electrical System chapter).
• Using two auxiliary leads, supply battery power to the FI
indicator light (LED) [A].
12 V Battery [B]
FI Indicator Light (LED) Check
Connector:
Meter Connector [C] (disconnected)
Connection:
W/BK Lead Terminal [10] of the Meter
→ Battery (+) Terminal
BR/R Lead Terminal [6] of the Meter →
Battery (-) Terminal
Criterion:
The light (LED) should light.
If the light (LED) does not go on, replace the meter unit
(see Meter Unit Removal/Installation in the Electrical Sys-
tem chapter).
FI Indicator Light (LED) Circuit
1. ECU
2. Water-proof Joint C
3. Ignition Switch
4. Meter Unit
5. Ignition Fuse 10 A
6. Main Fuse 30 A
7. Battery
8. Frame Ground
9. Joint Connector
3-80 FUEL SYSTEM (DFI)
ECU
CAUTION
Never drop the ECU, especially on a hard surface.
Such a shock to the ECU can damage it.
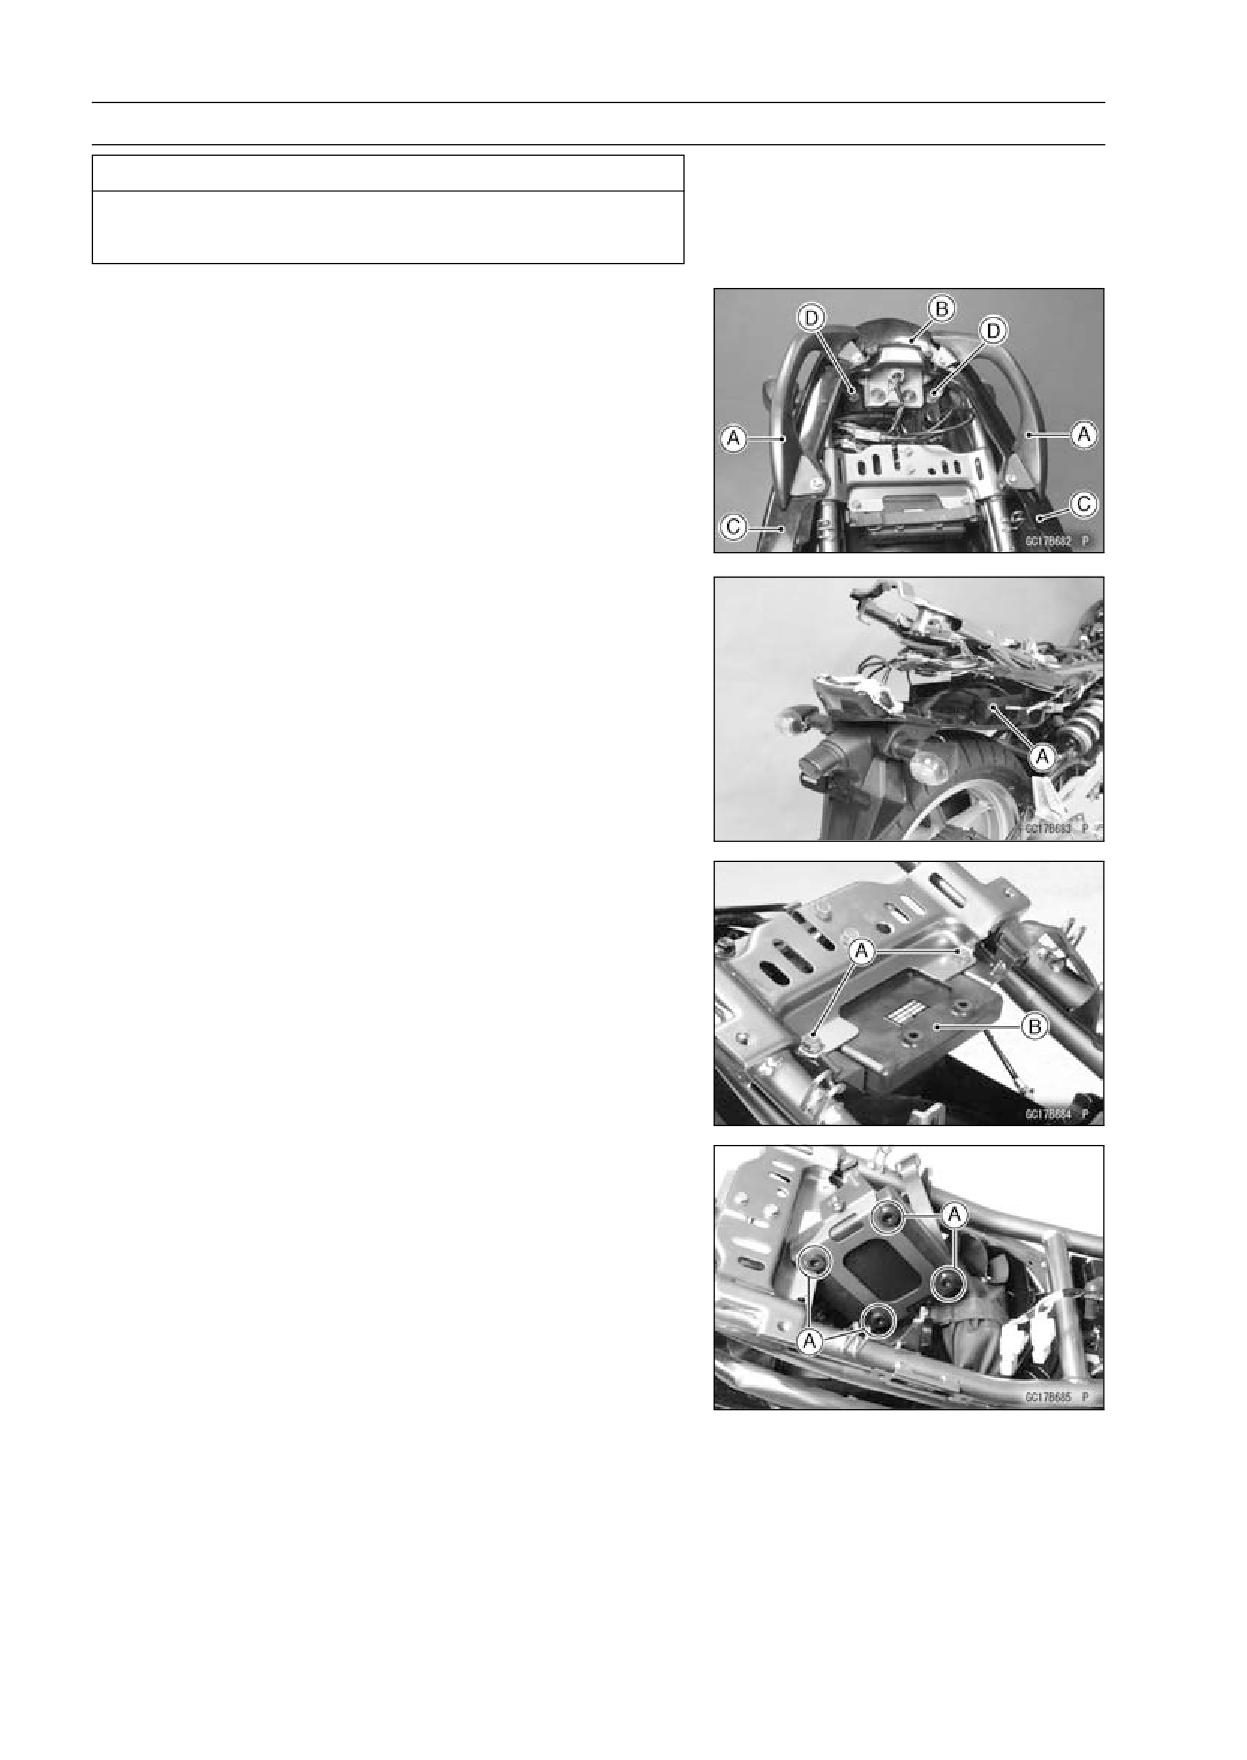
ECU Removal
• Remove:
Seat (see Seat Removal in the Frame chapter)
Grab Rails [A] (see Seat Cover Removal in the Frame
chapter)
Center Seat Cover [B] (see Seat Cover Removal in the
Frame chapter)
Seat Covers [C] (see Seat Cover Removal in the Frame
chapter)
Rear Fender Rear Bolts [D]
• Pull down the rear fender rear [A].
• Remove the ECU bracket bolts [A].
• Take the ECU [B] out along with the harness.
• Disconnect the ECU lead connectors.
ECU Installation
• Fit [A] the bracket on the ECU as shown.
FUEL SYSTEM (DFI) 3-81
ECU
ECU Power Supply Inspection
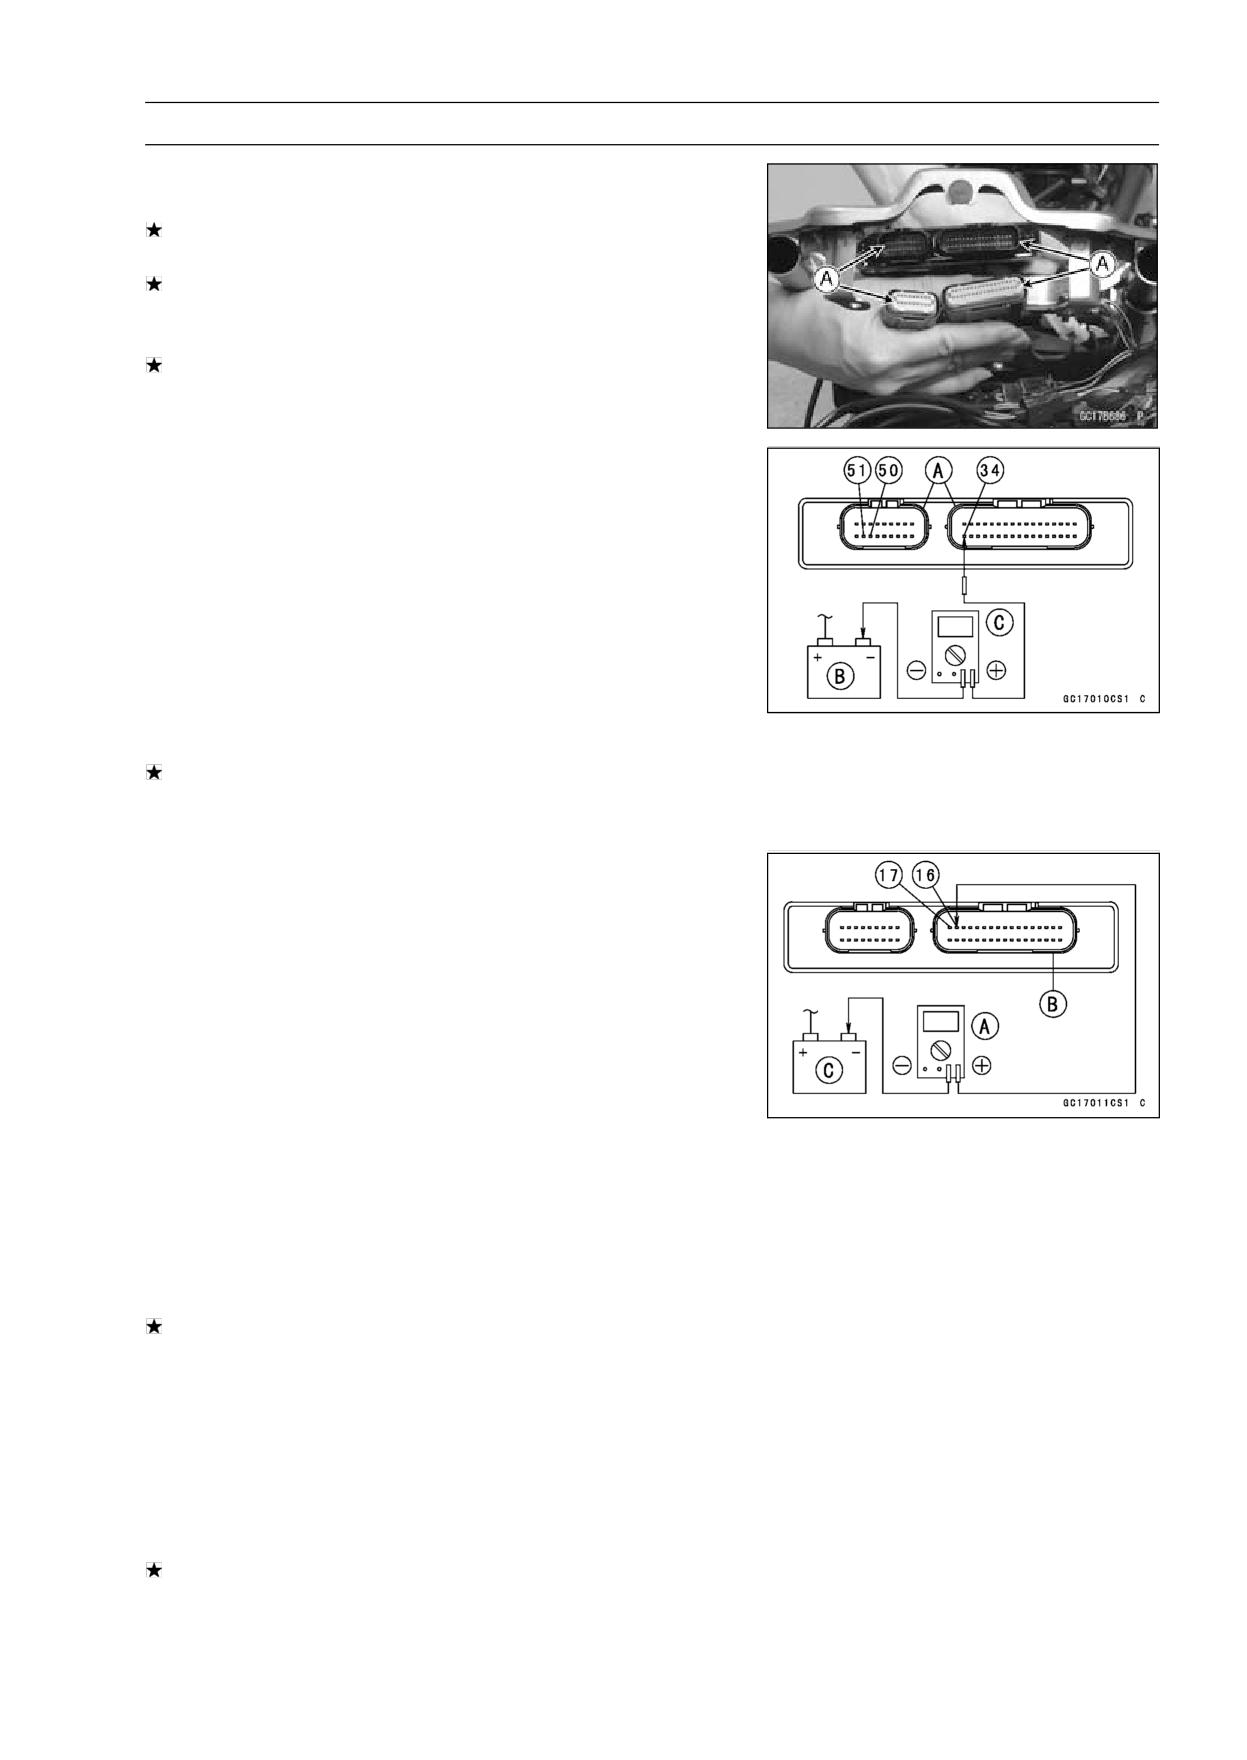
• Visually inspect the terminals [A] of the ECU connectors.
If the connector is clogged with mud or dust, blow it off
with compressed air.
Replace the main harness if the terminals of the main
harness connectors are cracked, bent, or otherwise dam-
aged.
Replace the ECU if the terminals of the ECU connectors
are cracked, bent, or otherwise damaged.
• With the ECU connectors [A] connected, check the fol-
lowing ground lead for continuity with the ignition switch
OFF, using a tester and needle adapter set.
Battery [B]
Tester [C]
Special Tool - Needle Adapter Set: 57001-1457
ECU Grounding Inspection
34, 50, or 51 (BK/Y)
←→ Battery (-) Terminal: 0 Ω
Terminal
Engine Ground
←→ Battery (-) Terminal: 0 Ω
If no continuity, check the connector, the engine ground
lead, or main harness, and repair or replace them if nec-
essary.
• Check the ECU power source voltage with a digital meter
[A].
○Position the terminal in accordance with terminal numbers
of ECU connectors [B] in this chapter figure.
Battery [C]
ECU Power Source Inspection
Meter Connections:
Between Terminal 16 (BR/W) and Battery (-) Terminal
Between Terminal 17 (W/BK) and Battery (-) Terminal
Ignition Switch OFF:
Terminal 16 (BR/W): 0 V
Terminal 17 (W/BK): Battery Voltage (12.8 V or more)
Ignition Switch ON:
Both: Battery Voltage (12.8 V or more)
If the meter does not read as specified, check the follow-
ing:
Main Fuse 30 A (see Fuse Inspection in the Electrical
System chapter)
ECU Fuse 15 A (see Fuse Inspection in the Electrical
System chapter)
ECU Main Relay (see Relay Circuit Inspection in the
Electrical System chapter)
Power Source Wiring (see wiring diagram below)
If the inspection checks good, the ECU is damaged. Re-
place the ECU (see ECU Removal/Installation). The ECU
itself cannot be checked or serviced.
3-82 FUEL SYSTEM (DFI)
ECU
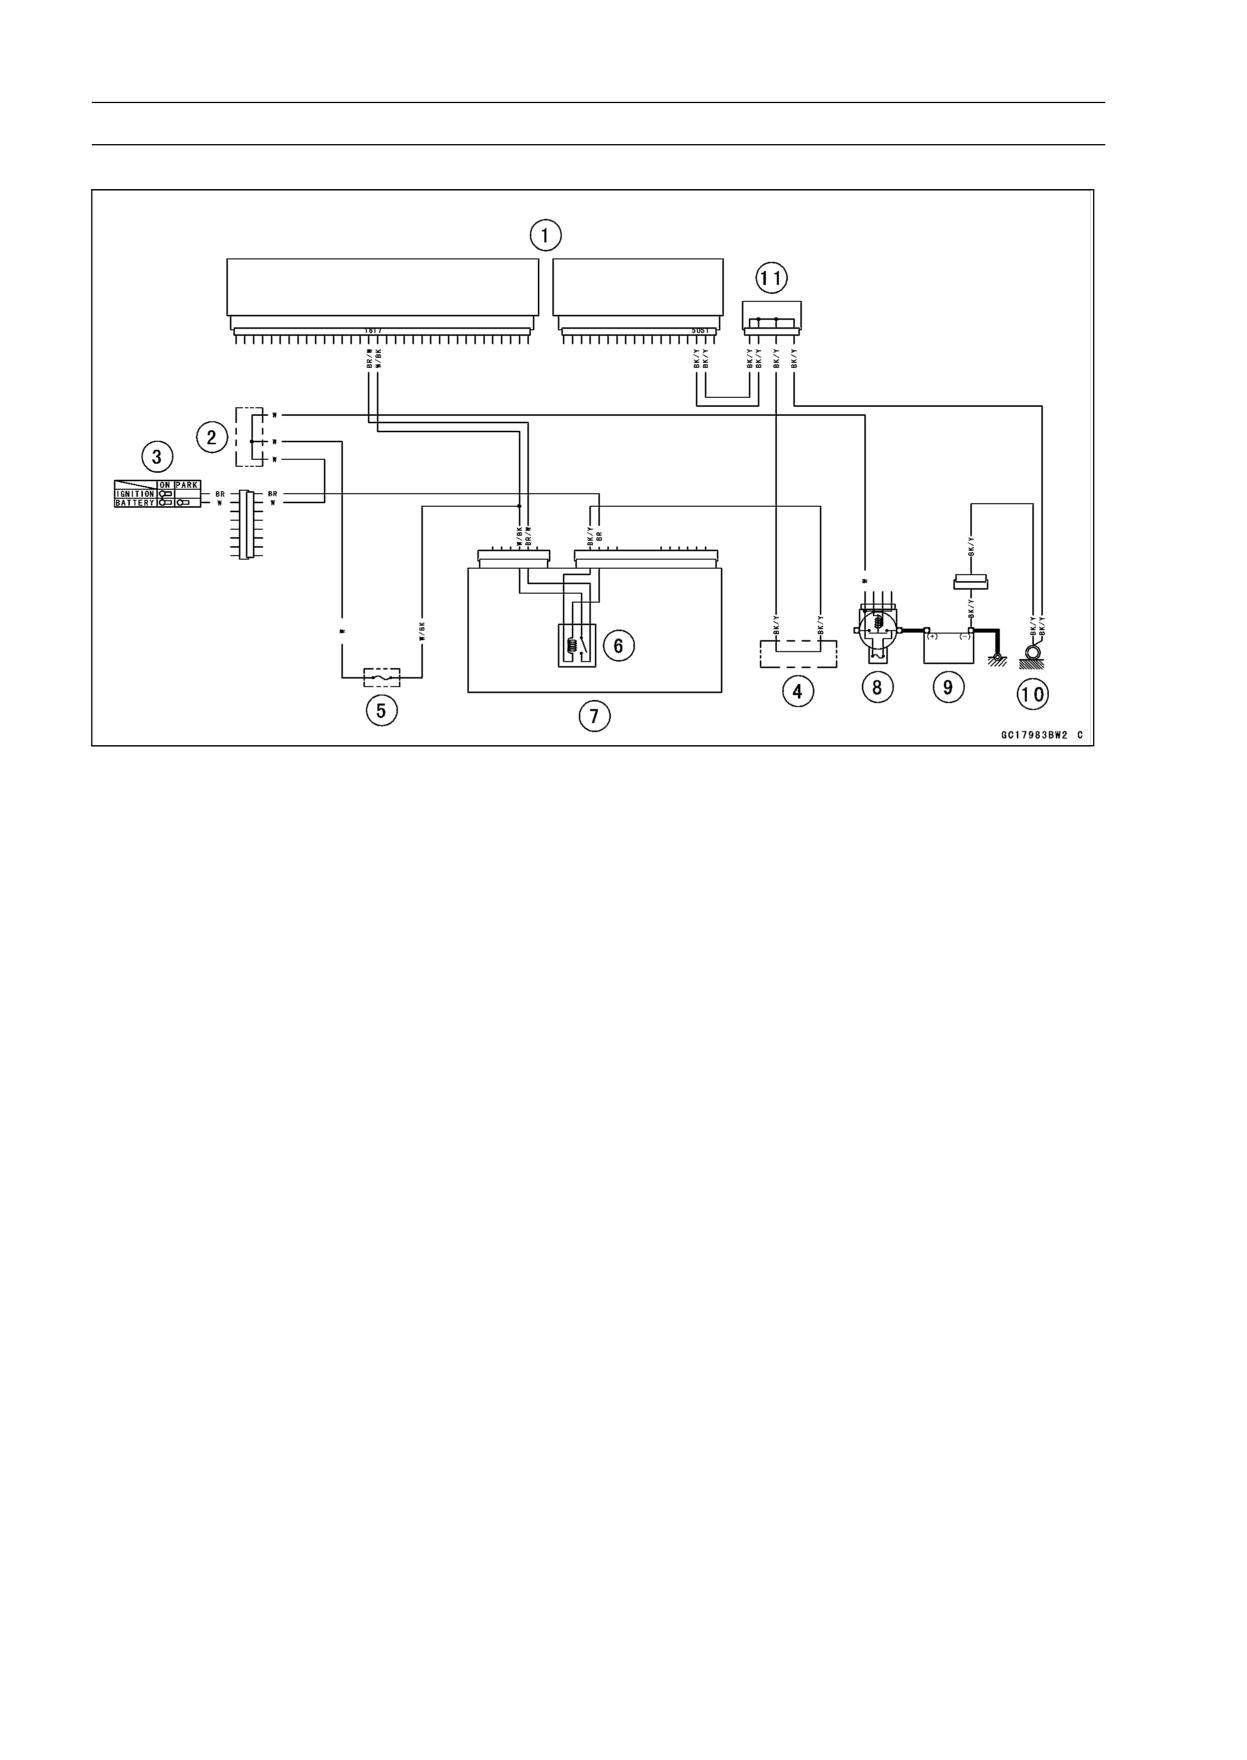
ECU Power Source Circuit
1. ECU
2. Water-proof Joint C
3. Ignition Switch
4. Water-proof Joint A
5. ECU Main Fuse 15 A
6. ECU Main Relay
7. Relay Box
8. Main Fuse 30 A
9. Battery
10. Frame Ground
11. Joint Connector
FUEL SYSTEM (DFI) 3-83
Fuel Line
Fuel Pressure Inspection
NOTE
○This inspection can determine which trouble the DFI
system has, mechanical or electrical trouble.
○It is preferable to measure the fuel pressure while run-
ning the motorcycle just when trouble occurred in order
to know symptom well.
○Be sure the battery is fully charged.
• Remove the fuel tank (see Fuel Tank Removal).
• Remove the left center fairing (see Center Fairing Re-
moval in the Frame chapter).
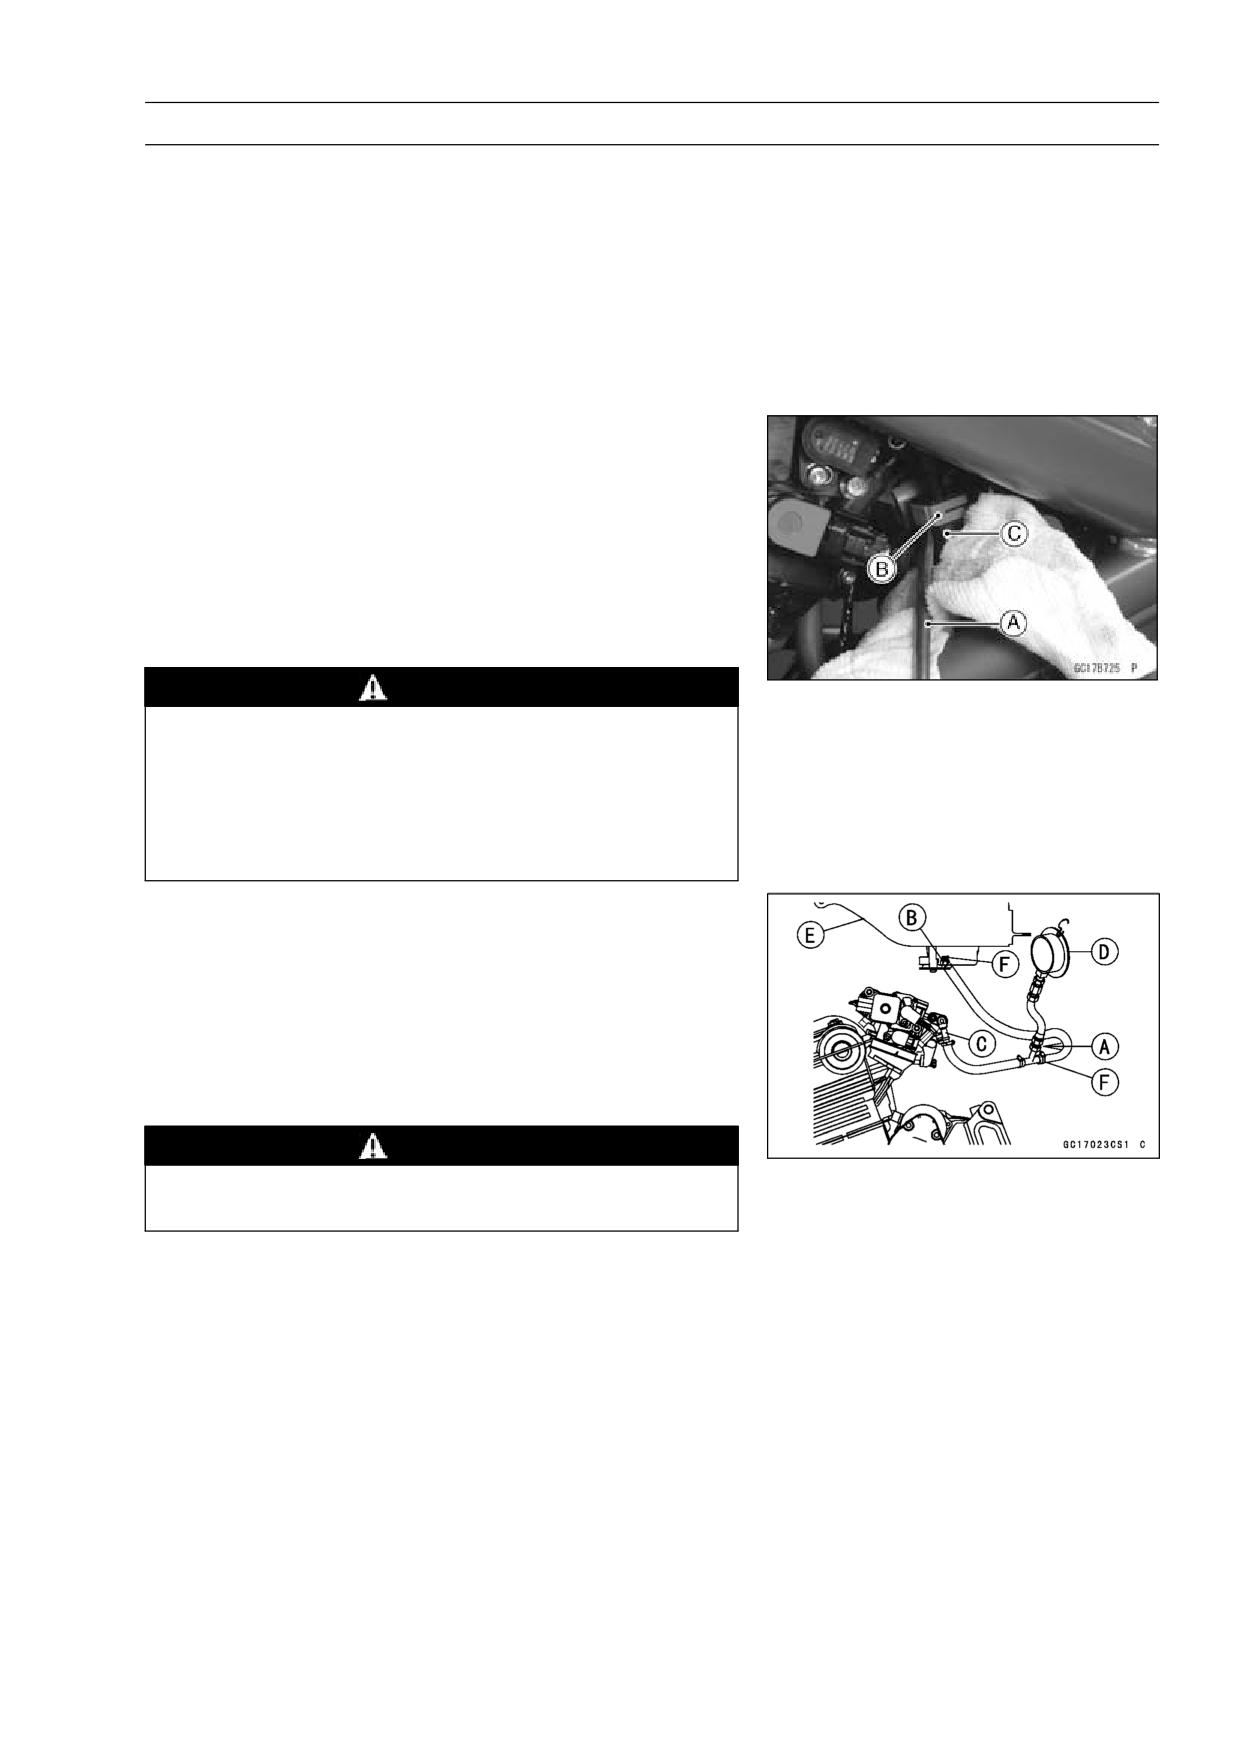
• Be sure to place a piece of cloth around the fuel hose joint
and the delivery pipe.
• Insert a minus screw driver [A] into the slit on the joint lock
[B].
• Turn the driver to disconnect the joint lock.
• Remove the fuel hose [C].
WARNING
Be prepared for fuel spillage; any spilled fuel must
be completely wiped up immediately.
When the fuel hose is disconnected, fuel spills out
from the hose and the pipe because of residual
pressure. Cover the hose connection with a piece
of clean cloth to prevent fuel spillage.
• Install the fuel pressure gauge adapter [A] and fuel hoses
between the fuel pump outlet pipe [B] and the delivery
pipe [C].
• Connect the pressure gauge [D] to the fuel pressure
gauge adapter.
Special Tools - Oil Pressure Gauge, 5 kgf/cm²: 57001-125
Fuel Pressure Gauge Adapter: 57001-1593
Fuel Hose: 57001-1607
WARNING
Do not try to start the engine with the fuel hoses
disconnected.
• Temporarily, install the fuel tank [E].
Clamps [F]
3-84 FUEL SYSTEM (DFI)
Fuel Line
• Turn the ignition switch ON. The fuel pump will turn for 3
seconds, and then stop.
CAUTION
Do not drive the fuel pump without the fuel in the
fuel tank.
• Measure the fuel pressure with the engine stopped.
Fuel Pressure
Right after Ignition Switch ON, with pump running:
Standard:
323 kPa (3.3 kgf/cm², 47 psi)
After 3 seconds from Ignition Switch ON, with pump
stopped:
Standard:
265 kPa (2.7 kgf/cm², 38 psi) (residual
fuel pressure)
The system should hold the residual
pressure about 30 seconds.
• Start the engine, and let it idle.
• Measure the fuel pressure with the engine idling.
Fuel Pressure (Idling)
Standard:
333 kPa (3.4 kgf/cm², 48 psi)
NOTE
○The gauge needle will fluctuate. Read the pressure at
the average of the maximum and minimum indications.
If the fuel pressure is normal, the fuel circulation system
(fuel pump, pressure regulator, and fuel passage) is no
faults. Check the DFI electronic control system (injectors,
sensors, crankshaft sensor, and ECU).
If the fuel pressure is much lower than specified, check
the following.
Fuel Line Leakage
Fuel Pump Operation (check the sound of the pump)
Amount of Fuel Flow (see Fuel Flow Rate Inspection)
If the fuel pressure is much higher than specified, check
the following.
Delivery Pipe Clogging
Injector Clogging
• Remove the fuel pressure gauge and adapter.
• Install the removed parts (see appropriate chapters).
FUEL SYSTEM (DFI) 3-85
Fuel Line
Fuel Flow Rate Inspection
NOTE
○Be sure the battery is fully charged.
WARNING
Gasoline is extremely flammable and can be explo-
sive under certain conditions. Make sure the area
is well-ventilated and free from any source of flame
or sparks; this includes any appliance with a pilot
light. Do not smoke. Turn the ignition switch OFF.
Be prepared for fuel spillage; any spilled fuel must
be completely wiped up immediately.
• Turn the ignition switch, and engine stop switch OFF.
• Wait until the engine cools down.
• Prepare a plastic hose of the inside diameter 7.5 mm
(0.30 in.) and a measuring cylinder.
• Remove the fuel tank bolt (see Fuel Tank Removal).
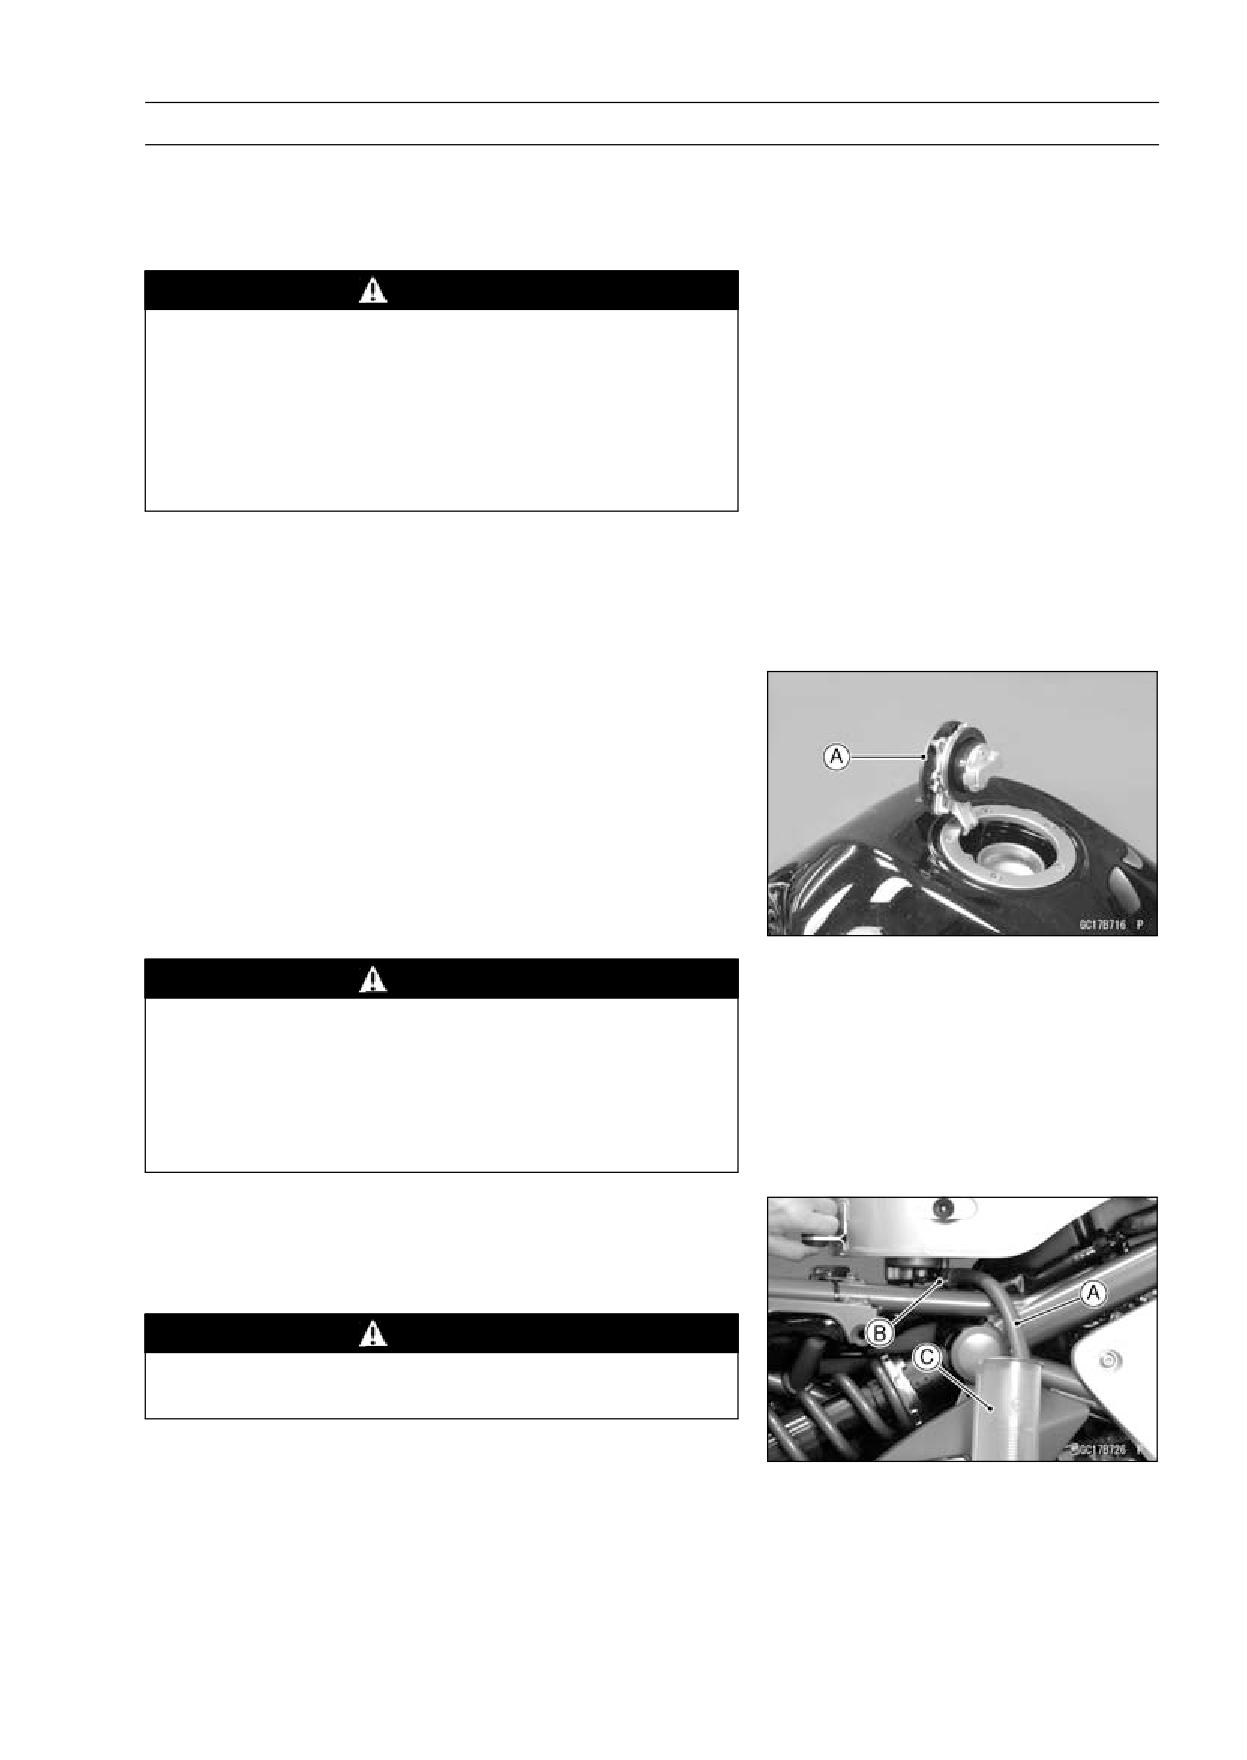
• Open the fuel tank cap [A] to lower the pressure in the
tank.
WARNING
Be prepared for fuel spillage; any spilled fuel must
be completely wiped up immediately.
When the fuel hose is disconnected, fuel spills out
from the hose and the pipe because of residual
pressure. Cover the hose connection with a piece
of clean cloth to prevent fuel spillage.
• Connect the plastic hose [A] to the fuel pump outlet pipe.
• Secure the plastic hose with a clamp [B].
• Run the other side of the plastic hose into the measuring
cylinder [C].
WARNING
Wipe off spilled out fuel immediately.
Be sure to hold the measuring cylinder vertical.
• Temporarily install the fuel tank and close the fuel tank
cap.
• With the engine stopped, turn the ignition switch ON. The
fuel pump should operate for 3 seconds, and then should
stop. Repeat this several times until the plastic hose is
filled with fuel.
3-86 FUEL SYSTEM (DFI)
Fuel Line
CAUTION
Do not drive the fuel pump without the fuel in the
fuel tank.
• Measure the discharge for 3 seconds with the plastic hose
filled with fuel.
○Repeat this operation several times.
Amount of Fuel Flow
Standard:
60 mL or more for 3 seconds
If the fuel flow is much less than the specified, check the
battery condition (see Charging Condition Inspection in
the Electrical System chapter). If the battery is good, re-
place the fuel pump (see Fuel Pump Removal/Installa-
tion).
• After inspection, install the fuel tank (see Fuel Tank Instal-
lation).
• Start the engine and check for fuel leakage.
FUEL SYSTEM (DFI) 3-87
Fuel Pump
Fuel Pump Removal
CAUTION
Never drop the fuel pump, especially on a hard sur-
face. Such a shock to the pump can damage it.
WARNING
Gasoline is extremely flammable and can be explo-
sive under certain conditions. Make sure the area
is well-ventilated and free from any source of flame
or sparks; this includes any appliance with a pilot
light. Do not smoke. Turn the ignition switch OFF.
Disconnect the battery (-) terminal.
To make fuel spillage minimum, draw the fuel out
from the fuel tank when the engine is cold. Be
prepared for fuel spillage; any spilled fuel must be
completely wiped up immediately.
• Draw the fuel out from the fuel tank with a commercially
available electric pump.
• Remove the fuel tank (see Fuel Tank Removal).
○Be careful of fuel spillage from the fuel tank since fuel still
remains in the fuel tank and fuel pump. Plug the fuel pipe
of the fuel tank.
• Turn the fuel tank upside down.
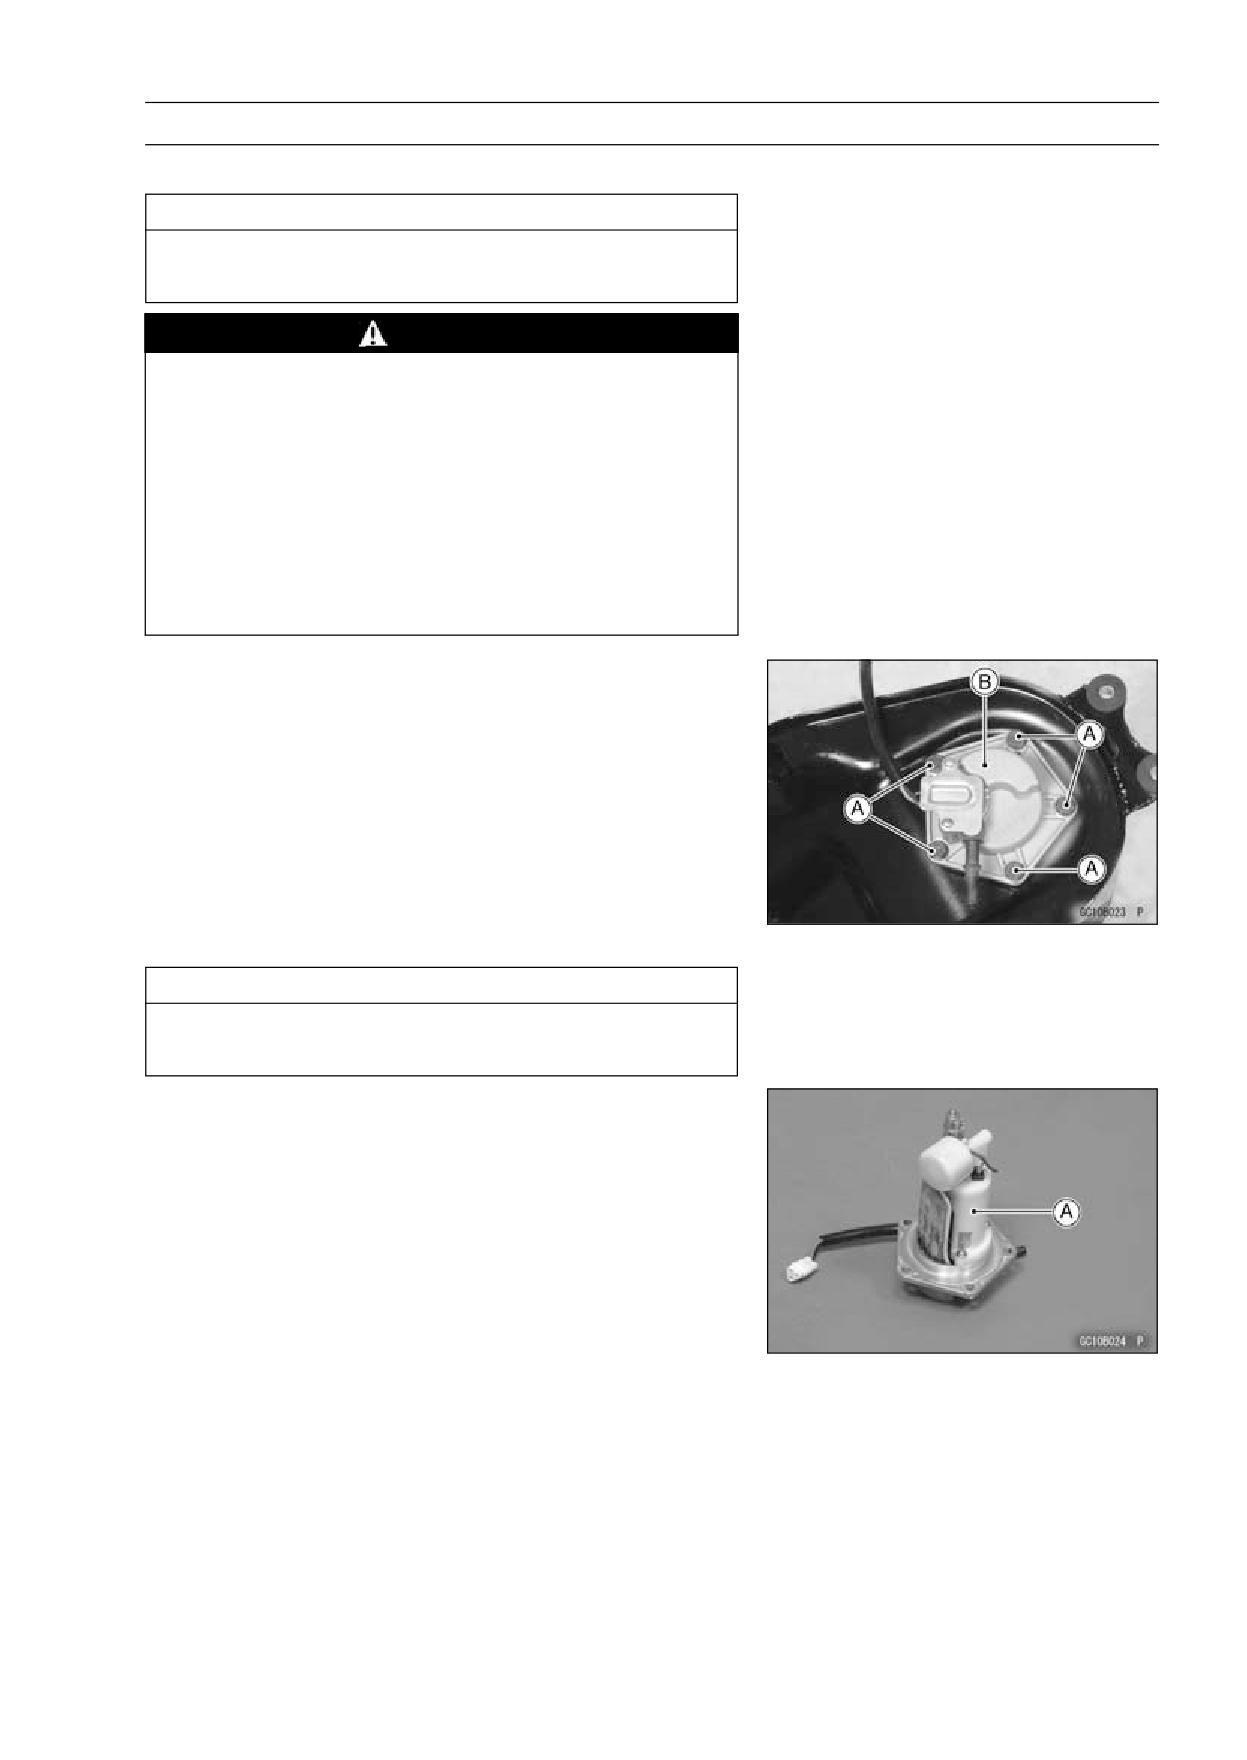
• Remove:
Fuel Pump Bolts [A]
Fuel Pump [B] and gasket
• Discard the fuel pump gasket.
CAUTION
Do not pull the lead of the fuel pump. If they are
pulled, the lead terminals may be damaged.
Fuel Pump Installation
• Remove dirt or dust from the fuel pump [A] by lightly ap-
plying compressed air.
3-88 FUEL SYSTEM (DFI)
Fuel Pump
• Replace the fuel pump gasket [A] with a new one.
• Apply a non-permanent locking agent to the threads of
the fuel pump bolts.
• Tighten the fuel pump bolts to a snug fit, tighten them
alternating diagonally.
Torque - Fuel Pump Bolts: 9.8 N·m (1.0 kgf·m, 87 in·lb)
• Tighten the pump bolts again alternating diagonally to
check the tightness.
Fuel Pump Operation Inspection
NOTE
○Be sure the battery is fully charged.
○Just listen to the pump sound in the fuel tank to confirm
pump operation.
• Turn the ignition switch ON and make sure that the fuel
pump operates (make light sounds) for 3 seconds, and
then stops.
• Turn the ignition switch OFF.
If the pump does not work as described above, inspect
the operating voltage.
Fuel Pump Operating Voltage Inspection
NOTE
○Be sure the battery is fully charged.
• Turn the ignition switch OFF.
• Remove the left side cover (see Side Cover Removal in
the Frame chapter).
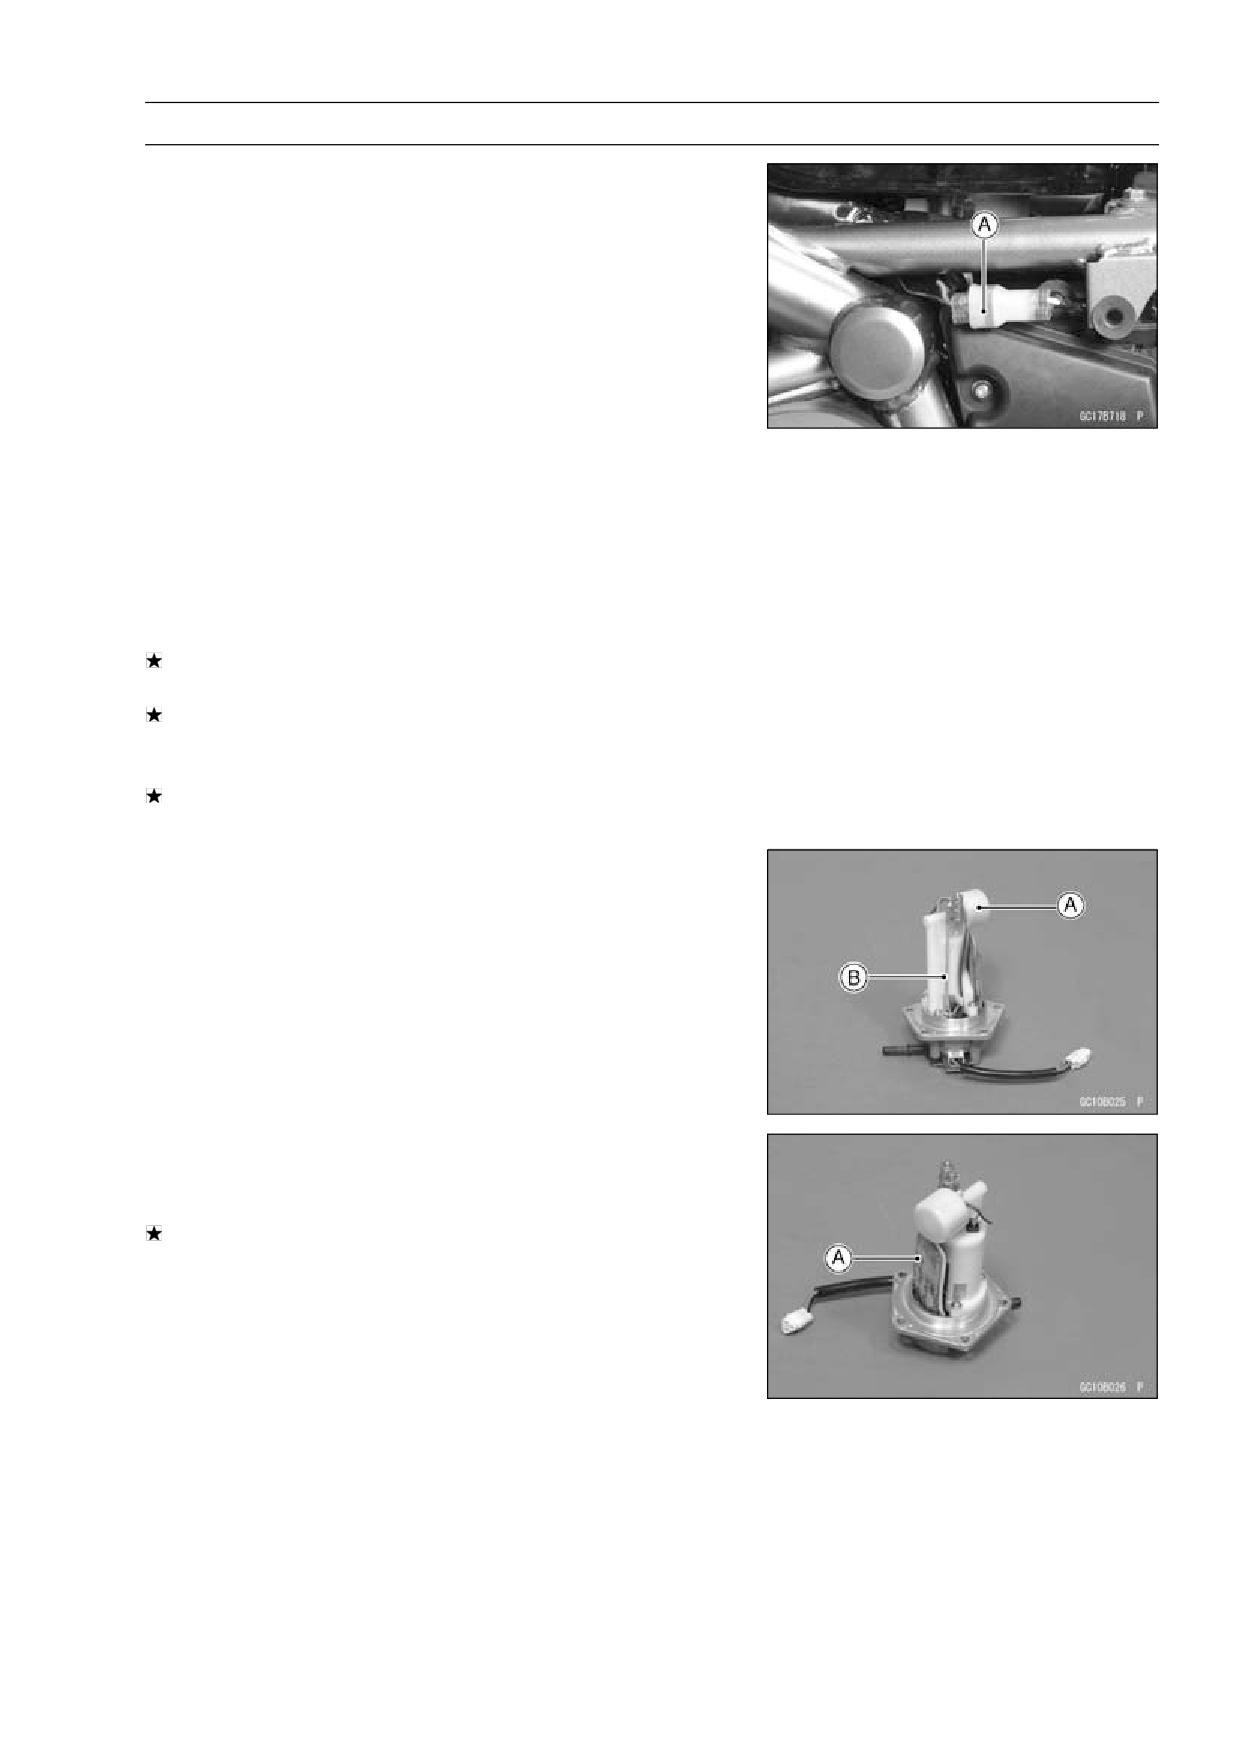
FUEL SYSTEM (DFI) 3-89
Fuel Pump
• Connect the hand tester (25 V DC) to the fuel pump con-
nector [A] with needle adapter set.
Special Tools - Hand Tester: 57001-1394
Needle Adapter Set: 57001-1457
○Measure the operating voltage with the engine stopped,
and with the connector joined.
• Turn the ignition switch ON.
○The tester needle should indicate battery voltage for 3
seconds, and then 0 V.
Pump Operating Voltage at Pump
Connections to Pump Connectors
Tester (+) → W/R Lead
Tester (-) → BK/Y Lead
Operating Voltage at Pump Connector
Standard:
Battery Voltage (12.8 V or more) for 3
seconds, and then 0 V.
If the reading stays on battery voltage, and never shows
0 V. Check the ECU and fuel pump relay.
If the voltage is in specification, but the pump doesn’t
work, replace the pump (see Fuel Pump Removal/Instal-
lation).
If there is still no battery voltage, check the pump relay
(see Relay Box section in the Electrical System chapter).
Pressure Regulator Removal
○The pressure regulator [A] is built into the fuel pump [B]
and cannot be removed.
Pump Screen, Fuel Filter Cleaning
○The fuel filter [A] is built into the pump and cannot be
cleaned or checked.
If the fuel filter is suspected of clogging or being damaged,
replace it with the fuel pump as a set.
3-90 FUEL SYSTEM (DFI)
Fuel Pump
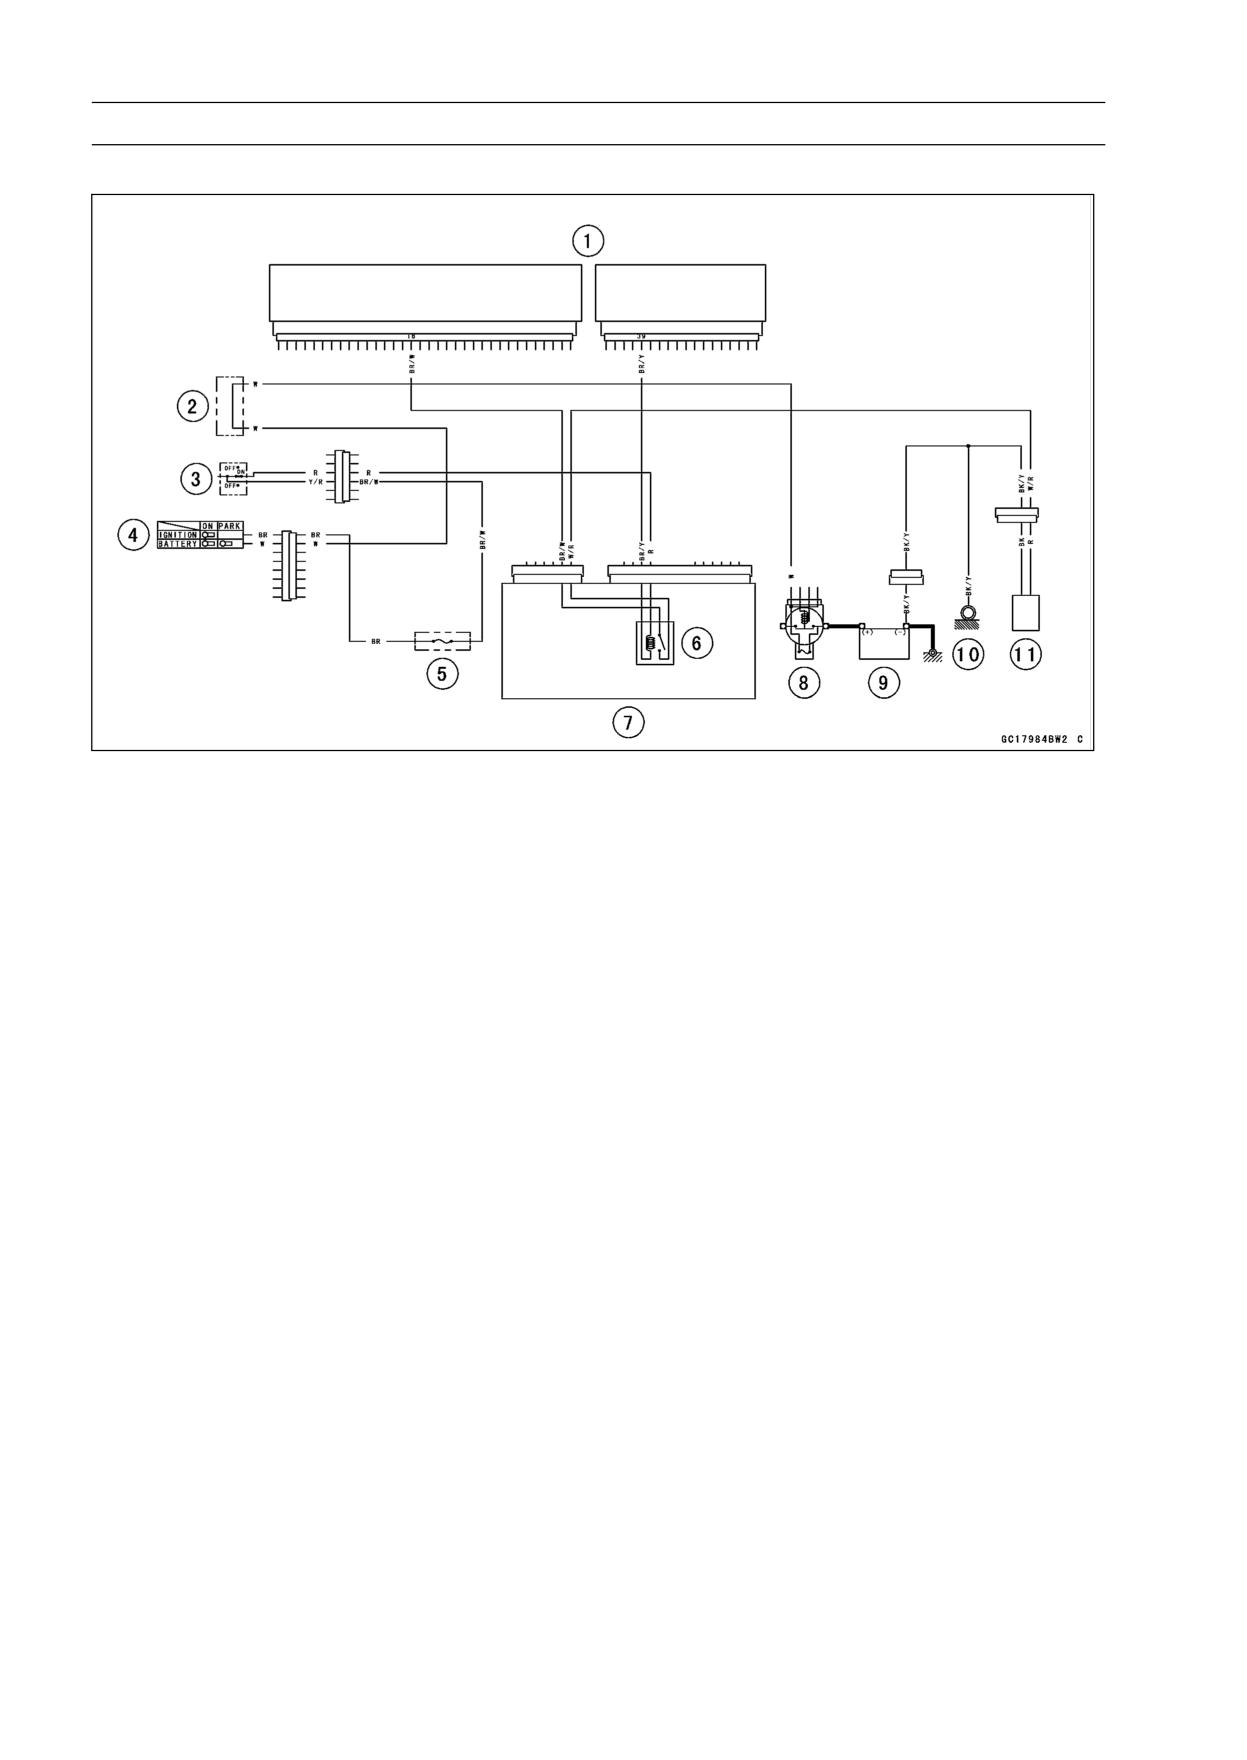
Fuel Pump Circuit
1. ECU
2. Water-proof Joint C
3. Engine Stop Switch
4. Ignition Switch
5. Ignition Fuse 10 A
6. Fuel Pump Relay
7. Relay Box
8. Main Fuse 30 A
9. Battery
10. Frame Ground
11. Fuel Pump
FUEL SYSTEM (DFI) 3-91
Fuel Injectors
Removal/Installation
• Refer to the Throttle Body Assy Disassembly/Assembly.
Audible Inspection
• Start the engine.
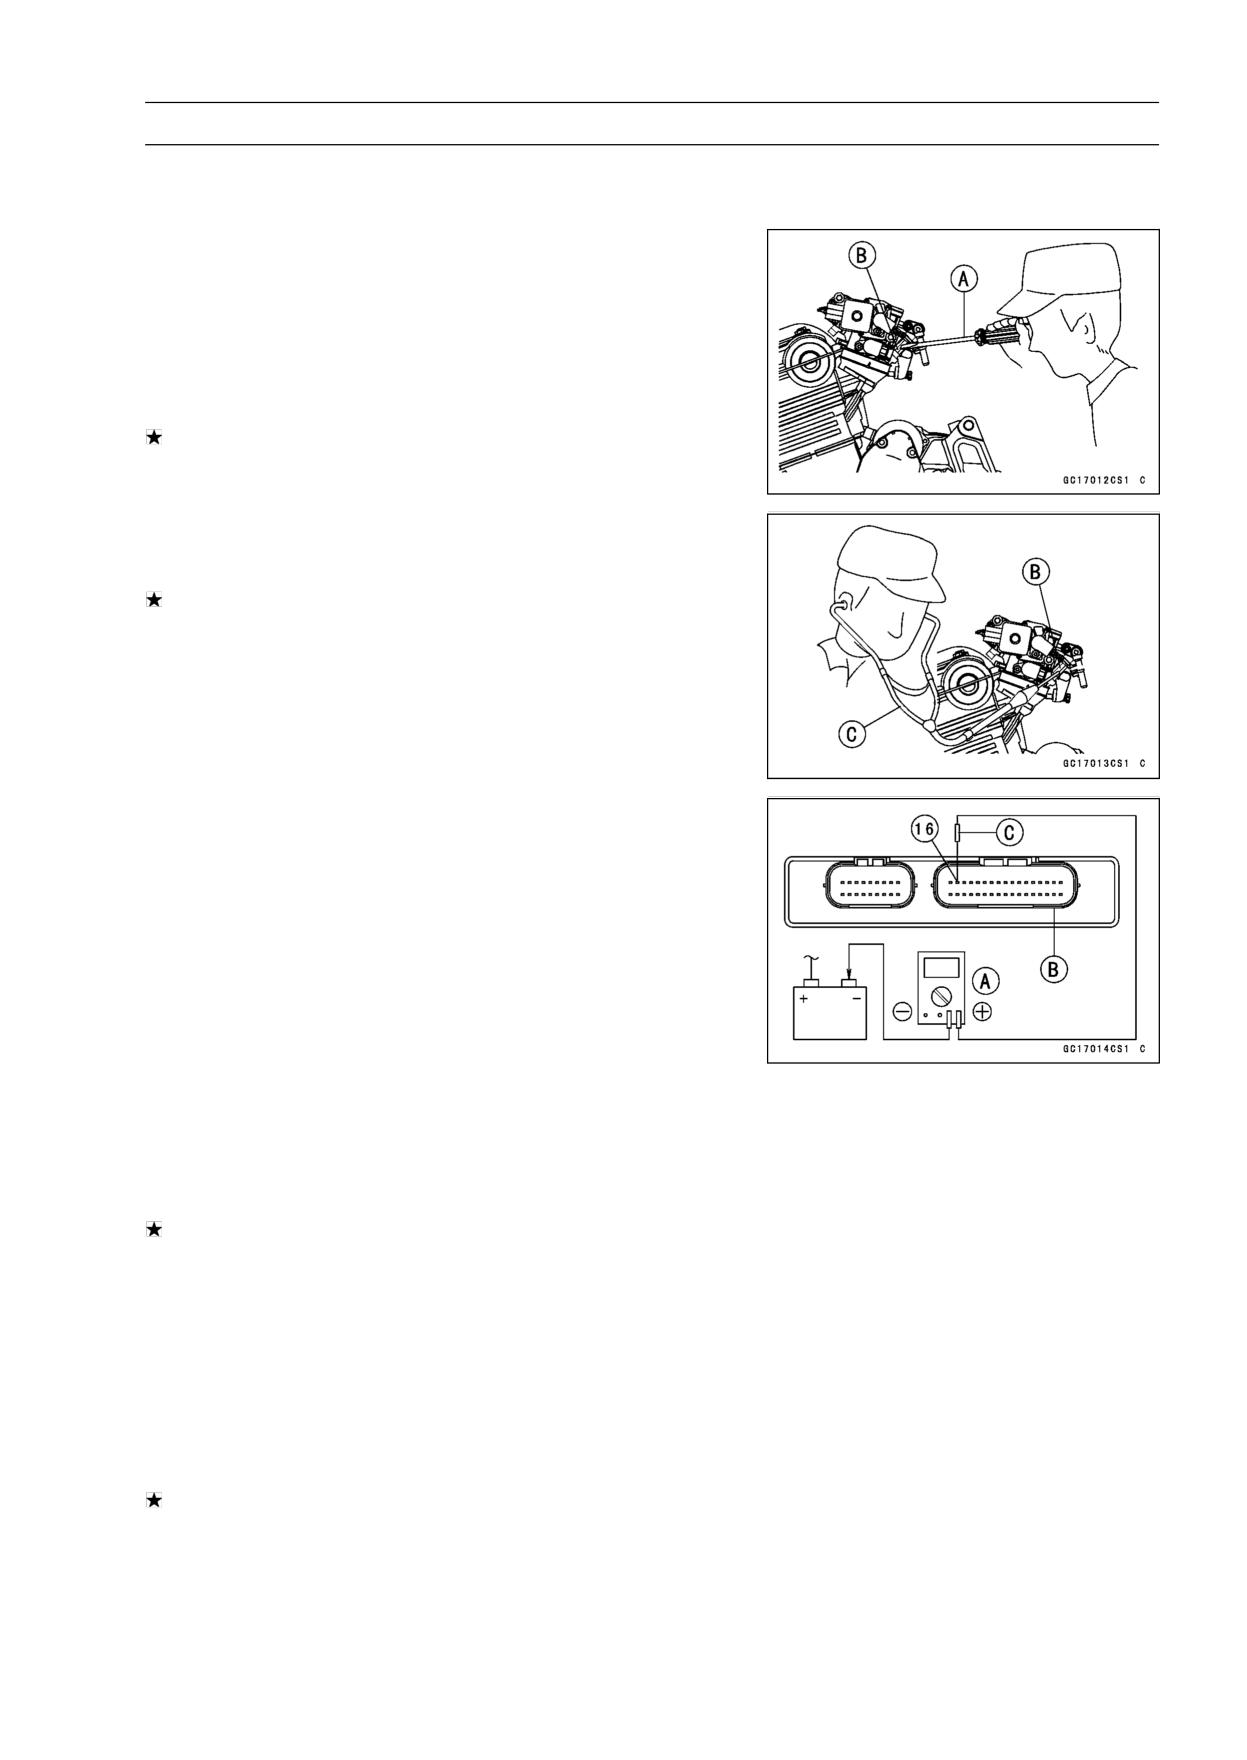
• Apply the tip of a screwdriver [A] to the injector [B]. Put
the grip end onto your ear, and listen whether the injector
is clicking or not.
○A sound scope [C] can also be used.
• Do the same for the other injectors.
If all the injectors click at a regular intervals, the injec-
tors are good. The trouble may be related to the fuel line,
requiring fuel pressure inspection (see Fuel Pressure In-
spection).
○The click interval becomes shorter as the engine speed
rises.
If any injector(s) doesn’t click, the DFI circuit or the injector
is suspect. Perform “Fuel Injector Power Source Voltage
Inspection”, first.
Fuel Injector Power Source Voltage Inspection
• Remove the ECU (see ECU Removal).
○Do not disconnect the ECU connector.
• Connect a digital meter [A] to the ECU connector [B], us-
ing the needle adapter [C].
Special Tool - Needle Adapter Set: 57001-1457
○Measure the power source voltage with the engine
stopped, and with the connector joined.
• Turn the ignition switch ON.
Injector Power Source Voltage at ECU
Connections: Meter (+) → W/Y (terminal 16)
Meter (-) → Battery (-) Terminal
Service Limit: Battery Voltage (12.8 V or more)
If the meter doesn’t read as specified, check the following.
Main Fuse 30 A (see Fuse Inspection in the Electrical
System chapter)
Fuel Pump Relay (see Relay Circuit Inspection in the
Electrical System chapter)
Power Source Wiring (see wiring diagram below)
○To check the W/R leads between the injector connector
and the fuel pump relay, remove the fuel tank (see Fuel
Tank Removal) and the left side cover (see Side Cover
Removal in the Frame chapter).
If the power source voltage is normal, check the output
voltage of the injectors.
3-92 FUEL SYSTEM (DFI)
Fuel Injectors
Fuel Injector Output Voltage Inspection
• Turn the ignition switch OFF.
• Remove the ECU (see ECU Removal).
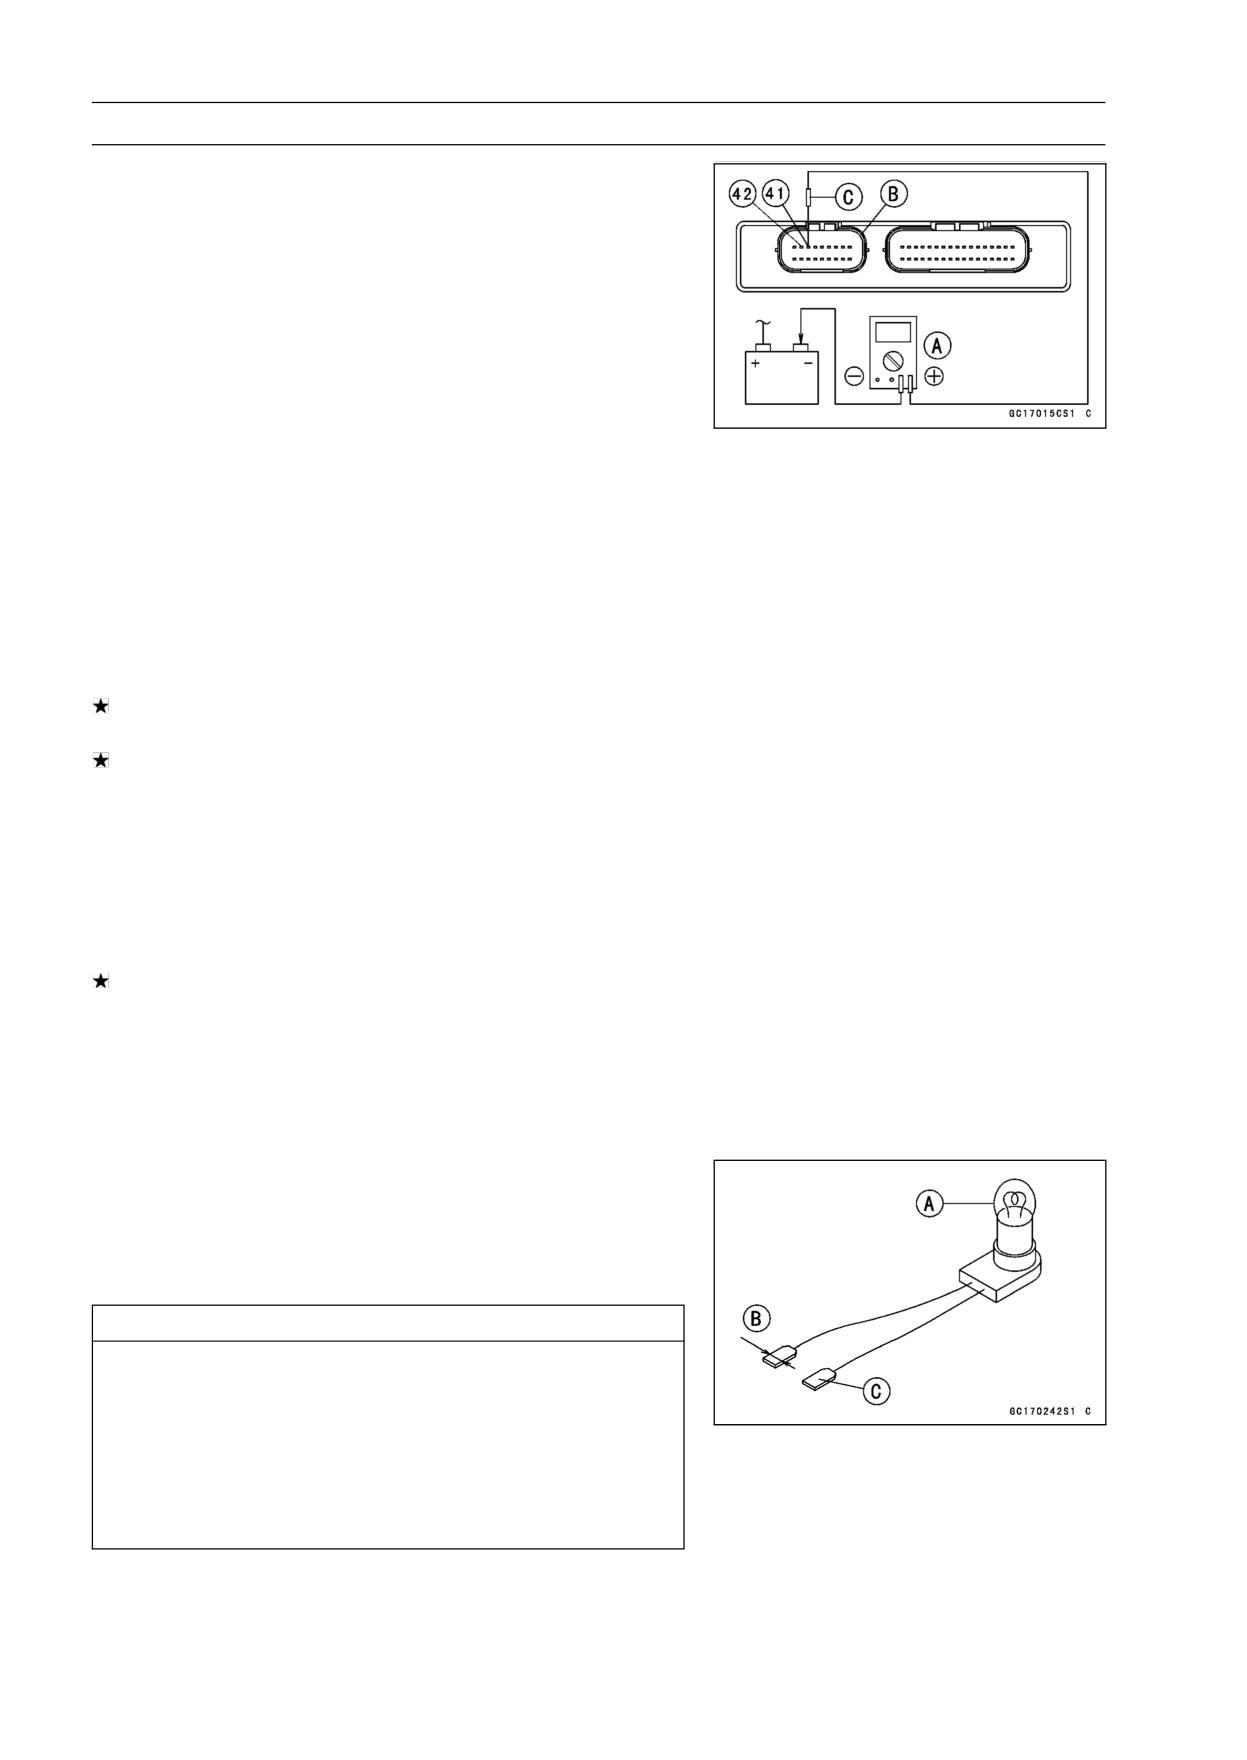
• Connect a digital voltmeter [A] to the ECU connector [B]
with the needle adapter set [C].
Special Tool - Needle Adapter Set: 57001-1457
Injector Output Voltage
Connections to Injector #1
Meter (+) → BL/R lead (terminal 42)
Meter (-) → Battery (-) Terminal
Connections to Injector #2
Meter (+) → BL/G lead (terminal 41)
Meter (-) → Battery (-) Terminal
• Turn the ignition switch ON.
Output Voltage at Injector Connector
Standard:
Battery Voltage (12.8 V or more)
If the output voltage is normal, perform “Injector Signal
Test”.
If the output voltage is out of the standard, turn the ignition
switch OFF, remove the fuel tank, and check the injector
wiring for continuity.
Injector Wiring Inspection
ECU Connector
Injector Connectors
Terminal 42
→ Injector #1 Terminal (BL/R)
Terminal 41
→ Injector #2 Terminal (BL/G)
If the wiring is good, inspect the resistance of the injectors
(see Injector Resistance Inspection).
• Remove the needle adapter.
• Apply silicone sealant to the seals of the ECU connector
for waterproofing.
Sealant - Kawasaki Bond (Silicone Sealant): 56019-120
Injector Signal Test
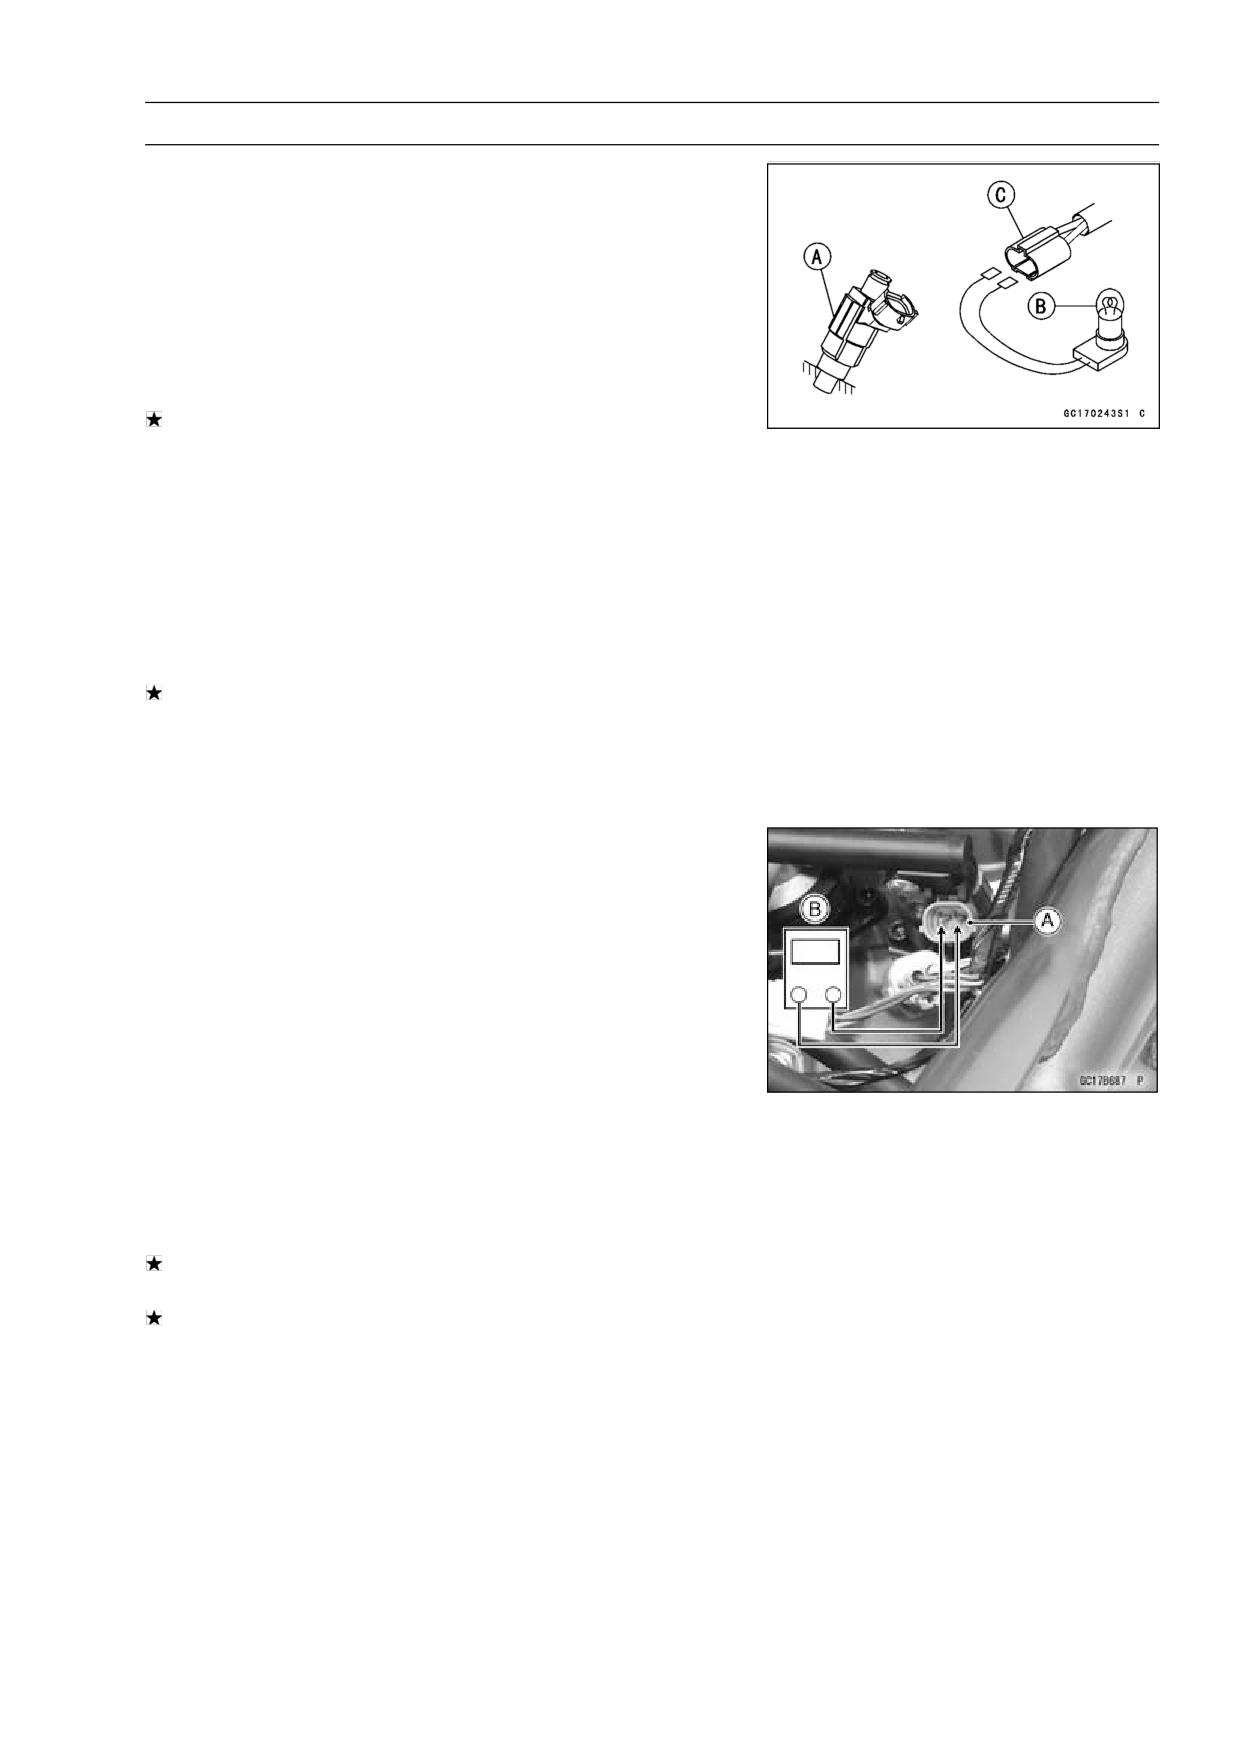
• Prepare two test light sets with male terminals as shown.
Rating of Bulb [A]: 12 V × 3 ∼ 3.4 W
Terminal Width [B]: 1.8 mm (0.071 in.)
Terminal Thickness [C]: 0.8 mm (0.031 in.)
CAUTION
Do not use larger terminals than specified above. A
larger terminal could damage the injector main har-
ness connector (female), leading to harness repair
or replacement.
Be sure to connect bulbs in series. The bulb works
as a current limiter to protect the solenoid in the
injector from excessive current.
FUEL SYSTEM (DFI) 3-93
Fuel Injectors
• Remove the fuel tank (see Fuel Tank Removal).
• Remove the air cleaner housing (see Air Cleaner Housing
Removal)
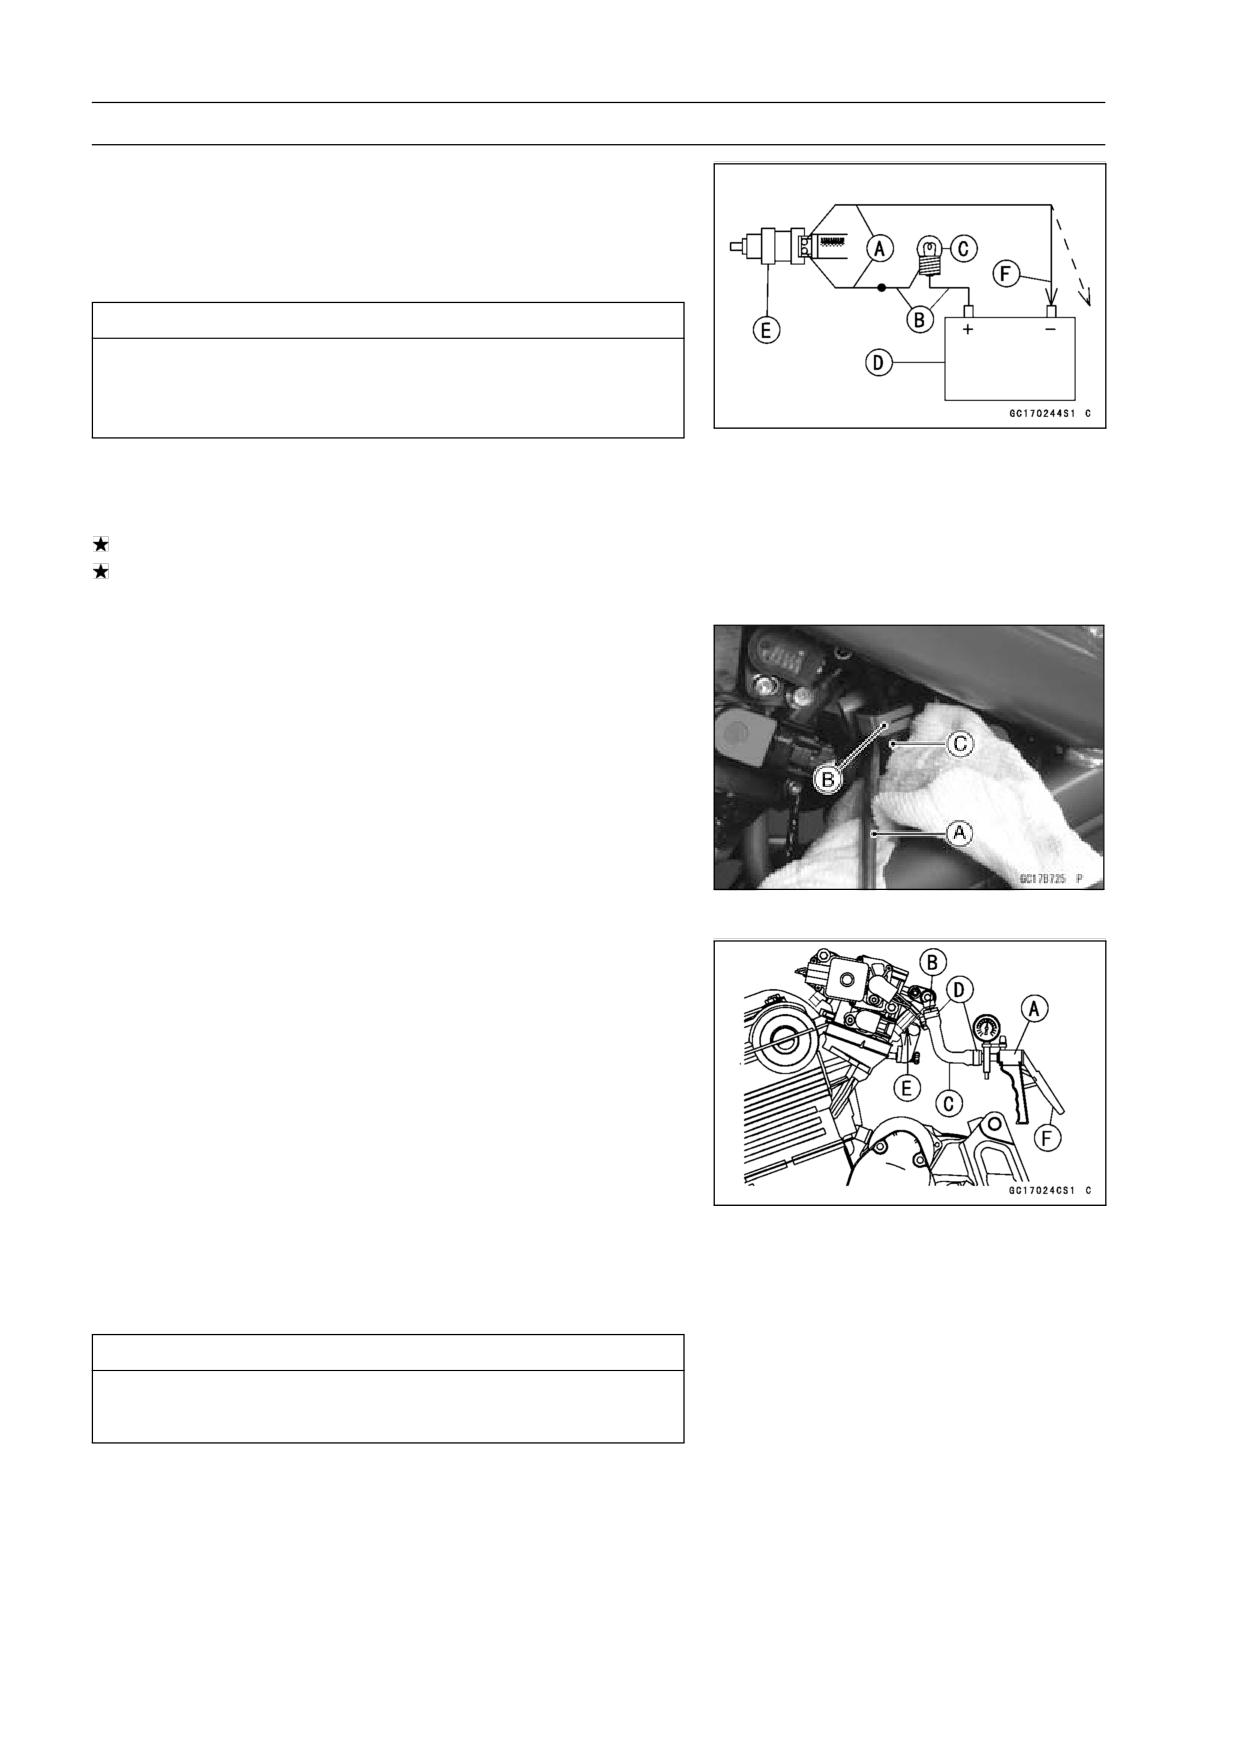
• Remove connectors for injector [A].
• Connect each test light set [B] to the injector sub harness
connector [C].
• Turn the ignition switch ON.
• While cranking the engine with the starter motor, watch
the test lights.
If the test lights flicker at regular intervals, the injector
circuit in the ECU, and the wiring are good. Perform the
“Injector Resistance Inspection”.
○Injector signals can be also confirmed by connecting the
hand tester (× 10 V AC) instead of the test light set to
the injector main harness (female) connector. Crank the
engine with the starter motor, and check to see if the hand
oscillates at regular intervals.
Special Tool - Hand Tester: 57001-1394
If the test light doesn’t flicker (or the tester needle doesn’t
oscillates), check the wiring and connectors again. If the
wiring is good, check the injector voltage. If the wiring is
good, inspect the ECU for its ground and power supply
(see ECU Power Supply Inspection).
Injector Resistance Inspection
• Remove the fuel tank (see Fuel Tank Removal).
• Remove the air cleaner housing (see Air Cleaner Housing
Removal).
• Disconnect the connector from the injector [A].
• Measure the injector resistance with the hand tester [B].
Special Tool - Hand Tester: 57001-1394
Injector Resistance
Connections to Injector
Meter (+)
Meter (-)
#1: W/R ←→ BL/R Terminal
#2: W/R ←→ BL/G Terminal
Standard:
About 11.7 ∼ 12.3 Ω at 20°C (68°F)
If the reading is out of the range, perform the “Injector Unit
Test”.
If the reading is normal, perform the “Injector Unit Test”
for confirmation.
3-94 FUEL SYSTEM (DFI)
Fuel Injectors
Injector Unit Test
• Use two leads [A] and the same test light set [B] as in
“Injector Signal Test”.
Rating of Bulb [C]: 12 V × (3 ∼ 3.4) W
12 V Battery [D]
CAUTION
Be sure to connect the bulb in series. The bulb
works as a current limiter to protect the solenoid
in the injector from excessive current.
• Connect the test light set to the injector [E] as shown.
• Open and connect [F] the end of the lead to the battery
(-) terminal repeatedly. The injector should click.
If the injector does not click, replace the injector.
If the injector clicks, check the wiring again. If the wiring
is good, replace the injector (may be clogged) or ECU.
Injector Fuel Line Inspection
• Remove:
Fuel Tank (see Fuel Tank Removal)
Left Center Fairing (see Center Fairing Removal in the
Frame chapter)
• Be sure to place a piece of cloth around the fuel hose joint
and the delivery pipe.
• Insert a minus screw driver [A] into the slit on the joint lock
[B].
• Turn the driver to disconnect the joint lock.
• Pull the fuel hose joint [C] out of the delivery pipe.
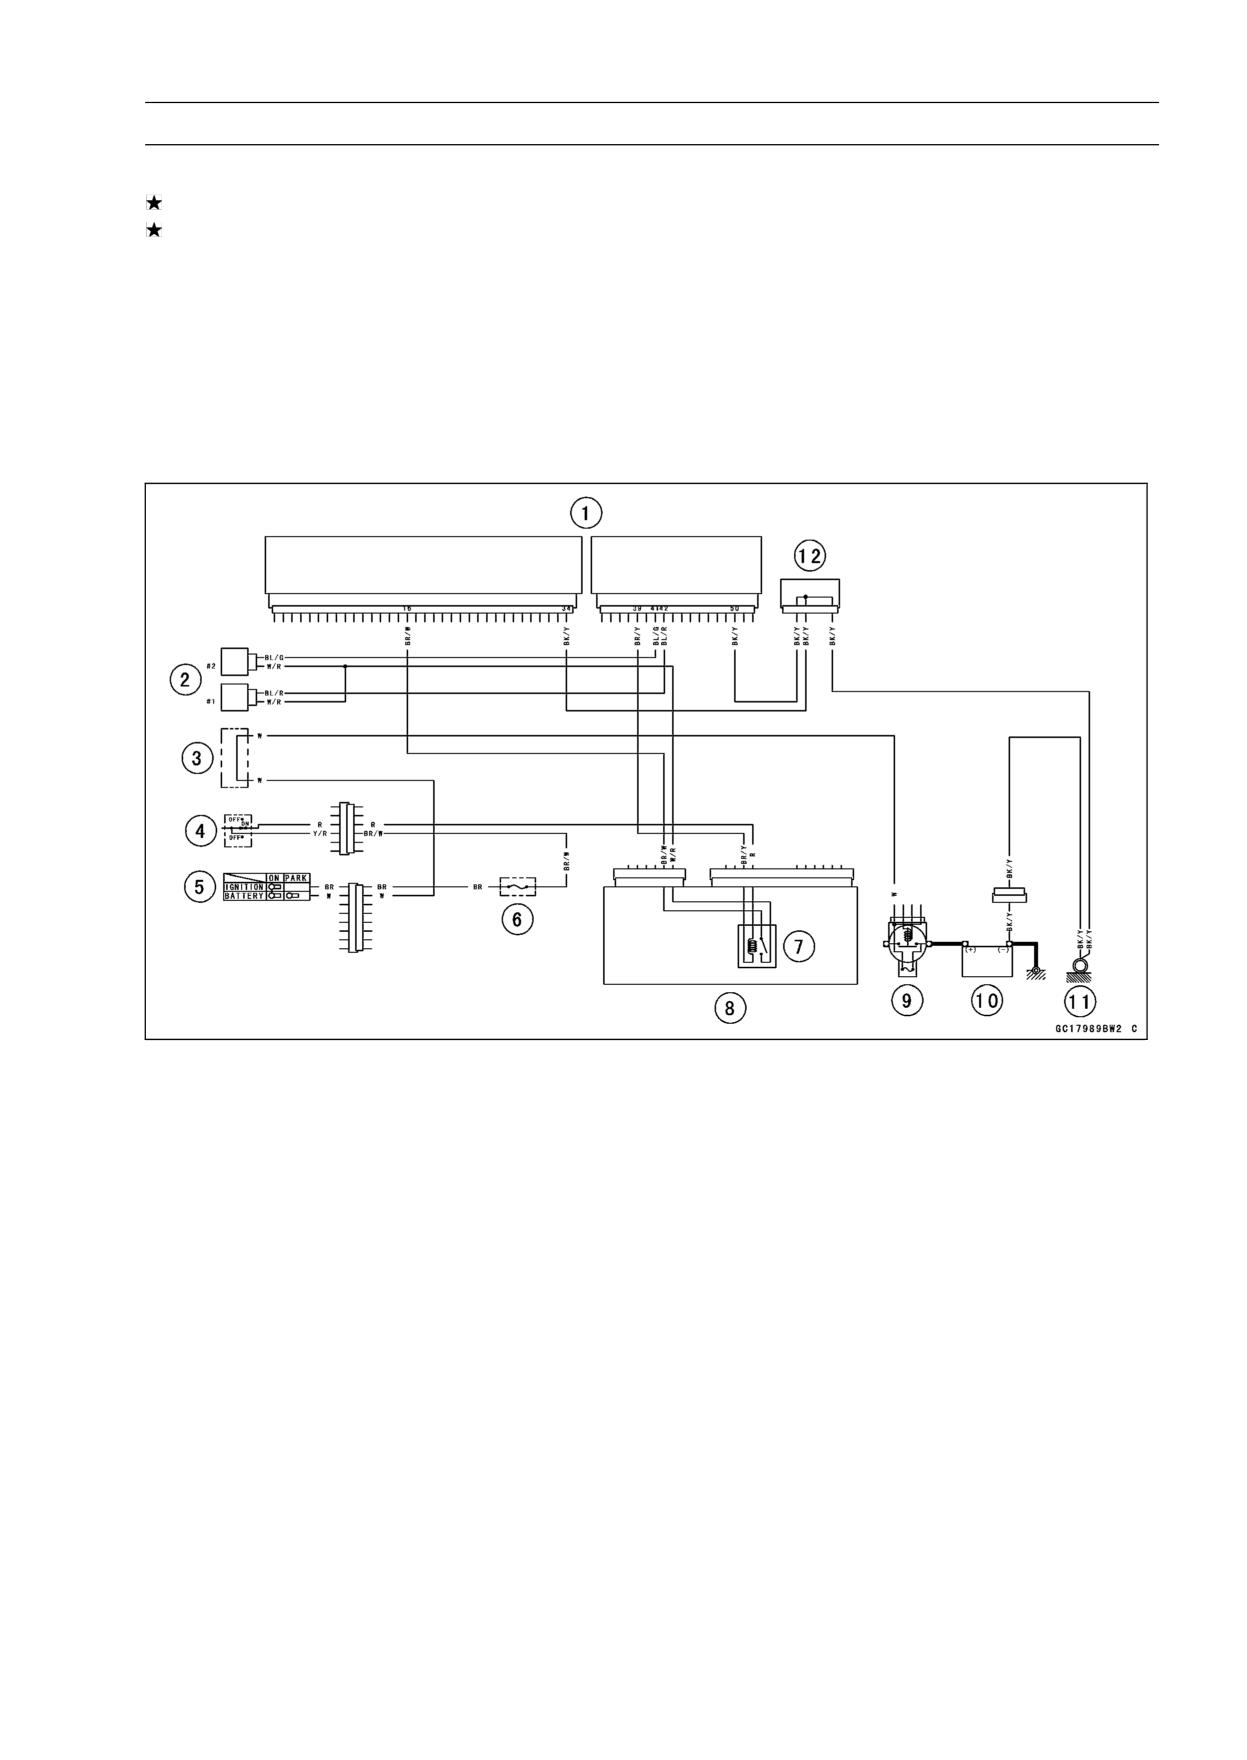
• Check the injector fuel line for leakage as follows.
○Connect a commercially available vacuum/pressure
pump [A] to the nipple of the delivery pipe [B] with a
high-pressure fuel hose [C] (both ends connected with
the clamps [D]) as shown.
Torque - Fuel Hose Clamp Screws: 1.5 N·m (0.15 kgf·m, 13
in·lb)
○Apply soap and water solution to the areas [E] as shown.
○Watching the pressure gauge, squeeze the pump lever
[F], and build up the pressure until the pressure reaches
the maximum pressure.
Injector Fuel Line Maximum Pressure
Standard:
333 kPa (3.4 kgf/cm², 48 psi)
CAUTION
During pressure testing, do not exceed the maxi-
mum pressure for which the system is designed.
FUEL SYSTEM (DFI) 3-95
Fuel Injectors
• Watch the gauge for at least 6 seconds.
If the pressure holds steady, the system is good.
If the pressure drops at once or if bubbles are found in
the area, the line is leaking. Replace the delivery pipe,
injectors and related parts.
○Repeat the leak test, and check the fuel line for no leak-
age.
• Install the pump outlet hose (see Fuel Tank Installation).
• Run the hoses correctly (see Cable, Wire, and Hose Rout-
ing section in the Appendix chapter).
Fuel Injector Circuit
1. ECU
2. Fuel Injectors
3. Water-proof Joint C
4. Engine Stop Switch
5. Ignition Switch
6. Ignition Fuse 10 A
7. Fuel Pump Relay (for fuel pump and injectors)
8. Relay Box
9. Main Fuse 30 A
10. Battery
11. Frame Ground
12. Joint Connector
3-96 FUEL SYSTEM (DFI)
Throttle Grip and Cables
Throttle Grip Free Play Inspection
• Refer to the Throttle Control System Inspection in the Pe-
riodic Maintenance chapter.
Throttle Grip Free Play Adjustment
• Refer to the Throttle Control System Inspection in the Pe-
riodic Maintenance chapter.
Throttle Cable Installation
• Install the throttle cables in accordance with Cable, Wire,
and Hose Routing section in the Appendix chapter.
• Install the lower ends of the throttle cables in the cable
bracket on the throttle body assy after installing the upper
ends of the throttle cables in the grip.
• After installation, adjust each cable properly.
WARNING
Operation with incorrectly routed or improperly ad-
justed cables could result in an unsafe riding con-
dition.
Throttle Cable Lubrication
• Refer to the Chassis Parts Lubrication in the Periodic
Maintenance chapter.
FUEL SYSTEM (DFI) 3-97
Throttle Body Assy
Idle Speed Inspection
• Refer to the Idle Speed Inspection in the Periodic Main-
tenance chapter.
Engine Vacuum Synchronization Inspection/Ad-
justment
• Refer to the Engine Vacuum Synchronization Inspection
in the Periodic Maintenance chapter.
High Altitude Performance Adjustment
• Any modification is not necessary in this model since
the inlet air pressure sensor senses inlet air pressure
change due to high altitude and the ECU compensates
the change.
Throttle Body Assy Removal
WARNING
Gasoline is extremely flammable and can be ex-
plosive under certain conditions. Turn the ignition
switch OFF. Disconnect the battery (-) cable ter-
minal. Do not smoke. Make sure the area is
well-ventilated and free from any source of flame
or sparks; this includes any appliance with a pilot
light.
Be prepared for fuel spillage: any spilled fuel must
be completely wiped up immediately.
• Remove:
Air Cleaner Housing (see Air Cleaner Housing Removal)
Center Fairings (see Center Fairing Removal in the
Frame chapter)
• Disconnect:
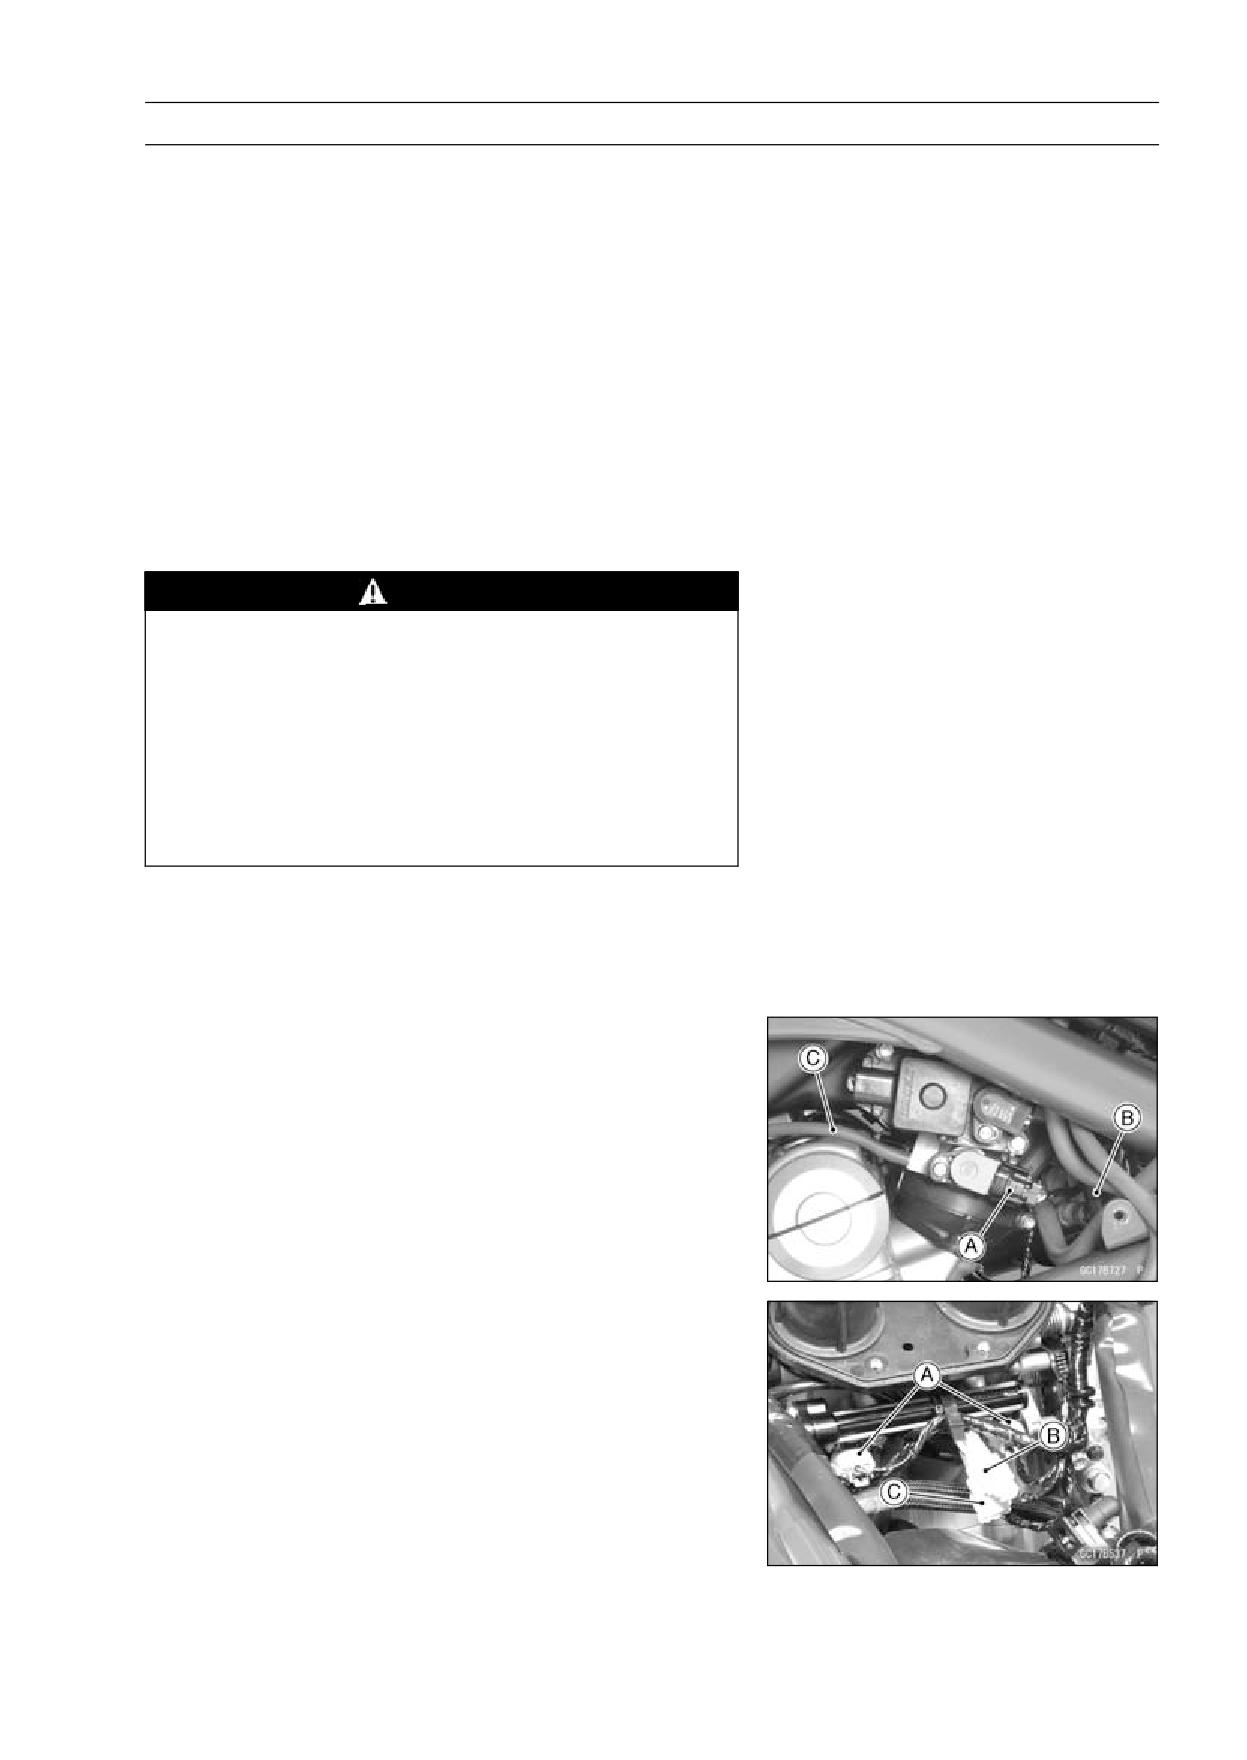
Main Throttle Sensor Connector [A]
Fuel Hose Lower End [B]
Vacuum Hose [C]
• Disconnect:
#1, #2 Injector Connector [A]
Subthrottle Sensor Connector [B]
Subthrottle Sensor Actuator Connector [C]
• Loosen:
Holder and Duct Clamp Bolts
3-98 FUEL SYSTEM (DFI)
Throttle Body Assy
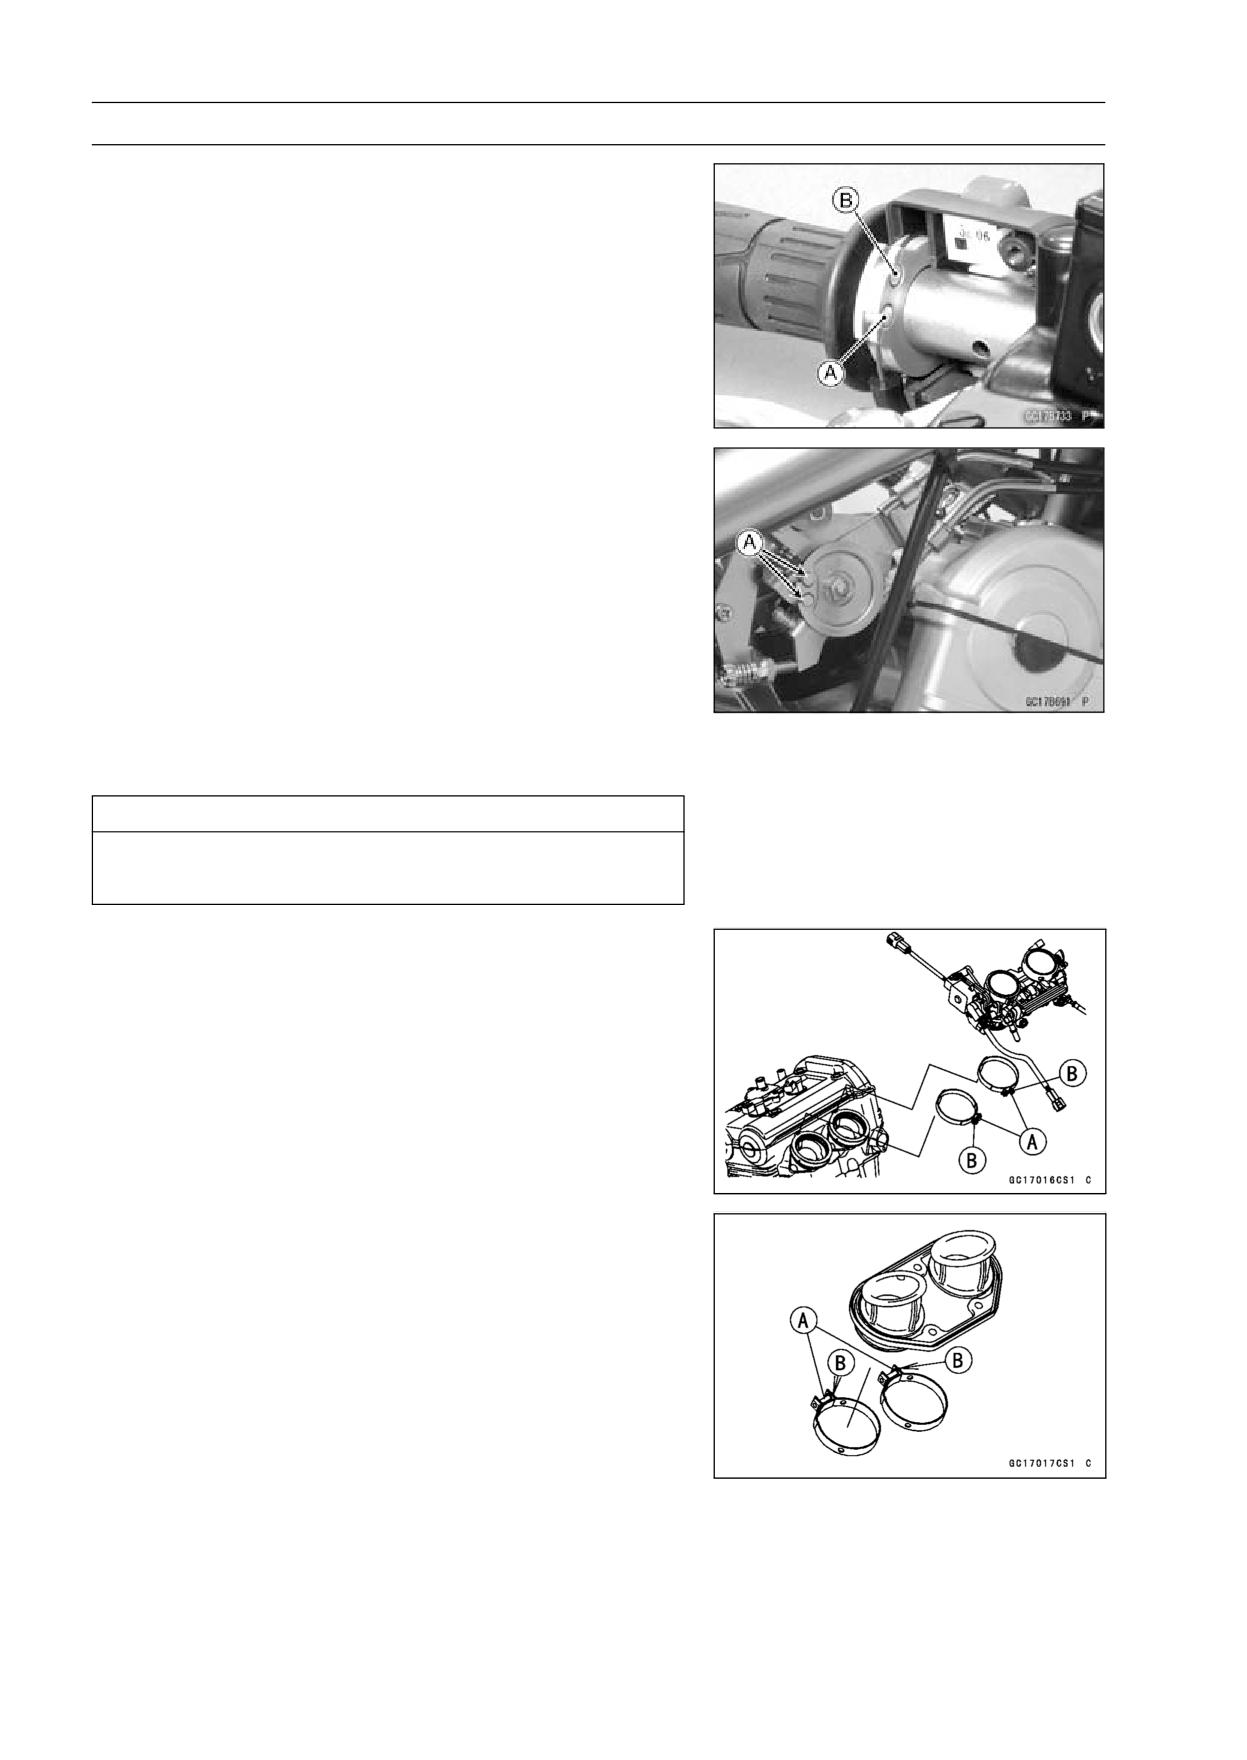
• Loosen the locknut and screw in the throttle cable adjuster
fully to give the cables plenty of play.
• Remove the right switch housing and take out the acceler-
ator cable upper end [A] and the decelerator cable upper
end [B].
• Remove the throttle cable lower ends [A] from the throttle
pulley.
• After removing the throttle body assy, stuff pieces of lint
-free, clean cloth into the throttle body holders.
CAUTION
If dirt gets into the engine, excessive engine wear
and possible engine damage will occur.
Throttle Body Assy Installation
• Install the holder clamp bolts [A] in the direction shown
with each bolt heads [B], facing outwards.
• Install the air cleaner duct clamp screws [A] so that their
screw heads [B] face the right.
• Run the vacuum hose (see Cable, Wire, and Hose Rout-
ing section in the Appendix chapter).
FUEL SYSTEM (DFI) 3-99
Throttle Body Assy
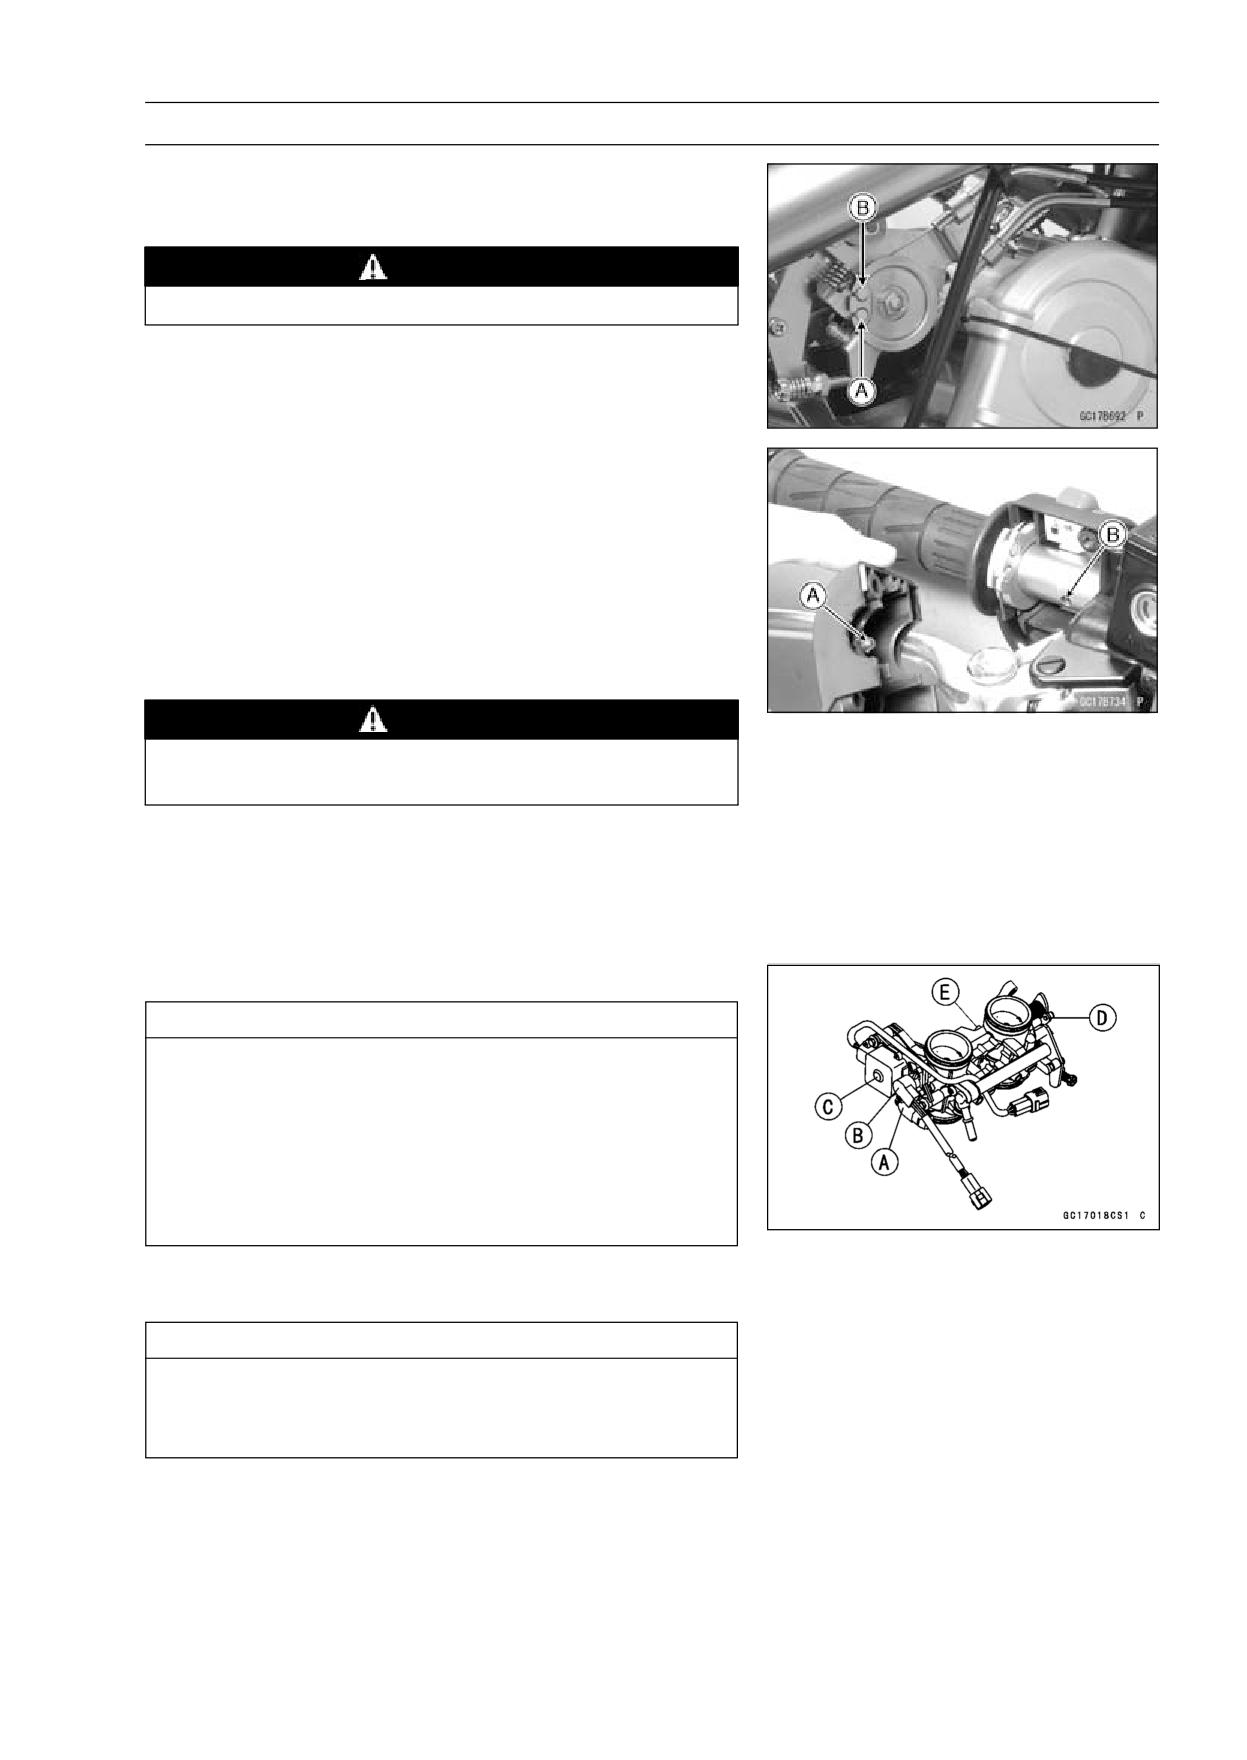
• Fit the accelerator cable end [A] and the decelerator cable
end [B] into the throttle pulley.
• Check fuel leakage from the throttle body assy.
WARNING
Fuel spilled from the carburetors is hazardous.
• Apply a thin coating of grease to the throttle cable upper
ends.
• Install the upper ends of the throttle cables in the grip.
• Fit the projection [A] of the right switch housing into the
hole [B] of the handlebar.
• Turn the throttle grip and make sure that the throttle valves
move smoothly and return by spring force.
• Check the throttle grip free play (see Throttle Control Sys-
tem Inspection in the Periodic Maintenance chapter).
WARNING
Operation with an incorrectly routed cable could re-
sult in an unsafe riding condition.
• Adjust:
Throttle Grip Free Play (see Throttle Control System In-
spection in the Periodic Maintenance chapter)
Idle Speed (see Idle Speed Adjustment in the Periodic
Maintenance chapter)
Throttle Body Assy Disassembly
CAUTION
Do not remove, disassemble or adjust the main
throttle sensor [A], subthrottle sensor [B], sub-
throttle valve actuator [C], throttle link mechanism
[D] and throttle body assy [E], because they are
adjusted or set at the manufacturer. Adjustment
of these parts could result in poor performance,
requiring replacement of the throttle body assy.
• Remove the throttle body assy (see Throttle Body Assy
Removal).
CAUTION
Never drop the throttle body assy , especially on a
hard surface. Such a shock to the body assy can
damage it.
3-100 FUEL SYSTEM (DFI)
Throttle Body Assy
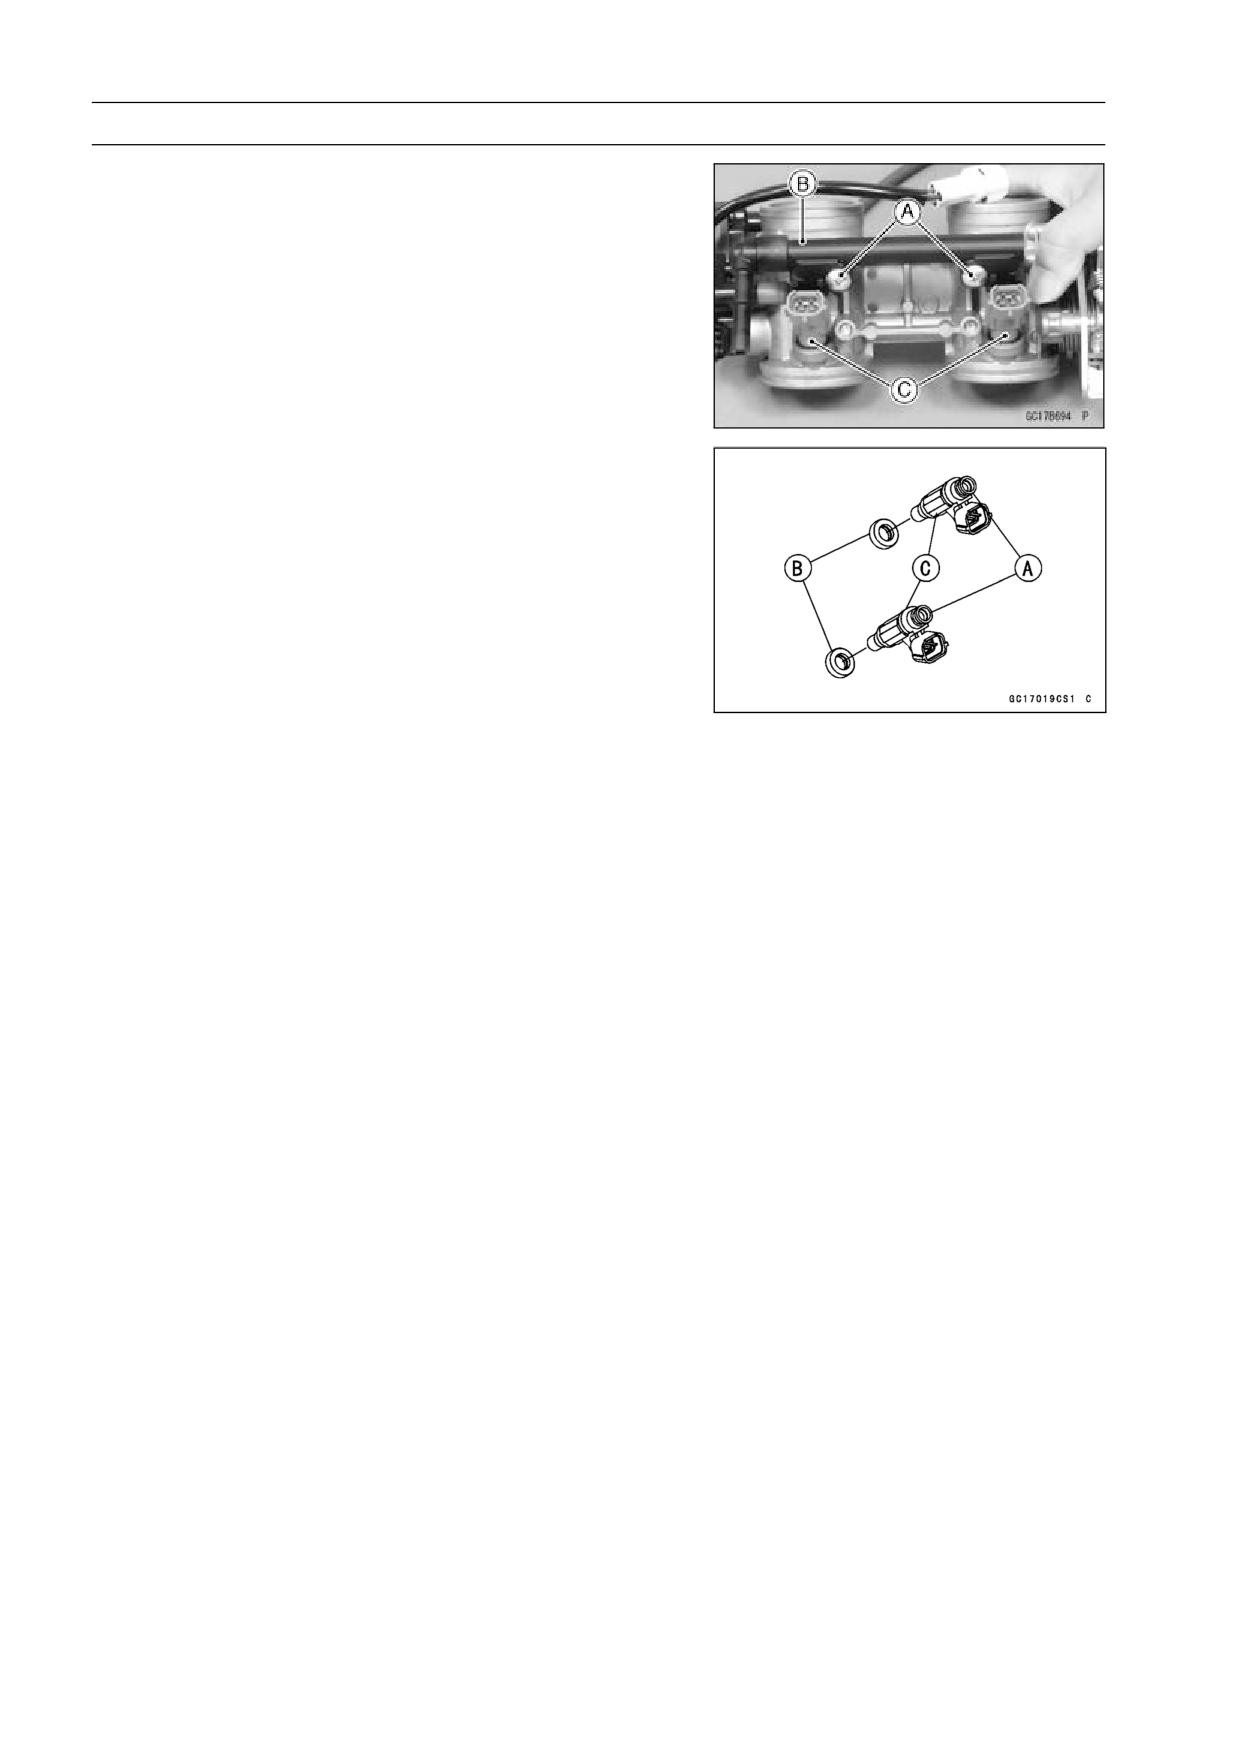
• Remove:
Screws [A]
Delivery Pipe [B]
Fuel Injectors [C]
Throttle Body Assy Assembly
○Replace the O-rings [A] and seals [B] with the new ones.
• Before assembling, blow away dirt or dust from the throttle
body and delivery pipe by applying compressed air.
• Apply engine oil to the new O-rings of each injector [C],
insert them into the delivery pipe and confirm whether the
injectors turn smoothly or not.
• Install the injectors along with the delivery pipe assy into
the throttle bodies.
• Install the throttle body assy (see Throttle Body Assy In-
stallation).
FUEL SYSTEM (DFI) 3-101
Air Cleaner
Air Cleaner Element Removal/Installation
• Refer to the Air Cleaner Element Replacement in the Pe-
riodic Maintenance chapter.
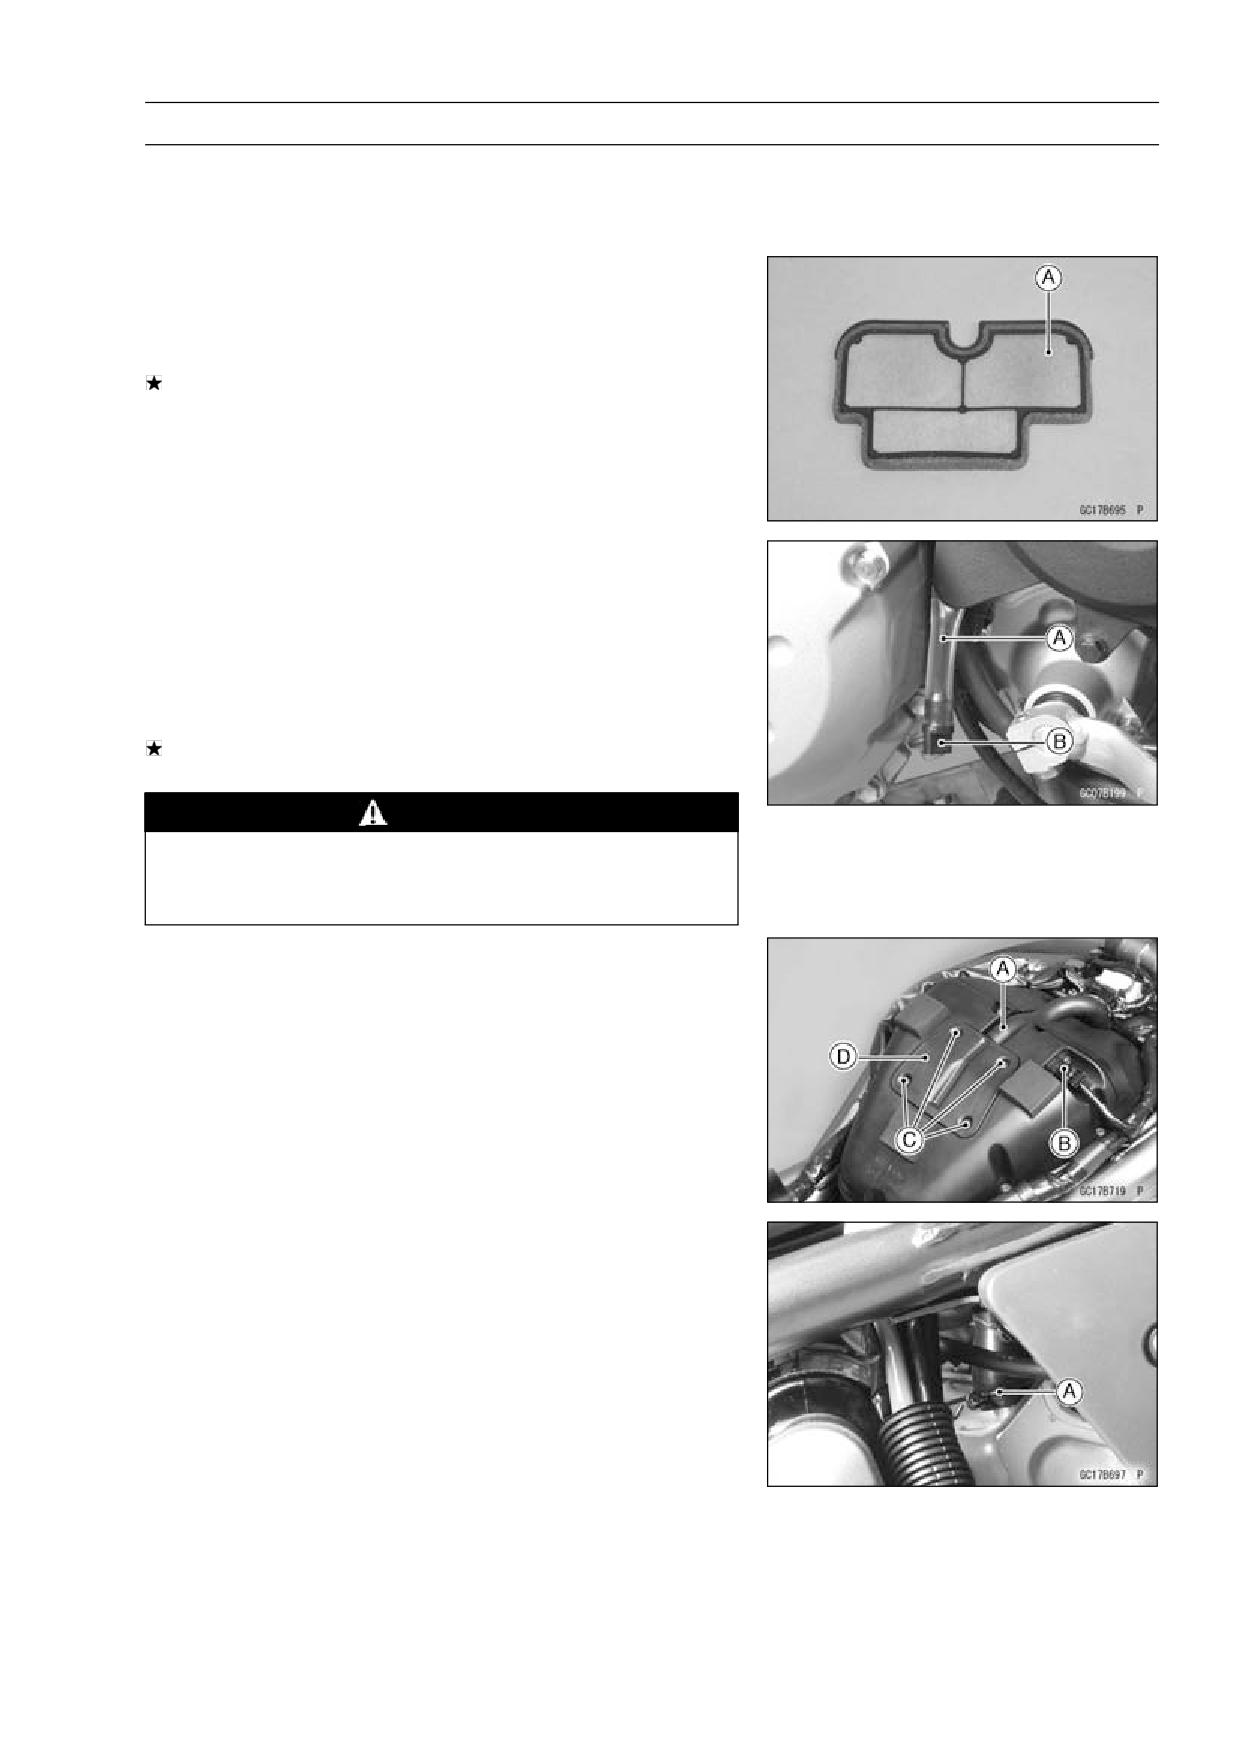
Air Cleaner Element Inspection
• Remove the air cleaner element (see Air Cleaner Element
Replacement in the Periodic Maintenance chapter).
• Visually check the element [A] for tears or breaks.
If the element has any tears or breaks, replace the ele-
ment.
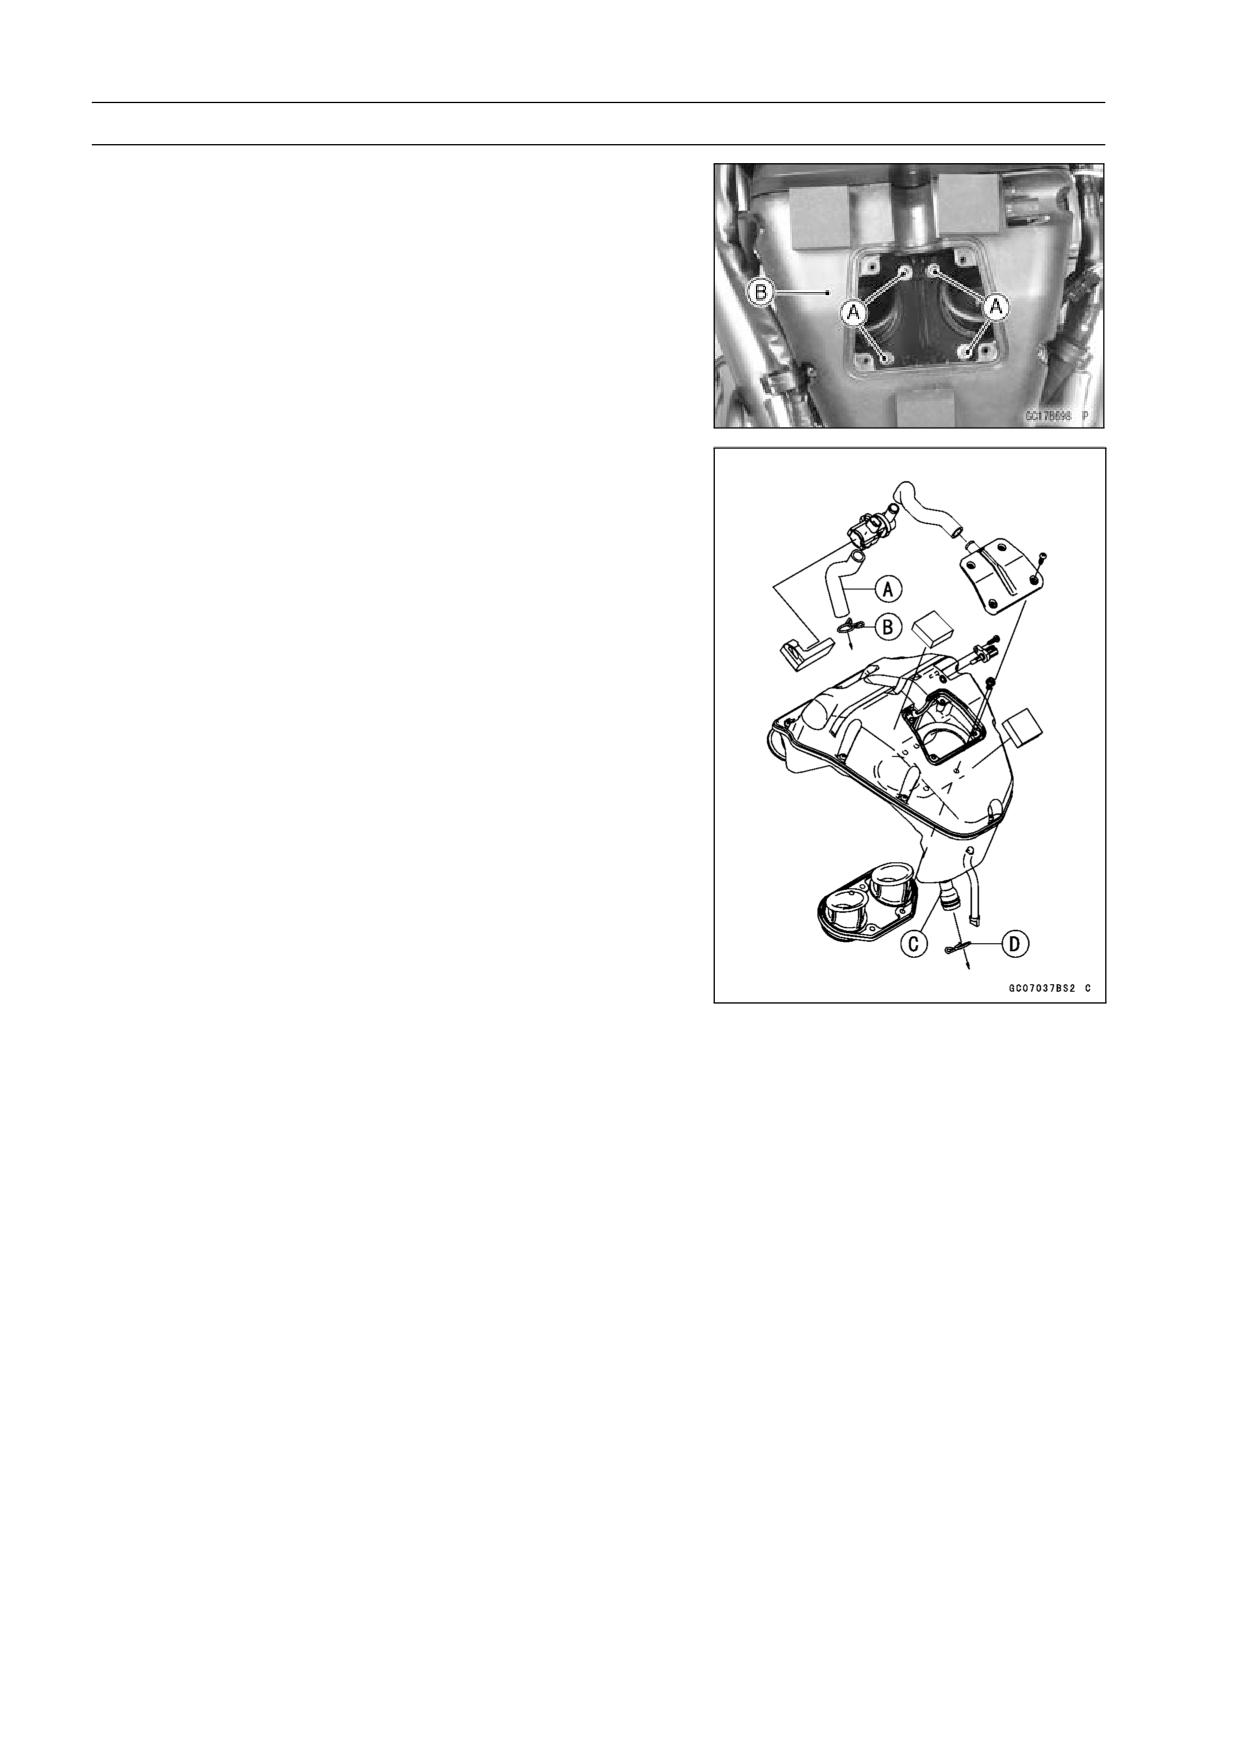
Air Cleaner Oil Draining
A drain hose is connected to the bottom of the air cleaner
to drain water or oil accumulated in the cleaner part.
• Remove the left center fairing (see Center Fairing Re-
moval in the Frame chapter).
• Visually check the drain hose [A] if the water or oil accu-
mulates.
If any water or oil accumulates in the hose, remove the
plug [B] from the drain hose and drain it.
WARNING
Be sure to reinstall the plug in the drain hose after
draining. Oil on tires will make them slippery and
can cause an accident and injury.
Air Cleaner Housing Removal
• Remove:
Fuel Tank (see Fuel Tank Removal)
Hose (Disconnect) [A]
Inlet Air Temperature Sensor Connector [B]
Screws [C]
Cover [D]
• Disconnect the breather hose [A] on the upper crankcase.
3-102 FUEL SYSTEM (DFI)
Air Cleaner
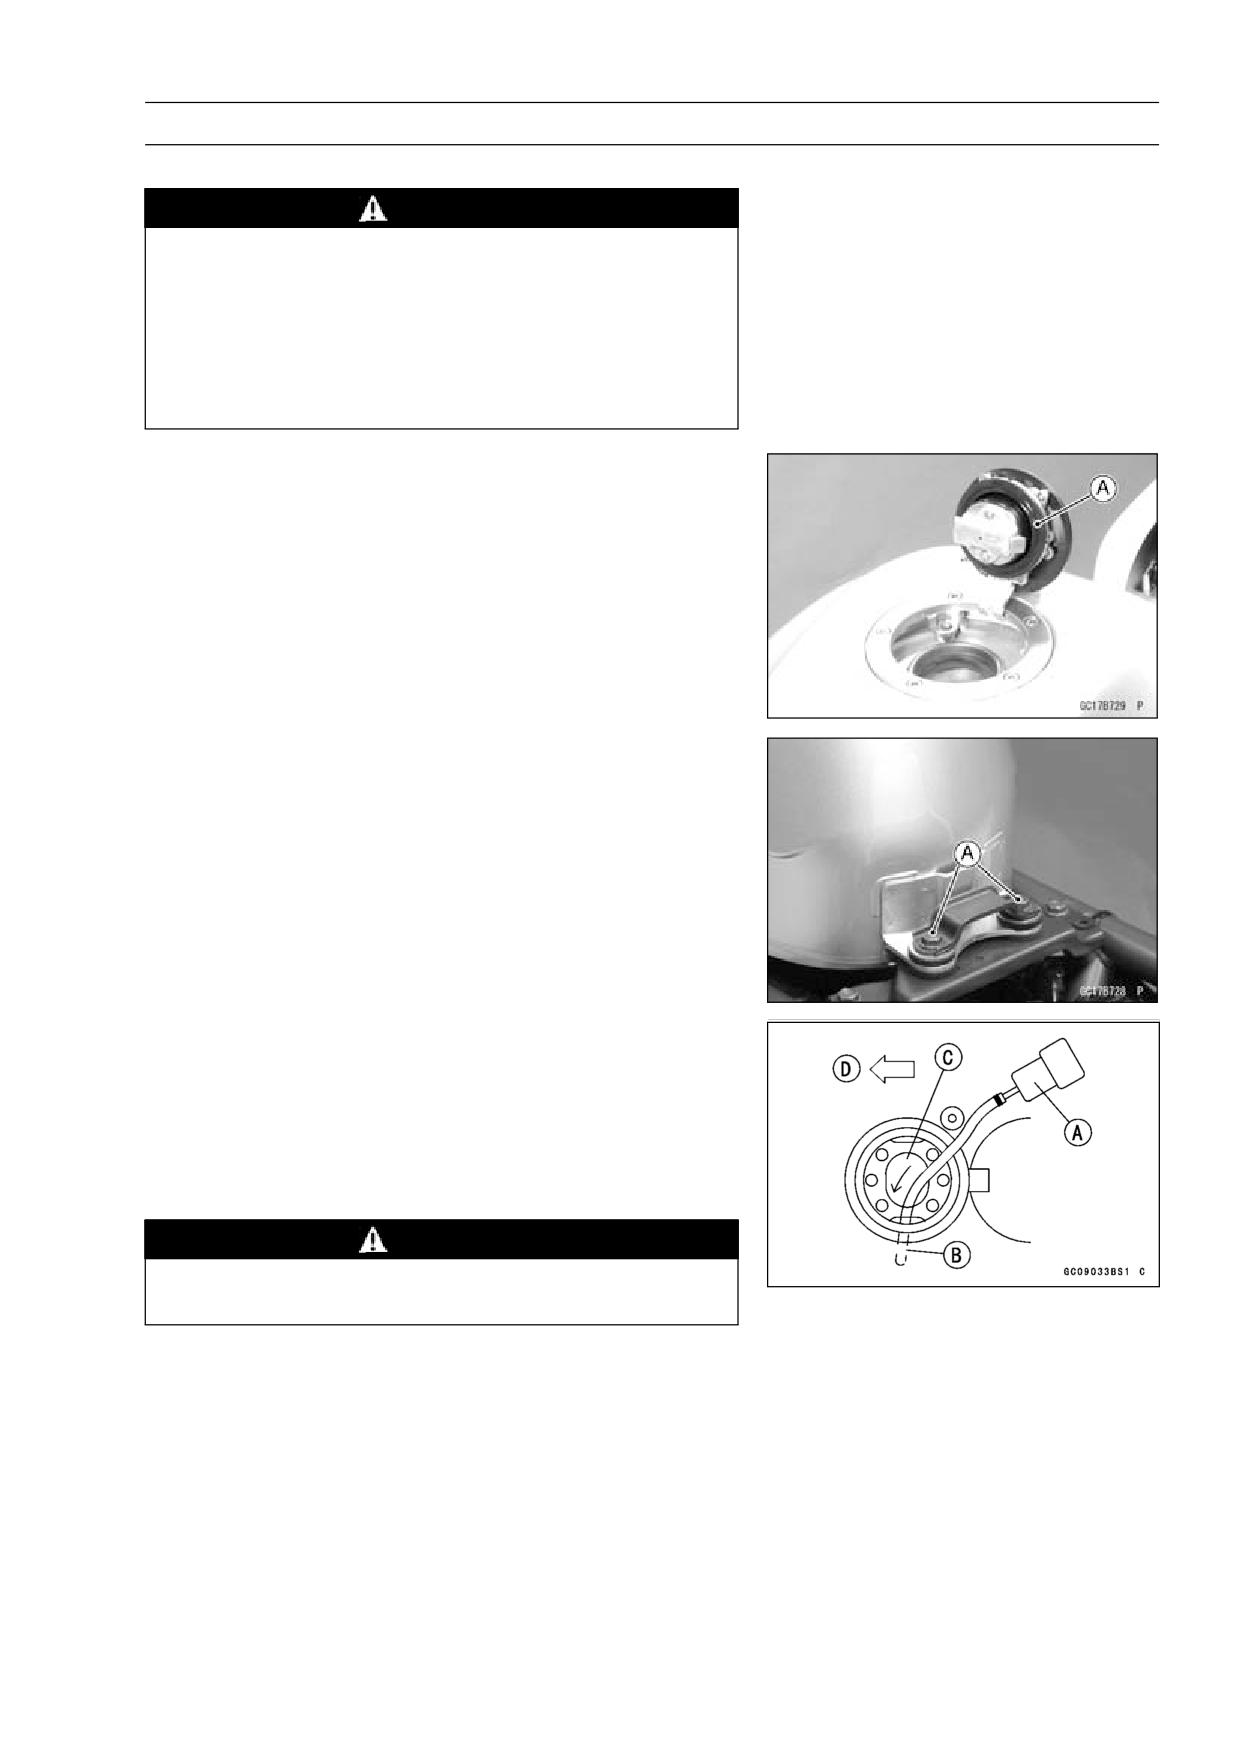
• Unscrew the bolts [A] and remove the air cleaner housing
[B].
Air Cleaner Housing Installation
• Install the clamp on the hose [A] so that its pinch heads
[B] face the right.
• Install the clamp on the breather hose [C] so that its pinch
heads [D] face the front.
FUEL SYSTEM (DFI) 3-103
Fuel Tank
Fuel Tank Removal
WARNING
Gasoline is extremely flammable and can be explo-
sive under certain conditions. Make sure the area
is well-ventilated and free from any source of flame
or sparks; this includes any appliance with a pilot
light. Do not smoke. Turn the ignition switch OFF.
Be prepared for fuel spillage; any spilled fuel must
be completely wiped up immediately.
• Turn the ignition switch and engine stop switch OFF.
• Wait until the engine cools down.
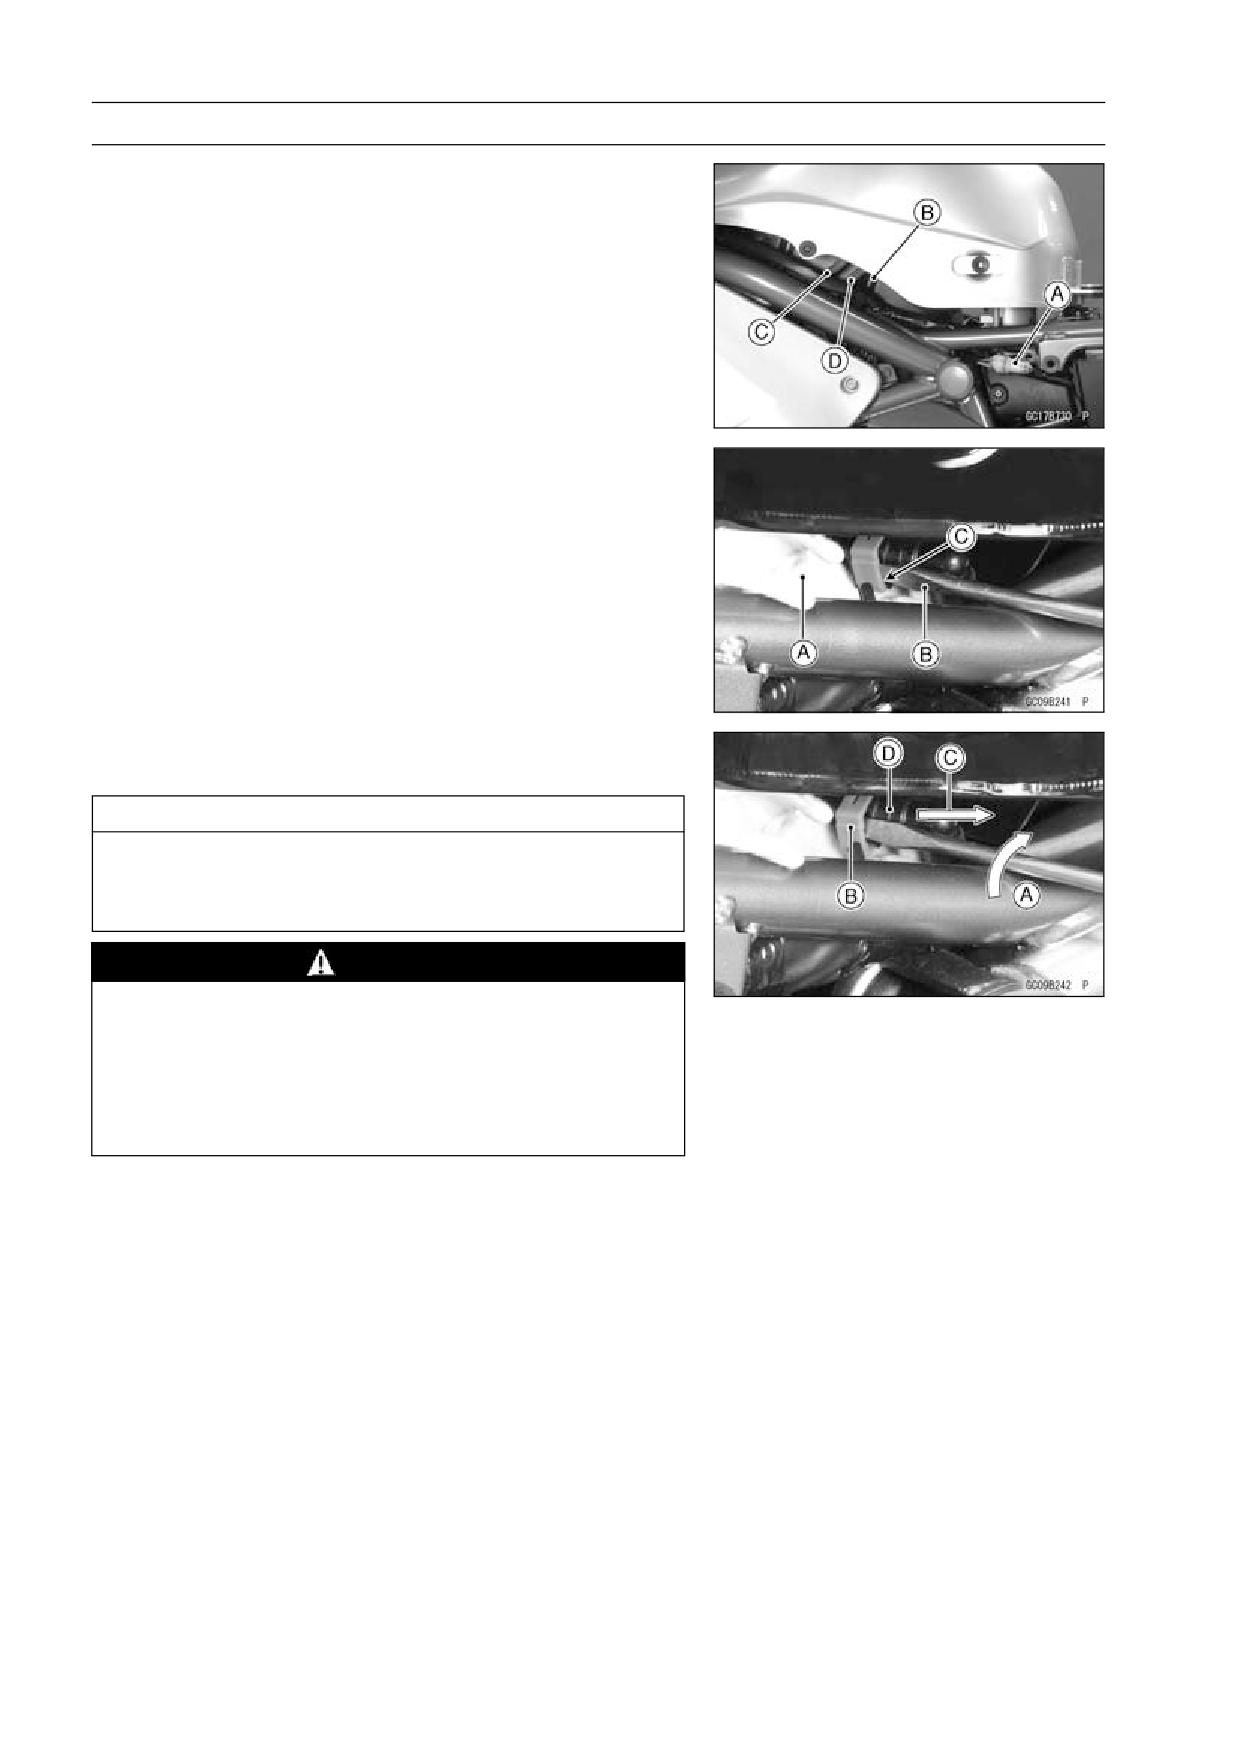
• Open the fuel tank cap [A] to lower the pressure in the
tank.
○During tank removal, keep the tank cap open to release
pressure in the tank. This makes fuel spillage less.
• Remove:
Seat (see Seat Removal in the Frame chapter)
Side Covers (see Side Cover Removal in the Frame
chapter)
Fuel Tank Bolts [A]
• Draw the fuel out from the fuel tank with a commercially
available pump [A].
○Use a soft plastic hose [B] as a pump inlet hose in order
to insert the hose smoothly.
○Put the hose through the fill opening [C] into the tank and
draw the fuel out.
Front [D]
WARNING
The fuel could not be removed completely from the
fuel tank. Be careful for remained fuel spillage.
3-104 FUEL SYSTEM (DFI)
Fuel Tank
• Disconnect the fuel pump lead connector [A] and the tube
[B].
• Remove:
Fuel Return Hose [C] (Red, California Model)
Fuel Tank Breather Hose [D] (Blue, California Model)
• Be sure to place a piece of cloth [A] around the fuel hose
joint.
• Insert a minus screw driver [B] into the slit [C]on the joint
lock.
• Turn [A] the driver to disconnect the joint lock [B].
• Pull [C] the fuel hose joint out [D] of the outlet pipe.
CAUTION
When removing the fuel hose joint, do not apply
strong force to the outlet pipe on the fuel pump. The
pipe made from resin could be damaged.
WARNING
Be prepared for fuel spillage; any spilled fuel must
be completely wiped up immediately.
When the fuel hose is disconnected, fuel spills out
from the hose and the pipe because of residual
pressure . Cover the hose connection with a piece
of clean cloth to prevent fuel spillage.
FUEL SYSTEM (DFI) 3-105
Fuel Tank
• Close the fuel tank cap.
• Remove the fuel tank, and place it on a flat surface.
○Do not apply the load to the fuel pump outlet portion [A]
especially the outlet pipe made from resin.
• For California model, note the following.
CAUTION
For California model, if gasoline, solvent, water or
any other liquid enters the canister, the canister’s
vapor absorbing capacity is greatly reduced. If the
canister does become contaminated, replace it with
a new one.
○Be sure to plug the evaporative fuel return hose to prevent
fuel spilling before fuel tank removal.
WARNING
For California model, be careful not to spill the
gasoline through the return hose. Spilled fuel is
hazardous.
If liquid or gasoline flows into the breather hose, remove
the hose and blow it clean with compressed air.
○Be careful of fuel spillage from the fuel tank since fuel still
remains in the fuel tank and fuel pump.
WARNING
Store the fuel tank in an area which is well
-ventilated and free from any source of flame
or sparks. Do not smoke in this area. Place the
fuel tank on a flat surface and plug the fuel pipes
to prevent fuel leakage.
Fuel Tank Installation
• Note the above WARNING (see Fuel Tank Removal).
• Route the hoses correctly (see Cable, Wire, and Hose
Routing in the Appendix chapter).
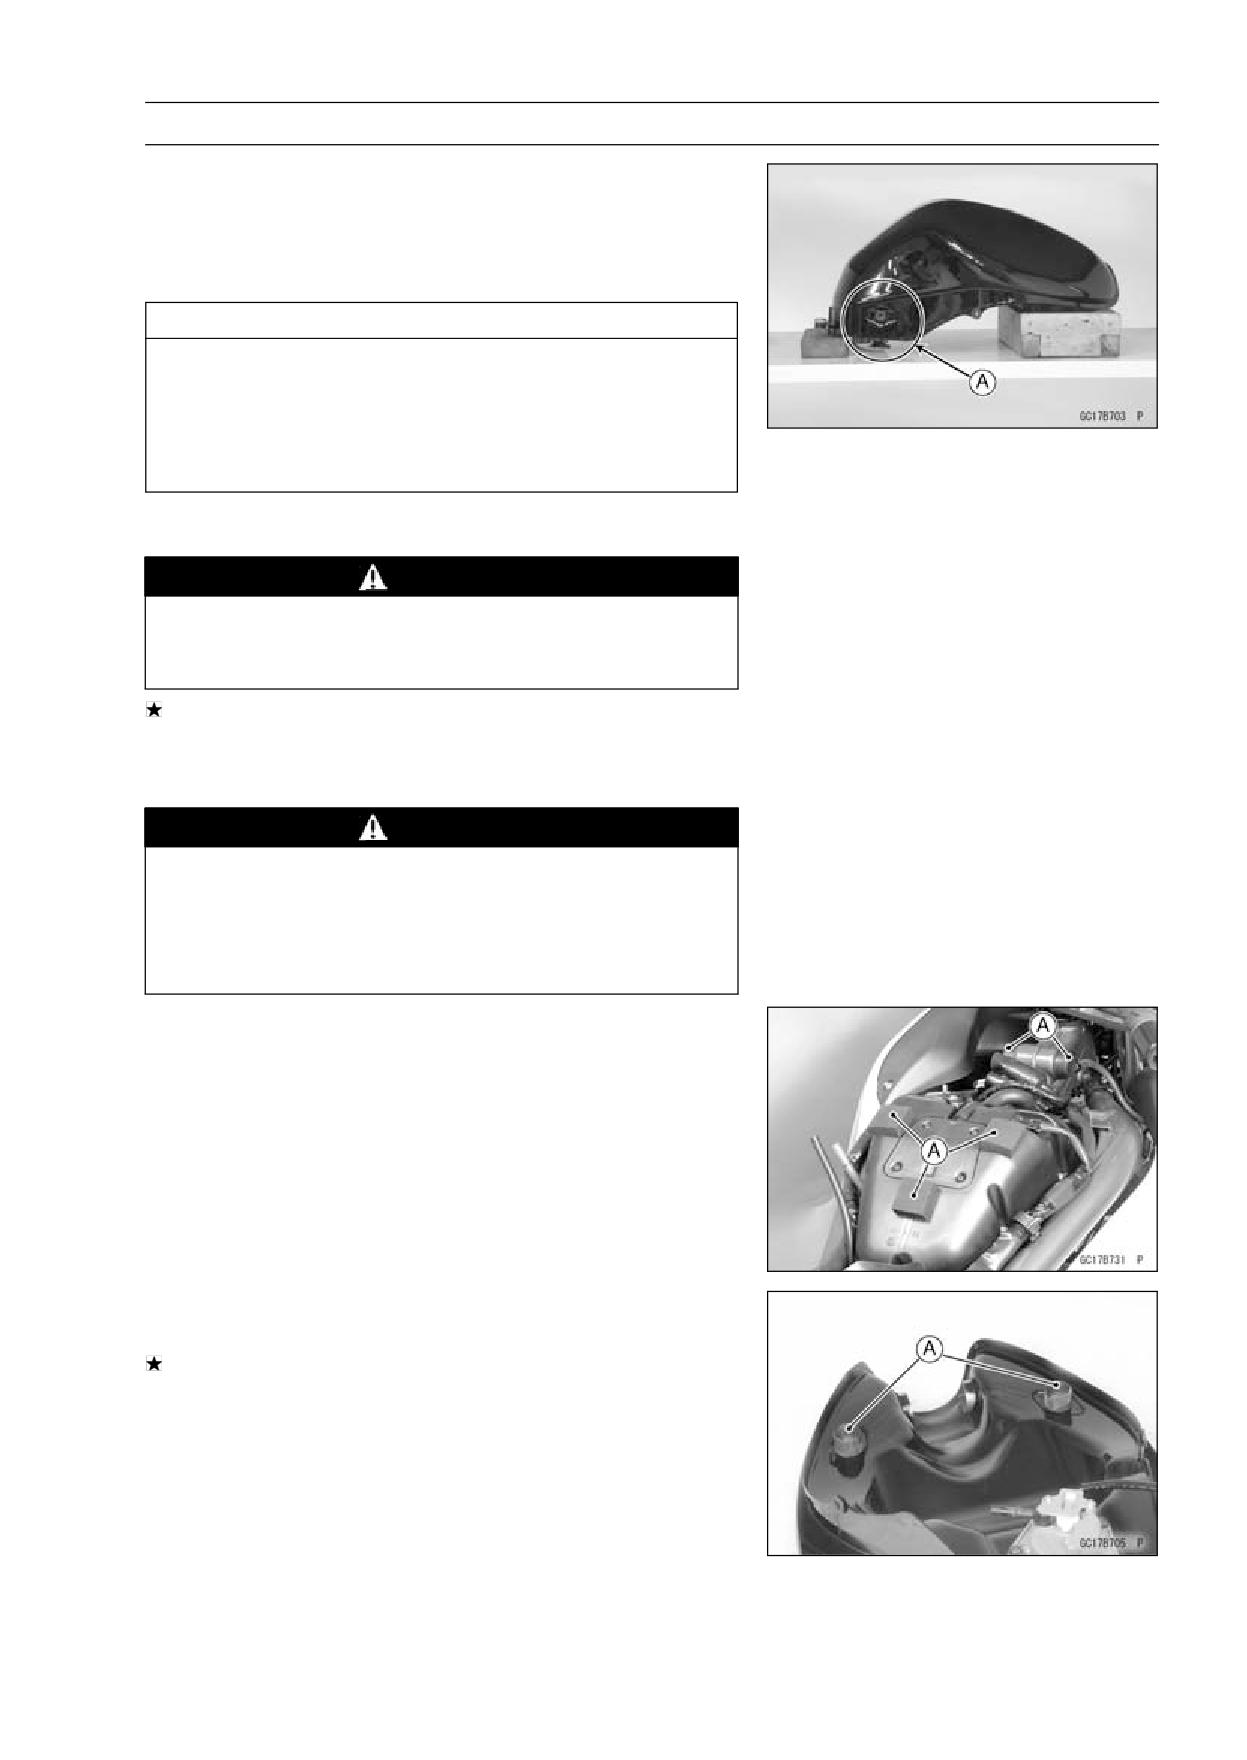
• Check that the rubber dampers [A] are on the frame and
the fuel tank.
• Check that the dampers [A] are in place on the fuel tank
as well.
If the dampers are damaged or deteriorated, replace
them.
3-106 FUEL SYSTEM (DFI)
Fuel Tank
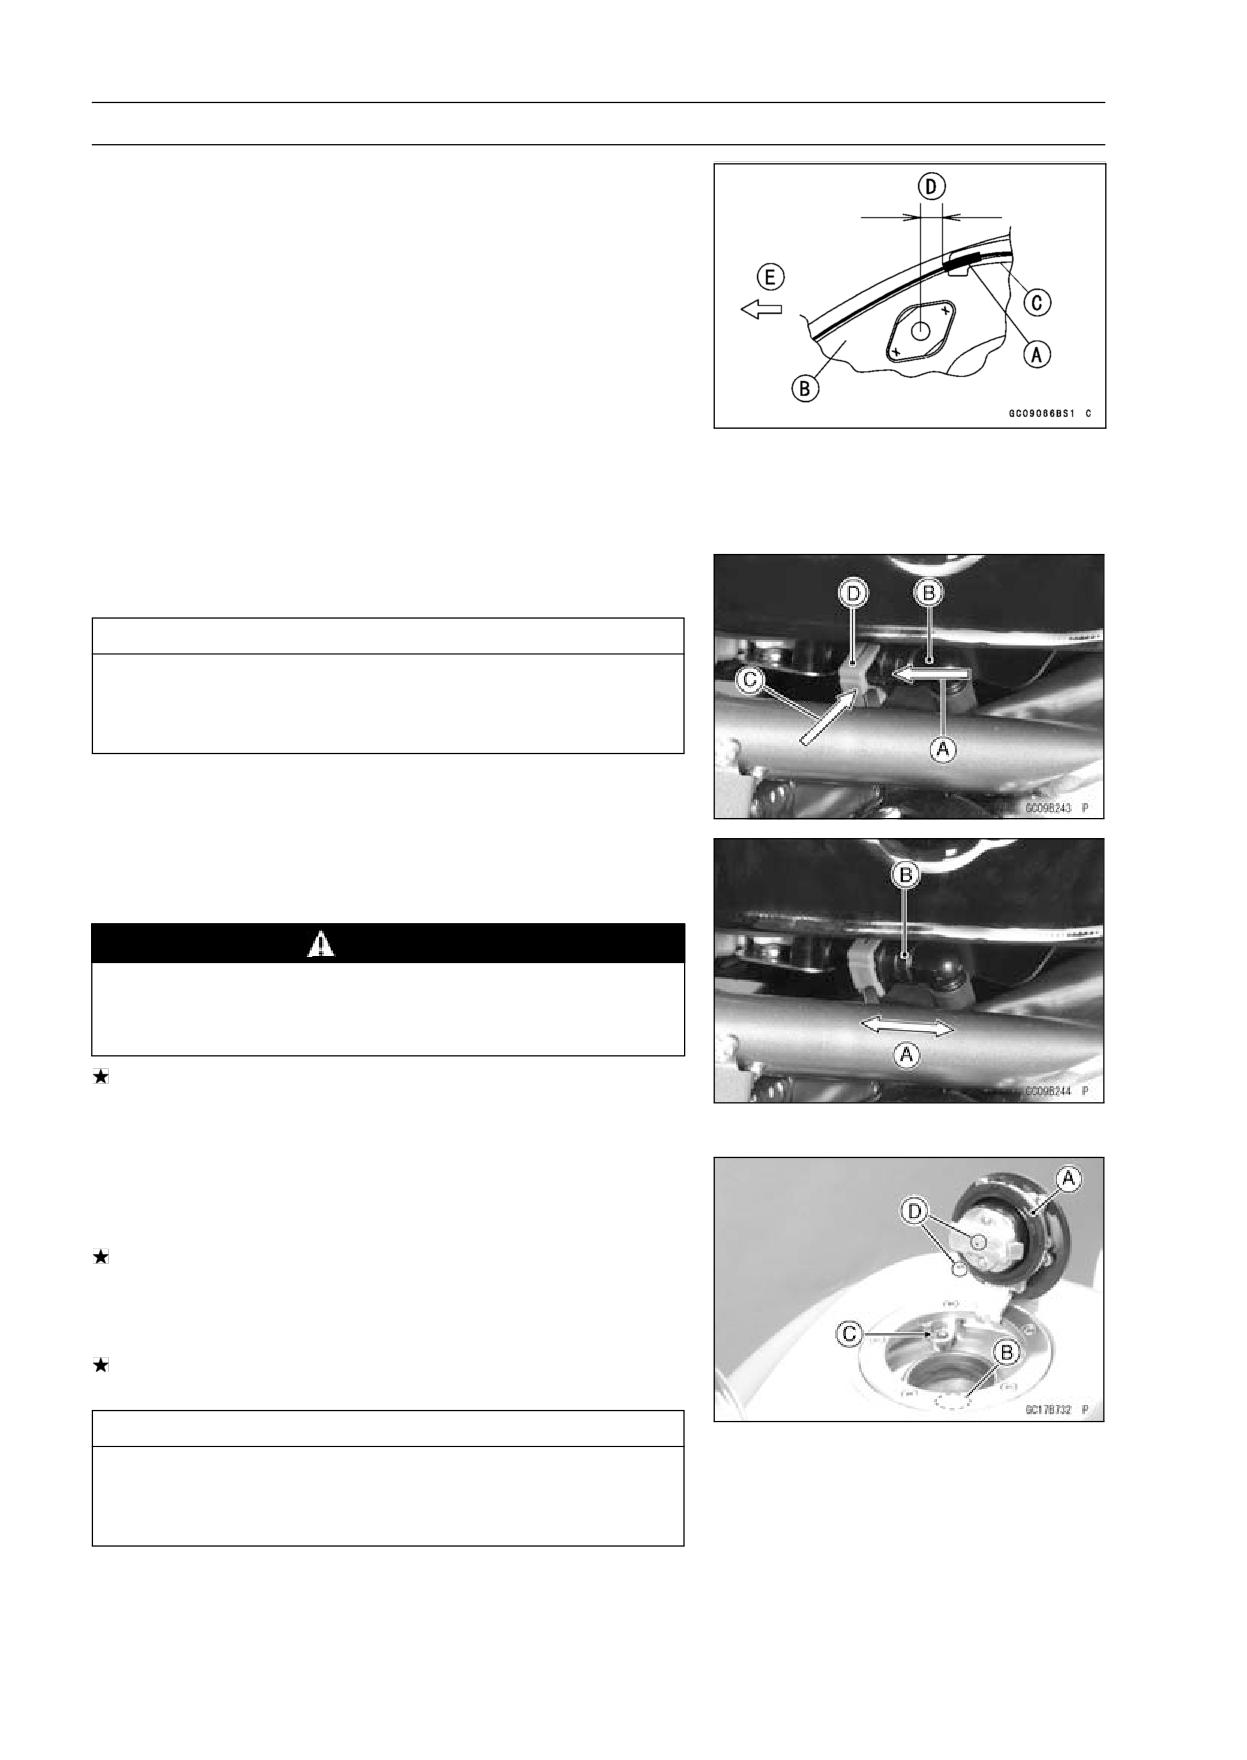
• Be sure that the trim seal [A] is on the fuel tank.
Reverse Side of Fuel Tank [B]
Side Cover [C]
Approx. 17 mm (0.67 in.) [D]
Front [E]
• For California model, note the following.
○To prevent the gasoline from flowing into or out of the
canister, hold the separator perpendicular to the ground.
○Connect the hoses according to the diagram of the sys-
tem (see Cable, Wire, and Hose Routing section in the
Appendix chapter). Make sure they do not get pinched or
kinked.
○Route hoses with a minimum of bending so that the air or
vapor will not be obstructed.
• Insert [A] the fuel hose joint [B] straight onto the delivery
pipe until the hose joint clicks.
CAUTION
When installing the fuel hose joint, do not apply
strong force to the outlet pipe on the fuel pump. The
pipe made from resin could be damaged.
• Push [C] the joint lock [D].
• Push and pull [A] the hose joint [B] back and forth more
than two times and make sure it is locked and doesn’t
come off.
WARNING
Make sure the hose joint is installed correctly on the
delivery pipe by sliding the joint, or the fuel could
leak.
If it comes off, reinstall the hose joint.
• Connect the fuel pump and the fuel level sensor connec-
tors and the battery (-) cable terminal.
Fuel Tank and Cap Inspection
• Visually inspect the gasket [A] on the tank cap for any
damage.
Replace the gasket if it is damaged.
• Check to see if the water drain pipe [B] and fuel breather
pipe [C] in the tank is not clogged. check the tank cap
breather also.
If they are clogged, remove the tank and drain it, and then
blow the breather free with compressed air.
CAUTION
Do not apply compressed air to the air vent holes
[D] in the tank cap. This could cause damage and
clogging of the labyrinth in the cap.
FUEL SYSTEM (DFI) 3-107
Fuel Tank
Fuel Tank Cleaning
WARNING
Clean the tank in a well-ventilated area, and take
care that there are no sparks or flame anywhere
near the working area. Because of the danger or
highly flammable liquids, do not use gasoline or
low-flash point solvents to clean the tank.
• Remove the fuel tank (see Fuel Tank Removal).
• Remove the fuel pump inlet hose and the fuel pump (see
Fuel Pump Removal).
• Pour some high-flash point solvent into the fuel tank and
shake the tank to remove dirt and fuel deposits.
• Draw the solvent out of the fuel tank.
• Dry the tank with compressed air.
• Install the fuel pump (see Fuel Pump Installation).
• Install the fuel tank (see Fuel Tank Installation).

3-108 FUEL SYSTEM (DFI)
Evaporative Emission Control System (California Model)
The Evaporative Emission Control System routes fuel va-
pors from the fuel system into the running engine or stores
the vapors in a canister when the engine is stopped. Al-
though no adjustments are required, a thorough visual in-
spection must be made at the intervals specified by the Pe-
riodic Maintenance Chart.
Parts Removal/Installation
WARNING
Gasoline is extremely flammable and can be ex-
plosive under certain conditions. Turn the ignition
switch OFF. Do not smoke. Make sure the area is
well-ventilated and free from any source of flame
or sparks; this includes any appliance with a pilot
light.
CAUTION
If gasoline, solvent, water or any other liquid enters
the canister, the canister’s vapor absorbing capac-
ity is greatly reduced. If the canister does become
contaminated, replace it with a new one.
• To prevent the gasoline from flowing into or out of the
canister, hold the separator perpendicular to the ground.
• Connect the hoses according to the diagram of the sys-
tem (see Cable, Wire, and Hose Routing section in the
Appendix chapter). Make sure they do not get pinched or
kinked.
Hose Inspection
• Refer to the Evaporative Emission Control System In-
spection in the Periodic Maintenance chapter.
Separator Inspection
• Refer to the Evaporative Emission Control System In-
spection in the Periodic Maintenance chapter.
Separator [A]
FUEL SYSTEM (DFI) 3-109
Evaporative Emission Control System (California Model)
Separator Operation Test
WARNING
Gasoline is extremely flammable and can be ex-
plosive under certain conditions. Turn the ignition
switch OFF. Do not smoke. Make sure the area is
well-ventilated and free from any source of flame
or sparks; this includes any appliance with a pilot
light.
• Connect the hoses to the separator, and install the sepa-
rator on the motorcycle.
• Disconnect the breather hose from the separator, and in-
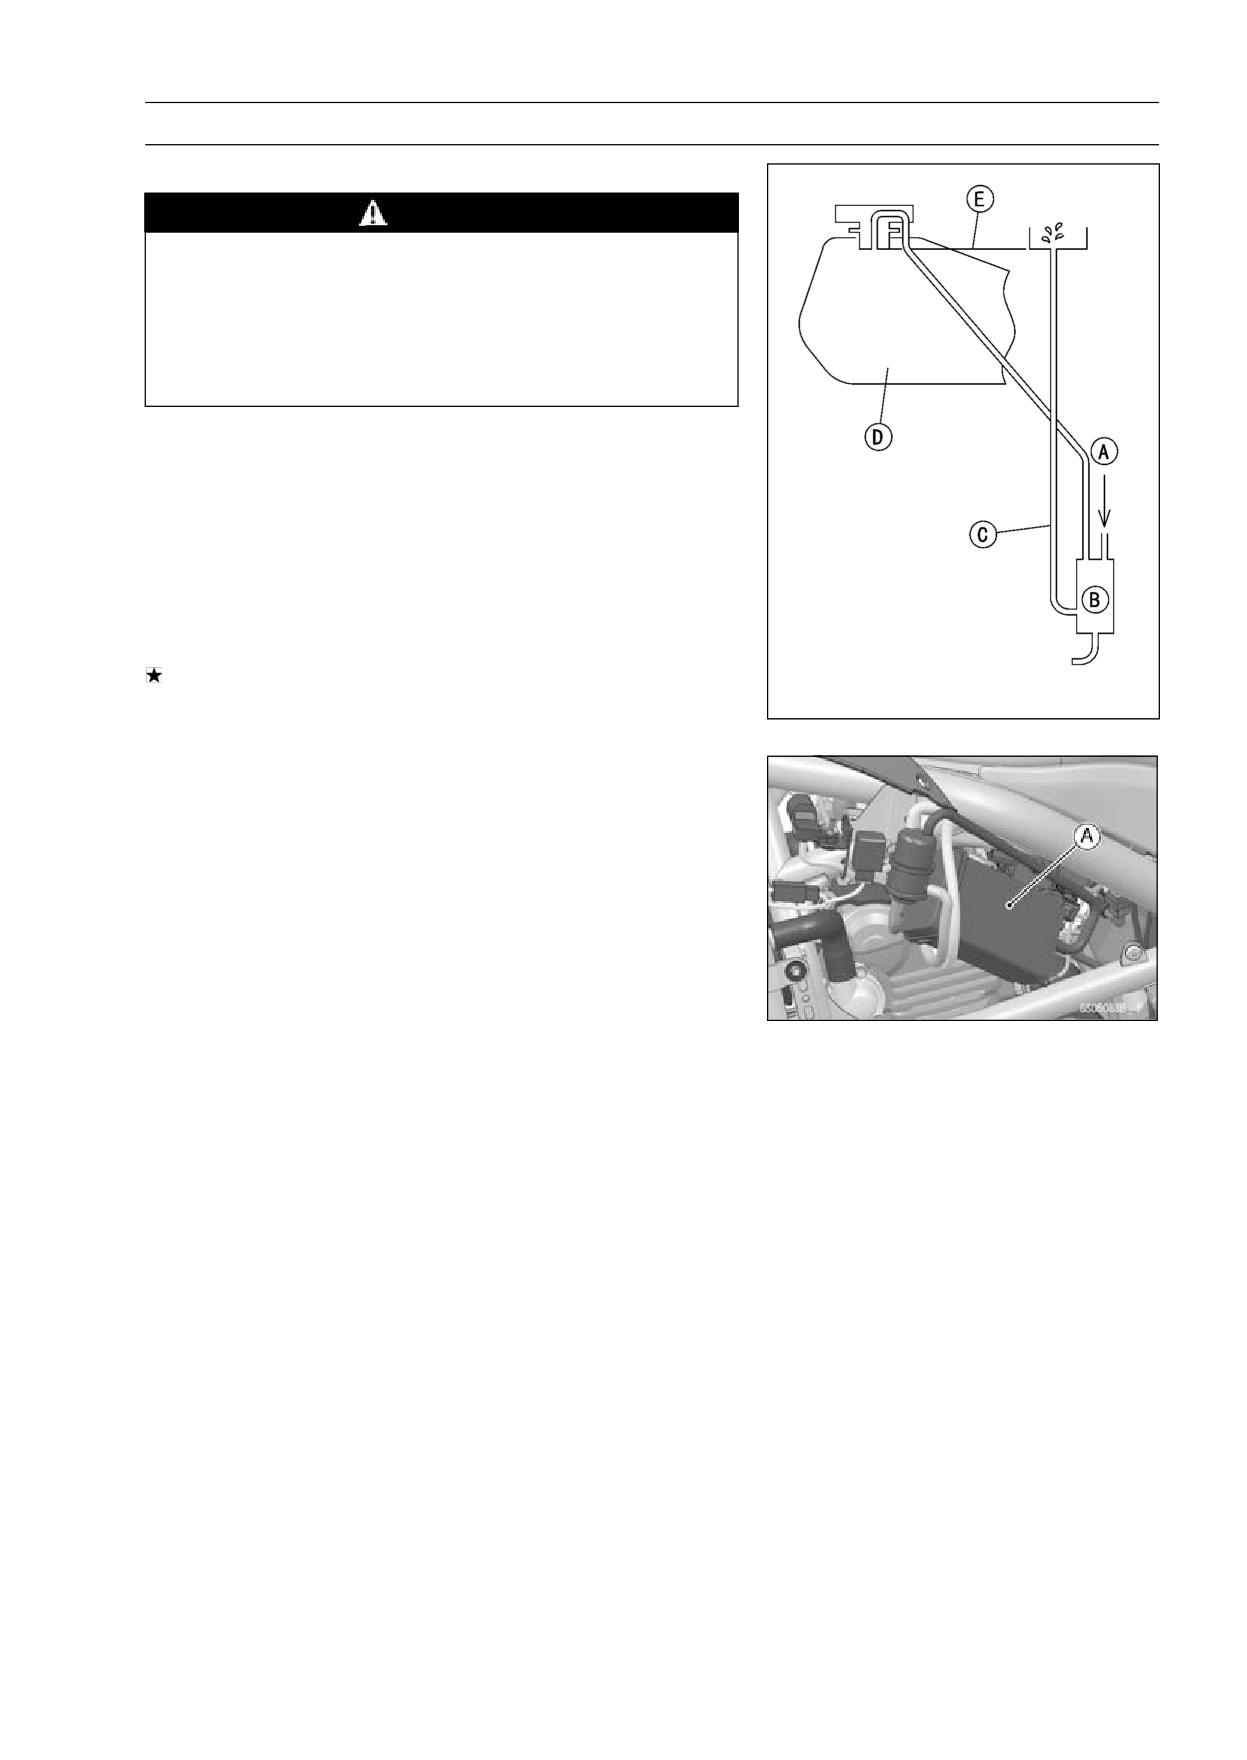
ject about 20 mL (0.68 US oz.) of gasoline [A] into the
separator [B] through the hose fitting.
• Disconnect the fuel return hose [C] from the fuel tank [D].
• Run the open end of the return hose into the container
and hold it level with the tank top [E].
• Start the engine, and let it idle.
If the gasoline in the separator comes out of the hose, the
separator works well. If it does not, replace the separator
with a new one.
Canister Inspection
• Refer to the Evaporative Emission Control System In-
spection in the Periodic Maintenance chapter.
NOTE
○The canister [A] is designed to work well through the
motorcycle’s life without any maintenance if it is used
under normal conditions.
COOLING SYSTEM 4-1
Cooling System
Table of Contents
Exploded View
4-2
Coolant Flow Chart
4-4
Specifications
4-6
Special Tools
4-7
Coolant
4-8
Coolant Deterioration Inspection
4-8
4
Coolant Level Inspection
4-8
Coolant Draining
4-8
Coolant Filling
4-8
Pressure Testing
4-8
Cooling System Flushing
4-9
Coolant Reserve Tank Removal/Installation
4-9
Water Pump
4-10
Water Pump Removal
4-10
Water Pump Installation
4-10
Mechanical Seal Inspection
4-11
Water Pump Housing Disassembly
4-11
Water Pump Housing Assembly
4-11
Impeller Assembly
4-12
Pump Impeller Inspection
4-12
Radiator
4-13
Radiator and Radiator Fan Removal
4-13
Radiator and Radiator Fan Installation
4-14
Radiator Inspection
4-14
Radiator Cap Inspection
4-14
Radiator Filler Neck Inspection
4-15
Thermostat
4-16
Thermostat Removal
4-16
Thermostat Installation
4-16
Thermostat Inspection
4-16
Hose and Pipes
4-18
Hose Installation
4-18
Hose Inspection
4-18
Water Temperature Sensor
4-19
Water Temperature Sensor Removal/Installation
4-19
Water Temperature Sensor Inspection
4-19
4-2 COOLING SYSTEM
Exploded View
COOLING SYSTEM 4-3
Exploded View
Torque
No.
Fastener
Remarks
N·m
kgf·m
ft·lb
1
Radiator Hose Clamp Screws
2.0
0.20
17 in·lb
2
Water Pump Impeller Bolt
9.8
1.0
87 in·lb
3
Water Pump Cover Bolts
9.8
1.0
87 in·lb
4
Water Pump Drain Bolt
7.0
0.70
62 in·lb
5
Thermostat Housing Bolts
9.8
1.0
87 in·lb
6
Water Temperature Sensor
12
1.2
106 in·lb
7
Baffle Plate Bolts
5.9
0.60
52 in·lb
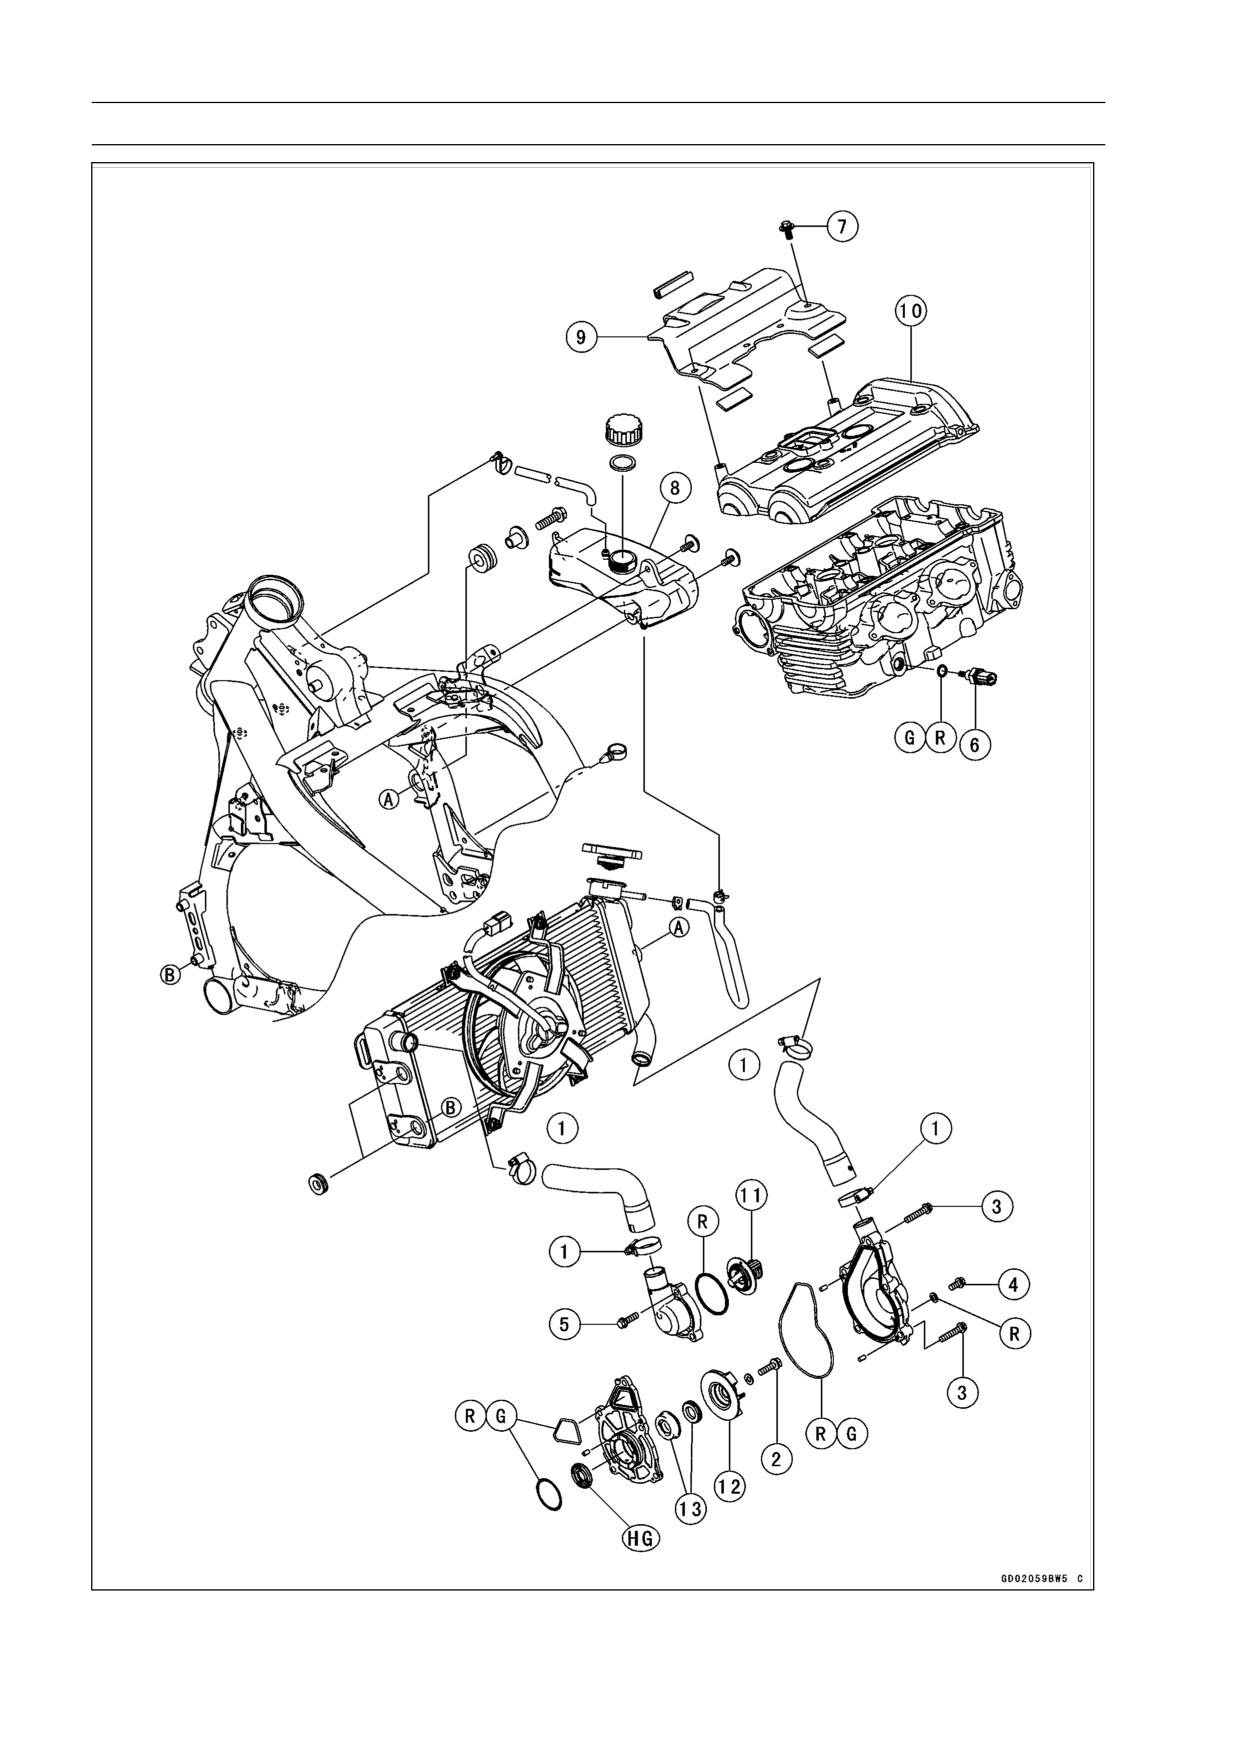
8. Reserve Tank
9. Baffle Plate
10. Cylinder Head Cover
11. Thermostat
12. Water Pump Impeller
13. Mechanical Seal
G: Apply grease.
HG: Apply high-temperature grease.
R: Replacement Parts
4-4 COOLING SYSTEM
Coolant Flow Chart
COOLING SYSTEM 4-5
Coolant Flow Chart
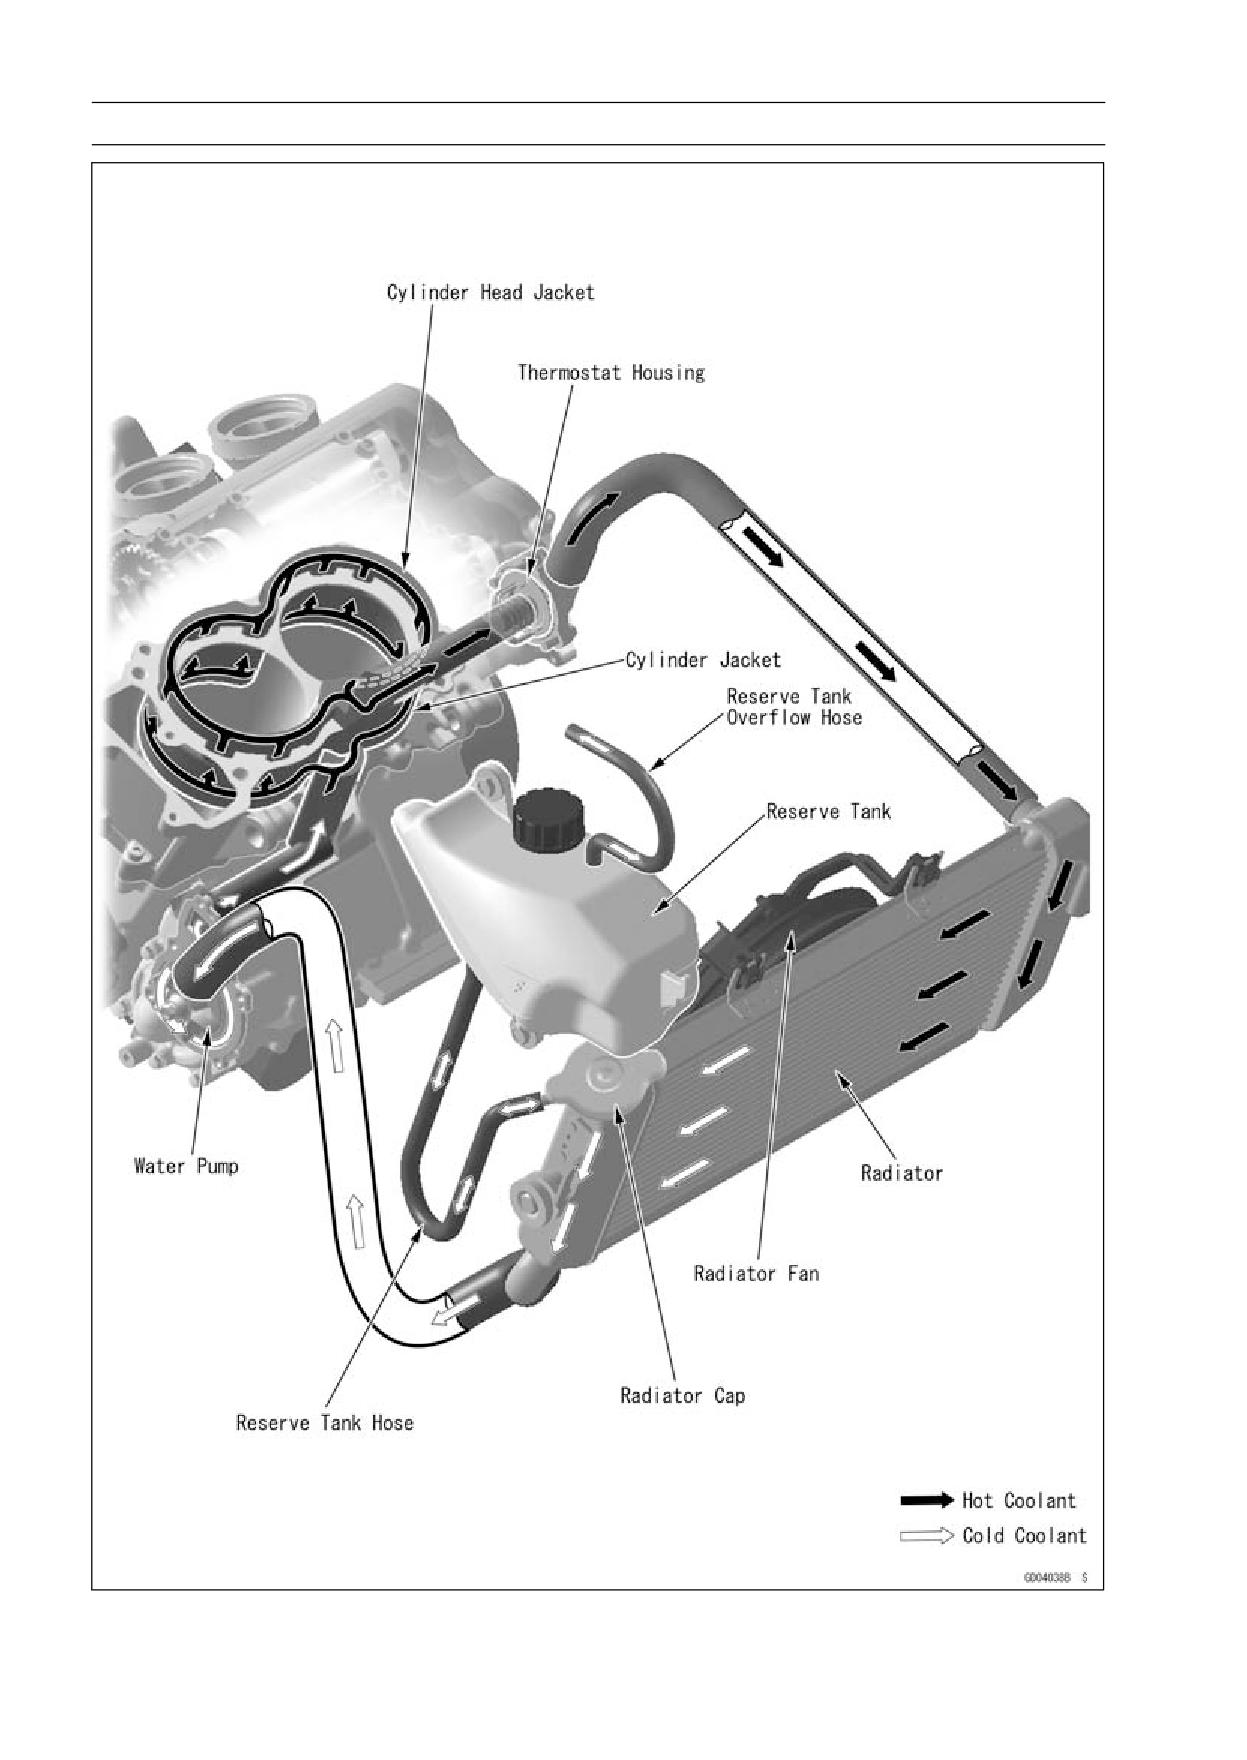
Permanent type antifreeze is used as a coolant to protect the cooling system from rust and corrosion.
When the engine starts, the water pump turns and the coolant circulates.
The thermostat is a wax pellet type which opens or closes with coolant temperature changes. The
thermostat continuously changes its valve opening to keep the coolant temperature at the proper level.
When coolant temperature is below 80.5 ∼ 83.5°C (177 ∼ 182°F), the thermostat closes so that the
coolant flow is restricted through the air bleeder hole, causing the engine to warm up more quickly.
When coolant temperature is more than 80.5 ∼ 83.5°C, the thermostat opens and the coolant flows.
When the coolant temperature goes up beyond 93 ∼ 103°C (199 ∼ 217°F), the radiator fan relay
conducts to operate the radiator fan. The radiator fan draws air through the radiator core when there
is not sufficient air flow such as at low speeds. This increases up the cooling action of the radiator.
When the temperature is below 91°C (196°F) ∼ temperature less than ON temperature, the fan relay
opens and the radiator fan stops.
In this way, this system controls the engine temperature within narrow limits where the engine op-
erates most efficiently even if the engine load varies.
The system is pressurized by the radiator cap to suppress boiling and the resultant air bubbles
which can cause engine overheating. As the engine warms up, the coolant in the radiator and the
water jacket expands. The excess coolant flows through the radiator cap and hose to the reserve tank
to be stored there temporarily. Conversely, as the engine cools down, the coolant in the radiator and
the water jacket contracts, and the stored coolant flows back to the radiator from the reserve tank.
The radiator cap has two valves. One is a pressure valve which holds the pressure in the system
when the engine is running. When the pressure exceeds 112.3 ∼ 141.7 kPa (1.15 ∼ 1.45 kgf/cm²,
16.3 ∼ 20.5 psi), the pressure valve opens and releases the pressure to the reserve tank. As soon
as pressure escapes, the valve closes, and keeps the pressure at 112.3 ∼ 141.7 kPa (1.15 ∼ 1.45
kgf/cm², 16.3 ∼ 20.5 psi). When the engine cools down, another small valve (vacuum valve) in the
cap opens. As the coolant cools, the coolant contracts to form a vacuum in the system. The vacuum
valve opens and allows the coolant from the reserve tank to enter the radiator.
4-6 COOLING SYSTEM
Specifications
Item
Standard
Coolant Provided when Shipping
Type (Recommended)
Permanent type of antifreeze (soft water and ethylene glycol
plus corrosion and rust inhibitor chemicals for aluminum
engines and radiators)
Color
Green
Mixed Ratio
Soft water 50%, coolant 50%
Freezing Point
-35°C (-31°F)
Total Amount
1.2 L (1.3 US qt) (reserve tank full level, including radiator
and engine)
Radiator Cap
Relief Pressure
112.3 ∼ 141.7 kPa (1.15 ∼ 1.45 kgf/cm², 16.3 ∼ 20.5 psi)
Thermostat
Valve Opening Temperature
80.5 ∼ 83.5°C (177 ∼ 182°F)
Valve Full Opening Lift
8 mm (0.31 in.) or more at 95°C (203°F)
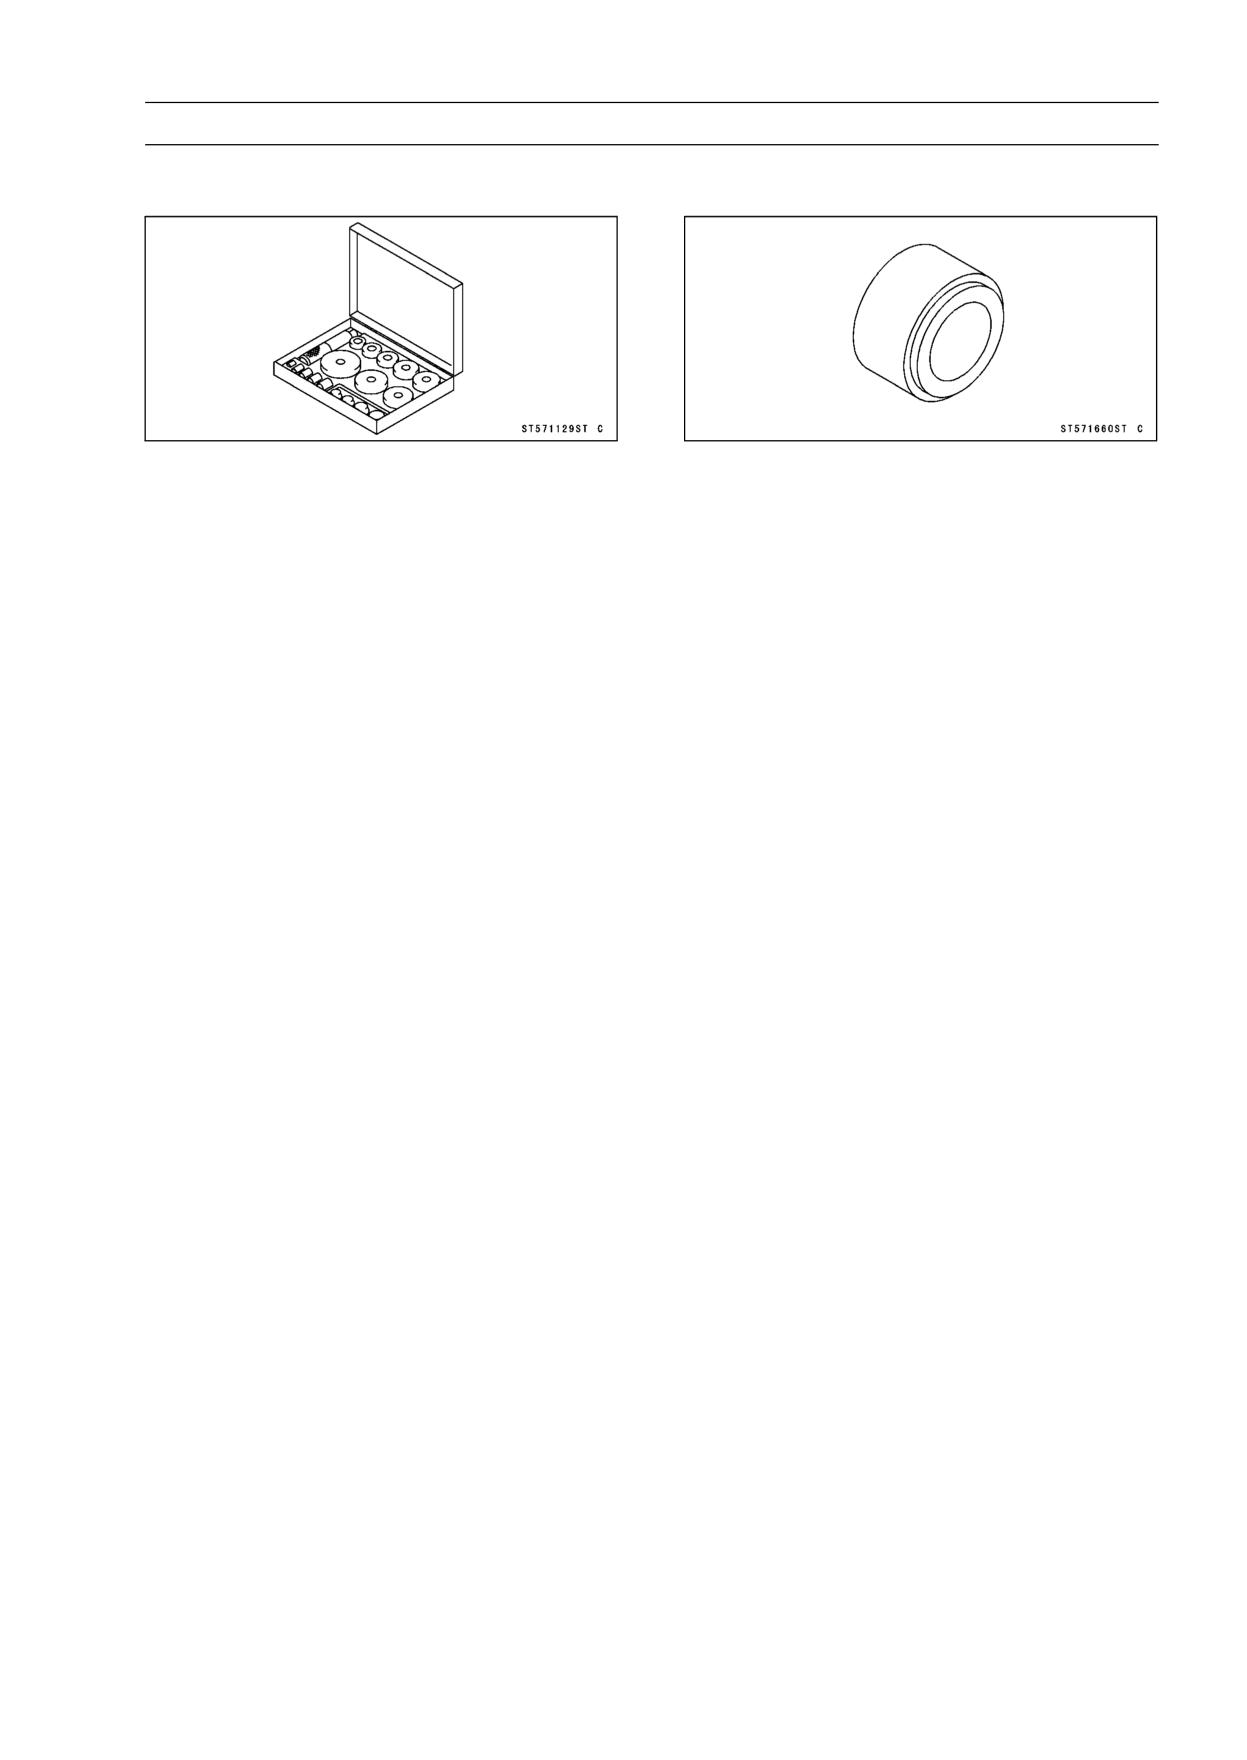
COOLING SYSTEM 4-7
Special Tools
Bearing Driver Set:
Oil Seal Driver:
57001-1129
57001-1660
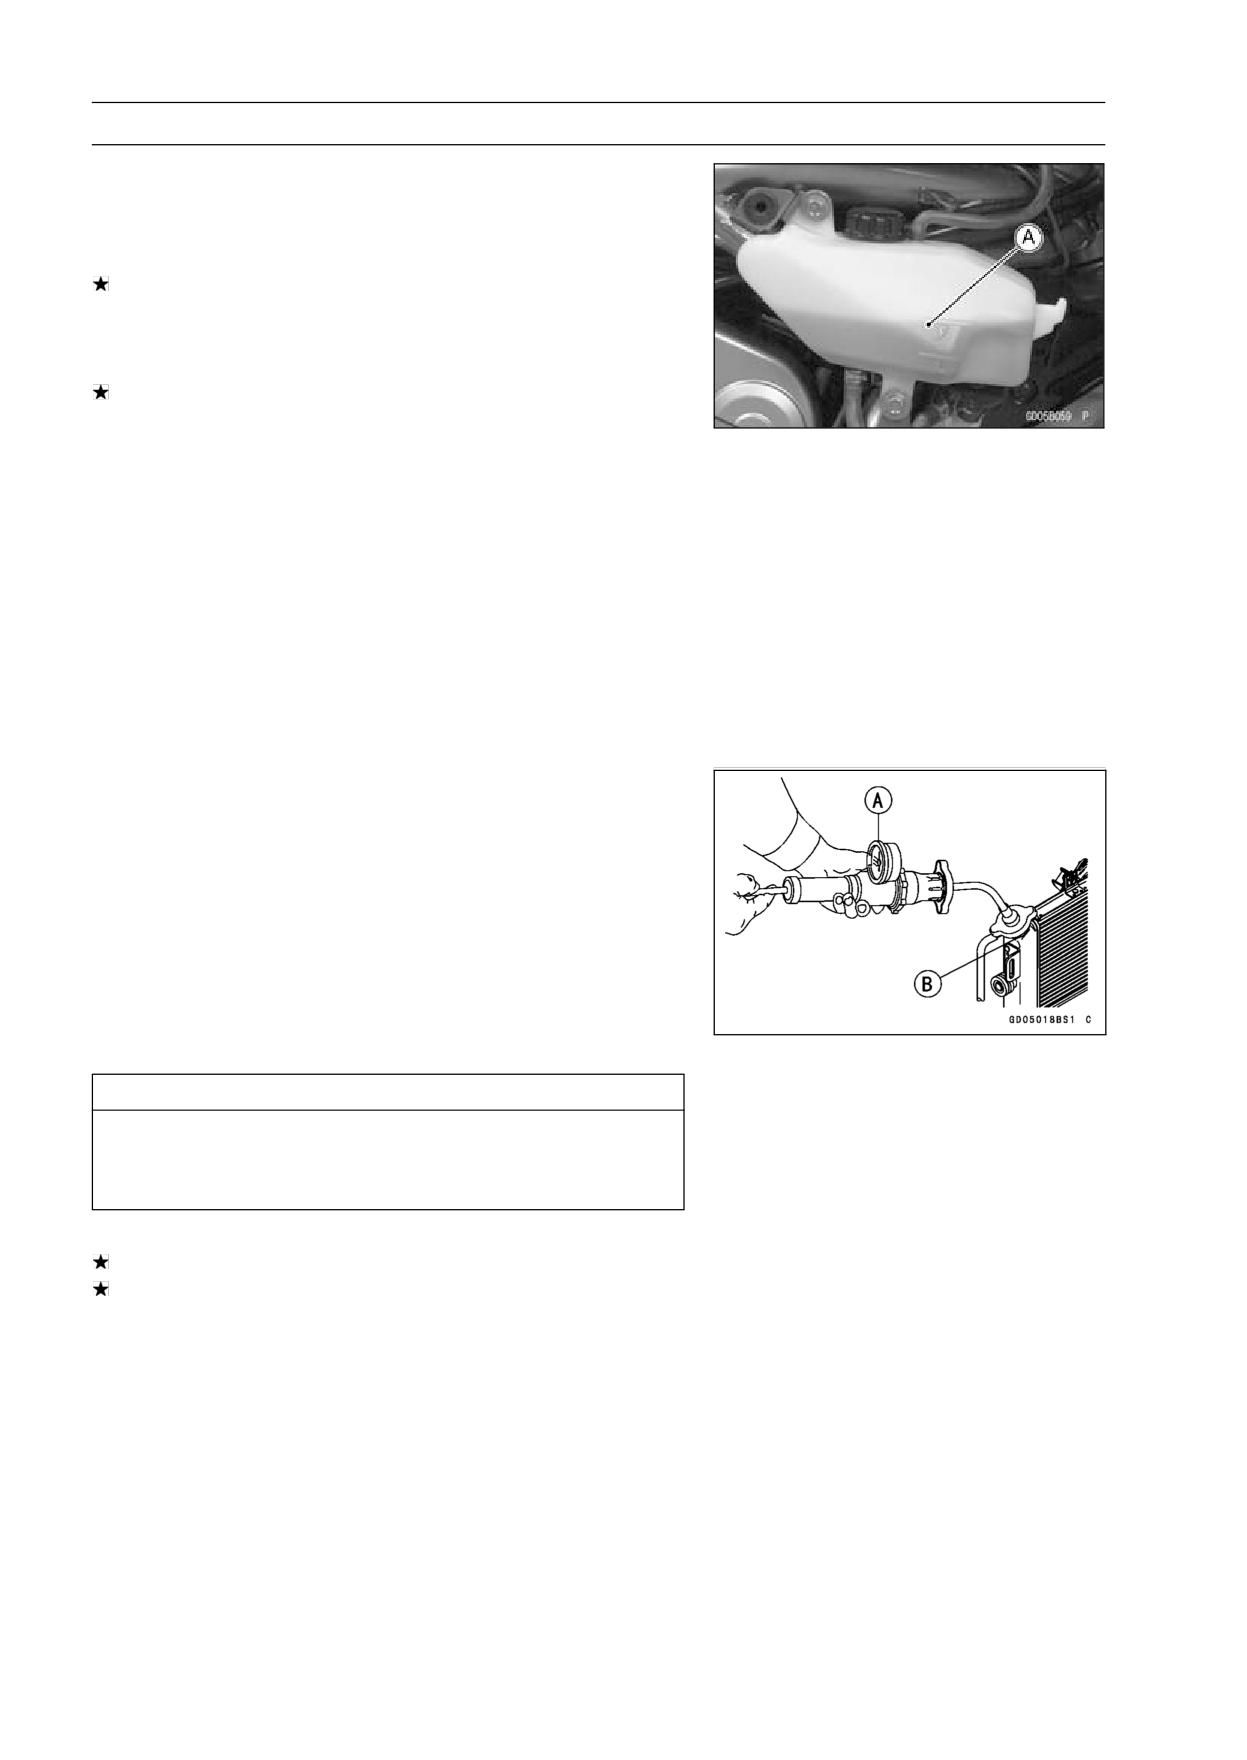
4-8 COOLING SYSTEM
Coolant
Coolant Deterioration Inspection
• Remove the right center fairing (see Center Fairing Re-
moval in the Frame chapter).
• Visually inspect the coolant [A] in the reserve tank.
If whitish cotton-like wafts are observed, aluminum parts
in the cooling system are corroded. If the coolant is
brown, iron or steel parts are rusting. In either case, flush
the cooling system.
If the coolant gives off an abnormal smell, check for a
cooling system leak. It may be caused by exhaust gas
leaking into the cooling system.
Coolant Level Inspection
• Refer to the Coolant Level in the Periodic Maintenance
chapter.
Coolant Draining
• Refer to the Coolant Change in the Periodic Maintenance
chapter.
Coolant Filling
• Refer to the Coolant Change in the Periodic Maintenance
chapter.
Pressure Testing
• Remove the reserve tank (see Coolant Change in the Pe-
riodic Maintenance chapter).
• Remove the radiator cap, and install a cooling system
pressure tester [A] on the filler neck [B].
NOTE
○Wet the cap sealing surfaces with water or coolant to
prevent pressure leaks.
• Build up pressure in the system carefully until the pres-
sure reaches 141.7 kPa (1.45 kgf/cm², 20.5 psi).
CAUTION
During pressure testing, do not exceed the pres-
sure for which the system is designed. The maxi-
mum pressure is 141.7 kPa (1.45 kgf/cm², 20.5 psi).
• Watch the gauge for at least 6 seconds.
If the pressure holds steady, the system is all right.
If the pressure drops and no external source is found,
check for internal leaks. Droplets in the engine oil indicate
internal leakage. Check the cylinder head gasket and the
water pump.
• Remove the pressure tester, replenish the coolant, and
install the radiator cap.
COOLING SYSTEM 4-9
Coolant
Cooling System Flushing
Over a period of time, the cooling system accumulates
rust, scale, and lime in the water jacket and radiator. When
this accumulation is suspected or observed, flush the cool-
ing system. If this accumulation is not removed, it will clog
up the water passage and considerable reduce the effi-
ciency of the cooling system.
• Drain the cooling system (see Coolant Change in the Pe-
riodic Maintenance chapter).
• Fill the cooling system with fresh water mixed with a flush-
ing compound.
CAUTION
Do not use a flushing compound which is harmful to
the aluminum engine and radiator. Carefully follow
the instructions supplied by the manufacturer of the
cleaning product.
• Warm up the engine, and run it at normal operating tem-
perature for about ten minutes.
• Stop the engine, and drain the cooling system.
• Fill the system with fresh water.
• Warm up the engine and drain the system.
• Repeat the previous two steps once more.
• Fill the system with a permanent type coolant and bleed
the air from the system (see Coolant Change in the Peri-
odic Maintenance chapter).
Coolant Reserve Tank Removal/Installation
• The coolant reserve tank is removed and installed dur-
ing coolant change (see Coolant Change in the Periodic
Maintenance chapter).
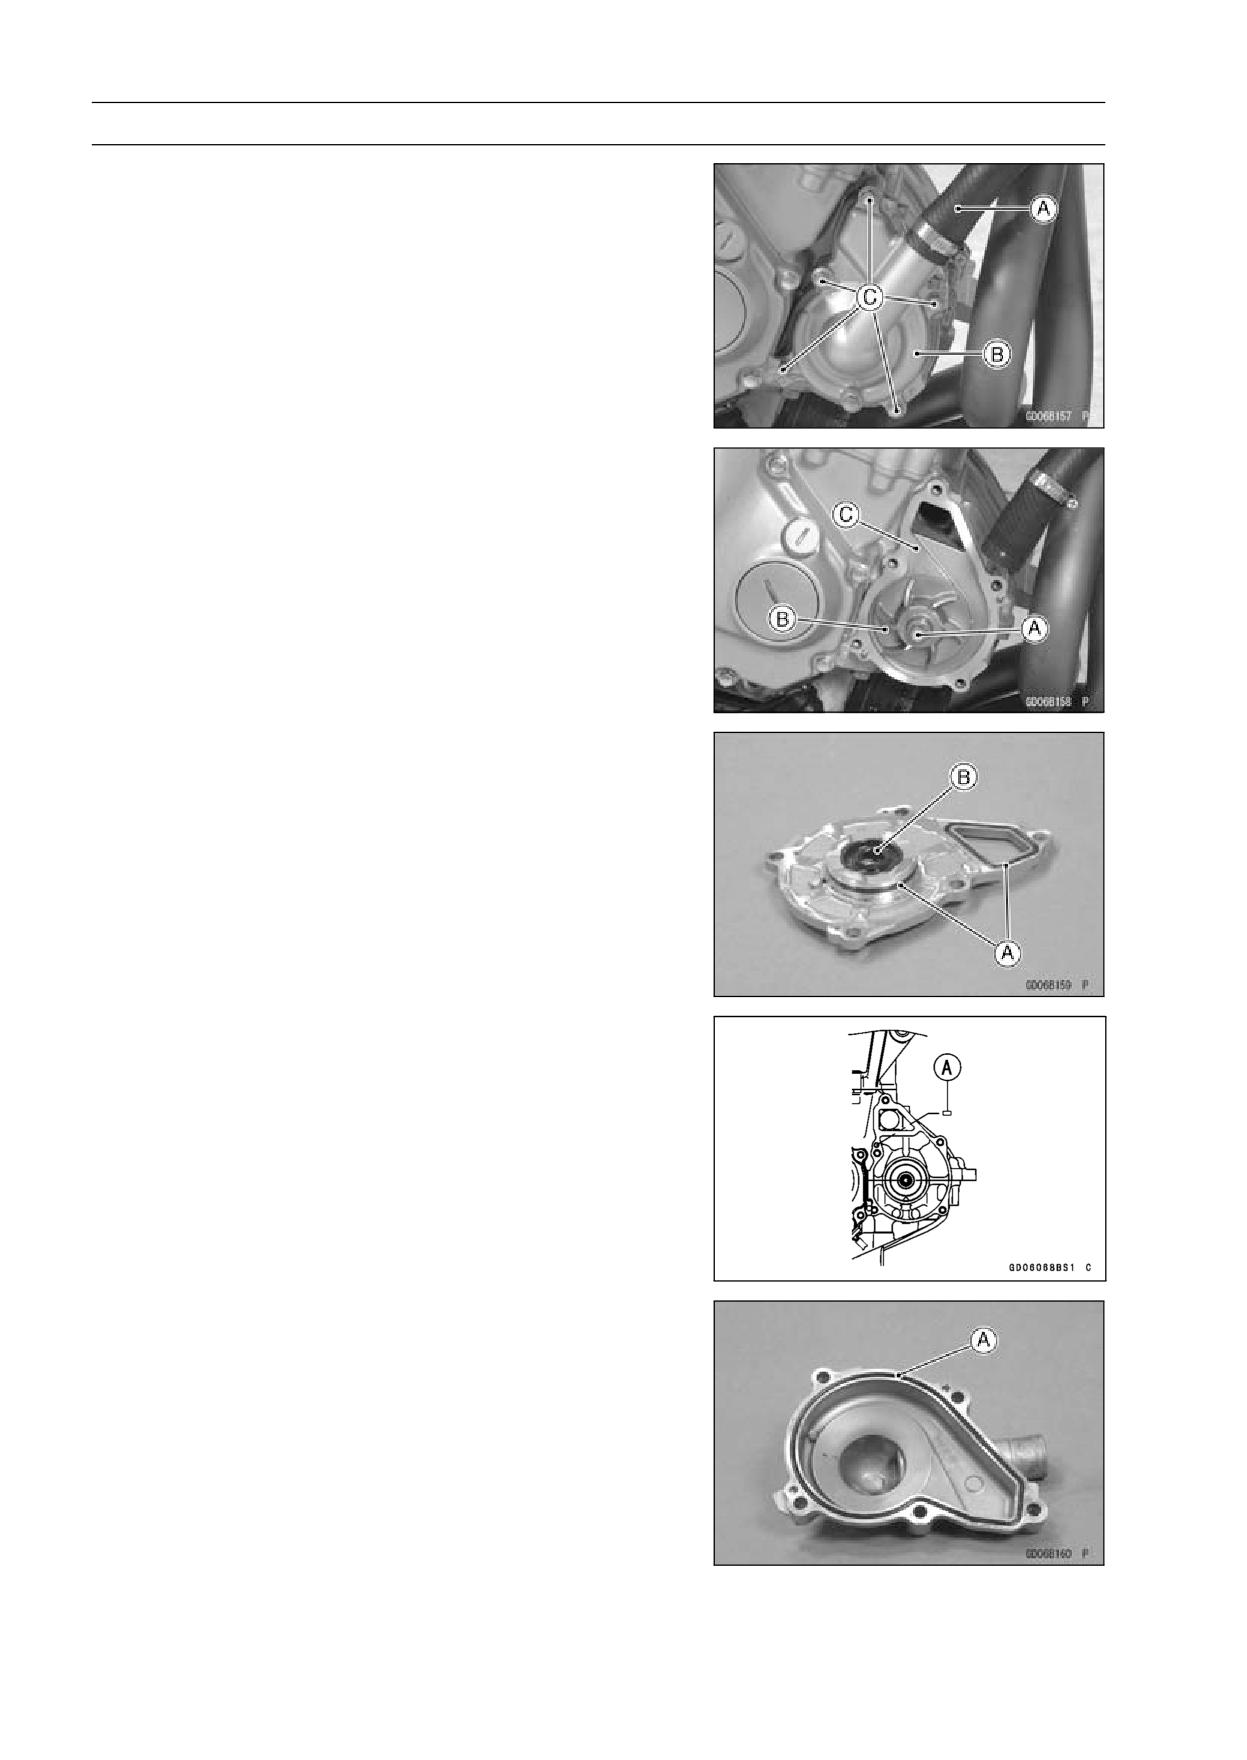
4-10 COOLING SYSTEM
Water Pump
Water Pump Removal
• Drain the coolant (see Coolant Change in the Periodic
Maintenance chapter).
• Loosen the clamp and remove the radiator hose [A] from
the water pump cover [B].
• Remove the water pump cover bolts [C].
• Shift the transmission into 1st gear.
• While applying the rear brake, remove the water pump
impeller bolt [A].
• Remove:
Impeller [B]
Water Pump Housing [C]
Water Pump Installation
• When installing the water pump impeller bolt, shift the
transmission into 1st gear and apply the rear brake.
• Replace the O-rings [A] on the water pump housing with
new ones and apply grease them.
• Apply high-temperature grease to the lips of the water
pump housing oil seal [B].
• Be sure that the dowel pin [A] is in position.
• Install the water pump housing.
• Tighten:
Torque - Water Pump Impeller Bolt: 9.8 N·m (1.0 kgf·m, 87
in·lb)
• Replace the O-ring [A] on the water pump cover with a
new one and grease it.
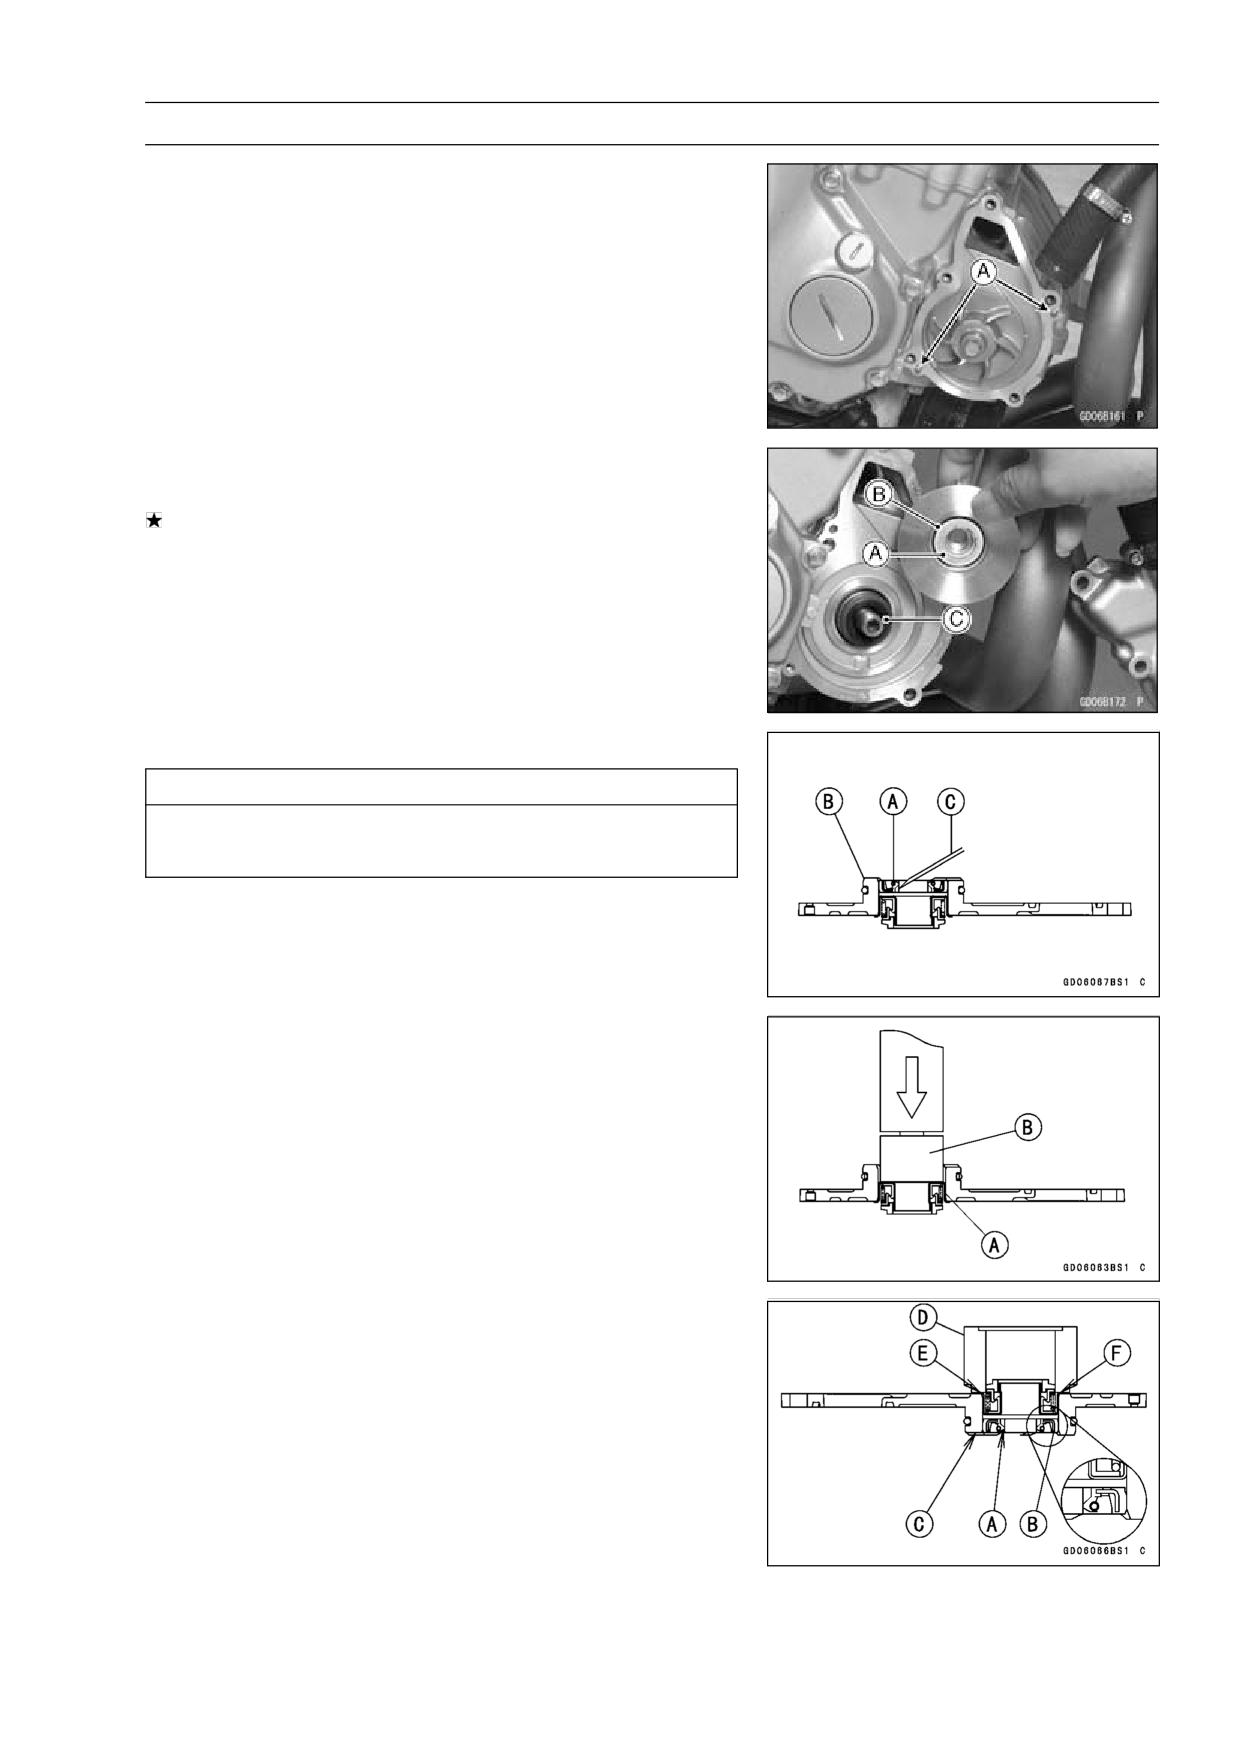
COOLING SYSTEM 4-11
Water Pump
• Install the water pump cover, being careful of the two
dowel pins [A].
Torque - Water Pump Cover Bolts: 9.8 N·m (1.0 kgf·m, 87
in·lb)
Mechanical Seal Inspection
• Visually inspect the mechanical seal.
If any one of the parts is damaged, replace the mechani-
cal seal as a unit.
○The sealing seat and rubber seal may be removed easily
by hand.
Impeller Sealing Seat Surface [A]
Rubber Seal [B]
Mechanical Seal Diaphragm [C]
Water Pump Housing Disassembly
CAUTION
Be careful not to damage the sealing surface of the
mechanical seal.
• Take the oil seal [A] out of the housing [B] with a hook [C].
• Press the mechanical seal [A] out of the housing with a
bearing driver [B].
Special Tool - Bearing Driver Set: 57001-1129
Water Pump Housing Assembly
• Apply high-temperature grease [A] to the new oil seal [B].
• Press the oil seal into the housing with a bearing driver so
that the seal surface is flush [C] with the end of the hole.
• Press the new mechanical seal into the housing with the
oil seal driver [D] until its flange [E] touches the surface
[F] of the housing.
Special Tool - Oil Seal Driver: 57001-1660
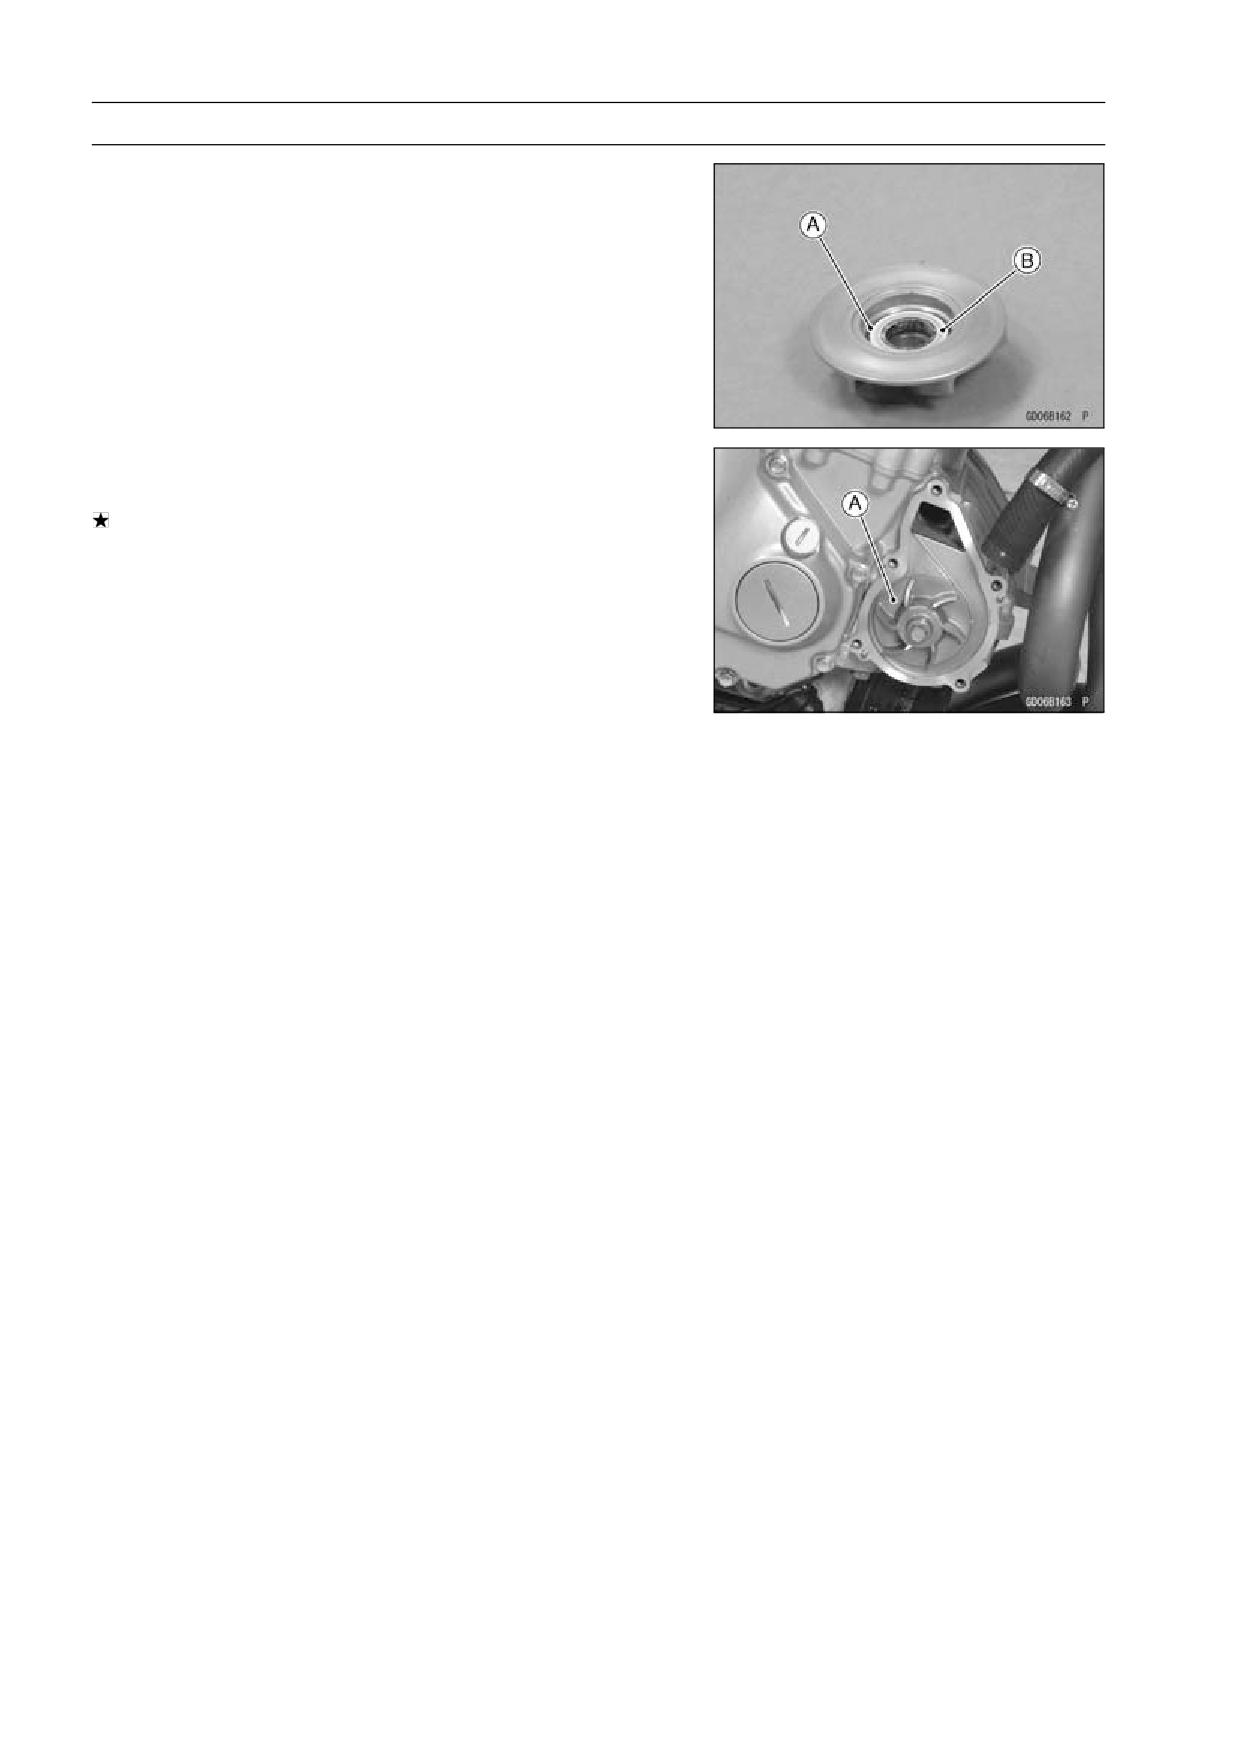
4-12 COOLING SYSTEM
Water Pump
Impeller Assembly
• Clean the sliding surface of the mechanical seal with a
high-flash point solvent, and apply a little coolant to the
sliding surface to give the mechanical seal initial lubrica-
tion.
• Apply coolant to the surfaces of the rubber seal [A] and
sealing seat [B], and install the rubber seal and sealing
seat into the impeller by pressing them by hand until the
seat stops at the bottom of the hole.
Pump Impeller Inspection
• Visually check the impeller [A].
If the surface is corroded, or if the blades are damaged,
replace the impeller (see Water Pump Removal).
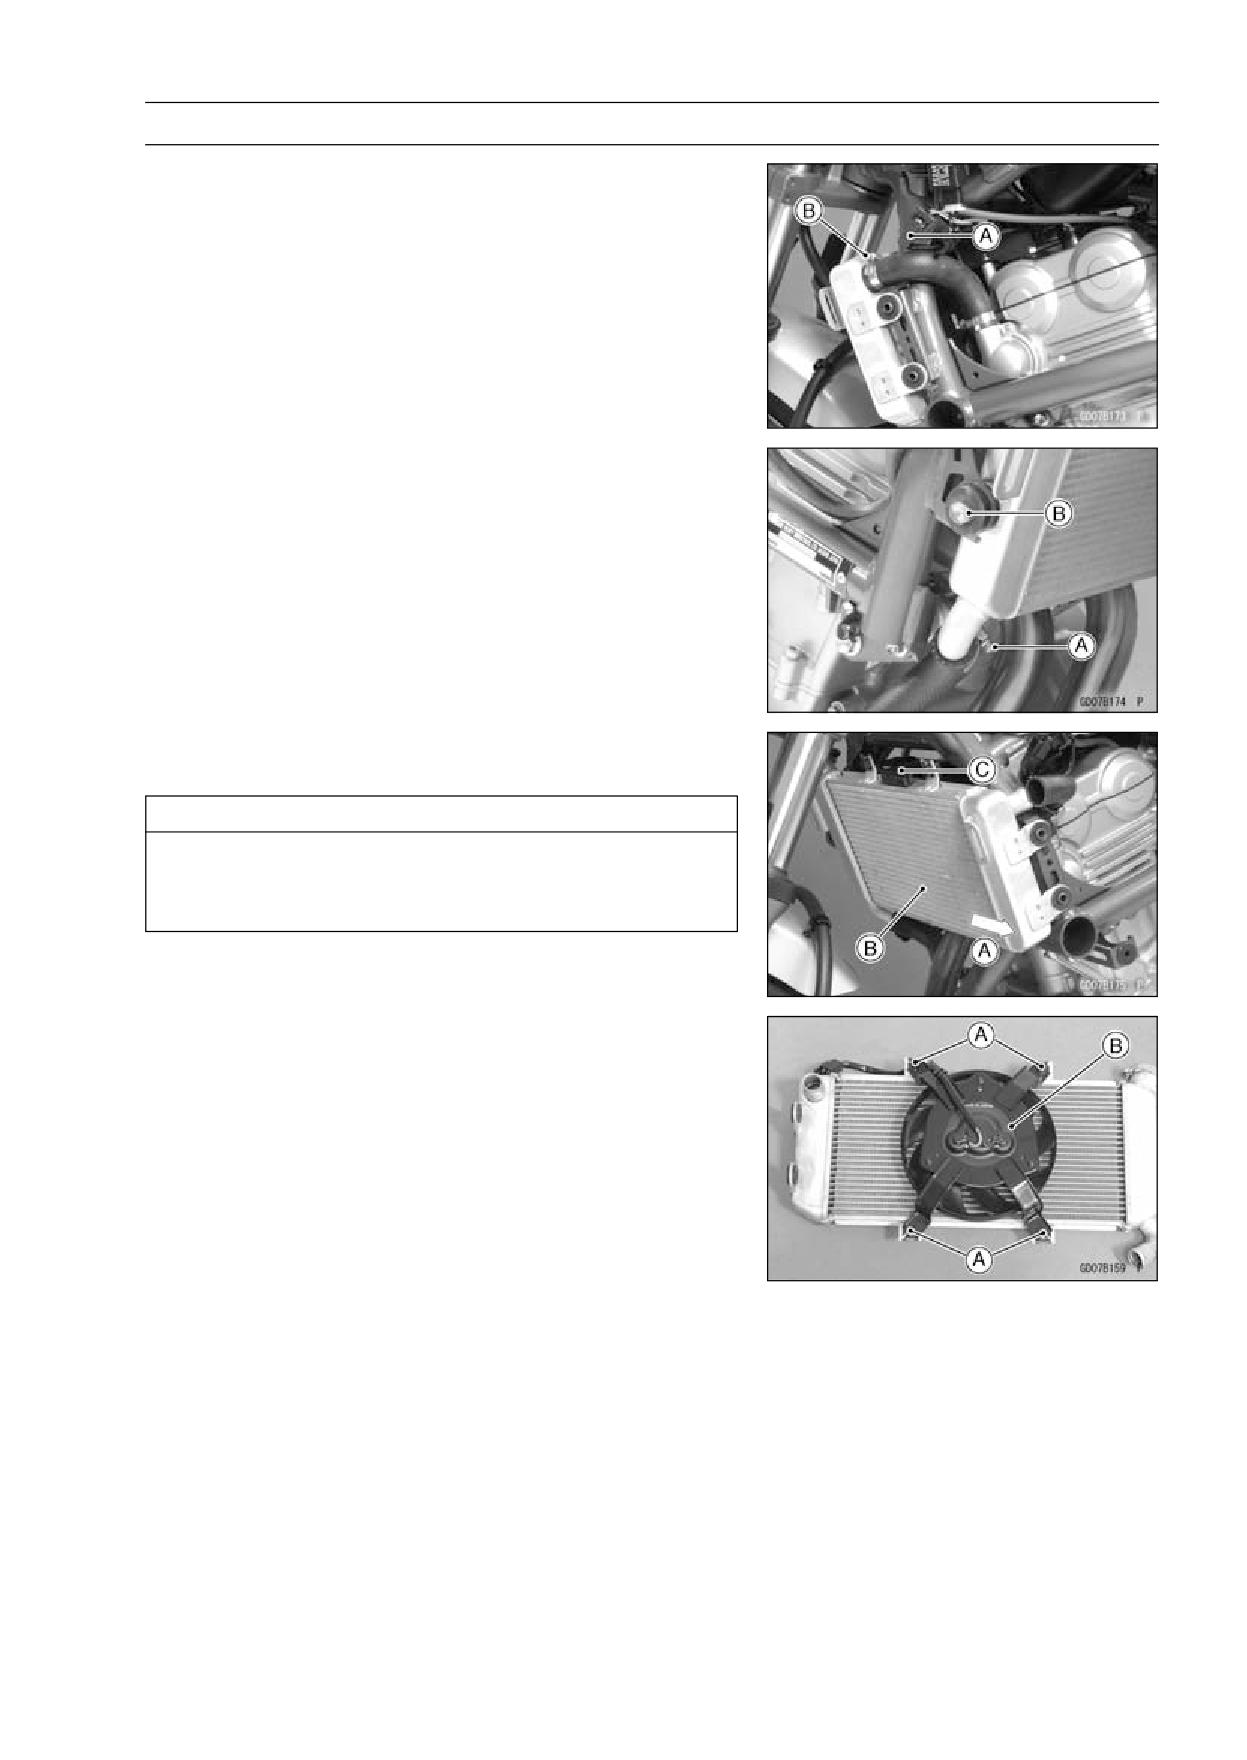
COOLING SYSTEM 4-13
Radiator
Radiator and Radiator Fan Removal
• Drain the coolant (see Coolant Change in the Periodic
Maintenance chapter).
• Remove:
Center Fairings (see Center Fairing in the Frame chap-
ter)
Reserve Tank (see Coolant Change in the Periodic Main-
tenance chapter)
Radiator Fan Motor Connector [A] (Disconnect)
Radiator Hose Clamp Screw [B] (Loosen)
• Loosen:
Radiator Hose Clamp Screw [A]
• Remove:
Radiator Bolt [B]
• Pull [A] the radiator [B] toward the left, noting the baffle
plate [C] on the cylinder head cover.
CAUTION
Do not touch the radiator core. This could damage
the radiator fins, resulting in loss of cooling effi-
ciency.
• If necessary, remove:
Radiator Fan Mounting Bolts [A]
Radiator Fan [B]
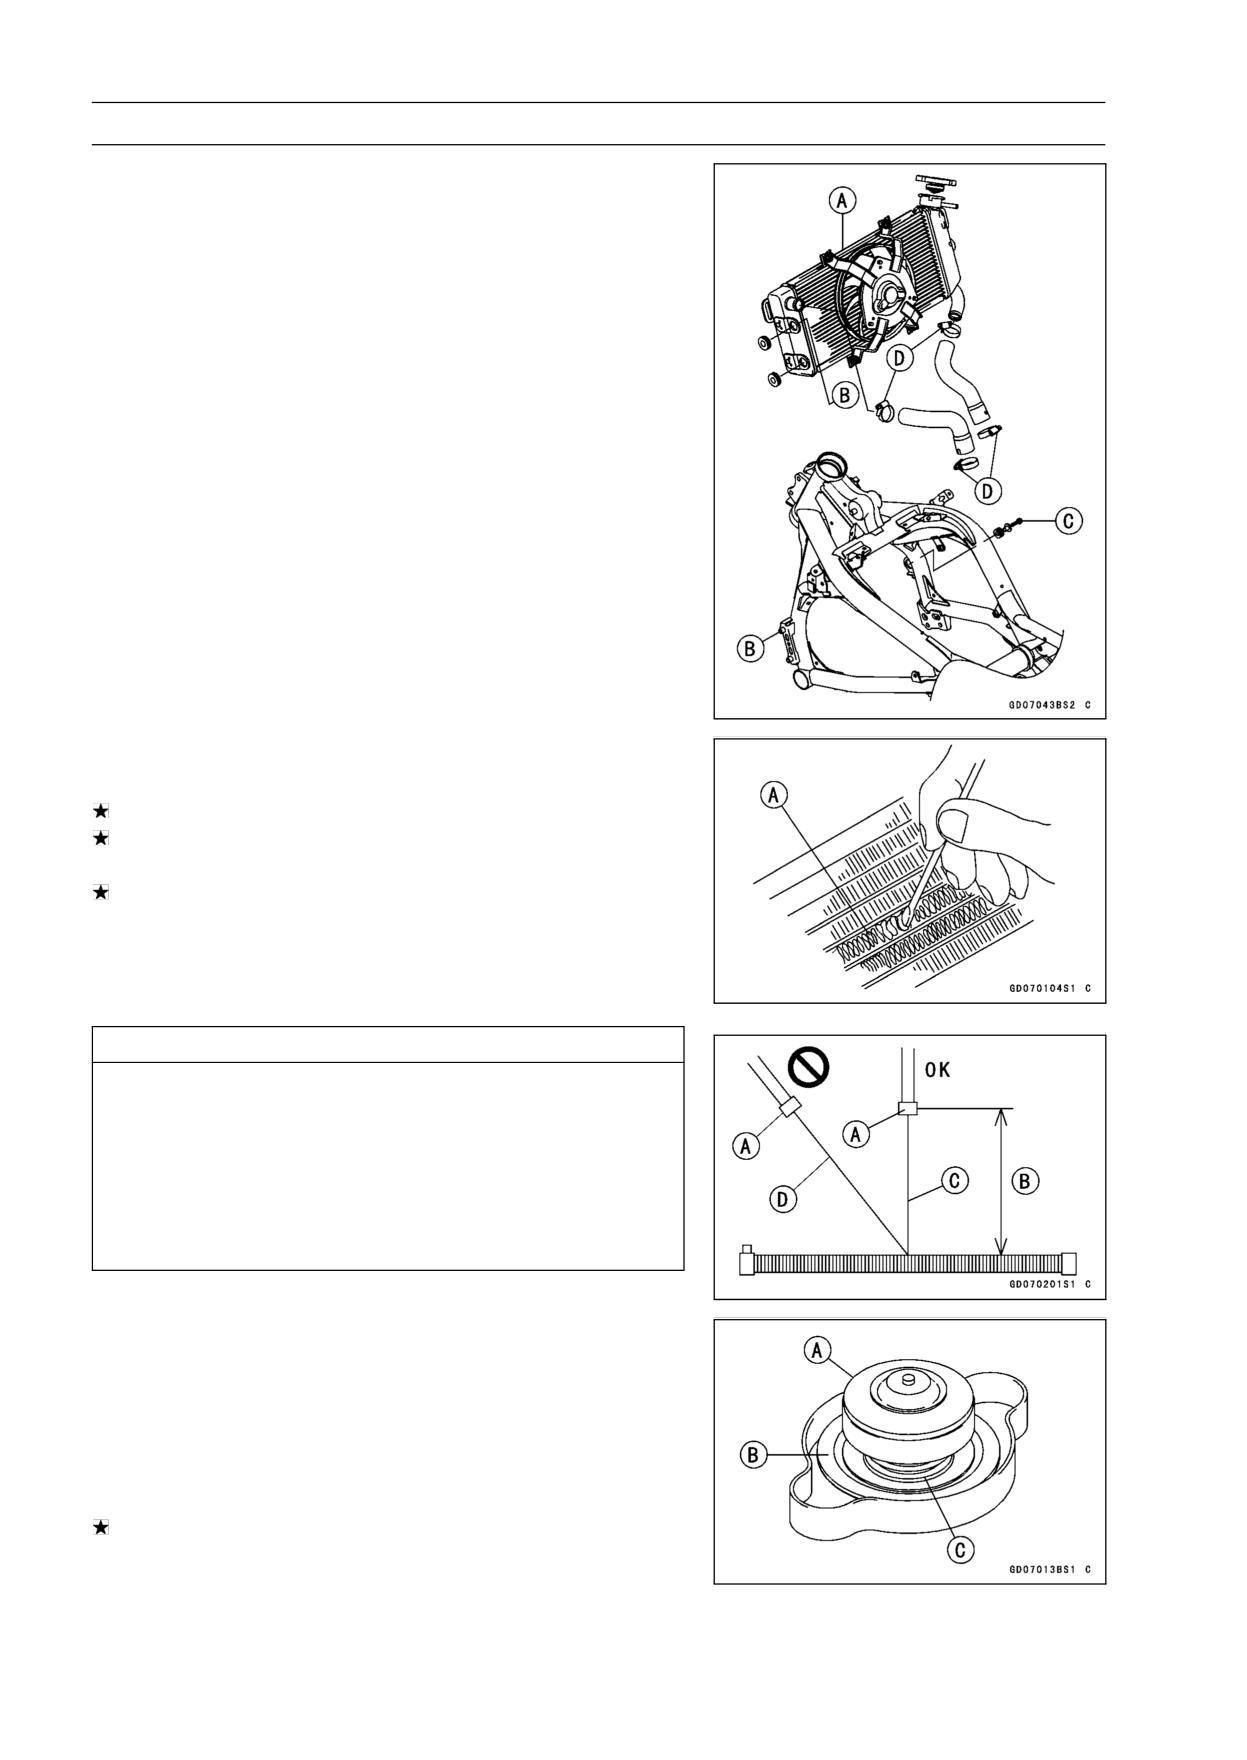
4-14 COOLING SYSTEM
Radiator
Radiator and Radiator Fan Installation
• Install the radiator [A] to the frame.
○Align [B] the projection on the frame with the hole on the
radiator.
○Tighten the radiator bolt [C].
○Note the baffle plate on the cylinder head cover when
installing the radiator.
○Position the radiator hose clamp screws [D] as shown.
Radiator Inspection
• Check the radiator core.
If there are obstructions to air flow, remove them.
If the corrugated fins [A] are deformed, carefully
straighten them.
If the air passages of the radiator core are blocked more
than 20% by unremovable obstructions or irreparably de-
formed fins, replace the radiator with a new one.
CAUTION
When cleaning the radiator with steam cleaner, be
careful of the following to prevent radiator damage:
Keep the steam gun [A] away more than 0.5 m (1.6
ft) [B] from the radiator core.
Hold the steam gun perpendicular [C] (not oblique
[D]) to the core surface.
Run the steam gun, following the core fin direction.
Radiator Cap Inspection
• Remove:
Reserve Tank (see Coolant Change in the Periodic Main-
tenance chapter)
Radiator Cap
• Check the condition of the bottom [A] and top [B] valve
seals and valve spring [C].
If any one of them shows visible damage, replace the cap
with a new one.
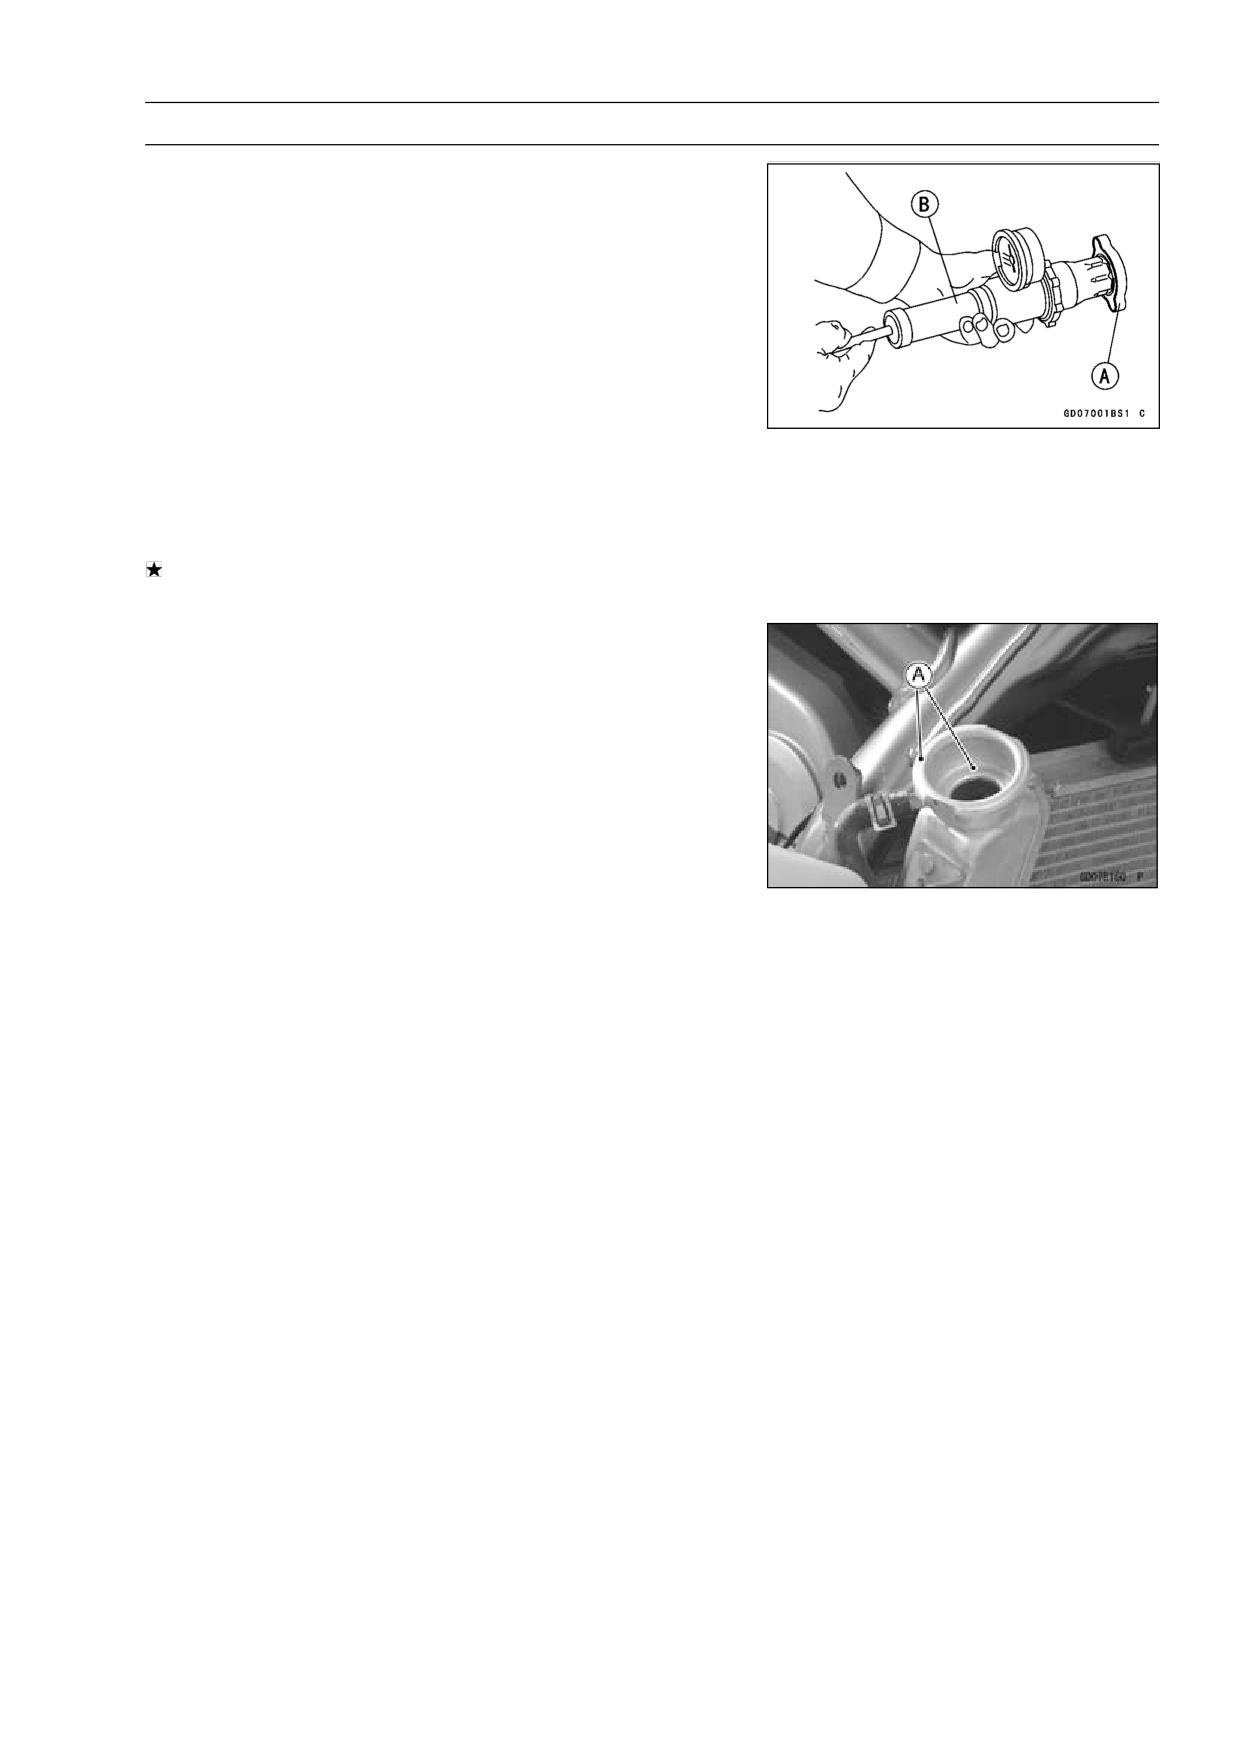
COOLING SYSTEM 4-15
Radiator
• Install the cap [A] on a cooling system pressure tester [B].
NOTE
○Wet the cap sealing surfaces with water or coolant to
prevent pressure leaks.
• Watching the pressure gauge, pump the pressure tester
to build up the pressure until the relief valve opens: the
gauge needle flicks downward. Stop pumping and mea-
sure leak time at once. The relief valve must open within
the specified range in the table below and the gauge hand
must remain within the same range at least 6 seconds.
Radiator Cap Relief Pressure
Standard:
112.3 ∼ 141.7 kPa (1.15 ∼ 1.45 kgf/cm², 16.3
∼ 20.5 psi)
If the cap can not hold the specified pressure or if it holds
too much pressure, replace it with a new one.
Radiator Filler Neck Inspection
• Remove the reserve tank (see Coolant Change in the Pe-
riodic Maintenance chapter).
• Remove the radiator cap.
• Check the radiator filler neck for signs of damage.
• Check the condition of the top and bottom sealing seats
[A] in the filler neck. They must be smooth and clean for
the radiator cap to function properly.
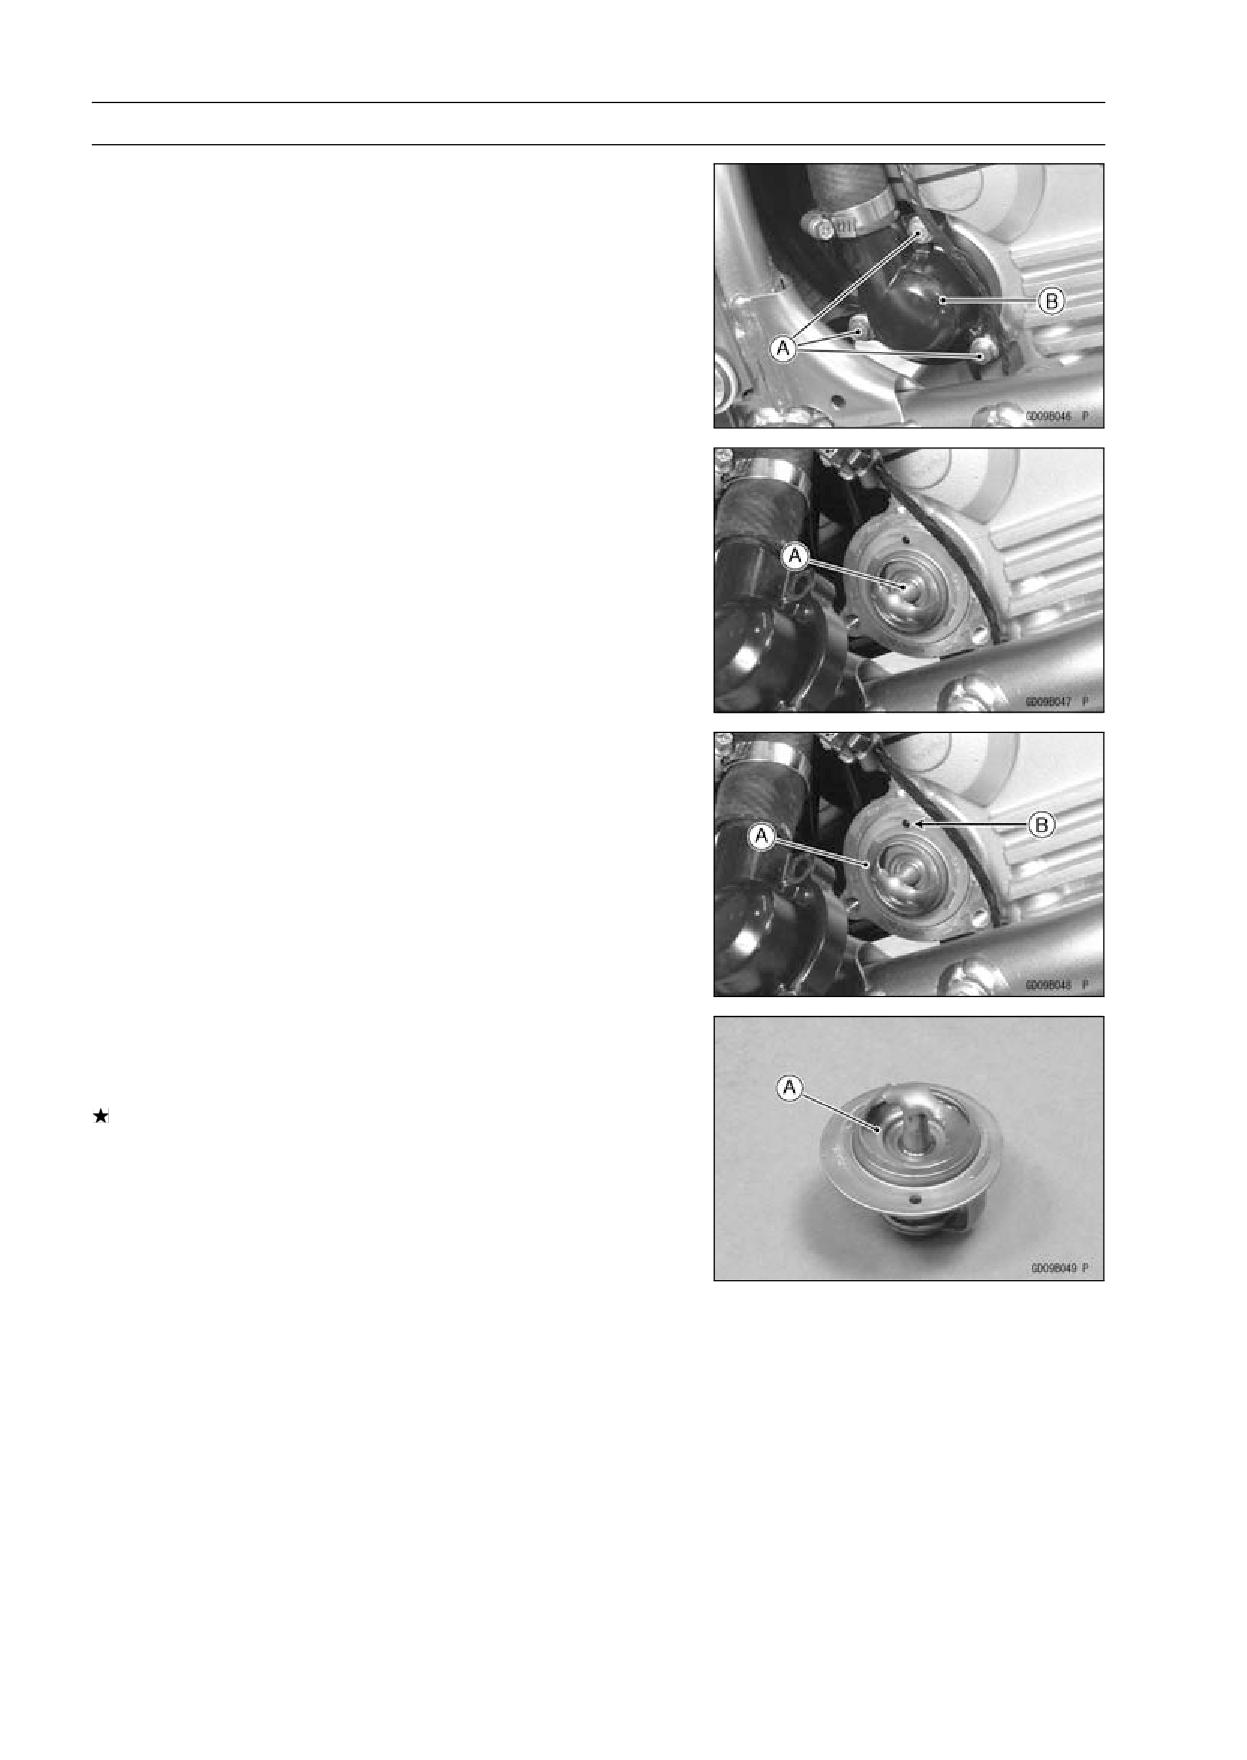
4-16 COOLING SYSTEM
Thermostat
Thermostat Removal
• Drain the coolant (see Coolant Change in the Periodic
Maintenance chapter).
• Remove:
Left Center Fairing (see Center Fairing Removal in the
Frame chapter)
Thermostat Hosing Bolts [A]
Thermostat Hosing [B]
• Pull the thermostat [A] out of the cylinder head.
Thermostat Installation
• Install the thermostat [A] in the cylinder head so that the
air bleeder hole [B] is on top.
• Install a new O-ring into the housing and apply grease it.
• Tighten:
Torque - Thermostat Hosing Bolts: 9.8 N·m (1.0 kgf·m, 87
in·lb)
• Fill the radiator with coolant (see Coolant Change in the
Periodic Maintenance chapter).
Thermostat Inspection
• Remove the thermostat, and inspect the thermostat valve
[A] at room temperature.
If the valve is open, replace the thermostat with a new
one.
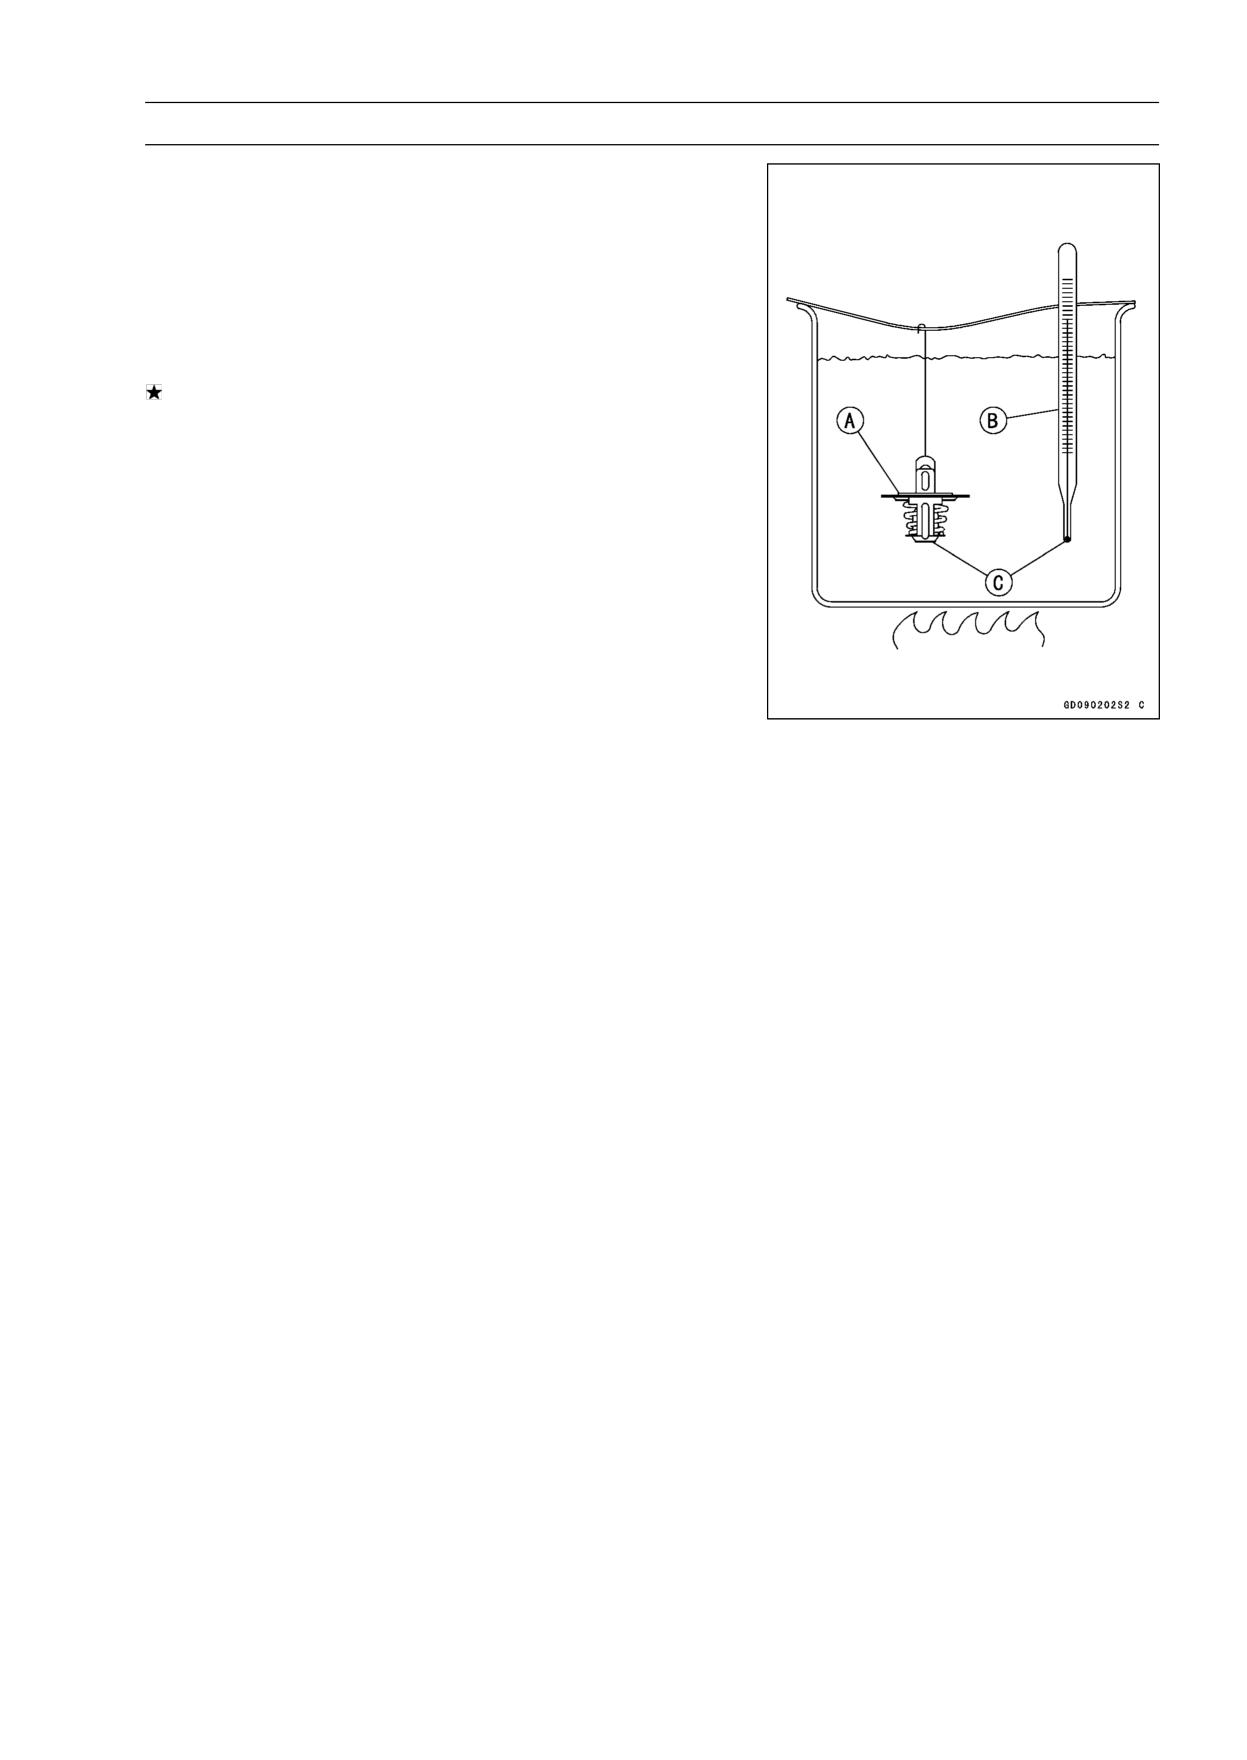
COOLING SYSTEM 4-17
Thermostat
• To check valve opening temperature, suspend the ther-
mostat [A] in a container of water and raise the tempera-
ture of the water.
○The thermostat must be completely submerged and must
not touch the container sides or bottom. Suspend an ac-
curate thermometer [B] in the water so that the heat sen-
sitive portions [C] are located in almost the same depth.
It must not touch the container, either.
If the measurement is out of the specified range, replace
the thermostat with a new one.
Thermostat Valve Opening Temperature
80.5 ∼ 83.5°C (177 ∼ 182°F)
4-18 COOLING SYSTEM
Hose and Pipes
Hose Installation
• Install the hoses and pipes, being careful to follow bend-
ing direction. Avoid sharp bending, kinking, flattening or
twisting.
• Run the hoses (see Cable, Wire, and Hose Routing sec-
tion in the Appendix chapter).
• Install the clamp [A] as near as possible to the hose end
to clear the raised rib of the fitting. This will prevent the
hoses from working loose.
○The clamp screws should be positioned correctly to pre-
vent the clamps from contacting the other parts.
Torque - Radiator Hose Clamp Screws: 2.0 N·m (0.20 kgf·m,
17 in·lb)
Hose Inspection
• Refer to the Radiator Hose Damage and Installation Con-
dition Inspection in the Periodic Maintenance chapter.
COOLING SYSTEM 4-19
Water Temperature Sensor
CAUTION
The water temperature sensor should never be al-
lowed to fall on a hard surface. Such a shock to the
water temperature sensor can damage it.
Water Temperature Sensor Removal/Installation
• Refer to the Water Temperature Sensor Removal/Instal-
lation in the Fuel System (DFI) chapter.
Water Temperature Sensor [A]
Water Temperature Sensor Inspection
• Refer to the Water Temperature Sensor Inspection in the
Electrical System chapter.
ENGINE TOP END 5-1
Engine Top End
Table of Contents
Exploded View
5-3
Exhaust System
5-8
Specifications
5-10
Special Tools and Sealant
5-12
Clean Air System
5-14
Air Suction Valve Removal
5-14
Air Suction Valve Installation
5-14
Air Suction Valve Inspection
5-14
5
Air Switching Valve Removal
5-14
Air Switching Valve Installation
5-14
Air Switching Valve Operation Test
5-15
Air Switching Valve Unit Test
5-15
Clean Air System Hose Inspection
5-15
Cylinder Head Cover
5-16
Cylinder Head Cover Removal
5-16
Cylinder Head Cover Installation
5-16
Camshaft Chain Tensioner
5-18
Camshaft Chain Tensioner Removal
5-18
Camshaft Chain Tensioner Installation
5-18
Camshaft, Camshaft Chain
5-19
Camshaft Removal
5-19
Camshaft Installation
5-19
Camshaft and Sprocket Assembly
5-22
Camshaft, Camshaft Cap Wear
5-22
Camshaft Runout
5-23
Cam Wear
5-23
Camshaft Chain Removal
5-23
Cylinder Head
5-24
Cylinder Compression Measurement
5-24
Cylinder Head Removal
5-25
Cylinder Head Installation
5-26
Cylinder Head Warp
5-28
Valves
5-29
Valve Clearance Inspection
5-29
Valve Clearance Adjustment
5-29
Valve Removal
5-29
Valve Installation
5-29
Valve Guide Removal
5-29
Valve Guide Installation
5-30
Valve-to-Guide Clearance Measurement (Wobble Method)
5-30
Valve Seat Inspection
5-31
Valve Seat Repair
5-31
Cylinder, Pistons
5-36
Cylinder Removal
5-36
Cylinder Installation
5-36
Piston Removal
5-36
Piston Installation
5-37
Cylinder Wear
5-38
Piston Wear
5-38
Piston Ring, Piston Ring Groove Wear
5-39
5-2 ENGINE TOP END
Piston Ring Groove Width
5-39
Piston Ring Thickness
5-39
Piston Ring End Gap
5-40
Throttle Body Holder
5-41
Throttle Body Holder Installation
5-41
Muffler
5-42
Muffler Body Removal
5-42
Exhaust Pipe Removal
5-42
Muffler Body and Exhaust Pipe Installation
5-43
ENGINE TOP END 5-3
Exploded View
Dummy Page
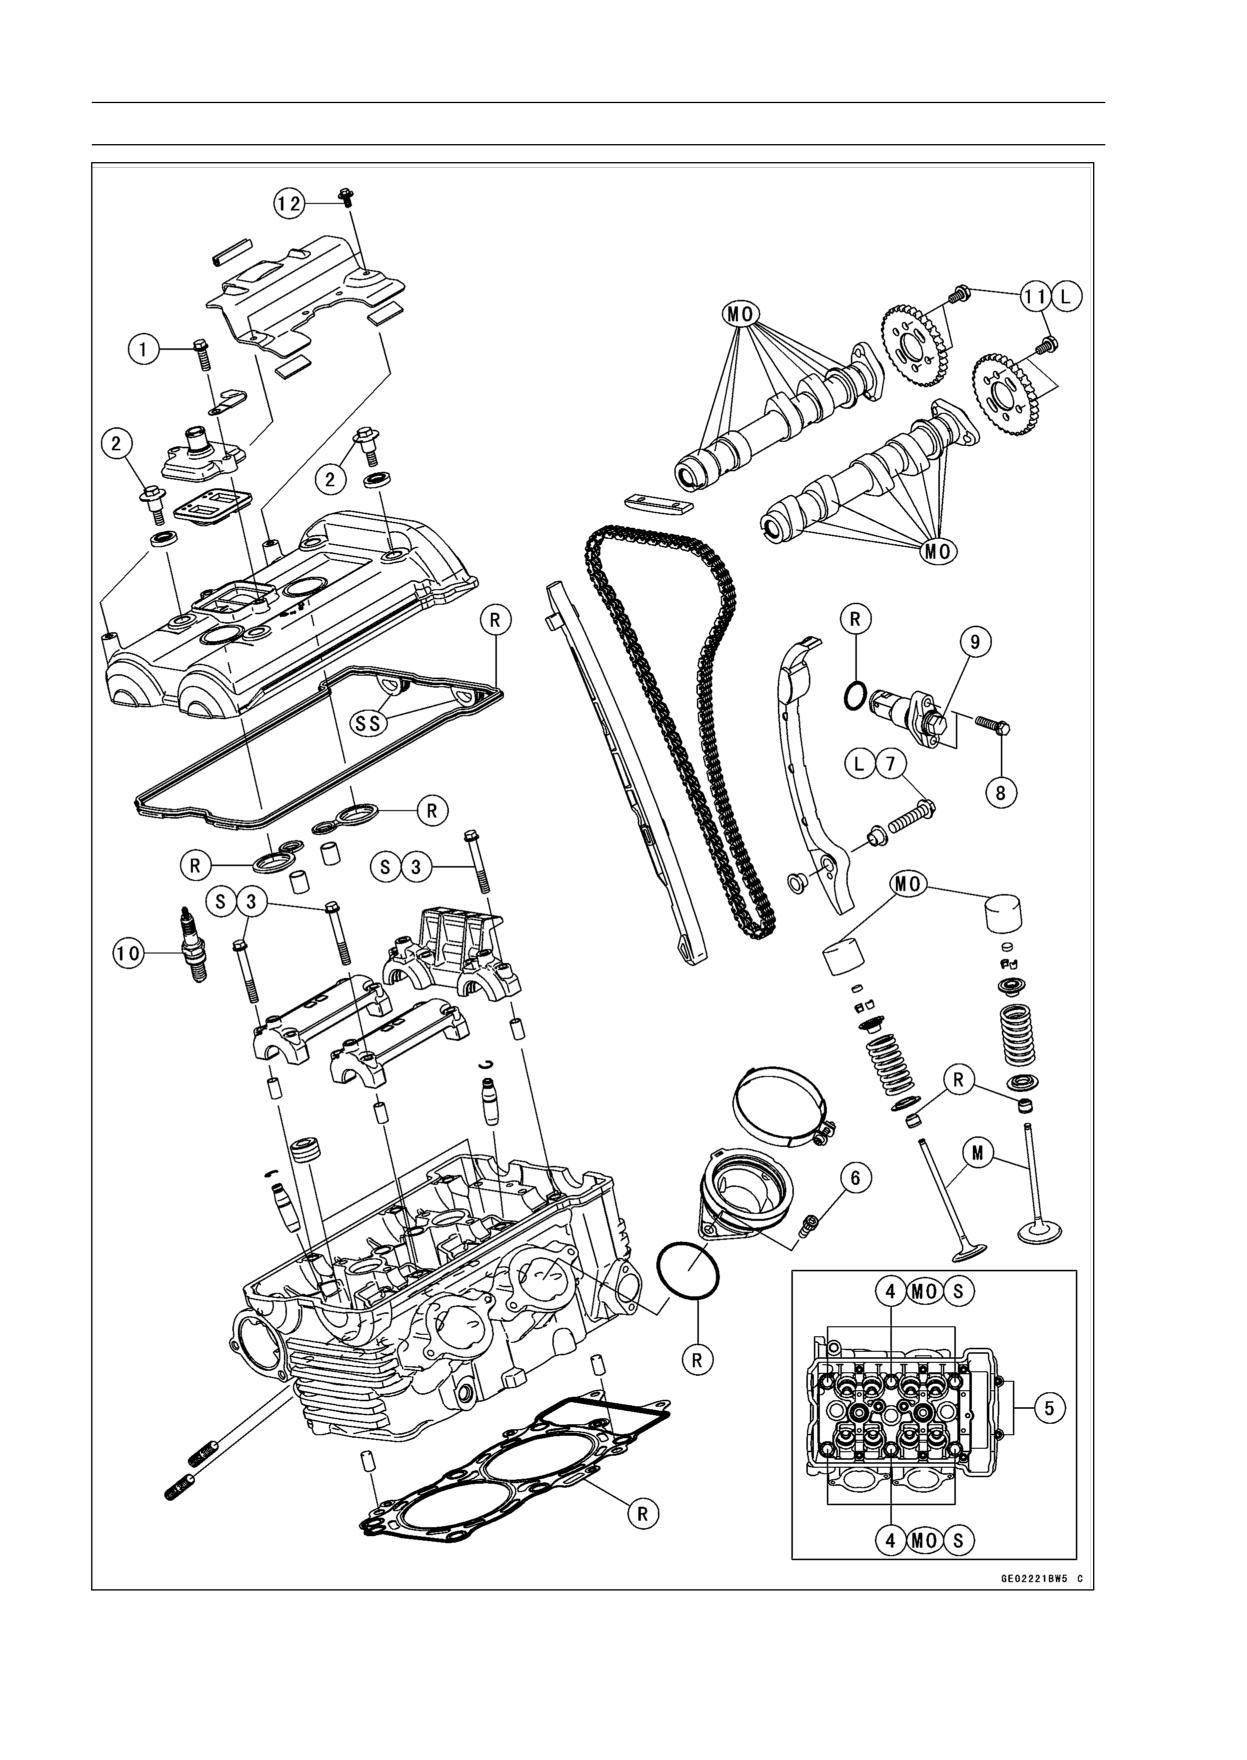
5-4 ENGINE TOP END
Exploded View
ENGINE TOP END 5-5
Exploded View
Torque
No.
Fastener
Remarks
N·m
kgf·m
ft·lb
1
Air Suction Valve Cover Bolts
9.8
1.0
87 in·lb
2
Cylinder Head Cover Bolts
9.8
1.0
87 in·lb
3
Camshaft Cap Bolts
12
1.2
106 in·lb
S
Cylinder Head Bolts (M10 New Bolts)
54
5.5
40
MO, S
4
Cylinder Head Bolts (M10 Used Bolts)
49
5.0
36
MO, S
5
Cylinder Head Bolts (M6)
12
1.2
106 in·lb
S
6
Throttle Body Holder Bolts
12
1.2
106 in·lb
7
Rear Camshaft Chain Guide Bolts
20
2.0
15
L
8
Camshaft Chain Tensioner Mounting Bolts
9.8
1.0
87 in·lb
9
Camshaft Chain Tensioner Cap Bolt
20
2.0
15
10
Spark Plugs
15
1.5
11
11
Camshaft Sprocket Bolts
15
1.5
11
L
12
Baffle Plate Bolts
5.9
0.60
52 in·lb
L: Apply a non-permanent locking agent.
M: Apply molybdenum disulfide grease.
MO: Apply molybdenum disulfide oil solution.
(mixture of the engine oil and molybdenum disulfide grease in a weight ratio 10 : 1)
R: Replacement Parts
S: Follow the specified tightening sequence.
SS: Apply silicone sealant.
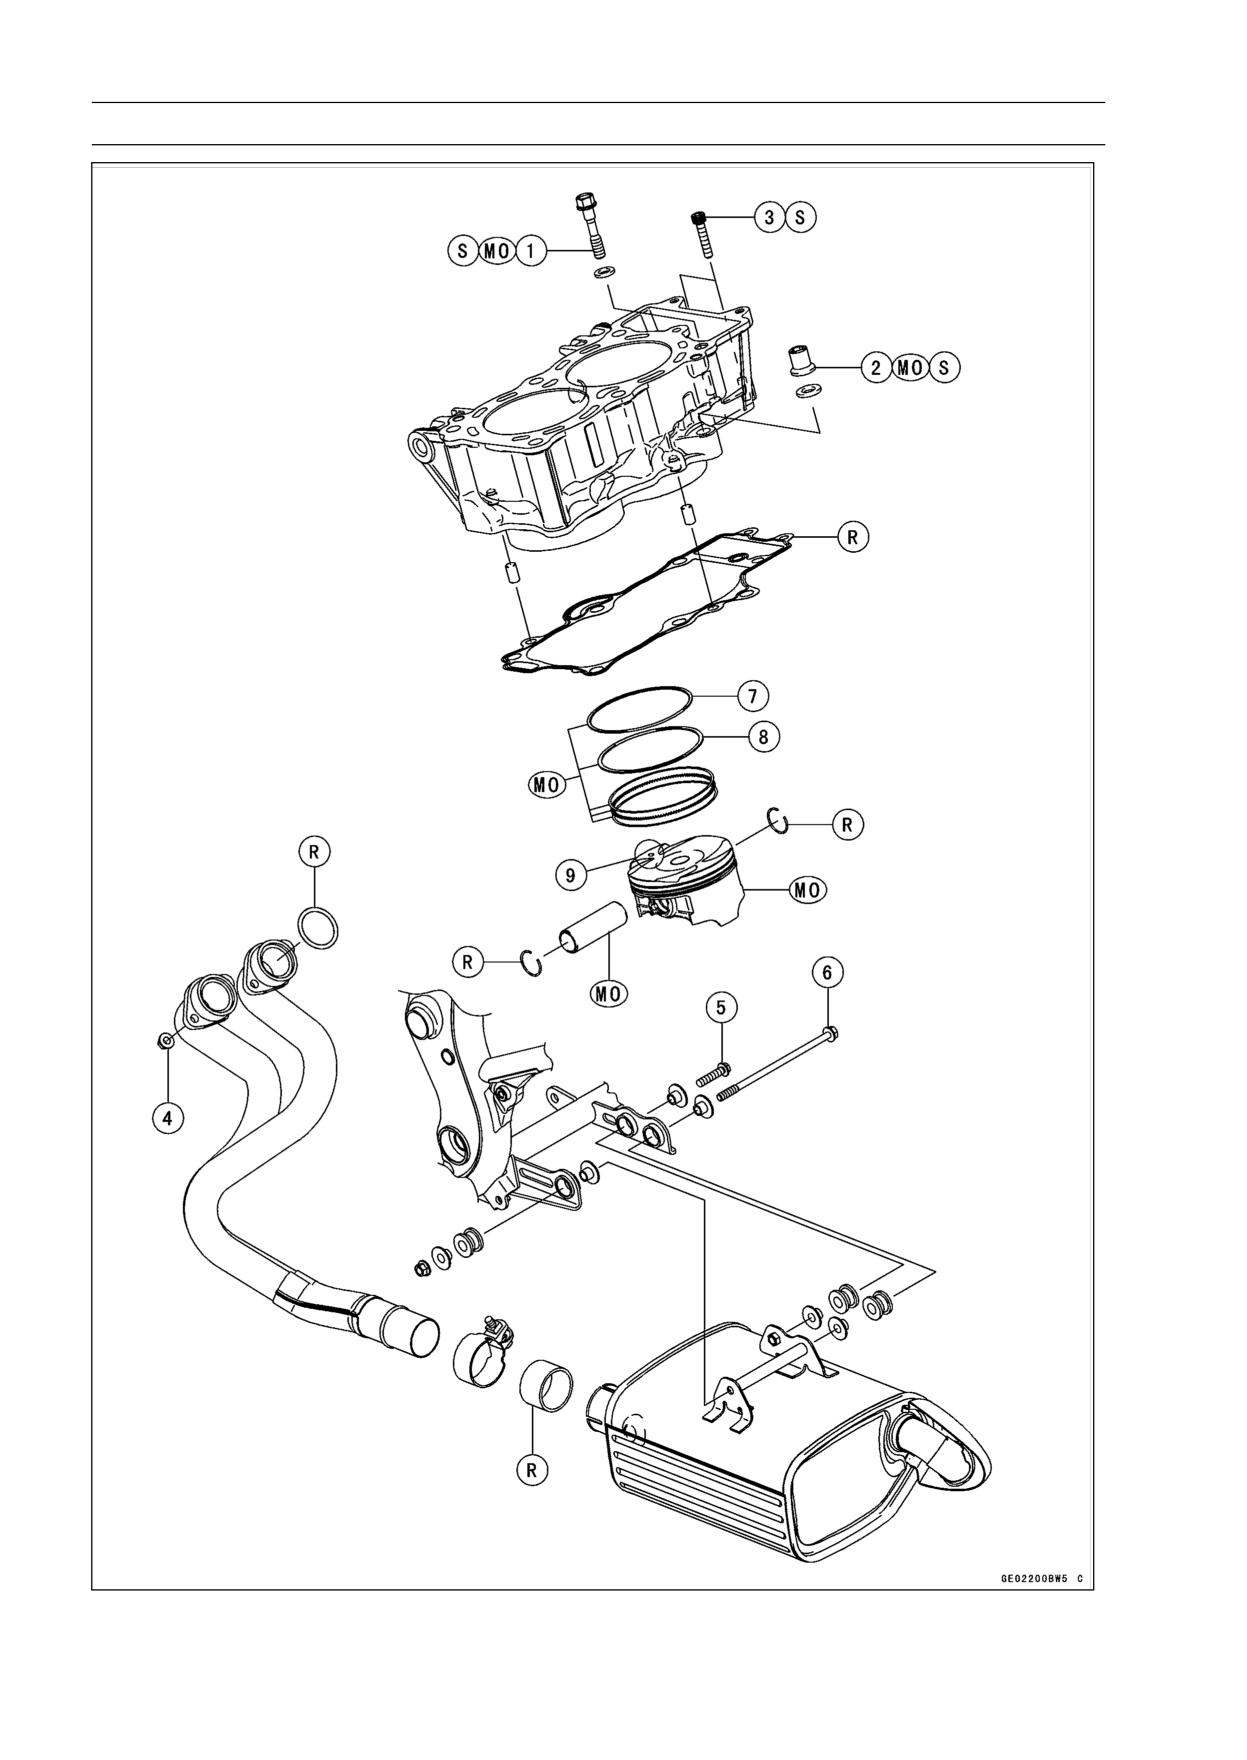
5-6 ENGINE TOP END
Exploded View
ENGINE TOP END 5-7
Exploded View
Torque
No.
Fastener
Remarks
N·m
kgf·m
ft·lb
1
Cylinder Bolt (M8)
27.5
2.8
20
MO,S
2
Cylinder Nut (M10)
49
5.0
36
MO,S
3
Cylinder Bolts (M6)
12
1.2
106 in·lb
S
4
Exhaust Pipe Manifold Holder Nuts
17
1.7
12
5
Muffler Body Mounting Bolt (Front)
20
2.0
15
6
Muffler Body Mounting Bolt (Rear)
20
2.0
15
7. "R" marked side faces up.
8. "RN" marked side faces up.
9. Hollow mark faces forward.
MO: Apply molybdenum disulfide oil solution.
(mixture of the engine oil and molybdenum disulfide grease in a weight ratio 10 : 1)
R: Replacement Parts
S: Follow the specified tightening sequence.
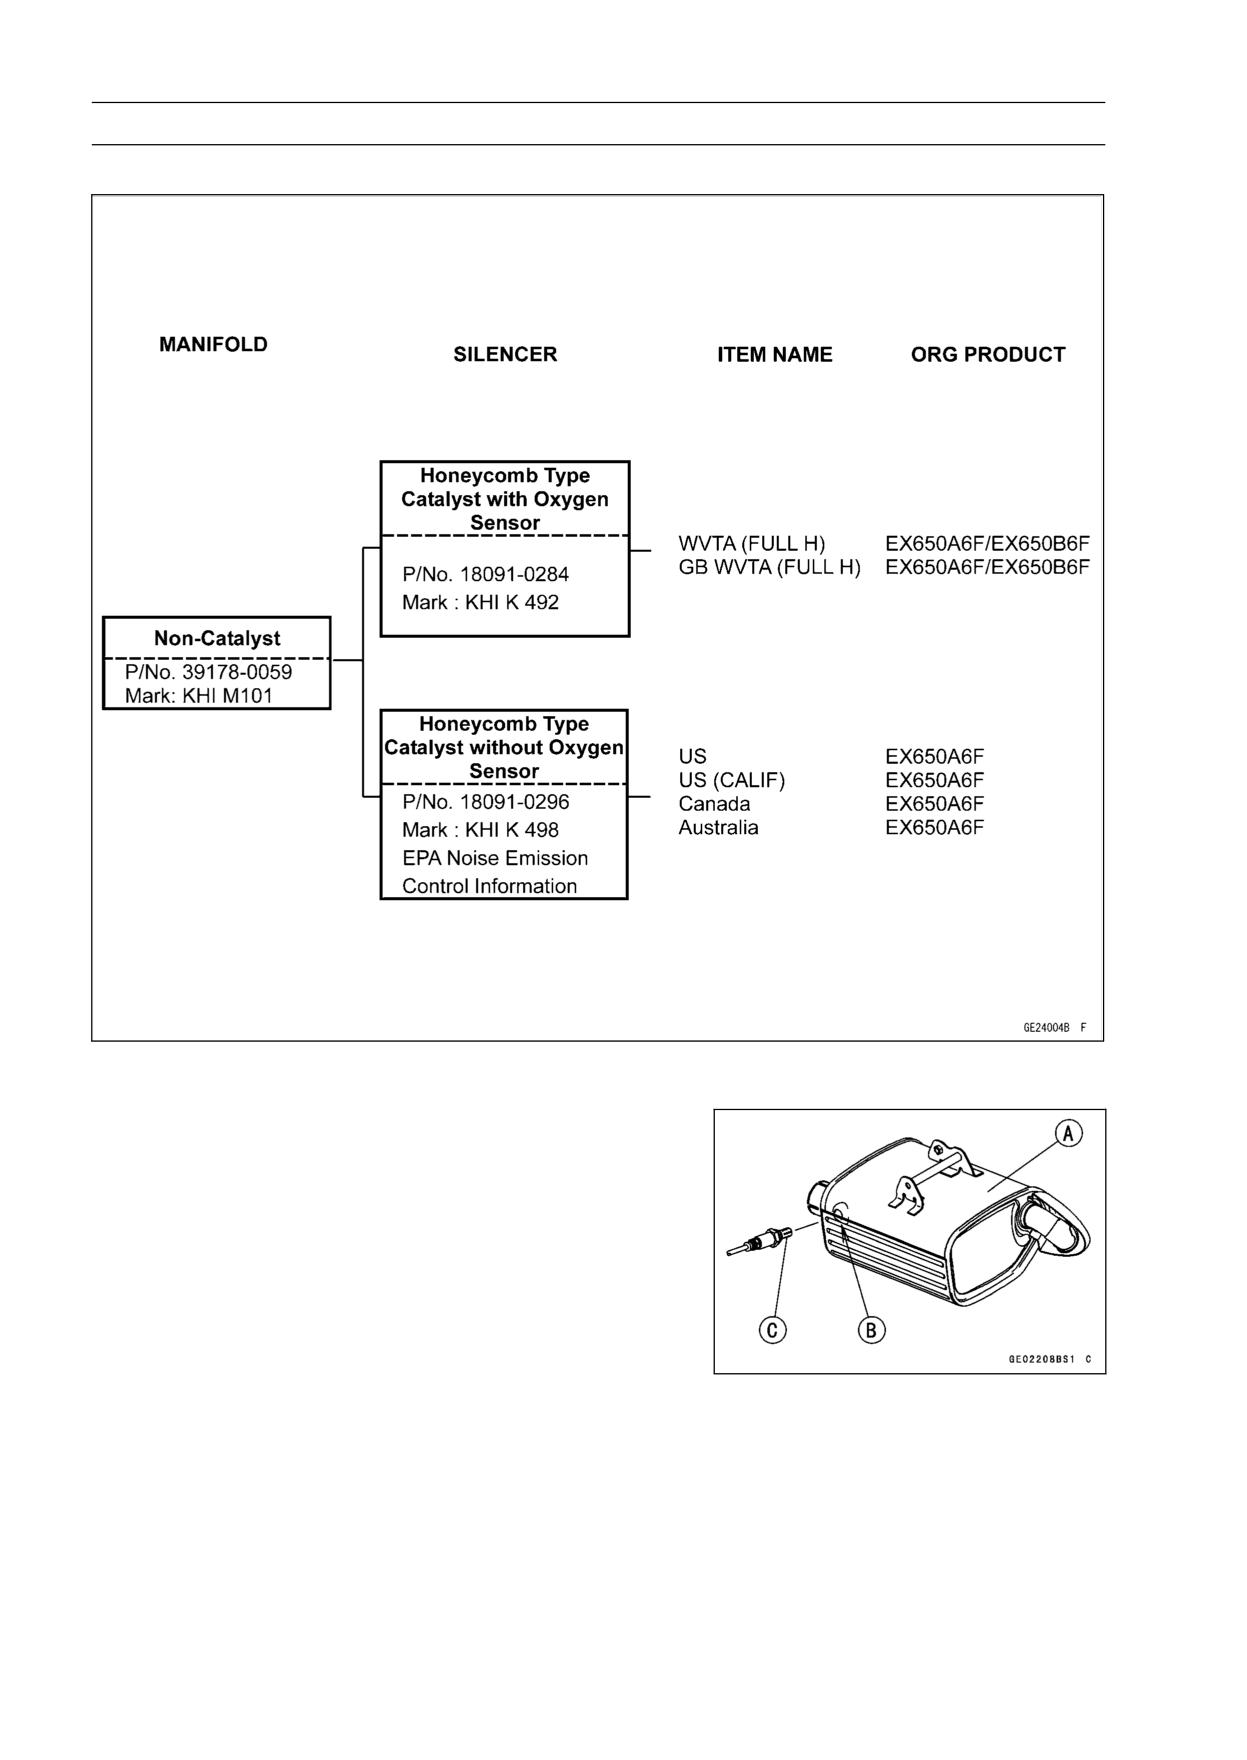
5-8 ENGINE TOP END
Exhaust System
Exhaust System EX650A6F/EX650B6F
Full: Full Power
H: Honeycomb Type Catalyst
Silencer [A] with Hole [B] for Oxygen Sensor [C]

ENGINE TOP END 5-9
Exhaust System
Manifold Mark Position [A]
Silencer Mark Position [A]
5-10 ENGINE TOP END
Specifications
Item
Standard
Service Limit
Camshafts
Cam Height:
Exhaust
35.843 ∼ 35.957 mm (1.4111 ∼ 1.4156 in.)
35.74 mm (1.4071 in.)
Inlet
36.543 ∼ 36.657 mm (1.4387 ∼ 1.4432 in.)
36.44 mm (1.4346 in.)
Camshaft Journal, Camshaft
0.028 ∼ 0.071 mm (0.0011 ∼ 0.0028 in.)
0.16 mm (0.0063 in.)
Cap Clearance
Camshaft Journal Diameter
23.950 ∼ 23.972 mm
23.92 mm (0.942 in.)
(0.9429 ∼ 0.9438 in.)
Camshaft Bearing Inside
24.000 ∼ 24.021 mm
24.08 mm (0.948 in.)
Diameter
(0.9449 ∼ 0.9457 in.)
Camshaft Runout
TIR 0.02 mm (0.0008 in.) or less
TIR 0.1 mm (0.004 in.)
Cylinder Head
Cylinder Compression
(Usable Range)
961 ∼ 1 471 kPa (9.8 ∼ 15.0 kgf/cm², 139
- - -
∼ 213 psi) at 400 r/min (rpm)
Cylinder Head Warp
- - -
0.05 mm (0.002 in.)
Valves
Valve Clearance:
Exhaust
0.22 ∼ 0.31 mm (0.0087 ∼ 0.0122 in.)
- - -
Inlet
0.15 ∼ 0.21 mm (0.0059 ∼ 0.0083 in.)
- - -
Valve Head Thickness:
Exhaust
0.8 mm (0.031 in.)
0.5 mm (0.020 in.)
Inlet
0.5 mm (0.020 in.)
0.25 mm (0.0098 in.)
Valve Stem Bend
TIR 0.01 mm (0.0004 in.) or less
TIR 0.05 mm
(0.002 in.)
Valve Stem Diameter:
Exhaust
4.455 ∼ 4.470 mm (0.1754 ∼ 0.1760 in.)
4.44 mm (0.175 in.)
Inlet
4.475 ∼ 4.490 mm (0.1762 ∼ 0.1768 in.)
4.46 mm (0.176 in.)
Valve Guide Inside Diameter:
Exhaust
4.500 ∼ 4.512 mm (0.1772 ∼ 0.1776 in.)
4.58 mm (0.180 in.)
Inlet
4.500 ∼ 4.512 mm (0.1772 ∼ 0.1776 in.)
4.58 mm (0.180 in.)
Valve/Valve Guide Clearance
(Wobble Method):
Exhaust
0.07 ∼ 0.14 mm (0.0028 ∼ 0.0055 in.)
0.27 mm (0.0106 in.)
Inlet
0.02 ∼ 0.08 mm (0.0008 ∼ 0.0032 in.)
0.22 mm (0.0087 in.)
Valve Seat Cutting Angle
32°, 45°, 55°, 60°
- - -
Valve Seating Surface:
Width:
Exhaust
0.5 ∼ 1.0 mm (0.020 ∼ 0.039 in.)
- - -
Inlet
0.5 ∼ 1.0 mm (0.020 ∼ 0.039 in.)
- - -
Outside Diameter:
Exhaust
27.6 ∼ 27.8 mm (1.087 ∼ 1.094 in.)
- - -
Inlet
32.6 ∼ 32.8 mm (1.283 ∼ 1.291 in.)
- - -
ENGINE TOP END 5-11
Specifications
Item
Standard
Service Limit
Valve Spring Free Length:
Exhaust
41.91 mm (1.650 in.)
40.3 mm (1.587 in.)
Inlet
41.91 mm (1.650 in.)
40.3 mm (1.587 in.)
Cylinder, Pistons
Cylinder Inside Diameter
82.994 ∼ 83.006 mm
83.10 mm (3.2716 in.)
(3.2675 ∼ 3.2679 in.)
Piston Diameter
82.969 ∼ 82.984 mm
82.82 mm (3.2606 in.)
(3.2665 ∼ 3.2671 in.)
Piston/Cylinder Clearance
0.010 ∼ 0.037 mm (0.0004 ∼ 0.0015 in.)
- - -
Piston Ring/Groove Clearance:
Top
0.03 ∼ 0.07 mm (0.0012 ∼ 0.0028 in.)
0.17 mm (0.0067 in.)
Second
0.02 ∼ 0.06 mm (0.0008 ∼ 0.0024 in.)
0.16 mm (0.0063 in.)
Piston Ring Groove Width:
Top
0.92 ∼ 0.94 mm (0.0362 ∼ 0.0370 in.)
1.02 mm (0.040 in.)
Second
1.01 ∼ 1.03 mm (0.0398 ∼ 0.0406 in.)
1.11 mm (0.044 in.)
Piston Ring Thickness:
Top
0.87 ∼ 0.89 mm (0.0342 ∼ 0.0350 in.)
0.80 mm (0.031 in.)
Second
0.97 ∼ 0.99 mm (0.0382 ∼ 0.0390 in.)
0.90 mm (0.035 in.)
Piston Ring End Gap:
Top
0.25 ∼ 0.40 mm (0.0098 ∼ 0.0157 in.)
0.7 mm (0.028 in.)
Second
0.40 ∼ 0.55 mm (0.0157 ∼ 0.0217 in.)
0.8 mm (0.031 in.)
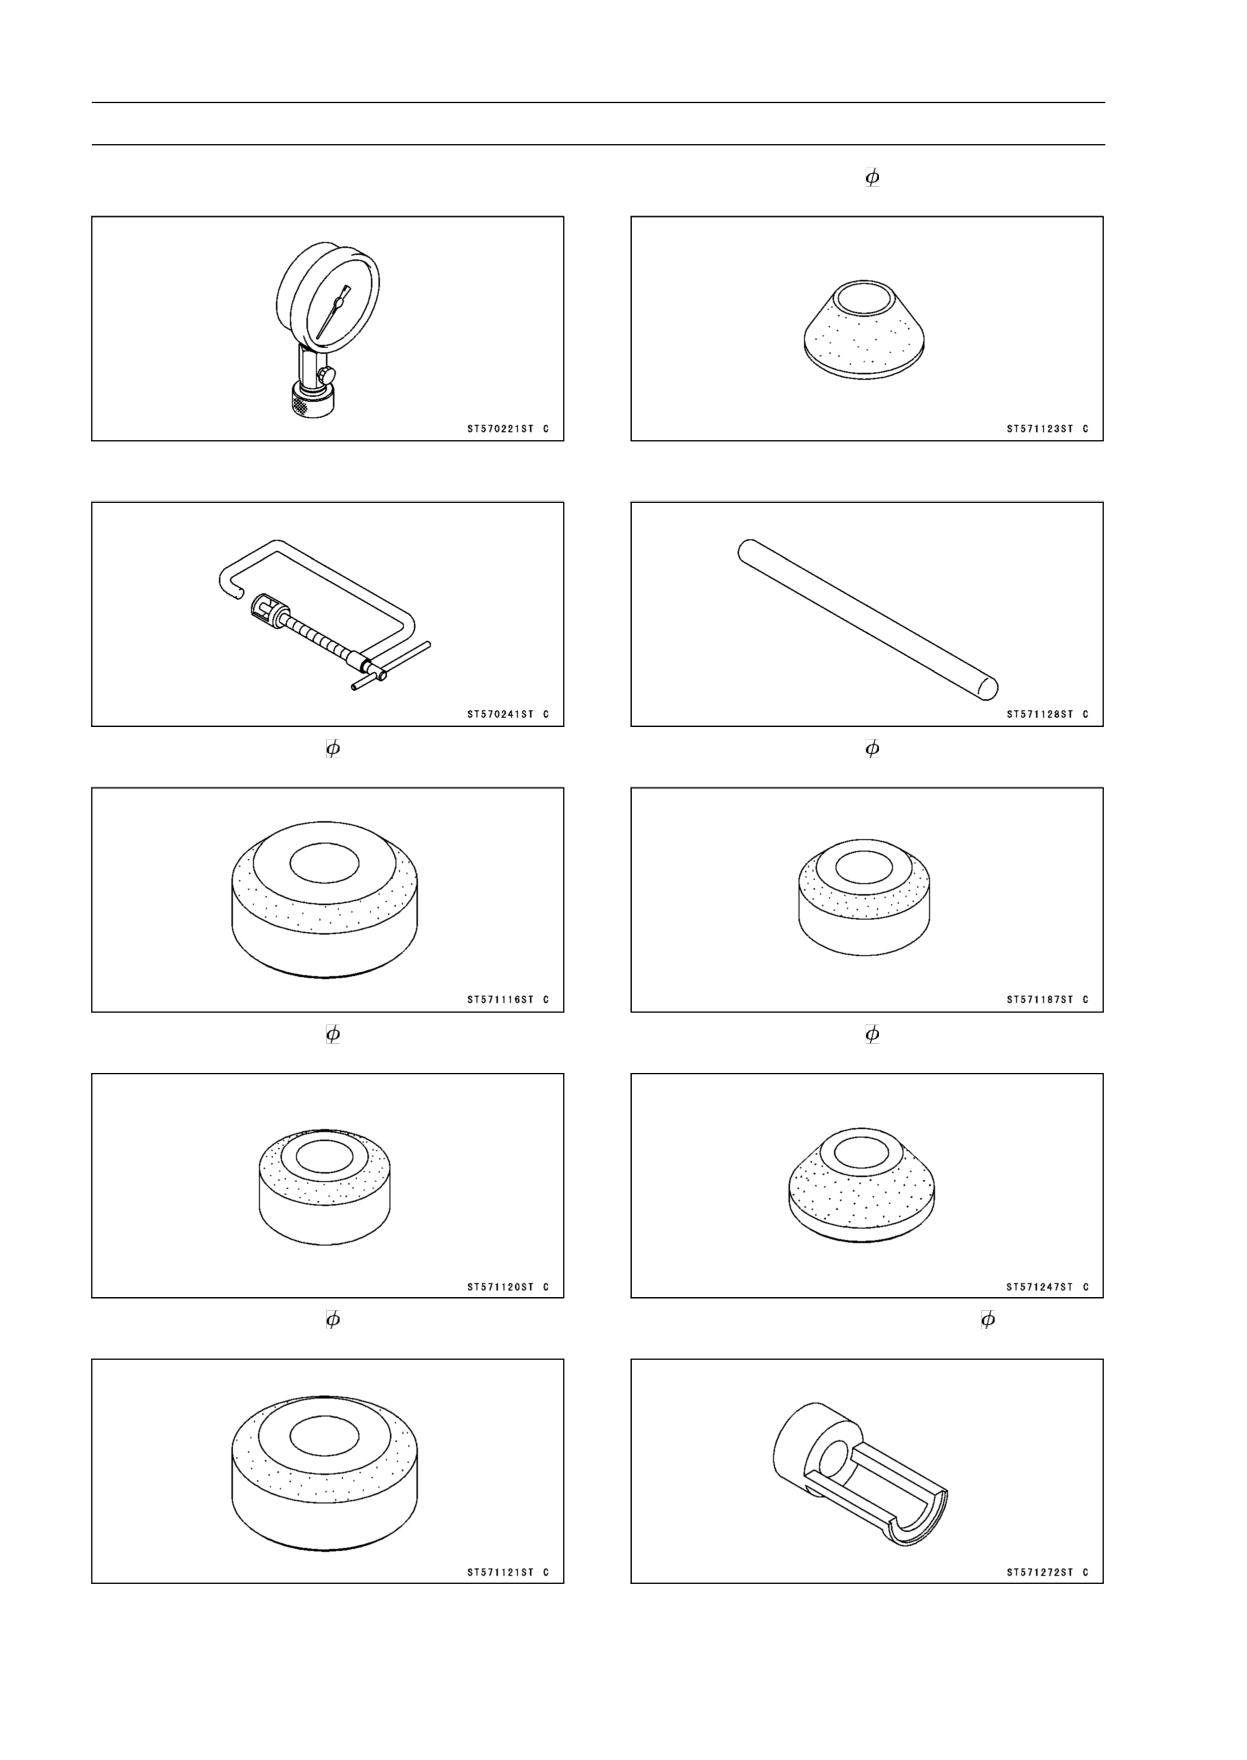
5-12 ENGINE TOP END
Special Tools and Sealant
Compression Gauge, 20 kgf/cm²:
Valve Seat Cutter, 60° -
30:
57001-221
57001-1123
Valve Spring Compressor Assembly:
Valve Seat Cutter Holder Bar:
57001-241
57001-1128
Valve Seat Cutter, 45° -
35:
Valve Seat Cutter, 45° -
30:
57001-1116
57001-1187
Valve Seat Cutter, 32° -
30:
Valve Seat Cutter, 55° -
35:
57001-1120
57001-1247
Valve Seat Cutter, 32° -
35:
Valve Spring Compressor Adapter,
21:
57001-1121
57001-1272
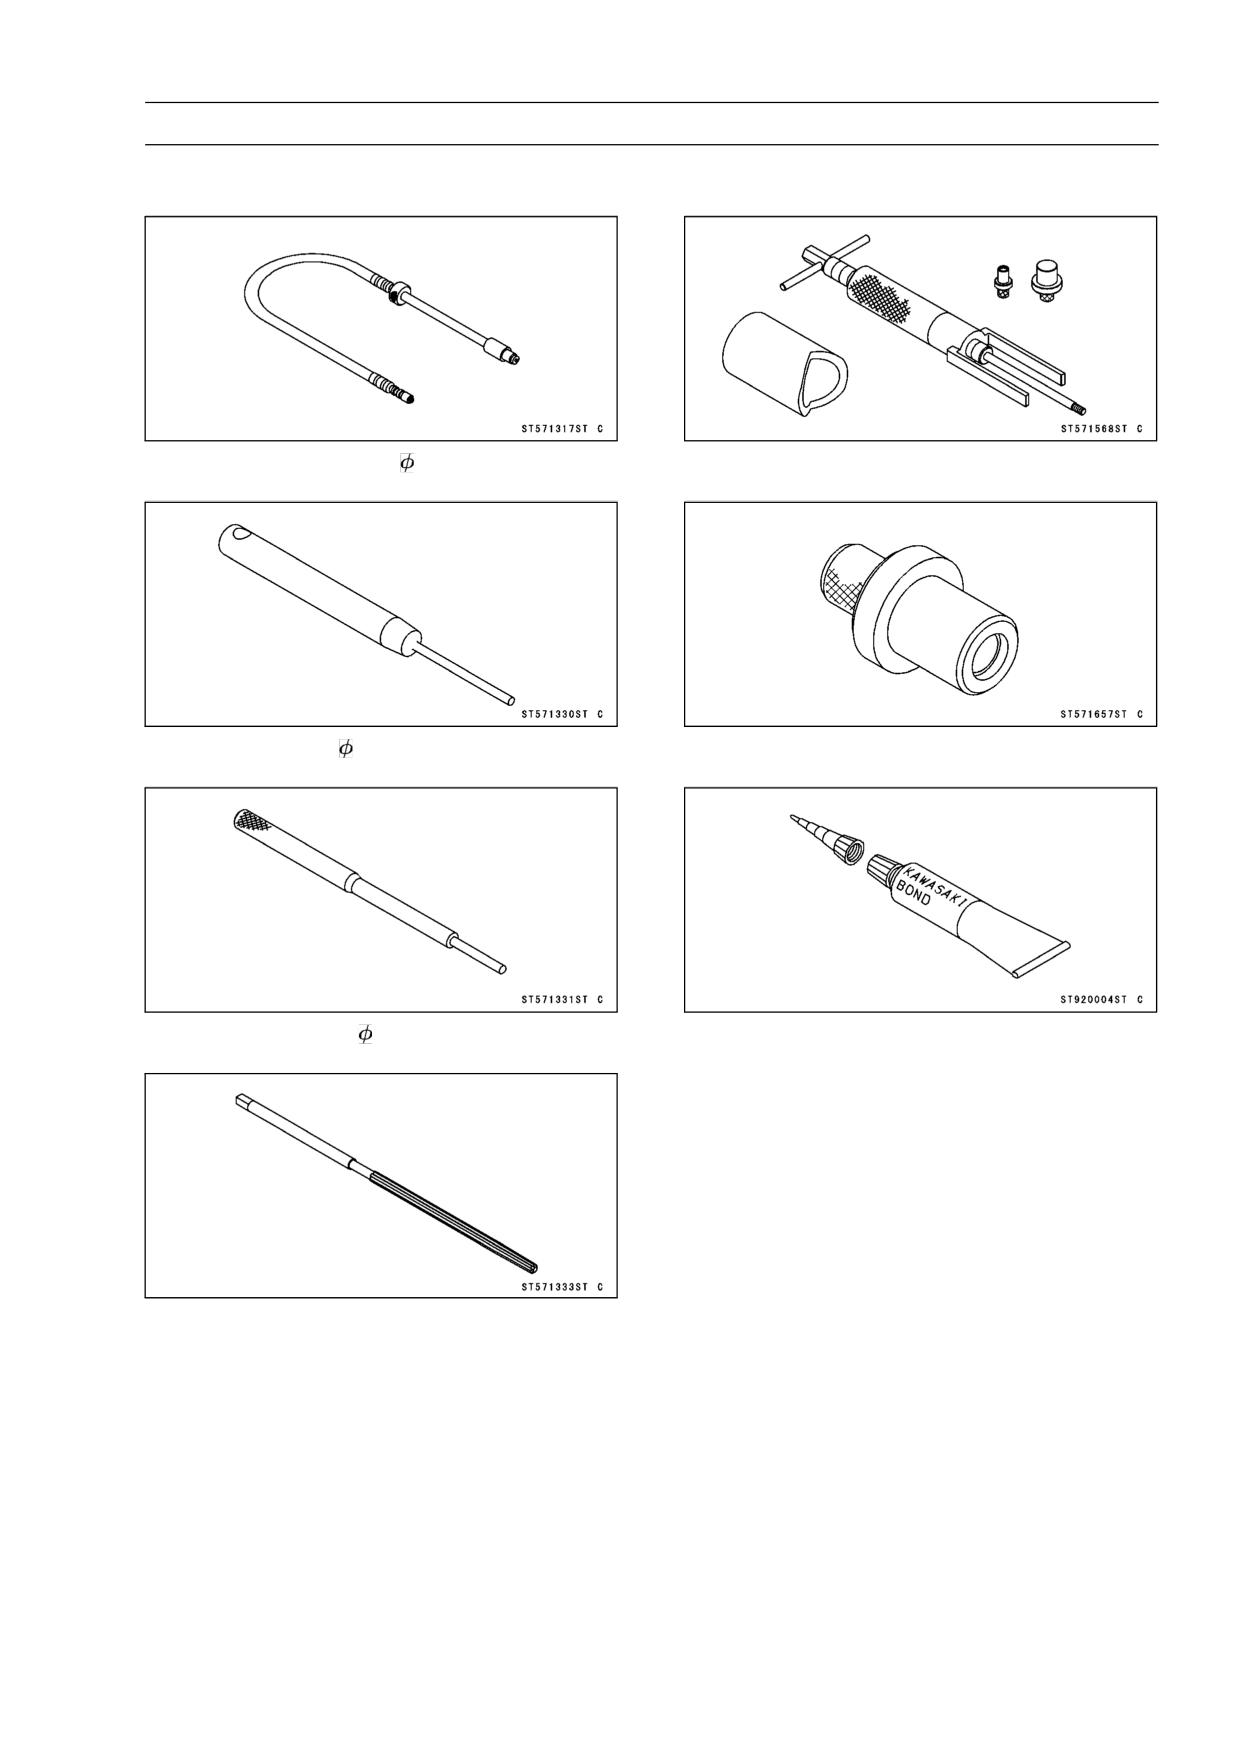
ENGINE TOP END 5-13
Special Tools and Sealant
Compression Gauge Adapter, M10 × 1.0:
Piston Pin Puller:
57001-1317
57001-1568
Valve Seat Cutter Holder,
4.5:
Piston Pin Puller Adapter C:
57001-1330
57001-1657
Valve Guide Arbor,
4.5:
Kawasaki Bond (Silicone Sealant):
57001-1331
92104-0004
Valve Guide Reamer,
4.5:
57001-1333
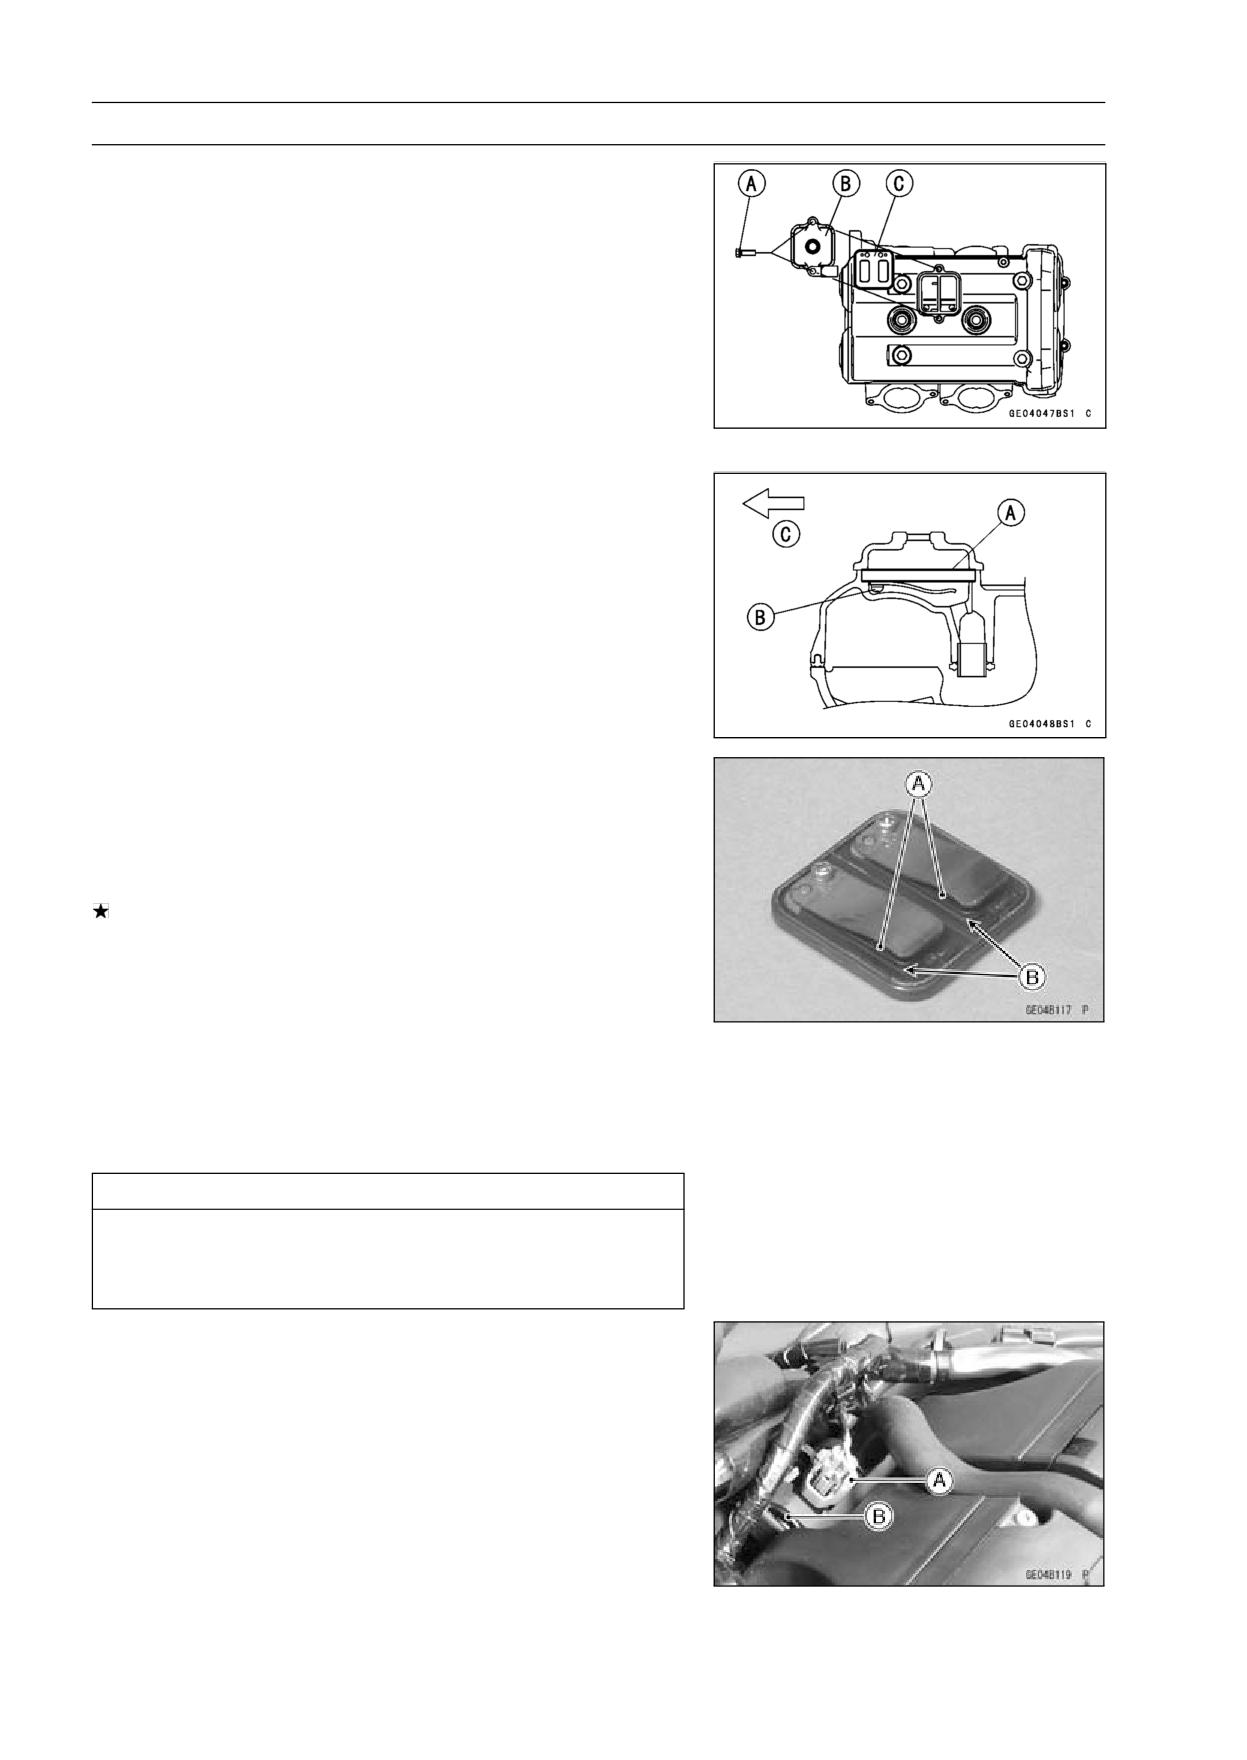
5-14 ENGINE TOP END
Clean Air System
Air Suction Valve Removal
• Remove:
Fuel Tank (see Fuel Tank Removal in the Fuel System
(DFI) chapter)
Air Cleaner Housing (see Air Cleaner Housing Removal
in the Fuel System (DFI) chapter)
Air Switching Valve with Hoses (see Air Switching Valve
Removal)
Air Suction Valve Cover Bolts [A] and Clamp
Air Suction Valve Cover [B]
Air Suction Valve [C]
Air Suction Valve Installation
• Install the air suction valve [A] so that its side where stop-
per is fixed with the screws [B] faces the front [C] .
• Tighten:
Torque - Air Suction Valve Cover Bolts: 9.8 N·m (1.0 kgf·m,
87 in·lb)
Air Suction Valve Inspection
• Remove the air suction valve (see Air Suction Valve Re-
moval).
• Visually inspect the reeds for cracks, folds, warps, heat
damage or other damage.
If there is any doubt as to the condition of the reeds [A],
replace the air suction valve as an assembly.
• Check the reed contact areas [B] of the valve holder for
grooves, scratches, any signs of separation from the
holder or heat damage.
• If there is any doubt as to the condition of the reed contact
areas, replace the air suction valve as an assembly.
• If any carbon or other foreign particles have accumulated
between the reed and the reed contact area, wash the
valve assembly clean with a high-flash point solvent.
CAUTION
Do not scrape off the deposits with a scraper as this
could damage the rubber, requiring replacement of
the suction valve assembly.
Air Switching Valve Removal
• Remove:
Fuel Tank (see Fuel Tank Removal in the Fuel System
(DFI) chapter)
Air Switching Valve Connector [A] (Disconnect)
Air Switching Valve [B]
Air Switching Valve Installation
• Route the hoses correctly (see Cable, Wire, and Hose
Routing section in the Appendix chapter).
ENGINE TOP END 5-15
Clean Air System
Air Switching Valve Operation Test
• Refer to the Air Switching Valve Operation Test in the
Electrical System chapter.
Air Switching Valve Unit Test
• Refer to the Air Switching Valve Unit Test in the Electrical
System chapter.
Clean Air System Hose Inspection
• Be certain that all the hoses are routed without being flat-
tened or kinked, and are connected correctly to the air
cleaner housing, air switching valve, #1 and #2 throttle
body holders and air suction valve covers.
If they are not, correct them. Replace them if they are
damaged.
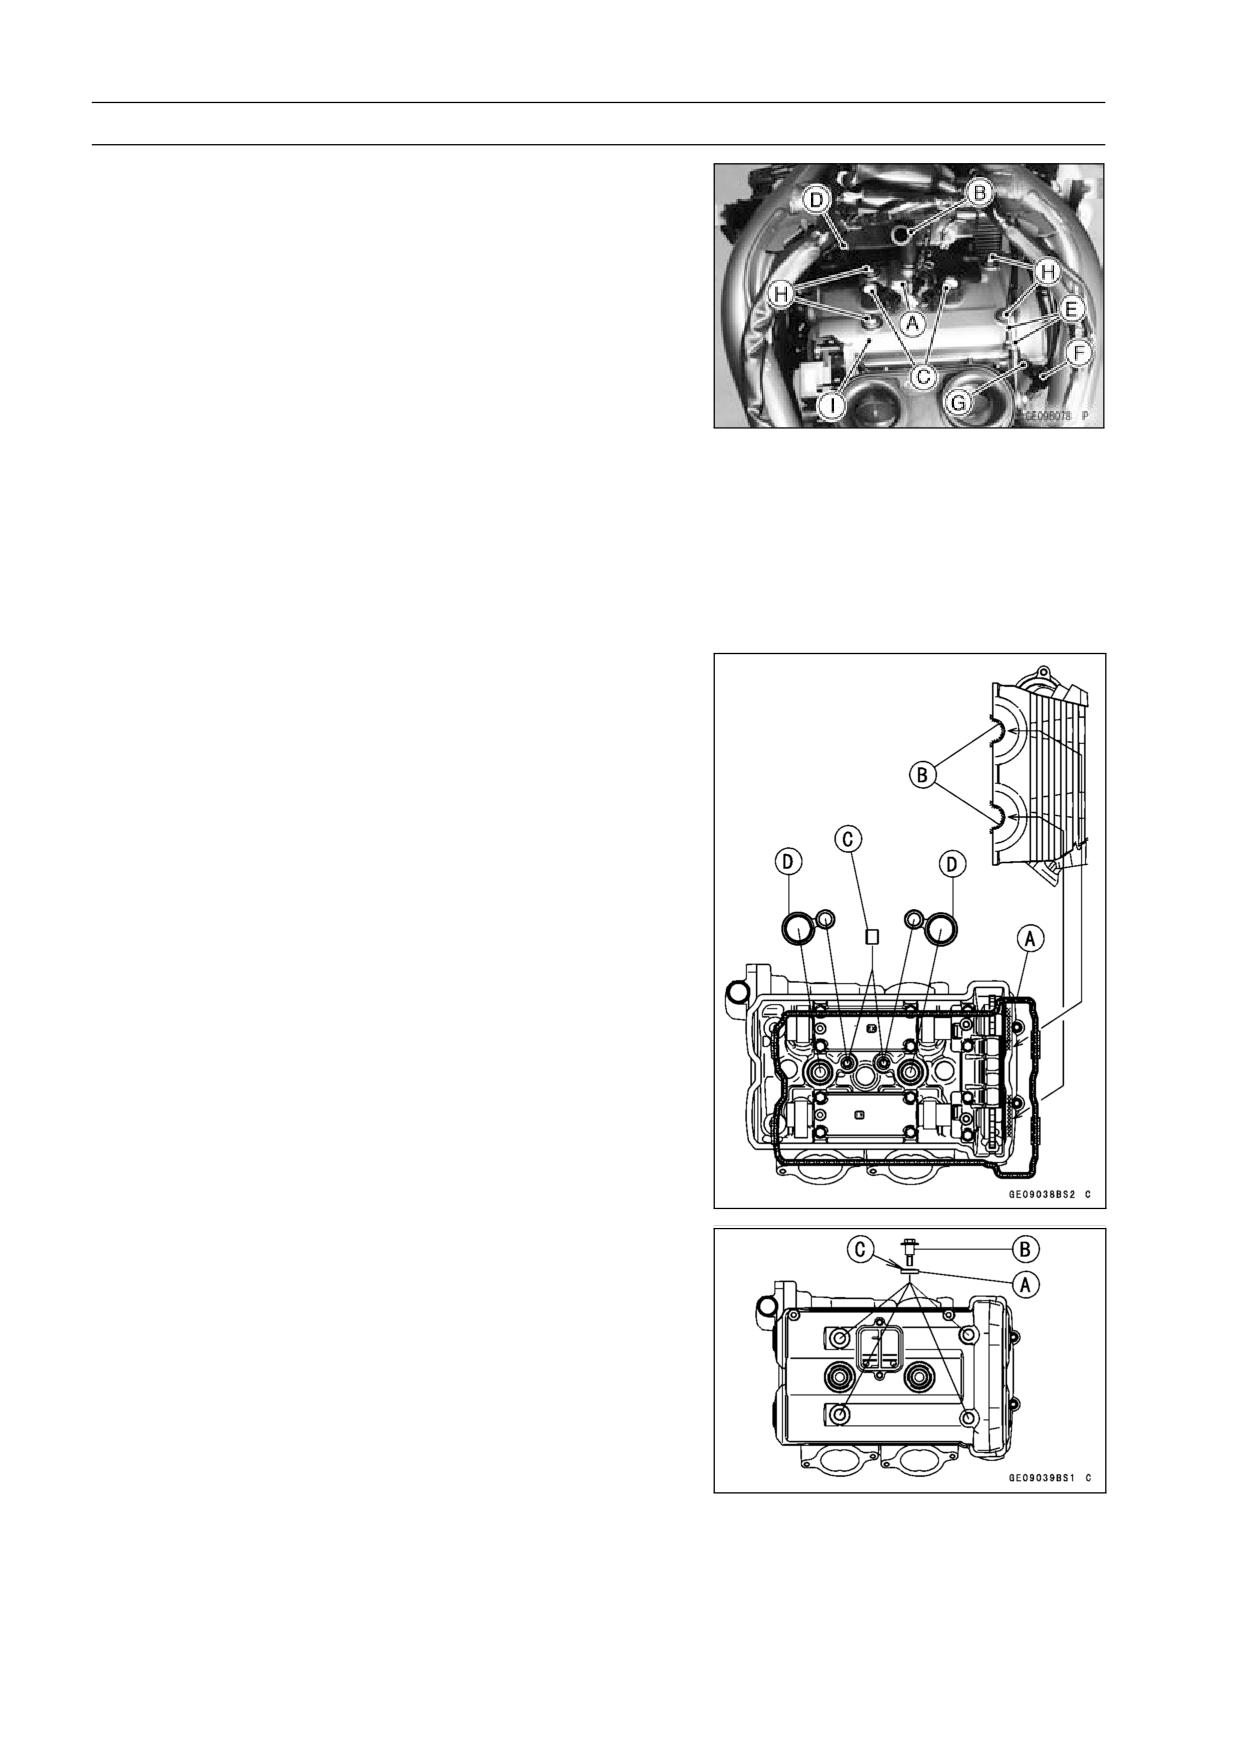
5-16 ENGINE TOP END
Cylinder Head Cover
Cylinder Head Cover Removal
• Remove:
Fuel Tank (see Fuel Tank Removal in the Fuel System
(DFI) chapter)
Air Cleaner Housing (see Air Cleaner Housing Removal
in the Fuel System (DFI) chapter)
Air Suction Valve Cover [A] with Hose [B]
Stick Coils [C]
Baffle Plate [D]
Throttle Cables [E]
Clutch Cable Holder [F] with Bolt [G]
Cylinder Head Cover Bolts [H]
Cylinder Head Cover [I]
EX650B Models
• Remove the radiator with radiator hoses and move it
forward (see Radiator and Radiator Fan Removal in the
Cooling System chapter).
Cylinder Head Cover Installation
• Replace the head cover gasket [A] with a new one.
• Apply silicone sealant [B] to the cylinder head as shown.
Sealant - Kawasaki Bond (Silicone Sealant): 92104-0004
• Install:
Dowel Pins [C]
Plug Hole Gaskets [D]
• Install:
Washers [A]
Cylinder Head Cover Bolts [B]
○Install the washers with metal side [C] faces upward.
• Tighten:
Torque - Cylinder Head Cover Bolts: 9.8 N·m (1.0 kgf·m, 87
in·lb)
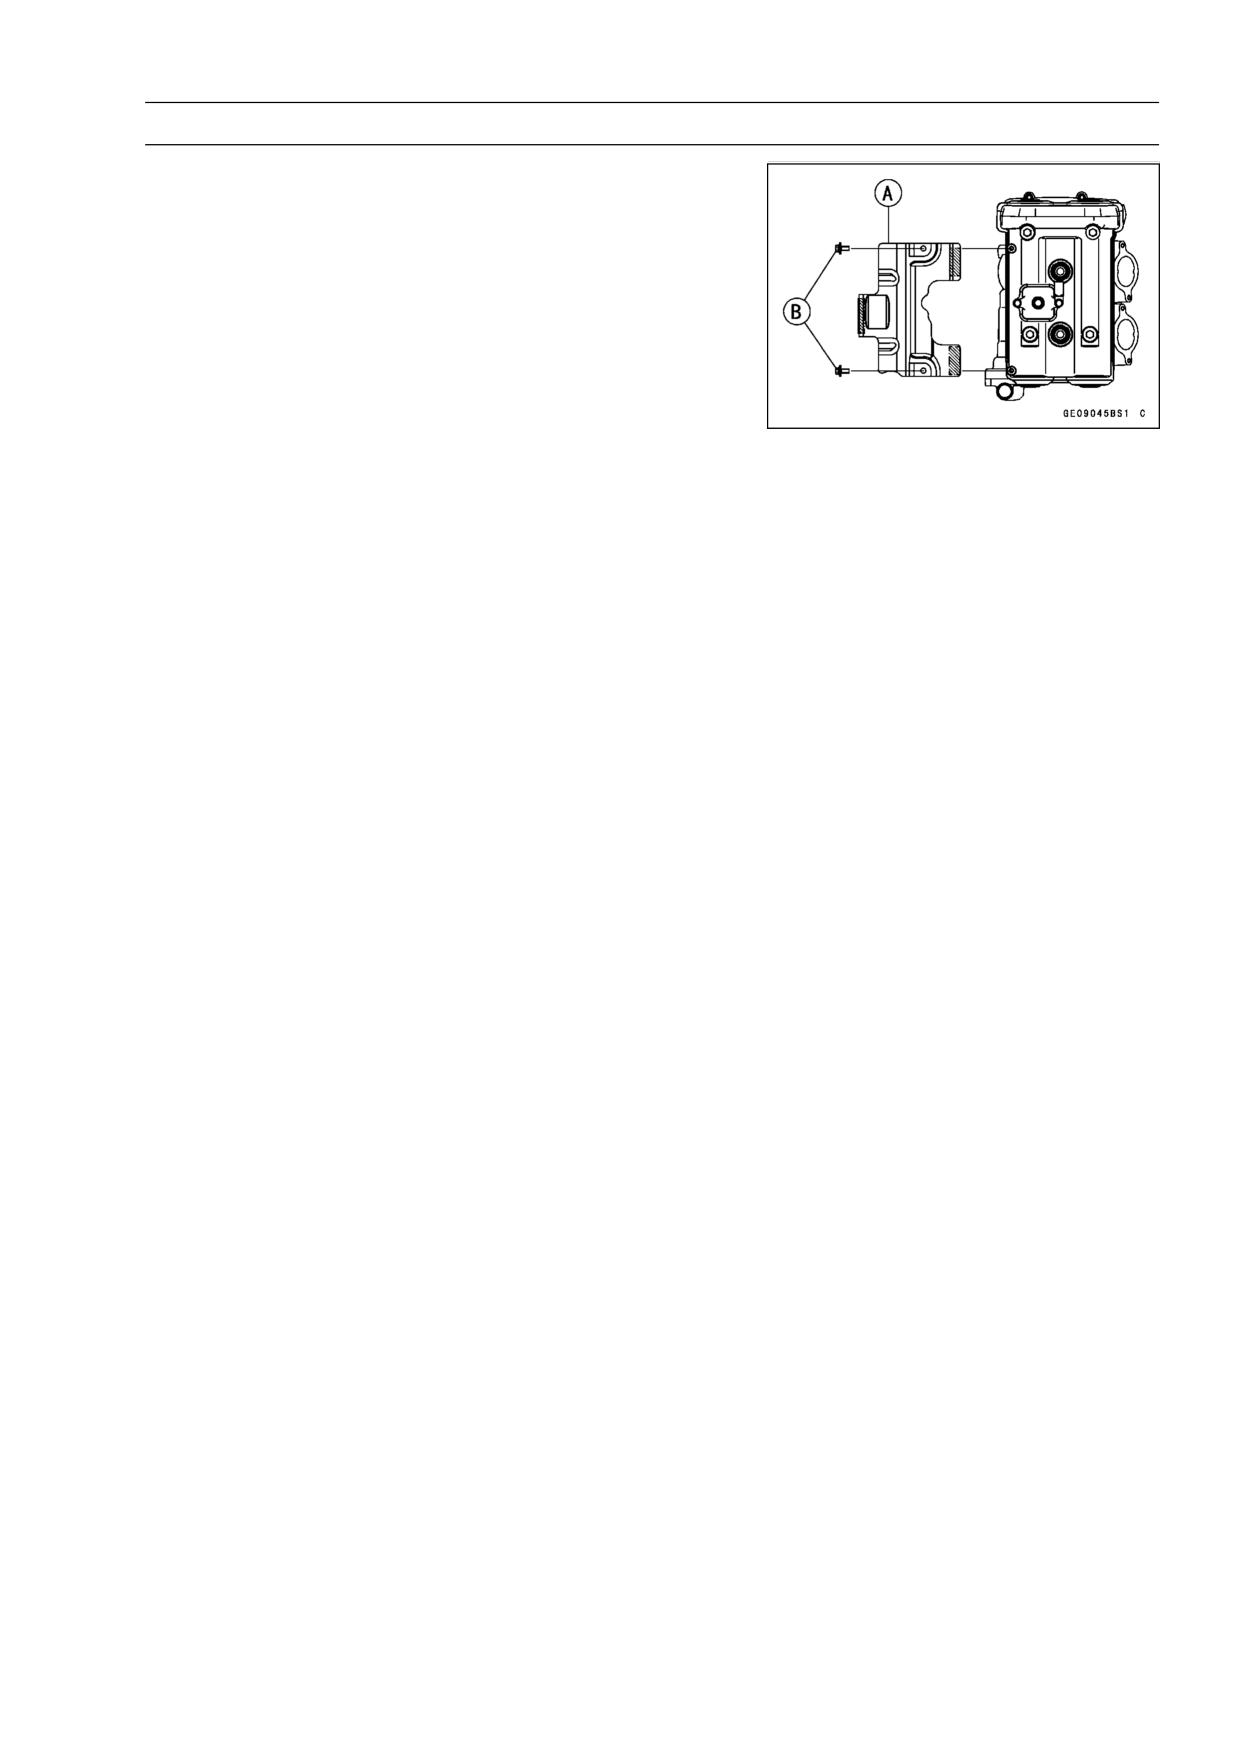
ENGINE TOP END 5-17
Cylinder Head Cover
• Install the baffle plate [A].
• Tighten:
Torque - Baffle Plate Bolts [B]: 5.9 N·m (0.60 kgf·m, 52 in·lb)
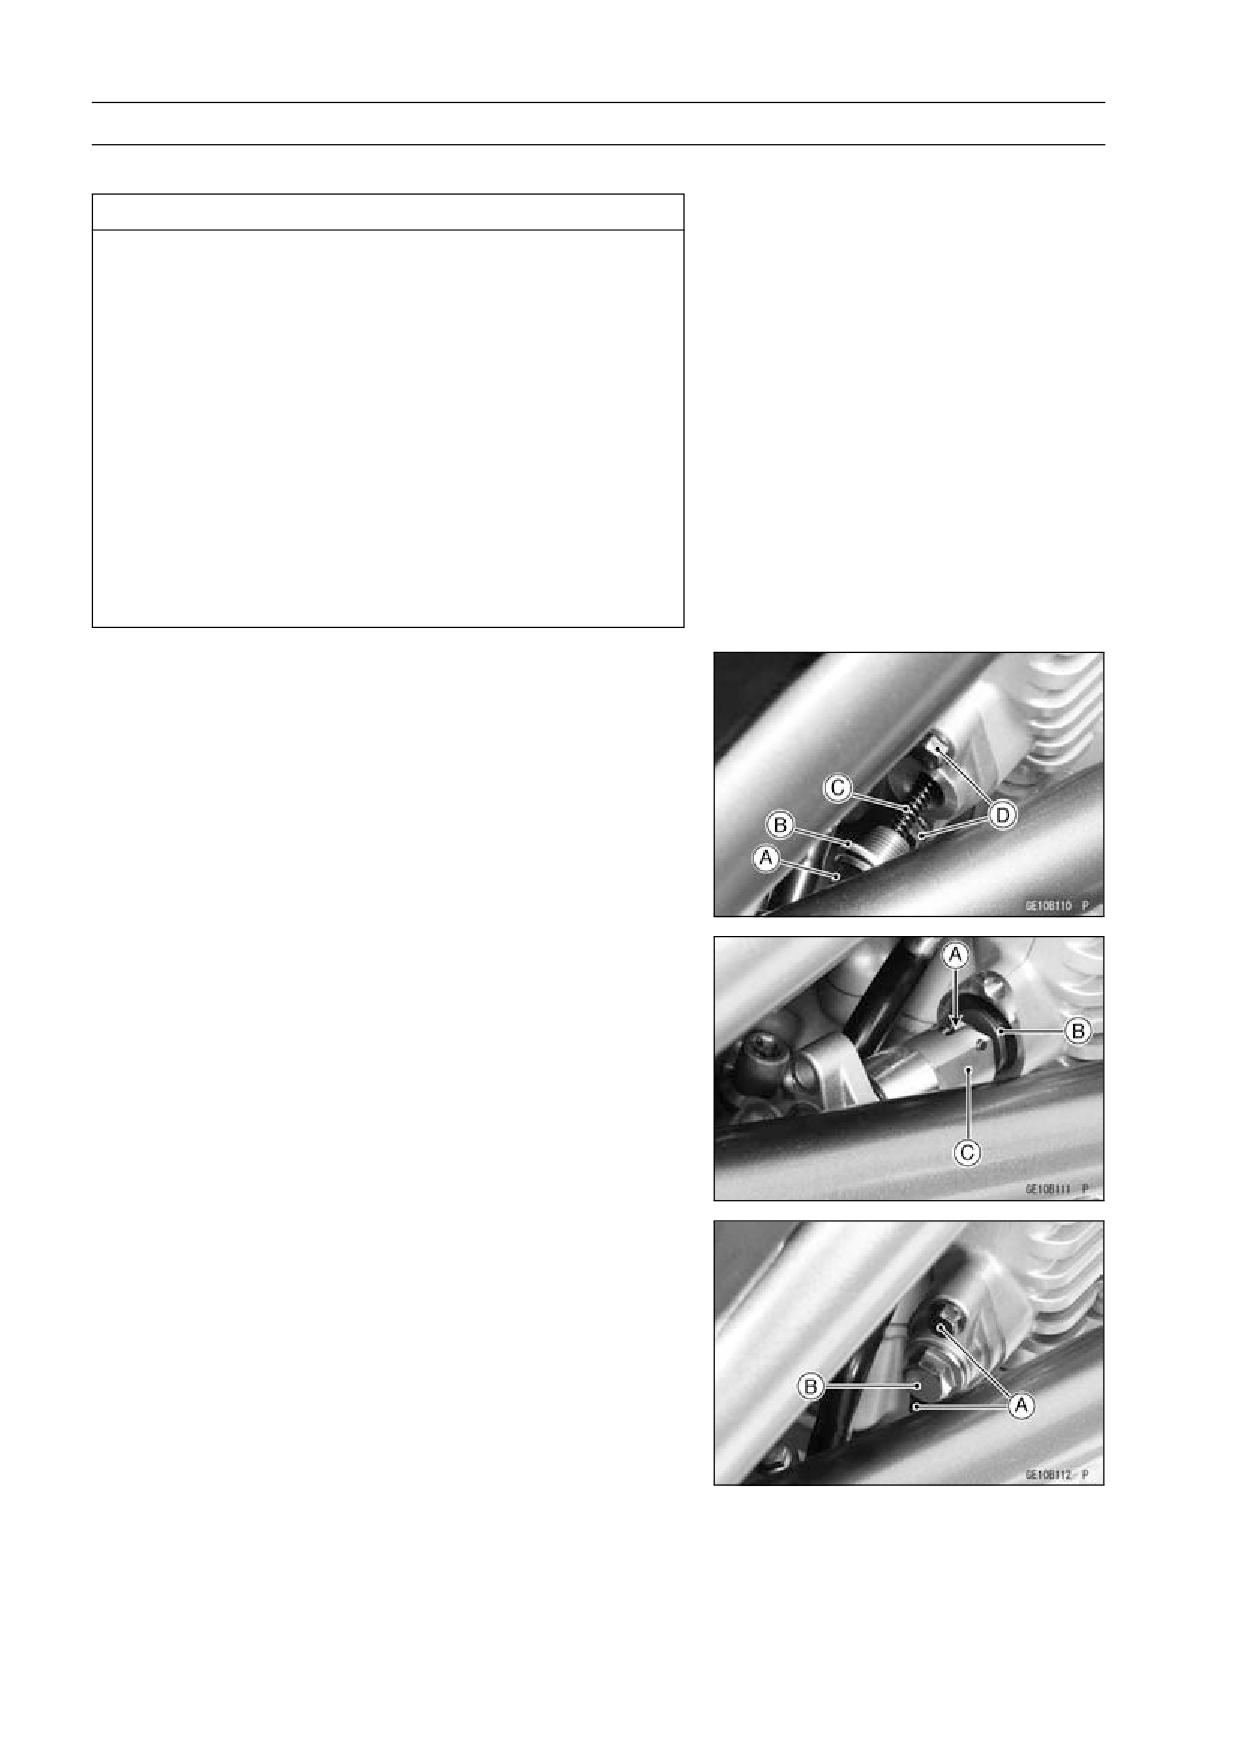
5-18 ENGINE TOP END
Camshaft Chain Tensioner
Camshaft Chain Tensioner Removal
CAUTION
This is a non-return type camshaft chain tensioner.
The push rod does not return to its original position
once it moves out to take up camshaft chain slack.
Observe all the rules listed below:
When removing the tensioner, do not take out the
mounting bolts only halfway. Retightening the
mounting bolts from this position could damage
the tensioner and the camshaft chain. Once the
bolts are loosened, the tensioner must be removed
and reset as described in “Camshaft Chain Ten-
sioner Installation.”
Do not turn over the crankshaft while the tensioner
is removed. This could upset the camshaft chain
timing, and damage the valves.
• Remove:
Right Center Fairing (see Center Fairing Removal in the
Frame chapter)
Cap Bolt [A]
Washer [B]
Spring [C]
• Remove the mounting bolts [D] and take off the camshaft
chain tensioner.
Camshaft Chain Tensioner Installation
• Release the stopper [A] and push the push rod [B] into
the tensioner [C].
• Install the tensioner so that the stopper faces upward.
• Tighten the tensioner mounting bolts [A].
Torque - Camshaft Chain Tensioner Mounting Bolts:
9.8
N·m (1.0 kgf·m, 87 in·lb)
• Install the spring and washer.
• Tighten the cap bolt [B].
Torque - Camshaft Chain Tensioner Cap Bolt: 20 N·m (2.0
kgf·m, 15 ft·lb)
• Turn the crankshaft 2 turns clockwise to allow the ten-
sioner to expand and recheck the camshaft chain timing.
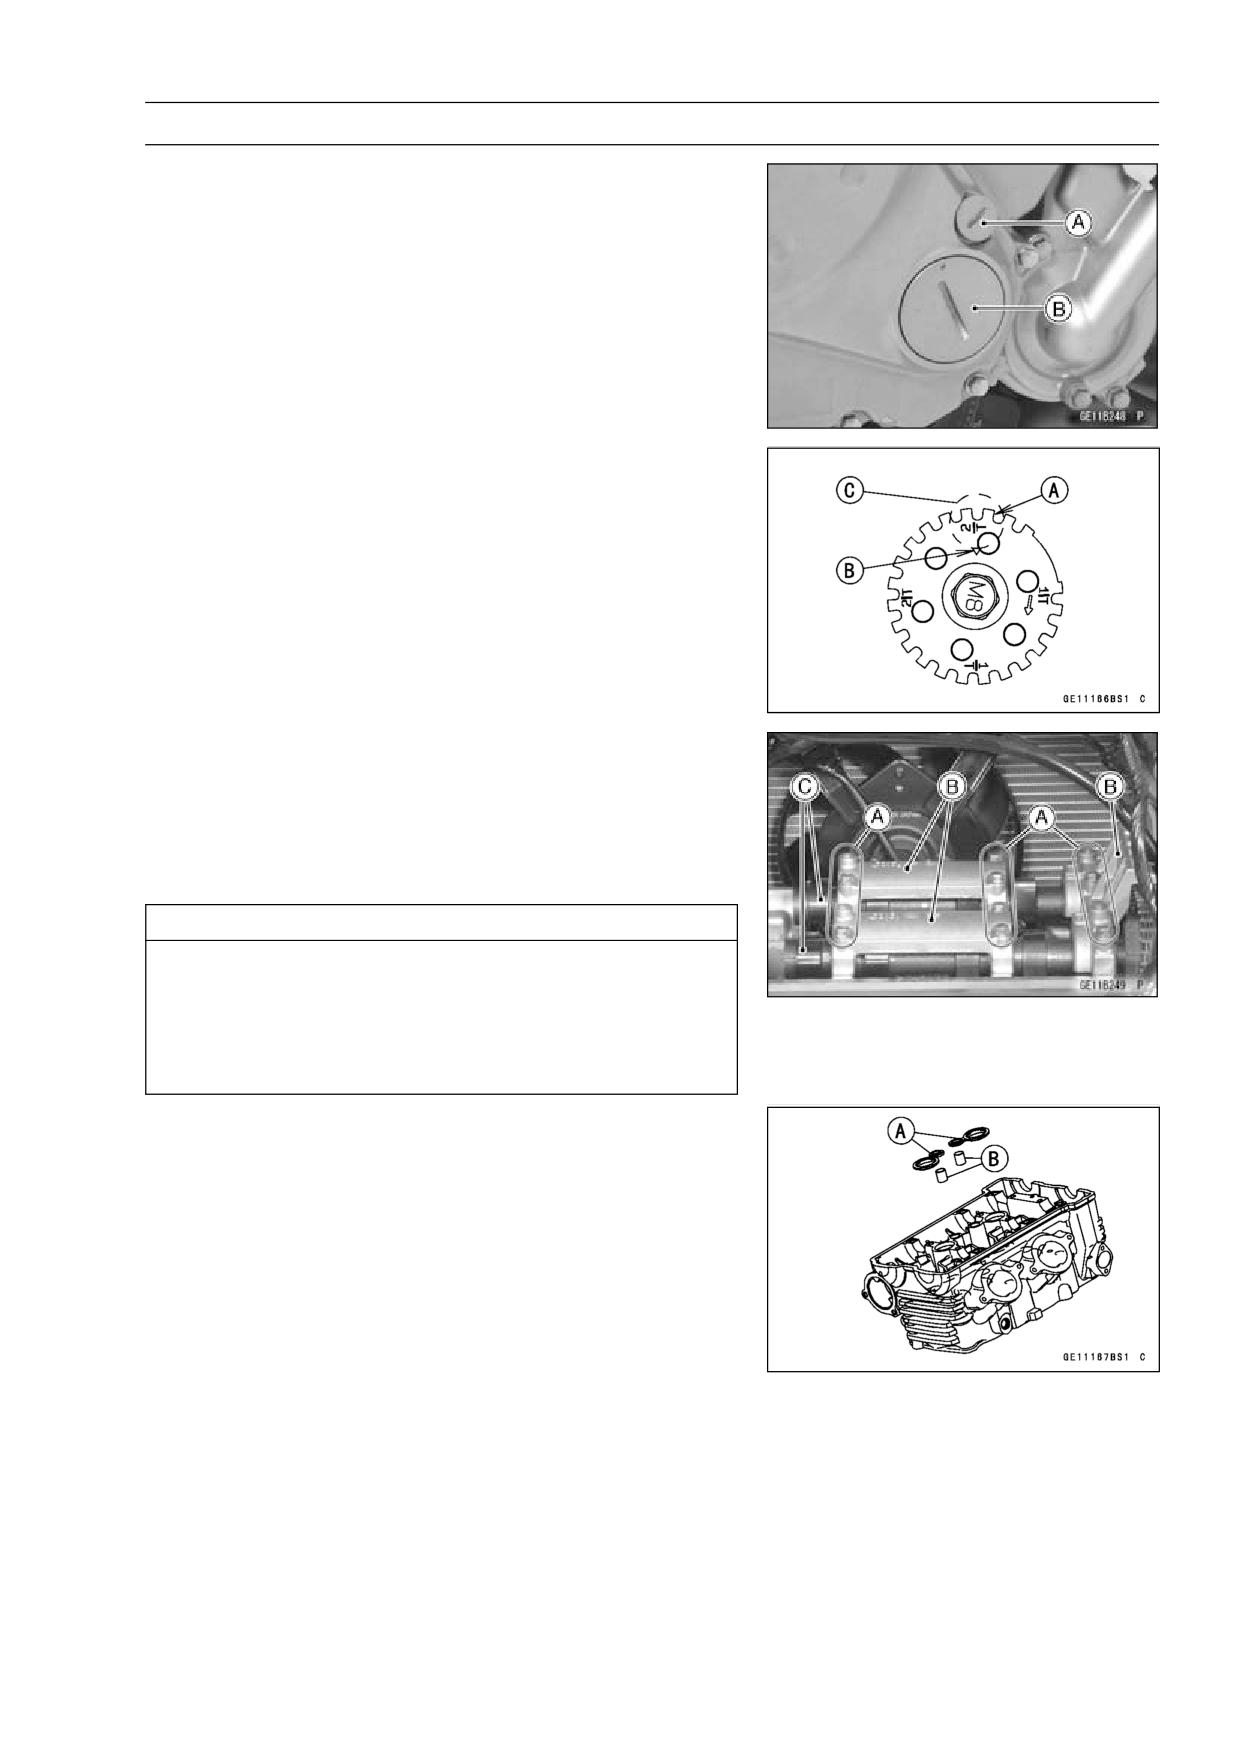
ENGINE TOP END 5-19
Camshaft, Camshaft Chain
Camshaft Removal
• Remove:
Cylinder Head Cover (see Cylinder Head Cover Re-
moval)
Right Lower Fairing (see Lower Fairing Removal in the
Frame chapter)
• Position the crankshaft as follows.
○Remove the upper [A] and lower [B] caps on the clutch
cover.
○Using a wrench on the crankshaft rotation bolt, turn the
crankshaft clockwise until the 2/T mark line [A] on the tim-
ing rotor is aligned with the notch [B] in the edge of the
upper hole [C] in the clutch cover.
• Remove:
Camshaft Chain Tensioner (see Camshaft Chain Ten-
sioner Removal)
Camshaft Cap Bolts [A]
Camshaft Caps [B]
Camshafts [C]
CAUTION
The crankshaft may be turned while the camshafts
are removed. Always pull the chain taut while turn-
ing the crankshaft. This avoids kinking the chain
on the lower (crankshaft) sprocket. A kinked chain
could damage both the chain and the sprocket.
Camshaft Installation
• Be sure to install the following parts.
Plug Hole Gaskets [A]
Dowel Pins [B]
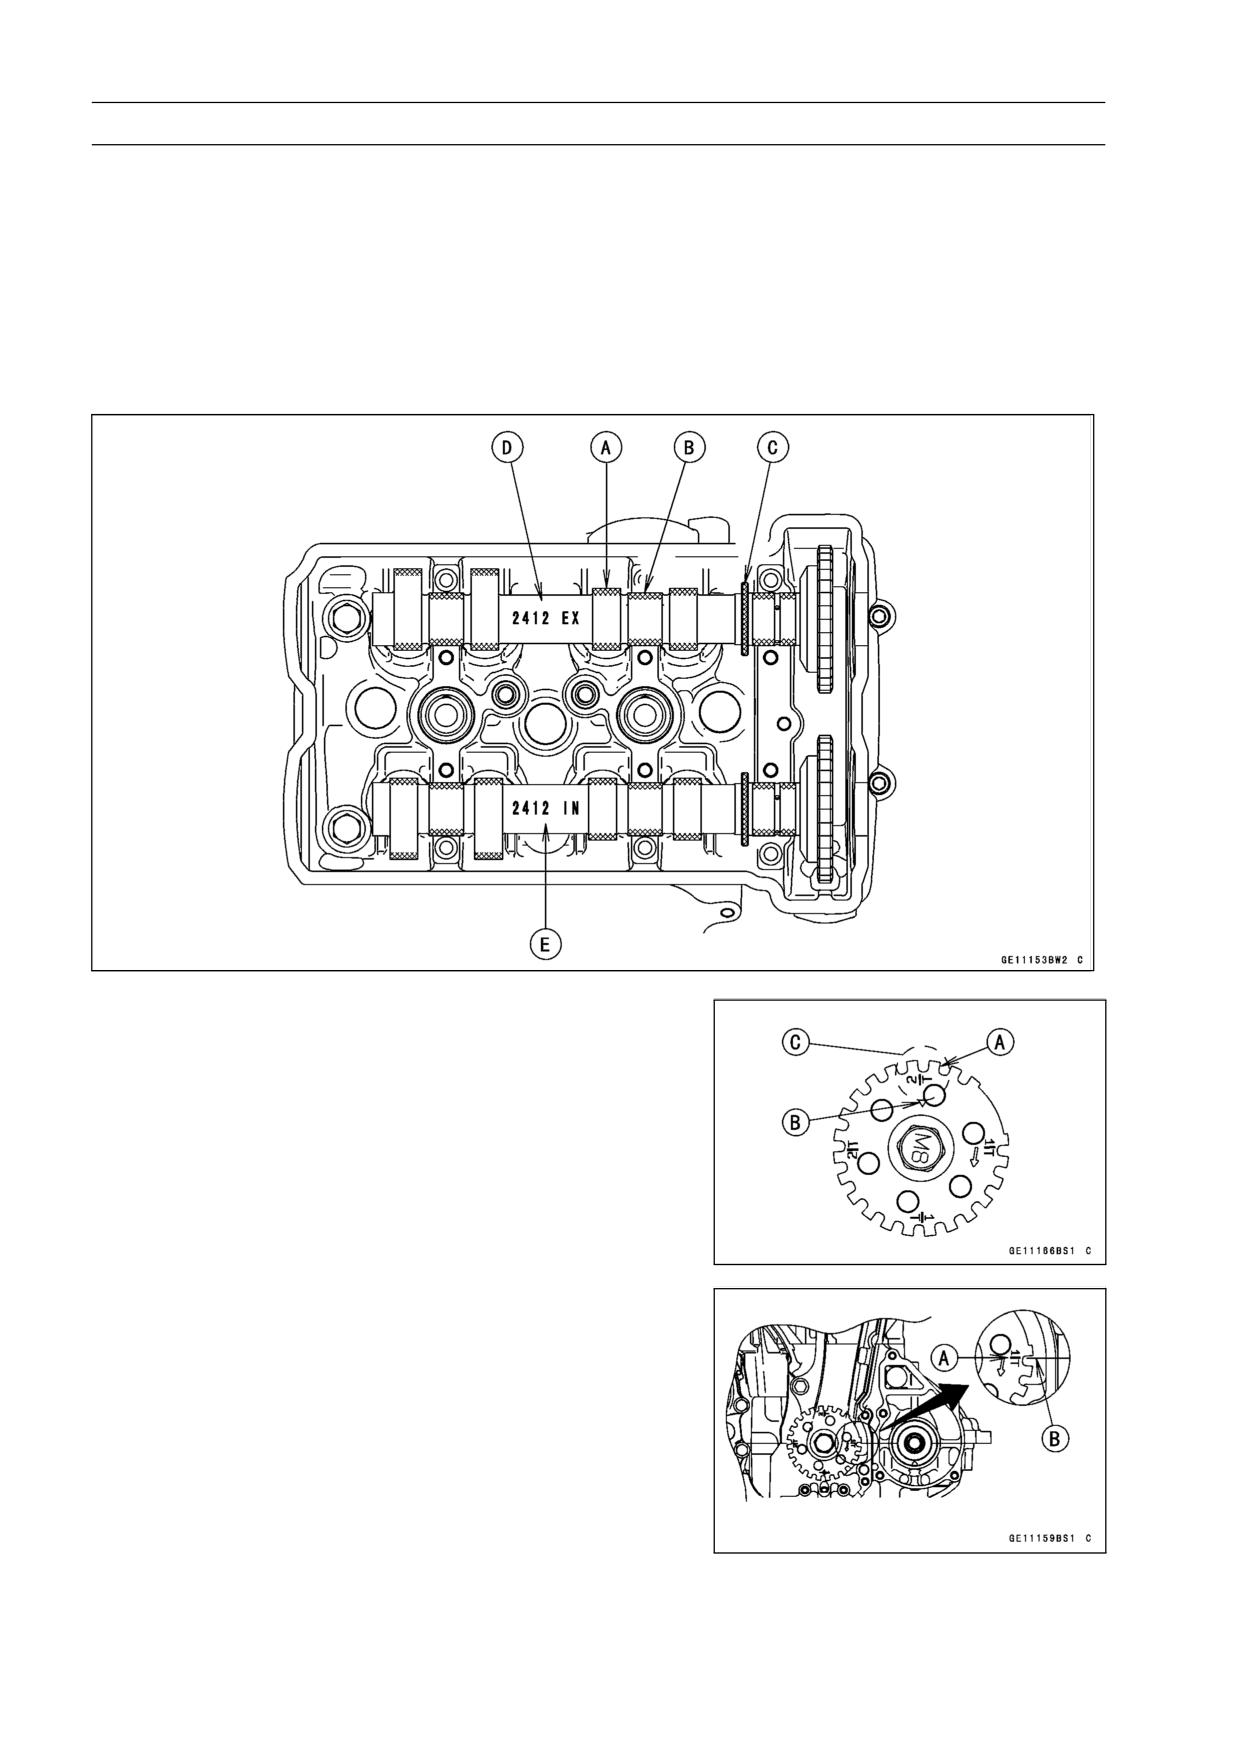
5-20 ENGINE TOP END
Camshaft, Camshaft Chain
• Apply molybdenum disulfide oil solution to all cams [A]
journals [B] and thrust blocks [C] with × marks.
• If a new camshaft is to be used, apply a thin coat of molyb-
denum disulfide grease to the cam surfaces.
NOTE
○The exhaust camshaft has a 2 412 EX mark [D] and the
inlet camshaft has a 2 412 IN mark [E]. Be careful not
to mix up these shafts.
• Position the crankshaft as follows.
• Pull the tension side (exhaust side) of the chain taut to
install the chain.
• Engage the camshaft chain with the camshaft sprockets
so that the timing marks on the sprockets are positioned
as shown.
○Using a wrench on the crankshaft rotation bolt, turn the
crankshaft clockwise until the 2/T mark line [A] on the tim-
ing rotor is aligned with the notch [B] in the edge of the
upper hole [C] in the clutch cover.
• If the clutch cover is removed, perform the next proce-
dure.
○Using a wrench on the crankshaft rotation bolt, turn the
crankshaft clockwise until the 1/T mark line [A] on the
timing rotor is aligned with the wating surface [B] of the
crankcase halves.
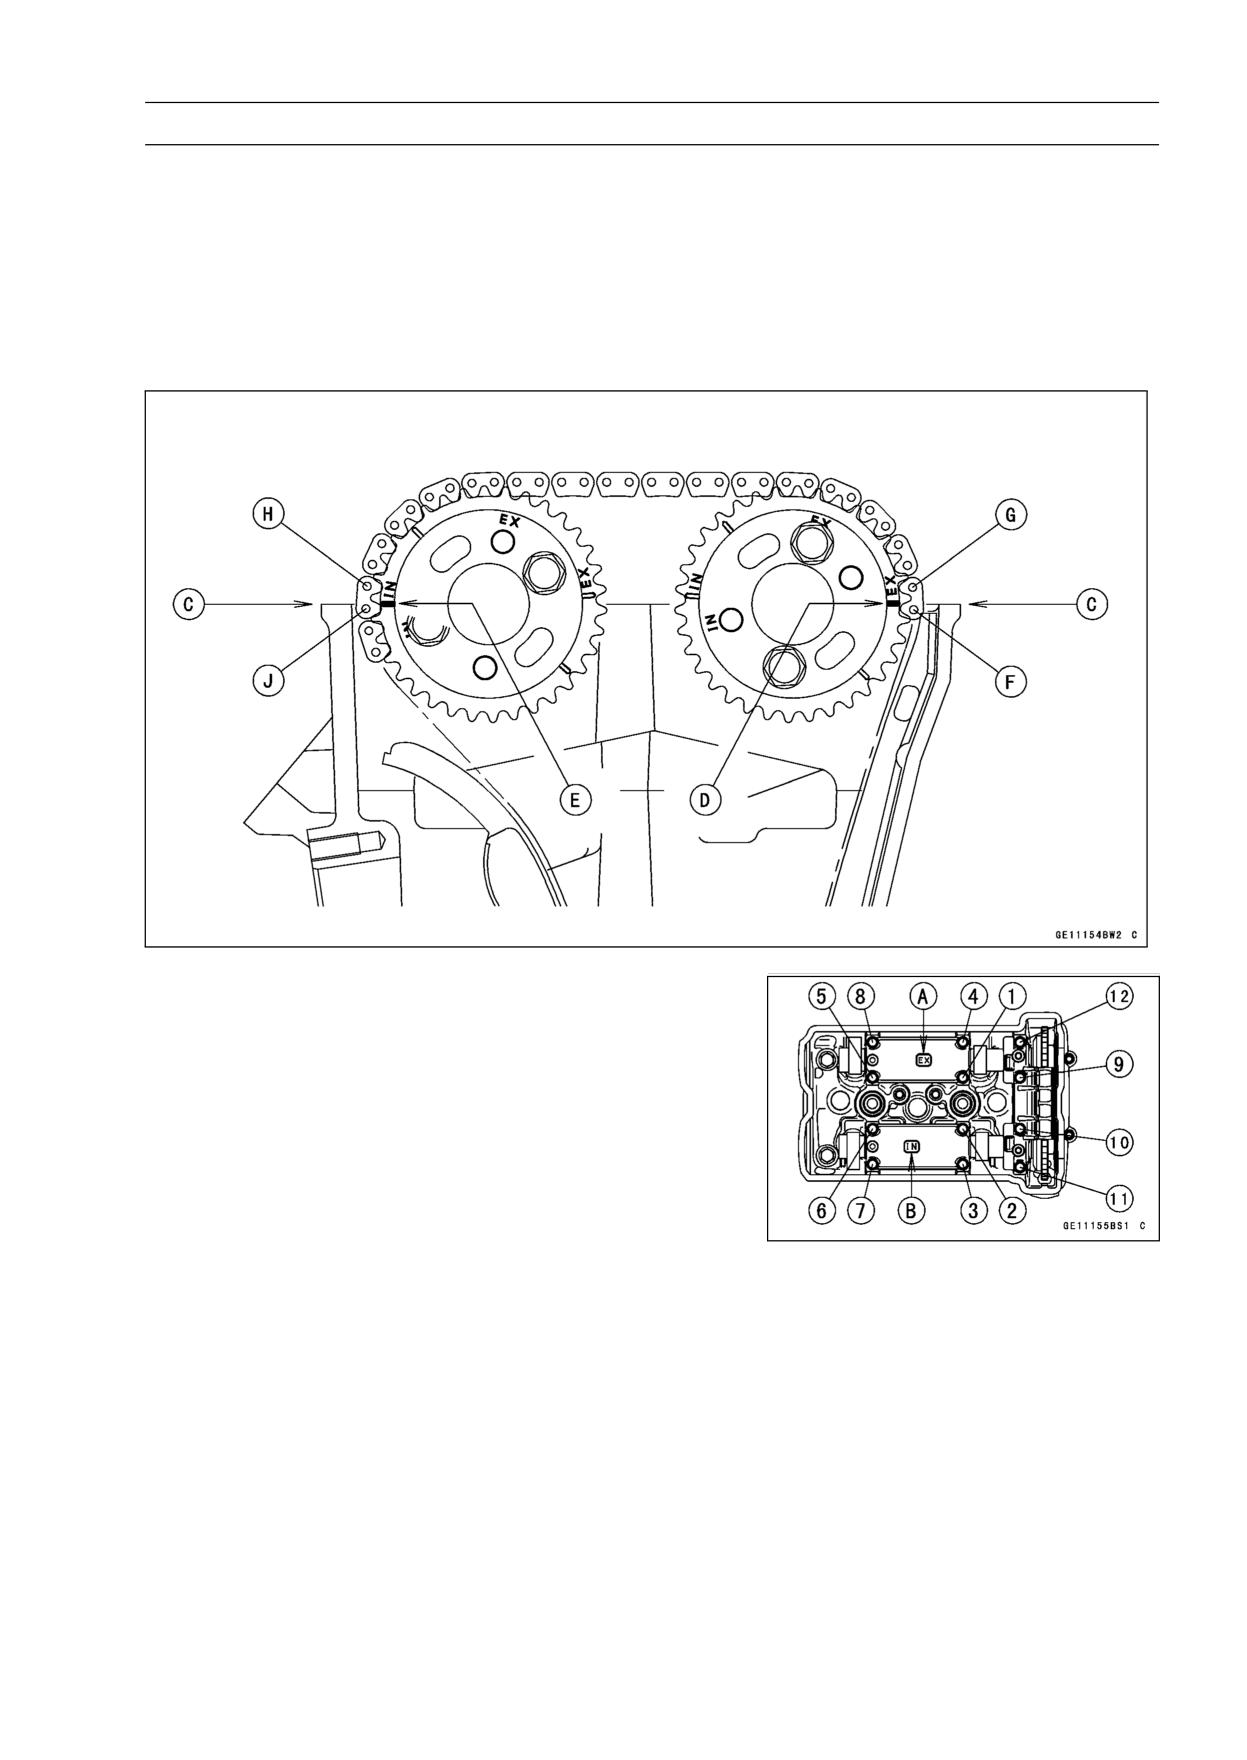
ENGINE TOP END 5-21
Camshaft, Camshaft Chain
○The timing marks must be aligned with the cylinder head
upper surface [C].
EX Mark [D] (Between #1 Pin and #2 Pin)
IN Mark [E] (Between #31 Pin and #32 Pin)
#1 Pin [F]
#2 Pin [G]
#31 Pin [H]
#32 Pin [J]
• Install the camshaft cap, while pushing the camshaft
chain, tighten all camshaft bolts and chain guide bolts.
NOTE
○The exhaust cap has a “EX” mark [A] and the inlet cap
has a “IN” mark [B]. Be careful not to mix up these caps.
○First tighten all the camshaft cap bolts evenly to seat the
camshaft in place, then tighten all bolts following the spec-
ified tightening sequence.
Torque - Camshaft Cap Bolts (1 ∼ 12): 12 N·m (1.2 kgf·m,
106 in·lb)
• Install:
Camshaft Chain Tensioner (see Camshaft Chain Ten-
sioner Installation)
Cylinder Head Cover (see Cylinder Head Cover Instal-
lation)
Right Lower Fairing (see Lower Fairing Removal in the
Frame chapter)
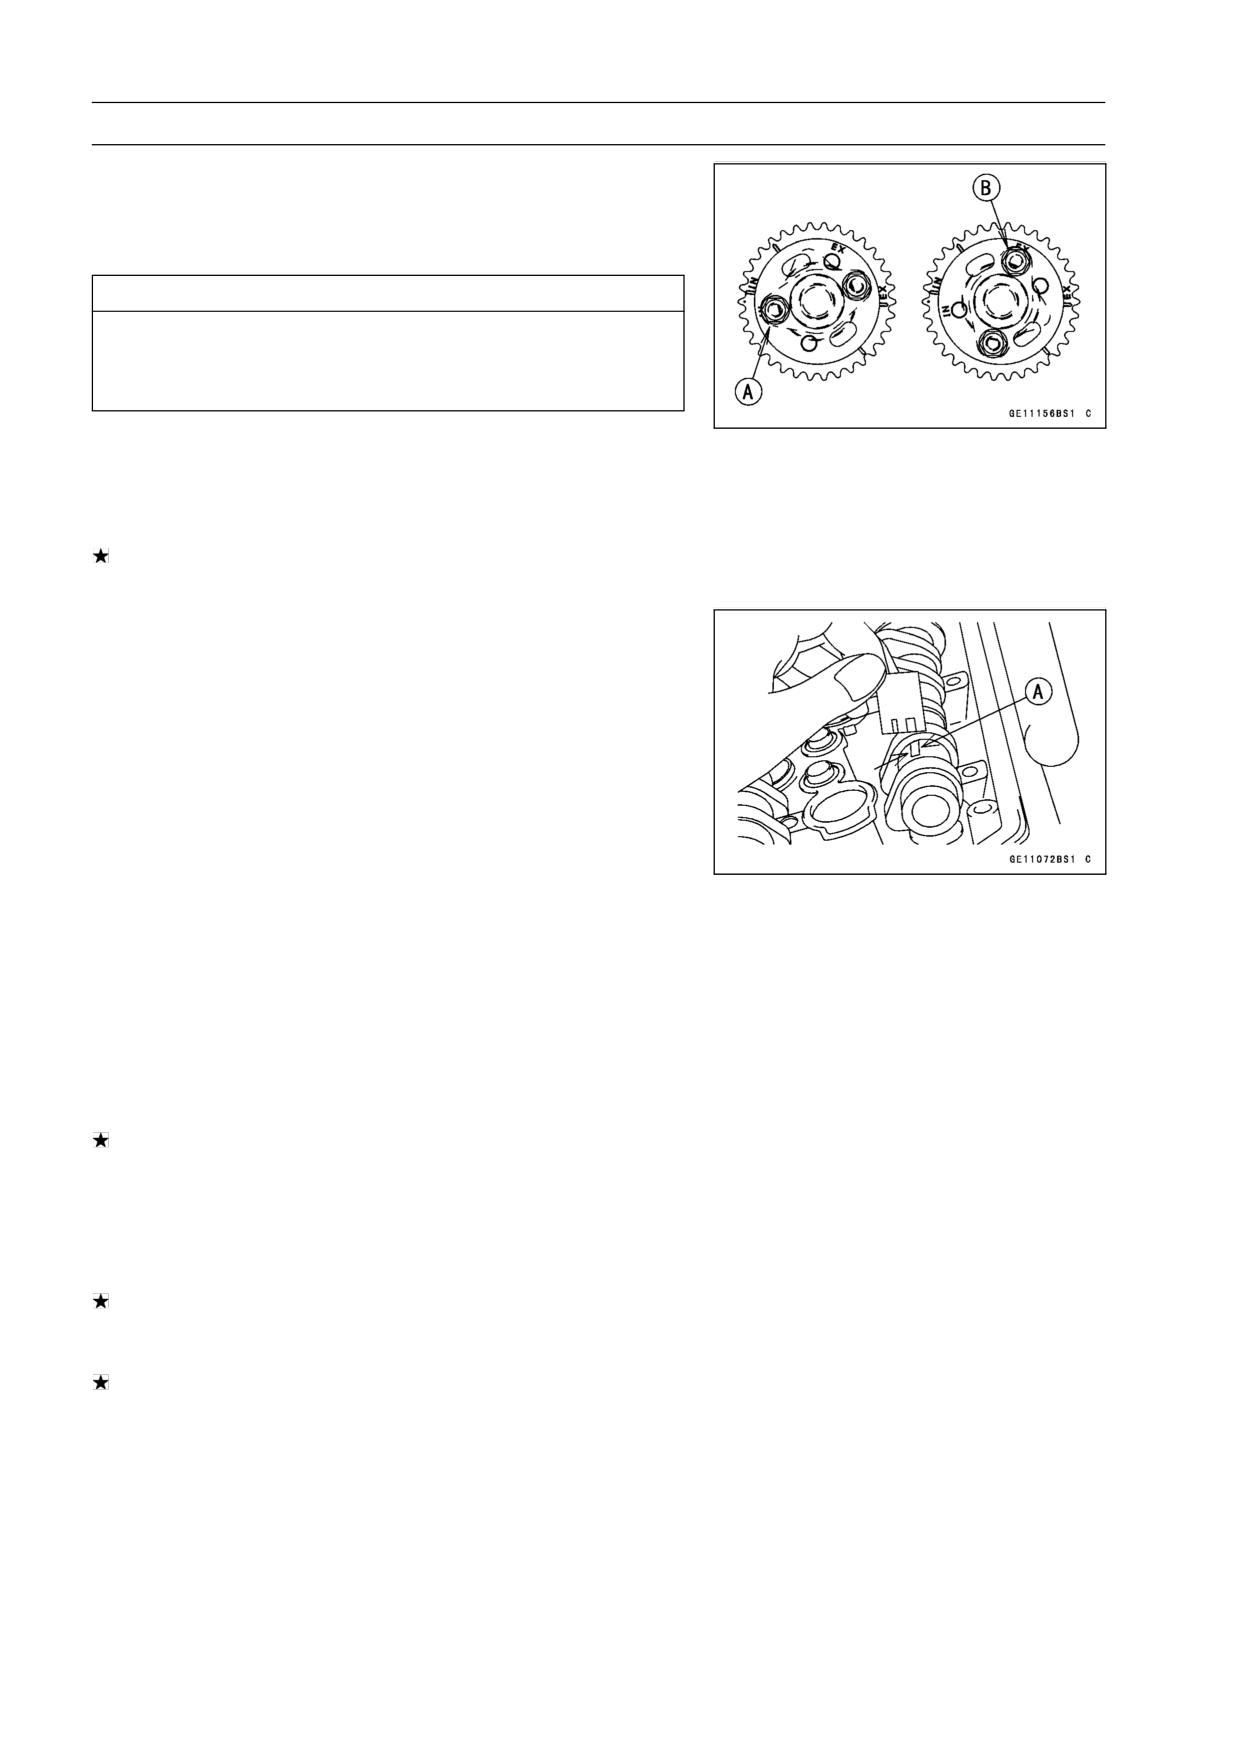
5-22 ENGINE TOP END
Camshaft, Camshaft Chain
Camshaft and Sprocket Assembly
○The inlet and exhaust sprockets are identical.
• Install the sprockets so that the marked (“IN” and “EX”)
side faces to the right side.
CAUTION
Inlet sprocket must use “IN” marked bolts holes [A].
Exhaust sprocket must use “EX” marked bolts
holes [B].
• Apply a non-permanent locking agent to the camshaft
sprockets bolts and tighten them.
Torque - Camshaft Sprockets Bolts: 15 N·m (1.5 kgf·m, 11
ft·lb)
If a new camshaft is to be used, apply a thin coat of a
molybdenum disulfide grease to the cam surfaces.
Camshaft, Camshaft Cap Wear
• Remove:
Camshaft Caps (see Camshaft Removal)
• Cut strips of plastigage to journal width. Place a strip
on each journal parallel to the camshaft installed in the
correct position.
• Measure each clearance between the camshaft journal
and the camshaft cap using plastigage (press gauge) [A].
• Tighten:
Torque - Camshaft Cap Bolts: 12 N·m (1.2 kgf·m, 106 in·lb)
NOTE
○Do not turn the camshaft when the plastigage is be-
tween the journal and camshaft cap.
Camshaft Journal, Camshaft Cap Clearance
Standard:
0.028 ∼ 0.071 mm (0.0011 ∼ 0.0028 in.)
Service Limit: 0.16 mm (0.0063 in.)
If any clearance exceeds the service limit, measure the
diameter of each camshaft journal with a micrometer.
Camshaft Journal Diameter
Standard:
23.950 ∼ 23.972 mm (0.9429 ∼ 0.9438 in.)
Service Limit: 23.92 mm (0.942 in.)
If the camshaft journal diameter is less than the service
limit, replace the camshaft with a new one and measure
the clearance again.
If the clearance still remains out of the limit, replace the
cylinder head unit.
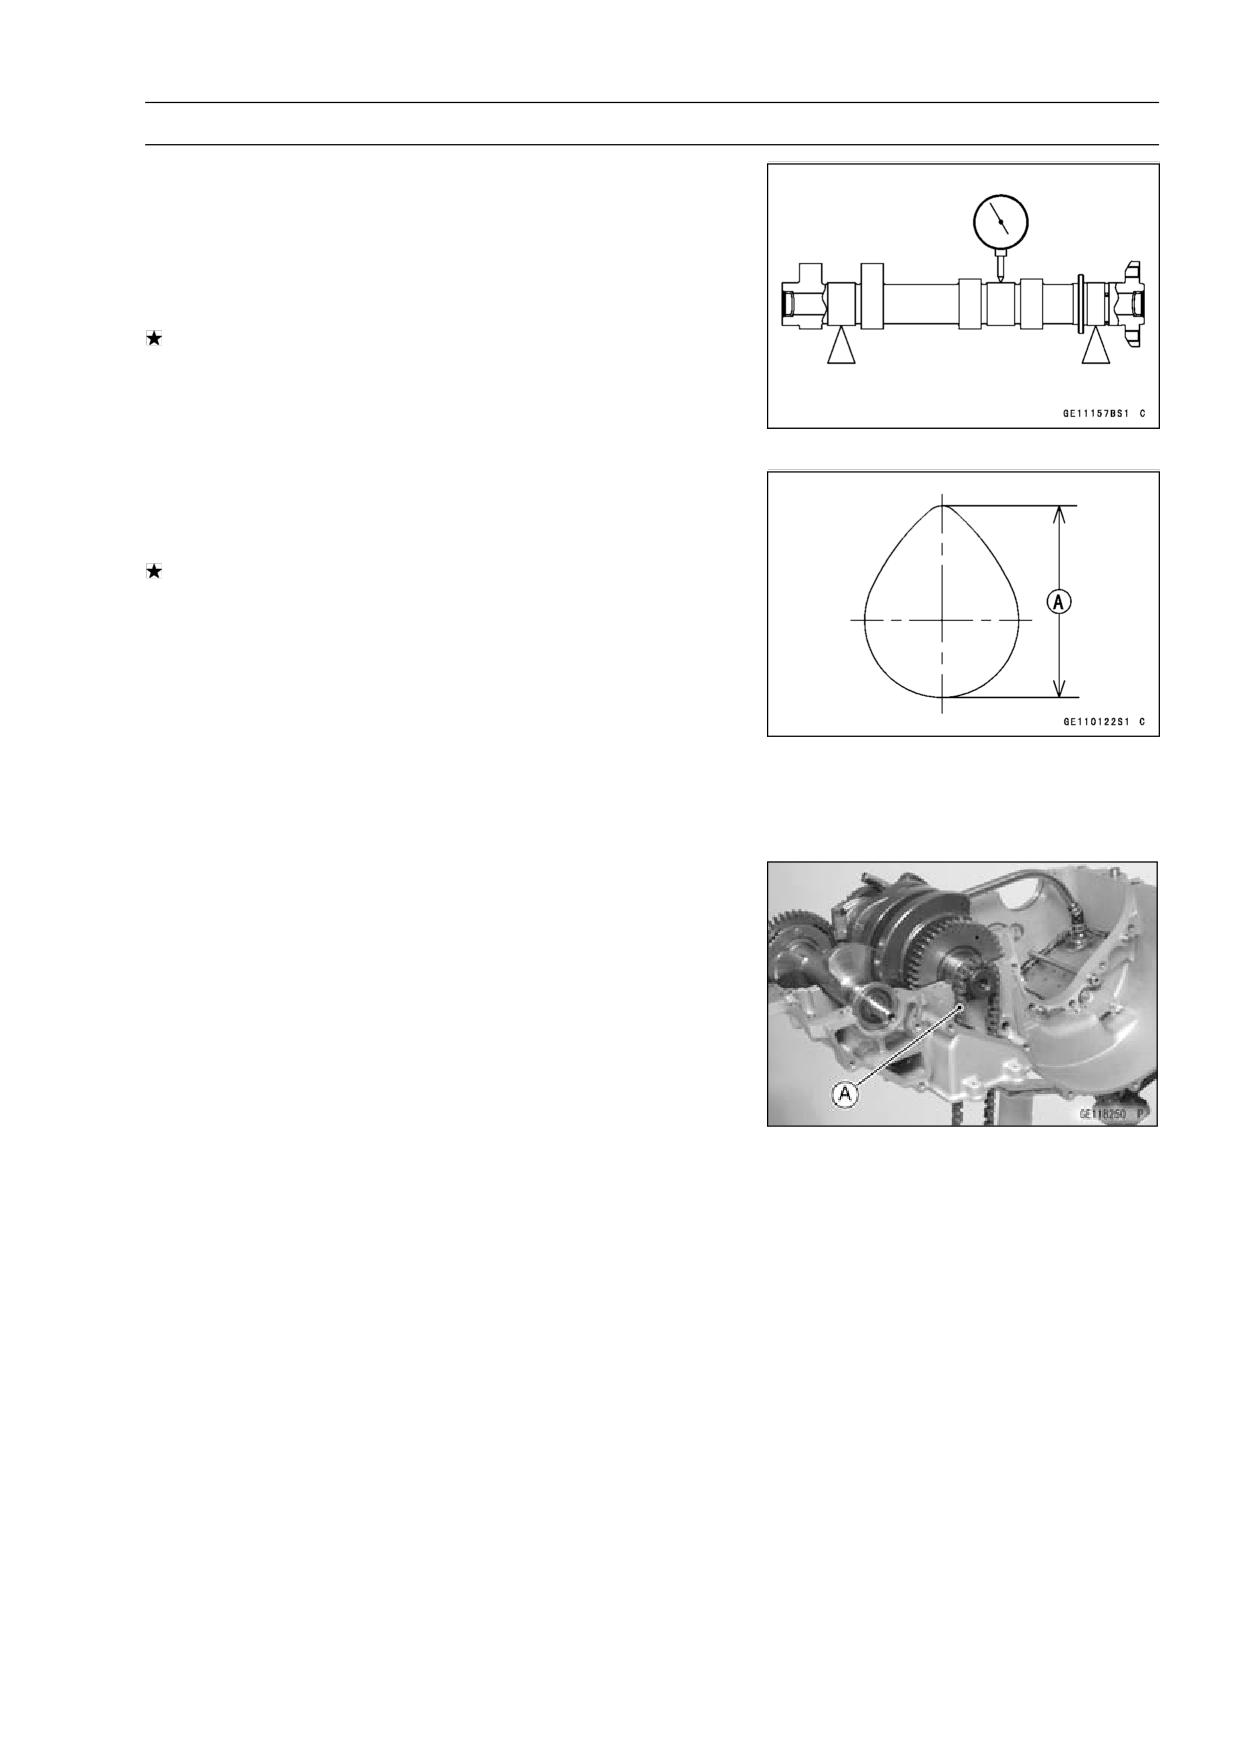
ENGINE TOP END 5-23
Camshaft, Camshaft Chain
Camshaft Runout
• Remove the camshaft (see Camshaft Removal).
• Set the camshaft in a camshaft alignment jig or on V
blocks.
• Measure runout with a dial gauge at the specified place
as shown.
If the runout exceeds the service limit, replace the shaft.
Camshaft Runout
Standard:
TIR 0.02 mm (0.0008 in.) or less
Service Limit: TIR 0.1 mm (0.004 in.)
Cam Wear
• Remove the camshaft (see Camshaft Removal).
• Measure the height [A] of each cam with a micrometer.
If the cams are worn down past the service limit, replace
the camshaft.
Cam Height
Standard:
Exhaust
35.843 ∼ 35.957 mm (1.4111 ∼ 1.4156 in.)
Inlet
36.543 ∼ 36.657 mm (1.4387 ∼ 1.4432 in.)
Service Limit:
Exhaust
35.74 mm (1.4071 in.)
Inlet
36.44 mm (1.4346 in.)
Camshaft Chain Removal
• Split the crankcase (see Crankcase Splitting in the Crank-
shaft/Transmission chapter).
• Remove the camshaft chain [A] from the crankshaft
sprocket.
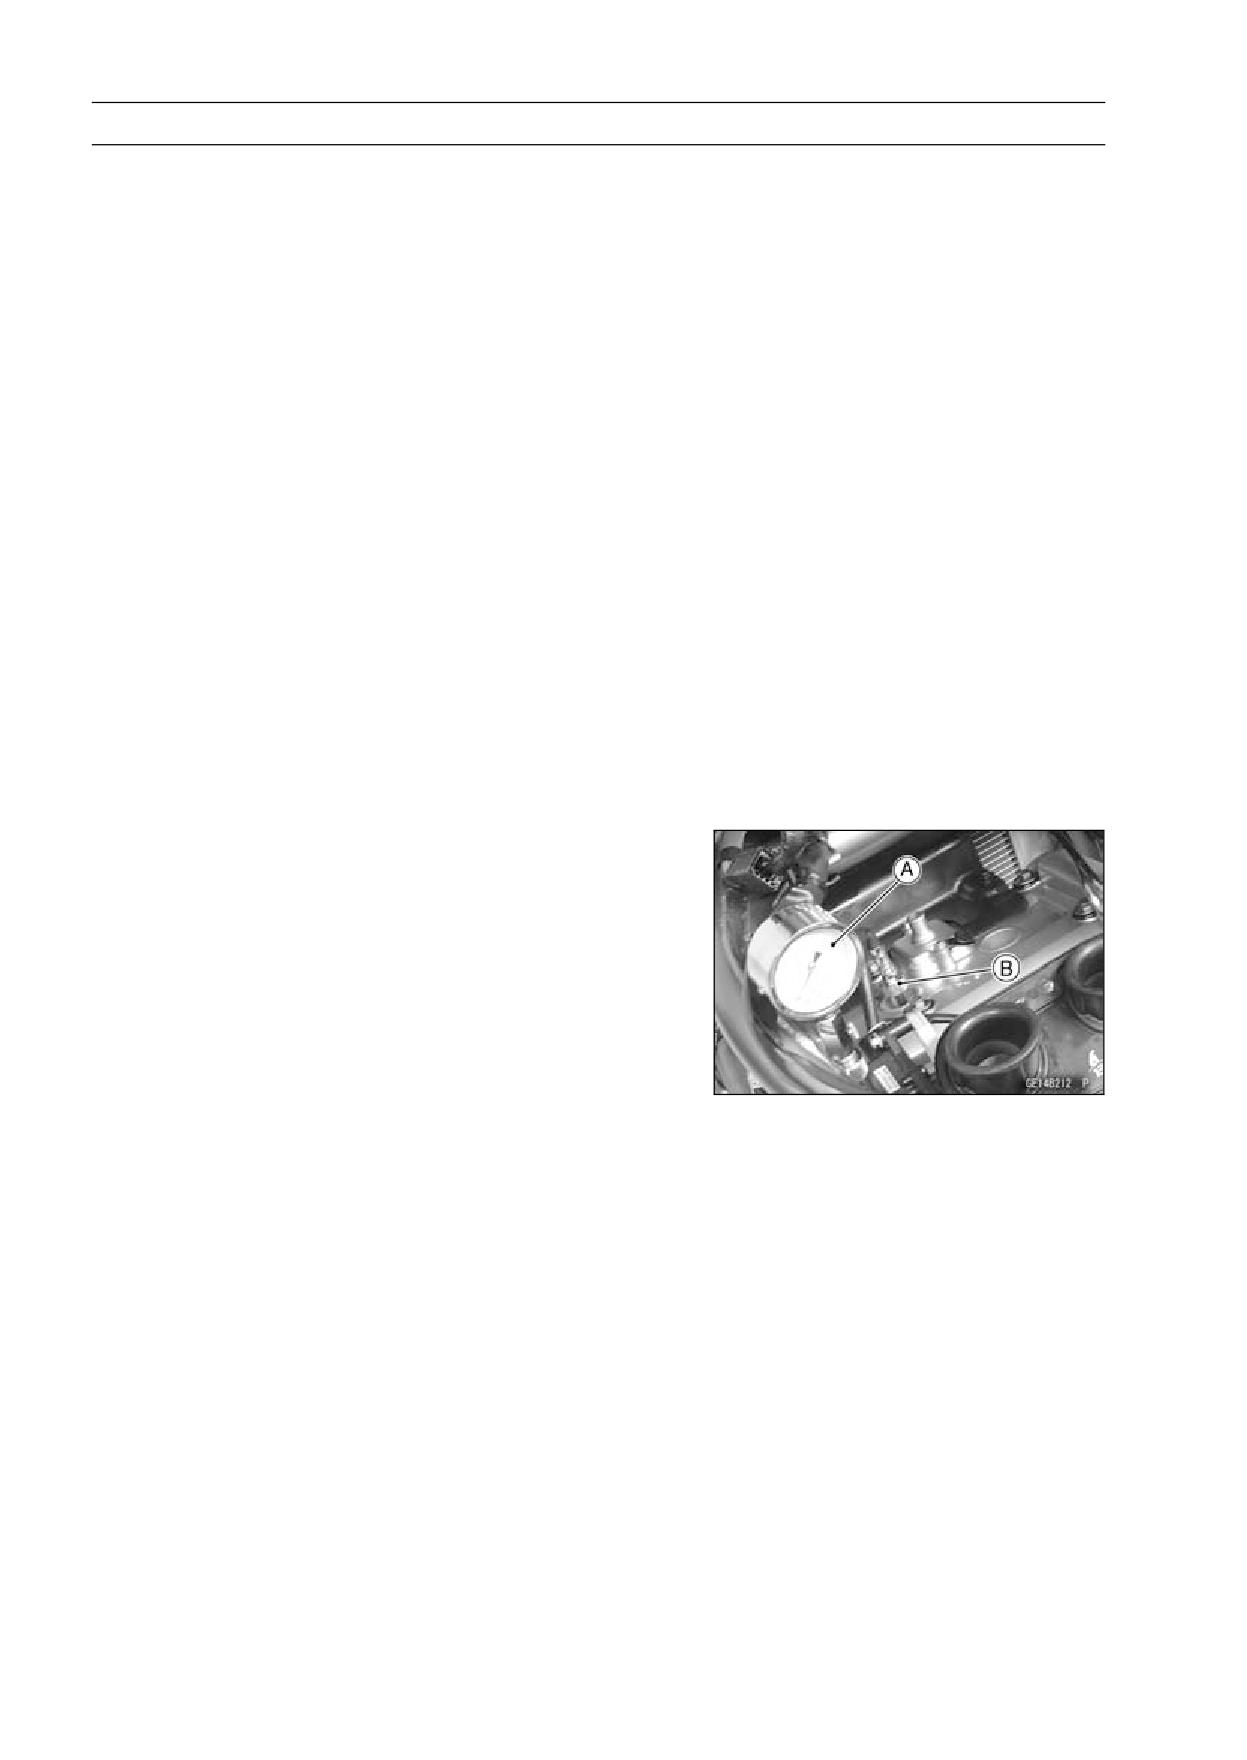
5-24 ENGINE TOP END
Cylinder Head
Cylinder Compression Measurement
NOTE
○Use the battery which is fully charged.
• Warm up the engine thoroughly.
• Stop the engine.
• Remove:
Fuel Tank (see Fuel Tank Removal in the Fuel System
(DFI) chapter)
Air Cleaner Housing (see Air Cleaner Housing Removal
in the Fuel System (DFI) chapter)
Stick Coils (see Stick Coil (Ignition Coil together with
Spark Plug Cap) Removal in the Electrical System chap-
ter)
Spark Plugs (see Spark Plug Replacement in the Peri-
odic Maintenance chapter)
Owner’s Tool - Spark Plug Wrench, 16 mm: 92110-1132
NOTE
○Reconnect the connectors of the air switching valve
lead and the inlet air temperature sensor lead. When
the ignition switch is turned ON with the above connec-
tors disconnected, the service codes (13, 64) are stores
in the ECU.
• Attach the compression gauge [A] and adapter [B] firmly
into the spark plug hole.
○Using the starter motor, turn the engine over with the throt-
tle fully open until the compression gauge stops rising; the
compression is the highest reading obtainable.
Special Tools - Compression Gauge, 20 kgf/cm²: 57001-221
Compression Gauge Adapter, M10 × 1.0:
57001-1317
Cylinder Compression
Usable Range:
961 ∼ 1 471 kPa (9.8 ∼ 15.0 kgf/cm², 139
∼ 213 psi) at 400 r/min (rpm)
• Repeat the measurement for the other cylinders.
• Install the spark plugs.
Torque - Spark Plugs: 15 N·m (1.5 kgf·m, 11 ft·lb)
ENGINE TOP END 5-25
Cylinder Head
○The following table should be consulted if the obtainable compression reading is not within the us-
able range.
Problem
Diagnosis
Remedy (Action)
Cylinder compression
Carbon accumulation on piston and in
is higher than usable
combustion chamber possibly due to
Remove the carbon deposits
range
damaged valve stem oil seal and/or
and replace damaged parts if
damaged piston oil rings (This may be
necessary.
indicated by white exhaust smoke).
Incorrect cylinder head gasket
Replace the gasket with a standard
thickness
part.
Cylinder compression
Replace damaged gasket and
Gas leakage around cylinder head
is lower than usable
check cylinder head warp.
range
Bad condition of valve seating
Repair if necessary.
Incorrect valve clearance
Adjust the valve clearance.
Incorrect piston/cylinder clearance
Replace the piston and/or cylinder.
Inspect the cylinder and
Piston seizure
replace/repair the cylinder and/or
piston as necessary.
Bad condition of piston ring and/or
Replace the piston and/or the
piston ring grooves
piston rings.
Cylinder Head Removal
• Remove:
Exhaust Pipes (see Exhaust Pipe Removal)
Cylinder Head Cover (see Cylinder Head Cover Re-
moval)
Camshafts (see Camshaft Removal)
Throttle Body Assy (see Throttle Body Assy Removal in
the Fuel System (DFI) chapter)
Throttle Body Holder
Water Hose
Water Temperature Sensor Connector
Front Camshaft Chain Guide
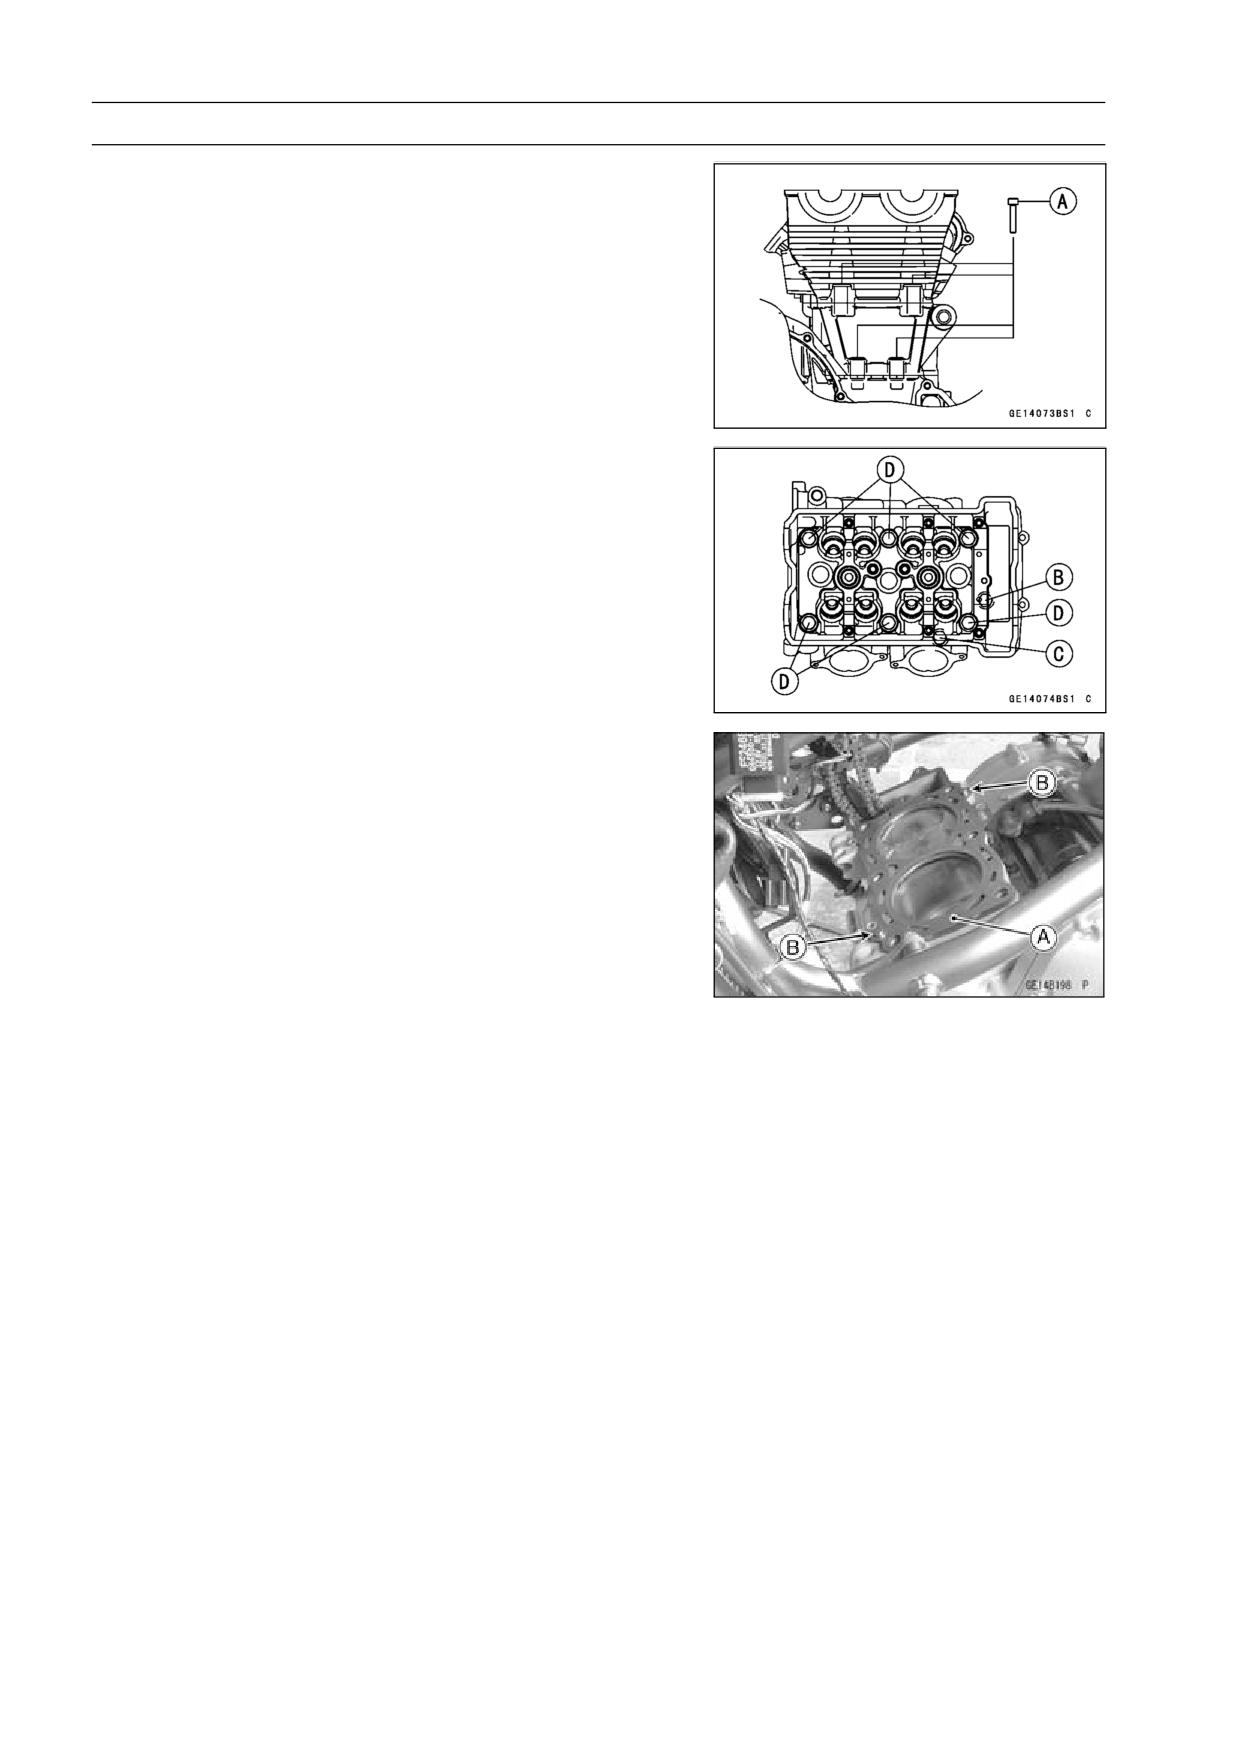
5-26 ENGINE TOP END
Cylinder Head
• Firstly remove the M6 cylinder head bolts and M6 cylinder
bolts [A].
• Secondly, remove the M8 bolts [B].
• Thirdly, remove the M10 nut [C].
• Fourthly, remove the M10 bolts [D].
Cylinder Head Installation
NOTE
○The camshaft cap is machined with the cylinder head,
so if a new cylinder head is installed, use the cap that
is supplied with the new head.
• Install a new cylinder head gasket [A] and dowel pins [B].
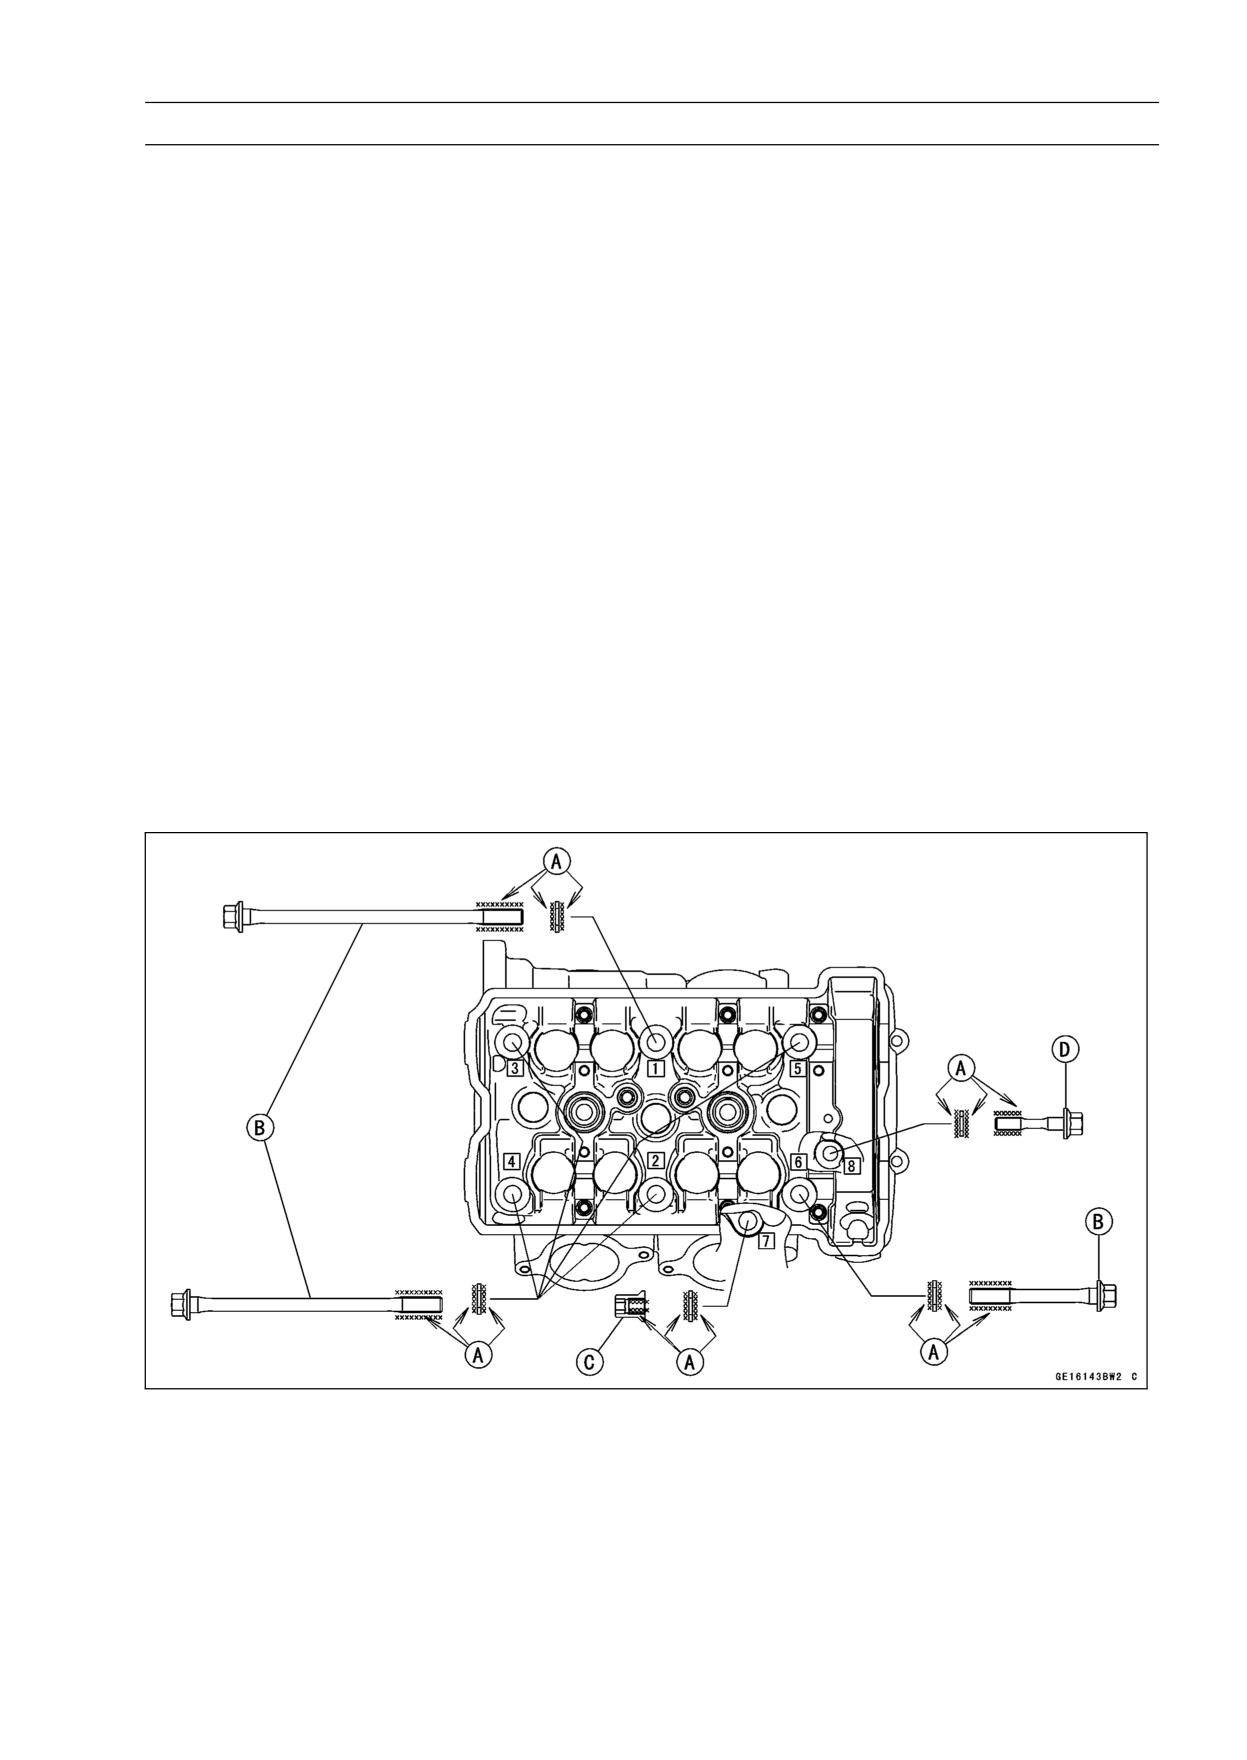
ENGINE TOP END 5-27
Cylinder Head
• Apply molybdenum disulfide oil solution [A] to both sides
of washers and the threads of bolts and nut.
M10 Cylinder Head Bolts [B]
M10 Cylinder Nut [C]
M8 Cylinder Bolt [D]
• Tighten the all the bolts and nut following the tightening
sequence [1 ∼ 8].
Torque - Cylinder Head Bolts (M10):
First: 25 N·m (2.5 kgf·m, 18 ft·lb)
Final:
Used Bolts 49 N·m (5.0 kgf·m, 36 ft·lb)
New Bolts 54 N·m (5.5 kgf·m, 40 ft·lb)
Cylinder Nut (M10): 49 N·m (5.0 kgf·m, 36 ft·lb)
Cylinder Bolt (M8): 27.5 N·m (2.8 kgf·m, 20 ft·lb)
NOTE
○The tightening sequence No.1 ∼ No.5 are the cylinder
head bolts that are tightened between the cylinder head
with the crankcase.
○The No.6 is the cylinder head bolt that is tightened be-
tween the cylinder head with the cylinder.
○The No.7 and No.8 are the cylinder nut and cylinder
bolt that are tightened between the cylinder and the
crankcase.
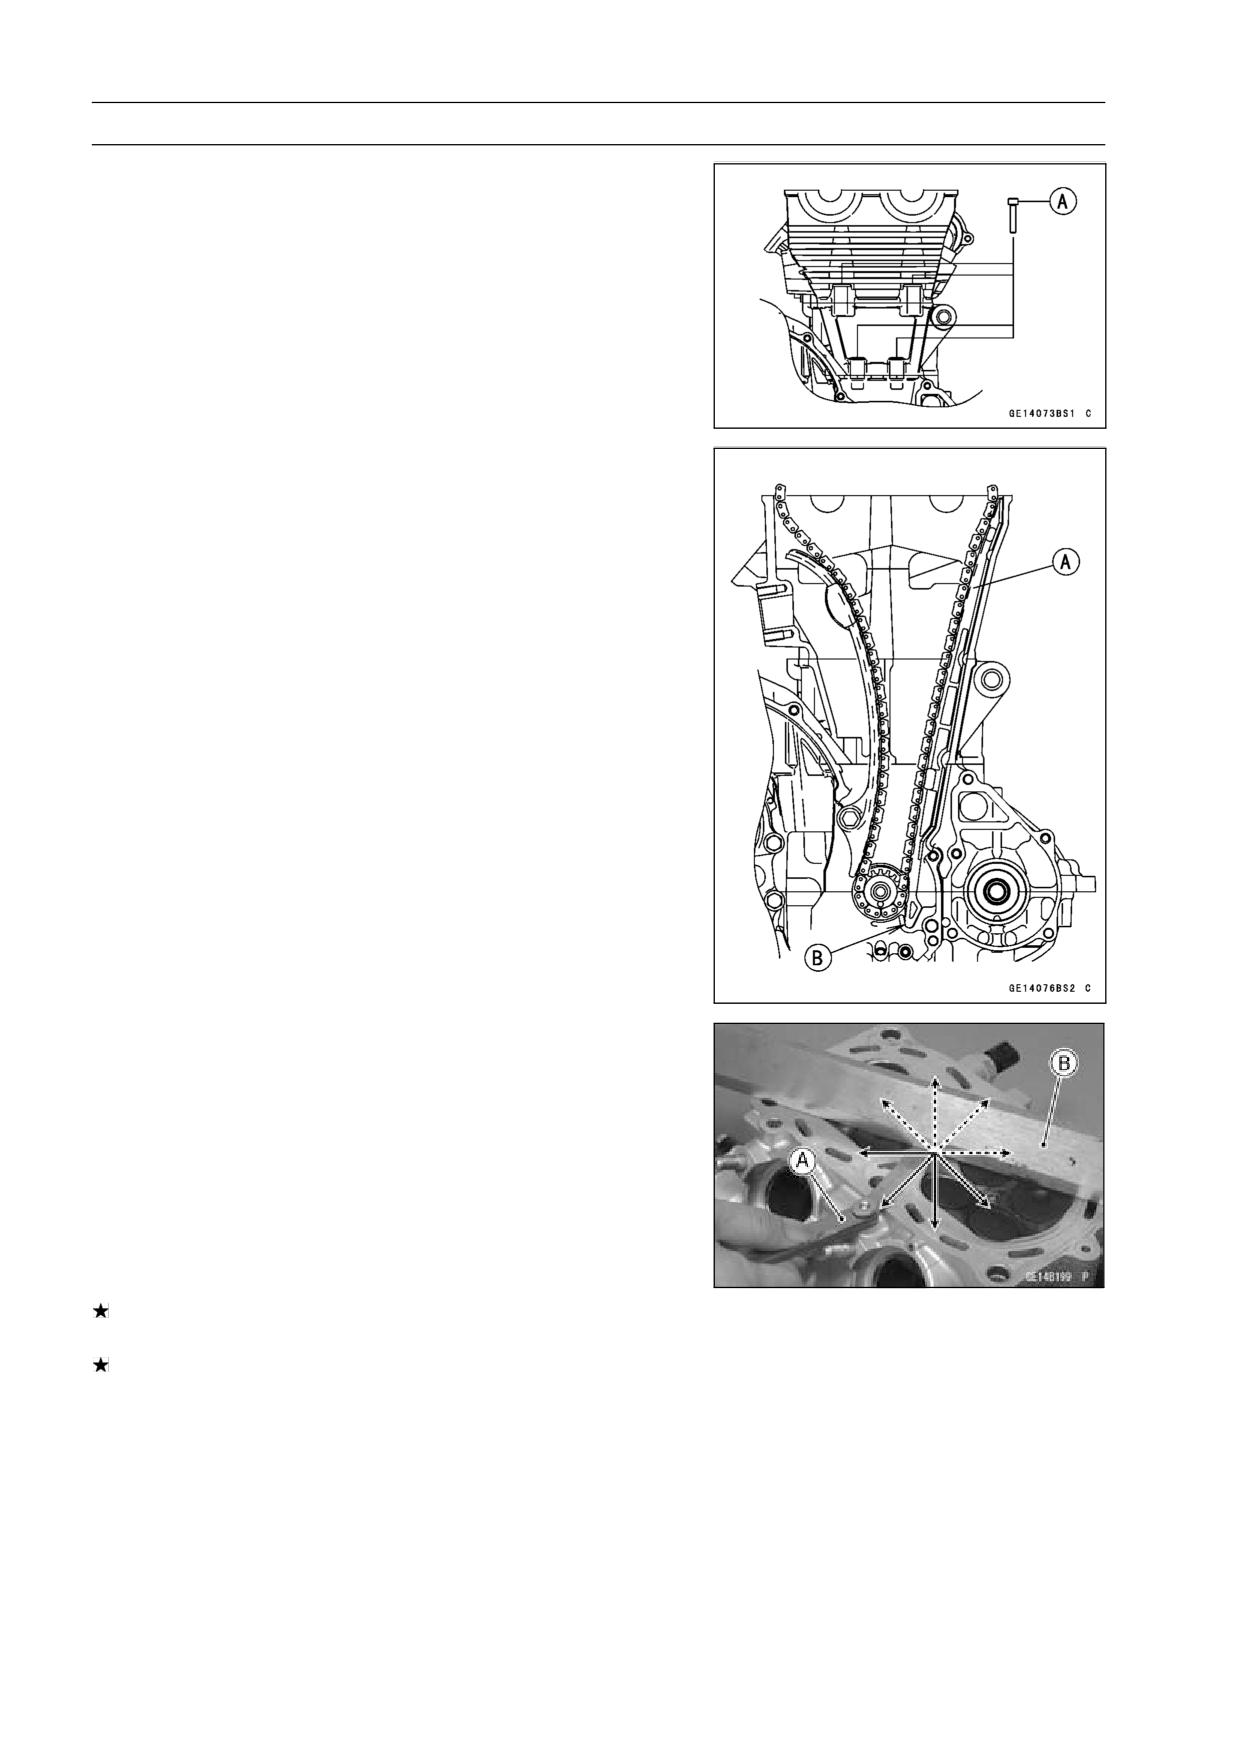
5-28 ENGINE TOP END
Cylinder Head
• Tighten the M6 cylinder head bolts and M6 cylinder bolts
[A].
Torque - Cylinder Head Bolts (M6): 12 N·m (1.2 kgf·m, 106
in·lb)
Cylinder Bolts (M6): 12 N·m (1.2 kgf·m, 106 in·lb)
• Install the front camshaft chain guide [A].
○Insert the end [B] of front camshaft chain guide into the
hollow on the lower crankcase half.
• Install the removed parts (see appropriate chapters).
Cylinder Head Warp
• Clean the cylinder head.
• Lay a straightedge across the lower surface of the cylinder
head at several positions.
• Use a thickness gauge [A] to measure the space between
the straightedge [B] and the head.
Cylinder Head Warp
Standard:
- - -
Service Limit: 0.05 mm (0.002 in.)
If the cylinder head is warped more than the service limit,
replace it.
If the cylinder head is warped less than the service limit,
repair the head by rubbing the lower surface on emery
paper secured to a surface plate (first No. 200, then No.
400).
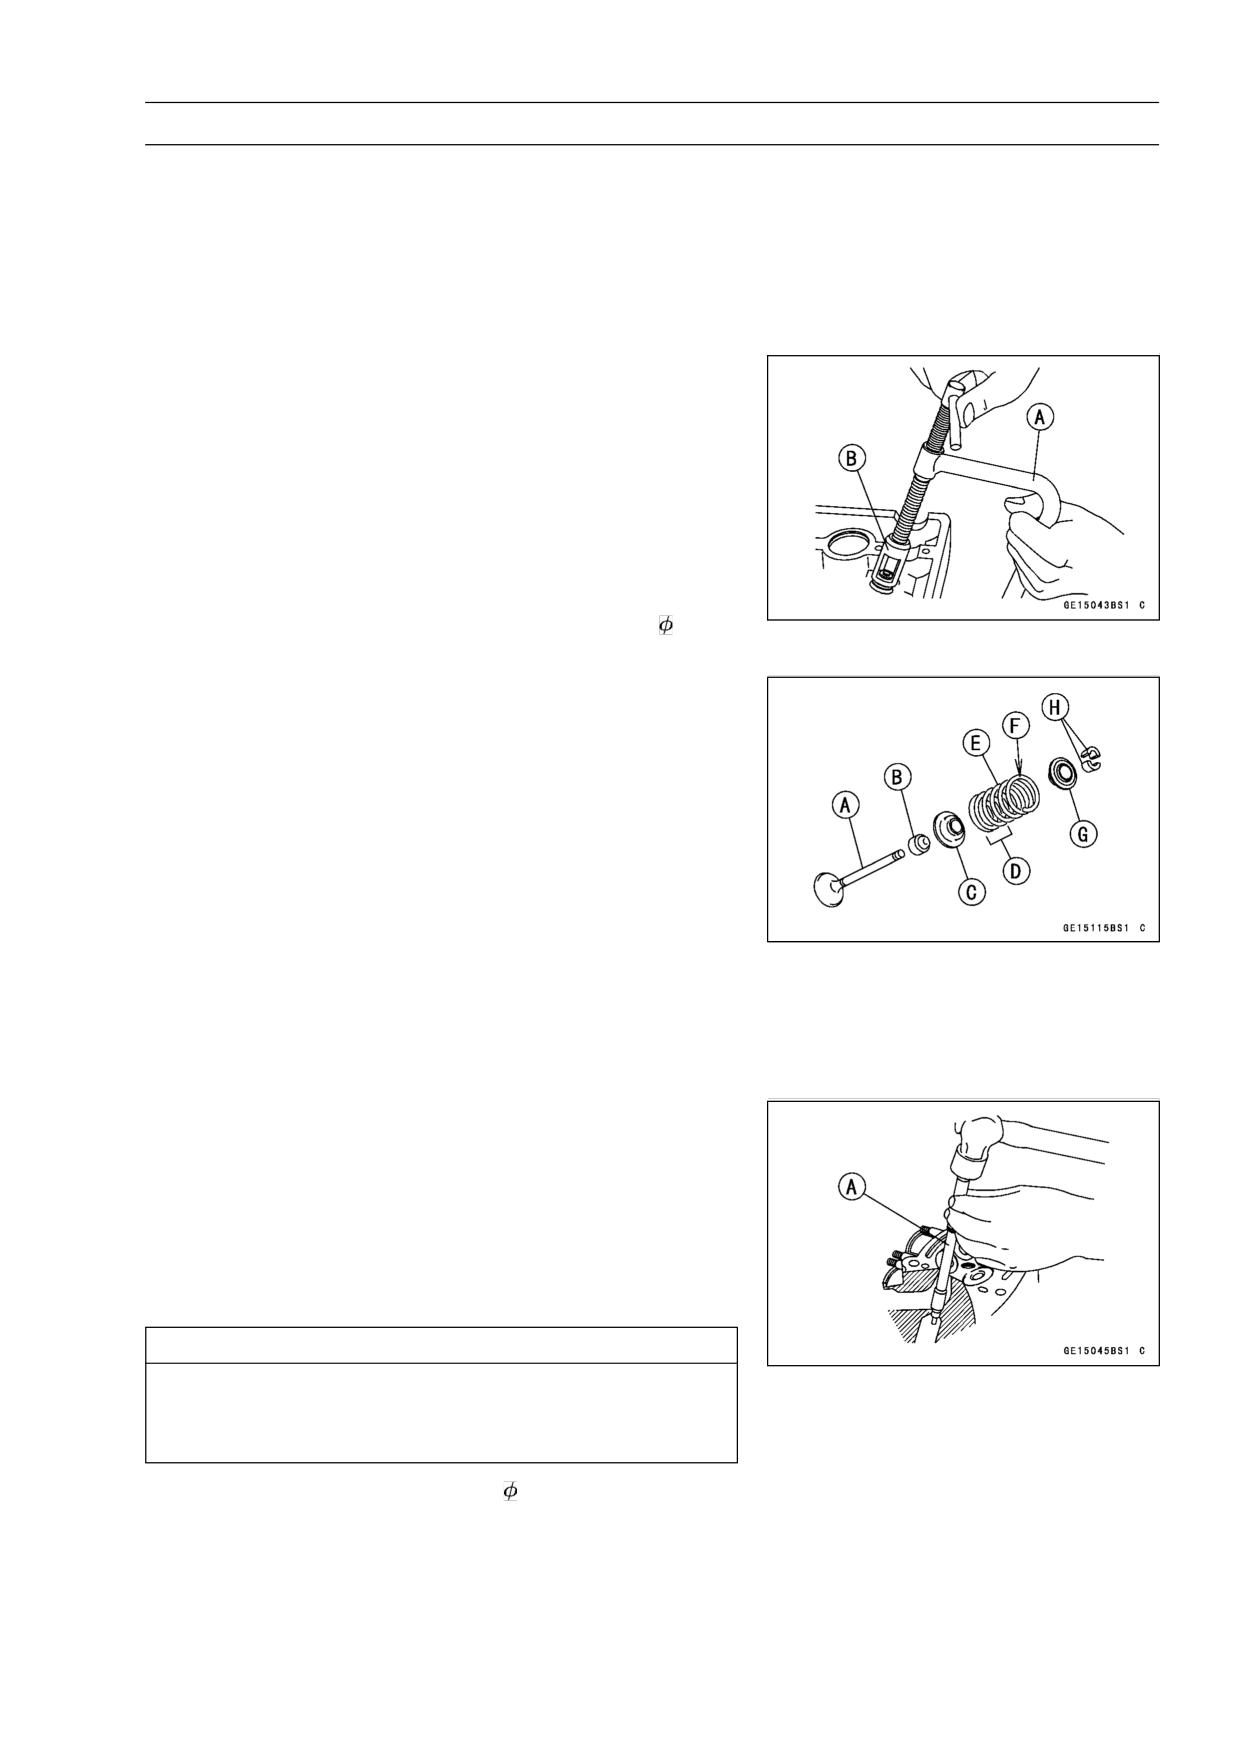
ENGINE TOP END 5-29
Valves
Valve Clearance Inspection
• Refer to the Valve Clearance Inspection in the Periodic
Maintenance chapter.
Valve Clearance Adjustment
• Refer to the Valve Clearance Adjustment in the Periodic
Maintenance chapter.
Valve Removal
• Remove cylinder head (see Cylinder Head Removal).
• Remove the valve lifter and shim.
○Mark and record the valve lifter and shim locations so they
can be installed in their original positions.
• Using the valve spring compressor assembly, remove the
valve.
Special Tools - Valve Spring Compressor Assembly [A]:
57001-241
Valve Spring Compressor Adapter,
21 [B]:
57001-1272
Valve Installation
• Replace the oil seal with a new one.
○Apply engine oil to the oil seal lip.
• Apply a thin coat of molybdenum disulfide grease to the
valve stem before valve installation.
• Install the springs so that the closed coil end faces down-
wards (the side painted in green faces upwards).
Valve Stem [A]
Oil Seal [B]
Spring Seat [C]
Closed Coil End [D]
Valve Spring [E]
Side Painted in Green [F]
Retainer [G]
Split Keepers [H]
Valve Guide Removal
• Remove:
Valve (see Valve Removal)
Oil Seal
Spring Seat
• Heat the area around the valve guide to 120 ∼ 150°C (248
∼ 302°F), and hammer lightly on the valve guide arbor [A]
to remove the guide from the top of the head.
CAUTION
Do not heat the cylinder head with a torch. This will
warp the cylinder head. Soak the cylinder head in
oil and heat the oil.
Special Tool - Valve Guide Arbor,
4.5: 57001-1331
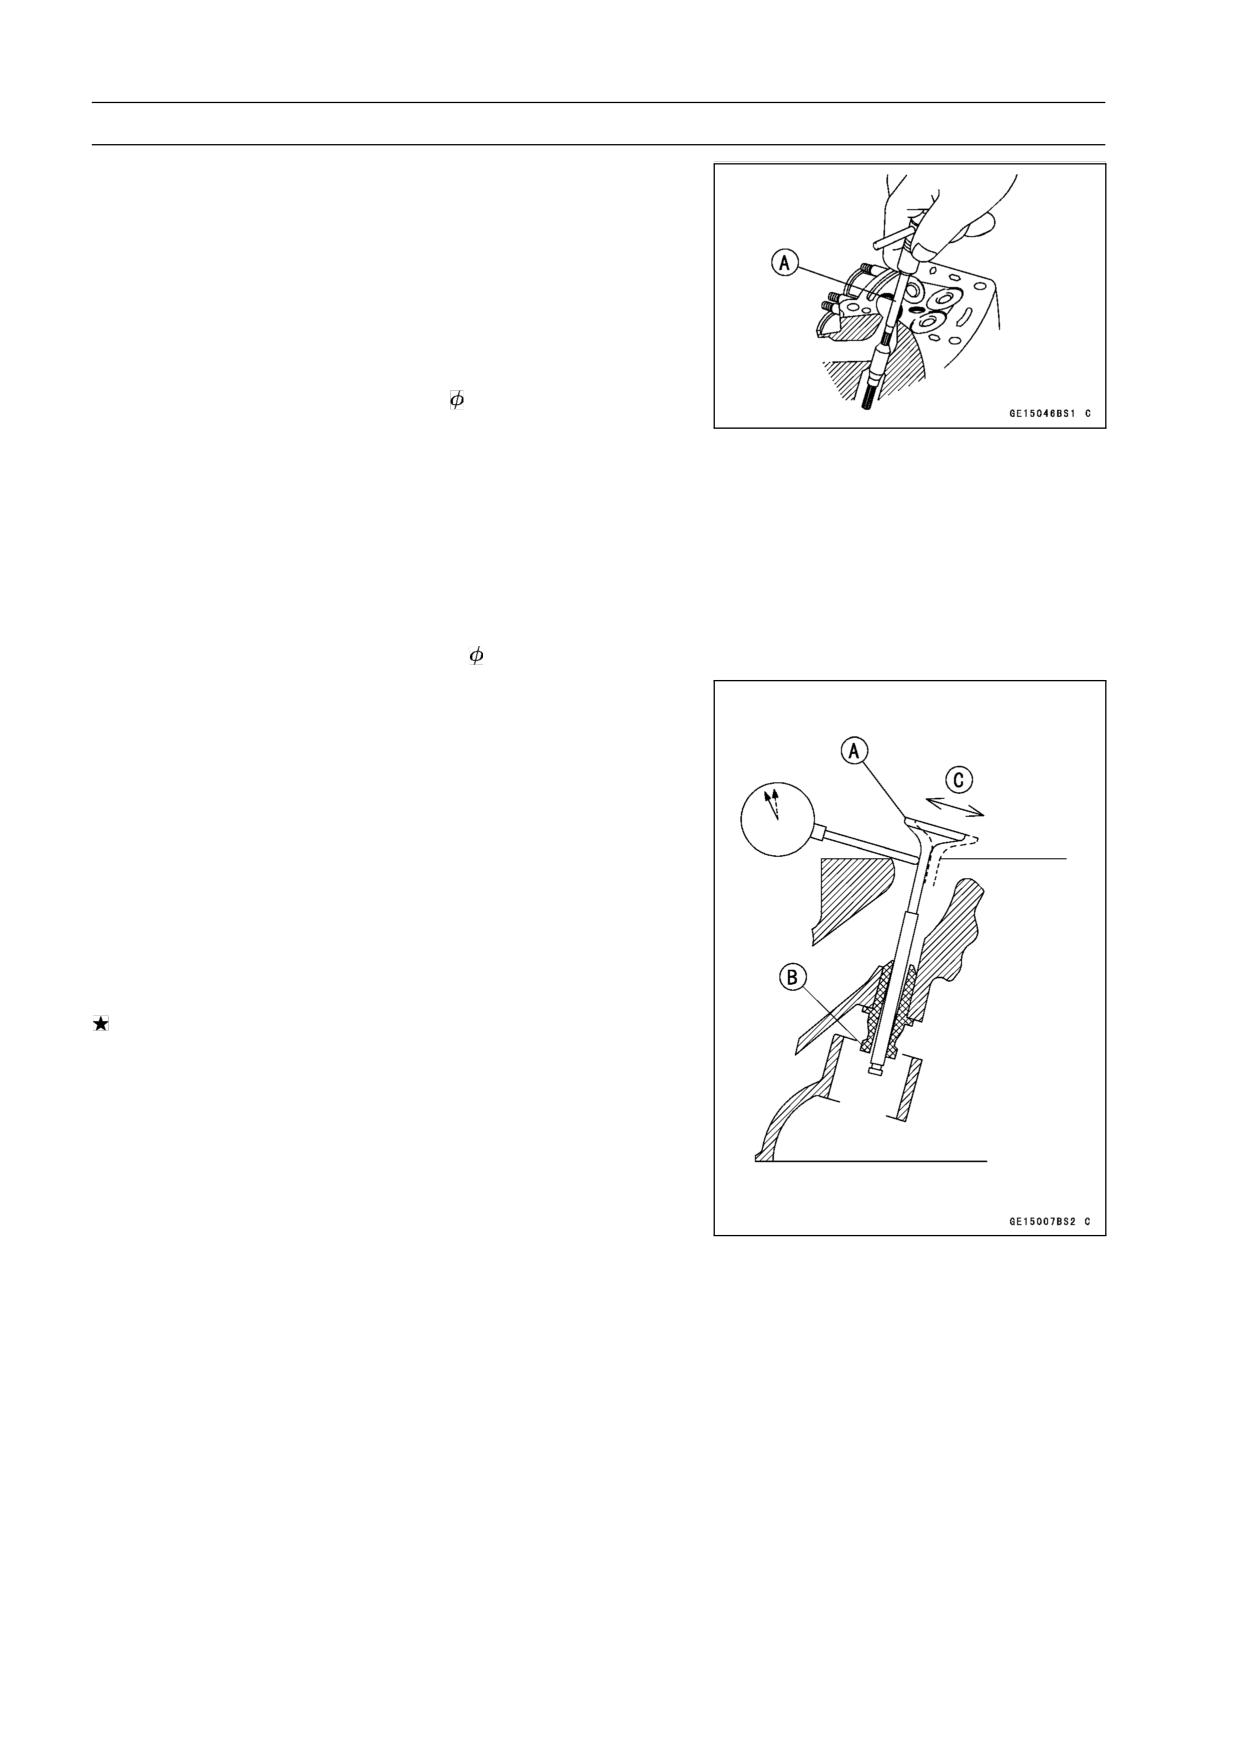
5-30 ENGINE TOP END
Valves
Valve Guide Installation
• Apply engine oil to the valve guide outer surface before
installation.
• Heat the area around the valve guide hole to about 120 ∼
150°C (248 ∼ 302°F).
• Drive the valve guide in from the top of the head using the
valve guide arbor. The flange stops the guide from going
in too far.
Special Tool - Valve Guide Arbor,
4.5: 57001-1331
• Wait until the cylinder head cools down and then ream the
valve guide with the valve guide reamer [A] even if the old
guide is reused.
○Turn the reamer in a clockwise direction until the reamer
turns freely in the guide. Never turn the reamer counter-
clockwise or it will be dulled.
○Once the guides are reamed they must be cleaned thor-
oughly.
Special Tool - Valve Guide Reamer,
4.5: 57001-1333
Valve-to-Guide Clearance Measurement (Wobble
Method)
If a small bore gauge is not available, inspect the valve
guide wear by measuring the valve to valve guide clearance
with the wobble method as indicated below.
• Insert a new valve [A] into the guide [B] and set a dial
gauge against the stem perpendicular to it as close as
possible to the cylinder head mating surface.
• Move the stem back and forth [C] to measure valve/valve
guide clearance.
• Repeat the measurement in a direction at a right angle to
the first.
If the reading exceeds the service limit, replace the guide.
NOTE
○The reading is not actual valve/valve guide clearance
because the measuring point is above the guide.
Valve/Valve Guide Clearance (Wobble Method)
Standard:
Exhaust
0.07 ∼ 0.14 mm (0.0028 ∼ 0.0055 in.)
Inlet
0.02 ∼ 0.08 mm (0.0008 ∼ 0.0032 in.)
Service Limit:
Exhaust
0.27 mm (0.0106 in.)
Inlet
0.22 mm (0.0087 in.)
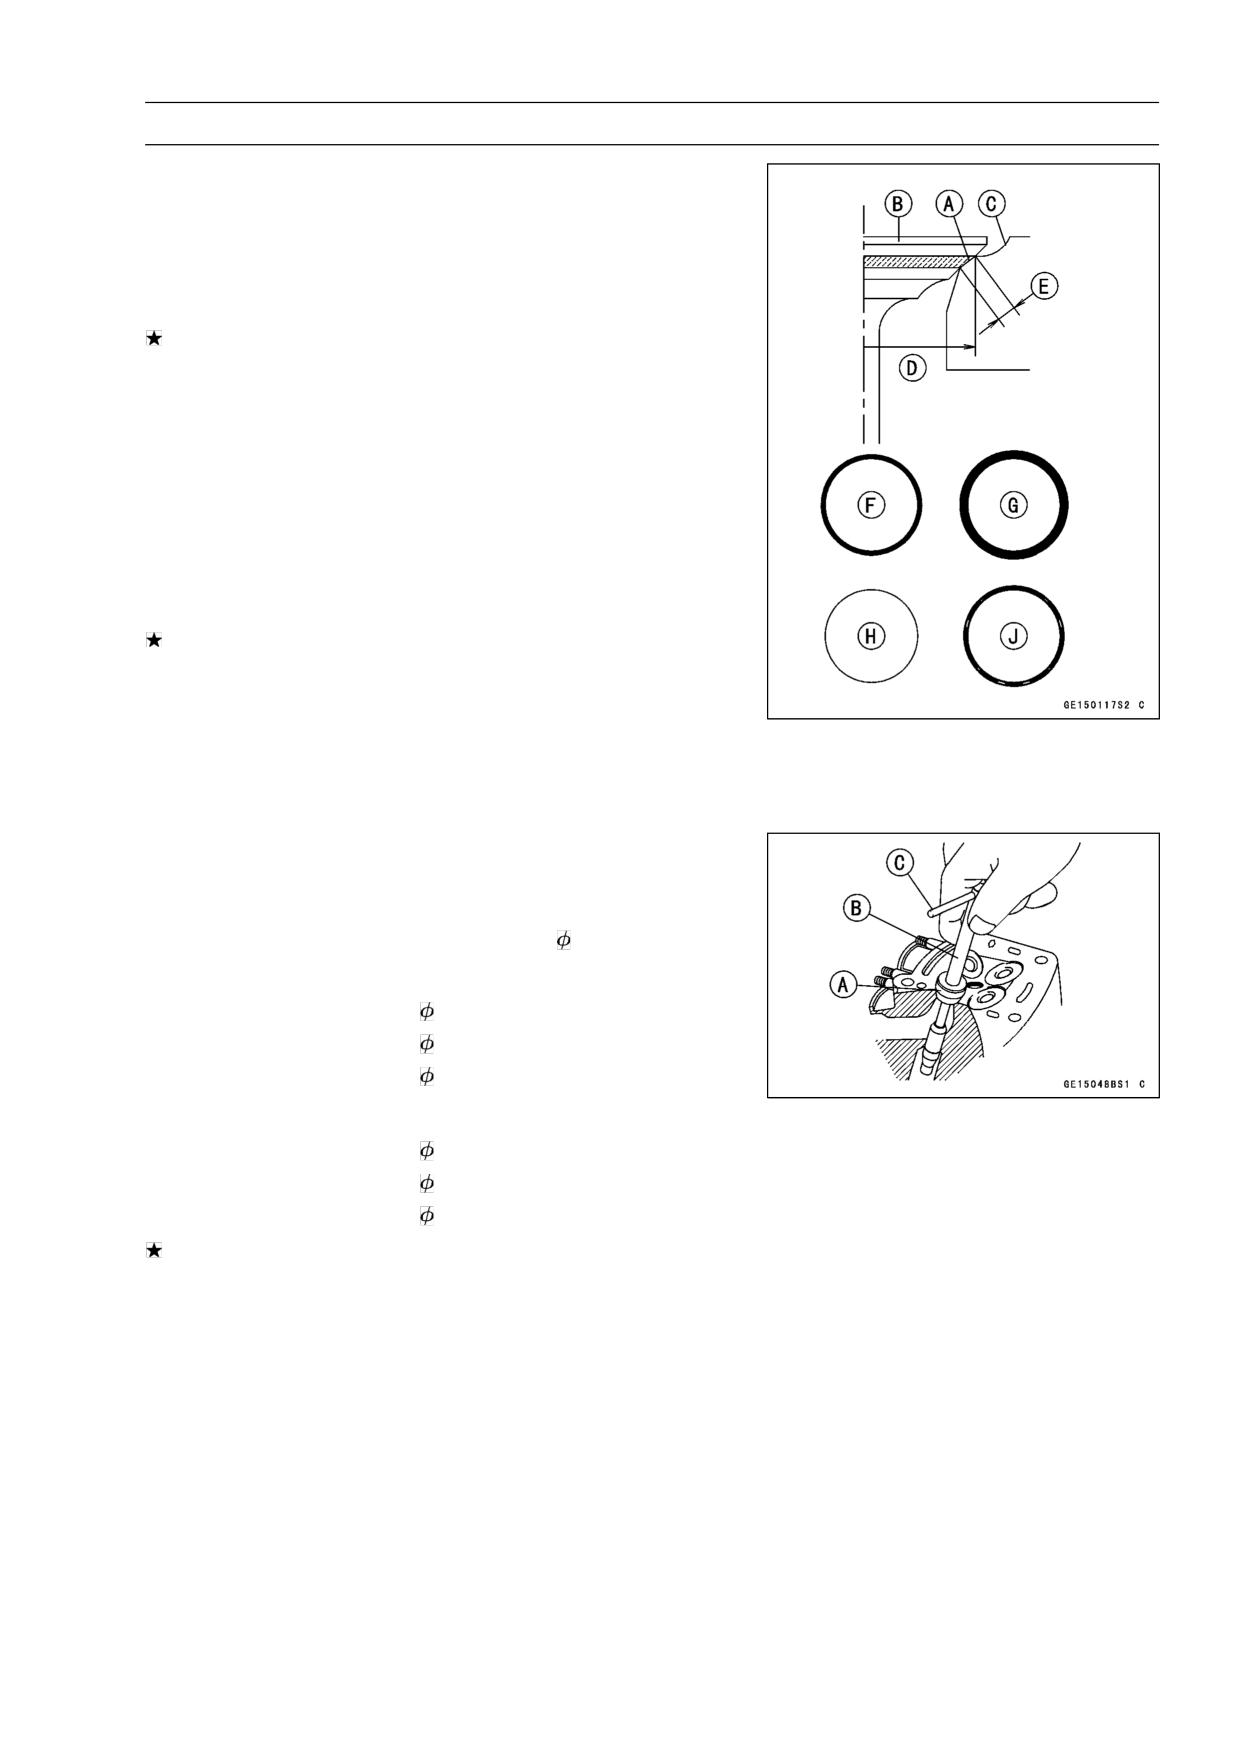
ENGINE TOP END 5-31
Valves
Valve Seat Inspection
• Remove the valve (see Valve Removal).
• Check the valve seating surface [A] between the valve [B]
and valve seat [C].
○Measure the outside diameter [D] of the seating pattern
on the valve seat.
If the outside diameter is too large or too small, repair the
seat (see Valve Seat Repair).
Valve Seating Surface Outside Diameter
Standard:
Exhaust
27.6 ∼ 27.8 mm (1.087 ∼ 1.094 in.)
Inlet
32.6 ∼ 32.8 mm (1.283 ∼ 1.291 in.)
○Measure the seat width [E] of the portion where there is
no build-up carbon (white portion) of the valve seat with a
vernier caliper.
Good [F]
If the width is too wide [G], too narrow [H] or uneven [J],
repair the seat (see Valve Seat Repair).
Valve Seating Surface Width
Standard:
Exhaust
0.5 ∼ 1.0 mm (0.020 ∼ 0.039 in.)
Inlet
0.5 ∼ 1.0 mm (0.020 ∼ 0.039 in.)
Valve Seat Repair
• Repair the valve seat with the valve seat cutters [A].
Special Tools - Valve Seat Cutter Holder Bar [C]: 57001-1128
Valve Seat Cutter Holder,
4.5 [B]: 57001-1330
For Exhaust Valve Seat
Valve Seat Cutter, 45° -
30: 57001-1187
Valve Seat Cutter, 32° -
30: 57001-1120
Valve Seat Cutter, 60° -
30: 57001-1123
For Inlet Valve Seat
Valve Seat Cutter, 45° -
35: 57001-1116
Valve Seat Cutter, 32° -
35: 57001-1121
Valve Seat Cutter, 55° -
35: 57001-1247
If the manufacturer’s instructions are not available, use
the following procedure.

5-32 ENGINE TOP END
Valves
Seat Cutter Operation Care
1. This valve seat cutter is developed to grind the valve for
repair. Therefore the cutter must not be used for other
purposes than seat repair.
2. Do not drop or shock the valve seat cutter, or the dia-
mond particles may fall off.
3. Do not fail to apply engine oil to the valve seat cutter
before grinding the seat surface. Also wash off ground
particles sticking to the cutter with washing oil.
NOTE
○Do not use a wire brush to remove the metal particles
from the cutter. It will take off the diamond particles.
4. Setting the valve seat cutter holder in position, operate
the cutter in one hand. Do not apply too much force to
the diamond portion.
NOTE
○Prior to grinding, apply engine oil to the cutter and dur-
ing the operation, wash off any ground particles sticking
to the cutter with washing oil.
5. After use, wash it with washing oil and apply thin layer
of engine oil before storing.
Marks Stamped on the Cutter
The marks stamped on the back of the cutter [A] represent
the following.
60°
Cutter angle [B]
37.5
Outer diameter of cutter [C]
Operating Procedures
• Clean the seat area carefully.
• Coat the seat with machinist’s dye.
• Fit a 45° cutter into the holder and slide it into the valve
guide.
• Press down lightly on the handle and turn it right or left.
Grind the seating surface only until it is smooth.
CAUTION
Do not grind the seat too much. Overgrinding will
reduce valve clearance by sinking the valve into the
head. If the valve sinks too far into the head, it will
be impossible to adjust the clearance, and the cylin-
der head must be replaced.
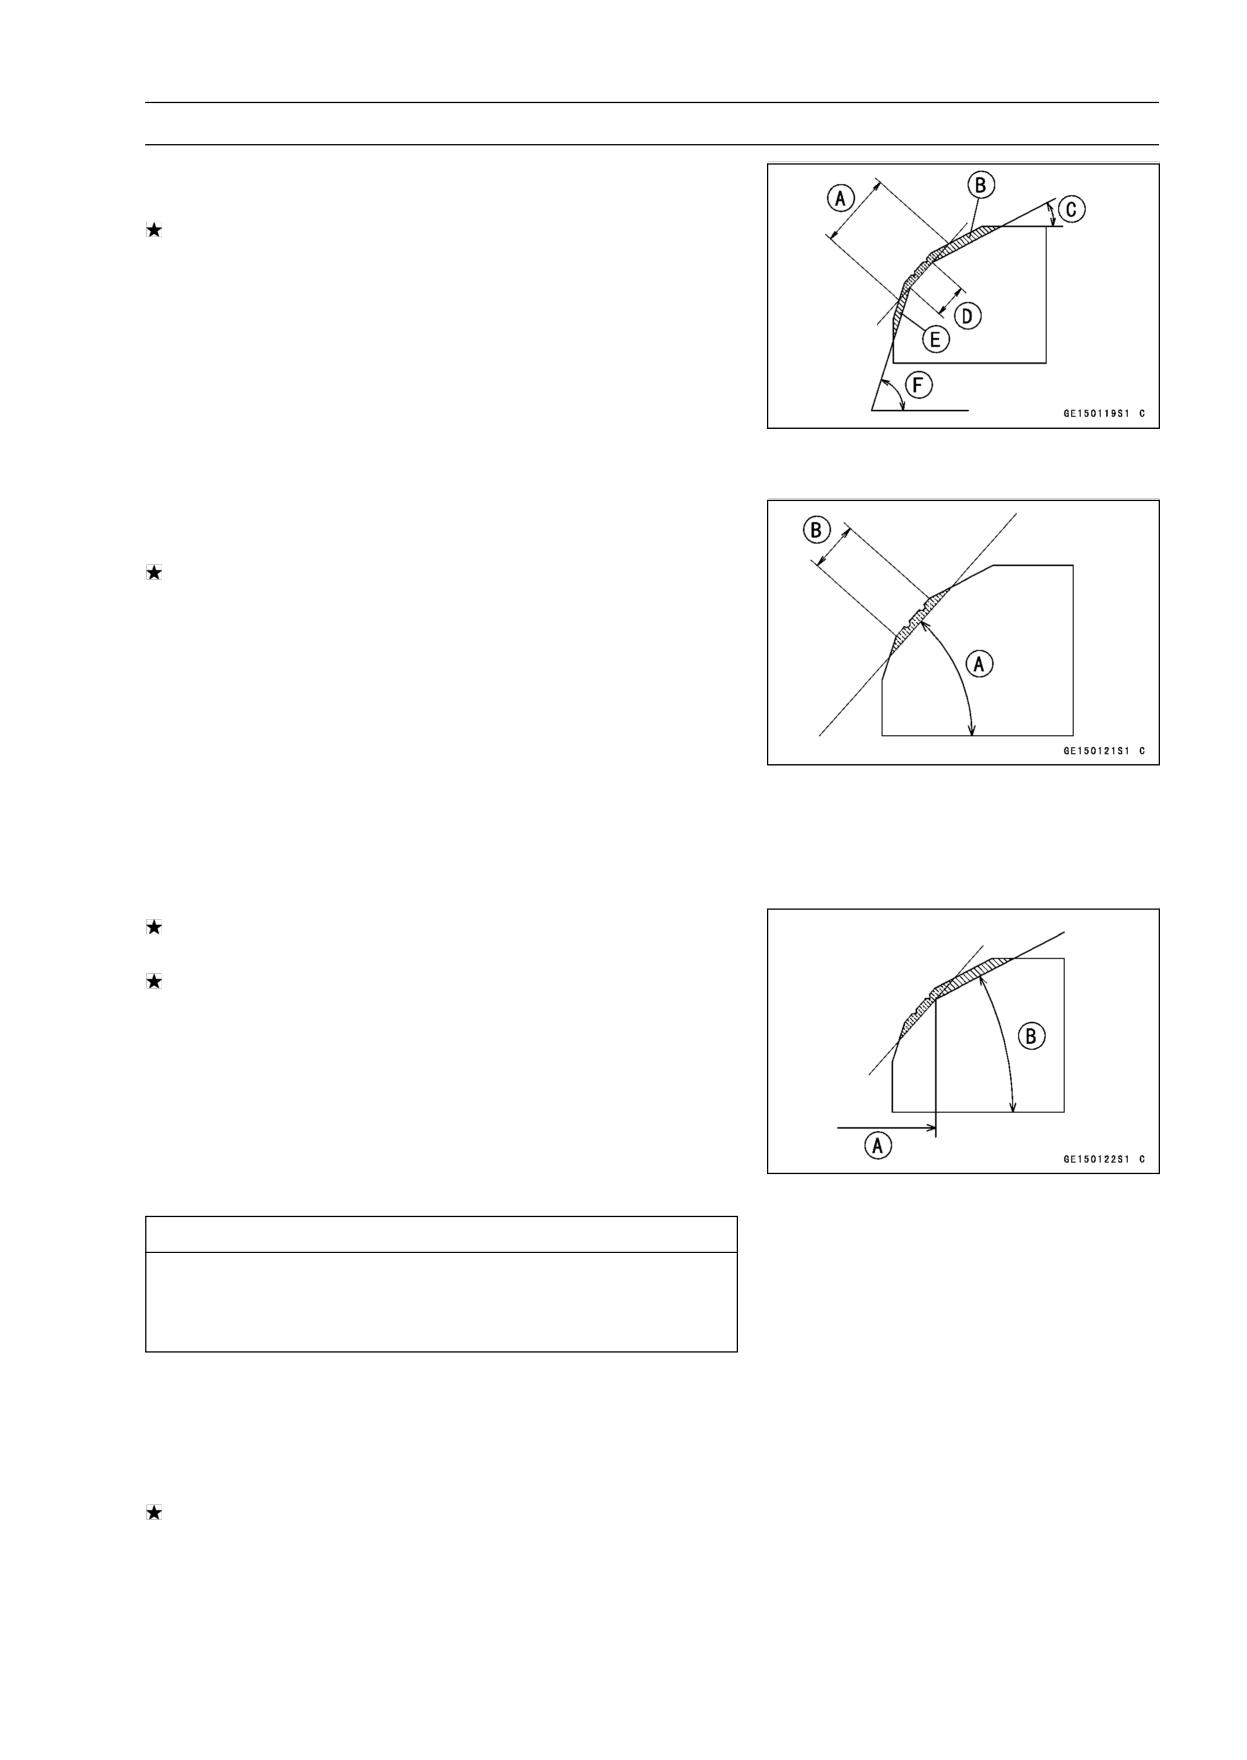
ENGINE TOP END 5-33
Valves
• Measure the outside diameter of the seating surface with
a vernier caliper.
If the outside diameter of the seating surface is too small,
repeat the 45° grind until the diameter is within the spec-
ified range.
Widened Width [A] of engagement by machining with
45° cutter
Ground Volume [B] by 32° cutter
32° [C]
Correct Width [D]
Ground Volume [E] by 60° or 55° cutter
60° or 55° [F]
• Measure the outside diameter of the seating surface with
a vernier caliper.
If the outside diameter of the seating surface is too small,
repeat the 45° grind [A] until the diameter is within the
specified range.
Original Seating Surface [B]
NOTE
○Remove all pittings of flaws from 45° ground surface.
○After grinding with 45° cutter, apply thin coat of machin-
ist’s dye to seating surface. This makes seating surface
distinct and 32° and 60° (or 55°) grinding operation eas-
ier.
○When the valve guide is replaced, be sure to grind with
45° cutter for centering and good contact.
If the outside diameter [A] of the seating surface is too
large, make the 32° grind described below.
If the outside diameter of the seating surface is within the
specified range, measure the seat width as described be-
low.
• Grind the seat at a 32° angle [B] until the seat outside
diameter is within the specified range.
○To make the 32° grind, fit a 32° cutter into the holder, and
slide it into the valve guide.
○Turn the holder one turn at a time while pressing down
very lightly. Check the seat after each turn.
CAUTION
The 32° cutter removes material very quickly.
Check the seat outside diameter frequently to pre-
vent overgrinding.
○After making the 32° grind, return to the seat outside di-
ameter measurement step above.
• To measure the seat width, use a vernier caliper to mea-
sure the width of the 45° angle portion of the seat at sev-
eral places around the seat.
If the seat width is too narrow, repeat the 45° grind until
the seat is slightly too wide, and then return to the seat
outside diameter measurement step above.

5-34 ENGINE TOP END
Valves
If the seat width is too wide, make the 60° or 55° [A] grind
described below.
If the seat width is within the specified range, lap the valve
to the seat as described below.
• Grind the seat at a 60° or 55° angle until the seat width is
within the specified range.
○To make the 60° or 55° grind, fit 60° or 55° cutter into the
holder, and slide it into the valve guide.
○Turn the holder, while pressing down lightly.
○After making the 60° or 55° grind, return to the seat width
measurement step above.
Correct Width [B]
• Lap the valve to the seat, once the seat width and outside
diameter are within the ranges specified above.
○Put a little coarse grinding compound on the face of the
valve in a number of places around the valve head.
○Spin the valve against the seat until the grinding com-
pound produces a smooth, matched surface on both the
seat and the valve.
○Repeat the process with a fine grinding compound.
Lapper [A]
Valve Seat [B]
Valve [C]
• The seating area should be marked about in the middle
of the valve face.
If the seat area is not in the right place on the valve, check
to be sure the valve is the correct part. If it is, it may have
been refaced too much; replace it.
• Be sure to remove all grinding compound before assem-
bly.
• When the engine is assembled, be sure to adjust the valve
clearance (see Valve Clearance Adjustment in the Peri-
odic Maintenance chapter).
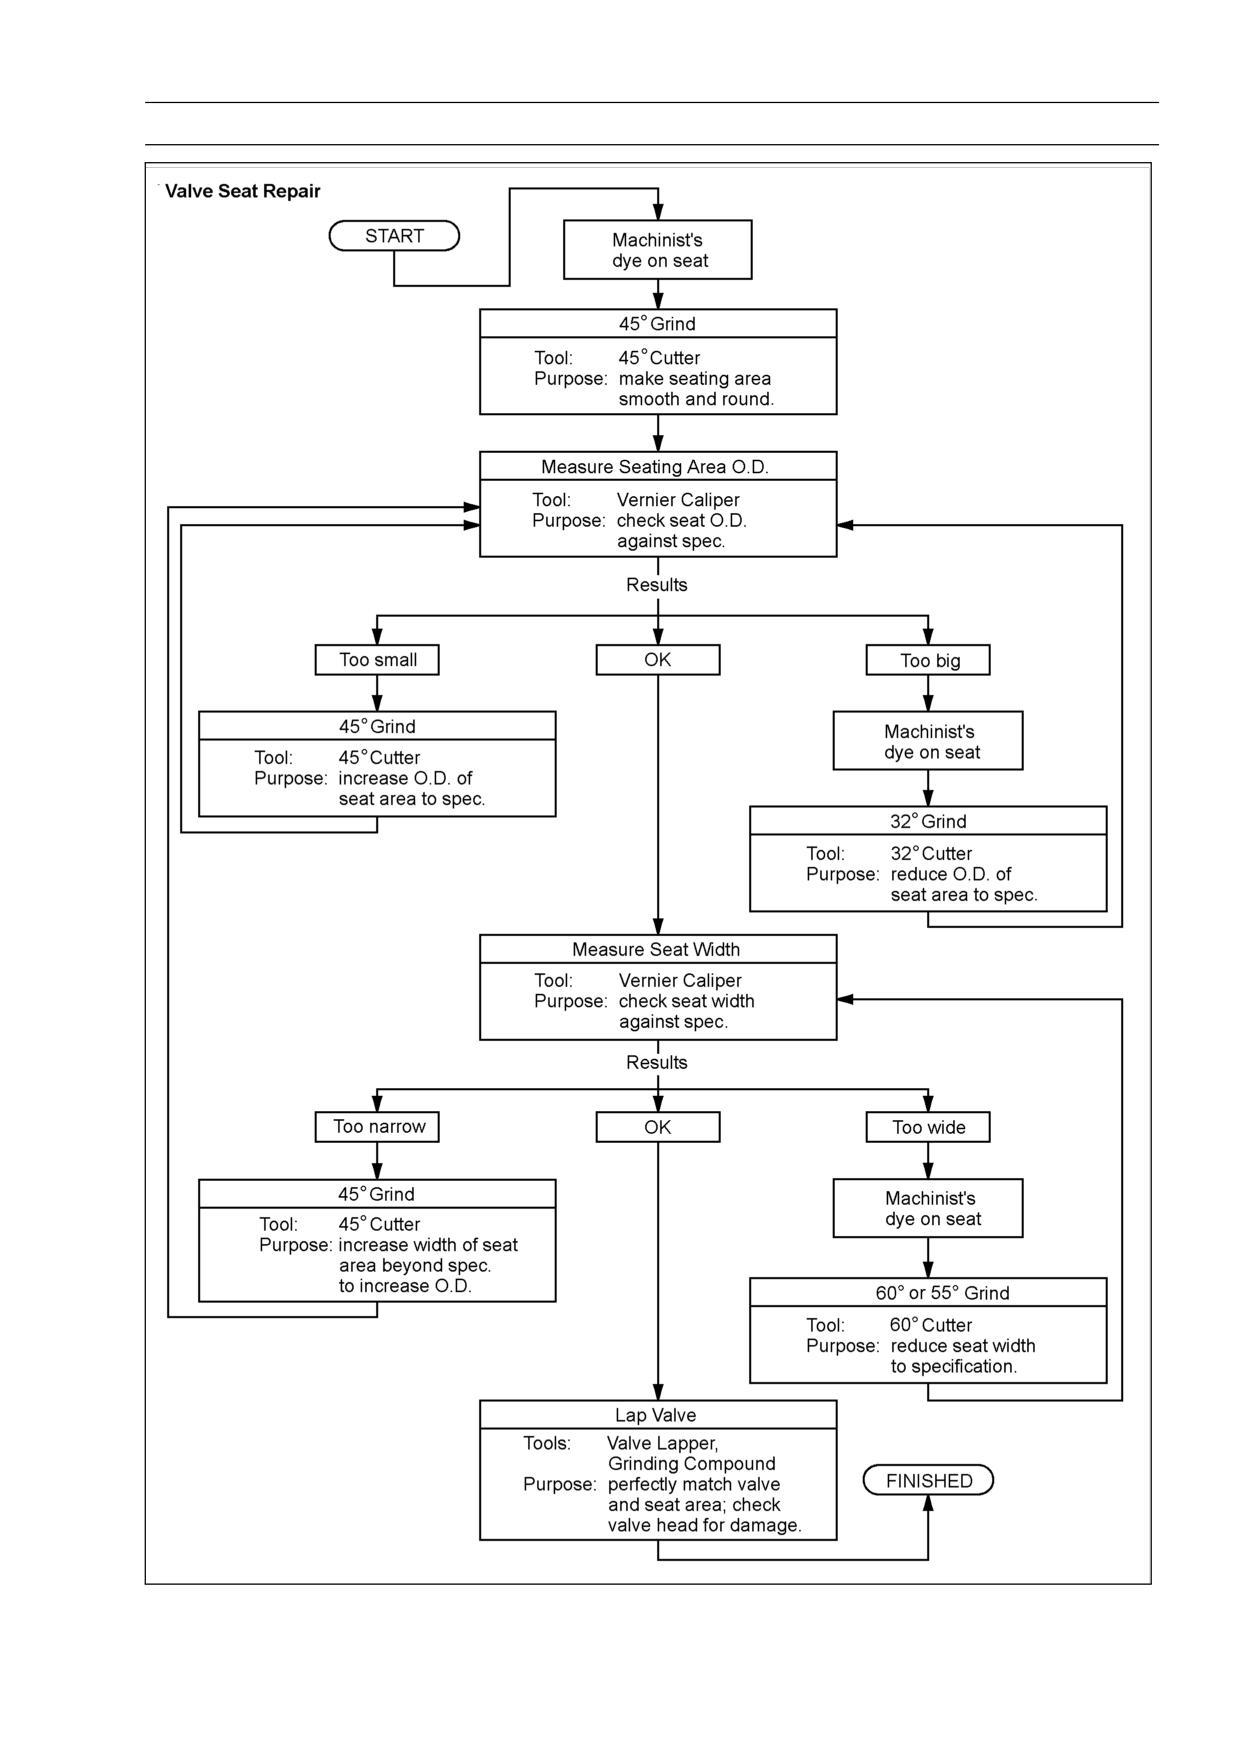
ENGINE TOP END 5-35
Valves
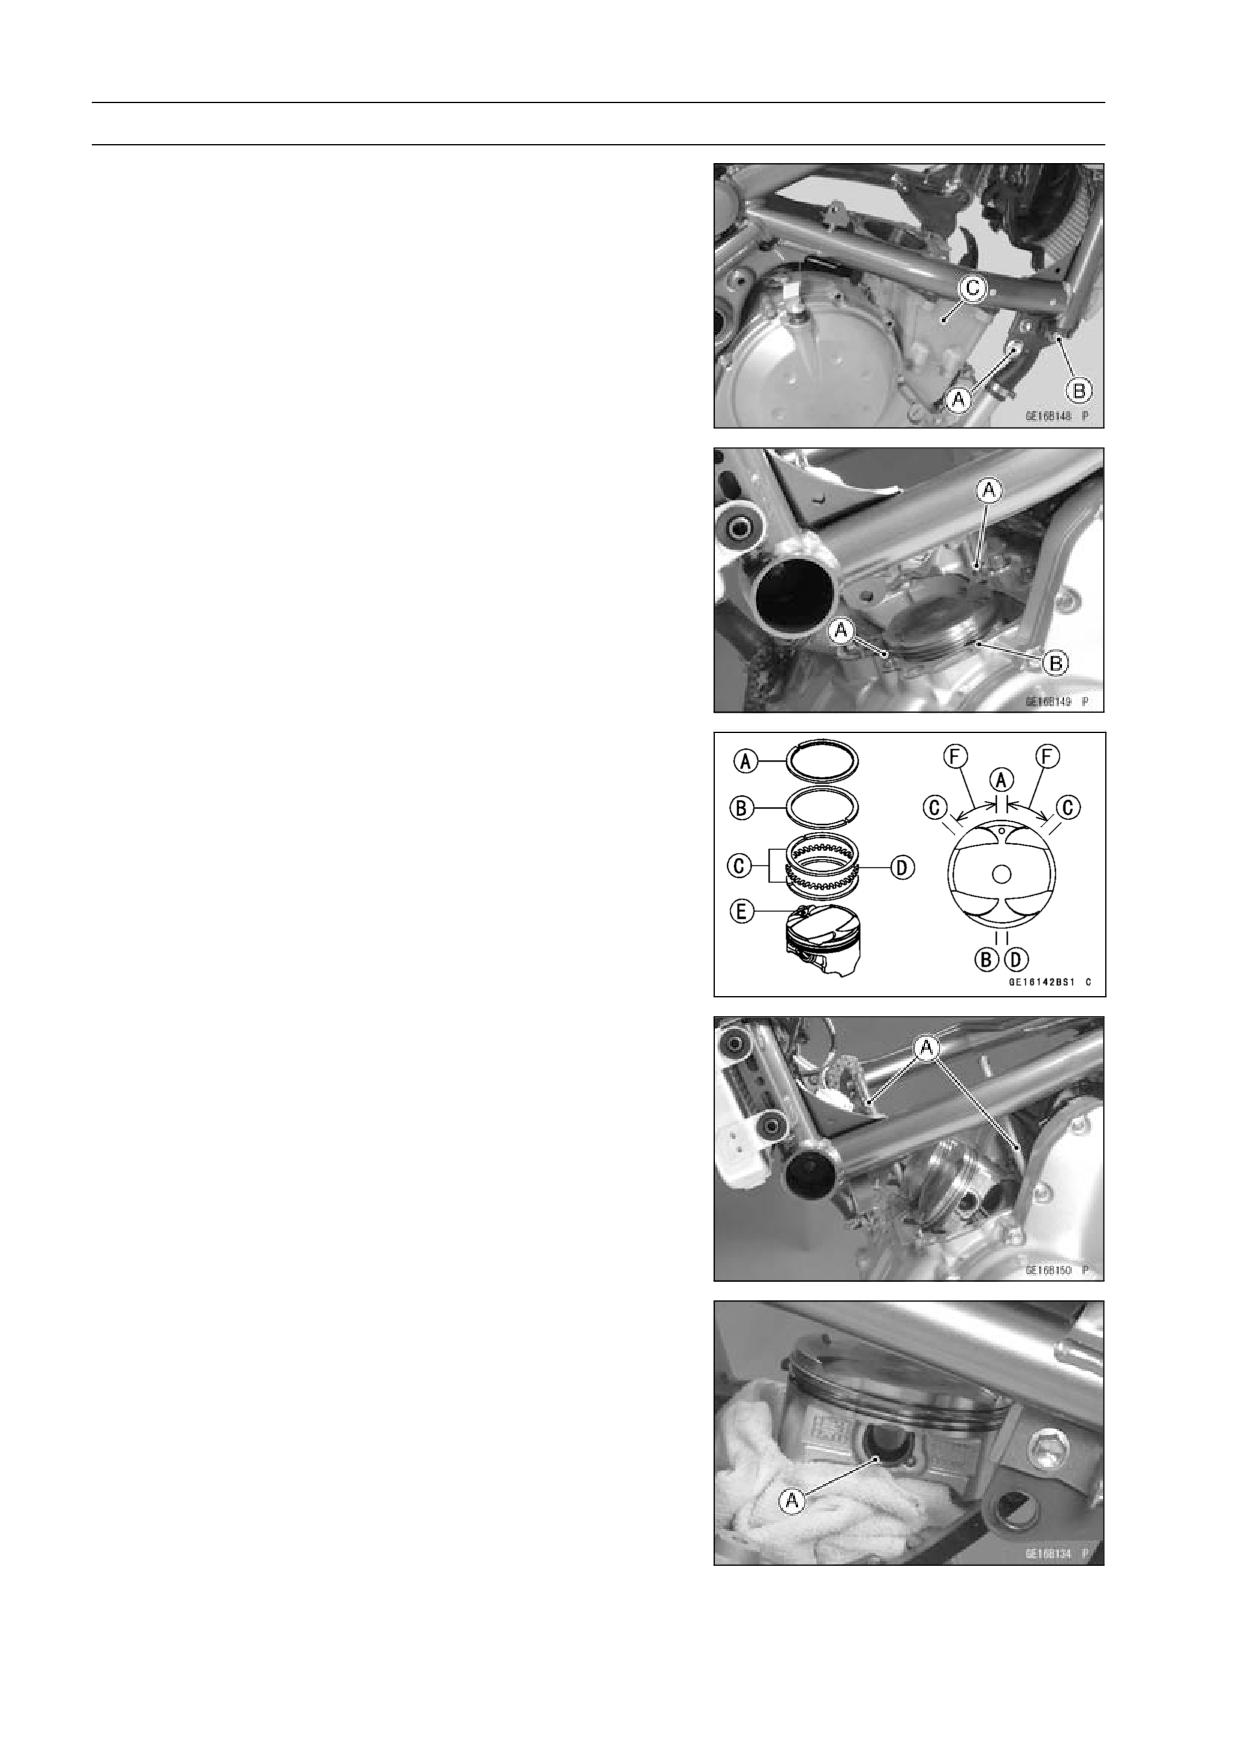
5-36 ENGINE TOP END
Cylinder, Pistons
Cylinder Removal
• Remove:
Cylinder Head (see Cylinder Head Removal)
Front Engine Mounting Bolts (Both Side) [A] (see Engine
Removal in the Engine Removal/Installation chapter)
Front Engine Brackets (Both Side) [B] (see Engine Re-
moval in the Engine Removal/Installation chapter)
Cylinder [C]
Cylinder Installation
NOTE
○If a new cylinder is used, use new piston ring.
• Install the dowel pins [A] and new cylinder gasket [B].
• The piston ring openings must be positioned as shown in
the figure. The openings of the oil ring steel rails must be
about 30 ∼ 40° of angle from the opening of the top ring.
Top Ring [A]
Second Ring [B]
Oil Ring Steel Rails [C]
Oil Ring Expander [D]
Hollow [E]
30 ∼ 40° [F]
• Apply molybdenum disulfide oil solution to the cylinder
bore, piston rings and piston.
• Prepare two auxiliary head bolts with their head cut.
○Install the two bolts [A] diagonally in the crankcase.
• Position the crankshaft so that all the piston heads are
almost level.
• Install the cylinder block.
○Insert the piston rings with your thumbs.
Piston Removal
• Remove the cylinder (see Cylinder Removal).
• Place a clean cloth under the pistons and remove the pis-
ton pin snap ring [A] from the outside of each piston.
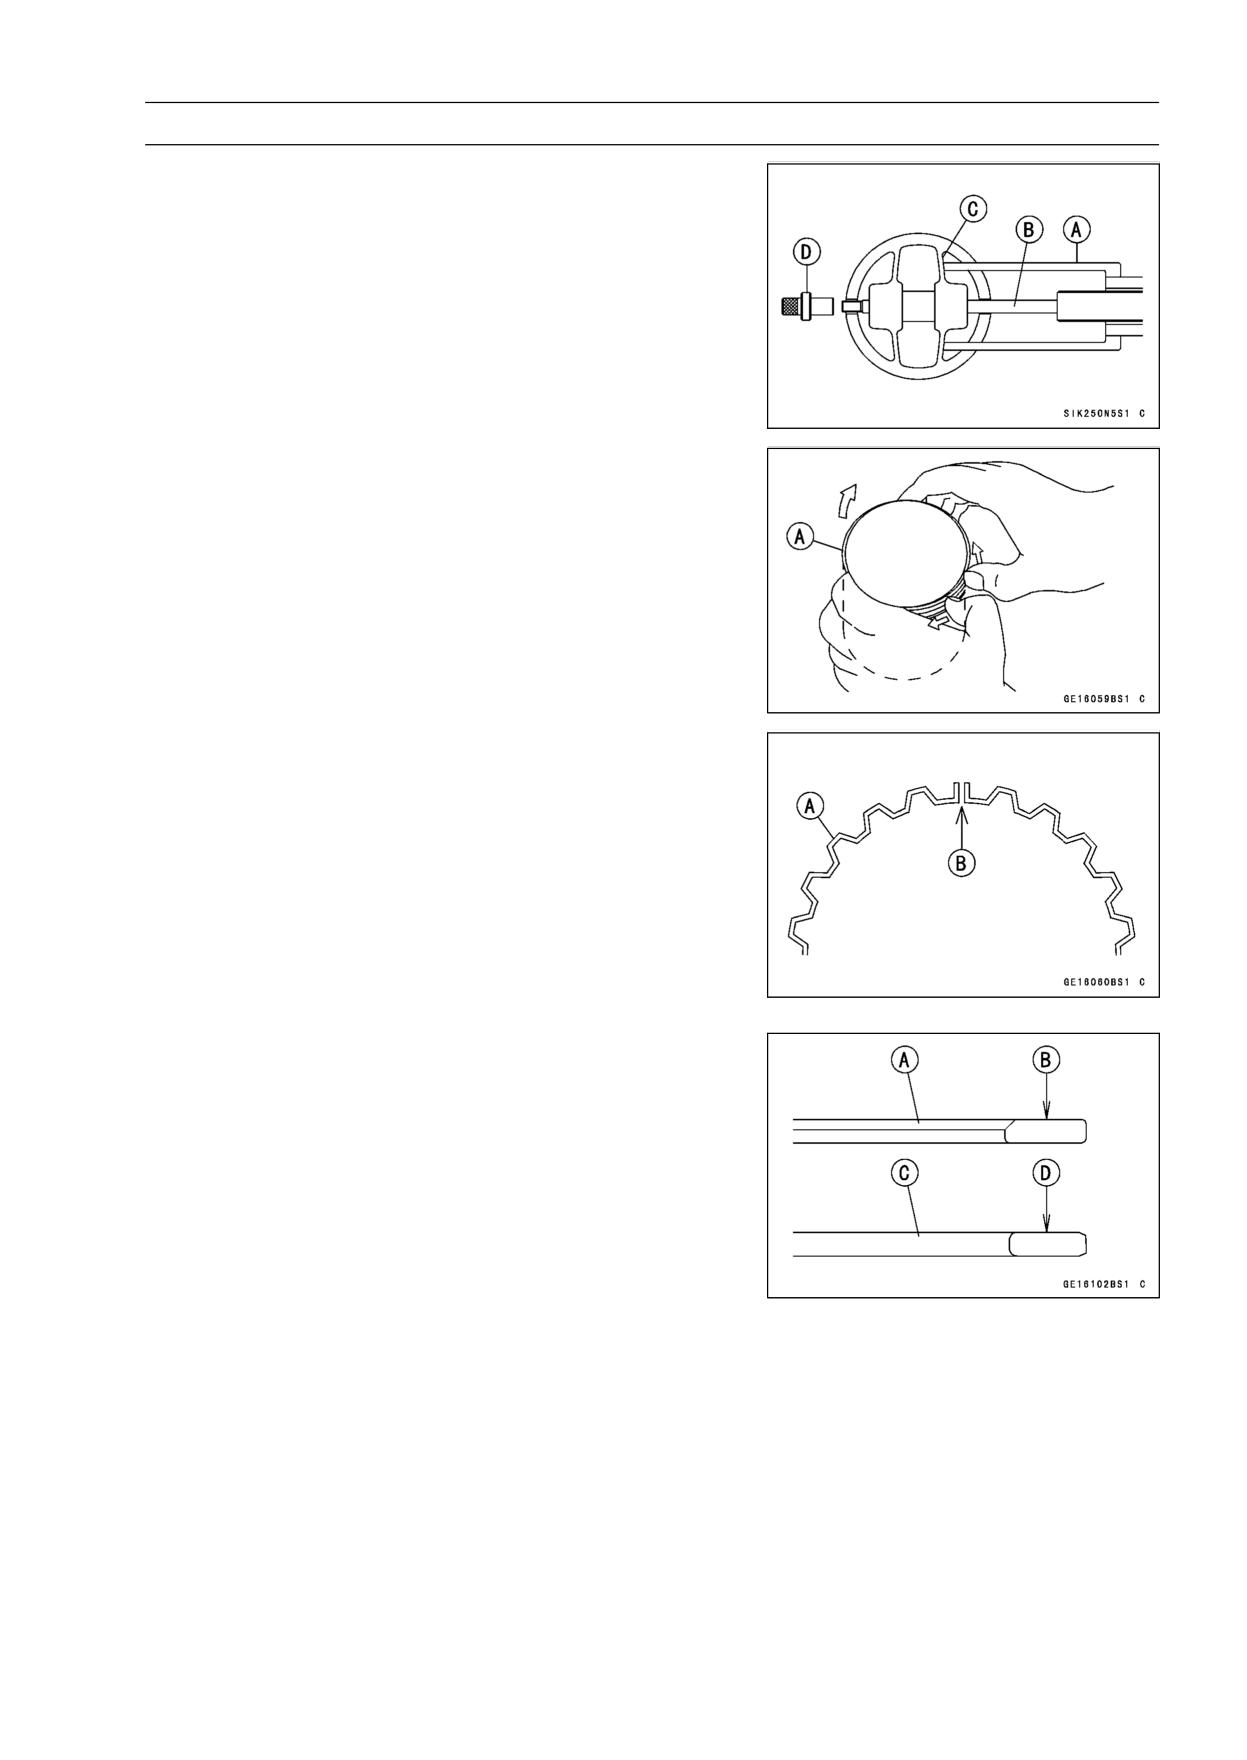
ENGINE TOP END 5-37
Cylinder, Pistons
• Remove the piston pins.
Special Tools - Piston Pin Puller [A]: 57001-1568
Piston Pin Puller Adapter C [D]: 57001-1657
Center Bolt [B]
Shall of Piston [C]
• Remove the pistons.
• Carefully spread the ring opening with your thumbs and
then push up on the opposite side of the ring [A] to remove
it.
• Remove the 3-piece oil ring with your thumbs in the same
manner.
Piston Installation
• Install the oil ring expander [A] in the bottom piston ring
groove so the ends [B] butt together.
• Install the oil ring steel rails, one above the expander and
one below it.
○Spread the rail with your thumbs, but only enough to fit
the rail over the piston.
○Release the rail into the bottom piston ring groove.
NOTE
○The oil ring rails have no “top” or “bottom”.
• Do not mix up the top and second ring.
• Install the top ring [A] so that the "R" mark [B] faces up.
• Install the second ring [C] so that the "RN" mark [D] faces
up.
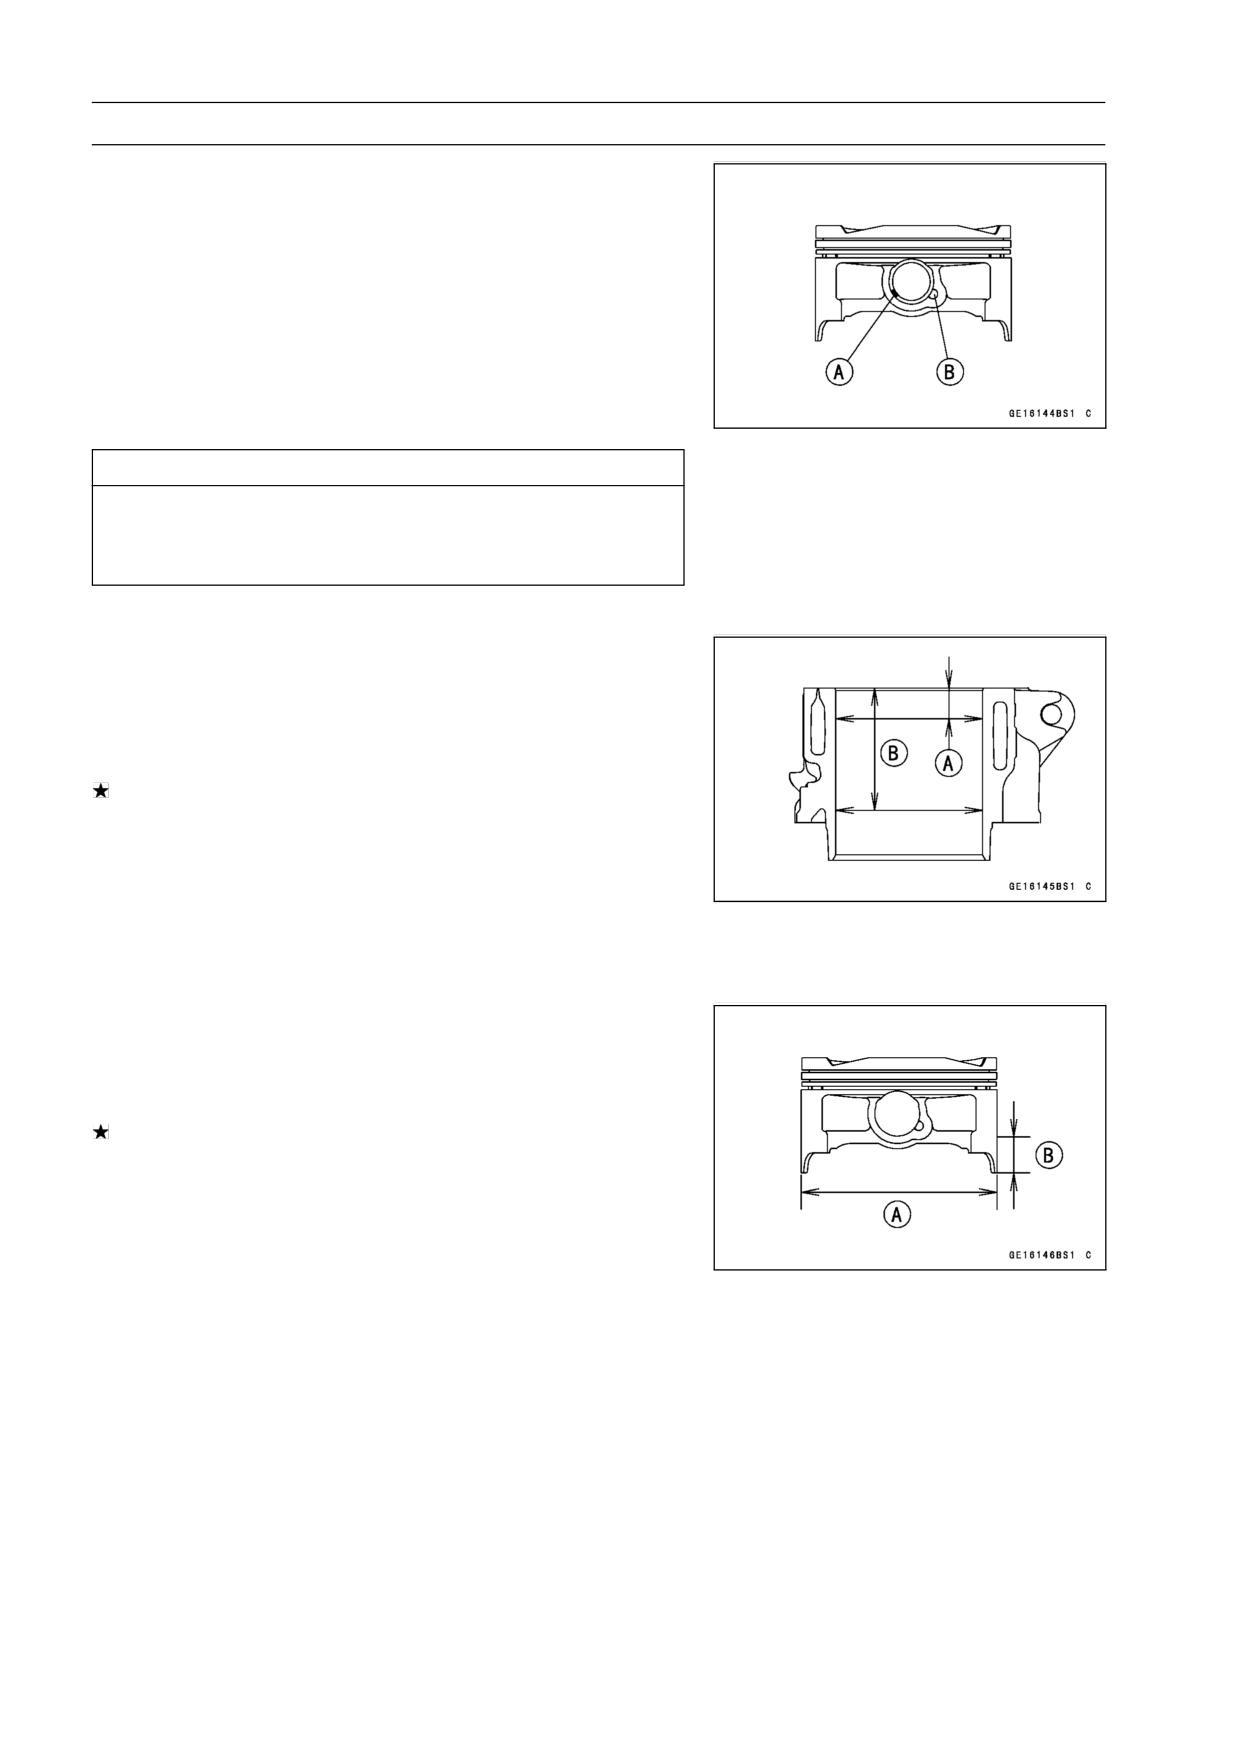
5-38 ENGINE TOP END
Cylinder, Pistons
NOTE
○If a new piston is used, use new piston ring.
• Install the piston with its marking hollow facing forward.
• Fit a new piston pin snap ring into the side of the piston
so that the ring opening [A] does not coincide with the slit
[B] of the piston pin hole.
○Apply molybdenum disulfide oil solution to the piston pins
and piston journals.
○When installing the piston pin snap ring, compress it only
enough to install it and no more.
CAUTION
Do not reuse snap rings, as removal weakens and
deforms them. They could fall out and score the
cylinder wall.
• Install the cylinder (see Cylinder Installation).
Cylinder Wear
• Since there is a difference in cylinder wear in different di-
rections, take a side-to-side and a front-to-back measure-
ment at each of the two locations (total of four measure-
ments) shown in the figure.
If any of the cylinder inside diameter measurements ex-
ceeds the service limit, replace the cylinder.
10 mm (0.39 in.) [A]
60 mm (2.36 in.) [B]
Cylinder Inside Diameter
Standard:
82.994 ∼ 83.006 mm (3.2675 ∼ 3.2679 in.)
Service Limit:
83.10 mm (3.2716 in.)
Piston Wear
• Measure the outside diameter [A] of each piston 18 mm
(0.7087 in.) [B] up from the bottom of the piston at a right
angle to the direction of the piston pin.
If the measurement is under service limit, replace the pis-
ton.
Piston Diameter
Standard:
82.969 ∼ 82.984 mm (3.2665 ∼ 3.2671 in.)
Service Limit:
82.82 mm (3.2606 in.)
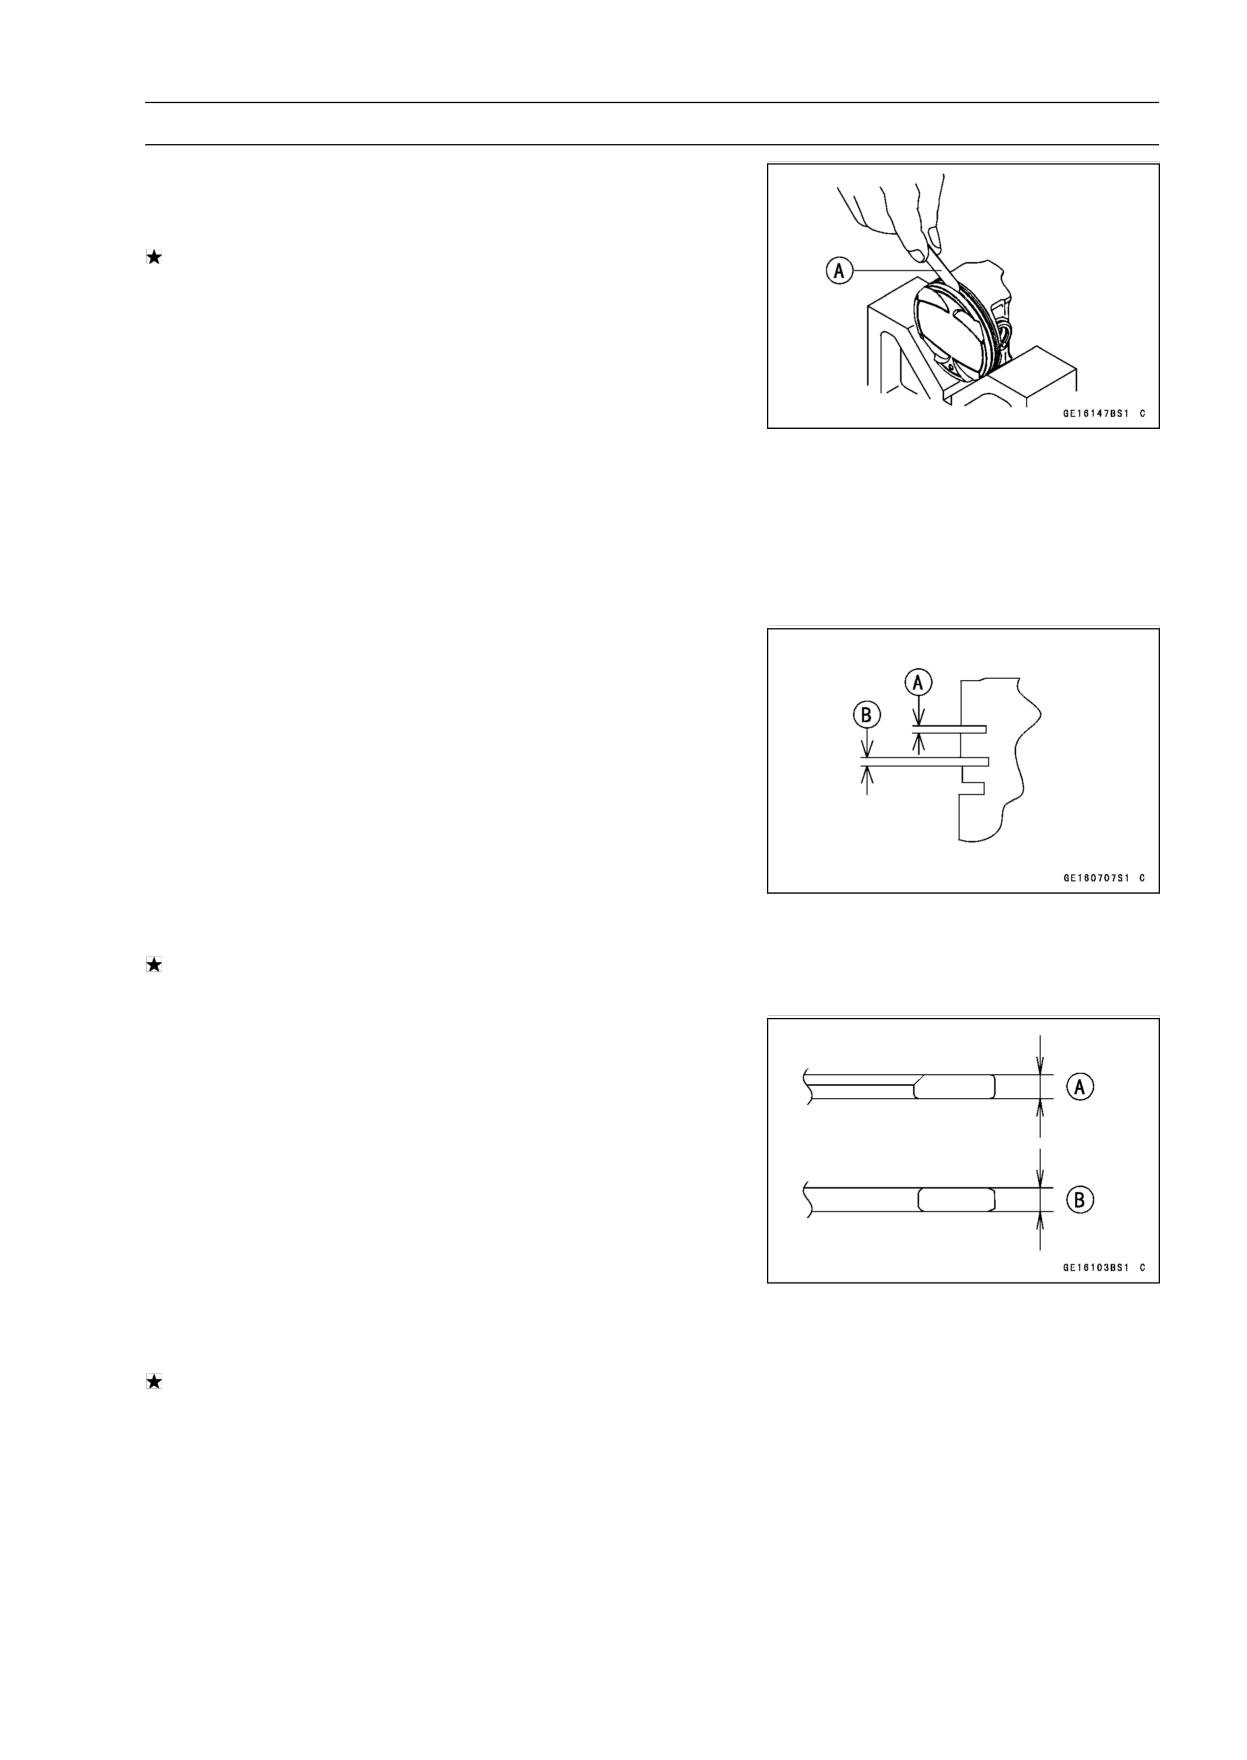
ENGINE TOP END 5-39
Cylinder, Pistons
Piston Ring, Piston Ring Groove Wear
• Check for uneven groove wear by inspecting the ring seat-
ing.
The rings should fit perfectly parallel to groove surfaces.
If not, replace the piston and all the piston rings.
• With the piston rings in their grooves, make several mea-
surements with a thickness gauge [A] to determine piston
ring/groove clearance.
Piston Ring/Groove Clearance
Top
Standard:
0.03 ∼ 0.07 mm (0.0012 ∼ 0.0028 in.)
Service Limit: 0.17 mm (0.0067 in.)
Second
Standard:
0.02 ∼ 0.06 mm (0.0008 ∼ 0.0024 in.)
Service Limit:
0.16 mm (0.0063 in.)
Piston Ring Groove Width
• Measure the piston ring groove width.
○Use a vernier caliper at several points around the piston.
Piston Ring Groove Width
Top [A]
Standard:
0.92 ∼ 0.94 mm (0.0362 ∼ 0.0370 in.)
Service Limit: 1.02 mm (0.040 in.)
Second [B]
Standard:
1.01 ∼ 1.03 mm (0.0398 ∼ 0.0406 in.)
Service Limit: 1.11 mm (0.044 in.)
If the width of any of the two grooves is wider than the
service limit at any point, replace the piston.
Piston Ring Thickness
• Measure the piston ring thickness.
○Use the micrometer to measure at several points around
the ring.
Piston Ring Thickness
Top [A]
Standard:
0.87 ∼ 0.89 mm (0.0342 ∼ 0.0350 in.)
Service Limit: 0.80 mm (0.031 in.)
Second [B]
Standard:
0.97 ∼ 0.99 mm (0.0382 ∼ 0.0390 in.)
Service Limit: 0.90 mm (0.035 in.)
If any of the measurements is less than the service limit
on either of the rings, replace all the rings.
NOTE
○When using new rings in a used piston, check for un-
even groove wear. The rings should fit perfectly parallel
to the groove sides. If not, replace the piston.
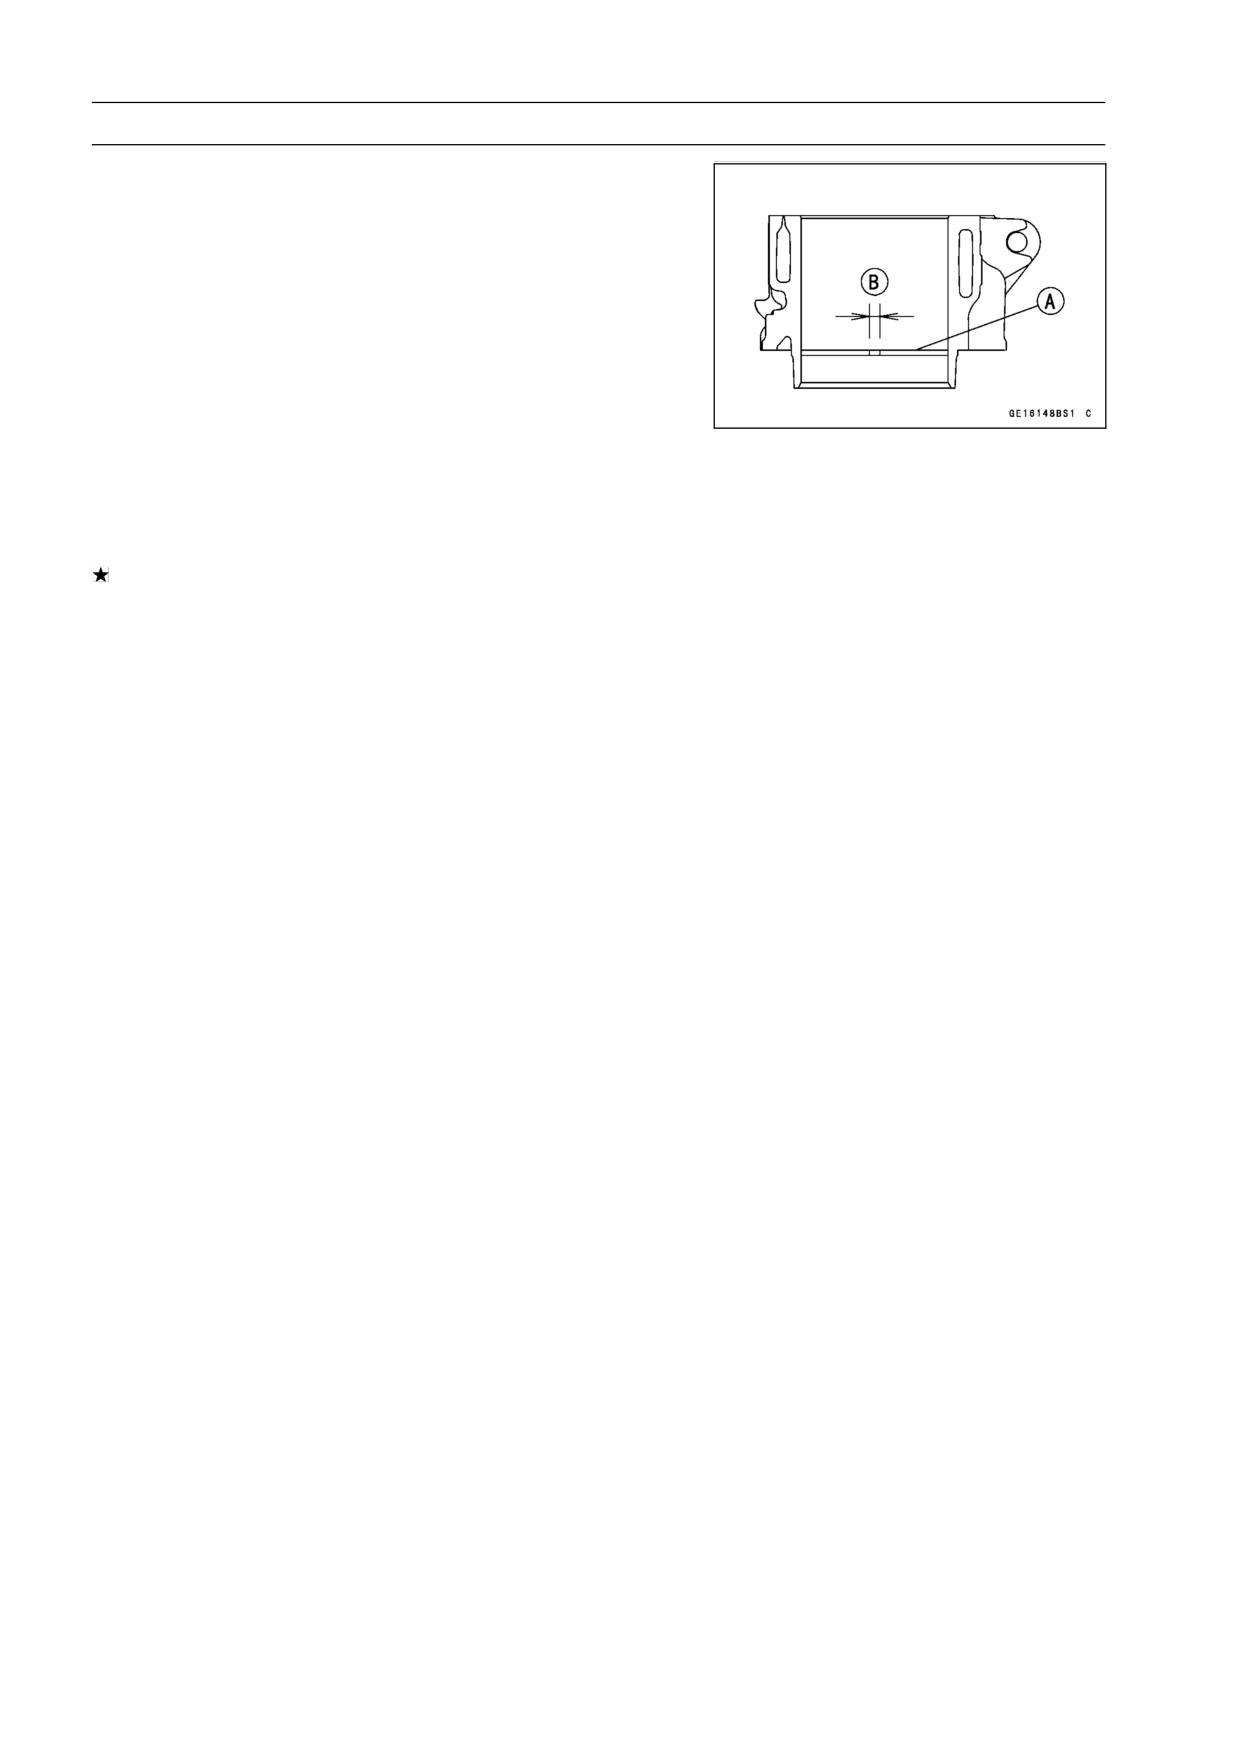
5-40 ENGINE TOP END
Cylinder, Pistons
Piston Ring End Gap
• Place the piston ring [A] inside the cylinder, using the pis-
ton to locate the ring squarely in place. Set it close to the
bottom of the cylinder, where cylinder wear is low.
• Measure the gap [B] between the ends of the ring with a
thickness gauge.
Piston Ring End Gap
Top
Standard:
0.25 ∼ 0.40 mm (0.0098 ∼ 0.0157 in.)
Service Limit: 0.7 mm (0.028 in.)
Second
Standard:
0.40 ∼ 0.55 mm (0.0157 ∼ 0.0217 in.)
Service Limit: 0.8 mm (0.031 in.)
If the end gap of either ring is greater than the service
limit, replace all the rings.
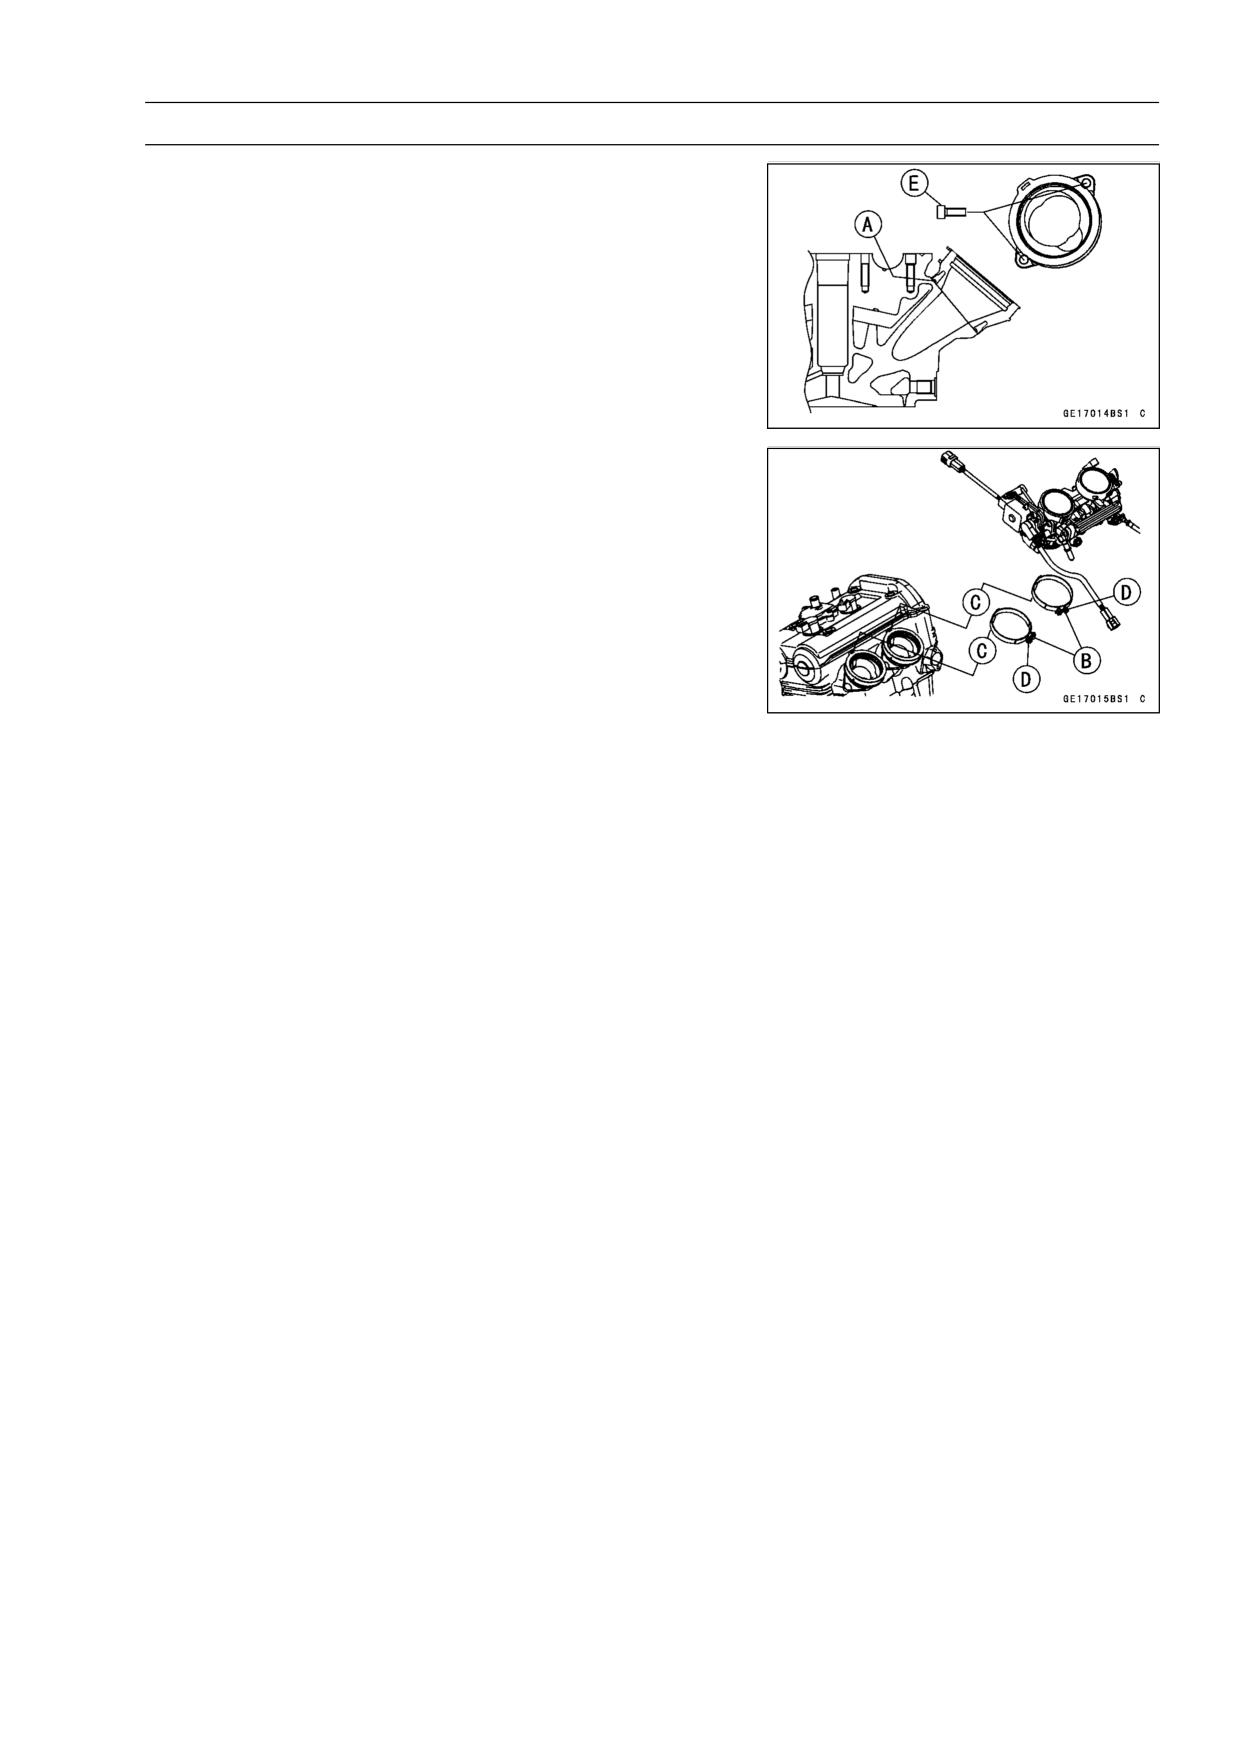
ENGINE TOP END 5-41
Throttle Body Holder
Throttle Body Holder Installation
• Be sure to install the O-rings [A].
• Install the clamps [B] as shown and so that their projec-
tions fit [C] on the holes of the holders.
○Be sure that the clamp bolt heads [D] face outwards.
• Tighten:
Torque - Throttle Body Holder Bolts [E]: 12 N·m (1.2 kgf·m,
106 in·lb)