Kawasaki ZZR 1400, ZZR1400 ABS, Ninja ZX-14 Motorcycle. Service Manual (2006-2007 year) - page 1
1-12 GENERAL INFORMATION
General Specifications
Items
ZX1400A6F, ZX1400B6F
Dimensions
Overall Length
2 170 mm (85.4 in.)
Overall Width
760 mm (29.9 in.)
Overall Height
1 170 mm (46.1 in.)
Wheelbase
1 460 mm (57.4 in.)
Road Clearance
125 mm (4.9 in.)
Seat Height
800 mm (31.5 in.)
Dry Mass:
ZX1400A6F
215 kg (474 lb)
ZX1400B6F
218 kg (481 lb)
Curb Mass:
Front
ZX1400A6F
125 kg (276 lb)
ZX1400B6F
126 kg (278 lb)
Rear
ZX1400A6F
127 kg (280 lb)
ZX1400B6F
129 kg (284 lb)
Fuel Tank Capacity
22 L (5.8 US gal)
Performance
Minimum Turning Radius
3.1 m (10.2 ft)
Engine
Type
4-stroke, DOHC, 4-cylinder
Cooling System
Liquid-cooled
Bore and Stroke
84.0 × 61.0 mm (3.3 × 2.4 in.)
Displacement
1 352 cm³ (82.5 cu in.)
Compression Ratio
12.0 : 1
Maximum Horsepower
140.0 kW (190 PS) @9 500 r/min (rpm),
(FR) 78.2 kW (106 PS) @8 500 r/min (rpm),
(MY) 132.6 kW (180 PS) @9 000 r/min (rpm),
(CA, CAL, US) - - -
Maximum Torque
154 N·m (15.7 kgf·m, 114 ft·lb) @7 500 r/min (rpm),
(FR) 114 N·m (11.6 kgf·m, 84 ft·lb) @4 500 r/min (rpm),
(MY) 147.4 N·m (15.0 kgf·m, 109 ft·lb) @7 500 r/min (rpm),
(CA), (CAL), (US) - - -
Carburetion System
FI (Fuel injection), MIKUNI 44EIDW × 4
Starting System
Electric starter
Ignition System
Battery and coil (transistorized)
Timing Advance
Electronically advanced (digital igniter in ECU)
Ignition Timing
From 10° BTDC @1 100 r/min (rpm)
Spark Plug
NGK CR9EIA-9
Cylinder Numbering Method
Left to right, 1-2-3-4
Firing Order
1-2-4-3
GENERAL INFORMATION 1-13
General Specifications
Items
ZX1400A6F, ZX1400B6F
Valve Timing:
Inlet:
Open
41° (BTDC)
Close
71° (ABDC)
Duration
292°
Exhaust:
Open
64° (BBDC)
Close
34° (ATDC)
Duration
278°
Lubrication System
Forced lubrication (wet sump with cooler)
Engine Oil:
Type
API SE, SF or SG
API SH, SJ or SL with JASO MA
Viscosity
SAE10W-40
Capacity
4.5 L (4.8 US qt)
Drive Train
Primary Reduction System:
Type
Gear
Reduction Ratio
1.541 (94/61)
Clutch Type
Wet multi disc
Transmission:
Type
6-speed, constant mesh, return shift
Gear Ratios:
1st
2.625 (42/16)
2nd
1.947 (37/19)
3rd
1.545 (34/22)
4th
1.333 (32/24)
5th
1.154 (30/26)
6th
1.036 (29/28)
Final Drive System:
Type
Chain drive
Reduction Ratio
2.412 (41/17)
Overall Drive Ratio
3.849 @Top gear
Frame
Type
Press, backbone
Caster (Rake Angle)
23°
Trail
94 mm (3.7 in.)
Front Tire:
Type
Tubeless
Size
120/70 ZR17 M/C (58 W)
Rear Tire:
Type
Tubeless
Size
190/50 ZR17 M/C (73 W)
1-14 GENERAL INFORMATION
General Specifications
Items
ZX1400A6F, ZX1400B6F
Rim Size:
Front
17 × 3.50
Rear
17 × 6.00
Front Suspension:
Type
Telescopic fork (upside-down)
Wheel Travel
117 mm (4.6 in.)
Rear Suspension:
Type
Swingarm (uni-trak)
Wheel Travel
122 mm (4.8 in.)
Brake Type:
Front
Dual discs
Rear
Single disc
Electrical Equipment
Battery
12 V 14 Ah
Headlight:
Type
Semi-sealed beam
Bulb:
High
12 V 55 W + 65 W (quartz-halogen) × 2
Low
12 V 55 W (quartz-halogen) × 2
Tail/Brake Light
12 V 0.5/4.9 W (LED)
Alternator:
Type
Three-phase AC
Rated Output
35 A/14 V @5 000 r/min (rpm)
Specifications subject to change without notice, and may not apply to every country.
GENERAL INFORMATION 1-15
Technical Information-CAN (Controller Area Network) Communication System
Overview
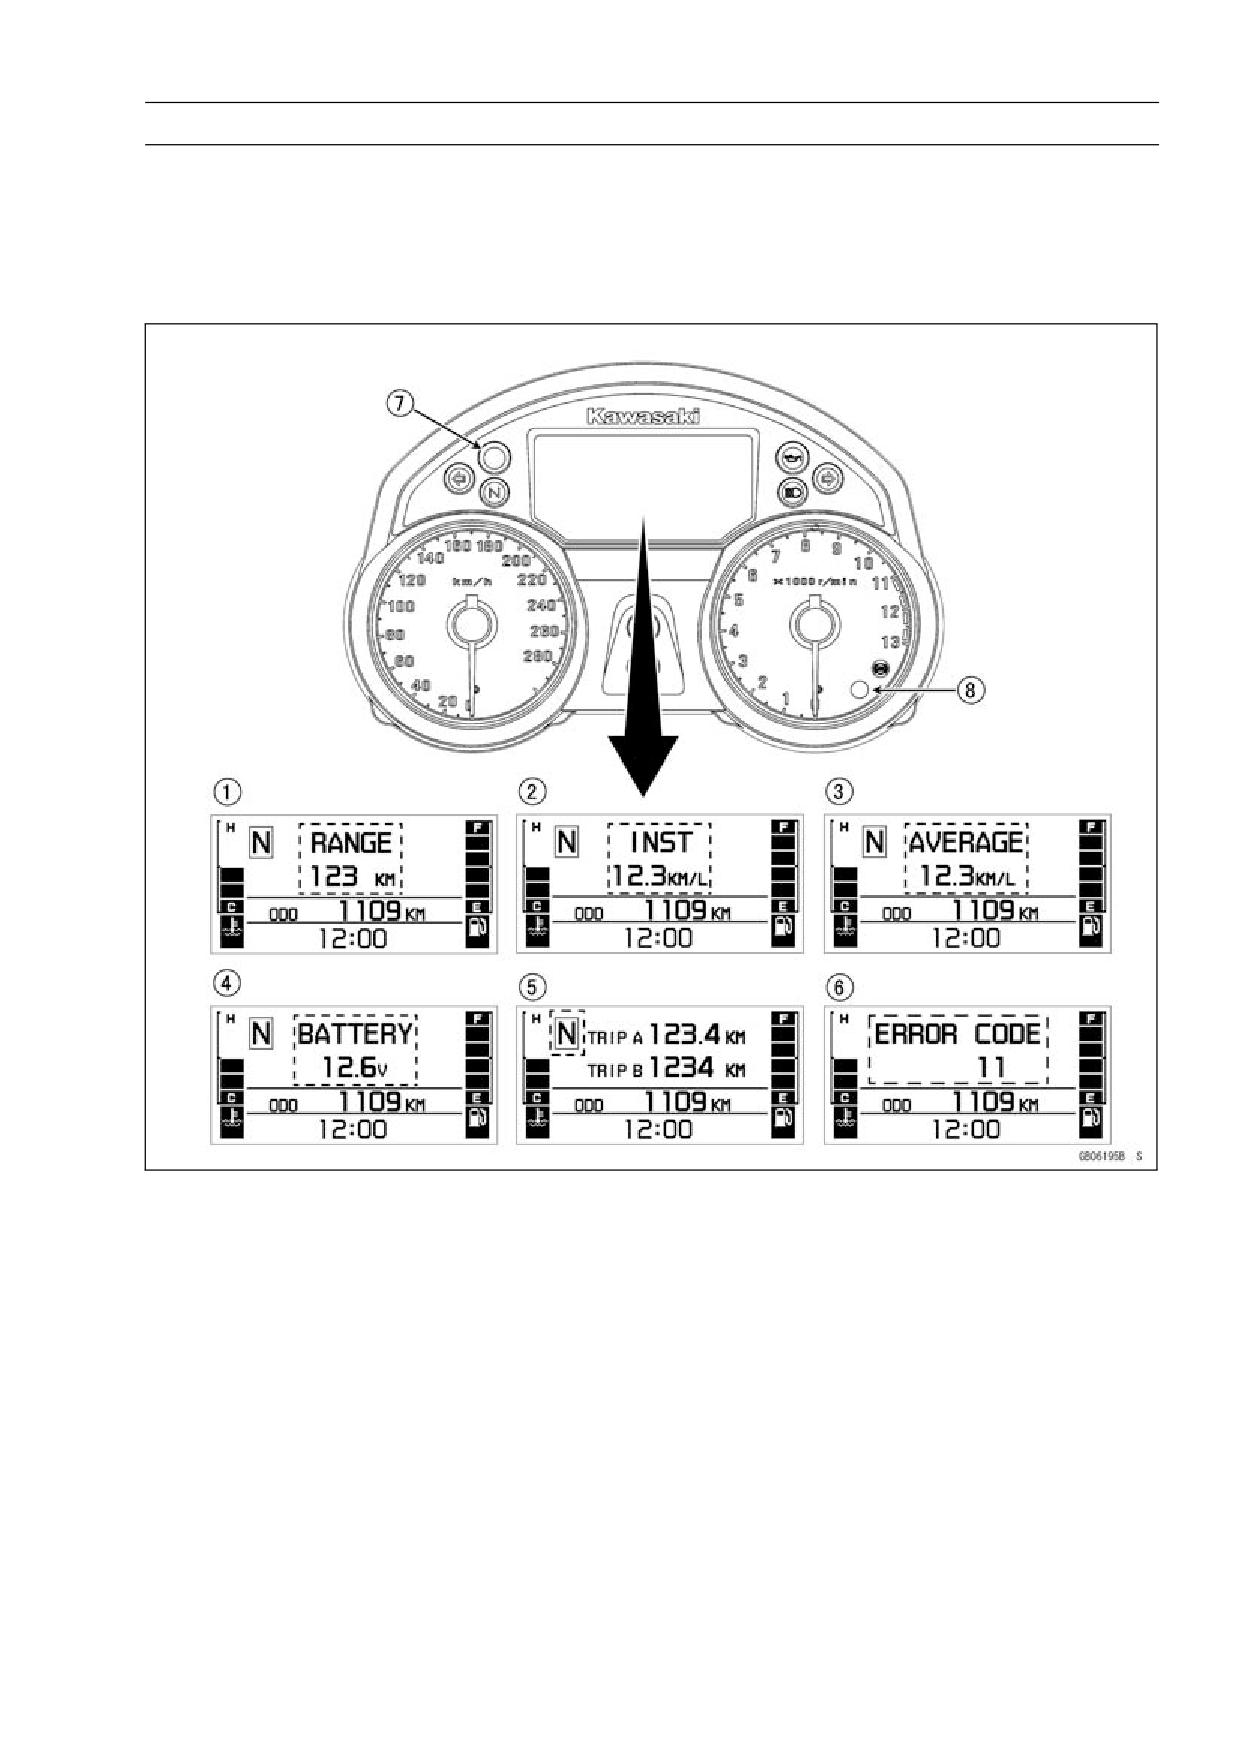
The CAN communication system is used for transmitting and receiving data that is sent to the meter
unit and ECU. A LCD (liquid crystal display) display in the meter unit displays information such as bat-
tery voltage, fuel consumption, and service codes in addition to the conventional indicator functions.
1. Meter Display
1. Fuel Mileage Range
5. Gear Position
2. Fuel Consumption (Current)
6. Service Code
3. Fuel Consumption (Average)
7. Immobilizer Registration
4. Battery Voltage
8. Clutch Engagement Timing
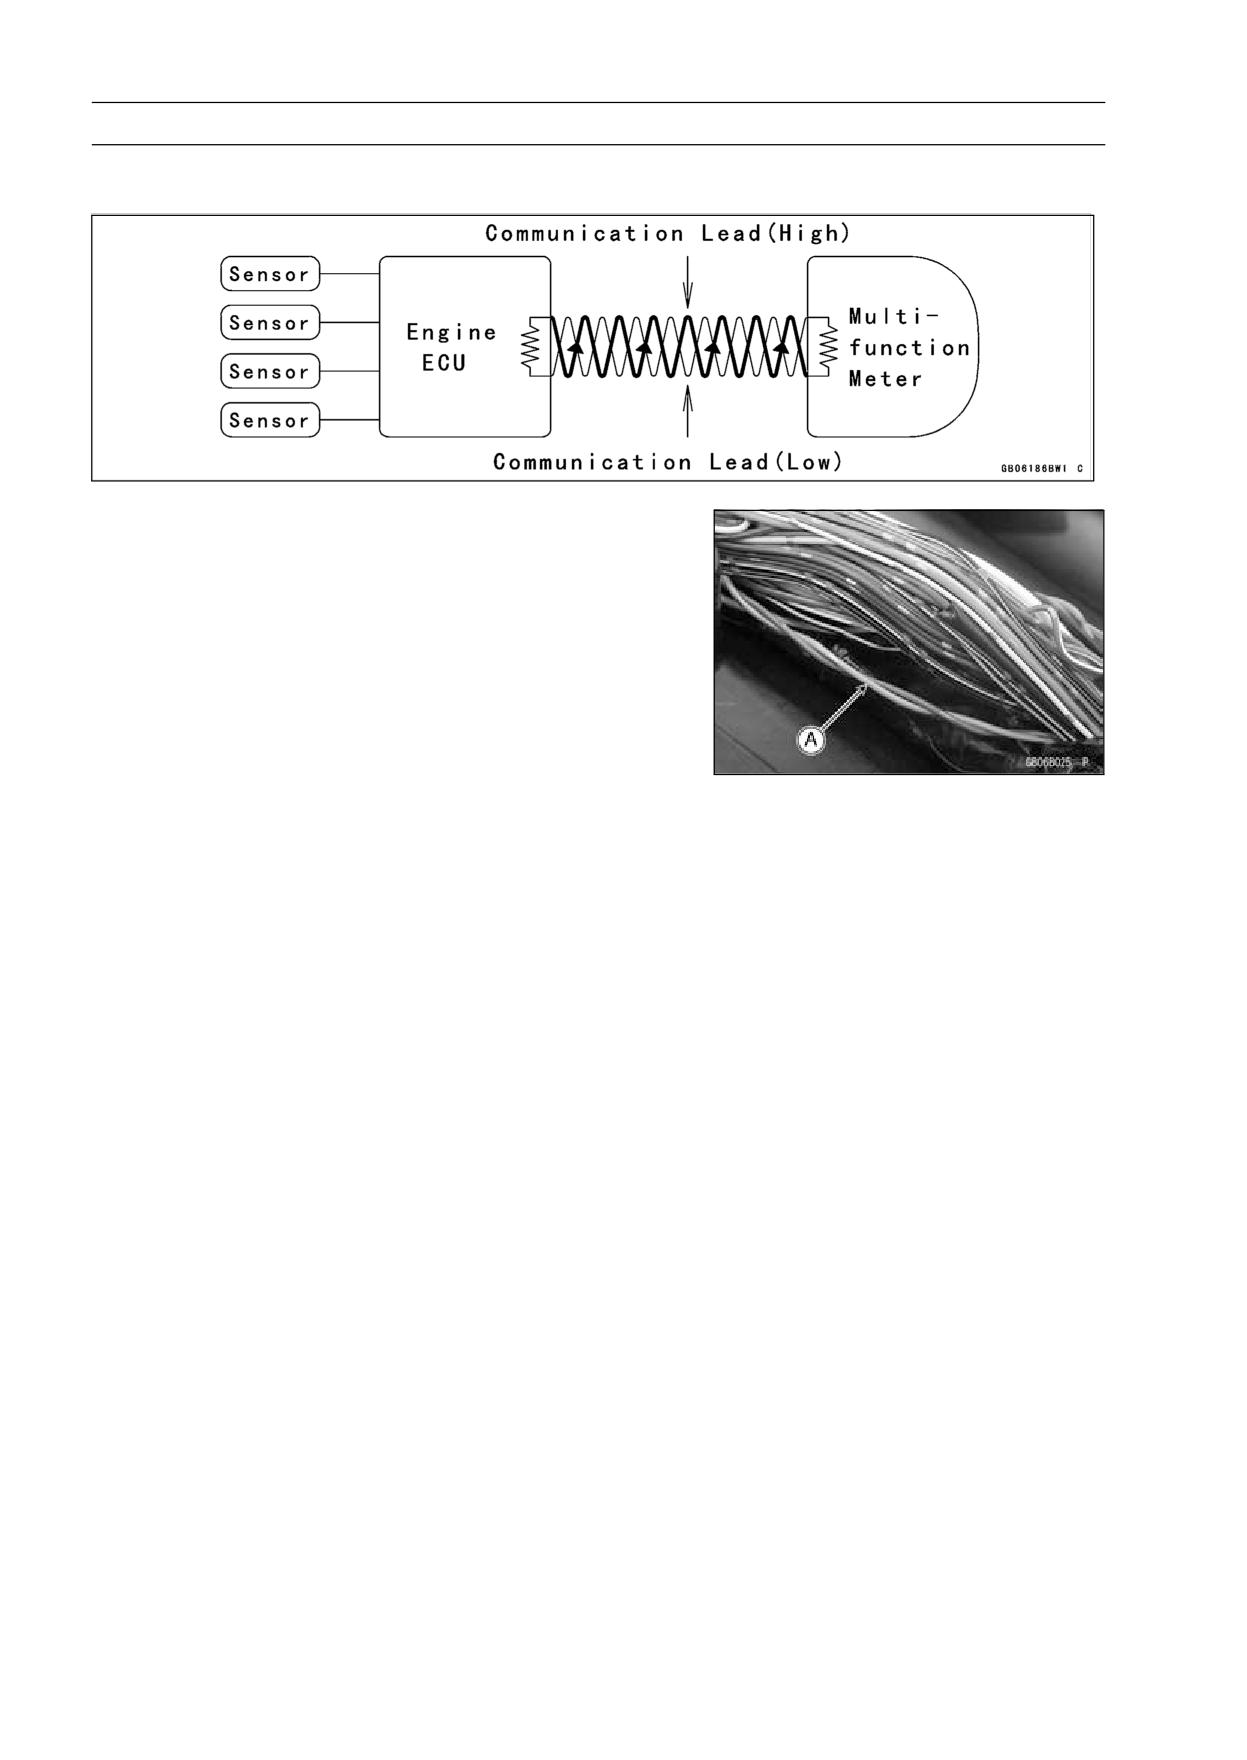
2. CAN is a multi-cast serial bus standard (ISO protocol). Data is transmitted by changing the voltage
signal of the two bus leads which are composed of high and low voltage wires twisted together.
Since the high-speed ISO standard is used (transmission speeds of up to 500 kbps*), large quan-
tities of data can be transmitted and received in a short period of time.
*bps: bit/sec → the number of signals (0 or 1) transmittable/receivable per second
1-16 GENERAL INFORMATION
Technical Information-CAN (Controller Area Network) Communication System
Structure and Function
1. In the CAN communication system, anti-noise twisted pair leads are used (two leads).
Twisted Pair Leads [A] (In the main harness)
2. Data is transmitted from the two nodes-the ECU and meter unit-on the CAN bus and does not
contain specific bus addresses of either node.
Instead, the content of a data stream, such as engine rpm, is labeled with an identifier that is unique
throughout the network. All nodes on the network receive the data and each performs an acceptance
test on the identifier to determine if the message (and its data) is relevant to that particular node.
If a message is relevant to a particular node (meter unit), it will be processed and displayed other-
wise it is ignored. The unique data identifier also determines the priority of the message. In situations
where the two nodes attempt to transmit at the same time, a non-destructive arbitration technique
guarantees that the messages are sent in order of importance.
3. The CAN data that is transmitted from the ECU to the meter unit are engine rpm, water temper-
ature, gear position, starter lockout switch, self-diagnosis information and *fuel injected volume.
And the data transmitted from the meter to the ECU is vehicle speed.
*Fuel injected volume is converted into the fuel consumption by the meter unit.
GENERAL INFORMATION 1-17
Technical Information-CAN (Controller Area Network) Communication System
System failure and maintenance
1. Detection of a system failure
When the DFI or immobilizer system fails, the information will be shown on the LCD under the "ig-
nition switch ON" condition.
2. System maintenance
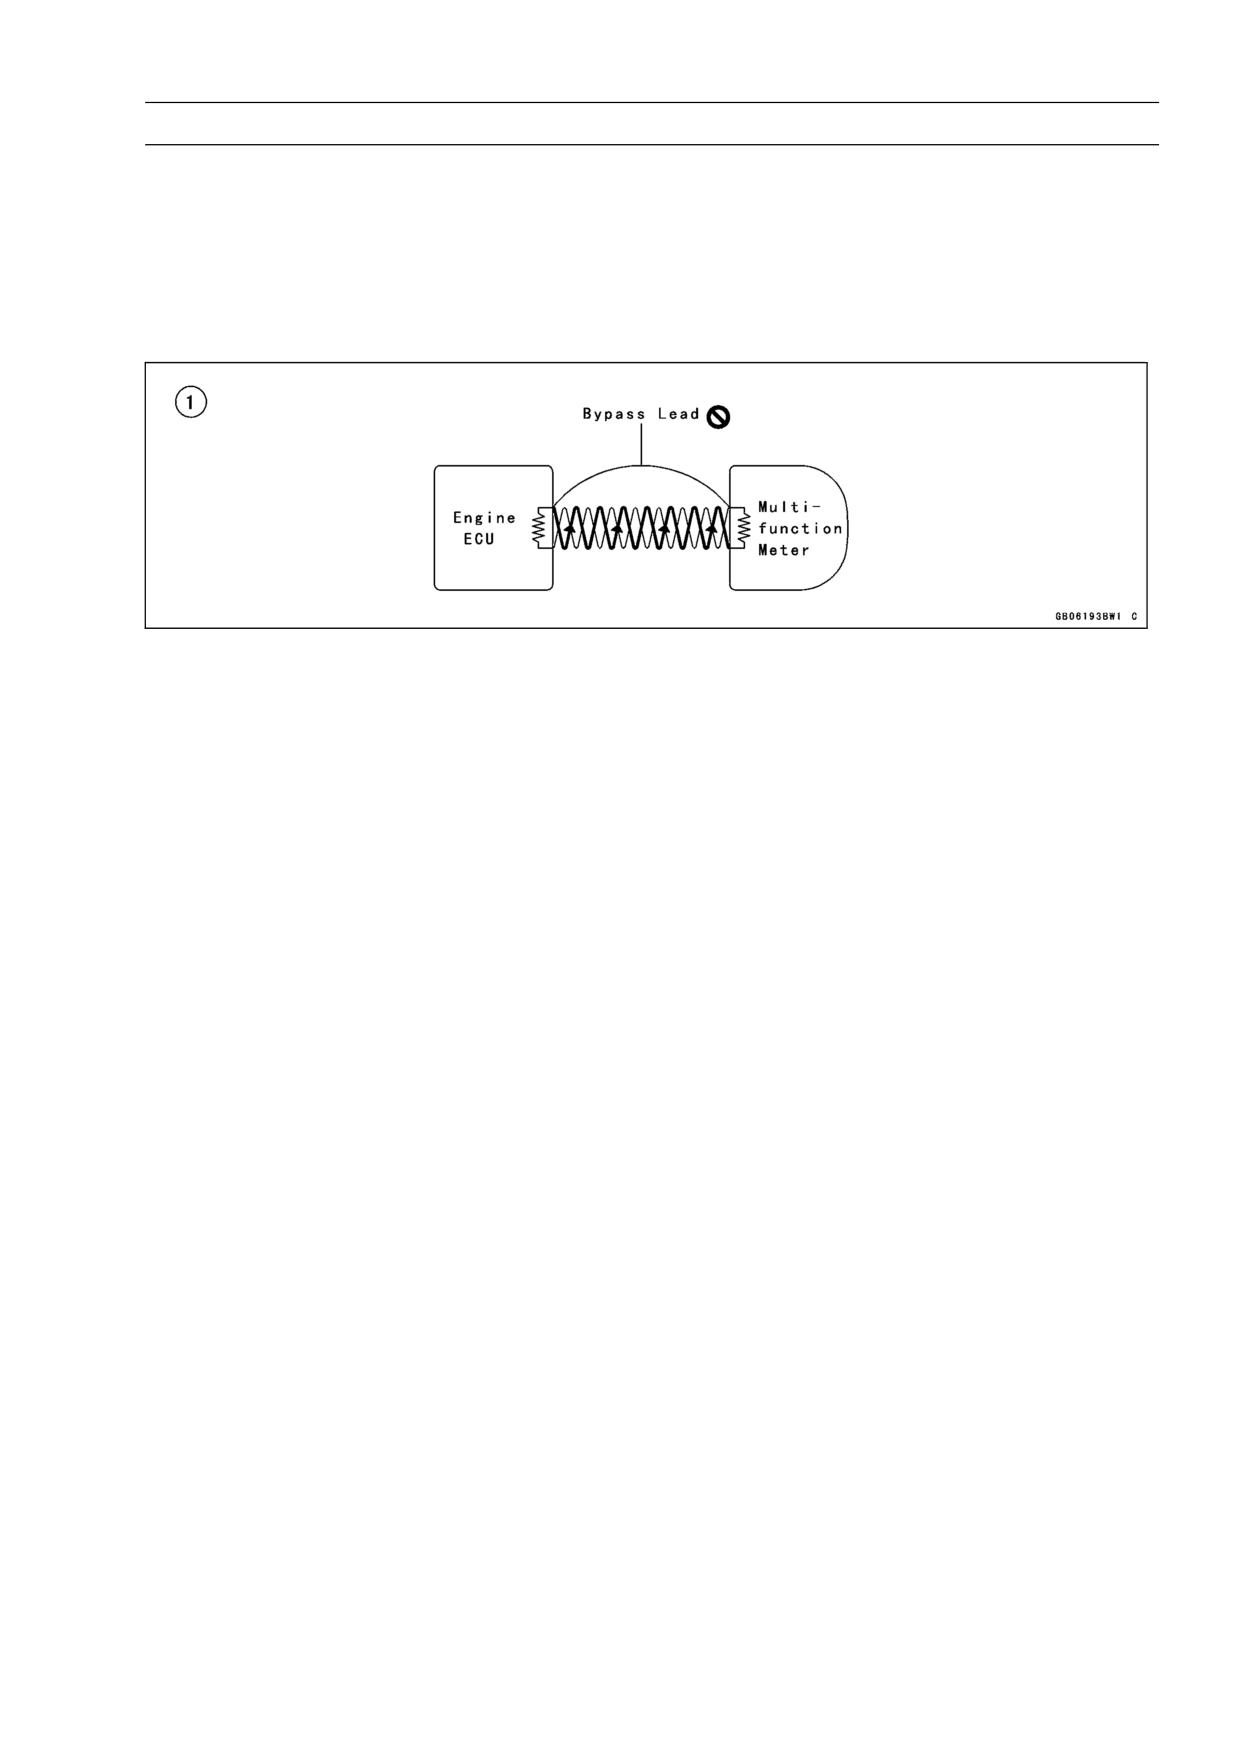
1. Do not add a by-pass lead to the twisted pair lead. This can damage components.
2. Do not modify the twisted pair lead or loosen/tighten the number of twists. Such modifications of
the leads can cause the deterioration of the anti-noise characteristics resulting in communication
errors.
PERIODIC MAINTENANCE 2-1
Periodic Maintenance
Table of Contents
Periodic Maintenance Chart
2-3
Torque and Locking Agent
2-6
2
Specifications
2-12
Special Tools
2-14
Maintenance Procedure
2-15
Fuel System (DFI)
2-15
Throttle Control System Inspection
2-15
Engine Vacuum Synchronization Inspection
2-15
Idle Speed Inspection
2-19
Idle Speed Adjustment
2-19
Fuel Hose Inspection (fuel leak, damage, installation condition)
2-19
Cooling System
2-20
Coolant Level Inspection
2-20
Radiator Hose and Pipe Inspection
2-20
Evaporative Emission Control System (California Model)
2-21
Evaporative Emission Control System Inspection
2-21
Air Suction System
2-21
Air Suction System Damage Inspection
2-21
Engine Top End
2-22
Valve Clearance Inspection
2-22
Clutch and Drive Train
2-27
Clutch Operation Inspection
2-27
Clutch Fluid Level Inspection
2-27
Clutch Fluid Leak Inspection
2-28
Clutch Hose and Pipe Damage and Installation Condition Inspection
2-28
Wheels/Tires
2-29
Air Pressure Inspection
2-29
Wheel/Tire Damage Inspection
2-29
Tire Tread Wear Inspection
2-29
Wheel Bearing Damage Inspection
2-30
Drive Train
2-30
Drive Chain Lubrication Condition Inspection
2-30
Drive Chain Slack Inspection
2-31
Drive Chain Slack Adjustment
2-31
Wheel Alignment Inspection
2-32
Drive Chain Wear Inspection
2-32
Chain Guide Wear Inspection
2-33
Brake System
2-34
Brake Fluid Leak (Brake Hose and Pipe) Inspection
2-34
Brake Hose and Pipe Damage and Installation Condition Inspection
2-35
Brake Operation Inspection
2-35
Brake Fluid Level Inspection
2-35
Brake Pad Wear Inspection
2-36
Brake Light Switch Operation Inspection
2-37
Suspensions
2-37
Front Forks/Rear Shock Absorber Operation Inspection
2-37
Front Fork Oil Leak Inspection
2-38
Rear Shock Absorber Oil Leak Inspection
2-38
Rocker Arm Operation Inspection
2-38
Tie-Rod Operation Inspection
2-38
2-2 PERIODIC MAINTENANCE
Steering System
2-39
Steering Play Inspection
2-39
Steering Play Adjustment
2-39
Steering Stem Bearing Lubrication
2-40
Electrical System
2-41
Lights and Switches Operation Inspection
2-41
Headlight Aiming Inspection
2-44
Sidestand Switch Operation Inspection
2-45
Engine Stop Switch Operation Inspection
2-46
Others
2-46
Chassis Parts Lubrication
2-46
Bolts, Nuts and Fasteners Tightness Inspection
2-47
Replacement Parts
2-48
Air Cleaner Element Replacement
2-48
Fuel Hose Replacement
2-49
Coolant Change
2-51
Radiator Hose and O-ring Replacement
2-53
Engine Oil Change
2-53
Oil Filter Replacement
2-54
Brake Hose and Pipe Replacement
2-55
Brake Fluid Change
2-57
Master Cylinder Rubber Parts Replacement
2-58
Caliper Rubber Parts Replacement
2-59
Rear Caliper Assembly
2-62
Clutch Hose and Pipe Replacement
2-63
Rubber Parts of Clutch Master Cylinder/Slave Cylinder Replacement
2-64
Clutch Fluid Change
2-66
Spark Plug Replacement
2-66
PERIODIC MAINTENANCE 2-3
Periodic Maintenance Chart
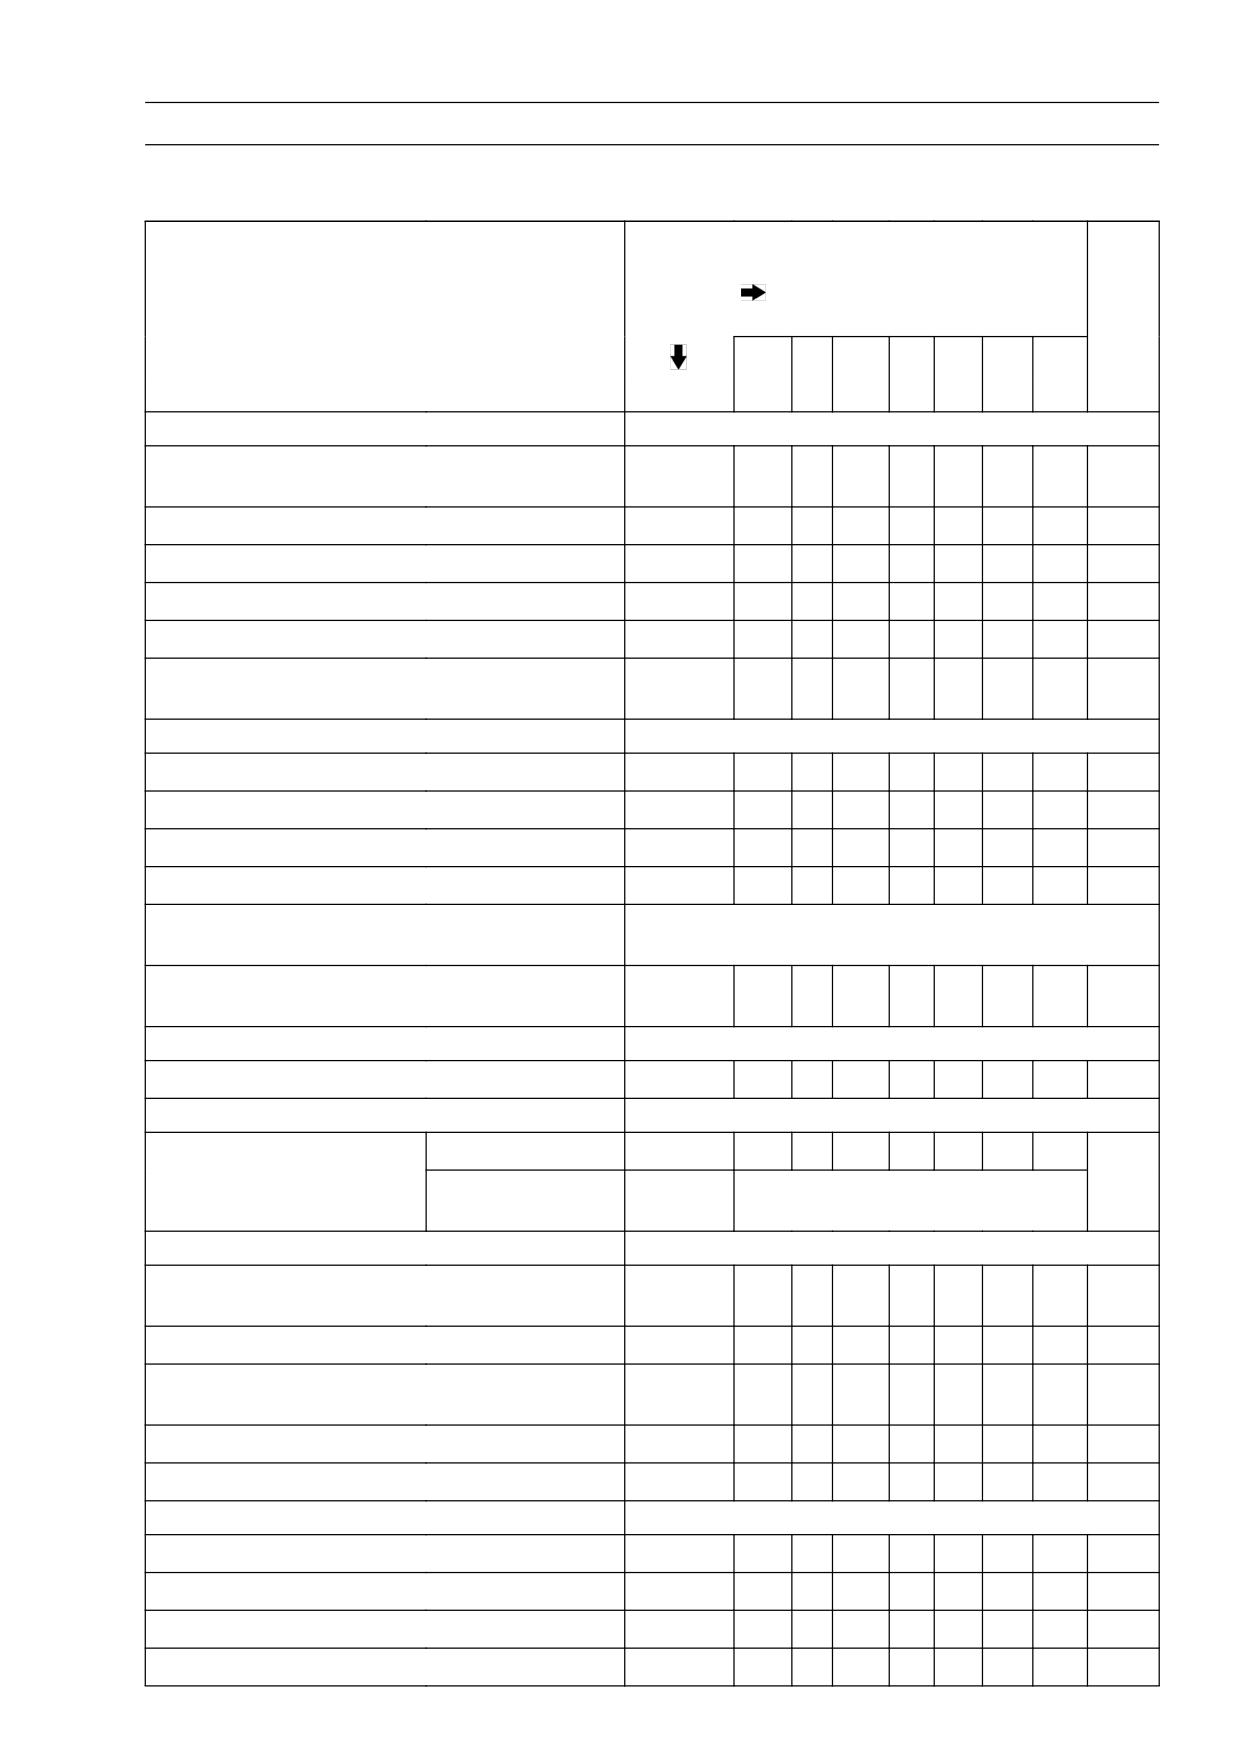
The scheduled maintenance must be done in accordance with this chart to keep the motorcycle in
good running condition.The initial maintenance is vitally important and must not be neglected.
FREQUENCY
Whichever
* ODOMETER
comes
READING
first
× 1000 km
See
(× 1000 mile)
Page
1
6
12
18
24
30
36
INSPECTION
Every
(0.6)
(4)
(7.5)
(12)
(15)
(20)
(24)
Fuel System
Throttle control system (play, smooth return,
year
2-15
no drag) - inspect
•
•
•
•
Engine vacuum synchronization-inspect
2-15
•
•
•
Idle speed-inspect
2-19
•
•
•
•
Fuel leak (fuel hose and pipe) - inspect
year
2-19
•
•
•
•
Fuel hose and pipe damage-inspect
year
2-19
•
•
•
•
Fuel hose and pipe installation
year
2-19
condition-inspect
•
•
•
•
Cooling System
Coolant level - inspect
2-20
•
•
•
•
Coolant leak (radiator hose and pipe) - inspect
year
2-20
•
•
•
•
Radiator hose damage - inspect
year
2-20
•
•
•
•
Radiator hose installation condition - inspect
year
2-20
•
•
•
•
Evaporative Emission Control System
(CAL)
Evaporative emission control system function
2-21
- inspect
•
•
•
•
•
•
•
Air Suction System
Air suction system damage - inspect
2-21
•
•
•
Engine Top End
Valve clearance - inspect
US, CA, AU Model
•
Other than US,
2-22
Every 42
000
km (26
000 mile)
CA, AU Model
Clutch and Drive Train
Clutch operation (play, disengagement,
2-27
engagement) - inspect
•
•
•
•
Clutch fluid level - inspect
6
months
2-27
•
•
•
•
•
•
•
Clutch fluid leak (clutch hose and pipe) -
year
2-28
inspect
•
•
•
•
•
•
•
Clutch hose and pipe damage - inspect
year
2-28
•
•
•
•
•
•
•
Clutch hose installation condition - inspect
year
2-28
•
•
•
•
•
•
•
Wheels and Tires
Tire air pressure - inspect
year
2-29
•
•
•
Wheels/tires damage - inspect
2-29
•
•
•
Tire tread wear abnormal wear - inspect
2-29
•
•
•
Wheel bearing damage - inspect
year
2-30
•
•
•
2-4 PERIODIC MAINTENANCE
Periodic Maintenance Chart
FREQUENCY
Whichever
* ODOMETER
comes
READING
first
× 1000 km
See
(× 1000 mile)
Page
1
6
12
18
24
30
36
INSPECTION
Every
(0.6)
(4)
(7.5)
(12)
(15)
(20)
(24)
Final Drive
Drive chain lubrication condition - inspect #
Every 600 km (400 mile) after driving in rain
2-30
Drive chain slack - inspect #
Every
1
000
km (600
mile)
2-31
Drive chain wear - inspect #
2-32
•
•
•
Drive chain guide wear - inspect
2-33
•
•
•
Brake System
Brake fluid leak (brake hose and pipe) -
year
2-34
inspect
•
•
•
•
•
•
•
Brake hose and pipe damage - inspect
year
2-35
•
•
•
•
•
•
•
Brake hose installation condition - inspect
year
2-35
•
•
•
•
•
•
•
Brake operation (effectiveness, play, no drag)
year
2-35
- inspect
•
•
•
•
•
•
•
Brake fluid level - inspect
6 months
2-35
•
•
•
•
•
•
•
Brake pad wear - inspect #
2-36
•
•
•
•
•
•
Brake light switch operation - inspect
2-37
•
•
•
•
•
•
•
Suspensions
Front forks/rear shock absorber operation
2-37
(damping and smooth stroke) - inspect
•
•
•
Front forks/rear shock absorber oil leak -
year
2-38
inspect
•
•
•
Rocker arm operation - inspect
2-38
•
•
•
Tie-rods operation - inspect
2-38
•
•
•
Steering System
Steering play - inspect
year
2-39
•
•
•
•
Steering stem bearings-lubricate
2 years
2-39
•
Electrical System
Lights and switches operation - inspect
year
2-41
•
•
•
Headlight aiming - inspect
year
2-44
•
•
•
Sidestand switch operation - inspect
year
2-45
•
•
•
Engine stop switch operation - inspect
year
2-46
•
•
•
Others
Chassis parts-lubricate
year
2-46
•
•
•
Bolts, nuts and fasteners tightness - inspect
2-47
•
•
•
•
#: Service more frequently when operating in severe conditions; dusty, wet, muddy, high speed or
frequent starting/stopping.
*: For higher odometer readings, repeat at the frequency interval established here.
PERIODIC MAINTENANCE 2-5
Periodic Maintenance Chart
Periodic Replacement Parts
FREQUENCY
Whichever
* ODOMETER READING
come
× 1000 km
first
(×
1000 mile)
See
Page
1
12
18
24
36
48
CHANGE/REPLACEMENT
Every
(0.6)
(7.5)
(12)
(15)
(24)
(30)
Air cleaner element #
Every 18 000 km (12
000
mile)
2-48
Fuel hose
4 years
2-49
•
Coolant
3 years
2-51
•
Radiator hoses and O-rings
3 years
2-53
•
Engine oil #
year
2-53
•
•
•
•
•
Oil filter
year
2-54
•
•
•
•
•
Brake hose and pipe
4 years
2-55
•
Brake fluid
2 years
2-57
•
•
Rubber parts of brake master cylinder/caliper
4 years
2-58
•
Clutch hose and pipe
4 years
2-63
•
Rubber parts of clutch master cylinder/slave
4 years
2-64
cylinder
•
Clutch fluid
2 years
2-66
•
•
Spark plugs
2-66
•
•
•
•
#: Service more frequently when operating in severe conditions; dusty, wet, muddy, high speed or
frequent starting/stopping.
*: For higher odometer readings, repeat at the frequency interval established here.
2-6 PERIODIC MAINTENANCE
Torque and Locking Agent
The following tables list the tightening torque for the major fasteners requiring use of a
non-permanent locking agent or silicone sealant etc.
Letters used in the “Remarks” column mean:
AL: Tighten the two clamp bolts alternately two times to ensure even tightening torque.
G: Apply grease to the threads.
L: Apply a non-permanent locking agent to the threads.
M: Apply molybdenum disulfied grease.
MO: Apply molybdenum disulfide grease oil
(mixture of engine oil and molybdenum disulfide grease in a weight ration is 10 : 1).
R: Replacement Parts
S: Tighten the fasteners following the specified sequence.
Si: Apply silicone grease (ex. PBC grease).
SS: Apply silicone sealant.
Torque
Fastener
Remarks
N·m
kgf·m
ft·lb
Fuel System
Air Cleaner Element Cover Bolts
6.9
0.70
61 in·lb
Air Cleaner Element Holder Screws
6.9
0.70
61 in·lb
Bypass Screws
0.2
0.02
1.8 in·lb
Camshaft Position Sensor Bolt
9.8
1.0
87 in·lb
Crankshaft Sensor Bolts
5.9
0.60
52 in·lb
L
Delivery Pipe Mounting Screws
5.0
0.51
44 in·lb
Duct Clamp Bolts
2.0
0.20
18 in·lb
Front Air Inlet Duct Mounting Bolts
9.8
1.0
87 in·lb
Fuel Pump Bolts
9.8
1.0
87 in·lb
L, S
Gear Position Switch Lead Clamp Bolts
9.8
1.0
87 in·lb
Gear Position Switch Screws
2.9
0.30
26 in·lb
L
Inlet Air Pressure Sensor Bracket Screws
3.5
0.36
31 in·lb
Middle Air Inlet Duct Clamp Bolts
2.9
0.30
26 in·lb
Middle Air Inlet Duct Mounting Bolts
9.8
1.0
87 in·lb
Rear Air Inlet Duct Mounting Bolts
9.8
1.0
87 in·lb
Speed Sensor Bolt
3.9
0.40
35 in·lb
L
Throttle Body Assy Holder Bolts
9.8
1.0
87 in·lb
S
Throttle Body Assy Holder Clamp Bolts
2.0
0.20
18 in·lb
Vehicle-down Sensor Bolts
5.9
0.60
52 in·lb
Water Temperature Sensor
25
2.5
18
Cooling System
Coolant Drain Plug
12
1.2
106 in·lb
Coolant Fitting Bolts
8.8
0.90
78 in·lb
L
Oil Cooler Mounting Bolts
12
1.2
106 in·lb
S
Radiator Hose Clamp Screws
2.0
0.20
18 in·lb
Thermostat Housing Cover Bolts
5.9
0.60
52 in·lb
Thermostat Housing Mounting Bolts
9.8
1.0
87 in·lb
Water Pump Cover Bolts
9.8
1.0
87 in·lb
Water Temperature Sensor
25
2.5
18
PERIODIC MAINTENANCE 2-7
Torque and Locking Agent
Torque
Fastener
Remarks
N·m
kgf·m
ft·lb
Engine Top End
Air Suction Valve Cover Bolts
9.8
1.0
87 in·lb
L
Camshaft Cap Bolts
12
1.2
106 in·lb
S
Camshaft Chain Guide Bolts
12
1.2
106 in·lb
S
Camshaft Chain Tensioner Mounting Bolts
9.8
1.0
87 in·lb
Camshaft Position Sensor Bolt
9.8
1.0
87 in·lb
Cam Sprocket Mounting Bolts
15
1.5
11
L
Crankshaft Sensor Cover Bolts
9.8
1.0
87 in·lb
L (1)
Cylinder Head Bolts (M6)
12
1.2
106 in·lb
S
Cylinder Head Cover Bolts
9.8
1.0
87 in·lb
S
Cylinder Head Bolts (M11, First)
39
4.0
29
MO, S
Cylinder Head Bolts (M11, Final)
71
7.2
52
MO, S
Engine Bracket Bolts (M8)
25
2.5
18
R, S
Front Camshaft Chain Guide Bolt (Upper)
25
2.5
18
Front Camshaft Chain Guide Bolt (Lower)
12
1.2
106 in·lb
Front Engine Mounting Bolts (M10)
59
6.0
44
R, S
Muffler Body Mounting Bolts
34
3.5
25
Spark Plugs
13
1.3
115 in·lb
Throttle Body Holder Bolts
9.8
1.0
87 in·lb
S
Throttle Body Assy Holder Clamp Bolts
2.0
0.20
18 in·lb
Water Passage Plugs
20
2.0
15
L
Clutch
Clutch Cover Bolts
9.8
1.0
87 in·lb
L (1)
Clutch Hose Banjo Bolt
25
2.5
18
Clutch Hub Nut
135
14
100
R
Clutch Lever Pivot Bolt
1.0
0.10
8.9 in·lb
Clutch Lever Pivot Bolt Locknut
5.9
0.60
52 in·lb
Clutch Master Cylinder Bleed Valve
7.8
0.80
69 in·lb
Clutch Master Cylinder Clamp Bolts
8.8
0.90
78 in·lb
S
Clutch Slave Cylinder Bleed Valve
7.8
0.80
69 in·lb
Clutch Slave Cylinder Bolts
-
-
-
L
Clutch Spring Bolts
8.8
0.90
78 in·lb
Hand
Oil Filler Cap
-
-
-
-tighten
Engine Lubrication System
Engine Oil Drain Bolt
30
3.0
22
Holder Mounting Bolt
35
3.6
26
L
Oil Cooler Mounting Bolts
12
1.2
106 in·lb
S
Oil Filter
31
3.2
23
G, R
Oil Pan Bolts
9.8
1.0
87 in·lb
Oil Pan Plate Bolts
9.8
1.0
87 in·lb
L
Oil Passage Plug
20
2.0
15
L
Oil Pressure Relief Valve
15
1.5
11
L
2-8 PERIODIC MAINTENANCE
Torque and Locking Agent
Torque
Fastener
Remarks
N·m
kgf·m
ft·lb
Oil Pressure Switch
15
1.5
11
SS
Oil Pressure Switch Terminal Bolt
1.5
0.15
13 in·lb
G
Oil Pump Cover Bolts
9.8
1.0
87 in·lb
Engine Removal/Installation
Adjusting Collars
25
2.5
18
M
Engine Bracket Bolts (M8)
25
2.5
18
S, R
Engine Mounting Nuts (M12)
59
6.0
44
S
Front Engine Mounting Bolts (M10)
59
6.0
44
S, R
Subframe Bolts
23
2.3
17
R
Crankshaft/Transmission
Balancer Shaft Clamp Bolts
9.8
1.0
87 in·lb
Balancer Shaft Clamp Lever Bolts
25
2.5
18
Bearing Position Plate Screws
4.9
0.50
43 in·lb
L
Breather Cover Bolts
9.8
1.0
87 in·lb
Breather Plate Screws
9.8
1.0
87 in·lb
L
see the
Connecting Rod Big End Nuts
←
←
←
text
Crankcase Bolts (M6, L = 25 mm)
12
1.2
106 in·lb
S
Crankcase Bolts (M6, L = 40 mm)
12
1.2
106 in·lb
S
Crankcase Bolt (M6, L = 50 mm)
12
1.2
106 in·lb
S
Crankcase Bolt (M6, L = 65 mm)
12
1.2
106 in·lb
S
Crankcase Bolts (M7, L = 45 mm)
20
2.0
15
S
Crankcase Bolt (M7, L = 50 mm)
20
2.0
15
S
Crankcase Bolts (M7, L = 60 mm)
20
2.0
15
S
Crankcase Bolts (M7, L = 65 mm)
20
2.0
15
S
Crankcase Bolt (M7, L = 85 mm)
20
2.0
15
S
Crankcase Bolt (M7, L = 110 mm)
20
2.0
15
S
Crankcase Bolts (M8, L = 70 mm)
27
2.8
20
S
Crankcase Bolts (M8, L = 80 mm)
27
2.8
20
S
Crankcase Bolts (M10, L = 90 mm)
47
4.8
35
MO, S
Crankcase Bolts (M10, L = 120 mm)
47
4.8
35
MO, S
Drive Shaft Cover Bolts
25
2.5
18
L
Gear Positioning Lever Bolt
12
1.2
106 in·lb
Gear Position Switch Lead Clamp Bolt
9.8
1.0
87 in·lb
Gear Position Switch Screws
2.9
0.30
26 in·lb
L
Oil Passage Plugs
20
2.0
15
L
Shift Drum Bearing Holder Screws
4.9
0.50
43 in·lb
L
Starter Clutch Shaft Bolt
9.8
1.0
87 in·lb
L
Starter Clutch Shaft Plate Bolt
9.8
1.0
87 in·lb
L
Shift Drum Cam Holder Bolt
12
1.2
106 in·lb
L
Shift Shaft Return Spring Pin
29
3.0
21
L
Timing Rotor Bolt
39
4.0
29
Torque Limiter Bolt
25
2.5
18
L
PERIODIC MAINTENANCE 2-9
Torque and Locking Agent
Torque
Fastener
Remarks
N·m
kgf·m
ft·lb
Wheels/Tires
Front Axle Clamp Bolts
20
2.0
15
AL
Front Axle Nut
127
13.0
94
Rear Axle Nut
127
13.0
94
Final Drive
Chain Guide Bolt
12
1.2
106 in·lb
L
Chain Guide Bolts
9.8
1.0
87 in·lb
L
Engine Sprocket Cover Bolts
9.8
1.0
87 in·lb
Engine Sprocket Nut
125
13.0
92
MO
Rear Axle Nut
127
13.0
94
Rear Sprocket Nuts
69
7.0
51
Speed Sensor Bolt
3.9
0.40
35 in·lb
L
Stud Bolts
14.7
1.5
11
L
Brakes
Bleed Valves
7.8
0.80
69 in·lb
Brake Hose Banjo Bolts
25
2.5
18
Brake Lever Pivot Bolt
1.0
0.10
9 in·lb
Si
Brake Lever Pivot Bolt Locknut
5.9
0.60
52 in·lb
Brake Pedal Bolt
8.8
0.90
78 in·lb
Brake Pipe Joint Nuts (ZX1400B Models)
18
1.8
13
Front Brake Disc Mounting Bolts
27
2.8
20
L
Front Brake Light Switch Screw
1.2
0.12
11 in·lb
Front Brake Pad Pins
17.2
1.8
13
Front Brake Reservoir Cap Stopper Screw
1.2
0.12
11 in·lb
Front Caliper Assembly Bolts
27
2.8
20
L
Front Caliper Mounting Bolts
34
3.5
25
Front Master Cylinder Bleed Valve
7.8
0.80
69 in·lb
Front Master Cylinder Clamp Bolts
8.8
0.90
78 in·lb
S
Rear Brake Disc Mounting Bolts
27
2.5
18
L
Rear Brake Pad Pin
17.2
1.8
13
Rear Caliper Assembly Bolts
37
3.8
27
L
Rear Caliper Mounting Bolts
25
2.5
18
Rear Master Cylinder Mounting Bolts
25
2.5
18
Rear Master Cylinder Push Rod Locknut
17.2
1.8
13
Suspension
Front Axle Clamp Bolts
20
2.0
15
AL
Front Fork Bottom Allen Bolts
23
2.3
17
L
Front Fork Clamp Bolts (Upper)
20
2.0
15
Front Fork Clamp Bolts (Lower)
30
3.1
22
AL
Front Fork Top Plugs
22
2.2
16
Piston Rod Nuts
28
2.9
21
Rear Shock Absorber Nut (Upper)
34
3.5
25
Rear Shock Absorber Nut (Lower)
34
3.5
25
2-10 PERIODIC MAINTENANCE
Torque and Locking Agent
Torque
Fastener
Remarks
N·m
kgf·m
ft·lb
Swingarm Pivot Adjusting Collar
20
2.0
15
Swingarm Pivot Adjusting Collar Locknut
98
10.0
72
Swingarm Pivot Shaft Nut
108
11.0
80
Tie-Rod Nuts
59
6.0
44
Uni-Trak Rocker Arm Nut
34
3.5
25
Steering
Front Fork Clamp Bolts (Upper)
20
2.0
15
Front Fork Clamp Bolts (Lower)
30
3.1
22
AL
Handlebar Bolts
34
3.5
25
L
Handlebar Holder Bolts
25
2.5
18
AL
Steering Stem Head Nut
78
8.0
58
Steering Stem Nut
23
2.3
17
Switch Housing Screws
3.5
0.36
31 in·lb
Frame
Center Stand Bolts
44
4.5
32
Front Footpeg Bracket Bolts
25
2.5
18
Grab Rail Mounting Bolts
25
2.5
18
Rear Fender Mounting Screws
1.2
0.12
11 in·lb
Rear Footpeg Bracket Bolts
25
2.5
18
Rear Frame Bolts
44
4.5
32
L
Rear Frame Pipe Bolts
44
4.5
32
Rear Frame Pipe Nuts
44
4.5
32
Seat Lock Bracket Screws
1.2
0.12
11 in·lb
Sidestand Bolt
44
4.5
32
Sidestand Bracket Bolts
49
5.0
36
L
Sidestand Switch Bolt
8.8
0.90
78 in·lb
L
Windshield Mounting Bolts
0.42
0.043
3.7 in·lb
Electrical System
Alternator Cover Bolts
9.8
1.0
87 in·lb
Alternator Lead Holding Plate Bolts
8.3
0.85
73 in·lb
L
Alternator Rotor Bolt (First)
69
7.0
51
S
Alternator Rotor Bolt (Final)
110
11.2
81
S
Camshaft Position Sensor Bolt
9.8
1.0
87 in·lb
Crankshaft Sensor Bolts
5.9
0.60
52 in·lb
L
Crankshaft Sensor Cover Bolts
9.8
1.0
87 in·lb
L (1)
Engine Ground Terminal Bolt
9.8
1.0
87 in·lb
Front Brake Light Switch Screw
1.2
0.12
11 in·lb
Front Turn Signal Light Mounting Screws
1.2
0.12
11 in·lb
Fuel Level Sensor Bolts
6.9
0.70
61 in·lb
L
Gear Position Switch Lead Clamp Bolts
9.8
1.0
87 in·lb
Gear Position Switch Screws
2.9
0.30
26 in·lb
L
Headlight Mounting Screws
1.2
0.12
11 in·lb
Left Switch Housing Screws
3.5
0.36
31 in·lb
PERIODIC MAINTENANCE 2-11
Torque and Locking Agent
Torque
Fastener
Remarks
N·m
kgf·m
ft·lb
Licence Plate Light Cover Mounting Screws
0.9
0.09
8 in·lb
Licence Plate Light Mounting Screws
1.2
0.12
11 in·lb
Rear Turn Signal Light Mounting Screws
1.2
0.12
11 in·lb
RegulatorRectifier Bolts
9.8
1.0
87 in·lb
Right Switch Housing Screws
3.5
0.36
31 in·lb
Sidestand Switch Bolt
8.8
0.90
78 in·lb
L
Spark Plugs
13
1.3
115 in·lb
Speed Sensor Bolt
3.9
0.40
34 in·lb
L
Starter Lockout Switch Screw
0.7
0.07
6 in·lb
Starter Motor Cable Mounting Bolt
3.9
0.40
34 in·lb
Starter Motor Cable Terminal Nut
5.9
0.60
52 in·lb
Starter Motor Mounting Bolts
9.8
1.0
87 in·lb
Starter Motor Terminal Locknut
6.9
0.70
61 in·lb
Starter Motor Through Bolts
3.4
0.35
30 in·lb
Stator Coil Bolts
12
1.2
106 in·lb
Tail/Brake Light Mounting Screws
1.2
0.12
11 in·lb
Water Temperature Sensor
25
2.5
18
The table below, relating tightening torque to thread diameter, lists the basic torque for the bolts and
nuts. Use this table for only the bolts and nuts which do not require a specific torque value. All of the
values are for use with dry solvent-cleaned threads.
Basic Torque for General Fasteners
Threads
Torque
diameter (mm)
N·m
kgf·m
ft·lb
5
3.4 ∼ 4.9
0.35 ∼ 0.50
30 ∼ 43 in·lb
6
5.9 ∼ 7.8
0.60 ∼ 0.80
52 ∼ 69 in·lb
8
14 ∼ 19
1.4 ∼ 1.9
10.0 ∼ 13.5
10
25 ∼ 34
2.6 ∼ 3.5
19.0 ∼ 25
12
44 ∼ 61
4.5 ∼ 6.2
33 ∼ 45
14
73 ∼ 98
7.4 ∼ 10.0
54 ∼ 72
16
115 ∼ 155
11.5 ∼ 16.0
83 ∼ 115
18
165 ∼ 225
17.0 ∼ 23.0
125 ∼ 165
20
225 ∼ 325
23 ∼ 33
165 ∼ 240
2-12 PERIODIC MAINTENANCE
Specifications
Item
Standard
Service Limit
Fuel System
Throttle Grip Free Play
2 ∼ 3 mm (0.08 ∼ 0.12 in.)
- - -
Idle Speed
1 100 ±50 r/min (rpm)
- - -
Throttle Body Vacuum
39 ±1.33 kPa (293 ±10 mmHg) at idle speed
- - -
Air Cleaner Element
Viscous paper element
- - -
Cooling System
Coolant:
Type (Recommended)
Permanent type antifreeze
- - -
Color
Green
- - -
Mixed Ratio
Soft water 50%, coolant 50%
- - -
Freezing Point
-35°C (-31°F)
- - -
Total Amount
3.4 L (3.6 US qt)
- - -
Engine Top End
Valve Clearance:
Exhaust
0.22 ∼ 0.27 mm (0.0087 ∼ 0.0106 in.)
- - -
Inlet
0.15 ∼ 0.20 mm (0.0059 ∼ 0.0079 in.)
- - -
Clutch
Clutch Fluid:
Grade
DOT4
- - -
Clutch Lever Free Play
Non-adjustable
- - -
Engine Lubrication System
Engine Oil:
Type
API SE, SF or SG
- - -
API SH, SJ or SL with JASO MA
Viscosity
SAE 10W-40
- - -
Capacity
3.7 L (3.9 US qt) (when filter is not removed)
- - -
4.1 L (4.3 US qt) (when filter is removed)
- - -
4.5 L (4.8 US qt) (when engine is completely
- - -
dry)
Level
Between upper and lower level lines (Wait 2 ∼
- - -
3 minutes after idling or running)
Wheels/Tires
Tread Depth:
Front
3.8 mm (0.15 in.)
1 mm (0.04 in.),
(AT, CH, DE) 1.6
mm (0.06 in.)
Rear
4.8 mm (0.19 in.)
Up to 130 km/h (80
mph): 2 mm (0.08
in.), Over 130 km/h
(80 mph): 3 mm
(0.12 in.)
Air Pressure (when Cold):
Front
Up to 180 kg (397 lb) load:
- - -
290 kPa (2.9 kgf/cm², 42 psi)
Rear
Up to 180 kg (397 lb) load:
- - -
290 kPa (2.9 kgf/cm², 42 psi)
PERIODIC MAINTENANCE 2-13
Specifications
Item
Standard
Service Limit
Final Drive
Drive Chain Slack
32 ∼ 38 mm (1.3 ∼ 1.5 in.)
- - -
Drive Chain Wear (20-link
317.5 ∼ 318.2 mm (12.50 ∼ 12.53 in.)
323 mm (12.7 in.)
Length)
Standard Chain:
Make
DAIDO
- - -
Type
DID50ZVM4 GC&B
- - -
Link
116 links
- - -
Brakes
Brake Fluid:
Grade
DOT4
- - -
Brake Pad Lining Thickness:
Front
4.0 mm (0.16 in.)
1 mm (0.04 in.)
Rear
5.0 mm (0.20 in.)
1 mm (0.04 in.)
Brake Light Timing:
Front
Pulled ON
- - -
Rear
On after about 10 mm (0.39 in.) of pedal travel
- - -
Electrical System
Spark Plug:
Type
NGK CR9EIA-9
- - -
2-14 PERIODIC MAINTENANCE
Special Tools
Inside Circlip Pliers:
Pilot Screw Adjuster, C:
57001-143
57001-1292
Steering Stem Nut Wrench:
Vacuum Gauge:
57001-1100
57001-1369
Jack:
Pilot Screw Adjuster Adapter,
5:
57001-1238
57001-1372
Oil Filter Wrench:
Jack Attachment:
57001-1249
57001-1608
PERIODIC MAINTENANCE 2-15
Maintenance Procedure
Fuel System (DFI)
Throttle Control System Inspection
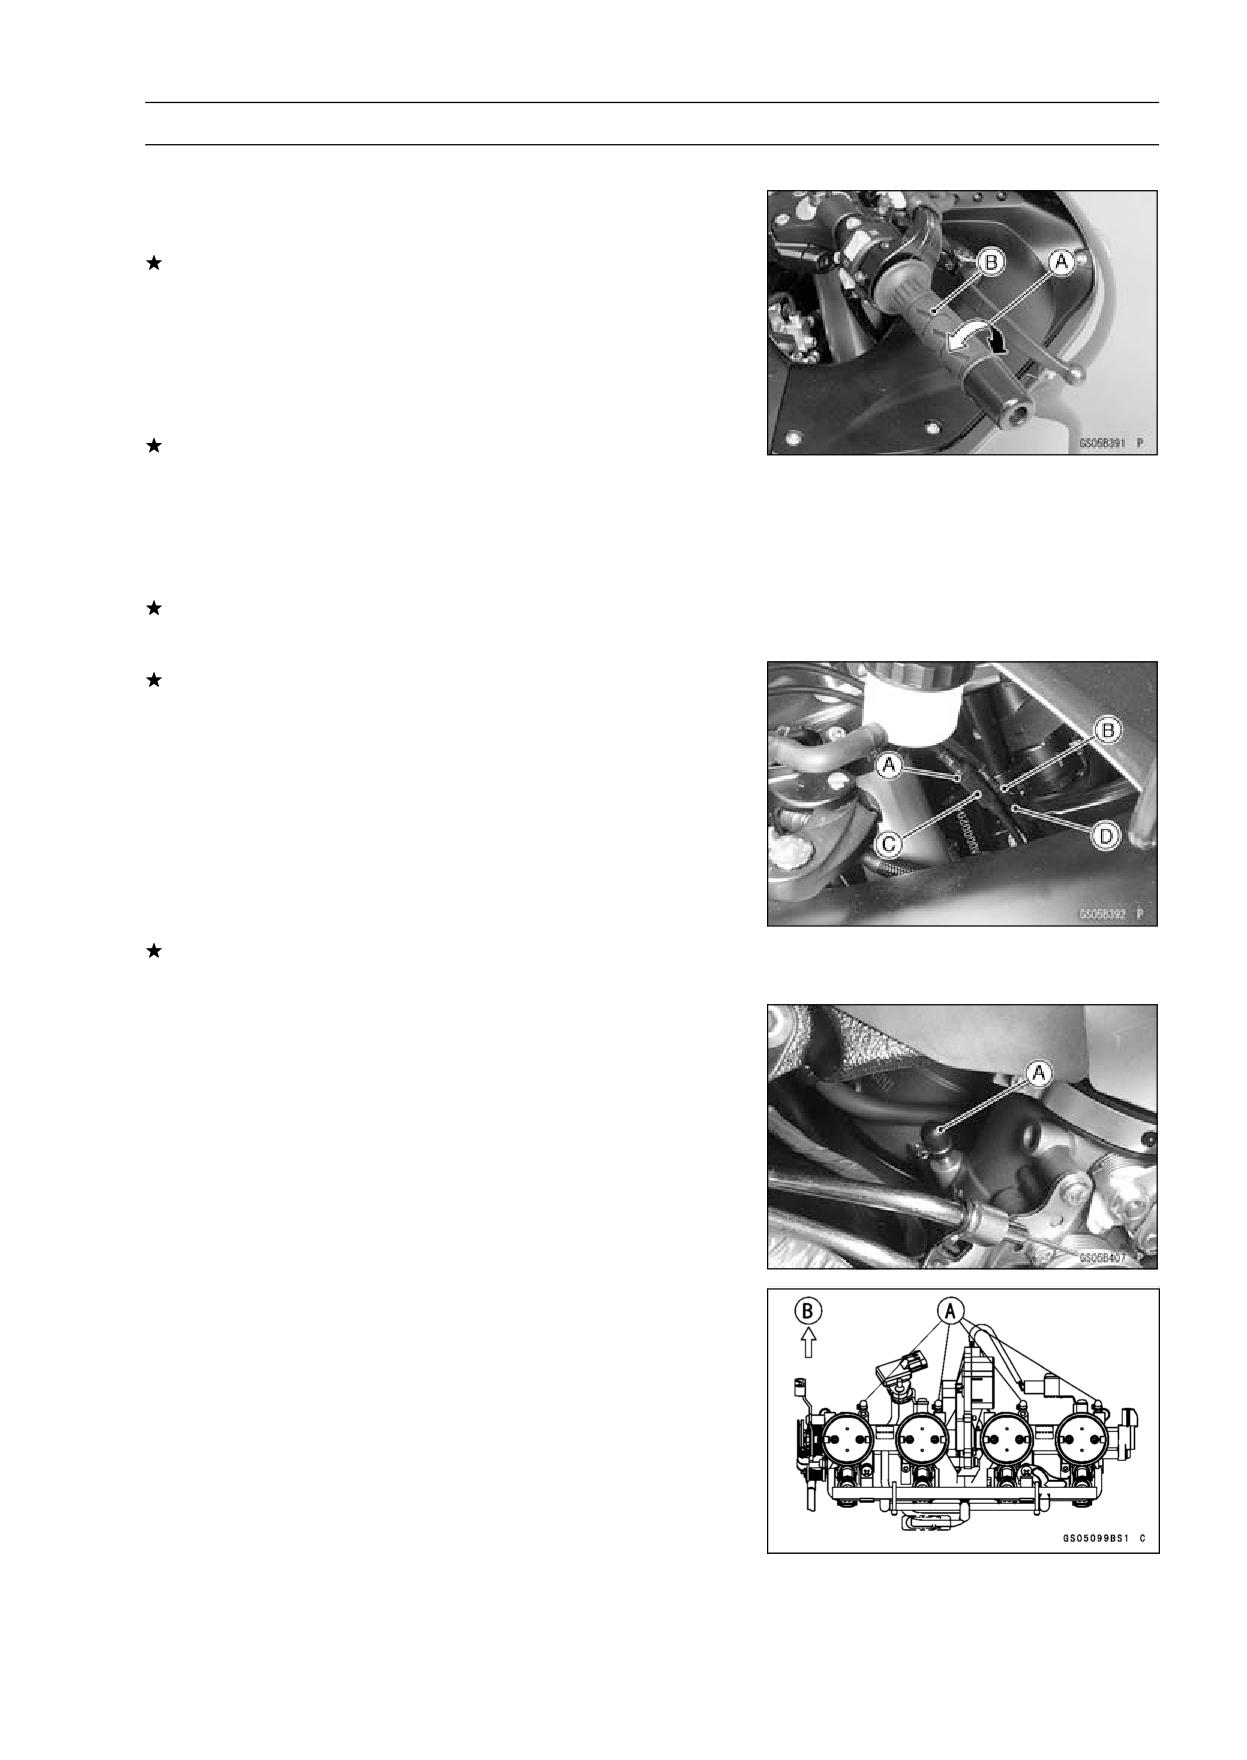
• Check the throttle grip free play [A].
If the free play is incorrect, adjust the throttle cables.
Throttle Grip Free Play
Standard:
2 ∼ 3 mm (0.08 ∼ 0.12 in.)
• Check that the throttle grip [B] moves smoothly from full
open to close, and the throttle closes quickly and com-
pletely by the return spring in all steering positions.
If the throttle grip does not return properly, check the throt-
tle cables routing, grip free play, and cable damage. Then
lubricate the throttle cable.
• Run the engine at the idle speed, and turn the handlebar
all the way to the right and left to ensure that the idle speed
does not change.
If the idle speed increases, check the throttle cable free
play and the cable routing.
If necessary, adjust the throttle cable as follows.
• Loosen the locknuts [A] [B].
• Screw both throttle cable adjusters [C] [D] to give the
throttle grip plenty of play.
• Turn the decelerator cable adjuster [C] until 2 ∼ 3 mm
(0.08 ∼ 0.12 in.) of throttle grip play is obtained.
• Tighten the locknut [A].
• Turn the accelerator cable adjuster [D] until 2 ∼ 3 mm
(0.08 ∼ 0.12 in.) of throttle grip play is obtained.
• Tighten the locknut [B].
If the free play cannot be adjusted with the adjusters, re-
place the cable.
Engine Vacuum Synchronization Inspection
NOTE
○These procedures are explained on the assumption that
the inlet and exhaust systems of the engine are in good
condition.
• Situate the motorcycle so that it is vertical.
• Remove:
Fuel Tank Cover (see Fuel Tank Removal in the Fuel
System (DFI) chapter)
Left and Right Middle Fairings (see Middle Fairing Re-
moval in the Frame chapter)
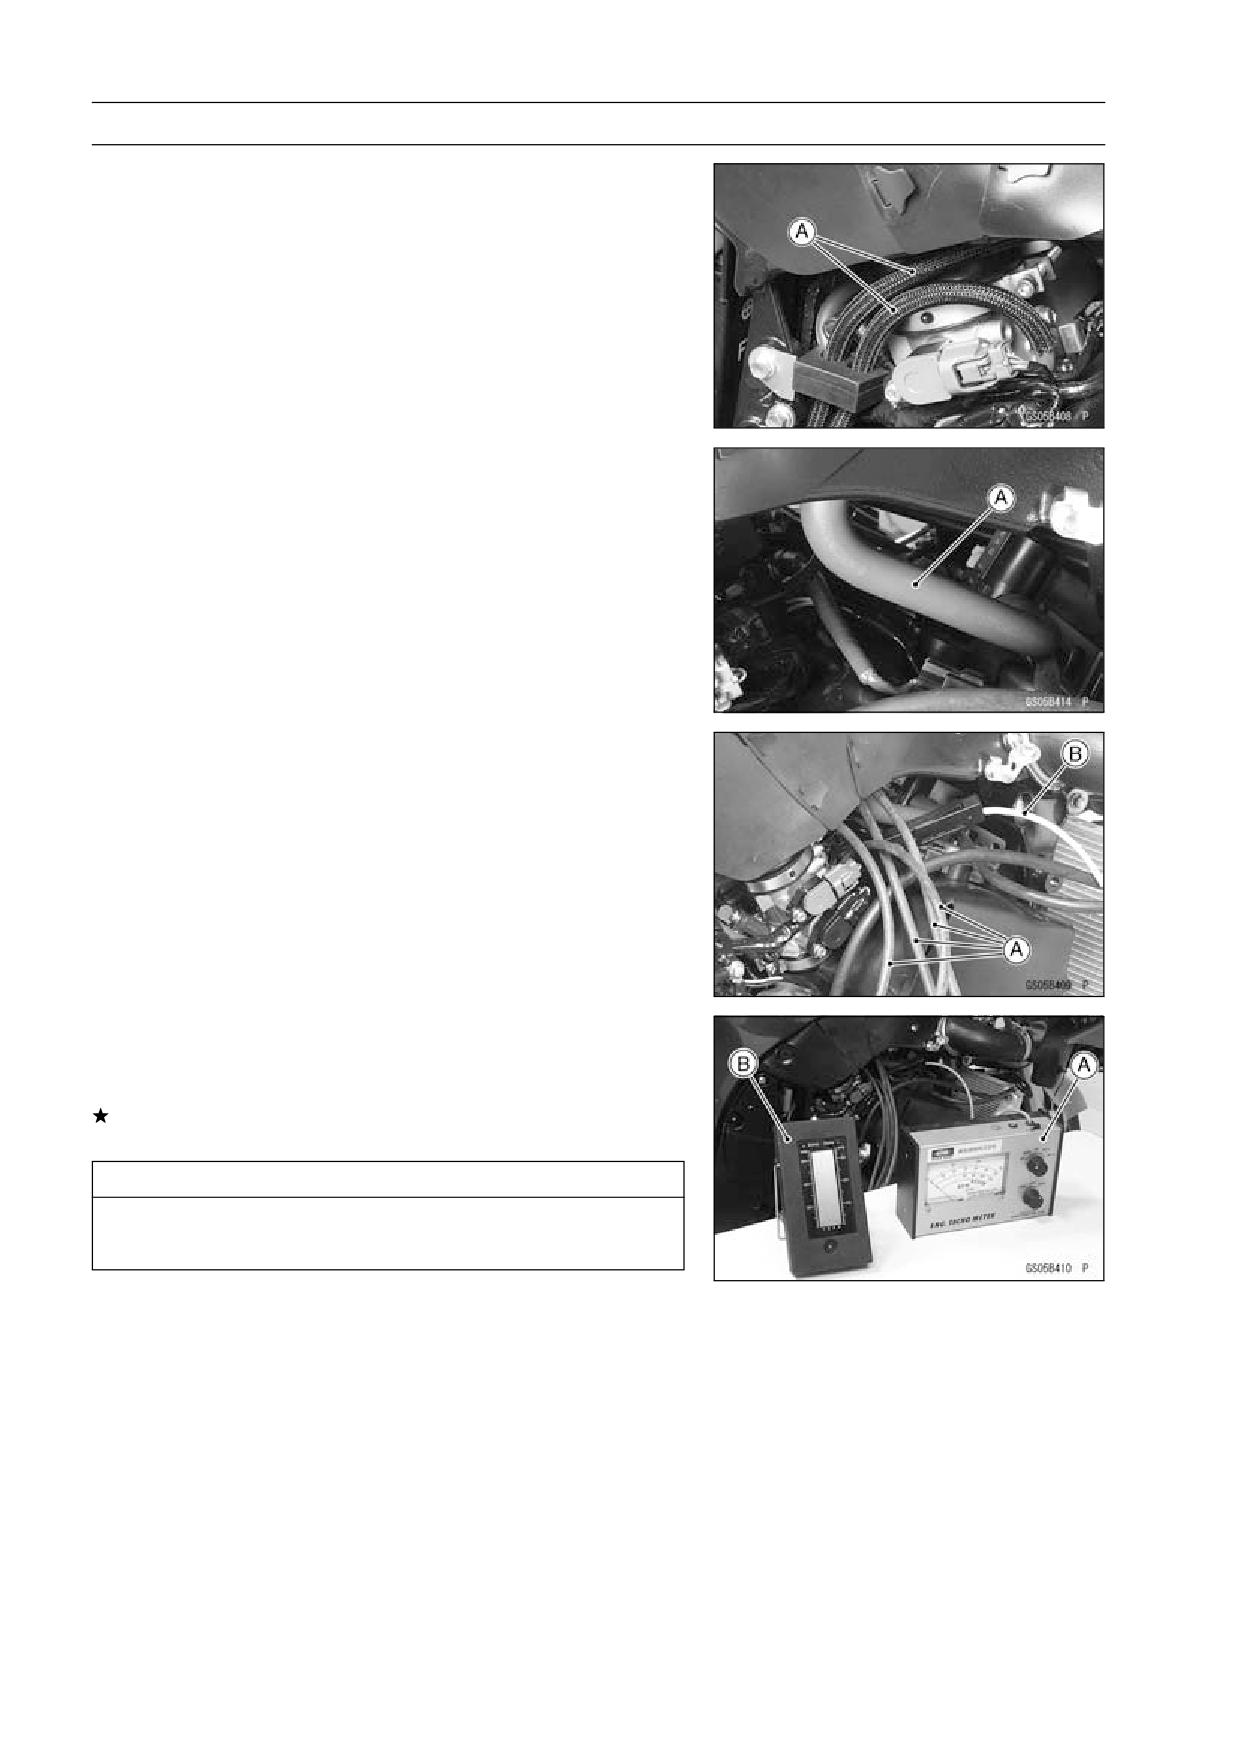
• Pull off the rubber caps [A] from the fittings of each throttle
body.
Front [B]
2-16 PERIODIC MAINTENANCE
Maintenance Procedure
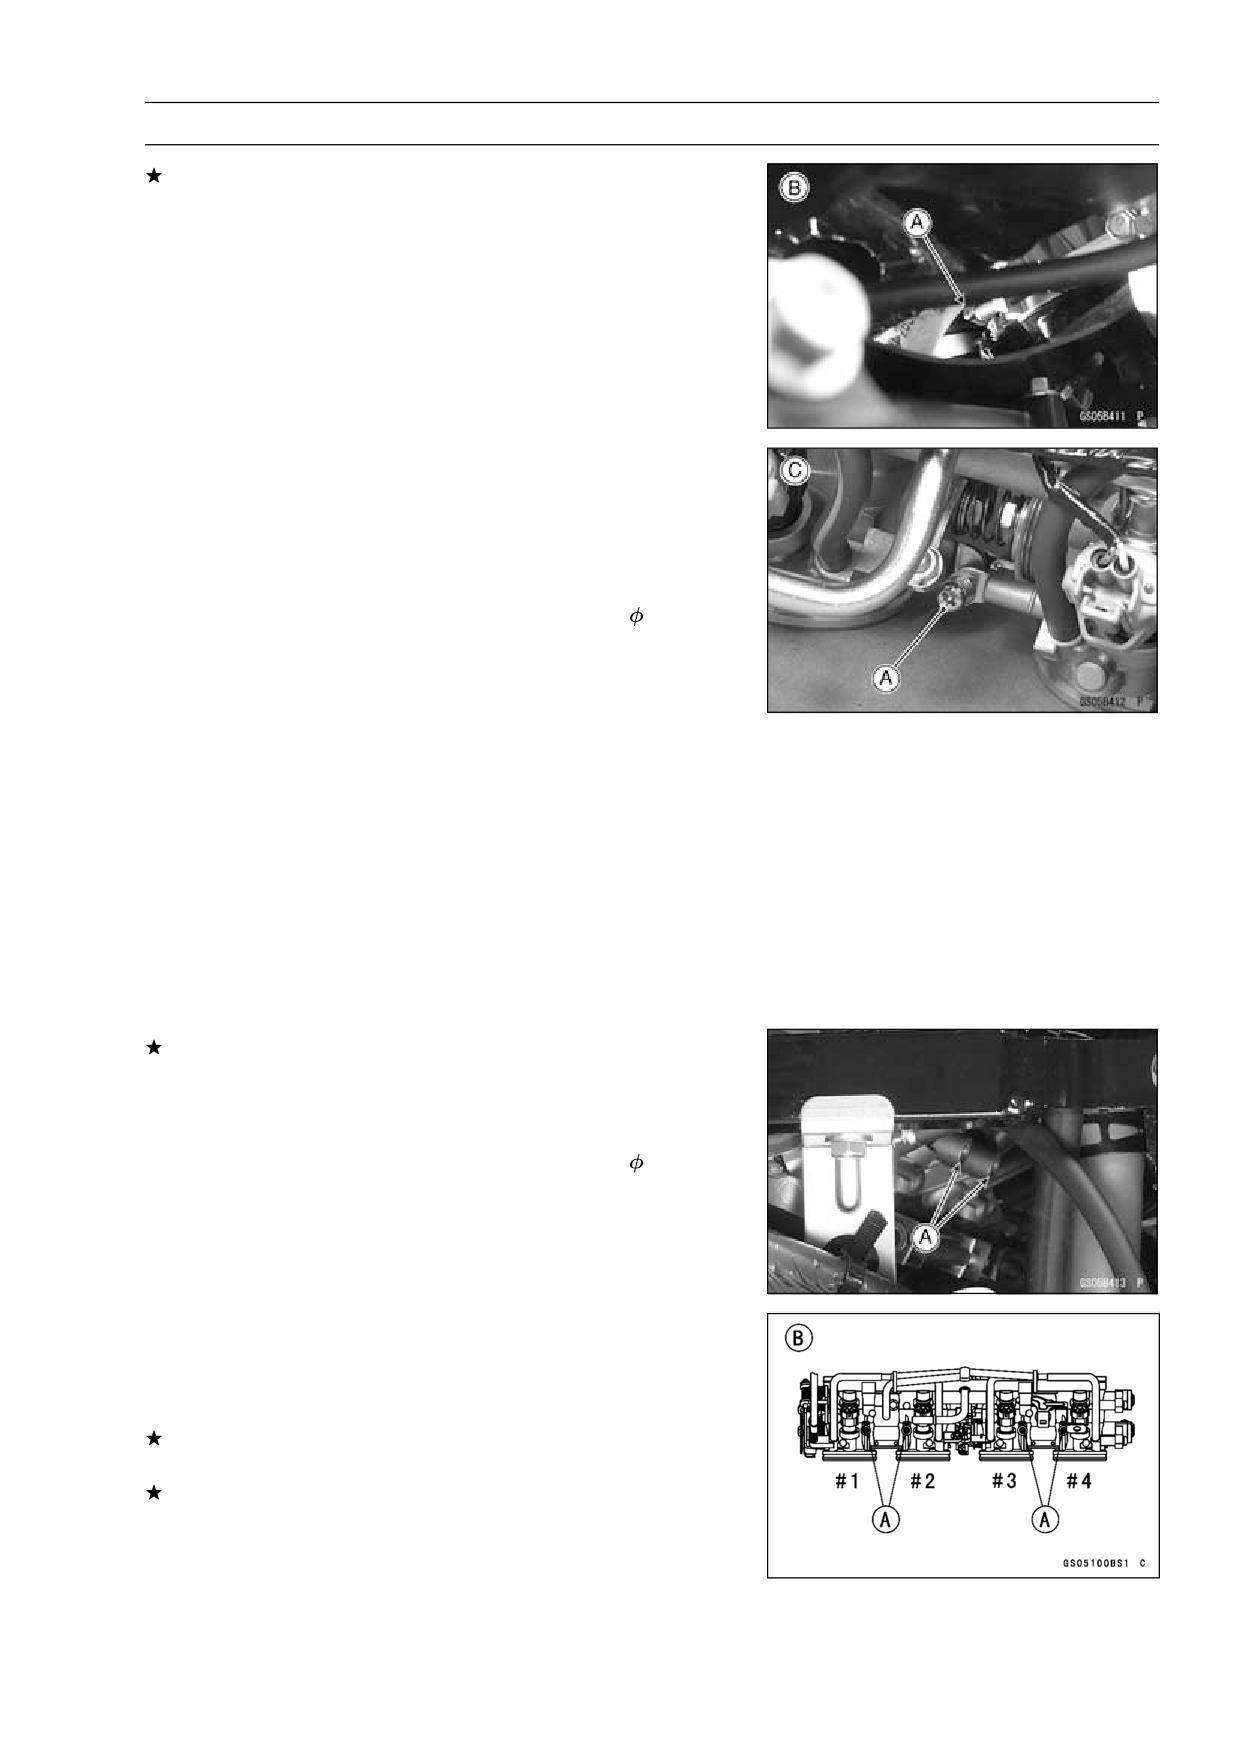
• For the California Model, pull off the vacuum hoses [A].
• Pull off the air switching valve hose [A] from the air cleaner
housing.
• Plug the air switching valve hose end and air cleaner
housing hole.
• Connect a vacuum gauge (special tool) and hoses [A] to
the fittings on the throttle body.
Special Tool - Vacuum Gauge: 57001-1369
• Connect a highly accurate tachometer [B] to one of the
stick coil primary leads.
• Start the engine and warm it up thoroughly.
• Check the idle speed, using a highly accurate tachometer
[A].
If the idle speed is out of the specified range, adjust it with
the adjust screw.
CAUTION
Do not measure the idle speed by the tachometer of
the meter unit.
• While idling the engine, inspect the throttle body vacuum,
using the vacuum gauge [B].
Throttle Body Vacuum
Standard:
39 ±1.33 kPa (293 ±10 mmHg) at Idle Speed
1 100 ±50 r/min (rpm)
PERIODIC MAINTENANCE 2-17
Maintenance Procedure
If any vacuum is not within specifications, first synchro-
nize the balance of the left (#1, #2 throttle valves) and
right (#3, #4 throttle valves) assemblies.
Example:
#1: 260 mmHg
#2: 290 mmHg
#3: 250 mmHg
#4: 270 mmHg
• With the engine at the correct idle speed, equalize higher
vacuum of #1 or #2 (for example 290 mmHg) to higher
vacuum of #3 or #4 (for example 270 mmHg) by turning
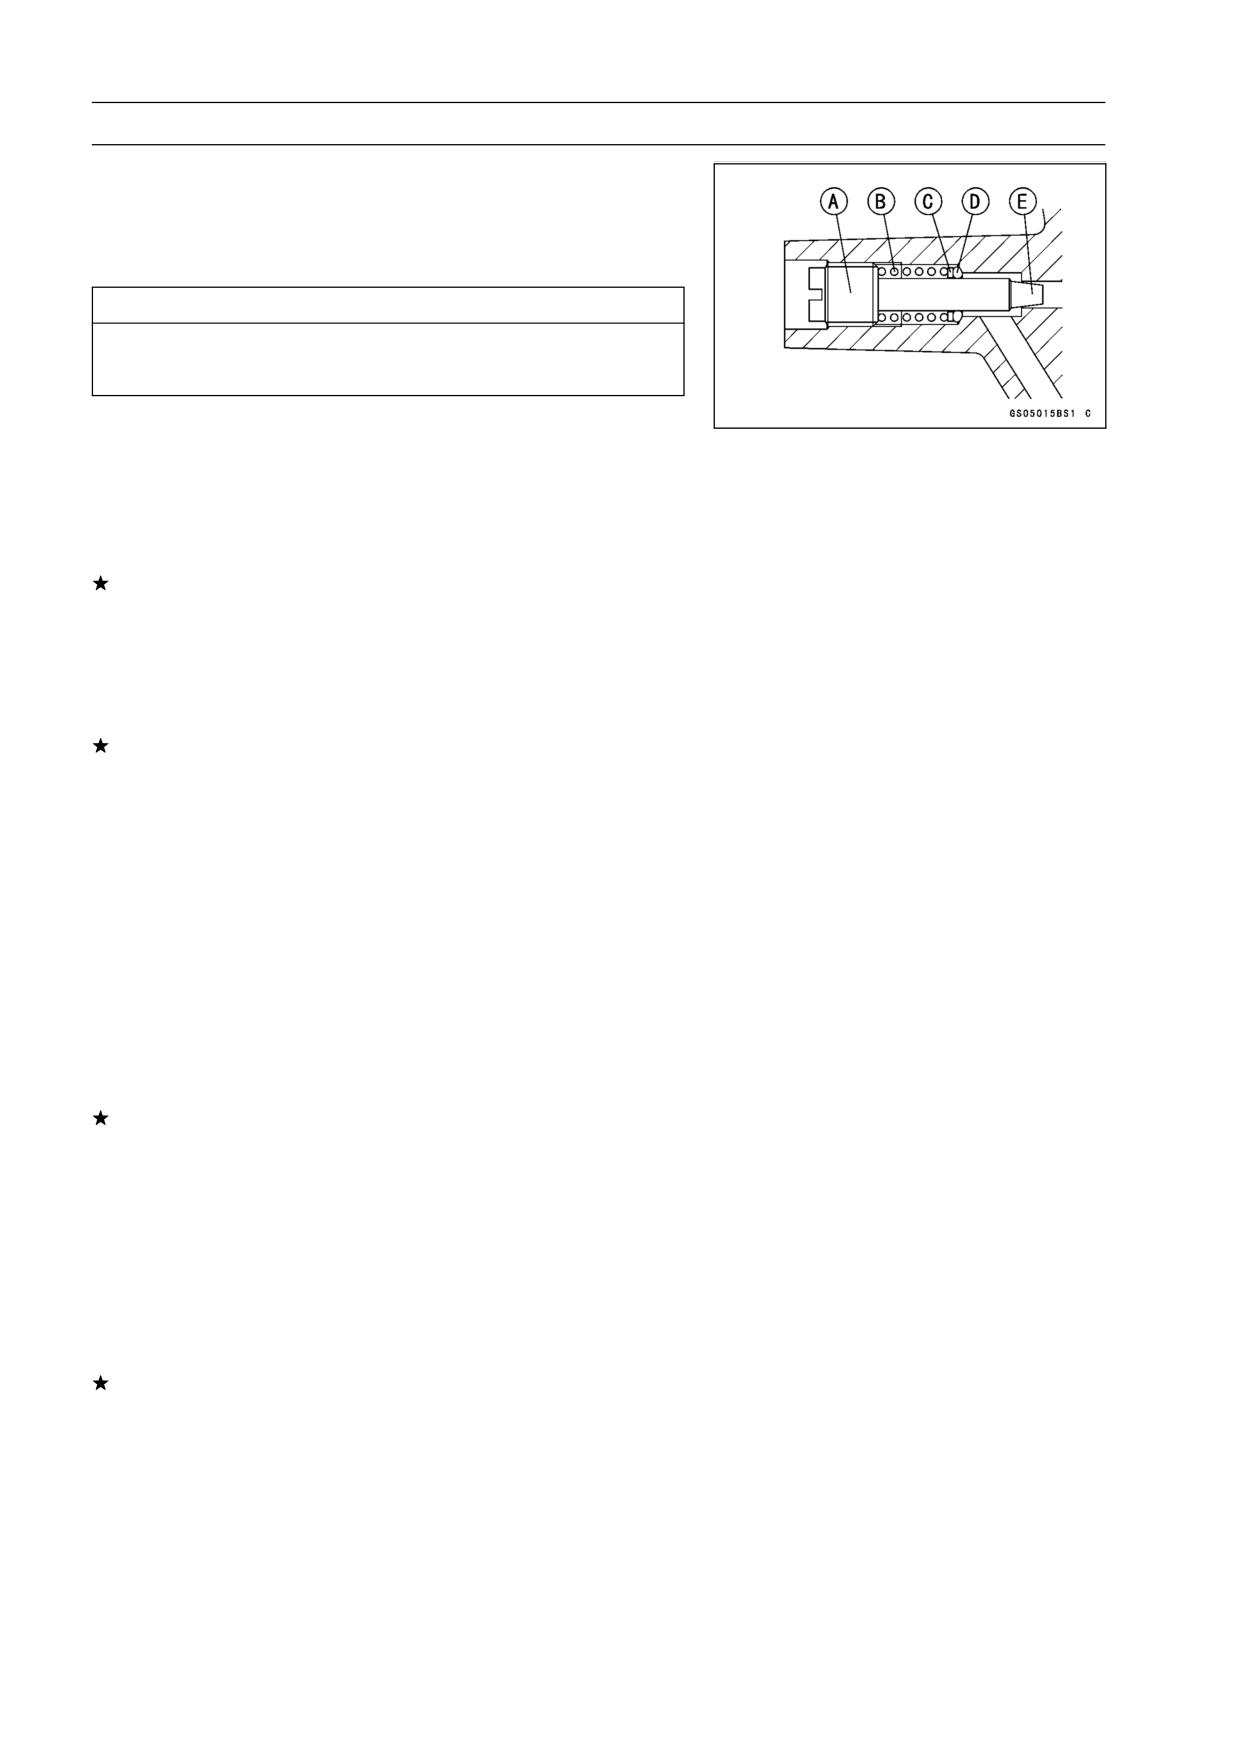
the center adjusting screw [A].
Right Side View [B]
○In this photo [C], the throttle body has been removed for
clarity.
Special Tool - Pilot Screw Adjuster, C: 57001-1292
Pilot Screw Adjuster Adapter,
5:
57001
-1372
NOTE
○After adjustment, the final vacuum measurement be-
tween the highest throttle valves may not be 290 mmHg
(for example). The goal is to have the highest two vac-
uums between the left (#1 and #2) and right (#3 and #4)
banks be the same and be within the service limits.
• Open and close the throttle after each measurement, and
adjust the idle speed as necessary.
• Once the throttle valves have been synchronized, inspect
output voltage of the main throttle sensor to ensure proper
operation (procedure is explained at the end of this sec-
tion).
If a value of measured vacuum pressure is out of the
specified range after synchronization, adjust the bypass
screws [A].
Special Tool - Pilot Screw Adjuster, C: 57001-1292
Pilot Screw Adjuster Adapter,
5:
57001
-1372
Rear View [B]
• Adjust lower vacuum between #1 and #2 to higher vac-
uum of #1 and #2.
• Adjust the lower vacuum between #3 and #4 to higher
vacuum of #3 and #4.
• Open and close the throttle valves after each measure-
ment, and adjust the idle speed as necessary.
• Check the vacuums as before.
If all vacuums are within the specification range, finish the
engine vacuum synchronization.
If any vacuum cannot be adjusted within the specification,
remove the bypass screws #1 ∼ #4 and clean them.
2-18 PERIODIC MAINTENANCE
Maintenance Procedure
• Turn in the bypass screw [A] with counting the number of
turns until it seals fully but not tightly. Record the number
of turns.
Torque - Bypass Screw: 0.2 N·m (0.02 kgf·m, 1.8 in·lb)
CAUTION
Do not over tighten them. They could be damaged,
requiring replacement.
• Remove:
Bypass Screw
Spring [B]
Washer [C]
O-ring [D]
• Check the bypass screw and its hole for carbon deposits.
If any carbons accumulate, wipe the carbons off from the
bypass screw and the hole, using a cotton pad penetrated
with a high-flash point solvent.
• Replace the O-ring with a new one.
• Check the tapered portion [E] of the bypass screw for
wear or damage.
If the bypass screw is worn or damaged, replace it.
• Turn in the bypass screw until it seats fully but not tightly.
Torque - Bypass Screw: 0.2 N·m (0.02 kgf·m, 1.8 in·lb)
• Back out the same number of turns counted when first
turned in. This is to set the screw to its original position.
NOTE
○A throttle body has different “turns out” of the bypass
screw for each individual unit. On setting the bypass
screw, use the “turns out” determined during disassem-
bly.
• Repeat the same procedure for other bypass screws.
• Repeat the synchronization.
If the vacuums are correct, check the output voltage of
the main throttle sensor (see Output Voltage Inspection of
Main Throttle Sensor in the Fuel System (DFI) chapter).
Main Throttle Sensor Output Voltage
Connections to ECU
Meter (+) → Y/W lead (terminal 26)
Meter (-) → BR/BK lead (terminal 34)
Standard: DC 0.63 ∼ 0.65 V (at idle throttle opening)
If the output voltage is out of the range, check the throttle
input voltage of the main throttle sensor (see Input Volt-
age Inspection in the Main Throttle Sensor section in the
Fuel System (DFI) chapter).
• Remove the vacuum gauge hoses and install the rubber
caps on the original position.
• For the California Model, install the vacuum hoses.
○Route the vacuum hoses according to Cable, Wire, and
Hose Routing section in the Appendix chapter. Refer to
the diagram of the evaporative emission control system
in the Fuel System (DFI) chapter too.
PERIODIC MAINTENANCE 2-19
Maintenance Procedure
Idle Speed Inspection
• Start the engine and warm it up thoroughly.
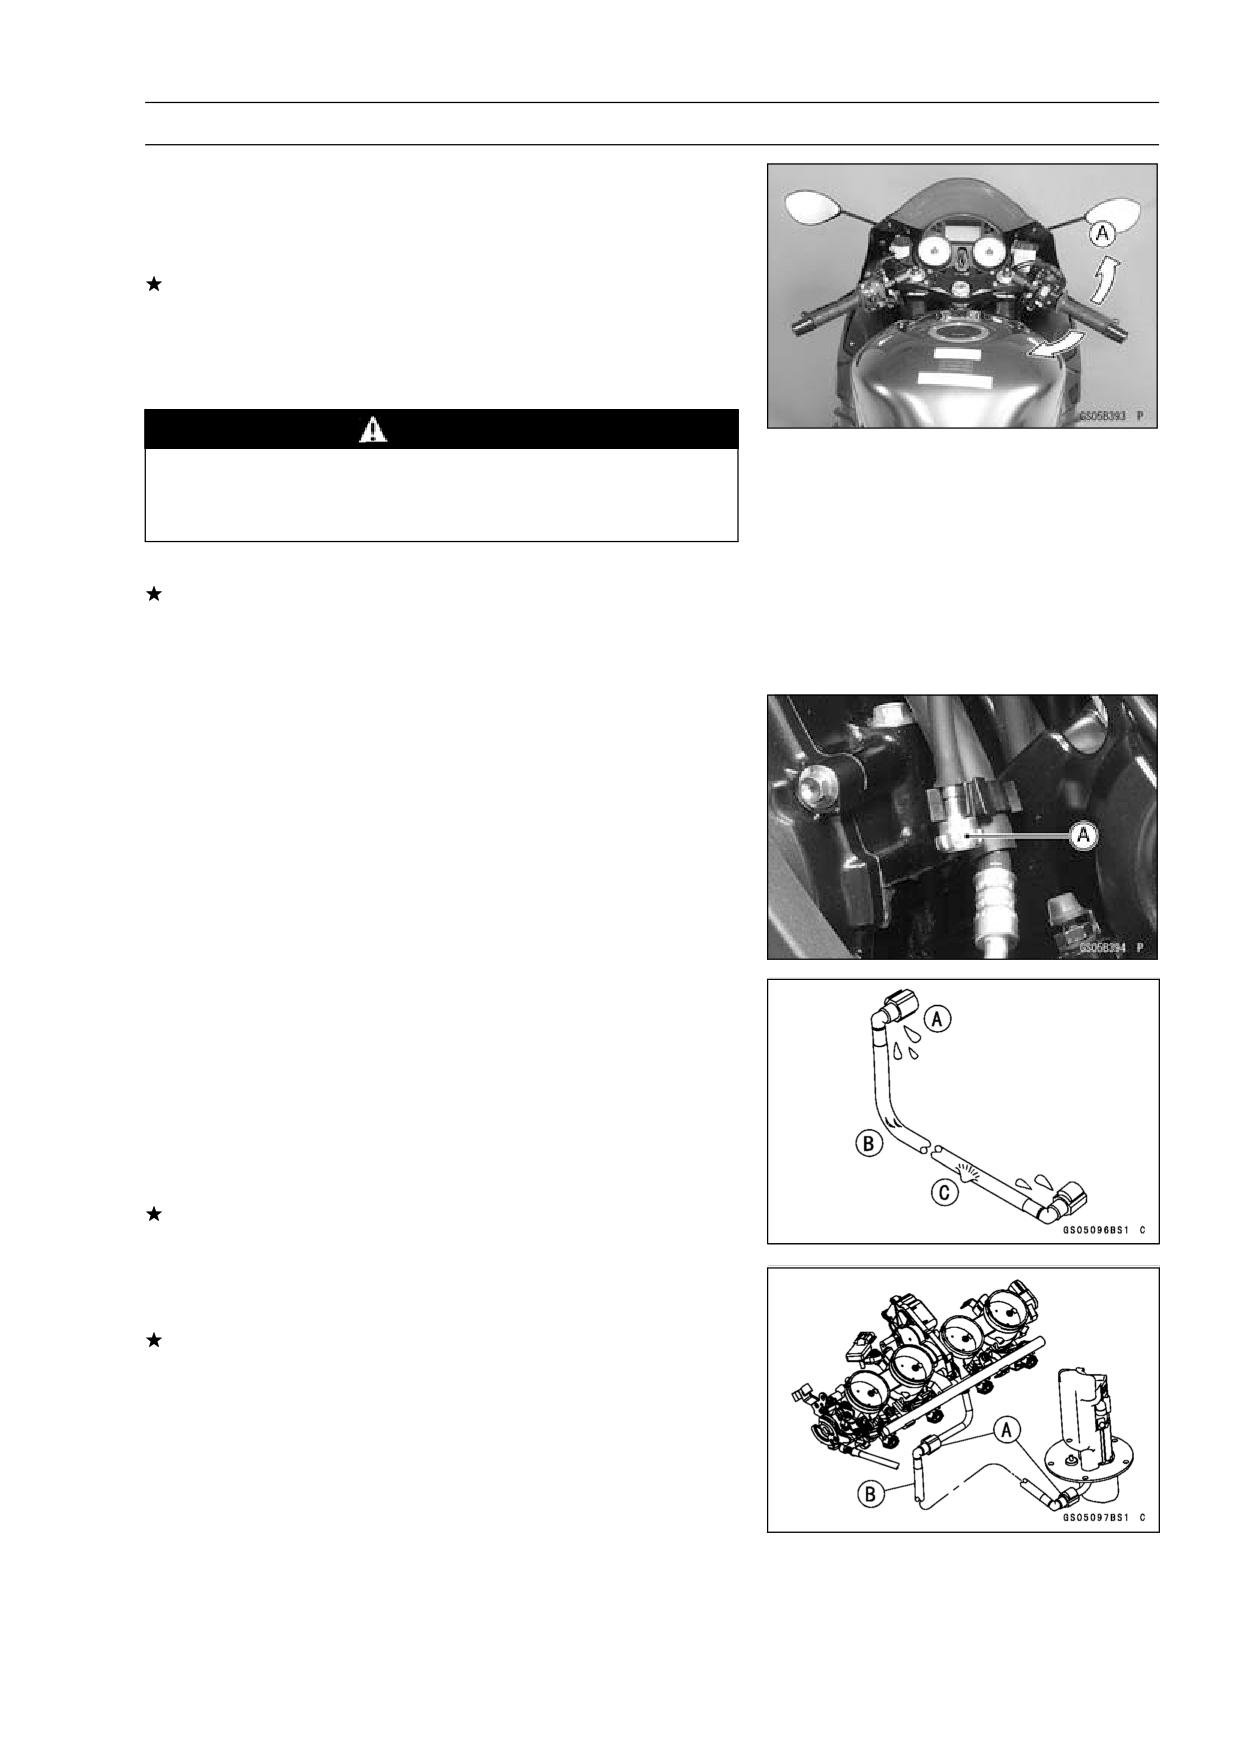
• With the engine idling, turn the handlebar to both sides
[A].
If handlebar movement changes the idle speed, the
throttle cables may be improperly adjusted or incorrectly
routed, or damaged. Be sure to correct any of these
conditions before riding (see Cable, Wire, and Hose
Routing section in the Appendix chapter).
WARNING
Operation with improperly adjusted, incorrectly
routed, or damaged cables could result in an un-
safe riding condition.
• Check the idle speed.
If the idle speed is out of specified range, adjust it.
Idle Speed
Standard:
1 100 ±50 r/min (rpm)
Idle Speed Adjustment
• Start the engine and warm it up thoroughly.
• Turn the adjusting screw [A] until the idle speed is correct.
○Open and close the throttle a few times to make sure that
the idle speed is within the specified range. Readjust if
necessary.
Fuel Hose Inspection (fuel leak, damage,
installation condition)
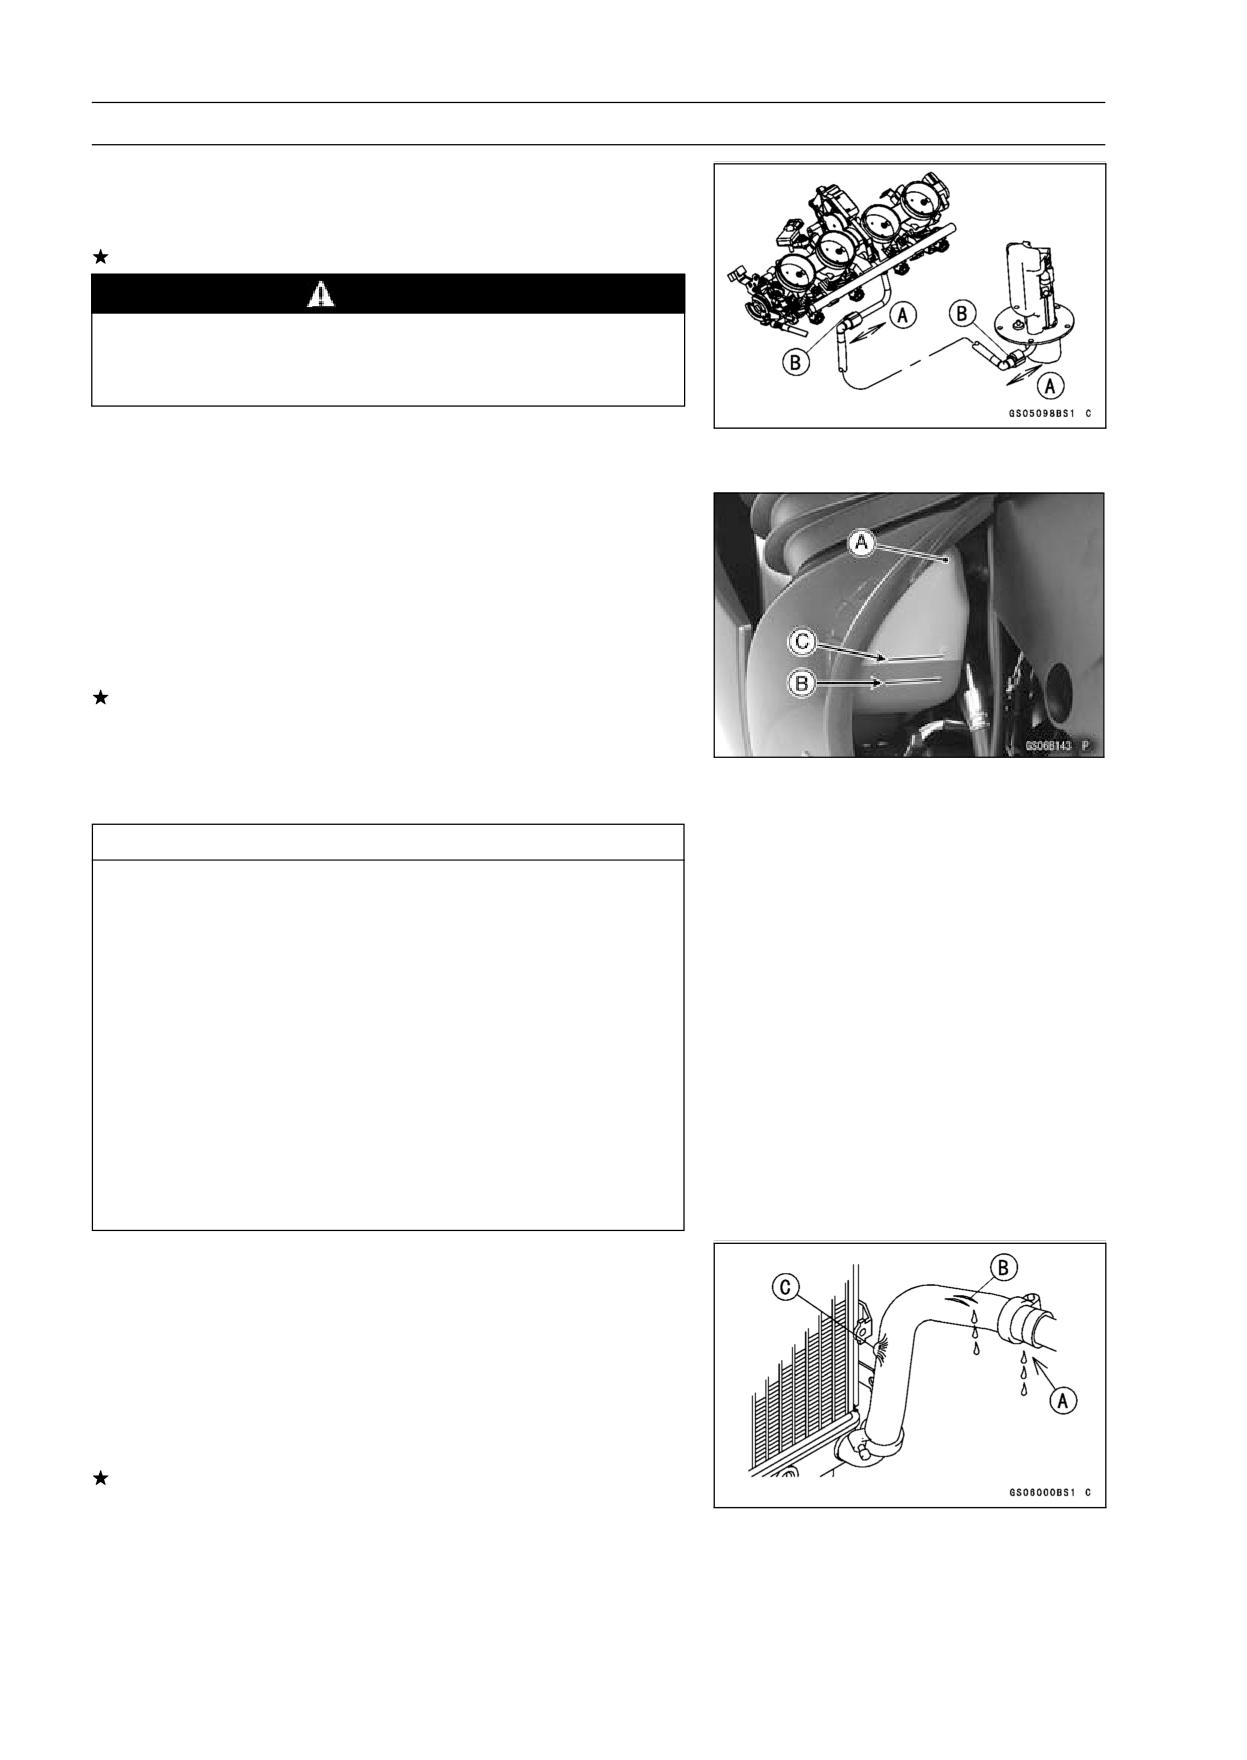
○If the motorcycle is not properly handled, the high pres-
sure inside the fuel line can cause fuel to leak [A] or the
hose to burst. Remove the fuel tank (see Fuel Tank Re-
moval in the Fuel System (DFI) chapter) and left middle
fairing (see Middle Fairing Removal in the Frame chap-
ter), and check the fuel hose.
Replace the fuel hose if any fraying, cracks [B] or bulges
[C] are noticed.
• Check that the hoses are routed according to Cable, Wire,
and Hose Routing section in the Appendix chapter.
Replace the hose if it has been sharply bent or kinked.
Hose Joints [A]
Fuel Hose [B]
2-20 PERIODIC MAINTENANCE
Maintenance Procedure
• Check that the hose joints are securely connected.
○Push and pull [A] the hose joint [B] back and forth more
than two times, and make sure it is locked.
If it does not locked, reinstall the hose joint.
WARNING
Make sure the hose joint is installed correctly on the
delivery pipe by sliding the joint, or the fuel could
leak.
Cooling System
Coolant Level Inspection
NOTE
○Check the level when the engine is cold (room or ambi-
ent temperature).
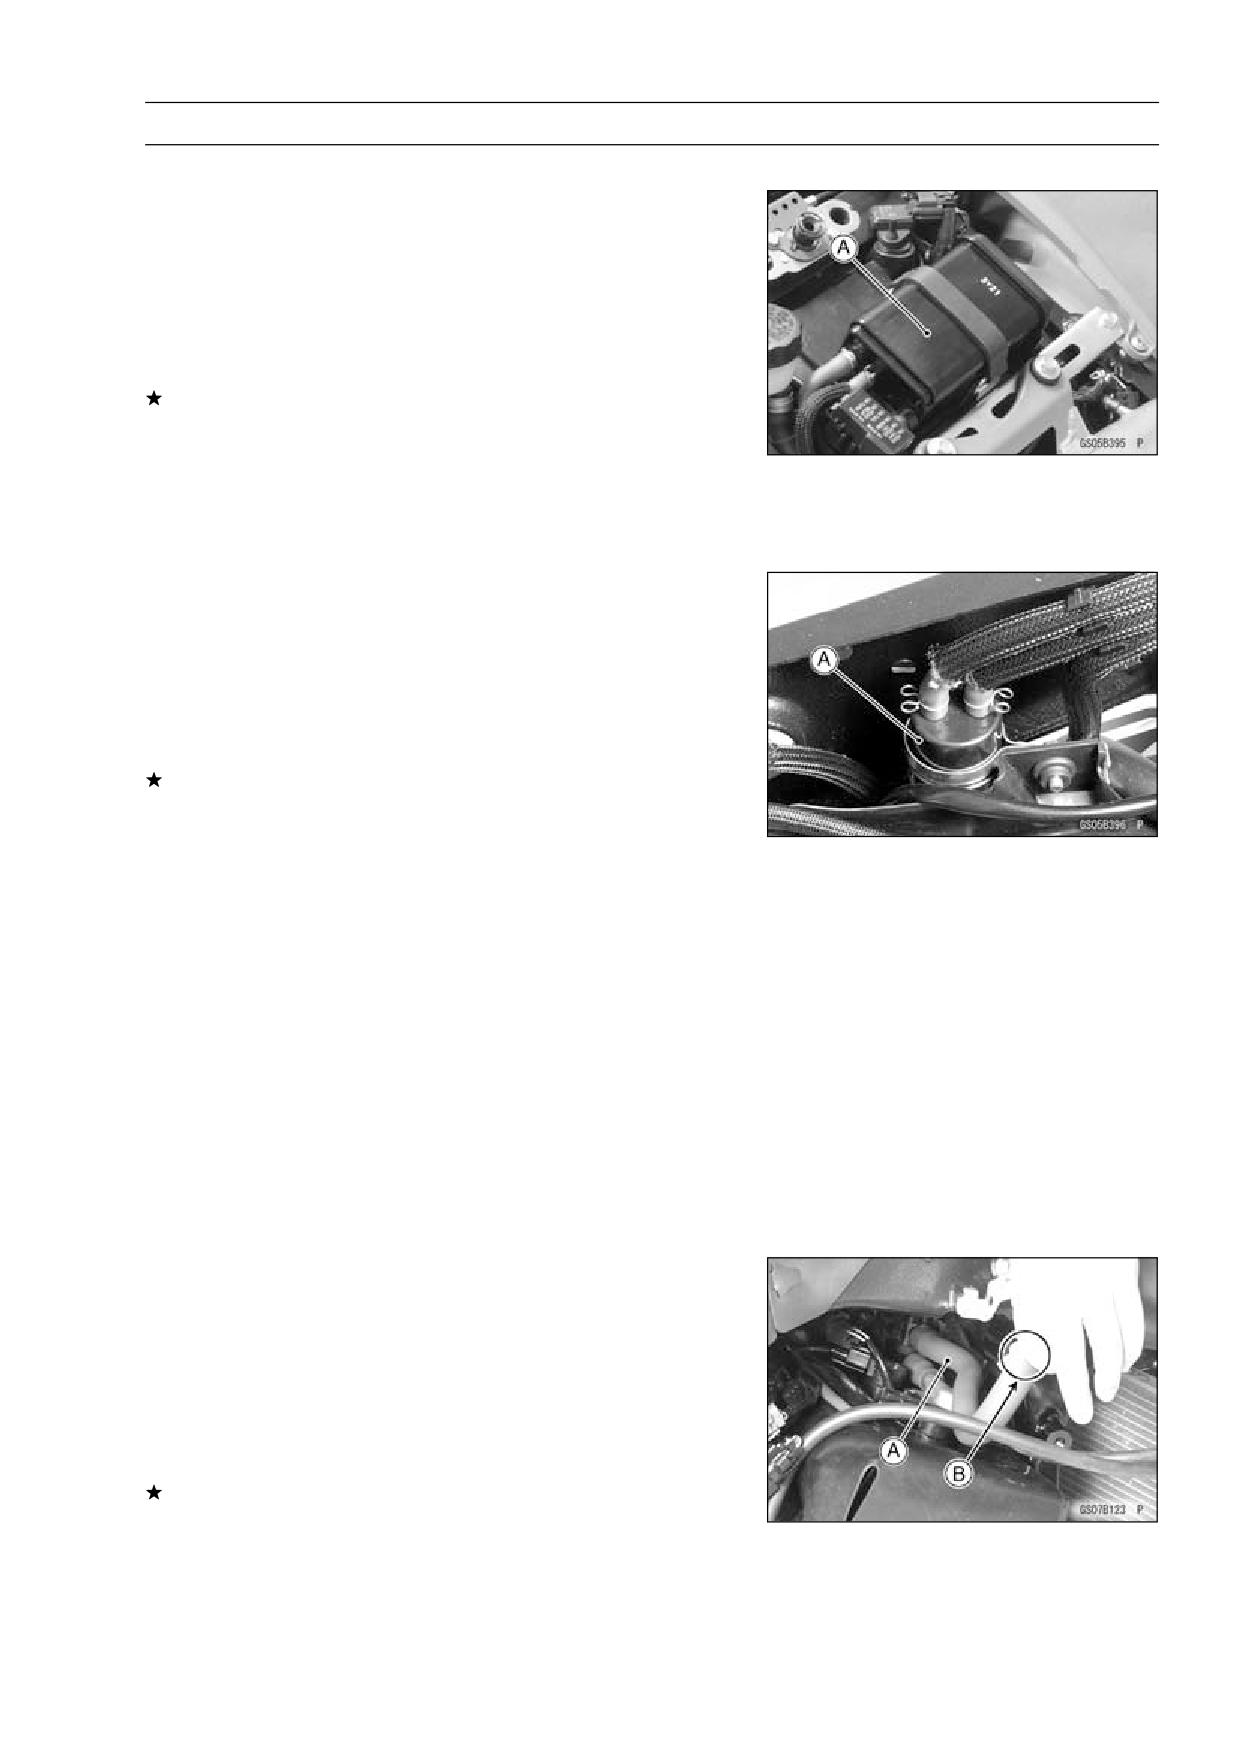
• Check the coolant level in the reserve tank [A] with the
motorcycle held perpendicular (Do not use the sidestand).
If the coolant level is lower than the “L” level line [B], un-
screw the reserve tank cap and add coolant to the “F”
level line [C].
“L”: low
“F”: full
CAUTION
For refilling, add the specified mixture of coolant
and soft water. Adding water alone dilutes the
coolant and degrades its anticorrosion properties.
The diluted coolant can attack the aluminum en-
gine parts. In an emergency, soft water alone can
be added. But the diluted coolant must be returned
to the correct mixture ratio within a few days.
If coolant must be added often or the reservoir tank
has run completely dry, there is probably leakage in
the cooling system. Check the system for leaks.
Coolant ruins painted surfaces. Immediately wash
away any coolant that spills on the frame, engine,
wheels or other painted parts.
Radiator Hose and Pipe Inspection
(Coolant leak, damage, Installation Condition)
○The high pressure inside the radiator hose can cause
coolant to leak [A] or the hose to burst if the line is not
properly maintained.
• Visually inspect the hoses for signs of deterioration.
Squeeze the hoses. A hose should not be hard and
brittle, nor should it be soft or swollen.
Replace the hose if any fraying, cracks [B] or bulges [C]
are noticed.
• Check that the hoses are securely connected and clamps
are tightened correctly.
Torque - Radiator Hose Clamp Screws: 2.0 N·m (0.20 kgf·m,
18 in·lb)
PERIODIC MAINTENANCE 2-21
Maintenance Procedure
Evaporative Emission Control System (California Model)
Evaporative Emission Control System Inspection
• Inspect the canister as follows.
○Remove the seat (see Seat Removal in the Frame chap-
ter).
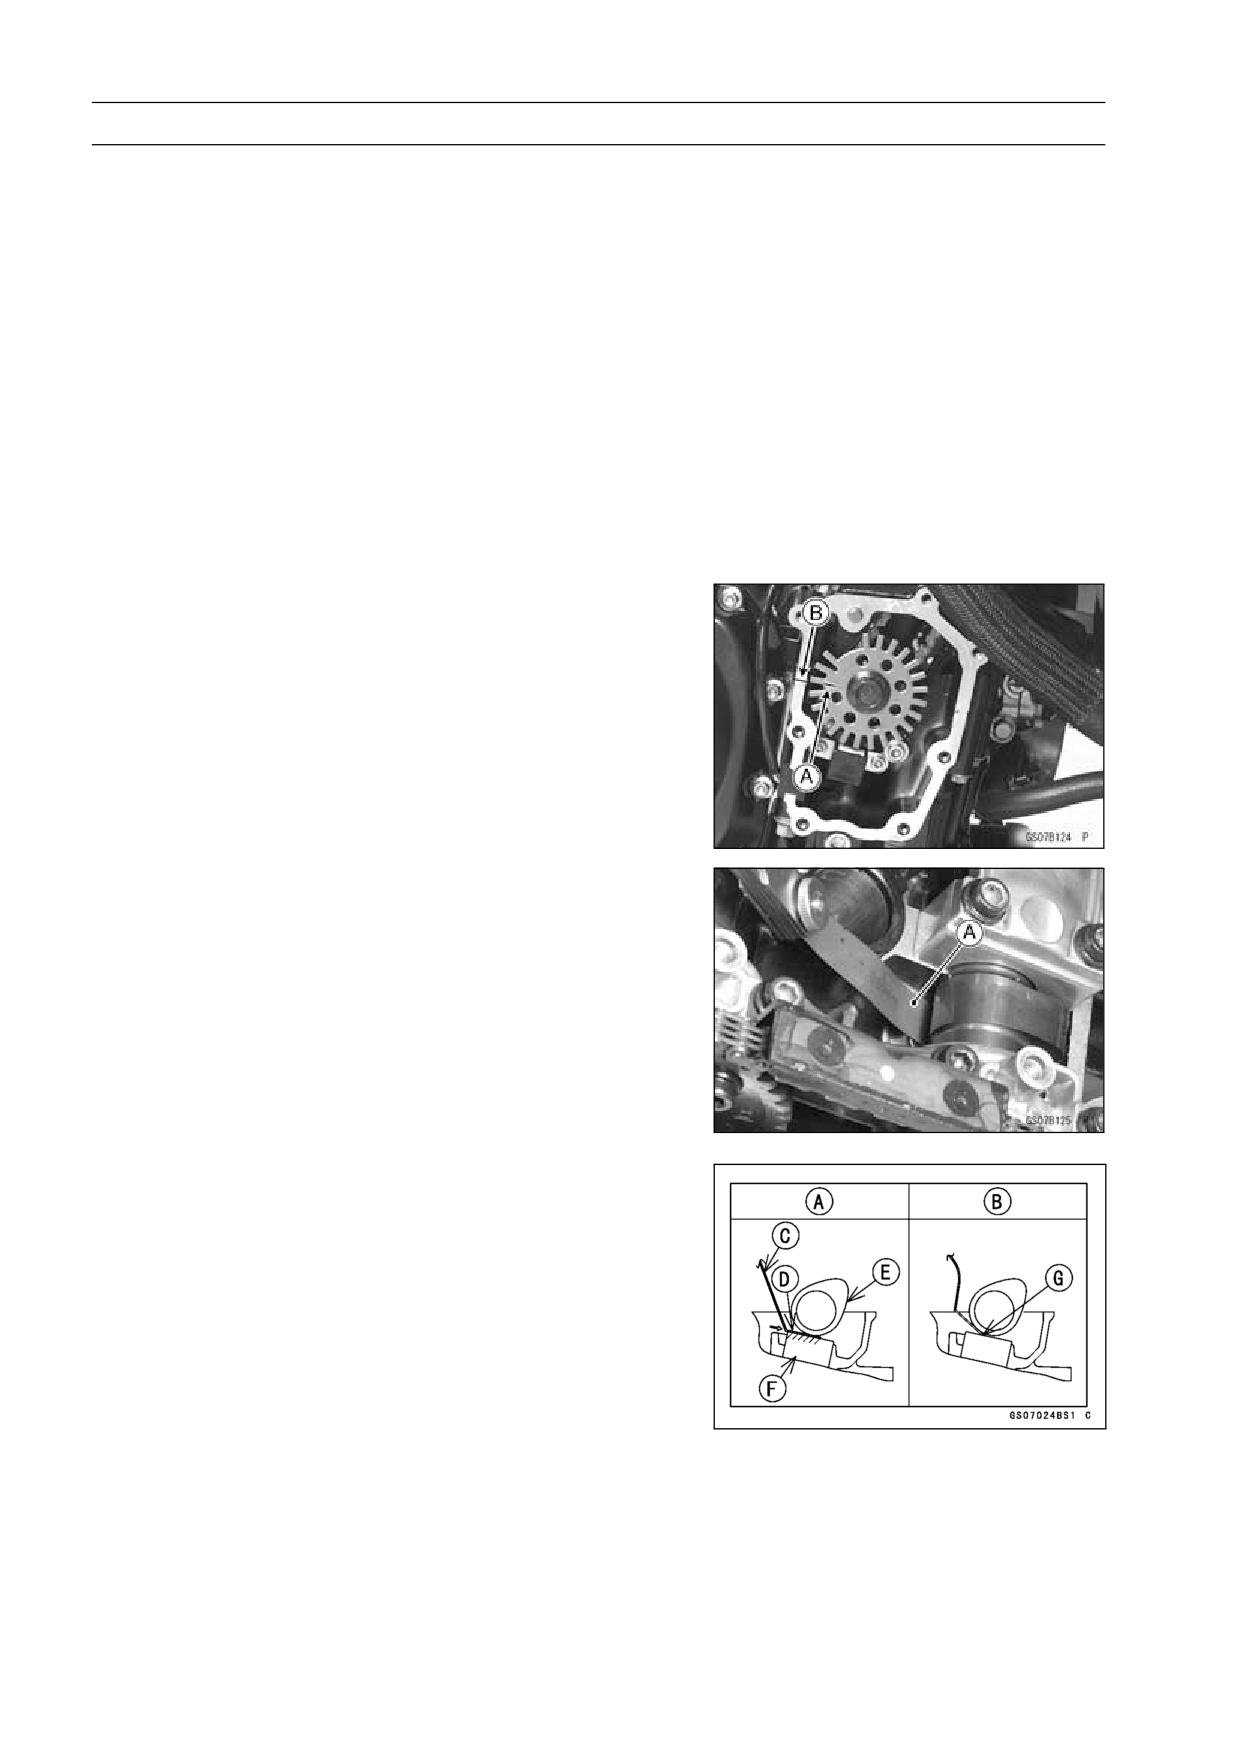
○Remove the canister [A], and disconnect the hoses from
the canister.
○Visually inspect the canister for cracks or other damage.
If the canister has any cracks or bad damage, replace it
with a new one.
NOTE
○The canister is designed to work well through the motor-
cycle’s life without any maintenance if it is used under
normal conditions.
• Check the liquid/vapor separator as follows.
○Remove the fuel tank (see Fuel Tank Removal in the Fuel
System (DFI) chapter).
○Disconnect the hoses from the separator, and remove the
separator [A] from the motorcycle right side.
○Visually inspect the separator for cracks and other dam-
age.
If the separator has any cracks or damage, replace it with
a new one.
○To prevent the gasoline from flowing into or out of the
canister, hold the separator perpendicular to the ground.
• Check the hoses of the evaporative emission control sys-
tem as follows.
○Check that the hoses are securely connected and clips
are in position.
○Replace any kinked, deteriorated or damaged hoses.
○Route the hoses according to Cable, Wire, and Hose
Routing section in the Appendix chapter. Refer to the di-
agram of the evaporative emission control system in the
Fuel System (DFI) chapter too.
○When installing the hoses, avoid sharp bending, kinking,
flattening or twisting, and route the hoses with a minimum
of bending so that the emission flow will not be obstructed.
Air Suction System
Air Suction System Damage Inspection
• Remove the right middle fairing (see Middle Fairing Re-
moval in the Frame chapter).
• Pull the air switching vale hose [A] out of the air cleaner
housing.
• Start the engine and run it at idle speed.
• Plug [B] the air switching valve hose end with your finger
and feel vaccum pulsing in the hose.
If there is no vaccum pulsation, check the hose line for
leak. If there is no leak, check the air switching valve
(see Air Switching Valve Unit Test in the Electrical Sys-
tem chapter) or air suction valve (see Air Suction Valve
Inspection in the Engine Top End chapter).
2-22 PERIODIC MAINTENANCE
Maintenance Procedure
Engine Top End
Valve Clearance Inspection
Valve Clearance Inspection
NOTE
○Valve clearance must be checked and adjusted when
the engine is cold (at room temperature).
• Remove:
Lower Fairings (see Lower Fairing Removal in the Frame
chapter)
Middle Fairings (see Middle Fairing Removal in the
Frame chapter)
Crankshaft Sensor Cover
Cylinder Head Cover (see Cylinder Head Cover Re-
moval in the Engine Top End chapter)
• Position the crankshaft at 1, 4 piston TDC.
TDC Mark [A] for #1, 4 Pistons
Timing Mark [B] (crankcase halves mating surface)
• Using a thickness gauge [A], measure the valve clearance
between the cam and the valve lifter.
Valve Clearance
Standard:
Exhaust
0.22 ∼ 0.27 mm (0.0087 ∼ 0.0106 in.)
Inlet
0.15 ∼ 0.20 mm (0.0059 ∼ 0.0079 in.)
NOTE
○Thickness gauge is horizontally inserted on the valve
lifter.
Appropriateness [A]
Inadequacy [B]
Thickness Gauge [C]
Horizontally Inserts [D]
Cam [E]
Valve Lifter [F]
Hits the Valve Lifter Ahead [G]
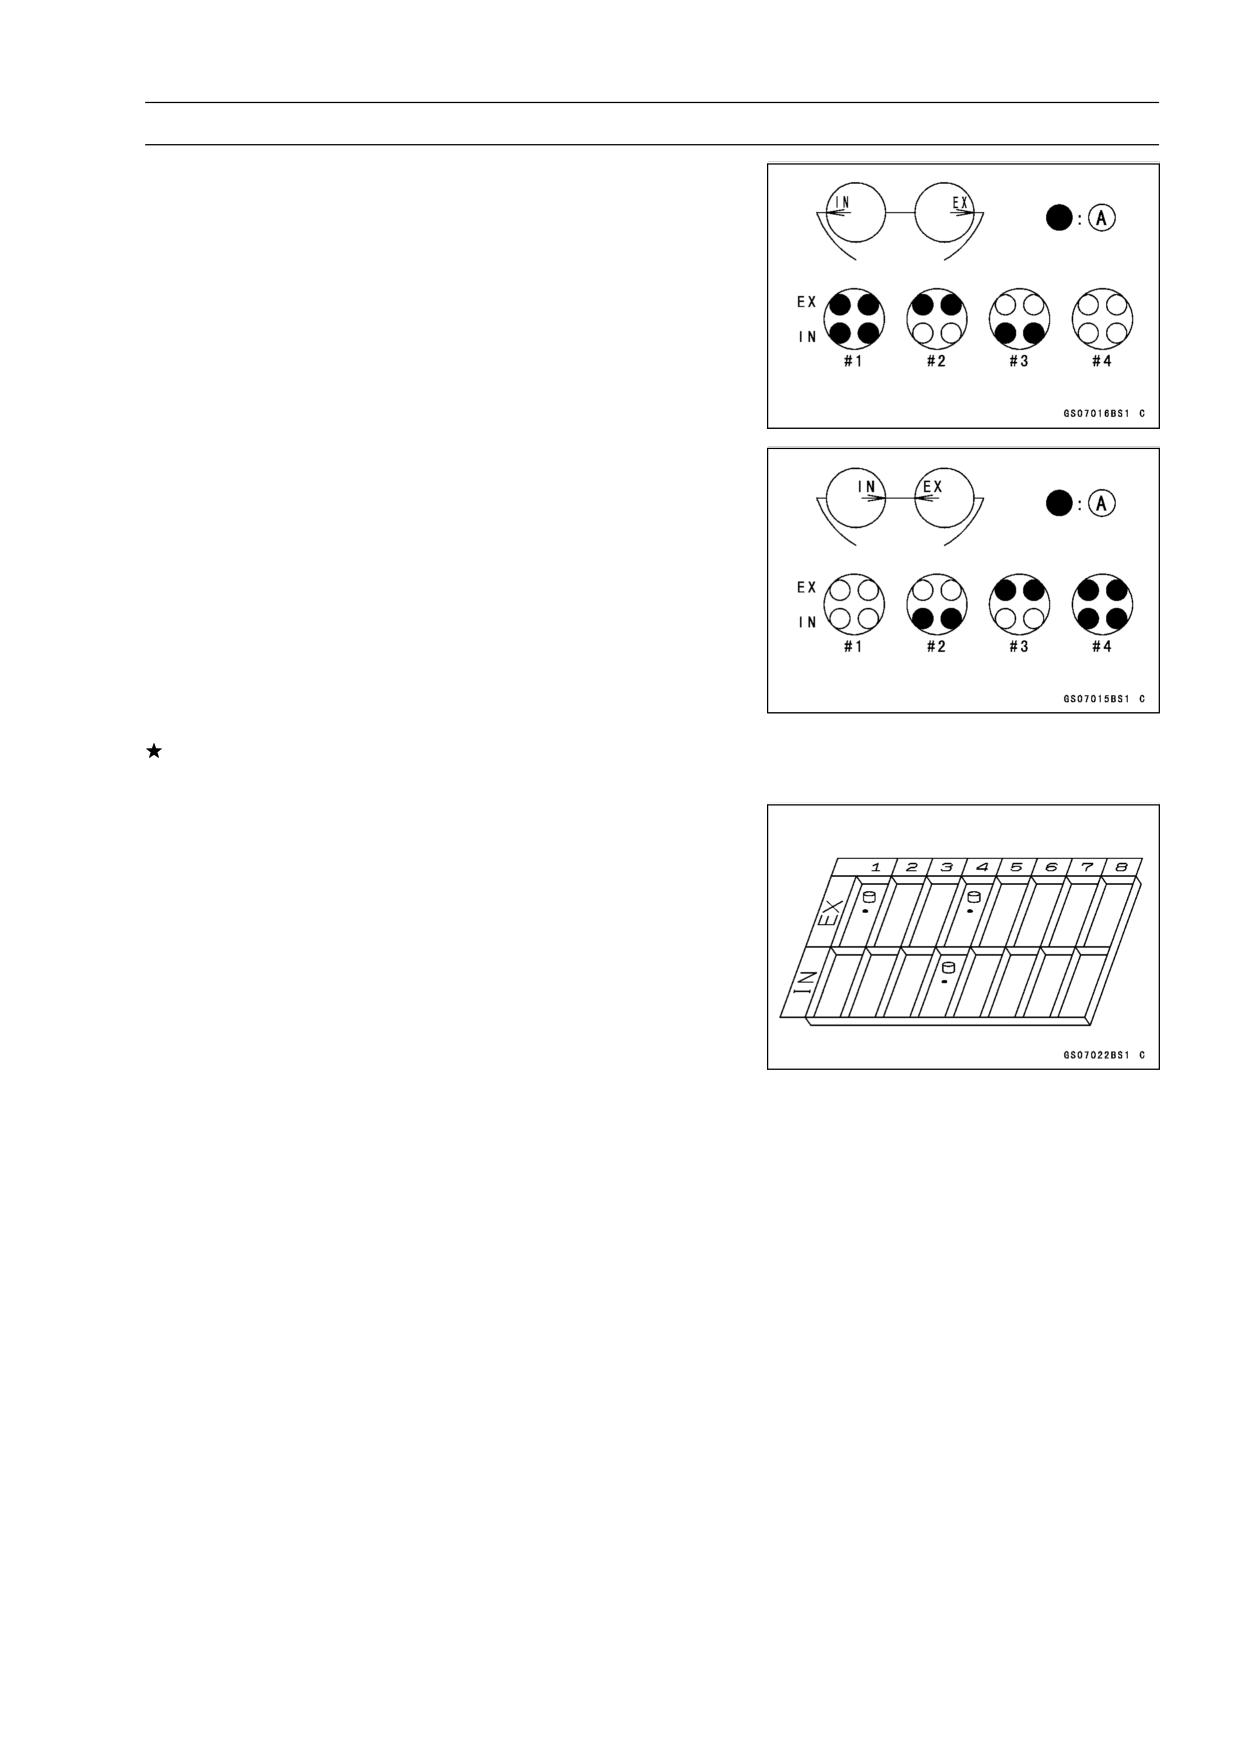
PERIODIC MAINTENANCE 2-23
Maintenance Procedure
○When positioning #1 piston TDC at the end of the
compression stroke:
Inlet Valve Clearance of #1 and #3 Cylinders
Exhaust Valve Clearance of #1 and #2 Cylinders
Measuring Valve [A]
○When positioning #4 piston TDC at the end of the
compression stroke:
Inlet Valve Clearance of #2 and #4 Cylinders
Exhaust Valve Clearance of #3 and #4 Cylinders
Measuring Valve [A]
If the valve clearance is not within the specified range,
first record the clearance, and then adjust it.
Valve Clearance Adjustment
• To change the valve clearance, remove the camshaft
chain tensioner, camshafts and valve lifters. Replace the
shim with one of a different thickness.
NOTE
○Mark and record the locations of the valve lifters and
shims so that they can be reinstalled in their original
positions.
2-24 PERIODIC MAINTENANCE
Maintenance Procedure
○Bisides the standard shims in the valve clearance adjust-
ment charts, the following additional shims maybe used.
Adjustment Shims
Part Number
Thickness
92025-1982
2.425
mm
92025-1983
2.475
mm
92025-1984
2.525
mm
92025-1985
2.575
mm
92180-1058
2.375
mm
92180-1059
2.625
mm
92180-1194
2.675
mm
92180-1195
2.725
mm
92180-1196
2.775
mm
92180-0209
2.025
mm
92180-0210
2.075
mm
92180-0211
2.125
mm
92180-0212
2.175
mm
92180-0213
2.225
mm
92180-0214
2.275
mm
92180-0215
2.325
mm
92180-0216
2.825
mm
92180-0217
2.875
mm
92180-0218
2.925
mm
92180-0219
2.975
mm
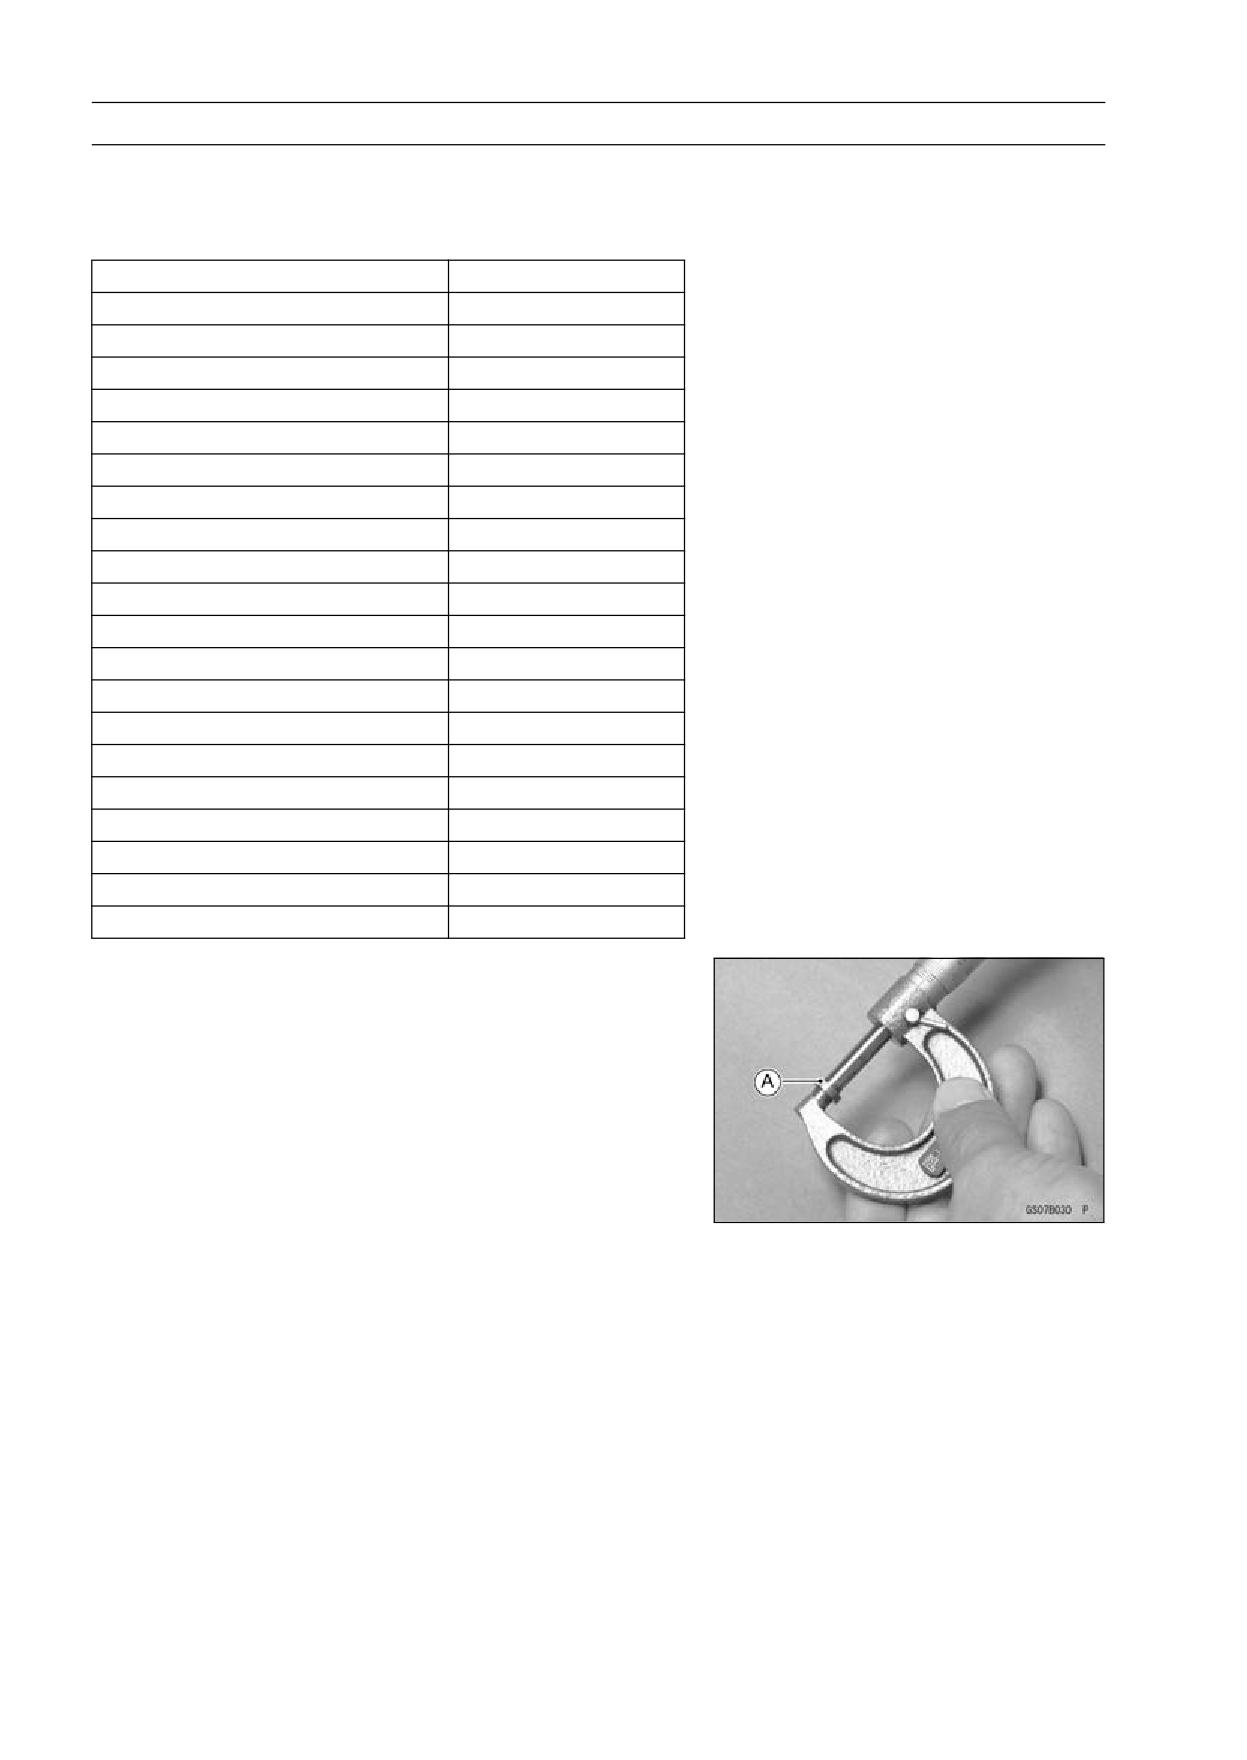
• Clean the shim to remove any dust or oil.
• Measure the thickness of the removed shim [A].
PERIODIC MAINTENANCE 2-25
Maintenance Procedure
EXHAUST- VALVE CLEARANCE ADJUSTMENT CHART
1. Measure the clearance (with engine cold).
2. Check present shim size.
3. Match clearance in vertical column with present shim
size in horizontal column.
4. Install the shim specified where the lines intersect. This
shim will give the proper clearance.
Example: Present shim is 2.60 mm.
Measured clearance is 0.33 mm.
Replace 2.60 mm shim with 2.70 mm shim.
2-26 PERIODIC MAINTENANCE
Maintenance Procedure
INLET- VALVE CLEARANCE ADJUSTMENT CHART
1. Measure the clearance (with engine cold).
2. Check present shim size.
3. Match clearance in vertical column with present shim
size in horizontal column.
4. Install the shim specified where the lines intersect. This
shim will give the proper clearance.
Example: Present shim is 2.55 mm.
Measured clearance is 0.36 mm.
Replace 2.55 mm shim with 2.75 mm shim.
PERIODIC MAINTENANCE 2-27
Maintenance Procedure
CAUTION
Be sure to remeasure the clearance after selecting
a shim according to the table. If the clearance is out
of the specified rage, use the additional shim.
○If there is no valve clearance, use a shim that is a few
sizes smaller, and remeaasure the valve clearance.
• When installing the shim, face the marked side toward the
valve lifter. At this time, apply engine oil to the shim or
the valve lifter to keep the shim in place during camshaft
installation.
CAUTION
Do not put shim stock under the shim. This may
cause the shim to pop out at high rpm, causing ex-
tensive engine damage.
Do not grind the shim. This may cause it to fracture,
causing extensive engine damage.
• Apply engine oil to the valve lifter surface and install the
lifter.
• Install the camshaft (see Camshaft Installation in the En-
gine Top End chapter).
• Recheck the valve clearance and readjust if necessary.
• Install the removed parts (see appropriate chapters).
Clutch and Drive Train
Clutch Operation Inspection
• Start the engine and check that the clutch does not slip
and that it releases properly.
If the clutch operation is insufficiency, inspect the clutch
system.
WARNING
When inspecting by running the vehicle, note a
surrounding traffic situation enough in the place of
safety.
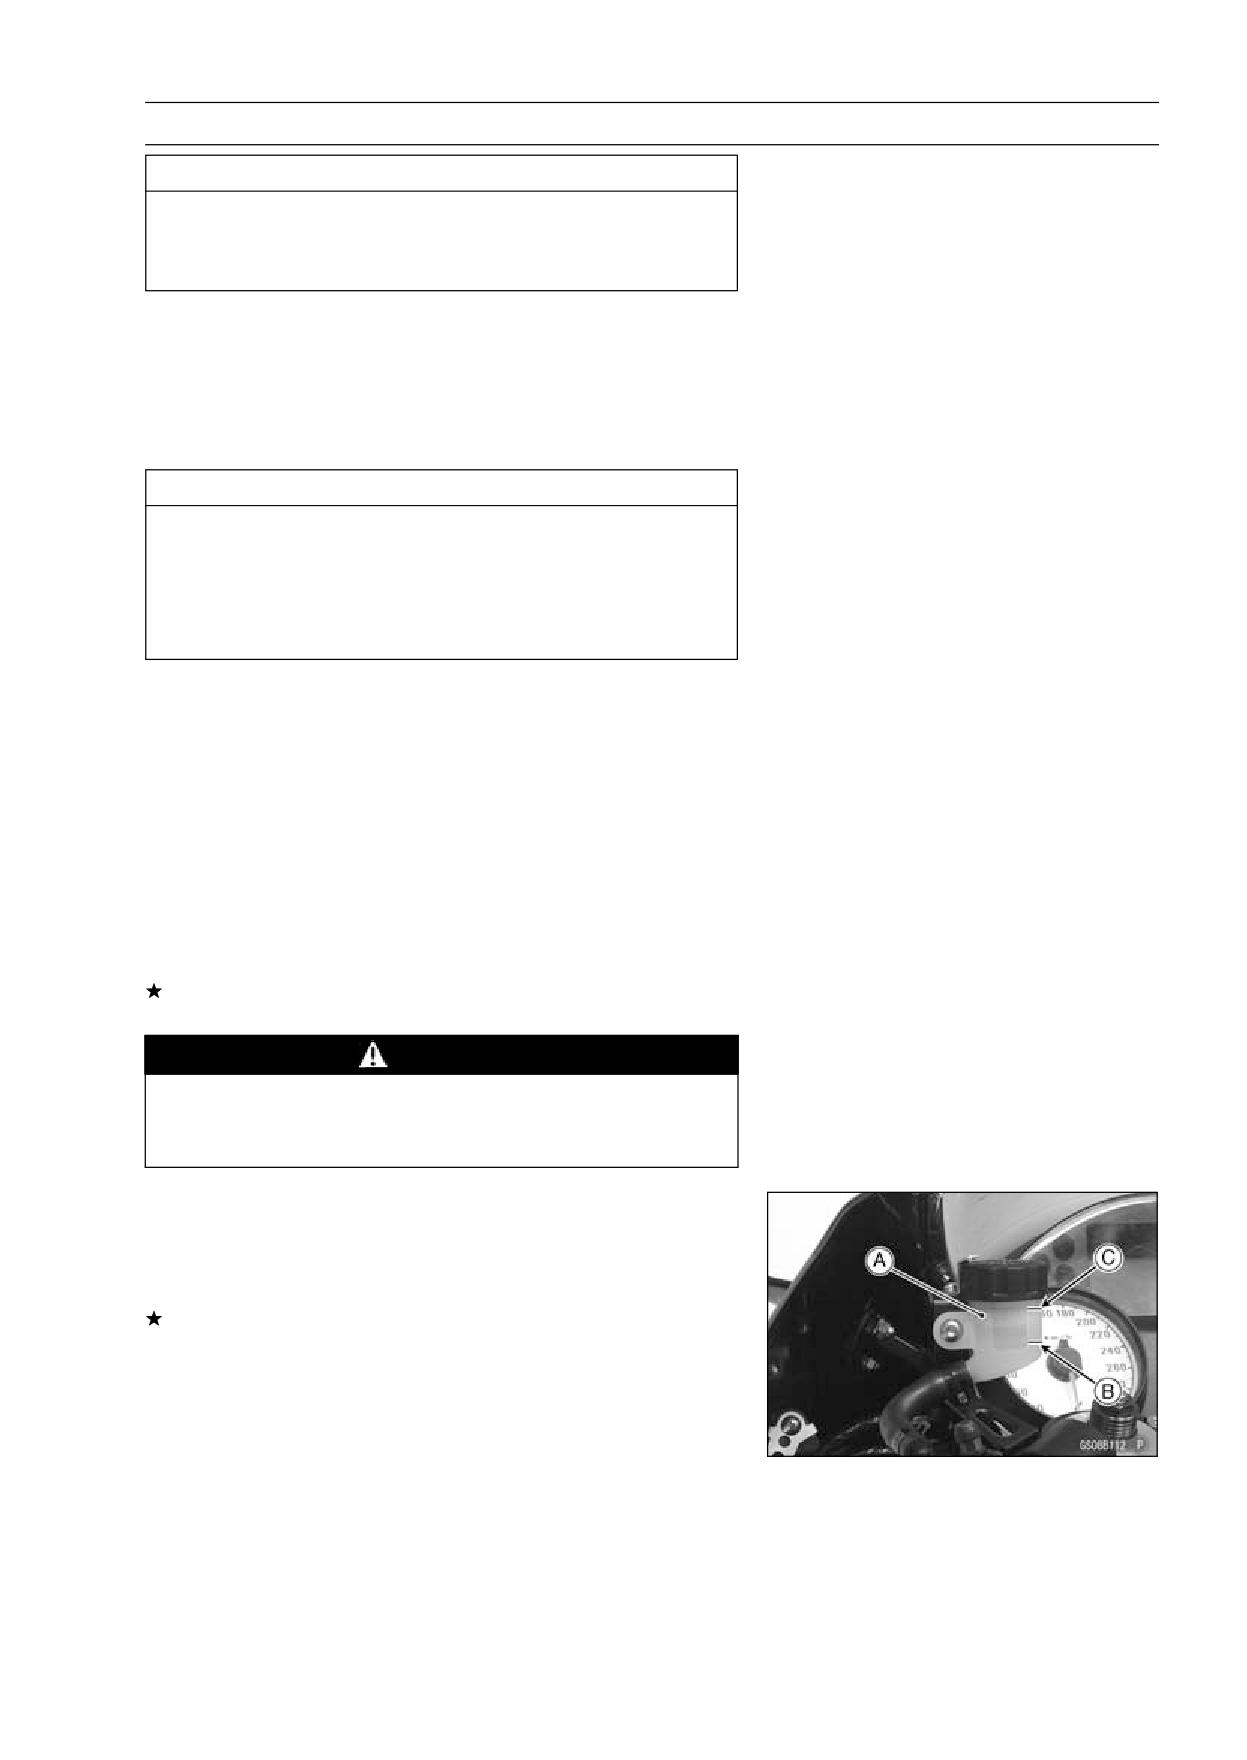
Clutch Fluid Level Inspection
• Hold the clutch fluid reservoir [A] horizontal.
• Check that the clutch fluid level of the clutch reservoir is
between the lower [B] and the upper [C] level lines.
If the fluid level is lower than the lower level line, fill the
reservoir to the upper level line in the reservoir.
○Since the clutch fluid is the same as the brake fluid, refer
to Brake Fluid Section in the Brake chapter for further
details.
2-28 PERIODIC MAINTENANCE
Maintenance Procedure
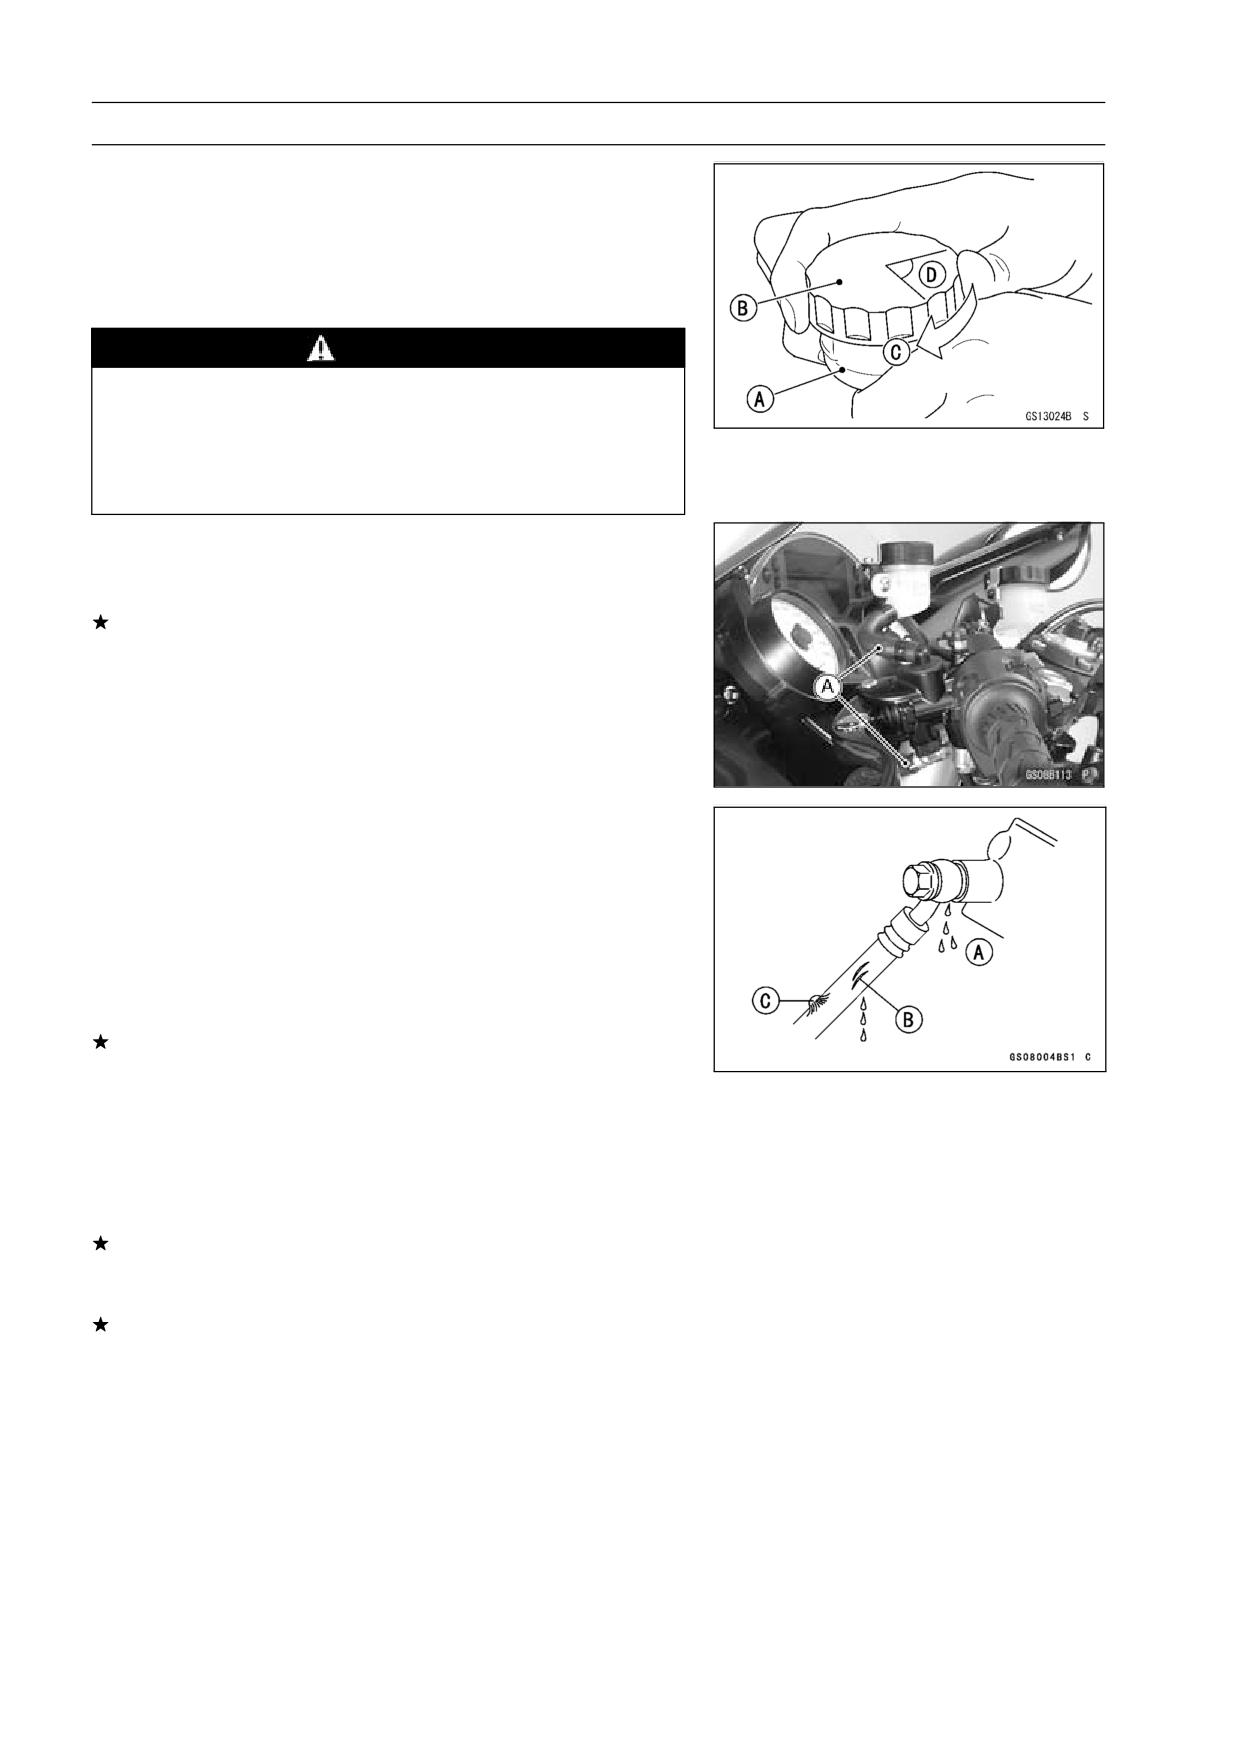
• Follow the procedure below to instal the clutch fluid reser-
voir cap correctly.
○First, tighten the clutch fluid reservoir cap [B] clockwise
[C] by hand until the resistance is felt fully; then, tighten
the cap an additional 1/6 turn [D] while holding the clutch
fluid reservoir body [A].
WARNING
Change the fluid in the clutch line completely if the
fluid must be refilled but the type and brand of the
fluid that already is in the reservoir are unidentified.
After changing the fluid, use only the same type and
brand of fluid thereafter.
Clutch Fluid Leak Inspection
• Apply the clutch lever and inspect the clutch fluid leak
from the clutch hose/pipe [A] and fittings.
If the clutch fluid leaked form any position, inspect or re-
place the problem part.
Clutch Hose and Pipe Damage and Installation
Condition Inspection
• Inspect the clutch hoses and fittings for deterioration,
cracks, corrosion and signs of leakage.
○The high pressure inside the clutch line can cause fluid
to leak [A] or the hose to burst if the line is not properly
maintained. Bend and twist the rubber hose while exam-
ining it.
Replace it if any fraying, cracks [B] or bulges [C] are no-
ticed.
• Check that the hoses are securely connected and banjo
bolts are tightened correctly.
Torque - Clutch Hose Banjo Bolts: 25 N·m (2.5 kgf·m, 18
ft·lb)
• Inspect the clutch hose routing.
If any clutch hose routing is incorrect, route the hoses
according to Cable, Wire, and Hose Routing section in
the Appendix chapter.
Replace the hose if the has been sharply bent or kinked.
PERIODIC MAINTENANCE 2-29
Maintenance Procedure
Wheels/Tires
Air Pressure Inspection
• Remove the air valve cap.
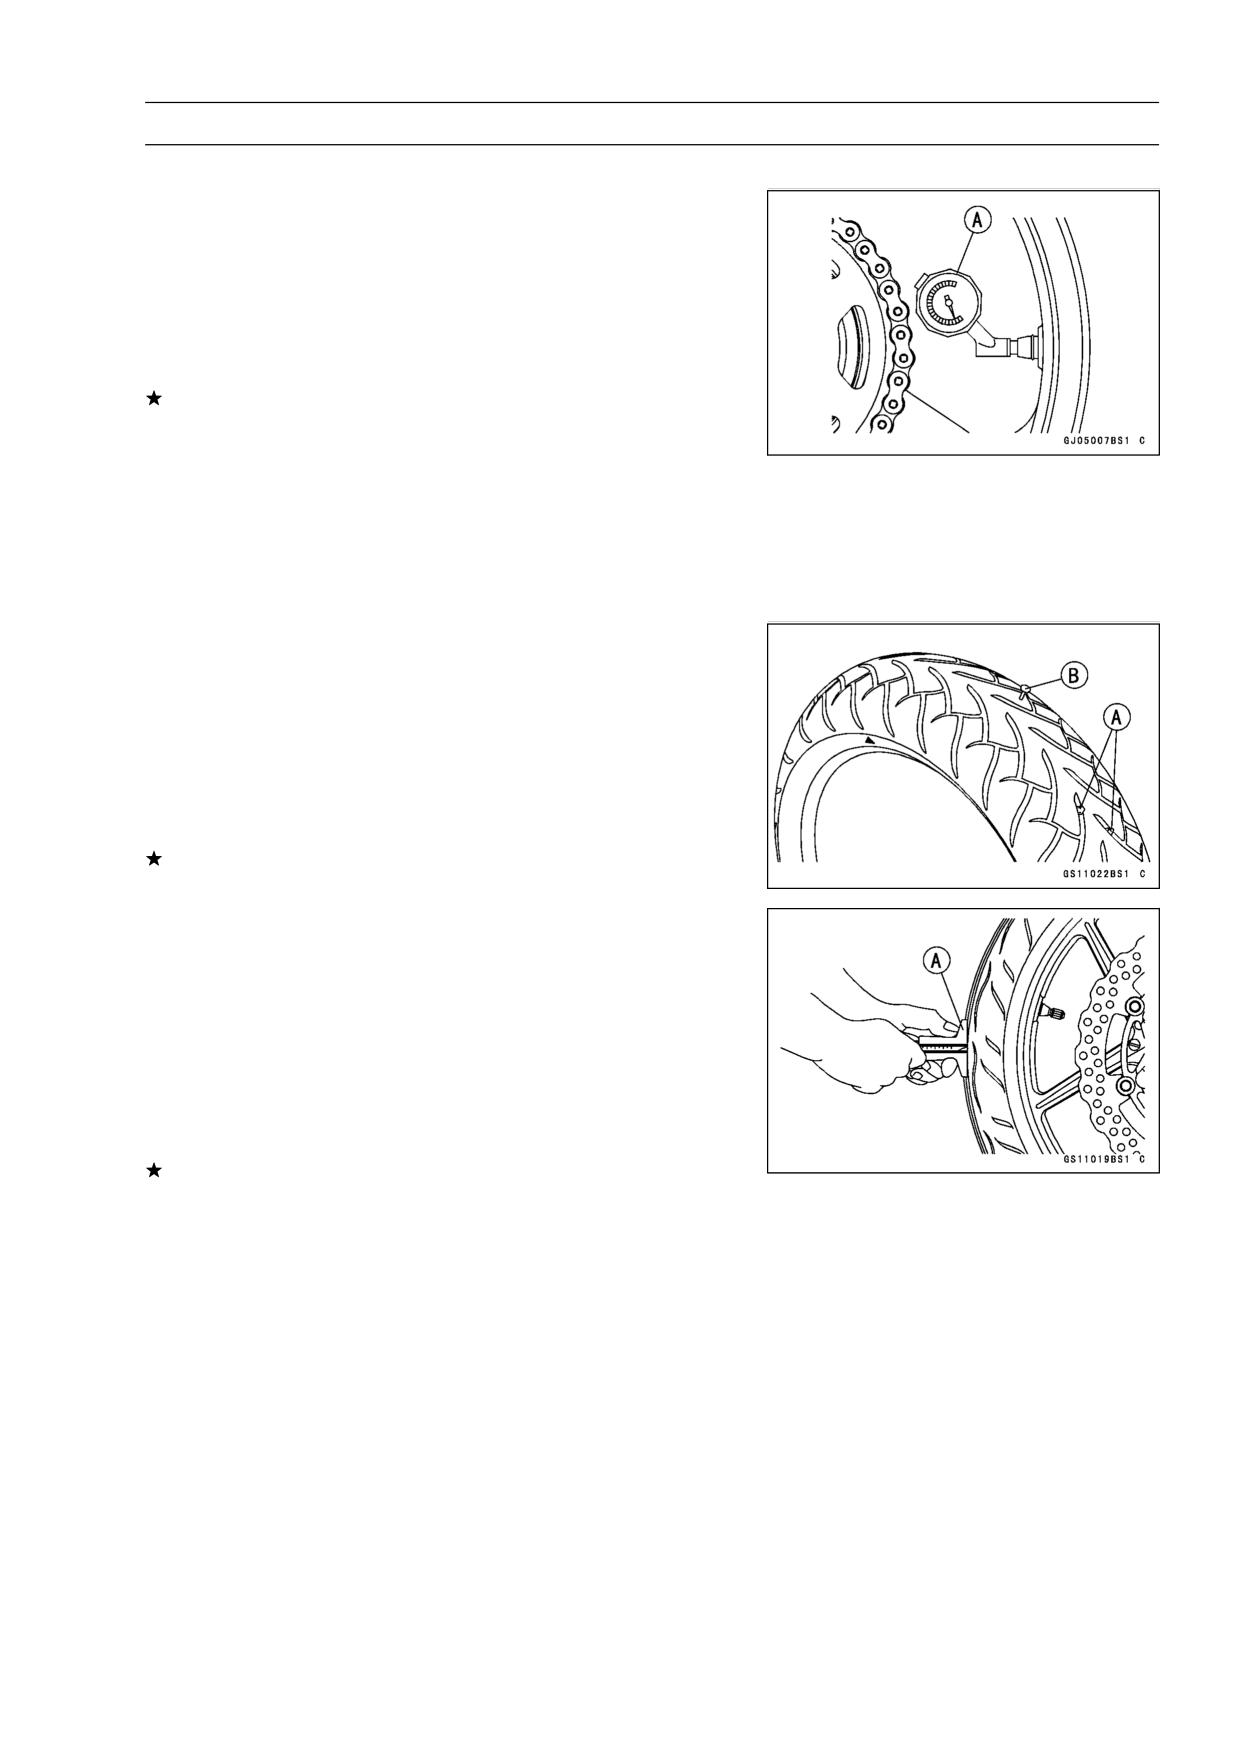
• Measure the tire air pressure with an air pressure gauge
[A] when the tires are cold (that is, when the motorcycle
has not been ridden more than a mile during the past 3
hours).
• Install the air valve cap.
Adjust the tire air pressure according to the specifications
if necessary.
Air Pressure (when Cold)
Front: Up to 180 kg (397 lb)
290 kPa (2.9 kgf/cm², 42 psi)
Rear:
Up to 180 kg (397 lb)
290 kPa (2.9 kgf/cm², 42 psi)
Wheel/Tire Damage Inspection
• Remove any imbedded stones [A] or other foreign parti-
cles [B] from tread.
• Visually inspect the tire for cracks and cuts, and replace
the tire if necessary. Swelling or high spots indicate inter-
nal damage, requiring tire replacement.
• Visually inspect the wheel for cracks, cuts and dents dam-
age.
If any damage is found, replace the wheel if necessary.
Tire Tread Wear Inspection
As the tire tread wears down, the tire becomes more sus-
ceptible to puncture and failure. An accepted estimate is
that 90% of all tire failures occur during the last 10% of tread
life (90% worn). So it is false economy and unsafe to use
the tires until they are bald.
• Measure the tread depth at the center of the tread with a
depth gauge [A]. Since the tire may wear unevenly, take
measurement at several places.
If any measurement is less than the service limit, replace
the tire (see Tire Removal/Installation in the Wheels/Tires
chapter).
Tread Depth
Standard:
Front
3.8 mm (0.15 in.)
Rear
4.8 mm (0.19 in.)
Service Limit:
Front
1 mm (0.04 in.)
(AT, CH, DE) 1.6 mm (0.06 in.)
Rear
2 mm (0.08 in.)
(Up to 130 km/h (80 mph))
3 mm (0.12 in.)
(Over 130 km/h (80 mph))
2-30 PERIODIC MAINTENANCE
Maintenance Procedure
WARNING
To ensure safe handling and stability, use only the
recommended standard tires for replacement, in-
flated to the standard pressure.
NOTE
○Most countries may have their own regulations a mini-
mum tire tread depth: be sure to follow them.
○Check and balance the wheel when a tire is replaced
with a new one.
Wheel Bearing Damage Inspection
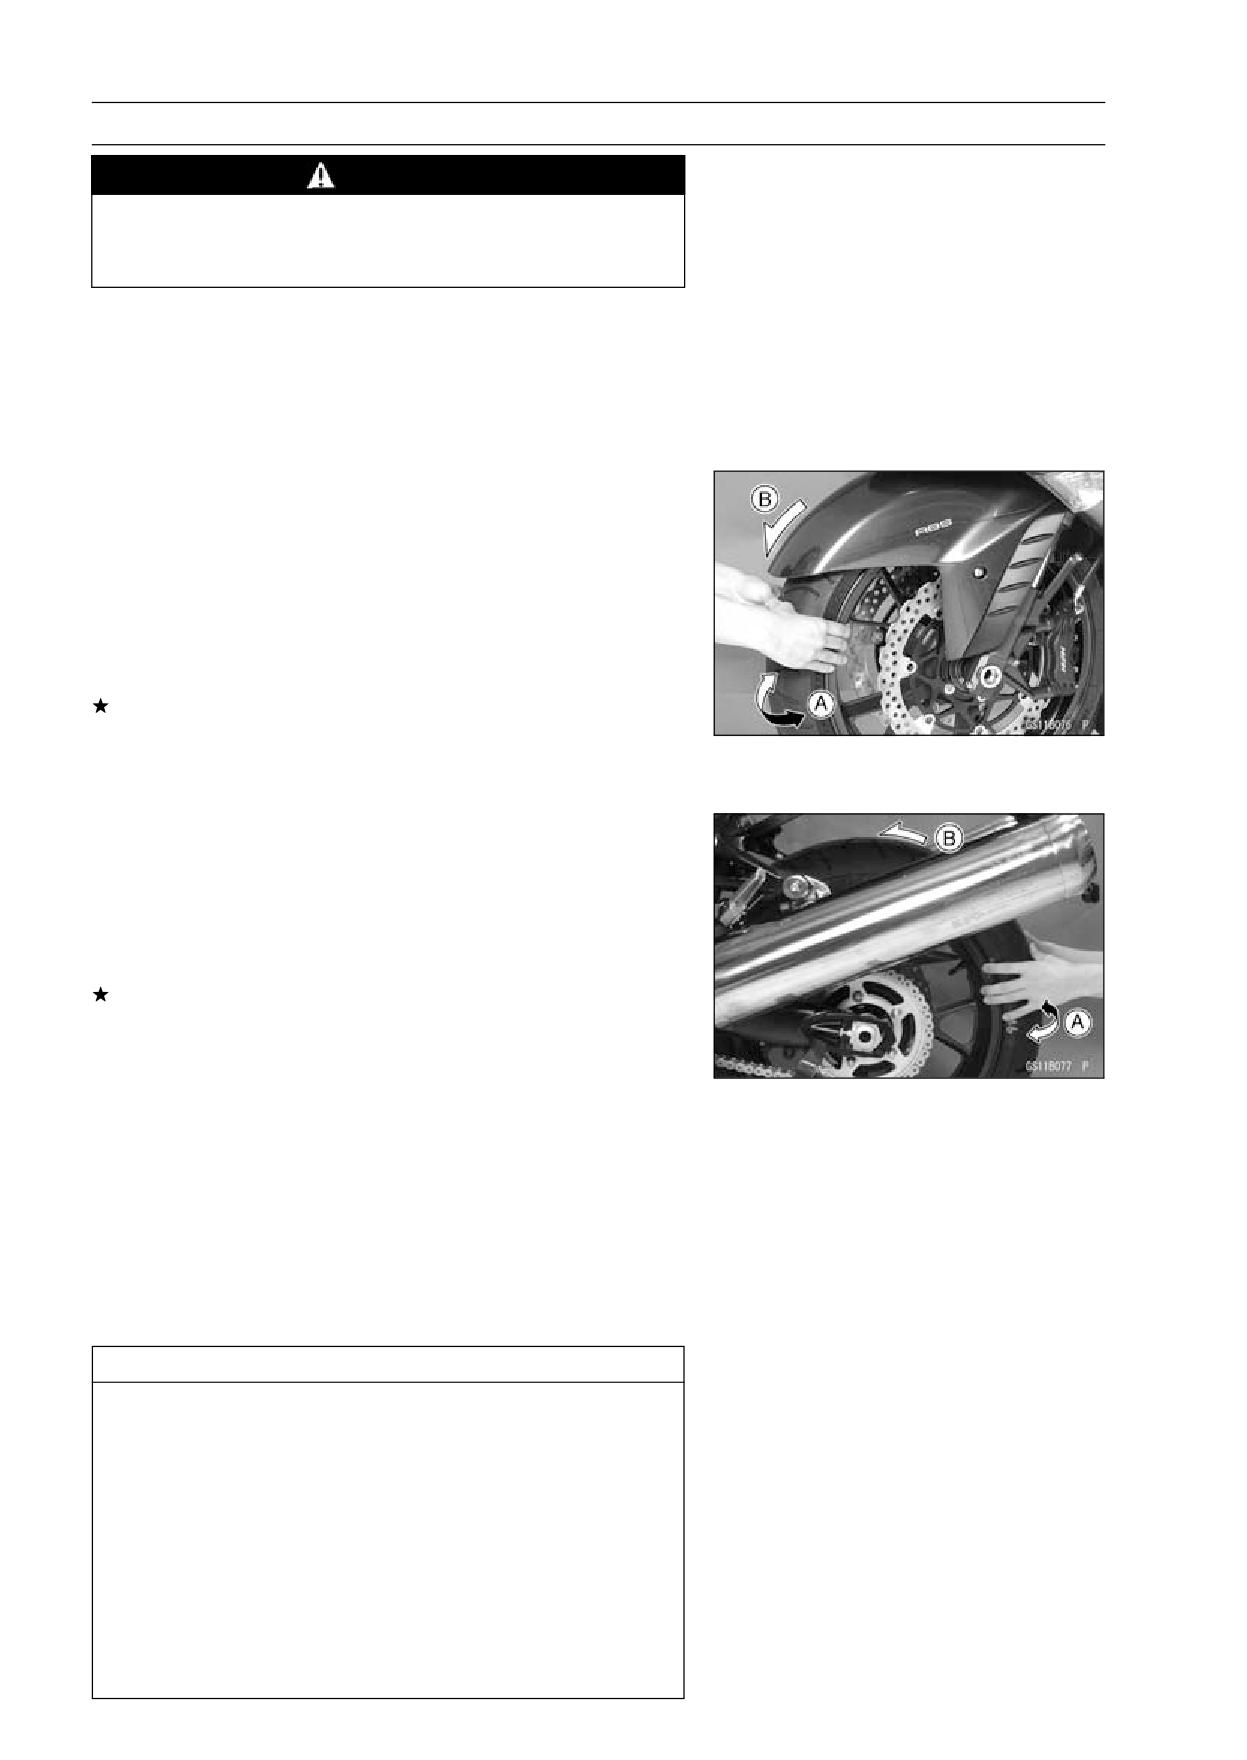
• Raise the front wheel off the ground with the jack (see
Front Wheel Removal in the Wheels/Tires chapter).
• Turn the handlebar all the way to the right or left.
• Inspect the roughness of the front wheel bearing by push-
ing and pulling [A] the wheel.
• Spin [B] the front wheel lightly, and check for smoothly
turn, roughness, binding or noise.
If roughness, binding or noise is found, remove the front
wheel and inspect the wheel bearing (see Front Wheel
Removal, Hub Bearing Inspection in the Wheels/Tires
chapter).
• Raise the rear wheel off the ground with the stand (see
Rear Wheel Removal in the Wheels/Tires chapter).
• Inspect the roughness of the rear wheel bearing by push-
ing and pulling [A] the wheel.
• Spin [B] the rear wheel lightly, and check for smoothly
turn, roughness, binding or noise.
If roughness, binding or noise is found, remove the rear
wheel and inspect the wheel bearing (see Rear Wheel Re-
moval, Hub Bearing Inspection in the Wheels/Tires chap-
ter) and coupling (see Coupling Bearing Inspection in the
Final Drive chapter).
Drive Train
Drive Chain Lubrication Condition Inspection
• If a special lubricant is not available, a heavy oil such as
SAE 90 is preferred to a lighter oil because it will stay on
the chain longer and provide better lubrication.
• If the chain appears especially dirty, clean it before lubri-
cation.
CAUTION
The O-rings between the side plates seal in the lu-
bricant between the pin and the bushing. To avoid
damaging the O-rings and resultant loss of lubri-
cant, observe the following rules.
Use only kerosene or diesel oil for cleaning of the O
-ring of the drive chain. Any other cleaning solution
such as gasoline or trichloroethylene will cause de-
terioration and swelling of the O-ring. Immediately
blow the chain dry with compressed air after clean-
ing. Complete cleaning and drying the chain within
10 minutes.
PERIODIC MAINTENANCE 2-31
Maintenance Procedure
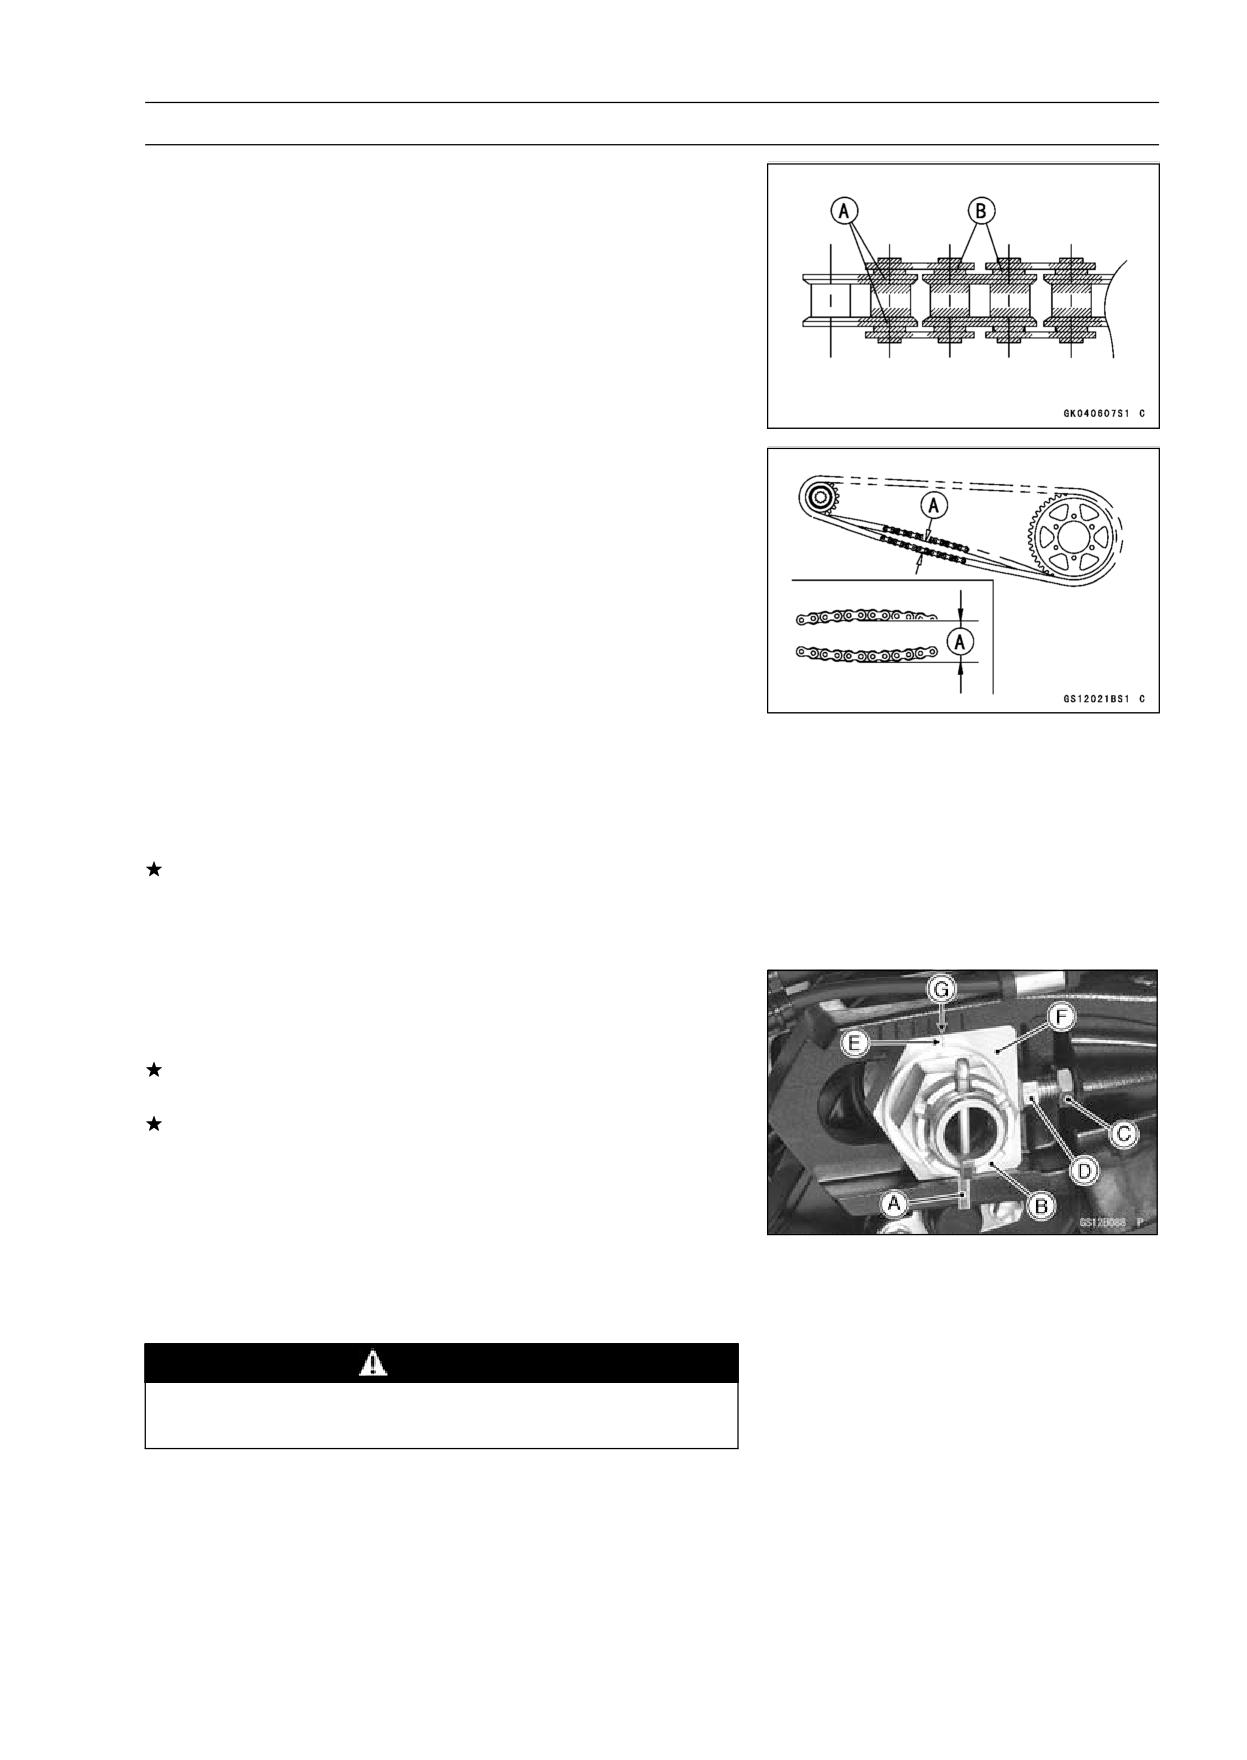
• Apply oil to the sides of the rollers so that oil will penetrate
to the rollers and bushings. Apply the oil to the O-rings so
that the O-rings will be coated with oil.
• Wipe off any excess oil.
Oil Applied Areas [A]
O-ring [B]
Drive Chain Slack Inspection
NOTE
○Check the slack with the motorcycle setting on its side
stand.
○Check the slack with the motorcycle setting on its center
stand (center stand equipped models).
○Clean the chain if it is dirty, and lubricate it if it appears
dry.
• Check the wheel alignment (see Wheel Alignment Inspec-
tion).
• Rotate the rear wheel to find the position where the chain
is tightest.
• Measure the vertical movement (chain slack) [A] midway
between the sprockets.
If the chain slack exceeds the standard, adjust it.
Chain Slack
Standard:
32 ∼ 38 mm (1.3 ∼ 1.5 in.)
Drive Chain Slack Adjustment
• Remove the cotter pin [A], and loosen the axle nut [B].
• Loosen the both chain adjuster locknuts [C].
If the chain is too loose, turn out the right and left chain
adjusters [D] evenly.
If the chain is too tight, turn in the right and left chain
adjusters evenly, and kick the wheel forward.
• Turn both chain adjusters evenly until the drive chain has
the correct amount of slack. To keep the chain and wheel
properly aligned, the notch [E] on the right wheel align-
ment indicator [F] should align with the same swingarm
mark or position [G] that the left indicator notch aligns
with.
WARNING
Misalignment of the wheel will result in abnormal
wear and may result in an unsafe riding condition.
• Tighten both chain adjuster locknuts securely.
• Tighten the axle nut.
Torque - Rear Axle Nut: 127 N·m (13.0 kgf·m, 94 ft·lb)
• Turn the wheel, measure the chain slack again at the tight-
est position, and readjust if necessary.
2-32 PERIODIC MAINTENANCE
Maintenance Procedure
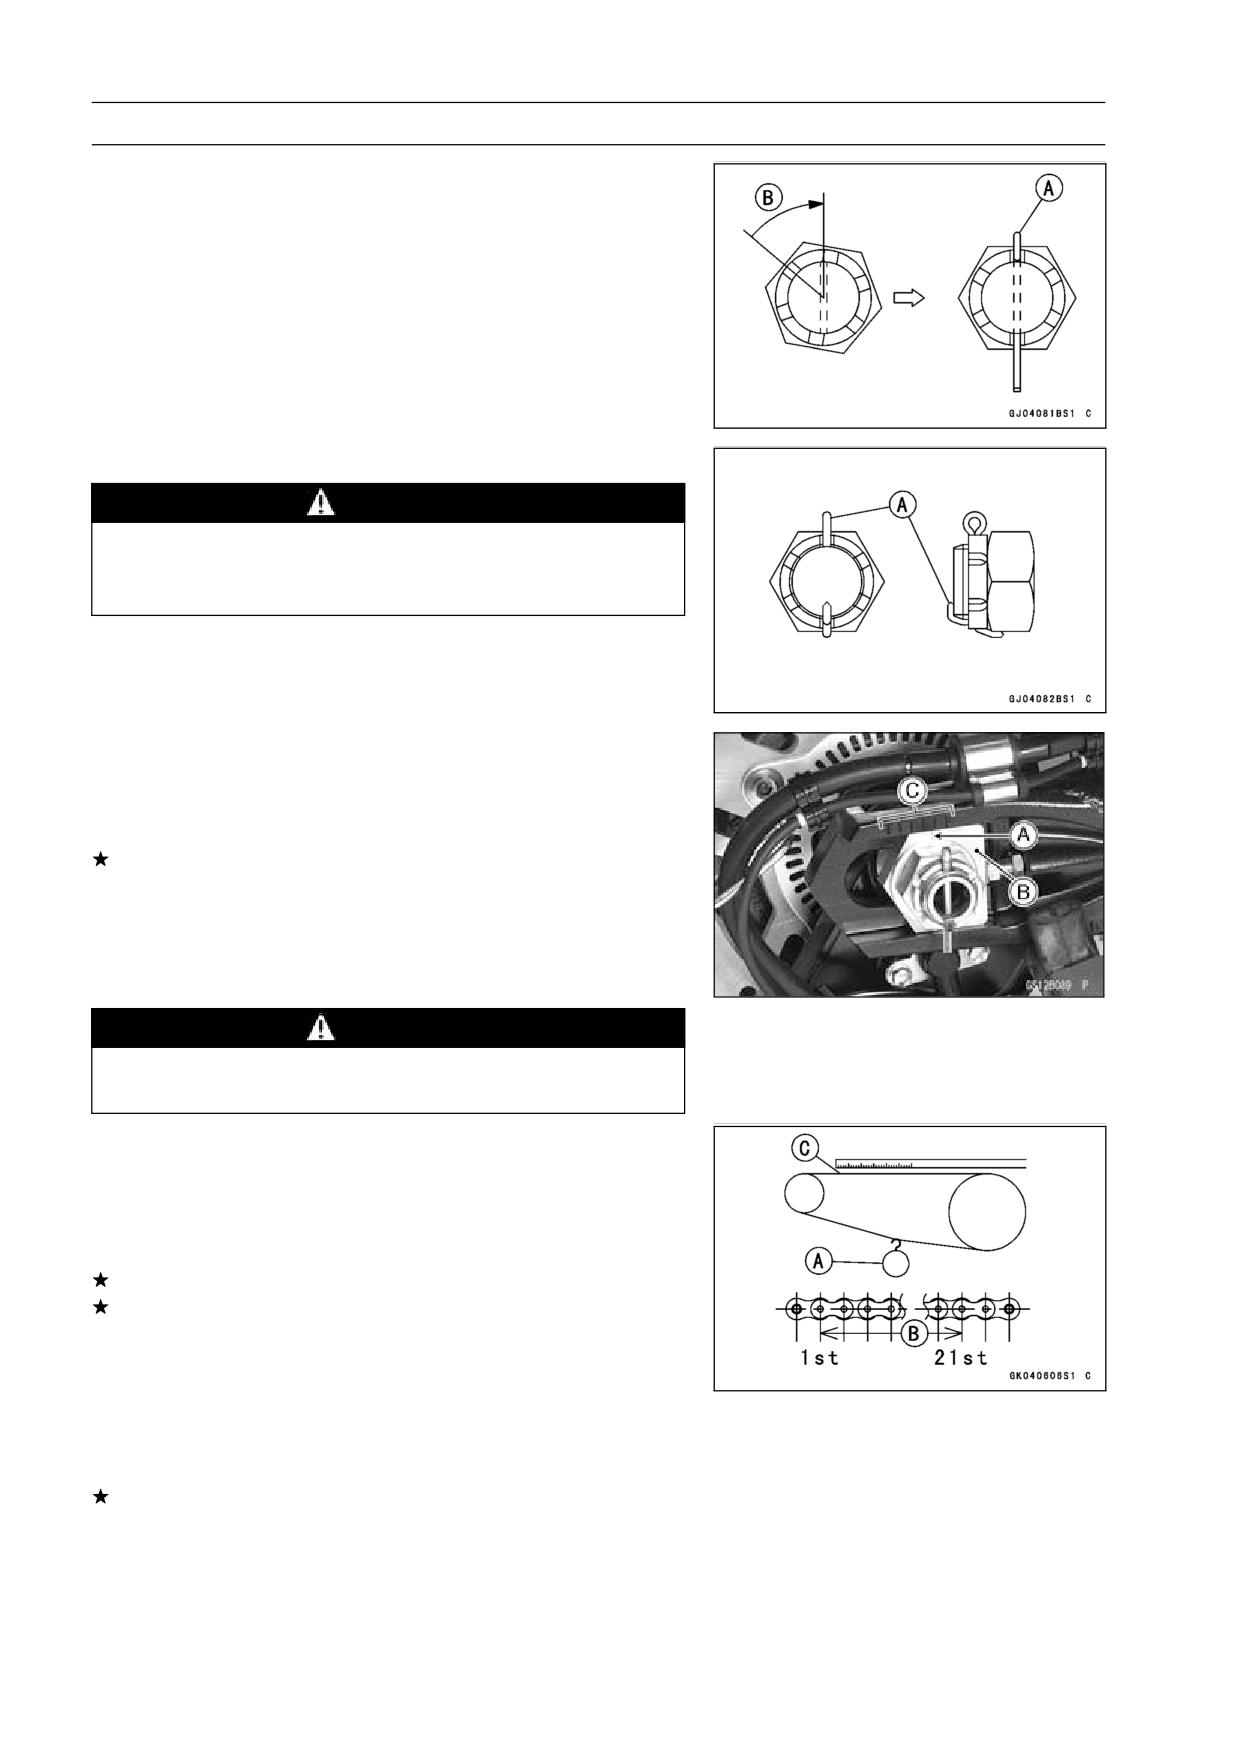
• Insert a new cotter pin [A].
NOTE
○When inserting the cotter pin, if the slots in the nut do
not align with the cotter pin hole in the axle, tighten the
nut clockwise [B] up to next alignment.
○It should be within 30°.
○Loosen once and tighten again when the slot goes past
the nearest hole.
• Bend the cotter pin [A] over the nut.
WARNING
If the rear axle nut is not securely tightened or the
cotter pin is not installed, an unsafe riding condi-
tion may result.
Wheel Alignment Inspection
• Check that the notch [A] on the right alignment indicator
[B] aligns with the same swingarm mark or position [C]
that the left alignment indicator notch aligns with.
If they do not, adjust the chain slack and align the wheel
alignment (see Drive Chain Slack Adjustment).
NOTE
○Wheel alignment can be also checked using the
straightedge or string method.
WARNING
Misalignment of the wheel will result in abnormal
wear, and may result in an unsafe riding condition.
Drive Chain Wear Inspection
• Remove the chain cover (see Drive Chain Removal in the
Final Drive chapter).
• Rotate the rear wheel to inspect the drive chain for dam-
aged rollers, and loose pins and links.
If there is any irregularity, replace the drive chain.
Lubricate the drive chain if it appears dry.
• Stretch the chain taut by hanging a 98 N (10 kg, 20 lb)
weight [A] on the chain.
• Measure the length of 20 links [B] on the straight part [C] of
the chain from the pin center of the 1st pin to the pin center
of the 21st pin. Since the chain may wear unevenly, take
measurements at several places.
If any measurements exceed the service limit, replace the
chain. Also, replace the front and rear sprockets when the
drive chain is replaced.
Drive Chain 20-link Length
Standard:
317.5 ∼ 318.2 mm (12.50 ∼ 12.53 in.)
Service Limit:
323 mm (12.7 in.)
PERIODIC MAINTENANCE 2-33
Maintenance Procedure
WARNING
If the drive chain wear exceeds the service limit, re-
place the chain or an unsafe riding condition may
result. A chain that breaks or jumps off the sprock-
ets could snag on the engine sprocket or lock the
rear wheel, severely damaging the motorcycle and
causing it to go out of control.
For safety, use only the standard chain. It is an end-
less type and should not be cut for installation.
Standard Chain
Make:
DAIDO
Type:
DID50ZVM4 GC&B
Link:
116 links
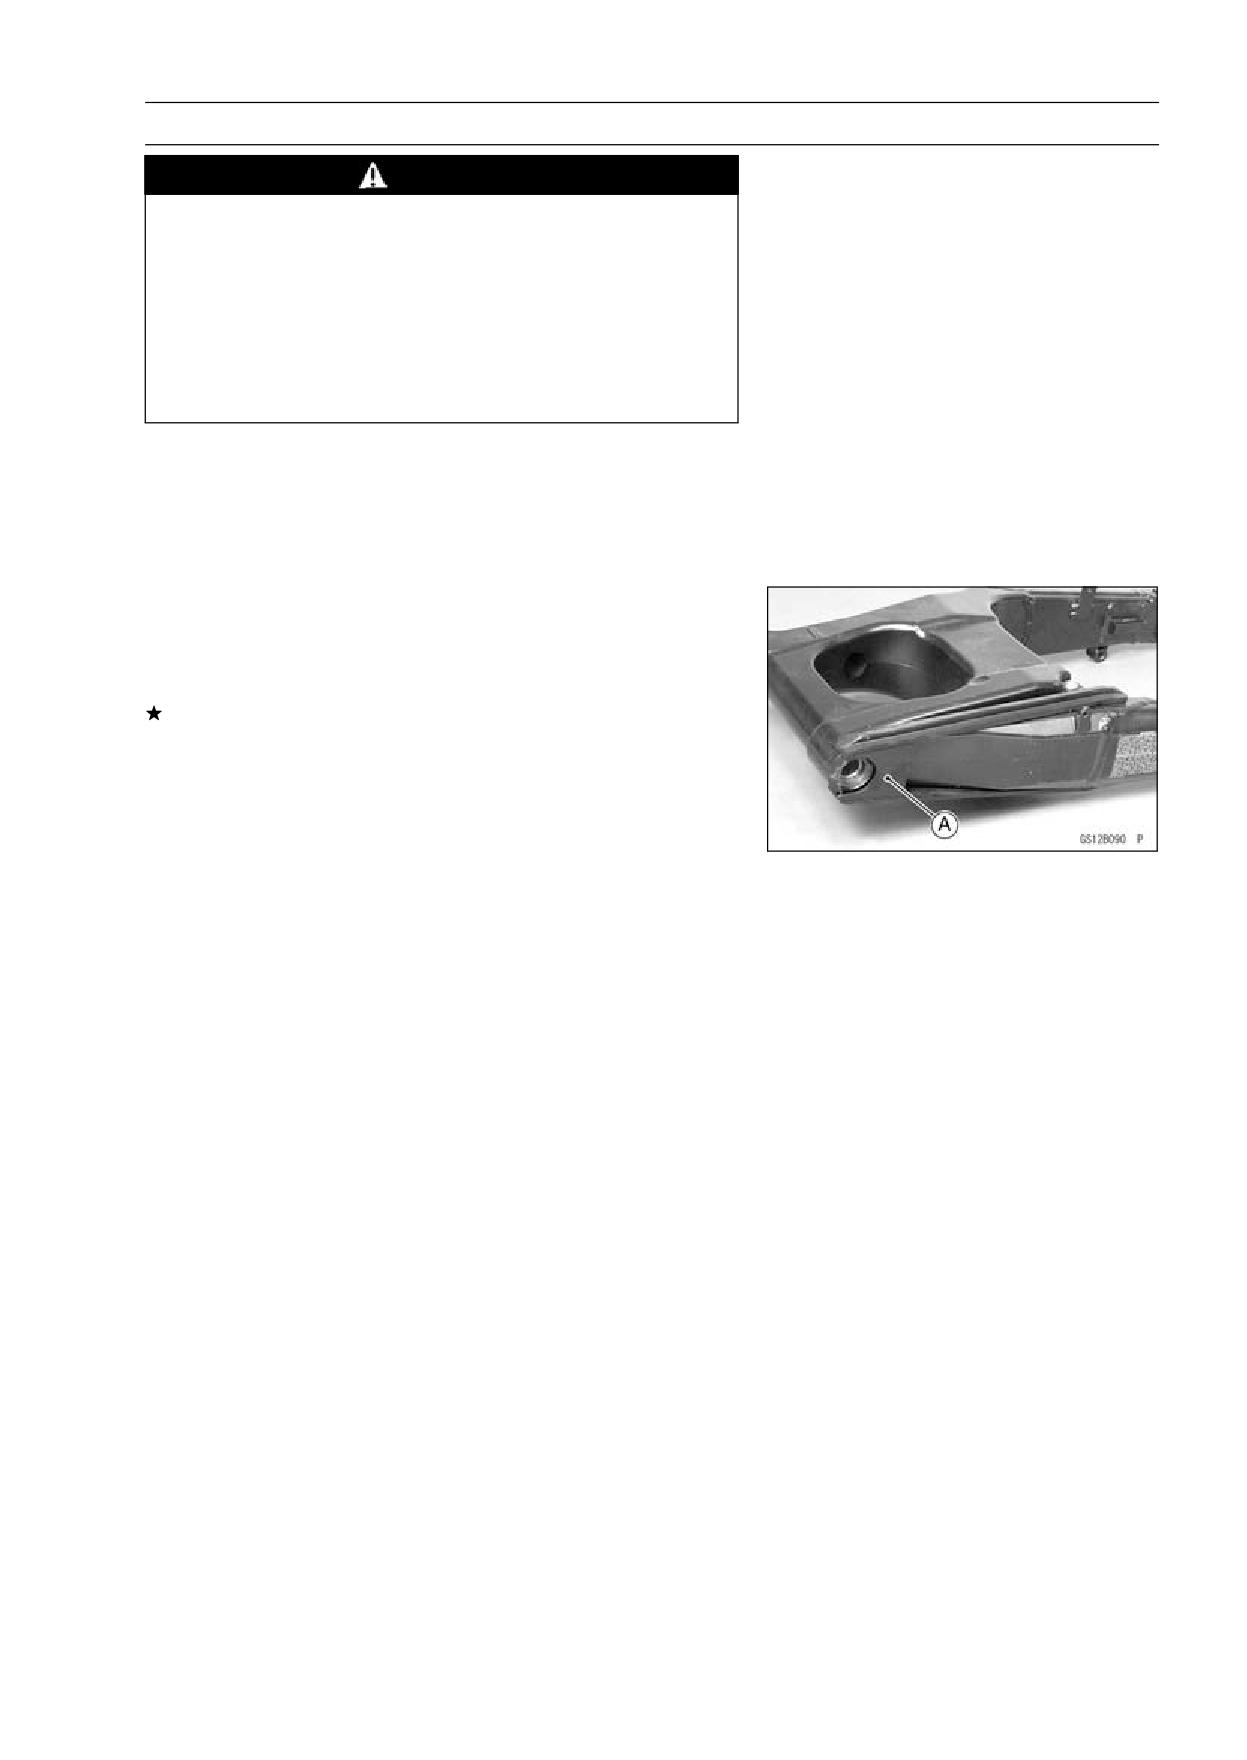
Chain Guide Wear Inspection
• Remove the swingarm (see Swingarm Removal in the
Suspension chapter).
• Visually inspect the chain guide [A].
Replace the chain guide if it shows any signs of abnormal
wear or damage.
2-34 PERIODIC MAINTENANCE
Maintenance Procedure
Brake System
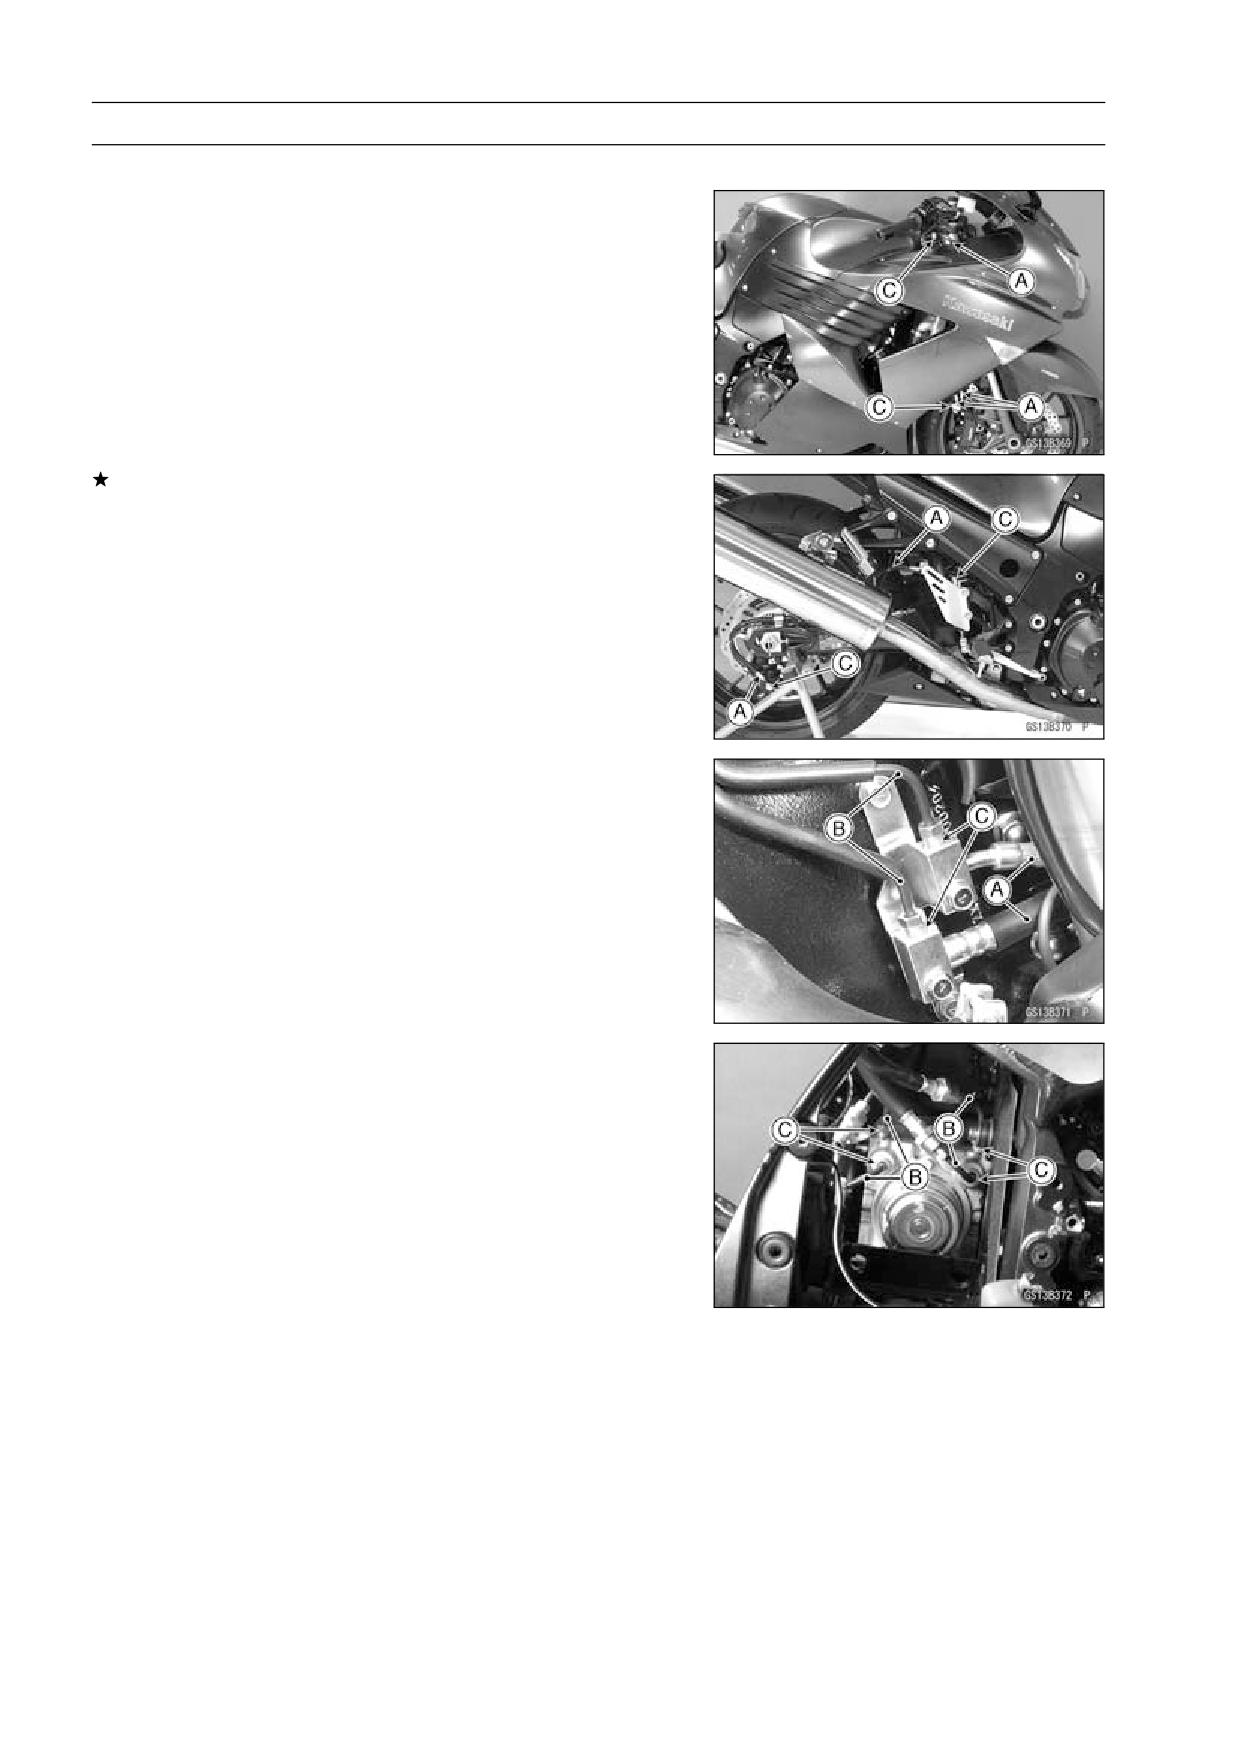
Brake Fluid Leak (Brake Hose and Pipe) Inspection
• For ABS equipped models; note the following.
• Remove:
Fuel Tank (see Fuel Tank Removal in the Fuel System
(DFI) chapter)
Battery (see Battery Removal in the Electrical System
chapter)
• Apply the brake lever or pedal and inspect the brake fluid
leak from the brake hoses [A], pipes (ABS equipped mod-
els) [B] and fittings [C].
If the brake fluid leaked from any position, inspect or re-
place the problem part.
PERIODIC MAINTENANCE 2-35
Maintenance Procedure
Brake Hose and Pipe Damage and Installation
Condition Inspection
• For ABS equipped models; note the following.
• Remove:
Fuel Tank (see Fuel Tank Removal in the Fuel System
(DFI) chapter)
Battery (see Battery Removal in the Electrical System
chapter)
• Inspect the brake hoses and fittings for deterioration,
cracks and signs of leakage.
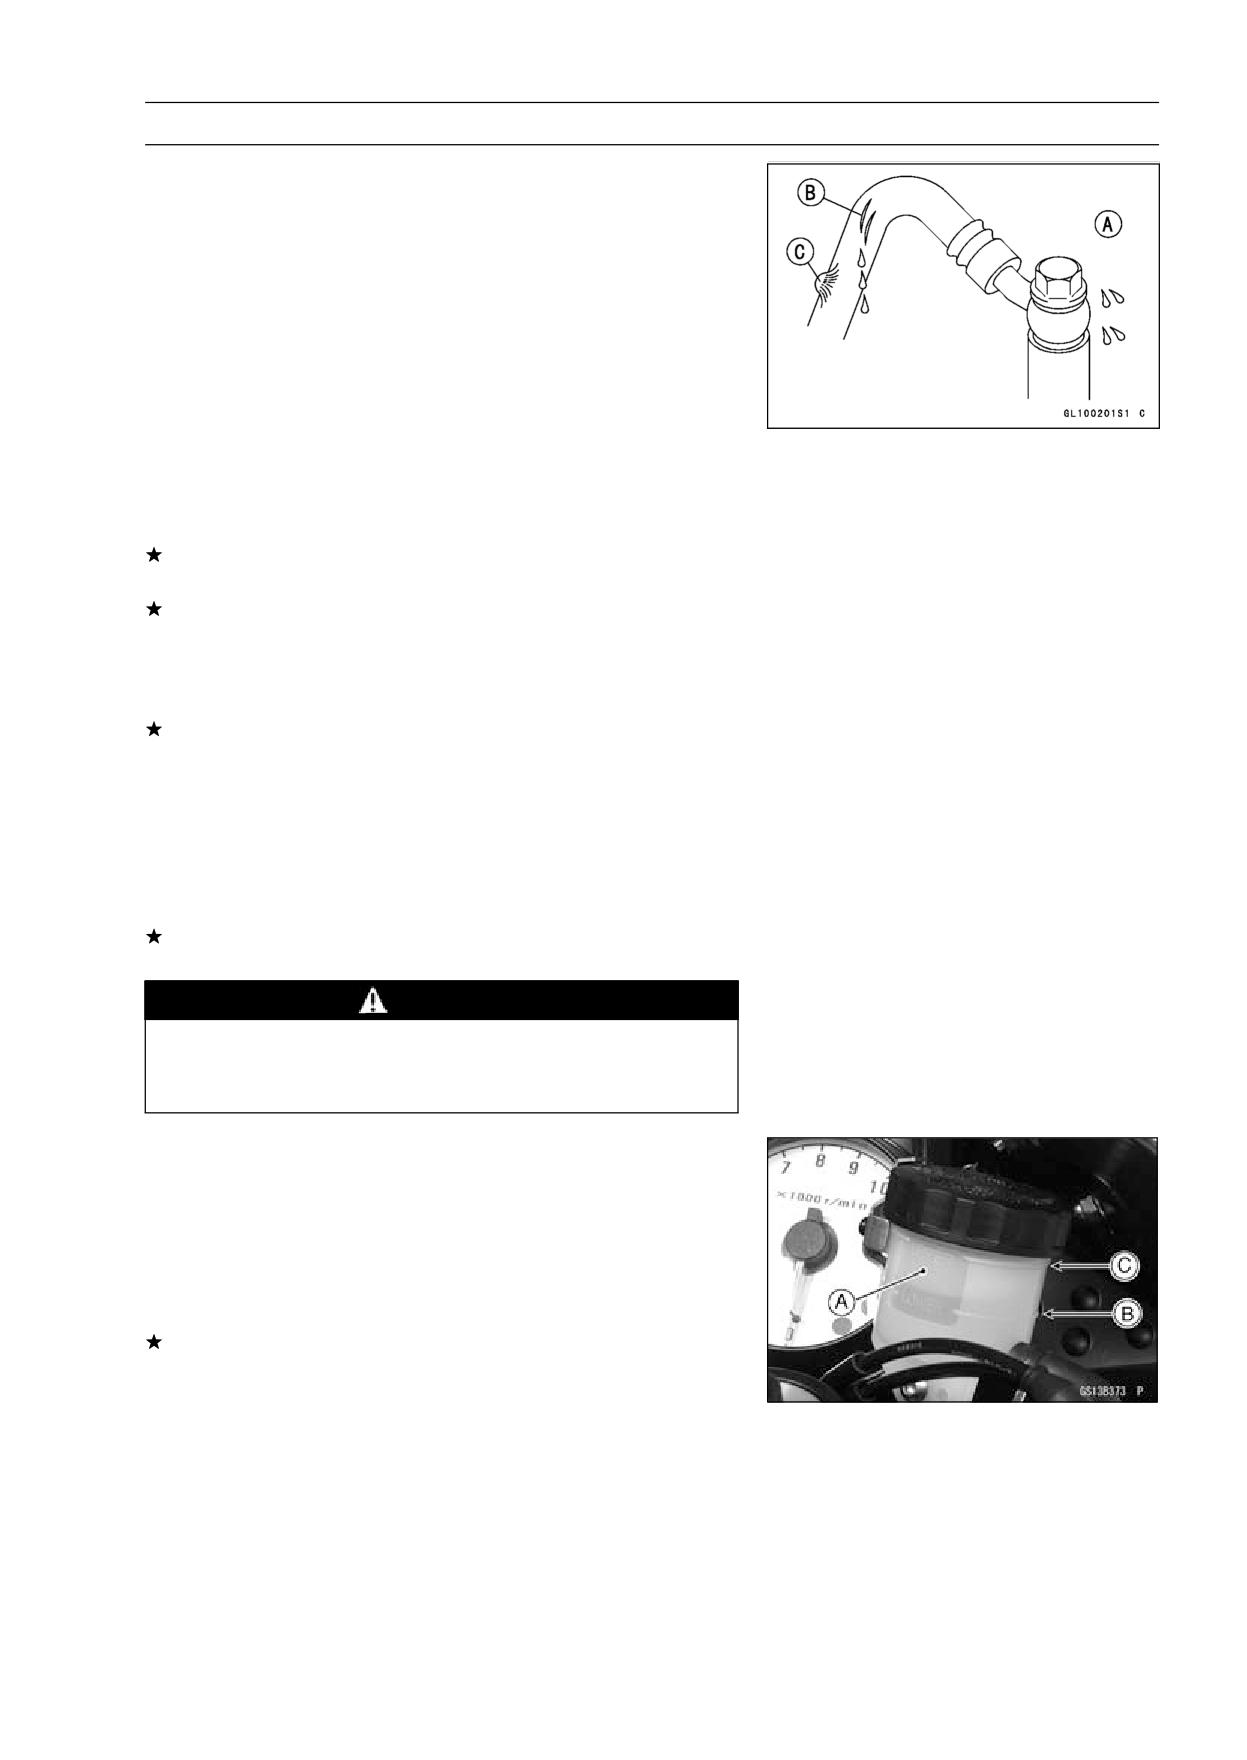
○The high pressure inside the brake line can cause fluid
to leak [A] or the hose, pipes (ABS equipped models) to
burst if the line is not properly maintained. Bend and twist
the rubber hose while examining it.
Replace the hose and pipe (ABS equipped models) if any
crack [B], bulge [C] or leakage is noticed.
Tighten any brake hose banjo bolts.
Torque - Brake Hose Banjo Bolts: 25 N·m (2.5 kgf·m, 18
ft·lb)
• Inspect the brake hose routing.
If any brake hose and pipe (ABS equipped models) rout-
ing is incorrect, route the brake hose and pipe according
to Cable, Wire, and Hose Routing section in the Appendix
chapter.
Brake Operation Inspection
• Inspect the operation of the front and rear brake by run-
ning the vehicle on the dry road.
If the brake operation is insufficiency, inspect the brake
system.
WARNING
When inspecting by running the vehicle, note a
surrounding traffic situation enough in the place of
safety.
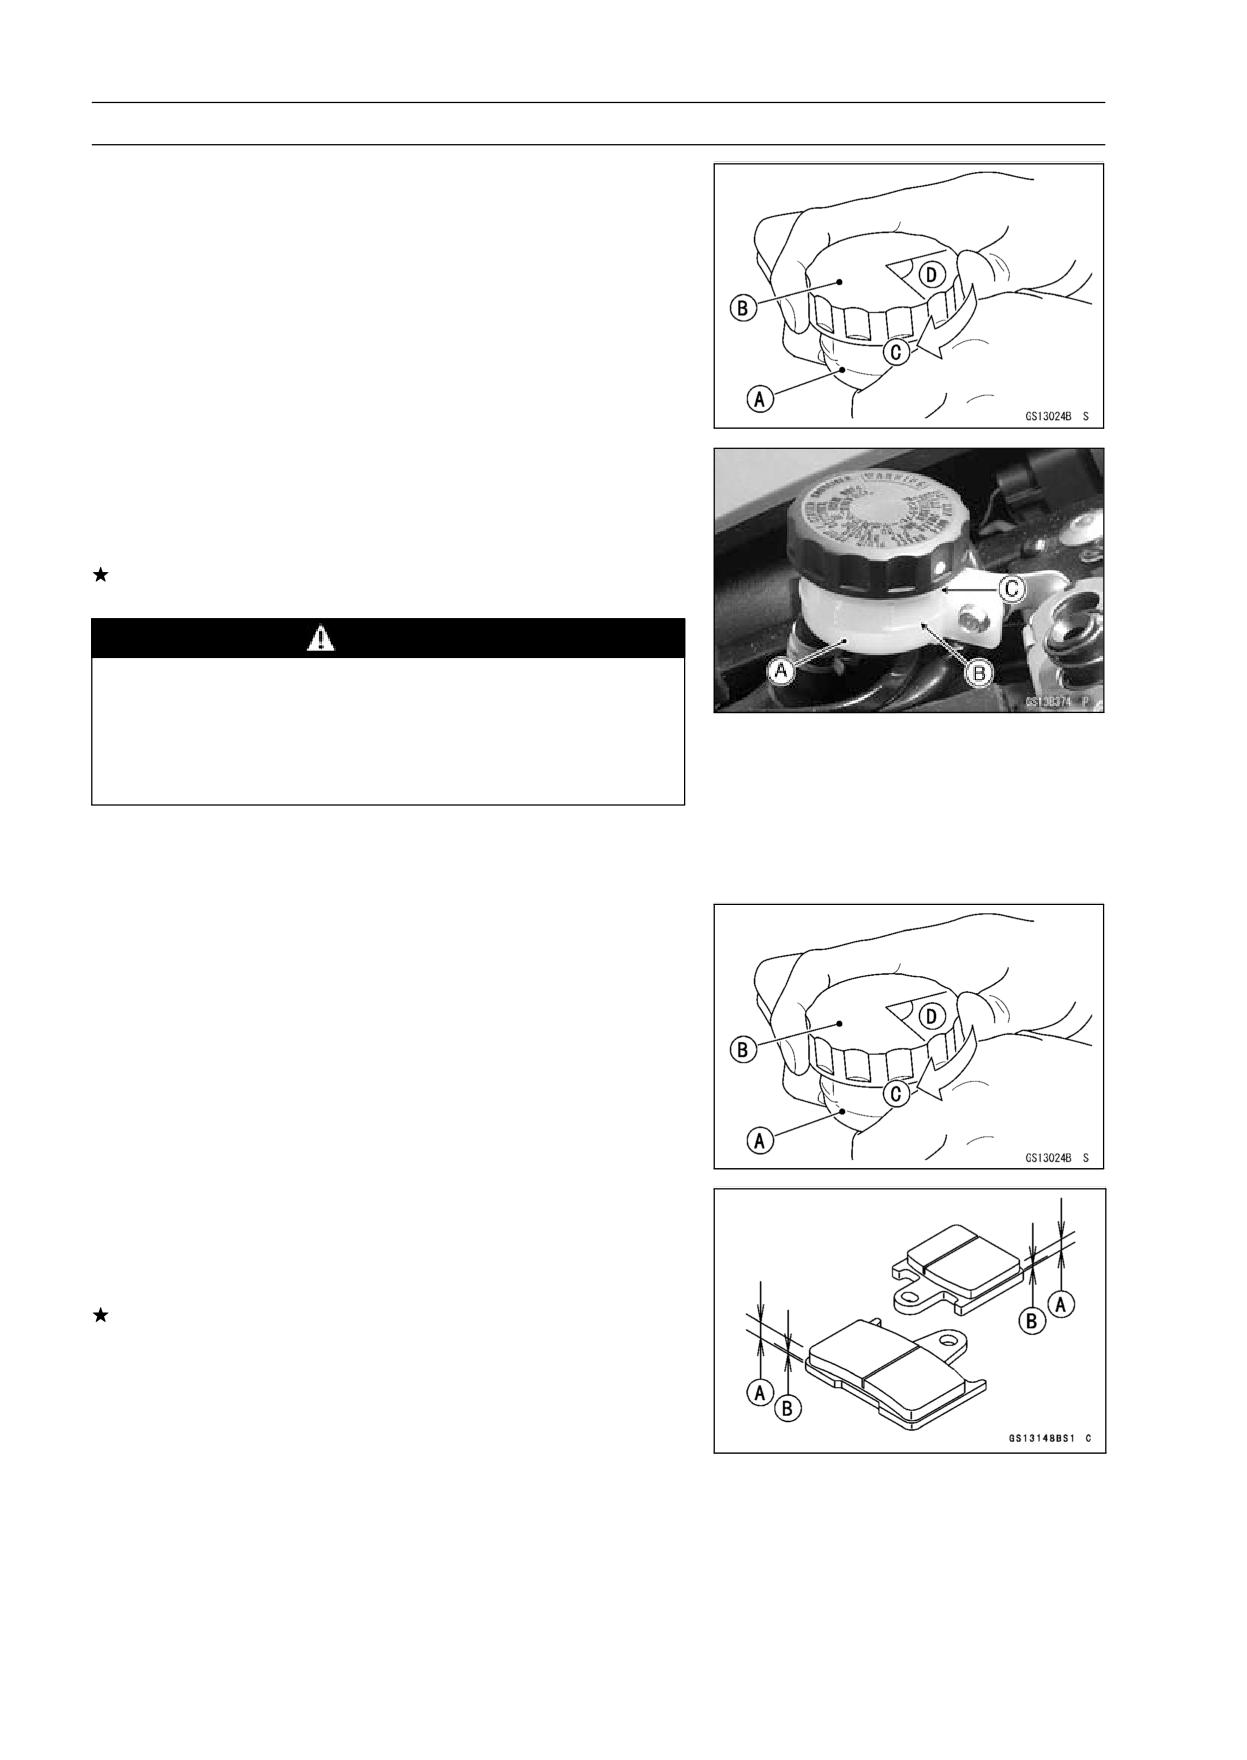
Brake Fluid Level Inspection
• Check that the brake fluid level in the front brake reservoir
[A] is above the lower level line [B].
NOTE
○Hold the reservoir horizontal by turning the handlebar
when checking brake fluid level.
If the fluid level is lower than the lower level line, fill the
reservoir to the upper level line [C].
2-36 PERIODIC MAINTENANCE
Maintenance Procedure
• Follow the procedure below to install the front brake fluid
reservoir cap correctly.
○First, tighten the front brake fluid reservoir cap [B] clock-
wise [C] by hand until slight resistance is felt indicating
that the cap is seated on the reservoir body, then tighten
the cap an additional 1/6 turn [D] while holding the brake
fluid reservoir body [A].
• Remove the seat (see Seat Removal in the Frame chap-
ter).
• Check that the brake fluid level in the rear brake reservoir
[A] is above the lower level line [B].
If the fluid level is lower than the lower level line, fill the
reservoir to the upper level line [C].
WARNING
Change the brake fluid in the brake line completely
if the brake fluid must be refilled but the type and
brand of the brake fluid that is already in the reser-
voir are unidentified. After changing the fluid, use
only the same type and brand of fluid thereafter.
Recommended Disc Brake Fluid
Grade:
DOT4
• Follow the procedure below to install the rear brake fluid
reservoir cap correctly.
○First, tighten the rear brake fluid reservoir cap [B] clock-
wise [C] by hand until slight resistance is felt indicating
that the cap is seated on the reservoir body, then tighten
the cap an additional 1/6 turn [D] while holding the brake
fluid reservoir body [A].
Brake Pad Wear Inspection
• Remove the brake pads (see Front/Rear Brake Pad Re-
moval in the Brakes chapter).
• Check the lining thickness [A] of the pads in each caliper.
If the lining thickness of either pad is less than the service
limit [B], replace both pads in the caliper as a set.
Pad Lining Thickness
Standard:
Front
4.0 mm (0.16 in.)
Rear
5.0 mm (0.20 in.)
Service Limit: 1 mm (0.04 in.)
PERIODIC MAINTENANCE 2-37
Maintenance Procedure
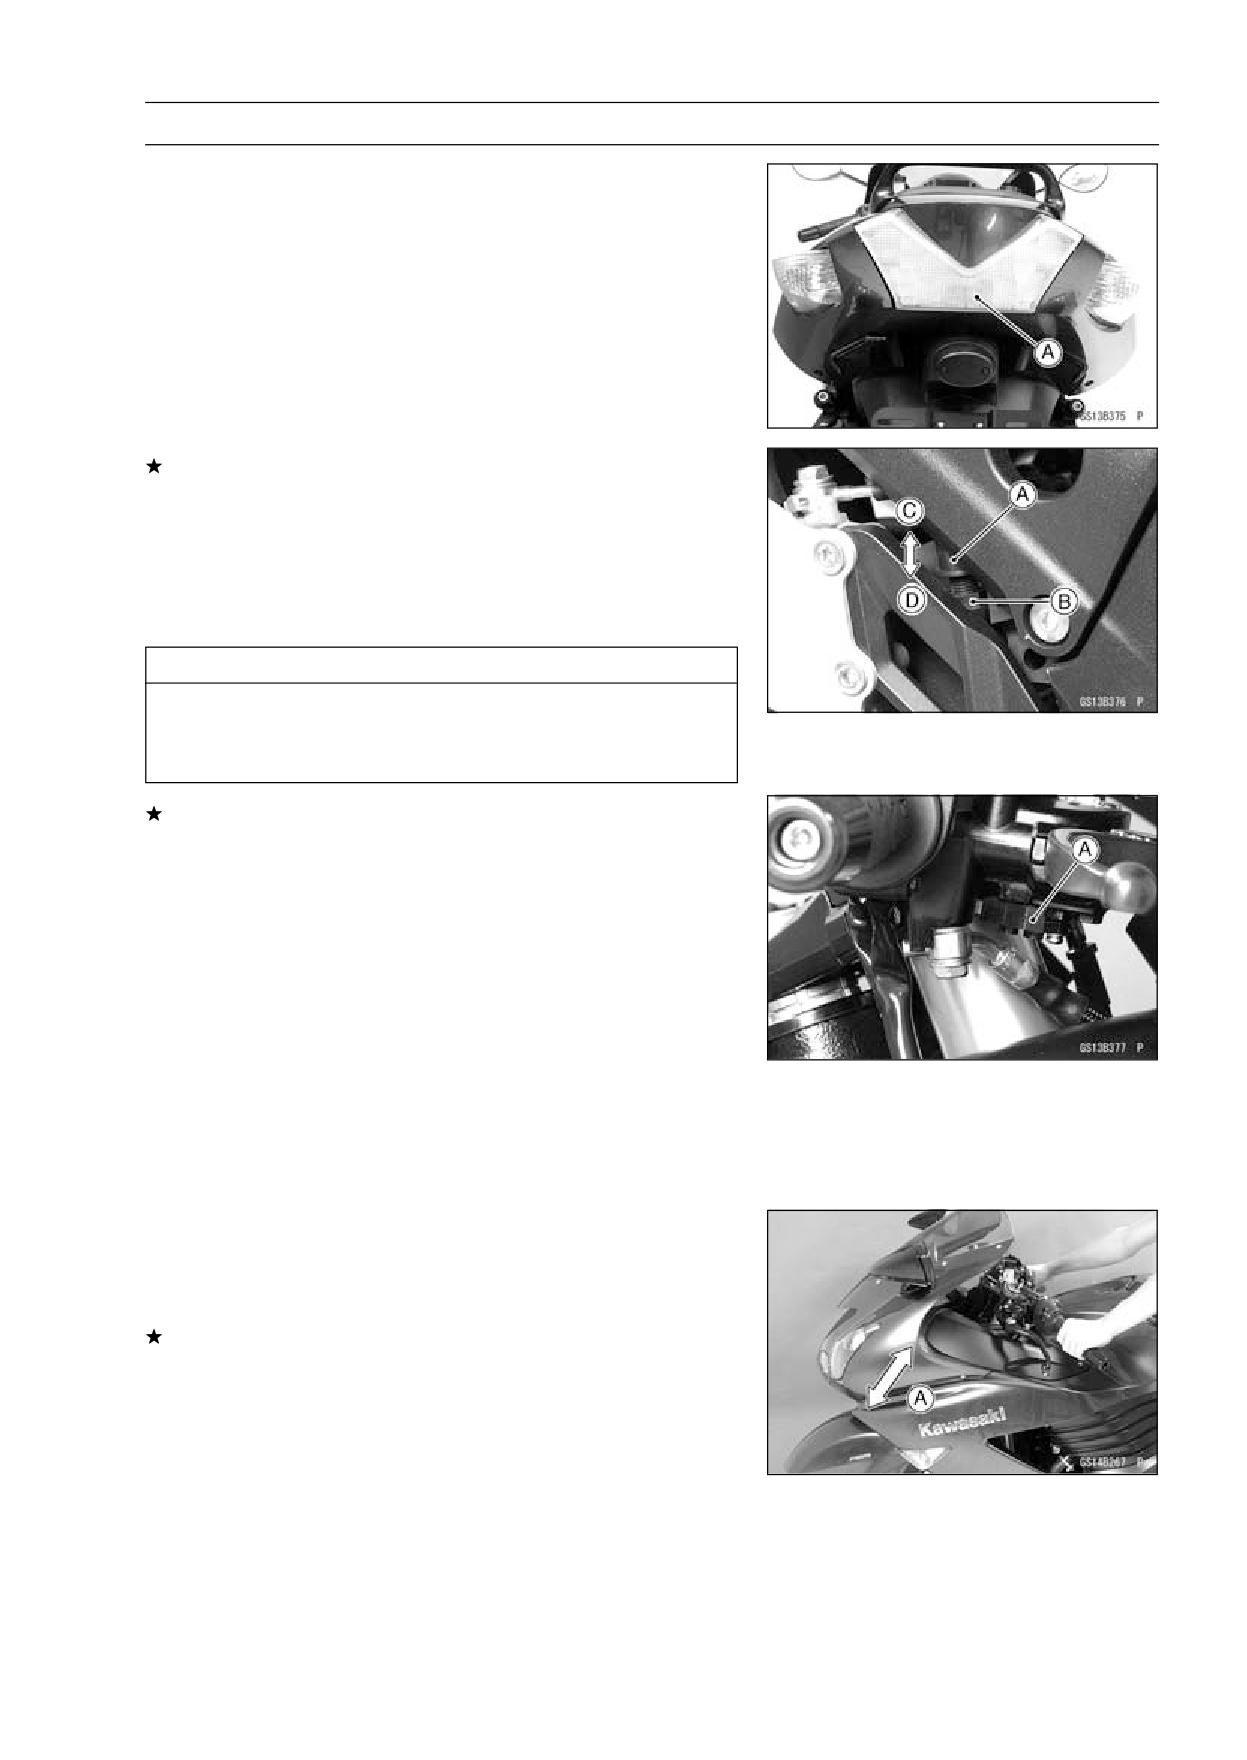
Brake Light Switch Operation Inspection
• Turn on the ignition switch.
• The brake light [A] should go on when the brake lever is
applied or after the brake pedal is depressed about 10
mm (0.39 in.).
If it does not, adjust the brake light switch.
• While holding the switch body, turn the adjusting nut to
adjust the switch.
Switch Body [A]
Adjusting Nut [B]
Light sooner as the body rises [C]
Light later as the body lowers [D]
CAUTION
To avoid damaging the electrical connections in-
side the switch, be sure that the switch body does
not turn during adjustment.
If it does not go on, inspect or replace the following items.
Battery (see Charging Condition Inspection in the Elec-
trical System chapter)
Brake Light (see Tail/Brake Light Removal in the Electri-
cal System chapter)
Main Fuse 30 A and Taillight Fuse 10 A (see Fuse In-
spection in the Electrical System chapter)
Front Brake Light Switch [A] (see Switch Inspection in
the Electrical System chapter)
Rear Brake Light Switch (see Switch Inspection in the
Electrical System chapter)
Harness (see Wiring Inspection in the Electrical System
chapter)
Suspensions
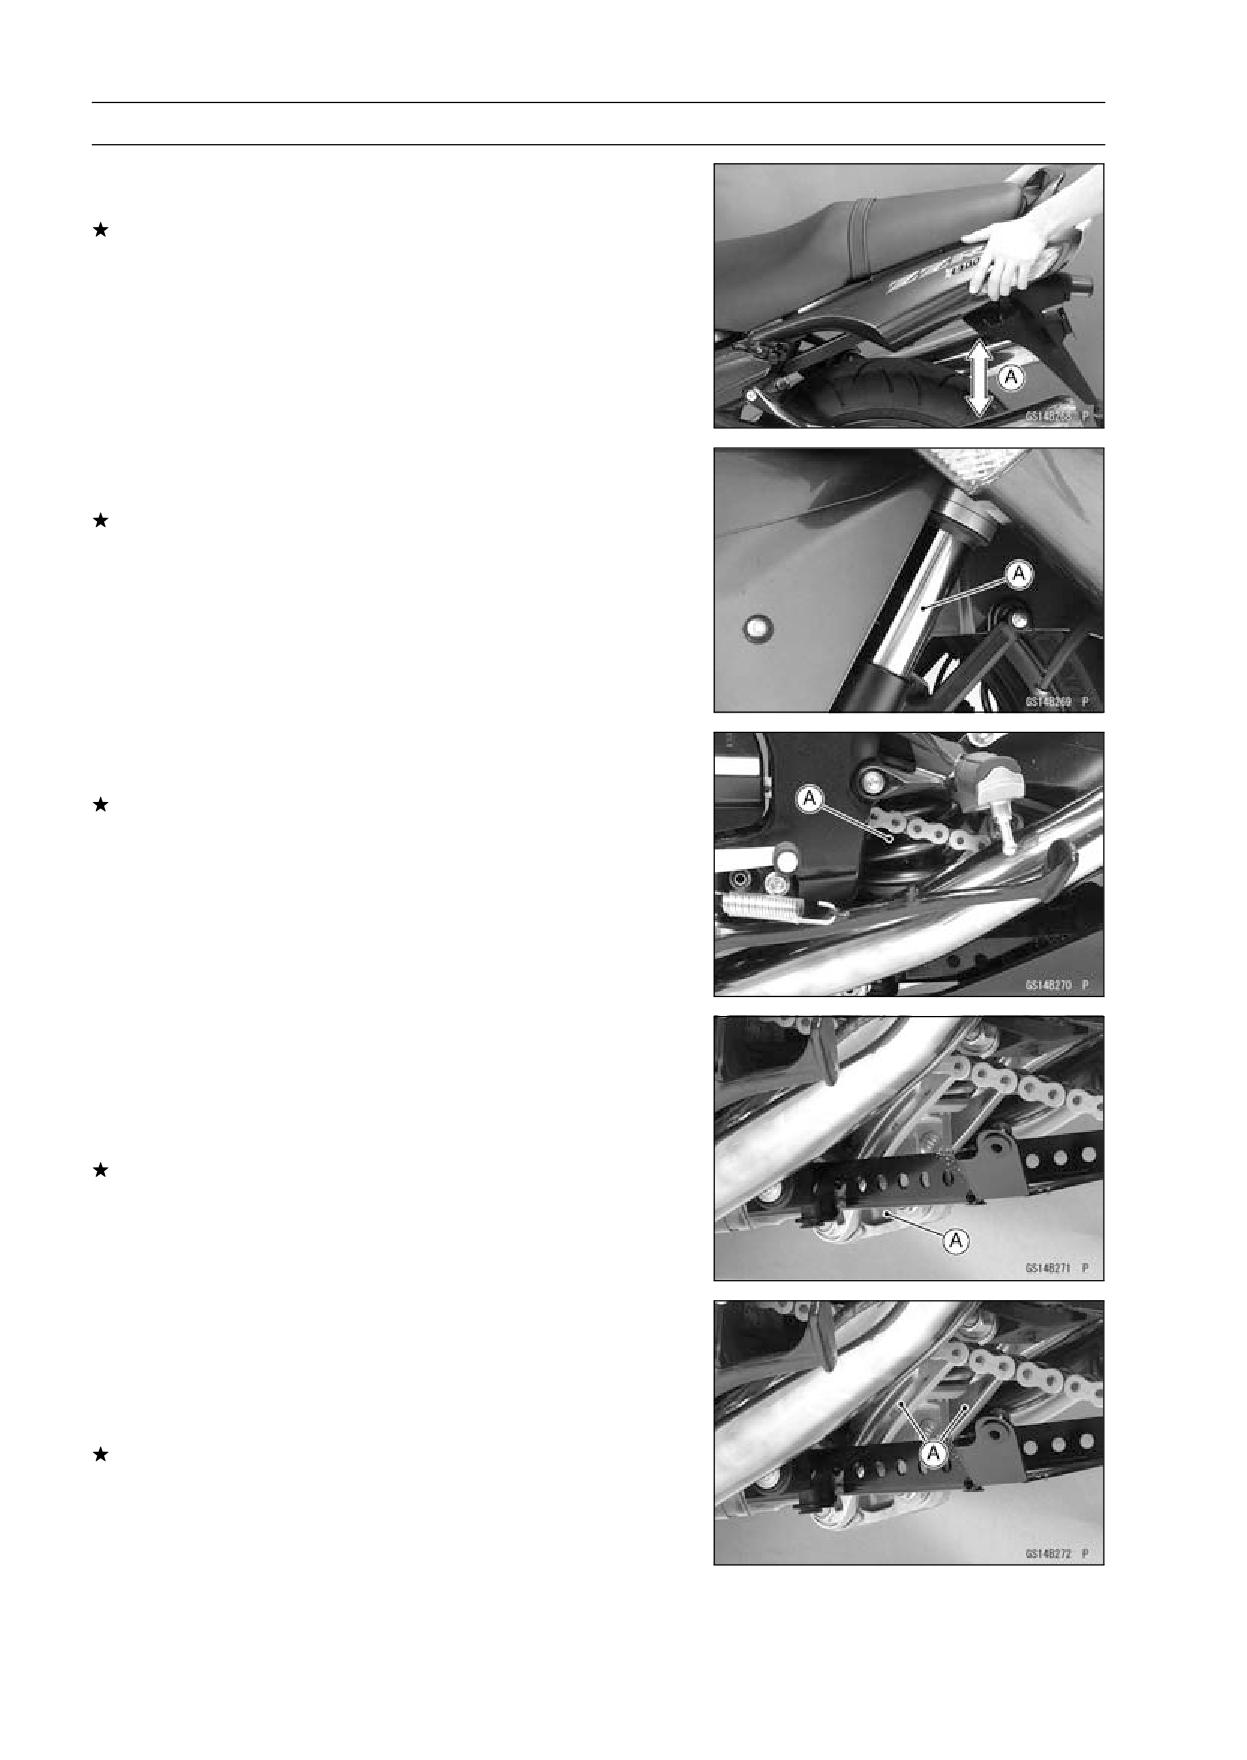
Front Forks/Rear Shock Absorber Operation
Inspection
• Pump the forks down and up [A] 4 or 5 times, and inspect
the smooth stroke.
If the forks do not smoothly or noise is found, inspect the
fork oil level or fork clamps (see Front Fork Oil Change in
the Suspension chapter).
2-38 PERIODIC MAINTENANCE
Maintenance Procedure
• Pump the seat down and up [A] 4 or 5 times, and inspect
the smooth stroke.
If the shock absorber does not smoothly stroke or noise
is found, inspect the oil leak (see Rear Shock Absorber
Oil Leak Inspection).
Front Fork Oil Leak Inspection
• Visually inspect the front forks [A] for oil leakage.
Replace or repair any defective parts, if necessary.
Rear Shock Absorber Oil Leak Inspection
• Visually inspect the shock absorber [A] for oil leakage.
If the oil leakage is found on it, replace the shock absorber
with a new one.
Rocker Arm Operation Inspection
• Remove the rear fairing (see Rear Fairing Removal in the
Frame chapter).
• Pump the seat down and up 4 or 5 times, and inspect the
smooth stroke.
If the rocker arm [A] does not smoothly stroke or noise
is found, inspect the fasteners and bearings (see Rocker
Arm/Tie-Rod Bearing, Sleeve Inspection in the Suspen-
sion chapter).
Tie-Rod Operation Inspection
• Remove the rear fairing (see Rear Fairing Removal in the
Frame chapter).
• Pump the seat down and up 4 or 5 times, and inspect the
smooth stroke.
If the tie-rods [A] do not smoothly stroke or noise is found,
inspect the fasteners and tie-rod bearings (see Rocker
Arm/Tie-Rod Bearing, Sleeve Inspection in the Suspen-
sion chapter).
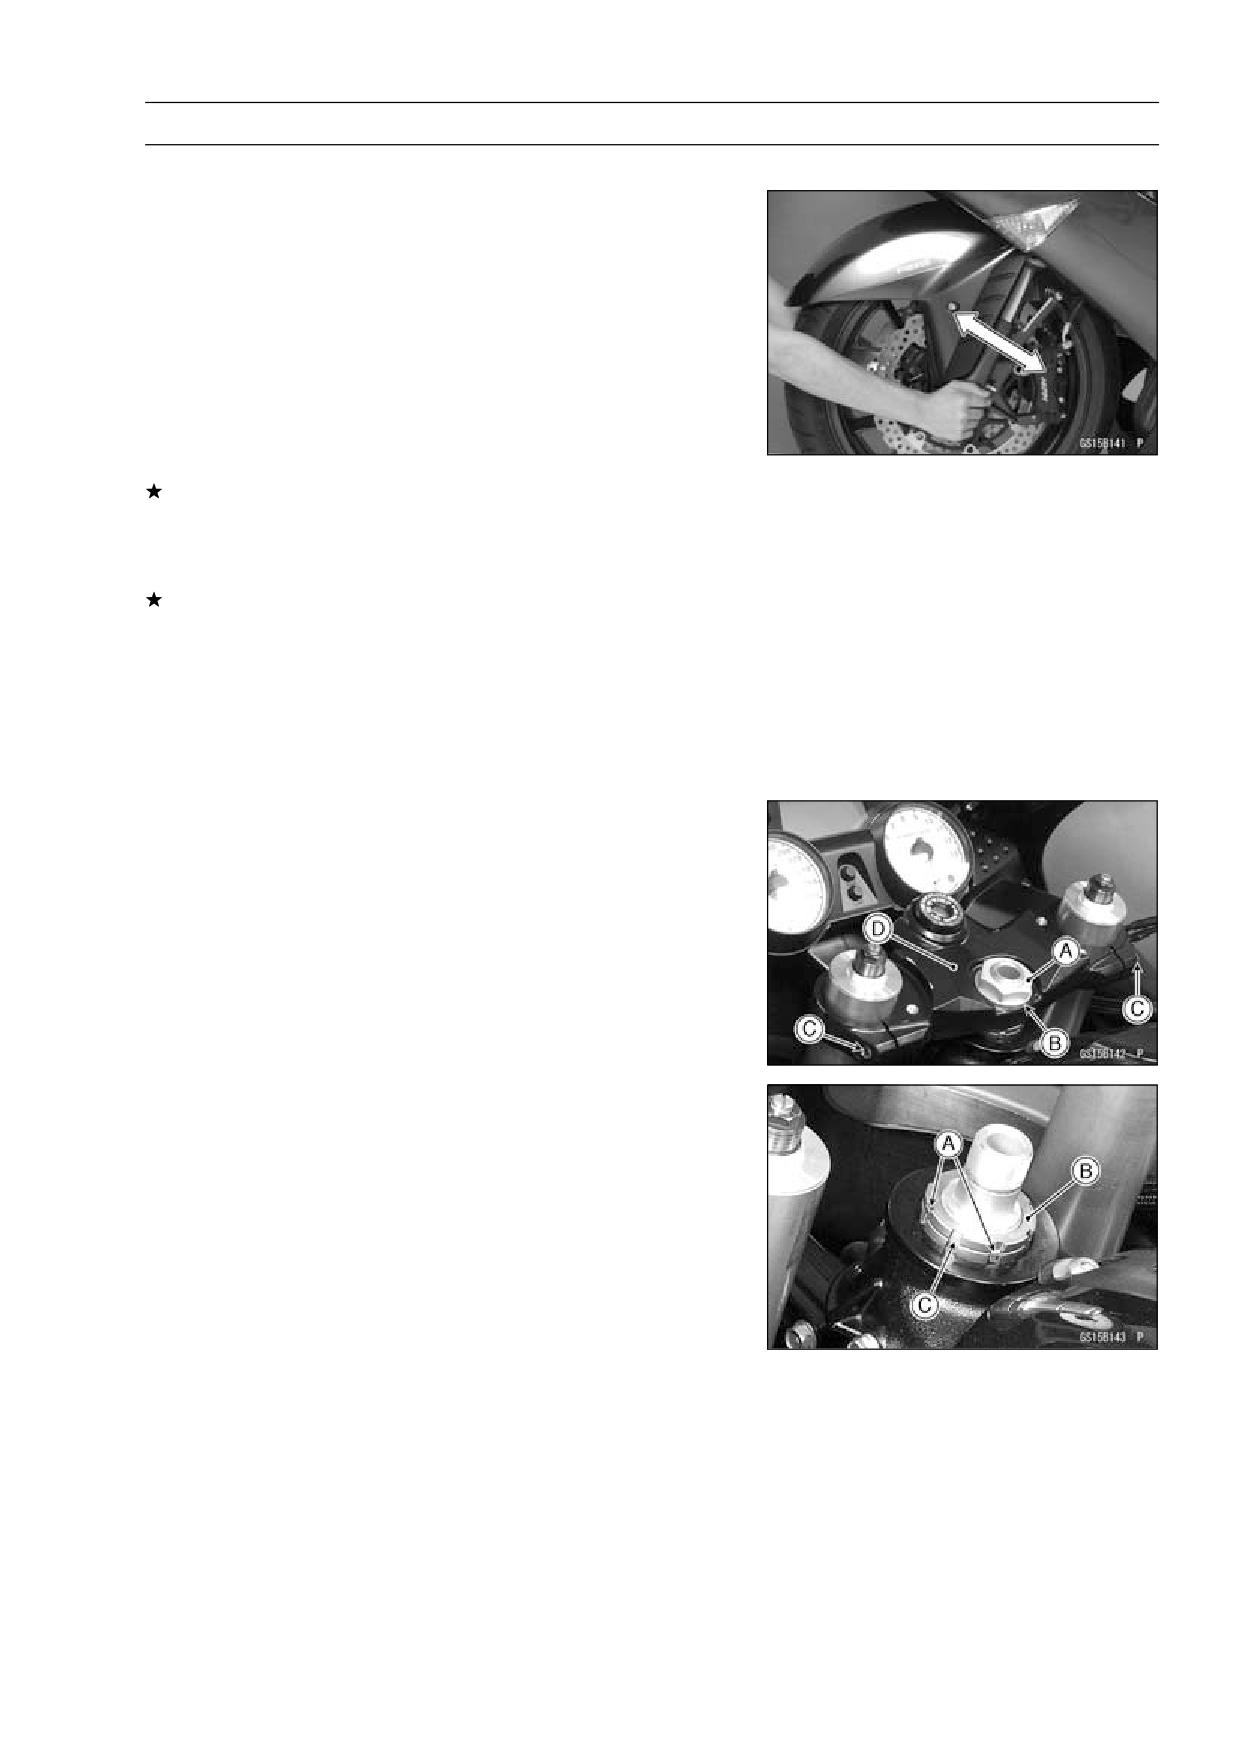
PERIODIC MAINTENANCE 2-39
Maintenance Procedure
Steering System
Steering Play Inspection
• Remove the lower fairings (see Lower Fairing Removal in
the Frame chapter).
• Raise the front wheel off the ground with the jack.
Special Tools - Jack: 57001-1238
Jack Attachment: 57001-1608
• With the front wheel pointing straight ahead, alternately
tap each end of the handlebar. The front wheel should
swing fully left and right from the force of gravity until the
fork hits the stop.
If the wheel binds or catches before the stop, the steering
is too tight.
• Feel for steering looseness by pushing and pulling the
forks.
If you feel looseness, the steering is too loose.
NOTE
○The cables and wiring will have some effect on the mo-
tion of the fork which must be taken into account.
○Be sure the leads and cables are properly routed.
○The bearings must be in good condition and properly
lubricated in order for any test to be valid.
Steering Play Adjustment
• Remove:
Handlebars (see Handlebar Removal in the Steering
chapter)
Stem Head Nut [A] and Washer [B]
Upper Fork Clamp Bolts [C] (Loosen)
Stem Head [D]
• Bend the claws [A] of the claw washer straighten.
• Remove the steering stem locknut [B] and claw washer
[C].
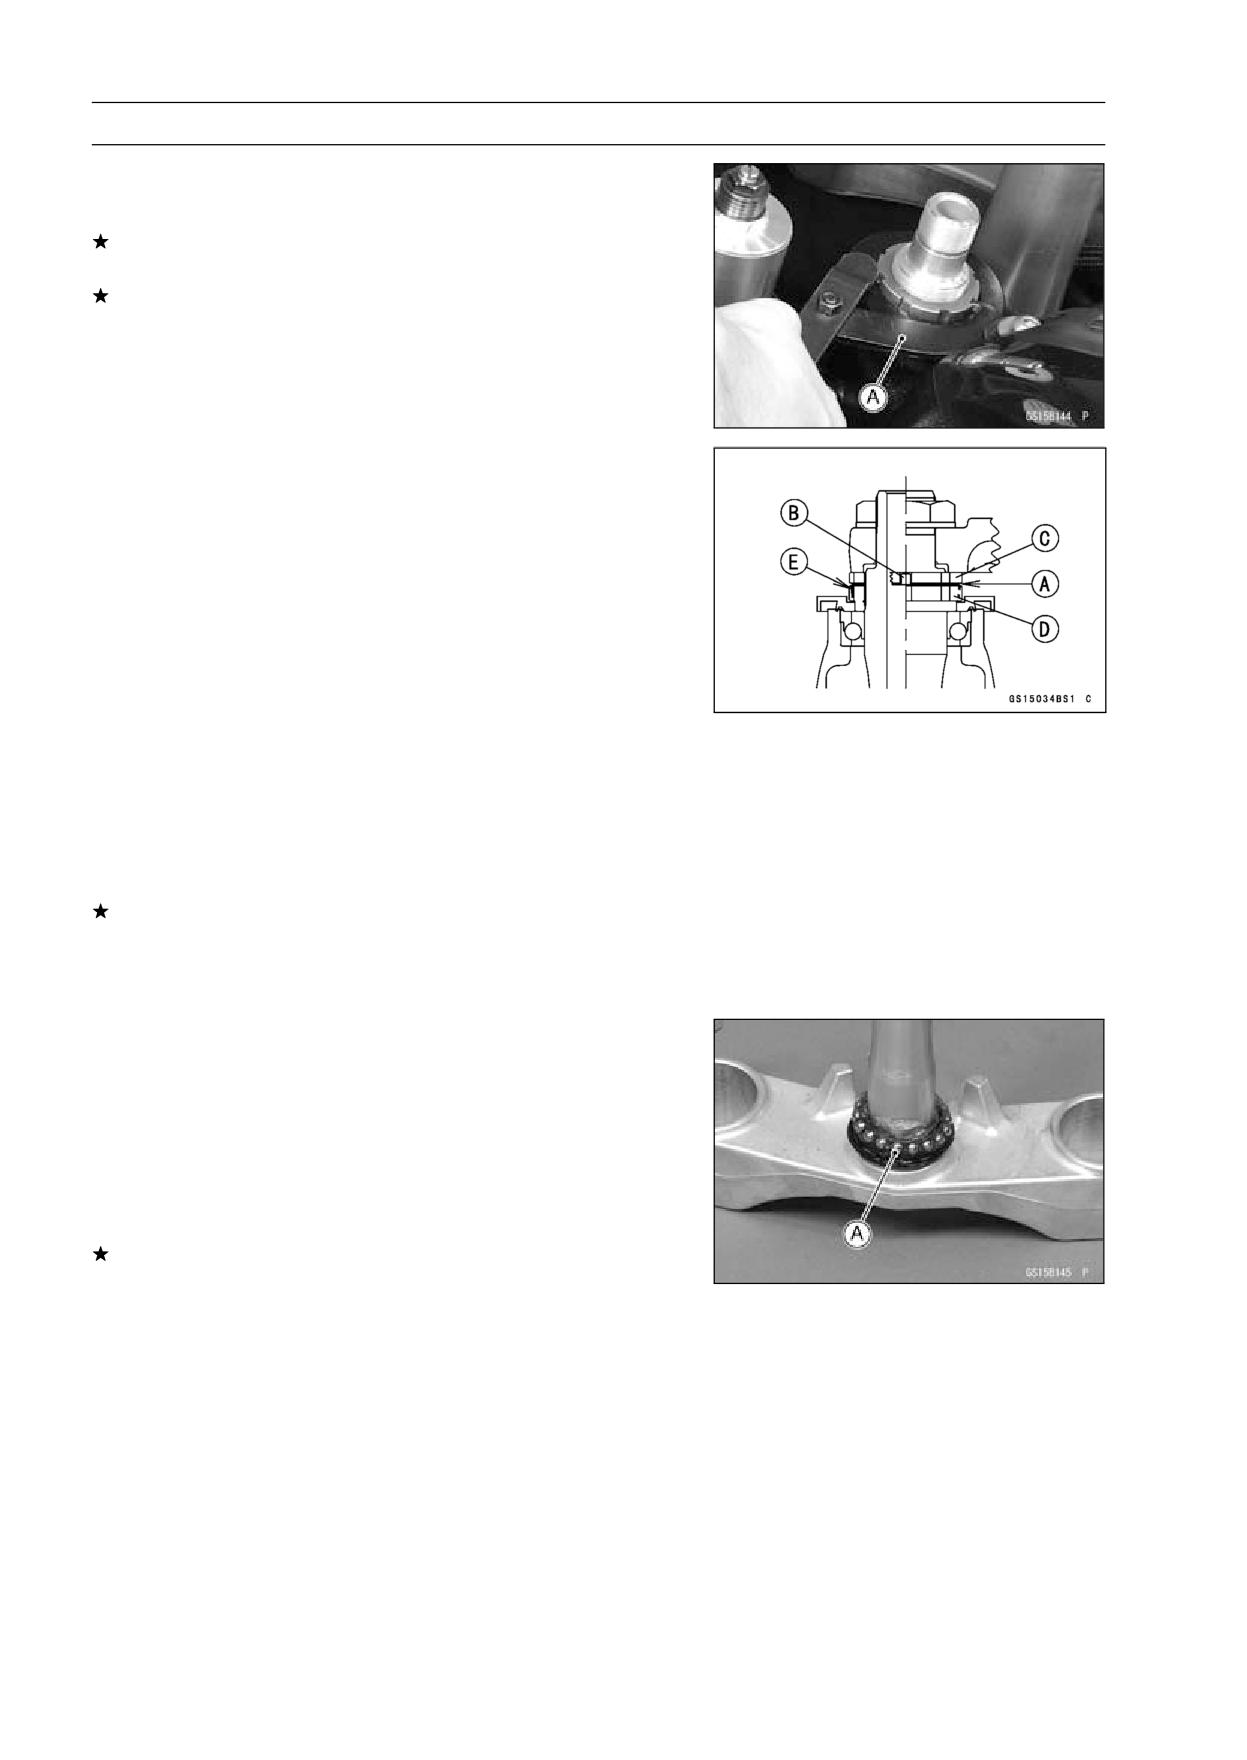
2-40 PERIODIC MAINTENANCE
Maintenance Procedure
• Adjust the steering.
Special Tool - Steering Stem Nut Wrench [A]: 57001-1100
If the steering is too tight, loosen the stem nut a fraction
of a turn.
If the steering is too loose, tighten the stem nut a fraction
of a turn.
NOTE
○Turn the stem nut 1/8 turn at time maximum.
• Install the claw washer [A] so that its bent side [B] faces
upward, and engage the bent claws with the grooves of
stem locknut [C].
• Hand tighten the stem locknut until it touches the claw
washer.
• Tighten the stem locknut clockwise until the claws are
aligned with the grooves (ranging from 2nd to 4th) of stem
nut [D], and bend the 2 claws downward [E].
• Install the stem head.
• Install the washer, and tighten the stem head nut.
• Tighten:
Torque - Upper Front Fork Clamp Bolts: 20 N·m (2.0 kgf·m,
15 ft·lb)
Steering Stem Head Nut: 78 N·m (8.0 kgf·m, 58
ft·lb)
• Check the steering again.
If the steering is still too tight or too loose, repeat the ad-
justment.
• Install the handlebars (see Handlebar Installation in the
Steering chapter).
Steering Stem Bearing Lubrication
• Remove the steering stem (see Stem, Stem Bearing Re-
moval in the Steering chapter).
• Using a high-flash point solvent, wash the upper and
lower ball bearings in the cages, and wipe the upper and
lower outer races, which are press-fitted into the frame
head pipe, clean off grease and dirt.
• Visually check the outer races and the ball bearings.
Replace the bearing assemblies if they show wear or
damage.
• Pack the upper and lower ball bearings [A] in the cages
with grease, and apply a light coat of grease to the upper
and lower outer races.
• Install the steering stem (see Stem, Stem Bearing Instal-
lation in the Steering chapter).
• Adjust the steering (see Steering Play Adjustment).
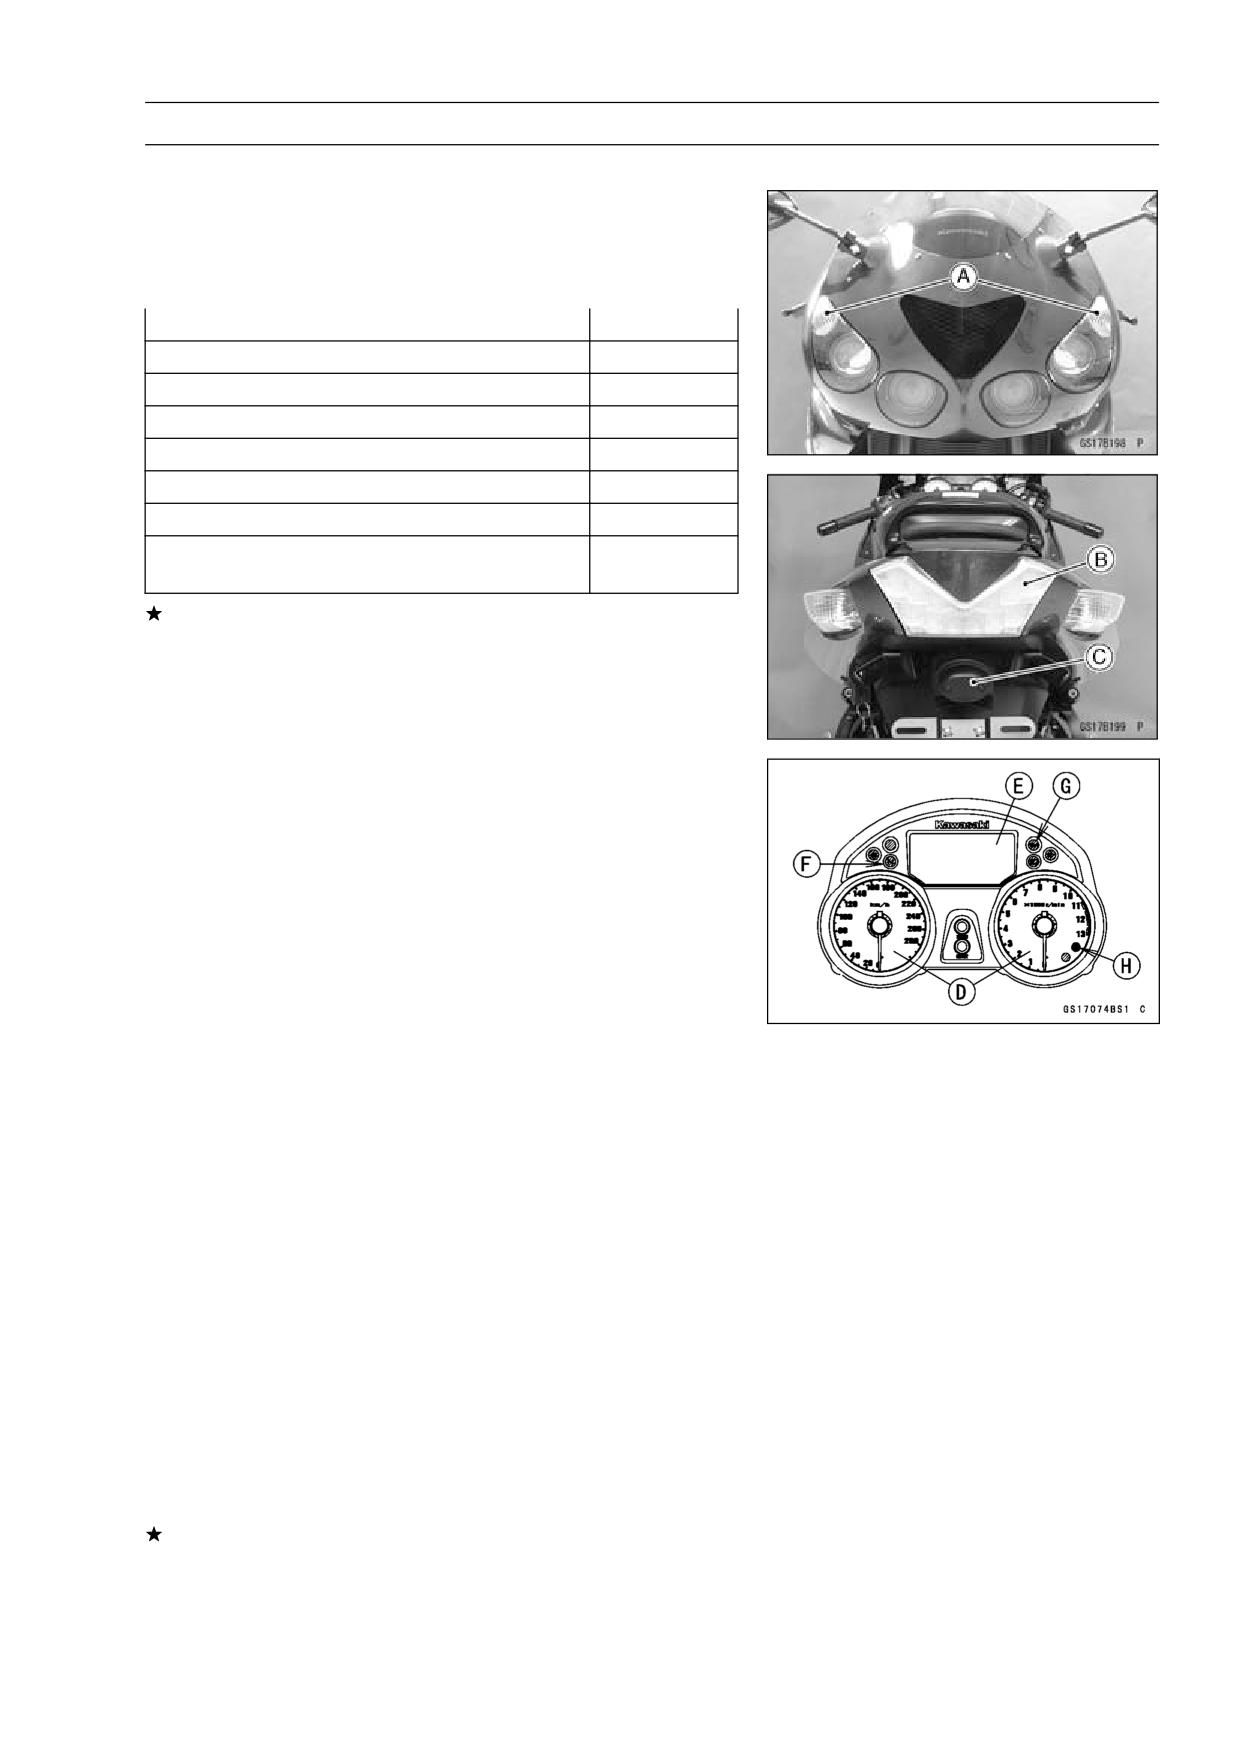
PERIODIC MAINTENANCE 2-41
Maintenance Procedure
Electrical System
Lights and Switches Operation Inspection
First Step
• Turn on the ignition switch.
• The following lights should go on according to below table.
City Light [A]
goes on
Taillight [B]
goes on
License Plate Light [C]
goes on
Meter Panel Illumination Light (LED) [D]
goes on
Meter Panel LCD [E]
goes on
Neutral Indicator Light (LED) [F]
goes on
Oil Pressure Warning Indicator Light (LED) [G]
goes on
ABS Indicator Light (LED) [H] (Equipped
goes on
Models)
If the light does not go on, inspect or replace the following
item.
Battery (see Charging Condition Inspection in the Elec-
trical System chapter)
Applicable Bulb (see Wiring Diagram in the Electrical
System chapter)
Meter Unit for Meter Panel LCD (see Meter Unit Inspec-
tion in the Electrical System chapter)
Meter Unit for Neutral Indicator Light (LED) (see Meter
Unit Inspection in the Electrical System chapter)
Meter Unit for Warning Indicator Light (LED) (see Meter
Unit Inspection in the Electrical System chapter)
Meter Unit for Oil Pressure Warning Indicator Light
(LED) (see Meter Unit Inspection in the Electrical Sys-
tem chapter)
Meter Unit for Illumination Light (LED) (see Meter Unit
Inspection in the Electrical System chapter)
ECU (see ECU Power Supply Inspection in the Fuel Sys-
tem (DFI) chapter)
Main Fuse 30 A and Taillight Fuse 10 A (see Fuse In-
spection in the Electrical System chapter)
Ignition Switch (see Switch Inspection in the Electrical
System chapter)
Gear Position Switch (see Gear Position Switch Inspec-
tion in the Electrical System chapter)
Harness (see Wiring Inspection in the Electrical System
chapter)
ABS Indicator Light (LED) (Equipped Models) (see ABS
Indicator Light (LED) Inspection in the Brakes chapter)
• Turn off the ignition switch.
• The all lights should go off.
• For the immobilizer model, Warning Indicator Light (LED)
will blinks (see Immobilizer System (Equipped Models)
section in the Electrical System chapter).
If the light does not go off, replace the ignition switch.
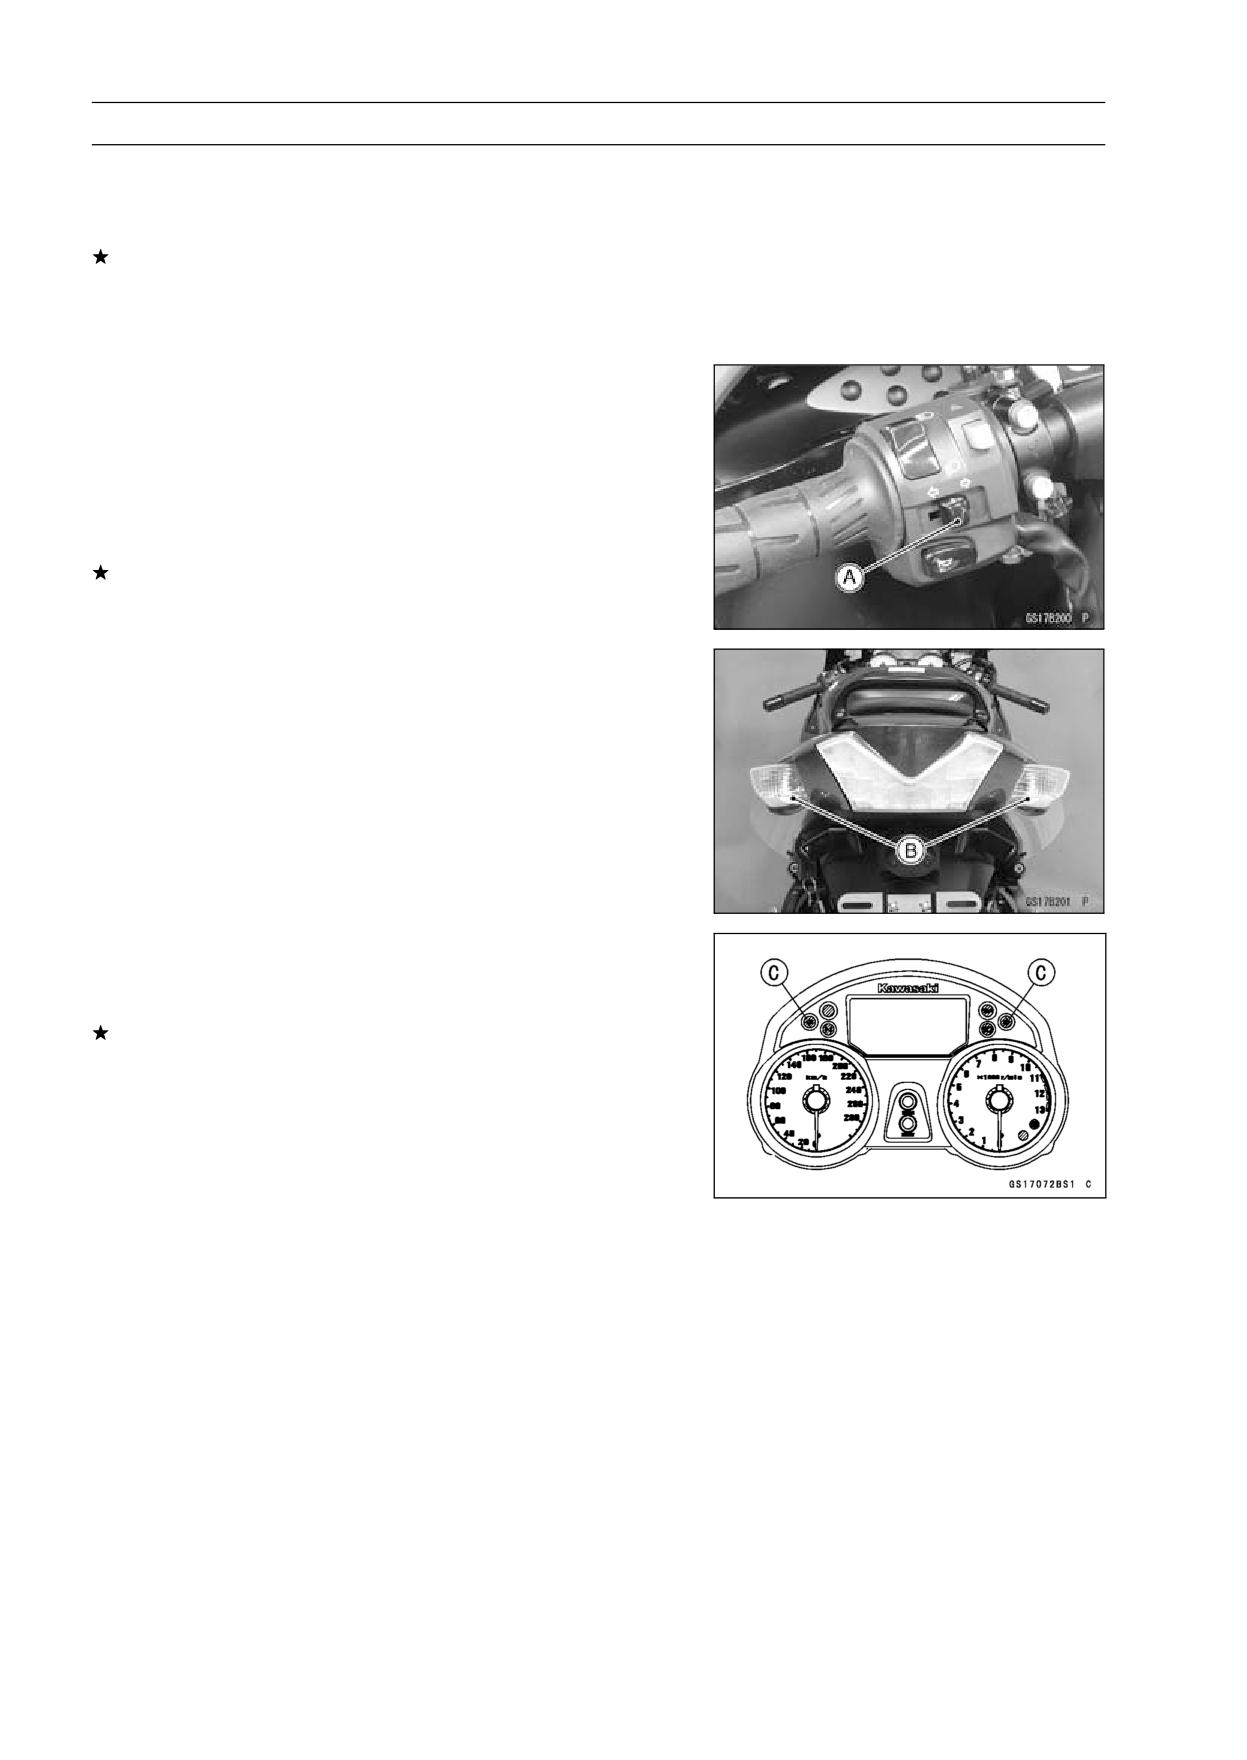
2-42 PERIODIC MAINTENANCE
Maintenance Procedure
Second Step
• Turn the ignition switch to P (Park) position.
• The city light, taillight and license plate light should go on.
If the light does not go on, inspect or replace the following
item.
Ignition Switch (see Switch Inspection in the Electrical
System chapter)
Third Step
• Turn on the ignition switch.
• Turn on the turn signal switch [A] (left or right position).
• The left or right turn signal lights [B] (front and rear) ac-
cording to the switch position should flash.
• The either of turn signal indicator lights (LED) [C] in the
meter unit should flash.
If the each light does not flash, inspect or replace the
following item.
Turn Signal Light Bulb (see Turn Signal Light Bulb Re-
placement in the Electrical System chapter)
Meter Unit for Turn Signal Indicator Light (LED) (see Me-
ter Unit Inspection in the Electrical System chapter)
Turn Signal Relay Fuse 10 A (see Fuse Inspection in the
Electrical System chapter)
Turn Signal Switch (see Switch Inspection in the Electri-
cal System chapter)
Turn Signal Relay (see Turn Signal Relay Inspection in
the Electrical System chapter)
Harness (see Wiring Inspection in the Electrical System
chapter)
• Push the turn signal switch.
• The turn signal lights and indicator light (LED) should go
off.
If the light does not go off, inspect or replace the following
item.
Turn Signal Switch (see Switch Inspection in the Electri-
cal System chapter)
Turn Signal Relay (see Turn Signal Relay Inspection in
the Electrical System chapter)
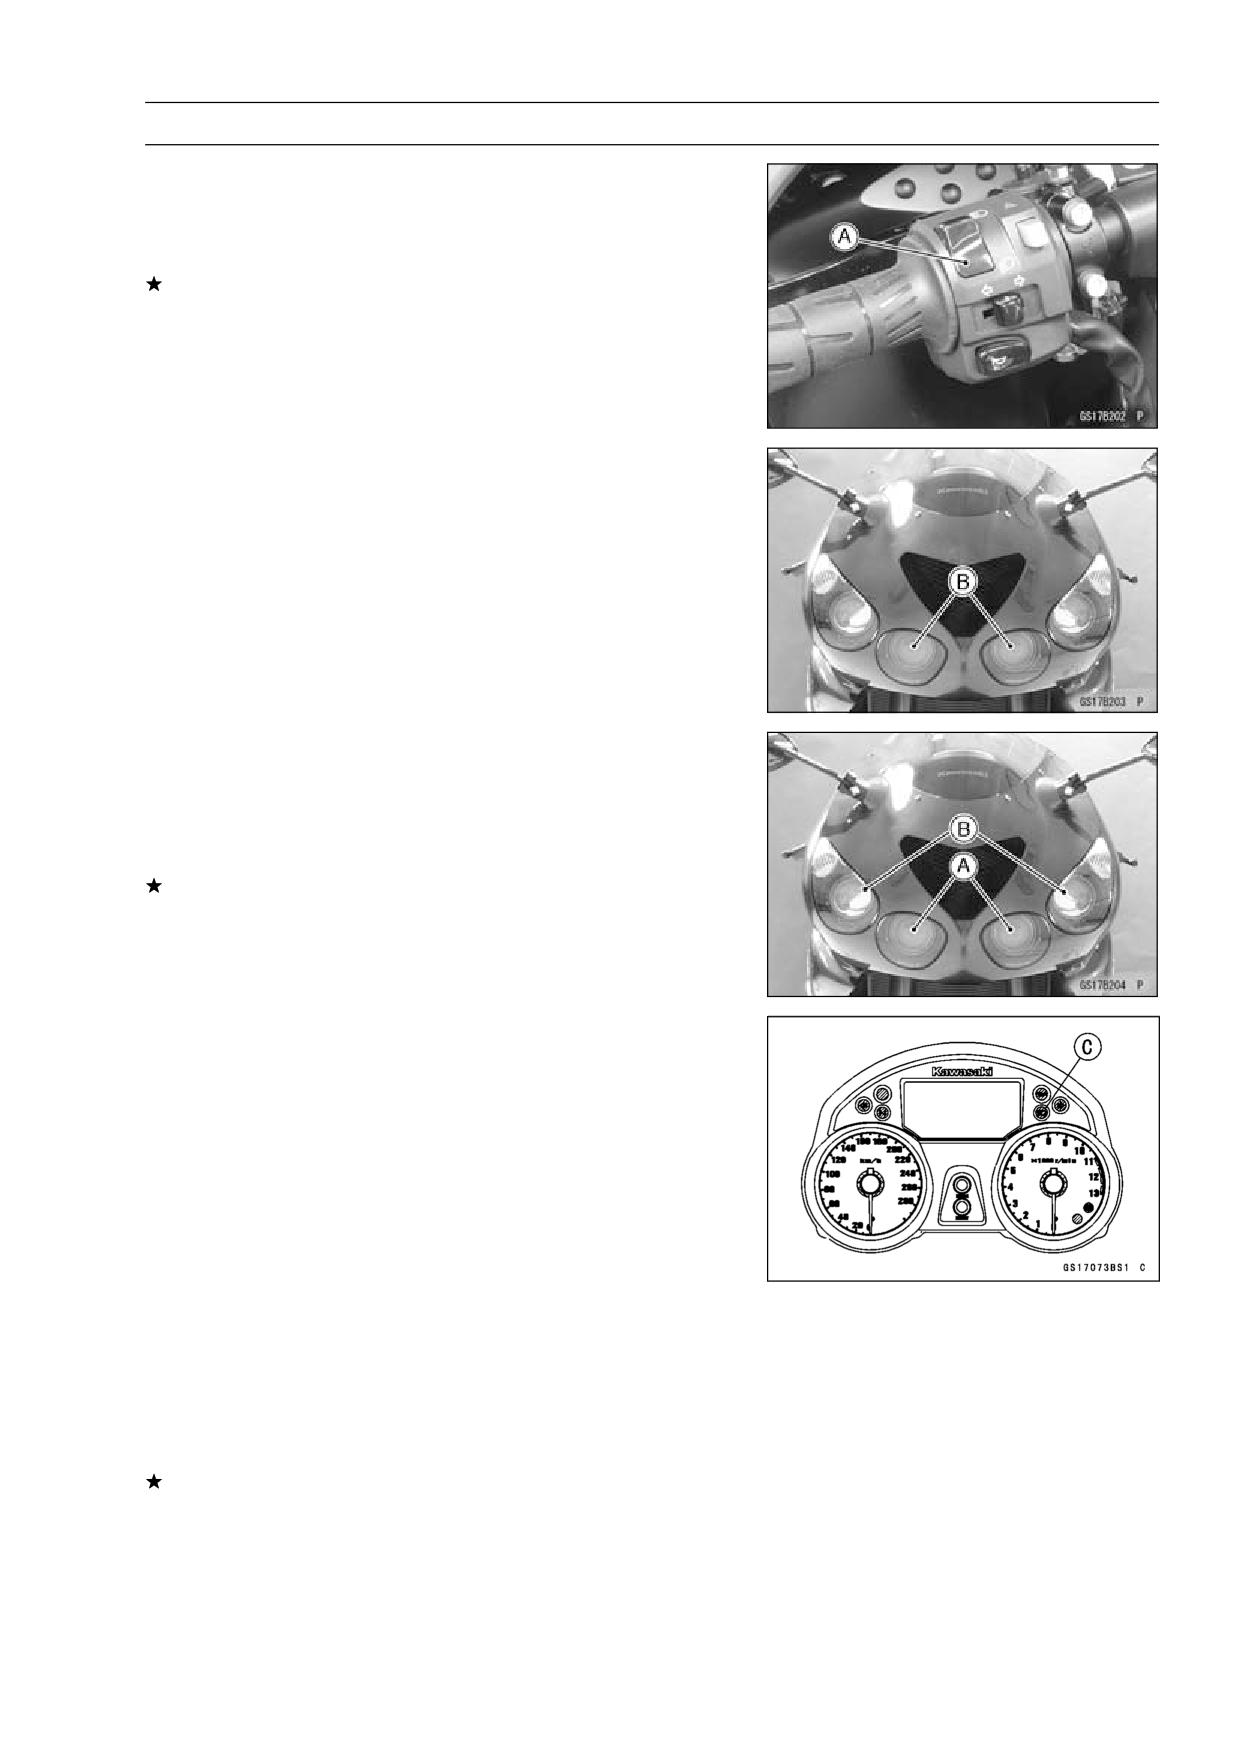
PERIODIC MAINTENANCE 2-43
Maintenance Procedure
Fourth Step
• Set the dimmer switch [A] to low beam position.
• Start the engine.
• The low beam headlights [B] should go on.
If the low beam headlight does not go on, inspect or re-
place the following item.
Headlight Low Beam Bulb (see Headlight Bulb Replace-
ment in the Electrical System chapter)
Headlight Fuse (Low) 15 A (see Fuse Inspection in the
Electrical System chapter)
Headlight Relay Fuse 10 A (see Fuse Inspection in the
Electrical System chapter)
Headlight Circuit Relay in Relay Box (see Relay Circuit
Inspection in the Electrical System chapter)
Headlight Relay (Low) (see Headlight Relay Inspection
in the Electrical System chapter)
Harness (see Wiring Inspection in the Electrical System
chapter)
• Push the passing button (equipped models) or set the
dimmer switch to high beam position.
• The low beam [A] and high beam [B] headlights should
go on.
• The high beam indicator light (LED) [C] should go on.
If the high beam headlight and/or high beam indicator light
(LED) does not go on, inspect or replace the following
item.
Headlight High Beam Bulb (see Headlight Bulb Replace-
ment in the Electrical System chapter)
Headlight Fuse (High) 15 A (see Fuse Inspection in the
Electrical System chapter)
Headlight Relay Fuse 10 A (see Fuse Inspection in the
Electrical System chapter)
Passing Button (Equipped Models) (see Switch Inspec-
tion in the Electrical system chapter)
Dimmer Switch (see Switch Inspection in the Electrical
System chapter)
Headlight Circuit Relay in Relay Box (see Relay Circuit
Inspection in the Electrical System chapter)
Headlight Relay (High) (see Headlight Relay Inspection
in the Electrical System chapter)
Harness (see Wiring Inspection in the Electrical System
chapter)
• Turn off the engine stop switch.
• The low beam and high beam headlights should stay go-
ing on.
If the headlights and high beam indicator light (LED) does
go off, inspect or replace the following item.
Headlight Circuit Relay in Relay Box (see Relay Circuit
Inspection in the Electrical System chapter)
• Turn off the ignition switch.
• The headlights and high beam indicator light (LED) should
go off.
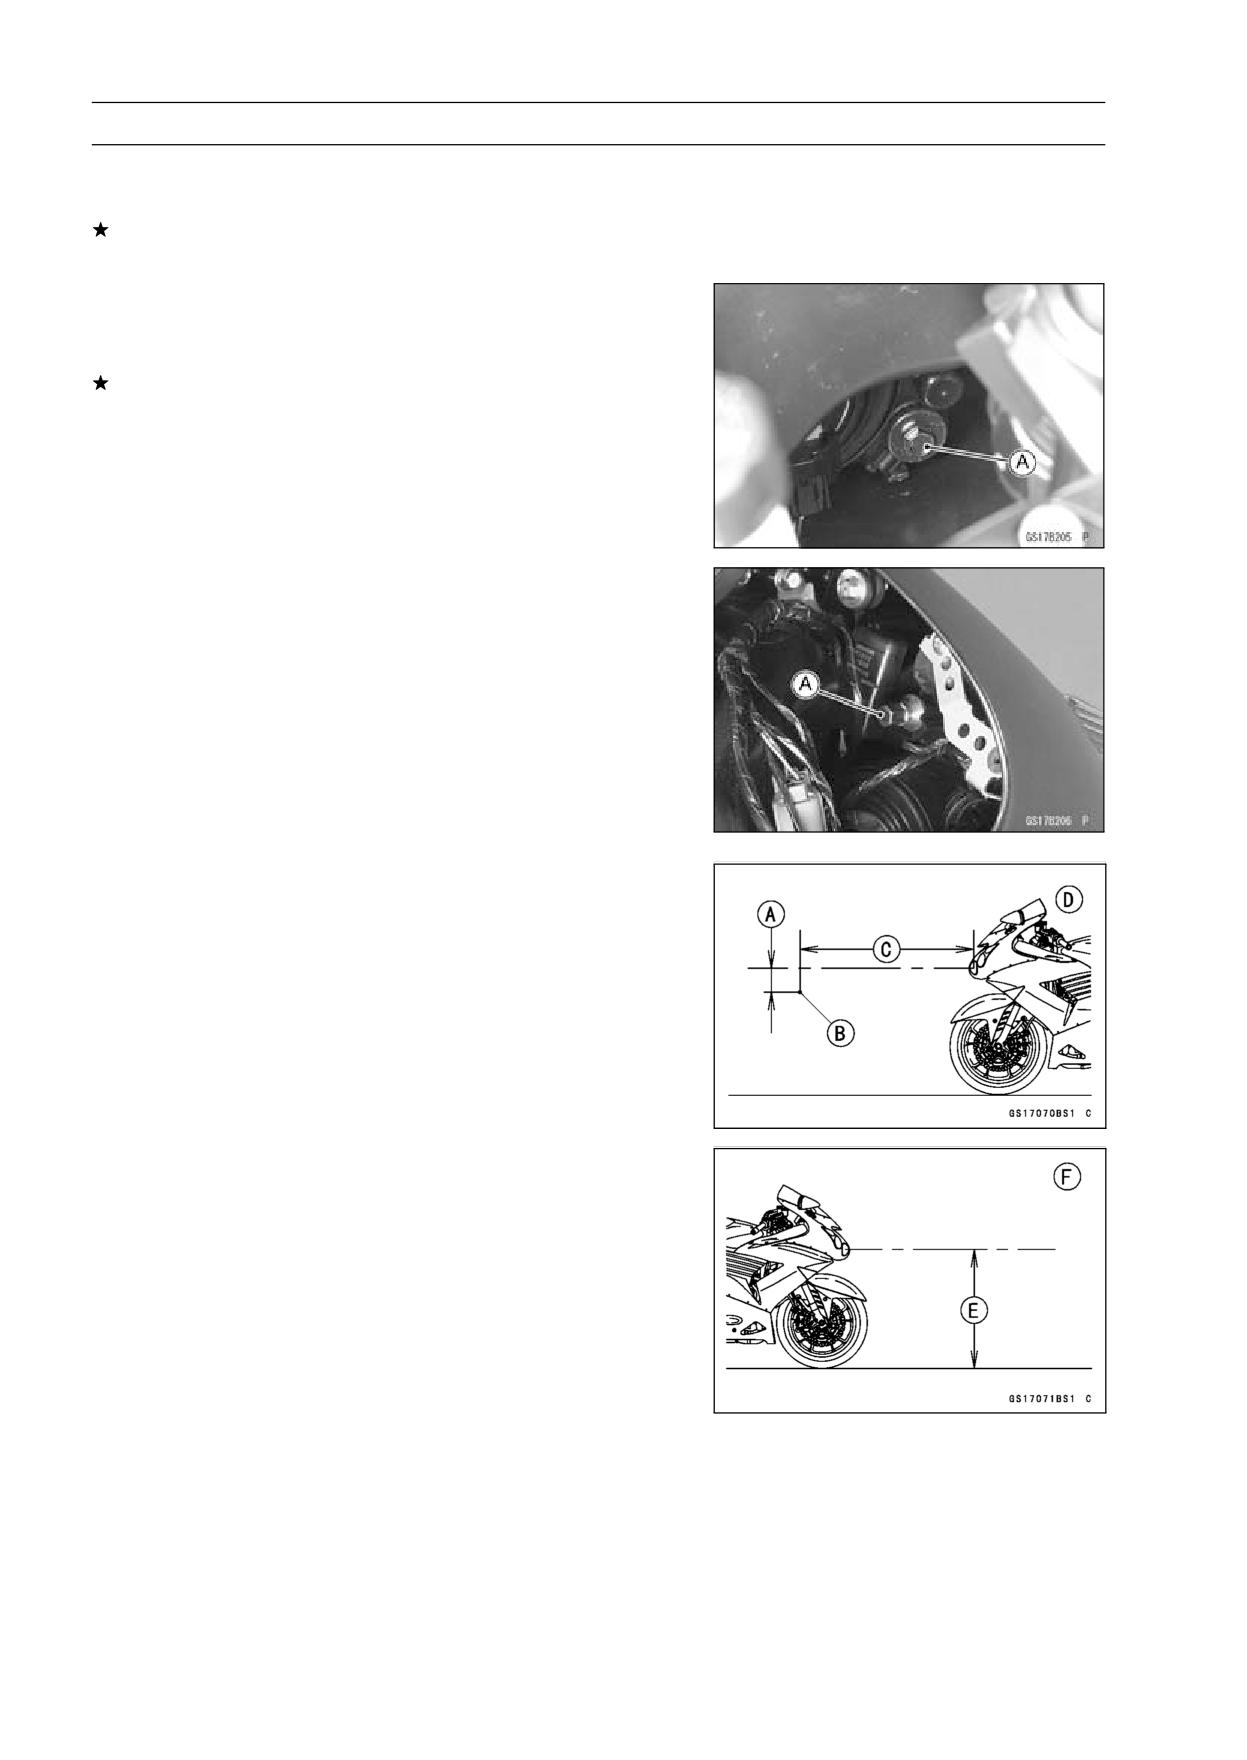
2-44 PERIODIC MAINTENANCE
Maintenance Procedure
Headlight Aiming Inspection
• Inspect the headlight beam for aiming.
If the headlight beam points to one side rather than
straight ahead, adjust the horizontal beam.
Headlight Beam Horizontal Adjustment
• Turn the horizontal adjuster [A] in both headlights in or out
until the beam points straight ahead.
If the headlight beam points too low or high, adjust the
vertical beam.
Headlight Beam Vertical Adjustment
• Turn the vertical adjuster [A] in both headlights in or out
to adjust the headlight vertically.
NOTE
○ON high beam, the brightest points should be slightly
below horizontal with the motorcycle on its wheels and
the rider seated. Adjust the headlight to the proper an-
gle according to local regulations.
○For US model, the proper angle is 0.4 degrees below
horizontal. This is 50 mm (2 in.) drop at 7.6 m (25
ft) measured from the center of the headlight with the
motorcycle on its wheels and the rider seated.
50 mm (2 in.) [A]
Center of Brightest Spot [B]
7.6 m (25 ft) [C]
Low Beam [D]
Height of Headlight Center [E]
High Beam [F]
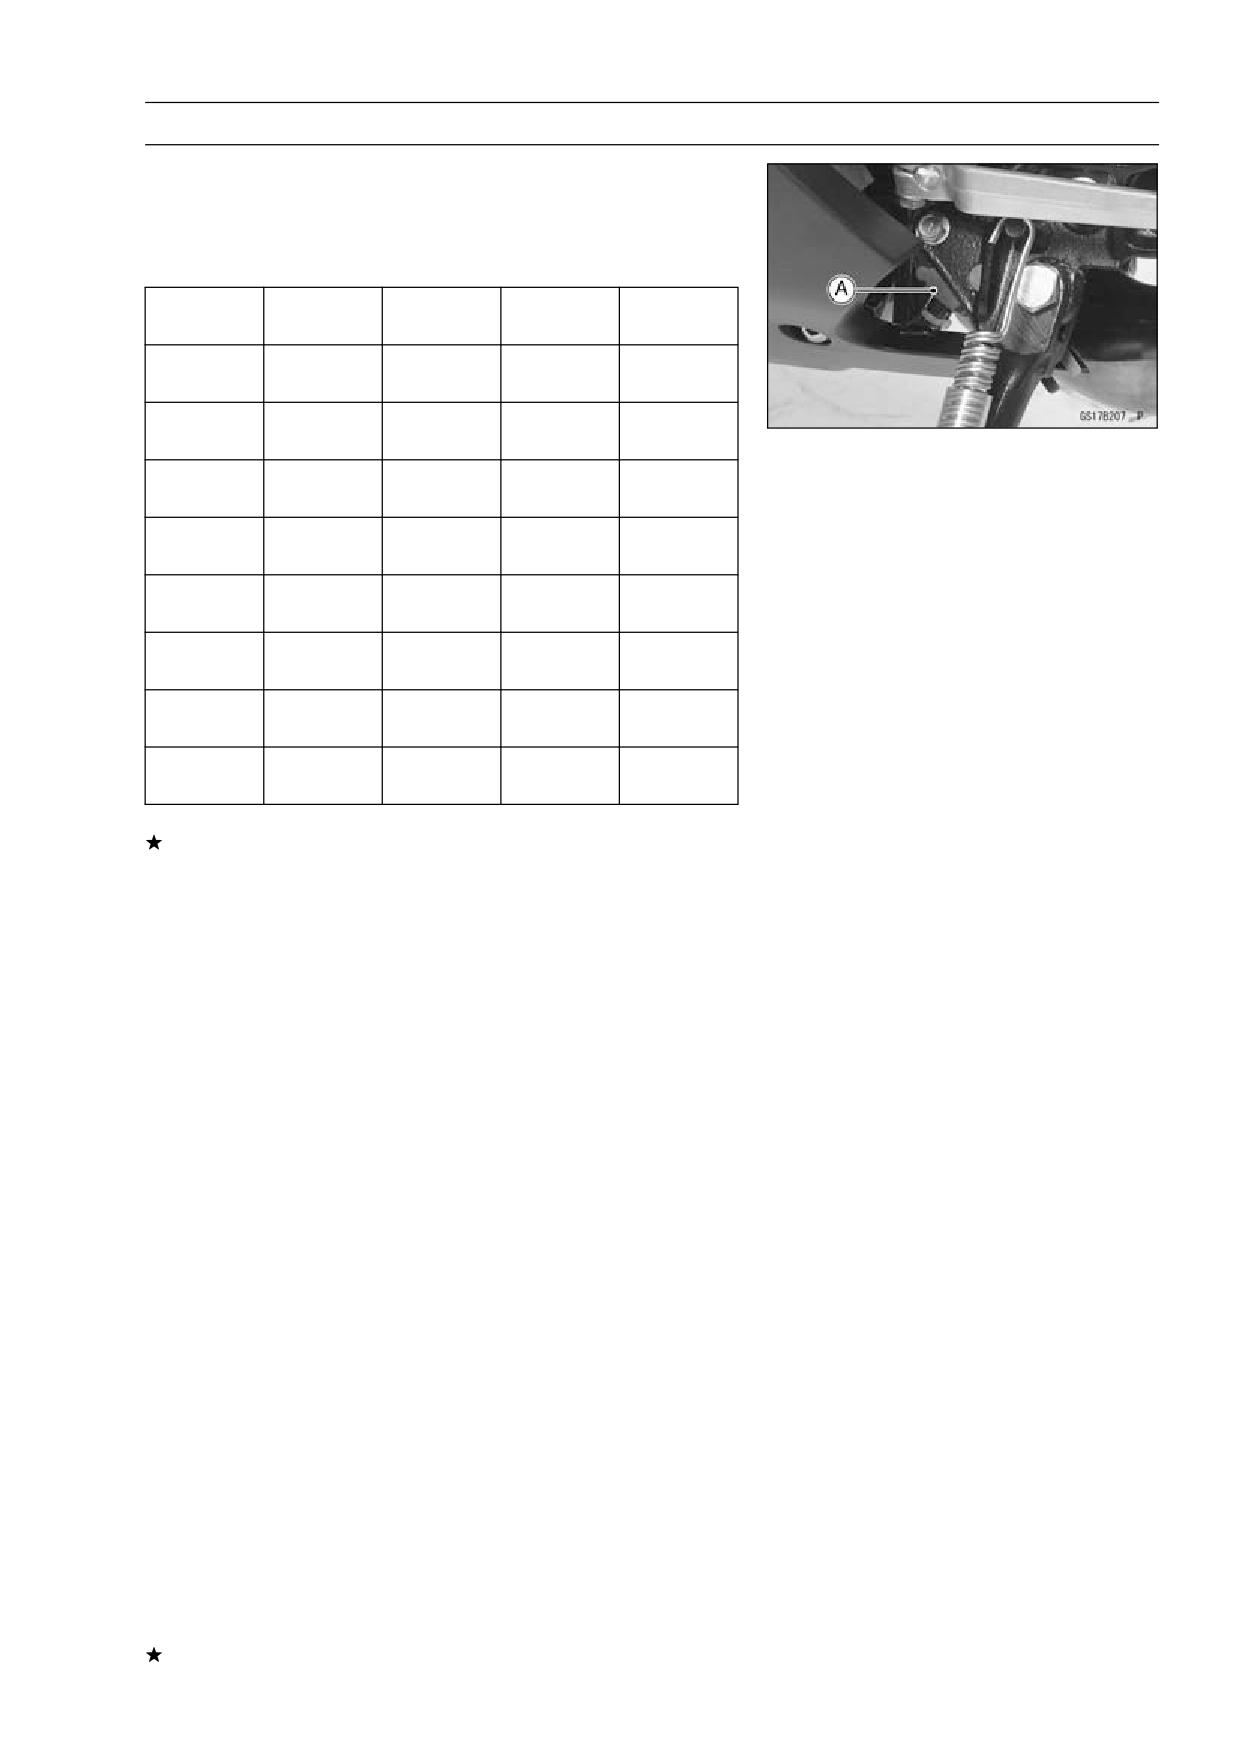
PERIODIC MAINTENANCE 2-45
Maintenance Procedure
Sidestand Switch Operation Inspection
• Inspect the sidestand switch [A] operation accordance to
table the below.
Sidestand Switch Operation
Gear
Clutch
Engine
Engine
Sidestand
Position
Lever
Start
Run
Continue
Up
Neutral
Released
Starts
running
Continue
Up
Neutral
Pulled in
Starts
running
Doesn’t
Continue
Up
In Gear
Released
start
running
Continue
Up
In Gear
Pulled in
Starts
running
Continue
Down
Neutral
Released
Starts
running
Continue
Down
Neutral
Pulled in
Starts
running
Doesn’t
Down
In Gear
Released
Stops
start
Doesn’t
Down
In Gear
Pulled in
Stops
start
If the sidestand switch operation does not work, inspect
or replace the following item.
Battery (see Charging Condition Inspection in the Elec-
trical System chapter)
Main Fuse 30 A (see Fuse Inspection in the Electrical
System chapter)
ECU Fuse 30 A (see Fuse Inspection in the Electrical
System chapter)
Ignition Fuse 10 A (see Fuse Inspection in the Electrical
System chapter)
Ignition Switch (see Switch Inspection in the Electrical
System chapter)
Sidestand Switch (see Switch Inspection in the Electrical
System chapter)
Starter Lockout Switch (see Switch Inspection in the
Electrical System chapter)
Engine Stop Switch (see Switch Inspection in the Elec-
trical System chapter)
Starter Button (see Switch Inspection in the Electrical
System chapter)
Gear Position Switch (see Gear Position Switch Inspec-
tion in the Electrical System chapter)
Starter Relay (see Starter Relay Inspection in the Elec-
trical System chapter)
Relay Box (see Relay Circuit Inspection in the Electrical
System chapter)
Starter Circuit Relay (see Relay Circuit Inspection in the
Electrical System chapter)
Harness (see Wiring Inspection in the Electrical System
chapter)
If the all parts are in good condition, replace the ECU.
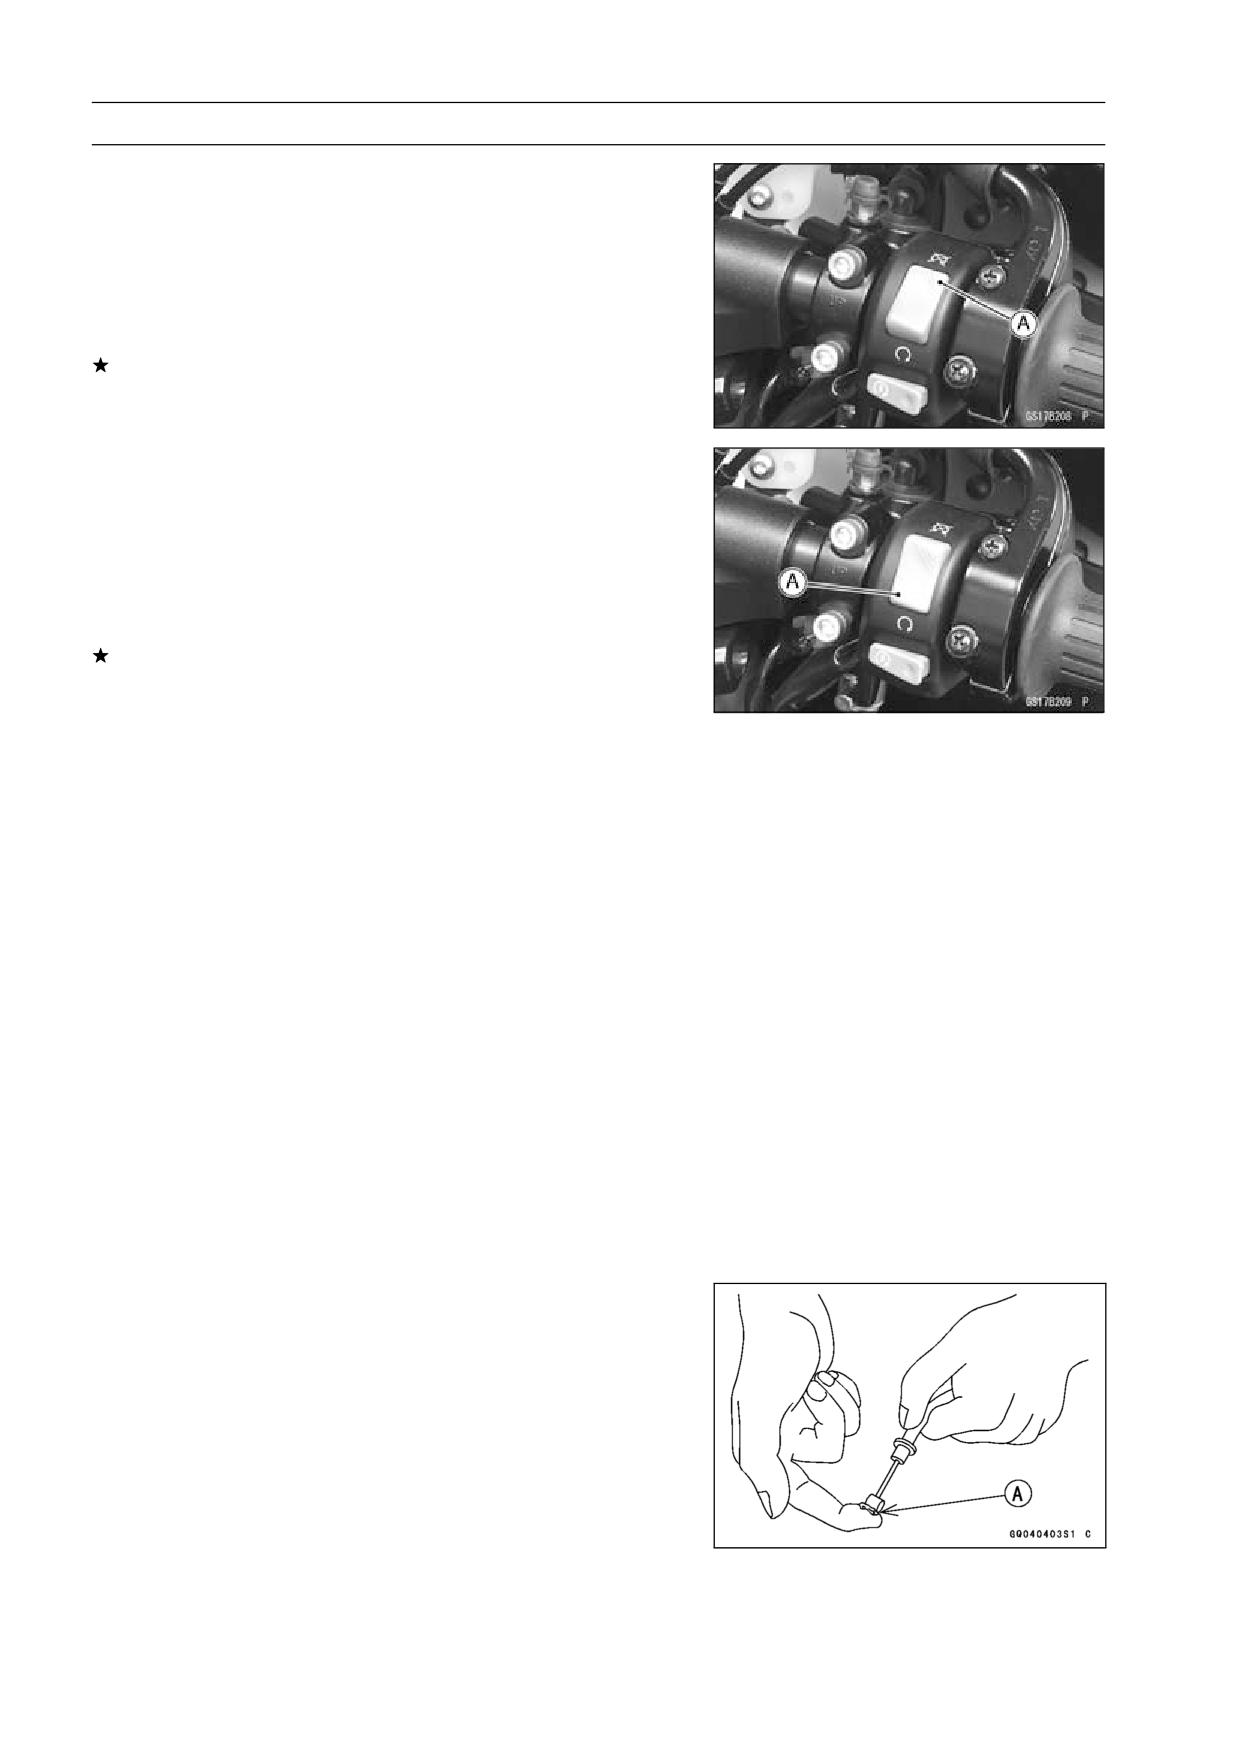
2-46 PERIODIC MAINTENANCE
Maintenance Procedure
Engine Stop Switch Operation Inspection
First Step
• Turn on the ignition switch.
• Set the neutral position.
• Turn the engine stop switch to stop position [A].
• Push the starter button.
• The engine does not start.
If the engine starts, inspect or replace the following item.
Engine Stop Switch (see Switch Inspection in the Elec-
trical System chapter)
Second Step
• Turn on the ignition switch.
• Set the neutral position.
• Turn the engine stop switch to run position [A].
• Push the starter button and run the engine.
• Turn the engine stop switch to stop position.
• Immediately the engine should be stop.
If the engine does not stop, inspect or replace the follow-
ing item.
Engine Stop Switch (see Switch Inspection in the Elec-
trical System chapter)
Others
Chassis Parts Lubrication
• Before lubricating each part, clean off any rusty spots with
rust remover and wipe off any grease, oil, dirt, or grime.
• Lubricate the points listed below with indicated lubricant.
NOTE
○Whenever the vehicle has been operated under
wet or rainy conditions, or especially after using a
high-pressure water spray, perform the general lubri-
cation.
Pivots: Lubricate with Grease.
Brake Lever
Brake Pedal
Clutch Lever
Center Stand (Equipped Models)
Rear Brake Joint Pin
Sidestand
Points: Lubricate with Grease.
Throttle Inner Cable Upper and Lower Ends [A]
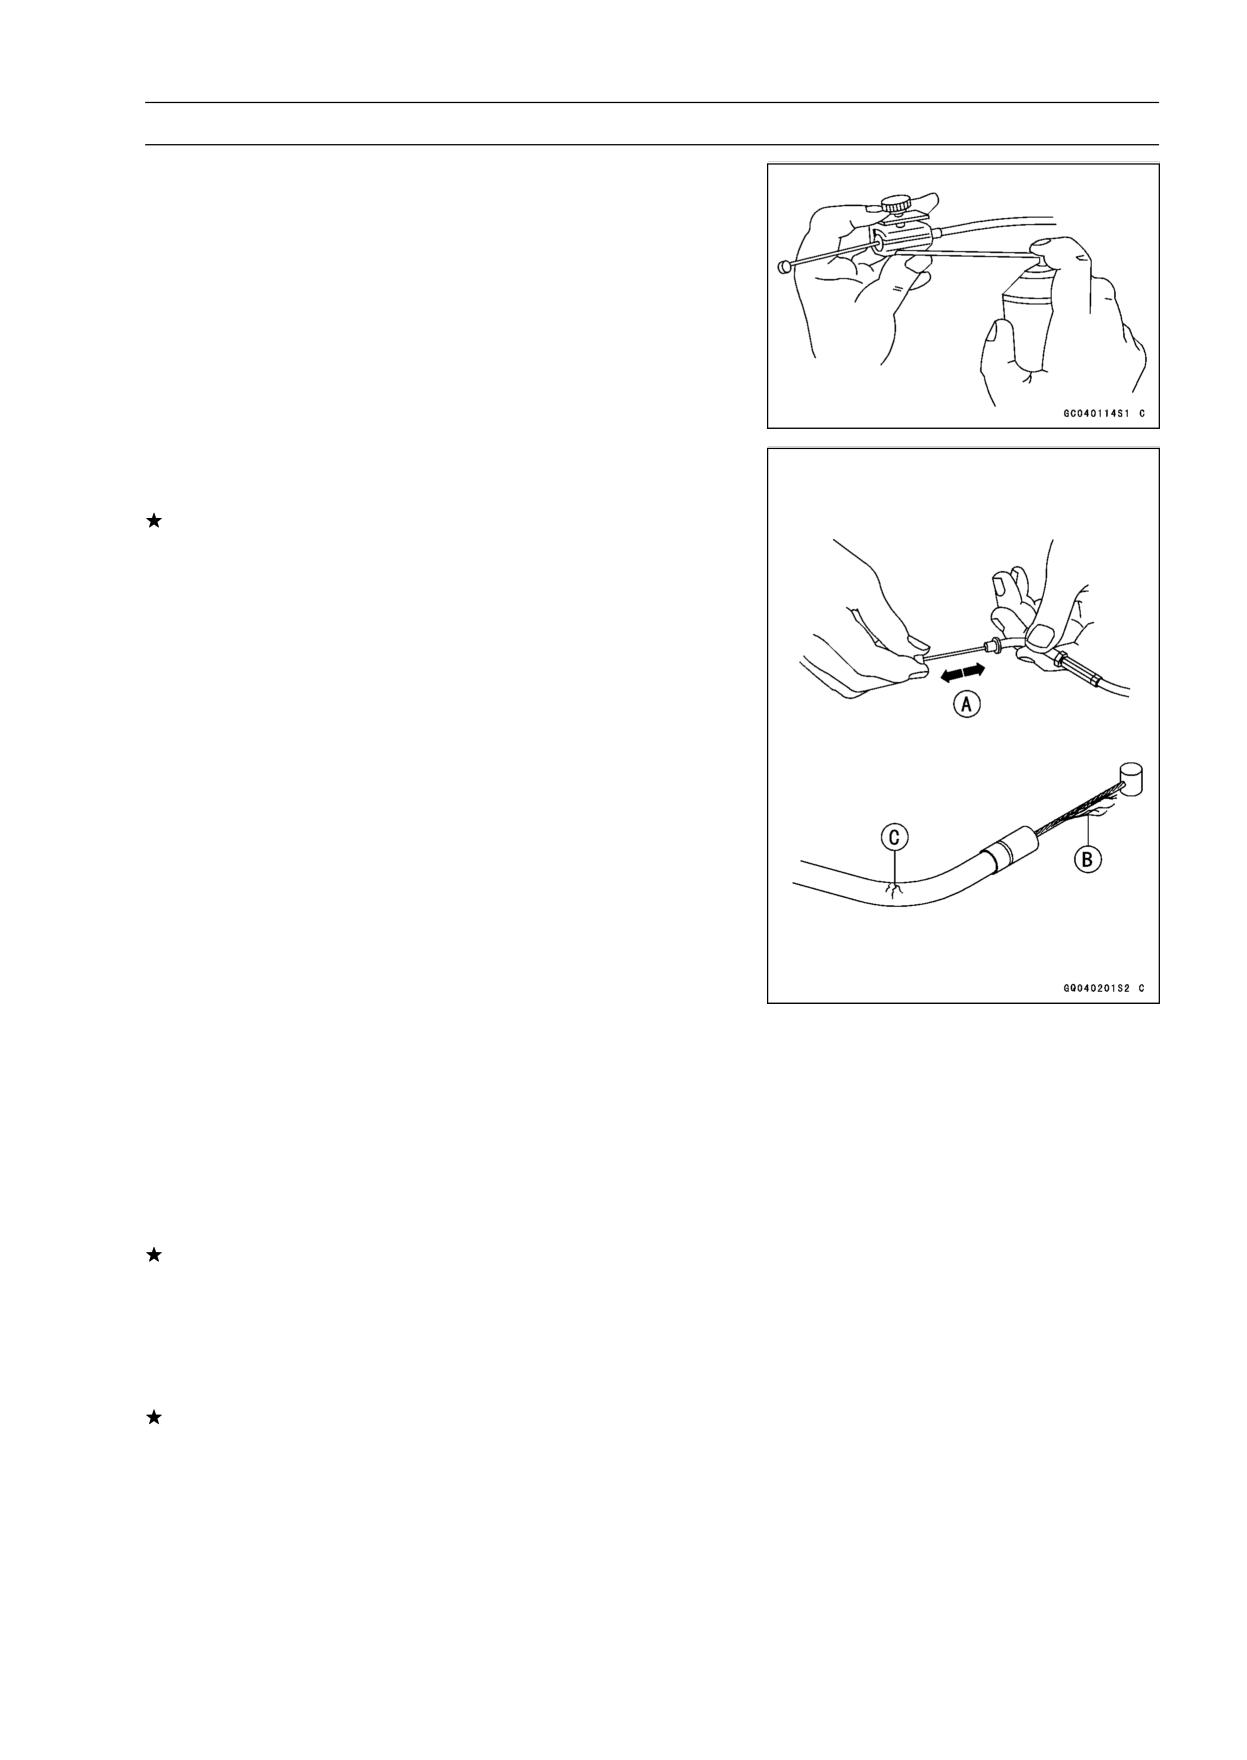
PERIODIC MAINTENANCE 2-47
Maintenance Procedure
Cables: Lubricate with Rust Inhibitor.
Throttle Cables
• Lubricate the cables by seeping the oil between the cable
and housing.
○The cable may be lubricated by using a commercially
available pressure cable lubricator with an aerosol cable
lubricant.
• With the cable disconnected at both ends, the inner cable
should move freely [A] within the cable housing.
If cable movement is not free after lubricating, if the cable
is frayed [B], or if the cable housing is kinked [C], replace
the cable.
Bolts, Nuts and Fasteners Tightness Inspection
• Check the tightness of the bolts and nuts listed here. Also,
check to see that each cotter pin is in place and in good
condition.
NOTE
○For the engine fasteners, check the tightness of them
when the engine is cold (at room temperature).
If there are loose fasteners, retorque them to the spec-
ified torque following the specified tightening sequence.
Refer to the appropriate chapter for torque specifications.
If torque specifications are not in the appropriate chapter,
see the Standard Torque Table. For each fastener, first
loosen it by 1/2 turn, then tighten it.
If cotter pins are damaged, replace them with new ones.
2-48 PERIODIC MAINTENANCE
Maintenance Procedure
Bolt, Nut and Fastener to be checked
Engine:
Clutch Lever Pivot Bolt Locknut
Engine Mounting Bolts
Muffler Clamp Bolts
Exhaust Pipe Manifold Holder Nuts
Muffler Body Mounting Bolts
Wheels:
Front Axle Clamp Bolts
Front Axle Nut
Rear Axle Nut
Rear Axle Nut Cotter Pin
Brakes:
Brake Lever Pivot Nut
Brake Pedal Bolt
Brake Rod Joint Cotter Pin
Caliper Mounting Bolts
Front Master Cylinder Clamp Bolts
Rear Master Cylinder Mounting Bolts
Suspension:
Front Fork Clamp Bolts
Rear Shock Absorber Mounting Nuts
Swingarm Pivot Shaft Nut
Uni-Trak Link Nuts
Steering:
Handlebar Holder Bolts
Steering Stem Head Nut
Others:
Center Stand (Equipped Models)
Footpeg Bracket Bolts
Sidestand Bolt
Replacement Parts
Air Cleaner Element Replacement
NOTE
○In dusty areas, the element should be replaced more
frequently than the recommended interval.
○After riding through rain or on muddy roads, the element
should be replaced immediately.
WARNING
If dirt or dust is allowed to pass through into the
throttle assembly, the throttle may become stuck,
possibly causing an accident.
CAUTION
If dirt gets through into the engine, excessive en-
gine wear and possibly engine damage will occur.
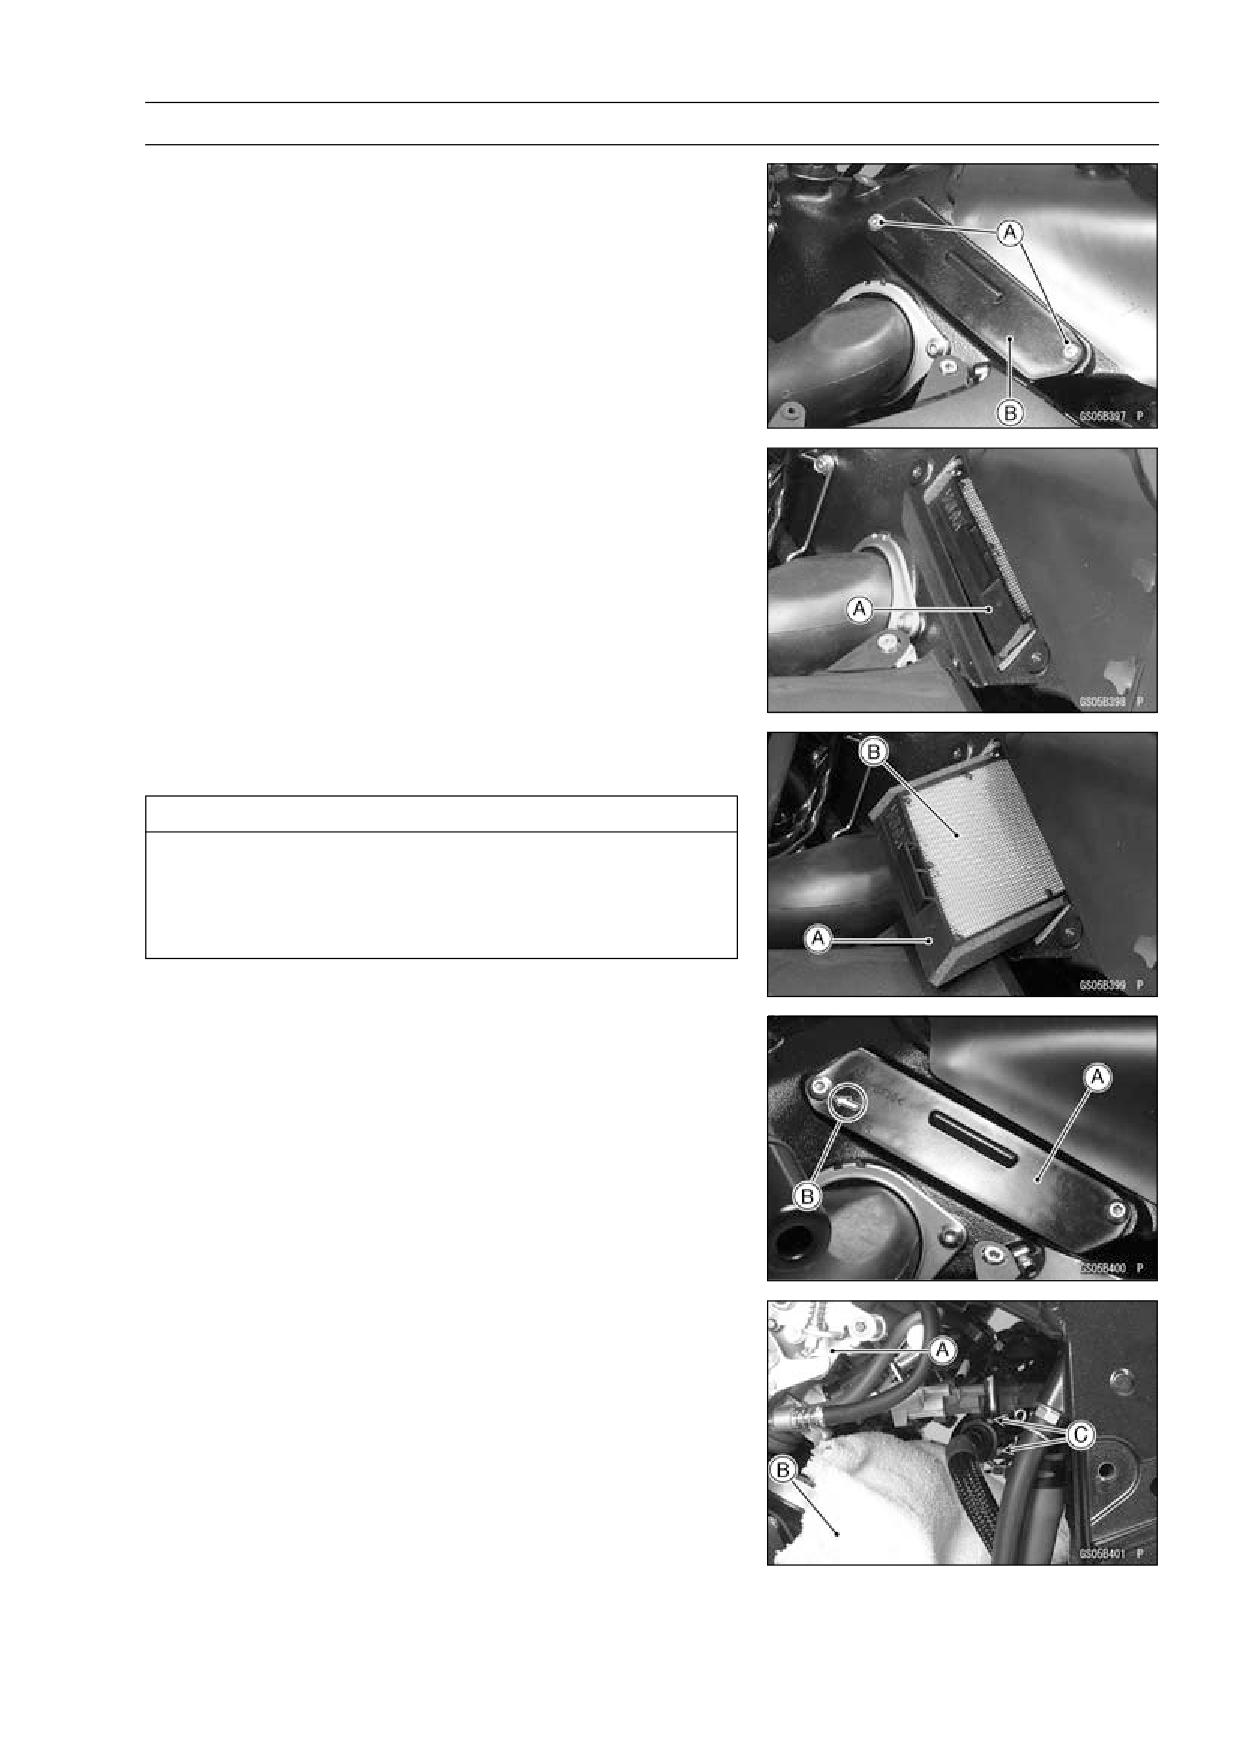
PERIODIC MAINTENANCE 2-49
Maintenance Procedure
• Remove:
Fuel Tank Cover (see Fuel Tank Removal in the Fuel
System (DFI) chapter)
Air Cleaner Element Cover Bolts [A]
Air Cleaner Element Cover [B]
• Discard the air cleaner element [A].
• Install a new element [A] so that screen side [B] faces
upward.
CAUTION
Use only the recommended air cleaner element
(Kawasaki part number 11013-0014). Using another
air cleaner element will wear the engine prema-
turely or lower the engine performance.
• Install the air cleaner element cover [A] so that arrow mark
[B] faces foward.
• Tighten:
Torque - Air Cleaner Element Cover Bolts: 6.9 N·m (0.70
kgf·m, 61 in·lb)
Fuel Hose Replacement
• Pull out the throttle body assy [A] from the holder (see
Throttle Body Assy Removal in the Fuel System (DFI)
chapter).
• Be sure to place a piece of cloth [B] around the fuel hose
joint.
• Push the joint lock claws [C].
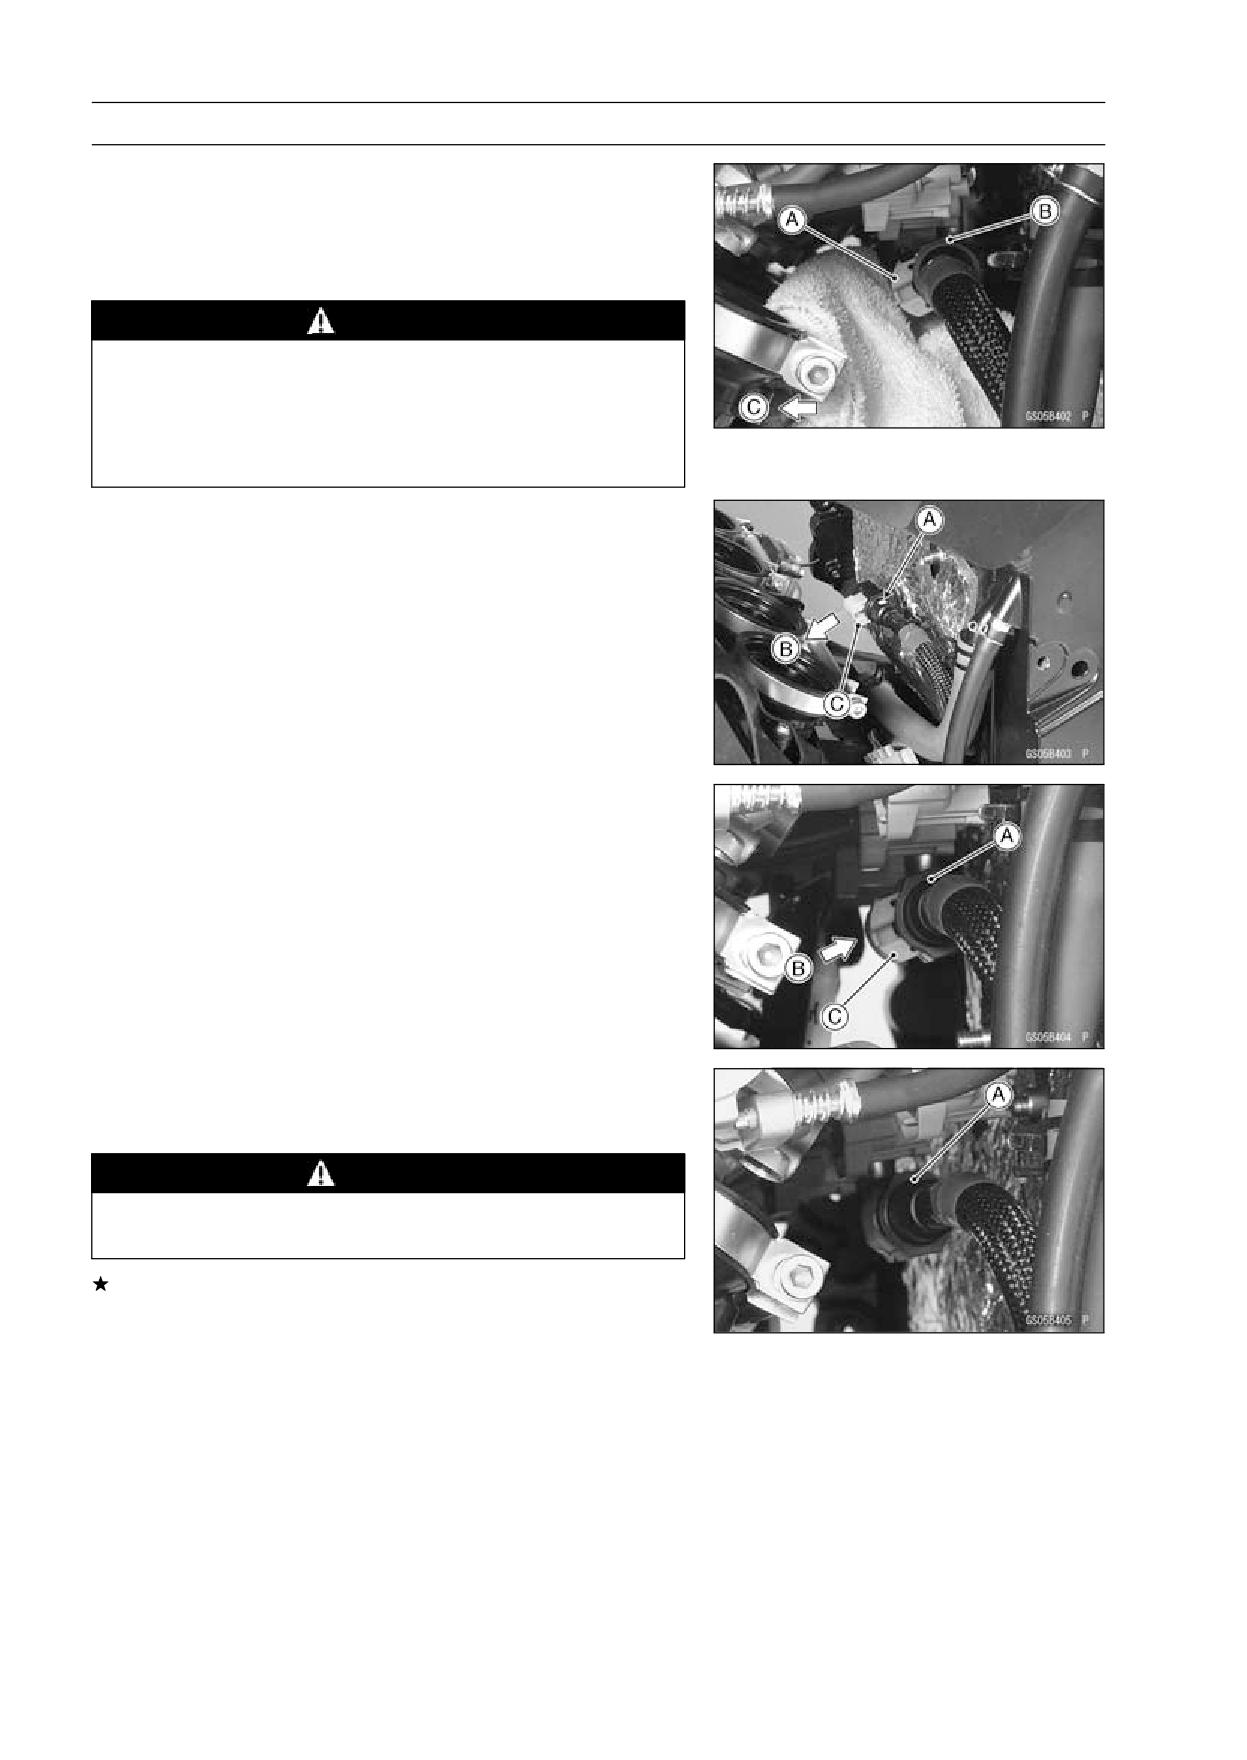
2-50 PERIODIC MAINTENANCE
Maintenance Procedure
• Pull the joint lock [A] as shown.
• Pull the fuel hose joint [B] out of the delivery pipe.
• Remove the throttle body assy (see Throttle Body Assy
Removal in the Fuel System (DFI) chapter).
• Pull out the fuel hose to foward [C].
WARNING
Be prepared for fuel spillage; any spilled fuel must
be completely wiped up immediately.
When the fuel hose is disconnected, fuel spills out
from the hose and the pipe. Cover the hose connec-
tion with a clean shop towel to prevent fuel spillage.
• Install the new fuel hose so that the white mark [A] side
faces throttle body assy.
• Run the fuel hose correctly (see Cable, Wire, and Hose
Routing section in the Appendix chapter).
• Pull [B] the joint lock [C] fully as shown.
• Insert the fuel hose joint [A] straight onto the delivery pipe
until the hose joint clicks.
• Push [B] the joint lock [C] until the hose joint clicks.
• Push and pull the fuel hose joint [A] back and forth more
than two times and make sure it is locked and doesn’t
come off.
WARNING
Make sure the fuel hose joint is installed correctly
on the delivery pipe or the fuel could leak.
If it comes off, reinstall the hose joint.
• Install the throttle body assy (see Throttle Body Assy In-
stallation in the Fuel System (DFI) chapter).
• Start the engine and check the fuel hose for leaks.
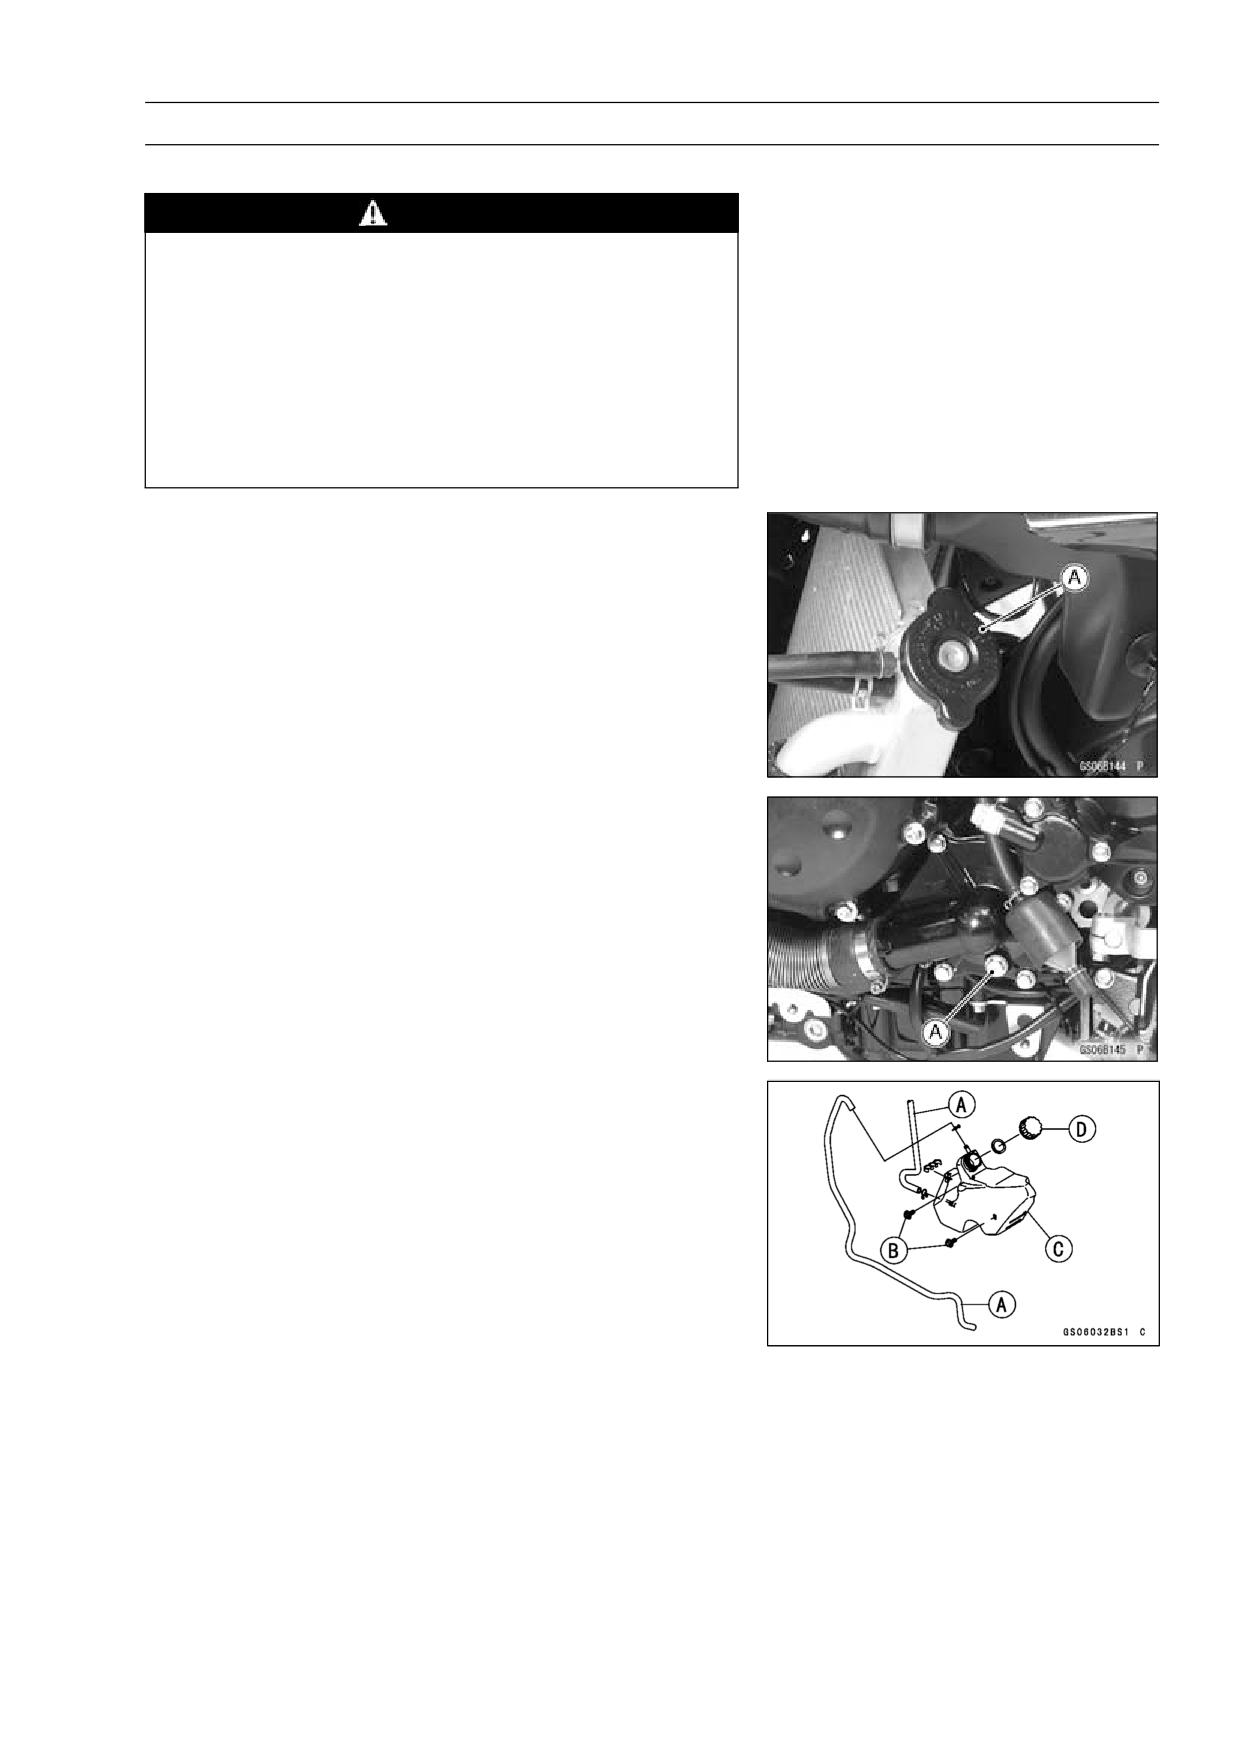
PERIODIC MAINTENANCE 2-51
Maintenance Procedure
Coolant Change
WARNING
To avoid burns, do not remove the radiator cap or
try to change the coolant when the engine is still
hot. Wait until it cools down. Coolant on tires will
make them slippery and can cause an accident
and injury. Immediately wipe up or wash away any
coolant that spills on the frame, engine, or other
painted parts.
Since coolant is harmful to the human body, do not
use for drinking.
• Remove:
Right Middle Fairing (see Middle Fairing Removal in the
Frame chapter)
Radiator Cap [A]
○Remove the radiator cap in two steps. First turn the cap
counterclockwise to the first stop. Then push and turn it
further in the same direction and remove the cap.
• Remove:
Left Lower Fairing (see Lower Fairing Removal in the
Frame chapter)
Left Middle Fairing (see Frame chapter)
• Place a containers under the drain plug [A] at the bottom
of the water pump cover.
• Drain the coolant from the radiator and engine by remov-
ing the drain plug.
• Remove:
Hoses [A]
Mounting Bolts [B]
Coolant Reserve Tank [C]
• Remove the cap [D] and pour the coolant into a container.
• Install the reserve tank, and reconnect the reserve tank
hose and overflow hose correctly (see Cable, Wire, and
Hose Routing in the Appendix chapter).
• Tighten the drain plug with the washer.
○Replace the drain plug gasket with a new one.
Torque - Coolant Drain Plug: 12 N·m (1.2 kgf·m, 106 in·lb)
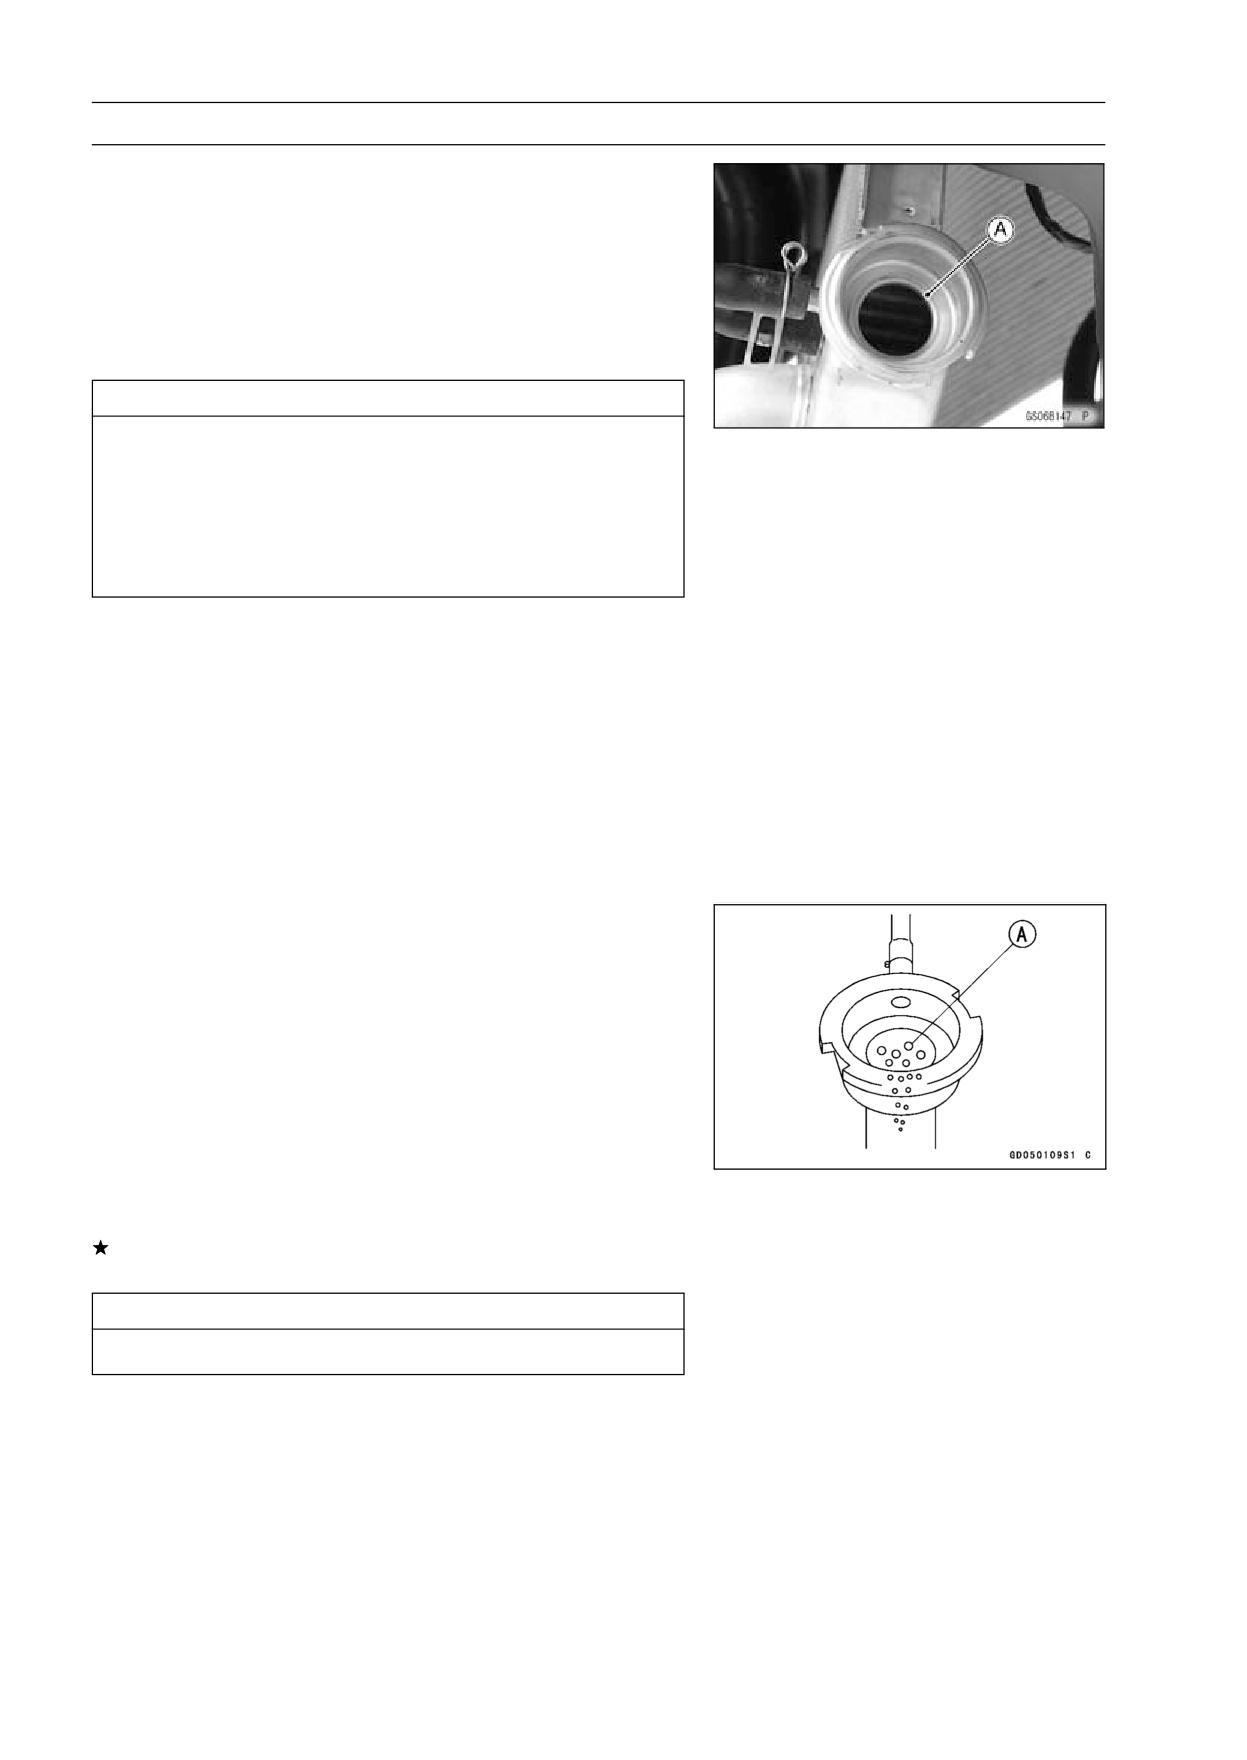
2-52 PERIODIC MAINTENANCE
Maintenance Procedure
• Fill the radiator up to the radiator filler neck [A] with
coolant, and install the radiator cap.
NOTE
○Pour in the coolant slowly so that it can expel the air
from the engine and radiator.
• Fill the reserve tank up to the full level line with coolant,
and install the cap.
CAUTION
Soft or distilled water must be used with the an-
tifreeze (see below for antifreeze) in the cooling sys-
tem.
If hard water is used in the system, it causes scales
accumulation in the water passages, and consider-
ably reduces the efficiency of the cooling system.
Water and Coolant Mixture Ratio (Recommended)
Soft Water:
50%
Coolant:
50%
Freezing Point:
-35°C (-31°F)
Total Amount:
3.4 L (3.6 US qt)
NOTE
○Choose a suitable mixture ratio by referring to the
coolant manufacturer’s directions.
• Bleed the air from the cooling system as follows.
○Start the engine with the radiator cap removed and run it
until no more air bubbles [A] can be seen in the coolant.
○Tap the radiator hoses to force any air bubbles caught
inside.
○Stop the engine and add coolant up to the radiator filler
neck.
• Install the radiator cap.
• Start the engine, warm it up thoroughly until the radiator
fan turns on and then stop the engine.
• Check the coolant level in the reserve tank after the en-
gine cools down.
If the coolant level is lower than the low level line, add
coolant to the full level line.
CAUTION
Do not add more coolant above the full level line.
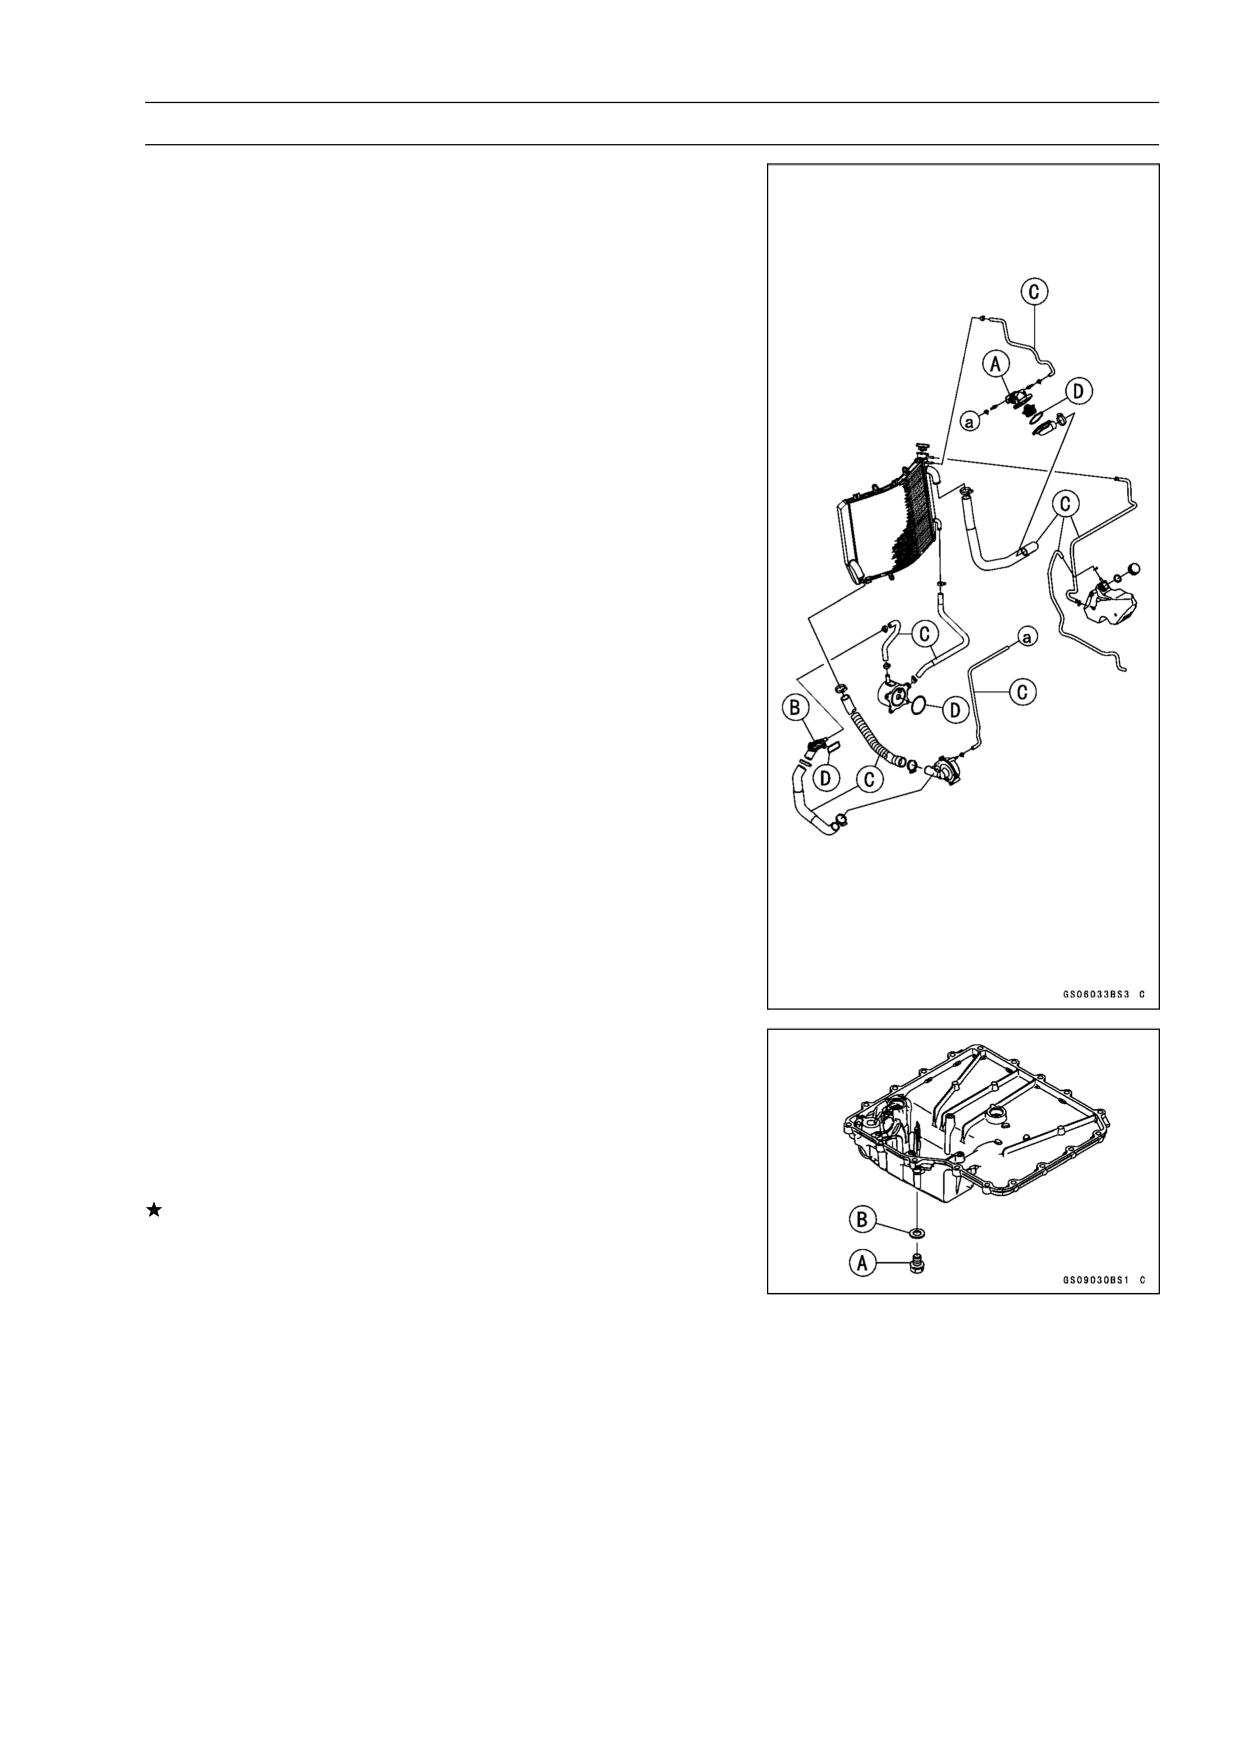
PERIODIC MAINTENANCE 2-53
Maintenance Procedure
Radiator Hose and O-ring Replacement
• Drain the coolant (see Coolant Change).
• Remove:
Lower Fairings (see Lower Fairing Removal in the Frame
chapter)
Middle Fairings (see Middle Fairing Removal in the
Frame chapter)
Throttle Body Assy (see Throttle Body Assy Removal in
the Fuel System (DFI) chapter)
Thermostat Housing [A]
Fitting [B]
Hoses [C]
O-rings [D]
• Apply grease to the new O-rings and install them.
• Instal the new hoses and tighten the clamps securely.
• Fill the coolant (see Coolant Change in the Periodic Main-
tenance chapter).
• Check the cooling system for leaks.
Engine Oil Change
• Situate the motorcycle so that it is vertical after warming
up the engine.
• Remove the engine oil drain bolt [A] to drain the oil.
○The oil in the oil filter can be drained by removing the filter
(see Oil Filter Replacement).
Replace the drain bolt gasket [B] with a new one.
• Tighten the drain bolt.
Torque - Engine Oil Drain Bolt: 30 N·m (3.0 kgf·m, 22 ft·lb)
• Pour in the specified type and amount of oil.
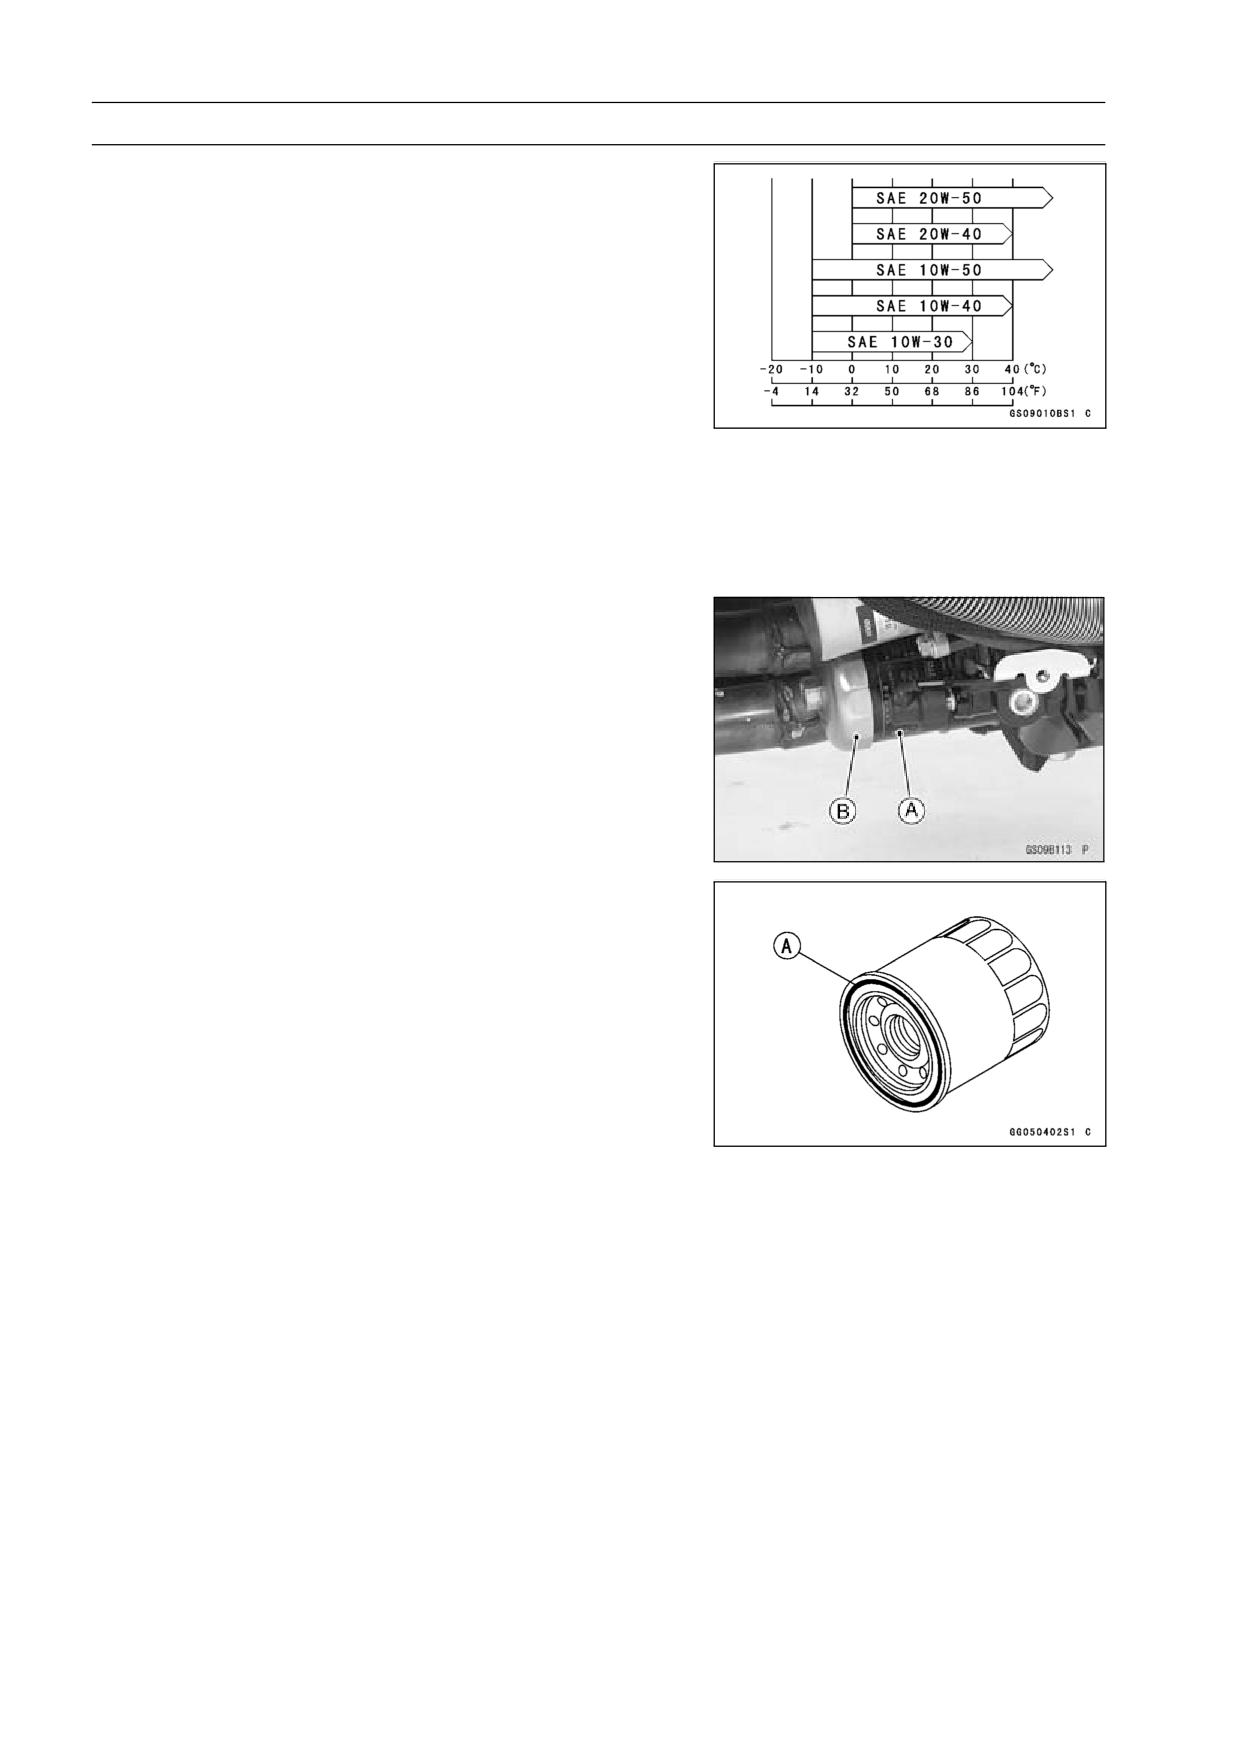
2-54 PERIODIC MAINTENANCE
Maintenance Procedure
Recommended Engine Oil
Type:
API SE, SF or SG
API SH, SJ or SL with JASO MA
Viscosity:
SAE 10W-40
Capacity:
3.7 L (3.9 US qt) (when filter is not
removed)
4.1 L (4.3 US qt) (when filter is removed)
4.5 L (4.8 US qt) (when engine is
completely dry)
NOTE
○Although 10W-40 engine oil is the recommended oil
for most conditions, the oil viscosity may need to be
changed to accommodate atmospheric conditions in
your riding area.
Oil Filter Replacement
• Drain the engine oil (see Engine Oil Change).
• Remove:
Lower Fairing (see Frame chapter)
• Remove the oil filter [A] with the oil filter wrench [B].
Special Tool - Oil Filter Wrench: 57001-1249
• Replace the filter with a new one.
• Apply engine oil to the gasket [A] before installation.
• Tighten the filter with the oil filter wrench.
Torque - Oil Filter: 31 N·m (3.2 kgf·m, 23 ft·lb)
NOTE
○Hand tightening of the oil filter can not be allowed since
it does not reach to this tightening torque.
• Pour in the specified type and amount of oil (see Engine
Oil Change).
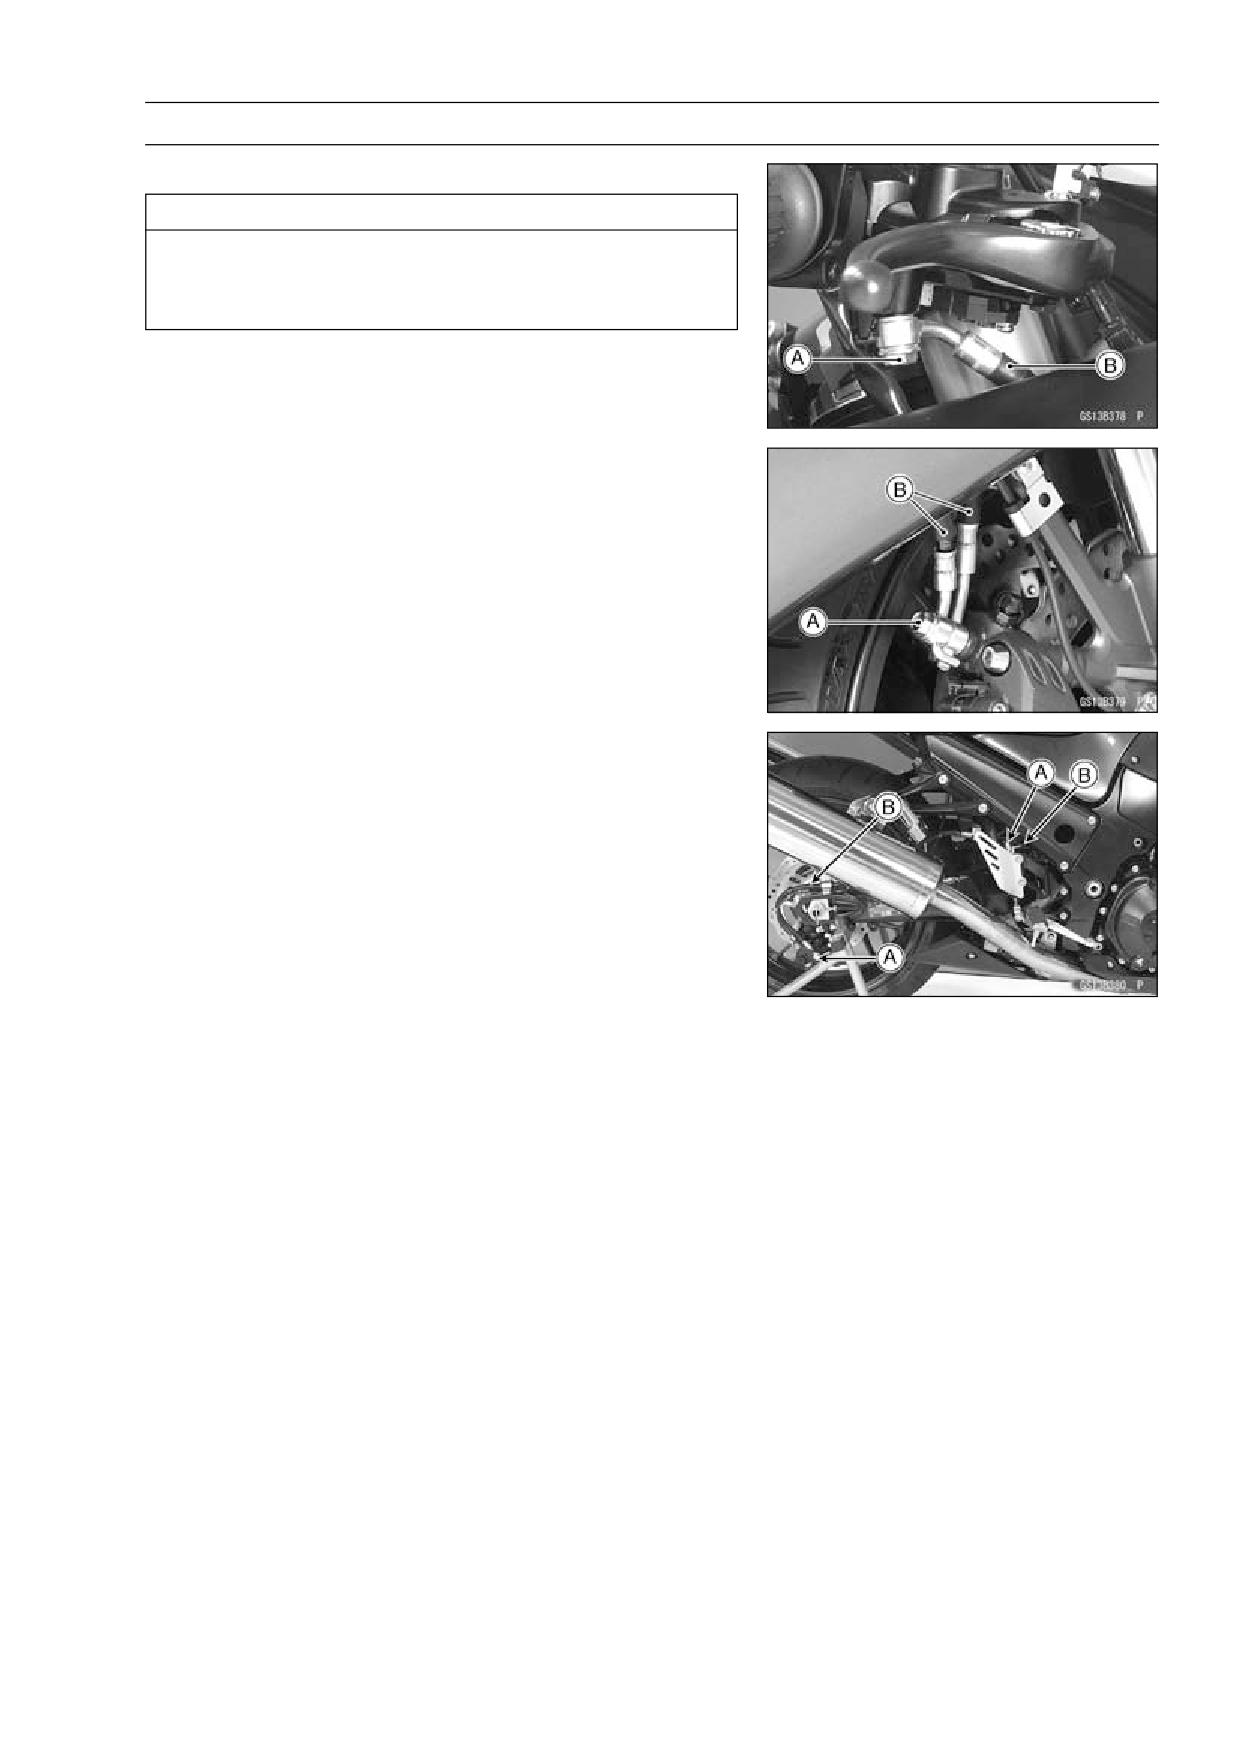
PERIODIC MAINTENANCE 2-55
Maintenance Procedure
Brake Hose and Pipe Replacement
CAUTION
Brake fluid quickly ruins painted plastic surfaces;
any spilled fluid should be completely washed away
immediately.
• Remove the brake hose banjo bolts [A].
• When removing the brake hose, take care not to spill the
brake fluid on the painted or plastic parts.
• When removing the brake hoses [B], temporarily secure
the end of the brake hose to some high place to keep fluid
loss to a minimum.
• Immediately wash away any brake fluid that spills.
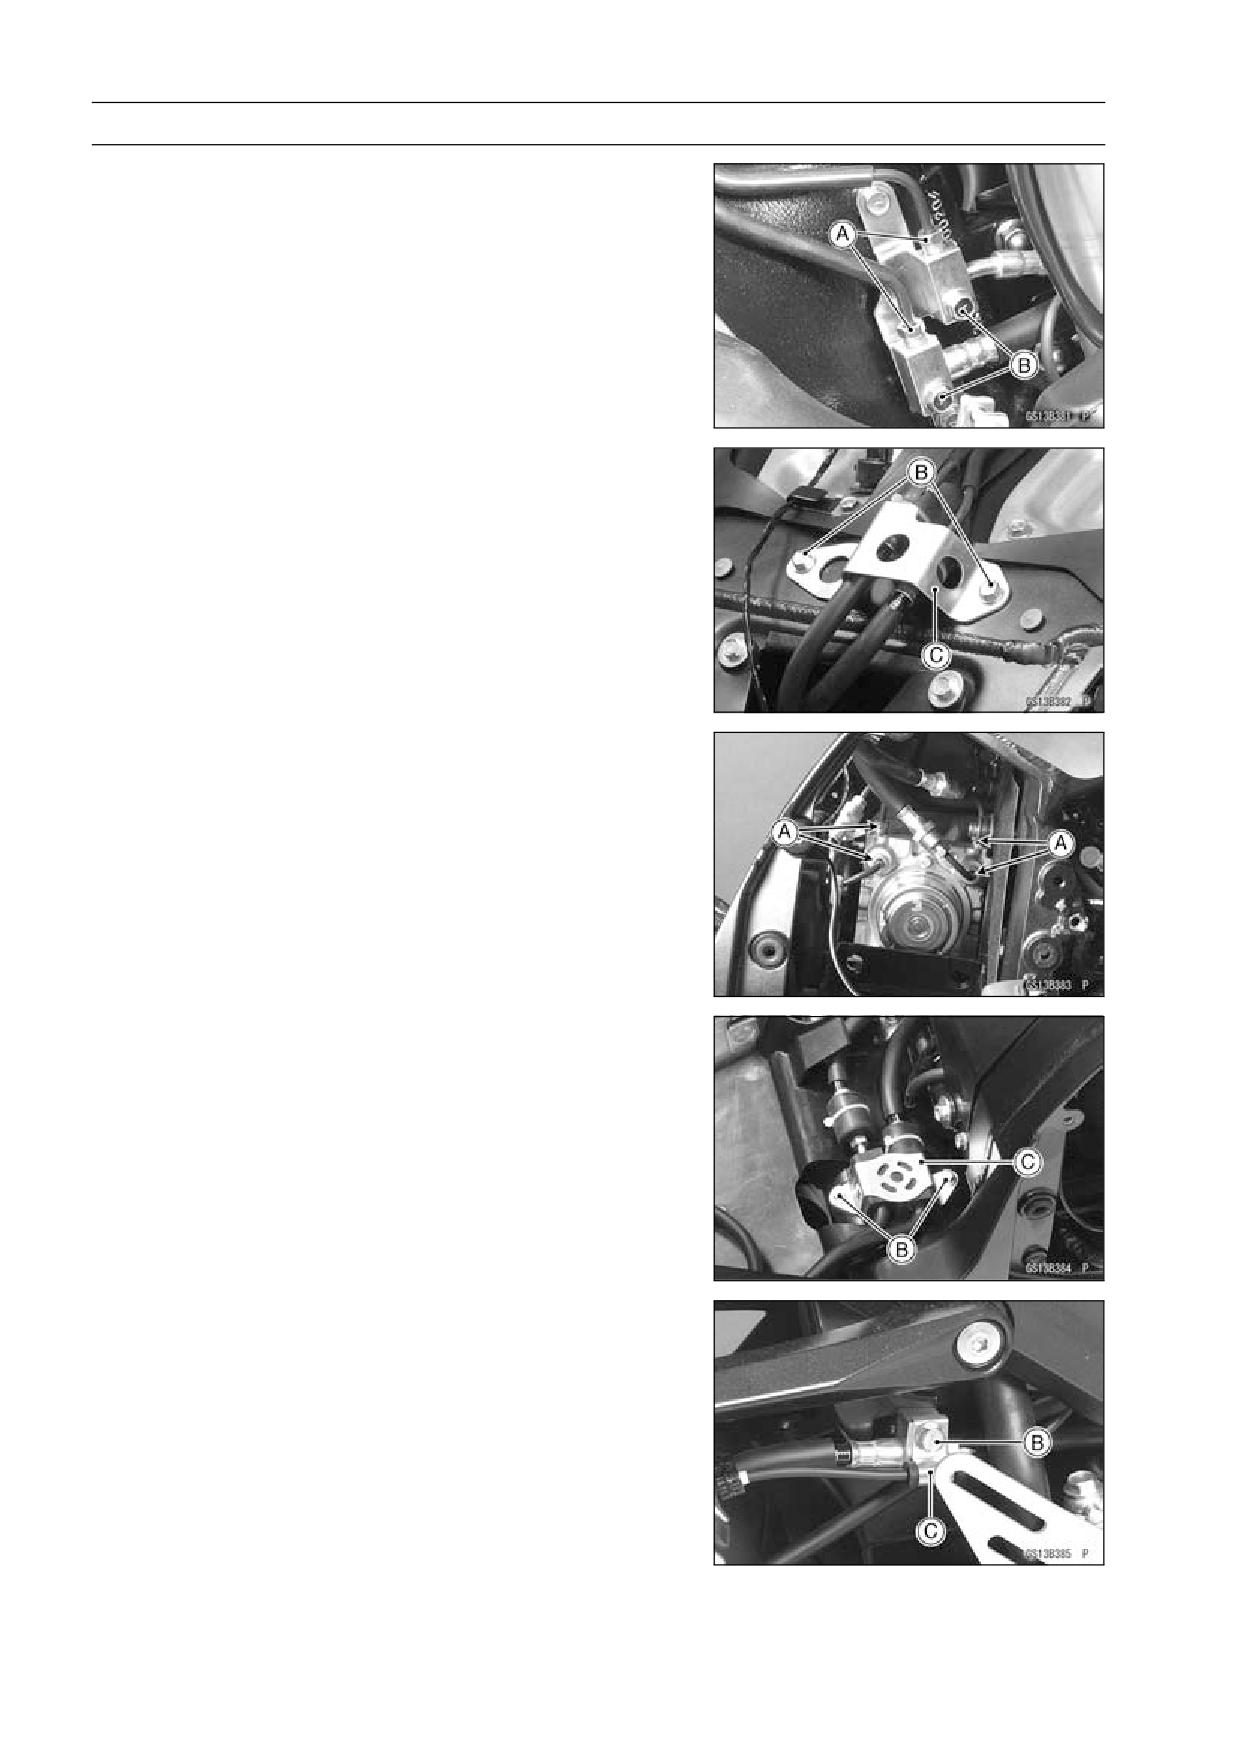
2-56 PERIODIC MAINTENANCE
Maintenance Procedure
• For ABS equipped models; note the following.
• Remove:
Fuel Tank (see Fuel Tank Removal in the Fuel System
(DFI) chapter)
Battery (see Battery Removal in the Electrical System
chapter)
Upper Fairing (see Upper Fairing Removal in the Frame
chapter)
Brake Pipe Joint Nuts [A]
Bolts [B]
Bracket [C]
• There are washers on each side of the brake hose fitting.
Replace them with new ones when installing.
• Tighten:
Torque - Brake Hose Banjo Bolts: 25 N·m (2.5 kgf·m, 18
ft·lb)
Brake Pipe Joint Nuts: 18 N·m (1.8 kgf·m, 13 ft·lb)
(ZX1400B Models)
• When installing the hoses, avoid sharp bending, kink-
ing, flatting or twisting, and route the hoses according to
Cable, Wire, and Hose Routing section in the Appendix
chapter.
• Fill the brake line after installing the brake hose (see
Brake Fluid Change).
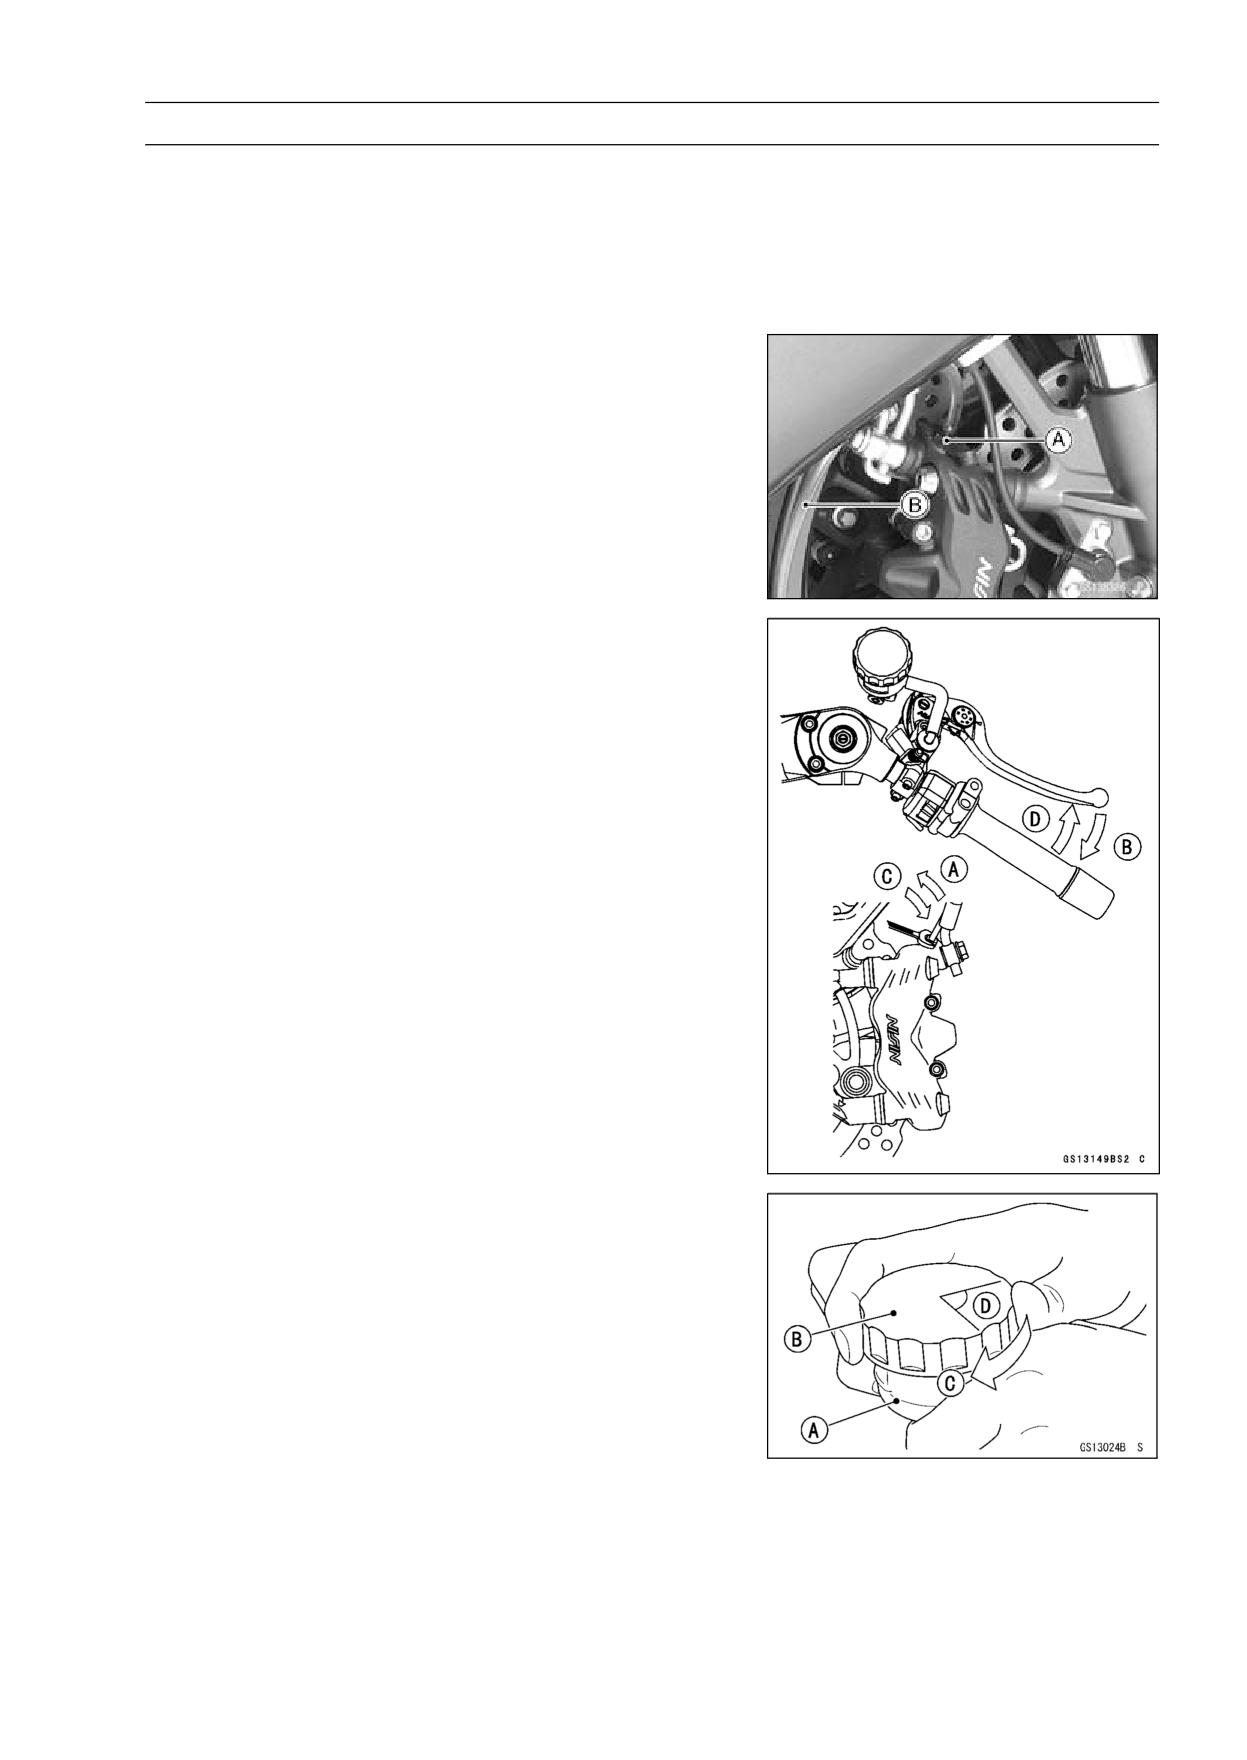
PERIODIC MAINTENANCE 2-57
Maintenance Procedure
Brake Fluid Change
NOTE
○The procedure to change the front brake fluid is as fol-
lows. Changing the rear brake fluid is the same as for
the front brake.
• Level the brake fluid reservoir.
• Remove the reservoir cap and diaphragm.
• Remove the rubber cap from the bleed valve [A] on the
caliper.
• Attach a clear plastic hose [B] to the bleed valve, and run
the other end of the hose into a container.
• Fill the reservoir with fresh specified brake fluid.
• Change the brake fluid.
○Repeat this operation until fresh brake fluid comes out
from the plastic hose or the color of the fluid changes.
1. Open the bleed valve [A].
2. Apply the brake and hold it [B].
3. Close the bleed valve [C].
4. Release the brake [D].
NOTE
○The fluid level must be checked often during the chang-
ing operation and replenished with fresh brake fluid. If
the fluid in the reservoir runs out any time during the
changing operation, the brakes will need to be bled
since air will have entered the brake line.
○Front Brake: Repeat the above steps for the other
caliper.
• Remove the clear plastic hose.
• Install the diaphragm and reservoir cap.
• Follow the procedure below to install the front brake fluid
reservoir cap correctly.
○First, tighten the front brake fluid reservoir cap [B] clock-
wise [C] by hand until slight resistance is felt indicating
that the cap is seated on the reservoir body, then tighten
the cap an additional 1/6 turn [D] while holding the brake
fluid reservoir body [A].
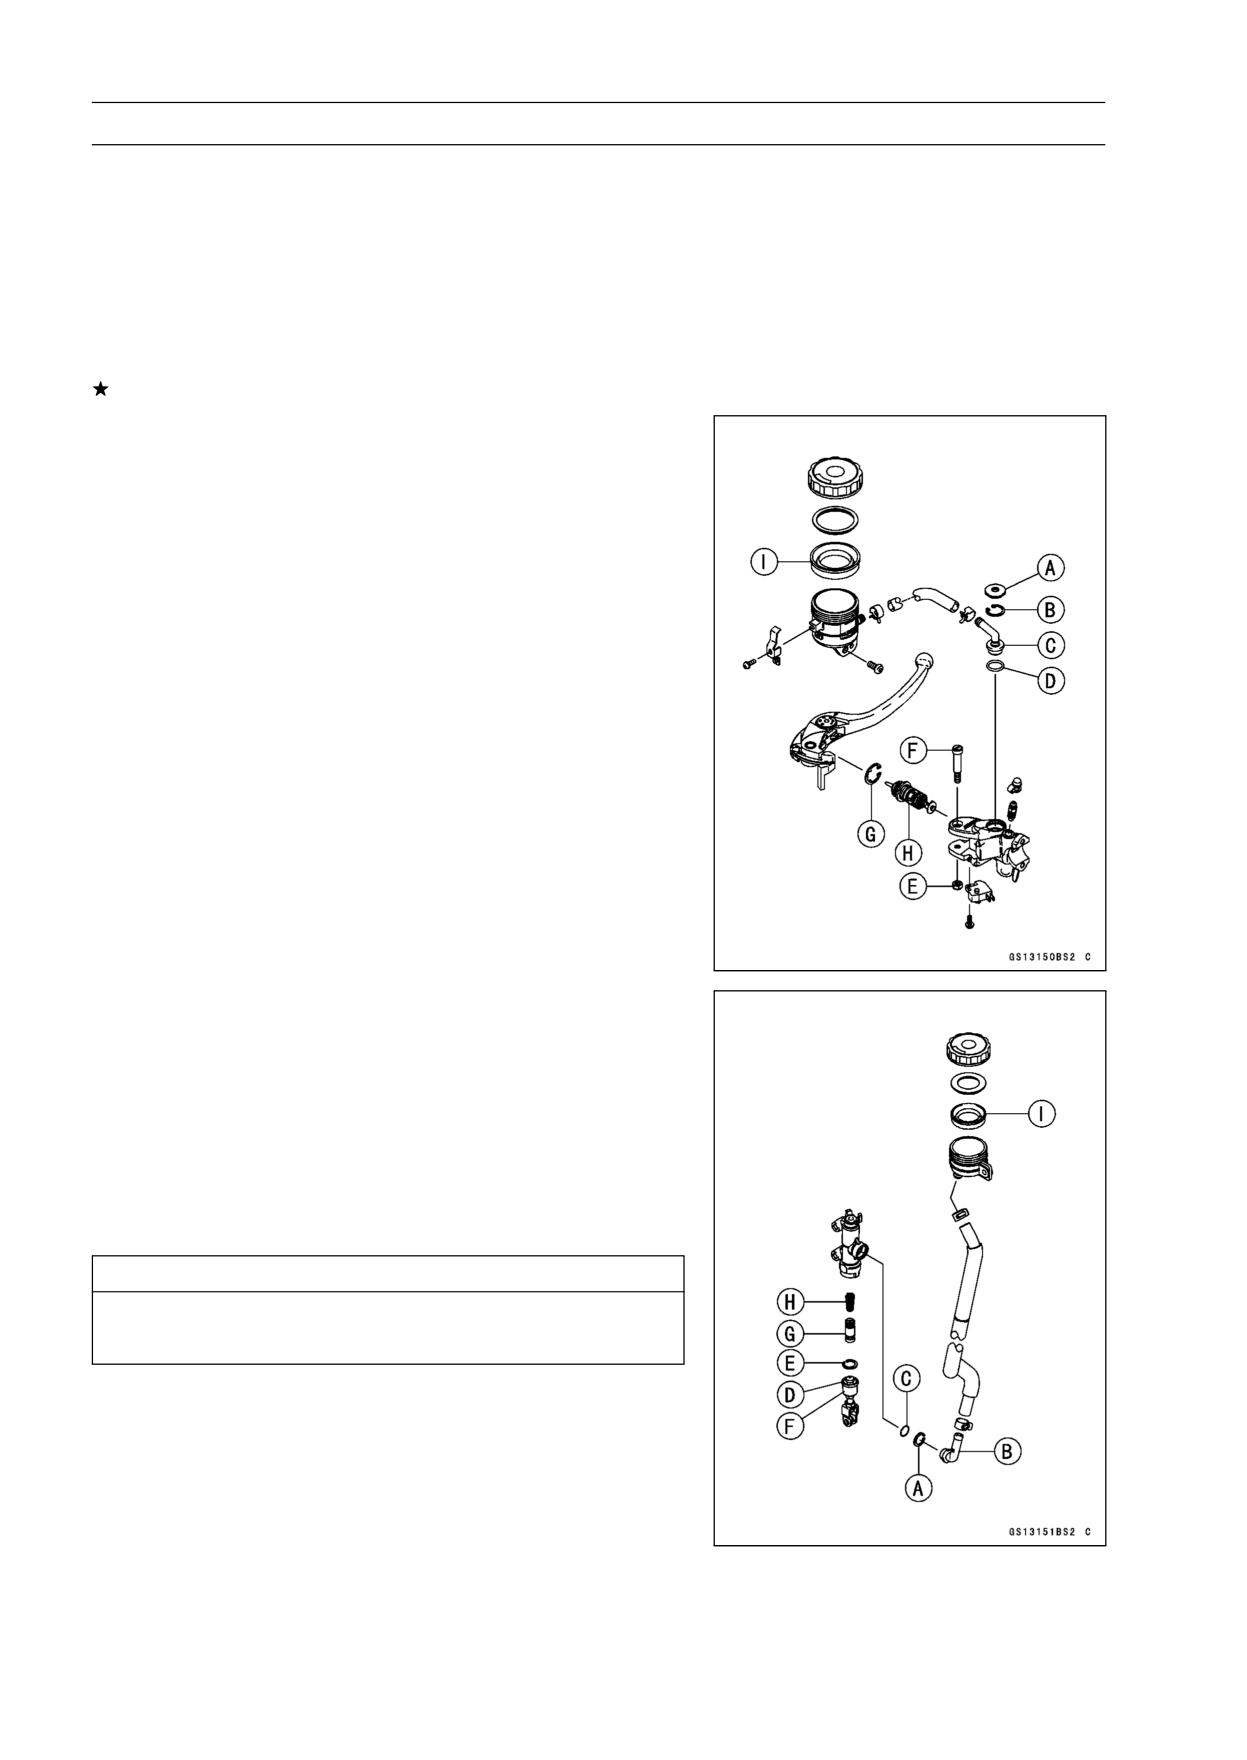
2-58 PERIODIC MAINTENANCE
Maintenance Procedure
• Tighten:
Torque - Front Brake Reservoir Cap Stopper Screw:
1.2
N·m (0.12 kgf·m, 11 in·lb)
• Tighten the bleed valve, and install the rubber cap.
Torque - Bleed Valve: 7.8 N·m (0.80 kgf·m, 69 in·lb)
• After changing the fluid, check the brake for good braking
power, no brake drag, and no fluid leakage.
If necessary, bleed the air from the lines.
Master Cylinder Rubber Parts Replacement
Front Master Cylinder Disassembly
• Remove the front master cylinder (see Front Master Cylin-
der Removal in the Brakes chapter).
• Remove the seal cover [A], circlip [B], connector [C] and
O-ring [D].
Special Tool - Inside Circlip Pliers: 57001-143
• Unscrew the locknut [E] and pivot bolt [F], and remove the
brake lever.
• Remove the circlip [G].
• Pull out the piston assy [H].
• Replace:
Seal Cover [A]
Circlip [B]
O-ring [D]
Circlip [G]
Piston Assy [H]
Diaphragm [I]
Rear Master Cylinder Disassembly
• Remove the rear master cylinder (see Rear Master Cylin-
der Removal in the Brakes chapter).
• Remove the circlip [A], connector [B] and O-ring [C].
Special Tool - Inside Circlip Pliers: 57001-143
• Slide the dust cover [D] out of place, and remove the cir-
clip [E].
• Pull out the push rod assy [F].
• Take off the piston assy [G] and return spring [H].
CAUTION
Do not remove the secondary cup from the piston
since removal will damage it.
• Replace:
Circlip [A]
O-ring [C]
Circlip [E]
Push Rod Assy [F]
Piston Assy [G]
Diaphragm [I]
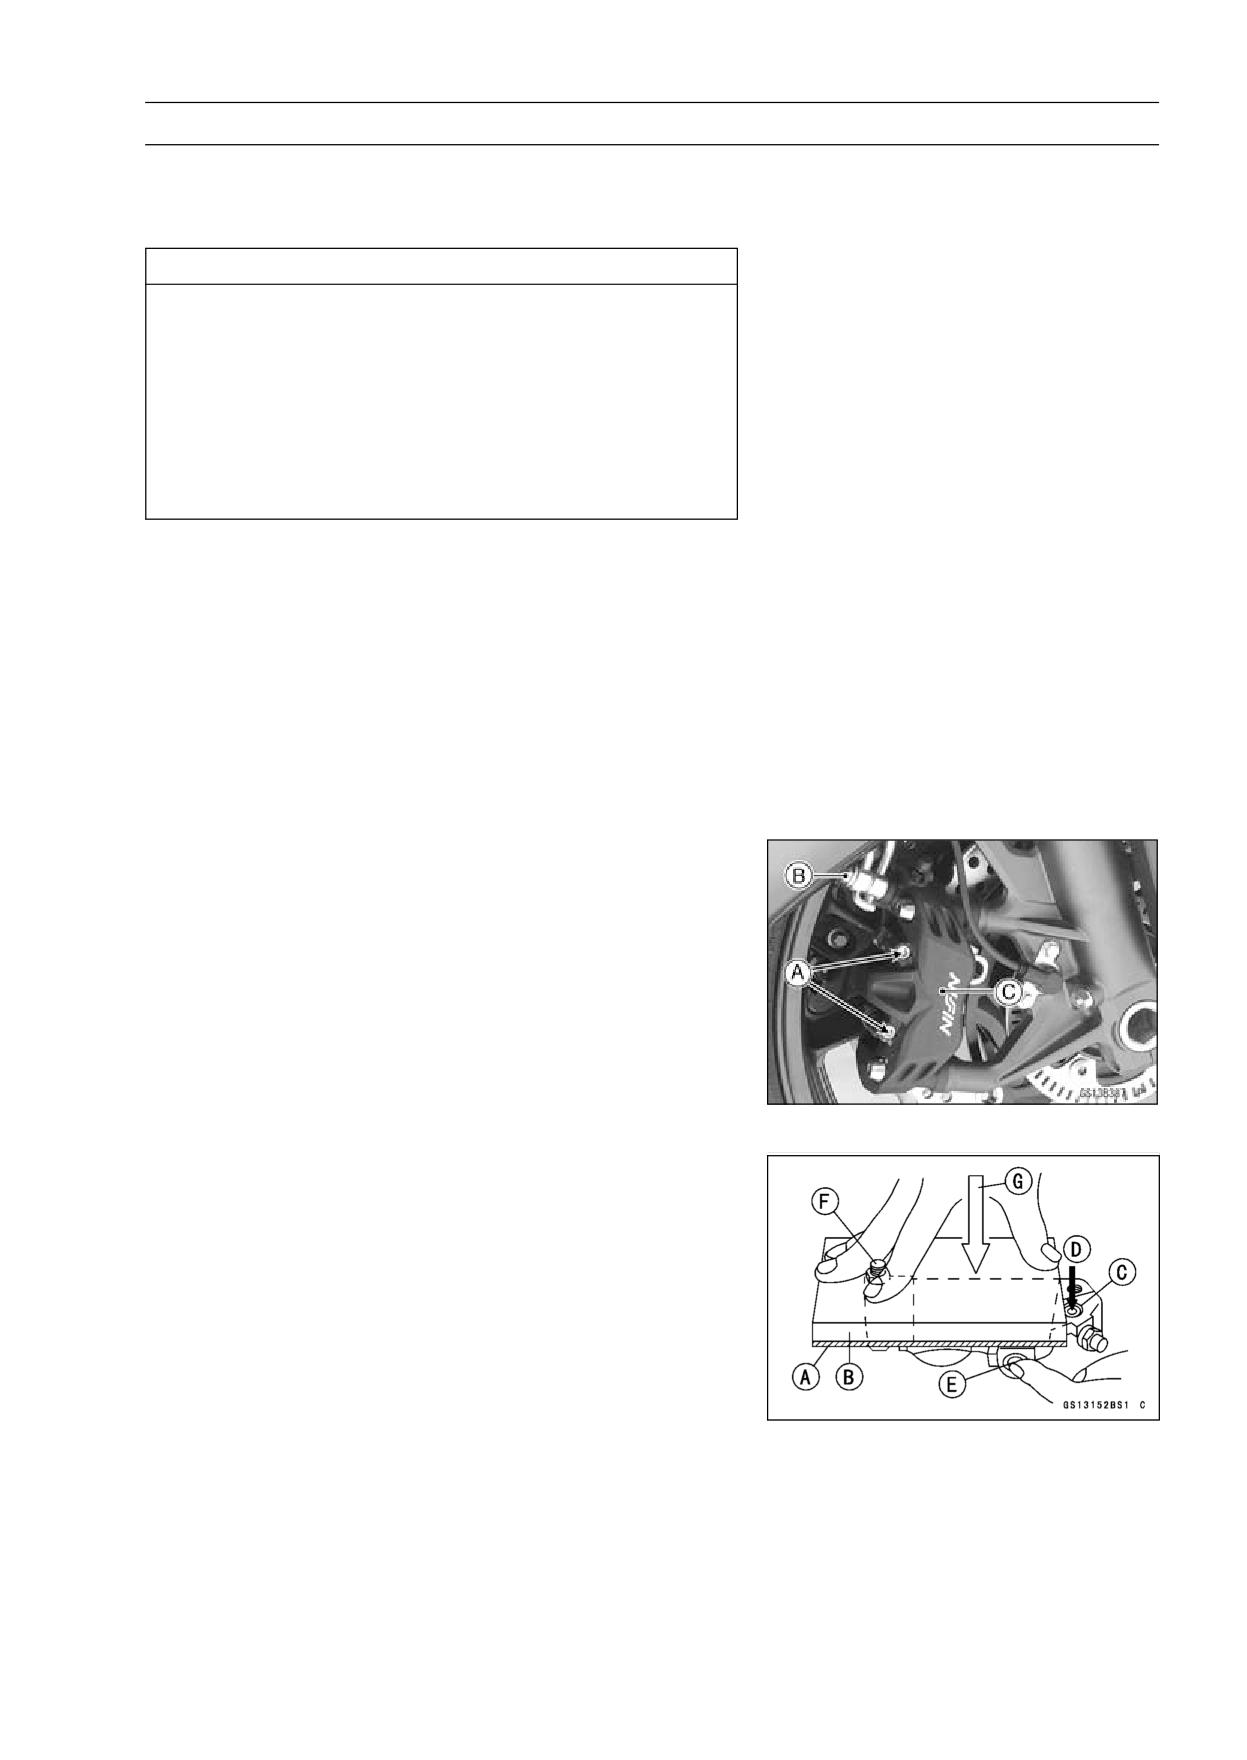
PERIODIC MAINTENANCE 2-59
Maintenance Procedure
Master Cylinder Assembly
• Before assembly, clean all parts including the master
cylinder with brake fluid or alcohol.
CAUTION
Except for the disc pads and disc, use only disc
brake fluid, isopropyl alcohol, or ethyl alcohol for
cleaning brake parts. Do not use any other fluid for
cleaning these parts. Gasoline, engine oil, or any
other petroleum distillate will cause deterioration of
the rubber parts. Oil spilled on any part will be diffi-
cult to wash off completely, and will eventually de-
teriorate the rubber used in the disc brake.
• Apply brake fluid to the new parts and to the inner wall of
the cylinder.
• Take care not to scratch the piston or the inner wall of the
cylinder.
• Apply silicone grease to the brake lever pivot bolt.
• Tighten the brake lever pivot bolt and the locknut.
Torque - Brake Lever Pivot Bolt:
1.0 N·m (0.10 kgf·m, 9
in·lb)
Brake Lever Pivot Bolt Locknut:
5.9 N·m (0.60
kgf·m, 52 in·lb)
Caliper Rubber Parts Replacement
Front Caliper Disassembly
• Loosen the front caliper pad pins [A] and banjo bolt [B]
and tighten them loosely.
• Remove:
Front Caliper [C] (see Front Caliper Removal in the
Brakes chapter)
Brake Pads (see Front Brake Pad Removal in the brakes
chapter)
Front Caliper Assembly Bolts
O-ring
• Using compressed air, remove the pistons. One way to
remove the pistons is as follows.
○Install a rubber gasket [A] and a wooden board [B] more
than 10 mm (0.4 in.) thick on the caliper half, and fas-
ten them together with a suitable bolt and nut as shown.
Leave one of the oil passages [C] open.
○Lightly apply compressed air [D] to the oil passage until
the pistons hit the rubber gasket. Block the hose joint
opening [E] during this operation if the caliper half has
the opening.
Bolt [F] and Nut
Push down [G].
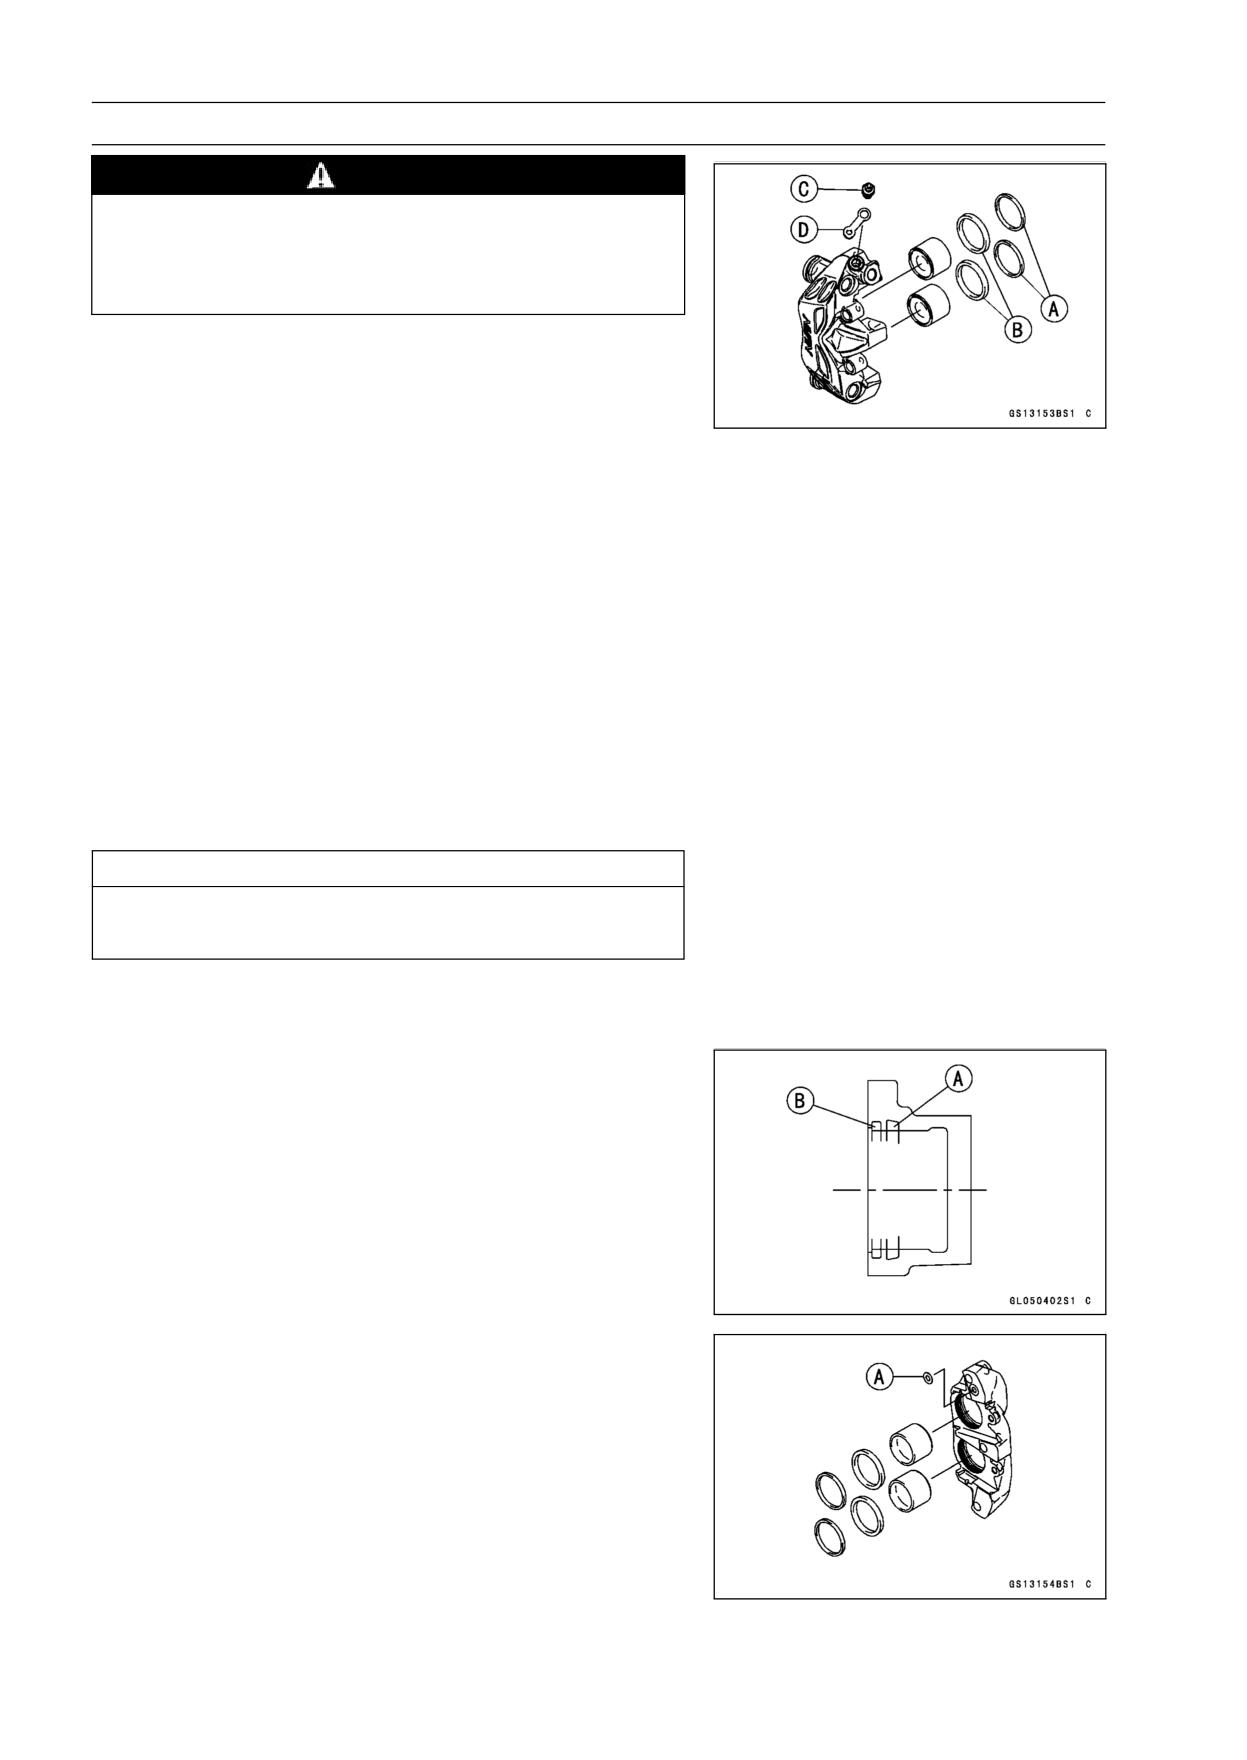
2-60 PERIODIC MAINTENANCE
Maintenance Procedure
WARNING
To avoid serious injury, never place your fingers or
palm in front of the piston. If you apply compressed
air into the caliper, the piston may crush your hand
or fingers.
○Pull out the pistons by hand.
• Remove the dust seals [A] and fluid seals [B].
• Remove the bleed valve [C] and rubber cap [D].
• Repeat the previous step to remove the pistons from the
other side of the caliper body.
NOTE
○If compressed air is not available, do as follows for both
calipers coincidentally, with the brake hose connected
to the caliper.
○Prepare a container for brake fluid, and perform the
work above it.
○Remove the pad springs and pads (see Front Brake
Pad Removal in the Brakes chapter).
○Pump the brake lever until the pistons come out of the
cylinders, and then disassemble the caliper.
Front Caliper Assembly
• Clean the caliper parts except for the pads.
CAUTION
For cleaning the parts, use only disc brake fluid,
isopropyl alcohol, or ethyl alcohol.
• Install the bleed valve and rubber cap.
Torque - Bleed Valve: 7.8 N·m (0.80 kgf·m, 69 in·lb)
• Replace the fluid seals [A] with new ones.
○Apply silicone grease to the fluid seals, and install them
into the cylinders by hand.
• Replace the dust seals [B] with new ones if they are dam-
aged.
○Apply silicone grease to the dust seals, and install them
into the cylinders by hand.
• Replace the O-ring [A].
• Apply brake fluid to the outside of the pistons, and push
them into each cylinder by hand.
• Be sure to install the O-ring.
• Apply a non-permanent locking agent to the threads of
the front caliper assembly bolts, and tighten them.
Torque - Front Caliper Assembly Bolts: 27 N·m (2.8 kgf·m,
20 ft·lb)
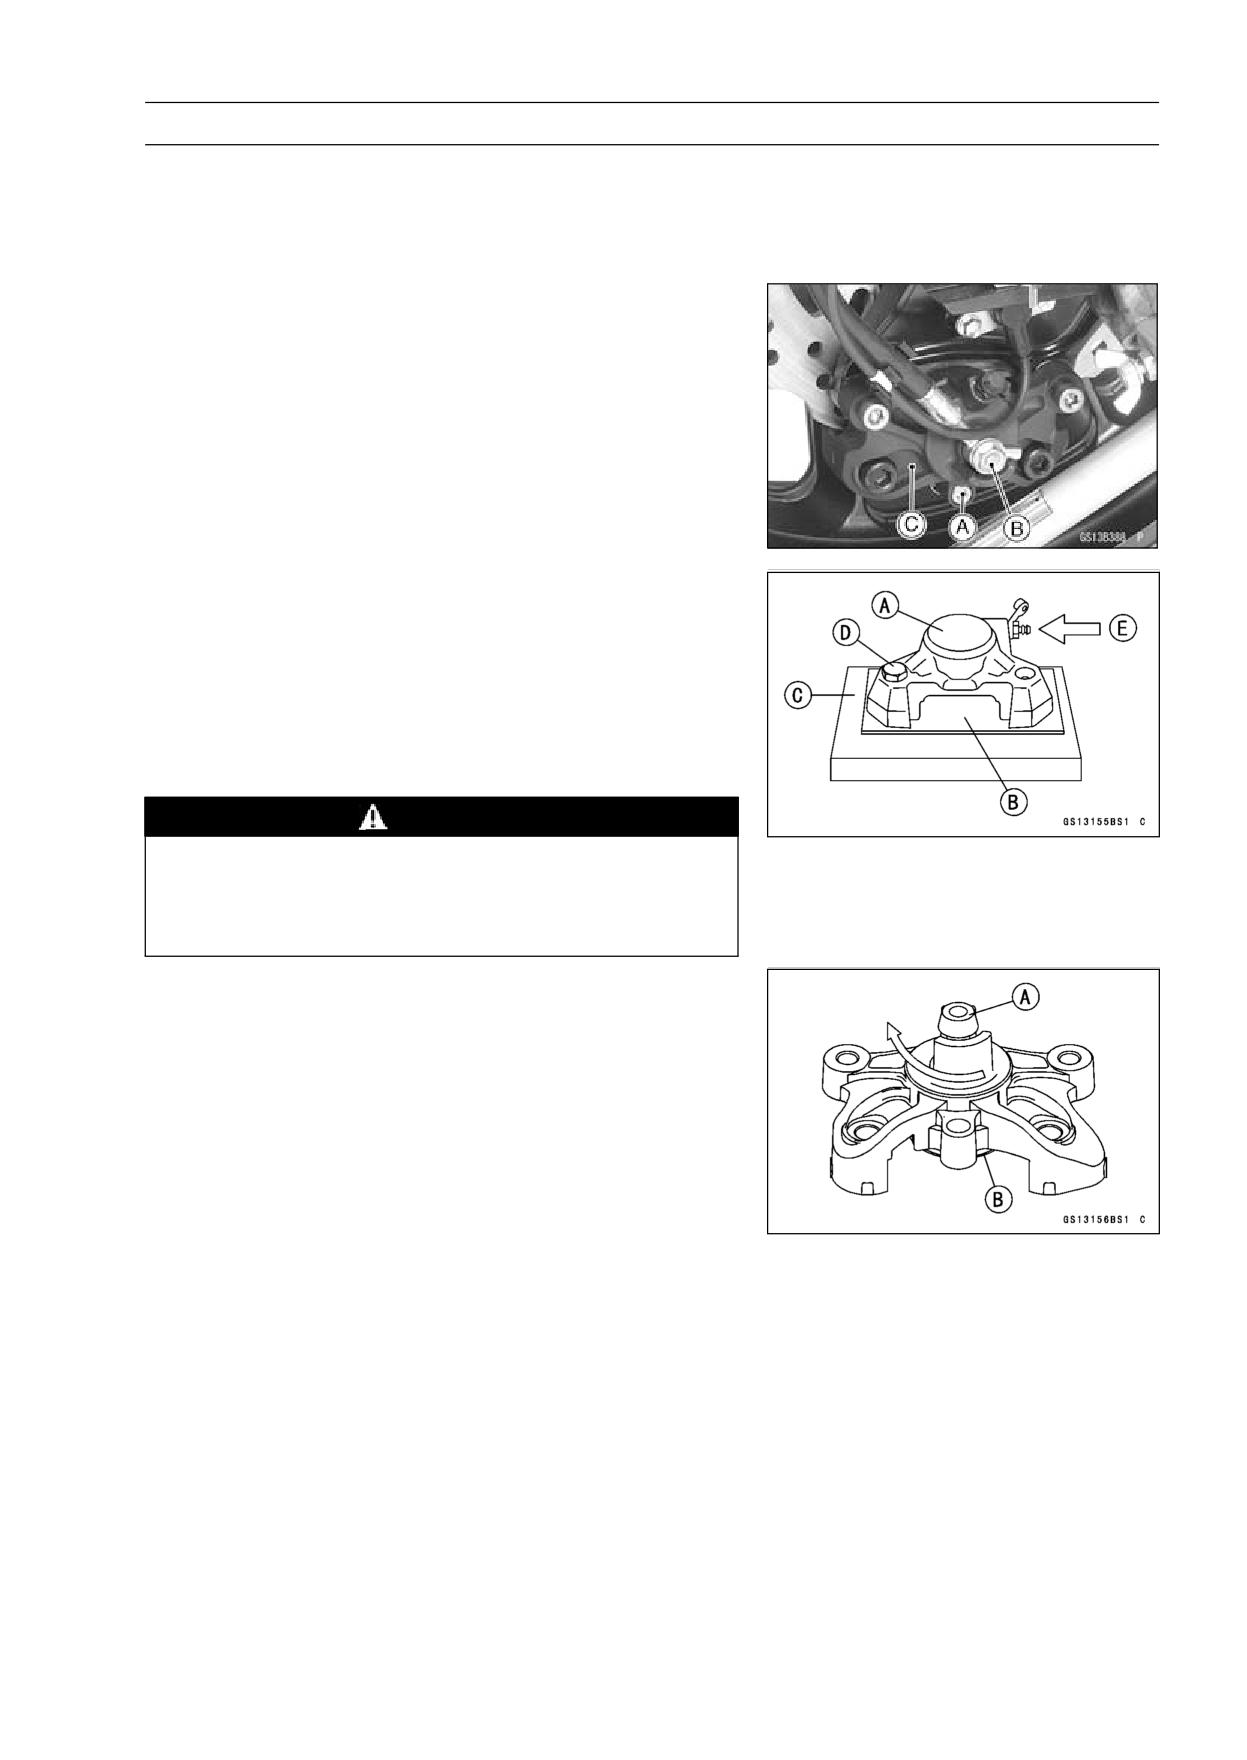
PERIODIC MAINTENANCE 2-61
Maintenance Procedure
• Install the pads (see Front Brake Pad Installation in the
Brakes chapter).
• Wipe up any spilled brake fluid on the caliper with wet
cloth.
Rear Caliper Disassembly
• Loosen the rear caliper pad pin [A] and banjo bolt [B], and
tighten them loosely.
• Remove:
Rear Caliper [C] (see Rear Caliper Removal in the
Brakes chapter)
Brake Pads (see Rear Brake Pad Removal in the Brakes
chapter)
Rear Caliper Assembly Bolts
O-ring
• Remove the left side piston as follows.
• Removal of the left side piston is the same as for the front
caliper.
Left Side Caliper [A]
Rubber Gasket [B]
Wooden Board [C]
Bolt [D] and Nut
Apply compressed air [E]
WARNING
To avoid serious injury, never place your fingers or
palm in rear of the piston. If you apply compressed
air into the caliper, the piston may crush your hand
or fingers.
• Remove the right side piston as follows.
• Using the rear caliper assembly bolt [A], remove the pis-
ton [B] as shown in the figure.
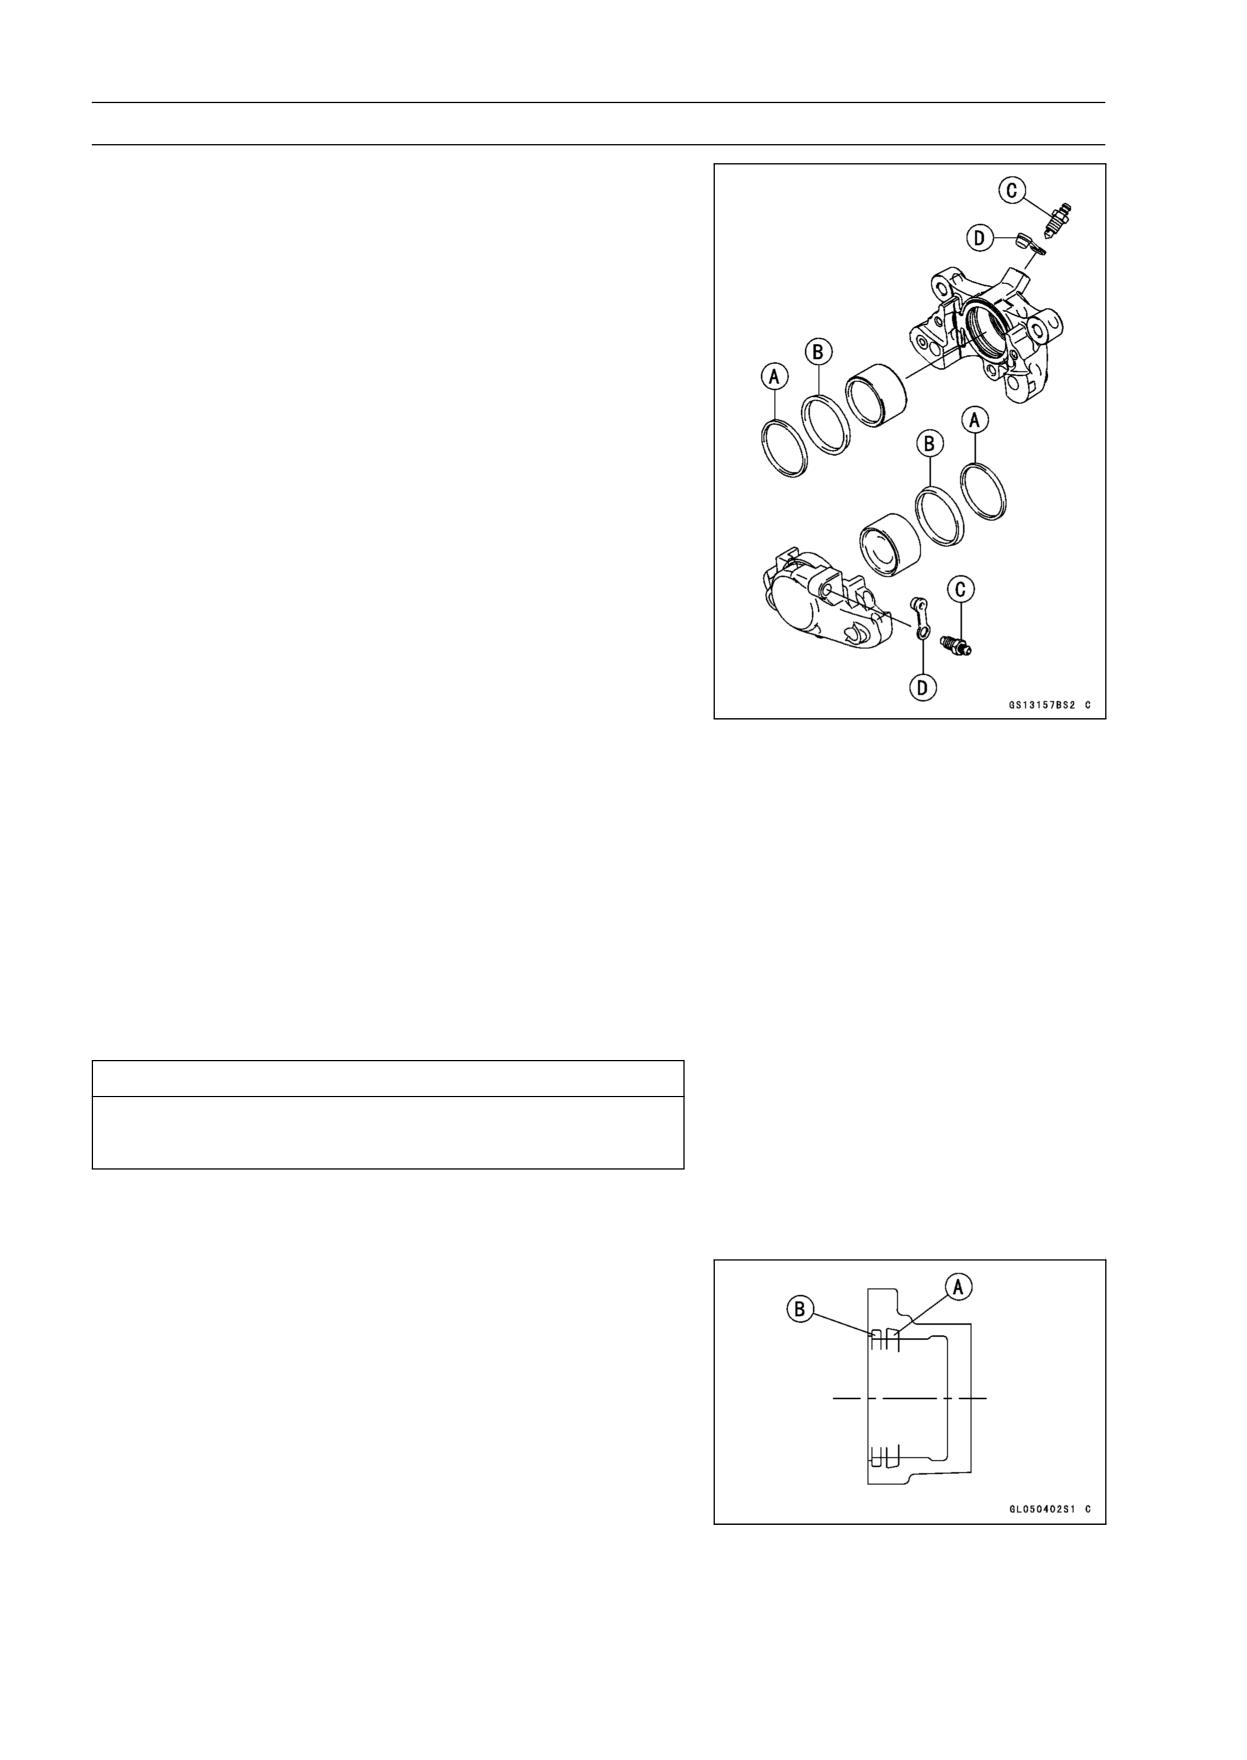
2-62 PERIODIC MAINTENANCE
Maintenance Procedure
• Remove the dust seals [A] and fluid seals [B].
• Remove the bleed valves [C] and rubber caps [D].
NOTE
○If compressed air is not available, do as follows with the
brake hose connected to the caliper.
○Prepare a container for brake fluid, and perform the
work above it.
○Remove the pads and pad spring (see Rear Brake Pad
Removal in the Brakes chapter).
○Pump the brake pedal to remove the caliper piston.
Rear Caliper Assembly
• Clean the caliper parts except for the pads.
CAUTION
For cleaning the parts, use only disc brake fluid,
isopropyl alcohol, or ethyl alcohol.
• Install the bleed valves and rubber caps.
Torque - Bleed Valves: 7.8 N·m (0.80 kgf·m, 69 in·lb)
• Apply brake fluid to the cylinder bores.
• Replace the fluid seals [A] with new ones.
○Apply silicone grease to the fluid seals, and install them
into each cylinder by hand.
• Replace the dust seals [B] with new ones.
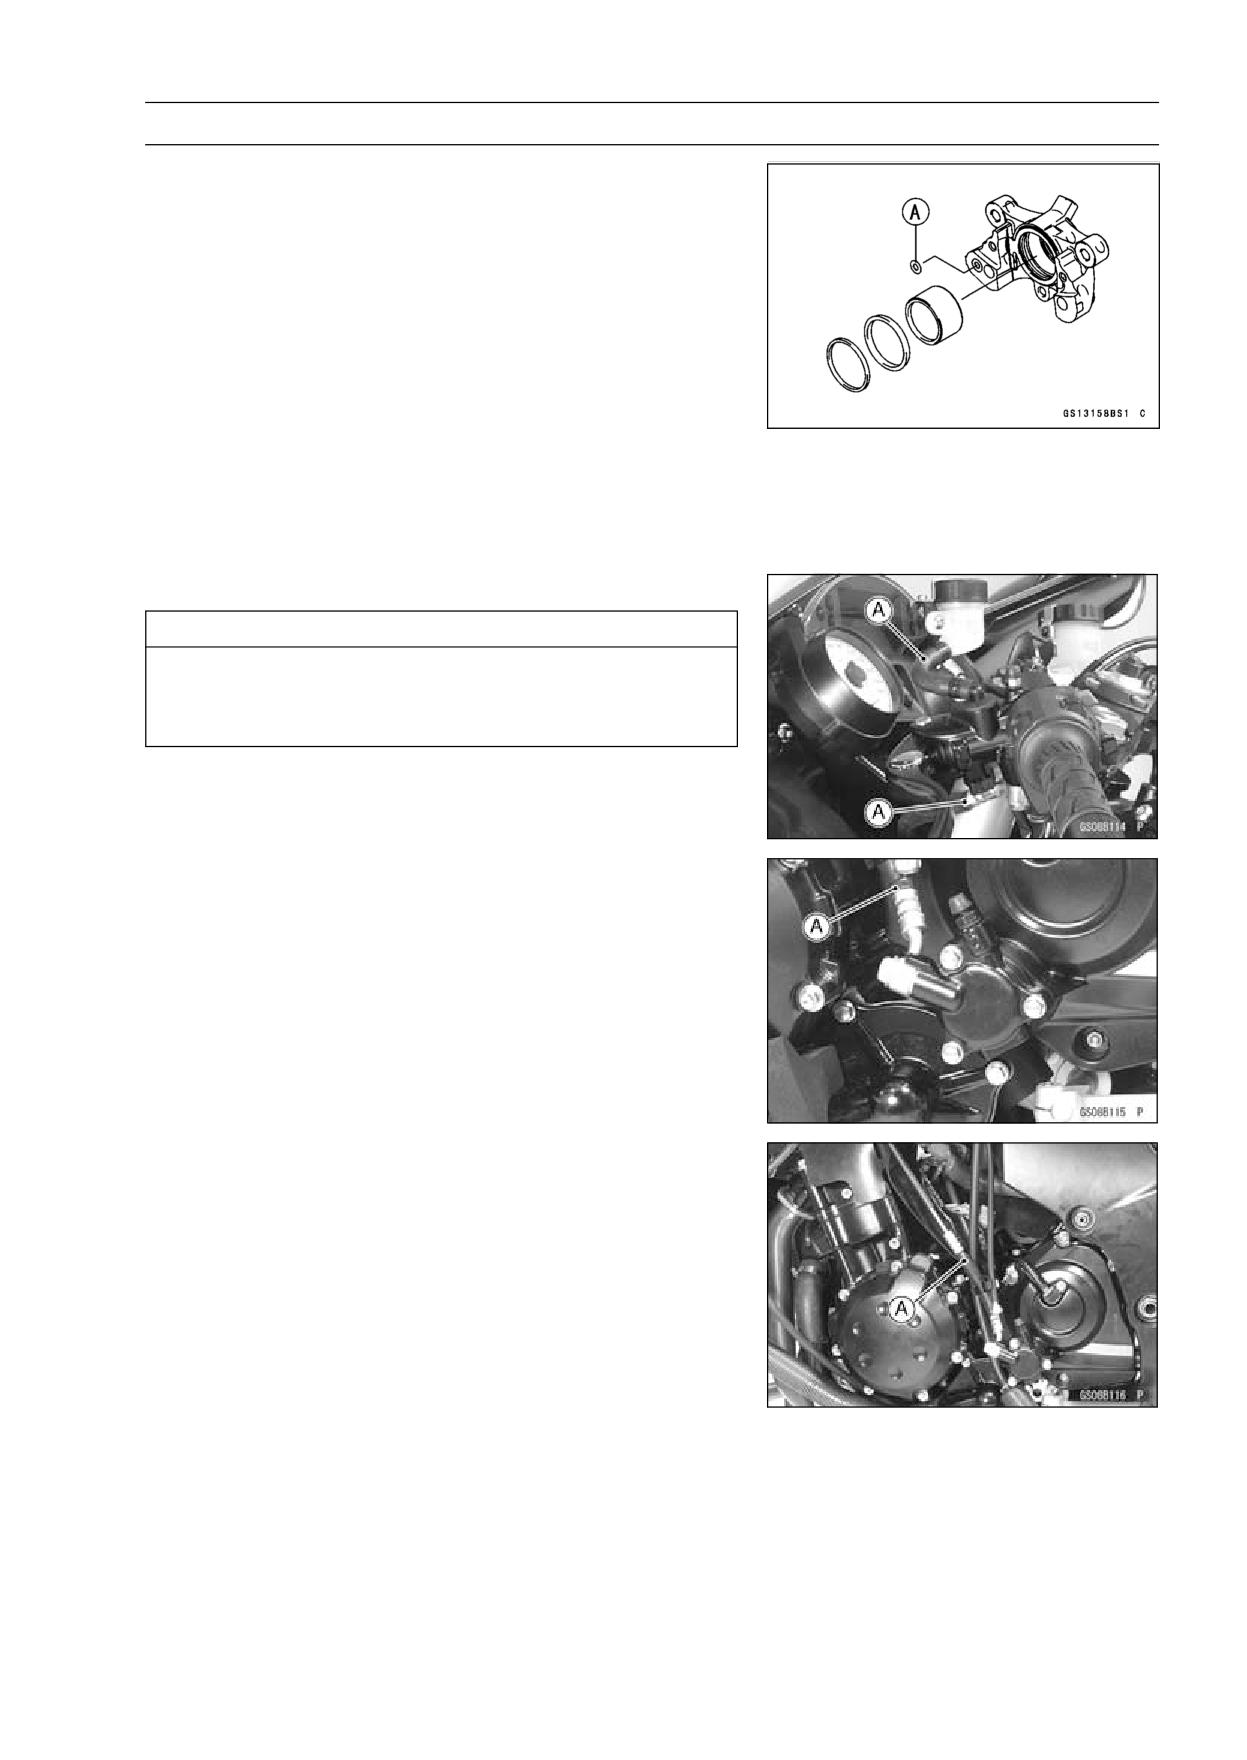
PERIODIC MAINTENANCE 2-63
Maintenance Procedure
• Replace the O-ring [A].
• Apply brake fluid to the outside of the pistons, and push
them into each cylinder by hand.
• Be sure to install the O-ring.
• Apply a non-permanent locking agent to the threads of
the rear caliper assembly bolts, and tighten them.
Torque - Rear Caliper Assembly Bolts: 37 N·m (3.8 kgf·m,
27 ft·lb)
• Install the pads (see Rear Brake Pad Installation in the
Brakes chapter).
• Wipe up any spilled brake fluid on the caliper with wet
cloth.
Clutch Hose and Pipe Replacement
CAUTION
Clutch fluid quickly ruins painted plastic surfaces;
any spilled fluid should be completely washed away
immediately.
• When removing the clutch hose, take care not to spill the
clutch fluid on the painted or plastic parts.
• When removing the clutch hose [A], temporarily secure
the end of the clutch hose to some high place to keep
fluid loss to a minimum.
• Immediately wash away any clutch fluid that spills.
• There are washers on each side of the clutch hose fittings.
Replace them with new ones when installing.
• Tighten:
Torque - Clutch Hose Banjo Bolts: 25 N·m (2.5 kgf·m, 18
ft·lb)
• When installing the hoses [A], avoid sharp bending, kink-
ing, flatting or twisting, and route the hoses according to
Cable, Wire, and Hose Routing section in Appendix chap-
ter.
• Fill the clutch line after installing the clutch hose (see
Clutch Fluid Change).
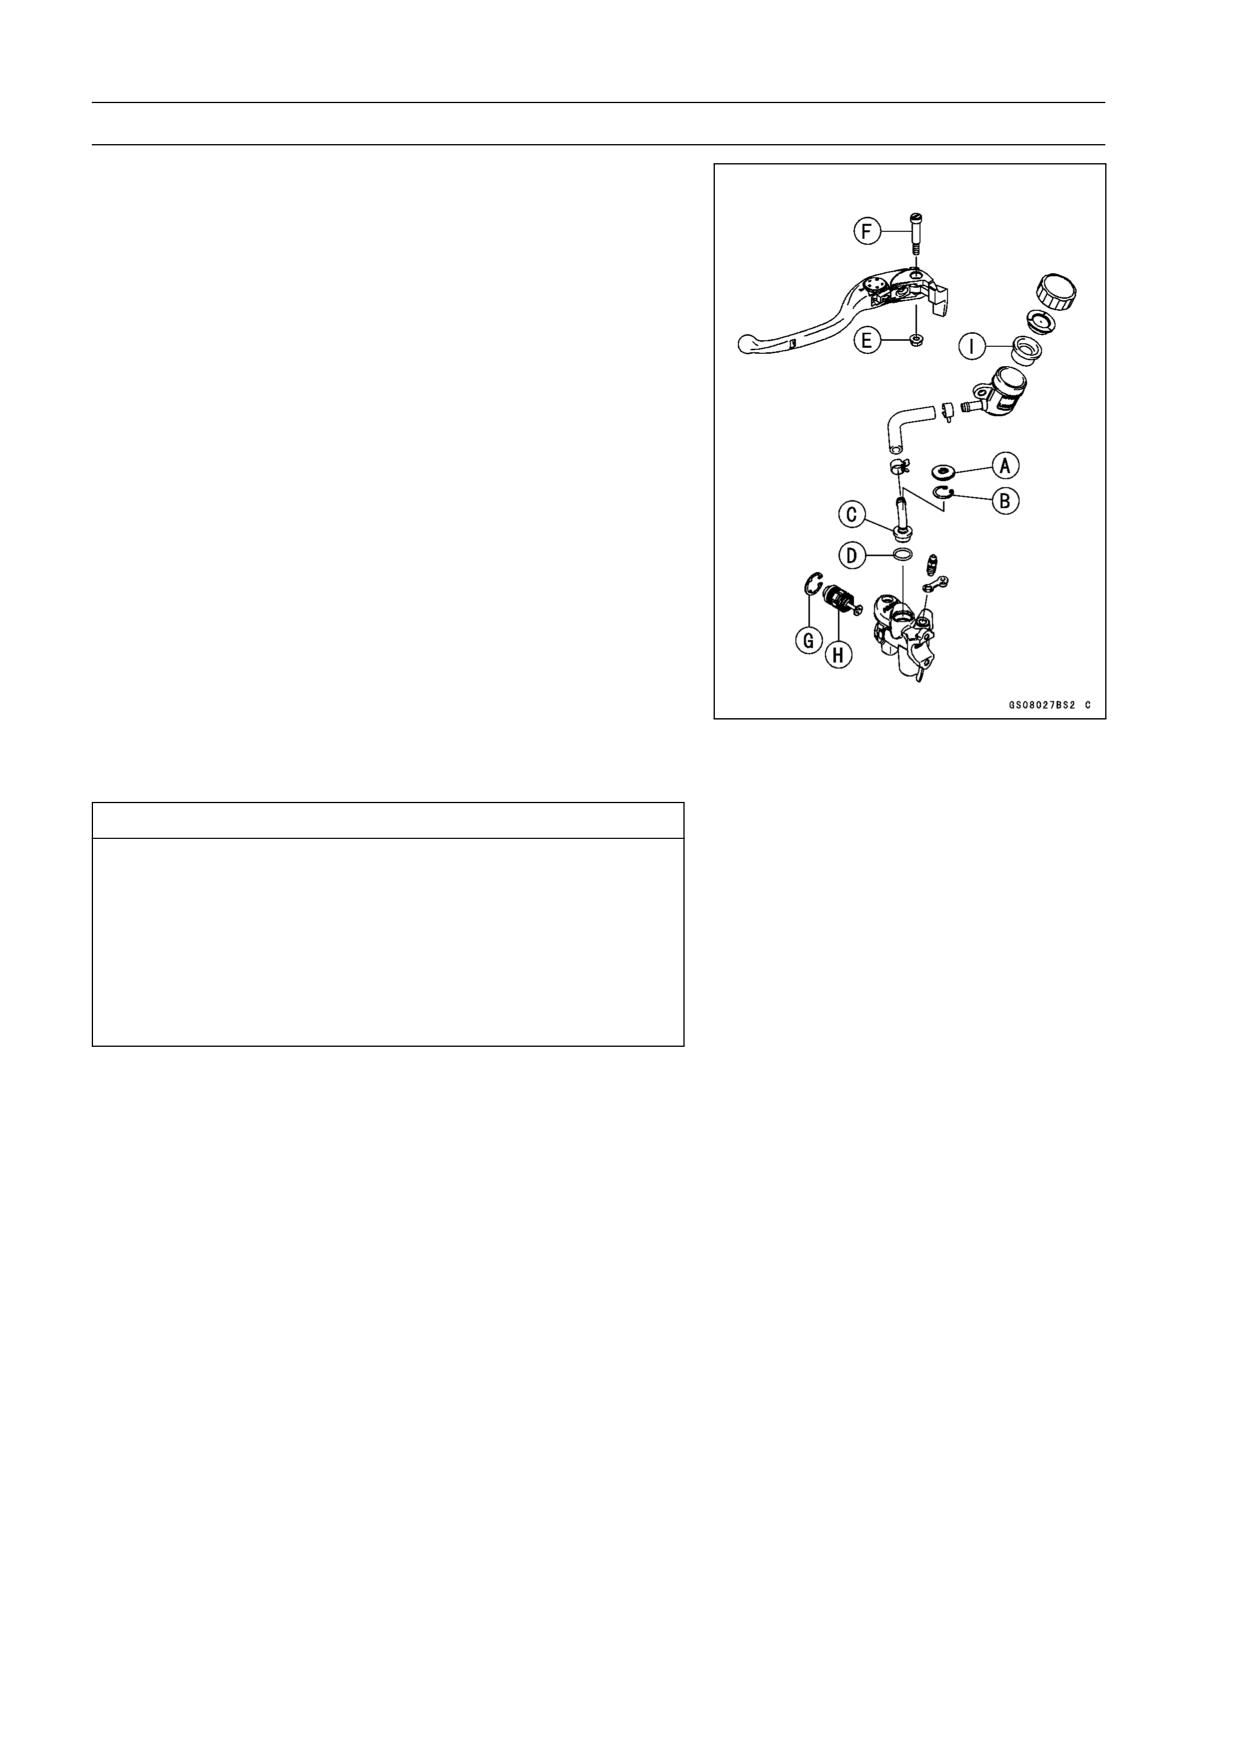
2-64 PERIODIC MAINTENANCE
Maintenance Procedure
Rubber Parts of Clutch Master Cylinder/Slave
Cylinder Replacement
Clutch Master Cylinder Cup and Dust Seal Replacement
• Remove the clutch master cylinder (see Clutch Master
Cylinder Removal in the Clutch chapter).
• Remove the seal cover [A], circlip [B], connector [C] and
O-ring [D].
Special Tool - Inside Circlip Pliers: 57001-143
• Unscrew the locknut [E] and pivot bolt [F], and remove the
clutch lever.
• Pull the circlip [G].
• Pull out the piston assy [H].
• Replace:
Seal Cover [A]
Circlip [B]
O-ring [D]
Circlip [G]
Piston Assy [H]
Diaphragm [I]
• Before assembly, clean all parts including the master
cylinder with clutch fluid or alcohol.
CAUTION
Use only disc brake fluid, isopropyl alcohol or ethyl
alcohol for cleaning parts. Do not use any other
fluid for cleaning these parts. Gasoline, motor oil
or any other petroleum distillate will cause deterio-
ration of the rubber parts. Oil spilled on any part will
be difficult to wash off completely, and will eventu-
ally deteriorate the rubber used in the cylinder.
• Apply clutch fluid to the parts removed and to the inner
wall of the cylinder.
• Take care not to scratch the piston or the inner wall of the
cylinder.
Torque - Clutch Lever Pivot Bolt: 1.0 N·m (0.10 kgf·m, 8.9
in·lb)
Clutch Lever Pivot Bolt Locknut:
5.9 N·m (0.60
kgf·m, 52 in·lb)
• Install the clutch master cylinder (see Clutch Master Cylin-
der Removal in the Clutch chapter).
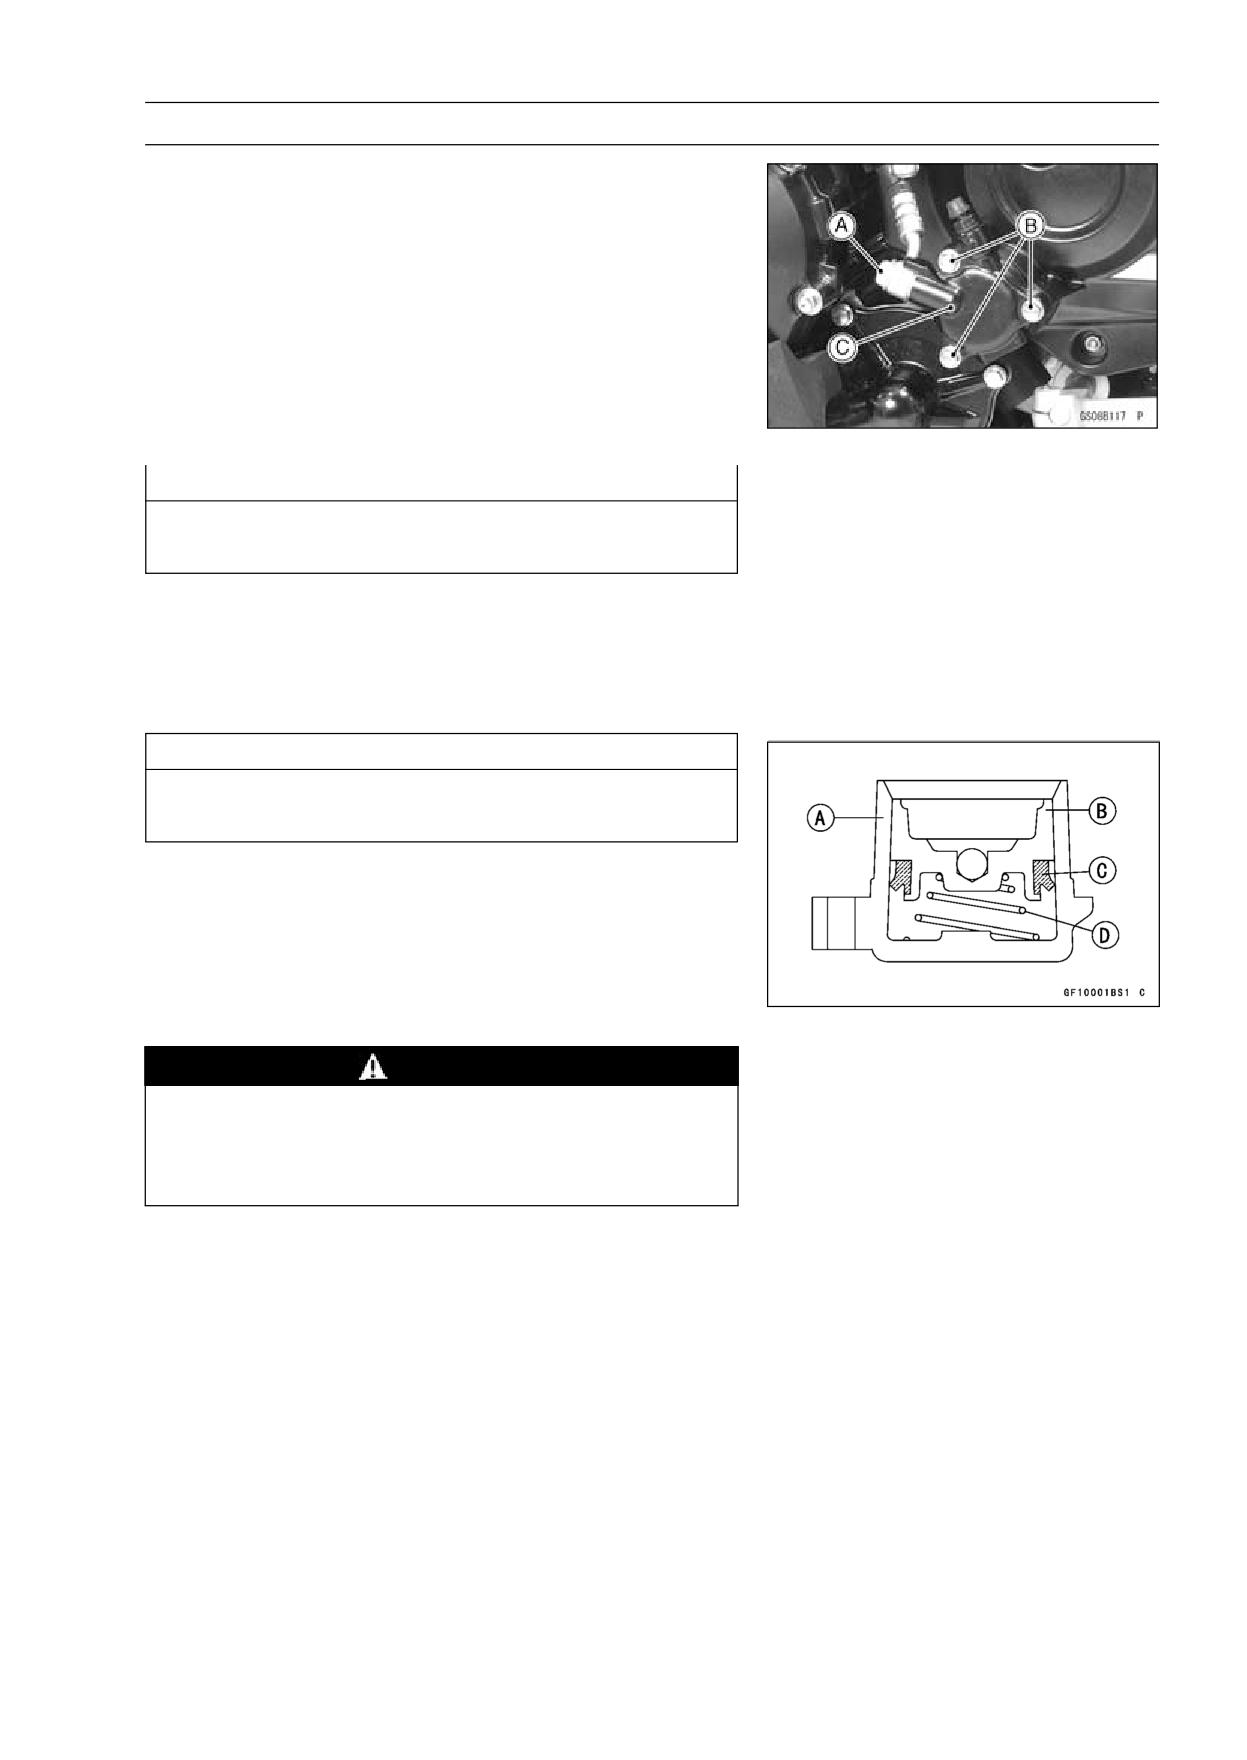
PERIODIC MAINTENANCE 2-65
Maintenance Procedure
Clutch Slave Cylinder Piston Seal Replacement
• Remove the left lower fairing (see Lower Fairing Removal
in the Frame chapter).
• Remove the coolant reserve tank.
• Loosen the banjo bolt [A] at the clutch pipe lower end, and
tighten it loosely.
• Unscrew the slave cylinder bolts [B] and detach the slave
cylinder with the pipe installed from the engine.
• Pump the clutch lever until the piston comes out of the
cylinder.
• Unscrew the banjo bolt and remove the slave cylinder [C].
CAUTION
Immediately wash away any clutch fluid that spills.
It may damage painted surfaces.
NOTE
○If the clutch slave cylinder is removed and left alone, the
piston will be pushed out by spring force.
• Remove the spring and piston seal.
CAUTION
Replace the piston seal with a new one if it was re-
moved from the piston.
• Before assembly, apply clutch fluid to the outside of the
piston and the piston seal.
• Install the piston seal as shown.
Cylinder [A]
Piston [B]
Piston Seal [C]
Spring [D]
WARNING
Motorcycle operation with insufficient, deteriorated
or contaminated engine oil will cause accelerated
wear and may result in engine or transmission
seizure, accident, and injury.
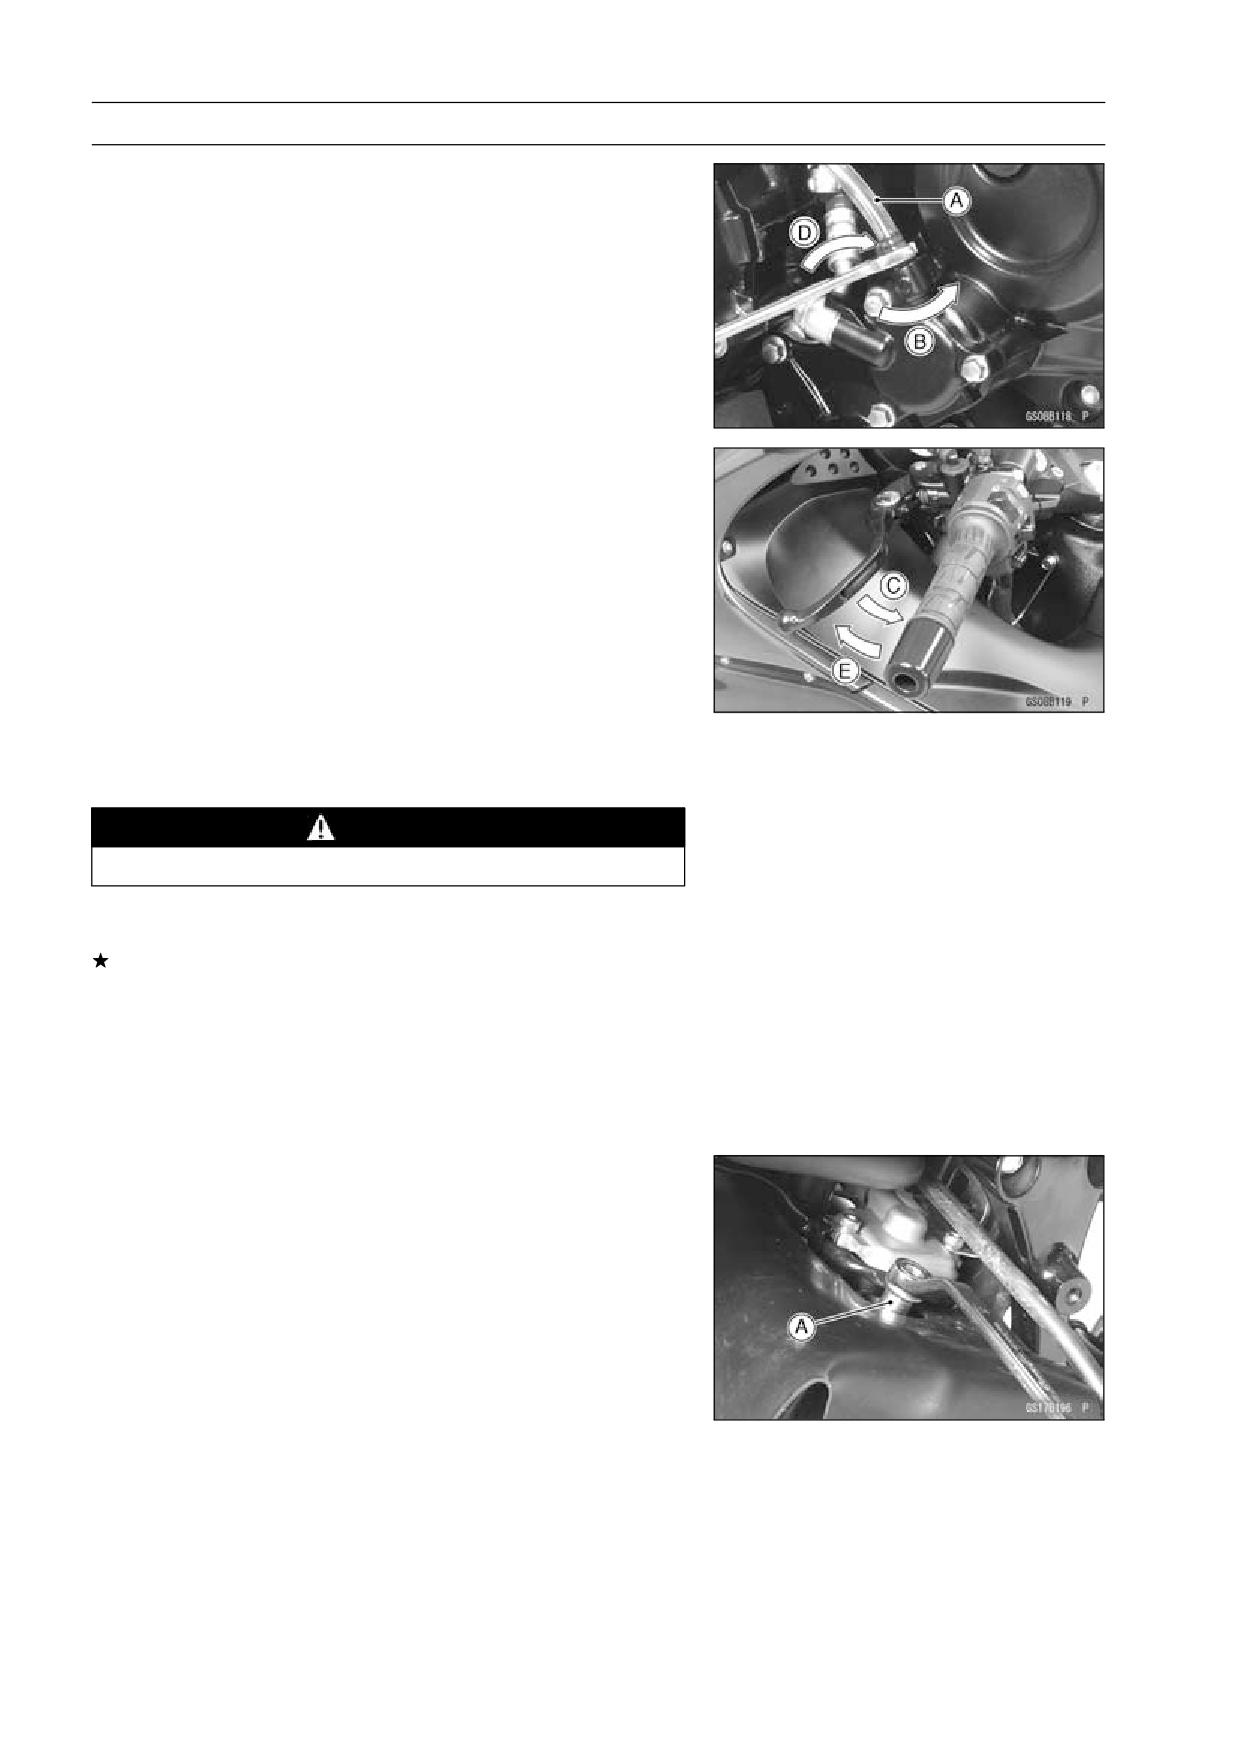
2-66 PERIODIC MAINTENANCE
Maintenance Procedure
Clutch Fluid Change
• Level the clutch fluid reservoir and remove the reservoir
cap.
• Remove the left lower fairing (see Frame chapter).
• Remove the rubber cap from the bleed valve on the clutch
slave cylinder.
• Attach a clear plastic hose [A] to the bleed valve and run
the other end of the hose into a container.
• Fill the reservoir with fresh fluid.
• Change the clutch fluid as follows.
Open [B] the bleed valve, using a wrench.
Pump the clutch lever and hold [C] it.
Close [D] the bleed valve.
Release [E] the clutch lever.
○Repeat this operation until fresh fluid comes out from the
plastic hose or the color of the fluid changes.
○Check the fluid level in the reservoir often, replenishing it
as necessary.
NOTE
○If the fluid in the reservoir runs completely out any time
during fluid changing, the bleeding operation must be
done over again from the beginning since air will have
entered the line.
WARNING
Do not mix two brands of fluid.
• After changing the fluid, check the clutch for good clutch
power and no fluid leakage.
If necessary, bleed the air from the lines (see Clutch Line
Bleeding in the Clutch chapter).
• Remove the clear plastic hose.
• Install the reservoir cap.
• Tighten the bleed valve, and install the rubber cap.
Torque - Clutch Slave Cylinder Bleed Valve: 7.8 N·m (0.80
kgf·m, 69 in·lb)
Spark Plug Replacement
• Remove:
Stick Coils (see Stick Coil Removal in the Electrical Sys-
tem chapter)
• Remove the spark plug using the 16 mm (0.63 in.) plug
wrench [A] vertically.
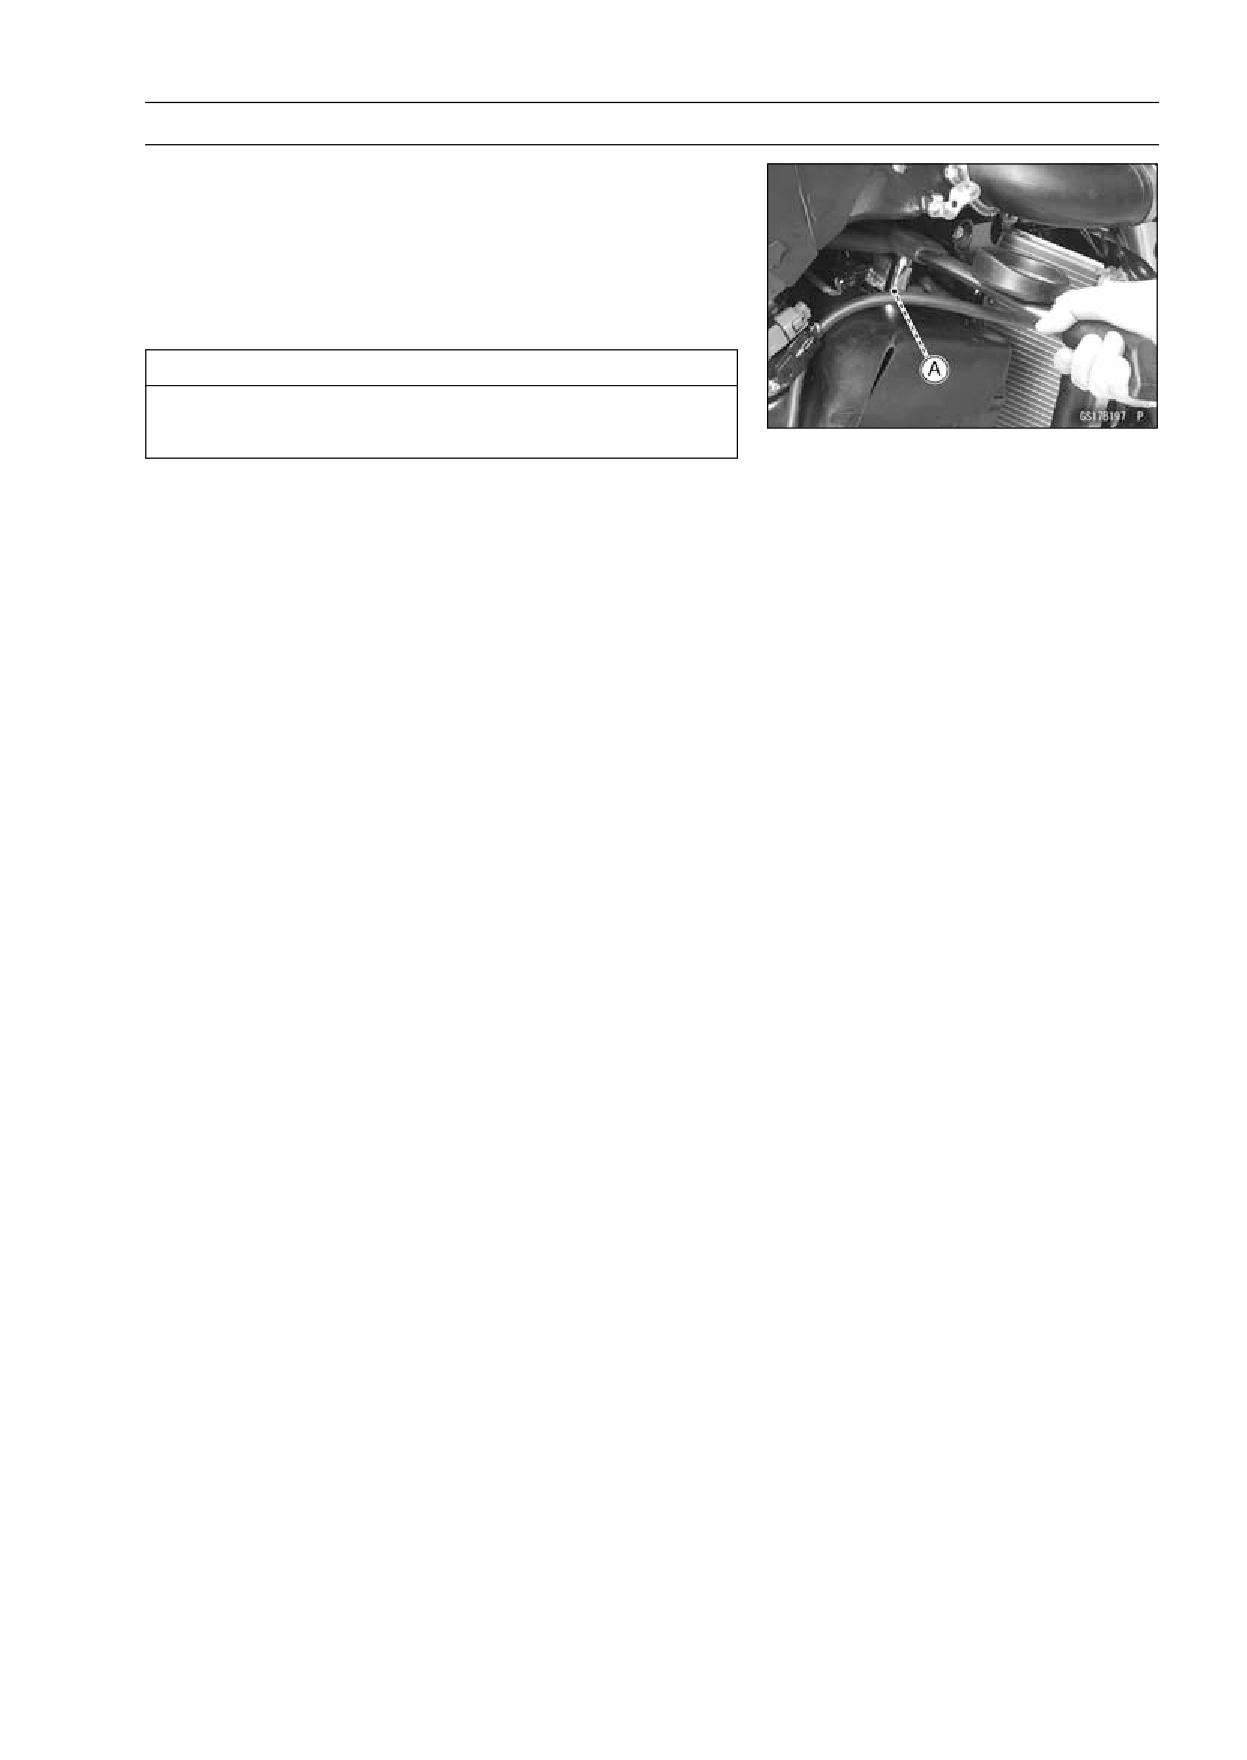
PERIODIC MAINTENANCE 2-67
Maintenance Procedure
• Replace the spark plug with a new one.
Standard Spark Plug
Type:
NGK CR9EIA-9
• Insert new spark plug in the plug hole, and finger-tighten
it first.
• Using the plug wrench [A] vertically, tighten the plug.
CAUTION
The insulator of the spark plug may break if when
the wrench is inclined during tightening.
Torque - Spark Plugs: 13 N·m (1.3 kgf·m, 115 in·lb)
• Install the stick coils securely.
○Be sure the stick coils are installed by pulling up it lightly.
FUEL SYSTEM (DFI) 3-1
Fuel System (DFI)
Table of Contents
Exploded View
3-4
DFI System
3-10
DFI Parts Location
3-16
Specifications
3-18
3
Special Tools and Sealant
3-20
DFI Servicing Precautions
3-22
DFI Servicing Precautions
3-22
Troubleshooting the DFI System
3-24
Outline
3-24
Inquiries to Rider
3-29
DFI System Troubleshooting Guide
3-32
Self-Diagnosis
3-37
Self-diagnosis Outline
3-37
Self-diagnosis Procedures
3-38
Service Code Reading
3-41
Service Code Erasing
3-41
Backups
3-43
Main Throttle Sensor (Service Code 11)
3-45
Main Throttle Sensor Removal/Adjustment
3-45
Input Voltage Inspection
3-45
Output Voltage Inspection
3-47
Resistance Inspection
3-50
Inlet Air Pressure Sensor (Service Code 12)
3-51
Removal
3-51
Installation
3-51
Input Voltage Inspection
3-52
Output Voltage Inspection
3-53
Inlet Air Temperature Sensor (Service Code 13)
3-57
Removal/Installation
3-57
Output Voltage Inspection
3-57
Sensor Resistance Inspection
3-58
Water Temperature Sensor (Service Code 14)
3-60
Removal/Installation
3-60
Output Voltage Inspection
3-60
Sensor Resistance Inspection
3-61
Atmospheric Pressure Sensor (Service Code 15)
3-62
Removal
3-62
Installation
3-62
Input Voltage Inspection
3-62
Output Voltage Inspection
3-63
Crankshaft Sensor (Service Code 21)
3-66
Crankshaft Sensor Removal/Installation
3-66
Crankshaft Sensor Inspection
3-66
Camshaft Position Sensor (Service Code 23)
3-67
Camshaft Position Sensor Removal/Installation
3-67
Camshaft Position Sensor Inspection
3-67
Speed Sensor (Service Code 24)
3-68
Speed Sensor Removal/Installation
3-68
Speed Sensor Inspection
3-68
Input Voltage Inspection
3-68
3-2 FUEL SYSTEM (DFI)
Output Voltage Inspection
3-69
Gear Position Switch (Service Code 25)
3-71
Gear Position Switch Removal/Installation
3-71
Gear Position Switch Inspection
3-71
Input Voltage Inspection
3-71
Vehicle-down Sensor (Service Code 31)
3-73
Removal
3-73
Installation
3-73
Inspection
3-74
Subthrottle Sensor (Service Code 32)
3-76
Subthrottle Sensor Removal/Adjustment
3-76
Input Voltage Inspection
3-76
Output Voltage Inspection
3-78
Resistance Inspection
3-80
Immobilizer Amplifier (Service Code 35)
3-81
Antenna Resistance Inspection
3-81
Amplifier Input Voltage Inspection
3-81
Blank Key Detection (Service Code 36)
3-82
User Key Inspection
3-82
Fuel Pump Relay (Service Code 46)
3-83
Fuel Pump Relay Removal
3-83
Fuel Pump Relay Inspection
3-83
Stick Coils #1, #2, #3, #4: (Service Code 51, 52, 53, 54)
3-85
Removal/Installation
3-85
Input Voltage Inspection
3-85
Subthrottle Valve Actuator (Service Code 62)
3-87
Subthrottle Valve Actuator Removal
3-87
Subthrottle Valve Actuator Inspection
3-87
Resistance Inspection
3-87
Input Voltage Inspection
3-88
ECU Main Relay (Service Code 75)
3-90
ECU Main Relay Inspection
3-90
ECU
3-91
ECU Identification
3-91
ECU Removal
3-91
ECU Installation
3-92
ECU Power Supply Inspection
3-93
CAN Communication Line Resistance Inspection
3-95
DFI Power Source
3-97
ECU Fuse Removal
3-97
ECU Fuse Installation
3-97
ECU Fuse Inspection
3-97
Warning Indicator Light (LED)
3-98
Light (LED) Inspection
3-98
Fuel Line
3-99
Fuel Pressure Inspection
3-99
Fuel Flow Rate Inspection
3-100
Fuel Pump
3-103
Fuel Pump Removal
3-103
Fuel Pump Installation
3-103
Operation Inspection
3-104
Operating Voltage Inspection
3-104
Fuel Injectors
3-106
Removal/Installation
3-106
Power Source Voltage Inspection
3-106
Output Voltage Inspection
3-107
Audible Inspection
3-108
FUEL SYSTEM (DFI) 3-3
Injector Signal Test
3-109
Injector Resistance Inspection
3-109
Injector Unit Test
3-110
Injector Fuel Line Inspection
3-110
Throttle Grip and Cables
3-112
Free Play Inspection
3-112
Free Play Adjustment
3-112
Cable Installation
3-112
Cable Lubrication
3-112
Throttle Body Assy
3-113
Idle Speed Inspection
3-113
Throttle Bore Cleaning
3-113
Synchronization Inspection
3-113
Synchronization Adjustment
3-113
Throttle Body Assy Removal
3-113
Throttle Body Assy Installation
3-116
Throttle Body Assy Disassembly
3-118
Throttle Body Assy Assembly
3-119
Air Line
3-121
Element Removal
3-121
Element Installation
3-121
Air Cleaner Element Inspection
3-121
Air Cleaner Element Holder Removal
3-121
Air Cleaner Element Holder Installation
3-121
Oil Draining
3-122
Rear Air Inlet Duct Removal
3-122
Rear Air Inlet Duct Installation
3-122
Front and Middle Air Inlet Duct Removal
3-123
Front and Middle Air Inlet Duct Installation
3-123
Fuel Tank
3-125
Fuel Tank Removal
3-125
Fuel Tank Installation
3-127
Fuel Tank and Cap Inspection
3-129
Fuel Tank Cleaning
3-129
Evaporative Emission Control System
3-130
Parts Removal/Installation
3-130
Hose Inspection
3-130
Separator Inspection
3-130
Separator Operation Test
3-131
Canister Inspection
3-131
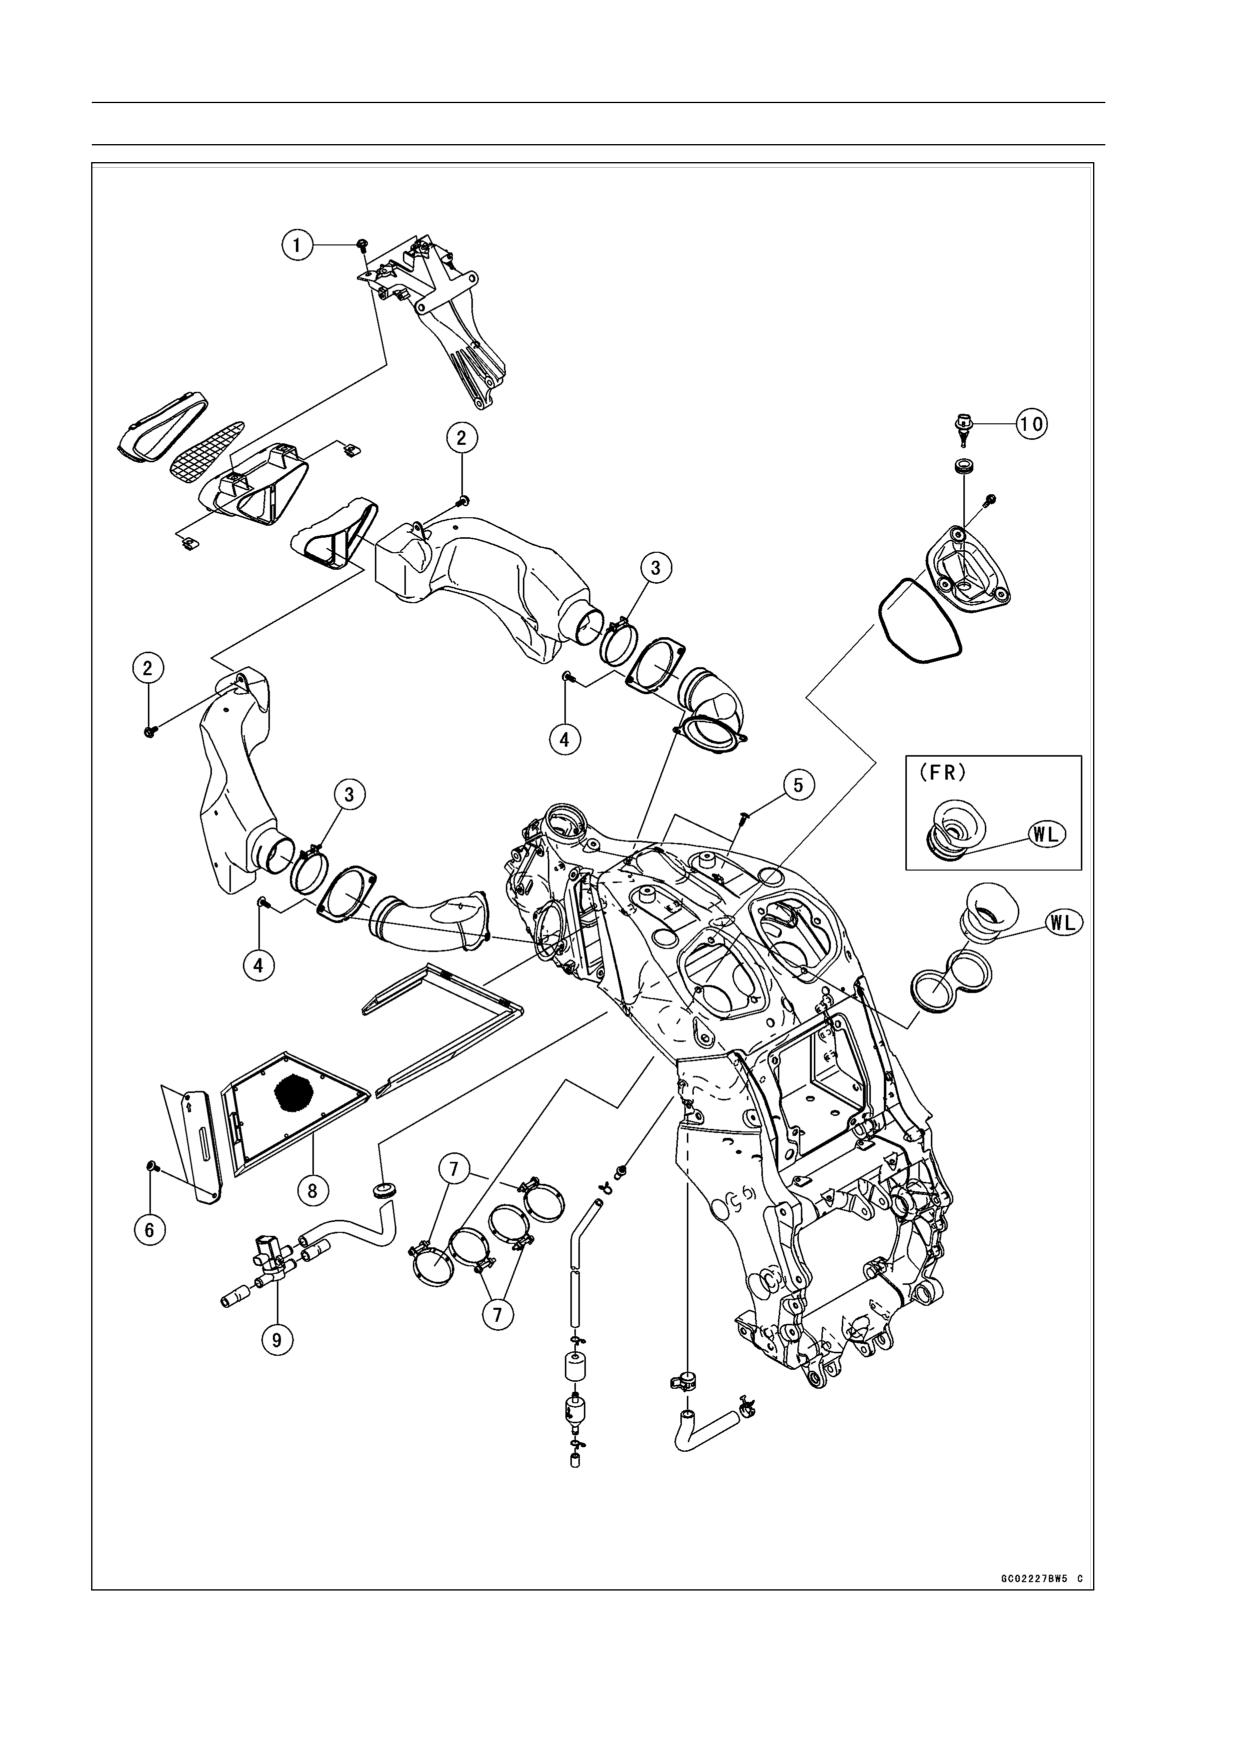
3-4 FUEL SYSTEM (DFI)
Exploded View
FUEL SYSTEM (DFI) 3-5
Exploded View
Torque
No.
Fastener
Remarks
N·m
kgf·m
ft·lb
1
Front Air Inlet Duct Mounting Bolts
9.8
1.0
87 in·lb
2
Middle Air Inlet Duct Mounting Bolts
9.8
1.0
87 in·lb
3
Middle Air Inlet Duct Clamp Bolts
2.9
0.30
26 in·lb
4
Rear Air Inlet Duct Mounting Bolts
9.8
1.0
87 in·lb
5
Air Cleaner Element Holder Screws
6.9
0.70
61 in·lb
6
Air Cleaner Element Cover Bolts
6.9
0.70
61 in·lb
7
Duct Clamp Bolts
2.0
0.20
18 in·lb
8. Air Cleaner Element
9. Air Switching Valve
10. Air Inlet Temperature Sensor
L: Apply a non-permanent locking agent.
WL: Apply a soap and water solution or rubber lubricant.
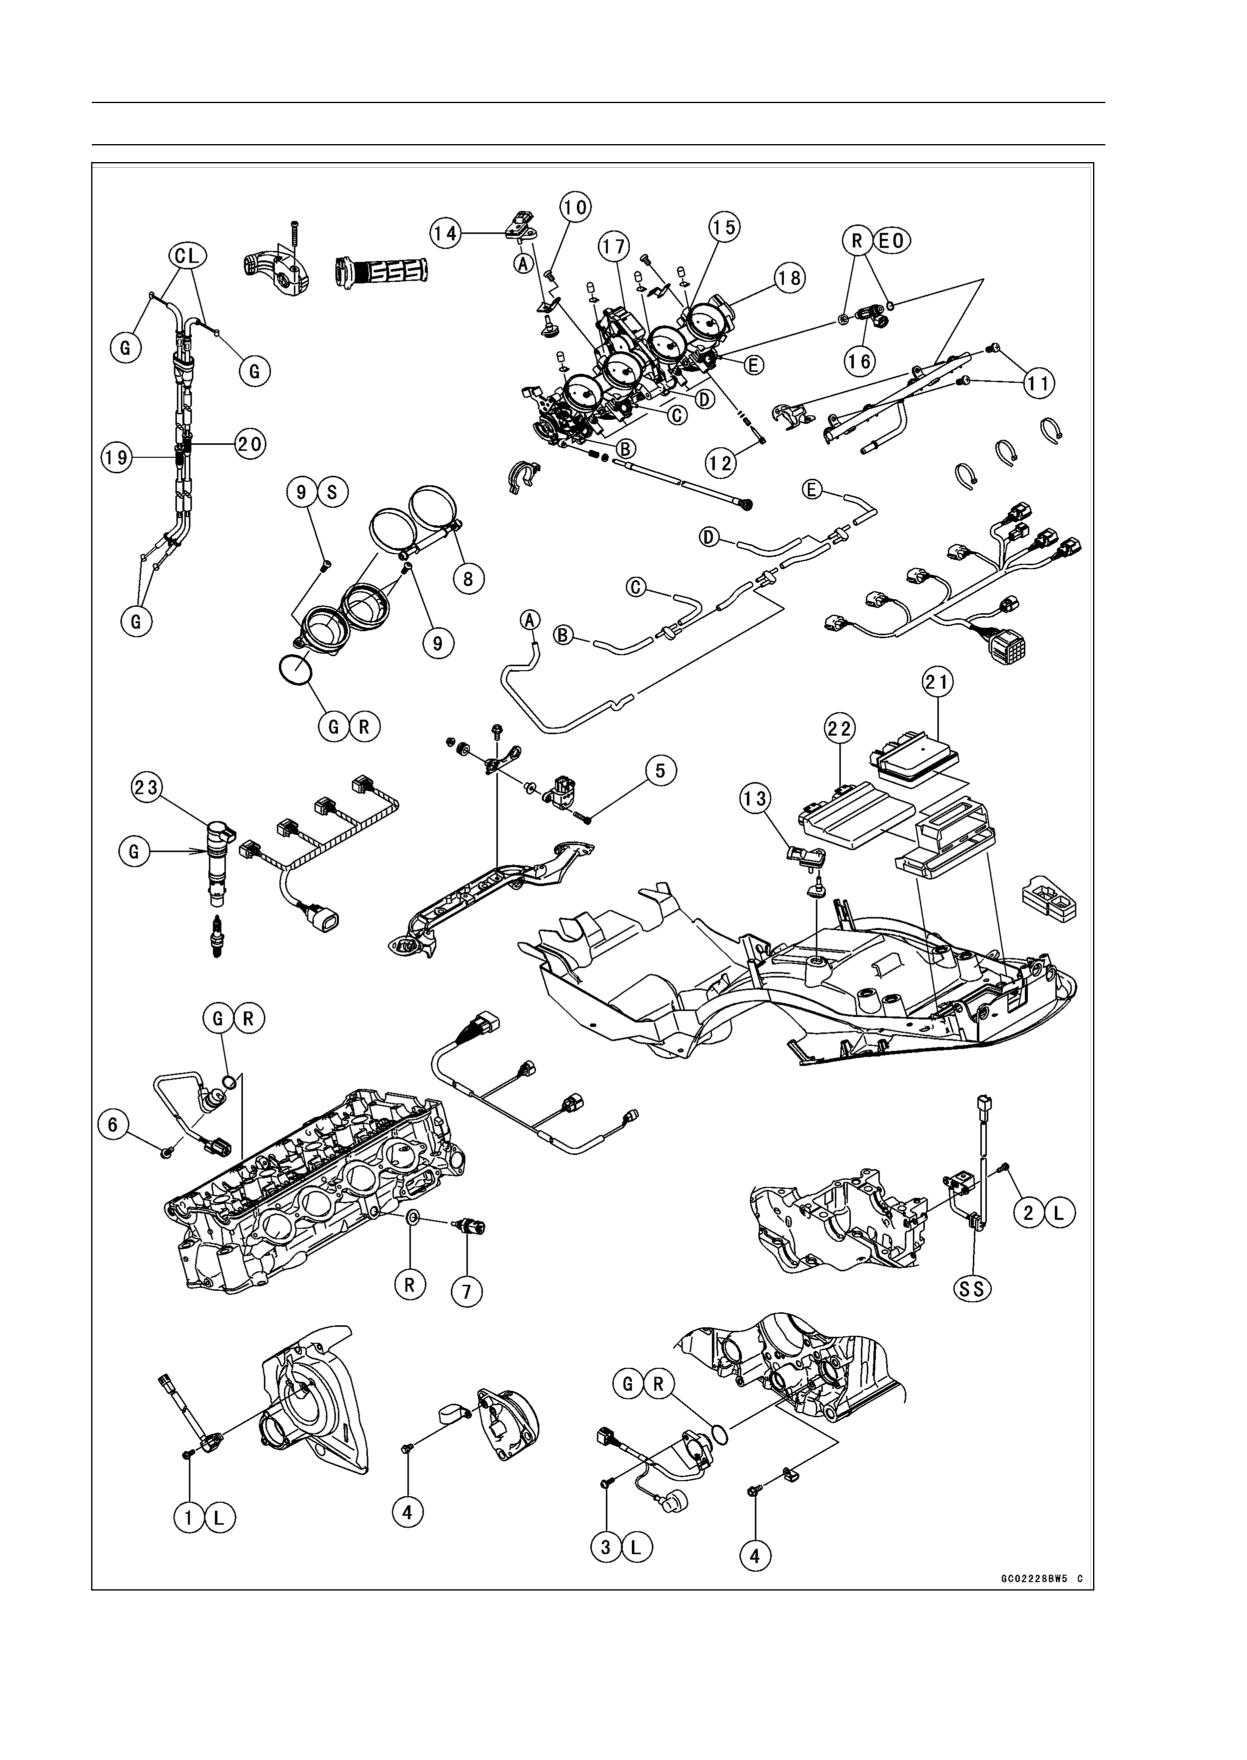
3-6 FUEL SYSTEM (DFI)
Exploded View
FUEL SYSTEM (DFI) 3-7
Exploded View
Torque
No.
Fastener
Remarks
N·m
kgf·m
ft·lb
1
Speed Sensor Bolt
3.9
0.40
35 in·lb
L
2
Crankshaft Sensor Bolts
5.9
0.60
52 in·lb
L
3
Gear Position Switch Screws
2.9
0.30
26 in·lb
L
4
Gear Position Switch Lead Clamp Bolts
9.8
1.0
87 in·lb
5
Vehicle-down Sensor Bolts
5.9
0.60
52 in·lb
6
Camshaft Position Sensor Bolt
9.8
1.0
87 in·lb
7
Water Temperature Sensor
25
2.5
18
8
Throttle Body Assy Holder Clamp Bolts
2.0
0.20
18 in·lb
9
Throttle Body Assy Holder Bolts
9.8
1.0
87 in·lb
S
10
Inlet Air Pressure Sensor Bracket Screws
3.5
0.36
31 in·lb
11
Delivery Pipe Mounting Screws
5.0
0.51
44 in·lb
12
Bypass Screws
0.2
0.02
1.8 in·lb
13. Atmospheric Pressure Sensor
14. Inlet Air Pressure Sensor
15. Main Throttle Sensor
16. Fuel Injectors
17. Subthrottle Valve Actuator
18. Subthrottle Sensor
19. Throttle Cable (Accelerator)
20. Throttle Cable (Decelerator)
21. Relay Box
22. ECU
23. Stick Coils
CL: Apply cable lubricant.
EO: Apply engine oil.
G: Apply grease.
L: Apply a non-permanent locking agent.
R: Replacement Parts
S: Follow the specified tightening sequence.
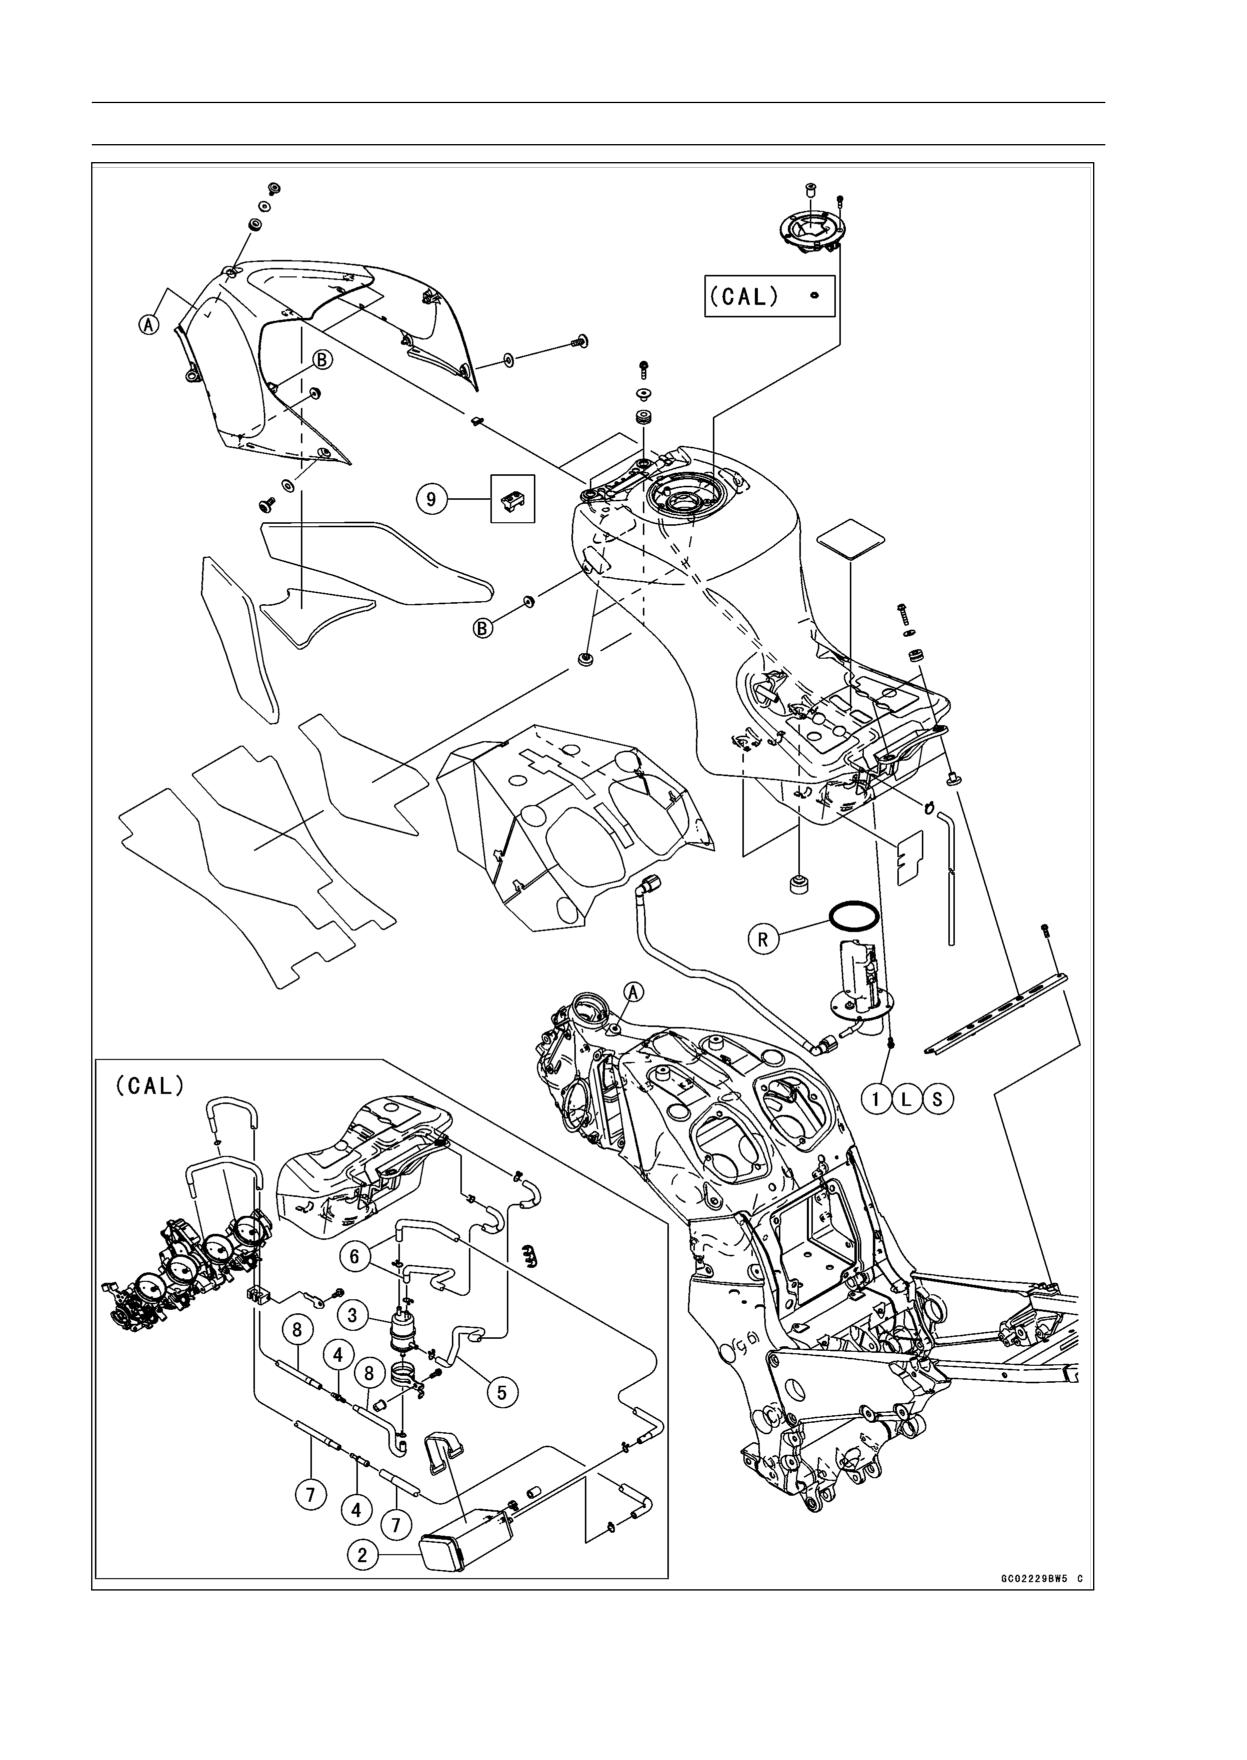
3-8 FUEL SYSTEM (DFI)
Exploded View
FUEL SYSTEM (DFI) 3-9
Exploded View
Torque
No.
Fastener
Remarks
N·m
kgf·m
ft·lb
1
Fuel Pump Bolts
9.8
1.0
87 in·lb
L, S
2. Canister
3. Separator
4. Fitting
5. Red Hose
6. Blue Hose
7. Green Hose
8. White Hose
9. Damper (ZX1400B Models)
L: Apply a non-permanent locking agent.
R: Replacement Parts
S: Follow the specified tightening sequence.
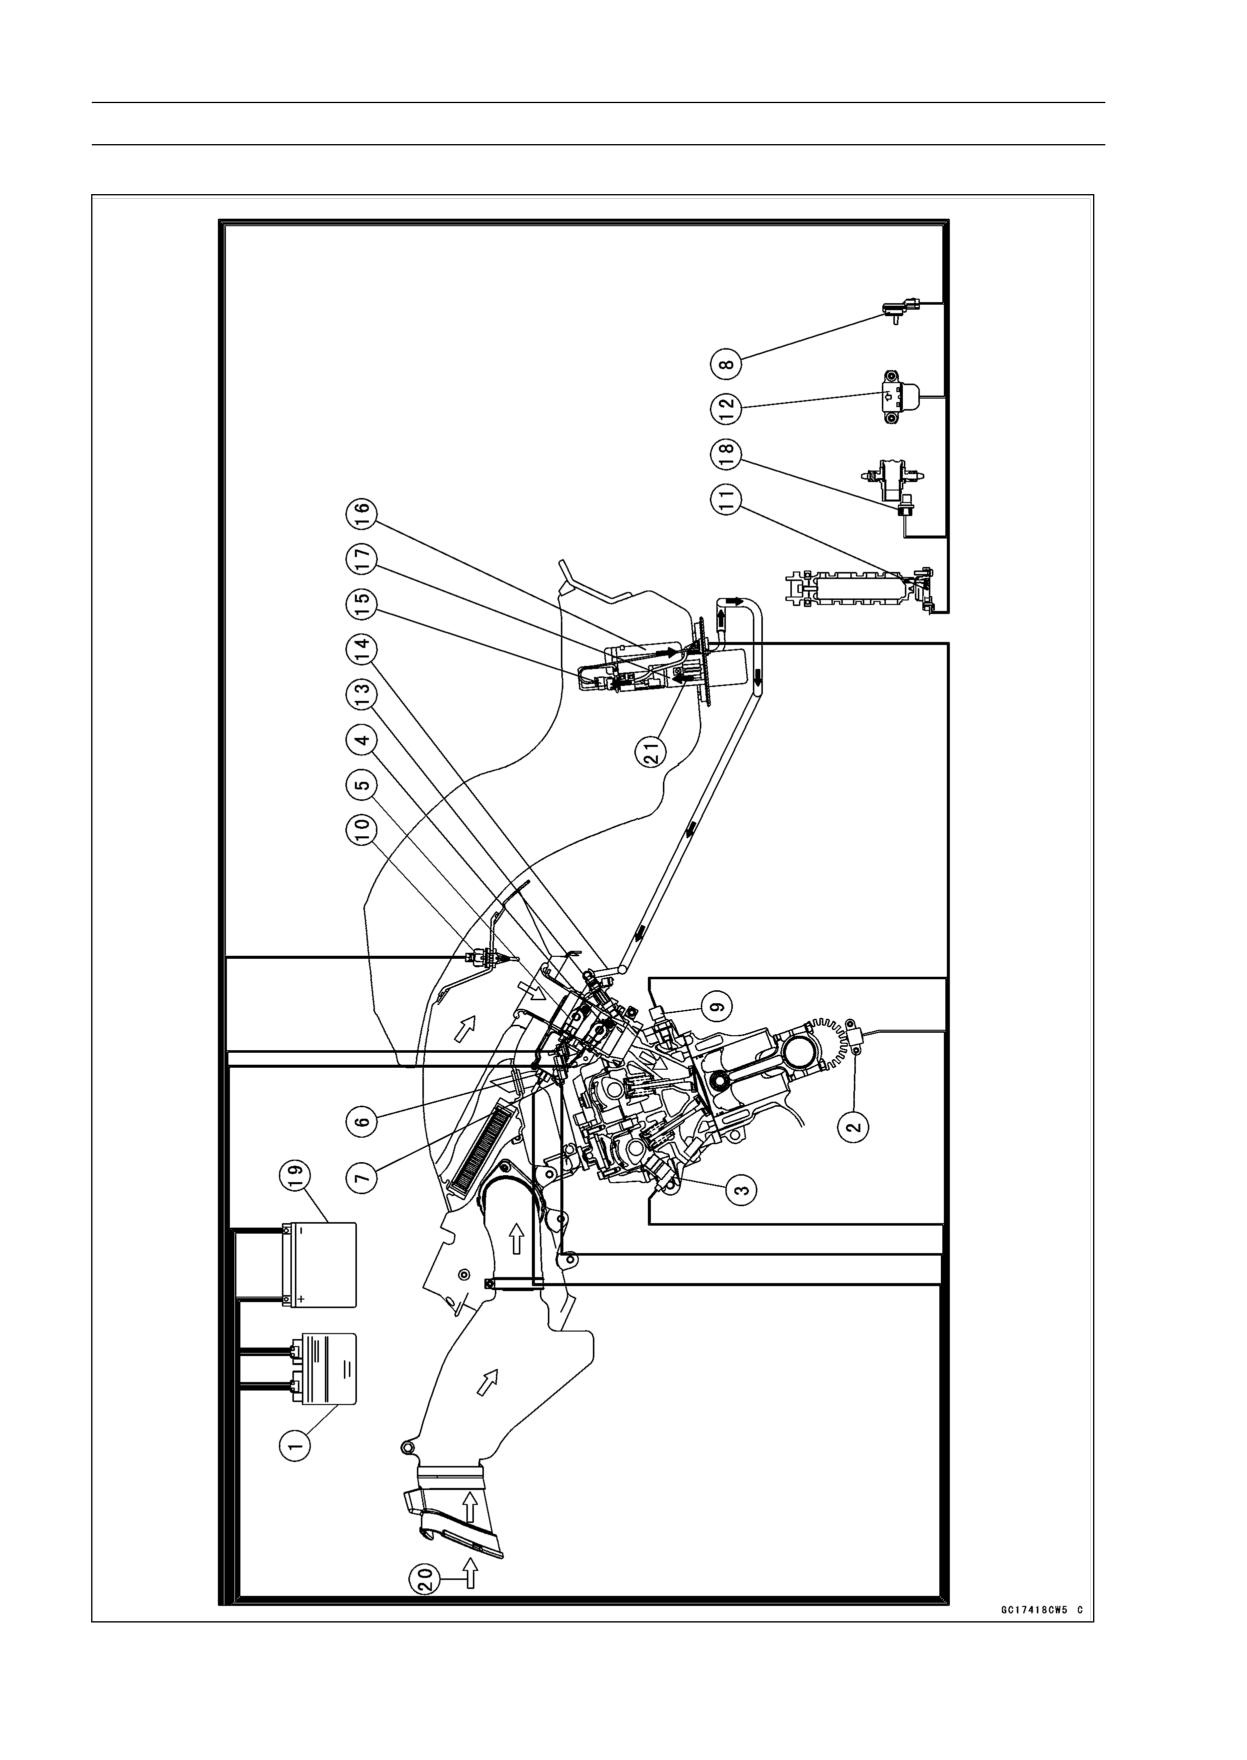
3-10 FUEL SYSTEM (DFI)
DFI System
DFI System
FUEL SYSTEM (DFI) 3-11
DFI System
1. ECU
2. Crankshaft Sensor
3. Camshaft Position Sensor
4. Main Throttle Sensor
5. Subthrottle Sensor
6. Subthrottle Valve Actuator
7. Inlet Air Pressure Sensor
8. Atmospheric Pressure Sensor
9. Water Temperature Sensor
10. Inlet Air Temperature Sensor
11. Gear Position Switch
12. Vehicle-down Sensor
13. Fuel Injectors
14. Delivery Pipe
15. Pressure Regulator
16. Fuel Pump
17. Fuel Filter
18. Speed Sensor
19. Battery 12 V 14 Ah
20. Air Flow
21. Fuel Flow
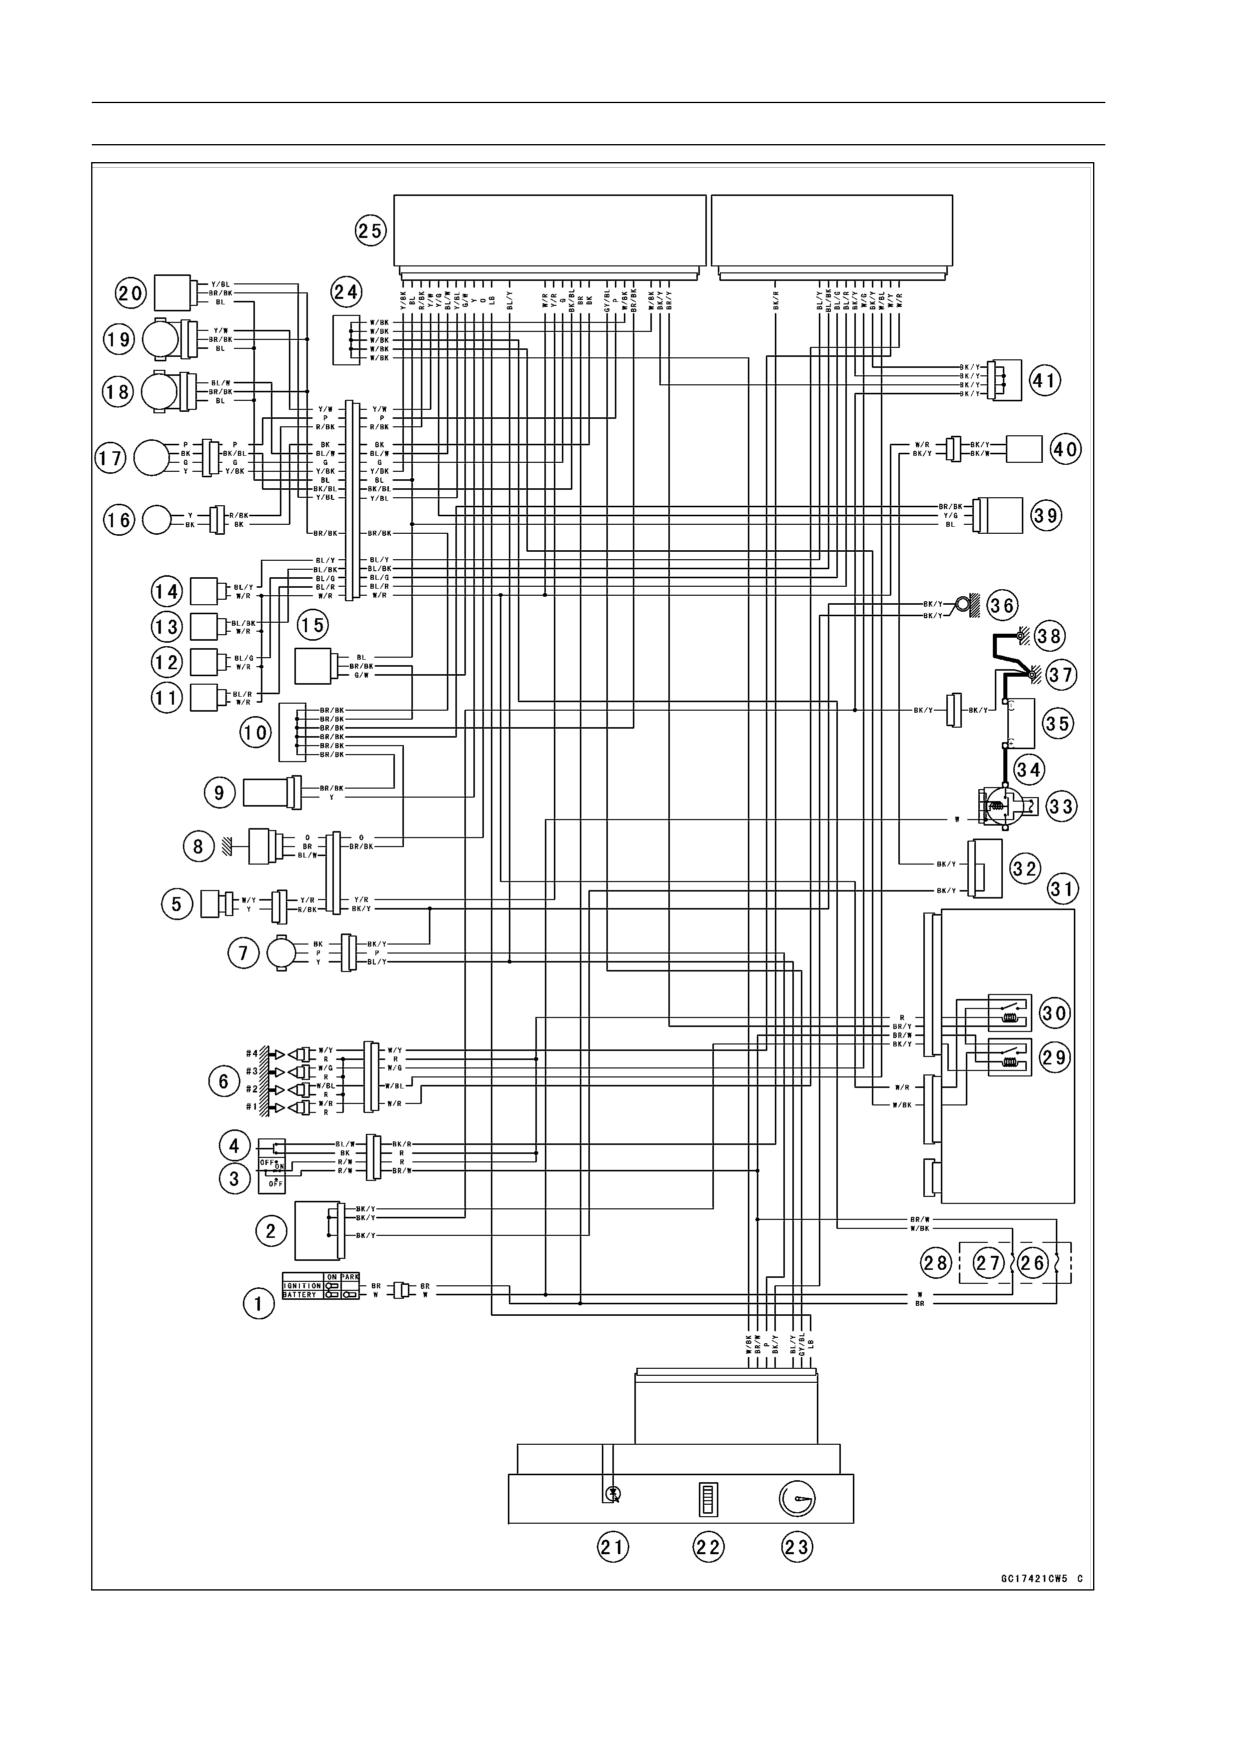
3-12 FUEL SYSTEM (DFI)
DFI System
FUEL SYSTEM (DFI) 3-13
DFI System
Part Name
1. Ignition Switch
2. Joint Connector 1
3. Engine Stop Switch
4. Starter Button
5. Camshaft Position Sensor
6. Stick Coil #1, #2, #3, #4
7. Speed Sensor
8. Water Temperature Sensor
9. Inlet Air Temperature Sensor
10. Water-proof Joint 2
11. Injector #1
12. Injector #2
13. Injector #3
14. Injector #4
15. Atmospheric Pressure Sensor
16. Crankshaft Sensor
17. Subthrottle Valve Actuator
18. Subthrottle Sensor
19. Main Throttle Sensor
20. Inlet Air Pressure Sensor
21. Warning Indicator Light (LED)
22. Water Temperature Gauge
23. Speedmeter
24. Water-proof Joint 1
25. ECU
26. ECU Fuse15 A
27. Ignition Fuse 10 A
28. Fuse Box 2
29. Main Relay
30. Fuel Pump Relay
31. Relay Box
32. Joint Connector 2
33. Main Fuse 30 A
34. Starter Relay
35. Battery 12 V 14 Ah
36. Frame Ground 1
37. Frame Ground 2
38. Engine Ground
39. Vehicle-down Sensor
40. Fuel Pump
41. Joint Connector 3
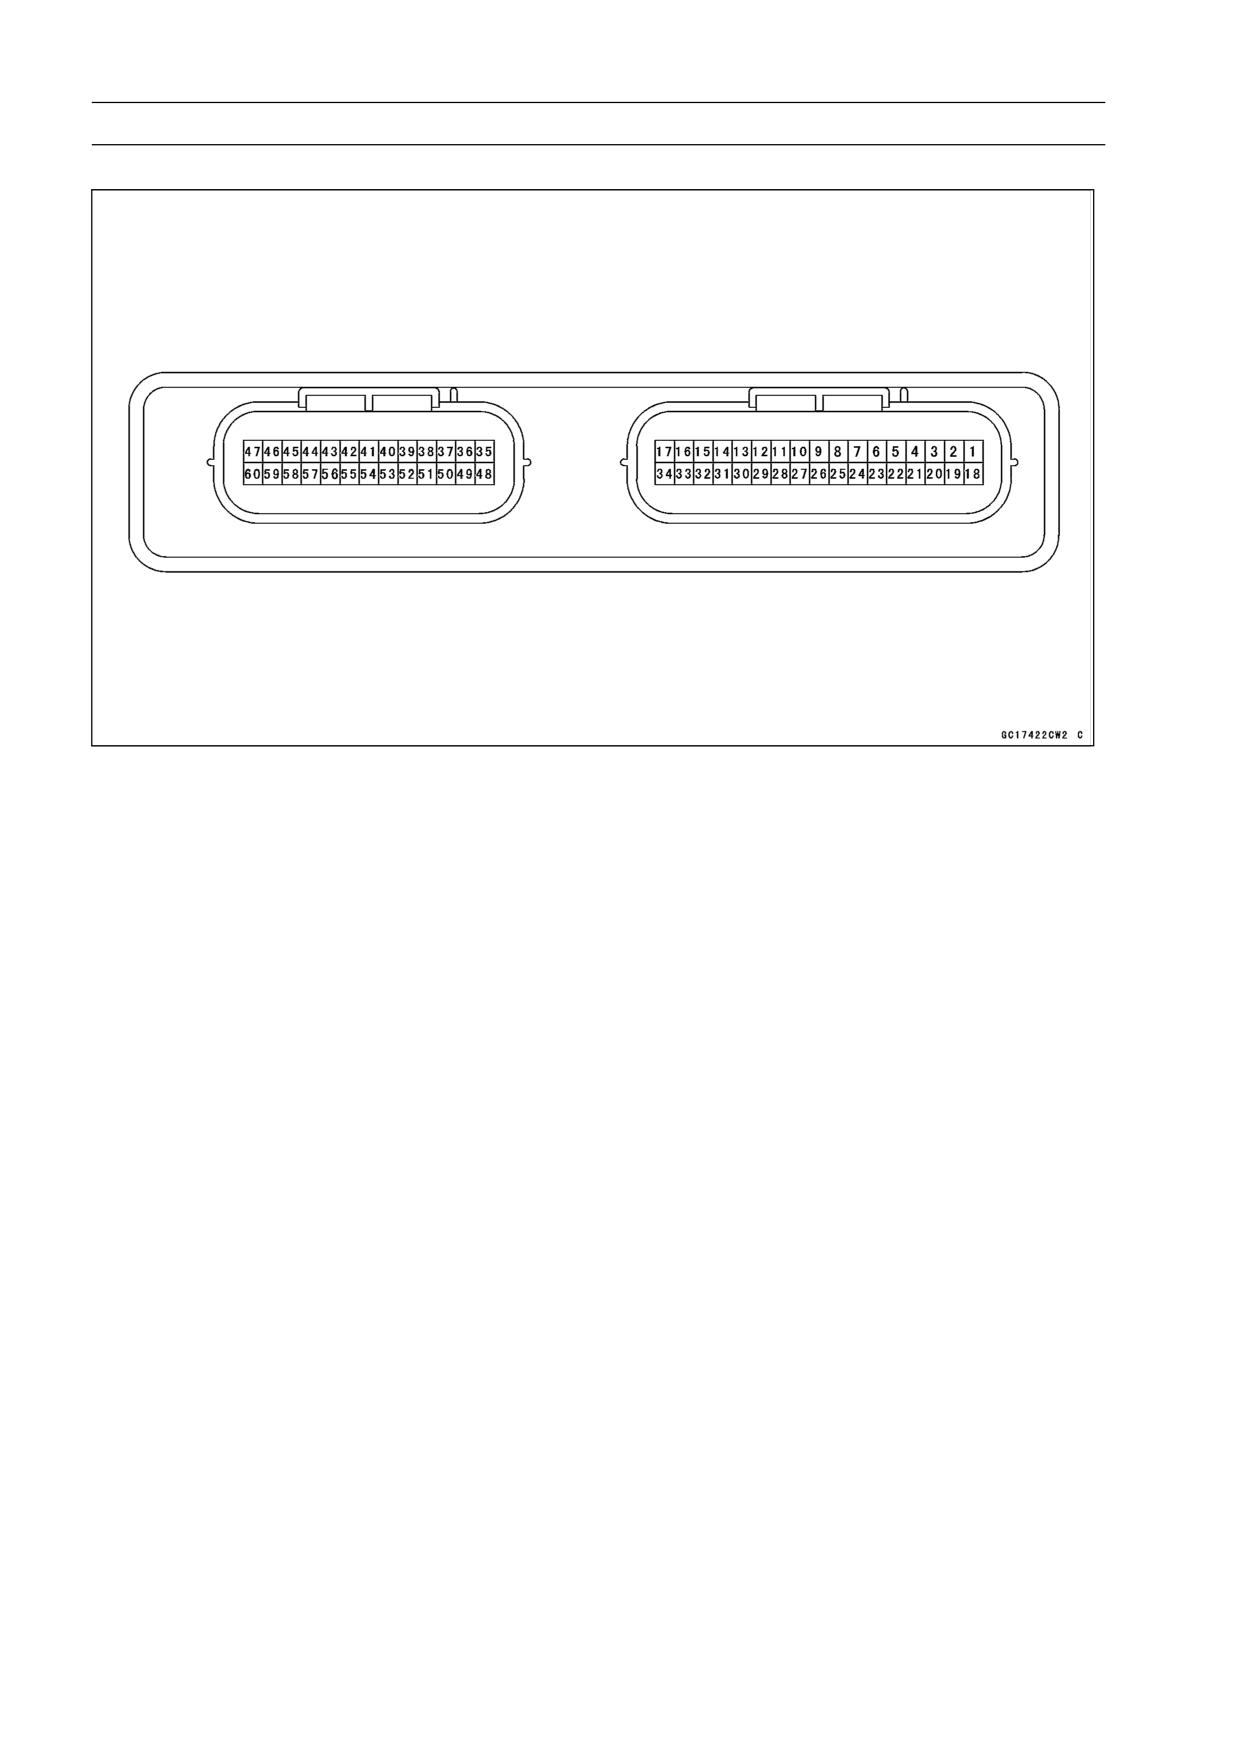
3-14 FUEL SYSTEM (DFI)
DFI System
Terminal Numbers of ECU Connectors
Terminal Names
1. CAN Communication Line (High)
2. Subthrottle Valve Actuator
3. Subthrottle Valve Actuator
4. Gear Position Switch
5. Crankshaft Sensor (-)
6. Speed Sensor
7. Power Supply to Sensors
8. Inlet Air Temperature Sensor
9. Vehicle-down Sensor
10. Unused
11. Atmospheric Pressure Sensor
12. Unused
13. Fuel Pump Relay
14. Battery Monitor
15. Power Supply to ECU (from Battery)
16. Unused
17. Ground for Control System
18. CAN Communication Line (Low)
19. Subthrottle Valve Actuator
20. Subthrottle Valve Actuator
21. External Communication Line (Immobilizer/*KDS)
22. Crankshaft Sensor (+)
23. Unused
24. Camshaft Position Sensor
25. Water Temperature Sensor
26. Main Throttle Sensor
27. Subthrottle Sensor
28. Inlet Air Pressure Sensor
29. Unused
30. Radiator Fan Relay
31. Unused
32. Power Supply to ECU (from Battery)
33. Ignition Switch
34. Ground for Sensors
FUEL SYSTEM (DFI) 3-15
DFI System
35. External Communication Line (Immobilizer/*KDS)
36. Immobilizer Amplifier
37. Unused
38. Air Switching Valve
39. Engine Ground
40. Starter Lockout Switch
41. Unused
42. Starter Button
43. Unused
44. Injector #3
45. Stick Coil #3
46. Injector #1
47. Stick Coil #1
48. Unused
49. Immobilizer Amplifier
50. Immobilizer Amplifier
51. Unused
52. Engine Ground
53. Sidestand Switch
54. Unused
55. Ground
56. Unused
57. Injector #4
58. Ignition Coil #4
59. Injector #2
60. Ignition Coil #2
* KDS (Kawasaki Diagnostic System)
KDS that runs on Windows personal computer (PC) diagnostic tool for motorcycle with Kawasaki
DFI system.
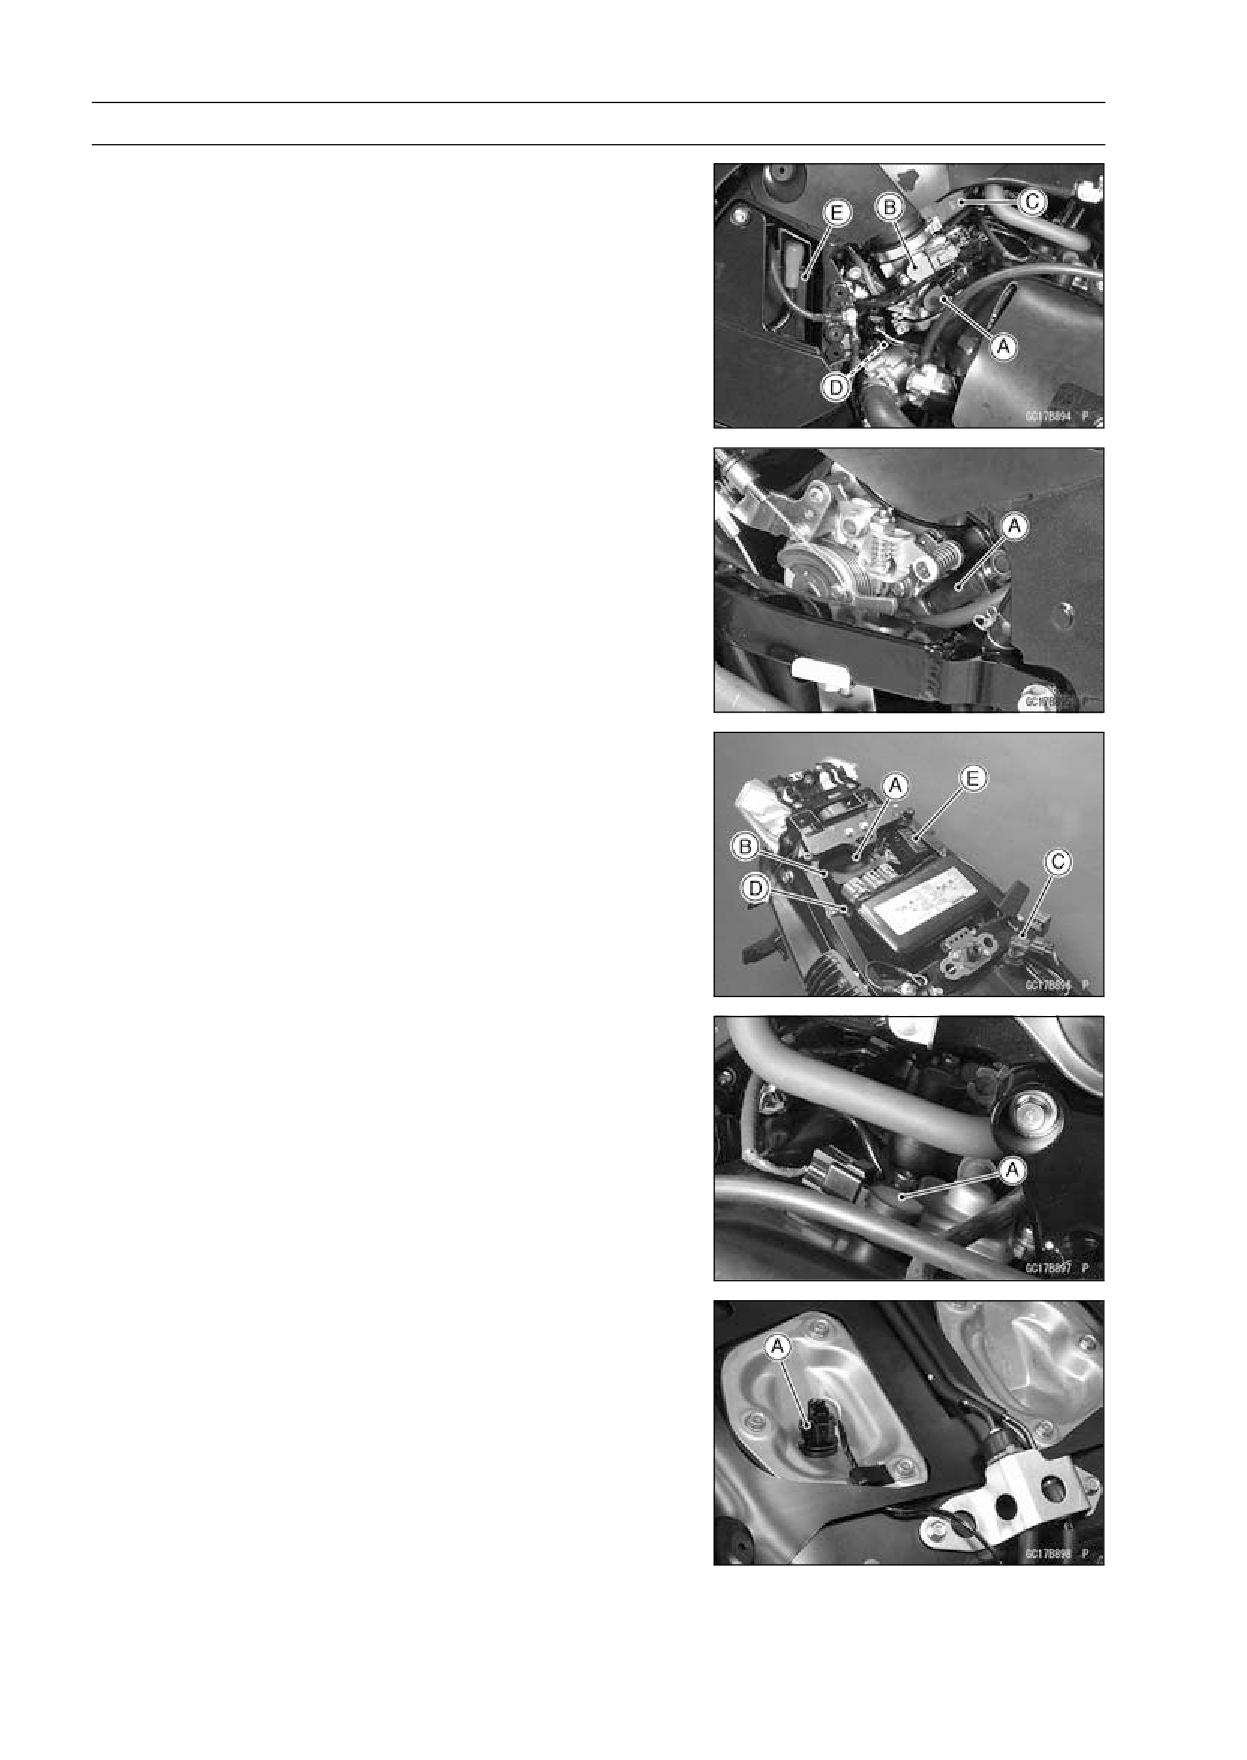
3-16 FUEL SYSTEM (DFI)
DFI Parts Location
Main Throttle Sensor [A]
Subthrottle Sensor [B]
Subthrottle Valve Actuator [C]
Water Temperature Sensor [D]
Battery [E]
Fuel Injectors #1, #2, #3, #4 [A]
Relay Box (Fuel Pump Relay) [A]
Immobilizer/Kawasaki Diagnostic System Connector [B]
Atmospheric Pressure Sensor [C]
ECU [D]
Fuse Box (ECU Fuse 15 A) [E]
Stick Coils #1, #2, #3, #4 [A]
Inlet Air Temperature Sensor [A]
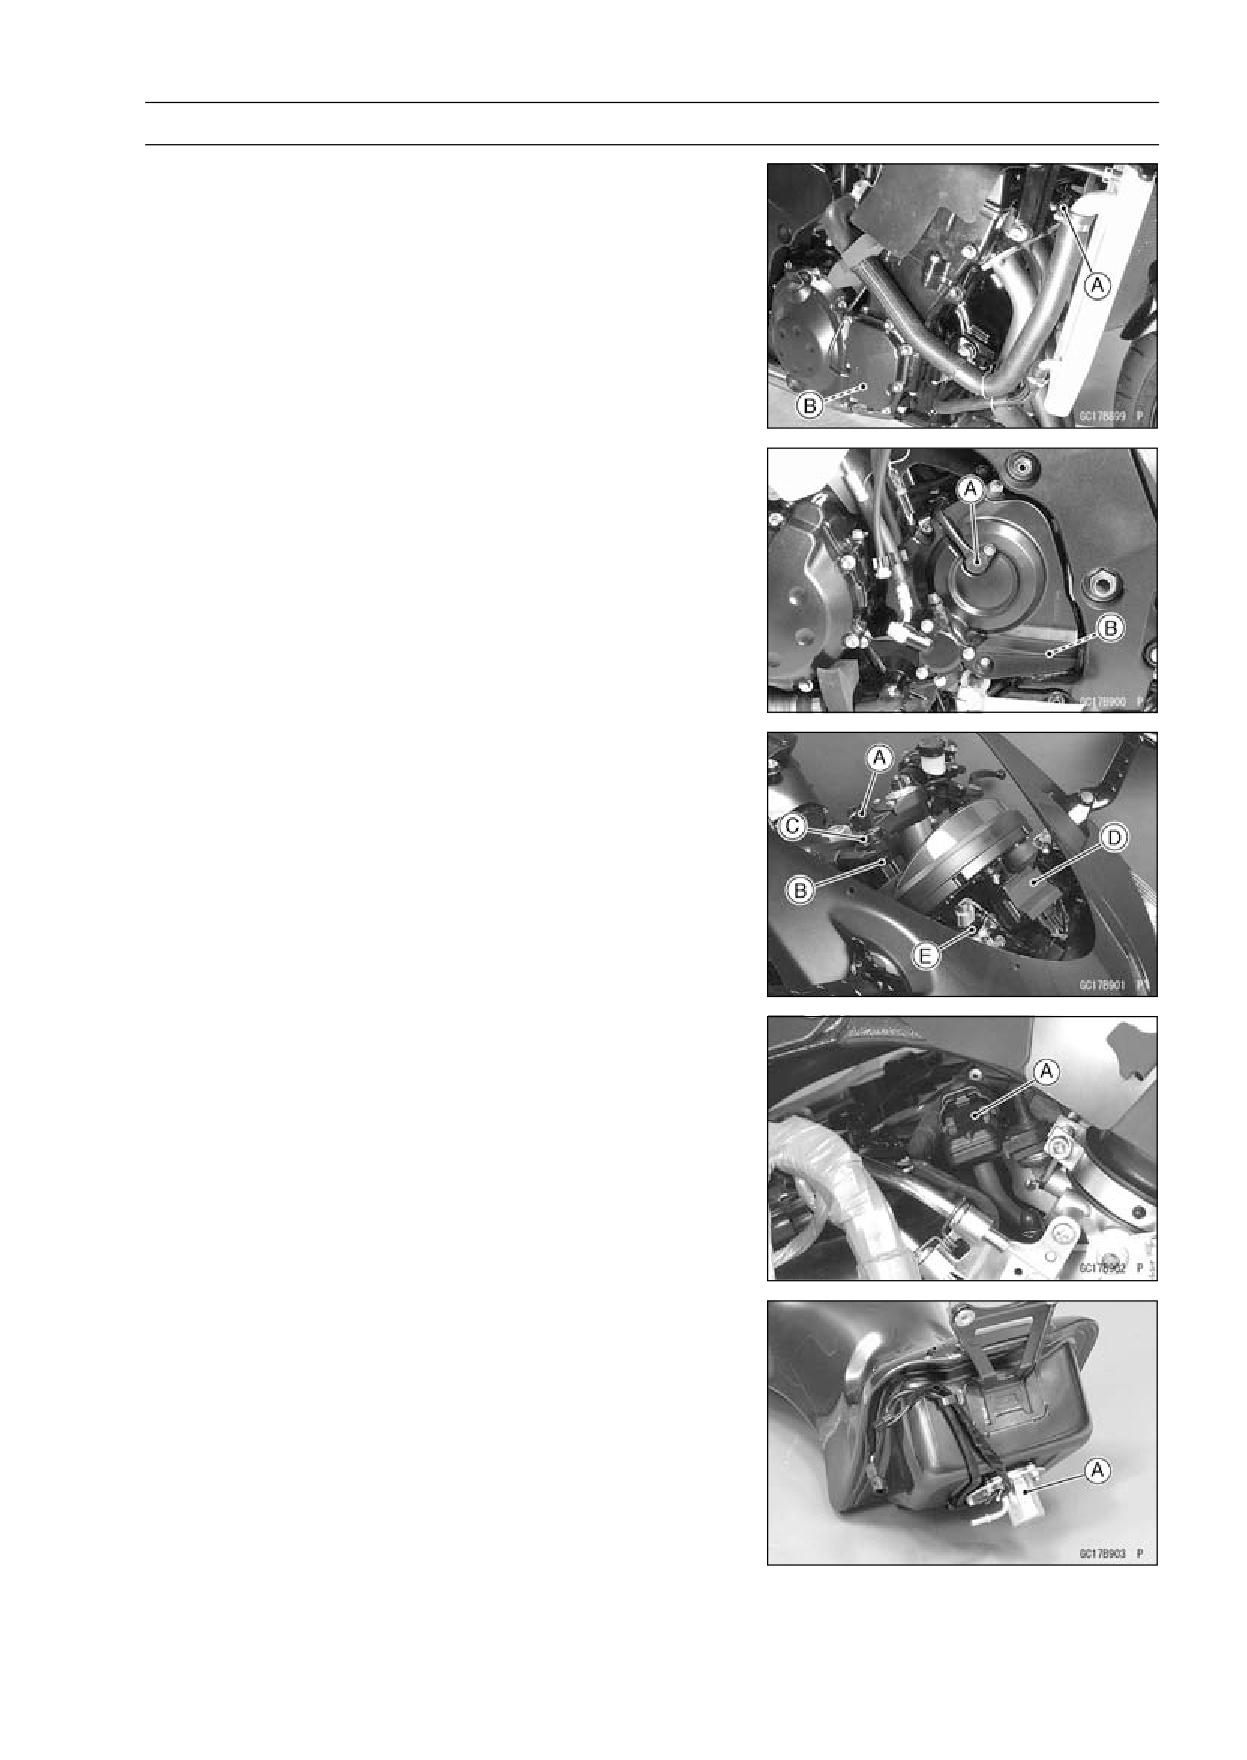
FUEL SYSTEM (DFI) 3-17
DFI Parts Location
Camshaft Position Sensor [A]
Crankshaft Sensor [B]
Speed Sensor [A]
Gear Position Switch [B]
Ignition Key [A] (Transponder, Immobilizer Models)
Ignition Switch [B]
Immobilizer Antenna [C] (Immobilizer Models)
Immobilizer Amplifier [D] (Immobilizer Models)
Vehicle-down [E]
Inlet Air Pressure Sensor [A]
Fuel Pump [A]
3-18 FUEL SYSTEM (DFI)
Specifications
Item
Standard
Digital Fuel Injection System
Idle Speed
1 100 ±50 r/min (rpm)
Throttle Assy:
Type
Four barrel type
Bore
44 mm (1.7 in.)
Throttle Body Vacuum
39 ±1.33 kPa (293 ±10 mmHg)
Bypass Screws
- - -
ECU:
Make
Mitsubishi Electric
Type
Digital memory type, with built in IC igniter, sealed with
resin
Usable Engine Speed
100 ∼ 12 000 r/min (rpm)
Fuel Pressure (high pressure line):
Right after Ignition Switch ON, with
304 kPa (3.1 kgf/cm², 44 psi) with fuel pump running
fuel pump running for 3 seconds
280 kPa (2.9 kgf/cm², 41 psi) with fuel pump stopped
with engine idling
304 kPa (3.1 kgf/cm², 44 psi) with fuel pump running
Fuel Pump:
Type
In-tank pump (in fuel tank), or Wesco pump (friction pump)
Discharge
67 mL (2.26 US oz.) or more for 3 seconds
Fuel Injectors:
Type
INP-286
Nozzle Type
One spray type with 10 holes
Resistance
About 11.7 ∼ 12.3 Ω at 20°C (68°F)
Main Throttle Sensor:
Non-adjustable and non-removable
Input Voltage
DC 4.75 ∼ 5.25 V between BL and BR/BK leads
Output Voltage
DC 0.63 ∼ 3.91 V between Y/W and BR/BK leads (at idle
throttle opening to full throttle opening)
Resistance
4 ∼ 6 kΩ
Inlet Air Pressure Sensor/Atmo-
spheric Pressure Sensor:
Input Voltage
DC 4.75 ∼ 5.25 V between BL and BR/BK leads
Output Voltage
DC 3.80 ∼ 4.20 V at standard atmospheric pressure (see
this text for details)
Inlet Air Temperature Sensor:
Resistance
2.09 ∼ 2.81 kΩ at 20°C (68°F)
About 0.322 kΩ at 80°C (176°F) (reference value)
Output Voltage at ECU
About 2.25 ∼ 2.50 V at 20°C (68°F)
Water Temperature Sensor:
Resistance
see Electrical System chapter
Output Voltage at ECU
About 2.80 ∼ 2.97 V at 20°C (68°F)
Speed Sensor:
Input Voltage at Sensor
About DC 9 ∼ 11 V at Ignition Switch ON
Output Voltage at Sensor
About DC 0.05 ∼ 0.09 V or DC 4.5 ∼ 4.9 at Ignition Switch
ON and 0 km/h
FUEL SYSTEM (DFI) 3-19
Specifications
Item
Standard
Vehicle-down sensor:
Detection Method
Magnetic flux detection method
Detection Angle
More than 60 ∼ 70° for each bank
Output Voltage
with sensor arrow mark pointed up: 3.55 ∼ 4.45 V
with sensor tilted 60 ∼ 70° or more: 0.65 ∼ 1.35 V
Subthrottle Sensor:
Non-adjustable and non-removal
Input Voltage
DC 4.75 ∼ 5.25 V between BL and BR/BK leads
Output Voltage
DC 0.62 ∼ 4.14 V between BL/W and BR/BK leads (at idle
throttle opening to full throttle opening)
Resistance
4 ∼ 6 kΩ
Immobilizer Antenna:
Resistance
About 0.6 ∼ 0.9 Ω
Subthrottle Valve Actuator:
Resistance
About 5 ∼ 7 Ω
Input Voltage
About DC 10.5 ∼ 12.5 V
CAN Communication Line:
Resistance
114 ∼ 126 Ω at ECU Connector
Throttle Grip and Cables
Throttle Grip Free Play
2∼3mm(0.08∼0.12in.)
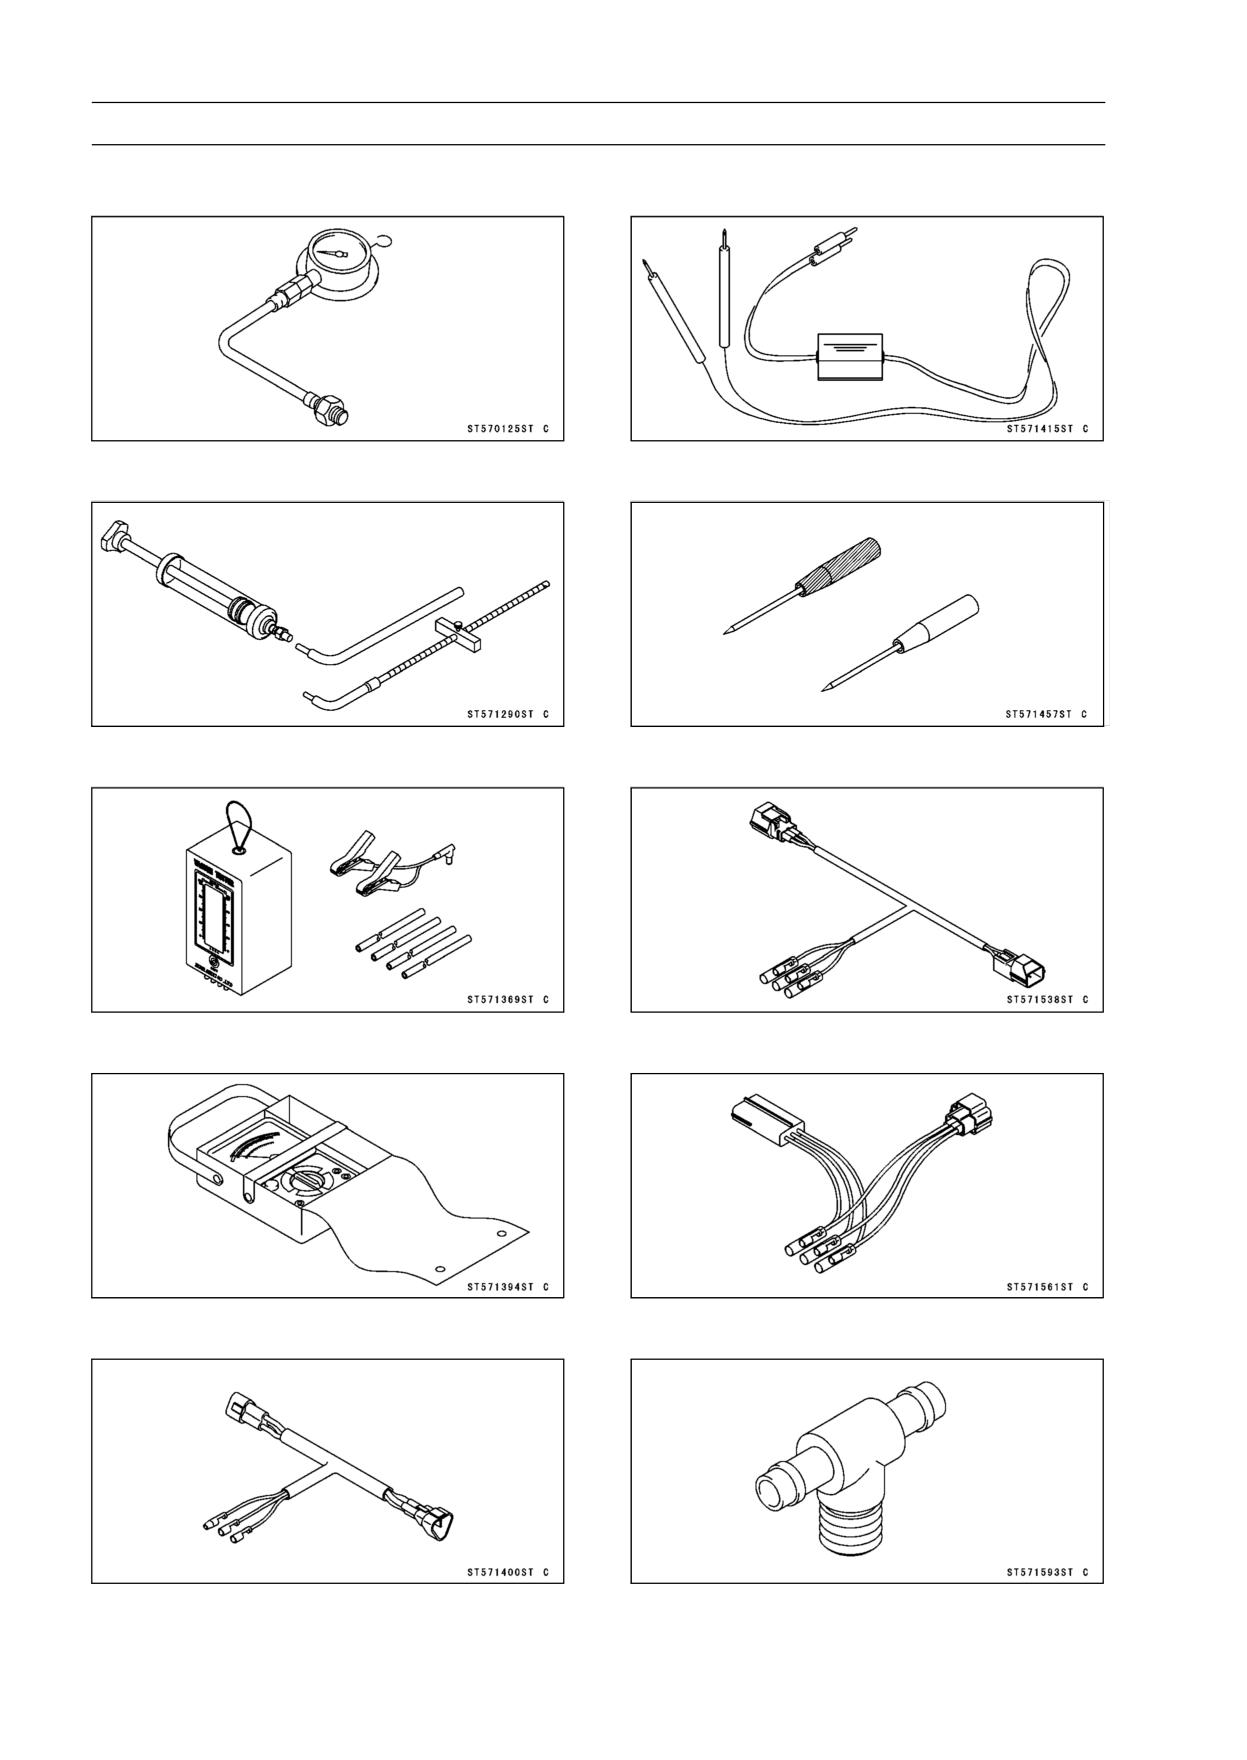
3-20 FUEL SYSTEM (DFI)
Special Tools and Sealant
Oil Pressure Gauge, 5 kgf/cm²:
Peak Voltage Adapter:
57001-125
57001-1415
Fork Oil Level Gauge:
Needle Adapter Set:
57001-1290
57001-1457
Vacuum Gauge:
Throttle Sensor Setting Adapter:
57001-1369
57001-1538
Hand Tester:
Sensor Harness Adapter:
57001-1394
57001-1561
Throttle Sensor Setting Adapter #1:
Fuel Pressure Gauge Adapter:
57001-1400
57001-1593
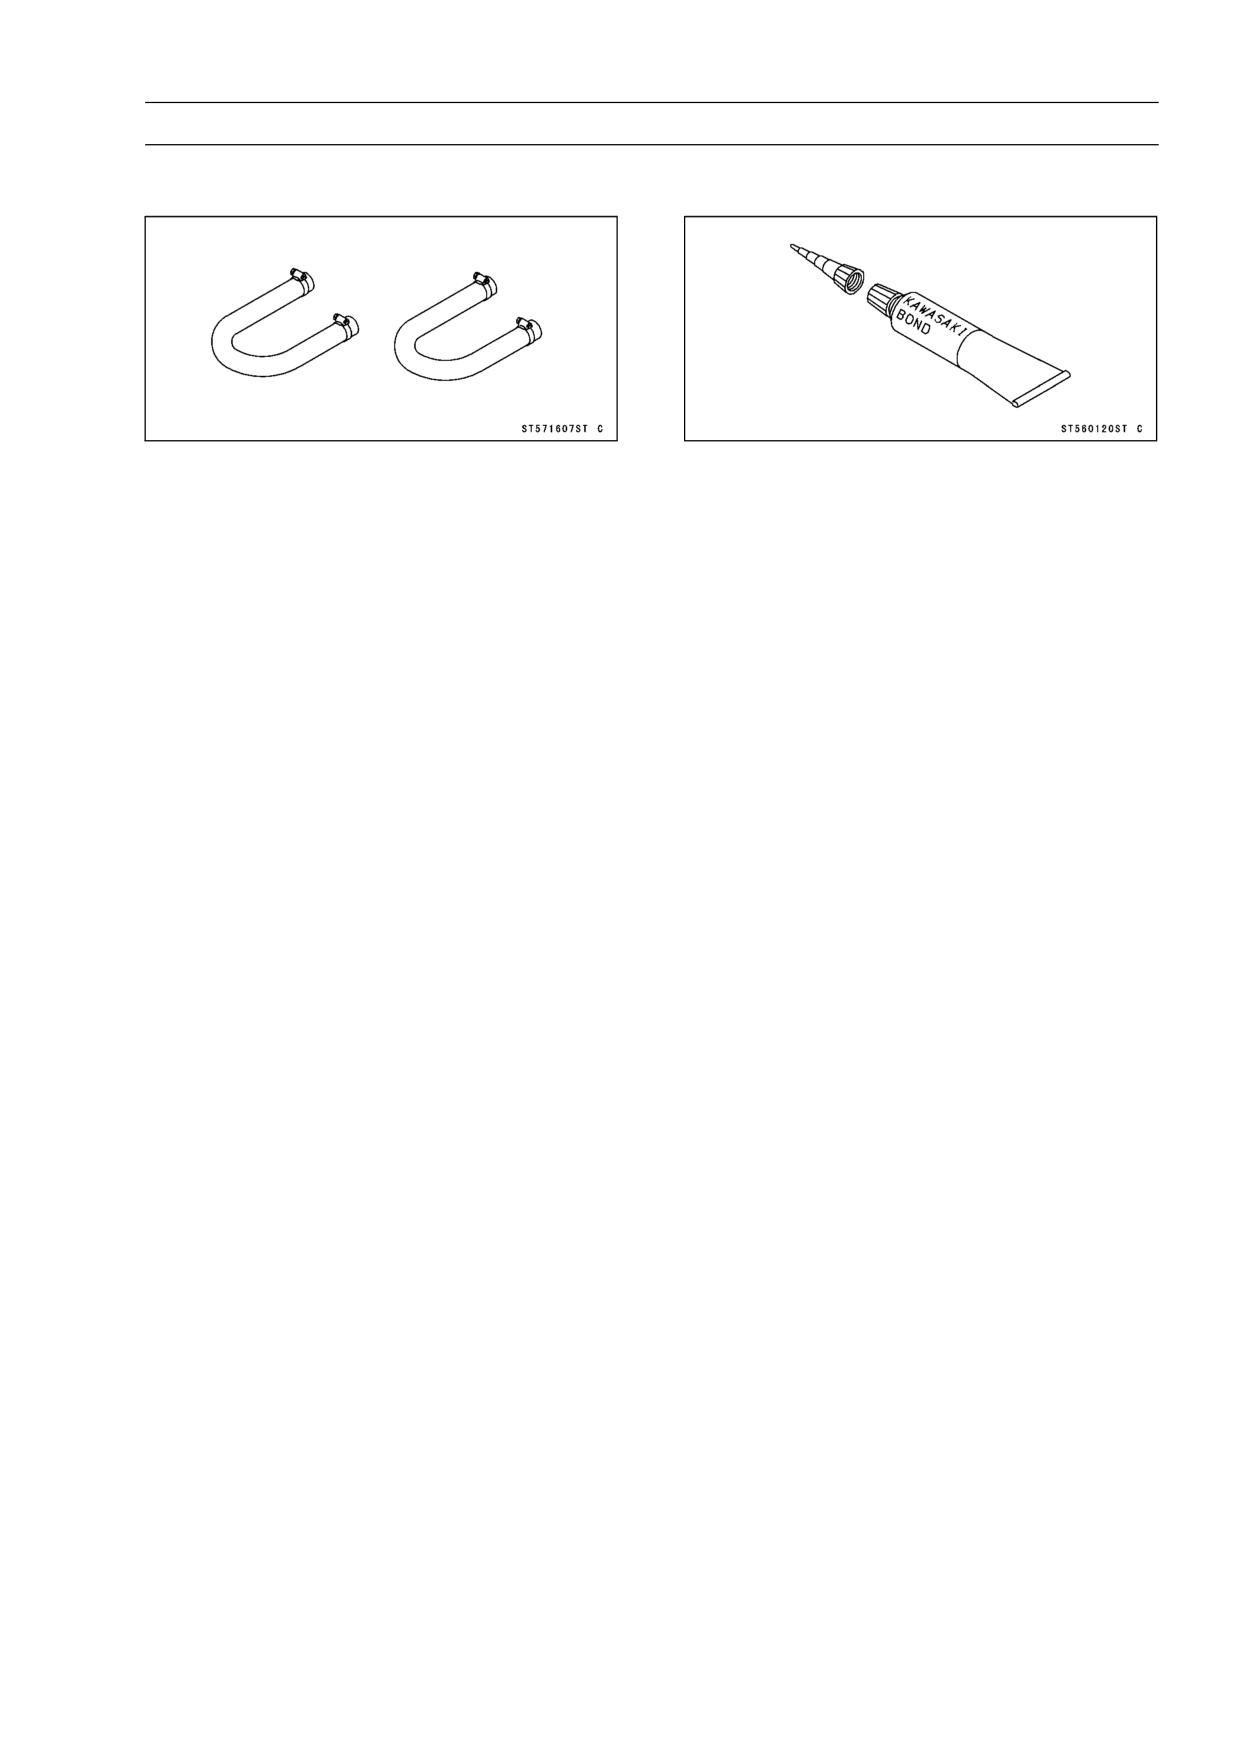
FUEL SYSTEM (DFI) 3-21
Special Tools and Sealant
Fuel Hose:
Kawasaki Bond (Silicone Sealant):
57001-1607
56019-120
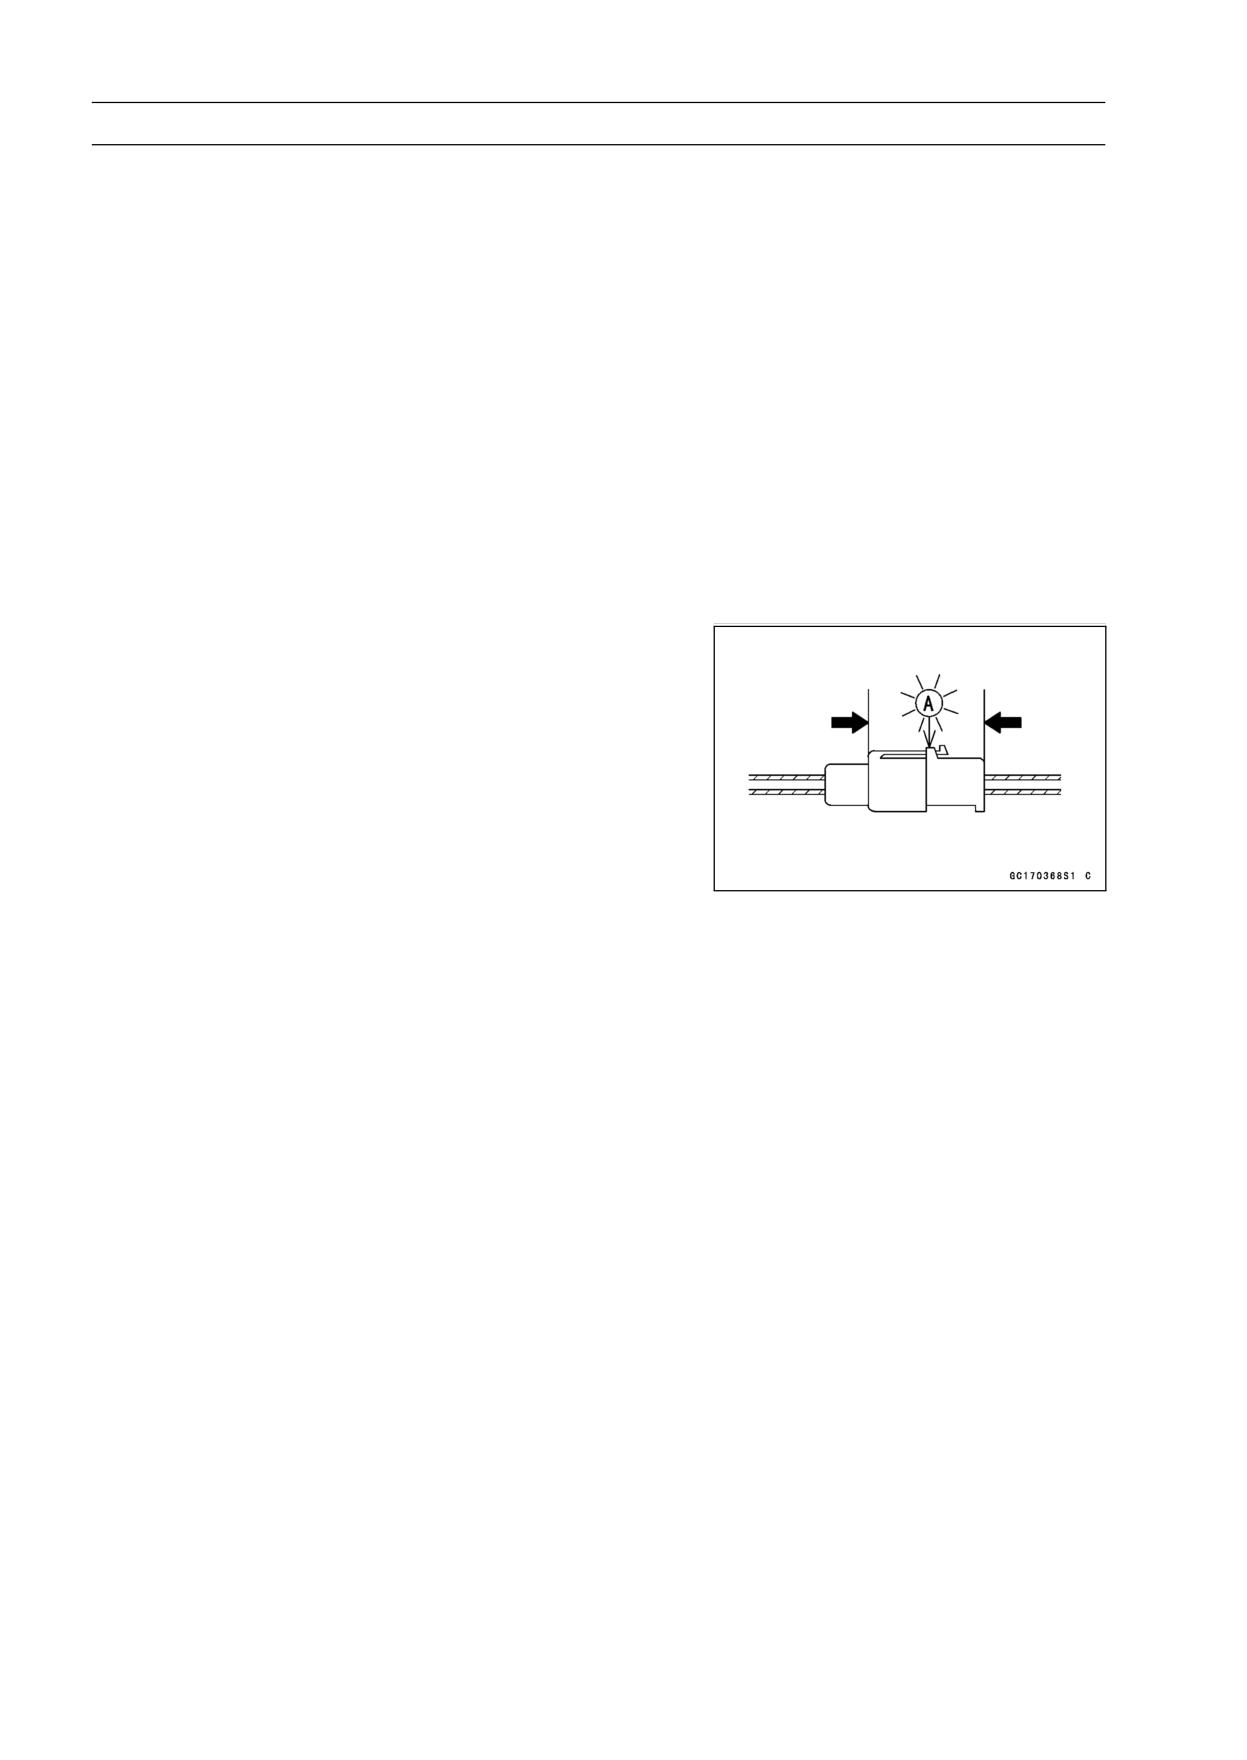
3-22 FUEL SYSTEM (DFI)
DFI Servicing Precautions
DFI Servicing Precautions
There are a number of important precautions that should
be followed servicing the DFI system.
○This DFI system is designed to be used with a 12 V sealed
battery as its power source. Do not use any other battery
except for a 12 V sealed battery as a power source.
○Do not reverse the battery cable connections. This will
damage the ECU.
○To prevent damage to the DFI parts, do not disconnect the
battery cables or any other electrical connections when
the ignition switch is on, or while the engine is running.
○Take care not to short the leads that are directly con-
nected to the battery positive (+) terminal to the chassis
ground.
○When charging, remove the battery from the motorcycle.
This is to prevent ECU damage by excessive voltage.
○Whenever the DFI electrical connections are to be dis-
connected, first turn off the ignition switch, and disconnect
the battery (-) terminal. Do not pull the lead, only the con-
nector. Conversely, make sure that all the DFI electrical
connections are firmly reconnected before starting the en-
gine.
○Connect these connectors until they click [A]
○Do not turn the ignition switch ON while any of the DFI
electrical connectors are disconnected. The ECU memo-
rizes service codes.
○Do not spray water on the electrical parts, DFI parts, con-
nectors, leads, and wiring.
○If a transceiver is installed on the motorcycle, make sure
that the operation of the DFI system is not influenced by
electric wave radiated from the antenna. Check operation
of the system with the engine at idle. Locate the antenna
as far as possible away from the ECU.
○When any fuel hose is disconnected, do not turn on the
ignition switch. Otherwise, the fuel pump will operate and
fuel will spout from the fuel hose.
○Do not operate the fuel pump if the pump is completely
dry. This is to prevent pump seizure.
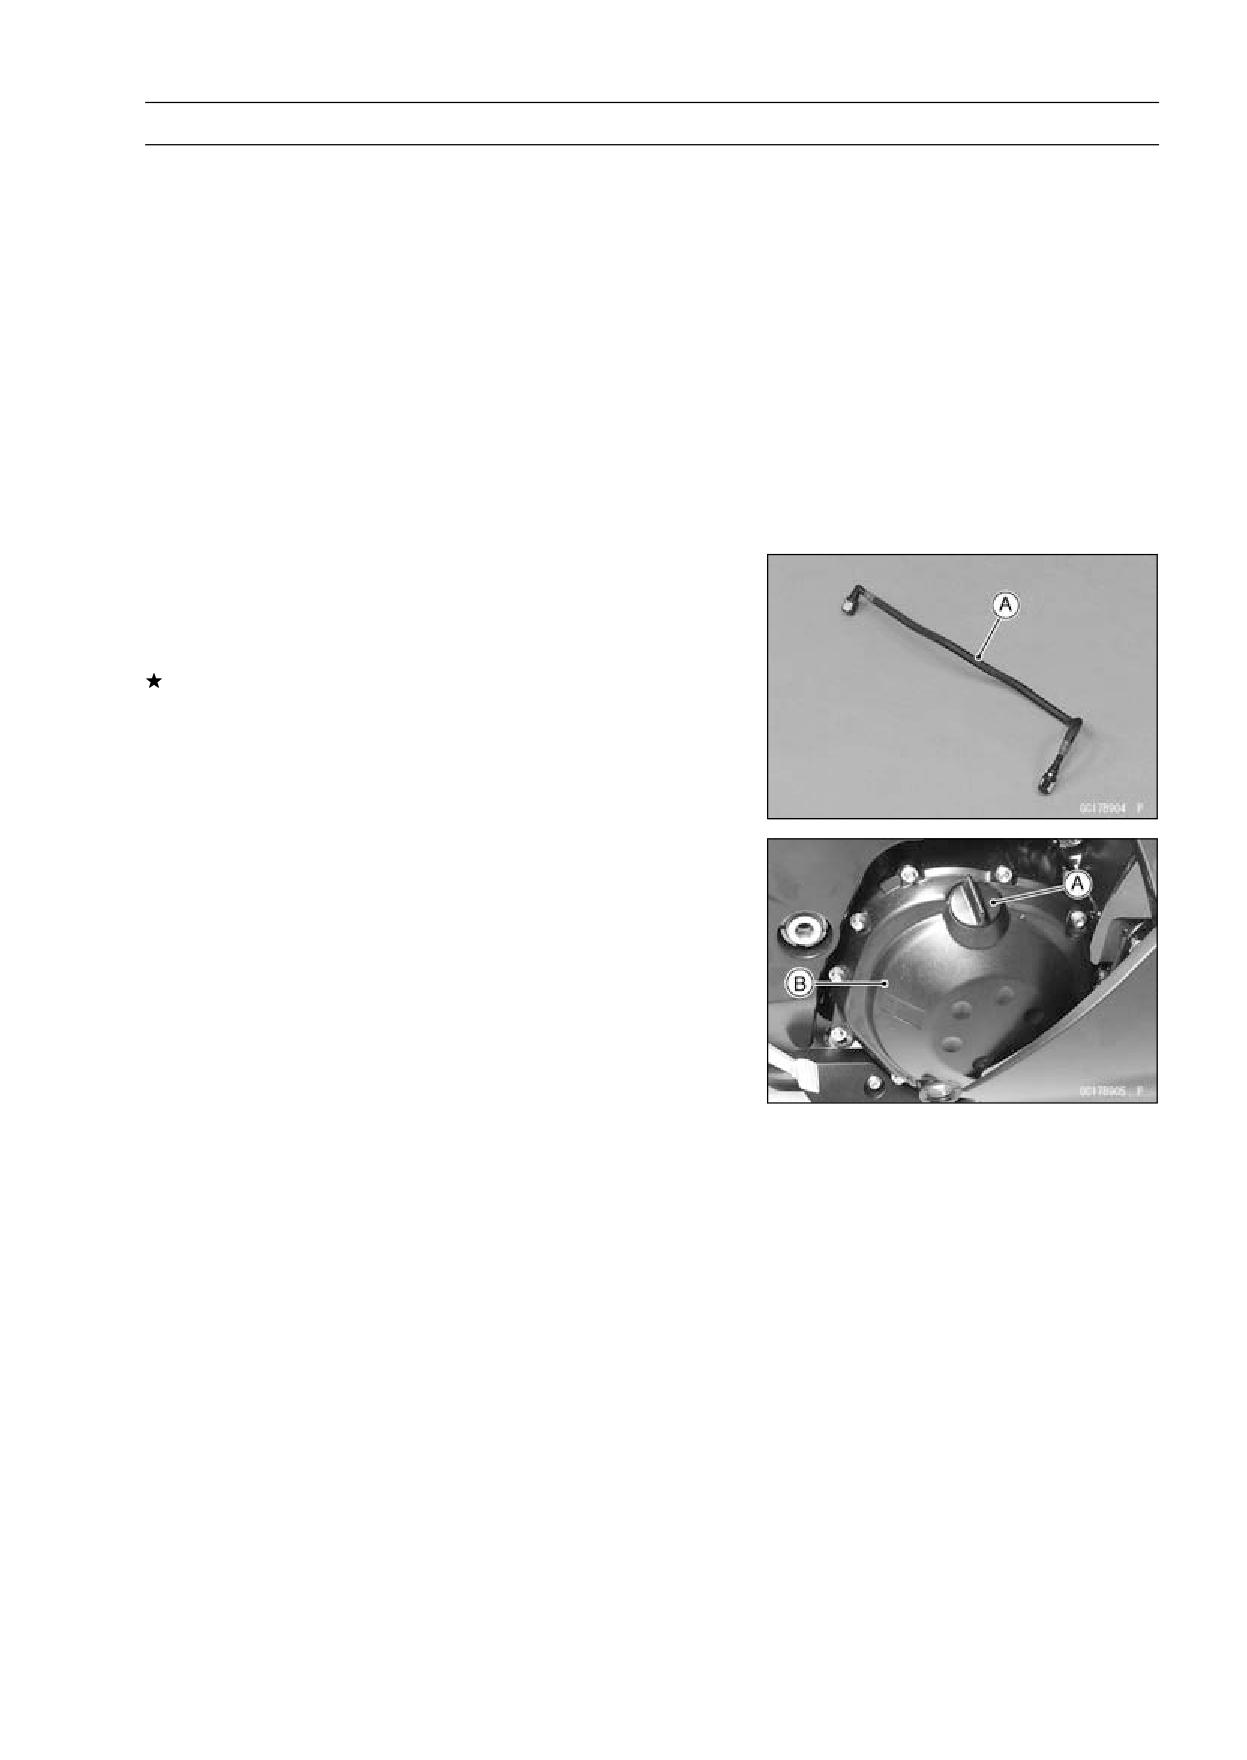
FUEL SYSTEM (DFI) 3-23
DFI Servicing Precautions
○Before removing the fuel system parts, blow the outer sur-
faces of these parts clean with compressed air.
○When any fuel hose is disconnected, fuel may spout out
by residual pressure in the fuel line. Cover the hose joint
with a piece of clean cloth to prevent fuel spillage.
○When installing the fuel hoses, avoid sharp bending, kink-
ing, flattening or twisting, and route the fuel hoses with a
minimum of bending so that the fuel flow will not be ob-
structed.
○Route the hoses according to Cable, Wire, and Hose
Routing section in the Appendix chapter.
○To prevent corrosion and deposits in the fuel system, do
not add to fuel any fuel antifreeze chemicals.
○Replace the fuel hose if it has been sharply bent or kinked.
○If the motorcycle is not properly handled, the high pres-
sure inside the fuel line can cause fuel to leak or the hose
[A] to burst. Bend and twist the fuel hose while examining
it.
Replace the hose if any cracks or bulges are noticed.
○To maintain the correct fuel/air mixture (F/A), there must
be no inlet air leaks in the DFI system. Be sure to install
the oil filler plug [A] after filling the engine oil.
Clutch Cover [B]
Torque - Oil Filler Plug: Hand-tighten
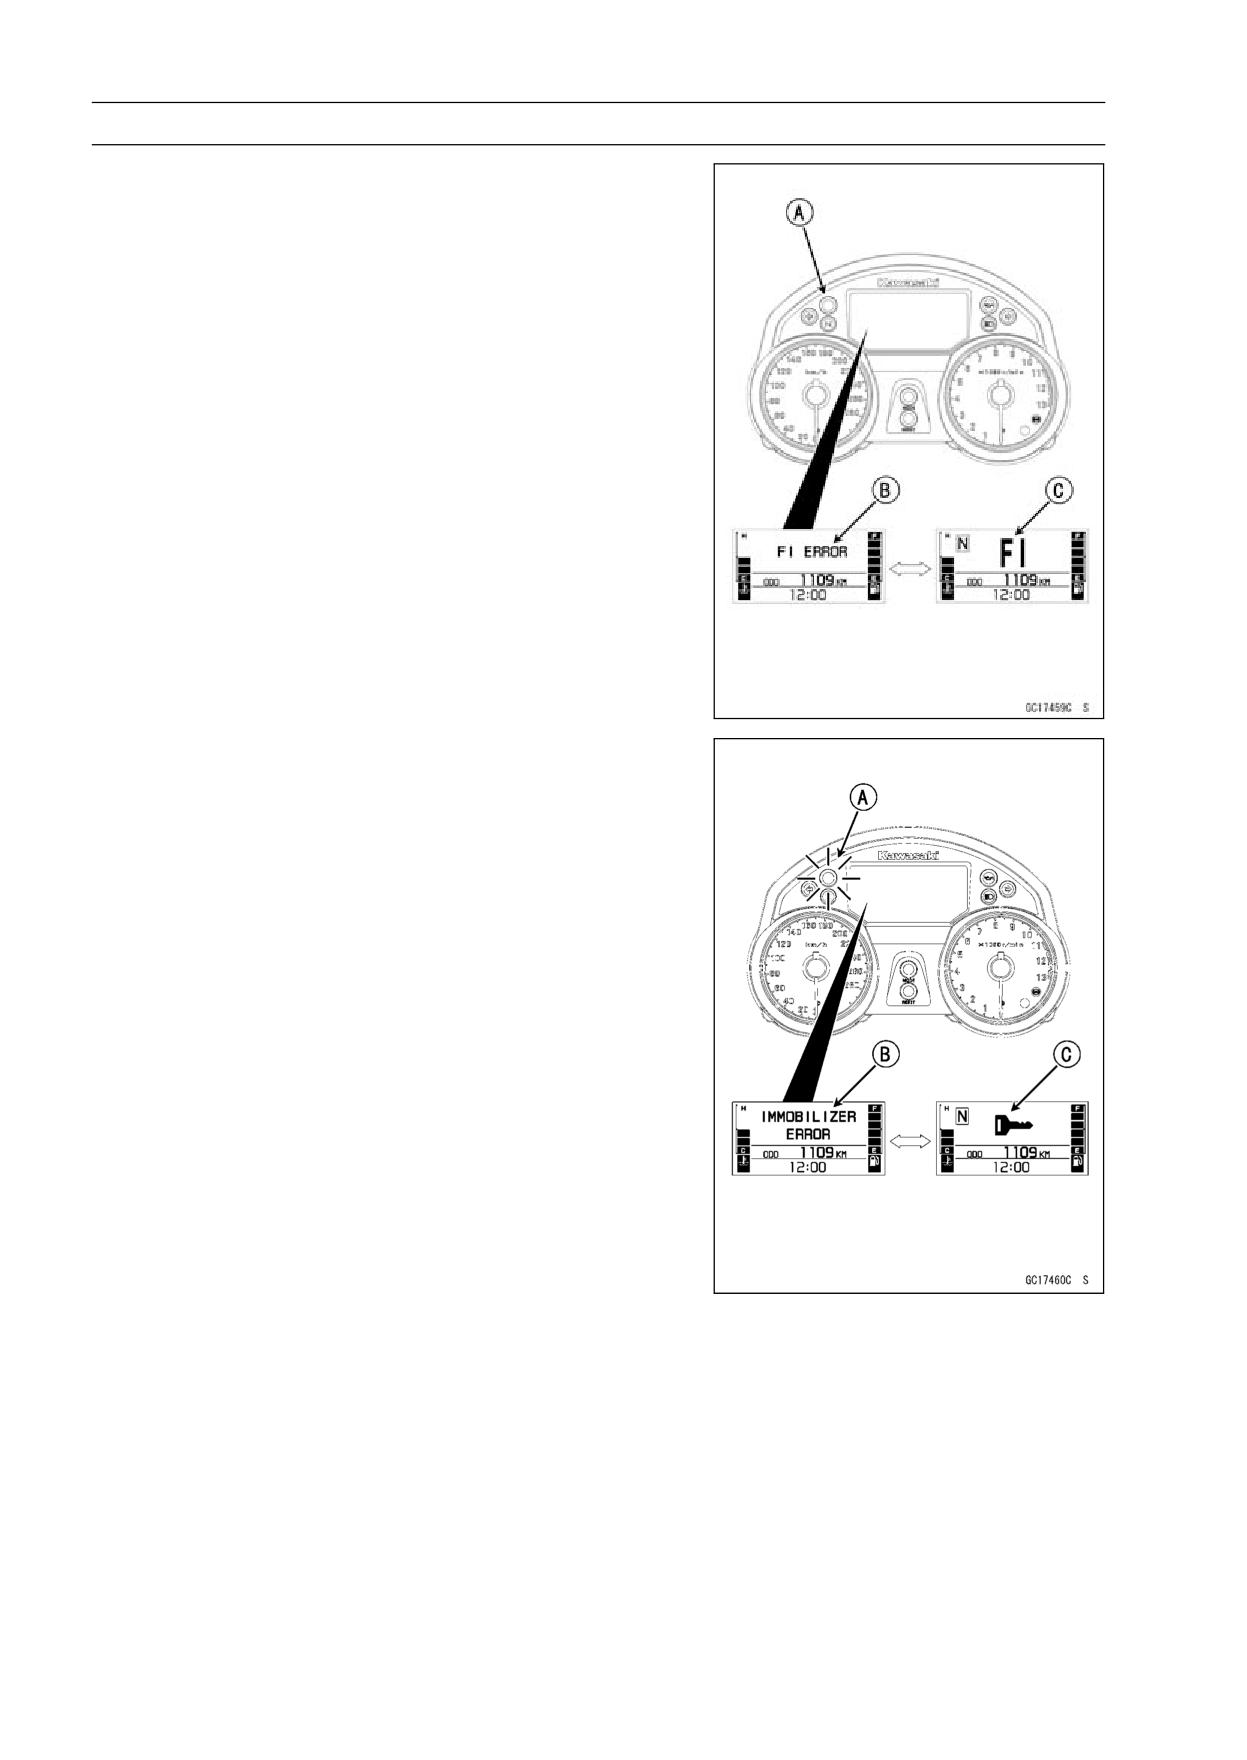
3-24 FUEL SYSTEM (DFI)
Troubleshooting the DFI System
Outline
When a problem occurs with DFI system, the warning in-
dicator (LED) [A] goes on and FI warning message [B] and
FI warning symbol [C] are displayed alternately on the LCD
(Liquid Crystal Display) to alert the rider.
For models equipped with an immobilizer system, the
warning indicator light [A] blinks and immobilizer warning
message [B] and immobilizer warning symbol [C] are
alternately displayed on the LCD, when a problem occurs
in the system.
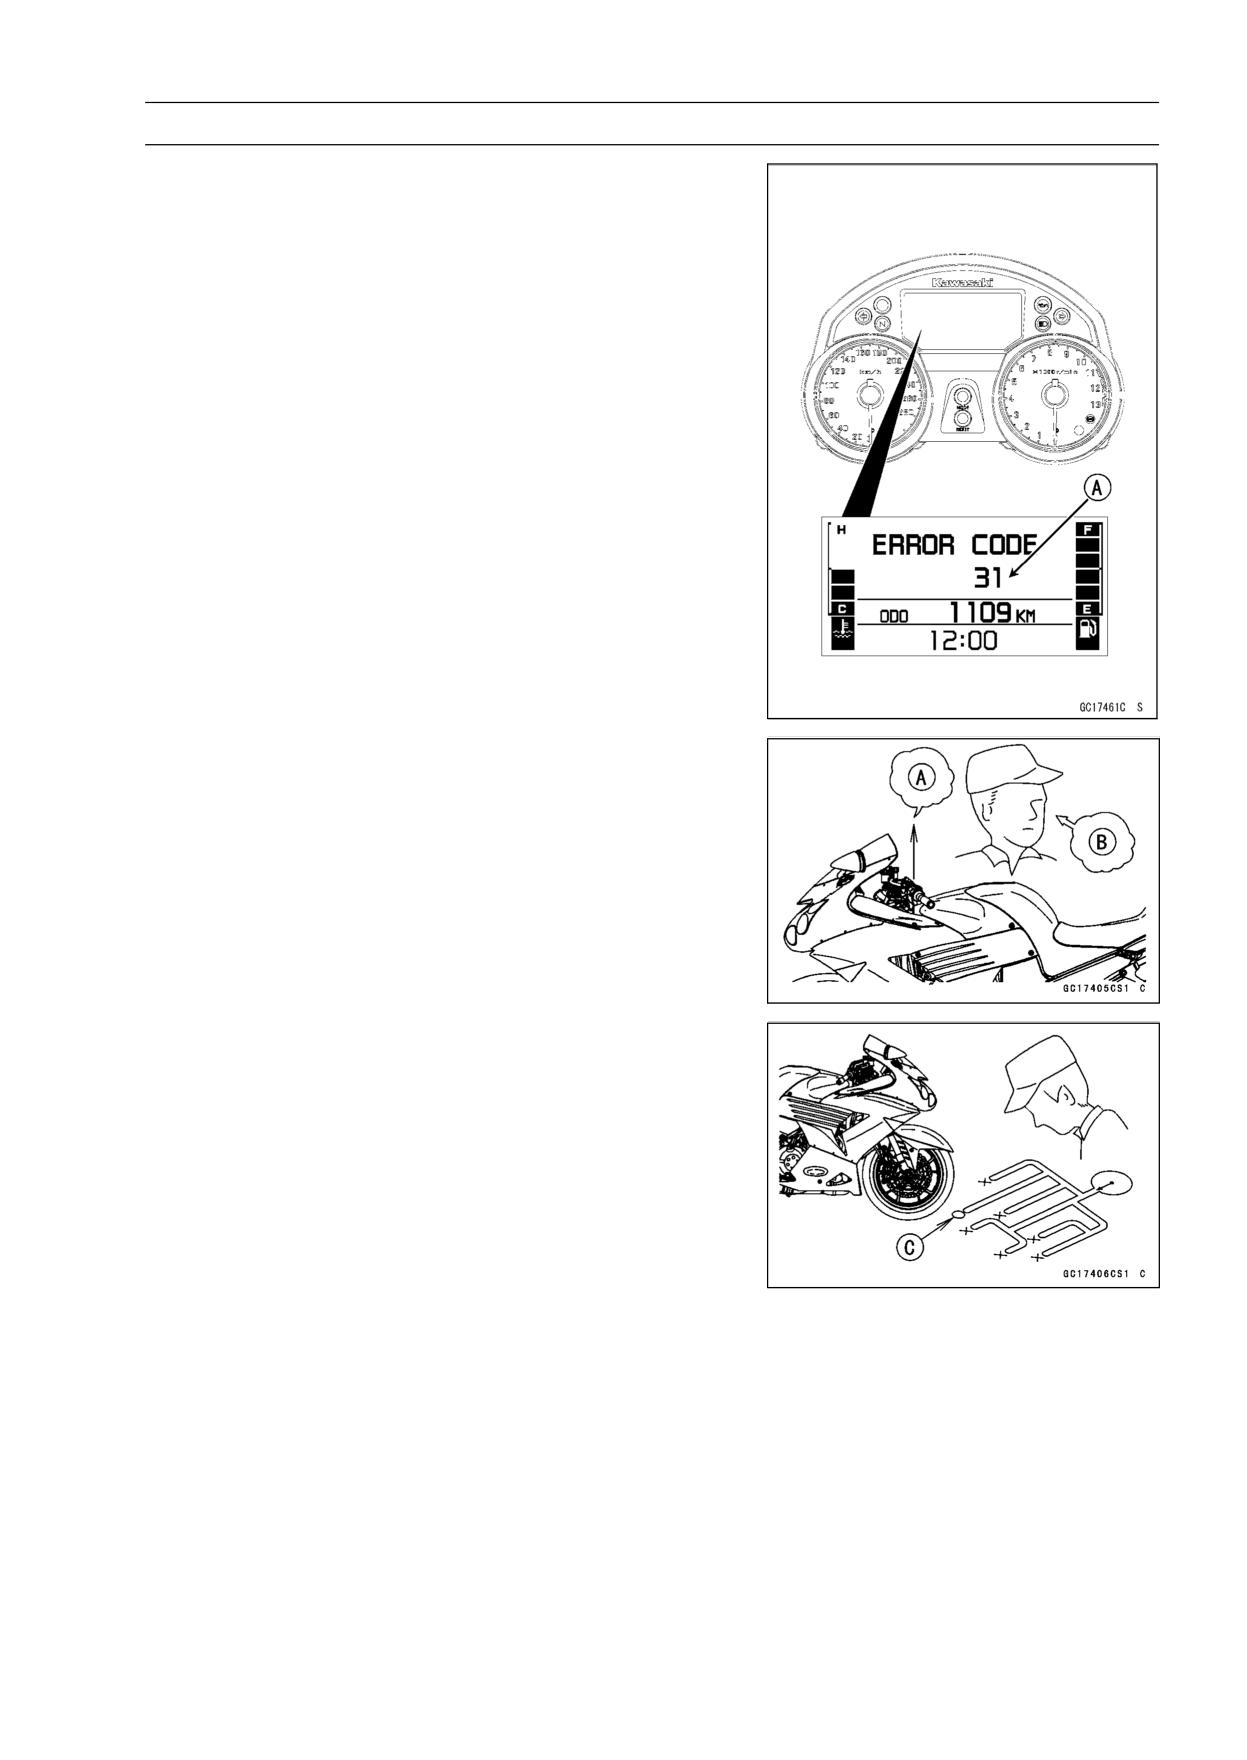
FUEL SYSTEM (DFI) 3-25
Troubleshooting the DFI System
With the engine stopped and turned in the self-diagnosis
mode, the service code (error code) [A] is displayed on the
LCD by the number of two digits.
When the service code [A] is displayed, for first ask the
rider about the conditions [B] of trouble, and then start to
determine the cause [C] of problem.
As a pre-diagnosis inspection, check the ECU for ground
and power supply, the fuel line for no fuel leaks, and for
correct pressure. The pre-diagnosis items are not indicated
by the warning indicator light (LED), FI warning message
and FI warning symbol.
Don’t rely solely on the DFI self-diagnosis function, use
common sense.
//////////////////////////////////////////