Opel Frontera UE. Manual - part 167


  Index      Opel     Opel Frontera UE - service repair manual 1999-2001 year


Search            


Content   ..  165  166  167  168   ..


Opel Frontera UE. Manual - part 167


6C–4

ENGINE FUEL (X22SE 2.2L)

Fuel Filter

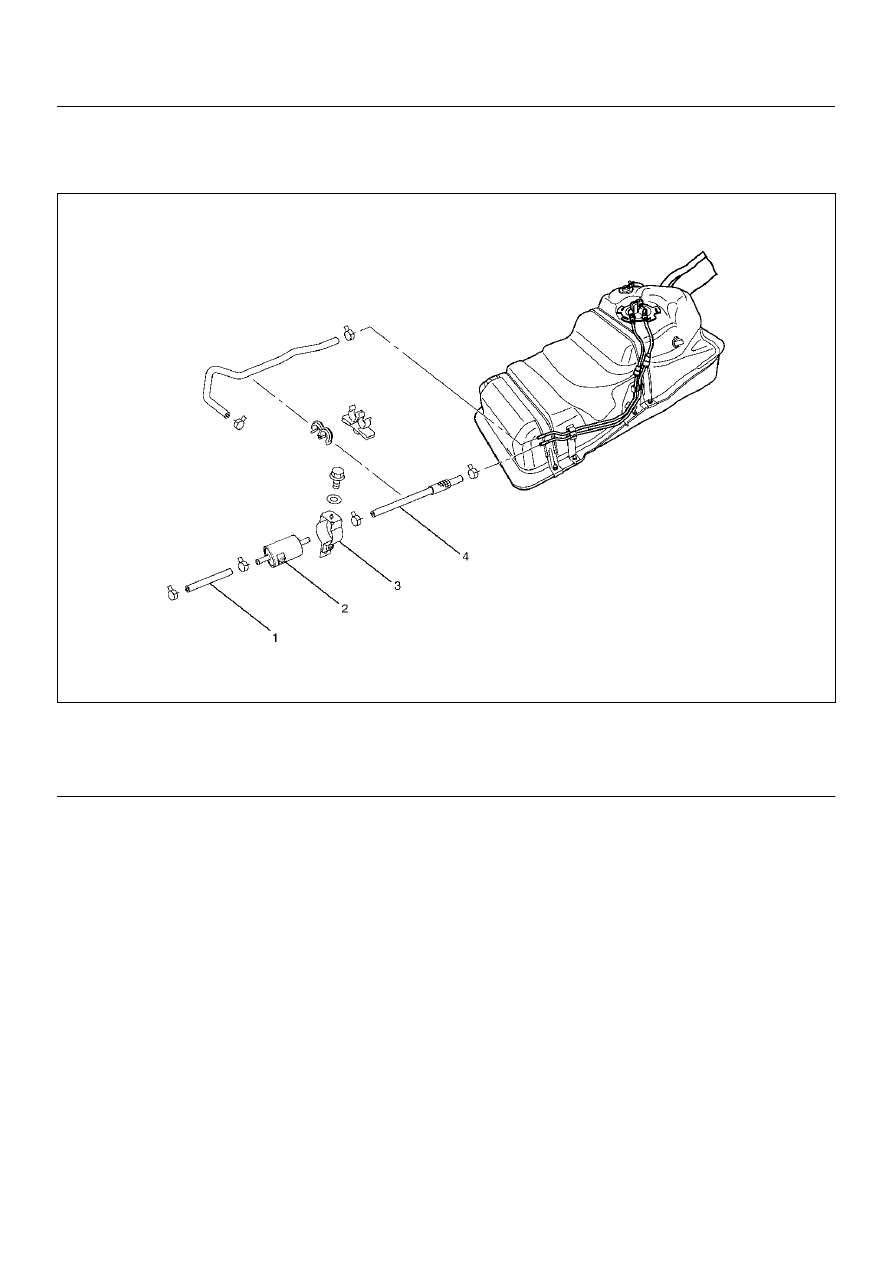
Fuel Filter and Associated Parts

140RX018

Legend

EndOFCallout

Removal

CAUTION:  When repair to the fuel system has been 
completed, start engine  and check the fuel system 
for loose connections or leakage. For the fuel 
system diagnosis, see  Section “Driveability and 
Emission".

1. Disconnect battery ground cable.

2. Remove fuel filler cap.

3. Disconnect fuel hoses(1) from fuel filter on both 

engine side and fuel tank side.

4. Fuel filter fixing bolt.

• Remove the fuel filter fixing bolt on fuel filter 

holder(3).

5. Remove fuel filter(2).

Inspection

1. Replace the fuel filter if the fuel leaks from fuel filter 

body or if the fuel filter body itself is damaged.

2. Replace the filter if it is clogged with dirt or 

sediment.

3. Check the drain and if it is clogged with dust, clean it 

out with air.

Installation

1. Install the fuel filter in the proper direction.

2. Install fuel filter holder fixing bolt.

3. Connect fuel hoses on engine side and fuel tank 

side.

4. Install fuel filler cap

5. Connect the battery ground cable.

(1) Fuel Hose
(2) Fuel Filter

(3) Fuel Filter Holder
(4) Fuel Hose

ENGINE FUEL (X22SE 2.2L)

6C–5

Inspection

After installation, start engine and check for fuel leak 
age.

In–Tank Fuel Filter

The filter is located on the lower end of the fuel pickup 
tube in the fuel tank. It prevents dirt from entering the 
fuel pipe and also stops water unless the filter is 
completely submerged in the water. It is a self cleaning 
type, not requiring scheduled maintenance. Excess 
water and sediment in the tank restricts fuel supply to 
the engine, resulting in engine stop. In such a case, the 
tank must be cleaned throughly.

Fuel Pump Flow Test

If reduction of fuel supply is suspected, perform the 
following checks.

1. Make sure that there is fuel in the tank.

2. With the engine running, check the fuel feed pipe 

and hose from fuel tank to injector for evidence of 
leakage. Retighten, if pipe or hose connection is 
loose. Also, check pipes and hoses for squashing or 
clogging.

3. Insert the hose from fuel feed pipe into a clean 

container, and check for fuel pump flow rate.

4. Connect the pump relay terminals with a jumper 

wire(1) as shown and start the fuel pump to 
measure delivery.

140RW015

CAUTION:  Never generate sparks when connecting 
a jumper wire.

If the measure value is out of standard, conduct the 
pressure test.

Pressure test

For the pressure test to the fuel system, see Section 6E 
“Fuel Control System".

Delivery

Delivery

15 seconds

0.38 liters minimum

6C–6

ENGINE FUEL (X22SE 2.2L)

Fuel Pump

Fuel Pump and Associated Parts

140RX016

Legend

EndOFCallout

Removal

CAUTION:  When repair to the fuel system has been 
completed, start engine  and check the fuel system 
for loose connection or leakage. For the fuel system 
diagnosis, see  Section “Driveability and Emission".

1. Disconnect battery ground cable.

2. Loosen fuel filler cap.

3. Support underneath of the fuel tank assembly (13) 

with a lifter.

4. Remove fuel tank assembly (13). Refer to “Fuel 

Tank Removal" in this section.

5. Remove Fuel Tube/Quick Connector (2).

NOTE:  Handling of the fuel tube sure to refer “Fuel  
Tube/Quick Connector Fittings" in this section.

(1) Fuel Feed Port
(2) Fuel Tube/Quick Connector
(3) Fuel Return Port
(4) Fuel Pump and Sender Assembly
(5) Connector; Fuel Feed Pump
(6) Connector; Fuel Level Sensor
(7) Fuel pump lock

(8) Hose; Evaporative Fuel
(9) Hose; Air Breather

(10) Hose; Fuel Filler
(11) Fuel Return Hose
(12) Fuel Feed Hose
(13) Fuel Tank Assembly

ENGINE FUEL (X22SE 2.2L)

6C–7

6. Remove fuel pump and sender (FPAS) assembly(4) 

using 5–8840–2602–0.

140RW068

NOTE:

• After removing pump assembly (4), cover fuel tank to 

prevent any dust entering.

Installation

1. Install FPAS assembly(4) using 5–8840–2602–0.

2. Install Fuel Tube/Quick Connector (2).

NOTE:  Handling of the fuel tube sure to refer “Fuel  
Tube/Quick Connector Fittings" in this section.

3. Install fuel tank assembly(11). Refer to “Fuel Tank 

Installation".

4. Fill the tank with fuel and tighten fuel filler cap.

5. Connect battery ground cable.


Content   ..  165  166  167  168   ..