Nissan Leaf. Manual - part 871


  Index      Nissan     Nissan Leaf (2011-2014 year) - Service and Repair Manual


Search            


Content   ..  869  870  871  872   ..


Nissan Leaf. Manual - part 871


BODY SIDE TRIM

INT-29

< REMOVAL AND INSTALLATION >

C

D

E

F

G

H

I

K

L

M

A

B

INT

N

O

P

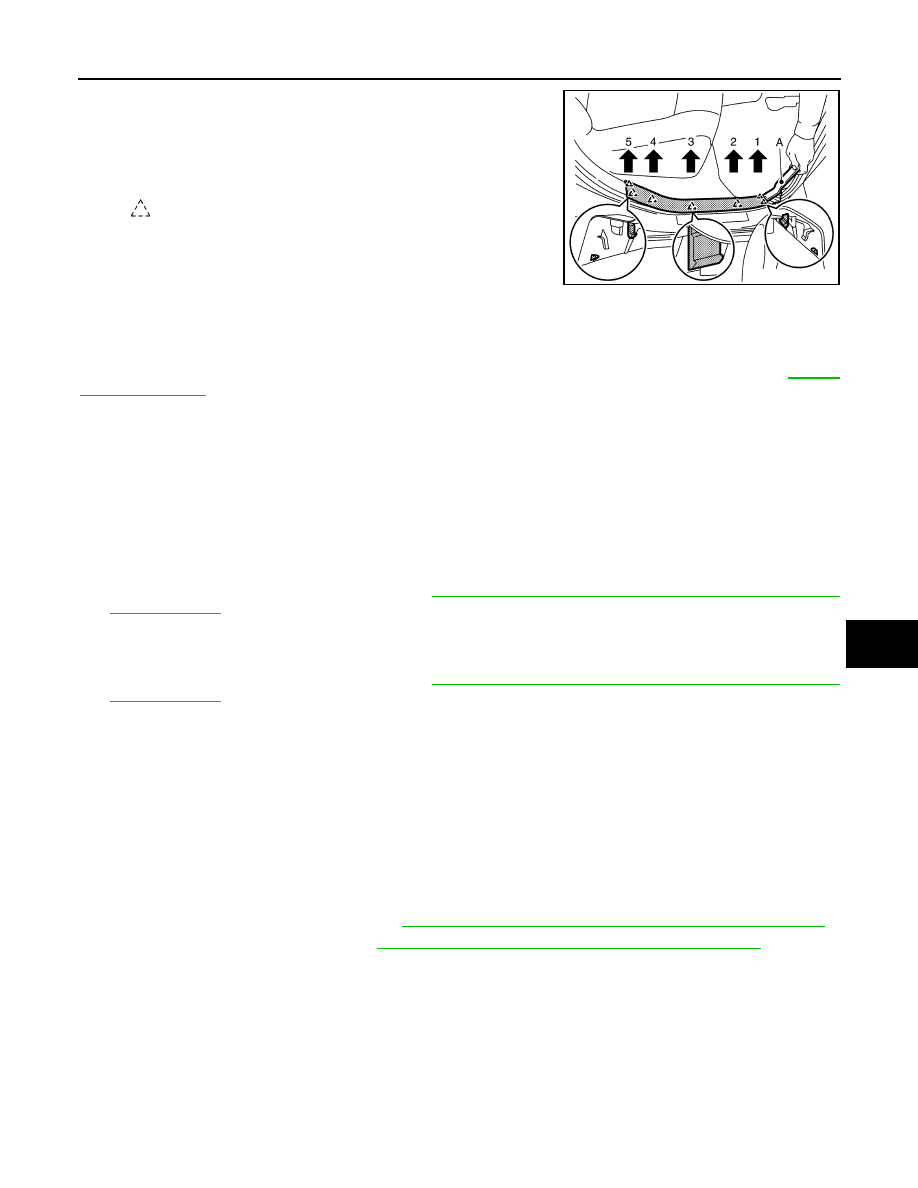
2. Disengage rear kicking plate inner fixing pawls with a suitable

tool (A) according to the numerical order 1 

→ 5 as shown in the

figure, and then remove rear kicking plate inner.

CAUTION:

Pawls may be damaged. Always remove from vehicle front.

INSATALLATION

Note the following item. and install in the reverse order of removal.

CAUTION:

The parts cannot be installed when the vehicle side metal clip (A) and metal clip (B) are not aligned

normally. Check that the positions of metal clip (A) and metal clip (B) are correct. Refer to 

INT-25,

"Exploded View"

.

BODY SIDE WELT
BODY SIDE WELT : Removal and Installation

INFOID:0000000010119672

CAUTION:

• Never excessively pull body side welt to prevent damage to the parts.

• Never damage the body.

REMOVAL

FRONT BODY SIDE WELT

1. Remove center pillar lower garnish. Refer to 

INT-30, "CENTER PILLAR LOWER GARNISH : Removal

and Installation"

.

2. Remove front body side welt.

REAR BODY SIDE WELT

1. Remove center pillar lower garnish. Refer to 

INT-30, "CENTER PILLAR LOWER GARNISH : Removal

and Installation"

.

2. Remove rear body side welt.

INSTALLATION

Install in the reverse order of removal.

DASH SIDE FINISHER
DASH SIDE FINISHER : Removal and Installation

INFOID:0000000010119673

CAUTION:

Never damage the body.

REMOVAL

1. Remove front kicking plate inner. Refer to 

INT-28, "KICKING PLATE INNER : Removal and Installation"

.

2. Remove front body side welt. Refer to 

INT-29, "BODY SIDE WELT : Removal and Installation"

.

3. Remove dash side finisher.

: Pawl

JMJIA6980ZZ

INT-30

< REMOVAL AND INSTALLATION >

BODY SIDE TRIM

a. Disengage stud bolt (A).

b. Pull back dash side finisher, and then disengage dash side fin-

isher fixing pawls, and then remove dash side finisher.

CAUTION:

Pull dash side finisher straight toward vehicle rear. Other-

wise, pawls may be damaged if front end of dash side fin-

isher opens toward vehicle inside.

INSTALLATION

Install in the reverse order of removal.

CENTER PILLAR LOWER GARNISH
CENTER PILLAR LOWER GARNISH : Removal and Installation

INFOID:0000000010119674

CAUTION:

• When removing, always use a suitable tool that is made of plastic to prevent damage to the parts.

• Never damage the body.

REMOVAL

1. Fully open front door and rear door.
2. Slide front seat to the fully forward position. Tilt seatback forward.
3. Remove front kicking plate inner and rear kicking plate inner. Refer to 

INT-28, "KICKING PLATE INNER :

Removal and Installation"

.

4. Remove center pillar lower garnish.

Disengage center pillar lower garnish fixing clips with a suitable

tool (A), and then remove center pillar lower garnish.

INSTALLATION

Note the following item, and install in the reverse order of removal.

CAUTION:

When installing, check in advance that clips are accurately aligned with the holes on body side, and

then install by pressing in.

CENTER PILLAR UPPER GARNISH

JMJIA6101ZZ

: Pawl

JMJIA5135ZZ

: Clip

JMJIA5136ZZ

BODY SIDE TRIM

INT-31

< REMOVAL AND INSTALLATION >

C

D

E

F

G

H

I

K

L

M

A

B

INT

N

O

P

CENTER PILLAR UPPER GARNISH : Removal and Installation

INFOID:0000000010119675

CAUTION:

• When removing, always use a suitable tool that is made of plastic to prevent damage to the parts.

• Never damage the body.

REMOVAL

1. Remove front seat belt shoulder anchor. Refer to

SB-11, "SEAT BELT RETRACTOR : Removal and Instal-

lation"

.

2. Remove center pillar lower garnish. Refer to 

INT-30, "CENTER PILLAR LOWER GARNISH : Removal

and Installation"

.

3. Remove front body side welt and rear body side welt. refer to 

INT-29, "BODY SIDE WELT : Removal and

Installation"

.

4. Remove center pillar upper garnish.
a. Disengage center pillar upper garnish lower side fixing clip with

a suitable tool (A).

b. Disengage center pillar upper garnish upper side fixing pawl, and then remove center pillar upper garnish.

NOTE:

Removal operation can be performed easily according to the numerical order 1 

→ 4 as shown in the figure

when pressing pawl by inserting a removal tool from direction (A) as shown in the figure.

CAUTION:

Be careful not to apply excessive force when removing center pillar upper garnish. Otherwise,

pawl may be damaged and fragments may drop in panel holes on body.

INATALLATION

Note the following items, and install in the reverse order of removal.

CAUTION:

• Replace center pillar upper garnish with a new part after removal. Never reuse center pillar upper

garnish.

• When installing, check in advance that clip and pawl are accurately aligned with the holes on body

side, and then install by pressing in.

REAR PILLAR FINISHER
REAR PILLAR FINISHER : Removal and Installation

INFOID:0000000010119676

CAUTION:

• When removing, always use a suitable tool that is made of plastic to prevent damage to the parts.

• Never damage the body.

REMOVAL

: Clip

: Pawl

JMJIA5137ZZ

PIIB7674J

INT-32

< REMOVAL AND INSTALLATION >

BODY SIDE TRIM

1. Fully open rear door and back door.
2. Remove rear body side welt. Refer to 

INT-29, "BODY SIDE WELT : Removal and Installation"

.

3. Remove back door weather-strip. Refer to 

DLK-185, "BACK DOOR WEATHER-STRIP : Removal and

Installation"

.

4. Remove rear parcel shelf finisher. Refer to 

INT-40, "REAR PARCEL SHELF FINISHER : Removal and

Installation"

.

5. Remove luggage side lower finisher. Refer to 

INT-43, "LUGGAGE SIDE LOWER FINISHER : Removal

and Installation"

.

6. Remove rear seat belt anchor bolt. Refer to 

SB-16, "SEAT BELT RETRACTOR : Removal and Installa-

tion"

.

7. Remove rear pillar finisher.

Disengage rear pillar finisher fixing clips with a suitable tool (A),

and then remove rear pillar finisher.

CAUTION:

Be careful not to damage parts when inserting seat belt

anchor bolt into seat belt opening hole of rear pillar finisher.

INSTALLATION

Note the following item, and install in the reverse order of removal.

CAUTION:

When installing, check in advance that clips are accurately aligned with the holes on body side, and

then install by pressing in.

: Clip

JMJIA5138ZZ


Content   ..  869  870  871  872   ..