Mitsubishi Montero Sport (2004+). Manual - part 380
 

  Index      Mitsubishi     Mitsubishi Montero Sport - service repair manual 2004 year


Search            


Content   ..  378  379  380  381   ..


Mitsubishi Montero Sport (2004+). Manual - part 380


TRANSMISSION

TSB Revision

AUTOMATIC TRANSMISSION OVERHAUL

23B-23

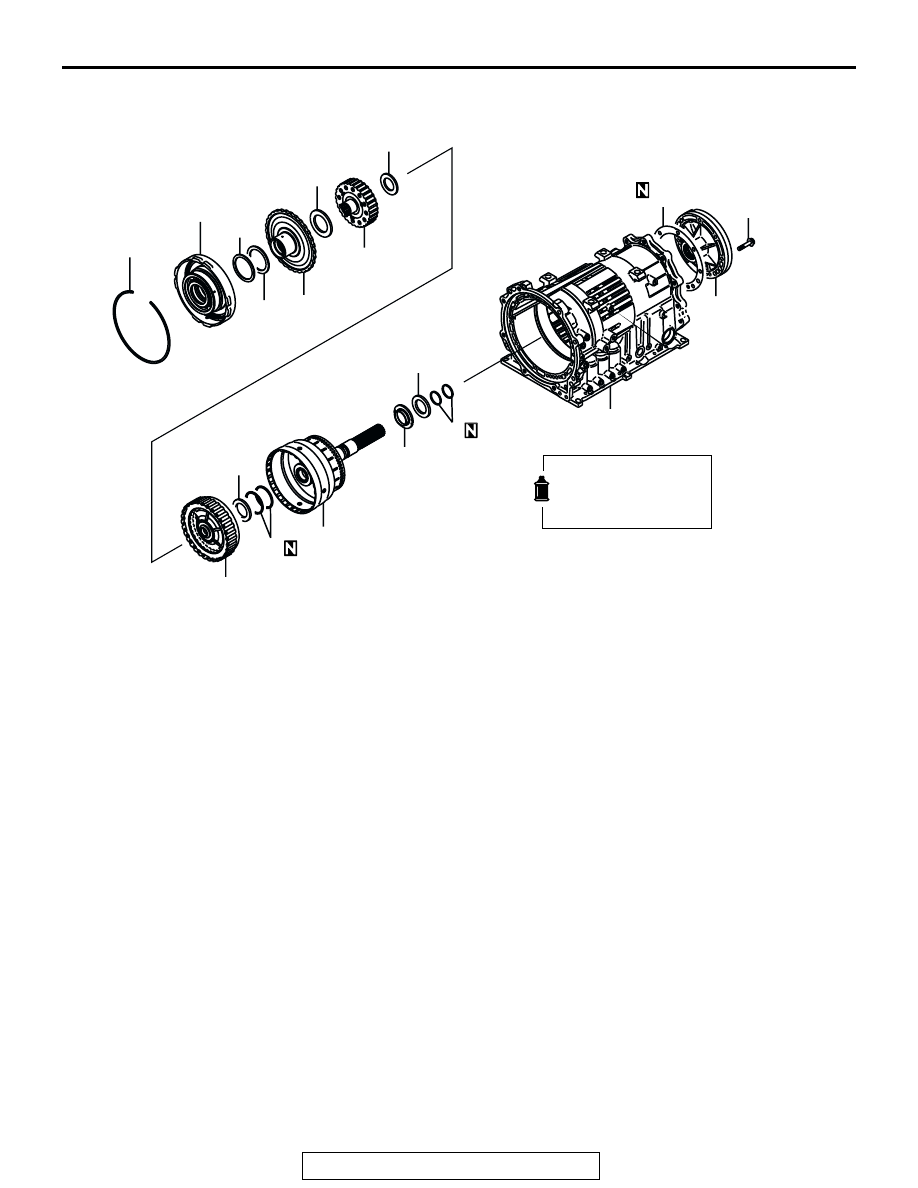
Required Special Tools:

• MB991603: Bearing Installer Stopper

• MB991632: Clearance Dummy Plate

• MD998304: Oil Seal Installer

• MD998316: Dial Gauge Support

• MD998333: Oil Pump Remover

• MD998412: Guide

• MD998727: Oil Pan Remover

• MD998913: Dial Gauge Extension

AKX00020

APPLY AUTOMATIC
TRANSMISSION FLUID
TO ALL MOVING PARTS
BEFORE INSTALLATION.

63

64

65

66

67

68

70

71

72

73

74

76

77

75

78

79

62

AC

23 ± 3 N·m
17 ± 2 ft-lb

69

DISASSEMBLY STEPS

62. SNAP RING
63. CENTER SUPPORT
64. THRUST RACE NO.8
65. THRUST BEARING NO.9
66. OUTPUT FLANGE
67. THRUST BEARING NO.10
68. UNDERDRIVE CLUTCH HUB
69. THRUST BEARING NO.11
70. UNDERDRIVE CLUTCH
71. THRUST BEARING NO.12

72. OUTPUT SHAFT
73. SEAL RING
74. SEAL RING
75. THRUST BEARING NO.13
76. BEARING RETAINER
77. OUTPUT SHAFT SUPPORT
78. OUTPUT SHAFT SUPPORT 

GASKET

79. TRANSMISSION CASE

DISASSEMBLY STEPS 

TRANSMISSION

TSB Revision

AUTOMATIC TRANSMISSION OVERHAUL

23B-24

DISASSEMBLY

CAUTION

• Because the automatic transmission is manufactured 

from high-precision parts, sufficient care must be taken 
not to scratch or damage these parts during disassem-
bly and reassembly.

• During the work, always use bare hands or vinyl 

gloves. Do not use cotton gloves. Use nylon cloth or 
paper towels when necessary. Do not use shop towels.

• Parts which have been disassembled should be 

cleaned. Metal parts can be cleaned with normal deter-
gent, but they should be dried completely using com-
pressed air.

• Clutch discs, plastic thrust race and rubber parts 

should be cleaned with ATF automatic transmission 
fluid so that they do not become dirty.

• If the transmission body has been damaged, disassem-

ble and clean the cooler system also.

.

1. Remove the input shaft speed sensor.

2. Remove the output shaft speed sensor.

3. Remove the manual control lever, and then remove the 

park/neutral position switch.

AKX00021

AKX00022

AKX00023

MANUAL CONTROL
LEVER

PARK/NEUTRAL
POSITION SWITCH

AB

TRANSMISSION

TSB Revision

AUTOMATIC TRANSMISSION OVERHAUL

23B-25

4. Remove the snap ring, and remove the parking gear using a 

puller [corresponding load approximately 9,800 N (2,200 
pounds)].
NOTE: Some parking gear may be removed without using a 
puller.

CAUTION

Carefully hammer the special tool so that the oil pan 
mounting surface is not damaged.
5. Remove the twenty oil pan mounting bolts and then using 

the special tool MD998727 to remove the oil pan.

6. Remove the oil filter and O-ring.

7. Remove the detent spring.

8. Disconnect the valve body harness connectors.

AKX00024

SNAP RING

PARKING GEAR

AB

AKX00025

MD998727

AB

AKX00026

OIL FILTER

O-RING

AB

AKX00027

AKX00028

TRANSMISSION

TSB Revision

AUTOMATIC TRANSMISSION OVERHAUL

23B-26

9. Remove the twenty valve body mounting bolts and then 

remove the valve body, O-ring and oil temperature sensor.
NOTE: The twenty valve body mounting bolts are plated 
bolts.
NOTE: The O-ring is mounted on the transmission case side 
as shown in the illustration. However there may be cases 
when it will come off with the valve body.

10.Remove the snap ring and disconnect the solenoid valve 

harness.

11.Remove the oil strainer and two oil seals.

12.Remover each accumulator piston, seal ring and spring.

NOTE: To make assembly easier, attach an identification tag 
on the removed accumulator piston.

NO.

NAME

1

FOR OVERDRIVE CLUTCH

2

FOR SECOND BRAKE

3

FOR LOW/REVERSE BRAKE

4

FOR UNDERDRIVE CLUTCH

AKX00029

OIL TEMPERATURE
SENSOR

AB

AKX00030

O-RING

AC

AKX00031

SNAP RING

AB

AKX00032

OIL SEALS

OIL STRAINER

AB

AKX00033

1

2

3

4

AB


Content   ..  378  379  380  381   ..