Mitsubishi L200. Manual - part 20
 

  Index      Mitsubishi     Mitsubishi L200 - service repair manual 2012 year


Search            


Content   ..  18  19  20  21   ..


Mitsubishi L200. Manual - part 20


ON-VEHICLE SERVICE

ENGINE MECHANICAL

11A-8

CAUTION

• The temperature of the surface of the belt 

should be as close to normal temperature as 
possible.

• Do not let any contaminants such as water or 

oil get onto the microphone.

• If strong gusts of wind blow against the 

microphone or if there are any loud sources 
of noise nearby, the values measured by the 
microphone may not correspond to actual 
values.

• If the microphone is touching the belt while 

the measurement is being made, the values 
measured by the microphone may not corre-
spond to actual values.

• Do not take the measurement while the vehi-

cle's engine is running.

AC903689

15˚

15˚

MB992080
(Microphone)

10 – 15 mm

AB

Tensioner pulley

Crankshaft 
pulley

A/C compressor pulley

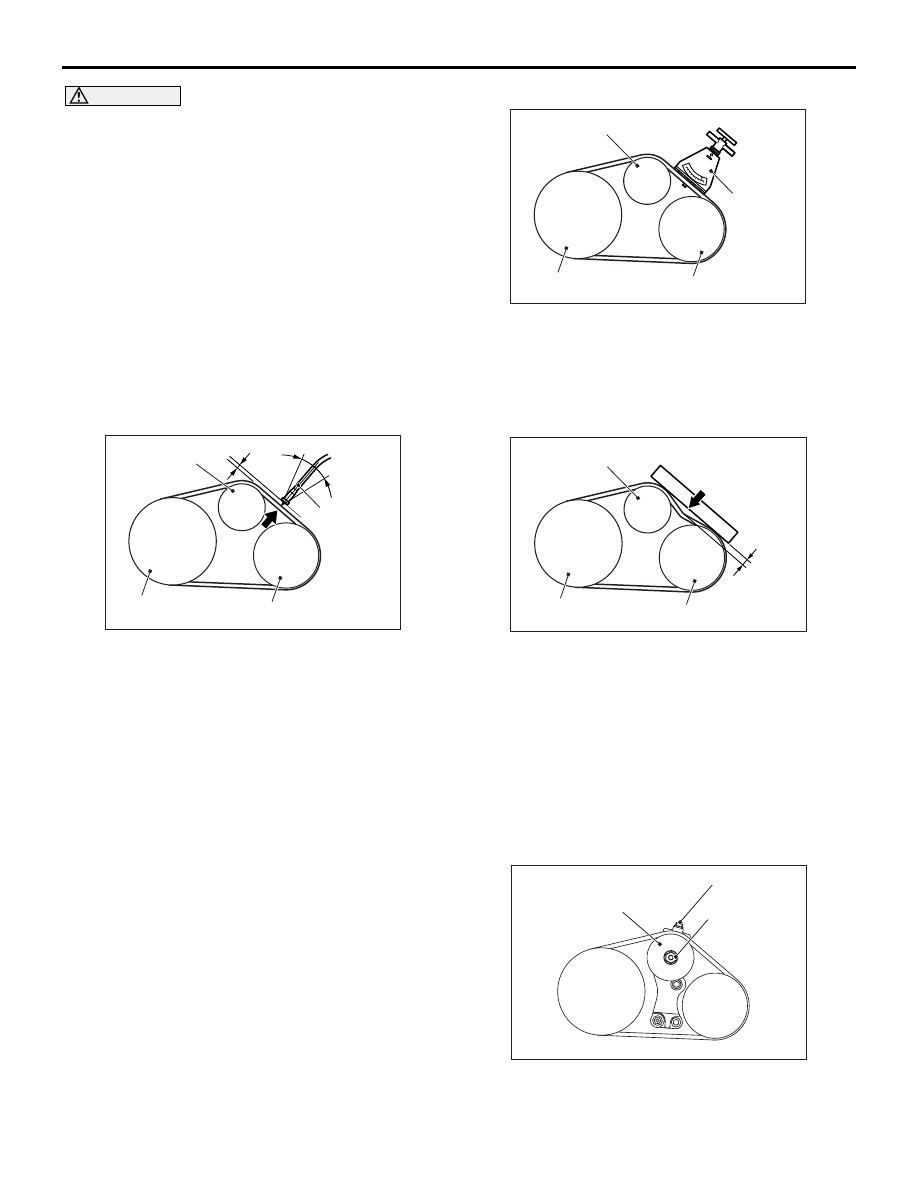
5. Hold special tool MB992080 to the middle of the 

belt between the pulleys (at the place indicated by 
arrow) where it does not contact the belt 
(approximately 10 

− 15 mm away from the rear 

surface of the belt) so that it is perpendicular to 
the belt (within an angle of 

± 15 °).

6. Press the "MEASURE" button.
7. Gently tap the middle of the belt between the 

pulleys (the place indicated by the arrow) with 
your finger as shown in the illustration, and check 
that the vibration frequency of the belt is within the 
standard value.
NOTE: To take the measurement repeatedly, fillip 
the belt again.

WHEN USING THE TENSION GAUGE

AC506003AB

Tensioner pulley

Crankshaft 
pulley

A/C compressor pulley

Tension
gauge

Use a belt tension gauge in the middle of the belt 
between the pulleys shown in the figure (at the place 
indicated by the arrow) to check that the belt tension 
is within the standard value.

BELT DEFLECTION CHECK

AC506004AB

Tensioner pulley

Crankshaft
pulley

A/C compressor pulley

Approximately
100N

Deflection

Apply approximately 100 N of pressure against the 
location between the pulleys shown by the arrow in 
the illustration and then measure the deflection.
When the belt tension is adjusted by measuring the 
belt deflection, adjust it with a tool for vibration fre-
quency measurement or tension measurement after-
ward.

BELT TENSION ADJUSTMENT
If not within the standard value, adjust the belt ten-
sion by the following procedure.

AC505988AB

Adjusting bolt

Locking nut

Tensioner pulley

1. Loosen the locking nut of the tensioner pulley.

ON-VEHICLE SERVICE

ENGINE MECHANICAL

11A-9

2. Use the adjusting bolt to adjust the belt tension. 

The tension will increase when turning the 
adjusting bolt clockwise, and decrease when 
turning anti-clockwise.

3. Tighten the locking nut.
4. Tighten the adjusting bolt.

CAUTION

When checking the belt tension, turn the crank-
shaft clockwise one turn or more.
5. Check the belt tension, and readjust if necessary.

AUTO-TENSIONER CHECK

M1111003003216

OPERATION CHECK

1. Turn off the engine from the idle state then check 

to see that the drive belt is not protruding from the 
pulley width of the auto tensioner.

2. Remove the drive belt (Refer to 

P.11A-17

).

AC501804

AC507703

Auto tensioner

AB

3. Install the tool to the auto tensioner, and check 

that no binding is present by turning the auto 
tensioner in the left and right directions.

4. If there are any problems in the procedure 1 or 3, 

replace the auto tensioner (Refer to 

P.11A-43

).

5. Install the drive belt (Refer to 

P.11A-17

).

FUNCTION CHECK

You can verify if the auto tensioner is defective or not 
by checking the drive belt tension.
When the vibration frequency is measured 
(Special tool MB992080 is used): 
Recommendation
1. Check the drive belt tension (Refer to 

P.11A-7

).

2. Measure the drive belt tension vibration frequency 

by the following procedures:

AC507219AB

MB992082

MB992081

Belt tension meter set (MB992080)

(1) Connect special tool microphone assembly 

(MB992082) to special tool belt tension meter 
(MB992081) of special tool belt tension meter 
set (MB992080).

(2) Press the "POWER" button to turn on the 

power supply.

(3) Press the numeral key of "1" and check that 

"No.1" appears on the upper left of the display.

NOTE: This operation is to temporarily set the 
preset data such as the belt specifications, 
because if the measurement is taken without 
input of the belt specifications, conversion to 
tension value (N) cannot be made, resulting in 
judgement of error.

(4) Press "Hz" button twice to change the display 

to the frequency display (Hz).

ON-VEHICLE SERVICE

ENGINE MECHANICAL

11A-10

CAUTION

• The temperature of the surface of the belt 

should be as close to normal temperature as 
possible.

• Do not allow any contaminants such as water 

or oil to get onto the microphone.

• If strong gusts of wind blow against the 

microphone or if there are any loud sources 
of noise nearby, the values measured by the 
microphone may not correspond to actual 
values.

• If the microphone is touching the belt while 

the measurement is being made, the values 
measured by the microphone may not corre-
spond to actual values.

• Do not take the measurement while the vehi-

cle's engine is running.

AC805802AF

15˚

15˚

10 –


15 mm

Power steering
oil pump pulley

MB992080
(Microphone)

<Except Euro5>

Gentry tap 
with your
finger

Water pump pulley

AC805654

AG

15˚

15˚

10 –


15 mm

Alternator pulley

Power steering
oil pump pulley

MB992080
(Microphone)

Gentry tap 
with your finger

<Euro5>

(5) Hold special tool MB992080 to the middle of 

the belt between the pulleys (at the place 
indicated by arrow) where it does not contact 
the belt (approximately 10 

− 15 mm away from 

the rear surface of the belt) so that it is 
perpendicular to the belt (within an angle of 

± 

15 

°).

(6) Press the "MEASURE" button.

ON-VEHICLE SERVICE

ENGINE MECHANICAL

11A-11

(7) Gently tap the middle of the belt between the 

pulleys (the place indicated by the arrow) with 
your finger as shown in the illustration, and 
check that the vibration frequency of the belt is 
within the standard value.

Standard value (Reference):

<Except Euro5> 107 

 151 Hz

<Euro5> 87 

 123 Hz

NOTE: To take the measurement repeatedly, 
fillip the belt again.

3. If not within the standard value, replace the auto 

tensioner (Refer to 

P.11A-43

).

When using the tension gauge
1. Check the drive belt tension (Refer to 

P.11A-7

).

AC805803AE

Power steering
oil pump pulley

<Except Euro5>

Water pump pulley

Belt tension
gauge

AC805655AF

Alternator pulley

Power steering
oil pump pulley

<Euro5>

Belt tension
gauge

2. Use a belt tension gauge in the middle of the belt 

between the pulleys shown in the figure (at the 
place indicated by the arrow) to check that the belt 
tension is within the standard value.

Standard value (Reference): 196 

 392 N

3. If not within the standard value, replace the auto 

tensioner (Refer to 

P.11A-43

).


Content   ..  18  19  20  21   ..